Embed Size (px)
Citation preview
What’s in this Book
Introduction
Your guide to everything you will need to play a RoE battle.
Game Rules
This section is the soul of the book. The rules allow you to fight battles in the modern era by describing how you do the following:
The sequence of a game turn. How you move your model soldiers on the battlefield. How to destroy the enemy with firepower. How to assault and capture enemy positions. How the effects of fire and casualties affect troops. How different troops and weapons work.
The Second World War 1944-45
Operation Overlord to the Fall of the Reich
Operation Overlord to the Fall of the Reich is a sourcebook within Rules of Engagement that allows you to field forces from the Western Front in 1944 and 1945.
It covers the D-Day landings to the surrender of Germany. The following nations are covered:
Great Britain and the Commonwealth. Germany. United States. France.
Other forces will be covered in further supplements and on the website www.greatescapegames.co.uk
Scenarios
The scenario section offers ten different missions for your platoon to complete. The scenarios instruct you how to set up the battlefield, deploy your troops, what the objectives are and how to determine who won and lost. These cover assaults on fixed positions, sabotage missions, desperate rearguard actions and patrols into enemy territory, among other things.
Hobby Section
The Hobby Section teaches techniques used by professional painters to prepare your models for action and showcases the miniature battlefield.
8
Introduction
••
••••
••••
•

Wrecked
The vehicle is no longer useful in this battle, but could be salvaged and refitted to allow it to fight again. Unless already hit, any passengers must make an Experience Test (with a +1 bonus modifier) or be removed as casualties. Any survivors are Shaken.
Destroyed
The vehicle is utterly destroyed - it is now only useful as scrap, and the twisted wreckage serves as a memorial to its brave (or foolish) crew.
Vehicle Damage Table
DICE ROLL
HULL TURRET PASSENGER TRACKS/WHEELS
1 Driver stunned! The vehicle either may not move (if stationary), or moves out of control (if moving) in its next turn.
Gunner stunned! The turret weapon may not fire and must miss its next shooting phase.
Filled with shrapnel. Roll a D6 - this indicates the number of passengers that are hit and killed if they fail an Experience Test. The vehicle is unharmed. Although the seats may need replacing.
Slews around! Move the vehicle 90 degrees toward the point of attack (roll a dice if this is in doubt: 1-3 left, 4-6 right). It may move and fire normally next turn. If the vehicle was stationary then treat this result as 2 below.
2 Driver and gunner stunned! The vehicle suffers the same result as above, but may not fire any bow weapon next turn.
Gunner dead! The crew may not fire the main weapon until an Experience Test is passed at the beginning of its turn.
Riddled with bullets! Roll a D6 - this indicates the number of passengers that are hit and killed if they fail an Experience Test. The survivors bail out automatically! The vehicle is wrecked.
Driver stunned! The vehicle either may not move (if stationary), or moves out of control (if moving) for its next turn.
3 Driver dead! The vehicle moves out of control in its next turn (if it moved) or remains stationary. It may no longer move until the remaining crew pass an Experience Test at the beginning of its turn.
Main weapon damaged! The crew may not fire the main weapon until an Experience Test is passed as above. In addition, the turret is jammed for the remainder of the game.
Thick smoke in the crew cabin! Perform an Experience Test for each passenger and crew member. Those that fail become casualties, and those that pass bail out. The vehicle is wrecked.
Track/Wheel Damaged! The vehicle moves with a -10cm penalty (this may result in it not being able to move) for the rest of the battle. In addition roll a D6 at the end of each Movement Phase. On a score of 1-2 the vehicle is immobilised for the rest of the game.
4 Driver and gunner dead! The vehicle moves out of control as above, and the remaining crew automatically bail out. The vehicle is Wrecked.
Gunner and commander dead! The commander and gunner are torn apart by shrapnel and are dead. The main gun is out of action for the remainder of the game.
Foom! The vehicle bursts into flame after taking a direct hit to an ammo store / fuel tank. It is Wrecked, the crew is dead and all of the passengers are hit and killed if they fail an Experience Test. The survivors bail out!
Track/Wheel blown! The vehicle grinds to a halt and remains stationary for the remainder of the battle. The crew must pass a Discipline Test or bail out. It may fire all weapons normally.
5 Brought to a standstill! The vehicle comes to an ominous halt. It counts as being Wrecked, and all the crew are dead.
Crew cabin filled with shrapnel. Perform an Experience Test for each crew member with a -2 penalty. Each crew member that fails dies and other crew must bail out automatically. The vehicle is Wrecked.
Turned into a sieve! The vehicle’s crew and passengers are all killed, and it comes to a halt 2D6cm straight ahead. The vehicle is Wrecked.
Engine damaged. The vehicle may not move for the remainder of the battle. It may fire all weapons normally, but must test to bail out immediately and at the start of each of its’ Discipline Phases. If it is failed, then the crew bails out with their trousers on fire.
6 Kaboom!!! The vehicle is Destroyed killing all the crew and passengers any model within 5cm takes one AP3+/AT2 hit.
Boom! The vehicle bursts into flame after taking a direct hit to an ammo store / fuel line. It is Destroyed and the crew/ passengers are all killed.
Boom! The vehicle bursts into flame after taking a direct hit to an ammo store / fuel tank. It is Destroyed and the crew and passengers are dead.
Thick smoke in the crew cabin! The tracks/wheels are destroyed and a secondary explosion affects the crew cabin. Perform an Experience Test for each crew member. Those that fail become casualties, and those that pass bail out. The vehicle is Wrecked.
Add +1 to the roll if the weapon has AT12 or moreDeduct 1 from the roll if the weapon has AT7 or less (unless Flamethrower)Deduct 2 from the roll if the weapon has AT1 or lessAdd +1 to the roll if a Flamethrower against an Open vehicle
51
Vehicles
••••
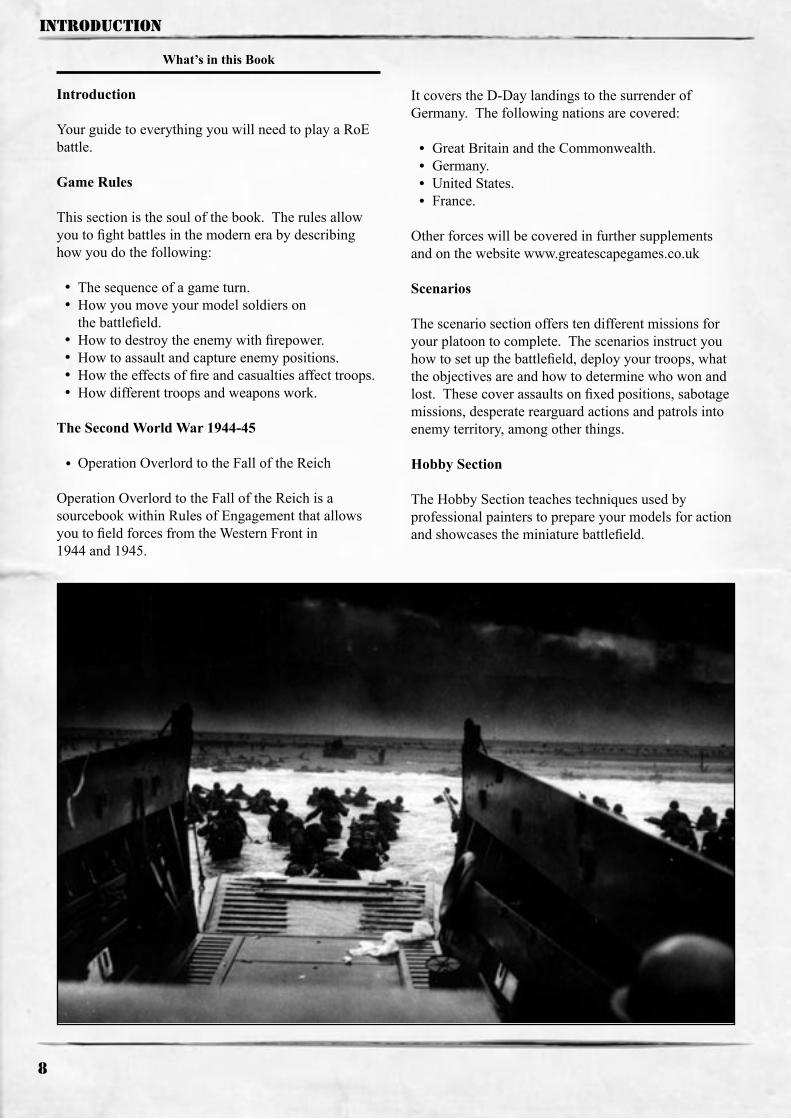
Expanding the Bridgehead
The advance west to cut the Cotentin Peninsula was hampered by the flooded Merderet and Douve rivers. An initial US assault ground to a halt with heavy losses but by the 12th VII Corps and the 82nd Airborne were prepared to thrust due north to Cherbourg. German forces in the area began withdrawing (in contravention of Hitler’s wishes) north to Cherbourg and south to defend St. Lô in the face of the massive build-up of US troops. The severing of the Cotentin was achieved by June 18th and the fate of Cherbourg was sealed.
The attack on Caumont, south of Carentan, faced light opposition and the objective was achieved by June 12th, opening the way to St. Lô. The advance on St. Lô by American infantrymen was checked by 3rd Fallschirmjäger Division. Several days of hard fighting halted the drive for the town with heavy losses for both sides – it would eventually take nearly a month and 40,000 casualties to dislodge the defenders and take St. Lô.
“The basic problem was that the enemy’s favourite formation – small groups of infantry backed by a tank or two and some belt-fed machine guns and mortars, all well camouflaged and concealed in the hedgerows – was one that could only be tackled by very well-trained infantry or at a high cost in lives.”
US Official History
At Caen, a frontal British offensive was thrown back after bitter fighting by 21st Panzer and the focus was switched to outflanking the city from the west via Villers-Bocage. 3rd Canadian Dvision was engaged in vicious combat against 12th SS near Carpiquet – in a week the Canadians had taken 3,000 casualties but had exhausted the German effort.
On June 12th, British 7th Armoured attempted to drive a wedge through the German defence between Omaha and Panzer Lehr on the western flank of the Caen perimeter. Within a day they had penetrated to Villers-Bocage, a distance of 15 miles. By the 15th the British had withdrawn following a terrible failure that had cost dozens of tanks. Despite daily ferocious air and naval bombardments, Caen would hold for several more weeks.
“They blew up the leading tank in one column and then knocked out the one at the back. Then, having jammed the column, they simply rolled down the line, gunning each of our tanks in turn, knocking them out or setting them aflame, killing or capturing a lot of our chaps. Frankly, Villers-Bocage was a bloody shambles.”
Sgt. Bramall, 4th County London Yeomanry Robin Neillands, The Battle for Normandy
On the eastern flank of the bridgehead, the British launched an offensive on June 25th. Operation Epsom attempted a breakthrough over the River Odon, west of Caen, in conjunction with a thrust out of the Orne bridgehead towards Ste-Honorine in order to penetrate the Caen-Falaise plain, ideal country for airstrips, and cut off Caen.
The terrain north of the Odon was broken and abundant in cover, ideal for defenders. The elite German defenders of the 12th SS, 21st Panzer and Panzer Lehr Divisions were faced with a massive bombardment from sea and air prior to the assault by the British and Canadians.
Initial attacks on Vendes and Fontenay went well but the 15th Scottish Division and 11th Armoured Brigade faced stiff opposition. Deadly close quarter fighting over several days failed to dislodge the Germans and Allied troops withdrew by June 29th. By the following day the operation was over.
The concentration of German forces around Caen led to an alteration of the strategic plan. Montgomery would continue to commit the British and Canadian troops against Caen and Carpiquet and facilitate a U.S breakout hinging on Caumont, about twenty miles west. The Americans would continue on the strategy to secure Cherbourg, take St. Lô and push southwest into Brittany and southeast to cut off the German Army in Normandy. This was the same strategic plan as at the onset of the campaign (except that the “hinge” was at Caumont rather than Caen) and displayed an ability of the Allies to react to the situation on the ground. With nearly a million troops ashore by the end of June, it was now only a matter of time and blood for the Allies to liberate France and push on to the Rhine.
The capture of the major port of Cherbourg at the end of June enabled the Allies to lay PLUTO (Pipeline under the ocean) which would provide them with a quarter of a million gallons of fuel a day from August. This was a major, if inevitable loss for the Wehrmacht but the start of the Soviet offensive on June 22nd, Operation Bagration, threatened to collapse the Eastern Front.
As General Bradley’s First U.S. Army made preparations to launch an all-out assault on the German Seventh Army, the British and Canadians again attacked Caen and the airfield at Carpiquet. The Canadians attacked the well dug-in defenders of 26th SS Panzergrenadier Regiment and 12th SS Panzer on July 4th. Supported by a massive artillery bombardment, the Canadians captured the village of Carpiquet but a determined counterattack prevented the taking of the airfield. After a day of attack followed by counterattack, the Canadians withdrew and I Corps prepared for an overwhelming attack by infantry, artillery and air forces on Caen.
“When the Germans come over, the Allies take cover. When the RAF come over, the Germans take cover. When the Yanks come over, everyone takes cover.”
Attributed to British ground troops
The terrain in the American sector caused considerable difficulty for U.S. forces, especially for mechanised operations. The ground near the coast was boggy, exacerbated by heavy rains in July, and further inland the landscape was dominated by the bocage. Bocage, overgrown hedgerows grown dense over centuries, was exploited to great effect by the German defenders. German infantry held the forward edge of the line in weak numbers, preventing the main defences from severe damage by artillery and air power. When these forward defences were assaulted, reserves could be mobilised to respond to immediate threats. However, German forces in the American sector were painfully thin, compounded by the German reliance on the extensive French rail network, now severely damaged by Allied air operations. Similar terrain - networks of small fields, woods, sunken lanes and farmhouses - faced the British and Canadians in their attempts to expand the eastern bridgehead and take Caen.
Caen, now in ruins, finally fell on July 9th after heavy street-fighting (the Allies had taken 5,500 casualties and lost 80 tanks) and the British Second Army, stretched to the limits of its manpower, was now tasked with fighting their way southwards towards Falaise. With rolling countryside, the area beyond Caen was much more suitable to armoured vehicles than the American sector, giving the opportunity to British and Canadian forces to move quickly. This victory, against the best that the Wehrmacht could muster, broke the stalemate in the Battle for Normandy.
THE SECOND WORLD WAR 1944-45
84

German Fallschirmjäger
“You are the chosen ones of the German Army. You will seek combat and train yourselves to endure any manner of test. To you, the battle shall be fulfi lment.”
First of the Fallschirmjäger 10 commandments.German use of Paratroopers in the Second World War was to change the face of combat forever. Nowhere was safe, objectives far behind the front line could be attacked. Although not the fi rst nation to examine the use of airborne forces they pioneered the way airborne forces were to be used in combat. The fi rst nation to seriously examine the use of airborne forces was Russia, which carried out extensive tests during the 1930’s. With Stalin’s purges of the military during the latter 30’s the development ceased. At some of the demonstrations carried out by the Russians were German staff offi cers, including Kurt Student, at the time a junior offi cer, but later to become instrumental in Germany’s airborne forces.
The fi rst German airborne troops came from Regiment General Göring in 1935 when they were transferred to the Luftwaffe. In 1938 after 3 years of training and development, the men were re-organised and renamed 7. Flieger Division. By January 1939 the Army Parachute Battalion was transferred to the Luftwaffe and 7. Fleiger Division consisted of 1st, 2nd and 3rd Battalions FJR1 (Fallschirmjäger regiment 1). They also had a Howitzer Battery, Anti-tank company, Intelligence and Medical companies as well as support and logistical units. They also had the 22nd Infantry Division from the Army as the air landing element; although still part of the Army they trained in air landing techniques and once in combat would be under Luftwaffe command. FJR2 was raised towards the end of 1939 and initially only had 2 battalions.
Throughout their development the new airborne forces had trained hard. The status of elite was reinforced by the “Ten Commandments” given by Hitler himself. The “Commandments” emphasised the bonds between the paratroopers and the expectations placed upon them.
“Keep your eyes wide open. Tune yourself to the top most pitch. Be nimble as a greyhound, as tough as leather, as hard as Krupp steel and so you shall be the German warrior incarnate.”
Tenth of the Ten Commandments
The fi rst use of this new formation was to be in Poland 1939, Norway and Denmark in1940. They met with mixed success; where troops had managed to be dropped in force, on target, they had quickly taken their objectives. Where they had been dropped off target, or had scattered, they had been much less successful.
At Aalborg, the Danish troops guarding the two airfi elds that the Fallschirmjäger were tasked with capturing were so shocked at the sight of enemy paratroopers that they surrendered without a fi ght.
On 10th May, 1940 a single assault group of just 85 men assaulted the Belgian Fort Eben Emael. The assault team landed by glider directly on top of the fort and the well trained troops immediately went to work knocking out the Belgian guns. They then sheltered in the captured parts of the fort for the night.
The following day after being reinforced by members of the engineer battalion they took the remainder of the fort, capturing over 1000 Belgian defenders.
The paratroopers were used in much larger numbers during the Invasion of Holland. They performed well, achieving the majority of their objectives. They would then fi ght with distinction in the Greek campaign of 1941. The next battle would change the way that Germany employed its airborne forces: the Battle of Crete.
The invasion of Crete in 1941 would be the last time that Germany would air drop forces in such large numbers. The Germans attacked the three airfi elds on the island in two waves of glider and parachute assaults. These were supported by air and sea landed infantry. Although they captured the island the cost was high, with estimates ranging from 1 in 4 to 1 in 2 German Airborne casualties.
“Crete was the grave of the German parachutists”
Kurt Student
They would continue to fi ght with distinction as infantry for the remainder of the war. Their defensive qualities were highlighted by the defence of Monte Cassino. Facing overwhelming odds the Fallschirmjäger fought a long hard battle which held up the Allied advance for four months. When they eventually withdrew the majority of their forces, they had infl icted over 50,000 casualties on the Allies.
When the Allies invaded Normandy in June 1944 the Fallschirmjäger fought gallantly. They were heavily involved against US Airborne troops at Carentan and in the defence of Brest. Under the command of Generalleutnant Ramcke, who had fought with great distinction in Africa with Fallschirmjäger-Brigade Afrika and was awarded the Oak Leaves to the Knights Cross, they held Brest until 19th September. On that day Ramcke was awarded the Swords and Diamond to the Knights Cross.
During the Ardennes Offensive Operation Stösser aimed at capturing a vital crossroads to slow advancing Allied reinforcements and supplies being brought to the front. Bad weather meant that the operation was delayed for 24 hours and when the paratroopers were eventually sent the poor weather caused them to be dropped off target. Only a small fraction of the men sent were in the correct place; they harried and harrased the Allies in the area before being captured.
Since the Allies had landed at Normandy the Fallschirmjäger forces had received replacments from all areas of the Luftwaffe. They continued to fi ght until the end of the war although their combat effectiveness had been greatly reduced due to the infl ux of less well trained or determined men.
FALLSCHIRMJAGER
123

Order of Battle
A German Fallschirmjäger Platoon must include a Platoon Command Squad.
PLATOON COMMAND
Qty Soldier Move Shoot CQ EXP Discipline Weapons Notes
1 Leutnant 20cm 4+ +3 3+ 3+ MP40 or Pistol Officer 20cm
1 Unteroffizier 20cm 4+ +3 3+ 3+ MP40 or Kar98k, AP/AT Grenades NCO
4 Jäger 20cm 4+ +3 3+ 3+ Kar 98k, AP/AT Grenades
One Fallschirmjäger may be upgraded to a Medic (see General Special Rules on page 39). Medics are armed with a pistol only.
A German Fallschirmjäger Platoon must include at least 2 Fallschirmjäger Squads.
FALLSCHIRMJAGER SQUAD
First Section
Qty Soldier Move Shoot CQ EXP Discipline Weapons Notes
1 Unteroffizier 20cm 4+ +3 3+ 3+ MP40 or Kar 98k, AP Grenades NCO
1 LMG Gunner 20cm 4+ +3 3+ 3+ LMG MG34/42, Pistol1 LMG Loader 20cm 4+ +3 3+ 3+ Kar 98k
3 Jäger 20cm 4+ +3 3+ 3+ Kar 98k, AP/AT Grenades
Second Section
Qty Soldier Move Shoot CQ EXP Discipline Weapons Notes
1 Gefreiter 20cm 4+ +3 3+ 3+ MP40 or Kar 98k, AP/AT Grenades NCO
1 LMG Gunner 20cm 4+ +3 3+ 3+ LMG MG34/42, Pistol1 LMG Loader 20cm 4+ +3 3+ 3+ Kar 98k
2 Jäger 20cm 4+ +3 3+ 3+ Kar 98k, AP/AT Grenades
FALLSCHIRMJAGER SQUAD
FALLSCHIRMJAGER
125
PLATOON COMMAND

Adding detail.
Now you have the skills needed to produce high quality miniatures it is time to look at some specific details. In this section details such as faces, military markings and bases will be looked at more closely allowing you to add the finishing touches that will add that extra level of detail to your miniatures.
Faces:
The face of your miniature will be the focal point of any detailed scrutiny. Using the techniques described previously they should be approached in the same way as any other part of the miniature.
The amount of time and thus the level of detail you wish to add to your miniatures is entirely up to you. The images on the right show the various ways it is possible to paint your miniatures face.
1. This face has had ink washed over a single flat colour.2. This face has also had an ink wash applied. It has then had the raised areas, the cheeks and forehead, highlighted with the original base colour.3. The highlights on the face are more dramatic.4. Finally this face has had an ink wash and then has been highlighted several times and had extra detail painted including eyes and stubble.
Bases:
A good base can add the finishing touch making a good miniature into an excellent one.
The simplest way to base your miniatures is to dry brush the sand that was initially glued to the base and then add static grass. Try to consider the theatre that your troops will be fighting in when painting and finishing your bases. If your games are to be based around the fighting in the Ardennes then golden sand on the bases will not fit, try a winter feel with snow instead.
Groups of miniatures such as machine gun and mortar teams present an excellent opportunity to show your modelling skills, as do specialist individuals such as snipers. Below are some example of the different types of bases that you could create.
Military markings:
Rank, divisional, regimental and operational markings can all add an extra element of detail to miniatures.
These markings can be used to give distinction to miniatures to mark them out from others on the battlefield. There is a whole wealth of information on markings and insignia; some formal, such as rank markings will clarify rules and situations in the game. Others such as regimental markings, can add background and historic relevance to your force.Opposite are two examples of NCO markings.
1. 2.
3. 4.
HOBBY SECTION
139

British Airborne
The most obvious difference between British Infantry and Airborne troops is the Airborne use of the Denison smock. This camouflaged jacket was designed in 1941 and by the end of the war it had reached its third variation. The other differences included the head gear, the helmet worn by Airborne troops differed from that of the infantry, as well as the distinctive maroon beret. The trousers worn were also different from the infantry with the parachutists trousers being introduced in 1943 and featuring a distinctive large single pocket, called the bellows pocket, on the front of the left leg. The webbing was identical to that issued to standard infantry soldiers.
The weapons used by British Airborne forces were also identical to those issued to the infantry. One of the major differences was the allocation of sten guns, there were enough extra sten guns to allow every other man in the platoon to be armed with one. The standard weapon given to the men was the Rifle, No. 4 Mk I. This weapon was the latest in a series of rifles developed since the first “Lee Enfield” had been produced in 1895. Section support came from the Bren gun, a light machine gun adopted by the British Army from a Czechoslovakian design in the late 1930’s. Each section was also provided with a 2 inch mortar, although they only received smoke rounds, and a scoped rifle.
Below is a selection of British airborne miniatures. The same figures could be used to represent any of the airborne forces equipped in the British style, e.g. Canadians, Polish and French, with only slight alterations. In the case of Polish airborne troops the only real difference is to the beret which was grey.
1. PIAT armed para: during the battle around Arnhem the airborne forces inflicted a terrible toll on German armour with these weapons, the dense urban terain proving an excellent hunting ground.
2. NCO armed with sten gun: British airborne forces had a much higher percentage of sergeants than standard infantry with one per section.
3. Bren gun armed para: each platoon had an additional bren gun which could be allocated by the commander.
4. Vickers medium machine gun team: interestingly the vickers were a support option chosen by the commander as replacements for the second mortar group. The commander could choose to swap any of the mortars with vickers machine guns to suit the operation. They would provide much needed additional firepower once the para’s were in position.
Airborne troops were given a higher number of sten guns than their infantry counterparts.
The basic webbing forAirborne troops wasidentical to that of the infantry.
Water bottles were madeby four different suppliersin the UK so could vary incolour.
Airborne troops jumpedwearing the standardhelmet but often changedinto their famous maroonberets.
Rank marking for NCO’swere on the right handsleeve of the Denisonsmock.
The standard anklet usedfastened with two buckles.
1. 2. 3. 4.
HOBBY SECTION
153