Embed Size (px)
Citation preview
Bulletin PDQuest 7.0 Update Training Rev A
1
bulletin # 2848
Imaging Products Division Bio-Rad Laboratories Life Science Group
Welcome to the PDQuest™ 2-D Analysis Software
Version 7.0 / 7.0.1 Update Training Guide
Bio-Rad is pleased to be able to distribute this training update as part of our continuing Product Support and Training Effort for our Imaging Products. This package is designed to give you a comprehensive tour of the newest releases of our PDQuest software program, versions 7.0 and 7.0.1. The PDQuest application has been extensively revamped with a multitude of new and enhanced features, offering unprecedented automation of the front end of image analysis and enhanced ease-of-use. PDQuest 7 also offers enhanced integration of mass spectrometer results, including a batch mode for importing protein identification results that will simplify the annotation and review of identified proteins, and the ability to import identification results from Matrix Sciences MASCOT software. Proteomic research labs, in particular, will benefit from the increased throughput in image analysis obtainable with these improvements.
PDQuest 7.0 (PC and Mac) and 7.0.1 (PC only) are available as part of The Discovery Series™ software, Release 13 CD-ROM. A newly revised PDQuest manual is also part of this release.
For users whose license password includes version 7.0, or to obtain a copy for evaluation;
•The updated software application can be obtained by ordering the release 13 CD as part number 170-8605. •The updated manual can be ordered as part number 170-8623. •The application is also available for download at
www.bio-rad.com/softwaredownloads
An upgrade pathway is available for users whose license password does not include version 7.0;
• Upgrades to the current release of PDQuest can be obtained by ordering catalogue number 170-8626. Contact your local Bio-Rad sales representative for pricing information.
For more information, or to place an order, contact us at 1-800-4BIORAD in the United States. Customers outside of the U.S. may call 510-724-7000 or contact a local Bio-Rad sales office.
Bulletin PDQuest 7.0 Update Training Rev A
2
PDQuest 7.0 / 7.0.1 TRAINING UPDATE
TABLE OF CONTENTS Highlights of PDQuest 7.0 / 7.0.1 Page 3 Introducing SPoT™ Technology Development for Proteomics Page 4 Summary of Major Changes in version 7.0 / 7.0.1 Page 5 Version 7.0 / 7.0.1 Product Update; Training Detail
New Features; Pages 6-39 Proprietary Auto-matching Algorithm
Eliminates need for user-defined landmarks Pages 6-9 Eliminates confirmation of ProteomeWorks™ Pages 10-13 Spot Cutter excision targeting; v.7.0 Eliminates confirmation of ProteomeWorks Spot Cutter Pages 14-20 excision targeting; v.7.0.1
Automation: Auto-detect and Auto-Match Pages 20-21 Matching Summary table has been added (v.7.0.1) Pages 21-24 Integration with WorksBase™ software for proteomics (v.7.0.1) Pages 24-29 “Master” image Page 29 2-D Scan images are now available in Matchsets Page 30 Proprietary SYPRO Ruby speckle filter Pages 30-32 Image Stack Tool enhancements Pages 32-35 Spot Review Tool now allows common editing Page 35 Batch import of Micromass® & Mascot™ Pages 35-36
MS protein identification info Import of Text Files as Annotations (v.7.0.1) Page 36-38 File System and Archiving Changes
Standard Windows Browser Page 38 Sharing members between Matchsets Page 38
Reporting TIFF image exported with displayed overlays Page 39 Selected reports include Page Setup and Print Preview Page 39
Retired Features; Windows 95 is no longer supported Page 39 Multiple exposures of same gel are no longer supported Page 39 Matchsets file name conventions changed Page 39 PDQuest will no longer open old gelspot files (1988) Page 39
Bulletin PDQuest 7.0 Update Training Rev A
3
PDQuest 2-D Analysis Software Version 7.0 / 7.0.1 Training Update With the release of version 7.0 / 7.0.1, PDQuest software functionality and tools have been extensively enhanced. A developmental focus on process automation and integration of data from a variety of sources will appeal to the proteome-oriented researcher.
Highlights of PDQuest 7.0 / 7.0.1 include: Significant New Features for high-throughput oriented Proteomic labs; • A new proprietary auto-matching algorithm eliminates the need to manually select
landmarks for matching • The auto-matching algorithm also eliminates the need to manually confirm Spot
Cutter excision targeting • A new user–interface automates the front-end of image processing by combining the
Auto-match algorithm with the Spot Detection and Matchset creation steps • Integration with WorksBase™ software for proteomics, a bioinformatics database,
for storage of image, spot, matching and annotation data Significant Usability Enhancements; • Original 2-D Scan images are now available in Matchsets • A proprietary SYPRO Ruby speckle filter has been added • A Matching Summary table has been added which gives feedback on spot detection
and matching statistics • Image Stack Tool has been enhanced to allow easier review of spot detection and/or
differential expression and new functionality has been added allowing users to flag visually identified spots of interest
• A new batch mode has been added for importing mass spec protein identifications from Micromass, Matrix Sciences MASCOT, or WorksBase software
• Exported TIFF image files can now include display of analysis overlays and annotations as they appear on-screen in color
Bulletin PDQuest 7.0 Update Training Rev A
4
PDQuest 2-D Analysis Software Introducing SPoT™ Technology: Addressing the 2-D Image Analysis Bottleneck in the Proteomic Workflow Market feedback consistently indicates the process of analyzing 2-D gels with software packages to be one of the key bottlenecks in the proteomic research workflow. Operations that have been regarded as most contributing to this bottleneck have been identified as:
• Spot Detection • Gel Matching • Editing of Spot Detection and Matching
These operations can be broadly classified as steps that are required before one can begin to analyze the gels for differential expression within the experiment. The shortcomings in the technology available to date can be thought of as two-fold; a) a need for automation to reduce the time and user-intervention required for the spot detection and gel matching steps and b) a need for greater accuracy in these steps which would reduce the requirement to edit the results. Ironically, the operational step of performing the statistical analysis of protein regulation has not been brought up as a similar bottleneck. In all probability, this is more a reflection of the depth of concern focused on the spot detection and matching stages than an acceptance that the analysis stage is being performed efficiently. It is anticipated that should the bottlenecks perceived in spot detection and matching be removed through automation and increased accuracy, attention will shift to streamlining the analysis stages. Bio-Rad has responded to this need with a new SPoT technology (Streamlined ProteOmic Tools) developmental effort. This is a comprehensive and ongoing R+D approach towards increased automation and efficiency in the proteomic workflow. Initial SPoT technology development has been focused on the initial stages of gel processing to address the critical bottlenecks. As a result, PDQuest 7.0 / 7.0.1 incorporates a new proprietary auto-matching algorithm which eliminates the need for manual intervention and significantly reduces the amount of time required to match gels within experiments. ProteomeWorks Spot Cutter users will also benefit from this algorithm as it allows auto-alignment of targeted spots during the excision process, eliminating the need to manually confirm the excision targeting of selected spots. Ongoing development of SPoT technology will address continued automation of the image analysis process, improvements in accuracy, and further integration with Bio-Rad’s ProteomeWorks System, as well as other data sources.

Bulletin PDQuest 7.0 Update Training Rev A
5
Summary of major changes incorporated into PDQuest versions 7.0 / 7.0.1
Significant New Features for high-throughput oriented Proteomic labs; • Proprietary Auto-matching Algorithm
– Automates Gel Matching – Auto-aligns Spot Cutter excision targeting (faster performance & more options with version 7.0.1)
• Automation of front-end of image processing: Auto-detect and Auto-Match – New user-interface offers One-step Spot Detection, Matchset Creation & Gel Matching
• Integration with WorksBase™ bioinformatics database (version 7.0.1) – archive sample, gel, image, spots, matchset, etc. – retrieve spot annotations (& MS identification)
Significant Usability Enhancements; • The “Standard Reference” image is now referred to as a “Master” image • 2-D Scan images are now available in Matchsets • A proprietary SYPRO Ruby speckle filter has been added • A Matching Summary table has been added (version.7.0.1) • Image Stack Tool has been enhanced
– allows user to flag spots of interest and create analysis sets for later review – automatically adds flagged spots to Master Image (if not already present)
• Spot Review Tool now allows common editing commands while open – Tool now allows commands to add & delete spot, manually match & un-match spots, add spots to
Master • Allows batch import of MS protein identification info
– The batch import mode is compatible directly with Micromass instrumentation or Matrix Sciences MASCOT software results (version 7.0.1 required for MASCOT )
– indirectly (through WorksBase bioinformatics software) with Micromass instrument results as well as MASCOT (Matrix Sciences) analyzed MS spectra from other mass spec instruments
• Import of Text Files as Annotations (version 7.0.1) • File System and Archiving Changes
– Standard browser open/save dialogues are now supported (the previous PDQuest custom open dialogue is still available as a user-definable option)
– Member images can now be members of multiple Matchsets and annotations can be shared between matchsets or be private to a single matchset
– Matchset members can be found automatically if moved on the hard disk outside of PDQuest • Reporting
– TIFF images can be exported with color display overlays & annotations as they appear on-screen – New report features have been added for selected reports, including Page Setup and Print Preview
Retired Features; •Windows 95 is no longer supported •multiple exposures of same gel are no longer supported •Matchset file naming conventions
- PDQuest Matchsets now consist of a <name>.ms file and a corresponding <name> Data directory – Previously a MatchSet was a directory – Previously could not be opened with the standard system open dialog
•PDQuest 7 will no longer open gelspot files produced by version 3.85 or older (1988) –These files must be first opened and saved with PDQuest 6.2
See subsequent pages of this training update for additional detail on the above features
Bulletin PDQuest 7.0 Update Training Rev A
6
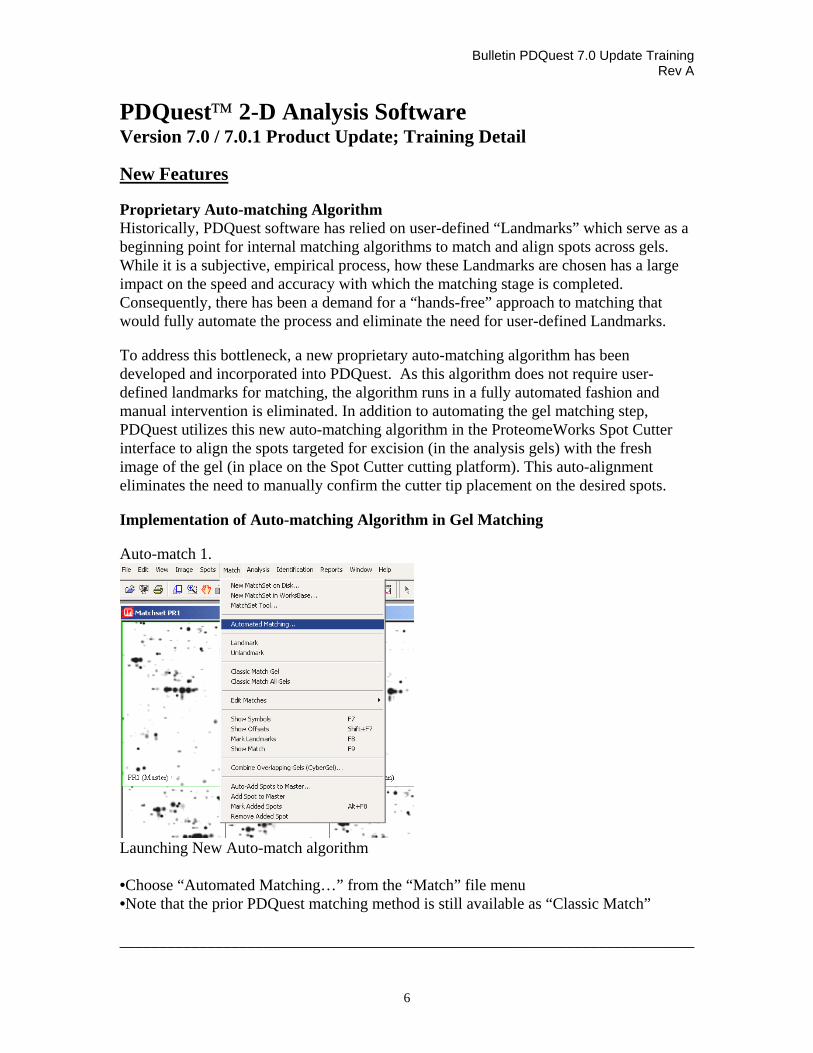
PDQuest 2-D Analysis Software Version 7.0 / 7.0.1 Product Update; Training Detail New Features Proprietary Auto-matching Algorithm Historically, PDQuest software has relied on user-defined “Landmarks” which serve as a beginning point for internal matching algorithms to match and align spots across gels. While it is a subjective, empirical process, how these Landmarks are chosen has a large impact on the speed and accuracy with which the matching stage is completed. Consequently, there has been a demand for a “hands-free” approach to matching that would fully automate the process and eliminate the need for user-defined Landmarks. To address this bottleneck, a new proprietary auto-matching algorithm has been developed and incorporated into PDQuest. As this algorithm does not require user-defined landmarks for matching, the algorithm runs in a fully automated fashion and manual intervention is eliminated. In addition to automating the gel matching step, PDQuest utilizes this new auto-matching algorithm in the ProteomeWorks Spot Cutter interface to align the spots targeted for excision (in the analysis gels) with the fresh image of the gel (in place on the Spot Cutter cutting platform). This auto-alignment eliminates the need to manually confirm the cutter tip placement on the desired spots. Implementation of Auto-matching Algorithm in Gel Matching Auto-match 1.
Launching New Auto-match algorithm •Choose “Automated Matching…” from the “Match” file menu •Note that the prior PDQuest matching method is still available as “Classic Match” ________________________________________________________________________
Bulletin PDQuest 7.0 Update Training Rev A
7
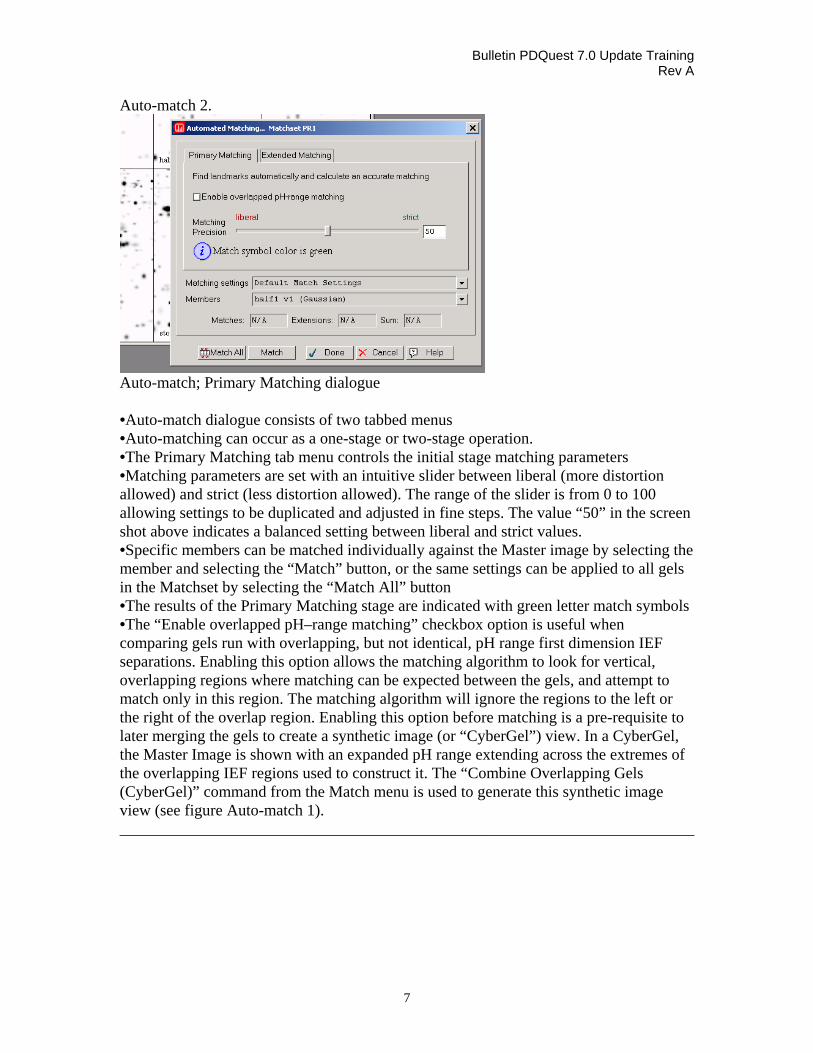
Auto-match 2.
Auto-match; Primary Matching dialogue •Auto-match dialogue consists of two tabbed menus •Auto-matching can occur as a one-stage or two-stage operation. •The Primary Matching tab menu controls the initial stage matching parameters •Matching parameters are set with an intuitive slider between liberal (more distortion allowed) and strict (less distortion allowed). The range of the slider is from 0 to 100 allowing settings to be duplicated and adjusted in fine steps. The value “50” in the screen shot above indicates a balanced setting between liberal and strict values. •Specific members can be matched individually against the Master image by selecting the member and selecting the “Match” button, or the same settings can be applied to all gels in the Matchset by selecting the “Match All” button •The results of the Primary Matching stage are indicated with green letter match symbols •The “Enable overlapped pH–range matching” checkbox option is useful when comparing gels run with overlapping, but not identical, pH range first dimension IEF separations. Enabling this option allows the matching algorithm to look for vertical, overlapping regions where matching can be expected between the gels, and attempt to match only in this region. The matching algorithm will ignore the regions to the left or the right of the overlap region. Enabling this option before matching is a pre-requisite to later merging the gels to create a synthetic image (or “CyberGel”) view. In a CyberGel, the Master Image is shown with an expanded pH range extending across the extremes of the overlapping IEF regions used to construct it. The “Combine Overlapping Gels (CyberGel)” command from the Match menu is used to generate this synthetic image view (see figure Auto-match 1). ________________________________________________________________________
Bulletin PDQuest 7.0 Update Training Rev A
8
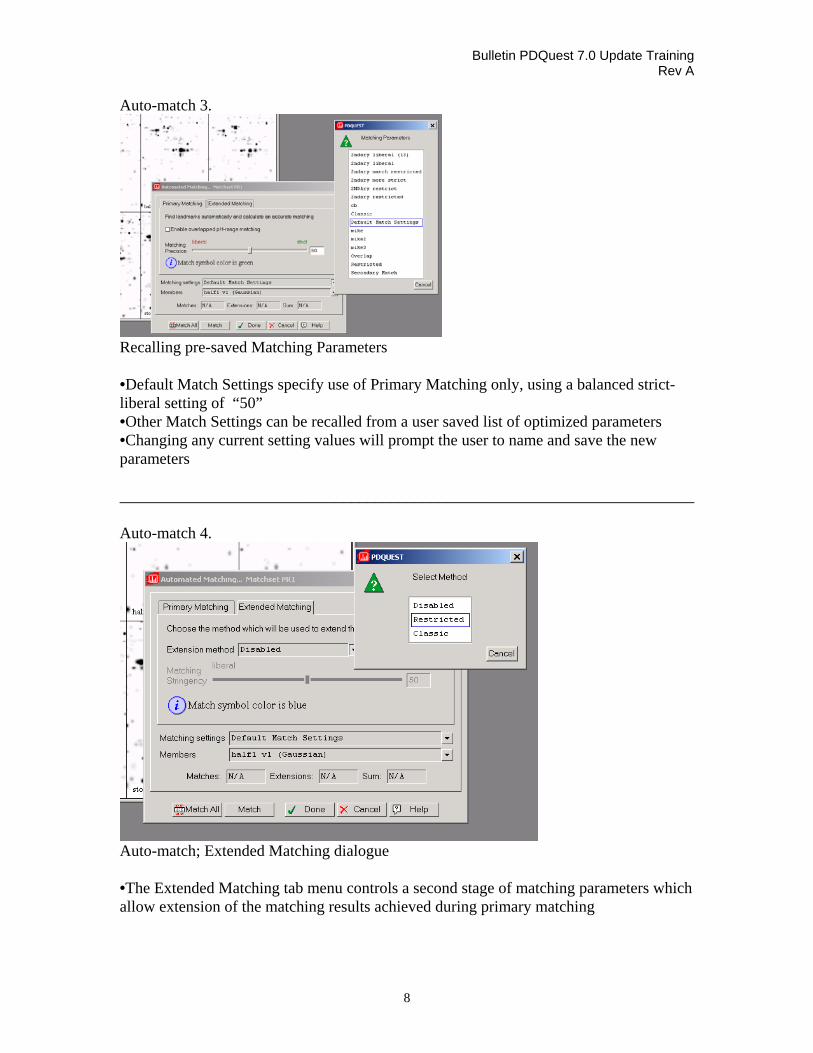
Auto-match 3.
Recalling pre-saved Matching Parameters •Default Match Settings specify use of Primary Matching only, using a balanced strict-liberal setting of “50” •Other Match Settings can be recalled from a user saved list of optimized parameters •Changing any current setting values will prompt the user to name and save the new parameters ________________________________________________________________________ Auto-match 4.
Auto-match; Extended Matching dialogue •The Extended Matching tab menu controls a second stage of matching parameters which allow extension of the matching results achieved during primary matching
Bulletin PDQuest 7.0 Update Training Rev A
9
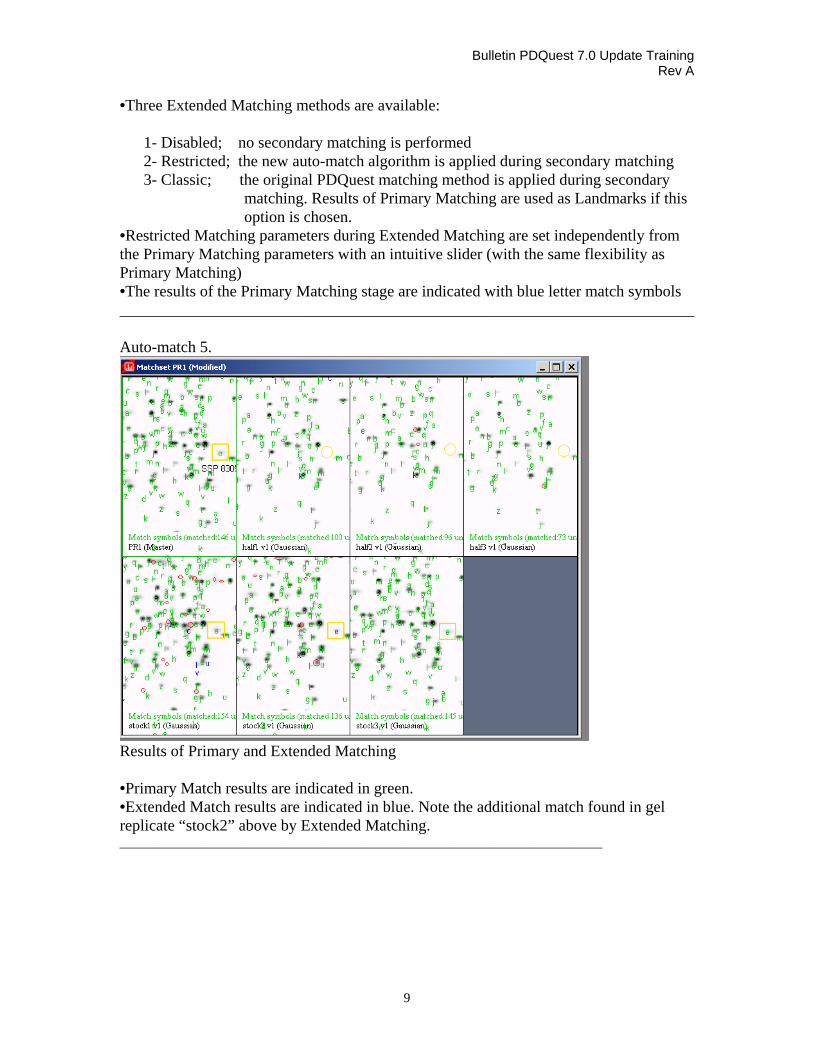
•Three Extended Matching methods are available: 1- Disabled; no secondary matching is performed 2- Restricted; the new auto-match algorithm is applied during secondary matching 3- Classic; the original PDQuest matching method is applied during secondary
matching. Results of Primary Matching are used as Landmarks if this option is chosen.
•Restricted Matching parameters during Extended Matching are set independently from the Primary Matching parameters with an intuitive slider (with the same flexibility as Primary Matching) •The results of the Primary Matching stage are indicated with blue letter match symbols ________________________________________________________________________ Auto-match 5.
Results of Primary and Extended Matching •Primary Match results are indicated in green. •Extended Match results are indicated in blue. Note the additional match found in gel replicate “stock2” above by Extended Matching. ________________________________________________________________________

Bulletin PDQuest 7.0 Update Training Rev A
10
Implementation of Auto-matching Algorithm in Spot Cutter Targeting (As applies to PDQuest version 7.0 ONLY) PDQuest 7.0 and 7.0.1 have different implementations of the Spot Cutter auto-alignment interface. It is recommended that all Spot Cutter users run version 7.0.1 to take advantage of faster auto-alignment performance. If you are running version 7.0.1, please turn to page 14 for a description of the interface. 7.0 Auto-align 1.
Implementation of Auto-match algorithm in Spot Cutter
•Use “Acquire Image “ button to take image of gel on Spot Cutter platen: ________________________________________________________________________ 7.0 Auto-align 2.
Opening gel file in Spot Cutter simulation mode

Bulletin PDQuest 7.0 Update Training Rev A
11
In demo or tutorial mode (i.e., without a Spot Cutter attached), the software has an option to run in Spot Cutter simulation mode • Note use of Standard Windows browser above to find gel file to load into Spot Cutter
Tip! If running in Spot Cutter Simulation mode, PDQuest software will not allow a file with the same file name as the analysis image to be opened into the Align Analysis and Cutter Image window. In order to simulate the spot cutting process, it is necessary to have prepared a copy of the target gel raw scan file in advance under a different name (for example, “Copy of stock3.gsc”)
________________________________________________________________________ 7.0 Auto-align 3.
Automatic initiation of auto-alignment • Once image is acquired (or file is loaded if in Spot Cutter Simulation mode) the user
is prompted to confirm the location of the data area box. • Confirming the data box area location then automatically initiates Spot Detection on
the Spot Cutter image and Automatic Alignment of spots in the Analysis and Spot Cutter images.
________________________________________________________________________ 7.0 Auto-align 4.
Utilize matching confidence thresholds to target matched spots for review • Optional step; user can proceed directly to spot cutting if desired • User-defined confidence thresholds indicate which spots to review (if any) ________________________________________________________________________

Bulletin PDQuest 7.0 Update Training Rev A
12
7.0 Auto-align 5.
Alignment Review Tool: All spots require review if confidence threshold set at 100% • Note feedback on number of targeted cuts at or below threshold (red) and above the
user-defined matching confidence threshold (green) ________________________________________________________________________ 7.0 Auto-align 6.
Alignment Review Tool: Some or all spots may require review when confidence threshold is set lower than 100%
• Only spots at or below the matching confidence threshold will be reviewed ________________________________________________________________________
Bulletin PDQuest 7.0 Update Training Rev A
13
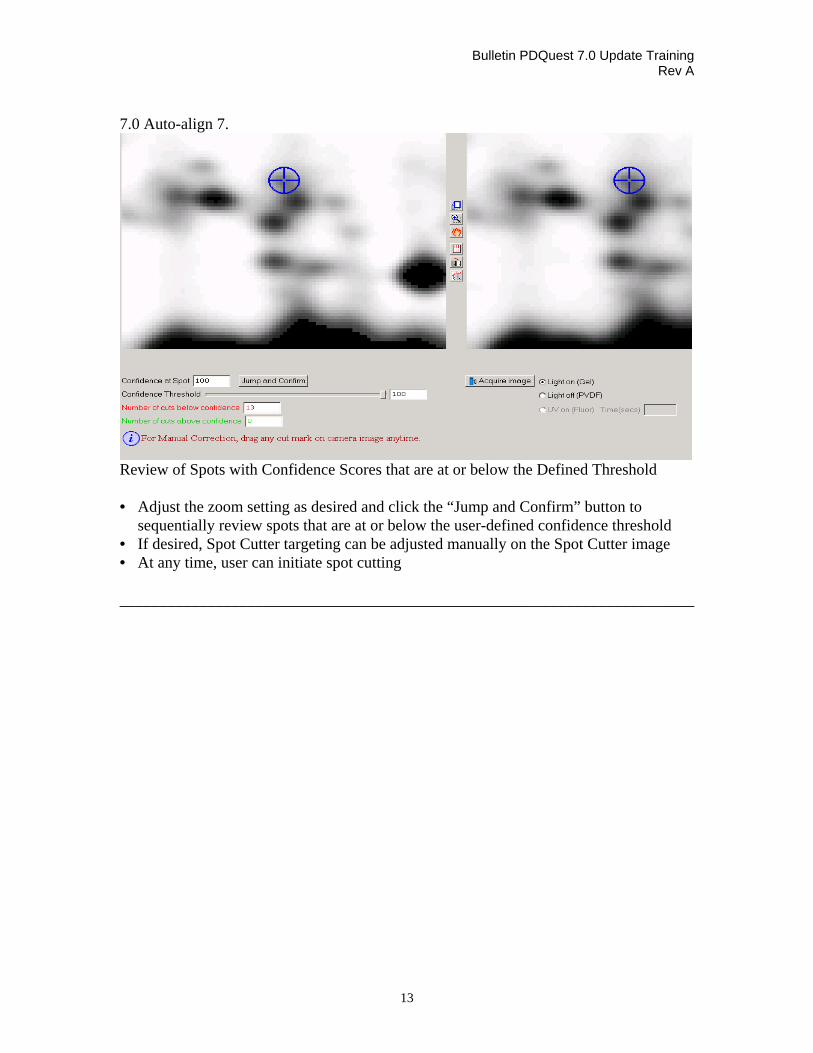
7.0 Auto-align 7.
Review of Spots with Confidence Scores that are at or below the Defined Threshold • Adjust the zoom setting as desired and click the “Jump and Confirm” button to
sequentially review spots that are at or below the user-defined confidence threshold • If desired, Spot Cutter targeting can be adjusted manually on the Spot Cutter image • At any time, user can initiate spot cutting ________________________________________________________________________

Bulletin PDQuest 7.0 Update Training Rev A
14
Implementation of Auto-matching Algorithm in Spot Cutter Targeting (As applies to PDQuest version 7.0.1 ONLY) PDQuest 7.0 and 7.0.1 have different implementations of the Spot Cutter auto-alignment interface. It is recommended that all Spot Cutter users run version 7.0.1 to take advantage of faster auto-alignment performance. If you are running version 7.0, please turn to page 10 for a description of the interface. The Spot Cutter control interface has been extensively revised in version 7.0.1.
• The ability to reorient the gel image has been added, eliminating the requirement to physically reorient the gel on the cutting platen surface
• The Gel and Excision Target auto-alignment operation is significantly faster • The ability to display multiple cut excision targeting is now available • The ability to display approximate protein contribution from nearby overlapping
spots is now available 7.0.1 Auto-align 1.
Revised Four-step interface for Implementation of Auto-match algorithm in Spot Cutter ________________________________________________________________________

Bulletin PDQuest 7.0 Update Training Rev A
15
7.0.1 Auto-align 2.
Revised Alignment Workflow- Steps 1 through 3 allow image acquisition, reorientation of gel, and initiation of alignment
•Step 1- Use “Acquire Image “ button to take image of gel on Spot Cutter platen •Note: Until an image has been acquired, the commands in Step 2 and 3 are “asleep” and unavailable
________________________________________________________________________ 7.0.1 Auto-align 3.
Opening gel file in Spot Cutter simulation mode In demo or tutorial mode (i.e., without a Spot Cutter attached), the software has an option to run in Spot Cutter simulation mode • Note use of Standard Windows browser to find gel file to load into Spot Cutter
Tip! If running in Spot Cutter Simulation mode, PDQuest software will not allow a file with the same file name as the analysis image to be opened into the Align Analysis and Cutter Image window. In order to simulate the spot cutting process, it is necessary to have prepared a copy of the target gel raw scan file in advance under a different name (for example, “Copy of stock3.gsc”)
________________________________________________________________________

Bulletin PDQuest 7.0 Update Training Rev A
16
7.0.1 Auto-align 4.
Post-acquisition user prompt After an image is acquired (or a file is loaded if in Spot Cutter Simulation mode), the user is prompted to confirm or correct the position of the data box and to re-orient the gel image if necessary • Click “OK” in the user prompt dialogue to proceed to Step 2 ________________________________________________________________________ 7.0.1 Auto-align 5.
Step 2 and 3 commands “wake up” once an image is loaded. If necessary, data box should be repositioned to match placement on the analysis image. Gel image re-orientation options include;
• flip horizontal • flip vertical • rotate 90 degrees left • Rotate 180 degrees
Proceed to Step 3 and choose “Auto” to initiate auto-alignment using the new automated matching algorithm (or choose “Manual” to use the manual target confirmation method). ________________________________________________________________________ 7.0.1 Auto-align 6.
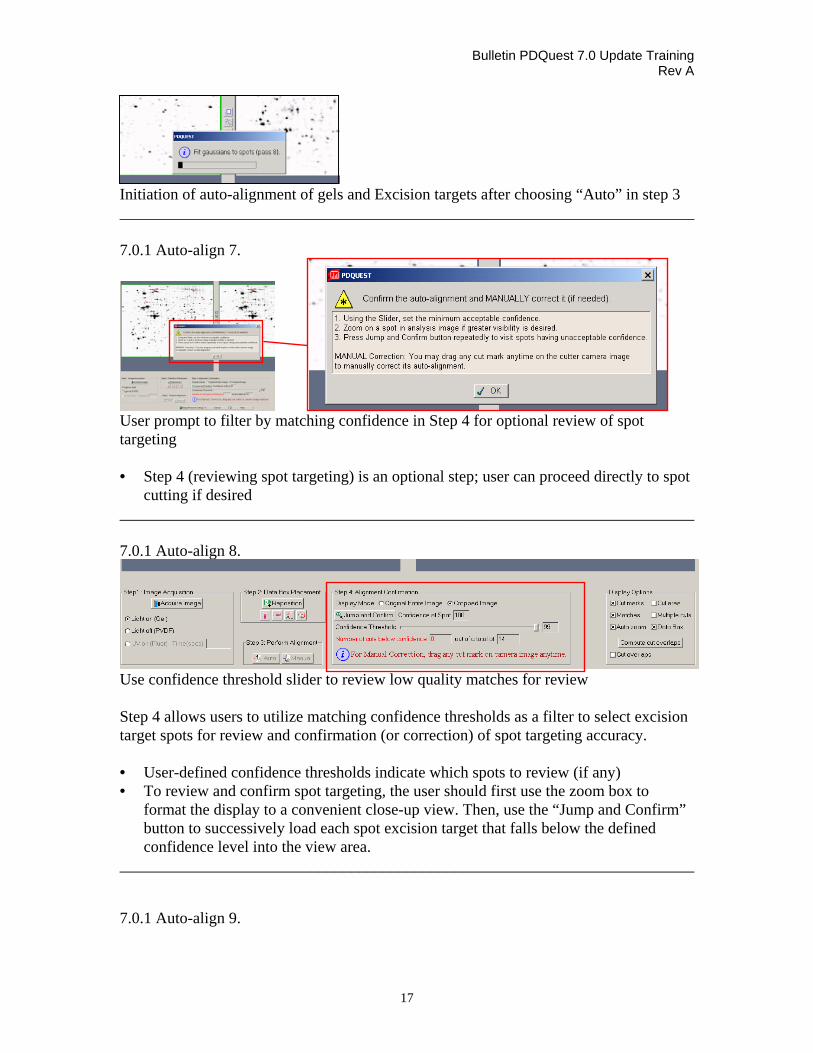
Bulletin PDQuest 7.0 Update Training Rev A
17
Initiation of auto-alignment of gels and Excision targets after choosing “Auto” in step 3 ________________________________________________________________________ 7.0.1 Auto-align 7.
User prompt to filter by matching confidence in Step 4 for optional review of spot targeting • Step 4 (reviewing spot targeting) is an optional step; user can proceed directly to spot
cutting if desired ________________________________________________________________________ 7.0.1 Auto-align 8.
Use confidence threshold slider to review low quality matches for review Step 4 allows users to utilize matching confidence thresholds as a filter to select excision target spots for review and confirmation (or correction) of spot targeting accuracy. • User-defined confidence thresholds indicate which spots to review (if any) • To review and confirm spot targeting, the user should first use the zoom box to
format the display to a convenient close-up view. Then, use the “Jump and Confirm” button to successively load each spot excision target that falls below the defined confidence level into the view area.
________________________________________________________________________ 7.0.1 Auto-align 9.
Bulletin PDQuest 7.0 Update Training Rev A
18
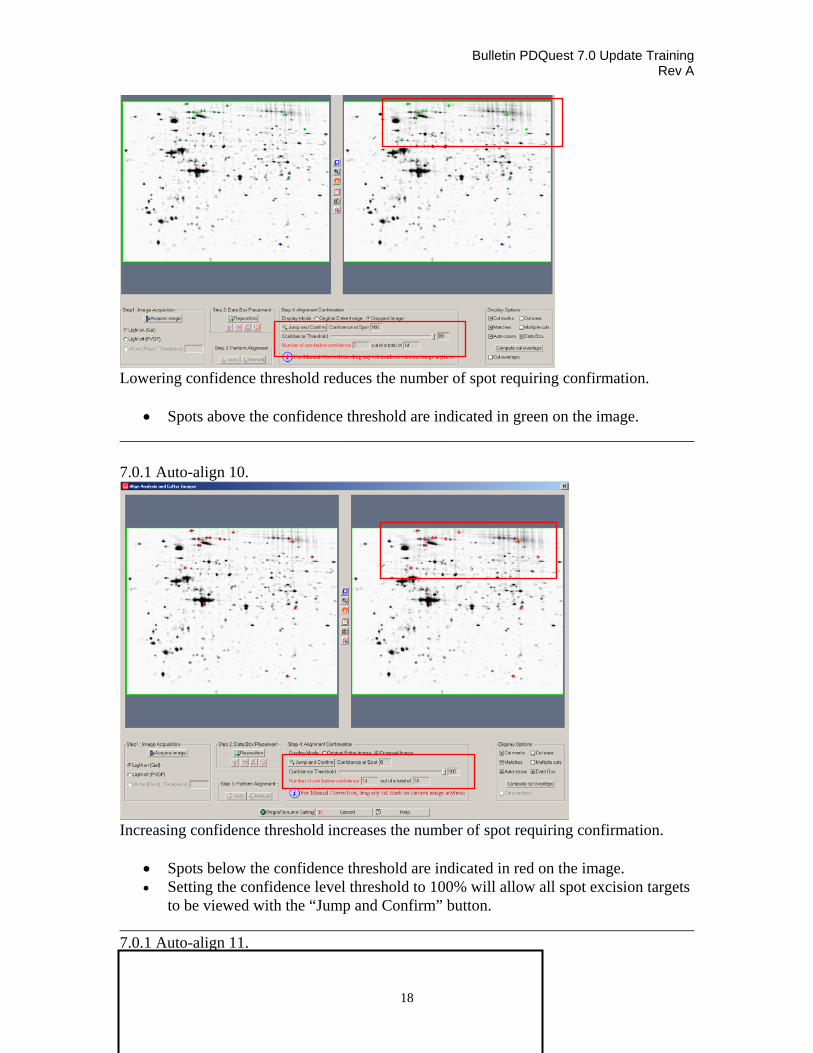
Lowering confidence threshold reduces the number of spot requiring confirmation.
• Spots above the confidence threshold are indicated in green on the image. ________________________________________________________________________ 7.0.1 Auto-align 10.
Increasing confidence threshold increases the number of spot requiring confirmation.
• Spots below the confidence threshold are indicated in red on the image. • Setting the confidence level threshold to 100% will allow all spot excision targets
to be viewed with the “Jump and Confirm” button. ________________________________________________________________________ 7.0.1 Auto-align 11.

Bulletin PDQuest 7.0 Update Training Rev A
19
Review of Spots with Confidence Scores that are at or below the Defined Threshold • The currently selected spot is indicated in blue. • If desired, Spot Cutter targeting can be adjusted manually on the Spot Cutter image
by dragging the targeting indicator to a new position. • At any time, user can initiate spot cutting ________________________________________________________________________ 7.0.1 Auto-align 12.
Display Options. Display interface includes ability to;
• display multiple cut targeting (when multiple cut option has been selected from Excision Gel Selection interface screen)
• compute and display cut overlap contribution from neighboring, overlapping spots to the targeted excision area
________________________________________________________________________ 7.0.1 Auto-align 13.
Close up of multiple cut targeting display indicator.
• Individual multiple cuts can also be selected and repositioned manually. ________________________________________________________________________ 7.0.1 Auto-align 14.

Bulletin PDQuest 7.0 Update Training Rev A
20
Close up of cut overlap contribution indicator. In the above example, the current cut area for the targeted (blue) spot will contain approximately 5% of the neighboring spot.
• User must select “Compute Cut Overlaps” before selecting the “Cut Overlaps” check box to display the results
• This calculation is made from the original analysis gel. It is not recalculated as the excision target area is repositioned manually
• The calculation is approximate and indicated in 5% increments (due to the inaccuracy of attempting to calculate the absolute amounts of two different proteins with different affinities for the same protein stain)
________________________________________________________________________ Automation of 2-D image processing: Auto-detect and Auto-Match One of the most frequent concerns raised about software analysis of 2-D gels is the amount of manual intervention associated with preparing the scanned digital gel images for statistical expression analysis. As sophisticated as 2-D analysis software has become in recent years, a high degree of user intervention has typically been required to guide the software through spot detection and gel matching. A new user-interface offers one-step Spot Detection, Matchset Creation & Gel Matching. By automating these operations, which compose the “front-end” of the 2-D image analysis process, PDQuest speeds the user to the review and spot population statistical analysis stages of the 2-D gel analysis process. Automation 1.
Auto-Detection and Matching automates the “front-end” of 2-D image processing • Single Auto-detect and Matching dialogue window is accessed from the “Spot” menu ________________________________________________________________________
Bulletin PDQuest 7.0 Update Training Rev A
21
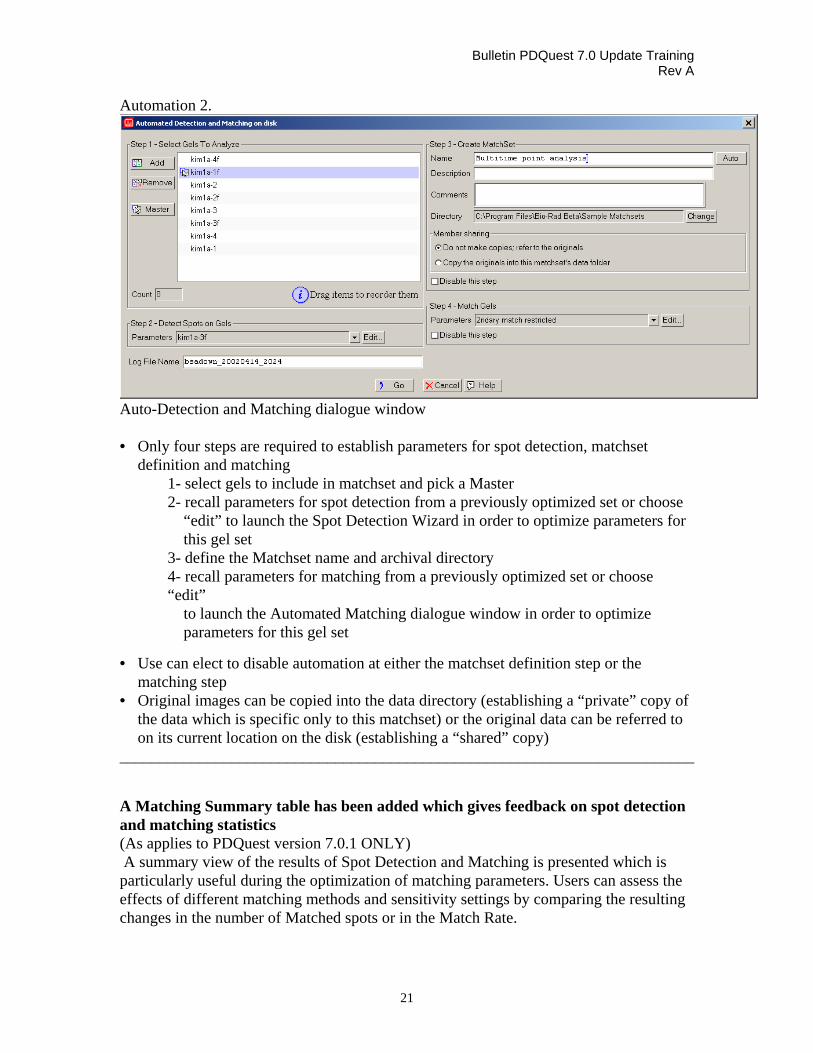
Automation 2.
Auto-Detection and Matching dialogue window • Only four steps are required to establish parameters for spot detection, matchset
definition and matching 1- select gels to include in matchset and pick a Master 2- recall parameters for spot detection from a previously optimized set or choose “edit” to launch the Spot Detection Wizard in order to optimize parameters for this gel set 3- define the Matchset name and archival directory 4- recall parameters for matching from a previously optimized set or choose “edit” to launch the Automated Matching dialogue window in order to optimize parameters for this gel set
• Use can elect to disable automation at either the matchset definition step or the matching step
• Original images can be copied into the data directory (establishing a “private” copy of the data which is specific only to this matchset) or the original data can be referred to on its current location on the disk (establishing a “shared” copy)
________________________________________________________________________ A Matching Summary table has been added which gives feedback on spot detection and matching statistics (As applies to PDQuest version 7.0.1 ONLY) A summary view of the results of Spot Detection and Matching is presented which is particularly useful during the optimization of matching parameters. Users can assess the effects of different matching methods and sensitivity settings by comparing the resulting changes in the number of Matched spots or in the Match Rate.
Bulletin PDQuest 7.0 Update Training Rev A
22
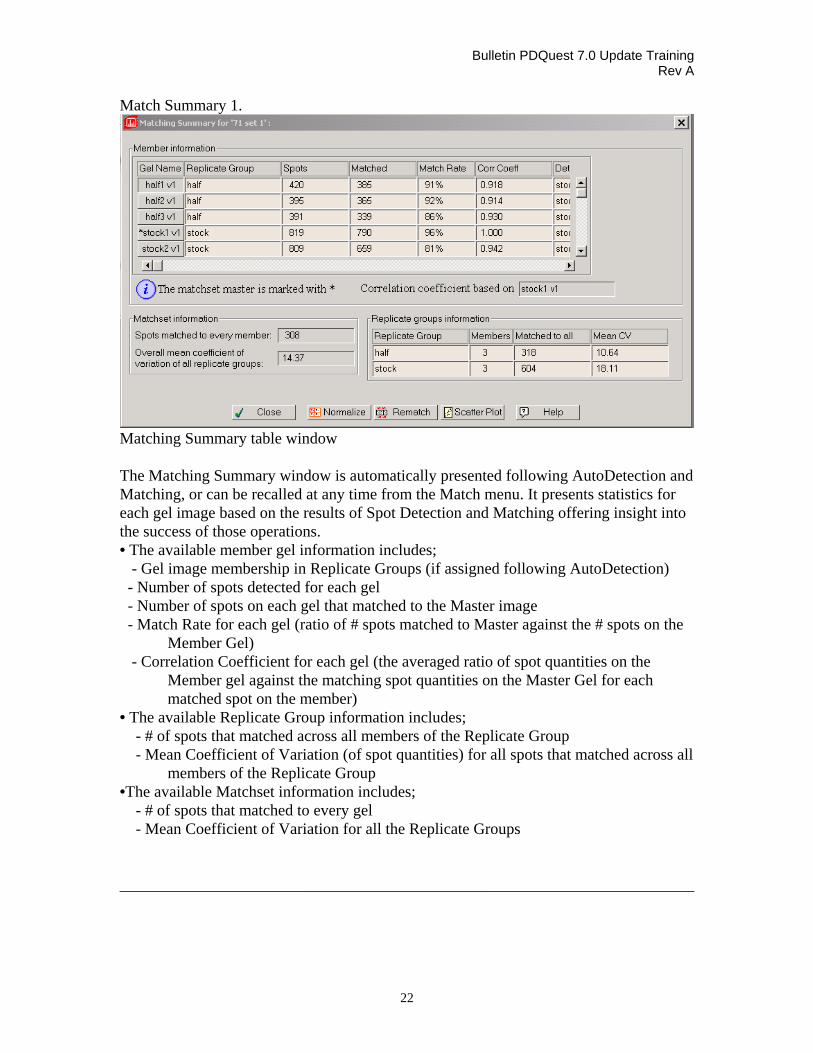
Match Summary 1.
Matching Summary table window The Matching Summary window is automatically presented following AutoDetection and Matching, or can be recalled at any time from the Match menu. It presents statistics for each gel image based on the results of Spot Detection and Matching offering insight into the success of those operations. • The available member gel information includes; - Gel image membership in Replicate Groups (if assigned following AutoDetection) - Number of spots detected for each gel - Number of spots on each gel that matched to the Master image - Match Rate for each gel (ratio of # spots matched to Master against the # spots on the
Member Gel) - Correlation Coefficient for each gel (the averaged ratio of spot quantities on the
Member gel against the matching spot quantities on the Master Gel for each matched spot on the member)
• The available Replicate Group information includes; - # of spots that matched across all members of the Replicate Group - Mean Coefficient of Variation (of spot quantities) for all spots that matched across all members of the Replicate Group •The available Matchset information includes; - # of spots that matched to every gel - Mean Coefficient of Variation for all the Replicate Groups ________________________________________________________________________

Bulletin PDQuest 7.0 Update Training Rev A
23
Match Summary 2.
Additional scrollable information fields in Matching Summary table •Additional fields are available by scrolling the table window, including; - Spot Detection Parameter file names -Match Setting Parameter file names ________________________________________________________________________ Match Summary 3.
Use comparative results (based on “Rematch”) to optimize Match Parameters • The “Rematch” option allows the user to select different match settings or methods and compare them to the results achieved with the prior settings. The resulting Summary Table for the new match settings will add a display of comparative results for key match indicators relative to the prior settings. Shown above is an example where the number of matched spots and the match rates seem to have been improved by selecting different matching parameters. Comparative data (based on “Rematch”) is presented for the Member gels, Replicate Groups, and the Matchset, including; - Number of spots detected for each gel - Number of spots on each gel that matched to the Master image
- Match Rate for each gel - Correlation Coefficient for each gel

Bulletin PDQuest 7.0 Update Training Rev A
24
- # spots that matched across all members of each Replicate Group - Mean Coefficient of Variation (of spot quantities) for all spots that matched
across all members of the Replicate Group - # spots that matched to every gel - Mean Coefficient of Variation for all the Replicate Groups ________________________________________________________________________ Integration with WorksBase™ software for proteomics, a bioinformatics database (As applies to PDQuest version 7.0.1 ONLY) PDQuest 7.0.1 includes seamless integration to WorksBase software for Proteomics for the storage of 2-D gel data and retrieval of associated protein information. Archive data: All parameters of PDQuest analysis of 2-D gels can be saved in WorksBase, including archiving of; samples, gel images, spots and spot data, matchsets, matching info, analysis sets, annotations, cut lists, etc. PDQuest can also open images saved in WorksBase for analysis.
Retrieve protein identifications: PDQuest can retrieve MS identification information that was automatically written to WorksBase and import it as a spot annotation for viewing within the image. A cut list must have been generated initially to drive the spot excision and identification process in order to import these MS identifications.
Additionally, PDQuest has data input screens that parallel many of the sample characteristics screens in WorksBase. This flexibility allows the user to conveniently enter or view sample characteristics within the database while working within PDQuest.
WorksBase integration 1.
WorksBase menu commands are enabled from the user preference menu
• User can configure either the local disk or WorksBase storage as the default method
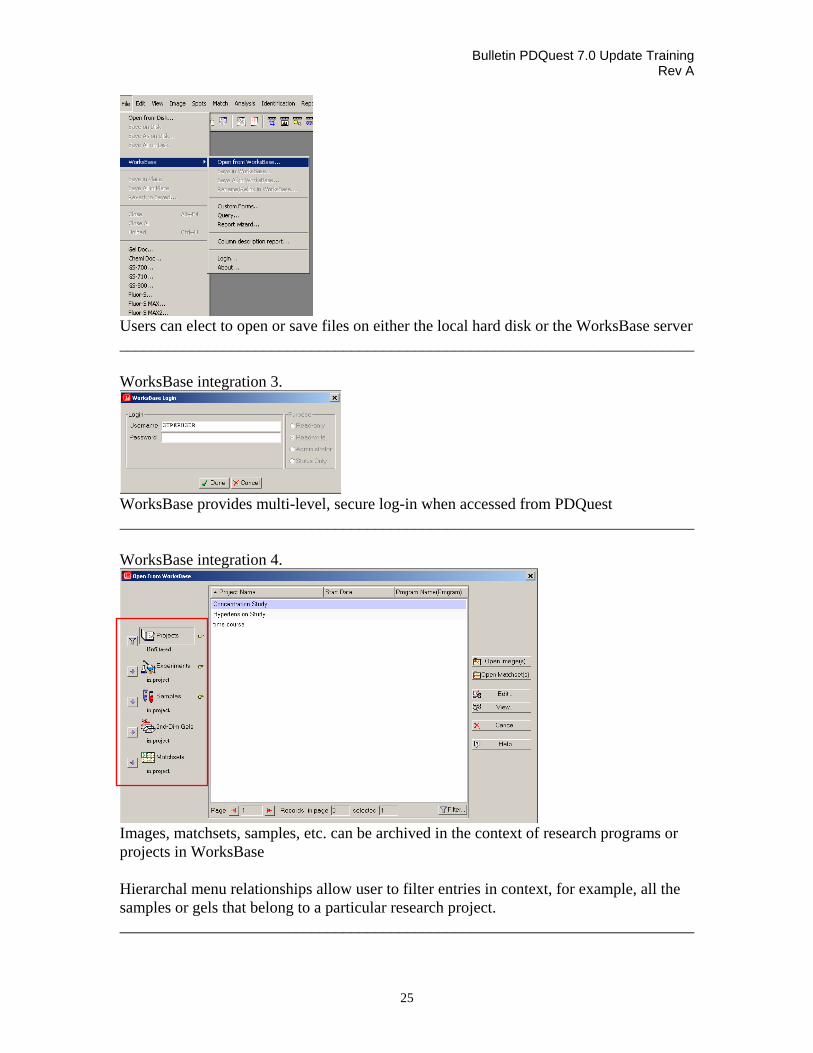
________________________________________________________________________ WorksBase integration 2.
Bulletin PDQuest 7.0 Update Training Rev A
25
Users can elect to open or save files on either the local hard disk or the WorksBase server ________________________________________________________________________ WorksBase integration 3.
WorksBase provides multi-level, secure log-in when accessed from PDQuest ________________________________________________________________________ WorksBase integration 4.
Images, matchsets, samples, etc. can be archived in the context of research programs or projects in WorksBase Hierarchal menu relationships allow user to filter entries in context, for example, all the samples or gels that belong to a particular research project. ________________________________________________________________________

Bulletin PDQuest 7.0 Update Training Rev A
26
WorksBase integration 5.
PDQuest Custom Forms PDQuest Custom Forms allow entry of nearly all aspects of sample characteristics or gel conditions to be entered into WorksBase archives
• Hyperlinks to database entries in WorksBase allow recall of stored attributes and parameters, eliminating redundant data entry.
________________________________________________________________________ WorksBase integration 6.
Click
Click
Bulletin PDQuest 7.0 Update Training Rev A
27
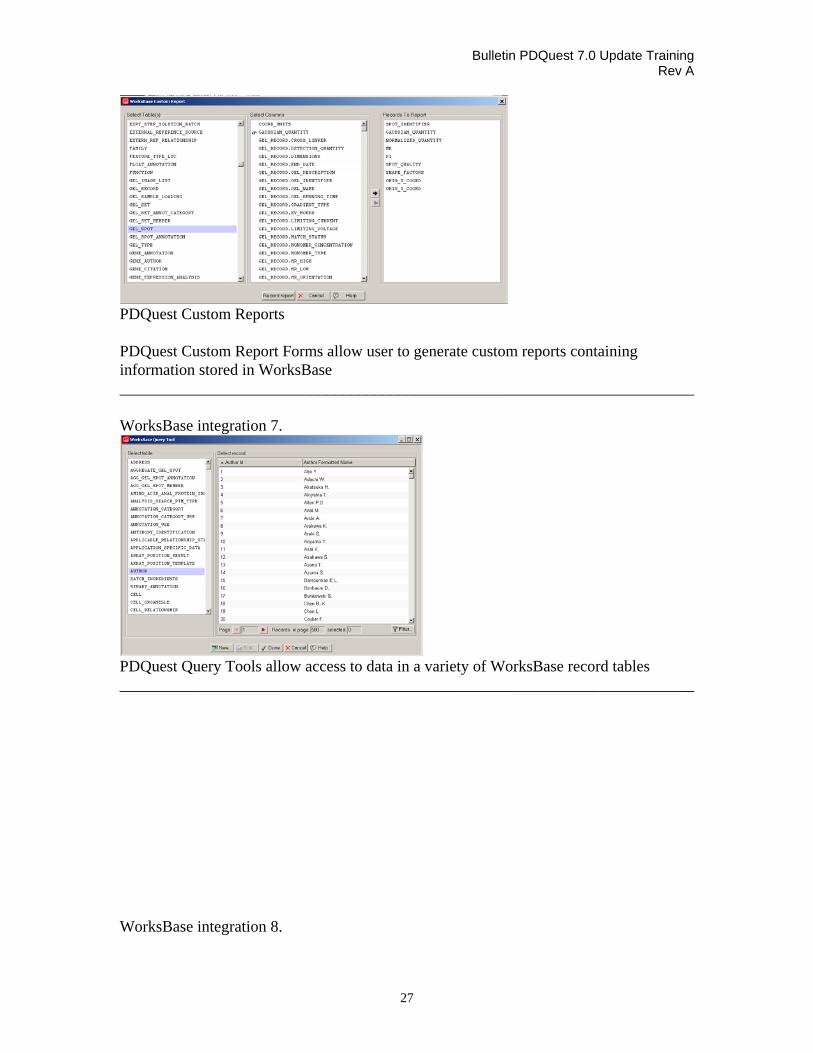
PDQuest Custom Reports PDQuest Custom Report Forms allow user to generate custom reports containing information stored in WorksBase ________________________________________________________________________ WorksBase integration 7.
PDQuest Query Tools allow access to data in a variety of WorksBase record tables ________________________________________________________________________ WorksBase integration 8.
Bulletin PDQuest 7.0 Update Training Rev A
28
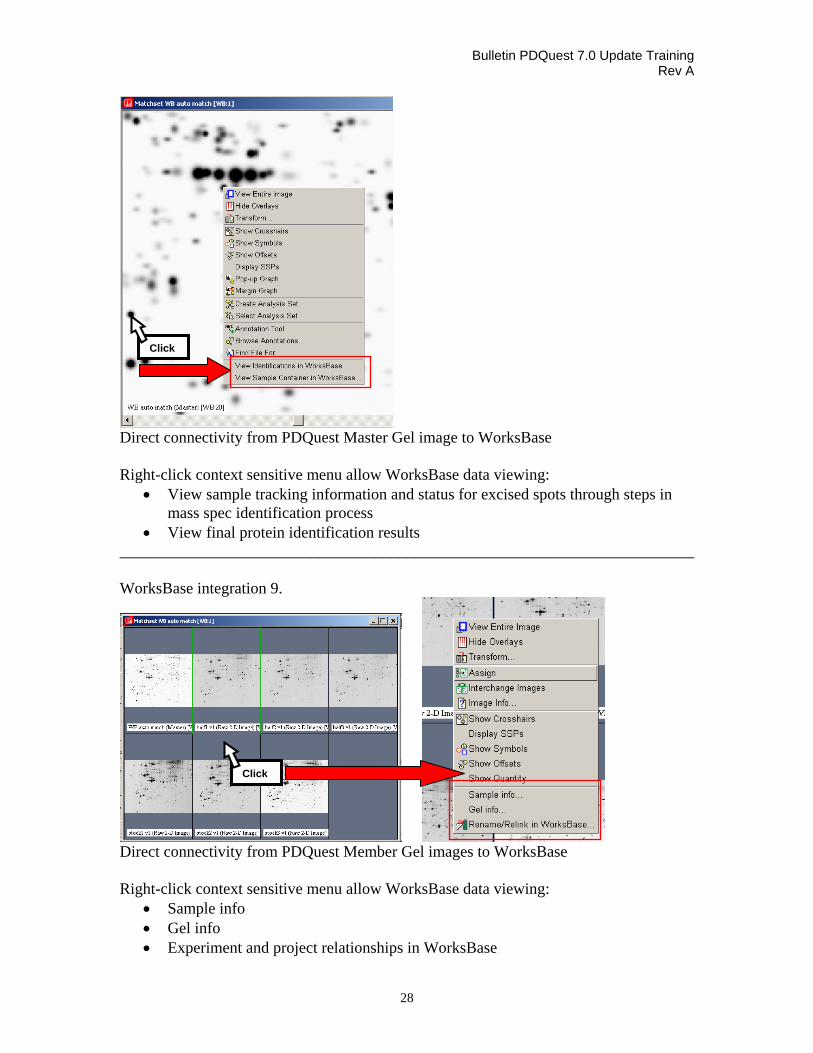
Direct connectivity from PDQuest Master Gel image to WorksBase Right-click context sensitive menu allow WorksBase data viewing:
• View sample tracking information and status for excised spots through steps in mass spec identification process
• View final protein identification results ________________________________________________________________________ WorksBase integration 9.
Direct connectivity from PDQuest Member Gel images to WorksBase Right-click context sensitive menu allow WorksBase data viewing:
• Sample info • Gel info • Experiment and project relationships in WorksBase
Click
Click
Bulletin PDQuest 7.0 Update Training Rev A
29
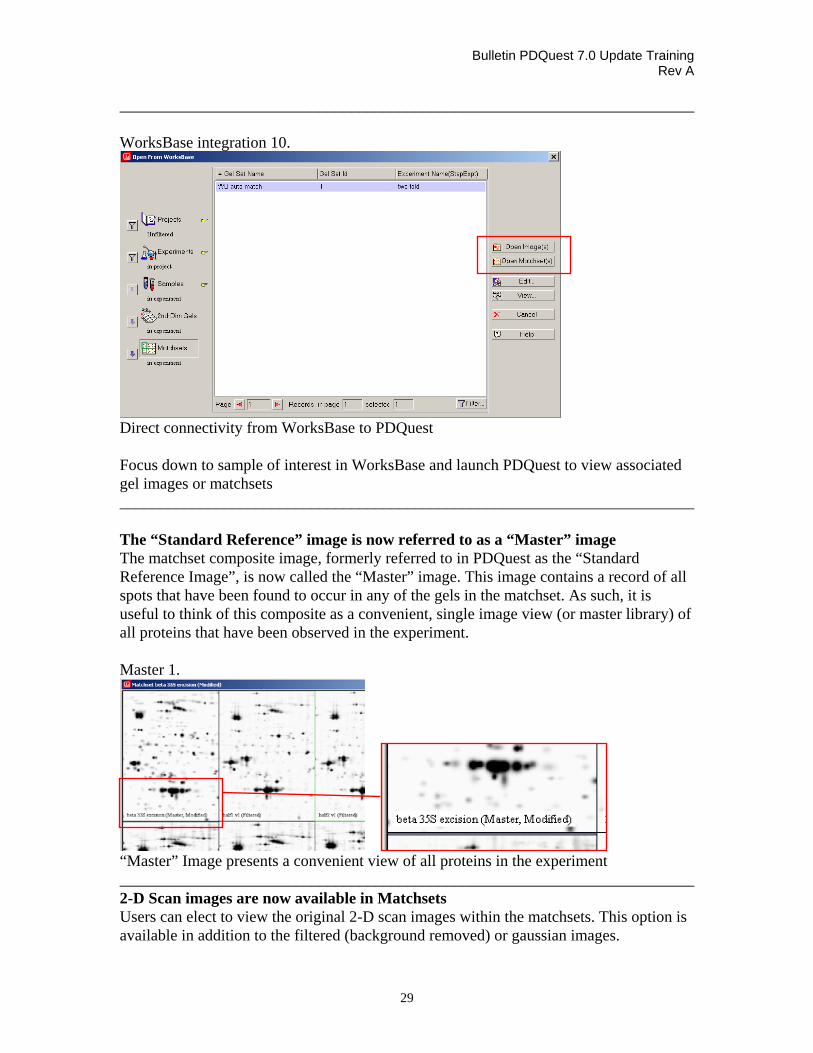
________________________________________________________________________ WorksBase integration 10.
Direct connectivity from WorksBase to PDQuest Focus down to sample of interest in WorksBase and launch PDQuest to view associated gel images or matchsets ________________________________________________________________________ The “Standard Reference” image is now referred to as a “Master” image The matchset composite image, formerly referred to in PDQuest as the “Standard Reference Image”, is now called the “Master” image. This image contains a record of all spots that have been found to occur in any of the gels in the matchset. As such, it is useful to think of this composite as a convenient, single image view (or master library) of all proteins that have been observed in the experiment. Master 1.
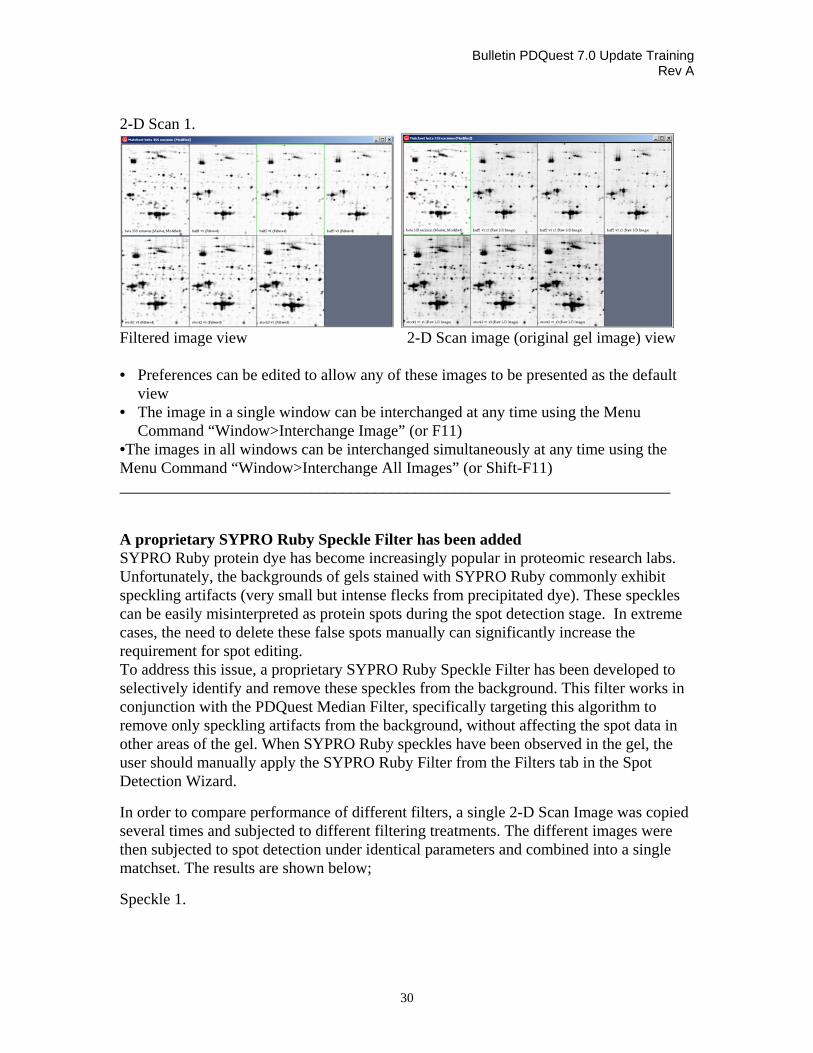
“Master” Image presents a convenient view of all proteins in the experiment ________________________________________________________________________ 2-D Scan images are now available in Matchsets Users can elect to view the original 2-D scan images within the matchsets. This option is available in addition to the filtered (background removed) or gaussian images.
Bulletin PDQuest 7.0 Update Training Rev A
30
2-D Scan 1.
Filtered image view 2-D Scan image (original gel image) view • Preferences can be edited to allow any of these images to be presented as the default
view • The image in a single window can be interchanged at any time using the Menu
Command “Window>Interchange Image” (or F11) •The images in all windows can be interchanged simultaneously at any time using the Menu Command “Window>Interchange All Images” (or Shift-F11) _____________________________________________________________________ A proprietary SYPRO Ruby Speckle Filter has been added SYPRO Ruby protein dye has become increasingly popular in proteomic research labs. Unfortunately, the backgrounds of gels stained with SYPRO Ruby commonly exhibit speckling artifacts (very small but intense flecks from precipitated dye). These speckles can be easily misinterpreted as protein spots during the spot detection stage. In extreme cases, the need to delete these false spots manually can significantly increase the requirement for spot editing. To address this issue, a proprietary SYPRO Ruby Speckle Filter has been developed to selectively identify and remove these speckles from the background. This filter works in conjunction with the PDQuest Median Filter, specifically targeting this algorithm to remove only speckling artifacts from the background, without affecting the spot data in other areas of the gel. When SYPRO Ruby speckles have been observed in the gel, the user should manually apply the SYPRO Ruby Filter from the Filters tab in the Spot Detection Wizard.
In order to compare performance of different filters, a single 2-D Scan Image was copied several times and subjected to different filtering treatments. The different images were then subjected to spot detection under identical parameters and combined into a single matchset. The results are shown below;
Speckle 1.
Bulletin PDQuest 7.0 Update Training Rev A
31
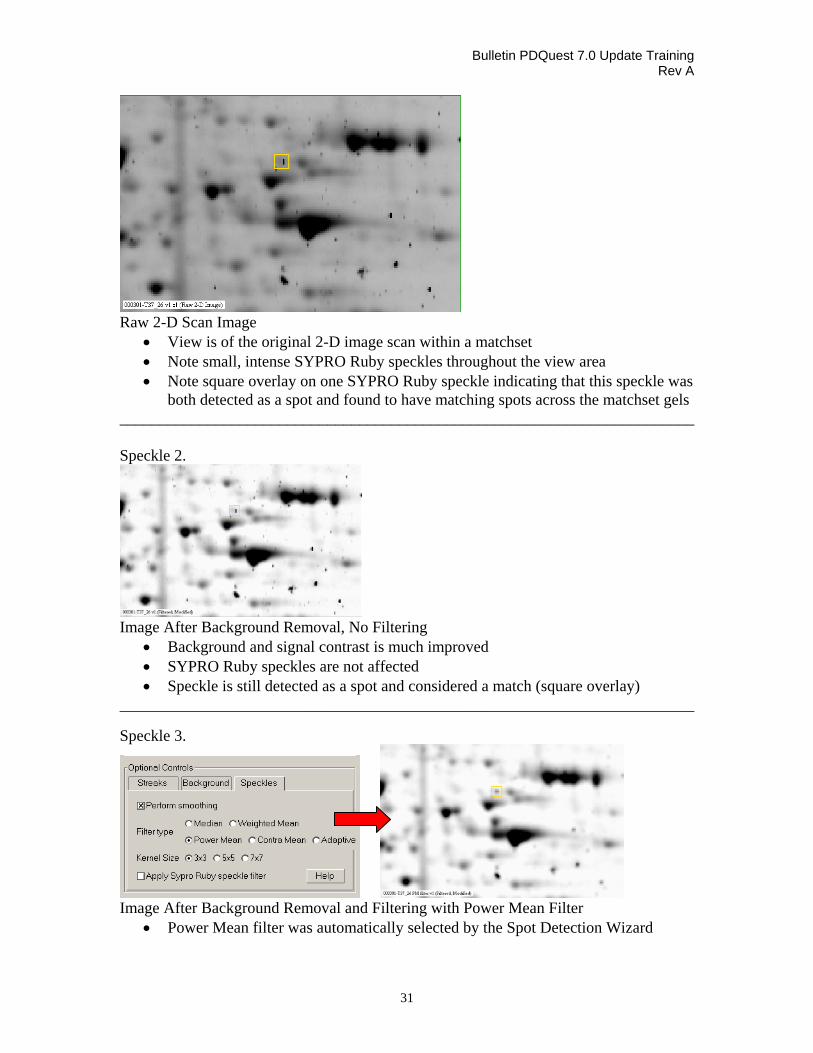
Raw 2-D Scan Image
• View is of the original 2-D image scan within a matchset • Note small, intense SYPRO Ruby speckles throughout the view area • Note square overlay on one SYPRO Ruby speckle indicating that this speckle was
both detected as a spot and found to have matching spots across the matchset gels ________________________________________________________________________ Speckle 2.
Image After Background Removal, No Filtering
• Background and signal contrast is much improved • SYPRO Ruby speckles are not affected • Speckle is still detected as a spot and considered a match (square overlay)
________________________________________________________________________
Speckle 3.
Image After Background Removal and Filtering with Power Mean Filter
• Power Mean filter was automatically selected by the Spot Detection Wizard
Bulletin PDQuest 7.0 Update Training Rev A
32
• Many SYPRO Ruby speckles have been removed & others are somewhat diminished
• Speckle is still detected as a spot and considered a match ________________________________________________________________________
Speckle 4.
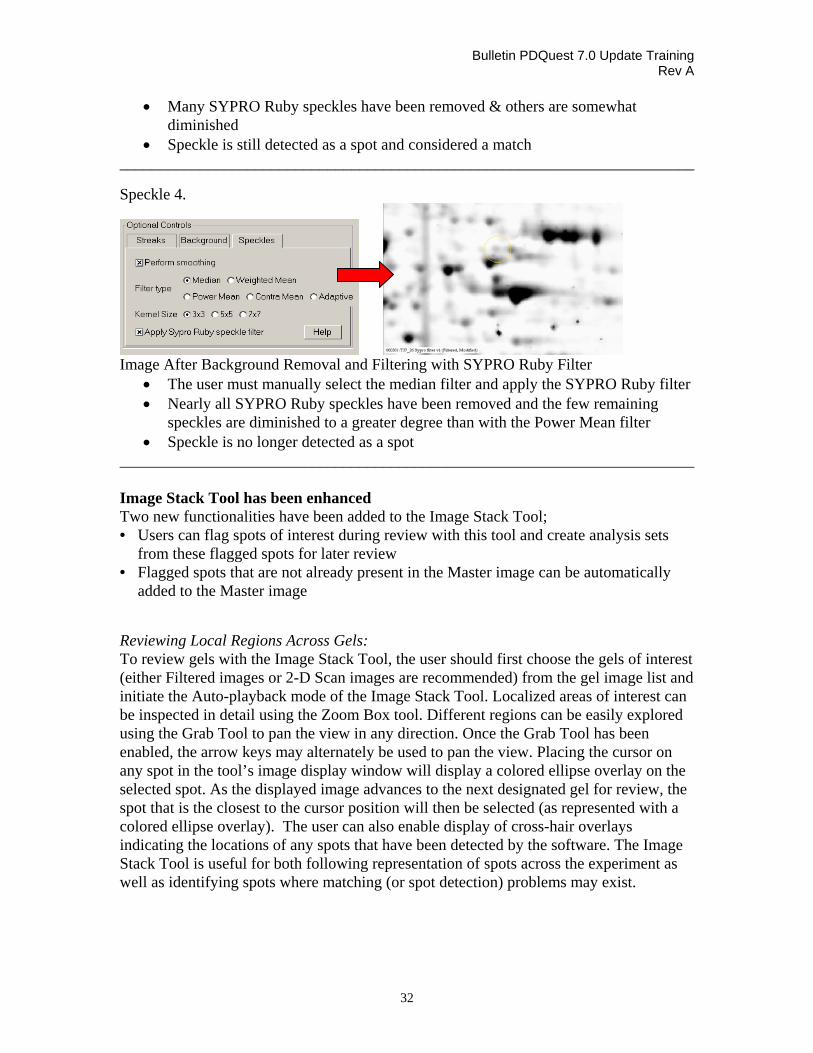
Image After Background Removal and Filtering with SYPRO Ruby Filter
• The user must manually select the median filter and apply the SYPRO Ruby filter • Nearly all SYPRO Ruby speckles have been removed and the few remaining
speckles are diminished to a greater degree than with the Power Mean filter • Speckle is no longer detected as a spot
________________________________________________________________________ Image Stack Tool has been enhanced Two new functionalities have been added to the Image Stack Tool; • Users can flag spots of interest during review with this tool and create analysis sets
from these flagged spots for later review • Flagged spots that are not already present in the Master image can be automatically
added to the Master image Reviewing Local Regions Across Gels: To review gels with the Image Stack Tool, the user should first choose the gels of interest (either Filtered images or 2-D Scan images are recommended) from the gel image list and initiate the Auto-playback mode of the Image Stack Tool. Localized areas of interest can be inspected in detail using the Zoom Box tool. Different regions can be easily explored using the Grab Tool to pan the view in any direction. Once the Grab Tool has been enabled, the arrow keys may alternately be used to pan the view. Placing the cursor on any spot in the tool’s image display window will display a colored ellipse overlay on the selected spot. As the displayed image advances to the next designated gel for review, the spot that is the closest to the cursor position will then be selected (as represented with a colored ellipse overlay). The user can also enable display of cross-hair overlays indicating the locations of any spots that have been detected by the software. The Image Stack Tool is useful for both following representation of spots across the experiment as well as identifying spots where matching (or spot detection) problems may exist.
Bulletin PDQuest 7.0 Update Training Rev A
33
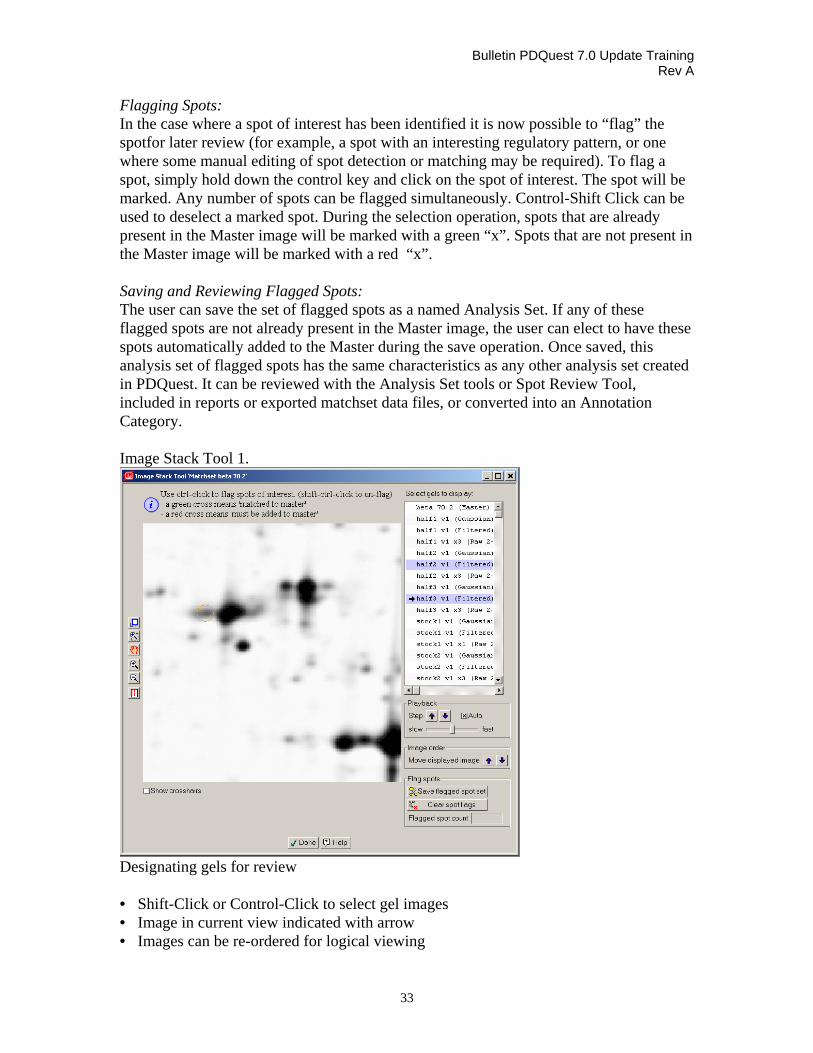
Flagging Spots: In the case where a spot of interest has been identified it is now possible to “flag” the spotfor later review (for example, a spot with an interesting regulatory pattern, or one where some manual editing of spot detection or matching may be required). To flag a spot, simply hold down the control key and click on the spot of interest. The spot will be marked. Any number of spots can be flagged simultaneously. Control-Shift Click can be used to deselect a marked spot. During the selection operation, spots that are already present in the Master image will be marked with a green “x”. Spots that are not present in the Master image will be marked with a red “x”. Saving and Reviewing Flagged Spots: The user can save the set of flagged spots as a named Analysis Set. If any of these flagged spots are not already present in the Master image, the user can elect to have these spots automatically added to the Master during the save operation. Once saved, this analysis set of flagged spots has the same characteristics as any other analysis set created in PDQuest. It can be reviewed with the Analysis Set tools or Spot Review Tool, included in reports or exported matchset data files, or converted into an Annotation Category. Image Stack Tool 1.
Designating gels for review • Shift-Click or Control-Click to select gel images • Image in current view indicated with arrow • Images can be re-ordered for logical viewing

Bulletin PDQuest 7.0 Update Training Rev A
34
• Note user tip prompt for flagging commands ________________________________________________________________________ Image Stack Tool 2.
Close up of Currently Selected Spot Overlay ________________________________________________________________________ Image Stack Tool 3.
Flagged Spot Overlays • Green indicates spot already matched to Master • Red indicates spot not yet in Master image • Current selected set of flagged spots can be either cleared or saved ________________________________________________________________________ Image Stack Tool 3.
User Prompt to Automatically Add Unmatched Spots to Master Image

Bulletin PDQuest 7.0 Update Training Rev A
35
• Prompt displayed if user selects “Save flagged spot set” • Feedback on number of spots that would be added ________________________________________________________________________ Image Stack Tool 3.
Naming Flagged Spot Set for Archiving as an Analysis Set
• Ability to add description of set • Flagged Spot Set has same characteristics as any other Analysis Set;
- can be selected and displayed as an Analysis Set - can be viewed with the Spot Review Tool - can be converted into an Annotation set - can be combined with other Analysis Sets via Boolean Analysis set tools
________________________________________________________________________ Spot Review Tool now allows common editing commands while open Tool now allows commands to add & delete spot, manually match & un-match spots, add spots to Master ________________________________________________________________________ Batch import of MS protein identification info The batch import mode is compatible with Micromass MS identification results, both directly from Micromass software and indirectly through WorksBase bioinformatics software. With version 7.0.1, PDQuest can also import MASCOT (Matrix Sciences) analyzed MS spectra from other mass spec instruments. The MASCOT import interface is similar to the Micromass import screens shown below. MS Import 1.
Bulletin PDQuest 7.0 Update Training Rev A
36
Batch import option for MS protein identification runs
• User can elect to overwrite existing entries without confirmation prompt. • Default is to prompt user to confirm or reject overwrite if a spot has already been
annotated with a protein identification ________________________________________________________________________ MS import 2.
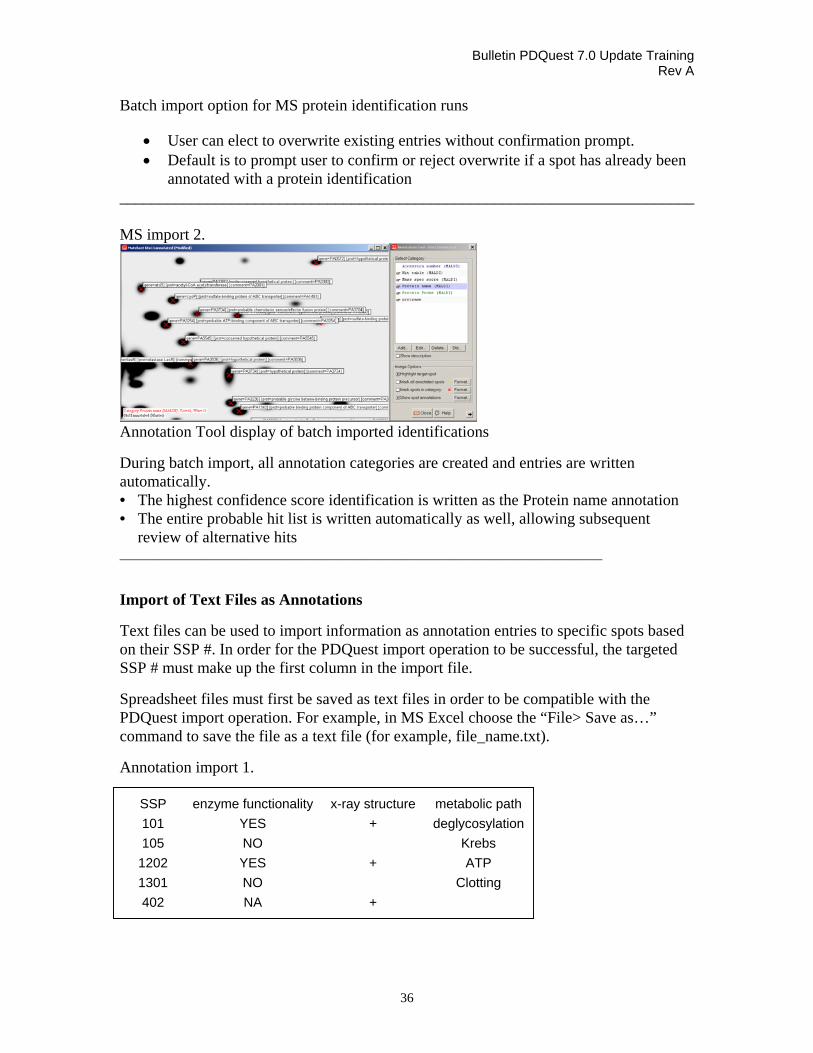
Annotation Tool display of batch imported identifications
During batch import, all annotation categories are created and entries are written automatically. • The highest confidence score identification is written as the Protein name annotation • The entire probable hit list is written automatically as well, allowing subsequent
review of alternative hits ________________________________________________________________________
Import of Text Files as Annotations Text files can be used to import information as annotation entries to specific spots based on their SSP #. In order for the PDQuest import operation to be successful, the targeted SSP # must make up the first column in the import file.
Spreadsheet files must first be saved as text files in order to be compatible with the PDQuest import operation. For example, in MS Excel choose the “File> Save as…” command to save the file as a text file (for example, file_name.txt).
Annotation import 1.
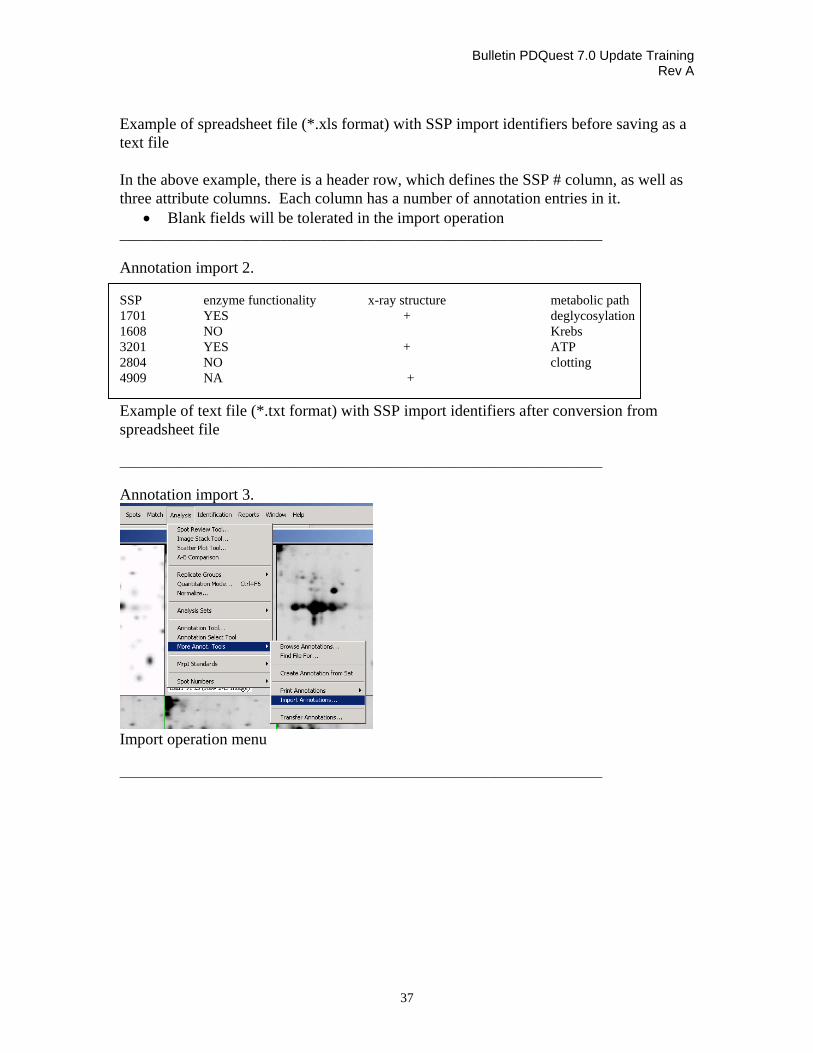
SSP enzyme functionality x-ray structure metabolic path101 YES + deglycosylation105 NO Krebs
1202 YES + ATP 1301 NO Clotting 402 NA +
Bulletin PDQuest 7.0 Update Training Rev A
37
Example of spreadsheet file (*.xls format) with SSP import identifiers before saving as a text file In the above example, there is a header row, which defines the SSP # column, as well as three attribute columns. Each column has a number of annotation entries in it.
• Blank fields will be tolerated in the import operation ________________________________________________________________________ Annotation import 2. SSP enzyme functionality x-ray structure metabolic path 1701 YES + deglycosylation 1608 NO Krebs 3201 YES + ATP 2804 NO clotting 4909 NA + Example of text file (*.txt format) with SSP import identifiers after conversion from spreadsheet file ________________________________________________________________________ Annotation import 3.
Import operation menu ________________________________________________________________________
Bulletin PDQuest 7.0 Update Training Rev A
38
Annotation import 4.
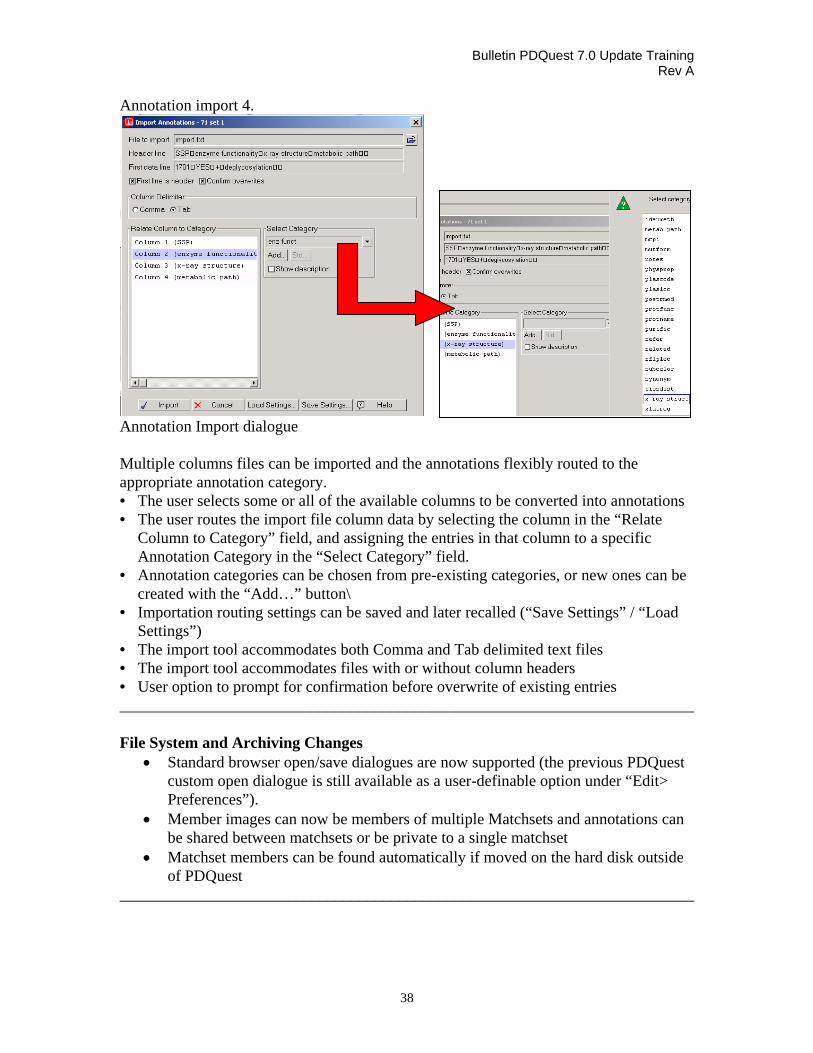
Annotation Import dialogue Multiple columns files can be imported and the annotations flexibly routed to the appropriate annotation category. • The user selects some or all of the available columns to be converted into annotations • The user routes the import file column data by selecting the column in the “Relate
Column to Category” field, and assigning the entries in that column to a specific Annotation Category in the “Select Category” field.
• Annotation categories can be chosen from pre-existing categories, or new ones can be created with the “Add…” button\
• Importation routing settings can be saved and later recalled (“Save Settings” / “Load Settings”)
• The import tool accommodates both Comma and Tab delimited text files • The import tool accommodates files with or without column headers • User option to prompt for confirmation before overwrite of existing entries ________________________________________________________________________ File System and Archiving Changes
• Standard browser open/save dialogues are now supported (the previous PDQuest custom open dialogue is still available as a user-definable option under “Edit> Preferences”).
• Member images can now be members of multiple Matchsets and annotations can be shared between matchsets or be private to a single matchset
• Matchset members can be found automatically if moved on the hard disk outside of PDQuest
________________________________________________________________________
Bulletin PDQuest 7.0 Update Training Rev A
39
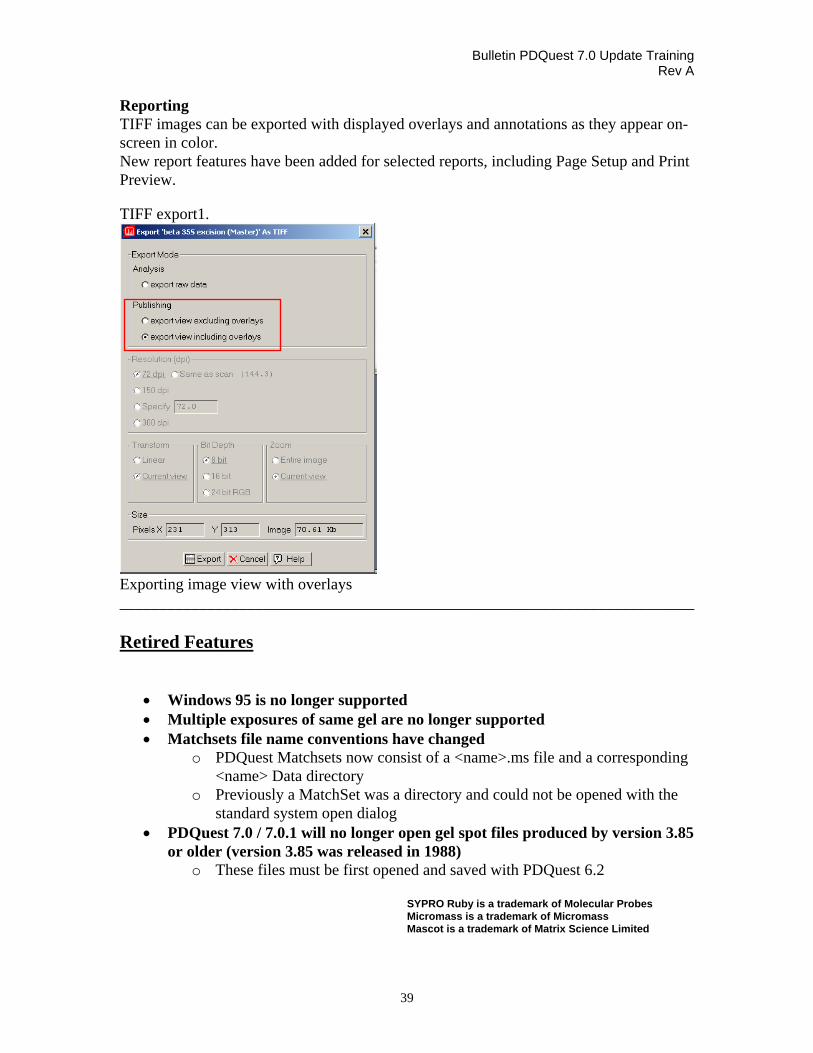
Reporting TIFF images can be exported with displayed overlays and annotations as they appear on-screen in color. New report features have been added for selected reports, including Page Setup and Print Preview. TIFF export1.
Exporting image view with overlays ________________________________________________________________________ Retired Features
• Windows 95 is no longer supported • Multiple exposures of same gel are no longer supported • Matchsets file name conventions have changed
o PDQuest Matchsets now consist of a <name>.ms file and a corresponding <name> Data directory
o Previously a MatchSet was a directory and could not be opened with the standard system open dialog
• PDQuest 7.0 / 7.0.1 will no longer open gel spot files produced by version 3.85 or older (version 3.85 was released in 1988)
o These files must be first opened and saved with PDQuest 6.2
SYPRO Ruby is a trademark of Molecular Probes Micromass is a trademark of Micromass Mascot is a trademark of Matrix Science Limited