Embed Size (px)
Citation preview

providerConnect™ User Guide 2
Welcome to providerConnect™ providerConnect is a web-based portal for health care providers offered in partnership with participating health benefit carriers. Here’s what you can do…
• Instantly check plan member eligibility • Submit claims for instant adjudication • Sign up for direct deposit • View and generate claim submission reports • Assign payment of a claim directly to yourself, or alternatively, assign payment to the plan
member when the plan member has already paid you for the service. Either choice allows both you and the plan member to know how much the carrier will reimburse for the service rendered.
About this user guide This guide provides details on how to get started with providerConnect, including registering, signing up for direct deposit, submitting online claims, and checking plan member eligibility. Questions? Don’t hesitate to contact us by telephone or email.
providerConnect™ User Guide 3
CONTENTS providerConnect Secure Services Features Summary ........................................................... 4
Benefit Eligibility ............................................................................................................... 5
Claim Submission .............................................................................................................. 9
Recurring Claims ............................................................................................................. 13
Reverse a Claim ............................................................................................................... 14
Claim Reporting Functionality .......................................................................................... 19
My Profile ....................................................................................................................... 26
Direct Deposit ................................................................................................................. 27
Help & News ................................................................................................................... 29
Contact Us ...................................................................................................................... 29
Appendix – Claim Submission Data Requirements Details .................................................. 30
Chiropractic Claim Example .......................................................................................... 30
Medical Items Example ................................................................................................. 33
providerConnect™ User Guide 4
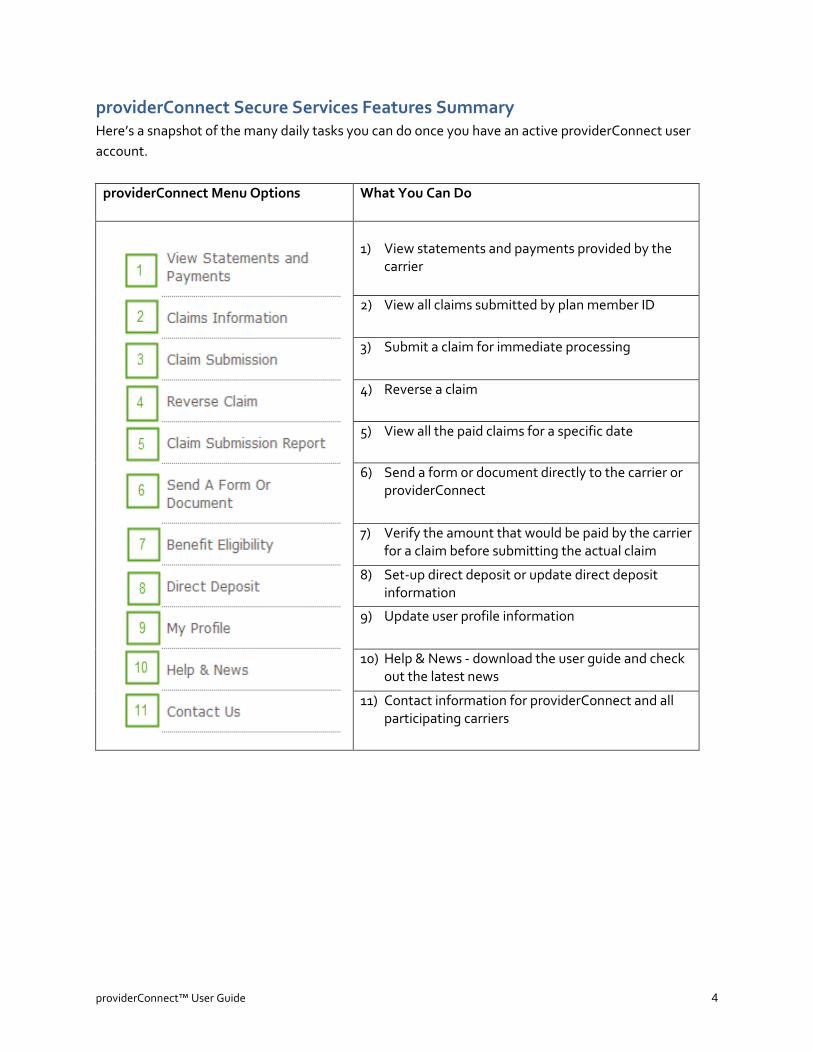
providerConnect Secure Services Features Summary Here’s a snapshot of the many daily tasks you can do once you have an active providerConnect user account.
providerConnect Menu Options What You Can Do
1) View statements and payments provided by the
carrier
2) View all claims submitted by plan member ID
3) Submit a claim for immediate processing
4) Reverse a claim
5) View all the paid claims for a specific date
6) Send a form or document directly to the carrier or providerConnect
7) Verify the amount that would be paid by the carrier for a claim before submitting the actual claim
8) Set-up direct deposit or update direct deposit information
9) Update user profile information
10) Help & News - download the user guide and check out the latest news
11) Contact information for providerConnect and all participating carriers

providerConnect™ User Guide 5
Benefit Eligibility This feature allows you to verify the amount that would be paid by the carrier for a service before submitting the actual claim. You are not required to check benefit eligibility before submitting a claim. The benefit eligibility can be saved for up to 30 days and can be used to submit a claim any time within that 30-day period. When you save the benefit eligibility, only the responses to the questions are saved; the amount displayed on the results page is not saved. Benefit eligibility can be verified for only one type of service at a time. Should the plan member’s eligibility change between the time that the benefit eligibility is checked and the time of the claim, the resulting payment may differ. How to Check Benefit Eligibility The same information used to submit an actual claim is required to verify benefit eligibility. If you require additional information, please refer to the appendix for a detailed explanation of data requirements. Benefit eligibility has the same three steps as claim submission. Similar to claim submission, a future date cannot be used when checking eligibility.
1. Select the claim type. 2. Select the carrier, enter the plan member (cardholder) and payee information. 3. Enter the patient and claim information specific to the claim type selected.
Step 1 – Select the Claim Type Note: If you can submit only one type of claim online, you will not see this page because the system will direct you to the Check Eligibility page in Step 2 after you select the Benefit Eligibility menu option. The claim type options listed on the page will be different for each provider type. The example below shows the two options available for a chiropractor.
1. Select Benefit Eligibility from the menu. 2. Select the claim submission type click here link.
providerConnect™ User Guide 6
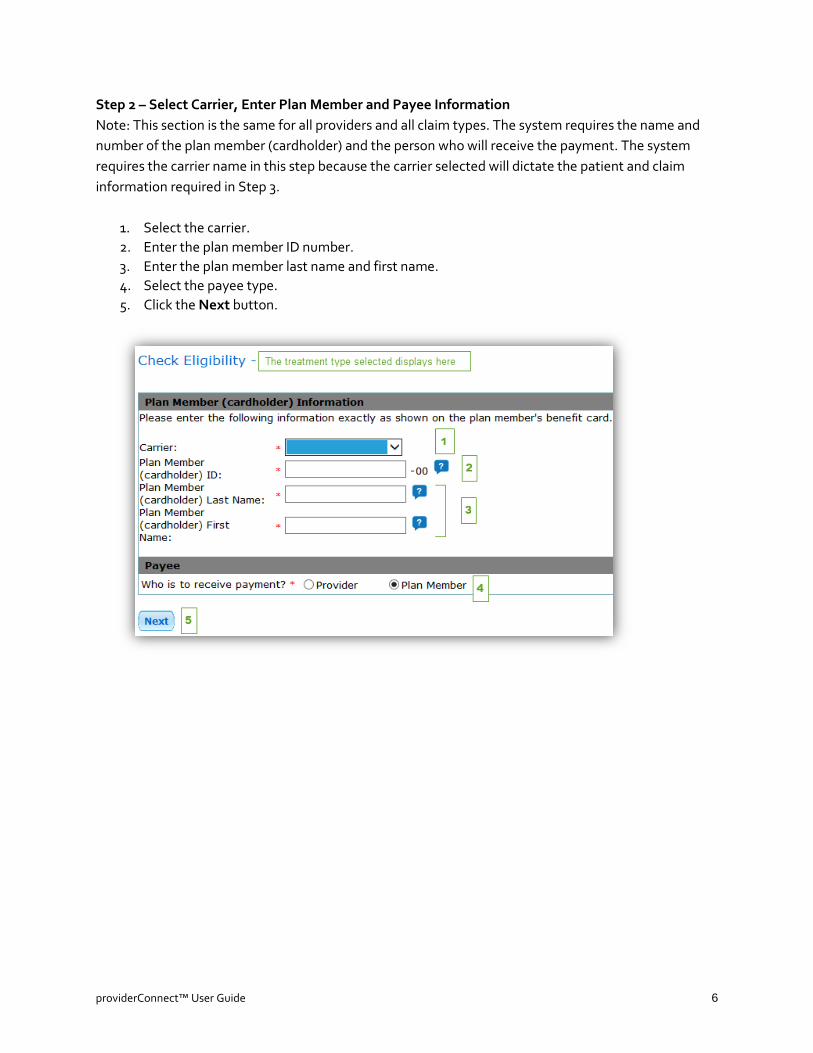
Step 2 – Select Carrier, Enter Plan Member and Payee Information Note: This section is the same for all providers and all claim types. The system requires the name and number of the plan member (cardholder) and the person who will receive the payment. The system requires the carrier name in this step because the carrier selected will dictate the patient and claim information required in Step 3.
1. Select the carrier. 2. Enter the plan member ID number. 3. Enter the plan member last name and first name. 4. Select the payee type. 5. Click the Next button.

providerConnect™ User Guide 7
Step 3 – Enter Patient and Claim Information Note: The patient selection is the only required field that is the same for all claims for all providers. The remainder of the section will vary depending on the claim type selected. The patient information and claim information requirements are based on the carrier you select in Step 1. Please refer to the appendix for a more detailed explanation of the required information. The steps and example below are for a chiropractic claim.
1. Select the patient from the list. 2. Respond to the alternate group insurance questions. 3. Indicate if required due to an auto accident. 4. Indicate if required due to a work accident. 5. Indicate if a provincial plan is exhausted or not applicable. 6. Select a service from the list. 7. Enter the service date in YYYYMMDD format (e.g., 20150727 for July 27, 2015). 8. Enter the total amount of the visit. 9. Enter the provincial plan paid amount if you answered No to #5. 10. Enter the amount paid by the alternate carrier if you said Yes to first two questions in #2. 11. Select Submit.
The system displays the Check Eligibility results page.
providerConnect™ User Guide 8
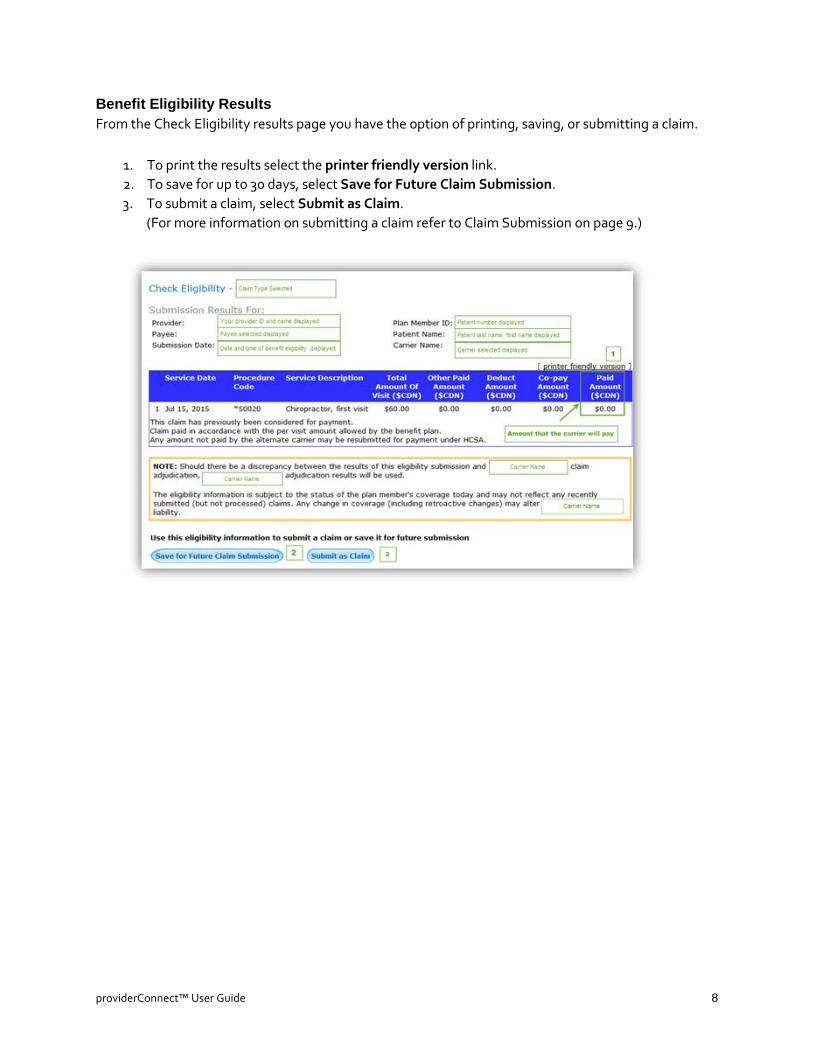
Benefit Eligibility Results From the Check Eligibility results page you have the option of printing, saving, or submitting a claim.
1. To print the results select the printer friendly version link. 2. To save for up to 30 days, select Save for Future Claim Submission. 3. To submit a claim, select Submit as Claim.
(For more information on submitting a claim refer to Claim Submission on page 9.)

providerConnect™ User Guide 9
Claim Submission If you are submitting a recurring claim or have a benefit eligibility check on file for the patient, you can submit your claim even faster. Refer to the Recurring Claims or Benefit Eligibility sections to learn how. How to Submit a Claim Submitting a claim consists of three main steps. The information required in Step 2 is the same for all claim types. The information required in Step 3 is different for each claim type. To obtain more details about the information required, please refer to the detailed explanation in the appendix. A future date cannot be used when submitting a claim. All claims must be dated either prior to the current date or with the current date.
1. Select the claim type. 2. Select carrier and enter the plan member (cardholder) and payee information. 3. Enter the patient and claim information specific to the claim type selected.
Step 1 – Select the Claim Type Note: If you can submit only one type of claim online, you will not see this page because the system will direct you to the Claim Submission page (Step 2) after you select the Claim Submission menu option. The claim type options listed on the page will be different for each provider type. The example below shows the two options available for a chiropractor.
1. Select Claim Submission from the menu. 2. Select the Claim Submission Type click here link.

providerConnect™ User Guide 10
Step 2 – Select Carrier and Enter Plan Member and Payee Information Note: This section is the same for all providers and all claim types. The system requires the name and number of the plan member (cardholder) and the person who will receive the payment. The system requires the carrier name in this step, because the carrier selected will dictate the patient and claim information required in Step 3.
1. Select the carrier. 2. Enter the plan member ID number. 3. Enter the plan member last name and first name. 4. Select the payee type. 5. Click the Next button.
providerConnect™ User Guide 11
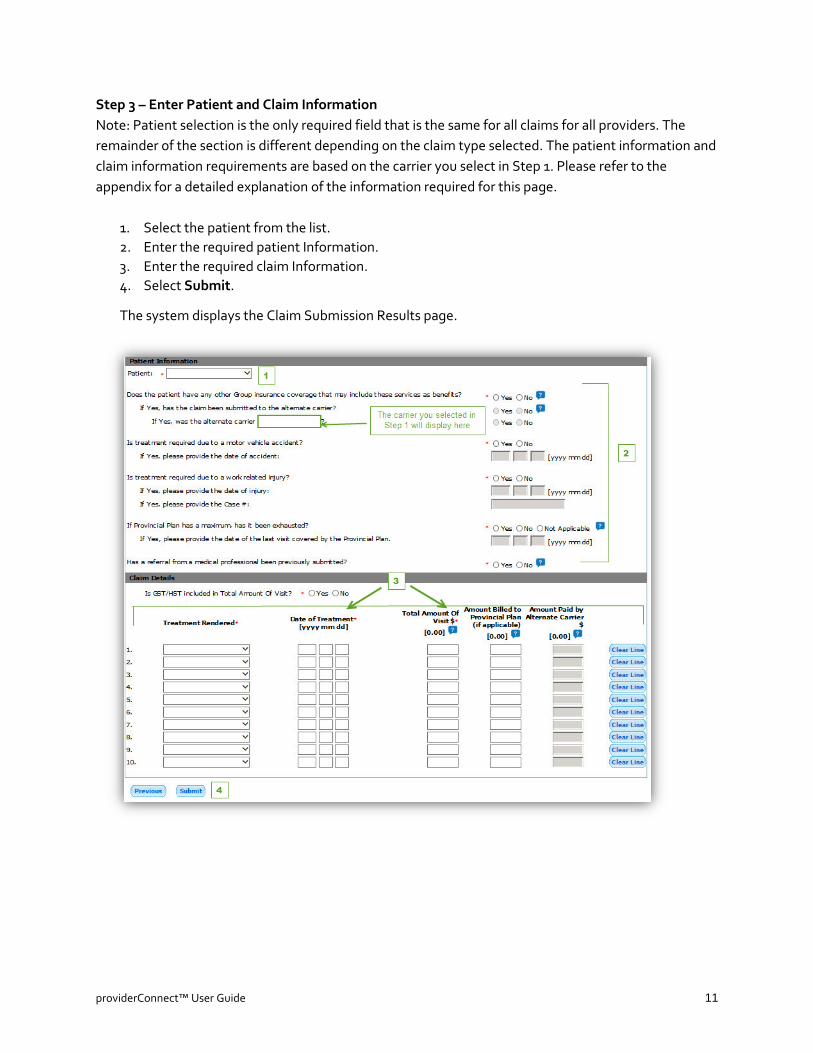
Step 3 – Enter Patient and Claim Information Note: Patient selection is the only required field that is the same for all claims for all providers. The remainder of the section is different depending on the claim type selected. The patient information and claim information requirements are based on the carrier you select in Step 1. Please refer to the appendix for a detailed explanation of the information required for this page.
1. Select the patient from the list. 2. Enter the required patient Information. 3. Enter the required claim Information. 4. Select Submit.
The system displays the Claim Submission Results page.
providerConnect™ User Guide 12
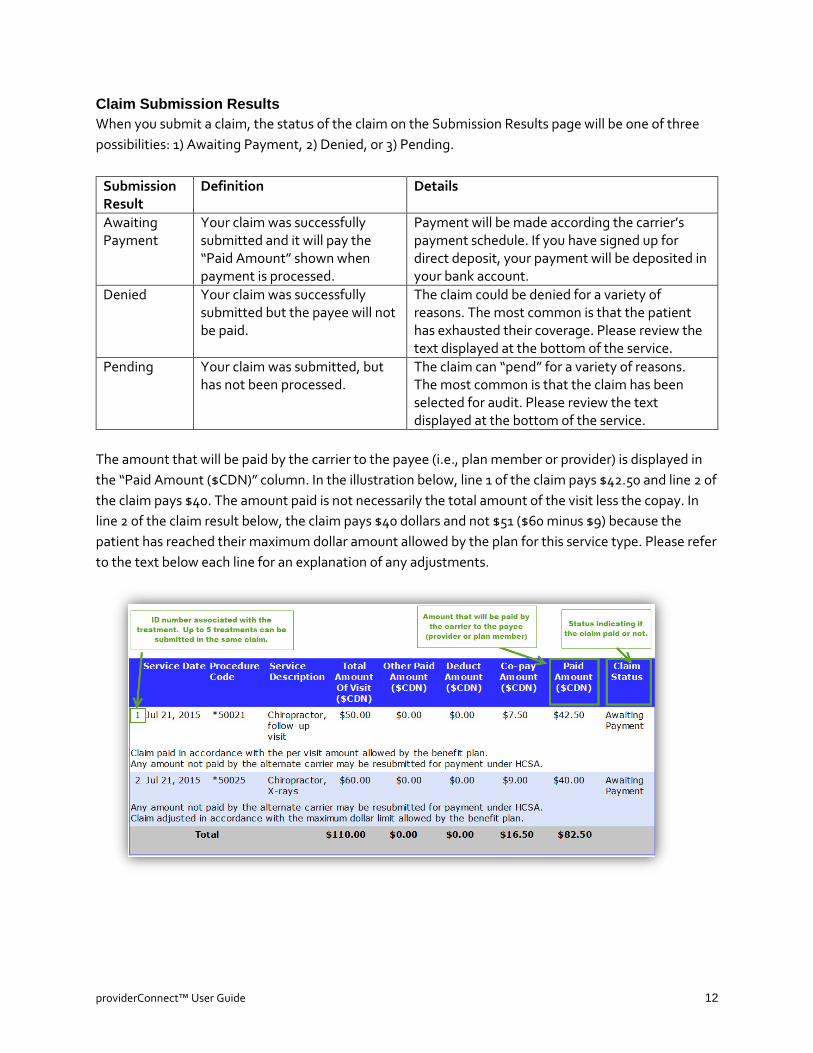
Claim Submission Results When you submit a claim, the status of the claim on the Submission Results page will be one of three possibilities: 1) Awaiting Payment, 2) Denied, or 3) Pending.
Submission Result
Definition Details
Awaiting Payment
Your claim was successfully submitted and it will pay the “Paid Amount” shown when payment is processed.
Payment will be made according the carrier’s payment schedule. If you have signed up for direct deposit, your payment will be deposited in your bank account.
Denied Your claim was successfully submitted but the payee will not be paid.
The claim could be denied for a variety of reasons. The most common is that the patient has exhausted their coverage. Please review the text displayed at the bottom of the service.
Pending Your claim was submitted, but has not been processed.
The claim can “pend” for a variety of reasons. The most common is that the claim has been selected for audit. Please review the text displayed at the bottom of the service.
The amount that will be paid by the carrier to the payee (i.e., plan member or provider) is displayed in the “Paid Amount ($CDN)” column. In the illustration below, line 1 of the claim pays $42.50 and line 2 of the claim pays $40. The amount paid is not necessarily the total amount of the visit less the copay. In line 2 of the claim result below, the claim pays $40 dollars and not $51 ($60 minus $9) because the patient has reached their maximum dollar amount allowed by the plan for this service type. Please refer to the text below each line for an explanation of any adjustments.
providerConnect™ User Guide 13
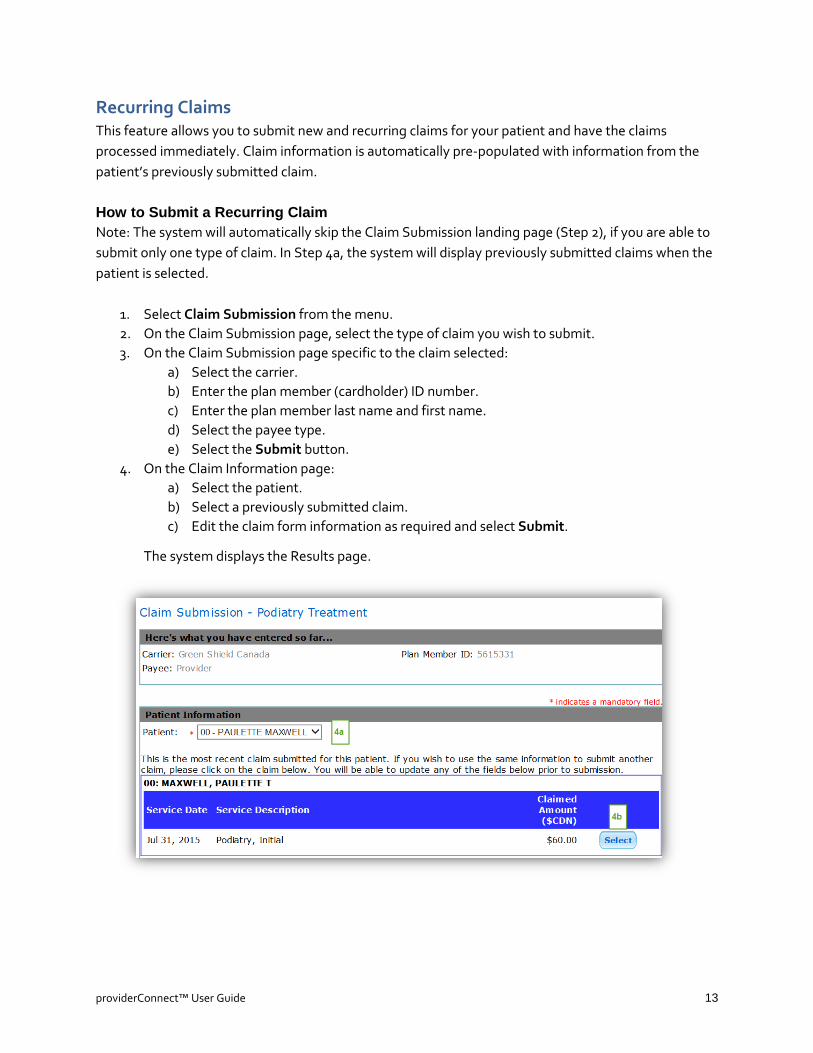
Recurring Claims This feature allows you to submit new and recurring claims for your patient and have the claims processed immediately. Claim information is automatically pre-populated with information from the patient’s previously submitted claim. How to Submit a Recurring Claim Note: The system will automatically skip the Claim Submission landing page (Step 2), if you are able to submit only one type of claim. In Step 4a, the system will display previously submitted claims when the patient is selected.
1. Select Claim Submission from the menu. 2. On the Claim Submission page, select the type of claim you wish to submit. 3. On the Claim Submission page specific to the claim selected:
a) Select the carrier. b) Enter the plan member (cardholder) ID number. c) Enter the plan member last name and first name. d) Select the payee type. e) Select the Submit button.
4. On the Claim Information page: a) Select the patient. b) Select a previously submitted claim. c) Edit the claim form information as required and select Submit.
The system displays the Results page.
Carrier Name

providerConnect™ User Guide 14
Reverse a Claim You can reverse any pay provider claim submitted online through providerConnect that is awaiting payment or that has already been paid to you. If payment has been issued by the carrier to the plan member, i.e., for the full claim amount or a portion paid through a plan member’s health care spending account (HCSA), you cannot reverse the claim using providerConnect. You will be required to submit a claim reversal form or contact your carrier directly. You can reverse any pay plan member claim that is awaiting payment from the Claim Submission Results page using the link at the bottom of the page. Once you leave the Claim Submission Results page, you are required to submit a claim reversal form or contact your carrier to reverse the claim. If the claim you wish to reverse is on a claim form that contains multiple claims, all claims linked to the claim form ID number will be reversed. Therefore, if you require that some but not all of the claims on the form to be reversed, you have two options:
• Complete a Claim Reversal Request form for the claim(s) that you want reversed, or
• Reverse all the claims on the claim form and re-enter the claims you want to submit. To determine whether your claim can be reversed using the Reverse a Claim feature on providerConnect, refer to the table below.
Claim Payment Status
Payee Claim Reversal Possible?
Result
Awaiting Payment
Provider
Yes Claim reversed immediately Claim reversal functionality available immediately after submitting the claim or from the left hand menu. Note: If there are multiple claims with the same claim form ID, all claims are reversed.
Awaiting Payment
Plan Member Yes Claim reversed immediately. Claim reversal functionality only available immediately after submitting the claim. Note: If there are multiple claims with the same claim form ID, all claims are reversed.
Paid Provider Yes
1) Reverse the claim using the “Reverse Claim” feature and the amount of the claim will be deducted from your next payment, OR 2) Complete a Claim Reversal Request form and send it to the applicable carrier along with a refund cheque for the full amount of the claim. Note: If a portion of the claim has been coordinated with the plan member’s HCSA and paid to the plan member, you will NOT be able to reverse the claim.

providerConnect™ User Guide 15
Claim Payment Status
Payee Claim Reversal Possible?
Result
Paid Plan member No
When payment has already been issued to the plan member, you cannot reverse the claim.
Denied Provider or plan member
No This claim reversal feature is not available for claims with a status of “denied.”
Pending Provider or plan member
No This claim reversal feature is not available for claims with a status of “pending.”
How to Reverse a Pay Plan Member Claim Note: All pay plan member claims can only be reversed immediately after they are submitted. The Reverse Claim menu option cannot be used for pay plan member claims since you can only search for and reverse pay provider claims with this functionality.
1. Select To reverse this “Claim Submission Type”, click here link 2. Select Proceed with Claim Reversal
The system will display the claim submission results page with a negative claimed amount when the reversal is complete.

providerConnect™ User Guide 16
providerConnect™ User Guide 17
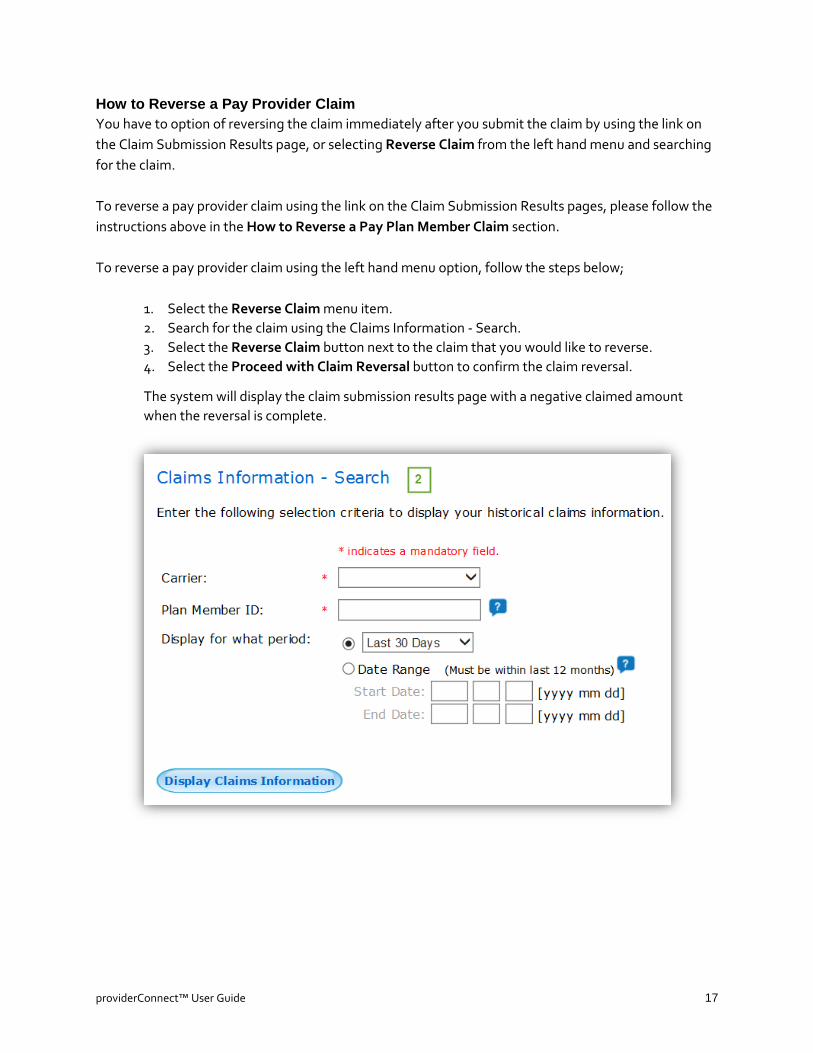
How to Reverse a Pay Provider Claim You have to option of reversing the claim immediately after you submit the claim by using the link on the Claim Submission Results page, or selecting Reverse Claim from the left hand menu and searching for the claim. To reverse a pay provider claim using the link on the Claim Submission Results pages, please follow the instructions above in the How to Reverse a Pay Plan Member Claim section. To reverse a pay provider claim using the left hand menu option, follow the steps below;
1. Select the Reverse Claim menu item. 2. Search for the claim using the Claims Information - Search. 3. Select the Reverse Claim button next to the claim that you would like to reverse. 4. Select the Proceed with Claim Reversal button to confirm the claim reversal.
The system will display the claim submission results page with a negative claimed amount when the reversal is complete.

providerConnect™ User Guide 18
Carrier name displays here

providerConnect™ User Guide 19
Claim Reporting Functionality To view claims that you have submitted for a patient, you have three different options available:
No Report Option Description 1 View Statements
and Payments Allows you to view the details for payments made according to the payment calendar.
2 Claims Information Allows you to view a summary of the claims submitted for a date that you specify for the patient account that you currently have open. You can also generate a report, on demand, should you require one for the patient.
3 Claim Submission Report
Allows you to view a summary and details of the claims submitted for patients on a specified day
View Statements and Payments This feature allows you to view the details of payments made according to the payment calendar. You have the option of selecting all carriers or just one carrier, and searching by a specific patient or all. More details about the payment schedules are available on providerConnect. The payment schedules are accessible from the What you need menu option. How to Generate Statements and Payments Report
1. Select View Statements and Payments from the menu. 2. Select a carrier or all carriers. 3. Select all plan members (i.e., patients) or enter a plan member ID number. 4. Select Display Statements.

providerConnect™ User Guide 20
5. To view the statement, select the date link. 6. To view the payment information, select the blue “P” next to the date. 7. To send a payment inquiry email to the carrier from the Payment Information page, select the
Payment Inquiry button, then enter your text and select submit.
Sample statement:
Carrier name selected or “all” displays
5
6

providerConnect™ User Guide 21
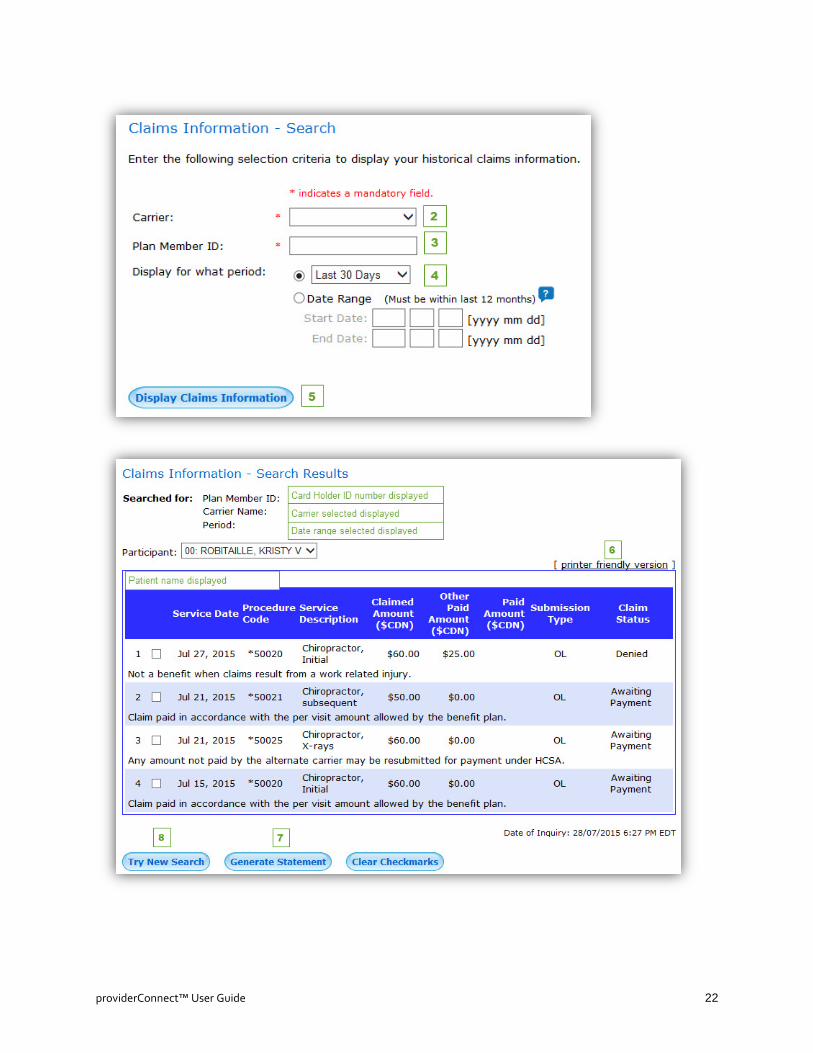
Claims Information Report This feature allows you to search for a specific patient using their ID number and obtain a report of all claims submitted within the date range specified. You can also generate a report with one or more transactions on demand, if required by you or the patient. How to Generate the Claims Information Report
1. Select Claims Information from the menu. 2. Select the carrier. 3. Enter the plan member ID number. 4. Select or enter your required date range. 5. Select the Display Claims Information button. 6. To print, select the printer friendly version link. 7. To generate a statement, select the required claims and click on Generate Statement. 8. To generate a new report, select Try New Search.
7
providerConnect™ User Guide 22

providerConnect™ User Guide 23
Sample statement:
Certificate Number
providerConnect™ User Guide 24
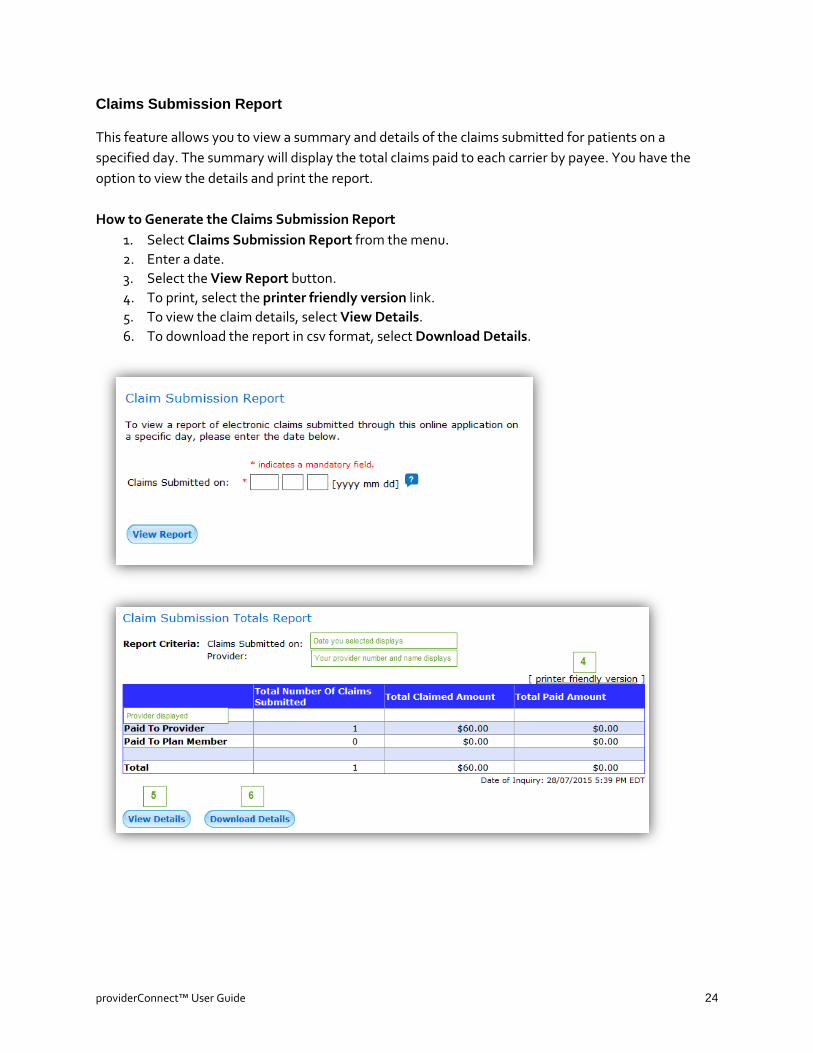
Claims Submission Report
This feature allows you to view a summary and details of the claims submitted for patients on a specified day. The summary will display the total claims paid to each carrier by payee. You have the option to view the details and print the report. How to Generate the Claims Submission Report
1. Select Claims Submission Report from the menu. 2. Enter a date. 3. Select the View Report button. 4. To print, select the printer friendly version link. 5. To view the claim details, select View Details. 6. To download the report in csv format, select Download Details.

providerConnect™ User Guide 25

providerConnect™ User Guide 26
My Profile This feature allows you to update the information in your profile.
No. Profile Information Update Time When will changes take effect? 1 User Name Immediate Next time you sign in to providerConnect 2 Password Immediate Next time you sign in to providerConnect 3 Email address Immediate Next time you sign in to providerConnect 4 Challenge Question and
Answer Immediate Next time you sign in to providerConnect
5 Business Telephone Number
Two business days
The update will be processed within two business days.
6 Business Name Two business days
The update request will be processed within two business days.
7 Business Address Two business days
The update request will be processed within two business days.
8 GST/HST/QST Registration Number
Immediate Next time you sign in to providerConnect
How to Update Your Profile Note: The system requires that you enter your password when you select the Submit button before any changes are processed. The email address that you specify will be the one used by the password reset notification when the Forgot Password feature is used.
1. Select My Profile from the menu. 2. Modify the required information. 3. Select Submit. 4. Review your changes on the Confirmation page. 5. Select Confirm if the updates are correct. (Note: If your updates are not correct, choose
the Back button to make your corrections.) 6. Enter your password when prompted by the system.
The system displays a confirmation page when the update is complete.

providerConnect™ User Guide 27
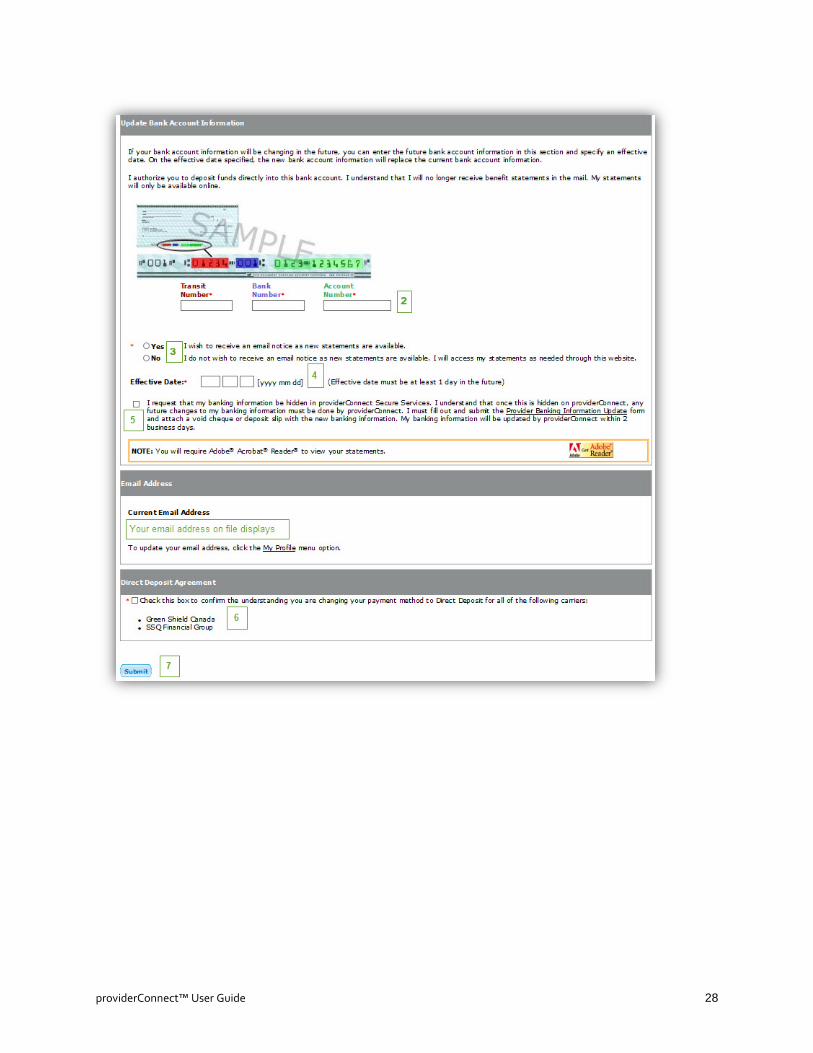
Direct Deposit Once you have a providerConnect Secure Services online account, you have the option of signing up for direct deposit. Your bank transit number, bank number, and account number are required. How to Sign Up for Direct Deposit Note: You have the option of hiding your banking information so that it is not visible in your providerConnect Secure Services online account. If you choose to hide your banking information, any future updates must be made by the providerConnect team through the Send Form or Document section.
1. Select Direct Deposit from the menu. 2. Enter your transit number, bank number, and account number. 3. Confirm whether you want to receive your statement notification by email. 4. Enter the effective date of the direct deposit information. 5. Check the box if you wish to hide your banking information. 6. Check the box next to the Direct Deposit Agreement. 7. Select the Submit button.
providerConnect™ User Guide 28

providerConnect™ User Guide 29
Help & News Once you have a providerConnect Secure Services online account, you have access to the Help & News information page where you can find out more about providerConnect features, and the latest news. To access this page, sign in to providerConnect, then click the Help & News menu option.
Contact Us If you have any questions about providerConnect functionality, including registering for providerConnect, signing into your Secure Services online account, or submitting claims, you can contact providerConnect by email or telephone. Select the Contact Us menu option from the providerConnect home page or from your Secure Services account. If you have any questions related to a patient’s claim or claim payment, please contact the carrier directly; the email and Customer Service telephone numbers for each carrier are displayed on the Contact Us page.

providerConnect™ User Guide 30
Appendix – Claim Submission Data Requirements Details Information required on the Claim Details page for the patient and the claim is the same for chiropractic, acupuncture, massage, and physiotherapy claims. Data requirements for other claim types will vary. The example below is for a chiropractic claim.
Chiropractic Claim Example Patient Information This part of the claim submission requires information about the patient, the patient’s coverage with another carrier, provincial plan, referring practitioner, and if the service is required due to an auto or work accident.
1. Patient Name • Select the patient from the list. • The plan member (cardholder) and all dependents are included on the list and ordered
according to the number associated with their name. Therefore, the plan member is first as the “00,” followed by the dependents.
2. Other group insurance coverage. Note: If you indicate that a claim was submitted to another
carrier, you are required to provide the amount in the Claim information section. • If the patient does not have other group insurance, select No. • If the patient has coverage with another carrier, select Yes. After indicating Yes, you
are required to indicate whether a claim has already been submitted to the other carrier: • Select Yes, if a claim has been submitted. • Select No, if a claim has not been submitted.
• If you select Yes to the question above, you are required to indicate whether the carrier is the same carrier as the carrier for this claim (i.e., the carrier you selected in Step 2 – Select Carrier, Enter Plan Member and Payee Information on page 7).
3. Accident
• If the service is not required due to a motor vehicle accident, select No. • If the service is required due to a motor vehicle accident, select Yes.
After selecting Yes, you are required to enter the accident date in YYYY MM DD format (e.g., 2015 07 27 for July 27, 2015).
4. Work Related Injury
• If the service is not required due to a work accident, select No. • If the service is required due to a work accident, select Yes.
After you select Yes, the accident date and case number are required. Accident date is required in in YYYY MM DD format (e.g., 2015 07 27 for July 27, 2015).

providerConnect™ User Guide 31
5. Provincial plan maximum exhausted Note: Provincial plans vary, therefore, please ensure you select the correct option applicable for your province. If you select No, the system requires the amount billed to the province.
• If there is no provincial plan for the service type, select Not Applicable. • If there is provincial plan for the service type, and the maximum is not exhausted, select
No. • If there is provincial plan for the service type, and the maximum has been exhausted,
select Yes. When you select Yes, you are required to enter the date. 6. Medical prescription question
• If you have a medical prescription to submit with the claim select Yes. • When you select Yes you are required to provide the date of the prescription and select
the medical professional who provided the prescription from the drop down menu. • If you do not have a medical prescription to submit, select NO.

providerConnect™ User Guide 32
Claim Information The part of the claim that is about the service rendered, the cost of the service, and the total cost breakdown (i.e., whether GST/HST is included and/or whether part of the cost is covered by the provincial plan or another carrier).
1. GST/HST • If GST/HST is included in the total amount of the service, select Yes. • If GST/HST is not included in the total amount of the service, select No.
2. Service/Treatment Type Rendered
• Select the service or treatment rendered. All services/treatments that are available on providerConnect for the claim type you selected are in the drop-down list.
3. Service/Treatment Date
• Enter the date as YYYY MM DD format (e.g., 2015/07/27 for July 27, 2015). The date must be the current date or before. A claim cannot be a future dated.
4. Total Amount of Visit
• Enter the total amount that was charged for the treatment rendered.
5. Amount Billed to Provincial Plan • You are required to enter an amount only if you selected No selected in #5 of the
Patient Information section.
6. Amount Paid by the Alternate Carrier • You are required to enter an amount only if you indicated that a claim has been paid by
another carrier in in #2 of the Patient Information section

providerConnect™ User Guide 33
Medical Items Example Patient information required on the Claim Details page is similar for most claim types. Claim information required can vary or be completely different, depending on the claim type. The example below is for a medical item claim. The claim information required in this example differs from a health care professional claim.
Patient Information This part of the claim submission requires information about the patient, the patient’s coverage with another carrier, provincial plan, referring practitioner, and whether the service is required due to an auto or work accident.
1. Patient name • Select the patient from the list. • The plan member (cardholder) and all dependents are in the list and ordered according
to the number associated with their name. Therefore, the plan member is first as the “00,” followed by the dependents.
2. Other group insurance coverage. Note: If you indicate that a claim was submitted to another carrier, you are required to provide the amount in the Claim information section.
• If the patient does not have other group insurance, select No. • If the patient has coverage with another carrier, select Yes.
• After indicating Yes, you are required to indicate whether a claim has already been submitted to the other carrier.
• Select Yes, if a claim has been submitted • Select No, if a claim has not been submitted
• If you select Yes to the question above, you are required to indicate whether the carrier is the same carrier as the carrier for this claim.
3. Accident • If the service is not required due to a motor vehicle accident, select No. • If the service is required due to a motor vehicle accident, select Yes.
• After selecting Yes, you are required to enter the accident date in YYYY MM DD format (e.g. 2015 07 27 for July 27, 2015).
4. Work-related injury a. If the service is not required due to a work accident, select No. b. If the service is required due to a work accident, select Yes.
• After you select Yes, accident date and case number are required.
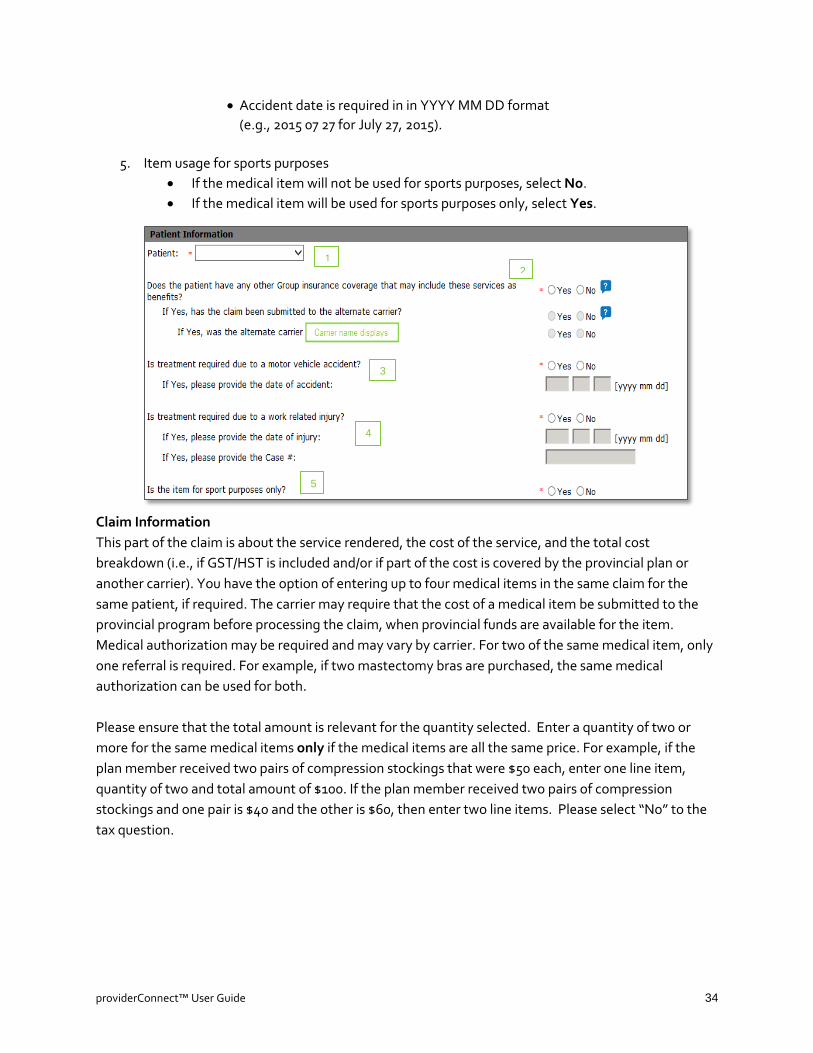
providerConnect™ User Guide 34
• Accident date is required in in YYYY MM DD format (e.g., 2015 07 27 for July 27, 2015).
5. Item usage for sports purposes • If the medical item will not be used for sports purposes, select No. • If the medical item will be used for sports purposes only, select Yes.
Claim Information This part of the claim is about the service rendered, the cost of the service, and the total cost breakdown (i.e., if GST/HST is included and/or if part of the cost is covered by the provincial plan or another carrier). You have the option of entering up to four medical items in the same claim for the same patient, if required. The carrier may require that the cost of a medical item be submitted to the provincial program before processing the claim, when provincial funds are available for the item. Medical authorization may be required and may vary by carrier. For two of the same medical item, only one referral is required. For example, if two mastectomy bras are purchased, the same medical authorization can be used for both. Please ensure that the total amount is relevant for the quantity selected. Enter a quantity of two or more for the same medical items only if the medical items are all the same price. For example, if the plan member received two pairs of compression stockings that were $50 each, enter one line item, quantity of two and total amount of $100. If the plan member received two pairs of compression stockings and one pair is $40 and the other is $60, then enter two line items. Please select “No” to the tax question.
1 2
3
4
5

providerConnect™ User Guide 35
When you enter a quantity of two or more for a medical item, the system will process the claim as if all medical items are all the same price. The system divides the total amount by the quantity to determine the amount per item. The system uses the calculated amount to determine the allowed amount and use the quantity entered to determine allowed frequency.
1. Item type • Select the service or treatment rendered from the drop down list. • All services/treatments available on providerConnect for the claim type you select are in
the drop-down list. If the medical item is not in the list, please submit your claim manually.
2. Item pick up date
Note: The date must be the current date or before. A claim cannot be future dated.
• Enter the date when the patient received the medical item. • The date is in YYYY MM DD format (e.g., 2015/07/27 for July 27, 2015).
3. Quantity • Enter the total number of the medical item type that the patient received. • For example, if the patient received two canes, enter 2 as the quantity if the canes are
the same price. If the canes are priced differently, enter a line item for each cane.
4. Total amount of visit/total amount charged • Enter the total amount for all medical items for the entry. • For example, if the patient received two canes, the quantity is two the total amount is
the price of the cane multiplied by two.
5. Amount billed to provincial plan
• Provincial plans vary, therefore, please ensure you enter the correct information applicable for your province.
• Note: If there is provincial coverage available but the province is not paying anything, $0.00 must be entered in the “Amount Billed to Provincial Plan” field.
• Enter the amount paid by the province for the medical item.
6. Amount paid by the other carrier • You are required to enter an amount only if you indicated that a claim has been paid by
another carrier in #2 of the Patient Information section
7. GST/HST and PST • Indicate whether GST/HST or PST is included in the total. • The default is No.
providerConnect™ User Guide 36
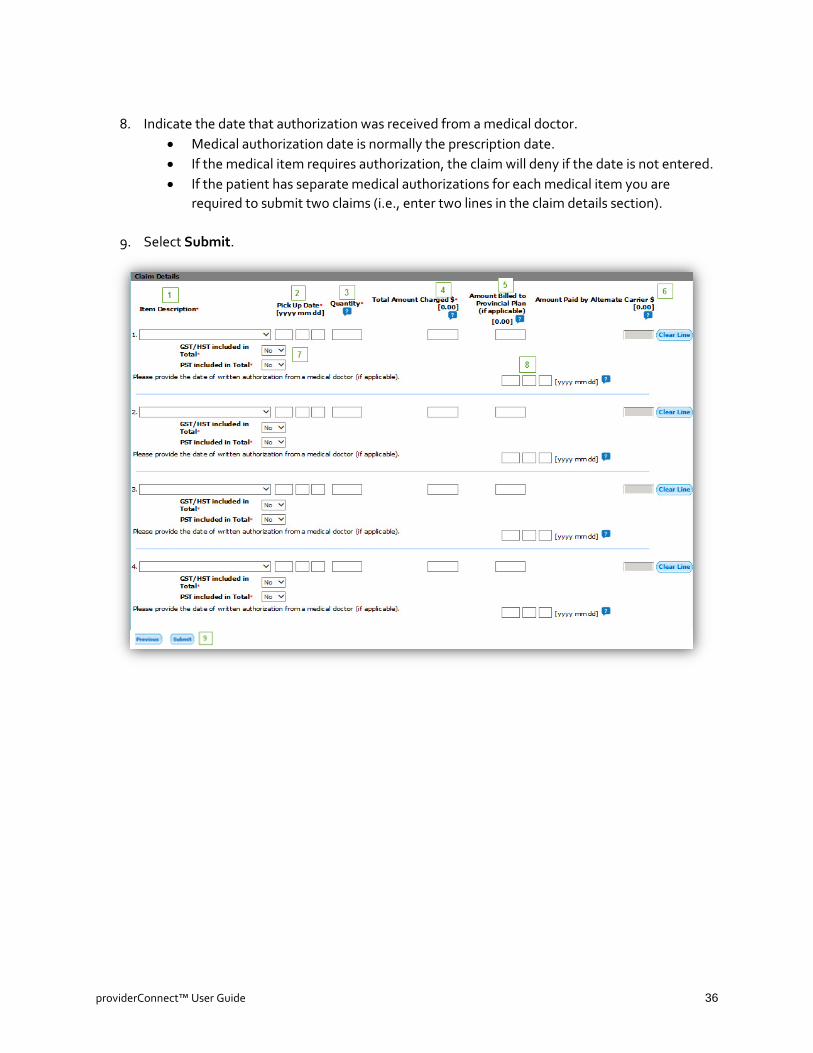
8. Indicate the date that authorization was received from a medical doctor.
• Medical authorization date is normally the prescription date. • If the medical item requires authorization, the claim will deny if the date is not entered. • If the patient has separate medical authorizations for each medical item you are
required to submit two claims (i.e., enter two lines in the claim details section).
9. Select Submit.