Embed Size (px)
Citation preview

MyRepublic Quick Start Guide
What is in the box
Welcome to MyRepublicPlease wait until you have received an SMS or email advising you your service is active. Once you have received this - follow our step by step guide.
Grey Telephone Cable
Quick Start GuideWi-Fi Hub+
Yellow & Red Ethernet Cable
Power Adaptor
Wi-Fi Security Card
Yellow Ethernet Cable
2.4GHz Wi-Fi Network Name: MyRepublic XXXX5GHz Wi-Fi Network Name: MyRepublic XXXX-5GHzWireless Key: XXYY123
Getting to know your Wi-Fi Hub+
The LED lights on your Wi-Fi Hub+ will indicate the status of you service.
LED Indicator Icon
LED lights (on/off) buttonBroadbandInternetWi-Fi 2.4GhzWi-Fi 5GhzWPSLANUSBVoiceWi-Fi (on/off) button
Front panelThe back ports are colour coded so it is easy to see which cables connect to which port.
Voice Ports LAN Ports WAN Port
DSL Port Power InletReset Button
Power Button
Back panel
A USB port and WPS button can be found on the side panel.USB port: Connect a USB device to share your content on your home network.WPS button: Hold down the WPS button on the Wi-Fi Hub+ to connect your Wi-Fi devices password free. Your device must have WPS functionality. Once your device is connected remember to press the WPS button on the Wi-Fi Hub+ to turn off the WPS session so no unauthorised devices access the connection.
Side panel
USB Port
WPS Button
MyRepublic Quick Start Guide
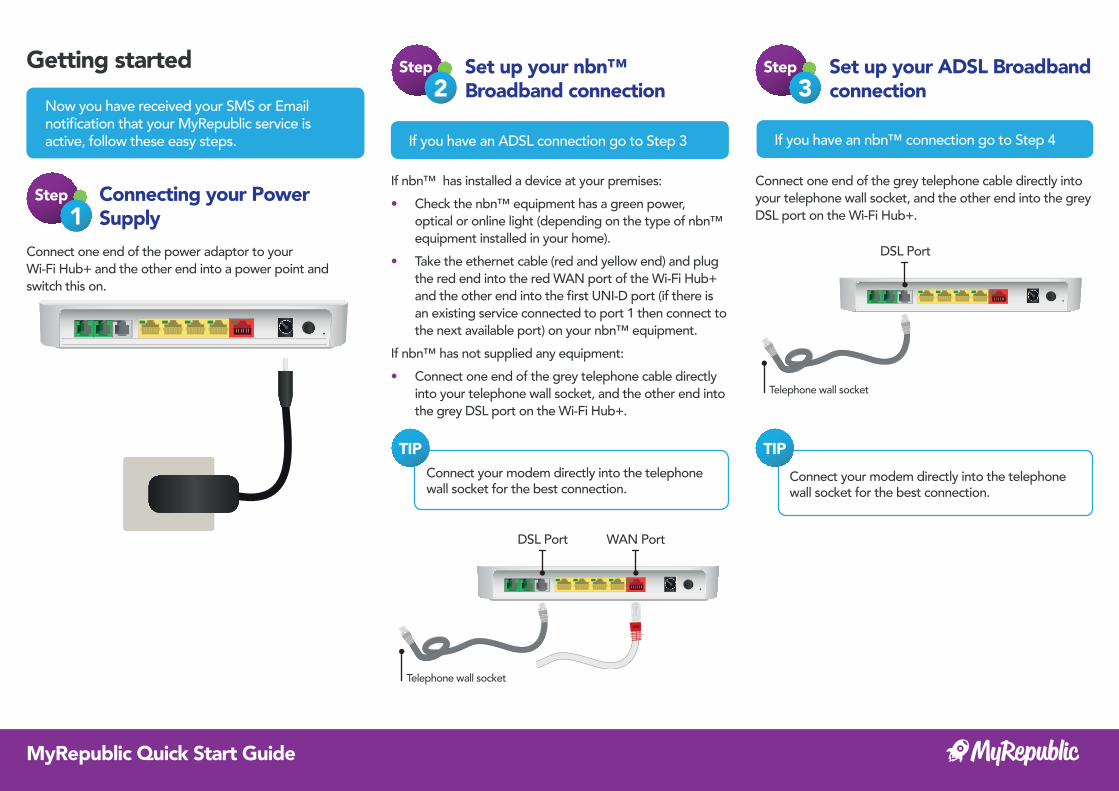
Step1
Connecting your Power Supply
Getting started
Connect one end of the power adaptor to yourWi-Fi Hub+ and the other end into a power point and switch this on.
Now you have received your SMS or Email notifi cation that your MyRepublic service is active, follow these easy steps.
Step2
Set up your nbn™ Broadband connection
If nbn™ has installed a device at your premises: • Check the nbn™ equipment has a green power,
optical or online light (depending on the type of nbn™ equipment installed in your home).
• Take the ethernet cable (red and yellow end) and plug the red end into the red WAN port of the Wi-Fi Hub+ and the other end into the fi rst UNI-D port (if there is an existing service connected to port 1 then connect to the next available port) on your nbn™ equipment.
If nbn™ has not supplied any equipment: • Connect one end of the grey telephone cable directly
into your telephone wall socket, and the other end into the grey DSL port on the Wi-Fi Hub+.
If you have an ADSL connection go to Step 3
Connect your modem directly into the telephone wall socket for the best connection.
TIP
Telephone wall socket
WAN PortDSL Port
Step3
Set up your ADSL Broadband connection
Connect one end of the grey telephone cable directly into your telephone wall socket, and the other end into the grey DSL port on the Wi-Fi Hub+.
If you have an nbn™ connection go to Step 4
Connect your modem directly into the telephone wall socket for the best connection.
TIP
Telephone wall socket
DSL Port
MyRepublic Quick Start Guide
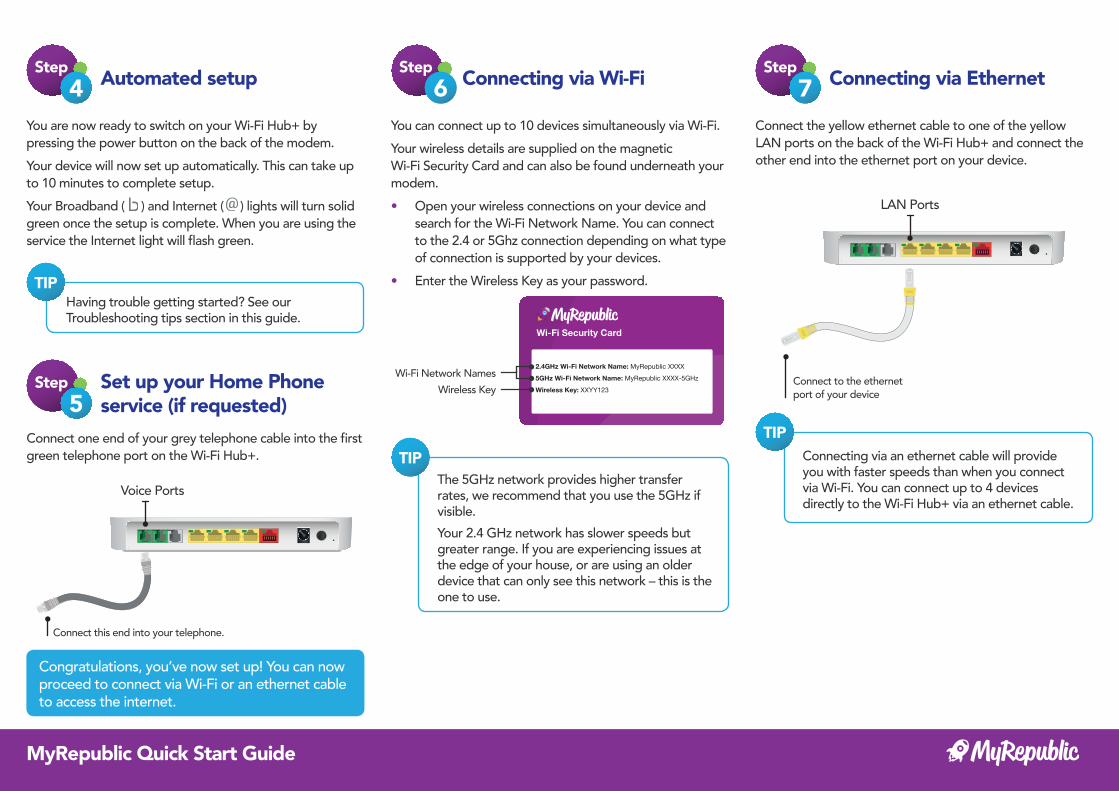
Step4
Step5
Automated setup
Set up your Home Phone service (if requested)
Connect one end of your grey telephone cable into the fi rst green telephone port on the Wi-Fi Hub+.
Congratulations, you’ve now set up! You can now proceed to connect via Wi-Fi or an ethernet cable to access the internet.
You are now ready to switch on your Wi-Fi Hub+ by pressing the power button on the back of the modem.Your device will now set up automatically. This can take up to 10 minutes to complete setup.Your Broadband ( ) and Internet ( ) lights will turn solid green once the setup is complete. When you are using the service the Internet light will fl ash green.
Having trouble getting started? See our Troubleshooting tips section in this guide.
TIP
Connect this end into your telephone.
Voice Ports
Step6 Connecting via Wi-Fi
You can connect up to 10 devices simultaneously via Wi-Fi.Your wireless details are supplied on the magnetic Wi-Fi Security Card and can also be found underneath your modem. • Open your wireless connections on your device and
search for the Wi-Fi Network Name. You can connect to the 2.4 or 5Ghz connection depending on what type of connection is supported by your devices.
• Enter the Wireless Key as your password.
2.4GHz Wi-Fi Network Name: MyRepublic XXXX5GHz Wi-Fi Network Name: MyRepublic XXXX-5GHzWireless Key: XXYY123
Wi-Fi Network NamesWireless Key
The 5GHz network provides higher transfer rates, we recommend that you use the 5GHz if visible. Your 2.4 GHz network has slower speeds but greater range. If you are experiencing issues at the edge of your house, or are using an older device that can only see this network – this is the one to use.
TIP
Step7 Connecting via Ethernet
Connect the yellow ethernet cable to one of the yellow LAN ports on the back of the Wi-Fi Hub+ and connect the other end into the ethernet port on your device.
Connecting via an ethernet cable will provide you with faster speeds than when you connect via Wi-Fi. You can connect up to 4 devices directly to the Wi-Fi Hub+ via an ethernet cable.
TIP
Connect to the ethernet port of your device
LAN Ports

MyRepublic Quick Start Guide
Troubleshooting tips
• Power off your Wi-Fi Hub+ and any attached equipment.
• Check that your Wi-Fi Hub+ has been plugged in correctly.
• After 2 minutes, power on your Wi-Fi Hub+ by pressing the power button on the back of the modem.
• Wait for the Broadband ( ) and Internet ( ) light on your Wi-Fi Hub+ to turn solid green.
• If the Broadband ( ) and Internet ( ) light on your Wi-Fi Hub+ does not turn solid green please contact Customer Service for further assistance.
• For advanced configuration options for your Wi-Fi Hub+ visit MyRepublic.com.au/Support
If you are unable to successfully connect to your Broadband service via Wi-Fi or directly via an ethernet cable, follow these steps that can help you get back up and running.
Important information
MyAccount
• Your Wi-Fi Hub+ supports both nbn™ and ADSL networks so is future proofed if nbn™ hasn’t arrived in your area or if you move house.
• Remember to keep any unused cables and your Wi-Fi Security Card in a safe place.
• Warranty Information can be found at MyRepublic.com.au/Legal
Log into MyAccount at MyRepublic.com.au/MyAccount to manage your account online. Here, you can view your plan information, update your details and much more.
Contact usIf you require further assistance setting up your Wi-Fi Hub+ this can be found at:
MyRepublic.com.au/Support
1300 130 888