Embed Size (px)
Citation preview
WebSphere and Message Driven Beans
1 Messaging
Messaging is a method of communication between software components or among
applications. A messaging system is a peer-to-peer facility: A messaging client sends
messages to, and/or receives messages from, any other clients. Every client connects
to one messaging agent which provides facilities for creating, sending, receiving, and
reading messages.
Messaging enables distributed communication that is loosely coupled. A component
sends a message to a destination, and the recipient can retrieve the message from the
destination. However, the sender and the receiver are not necessary to communicate
each other at the same time. In fact, the sender does not need to know anything about
the receiver; nor does the receiver need to know anything about the sender. The
sender and the receiver need to know only which message format and which
destination are used. In this respect, messaging differs from tightly coupled
technologies, such as Remote Method Invocation (RMI), which require an application
to know a remote application’s methods. Unlike email, messaging is used for
communication between software applications or software components.
2 JMS( Java Message Service )
The Java Message Service is a set of Java APIs that allows applications to create, send,
receive, and read messages. The JMS API defines a set of interfaces and associated
semantics that allow programmers write messaging components in Java that

communicate with other messaging implementations.
JMS API Programming Model
• Administered Objects: Administered objects are preconfigured JMS objects
created by an administrator that consists of two components connection
factories and destinations
• Connections
• Sessions
• Message Producers
• Message Consumers
• Messages
A connection factory is the object for clients to create a connection to a provider. A
connection factory encapsulates a set of connection configuration parameters that has
been defined by an administrator. Each connection factory is an instance of the
ConnectionFactory, QueueConnectionFactory, or Topic-ConnectionFactory
interface.
Figure 1 JMS Programming Architecture
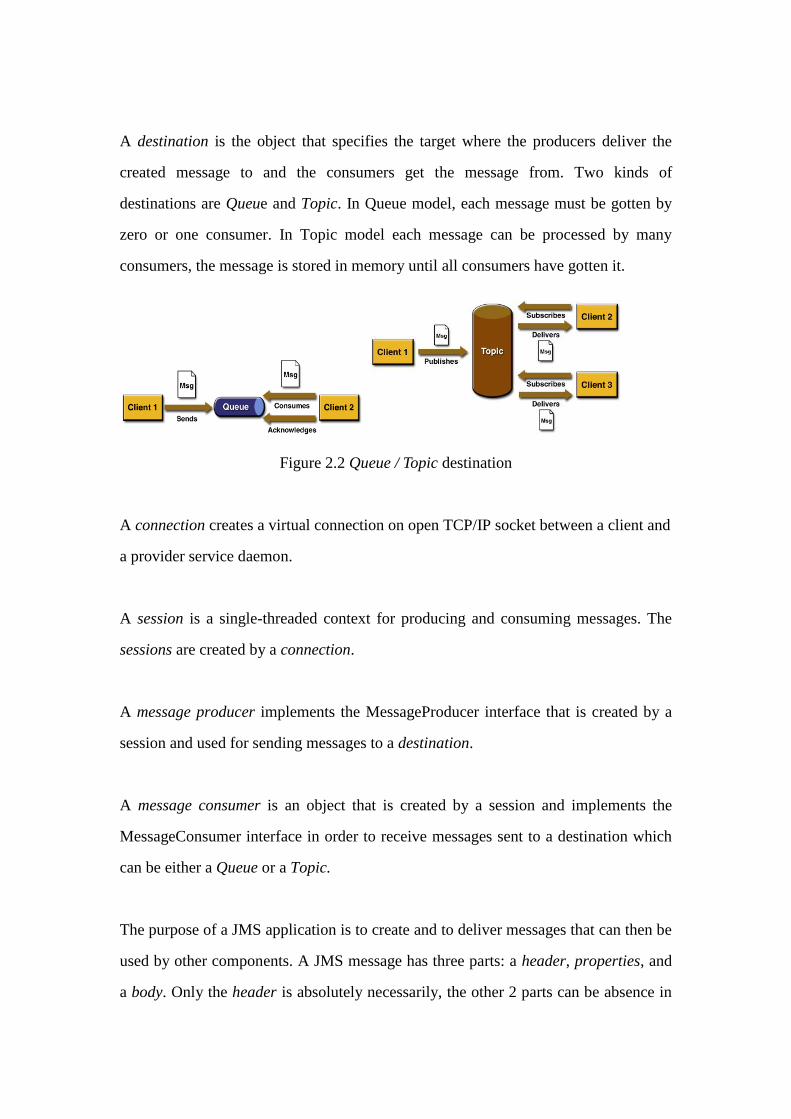
A destination is the object that specifies the target where the producers deliver the
created message to and the consumers get the message from. Two kinds of
destinations are Queue and Topic. In Queue model, each message must be gotten by
zero or one consumer. In Topic model each message can be processed by many
consumers, the message is stored in memory until all consumers have gotten it.
Figure 2.2 Queue / Topic destination
A connection creates a virtual connection on open TCP/IP socket between a client and
a provider service daemon.
A session is a single-threaded context for producing and consuming messages. The
sessions are created by a connection.
A message producer implements the MessageProducer interface that is created by a
session and used for sending messages to a destination.
A message consumer is an object that is created by a session and implements the
MessageConsumer interface in order to receive messages sent to a destination which
can be either a Queue or a Topic.
The purpose of a JMS application is to create and to deliver messages that can then be
used by other components. A JMS message has three parts: a header, properties, and
a body. Only the header is absolutely necessarily, the other 2 parts can be absence in
one message.
A JMS message header has a number of predefined fields that are used by clients and
providers to identify and to route messages. Each header field has setter and getter
methods itself. Table 1 shows all the fields and the place where the fields are setted.
Header Field Set By
JMSDestination send or publish method
JMSDeliveryMode send or publish method
JMSExpiration send or publish method
JMSPriority send or publish method
JMSMessageID send or publish method
JMSTimestamp send or publish method
JMSCorrelationID Client
JMSReplyTo Client
JMSType Client
JMSRedelivered JMS provider
Table 1 Properties of Message Header
If we have additional information to set in a message for other components, we could
use Message Properties, for an example of needing a property for a message selector .
The body contains the content of a message. Eevey messsage content must obey one
pre-defined message format, also named message type, which allows software
components to send and to receive data in different forms. Table 2 shows the message
types.
Message Type Body Contains
TextMessage A java.lang.String object
MapMessage A set of name-value pairs, with names as String objects and
values as primitive types in the Java programming language.
The entries can be accessed sequentially by enumerator or
randomly by name. The order of the entries is undefined.
BytesMessage A stream of uninterpreted bytes. This message type is for
literallyencoding a body to match an existing message format
StreamMessage A stream of primitive values in the Java programming language,
filledand read sequentially.
ObjectMessage A Serializable object in the Java programming language.
Message Nothing. Composed of header fields and properties only. This
message type is useful when a message body is not required.
Table 2 JMS Message Types
3 MDB ( Messsage Driven Bean )
A message-driven bean is an asynchronous message consumer.
In J2EE a MDB acts normally as a consumer and implements the listener interface
that has only one method onMessage( ) according the JMS standard. A MDB doesn’t
provide a client interface and can only be performanced passively. It listens a Queue/
Topic and does nothing until a message is delivered to it.
4 Developing a message-driven bean application
Before the developing make sure that you have installed a WebSphere Application
Server 6.1 ( WAS6.1) with EJB3 feature pack and Rational Application Developer V
7.5 ( RAD7.5 ) on your system.

4.1 Configuration in WAS6.1
Open a Browser and input „https://localhost:9043/ibm/console/“ in the address bar.
9043 is the default port for WAS6.1, if you don’t know which port does your WAS use,
look it up in the file <was-home>/ AppServer\profiles\AppSrv01\properties\
portdef.props, where <was-home> is the WAS Install-Path.
4.1.1 Creating a service integration bus
Select Service integration → Buses, and click New.
Input MDBSIBus as name and deselect the Bus security. (Figure 4.1.1-1)
Figure 4.1.1-1 Creating a service integration bus
Figure 4.1.1-2 Creating a service integration bus
Click Next and then click Finish to confirm the MDBSIBus configuration.
NNoottee:: AAfftteerr eeaacchh cchhaannggee yyoouu mmuusstt cclliicckk SSaavvee ttoo ssttoorree aallll cchhaannggeess iinn WWAASS.. TThhiiss
wwiillll nnoott bbee mmeennttiioonneedd aaggaaiinn ffoorr tthhee ffuuttuurree..
.
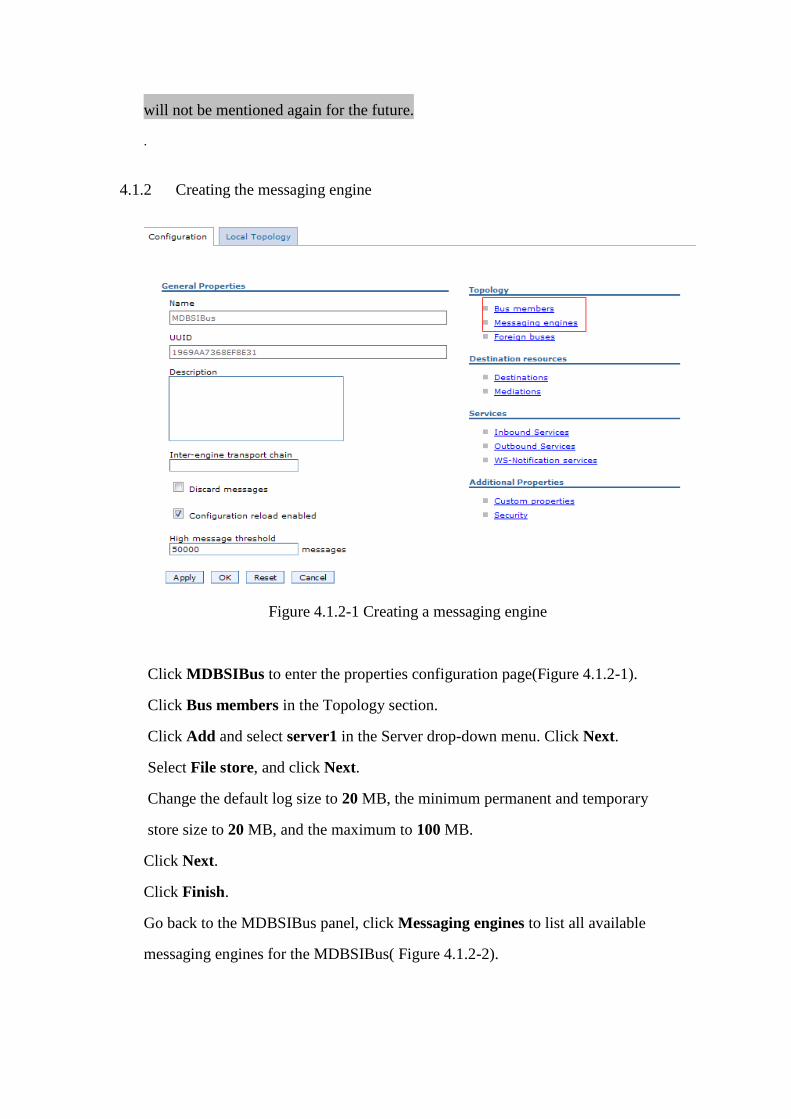
4.1.2 Creating the messaging engine
Figure 4.1.2-1 Creating a messaging engine
Click MDBSIBus to enter the properties configuration page(Figure 4.1.2-1).
Click Bus members in the Topology section.
Click Add and select server1 in the Server drop-down menu. Click Next.
Select File store, and click Next.
Change the default log size to 20 MB, the minimum permanent and temporary
store size to 20 MB, and the maximum to 100 MB.
Click Next.
Click Finish.
Go back to the MDBSIBus panel, click Messaging engines to list all available
messaging engines for the MDBSIBus( Figure 4.1.2-2).

Figure 4.1.2-2 Creating a messaging engine
4.1.3 Creating a destination
Figure 4.1.3-1 Creating a destination
Back to the MDBSIBus panel and select Destinations( Figure 4.1.3-1).
Click New.
Select Queue and click Next (Figure 4.1.3-2).
Give MDBQueue as Identifier and click Next
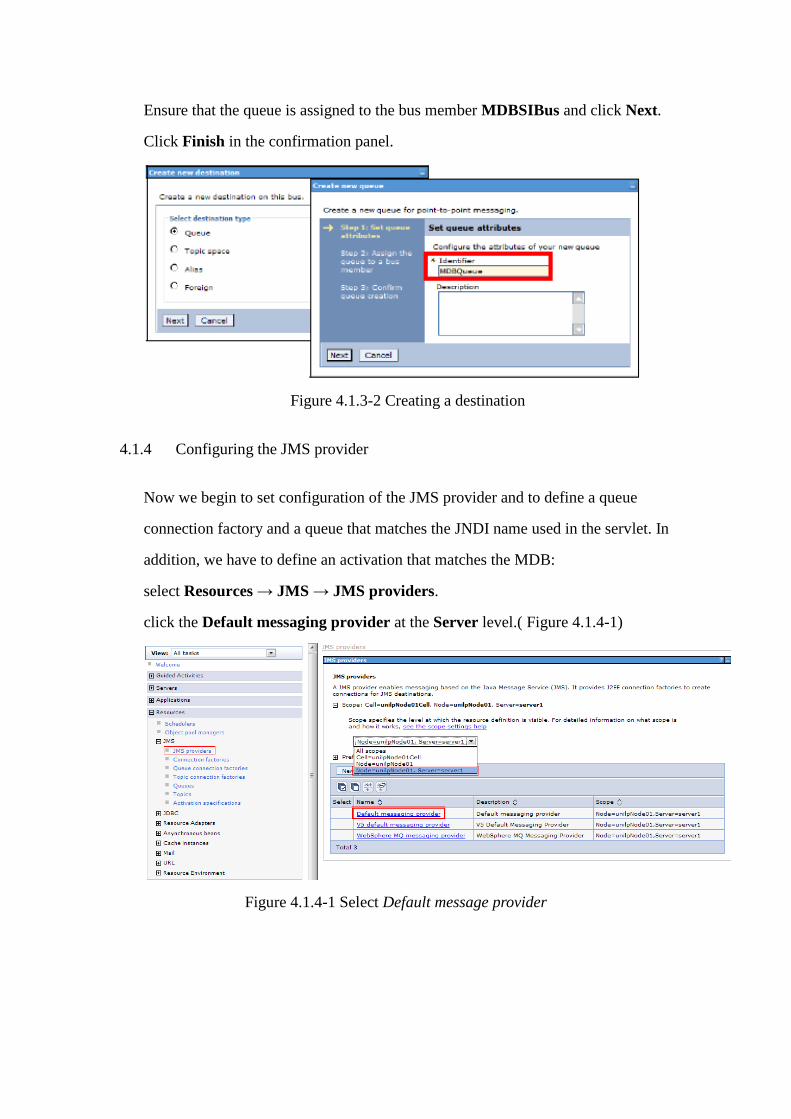
Ensure that the queue is assigned to the bus member MDBSIBus and click Next.
Click Finish in the confirmation panel.
Figure 4.1.3-2 Creating a destination
4.1.4 Configuring the JMS provider
Now we begin to set configuration of the JMS provider and to define a queue
connection factory and a queue that matches the JNDI name used in the servlet. In
addition, we have to define an activation that matches the MDB:
select Resources → JMS → JMS providers.
click the Default messaging provider at the Server level.( Figure 4.1.4-1)
Figure 4.1.4-1 Select Default message provider

Figure 4.1.4-2 Properties Configuration
Configurate the properties Queue connecton factories, Queues and Activation
specifications( Figure 4.1.4.2)
Click Queue connection factories.
Click New. Enter MDBQueueCF as name and jms/messageQueueCF as JNDI
name. Select MDBSIBus for bus name. For Provider endpoints, enter
localhost:7276:BootstrapBasicMessaging, where 7276 is the default
SIB_ENDPOINT_ADDRESS port of the server. If you don’t know which port is
used in your WAS, see the file
<was-home>\AppServer\profiles\AppSrv01\properties\ portdef.props, where
<was-home> is the WAS Install-Path.
Click OK( Figure 4.1.4-3 ).
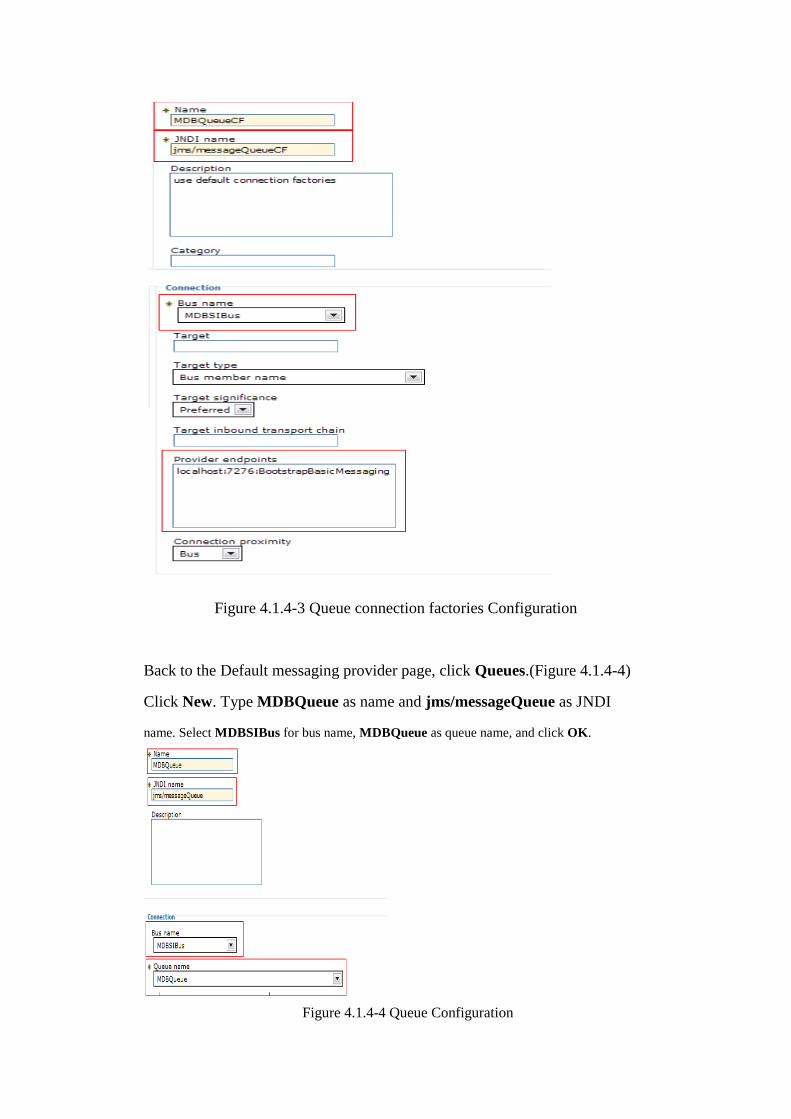
Figure 4.1.4-3 Queue connection factories Configuration
Back to the Default messaging provider page, click Queues.(Figure 4.1.4-4)
Click New. Type MDBQueue as name and jms/messageQueue as JNDI
name. Select MDBSIBus for bus name, MDBQueue as queue name, and click OK.
Figure 4.1.4-4 Queue Configuration
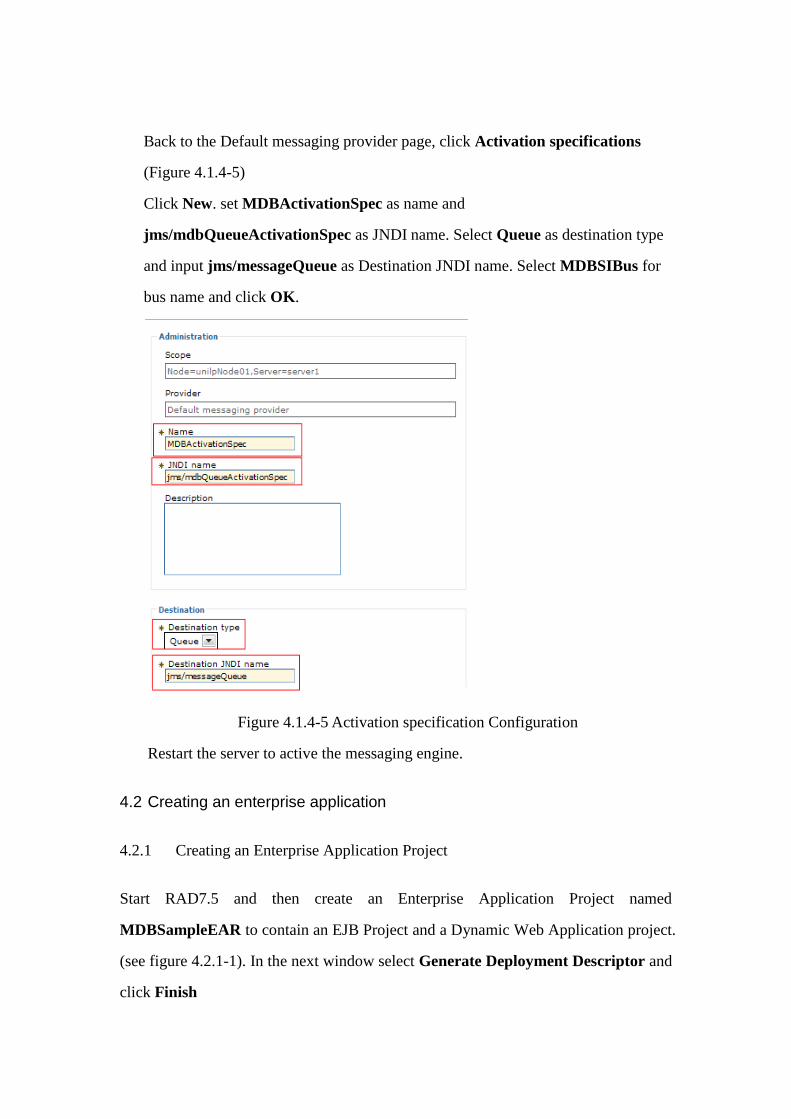
Back to the Default messaging provider page, click Activation specifications
(Figure 4.1.4-5)
Click New. set MDBActivationSpec as name and
jms/mdbQueueActivationSpec as JNDI name. Select Queue as destination type
and input jms/messageQueue as Destination JNDI name. Select MDBSIBus for
bus name and click OK.
Figure 4.1.4-5 Activation specification Configuration
Restart the server to active the messaging engine.
4.2 Creating an enterprise application
4.2.1 Creating an Enterprise Application Project
Start RAD7.5 and then create an Enterprise Application Project named
MDBSampleEAR to contain an EJB Project and a Dynamic Web Application project.
(see figure 4.2.1-1). In the next window select Generate Deployment Descriptor and
click Finish

Figure 4.2.1-1 Creating an Enterprise Application project
4.2.2 Creating an EJB Project
Create a new EJB Project named MDBSampleEJB as part of the MDBSampleEAR
enterprise application, and choose 3.0 as the EJB Module Version( Figure 4.2.2-1) in
the next dialog deselect the option Create an EJB Client Jar module and then click
Finish.

Figure 4.2.2-1 Creating an EJB Project
Click right button on the MDBSampleEJB project and select Java EE->Generate
WebSphere Bindings Deployment Descriptor to create the ibm-ejb-jar-bnd.xml file
(Figure 4.2.2-2) .
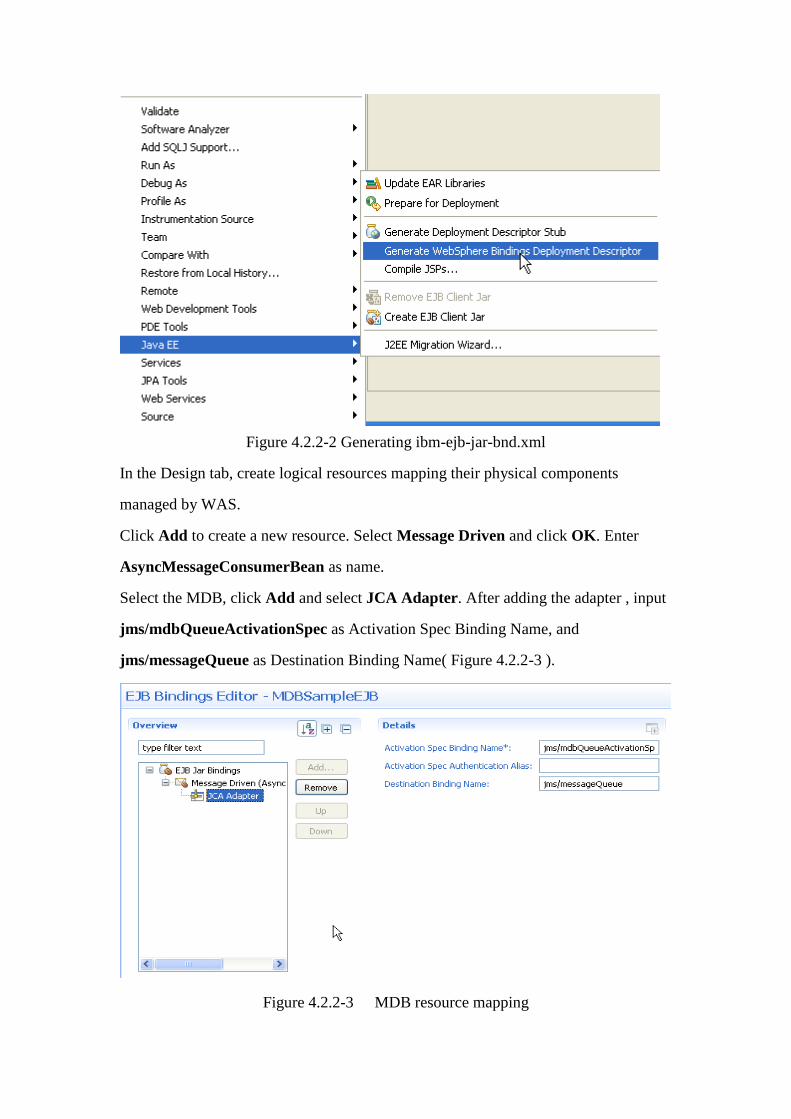
Figure 4.2.2-2 Generating ibm-ejb-jar-bnd.xml
In the Design tab, create logical resources mapping their physical components
managed by WAS.
Click Add to create a new resource. Select Message Driven and click OK. Enter
AsyncMessageConsumerBean as name.
Select the MDB, click Add and select JCA Adapter. After adding the adapter , input
jms/mdbQueueActivationSpec as Activation Spec Binding Name, and
jms/messageQueue as Destination Binding Name( Figure 4.2.2-3 ).
Figure 4.2.2-3 MDB resource mapping

Verify the created content in the Source tab, confirm that matches the following
source code.
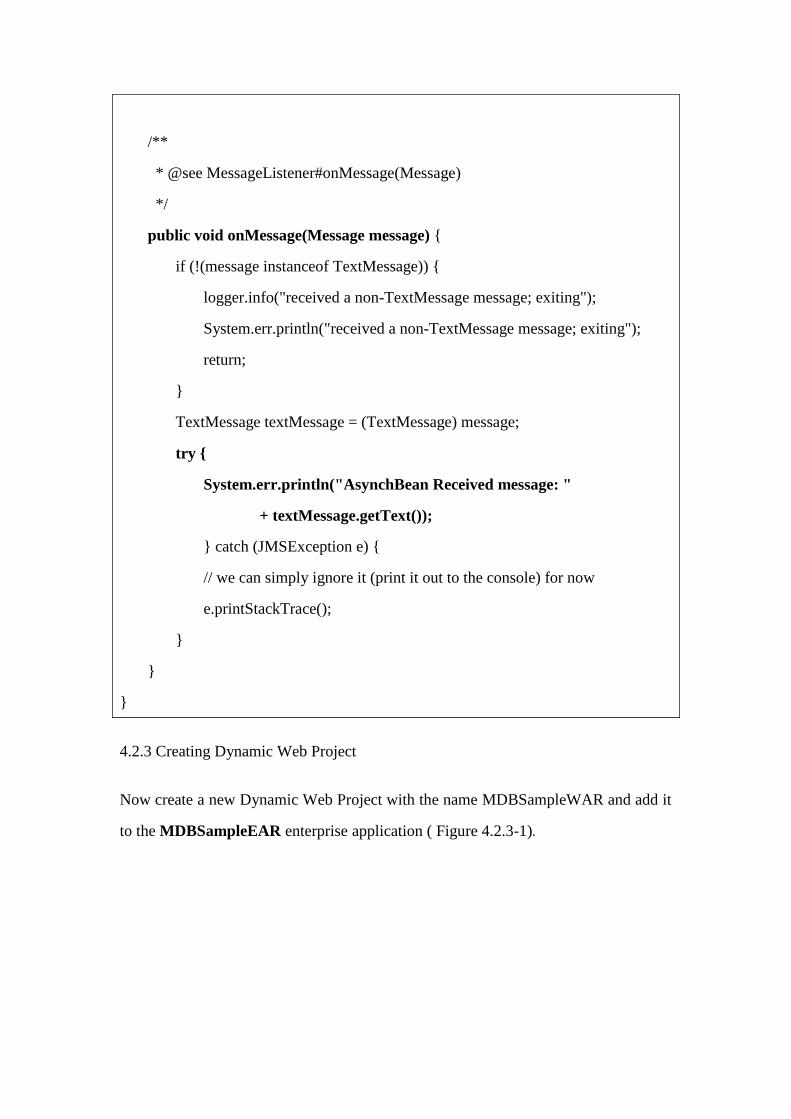
Creating a bean class named AsyncMessageConsumerBean in MDBSampleEJB
project which recieves message from Queue and deals with TextMessage.
Source Code of AsyncMessageConsumerBean.java
import java.util.logging.Logger;
import javax.annotation.PostConstruct;
import javax.annotation.PreDestroy;
import javax.ejb.MessageDriven;
import javax.ejb.ActivationConfigProperty;
import javax.jms.JMSException;
import javax.jms.Message;
import javax.jms.MessageListener;
import javax.jms.TextMessage;
/**
* Message-Driven Bean implementation class for: AsyncMessageConsumerBean
<?xml version="1.0" encoding="UTF-8"?>
<ejb-jar-bnd
xmlns="http://websphere.ibm.com/xml/ns/javaee"
xmlns:xsi="http://www.w3.org/2001/XMLSchema-instance"
xsi:schemaLocation="http://websphere.ibm.com/xml/ns/javaee
http://websphere.ibm.com/xml/ns/javaee/ibm-ejb-jar-bnd_1_0.xsd"
version="1.0">
<message-driven name="AsyncMessageConsumerBean">
<jca-adapter activation-spec-binding-name="jms/mdbQueueActivationSpec"
destination-binding-name="jms/messageQueue"/>
</message-driven>
</ejb-jar-bnd>

*
*/
@MessageDriven(activationConfig = {
@ActivationConfigProperty(propertyName = "destinationType",
propertyValue = "javax.jms.Queue"),
@ActivationConfigProperty(propertyName = "destination",
propertyValue = "jms/messageQueue") })
// a MDB must implements the MessageListene Interface
public class AsyncMessageConsumerBean implements MessageListener {
Logger logger =
Logger.getLogger(AsyncMessageConsumerBean.class.getName());
@PostConstruct
void postConstruct() {
logger.info("PostConstruct called");
}
@PreDestroy
void preDestroy() {
logger.info("PreDestroy called");
}
/**
* Default constructor.
*/
public AsyncMessageConsumerBean() {
// TODO Auto-generated constructor stub
}
/**
* @see MessageListener#onMessage(Message)
*/
public void onMessage(Message message) {
if (!(message instanceof TextMessage)) {
logger.info("received a non-TextMessage message; exiting");
System.err.println("received a non-TextMessage message; exiting");
return;
}
TextMessage textMessage = (TextMessage) message;
try {
System.err.println("AsynchBean Received message: "
+ textMessage.getText());
} catch (JMSException e) {
// we can simply ignore it (print it out to the console) for now
e.printStackTrace();
}
}
}
4.2.3 Creating Dynamic Web Project
Now create a new Dynamic Web Project with the name MDBSampleWAR and add it
to the MDBSampleEAR enterprise application ( Figure 4.2.3-1).
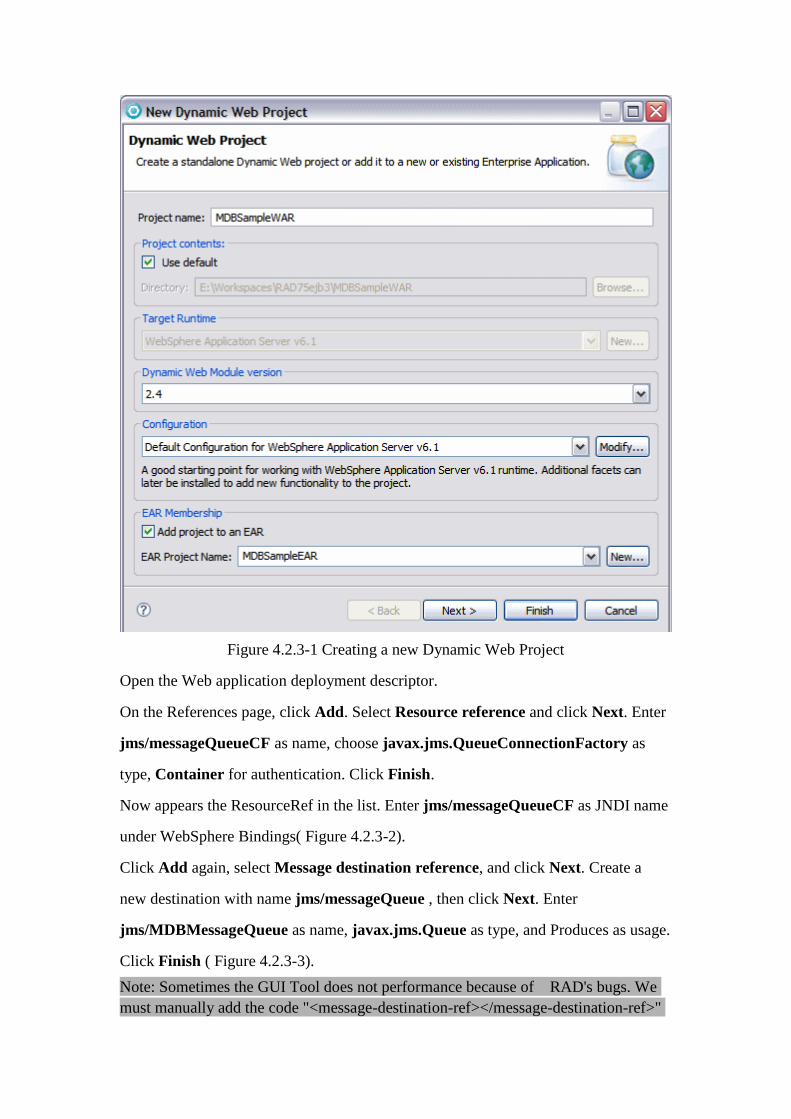
Figure 4.2.3-1 Creating a new Dynamic Web Project
Open the Web application deployment descriptor.
On the References page, click Add. Select Resource reference and click Next. Enter
jms/messageQueueCF as name, choose javax.jms.QueueConnectionFactory as
type, Container for authentication. Click Finish.
Now appears the ResourceRef in the list. Enter jms/messageQueueCF as JNDI name
under WebSphere Bindings( Figure 4.2.3-2).
Click Add again, select Message destination reference, and click Next. Create a
new destination with name jms/messageQueue , then click Next. Enter
jms/MDBMessageQueue as name, javax.jms.Queue as type, and Produces as usage.
Click Finish ( Figure 4.2.3-3).
Note: Sometimes the GUI Tool does not performance because of RAD's bugs. We
must manually add the code "<message-destination-ref></message-destination-ref>"
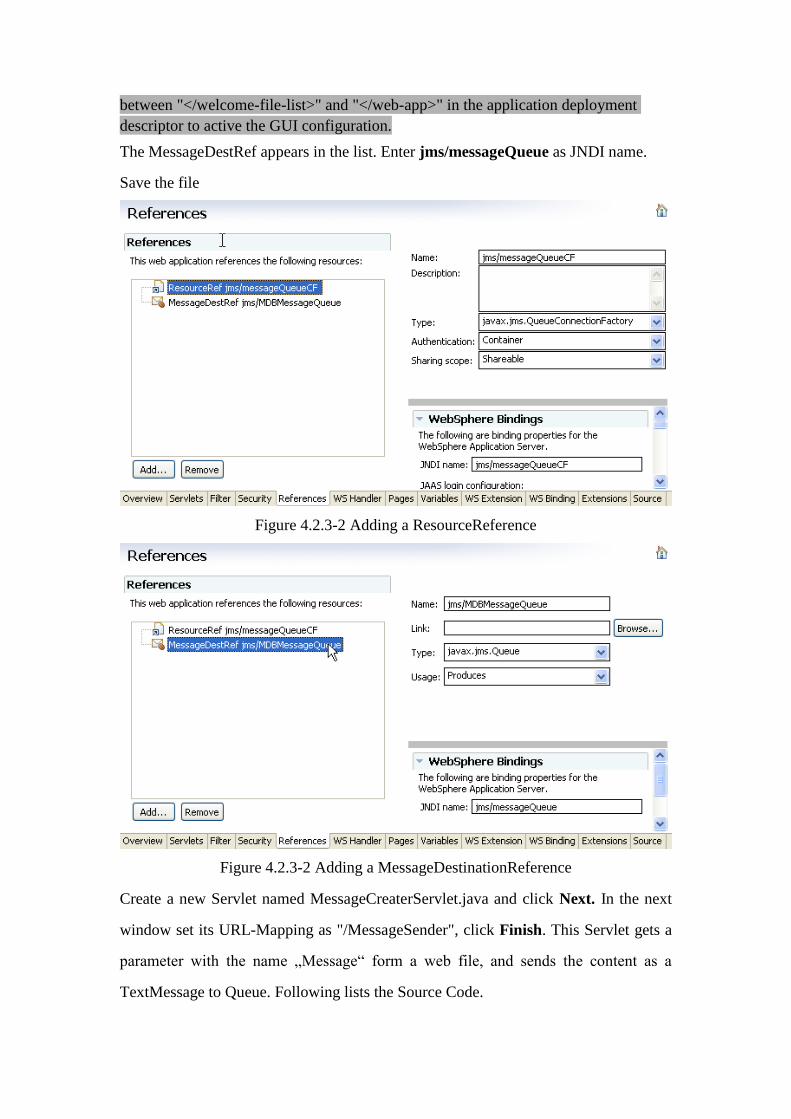
between "</welcome-file-list>" and "</web-app>" in the application deployment
descriptor to active the GUI configuration.
The MessageDestRef appears in the list. Enter jms/messageQueue as JNDI name.
Save the file
Figure 4.2.3-2 Adding a ResourceReference
Figure 4.2.3-2 Adding a MessageDestinationReference
Create a new Servlet named MessageCreaterServlet.java and click Next. In the next
window set its URL-Mapping as "/MessageSender", click Finish. This Servlet gets a
parameter with the name „Message“ form a web file, and sends the content as a
TextMessage to Queue. Following lists the Source Code.

import java.io.IOException;
import java.io.PrintWriter;
import javax.annotation.Resource;
import javax.jms.MessageProducer;
import javax.jms.Queue;
import javax.jms.QueueConnection;
import javax.jms.QueueConnectionFactory;
import javax.jms.QueueSession;
import javax.jms.Session;
import javax.jms.TextMessage;
import javax.servlet.ServletException;
import javax.servlet.http.HttpServlet;
import javax.servlet.http.HttpServletRequest;
import javax.servlet.http.HttpServletResponse;
public class MessageCreaterServlet extends HttpServlet {
private static final long serialVersionUID = 1878211202027547641L;
// Using the Resource Reference defined in Web Deployment Descript
@Resource(name = "jms/messageQueueCF")
QueueConnectionFactory qcf;
@Resource(name = "jms/MDBMessageQueue")
Queue queue;
protected void doGet(HttpServletRequest request, HttpServletResponse
response) throws ServletException, IOException {
performance(request, response);
}
protected void doPost(HttpServletRequest request, HttpServletResponse
response) throws ServletException, IOException {

performance(request, response);;
}
private void performance(HttpServletRequest request, HttpServletResponse
response) throws ServletException, IOException{
try {
QueueConnection connection = qcf.createQueueConnection();
QueueSession session = connection.createQueueSession(false,
Session.AUTO_ACKNOWLEDGE);
MessageProducer producer = session.createProducer(queue);
TextMessage txtMsg = session.createTextMessage();
txtMsg.setText(request.getParameter("Message"));
producer.send(txtMsg);
session.close();
connection.close();
// for testing purposes
PrintWriter out = response.getWriter();
out.println("Message is successfully sent.");
out.println("QueueConnectionFactory:" +qcf);
out.println("QueueConnection: "+ connection);
out.println("Queue: " + queue);
out.println("MessageProducer: " + producer);
out.println("Message Content: " + request.getParameter("Message"));
} catch (Exception e) {
throw new ServletException(e);
}
}
}

Following we create a simple Web Page named SendMessage.html
<!DOCTYPE html PUBLIC "-//W3C//DTD HTML 4.01 Transitional//EN"
"http://www.w3.org/TR/html4/loose.dtd">
<html>
<head>
<meta http-equiv="Content-Type" content="text/html; charset=ISO-8859-1">
<title>Insert title here</title>
</head>
<body>
<Form action=MessageSender>
<TABLE width="30%" border="0">
<TR>
<TD>Message</TD>
<TD><INPUT type="text" name="Message"></TD>
</TR>
</TABLE>
<input type=submit value="Send"/>
</Form>
</body>
</html>
4.3 Running and Testing the projects on WAS
4.3.1 Running the projects on WAS
Click right button on the MDBSampleEAR project, select Run As -> Run on Server,
choose WebSphere Application Server 6.1 at localhost (Figure 4.3.1), select the
both modules, MDBSampleEJB and MDBSampleWAR, click Finish to start the
project.

Figure 4.3.1
4.3.2 Testing the project
Open a Browser and enter http://localhost:9080/MDBSampleWAR/SendMessage.html in the
Address Bar. The page should be shown as same as Figure 4.3.2-1.
Input any message in the text area and click Send. The rusult should be shown like
Figure 4.3.2-2.
Figure 4.3.2-1
Figure 4.3.2-2 Result Page
Return to RD7.5, the Console window should list the messages shown in Figure

4.3.2-3
Figure 4.3.2-3 Messages in Console