Embed Size (px)
Citation preview

webpage4 ManualLast changed August 11, 2008

Table of contentsOverview..............................................................................................................................................................1
Features Overview..................................................................................................................................2System Requirements..............................................................................................................................3Upgrading................................................................................................................................................4Support.....................................................................................................................................................6Preferences...............................................................................................................................................7Introduction to HTML...........................................................................................................................10Frequently Asked Questions..................................................................................................................14
Using Webpage..................................................................................................................................................16Quick start guide....................................................................................................................................17Site design tips.......................................................................................................................................19Creating a new page...............................................................................................................................21Opening an existing page.......................................................................................................................23Importing pages.....................................................................................................................................24Page properties.......................................................................................................................................25
Editing META Tags........................................................................................................................26Appearance......................................................................................................................................28Scroll bar.........................................................................................................................................30Link settings....................................................................................................................................31Headings..........................................................................................................................................33
Entering and formatting text..................................................................................................................34Creating Forms......................................................................................................................................36
Form elements.................................................................................................................................36Submitting form data.......................................................................................................................37
Inserting a Table...................................................................................................................................39Creating a table................................................................................................................................39Border color and background image...............................................................................................40Changing cell properties..................................................................................................................41Deleting, inserting and splitting cells..............................................................................................42Autofit Rows or Columns................................................................................................................43
Creating lists..........................................................................................................................................45Creating Links and anchors...................................................................................................................47
Links................................................................................................................................................47Image links / existing text...............................................................................................................48Anchors...........................................................................................................................................49Unlink..............................................................................................................................................49
Inserting Date and Time.........................................................................................................................50Images....................................................................................................................................................51
Editing the Image............................................................................................................................54Restoring the Image.........................................................................................................................54Image Effects...................................................................................................................................55Photoshop Plugins...........................................................................................................................55Convert Image Format.....................................................................................................................56Image Resampling...........................................................................................................................56
Spelling Check.......................................................................................................................................58Adding Java Applets..............................................................................................................................59Inserting ActiveX Controls....................................................................................................................61
i

Table of contentsUsing Webpage
Inserting an IFrame................................................................................................................................63Marquee.................................................................................................................................................64Inserting Comments...............................................................................................................................65Find and Replace Tool (Source and Split views)...................................................................................66Code Collapse (Source and Split views)................................................................................................68GIF Animator.........................................................................................................................................69GIF Animator Menu Options.................................................................................................................74Inserting JavaScript................................................................................................................................78Inserting HTML code............................................................................................................................80Aligning Objects and Text.....................................................................................................................81Page Statistics........................................................................................................................................83Page Links..............................................................................................................................................83Document Tree.......................................................................................................................................84Site Explorer..........................................................................................................................................85HTML validation...................................................................................................................................87HTML tidy.............................................................................................................................................87Previewing a webpage...........................................................................................................................89Saving a page.........................................................................................................................................90Exporting a webpage..............................................................................................................................91Publishing a webpage............................................................................................................................92SEO (Search Engine Optimization) Tools.............................................................................................96
Interface.............................................................................................................................................................99Menu Options......................................................................................................................................100The Editor window..............................................................................................................................112The Preview window...........................................................................................................................113The Source Tab....................................................................................................................................114Customizing the Interface....................................................................................................................116Customizing Toolbars..........................................................................................................................116
ii

Overview
Trellian WebPage allows you to create your own web pages without having to learn complex scriptinglanguages. WebPage's WYSIWYG (What You See Is What You Get) interface makes editing pages as easy asusing your favorite word processor. Webmasters and other advanced users can hand code HTML using thebuilt in color highlighted source editor.
WebPage makes editing HTML a breeze. It doesn't matter if you are completely new to building web pages orif you have been building them for years, WebPage is a pleasure to use.
Overview 1

Features Overview
Intuitive Interface♦ Imports pages compatible with today's browsers♦ Absolute positioning of HTML elements♦ Color Highlighted HTML Editor♦ Meta Tag editor♦ Drag &drop interface♦ Imports all major image formats including PNG &JPEG♦ Support for current Internet technologies♦ Built−in document spellchecker♦ Support for 1000's of Photoshop Plugins♦ Easy image conversion and resampling tools with unlimited undo's♦ Create Search engine friendly pages, so that your site can be found.♦
Features Overview 2

System Requirements
Operating Systems:Microsoft Windows 98/ME/2000/XP/Vista
CPU/Processors:Intel Pentium I, II, III, IV, AMD or compatible
RAM/Memory:64MB or greater
Disk Space:20MB Disk Space
Web Browser:Internet Explorer 5.5 or greater
System Requirements 3
Upgrading
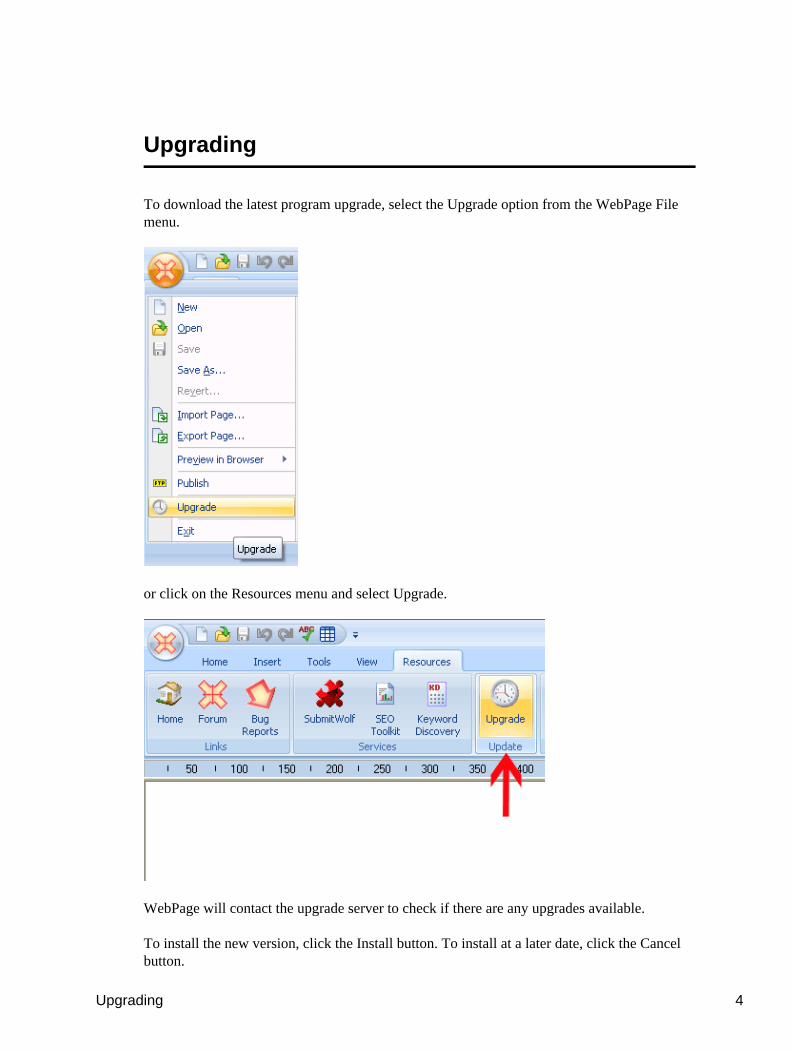
To download the latest program upgrade, select the Upgrade option from the WebPage Filemenu.
or click on the Resources menu and select Upgrade.
WebPage will contact the upgrade server to check if there are any upgrades available.
To install the new version, click the Install button. To install at a later date, click the Cancelbutton.
Upgrading 4

Upgrading 5

Support
If you are experiencing problems with the WebPage program itself, please send an email [email protected] detailing the issue that you are experiencing.
Note: We do not provide coding or web design assistance. If you need help to upload yourfiles, please contact your web hosting company
Support Hours:Open Mon − Fri, 9:00am − 5:00pm (Melbourne, Australia − Eastern Standard Time)Please include some basic information about your computer, eg The version of Windows youare using. Before contacting support, please check the FAQ first, as 90% of all questions wereceive are already answered on these pages. You can view the FAQ athttp://trellian.com/webpage/faq.htm.
Additional help resources can be viewed by clicking on the Resources menu, under Help.
HTML reference:Displays HTML 4.0 Reference help file.
CSS:Displays Cascading Style Sheets help file.
Support 6

Preferences.
The preference settings lets you change various options for Webpage. To access it, click onthe View menu and select preferences.
Re−open pages at startup − automatically opens the pages worked on previously whenWebpage starts up.
Warn when opening read only files − warns when opening a read only file.
Use <strong> and <em> instead of <b> and <i> − uses replacement tags as specified.
Set as default HTML editor − sets Webpage as the default HTML editor.
Preferences. 7

Make paragraph on enter − creates a new paragraph when enter is pressed. Turn this optionoff to create a new line instead
Show outlines for tables with zero value border − toggles display of a dotted table outlinefor tables with a zero value border.
Turn off the automatic html header insertion − Disables automatic insertion of HTMLheaders.
Show menu − Displays main toolbar menu
Use <div> tag for centering instead of <center> − Substitutes html <center> tags with<DIV align=center>
Tab size − Set Tab size in source and split views.
FTP client − Enter the path to your FTP client. eg. C:\Program Files\TRELLIAN\TrellianFTP\ftp.exe
Parameters − Enter any parameters required by the FTP program. .
Preferences. 8

Default extension − Sets the default file extension, eg. .html
Default Document Type (DTD) − Sets the default document type.
Default encoding − Sets the default encoding type, default is UTF−8.
Show wizard when creating a new page − Displays the new page wizard whenever a newpage is created.
Preferences. 9

Introduction to HTML
A web site is a collection of web pages that are linked together. A web page (HTML file) is aplain text file that uses HTML code tags to instruct web browsers to display text and objectsin specific ways. They can be prepared using any plain text editor (such as Notepad) or byusing a visual editor such as WebPage.
The HTML code for any page can be viewed in a web browser by clicking on the Edit menuand selecting View source (Internet Explorer) or clicking on the View menu and selectingPage source (Firefox).
To create a web site using Webpage, you need to create multiple web pages and link themtogether. See the link section on this page for more information.
Required HTML tags
HTML files have some required elements.Every HTML file must begin with:
<html><head><title>TITLE OF WINDOW</title></head><body>where "TITLE OF WINDOW" is the text that you want to appear in the title bar of thebrowser window.The title text is also displayed by search engines when listing your site in the search results.Every HTML file must end with</body></html>
The page content (text, images etc.) is located between the <body> and the </body> tags.To enter the page title and other tags in the WebPage Editor tab, click on the Tools menu andselect Meta Tag Editor.
Page text
Plain text content can be entered directly into the WebPage Editor tab and source tab,however it is important to realize that browsers will ignore all of the formatting and even thecarriage returns, tabs, and multiple spaces between words in the source tab. For example, the
Introduction to HTML 10

following text:
It is important to realize that browsers will ignore all of the formatting and even the carriage returns, tabs, and multiple spaces between words.
will be appear on a Web page like this:
It is important to realize that browsers will ignore all of the formatting and even the carriagereturns, tabs, and multiple spaces between words.
In order to force a line break, you must insert a <br> into the text, and to create a paragraphseparation (white space between paragraphs) you must insert a <p> between the paragraphs.This is not a concern when using the WebPage Editor tab, as WebPage automatically convertsspaces into the relevant HTML code.
Text Formatting with HTML code
Text formatting options are controlled by pairs of tags which surround the effected text, suchas:
Effect HTML tags What it looks like
boldface <b>example</b> example
Italic <i>example</i> example
bold italic <b><i>example</i></b> example
larger font <font size="+1">example</font> example
larger font <font size="+2">example</font> examplesmaller font <font size="−1">example</font> example
Large letter <font size="+3">E</font>example Eexample
Color text <font color="#ff0000">example</font> example
Centering <center>example</center> example
subscript H<sub>2</sub>O H2O
superscript cm<sup>2</sup> cm2
Symbol font <font face="symbol">abcde</font> αβχδε
Introduction to HTML 11

Images
Images should be in gif or jpg format to ensure cross browser compatibility. png and bmpformats are not supported by all web browsers, whereas jpg and gif formats are supported byall browsers.
To insert an image in the Webpage Editor tab, click on the Insert menu and select Image. TheHTML tags for images specify the image source (path and filename), alt tags and otheraligning and size attributes, if required. Alt tags are displayed when image display is disabled,and the alt text is used for vision impaired viewers (e.g.. narrated by text readers etc). To editimage settings in the Editor tab, right click on the image and select Properties.
Note:To avoid issues with the image path, the image files should ideally be located in thesame folder/directory as the HTML file itself. WebPage can export the images and HTMLfiles in one folder to allow for easy uploading and will automatically convert the image pathsto match the exported folder. See the Exporting a webpage section of the manual.
HTML code examples for images:
<img src="trellian.gif"> will display the GIF file "trellian.gif", if that file is in the samedirectory as the HTML file.
If the image file is in a subdirectory/folder, then the subdirectory name must be specified. Forexample, if the file "trellian.gif" is in a subdirectory called "img", then the image tag wouldbe:<img src="img/trellian.gif">
Ensure the file and subdirectory/folder names are exact, as some web servers are casesensitive and consider IMAGE.GIF to be a different file from image.gif
Links
Links are text or images that specify, or link, to another page, image or other element. Textlinks usually appear as underlined text on web pages.
To insert links using the WebPage Editor, click on the Insert menu and select Hyperlink.Enter the filename and path (if required − see below for an explanation).
HTML code examples for links:
To create a link to the HTML page "faq.html" which is stored in the same directory/folder asthe current page, the code link tag would be:Click Here to go to <a href="faq.html">FAQ page</a>.
Would would appear on the page like this:Click Here to go to FAQ page.
Introduction to HTML 12
If the faq.html page is in a subdirectory/folder eg. the support folder, then the folder namemust be specified. <a href="support/faq.html">
If faq.html is stored in a higher level folder (one level up from the current folder), then foldername would be prefixed with .. eg.<a href="../faq.html">
To link to another website (URL) enter the entire URL, for example:<a href="http://partner.vendercom.com/form.php">Click here to join now!</a>.
Images can also be links. To create a linked image in the WebPage Editor tab, first insert theimage, then select the image, click on the Insert menu and select Hyperlink.
To link a small image (thumbnail) to a larger version, a standard link is used.
Small images should be used to reduce the loading time for pages. By linking the small imageto a larger version, users can decide for themselves whether to access the larger, slower toload, full−size image.To do this in the WebPage Editor tab, first insert the image, then select the image, click on theInsert menu and select Hyperlink. Enter the file name and/or path to the larger image.
Sound and video links
Sound and video links are constructed as per normal links. For example:<a href="sound1.au">[Click here to hear a sound bite]</a>
When the user clicks on the link, the browser downloads the file, looks at the file extension(".au"), determines which application to launch to run the file..
Video links work exactly the same way, except that the file name would be a .mov, .mpeg,.avi etc. type file
Alternatively, other elements, such as Flash, music players, video players etc. can be added toa page by embedding the element: To do this in the WebPage editor, click on the Insert menuand select Embedded plugin.
Headings
Headings can be used to create titles in various sizes.Headings are available in 6 sizes (Note: the smallest heading size number is the largest, eg.H6 is the smallest heading size):To select a heading in the WebPage Editor tab, select a heading size from the drop downmenu on the toolbar. This menu displays "Normal" for non−heading text.
Introduction to HTML 13

Frequently Asked Questions
What do I need to create my own web site?
You will need:
A web hosting account, which stores your web site files and makes them available forpeople to view on the Internet.
♦
A domain name, which is a unique address used to identify your web site on theInternet.
♦
Domain names can be purchased from Vendercom.com. Domain registration costs are usuallyless than $15 USD per year. Some ISP's provide space for your web pages with their ISPaccounts, however if you are planning to run a business from your site, it will look muchmore professional with it's own domain name.
Web hosting can cost anywhere from $5 per month, up to several hundred dollars a month,depending on the size of your website and the amount of traffic (visitors) to your site (alsoknown as bandwidth). When creating a new website, we recommend starting with a smallweb hosting plan and upgrading as the traffic and size of the site begins to grow.
What is the difference between a web page and a web site?
A web site is a collection of web pages that are linked together.
Are there any templates included with WebPage?
No, but there are lots of free templates available on the Internet.
Can you create a page for me ?
Sorry, we don't provide a web design service.
Can you help me with my site ?
Sorry, we don't provide coding /site design assistance.
Frequently Asked Questions 14

Frequently Asked Questions 15

Using Webpage
This chapter explains how to use Webpage
Using Webpage 16
Quick start guide
Follow these steps to create a basic page
1. Create a new pageClick on the WebPage icon and select New to create a new page.
2. Set the page propertiesClick on the View menu and select Properties.In the Meta Tags section, enter a page title, description and a few keywords. (None of themeta tag fields are compulsory so feel free to leave some or all blank).See the Meta tags section of the manual for more information on each item.
In the Appearance section, select a default font type and size to use on the page.
To set a background color, select a color by clicking the ... button next to the color field.
To set a background image, select an image by clicking the ... button next to Image field.Select the image repeat options.
To set page margins, enter the margin values (in pixels) into the margin fields. See theAppearance section of the manual for more information on each item.
3. Enter a heading/titleEnter a heading for your page and format the font accordingly.
4. Enter page contentEnter the content for your page. eg. text, images and any other content you wish to provide.
5. Preview the pageClick on the Preview button to preview your page. To preview the page in a web browser,click on the WebPage icon and select Preview in browser, and choose a web browser. Makeany changes, if necessary.
6. Export the pageIf you linked to images or other files on your computer, the export function will place all thefiles in a single folder. This makes uploading much easier. To export the page, click on the
Quick start guide 17

WebPage icon and select Export Page. Enter a file name for your exported page. Most webservers require that your page is called index.htm, index.html, home.htm or other variations.You may need to check with your web hosting company.
7. Upload / publish the pageTo publish your page, click on the WebPage icon and select Publish. (note: FTP path must beset prior to publishing) WebPage will create a folder based on the file name you entered whenexporting. eg. If the file name was "flowers.htm" the folder will be called "flowers_files".Upload the HTML file and its associated folder to your web hosting account.
8. Check your pageVisit your page on line to check that it has uploaded correctly.
Quick start guide 18

Site design tips
A basic web page consists of :
Title/logoA title and logo are usually situated at the top of the page. The title should be large enough tostand out from the rest of the page. An example of a title would be "John Smith Plumbing".
NavigationIf you are creating a web site that contains more than one page, you will need to create linksto the other pages on your website. These links are referred to as "navigation". The navigationlinks can be plain text links, or you can use different images for each page (link) by adding alink to the image.
Some common placement for the navigation links are horizontally underneath the title, orvertically down the left or right side of the page. Tables are commonly used to organise anddisplay the layout of the page. It is also common to list the navigation links along the verybottom of the page in plain text.
Each page should have an easily accessible link back to the home (main/index/starting) page.
The navigation should be in the same location on every page.
Color schemesWhile a hot pink and lime green web page may appeal to you, it is important to pick a colorscheme that is easy on the eye, and will not offend the majority of visitors.
Page contentTry not to put too many large images or videos on a page, as there are many people who arestill using dial up (very slow) connections to the Internet. If a page takes too long to load,visitors may give up and go elsewhere.
Break up large blocks of text into paragraphs. Too much text in a large block can be difficultto read may put off some visitors.
Most visitors will read the first few sentences on the page before deciding whether the site isuseful and they will stay on the site, or if they will leave. Make sure the first paragraphcontains the important information that you wish to convey to your visitors.
Don't use a small font. By using a small font, you may deter visitors who are unable to readyour page content.
Site design tips 19

While a Flash movie on the index page may look great, its important to remember that not allvisitors will have the required Flash plugins installed. This also applies to other plugins suchas video and audio codecs, and Javascript.
Site design tips 20

Creating a new page
To create a new page, Click on the WebPage icon and then New
or by clicking on the New page button
WebPage is a single page editor, multiple instances can be opened if you wish to edit multiplepages at the same time. Click on the View menu and select the New window icon to open anew instance.
Creating a new page 21

SplitSwitches to Split view.
Arrange AllTile WebPage windows vertically.
Switch WindowsSwitch to the desired webpage instance to edit.
Creating a new page 22

Opening an existing page
To open an existing page, select Open from the WebPage menu, then locate the web page onyour computer's hard drive.
You can also click the Open button on the toolbar.
Webpage can automatically open the previous page on start up. To toggle this setting, clickon the View menu and select Preferences. Tick/untick the 'Re−open pages at startup' option.
Opening an existing page 23

Importing pages
To import a page from the Internet, click on the WebPage icon and select Import Page. Enterthe URL (web address) of the page in the Internet Address field and click the Downloadbutton.
Webpage will prompt for a filename and location to save the page. Browse for a location andenter a file name, then click Save. Webpage will download the page and display the page in anew window. The web page can now be edited.
Note, WebPage will only import the page specified in the address field, it will not import theentire website. If you don't enter a page name in the Internet address field, WebPage willimport the index (home) page. To edit other pages, you will need to import them individually.
Importing pages 24

Page properties
The page properties setting lets you specify the background colours, font settings, linksettings, meta tags and margins.
To view the page properties window, click on the View menu and select the Properties icon.
Page properties 25

Editing META Tags
Meta tags are HTML tags that don't appear in a web page, but provide information thatdescribes the content of a web page. Meta Tags are used by search engines to help index andrank web sites on the Internet. If a page doesn't contain META tags, some search enginescreate a description and a keyword index based on the first few lines of text on a page.
To enter meta tags, click on the View menu and select the Properties icon, then select theMeta tags item.
Title − The title of the page. eg. The fine wine store.
Author − The author of the page. eg. John Smith
Owner − The owner of the page. eg. The fine wine store
Copyright − Copyright information eg. Copyright to The fine wine store, 2008
Rating − The rating for the page. eg. General . (other options are mature, restricted, safe forkids)
Editing META Tags 26
Charset − The character set used on the page. Usually utf−8 unless the page content is in alanguage other than English.
Description − A description of the page content. eg. Current wine specials at The fine winestore
Keywords − A few keywords (separated by commas) to describe the page content. eg.wine,beer,spirits,online store
Revisit after − The number of days after which the search engines should revisit the page.Note that most search engines will ignore this tag.
Editing META Tags 27

Appearance
The appearance settings let you specify the background colour or image, font settings andmargins.
To enter the page appearance settings, click on the View menu and select the Properties icon,then select the Appearance item.
Font − The font style. Click on the ... button to select from a list of fonts. A few differentfonts should be selected as some visitors to the page may not have particular fonts styles ontheir computers. To select a Bold and/or Italic font, click the B button for Bold, and the Ibutton for Italic.
Size − Specifies the size of the font. Select a unit of measurement, eg, pixels, em, points,inches etc. and enter the value. eg. 12 points.
Color − The default font color of the page. Either enter a color in hex format ( eg. #0099FF)or click the ... button to select a color from the color picker.
Image − The background image for the page. This can be left blank. Enter the path to theimage, or click the ... button to browse for an image.
Appearance 28

Repeats − Specifies if the image should be repeated thoughout the page (repeat), repeatedhorizontally only (repeat−x), repeated vertically only (repeat−y) or not repeated (no−repeat).
Background color − The background color of the page. Either enter a color in hex format orclick the ... button to select a color.
Left Margin − Defines the amount of space to use for the left margin, measured in pixels.
Top Margin − Defines the amount of space to use for the top margin, measured in pixels.
Right Margin − Defines the amount of space to use for the right margin, measured in pixels.
Bottom Margin − Defines the amount of space to use for the bottom margin, measured inpixels.
Appearance 29

Scroll bar
The scroll settings let you specify the scroll bar colours.
To enter the scroll bar settings, click on the View menu and select the Properties icon, thenselect the Scroll item.
Either enter a color in hex format such as #FF0000 or click the ... button to select a color fromthe color picker.
Scroll bar 30

Link settings
The link settings let you specify the font color, size and styles to use on the page.
To enter the page appearance settings, click on the View menu and select the Properties icon,then select the Links item.
Font − The font style. Click on the ... button to select from a list of fonts. A few differentfonts should be selected as some visitors to the page may not have particular fonts styles ontheir computers. To select a Bold and/or Italic font, click the B button for Bold, and the Ibutton for Italic.
Size − Specifies the size of the font. Select a unit of measurement, eg, pixels, em, points,inches etc. and enter the value. eg. 12 points.
Link color − The color of unvisited links. Either enter a color in hex format ( eg. #0099FF) orclick the ... button to select a color from the color picker.
Rollover color − The color of links when the mouse is moved over the link. Either enter acolor in hex format ( eg. #0099FF) or click the ... button to select a color from the colorpicker.
Link settings 31

Visited links − The color of visited links. Either enter a color in hex format ( eg. #0099FF) orclick the ... button to select a color from the color picker.
Active links − The color of active links. Either enter a color in hex format ( eg. #0099FF) orclick the ... button to select a color from the color picker.
Underline Style − The underline style of links. Select from None, Underline, Underline onrollover and Hide underline on rollover.
Link settings 32

Headings
The heading settings let you specify the font color, size and styles. These settings can be leftblank, and WebPage will use the default settings for the headings. Heading 1 is normally thelargest heading, and heading 6 is the smallest.
To specify the heading settings, click on the View menu and select the Properties icon, thenselect the Headings item.
Font − The font style. Click on the ... button to select from a list of fonts. A few differentfonts should be selected as some visitors to the page may not have particular fonts styles ontheir computers. To select a Bold and/or Italic font, click the B button for Bold, and the Ibutton for Italic.
Heading 1 to 6 − Specifiy the size of the font and select a unit of measurement, eg, pixels,em, points, inches etc. . eg. enter the number 12 in the first field, and select points from thelist. In the last field, either enter a color in hex format ( eg. #0099FF) or click the ... button toselect a color from the color picker.
Headings 33

Entering and formatting text
To enter text on your page, check that you have selected the Home tab, and begin typing yourtext.
Fonts and formatting
To change the font of text on the page, highlight the text then change the font color, sizeand/or style using the menus
The font settings can also be changed via the Format menu (if show menu is enabled.)
To apply bold, italic or underline formatting to text, highlight the text, then click on the B, Iand U buttons on the toolbar.
Removing Formatting
To remove formatting from text, highlight the text and de−select the options you wish toremove or click on Remove Formatting from the Format menu.
Entering and formatting text 34

Paragraph Formatting
To apply paragraph specific formatting, click on the desired option under the Home menu.
Entering and formatting text 35

Creating Forms
A form is used to obtain input and send it to a specific location. For example, a 'contact us'form that accepts a name, email address and comment/question from a visitor.
To insert a form, click on the Insert menu and select the Insert Form icon. This adds Formtags, in which the form elements must be added to. eg. text boxes, buttons, etc. To add formelements, select the element to add in the Form menu.
Form elements
Fieldset − Adds a border around the form elements inside the fieldset.
Submit − A button that submits the form. More information below.
Reset − A button that clears all data that has been entered into the form.
Radio button − a selection element whereby only one option can be selected.
Check box− a selection element whereby multiple options can be selected.
Text Field− a single line input field for text.
Text Area − a multiple line input field for text.
Password field − a single line input field that displays the * character when typed into.
Drop down selection − a selection element that allows a single selection from a list.
List box selection − similar to a drop down selection, but allows for multiple selections.
File upload field − an input field with a browse button for selecting files.
Creating Forms 36

An example of a contact form and the various form elements:
To change element properties double click the element. The properties window will showoptions available for the element.
Submitting form data
To send the submitted form data to a destination, you need to specify a form 'action' and'method'. The action tells the form where/how to send the data. There are two ways for thedata to be sent from a form.The form data can be sent to a CGI, Perl, asp or other type of script where the script willcapture the data and send it to a specific email address, or the mailto method can be used.
Submitting form data 37

MailtoThe mailto method uses the visitor's email client (program) to send the form data. To use thismethod, in the action field, enter the destination email address. When the submit button isclicked, the visitor's email program will open an email that contains the form data, and theywill need to send the email to you.To use the mailto method, right click in the form area and select properties. In the action field,enter mailto:[email protected] and form method as post.
Form elements must also have a Name to identify them. To add a name, right click theelement and left click Properties.To ensure the email is sent as a text message, include encType=text/plain in the form tag.For example, in source view <FORM action=mailto:[email protected] method=postencType=text/plain>
Using a script (program)When a script is used, the form data will be sent to the script on your web server, and thescript will send you an email that contains the data. A free, easy to set up mail script is'Formmail'. Your web hosting company can help you set up the formmail script if needed. Forinformation about Formmail, see http://www.scriptarchive.com/formmail.html
To enter the script action and method, right click in the form area and select properties. In theaction field, enter the path to your script. eg. formmail.cgiThe form method to select will depend on what your script is expecting. (usually post)
Submitting form data 38
Inserting a Table
Tables can be used to present data in an ordered fashion, or even to organize the layout of anentire page.
Creating a table
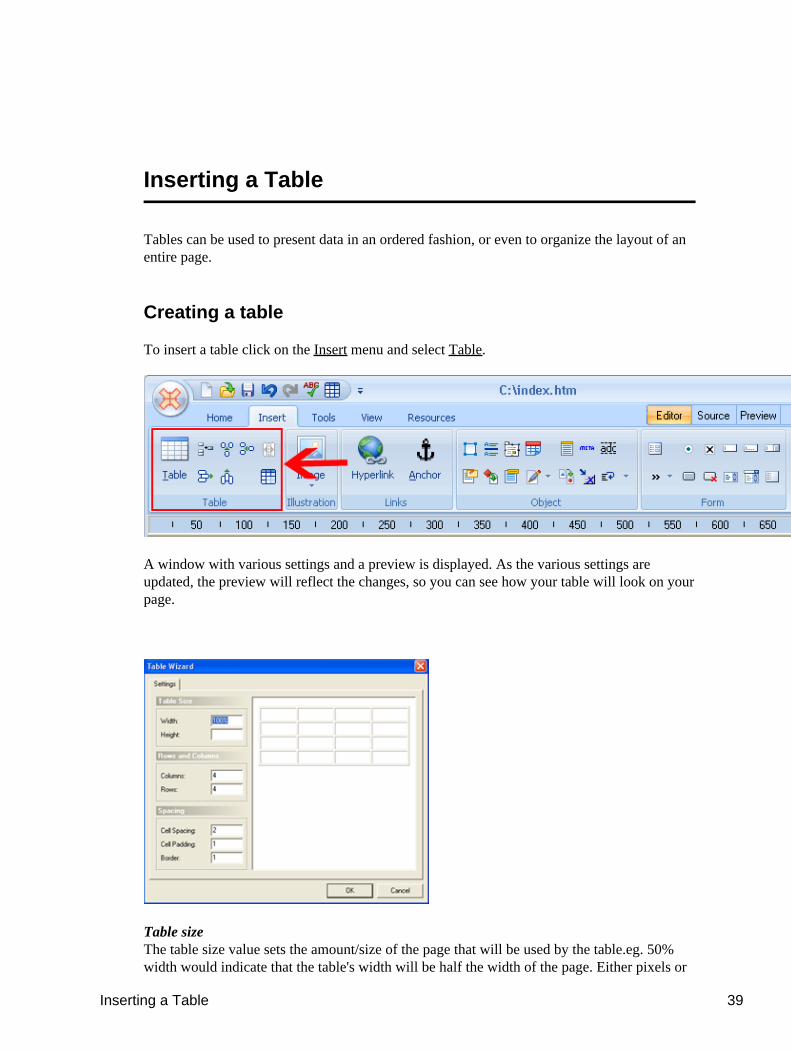
To insert a table click on the Insert menu and select Table.
A window with various settings and a preview is displayed. As the various settings areupdated, the preview will reflect the changes, so you can see how your table will look on yourpage.
Table sizeThe table size value sets the amount/size of the page that will be used by the table.eg. 50%width would indicate that the table's width will be half the width of the page. Either pixels or
Inserting a Table 39

percentages can be used to specifiy the size.
Rows and columnsA table is defined by the number of rows and columns that it contains.
SpacingCellpadding refers to the amount of space between the cell contents and the border of the cell.Cellspacing refers to the amount of space between each cell. Both cellpadding and cellspacingare measured in pixels.
Border color and background image
To set the border colors and/or background image, select the table, right click and selectproperties.
BorderTo hide the table border, set the border field to 0. To display the border, set the border field to1.
Background colorTo set a background color for the table, click the ... button and select a color.
Border colorTo set the table border color, click the ... button and select a color.
Border color and background image 40

Border color lightTable borders are rendered in a 3d style, where the top and left borders are light, and thebottom and right borders are dark. To set the light border color, click the ... button and selecta color.
Border color darkTable borders are rendered in a 3d style, where the top and left borders are light, and thebottom and right borders are dark. To set the dark border color, click the ... button and select acolor.
Background imageTo set a backgound image, click the ... button and locate an image.
Changing cell properties
To change the cell size, color, background image and other properties, click inside the cell,then right click and select properties. The cell properties will be displayed.
WidthSpecifies the width of the cell in pixels.
HeightSpecifies the height of the cell in pixels.
Changing cell properties 41

Span acrossSpecifies how many cells this cell spans across.
Span downSpecifies how many cells this cell spans down.
Background colorTo set a background color for the table, click the ... button and select a color.
Border colorTo set the table border color, click the ... button and select a color.
Border color lightTable borders are rendered in a 3d style, where the top and left borders are light, and thebottom and right borders are dark. To set the light border color, click the ... button and selecta color.
Border color darkTable borders are rendered in a 3d style, where the top and left borders are light, and thebottom and right borders are dark. To set the dark border color, click the ... button and select acolor.
Background imageTo set a backgound image, click the ... button and locate an image.
Horizonal alignmentSpecifies the horizontal text alignment within the cell.
Vertical alignmentSpecifies the vertical text alignment within the cell.
No WrapSpecifies if text should wrap within the cell.
Background imageTo set a backgound image, click the ... button and locate an image.
Deleting, inserting and splitting cells
To insert or delete rows or columns, click on the Insert menu and select the relevant tableoption.
To split or merge a cell, click the relevant cell(s), click on the Insert menu and select the SplitCell icon or Merge Cells icon.
Deleting, inserting and splitting cells 42

Autofit Rows or Columns
Rows and Columns can be automatically aligned to the same size of the largest row orcolumn.In the example below, column 1 is slightly larger than all other columns.
To ensure all columns are the same size, select the entire row of columns and right click toopen the table menu.
Autofit Rows or Columns 43

Select Autofit and Distribute columns evenly.Resulting table is displayed below.
Autofit Rows or Columns 44

Creating lists
There are 2 types of lists. A numbered list and a bulleted list.
Example of a bulleted list:
Example of a numbered list:
To create a list, click on the Home menu, and select the type of list within the paragraphgroup of tools.
Creating lists 45

To finish/complete the list, press enter twice.
Existing text can be converted to a list by highlighting the text, then selecting the list typefrom the Home menu.
Creating lists 46

Creating Links and anchors
Links
A link is an element that points to other items on the Internet, for example, other web pages,web sites, movies, pictures etc.
To create a link, click on the Insert menu and select Hyperlink.
URLTo create a link to another website or web page, enter the URL eg. http://www.trellian.comIf you are linking to a page on your website, you can just enter the filename of the page, eg.contact.html. (this is known as a relative link).
To link to a file from your computer, click the ... button and locate the file you wish to link to.
Link textEnter the text to display for the link in the text link field. If you are creating an image link,leave this field blank.eg. Entering the link text "Trellian Website" will create a link that looks like this:
Creating Links and anchors 47

TargetThe target attribute lets you define where the link should be opened. The most commontargets are _blank and _self
_blank will open the link in a new browser window.♦ _parent will open the link in the immediate frameset parent.♦ _self will open the link in the current browser window.♦ _top will open the link in the full browser window. This is commonly used to breakout of framed pages.
♦
This field can be left blank, and the link will be opened in the current browser window (sameas the _self value).
Link titleThe link title should be a brief description of the link. The link title does not appear on thepage itself, but may be displayed in a tool tip, or read aloud by a reader program (used byblind visitors).The link title can be left blank.
Image links / existing text
To create a link from existing text or an image, highlight the text / click on the image, thenright click and select create link. See above for an explanation of the various link fields
Image links / existing text 48

Anchors
An anchor is a link to a particular position on a web page. Anchors are generally used whenthere is a large amount of text on a single page, and are used to skip quickly from a table ofcontents to the relevant section of the page.
To create an anchor, select/highlight the text to link to then click on the Insert menu andselect Anchor . Enter a name for the anchor when prompted. This marks the section of text toskip to. To create a link to the anchor, create a link using the page name and append a hashsymbol (#) to the end of the page name, followed by the anchor name. eg.http://www.example.com/page1.htm#anchorname
Unlink
To unlink text (remove the link), highlight the text, right click and select Unlink from themenu.
Anchors 49

Inserting Date and Time
To insert the date and time into the Webpage, select the Time/Date icon from the Insert menu.This is useful for displaying the last updated date and time.
The date and time appear as per this example:
Inserting Date and Time 50
Images
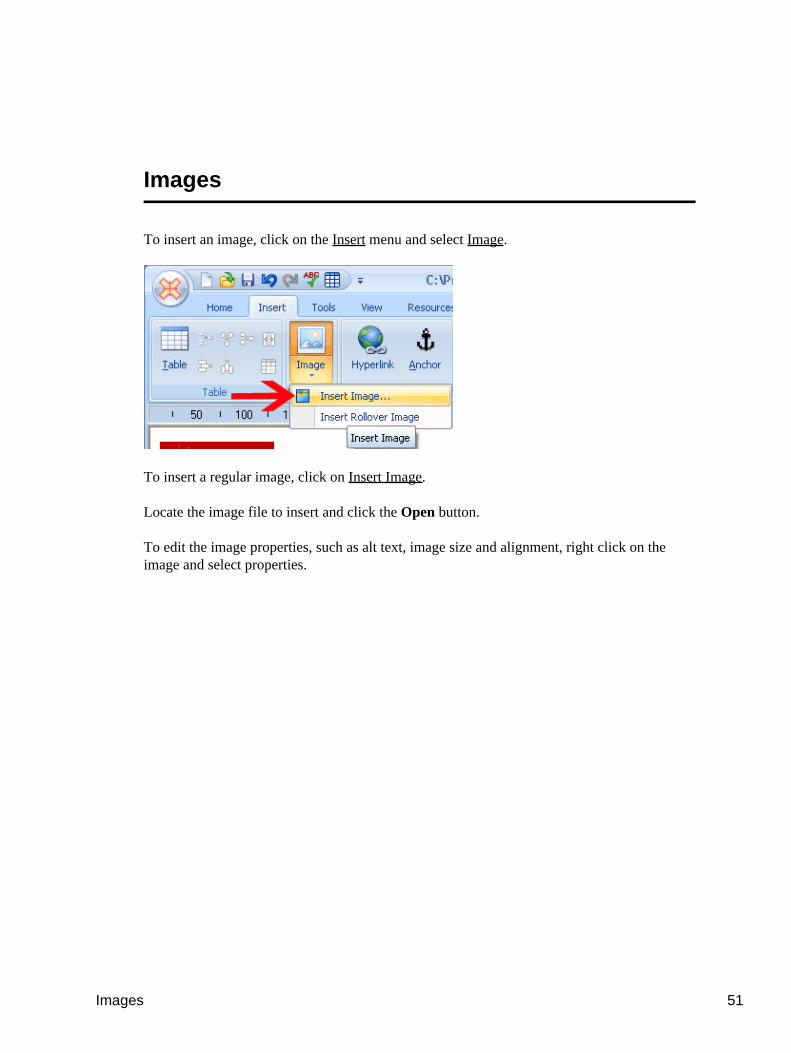
To insert an image, click on the Insert menu and select Image.
To insert a regular image, click on Insert Image.
Locate the image file to insert and click the Open button.
To edit the image properties, such as alt text, image size and alignment, right click on theimage and select properties.
Images 51

SourceDisplays the path to the image source. To change the image source, click on the ... button andbrowser for an image file.
Alt textAlt text is used in conjunction with image tags to provide a textual description of the image.The alt tag is useful for the visually impaired visitors who are using software to read out thepage contents, and for people who have images turned off in their browser. Ideally all imagetags should have an alt section.
Use MapAn image map is an image in which defined regions within the image are links to other items.To create an image map, enter a name for the image map and click the Create button. Markout the regions with the shape buttons and enter a link. For example, in the image below, thehorse's ears and eye have been mapped to link to http://www.example.com
Images 52

To insert a rollover image, click on Insert Rollover Image from the Image menu.
Image NameEnter a name for the rollover image.
Original ImageInsert the image that will be displayed first.
Images 53

Rollover ImageInsert the rollover image that will appear when original image is moused over.
Alternate TextEnter the alternate text.
When clicked, Go to URL:Enter the link that will be visited when the rollover image is clicked.
Example of a rollover image is displayed below.
Editing the Image
To edit the image, click on the image and select Edit.. from the Tools menu.
The default image editor will be opened with the image ready for editing. When finished,save the image, then close your image editor.
Restoring the Image
To restore the image to its original state, click on the image then click on the Tools menu andselect Restore.
Editing the Image 54

Image Effects
WebPage includes a variety of different image filters to add special effects to images. Thefilters can be found under the Filter menu in Tools.
For example this image uses the Wave filter located in the Real Time Filters.
Image colors, filters, transformation and other settings can be found in the Tools menu.
Photoshop Plugins
To apply photoshop plugins to an image, click on the image and select Plugin from the Toolsmenu.
Image Effects 55

Locate the Photoshop plugins directory (usually in c:\ProgramFiles\Adobe\Photoshop\Plugins) and click OK. Webpage will import any Photoshop pluginsfound in the specified directory. To apply a plugin, select Plugin from the Tools menu. Selectthe plugin from the list and click Apply.
Convert Image Format
To convert an image to a different format, select the image and select a new image formatfrom the Convert submenu in the Tools menu.
Image Resampling
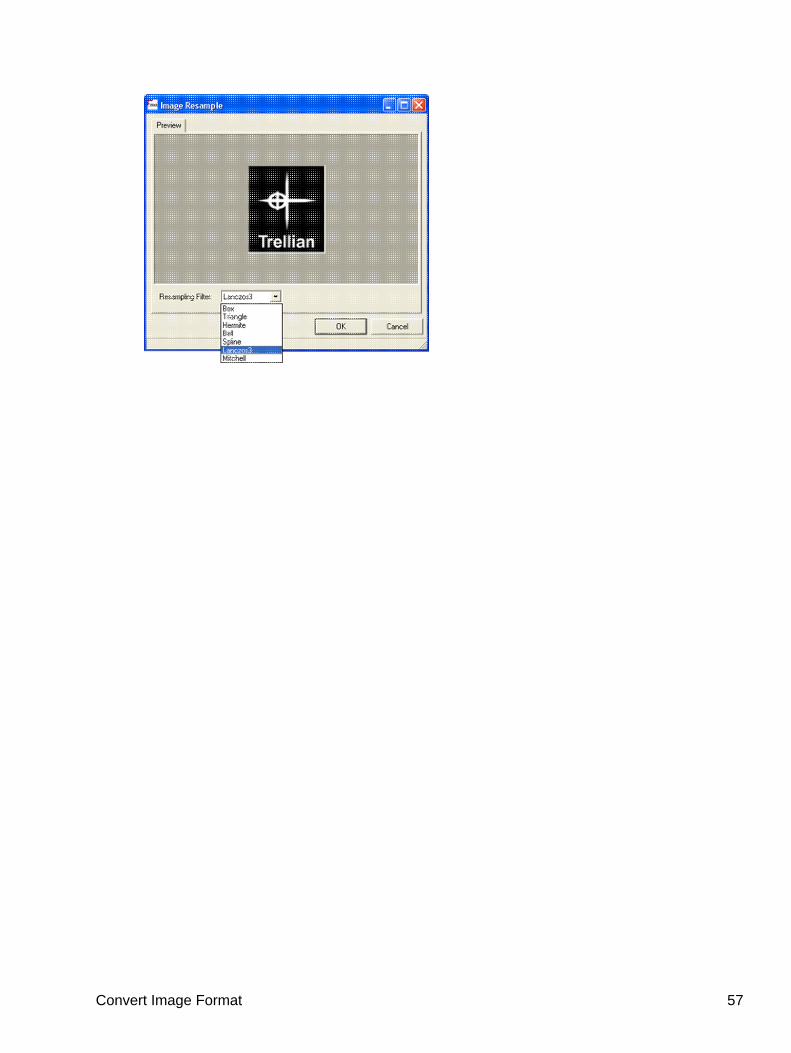
Resampling increases or decreases the resolution of the pixels in an image. To resample animage, click on the image and select Resample Image within the Transform submenu fromthe Tools menu.
Select a resampling algorithm from the drop down menu and click Ok to apply the selectedalgorithm.
Convert Image Format 56
Convert Image Format 57

Spelling Check
To check a webpage for spelling mistakes, click on the Check Spelling icon located at the topof screen .
Any spelling mistakes will be displayed with an option to insert the correctly spelt word.
Spelling Check 58

Adding Java Applets
To add a Java applet to a webpage, select Java Applet from the Insert Script sub menu.
Locate the .class file and click Open.
CodeThe path (URL) to the applet's class file.
Code base
Adding Java Applets 59

The path (URL) to the applet if a relative path was specified in the code parameter.
ArchiveThe path (URL) to the Java archive or zip file.
Alt HTMLThe text to display if the applet cannot be run/viewed.
WidthSpecifies the applet width.
HeightSpecifies the applet height.
Border spacing − HorizontalSpecifies the horizontal border spacing around the applet.
Border spacing − VerticalSpecifies the vertical border spacing around the applet.
If the applet requires parameters, click on the Parameters tab.
Enter the name and value pairs required by the applet.
Adding Java Applets 60

Inserting ActiveX Controls
ActiveX controls are used to incorporate multimedia and other objects into webpages. Toinsert an ActiveX control select ActiveX Control from the Insert menu .
Select a control and click OK to insert the control.
Inserting ActiveX Controls 61

Inserting ActiveX Controls 62

Inserting an IFrame
An Iframe is an 'inline frame' that contains content from a different URL. To insert anIFrame, click on the Insert menu and select IFrame.
The URL of the IFrame can be set by double clicking on the IFrame.
For example the following image shows an IFrame of the Trellian website in an otherwiseblue webpage.
Inserting an IFrame 63
Marquee
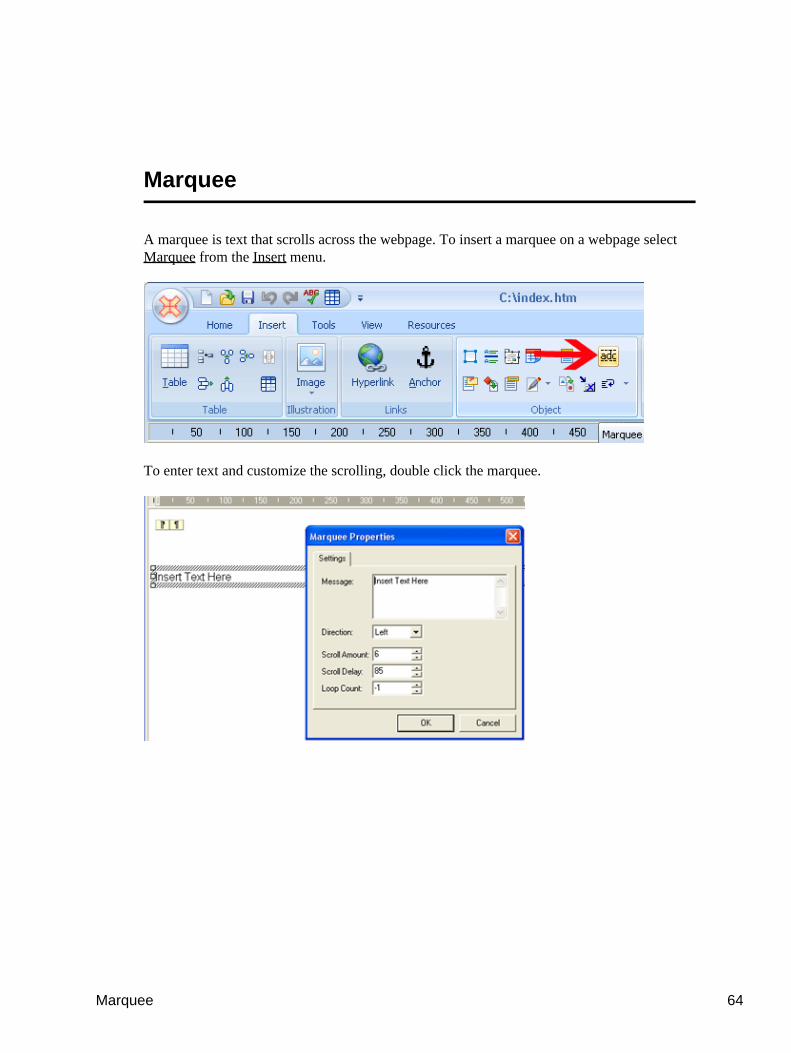
A marquee is text that scrolls across the webpage. To insert a marquee on a webpage selectMarquee from the Insert menu.
To enter text and customize the scrolling, double click the marquee.
Marquee 64

Inserting Comments
Comments are text in the source code that is not seen by visitors viewing the webpage. Toenter comments, click on the Insert menu and select the Comment icon .
Enter a comment in the window and click OK. The comment will be shown in the sourcecode.
Inserting Comments 65

Find and Replace Tool (Source and Split views)
Find and Replace tool is available under the Home menu.
FindFind patterns within the HTML source code of the page. Click on Options to view furthersearch options.
ReplaceReplace patterns within the HTML source code of the page.
Find and Replace Tool (Source and Split views) 66

Go toMoves the cursor to the previous or next specified line number relative to the current position.For example, if the cursor is currently at line 14, entering 4 and clicking Next will move thecursor to line 18.Clicking on Previous will move the cursor back to line 14.
Find and Replace Tool (Source and Split views) 67

Code Collapse (Source and Split views)
Code Collapse is a feature to collapse and minimize code blocks for easier nagivation.
In the example below, we will collapse the <STYLE> </STYLE> block of code.
Bottom image displays the source code after it has been collapsed.Expanding the code back to the original is a simple case of double clicking the html tag.
Code Collapse (Source and Split views) 68

GIF Animator
Use GIF Animator to animate images. Select an image and click on the Animate button fromthe Tools menu.
Frame originLeft Position/Top Position − Position the selected frame as desired.
Undraw MethodUndefined/Leave − Frames will remain, new frames will be shown above them.RestoreBackground − Background will be restored after each frame ends.RestorePrevious − Previous frame will be restored if that previous frame was set as leave.
GIF Animator 69

Frame Delay − Delay frame display in milliseconds.
Background Color − Change background color.
Insert Blank Frame − Insert a blank frame using the color picker.
Insert Image − Insert an image.
Movie Properties − Displays movie properties.
In the following example, we will insert the same image five times to create a simple effect ofit moving from top to bottom and vice versa.
In the screen above, we have already inserted the five images by clicking on the Insert buttonand selecting the same image.Frame delay has been set to a 500ms delay for each individual frame.
GIF Animator 70
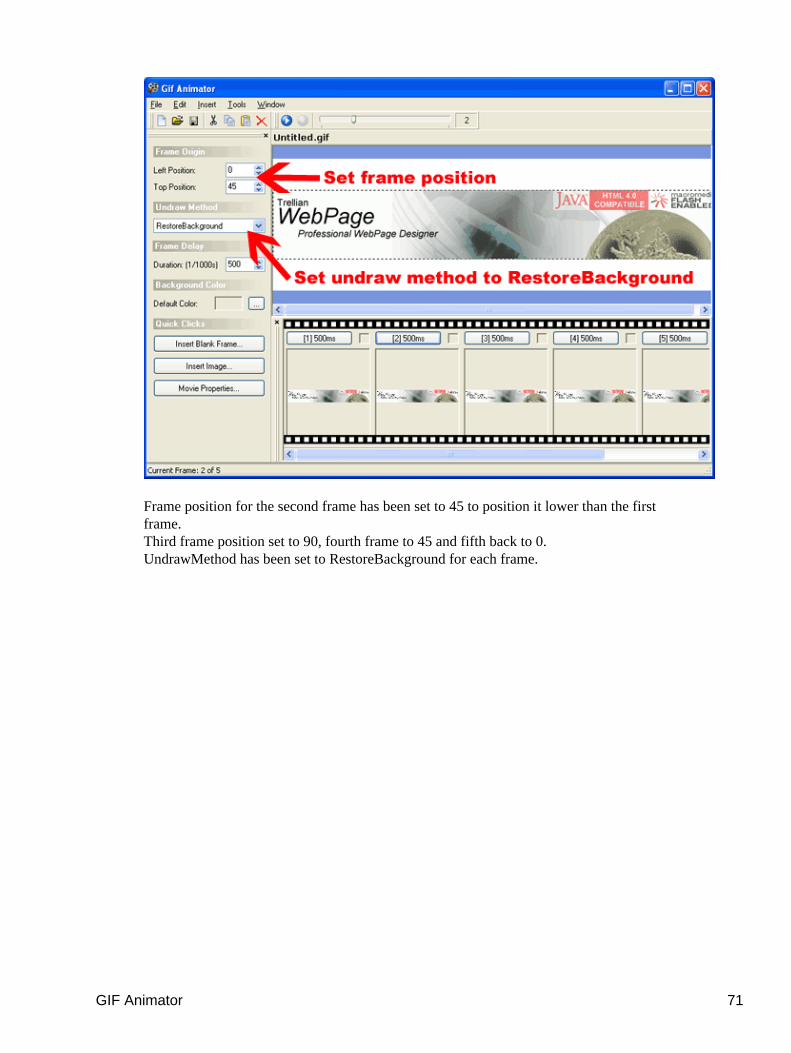
Frame position for the second frame has been set to 45 to position it lower than the firstframe.Third frame position set to 90, fourth frame to 45 and fifth back to 0.UndrawMethod has been set to RestoreBackground for each frame.
GIF Animator 71

To ensure the animation loops and repeats, tick these options in Movie Properties.
GIF Animator 72

To save this as a GIF animation, click on the Export Compressed GIF option in the Filemenu.
Resulting GIF image is displayed below.
GIF Animator 73

GIF Animator Menu Options
New − Creates a new animation.
Open − Opens an image.
Save − Save the current image.
Save As − Save the current image under a different name.
Export Compressed GIF − Export the animation as a gif file.
Live Dragging − Set by default, this allows you to click and drag images.
Close − Close GIF Animator.
GIF Animator Menu Options 74
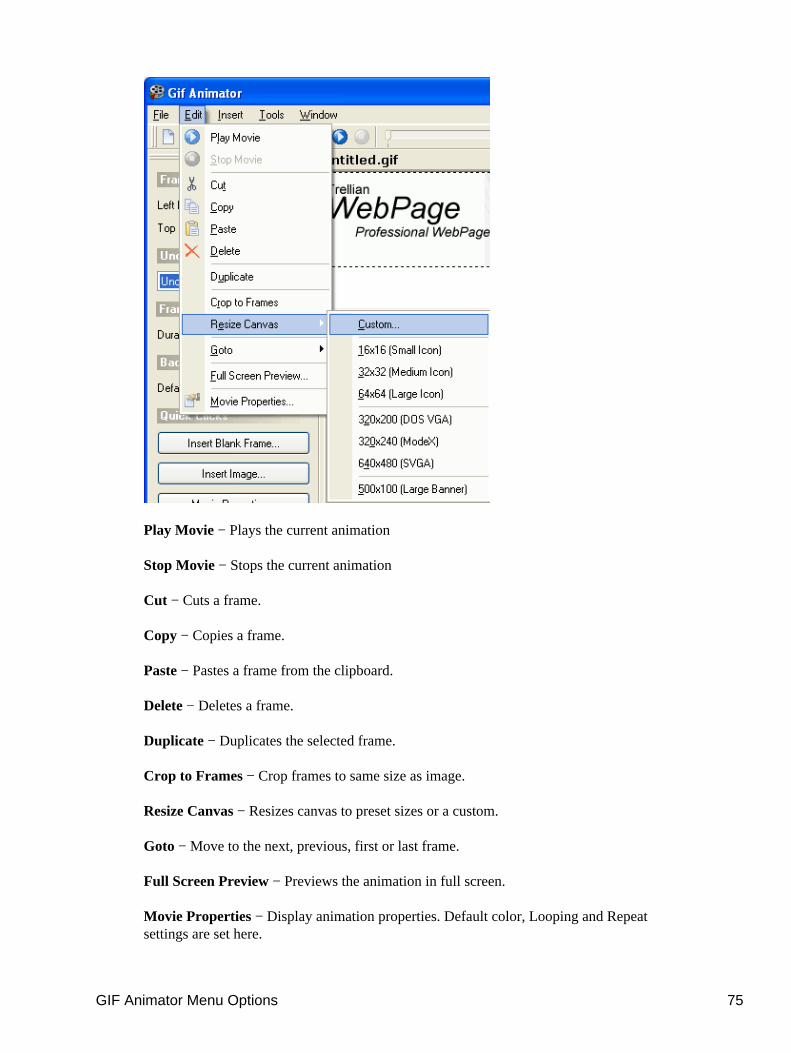
Play Movie − Plays the current animation
Stop Movie − Stops the current animation
Cut − Cuts a frame.
Copy − Copies a frame.
Paste − Pastes a frame from the clipboard.
Delete − Deletes a frame.
Duplicate − Duplicates the selected frame.
Crop to Frames − Crop frames to same size as image.
Resize Canvas − Resizes canvas to preset sizes or a custom.
Goto − Move to the next, previous, first or last frame.
Full Screen Preview − Previews the animation in full screen.
Movie Properties − Display animation properties. Default color, Looping and Repeatsettings are set here.
GIF Animator Menu Options 75

Image − Inserts an image.
Text − Inserts text.
Blank Frame − Inserts blank frame.
Create HTML Code − Creates HTML code to insert your animation.
Apply Transition − Apply transition.
Flatten Current Frame − Flattens currently selected frame.
Resize Frame − Resize frame.
Rotate Frame − Rotate frame.
Adjust Brightness − Adjust brightness settings.
Adjust Gamma − Adjust gamma settings.
Set Plugin Path − Set plugin path.
Plugins − Plugins.
GIF Animator Menu Options 76

Movie Frames − Display movie frames window.
Movie Properties − Display movie properties window.
GIF Animator Menu Options 77

Inserting JavaScript
Internal Javascript
JavaScript is a script/programming language that can be embedded into a web page to addfunctionality.
To insert Javascript code directly into the webpage click on the Insert menu and selectInternal Script from the Insert Script submenu.
The Javascript editor will be displayed.
Select the Javascript version from the drop down menu and enter the script code. Whenfinished click OK and the script will be incorporated into the webpage. Other scriptlanguages can also be inserted in the same manner.
External Javascript
Inserting JavaScript 78

To insert Javascript from a .js file click on the Insert menu and select External Script from theInsert Script submenu. Locate the .js file and click Open to insert the script.
Visitor Javascript
To control webpage visitor access to some browser features, eg. right clicking, click on theInsert menu and select the desired option in the Visitor Access submenu from the Insert Scriptmain menu.
Note: These functions provide basic access restrictions, however there are alternativemethods that can be used to circumvent Javascript based restrictions.
Inserting JavaScript 79

Inserting HTML code
To insert HTML code from another file, click on the Insert menu and select the HTMLMarkup icon.
Select the file to insert, and click the OK button. The file contents will be inserted at thecurrent cursor location in the Source window.
Inserting HTML code 80

Aligning Objects and Text
Text
To align paragraphs of text and/or objects, highlight the text and select the desired alignmentbutton.
Object Alignment
Objects can be moved between layers (uses the z scale), behind text and floated (aligned leftor right with content flowing around the element). To apply object alignment, select theobject and choose an alignment option from the Home menu. When an element is locked, itwill not move between layers.
The image below shows 3 separate images of a red, blue and yellow rectangle at the top of thepage. The separate rectangles were then floated, and dragged to overlap each other (shown atthe bottom of the page). Using the Send to front and Send to back menu options, therectangles were arranged in layers, so what apears to be a single image is actually made up of3 separate images.
Aligning Objects and Text 81

Ruler
To assist in lining up objects, a ruler can be toggled by clicking on the View menu andclicking on Ruler.
Gridlines
Gridlines can be toggled by clicking on the View menu and then Gridlines. Snapping objectsto gridlines and the size of grids can be managed within the Gridlines submenu.
Aligning Objects and Text 82

Page Statistics
To view page statistics, click on the View menu and select the Page Statistics icon.
Page Links
To view link details of the current page, click on the View menu and select the Links icon.
Page Statistics 83

Each link on the page is listed and highlighted when selected. Links can also be edited in thisscreen.
Document Tree
To view the document tree, click on the View menu and select the Source Tree icon.
The document tree shows the HTML tag layout for the webpage. The HTML code for each
Document Tree 84

tag can be viewed by clicking on the tag name.
Site Explorer
Site Explorer is a file system browser, click on the View menu and select the Site Explorericon to open it.
Site Explorer 85

To navigate, double click the desired folder or enter in the directory path.
Site Explorer 86

HTML validation
Validating the HTML code of your webpage can be achieved by clicking on the Tools menuand selecting validate.
Validation is a process of checking your webpage against a standard, such as those publishedby the World Wide Web Consortium (W3C) for HTML.
HTML tidy
The tidy tool located in the same Tools menu, will "tidy" up the HTML code of the webpage.This is achieved by applying the desired filtering options.
HTML validation 87

HTML validation 88

Previewing a webpage
Webpages can be previewed in the Preview window or in a browser window. The previewwindow allows the webpage to be previewed in different screen resolutions. Checking awebpage this way ensures that a webpage will not display strangely in different resolutions.
To preview a webpage in a browser window, select the Preview in Browser from theWebPage menu. Alternatively you can click on the browser icons located at the top rightcorner of the toolbar. To change the preview resolution, select a resolution from the dropdown menu.
Previewing a webpage 89

Saving a page
To save the current page select Save from the WebPage menu or click on the save button.
To save the project with a different file name, select Save As from the WebPage menu.
Saving a page 90

Exporting a webpage
The export function converts your page so it is ready to be uploaded. The images will becopied to the export folder to make uploading images more convenient.
To export a webpage select Export page from the WebPage menu.
Select either htm or html format (either can be used) and click Save
You can now upload your work − simply upload your web page and its associated folder.
eg. If you saved your page as "Johns website", upload the "johns website.html" file and the"johns website" folder.
Exporting a webpage 91
Publishing a webpage
When you have finished working on your web page, you need to publish/upload it to theInternet.
Some ISP's provide space for your web pages with their ISP accounts, however if you areplanning to run a business from your site, it will look much more professional with it's owndomain name.
Web hosting and domain names can be purchased from Vendercom.com . Domainregistration costs are usually less than $50 USD per year. Web hosting can cost anywherefrom $5 per month, up to several hundred dollars a month, depending on the size of yourwebsite and the amount of traffic (visitors) to your site (also known as bandwidth). Whencreating a new website, we recommend starting with a small web hosting plan and upgradingas the traffic and size of the site begins to grow
To publish/upload website files, an FTP program (File Transfer Protocol) is required.Webpage has a built in FTP client, however you can configure Webpage to launch anotherFTP program.
To automatically launch a different FTP program when the Publish menu item is clicked,enter the path to the FTP executable file in the Webpage preferences. (click on the Viewmenu and select Preferences).
Basic uploading instructions.
To publish(upload) a website/webpage, click on the WebPage icon and select Publish1.
Publishing a webpage 92

Click the Connect button.2.
Enter a name for the connection in the FTP site name field. Enter the hostname, port,username and password to connect to your web host's server. Most servers will belistening on port 21, however you may need to contact your web hosting provider forinstructions/settings. You can enter a remote path if you know it, or you can leave thefield blank.
3.
Publishing a webpage 93

Click the Connect button.4.
Locate the files to upload on the Local computer side, and click the arrow button (−>) to transfer the files to the relevant folder/directory on the server. (you may needto check the upload folder/directory name with your hosting provider)
5.
Publishing a webpage 94

After uploading, check that the pages display correctly in a web browser.6.
Disconnect from the web server.7.
Publishing a webpage 95

SEO (Search Engine Optimization) Tools
Search Engine Optimization is the process of optimizing your webpages to increase web sitetraffic and search engine visibility. WebPage offers easy access to the SEO Toolkit suite ofprograms to assist you in this process.
Click on the Tools menu and select the desired tool in the SEO Tools section.Mouse over the icons to view tool details.
SEO Toolkit − Opens SEO Toolkit main program.
Keyword Manager − Keyword Manager tool for keyword research.
Ranking Advisor − Provides SEO suggestions and advice by analyzing a webpage.
Meta Tag Editor − Edit Meta Tags.
Reciprocal Link Checker − Easily check reciprocal links without wasting time doing itmanually.
Keyword Density Tool − Checks the keyword density of a particular page.
Domain manager − Manage and check domains with this tool.
Competitive Intelligence − Monitor your competitor's websites.
Meta Tag Browser − Manager and Edit metatags of multiple pages.
ROI Calculator − Return on Investment calculators.
Server Header Check − Checks the server header.
Submit Wolf − Opens the SubmitWolf website submission tool.
SEO (Search Engine Optimization) Tools 96

Further details on SEO Toolkit can be viewed at http://trellian.com/seotoolkit
SubmitWolf and SEO Toolkit links can also be accessed via the Resources menu.This also includes a link to Keyword Discovery, a service that compiles keyword searchstatistics from over 180 search engines world wide.
You can take advantage of these statistics to:
Optimize the content of your web pages and your meta tags♦ Maximize your pay per click campaigns♦ Take traffic away from your competitors♦
Further details on Keyword Discovery can be viewed at http://www.keyworddiscovery.com
SEO (Search Engine Optimization) Tools 97

SEO (Search Engine Optimization) Tools 98

Interface
WebPage's interface features four windows to view your webpage.
Editor Window − WYSIWYG editing.♦ Source Window − Source code editing.♦ Preview Window − Preview of the webpage.♦ Split Window − Combination of Preview and Source Window.♦
Interface 99

Menu Options
Menu can be toggled by selecting the View menu, Preferences and enabling Show Menu
File
New Create a new page
Open Opens an existing page
Open Recent Shows a list of the recently opened pages
Save Saves changes to the page
Save As Saves changes to the page with a different file name
Revert Reverts to the saved version of the page
Import Page Imports the source code from a URL
Export Page Exports the web page to HTML only, complete web page, web archivefile, or a text file
Preview inBrowser
Previews the webpage in a web browser
Publish Opens the specified FTP/upload program
Upgrade Connects to the Trellian upgrade server to check for software upgrades
Exit Exits the program
Menu Options 100

Edit
Page properties Displays the page property settings
Undo Undoes the previous command
Redo Duplicates the previous command
Cut Cuts the selected item to the clipboard
Copy Copies the selected item to the clipboard
Paste Pastes the item from the clipboard
Delete Deletes the selected item
Duplicate Duplicates the selected item
Select All Selects all items on the webpage
Select None Deselects all items on the webpage
Unlink Removes a link from the selected text
Find Searches the webpage for the text entered
Find Next Finds the next occurrence of the text
Replace Finds and replaces text in Source or Split window
Check spelling Checks the spelling on the webpage
Preferences Displays the options/preferences for the software
Menu Options 101

Insert
Header Inserts header tags into the source code
Insert Image Inserts an image
Line Break Inserts a <BR> (line break) tag
Full line break Inserts a <BR clear=all> (line break) tag
Horizontal Rule Inserts a horizontal line
Bulleted List Creates a bulleted list
Numbered List Creates a numbered list
Anchor Inserts an anchor
link Creates a link
Java Applet Inserts a java applet (.class file)
EmbeddedPlugin
Inserts an embedded plugin
ActiveX Control Displays a list of activeX controls to insert
IFrame Inserts an IFrame (a frame in the center of the non−framed webpage)
Menu Options 102

DIV Element Inserts DIV tags
Table Inserts a table
Marquee Inserts a marquee (scrolling text)
Comment Inserts a comment (text not displayed in web browsers)
JavaScript Insert a js file, create an internal script or insert visitor access restrictioncode
HTML Markup Opens codepad to allow insertion of HTML code
Time/Date Inserts the current time and date
Format
Font Displays the font selection window
Menu Options 103

Font Style Sets the font style
Font Size Sets the font size
Font Color Sets the font color
Charset Select upper or lower case characters
Real Time Filters Displays a variety of image filters
Page Color Sets the page background color
Scroll Bar Color Sets scroll bar color
Preformatted Sets the selected text to preformatted (<PRE> tags)
Normal Sets the selected text to normal
Heading 1 Places the selected text in H1 tags
Heading 2 Places the selected text in H2 tags
Heading 3 Places the selected text in H3 tags
Heading 4 Places the selected text in H4 tags
Heading 5 Places the selected text in H5 tags
Heading 6 Places the selected text in H6 tags
Address Formats the text in the address format (ADDRESS tags)
List Formats the selected text to a list
Paragraph Sets the paragraph formatting, eg. heading 1
Paragraph Alignment Aligns the selected text left, center or right
Object Alignment Aligns the selected object as specified
Indent Paragraph Indents the paragraph
Outdent Paragraph Outdents the paragraph
Remove Formatting Removes existing formatting
Menu Options 104

Options
Table Inserts a table at the current cursor position
Insert Cell Inserts a cell into the table
Insert Column Inserts a column into the table
Insert Row Inserts a row into the table
Autofit Distributes select rows or columns evenly
Delete Cells Deletes selected Cells
Delete Column Deletes the selected column
Delete Row Deletes the selected row
Split Cell Splits the selected cell into two cells
Merge Cells Merges two cells into one
Menu Options 105

Image
Insert Image Inserts an image
Insert Rollover Image Inserts an image
Edit Edits an image using the default image editor
Animate Opens the image animator
Restore Original Image Restores the image to its original state
Transform Flip, rotate or mirrors the image
Filter Applies various image filters
Modify Color Modifies the color, sharpness, brighness etc. of the image
Plugin Applies a photoshop plugin to the image
Resample Image Resamples the image using the selected algorithm
Convert Converts the image to a different file format
Element
ElementProperties
Displays the properties of the selected element
Float Element Allows text to wrap around the element
Send to Back Changes the display order of the elements, sending the selected elementto the back
Bring to Front Changes the display order of the elements, moving the selected elementto the font (top)
Send Below Text
Menu Options 106
Changes the display order of the elements, sending the selected elementbehind any text
Bring AboveText
Changes the display order of the elements, bringing the selectedelement in front any text
Bring Forward Changes the display order of the elements, bringing the selectedelement forward one level
Send Backward Changes the display order of the elements, sending the selected elementback one level
Lock element Prevents the element from moving between layers
Gridlines Displays gridlines to assist in object positioning
Snap to Grid Automatically aligns the element with the grid
Grid Size Set gridline size
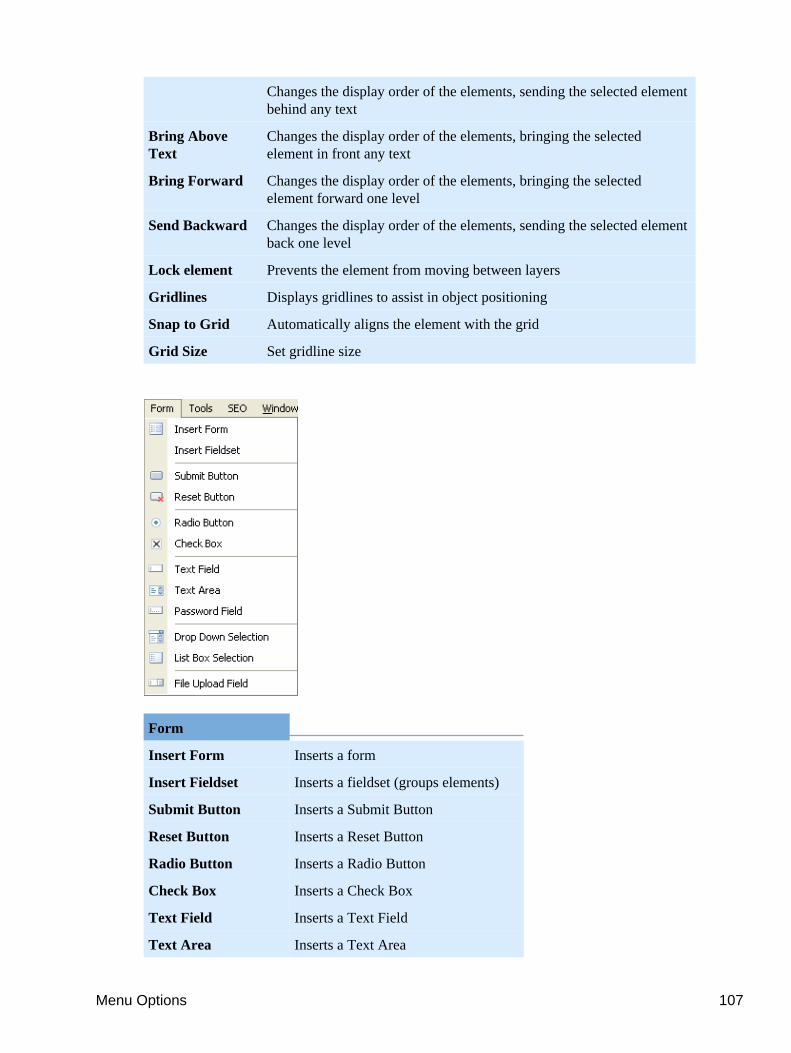
Form
Insert Form Inserts a form
Insert Fieldset Inserts a fieldset (groups elements)
Submit Button Inserts a Submit Button
Reset Button Inserts a Reset Button
Radio Button Inserts a Radio Button
Check Box Inserts a Check Box
Text Field Inserts a Text Field
Text Area Inserts a Text Area
Menu Options 107

Password Field Inserts a Password Field
Drop Down Selection Inserts a Drop Down Selection menu
List Box Selection Inserts a List Box Selection
File Upload Field Inserts a File Upload Field
Tools
Page Statistics Displays information about the HTML document
META Tag Editor Opens the META tag editor
Links Displays information about the Hyperlinks in the webpage
Javascript Opens the Javascript / script editor
Source Tree Displays information about the HTML document structured byHTML Tags
Image Editor Opens the default windows image editor
Image Map Editor Opens Trellian Image Mapper
Validate Validates the HTML in the source window
Tidy Tidies the HTML in the source window
Menu Options 108

SEO ToolsA prompt to download the software will display if they are notinstalled
SEO Toolkit Opens the SEO Toolkit software suite
Domain Manager Opens the Domain Manager
Keyword Manager Opens the Keyword Manager
Keyword DensityAnalyzer
Opens the Keyword Density Analyzer tool
Competitive Intelligence Opens the Competitive Intelligence tool
Ranking Advisor Opens the Ranking Advisor
Submit URL Opens the URL Submission tool
Meta Tag Browser Opens the Meta Tag Browser
Meta Tag Editor Opens the Meta Tag Editor
ROI Calculator Opens the ROI Calculator
Links Useful links to help promote your website
Reciprocal LinkChecker
Opens the Reciprocal Link Checker
Server Header Check Opens the Server Header Checker
Menu Options 109

Window menu
Site Explorer Displays the file browser
File Tools Toggles display of the File tool buttons
Edit Tools Toggles display of the Edit tool buttons
HTML Elements Toggles display of the HTML Elements buttons
Form Elements Toggles display of the Form Elements buttons
Table Editing Tools Toggles display of the Table Editing Tools buttons
Font Style Toggles display of the Font Style buttons
Font Face Toggles display of the Font Face buttons
Font Color Toggles display of the Font color buttons
Tools Toggles display of the tools buttons
Common Tools Toggles display of the common tools buttons
SEO Tools Toggles display of the seo tools buttons
Ruler Toggles display of the ruler
Menu Options 110

Help
About Displays information about the software
Manual Opens manual in a browser window
HTML Reference Displays HTML reference documents
CSSDisplays Cascading Style sheets (CSS) referencedocuments
Menu Options 111

The Editor window
The editor window is where the WYSIWYG editing takes place. HTML elements can bedragged and dropped in the editor window and WebPage will generate the HTML code in thebackground.
The Editor window 112

The Preview window
The Preview window displays a preview of the webpage. This is how the webpage willappear in a browser window. To display the page using an installed web browser, click onrelevant browser icon at the top right hand corner of the main toolbar. Alternatively you canclick on the WebPage icon, "Preview in Browser" and the desired browser.
To change the preview resolution, select a resolution from the drop down menu.
The Preview window 113

The Source Tab
The Source window displays the HTML code created from the editor tab. HTML code can beedited in the source window and the changes will be reflected in the editor and previewwindows.
Located on the left side of the source window are the following tools.
Line numbers: Displays line numbers.♦ Comment selected code: Inserts HTML comment tags around selected text.♦ Remove selected code: Removes HTML comment tags from selected text.♦ Indent code: Indents selected code.♦ Outdent code: Outdents selected code.♦ Validate tool: Runs the HTML validation tool.♦
Right side lists common html tags such as <font></font>, <b></b>, <br> etc.
The Source Tab 114

The Source Tab 115

Customizing the Interface
Interface elements such as buttons and toolbars can be toggled on or off from the Windowmenu. To customize the interface select the items to display on the screen from the Windowmenu.
Customizing Toolbars
Right click an icon inside the ribbon or the quick access toolbar to customize the settings.
Customizing the Interface 116

Minimize ribbon removes the ribbon entirely.
The quick access toolbar can be moved below or above the ribbon.
To add a tool to the quick access toolbar, select customize quick access toolbar.Select the desired tool and use the Add and Remove buttons to customize.
Alternatively you can also right click the icon and left click Add to quick access toolbar.
Customizing the Interface 117