Embed Size (px)
Citation preview
WebOPSS Field User Guide
Web-based Operations Safety System
Version 3.1
June 12, 2012
13135 Lee Jackson Memorial Hwy, Suite 340
Fairfax, VA 22033
703-230-0100
703-230-0150 FAX
www.TeamAskin.com
WebOPSS Field User Guide Version 3.1 June 12, 2012
Team Askin Technologies, Inc. Page ii
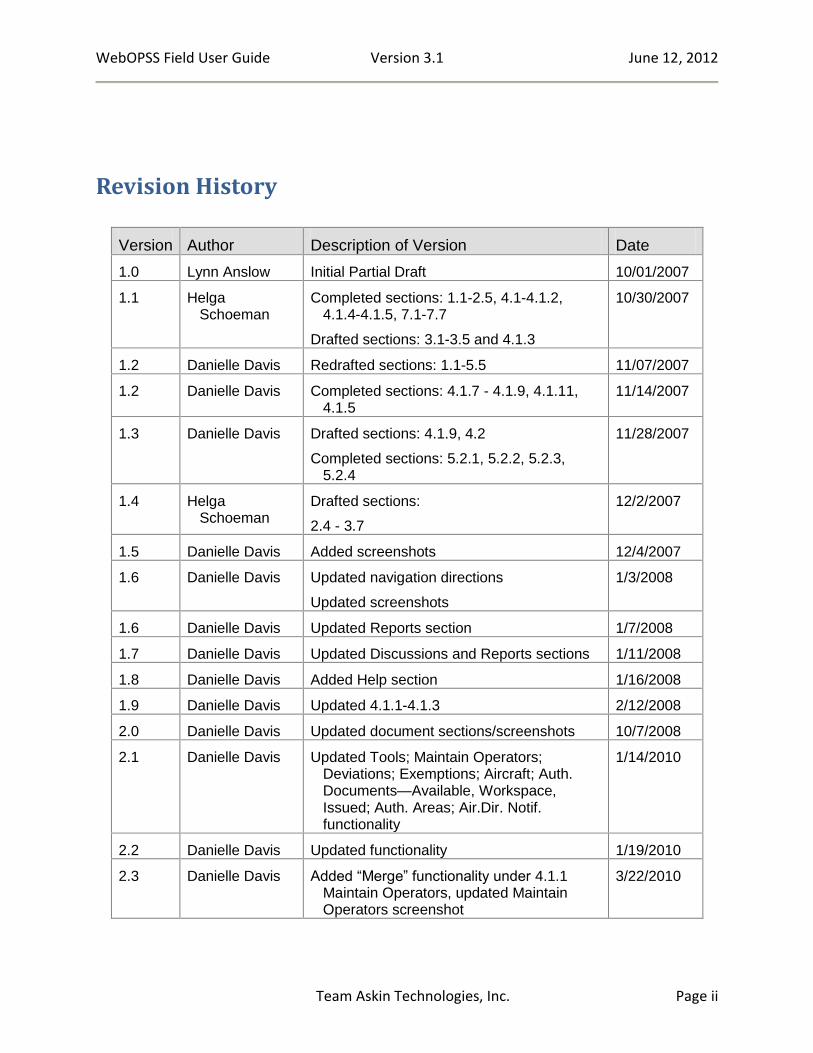
Revision History
Version Author Description of Version Date
1.0 Lynn Anslow Initial Partial Draft 10/01/2007
1.1 Helga Schoeman
Completed sections: 1.1-2.5, 4.1-4.1.2, 4.1.4-4.1.5, 7.1-7.7
Drafted sections: 3.1-3.5 and 4.1.3
10/30/2007
1.2 Danielle Davis Redrafted sections: 1.1-5.5 11/07/2007
1.2 Danielle Davis Completed sections: 4.1.7 - 4.1.9, 4.1.11, 4.1.5
11/14/2007
1.3 Danielle Davis Drafted sections: 4.1.9, 4.2
Completed sections: 5.2.1, 5.2.2, 5.2.3, 5.2.4
11/28/2007
1.4 Helga Schoeman
Drafted sections:
2.4 - 3.7
12/2/2007
1.5 Danielle Davis Added screenshots 12/4/2007
1.6 Danielle Davis Updated navigation directions
Updated screenshots
1/3/2008
1.6 Danielle Davis Updated Reports section 1/7/2008
1.7 Danielle Davis Updated Discussions and Reports sections 1/11/2008
1.8 Danielle Davis Added Help section 1/16/2008
1.9 Danielle Davis Updated 4.1.1-4.1.3 2/12/2008
2.0 Danielle Davis Updated document sections/screenshots 10/7/2008
2.1 Danielle Davis Updated Tools; Maintain Operators; Deviations; Exemptions; Aircraft; Auth. Documents—Available, Workspace, Issued; Auth. Areas; Air.Dir. Notif. functionality
1/14/2010
2.2 Danielle Davis Updated functionality 1/19/2010
2.3 Danielle Davis Added “Merge” functionality under 4.1.1 Maintain Operators, updated Maintain Operators screenshot
3/22/2010
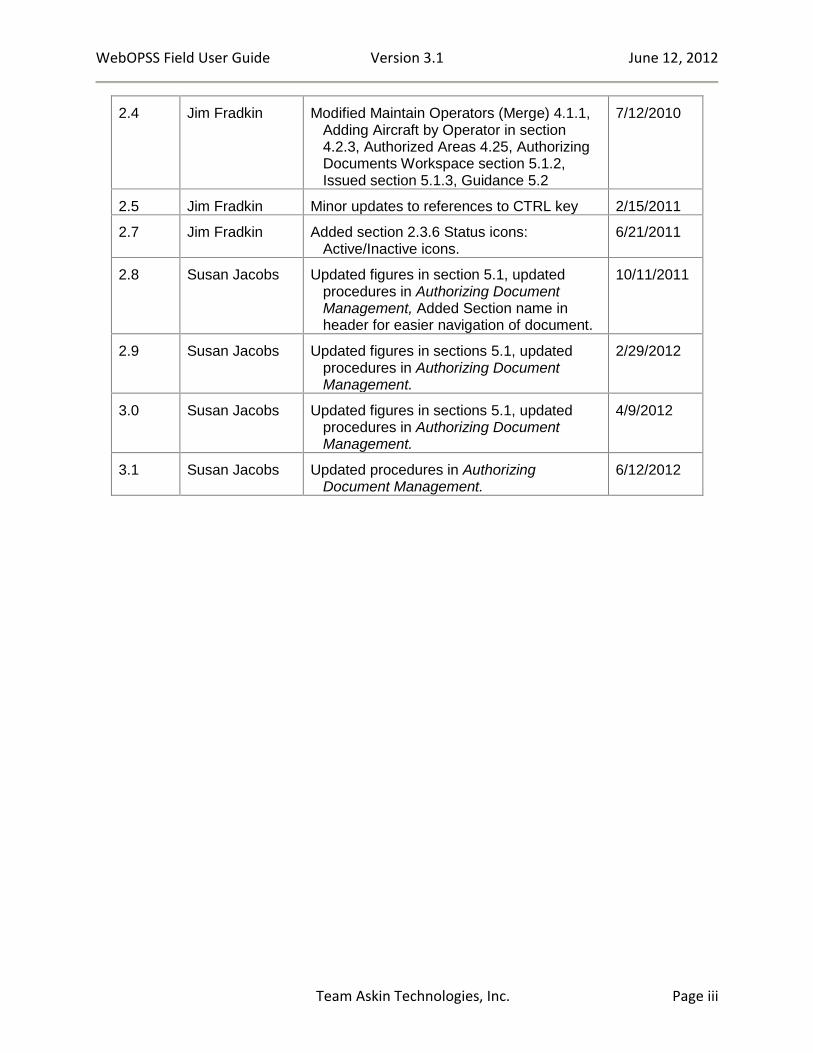
WebOPSS Field User Guide Version 3.1 June 12, 2012
Team Askin Technologies, Inc. Page iii
2.4 Jim Fradkin Modified Maintain Operators (Merge) 4.1.1, Adding Aircraft by Operator in section 4.2.3, Authorized Areas 4.25, Authorizing Documents Workspace section 5.1.2, Issued section 5.1.3, Guidance 5.2
7/12/2010
2.5 Jim Fradkin Minor updates to references to CTRL key 2/15/2011
2.7 Jim Fradkin Added section 2.3.6 Status icons: Active/Inactive icons.
6/21/2011
2.8 Susan Jacobs Updated figures in section 5.1, updated procedures in Authorizing Document Management, Added Section name in header for easier navigation of document.
10/11/2011
2.9 Susan Jacobs Updated figures in sections 5.1, updated procedures in Authorizing Document Management.
2/29/2012
3.0 Susan Jacobs Updated figures in sections 5.1, updated procedures in Authorizing Document Management.
4/9/2012
3.1 Susan Jacobs Updated procedures in Authorizing Document Management.
6/12/2012
WebOPSS Field User Guide Version 3.1 June 12, 2012
Team Askin Technologies, Inc. Page iv
Table of Contents 1. Introduction 1
1.1 WebOPSS Functions 1
1.2 About this User Guide 1
1.2.1 Field Guide User Capabilities 2
2. Using WebOPSS 2
2.1 WebOPSS System Requirements 2
2.2 Accessing WebOPSS 3
2.3 Screen Navigation and Common Practices 4
2.3.1 Standard Web Navigation 4
2.3.2 The WebOPSS Environment 5
2.3.3 Hyperlinks 5
2.3.4 Breadcrumbs 6
2.3.5 Common Controls 6
2.3.6 Status Icons and Warnings 7
2.3.7 Using the Search Filter 8
2.3.8 Context-Sensitive Help (CSH) 10
2.4 System Timeout 11
2.5 Maximizing the Workspace 11
2.6 Logging Out 12
2.7 WebOPSS Technical Support 12
3. Inbox 12
3.1 WebOPSS Home Tasks 12
3.2 Summary 13
3.3 Tasks 15
3.4 Messages 19
4. Data Management 22
4.1 Operators 22
4.1.1 Maintain Operators 22
4.1.2 My Operators 40
4.2 Operator Data 43
4.2.1 Addresses 45
4.2.2 Airworthiness Directive Notification (AD Notification) 47
4.2.3 Aircraft 50
4.2.4 Airports 61
4.2.5 Authorized Areas 64
4.2.6 Territories 72
4.2.7 Deviations 80
4.2.8 DBAs 82
WebOPSS Field User Guide Version 3.1 June 12, 2012
Team Askin Technologies, Inc. Page v
4.2.9 Exemptions 85
4.2.10 Type text in the filtering row (first row) of the appropriate exemption list. Then click outside the field where you typed. (For more information on how to use filters, see the “Status Icons and Warnings 85
4.2.11 Insurance 88
4.2.12 Personnel 88
4.3 Inspectors 92
5. Authorizing Documents Management 96
5.1 Authorizing Documents 97
5.1.1 Available 106
5.1.2 Workspace 109
5.1.3 Issued 123
5.1.4 Archived 126
5.2 Guidance 126
6. User Management 129
6.1 Users 129
6.1.1 Searching for Users 129
6.2 Editing User Account Information 131
7. Reports 134
7.1 Standard Reports 135
7.2 Custom Reports 138
8. Tools 138
WebOPSS Field User Guide Version 3.1 June 12, 2012 Introduction
Team Askin Technologies, Inc. Page 1
1. Introduction WebOPSS (Web-based Operations Safety System) is the next generation of application automation used by the Flight Standards Service (AFS) to collect data on operator activities, disseminate FAA policy to the operator and inspector communities, and generate and manage Authorizing Documents on behalf of the operator. The system is also a repository containing some of the most up-to-date data about the airline industry.
1.1 WebOPSS Functions
The WebOPSS system has four primary functions:
To generate regulatory and policy templates used to create operator-specific Authorizing Documents
To generate and manage operator-specific Authorizing Documents
To aid in the collection of non-regulatory, operator-specific data
To provide a reporting capability on data and metadata elements contained within the system.
1.2 About this User Guide
This WebOPSS Field User Guide provides information on the use of each application function within the Web Enabled Business Operations Safety System (WebOPSS) that a Certificate Holding District Office (CHDO) needs to use in order to fulfill the functions listed in “1.1 WebOPSS Functions” section. The processes in this guide are directed primarily towards field users, Aviation Safety Inspectors (ASI), Aviation Safety Assistants (ASA), and Aviation Safety Technicians (AST). For more specific administrative functions, System administrators, AFS SMEs, and AFS HQ Administrators will want to refer to the WebOPSS HQ User Guide. For the purpose of this document, the following terminology will be used:
User: this term will be used to identify any person accessing the WebOPSS system. Users are made up of all FAA Field, ASI, ASA, AST, and Administration individuals.
Designator: this term will be used to identify Certificate Holders/operators.
Authorizing Documents: this term will be used in reference to OpSpecs, MSpecs, TSpecs, LOAs, and Waivers. (For more information on Authorizing Documents, see Chapter “5 Authorizing Documents Management” on page 96.)
While it is not necessary to read this guide from beginning to end, it has been structured to introduce simple concepts and building block processes early and proceed to more complex procedures. Therefore, it may be helpful to read the introduction and scan preceding sections before attempting the operations of later sections.

WebOPSS Field User Guide Version 3.1 June 12, 2012 Using WebOPSS
Team Askin Technologies, Inc. Page 2
1.2.1 Field Guide User Capabilities
WebOPSS is designed as a roles-based system, meaning that a variety of standard Roles exist that have certain Permissions associated with each of them. Though the name of the specific roles available are not relevant for the purpose of this document, there are generic actions associated with the different user levels in the system:
Field users: have a wide range of capabilities in WebOPSS. They essentially have full access to all CHDO functionality, but cannot Issue Authorizing Documents or change Inspectors.
ASI users: have full access to all CHDO functionality.
ASA and AST users: have a similar range of capabilities as the Field user, but cannot sign or issue Authorizing Documents.
2. Using WebOPSS This section describes the system requirements for running WebOPSS, login and logout procedures, and an introduction to the interface.
2.1 WebOPSS System Requirements
WebOPSS is a Web application completely compatible with Internet Explorer Version 8 or higher. While WebOPSS may operate to some extent with other versions of Internet Explorer and other browsers, it is only guaranteed to work with Internet Explorer Version 8. The following is the minimum recommended system configuration for a workstation running WebOPSS in an Internet Explorer Version 8 browser:
PC with 1.5 gigahertz or higher processor clock speed recommended; 1 GHz minimum required (single or dual processor system); Intel Pentium/Celeron family, or AMD K6/Athlon/Duron family, or compatible processor recommended
128 megabytes (MB) of RAM or higher recommended (64 MB minimum supported; may limit performance and some features)
1.5 gigabytes (GB) of available hard disk space
Super VGA (800 x 600) or higher-resolution video adapter and monitor
Keyboard and Microsoft Mouse or compatible pointing device For Field Users, WebOPSS is now compatible with Internet Explorer 9. It is recommended that Compatibility View be turned ON if using IE 9 to view WebOPSS. Some pages may not display correctly if Compatibility View is OFF. To turn Compatibility View on in IE 9, click the Compatibility View button in the address bar to
make the icon change from an outline to a solid color .
WebOPSS Field User Guide Version 3.1 June 12, 2012 Using WebOPSS
Team Askin Technologies, Inc. Page 3
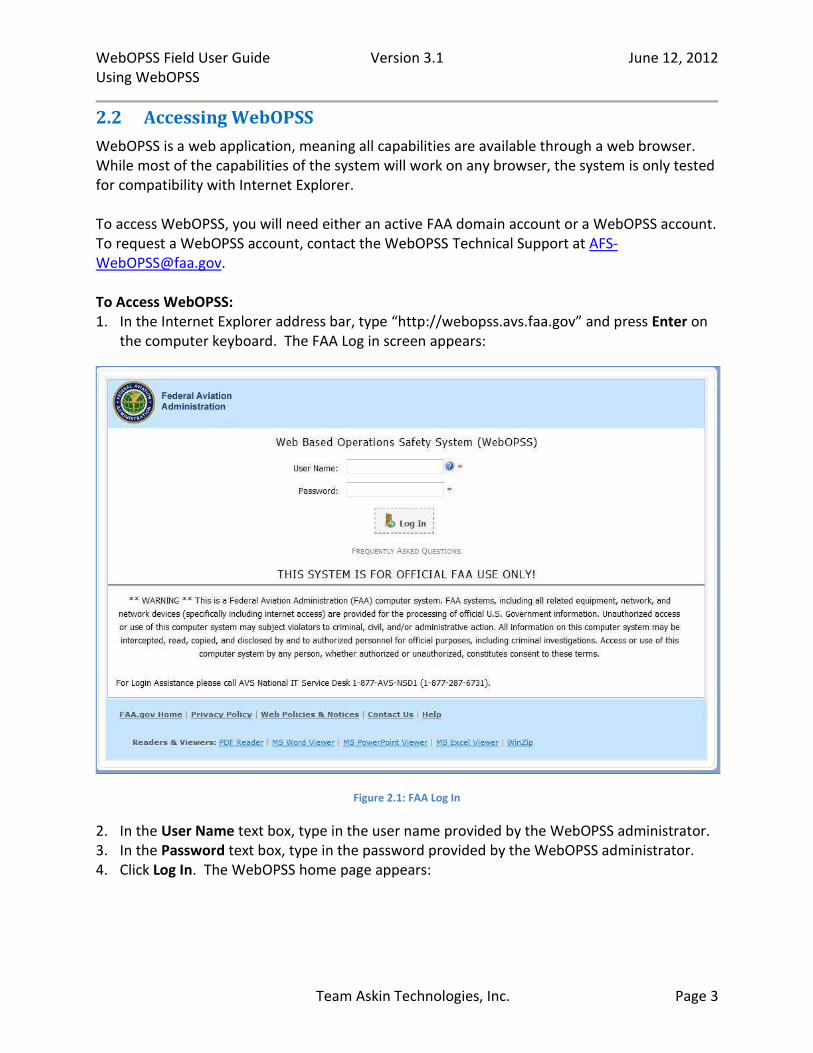
2.2 Accessing WebOPSS
WebOPSS is a web application, meaning all capabilities are available through a web browser. While most of the capabilities of the system will work on any browser, the system is only tested for compatibility with Internet Explorer. To access WebOPSS, you will need either an active FAA domain account or a WebOPSS account. To request a WebOPSS account, contact the WebOPSS Technical Support at [email protected]. To Access WebOPSS: 1. In the Internet Explorer address bar, type “http://webopss.avs.faa.gov” and press Enter on
the computer keyboard. The FAA Log in screen appears:
Figure 2.1: FAA Log In
2. In the User Name text box, type in the user name provided by the WebOPSS administrator. 3. In the Password text box, type in the password provided by the WebOPSS administrator. 4. Click Log In. The WebOPSS home page appears:

WebOPSS Field User Guide Version 3.1 June 12, 2012 Using WebOPSS
Team Askin Technologies, Inc. Page 4
Figure 2.2: WebOPSS Home Page
2.3 Screen Navigation and Common Practices
2.3.1 Standard Web Navigation
WebOPSS is a web-based application, meaning that it is accessed via the internet. This allows for users to access the system wherever they are, provided they have internet access. To open WebOPSS, users must first open their web browser, a software program designed to allow people to access the internet; Internet Explorer, Netscape Navigator, or Firefox are some examples of popular internet browsers. Once the browser is opened, in a screen called a “window,” users can access WebOPSS by typing the appropriate URL. The URL is the specific address of a web page and is entered in the address bar of the browser—in the figure below, the URL is “http://www.faa.gov/:”
Figure 2.3: Internet Explorer Browser Window Address Bar
WebOPSS Field User Guide Version 3.1 June 12, 2012 Using WebOPSS
Team Askin Technologies, Inc. Page 5
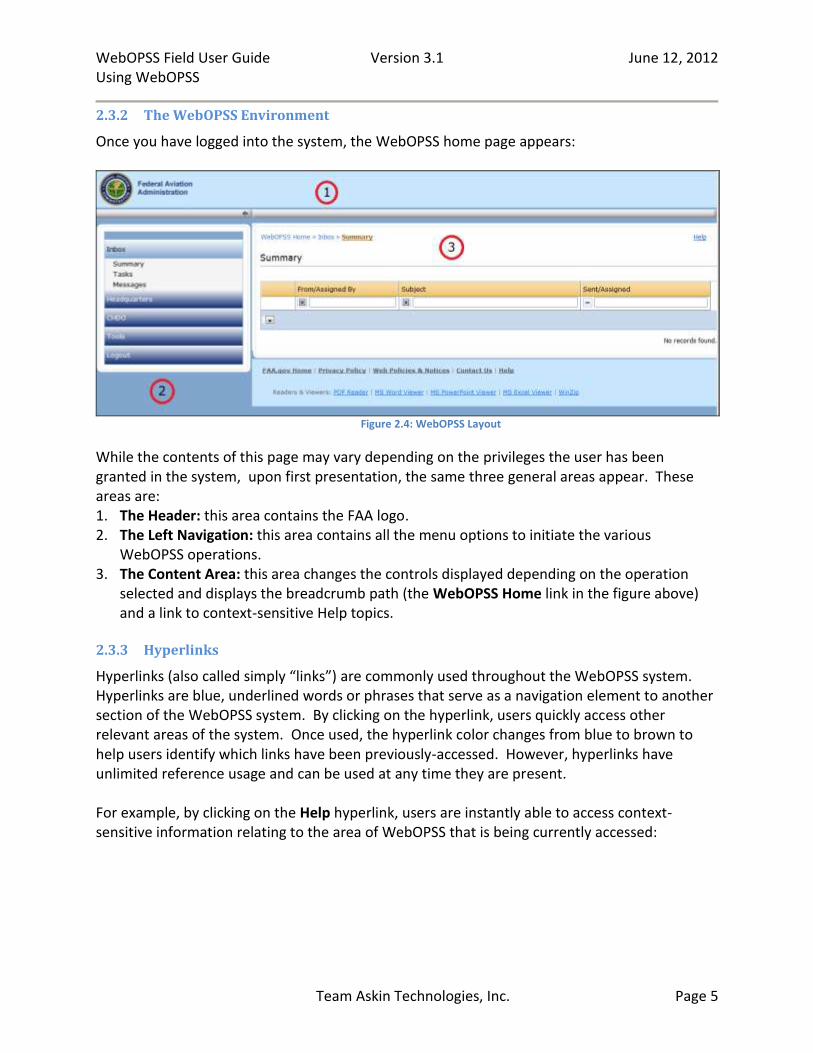
2.3.2 The WebOPSS Environment
Once you have logged into the system, the WebOPSS home page appears:
Figure 2.4: WebOPSS Layout
While the contents of this page may vary depending on the privileges the user has been granted in the system, upon first presentation, the same three general areas appear. These areas are: 1. The Header: this area contains the FAA logo. 2. The Left Navigation: this area contains all the menu options to initiate the various
WebOPSS operations. 3. The Content Area: this area changes the controls displayed depending on the operation
selected and displays the breadcrumb path (the WebOPSS Home link in the figure above) and a link to context-sensitive Help topics.
2.3.3 Hyperlinks
Hyperlinks (also called simply “links”) are commonly used throughout the WebOPSS system. Hyperlinks are blue, underlined words or phrases that serve as a navigation element to another section of the WebOPSS system. By clicking on the hyperlink, users quickly access other relevant areas of the system. Once used, the hyperlink color changes from blue to brown to help users identify which links have been previously-accessed. However, hyperlinks have unlimited reference usage and can be used at any time they are present. For example, by clicking on the Help hyperlink, users are instantly able to access context-sensitive information relating to the area of WebOPSS that is being currently accessed:

WebOPSS Field User Guide Version 3.1 June 12, 2012 Using WebOPSS
Team Askin Technologies, Inc. Page 6
Figure 2.5: Hyperlink
2.3.4 Breadcrumbs
The WebOPSS breadcrumb consists of hyperlinks that appear horizontally across the top of the content area below the header. This provides links back to each previous topic or subtopic page that the user navigated through in order to get to the current page. Breadcrumbs are a handy “shortcut” that users can use to get back to previously-visited pages:
Figure 2.6: Breadcrumb Path
2.3.5 Common Controls
Users will encounter many action buttons throughout the WebOPSS system. While some buttons are area-specific depending on where the user is in the system, there are several common buttons that they will encounter:
Add: this option allows the user to add a new item to a page/table.
Edit: this option allows the user to edit, or change, an existing item or data in a page/table.
Delete: this option allows users to permanently remove an existing item or data in a page/table.
Export: this option allows users to access a table’s contents in a non-web-related manner, such as in a spreadsheet using Microsoft Excel or in a document using Microsoft Word. Once accessed, the data can be printed or saved to a specific location on the user’s local computer.
Back: this option allows users to return to the previous screen viewed or the main “home” page for the selected area.
Save: this option allows users to save any data that has been entered or modified in a form or table.
In addition to action buttons, users also encounter a number of user interface widgets that require user input. There are several common interface items in WebOPSS:
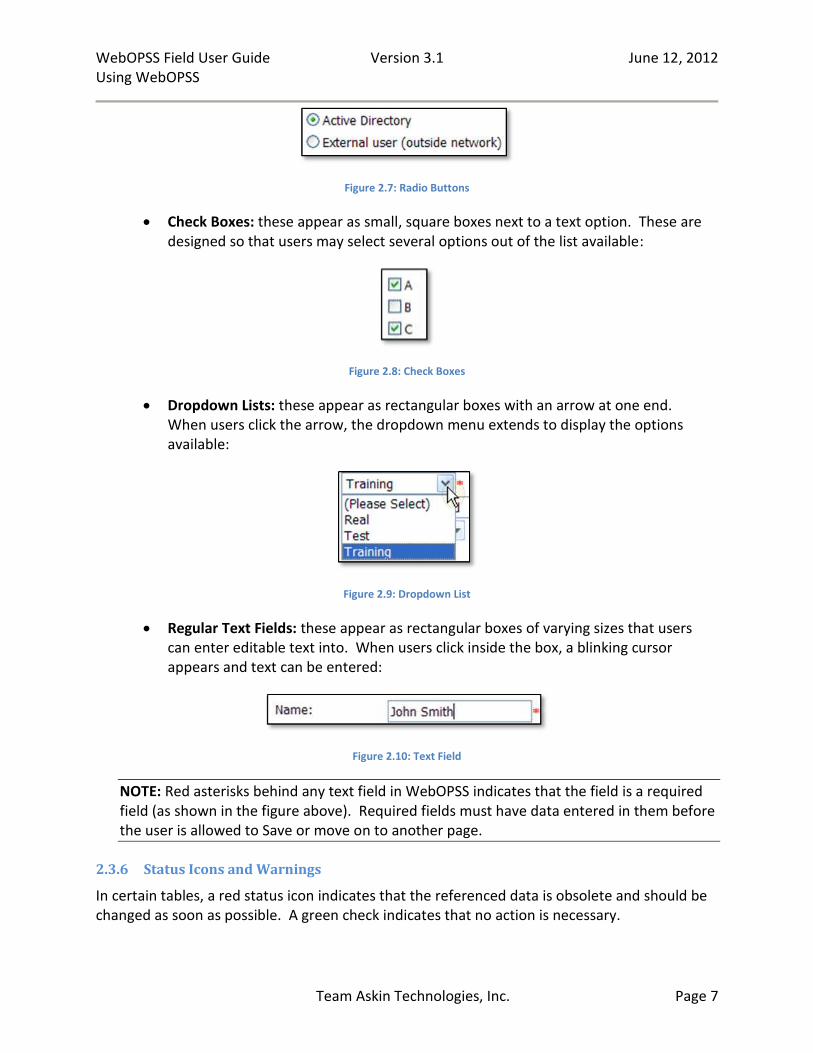
Radio Buttons: these appear as small, round circles next to a text option. These are designed so that users may only select one option out of the list available:
WebOPSS Field User Guide Version 3.1 June 12, 2012 Using WebOPSS
Team Askin Technologies, Inc. Page 7
Figure 2.7: Radio Buttons
Check Boxes: these appear as small, square boxes next to a text option. These are designed so that users may select several options out of the list available:
Figure 2.8: Check Boxes
Dropdown Lists: these appear as rectangular boxes with an arrow at one end. When users click the arrow, the dropdown menu extends to display the options available:
Figure 2.9: Dropdown List
Regular Text Fields: these appear as rectangular boxes of varying sizes that users can enter editable text into. When users click inside the box, a blinking cursor appears and text can be entered:
Figure 2.10: Text Field
NOTE: Red asterisks behind any text field in WebOPSS indicates that the field is a required field (as shown in the figure above). Required fields must have data entered in them before the user is allowed to Save or move on to another page.
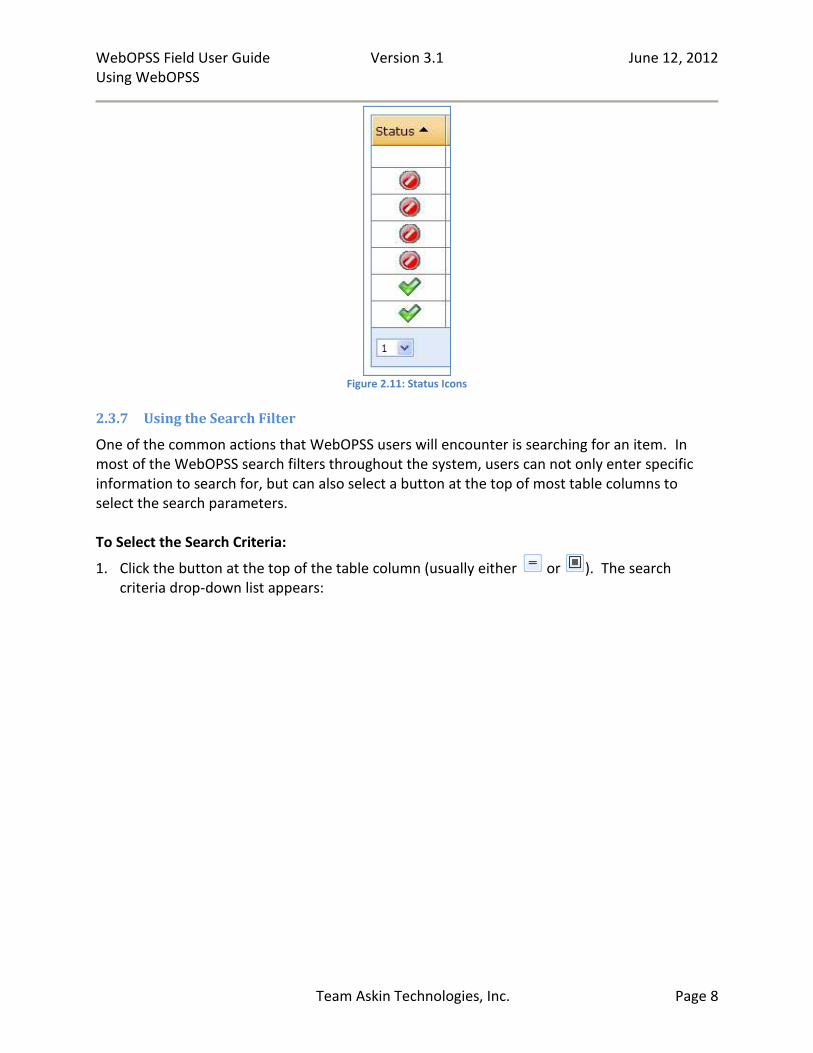
2.3.6 Status Icons and Warnings
In certain tables, a red status icon indicates that the referenced data is obsolete and should be changed as soon as possible. A green check indicates that no action is necessary.
WebOPSS Field User Guide Version 3.1 June 12, 2012 Using WebOPSS
Team Askin Technologies, Inc. Page 8
Figure 2.11: Status Icons
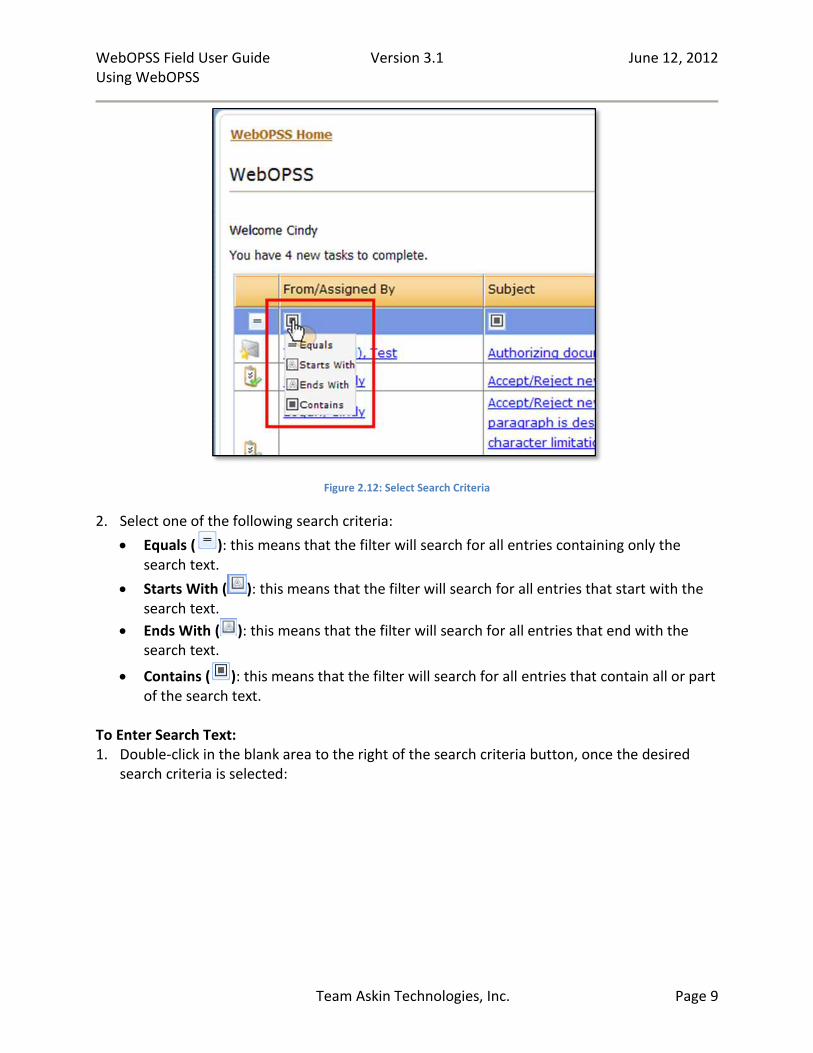
2.3.7 Using the Search Filter
One of the common actions that WebOPSS users will encounter is searching for an item. In most of the WebOPSS search filters throughout the system, users can not only enter specific information to search for, but can also select a button at the top of most table columns to select the search parameters. To Select the Search Criteria:
1. Click the button at the top of the table column (usually either or ). The search criteria drop-down list appears:
WebOPSS Field User Guide Version 3.1 June 12, 2012 Using WebOPSS
Team Askin Technologies, Inc. Page 9
Figure 2.12: Select Search Criteria
2. Select one of the following search criteria:
Equals ( ): this means that the filter will search for all entries containing only the search text.
Starts With ( ): this means that the filter will search for all entries that start with the search text.
Ends With ( ): this means that the filter will search for all entries that end with the search text.
Contains ( ): this means that the filter will search for all entries that contain all or part of the search text.
To Enter Search Text: 1. Double-click in the blank area to the right of the search criteria button, once the desired
search criteria is selected:
WebOPSS Field User Guide Version 3.1 June 12, 2012 Using WebOPSS
Team Askin Technologies, Inc. Page 10
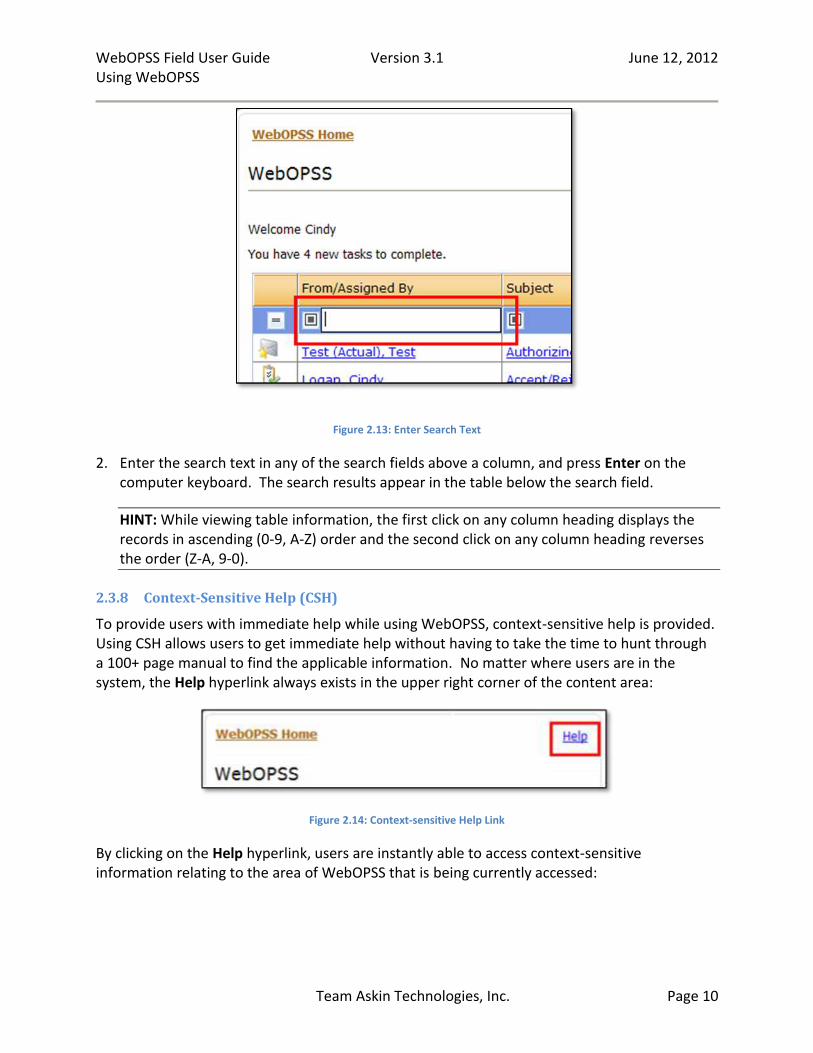
Figure 2.13: Enter Search Text
2. Enter the search text in any of the search fields above a column, and press Enter on the computer keyboard. The search results appear in the table below the search field.
HINT: While viewing table information, the first click on any column heading displays the records in ascending (0-9, A-Z) order and the second click on any column heading reverses the order (Z-A, 9-0).
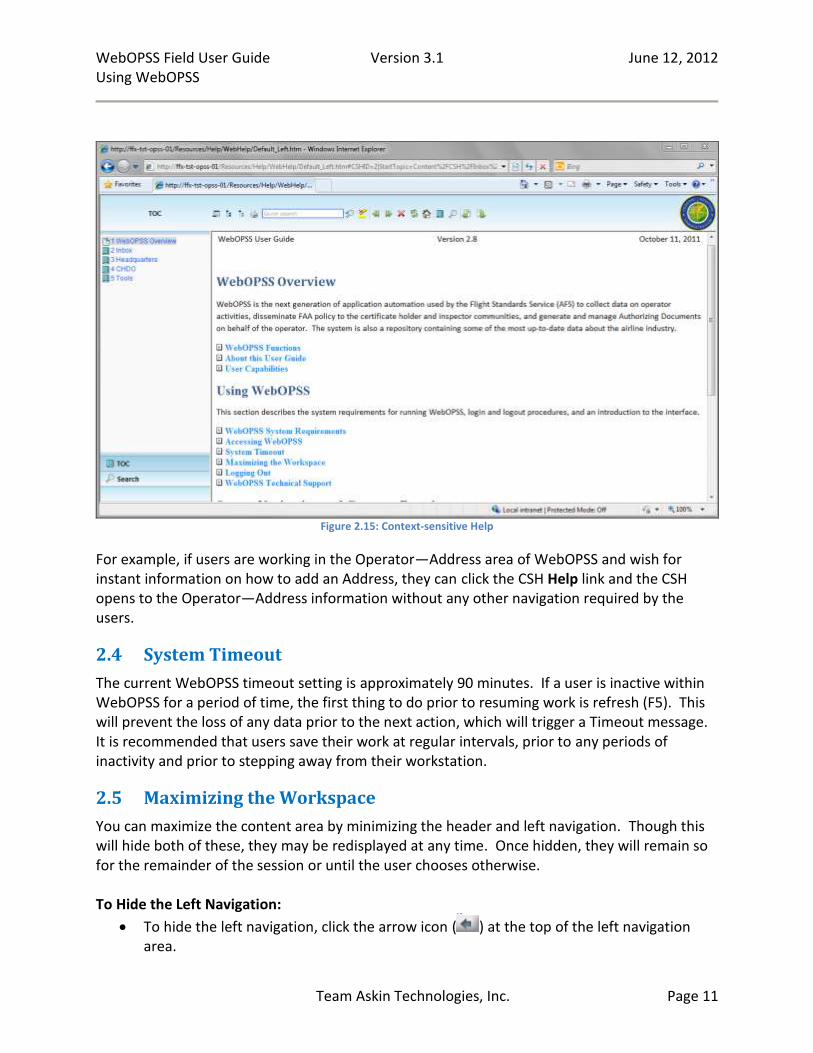
2.3.8 Context-Sensitive Help (CSH)
To provide users with immediate help while using WebOPSS, context-sensitive help is provided. Using CSH allows users to get immediate help without having to take the time to hunt through a 100+ page manual to find the applicable information. No matter where users are in the system, the Help hyperlink always exists in the upper right corner of the content area:
Figure 2.14: Context-sensitive Help Link
By clicking on the Help hyperlink, users are instantly able to access context-sensitive information relating to the area of WebOPSS that is being currently accessed:
WebOPSS Field User Guide Version 3.1 June 12, 2012 Using WebOPSS
Team Askin Technologies, Inc. Page 11
Figure 2.15: Context-sensitive Help
For example, if users are working in the Operator—Address area of WebOPSS and wish for instant information on how to add an Address, they can click the CSH Help link and the CSH opens to the Operator—Address information without any other navigation required by the users.
2.4 System Timeout
The current WebOPSS timeout setting is approximately 90 minutes. If a user is inactive within WebOPSS for a period of time, the first thing to do prior to resuming work is refresh (F5). This will prevent the loss of any data prior to the next action, which will trigger a Timeout message. It is recommended that users save their work at regular intervals, prior to any periods of inactivity and prior to stepping away from their workstation.
2.5 Maximizing the Workspace
You can maximize the content area by minimizing the header and left navigation. Though this will hide both of these, they may be redisplayed at any time. Once hidden, they will remain so for the remainder of the session or until the user chooses otherwise. To Hide the Left Navigation:
To hide the left navigation, click the arrow icon ( ) at the top of the left navigation area.

WebOPSS Field User Guide Version 3.1 June 12, 2012 Inbox
Team Askin Technologies, Inc. Page 12
Figure 2.16: Collapsing Left Navigation
To Display the Left Navigation:
To display the left navigation, click the arrow icon ( ) at the top left corner of the page.
2.6 Logging Out
To logout, click the Logout tab in the left navigation area.
2.7 WebOPSS Technical Support
If you have questions or require assistance with WebOPSS, technical support is available. For phone help, call (877) 287-6731. To email WebOPSS Technical Support, contact [email protected].
3. Inbox The WebOPSS system introduces the concept of an Inbox similar to the physical inbox that sits on one’s work desk. The WebOPSS Inbox stores and lists all notifications that a user has been sent in the form of messages and tasks assigned to the user. Notifications in the WebOPSS Inbox system can also include system-wide messages to inform the user community of an upcoming system upgrade, policy change, or any other general FAA information. The new features used to enhance two-way communication between the program office, field, and industry users are:
Summary (will contain Messages and Tasks)
Tasks
Messages
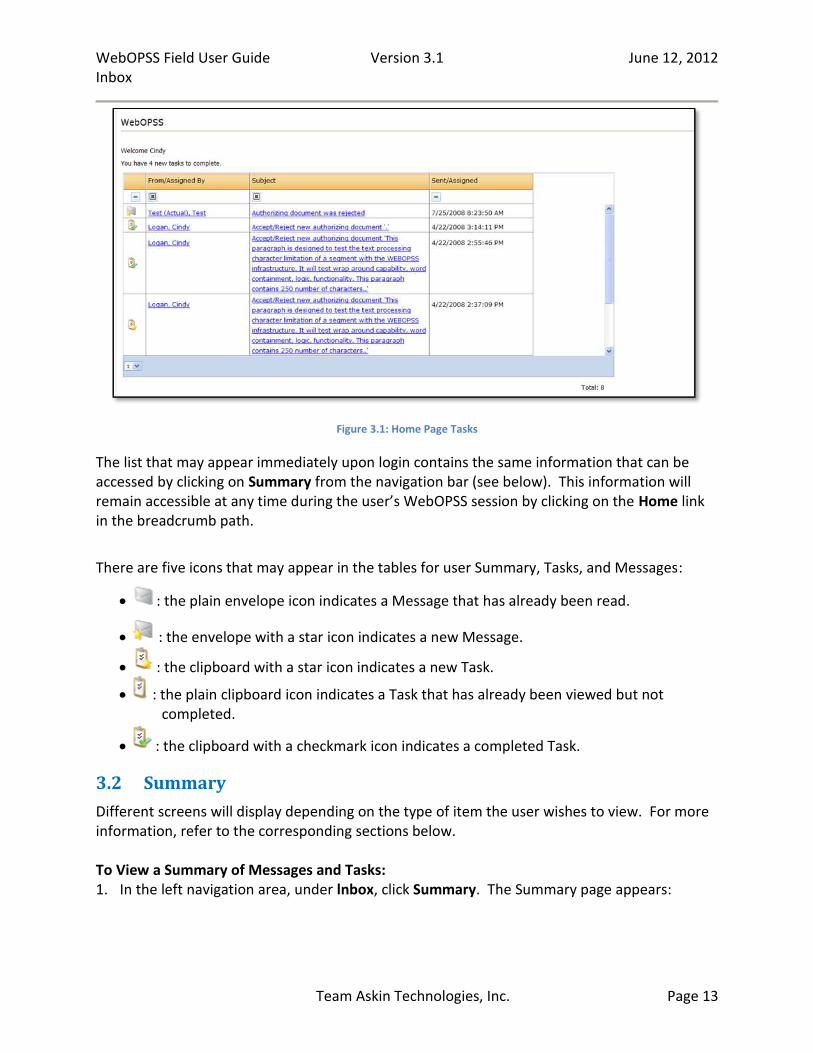
3.1 WebOPSS Home Tasks
Upon login, the WebOPSS Home page will display any available new task information, including all tasks and messages received, with icons indicating the different status of the item (i.e., the icon for a completed task will be different from that of a new message):
WebOPSS Field User Guide Version 3.1 June 12, 2012 Inbox
Team Askin Technologies, Inc. Page 13
Figure 3.1: Home Page Tasks
The list that may appear immediately upon login contains the same information that can be accessed by clicking on Summary from the navigation bar (see below). This information will remain accessible at any time during the user’s WebOPSS session by clicking on the Home link in the breadcrumb path.
There are five icons that may appear in the tables for user Summary, Tasks, and Messages:
: the plain envelope icon indicates a Message that has already been read.
: the envelope with a star icon indicates a new Message.
: the clipboard with a star icon indicates a new Task.
: the plain clipboard icon indicates a Task that has already been viewed but not completed.
: the clipboard with a checkmark icon indicates a completed Task.
3.2 Summary
Different screens will display depending on the type of item the user wishes to view. For more information, refer to the corresponding sections below. To View a Summary of Messages and Tasks: 1. In the left navigation area, under lnbox, click Summary. The Summary page appears:

WebOPSS Field User Guide Version 3.1 June 12, 2012 Inbox
Team Askin Technologies, Inc. Page 14
Figure 3.2: Summary Table
2. To view a particular message, click the text of the desired message in either the Subject column or the From/Assigned By column.
3. To view additional details for a Task, click on the row of the task. Task details appear to the right of the Summary table:
Figure 3.3: Task Details
NOTE: Task details can also be viewed from the WebOPSS Home page summary table.
WebOPSS Field User Guide Version 3.1 June 12, 2012 Inbox
Team Askin Technologies, Inc. Page 15
3.3 Tasks
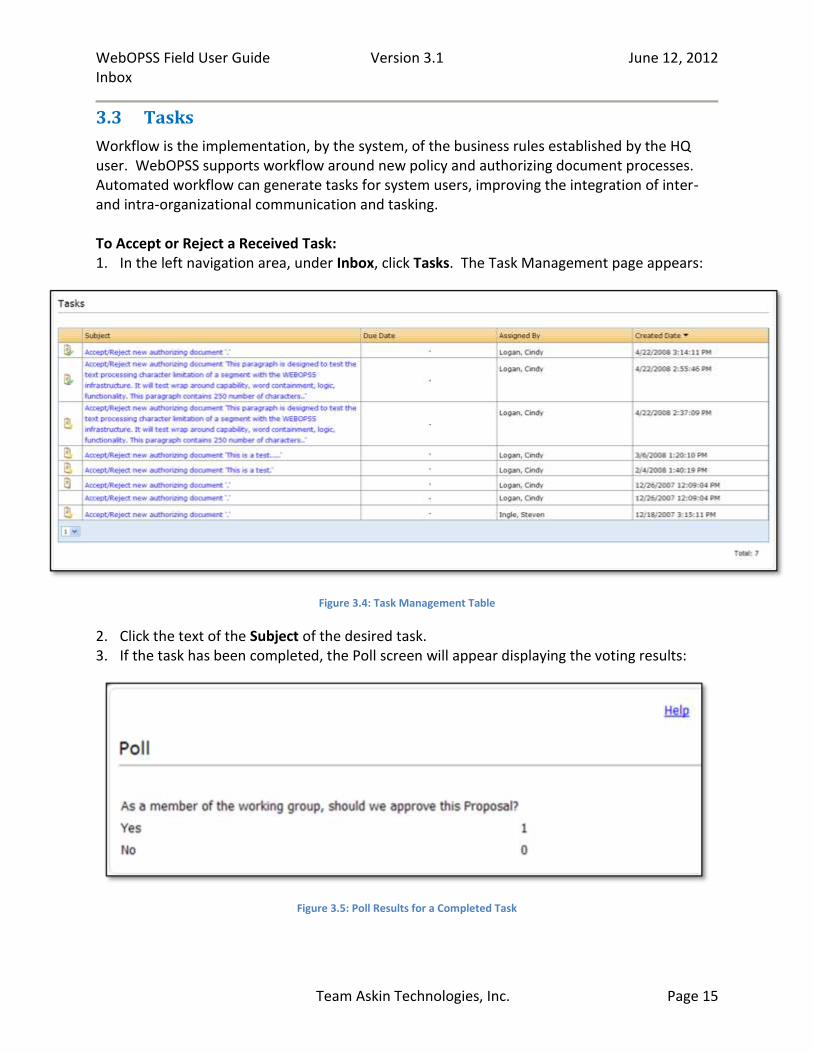
Workflow is the implementation, by the system, of the business rules established by the HQ user. WebOPSS supports workflow around new policy and authorizing document processes. Automated workflow can generate tasks for system users, improving the integration of inter- and intra-organizational communication and tasking. To Accept or Reject a Received Task: 1. In the left navigation area, under Inbox, click Tasks. The Task Management page appears:
Figure 3.4: Task Management Table
2. Click the text of the Subject of the desired task. 3. If the task has been completed, the Poll screen will appear displaying the voting results:
Figure 3.5: Poll Results for a Completed Task

WebOPSS Field User Guide Version 3.1 June 12, 2012 Inbox
Team Askin Technologies, Inc. Page 16
4. If the task has not been completed (i.e., it is a new or previously-viewed task), the Poll screen will appear displaying the option to vote on the task:
Figure 3.6: Vote on a New or Previously-viewed Task
5. To vote on the task, do the following: a. Select Yes or No. b. If desired, enter any comments in the Comments text field.
NOTE: Comments are mandatory for a negative response.
6. Click Vote. The Poll results are displayed with options to either go Back, to change the vote, or Continue to the rest of the Task workflow.
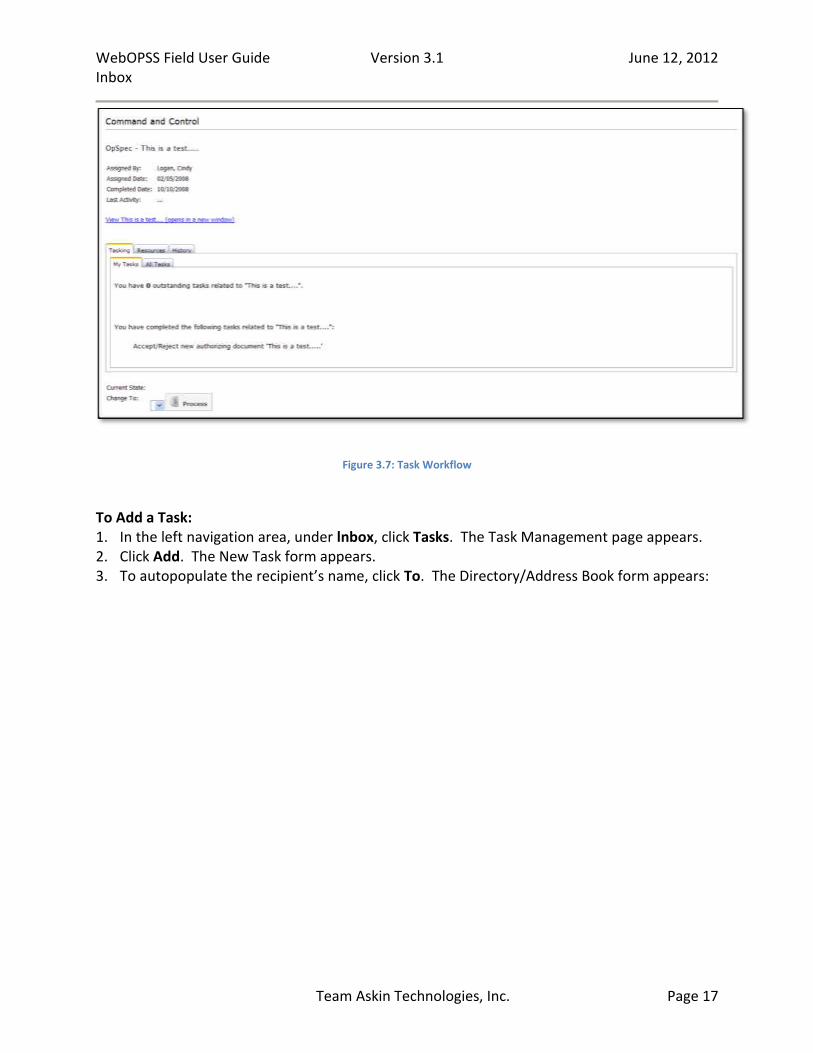
7. To view the Task Workflow, click Continue. The Command Control screen appears:
WebOPSS Field User Guide Version 3.1 June 12, 2012 Inbox
Team Askin Technologies, Inc. Page 17
Figure 3.7: Task Workflow
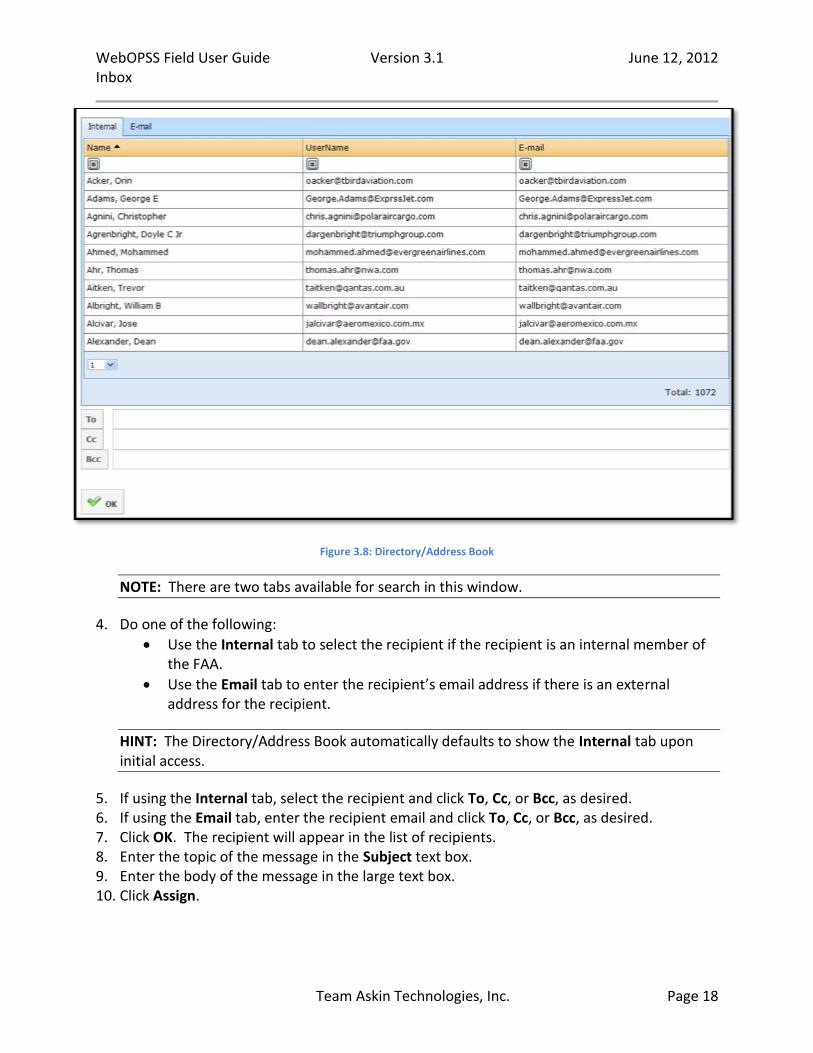
To Add a Task: 1. In the left navigation area, under lnbox, click Tasks. The Task Management page appears. 2. Click Add. The New Task form appears. 3. To autopopulate the recipient’s name, click To. The Directory/Address Book form appears:
WebOPSS Field User Guide Version 3.1 June 12, 2012 Inbox
Team Askin Technologies, Inc. Page 18
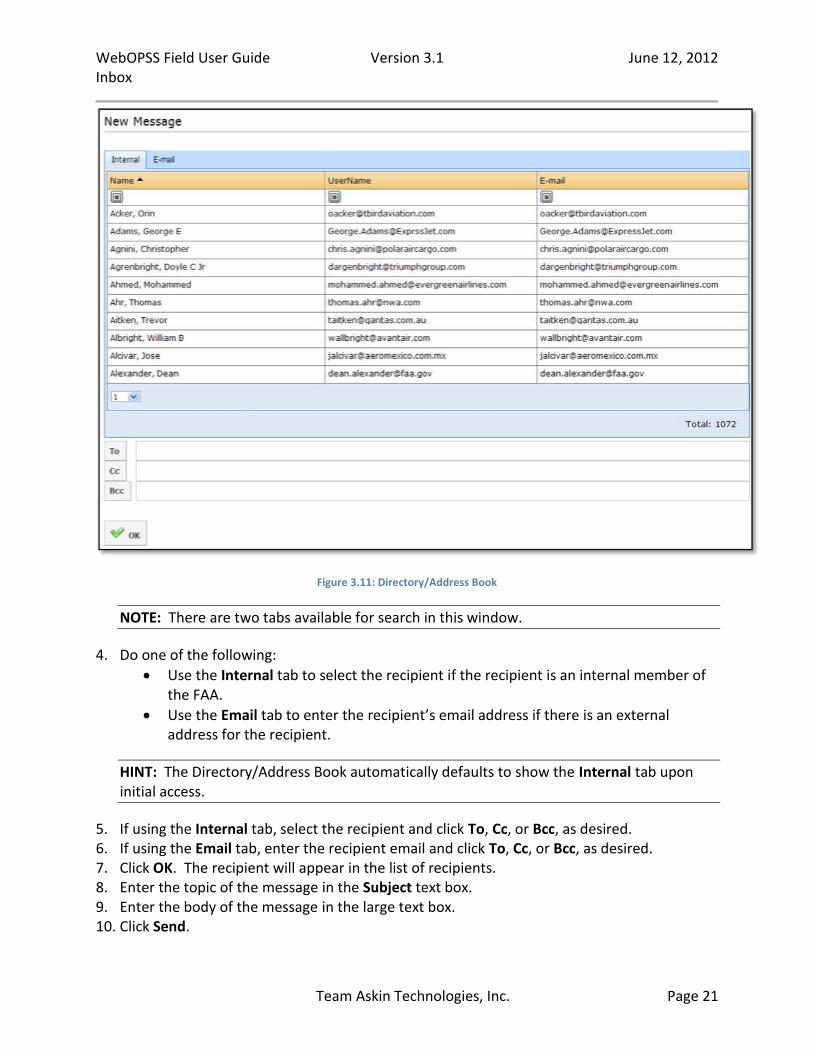
Figure 3.8: Directory/Address Book
NOTE: There are two tabs available for search in this window.
4. Do one of the following:
Use the Internal tab to select the recipient if the recipient is an internal member of the FAA.
Use the Email tab to enter the recipient’s email address if there is an external address for the recipient.
HINT: The Directory/Address Book automatically defaults to show the Internal tab upon initial access.
5. If using the Internal tab, select the recipient and click To, Cc, or Bcc, as desired. 6. If using the Email tab, enter the recipient email and click To, Cc, or Bcc, as desired. 7. Click OK. The recipient will appear in the list of recipients. 8. Enter the topic of the message in the Subject text box. 9. Enter the body of the message in the large text box. 10. Click Assign.
WebOPSS Field User Guide Version 3.1 June 12, 2012 Inbox
Team Askin Technologies, Inc. Page 19
3.4 Messages
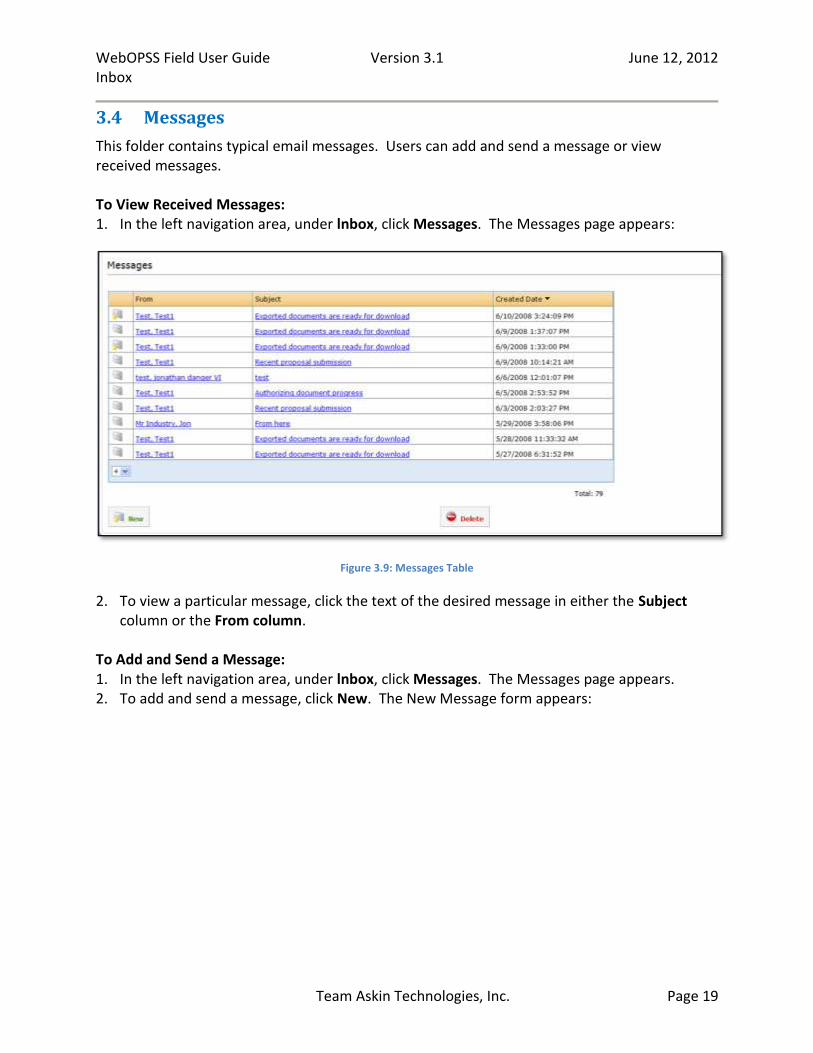
This folder contains typical email messages. Users can add and send a message or view received messages. To View Received Messages: 1. In the left navigation area, under lnbox, click Messages. The Messages page appears:
Figure 3.9: Messages Table
2. To view a particular message, click the text of the desired message in either the Subject column or the From column.
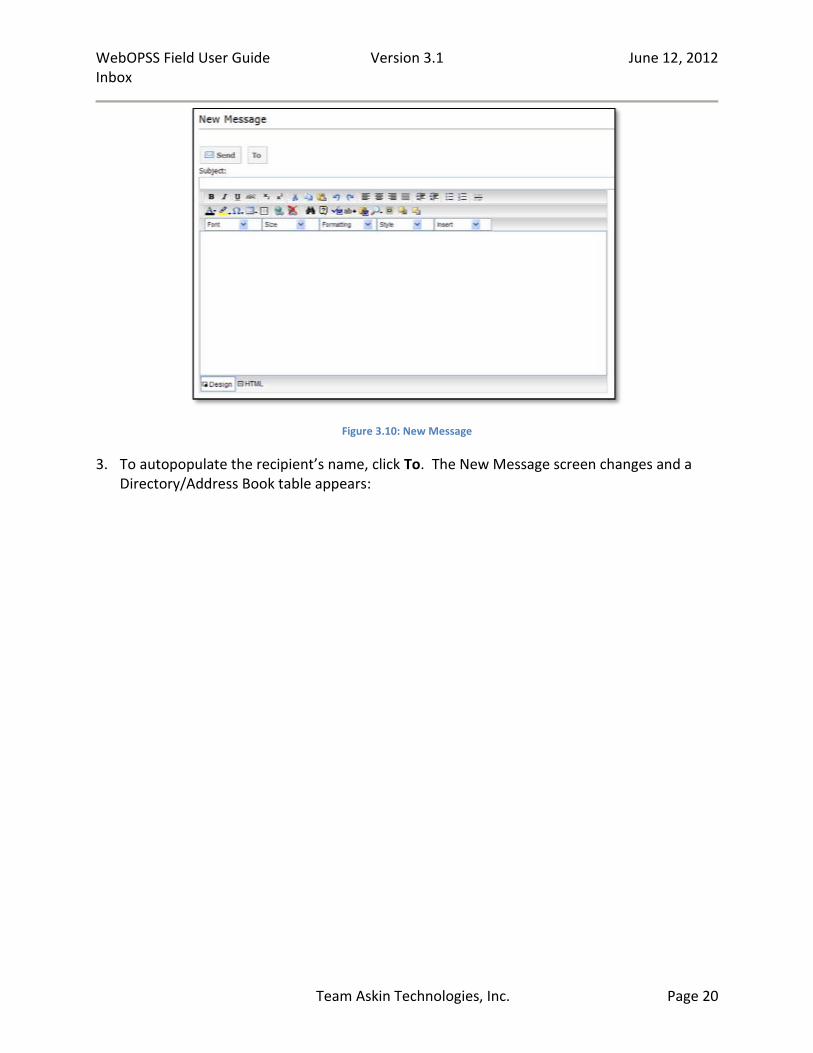
To Add and Send a Message: 1. In the left navigation area, under lnbox, click Messages. The Messages page appears. 2. To add and send a message, click New. The New Message form appears:
WebOPSS Field User Guide Version 3.1 June 12, 2012 Inbox
Team Askin Technologies, Inc. Page 20
Figure 3.10: New Message
3. To autopopulate the recipient’s name, click To. The New Message screen changes and a Directory/Address Book table appears:
WebOPSS Field User Guide Version 3.1 June 12, 2012 Inbox
Team Askin Technologies, Inc. Page 21
Figure 3.11: Directory/Address Book
NOTE: There are two tabs available for search in this window.
4. Do one of the following:
Use the Internal tab to select the recipient if the recipient is an internal member of the FAA.
Use the Email tab to enter the recipient’s email address if there is an external address for the recipient.
HINT: The Directory/Address Book automatically defaults to show the Internal tab upon initial access.
5. If using the Internal tab, select the recipient and click To, Cc, or Bcc, as desired. 6. If using the Email tab, enter the recipient email and click To, Cc, or Bcc, as desired. 7. Click OK. The recipient will appear in the list of recipients. 8. Enter the topic of the message in the Subject text box. 9. Enter the body of the message in the large text box. 10. Click Send.

WebOPSS Field User Guide Version 3.1 June 12, 2012 Data Management
Team Askin Technologies, Inc. Page 22
4. Data Management
4.1 Operators
Users with the appropriate roles and permissions can manage operator data. This information is accessed through the Maintain and My Operators subheadings.
4.1.1 Maintain Operators
Within WebOPSS, users will go to the Operators > Maintain area to view a certificate for any operator assigned to their offices. Non-field users will be shown a list of all the operators associated with their assigned regional offices. However, for field users the system displays the operators assigned to the login user. The Maintain Operators area in WebOPSS is where the bulk of operator management will probably take place. It is the area for more common tasks, such as adding and editing operators and related information. Additionally, authorized users can also deleting test operators within the authorized user’s CHDO and view the historical information of operators from the database. To Add an Operator: 1. In the left navigation area, CHDO > Operators, click Maintain. The Operator—Maintain
table appears:
Figure 4.1: Maintain Operators Table
2. Click Add. The Add Operator wizard appears:
WebOPSS Field User Guide Version 3.1 June 12, 2012 Data Management
Team Askin Technologies, Inc. Page 23
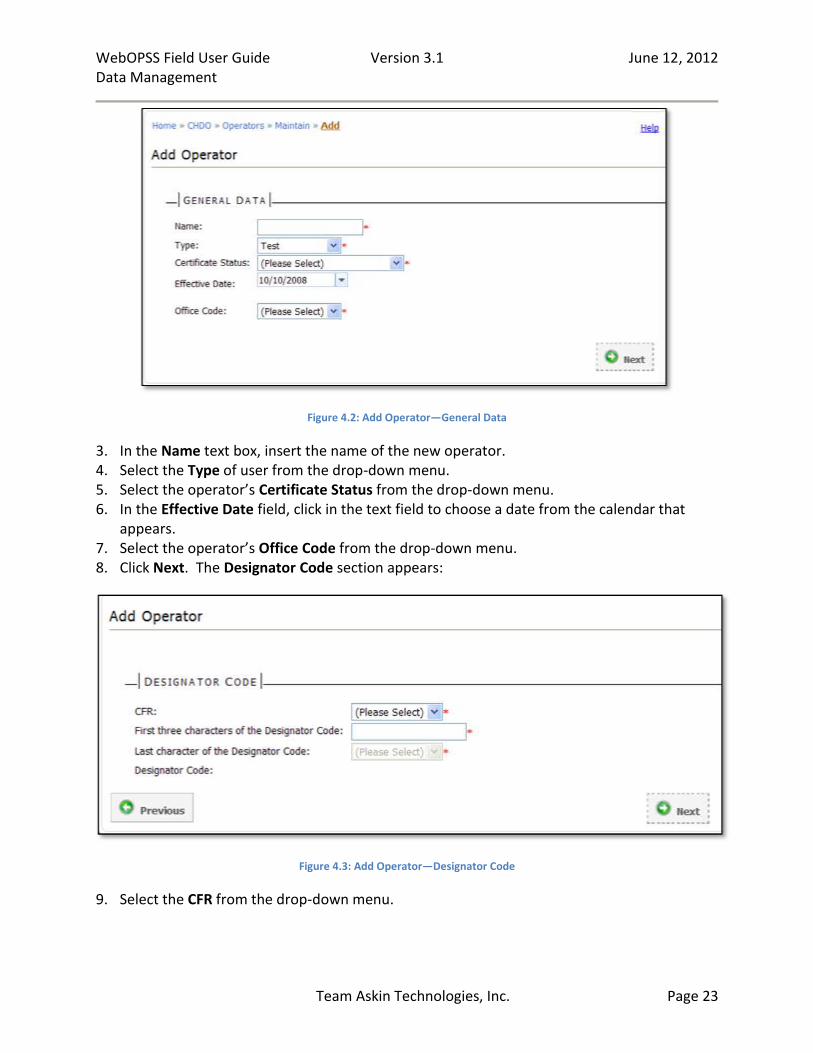
Figure 4.2: Add Operator—General Data
3. In the Name text box, insert the name of the new operator. 4. Select the Type of user from the drop-down menu. 5. Select the operator’s Certificate Status from the drop-down menu. 6. In the Effective Date field, click in the text field to choose a date from the calendar that
appears. 7. Select the operator’s Office Code from the drop-down menu. 8. Click Next. The Designator Code section appears:
Figure 4.3: Add Operator—Designator Code
9. Select the CFR from the drop-down menu.

WebOPSS Field User Guide Version 3.1 June 12, 2012 Data Management
Team Askin Technologies, Inc. Page 24
10. In the First three characters of the Designator Code text field, enter the appropriate information. The letters will appear in the Designator Code section on the last field as they are typed.
11. Select the Last character of the Designator Code from the drop-down menu. This letter will also appear at the end of the Designator Code on the last field.
12. Click Next. The Certificate Number section appears. 13. Enter the Last four characters of Certificate Number in the text field. These numbers will
appear in the Certificate Number field below as they are typed. 14. Click Finish. The Edit Operator screen appears:
Figure 4.4: Edit Operator
15. Click Save to return to the Operator—Maintain table.

WebOPSS Field User Guide Version 3.1 June 12, 2012 Data Management
Team Askin Technologies, Inc. Page 25
To Open an Operator: 1. In the left navigation area, under CHDO > Operators, click Maintain. The Operator—
Maintain table appears. 2. Select the desired row. 3. Click Open. The Authorizing Documents screen appears under the selected operator.
HINT: For more information on authorizing documents, see “5 Authorizing Documents Management” chapter on page 96.
To Edit Operator Information: 1. In the left navigation area, under CHDO > Operators, click Maintain. The Operator—
Maintain table appears. 2. Select an operator from the operator list. 3. Click Edit. The Edit Operator form appears. 4. Modify the operator properties as needed.
NOTE: The information in the “Designator Code” section cannot be changed.
5. When finished, click Save to return to the Operator—Maintain table. To Merge Operators:
NOTE: When users merge operators, selected data from each is assimilated from one "Source" operator to a different "Destination" operator. Merge functionality is permission-based, so if a user does not have permission for this action, the Merge button will not be available. Because merge functionality can be complex and may have some data-specific actions, example scenarios are presented for each data row (e.g., Addresses, Aircraft, DBAs, etc.) below.
1. In the left navigation area, under CHDO > Operators, click Maintain. The Operator—Data table appears.
2. Select an operator from the operator list.
HINT: The selected operator will be used as the Source Designator. If users do not first select an operator from the operator list and instead simply click Merge, they will have to input a valid designator code in the Source Designator text field. If an operator is selected from the operator list first, the Source Designator CFR and Name data will preload on the Merge Operators page, which indicates that a valid operator was entered.
3. Click Merge. The Merge Operators page appears:
WebOPSS Field User Guide Version 3.1 June 12, 2012 Data Management
Team Askin Technologies, Inc. Page 26
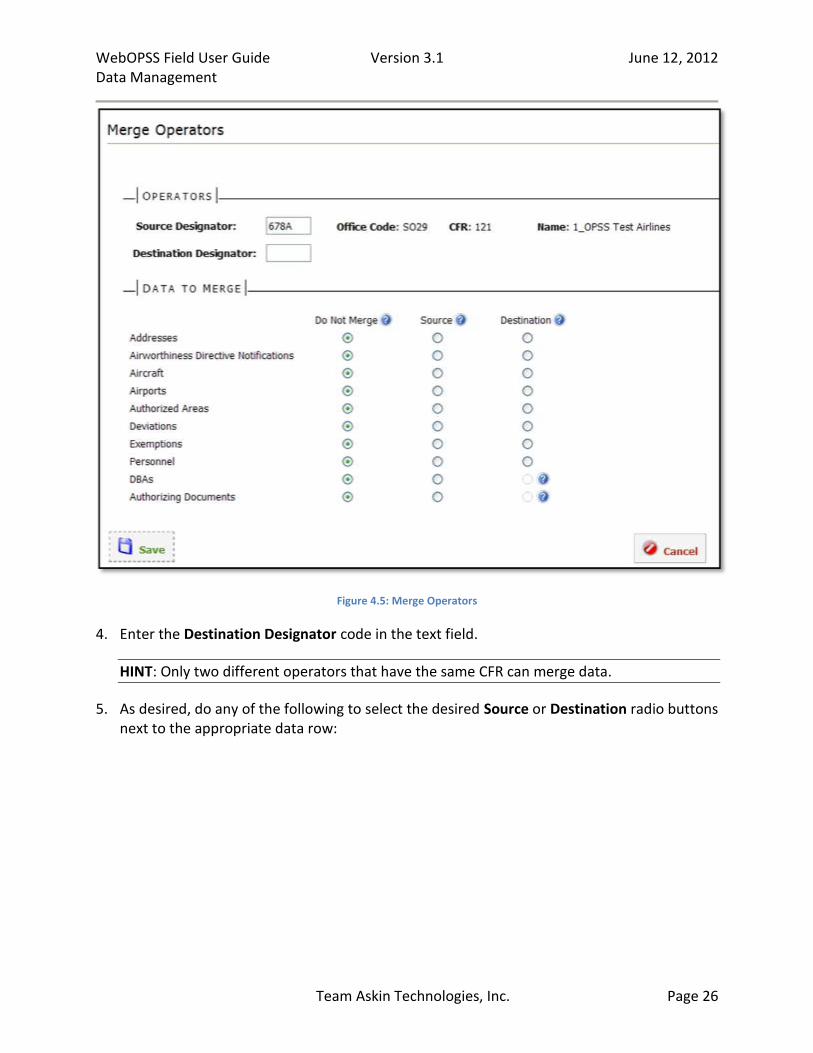
Figure 4.5: Merge Operators
4. Enter the Destination Designator code in the text field.
HINT: Only two different operators that have the same CFR can merge data.
5. As desired, do any of the following to select the desired Source or Destination radio buttons next to the appropriate data row:

WebOPSS Field User Guide Version 3.1 June 12, 2012 Data Management
Team Askin Technologies, Inc. Page 27
NOTE: Only one radio button per row can be selected at a time. The Do Not Merge option is chosen for all data rows by default. When users select Do Not Merge for a data row, the system does not change that data for either the source or the destination—that data stays the same as it was before the merge. Whether users merge by selecting Source or by selecting Destination, the functionality of the merge action will always happen from source to destination. No changes will ever occur for the source data; only the destination data will change. If the Source radio button is selected to merge, and there is data in the Source that does not exist under the Destination operator, then the Source data will be copied over to Destination. If Destination has data that does not exist under Source, then nothing happens to the Destination data. If a conflict exists, then the Source information will overwrite the Destination information. If the Destination radio button is selected, and an element in it (e.g., an Address Type under the “Addresses” data row) exists under Source but does not exist under Destination, then the Source data is copied over to Destination. If the Destination has an element that does not exist under Source then nothing happens to the Destination element. If a conflict exists for an element (e.g., for “Addresses,” the Address Type “Primary” exists for both Source and Destination, but the Primary Address is different for both), then the Destination address is not overwritten by the Source address.
Select an option for Addresses.
WebOPSS Field User Guide Version 3.1 June 12, 2012 Data Management
Team Askin Technologies, Inc. Page 28
HINT: The basic functionality of the Addresses merger is that if Source and Destination addresses have the same Address Type, then Source data will overwrite Destination data when Source is selected; likewise, when Destination is selected, the Destination data will remain the same. Example Scenario: The Source has Primary (Different than Destination), Within US, and Training. The Destination has Primary and Agent for Service. If Source were selected: After the merge, Destination will have the following: Primary (copied over from Source), Within the US (copied over from Source), Training (copied over from Source), and Agent for Service (left over from Destination and is not deleted). If Destination were selected: After the merge, Destination will have the following: Primary (not copied over from Source), Within the US (copied over from Source), Training (copied over from Source), and Agent for Service (left over from Destination and is not deleted).
Select an option for Airworthiness Directive Notifications.
WebOPSS Field User Guide Version 3.1 June 12, 2012 Data Management
Team Askin Technologies, Inc. Page 29
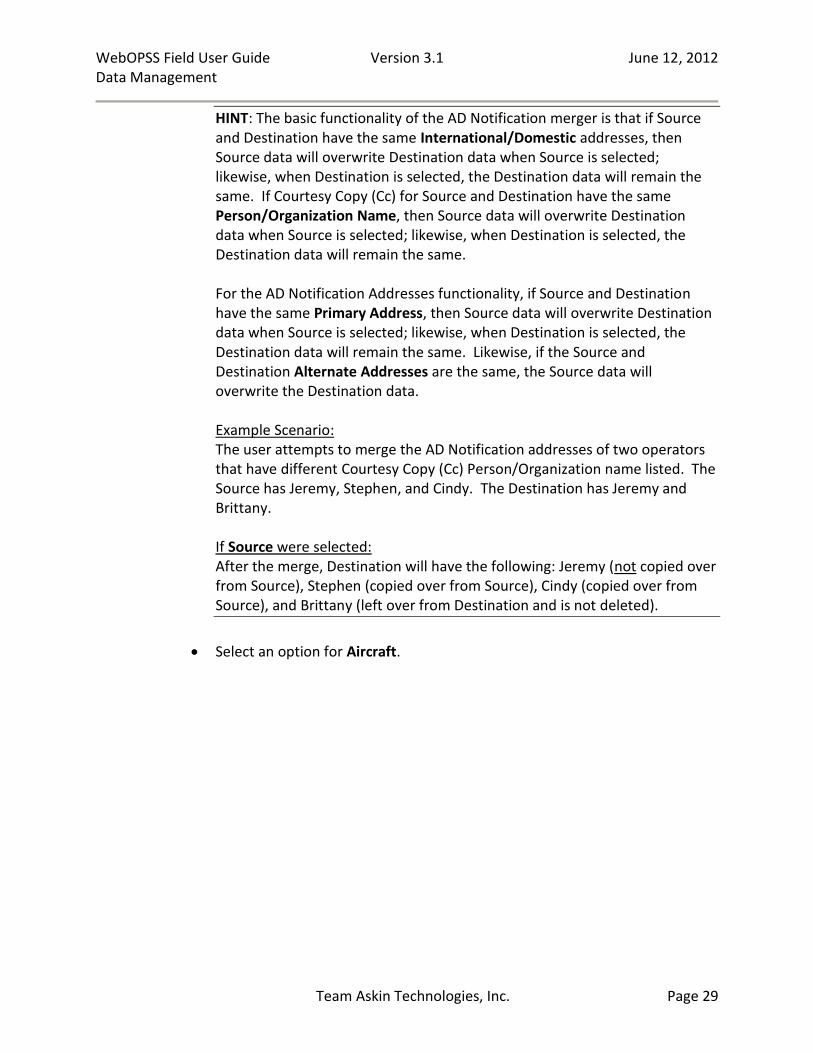
HINT: The basic functionality of the AD Notification merger is that if Source and Destination have the same International/Domestic addresses, then Source data will overwrite Destination data when Source is selected; likewise, when Destination is selected, the Destination data will remain the same. If Courtesy Copy (Cc) for Source and Destination have the same Person/Organization Name, then Source data will overwrite Destination data when Source is selected; likewise, when Destination is selected, the Destination data will remain the same. For the AD Notification Addresses functionality, if Source and Destination have the same Primary Address, then Source data will overwrite Destination data when Source is selected; likewise, when Destination is selected, the Destination data will remain the same. Likewise, if the Source and Destination Alternate Addresses are the same, the Source data will overwrite the Destination data. Example Scenario: The user attempts to merge the AD Notification addresses of two operators that have different Courtesy Copy (Cc) Person/Organization name listed. The Source has Jeremy, Stephen, and Cindy. The Destination has Jeremy and Brittany. If Source were selected: After the merge, Destination will have the following: Jeremy (not copied over from Source), Stephen (copied over from Source), Cindy (copied over from Source), and Brittany (left over from Destination and is not deleted).
Select an option for Aircraft.
WebOPSS Field User Guide Version 3.1 June 12, 2012 Data Management
Team Askin Technologies, Inc. Page 30
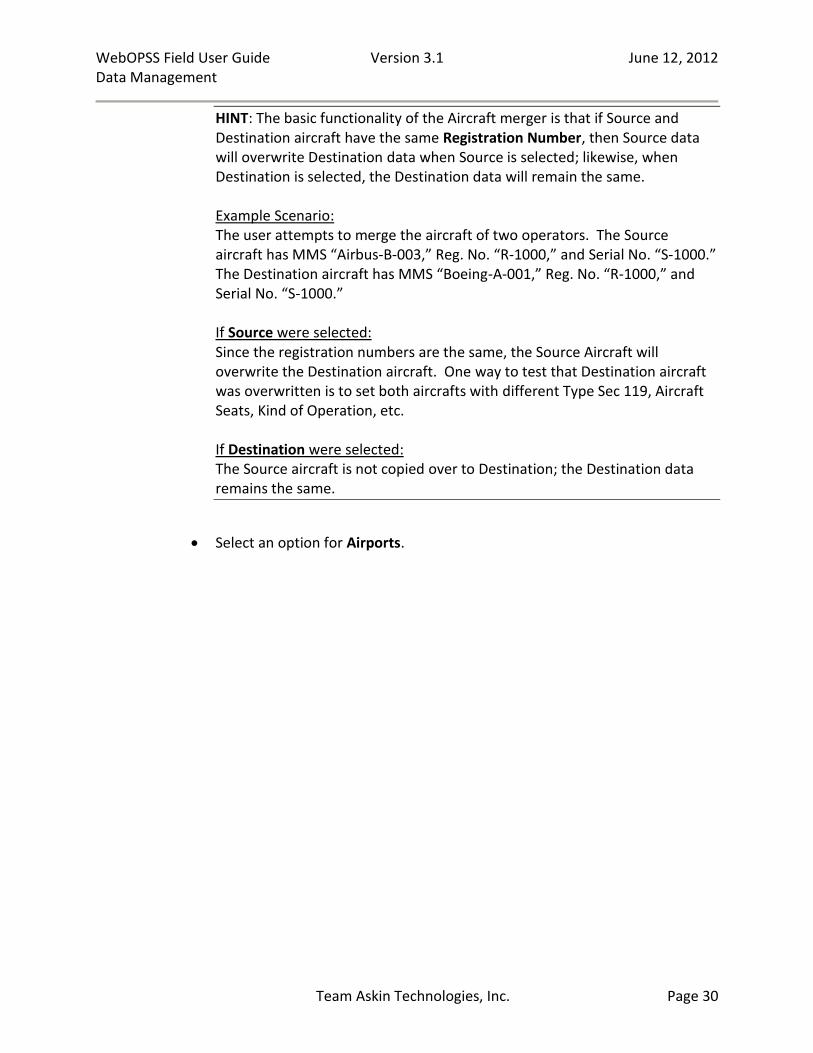
HINT: The basic functionality of the Aircraft merger is that if Source and Destination aircraft have the same Registration Number, then Source data will overwrite Destination data when Source is selected; likewise, when Destination is selected, the Destination data will remain the same. Example Scenario: The user attempts to merge the aircraft of two operators. The Source aircraft has MMS “Airbus-B-003,” Reg. No. “R-1000,” and Serial No. “S-1000.” The Destination aircraft has MMS “Boeing-A-001,” Reg. No. “R-1000,” and Serial No. “S-1000.” If Source were selected: Since the registration numbers are the same, the Source Aircraft will overwrite the Destination aircraft. One way to test that Destination aircraft was overwritten is to set both aircrafts with different Type Sec 119, Aircraft Seats, Kind of Operation, etc. If Destination were selected: The Source aircraft is not copied over to Destination; the Destination data remains the same.
Select an option for Airports.

WebOPSS Field User Guide Version 3.1 June 12, 2012 Data Management
Team Askin Technologies, Inc. Page 31
HINT: The basic functionality of the Airports merger is that if Source and Destination airports have the same Assigned Airports, then Source data will overwrite Destination data when Source is selected; likewise, when Destination is selected, the Destination data will remain the same. Example Scenario: The user attempts to merge the Assigned Airports lists of two operators. The Source has Acapulco (with different Airport Authorizations, Provisional Airports, and Runway Categories than Destination), Kansas City International, and Johannesburg International. The Destination has Acapulco and St. Croix/Henry E. Rohlsen. (The Available Airports list will always be the same, regardless of the Source or Destination operator.) If Source were selected: After the merge, Destination will have the following: Acapulco (copied over from Source), Kansas City International (copied over from Source), Johannesburg International (copied over from Source), and St. Croix/Henry E. Rohlsen (left over from Destination and is not deleted). If Destination were selected: After the merge, Destination will have the following: Acapulco (not copied over from Source), Kansas City International (copied over from Source), Johannesburg International (copied over from Source), and St. Croix/Henry E. Rohlsen (left over from Destination and is not deleted).
Select an option for Authorized Areas.
HINT: The basic functionality of the Authorized Areas merger is that if Source and Destination Authorized Areas have the same Area, Notes, and Reference Documents, then Source data will overwrite Destination data when Source is selected; likewise, when Destination is selected, the Destination data will remain the same. Select an option for Deviations.
WebOPSS Field User Guide Version 3.1 June 12, 2012 Data Management
Team Askin Technologies, Inc. Page 32
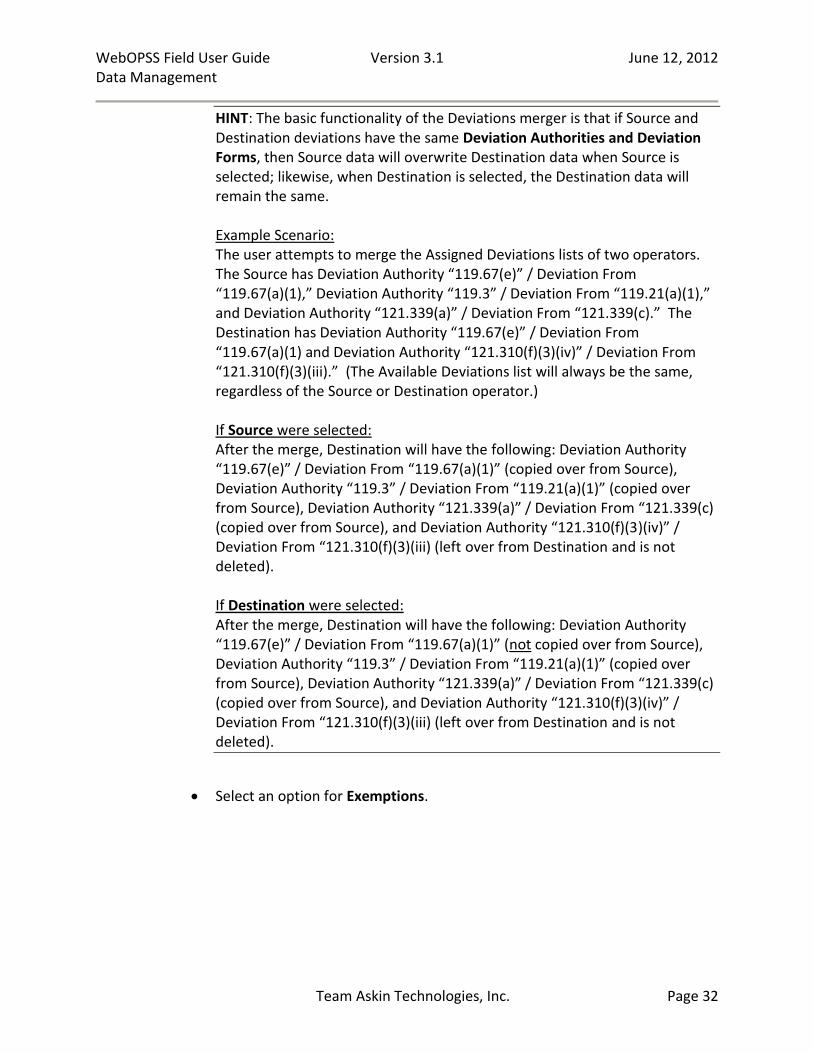
HINT: The basic functionality of the Deviations merger is that if Source and Destination deviations have the same Deviation Authorities and Deviation Forms, then Source data will overwrite Destination data when Source is selected; likewise, when Destination is selected, the Destination data will remain the same. Example Scenario: The user attempts to merge the Assigned Deviations lists of two operators. The Source has Deviation Authority “119.67(e)” / Deviation From “119.67(a)(1),” Deviation Authority “119.3” / Deviation From “119.21(a)(1),” and Deviation Authority “121.339(a)” / Deviation From “121.339(c).” The Destination has Deviation Authority “119.67(e)” / Deviation From “119.67(a)(1) and Deviation Authority “121.310(f)(3)(iv)” / Deviation From “121.310(f)(3)(iii).” (The Available Deviations list will always be the same, regardless of the Source or Destination operator.) If Source were selected: After the merge, Destination will have the following: Deviation Authority “119.67(e)” / Deviation From “119.67(a)(1)” (copied over from Source), Deviation Authority “119.3” / Deviation From “119.21(a)(1)” (copied over from Source), Deviation Authority “121.339(a)” / Deviation From “121.339(c) (copied over from Source), and Deviation Authority “121.310(f)(3)(iv)” / Deviation From “121.310(f)(3)(iii) (left over from Destination and is not deleted). If Destination were selected: After the merge, Destination will have the following: Deviation Authority “119.67(e)” / Deviation From “119.67(a)(1)” (not copied over from Source), Deviation Authority “119.3” / Deviation From “119.21(a)(1)” (copied over from Source), Deviation Authority “121.339(a)” / Deviation From “121.339(c) (copied over from Source), and Deviation Authority “121.310(f)(3)(iv)” / Deviation From “121.310(f)(3)(iii) (left over from Destination and is not deleted).
Select an option for Exemptions.

WebOPSS Field User Guide Version 3.1 June 12, 2012 Data Management
Team Askin Technologies, Inc. Page 33
HINT: The basic functionality of the Exemptions merger is that if Source and Destination exemptions have the same Exemption Number assigned, then Source data will overwrite Destination data when Source is selected; likewise, when Destination is selected, the Destination data will remain the same. Example Scenario: The user attempts to merge the Assigned Exemptions lists of two operators. The Source has Exemption Numbers 5318, 396, and 444. The Destination has Exemption Numbers 5318 and 7020.” (The Available Exemptions list will always be the same, regardless of the Source or Destination operator.) If Source were selected: After the merge, Destination will have the following: Exemption No. 5318 (copied over from Source, including Remarks), Exemption No. 396 (copied over from Source), Exemption No. 444 (copied over from Source), and Exemption No. 7020 (left over from Destination and is not deleted). If Destination were selected: After the merge, Destination will have the following: Exemption No. 5318 (not copied over from Source), Exemption No. 396 (copied over from Source), Exemption No. 444 (copied over from Source), and Exemption No. 7020 (left over from Destination and is not deleted).
Select an option for Personnel.
WebOPSS Field User Guide Version 3.1 June 12, 2012 Data Management
Team Askin Technologies, Inc. Page 34
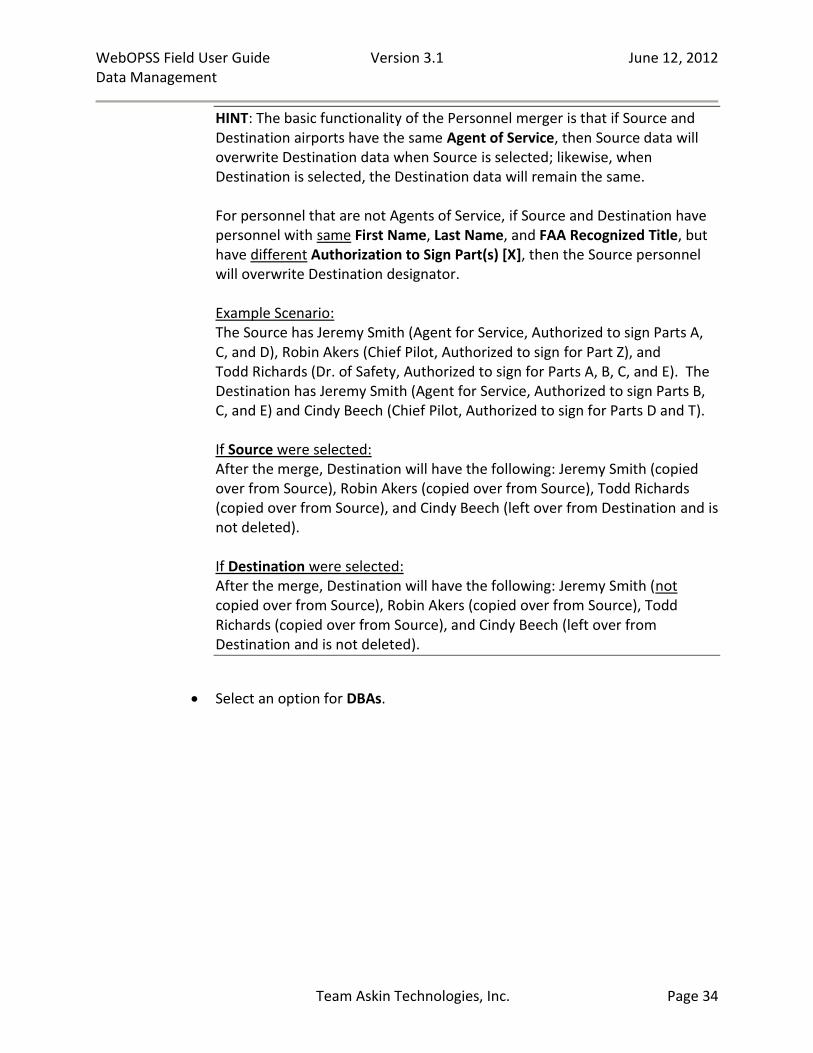
HINT: The basic functionality of the Personnel merger is that if Source and Destination airports have the same Agent of Service, then Source data will overwrite Destination data when Source is selected; likewise, when Destination is selected, the Destination data will remain the same. For personnel that are not Agents of Service, if Source and Destination have personnel with same First Name, Last Name, and FAA Recognized Title, but have different Authorization to Sign Part(s) [X], then the Source personnel will overwrite Destination designator. Example Scenario: The Source has Jeremy Smith (Agent for Service, Authorized to sign Parts A, C, and D), Robin Akers (Chief Pilot, Authorized to sign for Part Z), and Todd Richards (Dr. of Safety, Authorized to sign for Parts A, B, C, and E). The Destination has Jeremy Smith (Agent for Service, Authorized to sign Parts B, C, and E) and Cindy Beech (Chief Pilot, Authorized to sign for Parts D and T). If Source were selected: After the merge, Destination will have the following: Jeremy Smith (copied over from Source), Robin Akers (copied over from Source), Todd Richards (copied over from Source), and Cindy Beech (left over from Destination and is not deleted). If Destination were selected: After the merge, Destination will have the following: Jeremy Smith (not copied over from Source), Robin Akers (copied over from Source), Todd Richards (copied over from Source), and Cindy Beech (left over from Destination and is not deleted).
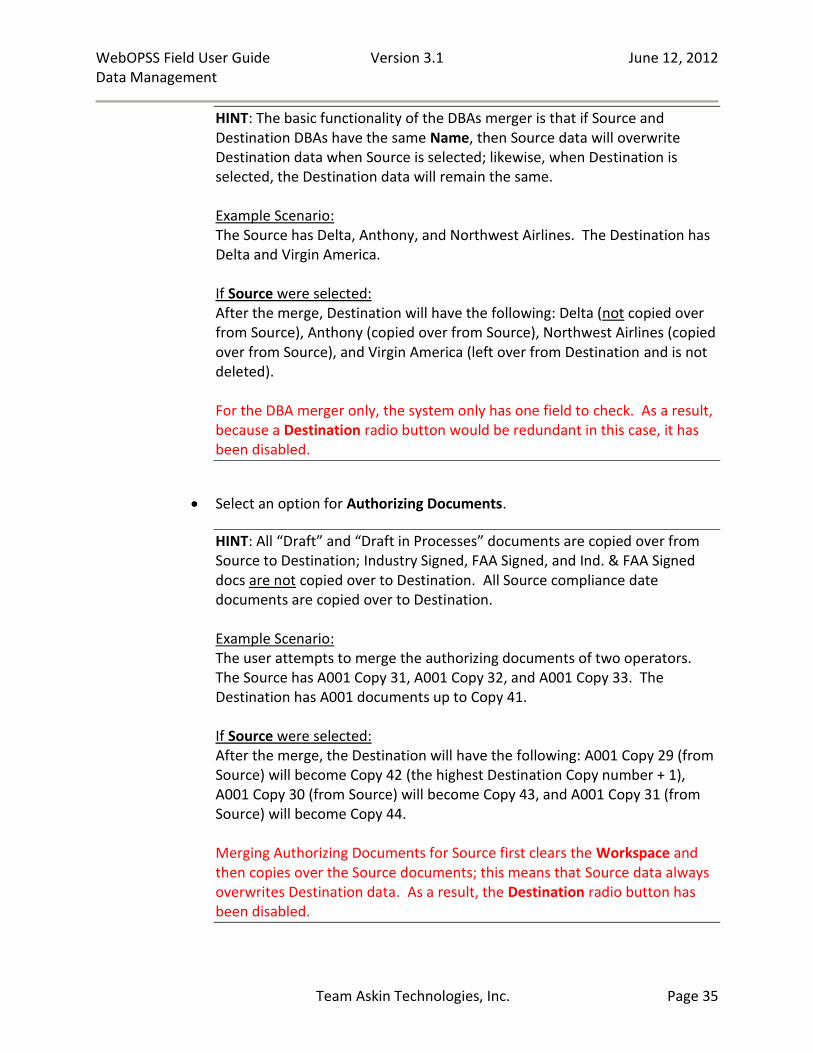
Select an option for DBAs.
WebOPSS Field User Guide Version 3.1 June 12, 2012 Data Management
Team Askin Technologies, Inc. Page 35
HINT: The basic functionality of the DBAs merger is that if Source and Destination DBAs have the same Name, then Source data will overwrite Destination data when Source is selected; likewise, when Destination is selected, the Destination data will remain the same. Example Scenario: The Source has Delta, Anthony, and Northwest Airlines. The Destination has Delta and Virgin America. If Source were selected: After the merge, Destination will have the following: Delta (not copied over from Source), Anthony (copied over from Source), Northwest Airlines (copied over from Source), and Virgin America (left over from Destination and is not deleted). For the DBA merger only, the system only has one field to check. As a result, because a Destination radio button would be redundant in this case, it has been disabled.
Select an option for Authorizing Documents.
HINT: All “Draft” and “Draft in Processes” documents are copied over from Source to Destination; Industry Signed, FAA Signed, and Ind. & FAA Signed docs are not copied over to Destination. All Source compliance date documents are copied over to Destination. Example Scenario: The user attempts to merge the authorizing documents of two operators. The Source has A001 Copy 31, A001 Copy 32, and A001 Copy 33. The Destination has A001 documents up to Copy 41. If Source were selected: After the merge, the Destination will have the following: A001 Copy 29 (from Source) will become Copy 42 (the highest Destination Copy number + 1), A001 Copy 30 (from Source) will become Copy 43, and A001 Copy 31 (from Source) will become Copy 44. Merging Authorizing Documents for Source first clears the Workspace and then copies over the Source documents; this means that Source data always overwrites Destination data. As a result, the Destination radio button has been disabled.
WebOPSS Field User Guide Version 3.1 June 12, 2012 Data Management
Team Askin Technologies, Inc. Page 36
6. Click Save. A confirmation box appears. 7. Click Yes. Once the merge has successfully completed, a confirmation message, titled
“Merge Operator Data,” will appear under the Inbox > Messages path in the left navigation area.
To Delete an Operator: 1. In the left navigation area, under CHDO > Operators, click Maintain. The Operator—Data
table appears. 2. Select an operator from the operator list. 3. If deleting a test operator, do the following:
HINT: It may help to first search for “test” under the Type column to find all test operators.
a. Select the row of the desired test operator. b. Click Delete. A confirmation box appears.
4. If deleting a real operator, do the following:
HINT: It may help to first search for “real” under the Type column to find all real operators.
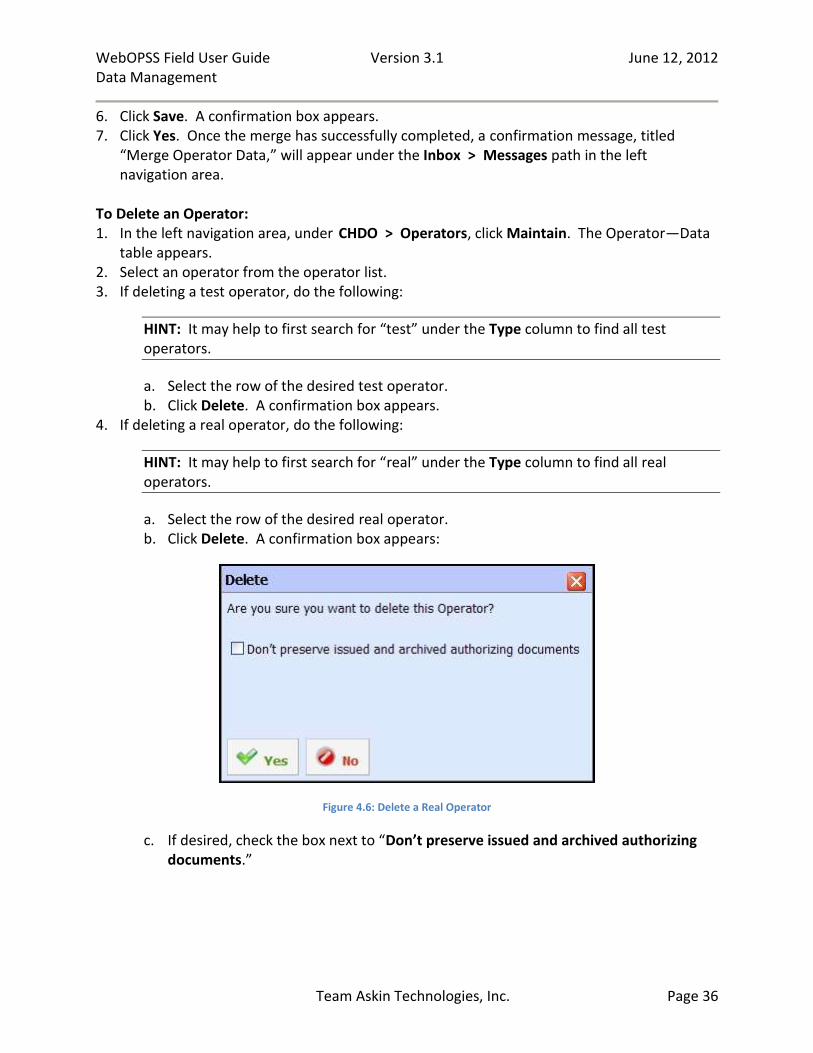
a. Select the row of the desired real operator. b. Click Delete. A confirmation box appears:
Figure 4.6: Delete a Real Operator
c. If desired, check the box next to “Don’t preserve issued and archived authorizing documents.”

WebOPSS Field User Guide Version 3.1 June 12, 2012 Data Management
Team Askin Technologies, Inc. Page 37
NOTE: The checkbox next to “Don’t preserve issued and archived authorizing documents” allows the user to perform either a “hard delete” or “soft delete.” A hard delete is performed when the box is checked. With a hard delete, 1) all users and inspectors are disassociated from the operator (though no logins will be deleted), 2) the designator can be reused for a new operator, and 3) the operator is removed from all CHDO Operator and Inspector/ASA Maintenance pages, and 4) all documents and operator data are permanently removed from the system. Hard deletes are most commonly used in cases where an operator was created by mistake. A soft delete is performed when the box is not checked. With a soft delete, 1) all users and inspectors are disassociated from the operator (though no logins will be deleted), 2) the designator can be reused for a new operator, and 3) the operator is removed from all CHDO Operator and Inspector/ASA Maintenance pages, 4) the operator’s certificate status is changed to “Deleted,” 5) all of the operator’s Issued documents are moved to Archive and will be accessible via reporting tools, and 6) all of the operator’s data is permanently removed from the system. Soft deletes are most commonly used when an operator is no longer in business for a given period.
5. Click Yes. The operator is removed from the Operator—Data table. To View Operator History: 1. In the left navigation area, under CHDO > Operators, click Maintain. The Operator—
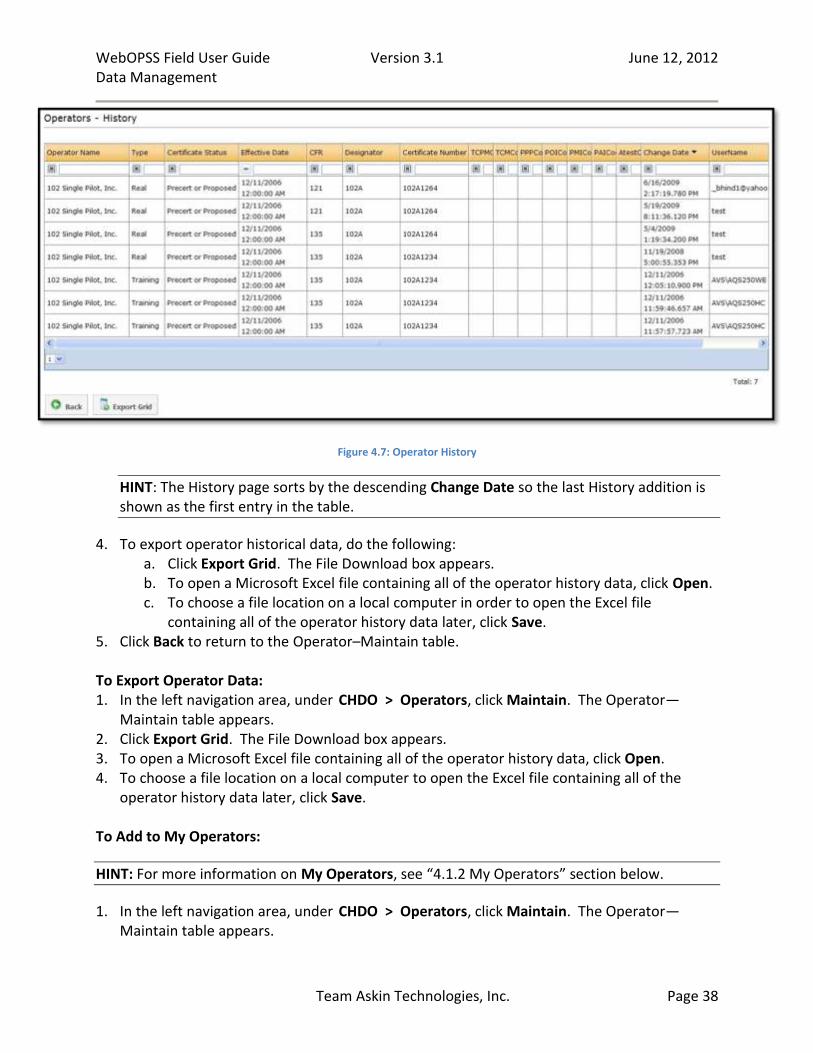
Maintain table appears. 2. Select the desired operator from the operator list. 3. Click History. The History table appears:
WebOPSS Field User Guide Version 3.1 June 12, 2012 Data Management
Team Askin Technologies, Inc. Page 38
Figure 4.7: Operator History
HINT: The History page sorts by the descending Change Date so the last History addition is shown as the first entry in the table.
4. To export operator historical data, do the following: a. Click Export Grid. The File Download box appears. b. To open a Microsoft Excel file containing all of the operator history data, click Open. c. To choose a file location on a local computer in order to open the Excel file
containing all of the operator history data later, click Save. 5. Click Back to return to the Operator–Maintain table. To Export Operator Data: 1. In the left navigation area, under CHDO > Operators, click Maintain. The Operator—
Maintain table appears. 2. Click Export Grid. The File Download box appears. 3. To open a Microsoft Excel file containing all of the operator history data, click Open. 4. To choose a file location on a local computer to open the Excel file containing all of the
operator history data later, click Save. To Add to My Operators:
HINT: For more information on My Operators, see “4.1.2 My Operators” section below.
1. In the left navigation area, under CHDO > Operators, click Maintain. The Operator—Maintain table appears.
WebOPSS Field User Guide Version 3.1 June 12, 2012 Data Management
Team Askin Technologies, Inc. Page 39
2. Select the desired row. 3. Click Add to My Operators. A confirmation message appears at the top of the Operator—
Maintain screen:
Figure 4.8: Add to My Operators
To View an Operator’s Principal Inspectors: 1. In the left navigation area, under CHDO > Operators, click Maintain. The Operator—
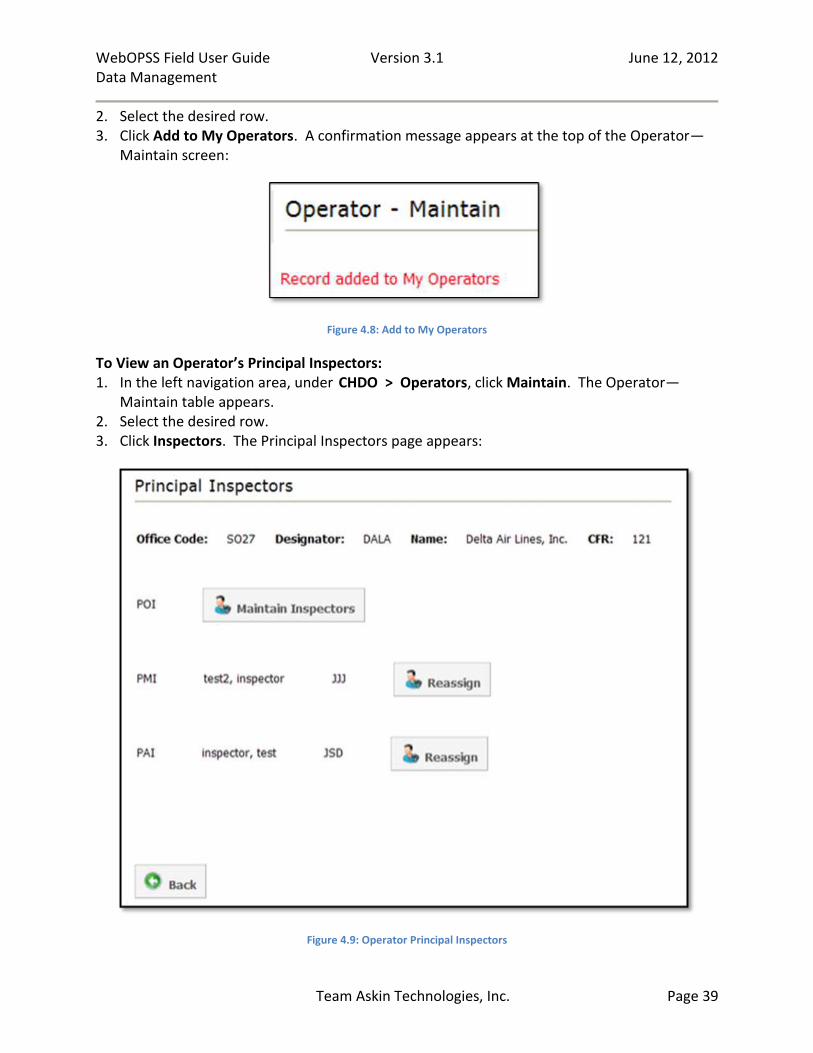
Maintain table appears. 2. Select the desired row. 3. Click Inspectors. The Principal Inspectors page appears:
Figure 4.9: Operator Principal Inspectors
WebOPSS Field User Guide Version 3.1 June 12, 2012 Data Management
Team Askin Technologies, Inc. Page 40
HINT: The Principal Inspectors page is designed in an invisible table format with “rows” and “columns:” each “row” shows the type of inspector available for the selected operator. The two “columns,” indicate whether or not an inspector is assigned to the listed inspector types. If no inspector is currently assigned, the Maintain Inspectors button appears, in the first “column,” next to the unassigned inspector types. If an inspector is currently assigned, the inspector’s name and inspector code is listed and the Reassign button appears, in the second “column,” next to the assigned inspector type.
4. To assign a new inspector, click Maintain Inspectors next to the desired inspector type. The Inspectors page appears.
5. To reassign an existing inspector, click Reassign next to the desired inspector name. The Reassign Inspectors page appears.
6. Follow the directions listed under “To Reassign an Inspector” in the “4.3 Inspectors” chapter on page 92.
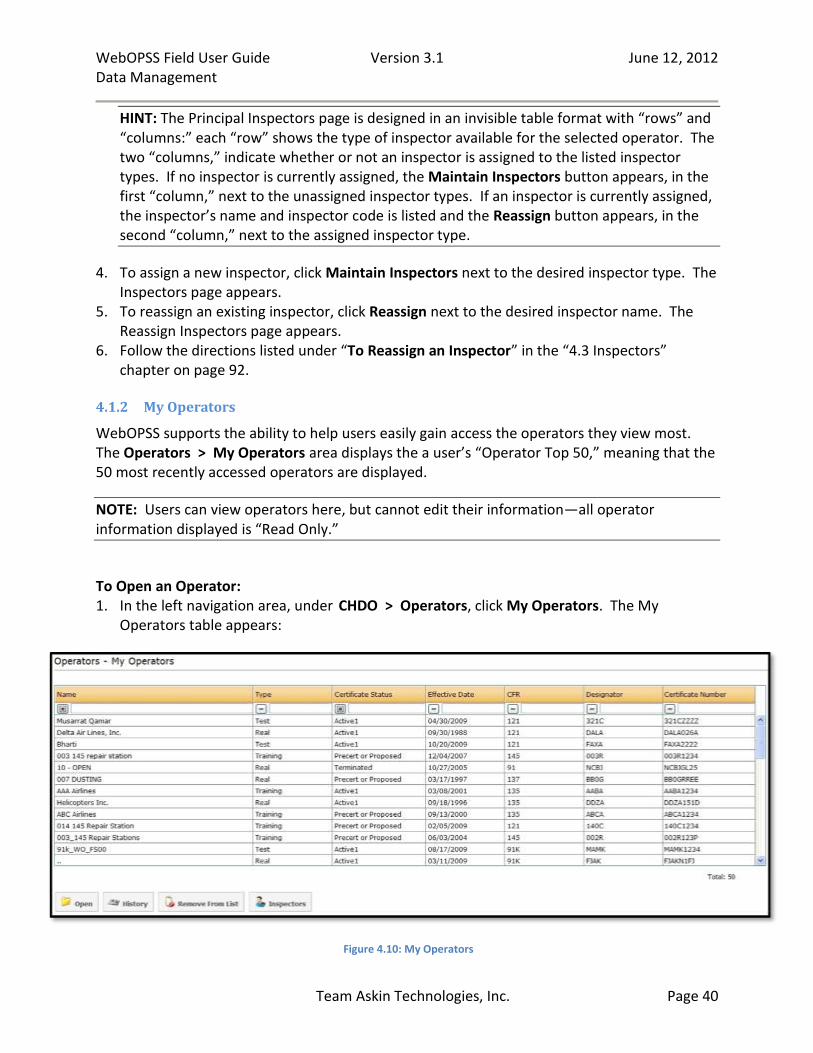
4.1.2 My Operators
WebOPSS supports the ability to help users easily gain access the operators they view most. The Operators > My Operators area displays the a user’s “Operator Top 50,” meaning that the 50 most recently accessed operators are displayed.
NOTE: Users can view operators here, but cannot edit their information—all operator information displayed is “Read Only.”
To Open an Operator: 1. In the left navigation area, under CHDO > Operators, click My Operators. The My
Operators table appears:
Figure 4.10: My Operators
WebOPSS Field User Guide Version 3.1 June 12, 2012 Data Management
Team Askin Technologies, Inc. Page 41
2. Select the desired row. 3. Click Open. The Authorizing Documents screen appears under the selected operator.
HINT: For more information on authorizing documents, see Chapter “5 Authorizing Documents Management” on page 96.
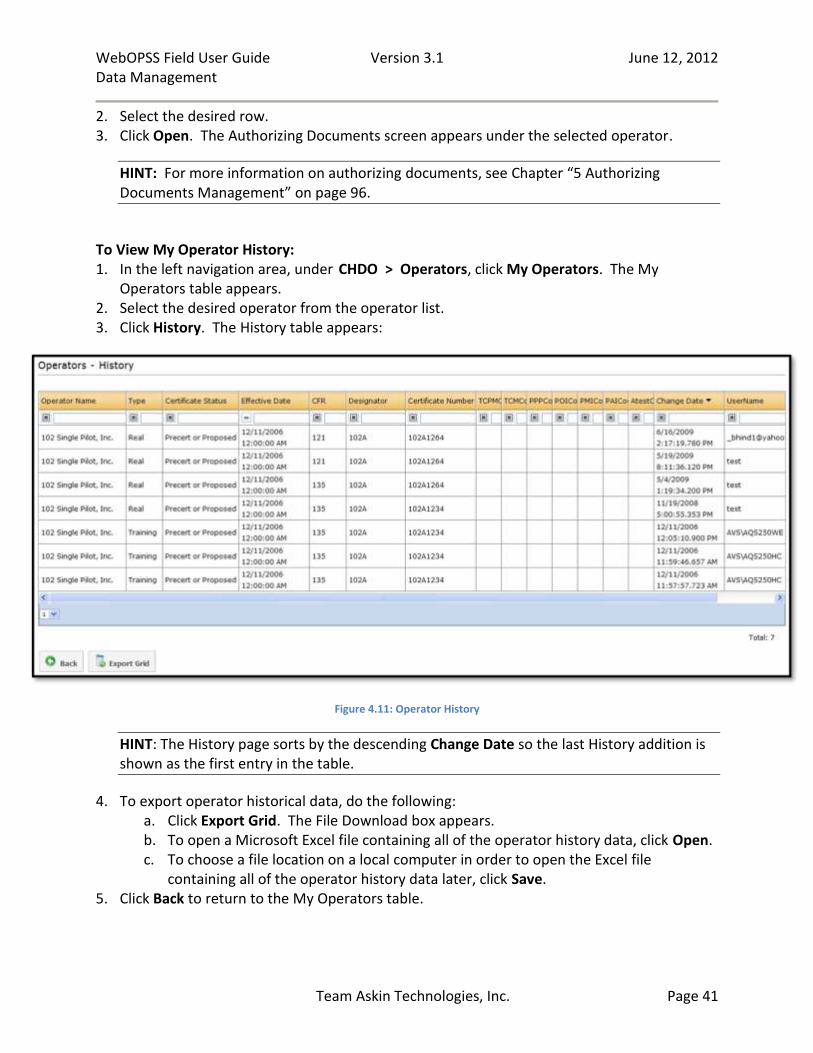
To View My Operator History: 1. In the left navigation area, under CHDO > Operators, click My Operators. The My
Operators table appears. 2. Select the desired operator from the operator list. 3. Click History. The History table appears:
Figure 4.11: Operator History
HINT: The History page sorts by the descending Change Date so the last History addition is shown as the first entry in the table.
4. To export operator historical data, do the following: a. Click Export Grid. The File Download box appears. b. To open a Microsoft Excel file containing all of the operator history data, click Open. c. To choose a file location on a local computer in order to open the Excel file
containing all of the operator history data later, click Save. 5. Click Back to return to the My Operators table.
WebOPSS Field User Guide Version 3.1 June 12, 2012 Data Management
Team Askin Technologies, Inc. Page 42
To Remove an Operator from My Operators: 1. In the left navigation area, under CHDO > Operators, click My Operators. The My
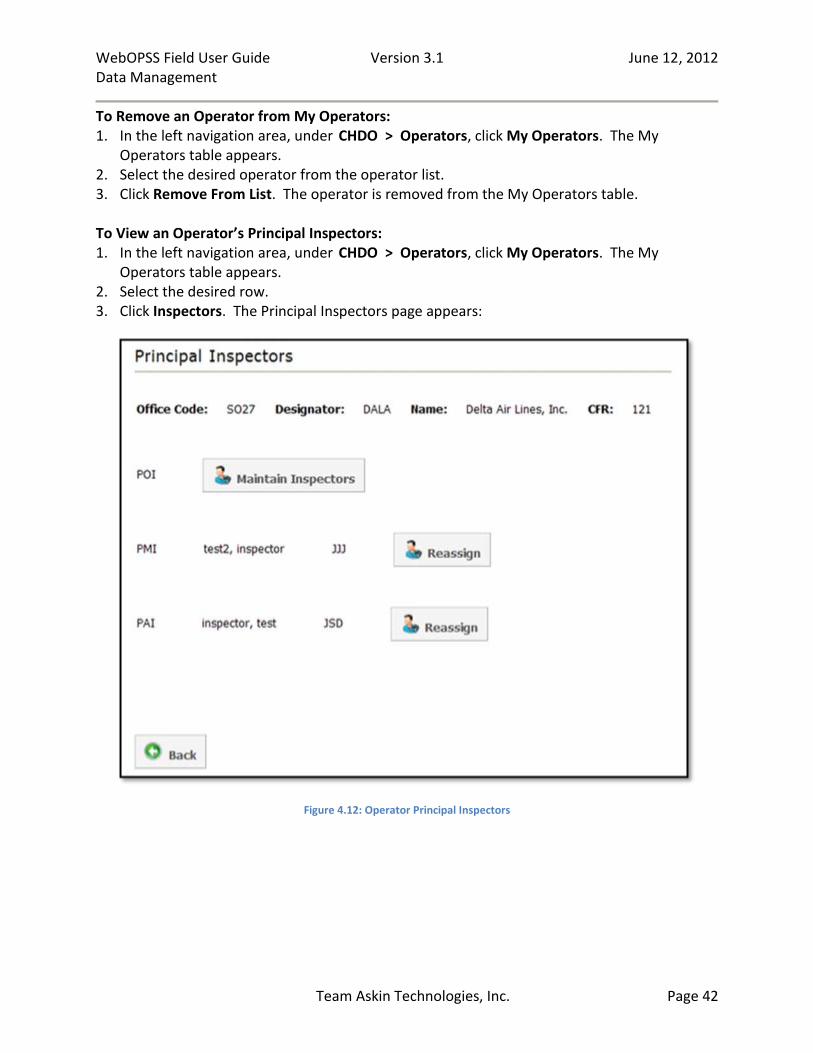
Operators table appears. 2. Select the desired operator from the operator list. 3. Click Remove From List. The operator is removed from the My Operators table. To View an Operator’s Principal Inspectors: 1. In the left navigation area, under CHDO > Operators, click My Operators. The My
Operators table appears. 2. Select the desired row. 3. Click Inspectors. The Principal Inspectors page appears:
Figure 4.12: Operator Principal Inspectors
WebOPSS Field User Guide Version 3.1 June 12, 2012 Data Management
Team Askin Technologies, Inc. Page 43
HINT: The Principal Inspectors page is designed in an invisible table format with “rows” and “columns:” each “row” shows the type of inspector available for the selected operator. The two “columns,” indicate whether or not an inspector is assigned to the listed inspector types. If no inspector is currently assigned, the Maintain Inspectors button appears, in the first “column,” next to the unassigned inspector types. If an inspector is currently assigned, the inspector’s name and inspector code is listed and the Reassign button appears, in the second “column,” next to the assigned inspector type.
4. To assign a new inspector, click Maintain Inspectors next to the desired inspector type. The Inspectors page appears.
5. To reassign an existing inspector, click Reassign next to the desired inspector name. The Reassign Inspectors page appears.
6. Follow the directions listed under “To Reassign an Inspector” in the “4.3 Inspectors” chapter on page 92.
4.2 Operator Data
One of the purposes of WebOPSS is the storage and organization of operator data. While users can access and modify much of this information, some of the actions are permission-based and not available to all users. The information on the CHDO level includes addresses, aircraft, airports, Authorized Areas, deviations, exemptions, insurance, personnel, and DBAs. Prior to editing any data pertinent to an operator, the user needs to identify with which Operator they wish to work. An operator must be selected before a user can access operator data. Once an operator is selected, WebOPSS will display attributes for that operator (for example, Address, Aircraft, Airport) until the operator is changed. At any time, users can change the desired operator by clicking on the Change Operator hyperlink.
NOTE: If a user signs on as a particular operator, all CHDO information viewed will be specific to the selected operator, until either the Log In session times out—after which the user will be prompted to reselect the operator—,or the user chooses to change the operator (to change operators, see “To Change an Operator” section below).
To Select an Operator: 1. In the left navigation area, under CHDO > Operators > Maintain Operator Data, click one
of the following:
Addresses
Airworthiness Directive Notification
Aircraft
Airports
Authorized Areas
Deviations
Exemptions
Insurance

WebOPSS Field User Guide Version 3.1 June 12, 2012 Data Management
Team Askin Technologies, Inc. Page 44
Personnel
DBAs 2. The Select an Operator table appears:
Figure 4.13: Select an Operator
3. Select the search parameters and enter the search text in any of the search fields above the columns.
4. Click Enter. 5. Select the row of the desired operator. 6. Click Select. The page to manage the attribute (for example, Address, Aircraft, Airport) of
the selected Operator appears. To Change an Operator: 1. In the Content area, on the same line which displays the current operator, click on the
Change Operator hyperlink:
Figure 4.14: Change Operator Hyperlink
2. Follow steps listed in “To Select an Operator” section above.
NOTE: Once an operator is selected, WebOPSS will display attributes for that operator (for example, Address, Aircraft, Airport) until the operator is changed.

WebOPSS Field User Guide Version 3.1 June 12, 2012 Data Management
Team Askin Technologies, Inc. Page 45
4.2.1 Addresses
Anyone who has the permission to add, edit, or delete an operator’s address may do so. To Add an Operator Address: 1. In the left navigation area, under CHDO > Maintain Operator Data, click Addresses. The
Operator—Addresses page appears:
Figure 4.15: Operator Addresses
2. Click Add. The Add Address form appears:

WebOPSS Field User Guide Version 3.1 June 12, 2012 Data Management
Team Askin Technologies, Inc. Page 46
Figure 4.16: Add Operator Address
3. Enter the appropriate address information. 4. Click Save. The Operator Addresses table changes to reflect the addition. To Edit an Operator Address:
NOTE: When the screen appears, the Edit, Delete, and Copy buttons will appear grayed out (inaccessible). They will become accessible once a row in the table is selected.
1. In the left navigation area, under CHDO > Maintain Operator Data, click Addresses. The Operator—Addresses page appears.
2. Select the row of the desired operator address. 3. Click Edit. The Edit Address form appears. 4. Enter the desired address information. 5. Click Save. The Operator—Addresses table appears with a list of all addresses in the
database for the selected operator. To Delete an Operator Address:
NOTE: When the screen appears, the Edit, Delete, and Copy buttons will appear grayed out (inaccessible). They will become accessible once a row in the table is selected.
1. In the left navigation area, under CHDO > Maintain Operator Data, click Addresses. The Operator—Addresses page appears.
2. Select the row of the desired operator address. 3. Click Delete. A confirmation window appears. 4. Click Yes. The address is removed from the Operator—Addresses table.
WebOPSS Field User Guide Version 3.1 June 12, 2012 Data Management
Team Askin Technologies, Inc. Page 47
To Copy an Operator Address:
NOTE: When the screen appears, the Edit, Delete, and Copy buttons will appear grayed out (inaccessible). They will become accessible once a row in the table is selected.
1. In the left navigation area, under CHDO > Maintain Operator Data, click Addresses. The Operator—Addresses page appears.
2. Select the row of the desired operator address. 3. Click Copy. The screen will update itself to automatically open the copied address. 4. Select the new Address Type.
HINT: There can only be one address type per operator.
5. Click Save. The Operator-Addresses table changes to reflect the addition.
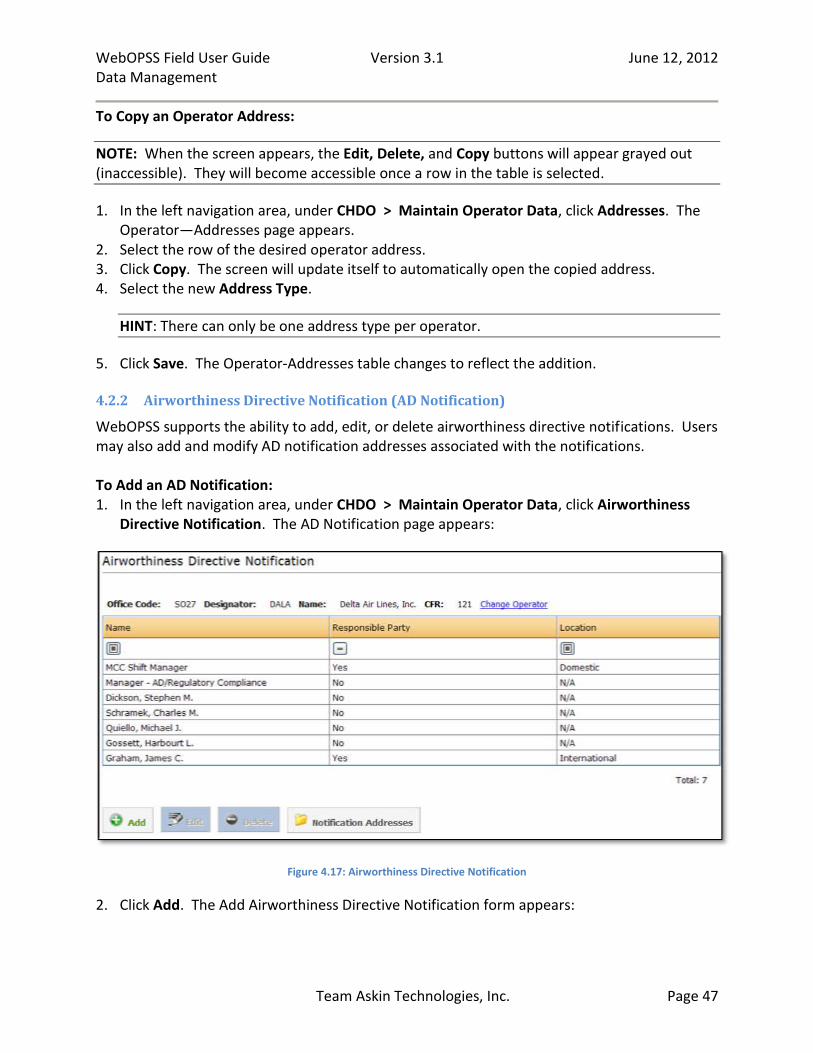
4.2.2 Airworthiness Directive Notification (AD Notification)
WebOPSS supports the ability to add, edit, or delete airworthiness directive notifications. Users may also add and modify AD notification addresses associated with the notifications. To Add an AD Notification: 1. In the left navigation area, under CHDO > Maintain Operator Data, click Airworthiness
Directive Notification. The AD Notification page appears:
Figure 4.17: Airworthiness Directive Notification
2. Click Add. The Add Airworthiness Directive Notification form appears:

WebOPSS Field User Guide Version 3.1 June 12, 2012 Data Management
Team Askin Technologies, Inc. Page 48
Figure 4.18: Add Airworthiness Directive Notification
3. Select the circle indicating that the party is either the “Responsible Party” or a “Courtesy Copy.”
4. Enter the name and contact information for the Responsible Party.
HINT: The Person/Organization text field allows up to 65 characters.
5. If the user is located outside the United States or its holdings (for example, Puerto Rico), check the International box.
6. Enter the address information. 7. Click Save. The AD Notification table changes to reflect the addition. To Edit an AD Notification: 1. In the left navigation area, under CHDO > Maintain Operator Data, click Airworthiness
Directive Notification. The AD Notification page appears. 2. Select the row of the desired AD Notification.
NOTE: When the screen appears, the Edit and Delete buttons are grayed out (inaccessible). They will become accessible once a row in the table is selected.
3. Click Edit. The Edit Airworthiness Directive Notification form appears. 4. Make the appropriate changes. 5. Click Save. The AD Notification table appears with a list of all AD Notifications in the
database for the selected operator.
WebOPSS Field User Guide Version 3.1 June 12, 2012 Data Management
Team Askin Technologies, Inc. Page 49
To Delete an AD Notification: 1. In the left navigation area, under CHDO > Maintain Operator Data, click Airworthiness
Directive Notification. The AD Notification page appears. 2. Select the row of the desired AD Notification.
NOTE: When the screen appears, the Edit and Delete buttons are grayed out (inaccessible). They will become accessible once a row in the table is selected.
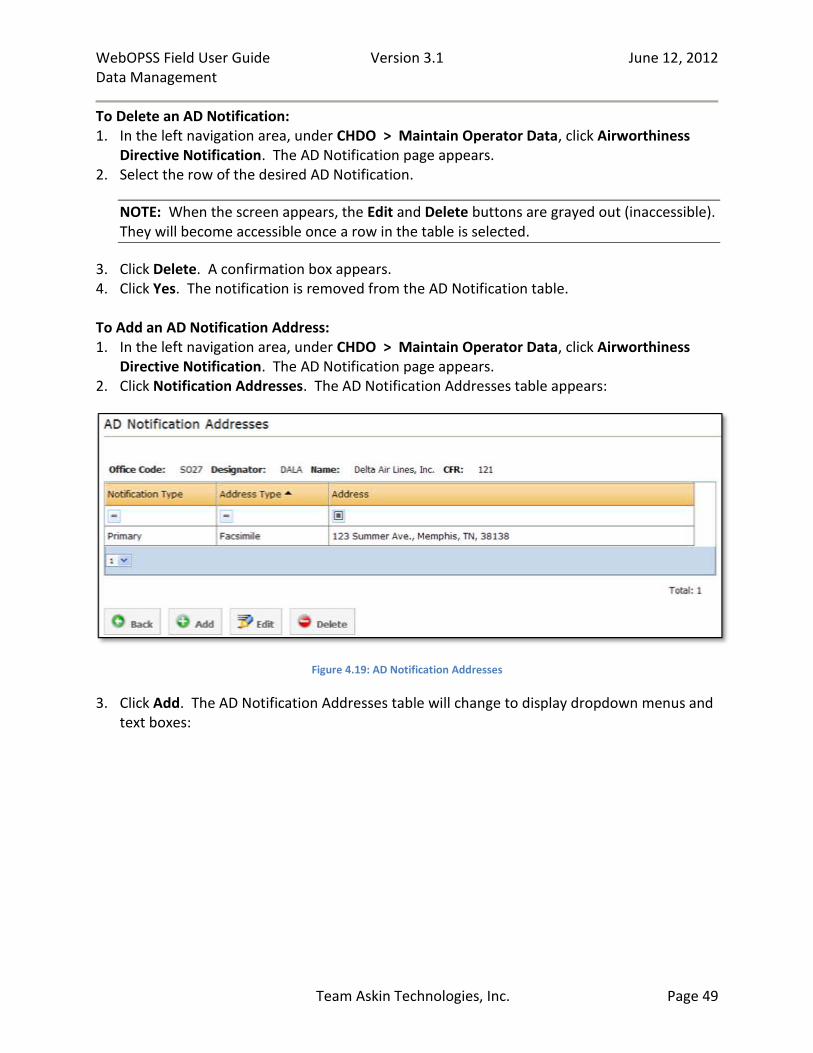
3. Click Delete. A confirmation box appears. 4. Click Yes. The notification is removed from the AD Notification table. To Add an AD Notification Address: 1. In the left navigation area, under CHDO > Maintain Operator Data, click Airworthiness
Directive Notification. The AD Notification page appears. 2. Click Notification Addresses. The AD Notification Addresses table appears:
Figure 4.19: AD Notification Addresses
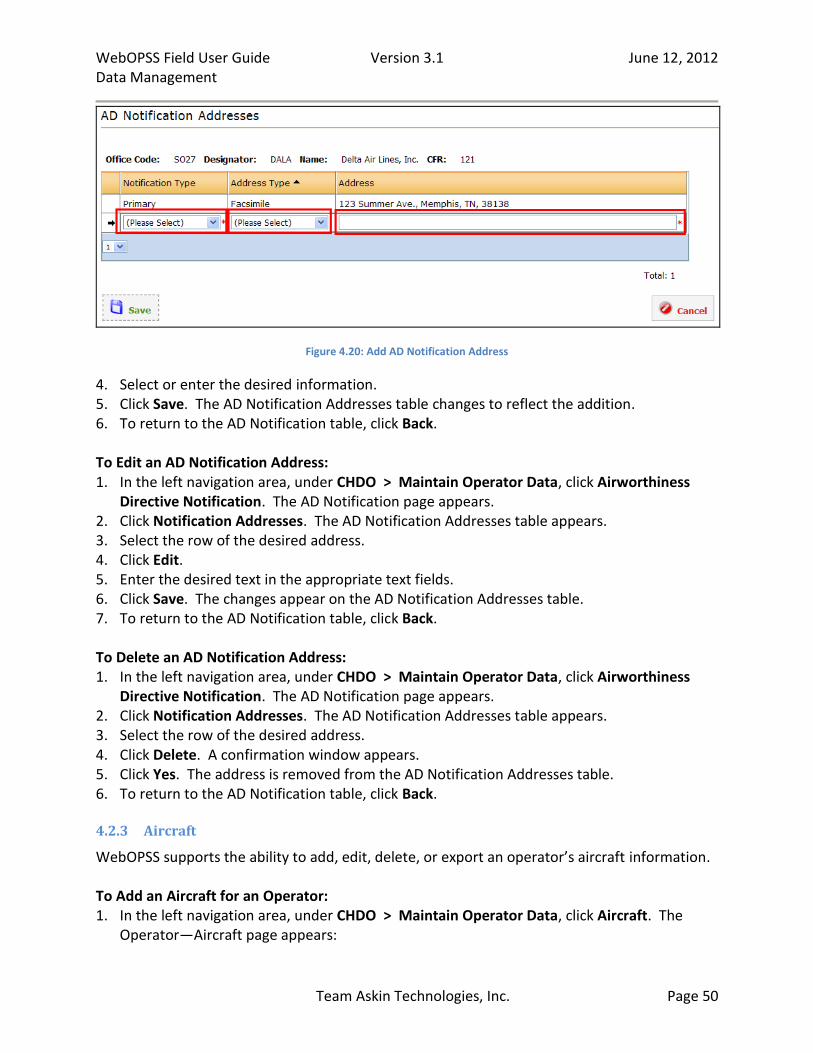
3. Click Add. The AD Notification Addresses table will change to display dropdown menus and text boxes:
WebOPSS Field User Guide Version 3.1 June 12, 2012 Data Management
Team Askin Technologies, Inc. Page 50
Figure 4.20: Add AD Notification Address
4. Select or enter the desired information. 5. Click Save. The AD Notification Addresses table changes to reflect the addition. 6. To return to the AD Notification table, click Back. To Edit an AD Notification Address: 1. In the left navigation area, under CHDO > Maintain Operator Data, click Airworthiness
Directive Notification. The AD Notification page appears. 2. Click Notification Addresses. The AD Notification Addresses table appears. 3. Select the row of the desired address. 4. Click Edit. 5. Enter the desired text in the appropriate text fields. 6. Click Save. The changes appear on the AD Notification Addresses table. 7. To return to the AD Notification table, click Back. To Delete an AD Notification Address: 1. In the left navigation area, under CHDO > Maintain Operator Data, click Airworthiness
Directive Notification. The AD Notification page appears. 2. Click Notification Addresses. The AD Notification Addresses table appears. 3. Select the row of the desired address. 4. Click Delete. A confirmation window appears. 5. Click Yes. The address is removed from the AD Notification Addresses table. 6. To return to the AD Notification table, click Back.
4.2.3 Aircraft
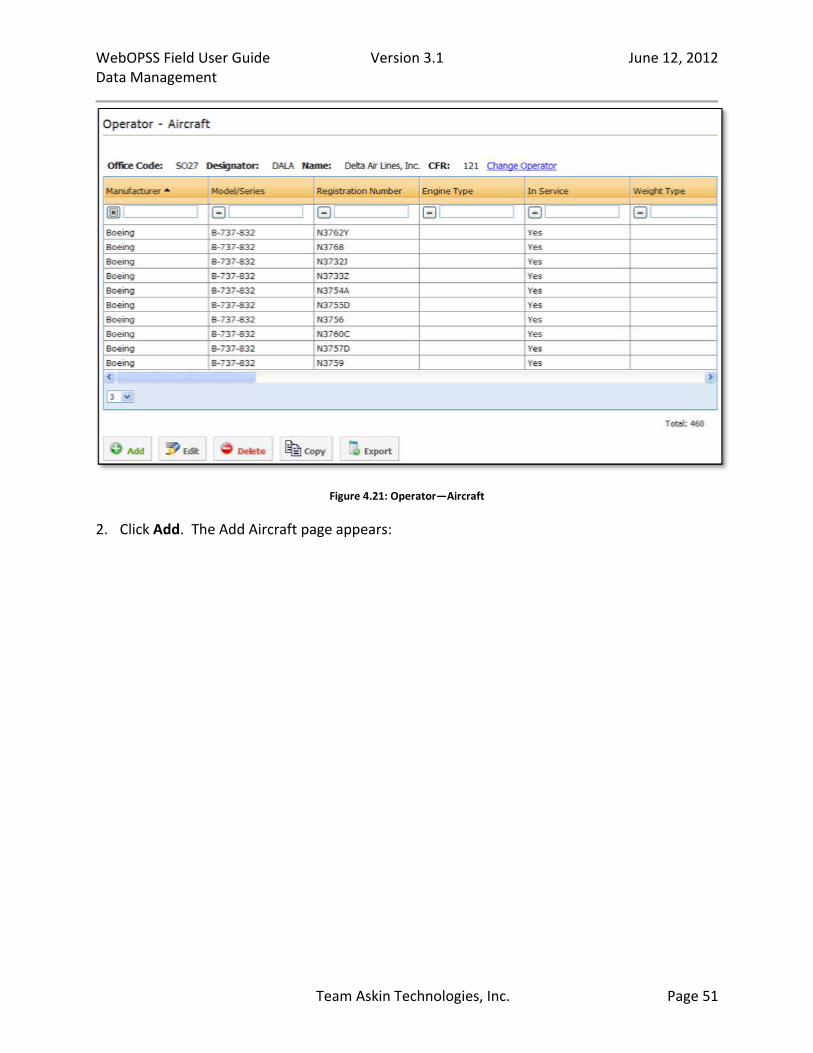
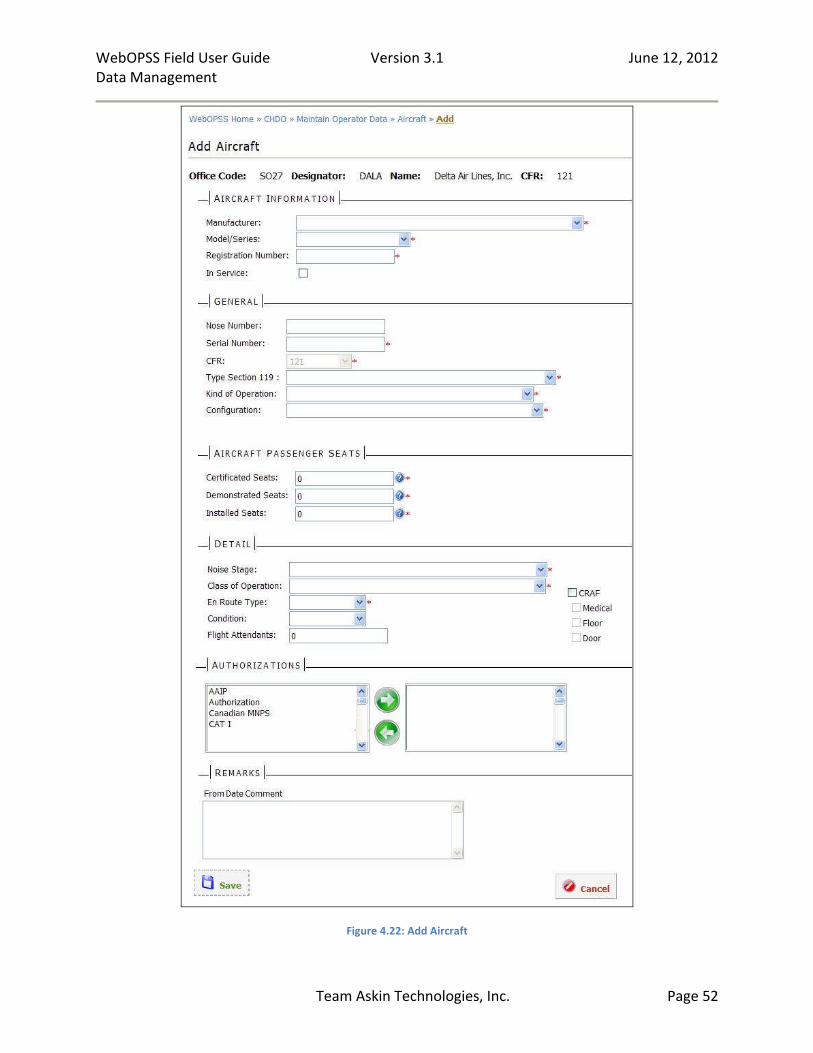
WebOPSS supports the ability to add, edit, delete, or export an operator’s aircraft information. To Add an Aircraft for an Operator: 1. In the left navigation area, under CHDO > Maintain Operator Data, click Aircraft. The
Operator—Aircraft page appears:
WebOPSS Field User Guide Version 3.1 June 12, 2012 Data Management
Team Askin Technologies, Inc. Page 51
Figure 4.21: Operator—Aircraft
2. Click Add. The Add Aircraft page appears:
WebOPSS Field User Guide Version 3.1 June 12, 2012 Data Management
Team Askin Technologies, Inc. Page 52
Figure 4.22: Add Aircraft
WebOPSS Field User Guide Version 3.1 June 12, 2012 Data Management
Team Askin Technologies, Inc. Page 53
3. Complete the Aircraft Information section as follows: a. Select the Manufacturer from the drop-down list. b. Select the Model/Series from the drop-down list. c. Enter the Registration Number in the text field. d. Check or uncheck the In Service box as appropriate.
4. Complete the General section as follows: a. If desired, enter the Nose Number in the text field. b. Enter the Serial Number in the text field.
NOTE: The CFR dropdown menu will default to the operator’s CFR and will be grayed out (inaccessible) for change.
c. Select the Type Section 119 from the drop-down list. d. Select the Kind of Operation from the drop-down list. e. Select the Configuration from the drop-down list.
NOTE: When an operator selects “All Cargo” configuration, the text fields to the seat (Certificated, Demonstrated, and Installed Seats) fields on the next page may be grayed out (inaccessible). If accessible, users can enter “N/A.”
5. Complete the Aircraft Passenger Seats section as follows: a. Enter the Certificated Seats in the text field.
HINT: Certificated Seats indicates the maximum number of seats as listed on the aircraft Type Certificate, not the supplemental Type Certificate; in other words, what an airplane is certified for. It is required for all air operators (i.e., 91, 91K, 121, 135, 125, 125M, 129, 129.14, 133, 137), and must be entered as any numerical value ranging 0-9,999—0 is the default value, and “N/A” is not allowed. No other seat numbers can be higher than Certificated Seats.
b. Enter the Demonstrated Seats in the text field.
HINT: Demonstrated Seats indicates the maximum number of seats demonstrated in emergency evacuation. It is only applicable to and required for Part 121, 121/135, 125 and 125M operators—for all other operators, this field will be disabled (grayed out) and defaulted to “N/A.” Demonstrated Seat values may be entered as “N/A” for Part 125 & 125M if they also have a deviation from the demonstration requirement. Additionally, if Installed/Approved Seats has selected “Cargo Only,” then Demonstrated is “N/A.” In all other cases, the Demonstrated Seat value should be entered as any numerical value ranging 0-9,999, though 0 is the default value. It can be higher than the number of Installed Seats but cannot be higher than Certificated Seats.
WebOPSS Field User Guide Version 3.1 June 12, 2012 Data Management
Team Askin Technologies, Inc. Page 54
c. Enter the Installed Seats in the text field.
HINT: Installed Seats indicates the actual number of seats installed or approved for installation in the aircraft. It is required for 121, 125, 125M, 135, 91K operators. Installed Seat values can be entered as any numerical value ranging 0-9,999, though 0 is the default value. Installed Seats can be higher than Demonstrated Seats (if applicable) but cannot be higher than Certificated Seats.
6. Complete the Detail section as follows: a. Select the Noise Stage from the drop-down list. b. Select the Class of Operation from the drop-down list. c. Select the En Route Type from the drop-down list. d. If applicable, select the Condition from the drop-down list. e. If applicable, enter the number of flight attendants in the Flight Attendants text field. f. If applicable, select the Civil Reserve Air Fleet (CRAF) check box. g. If applicable, further define the type of CRAF by selecting the Medical check box. h. If applicable, further define the type of CRAF by selecting the Floor check box. i. If applicable, further define the type of CRAF by selecting the Door check box.
7. Complete the Authorizations section as follows: a. In the Authorizations list, click on the row of the desired authorization(s) to assign to
the aircraft.
HINT: To select multiple authorizations, hold down the CTRL key while clicking to select multiple authorizations.
b. Click on the right arrow icon (>) when all authorizations have been selected. The selected authorizations appear in the right window.
8. Complete the Remarks section by entering any necessary Remarks in the text field.
9. Click Save.
If there are validation errors, an error report appears at the top of the form. Correct the errors and click Save again.
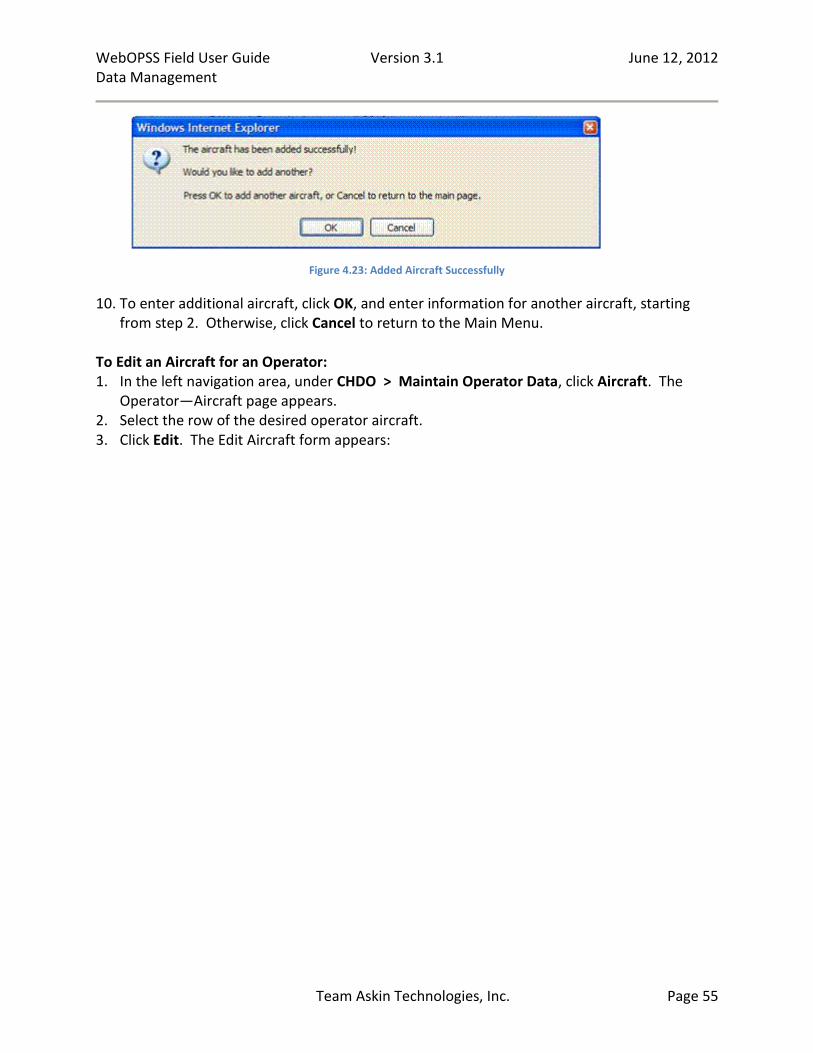
If there are no validation errors, the following dialog appears:
WebOPSS Field User Guide Version 3.1 June 12, 2012 Data Management
Team Askin Technologies, Inc. Page 55
Figure 4.23: Added Aircraft Successfully
10. To enter additional aircraft, click OK, and enter information for another aircraft, starting from step 2. Otherwise, click Cancel to return to the Main Menu.
To Edit an Aircraft for an Operator: 1. In the left navigation area, under CHDO > Maintain Operator Data, click Aircraft. The
Operator—Aircraft page appears. 2. Select the row of the desired operator aircraft. 3. Click Edit. The Edit Aircraft form appears:
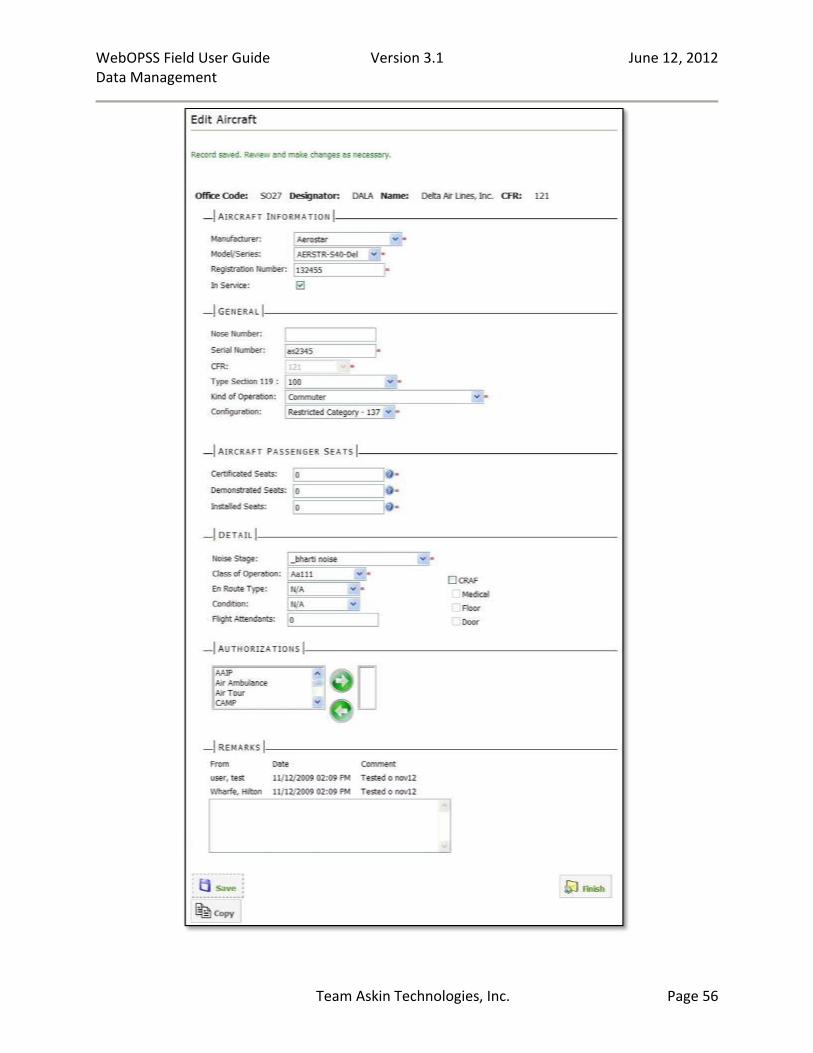
WebOPSS Field User Guide Version 3.1 June 12, 2012 Data Management
Team Askin Technologies, Inc. Page 56
WebOPSS Field User Guide Version 3.1 June 12, 2012 Data Management
Team Askin Technologies, Inc. Page 57
Figure 4.24: Edit Aircraft
4. Make the desired changes. 5. Click Save. The Operator—Aircraft screen appears with a list of all aircraft in the database
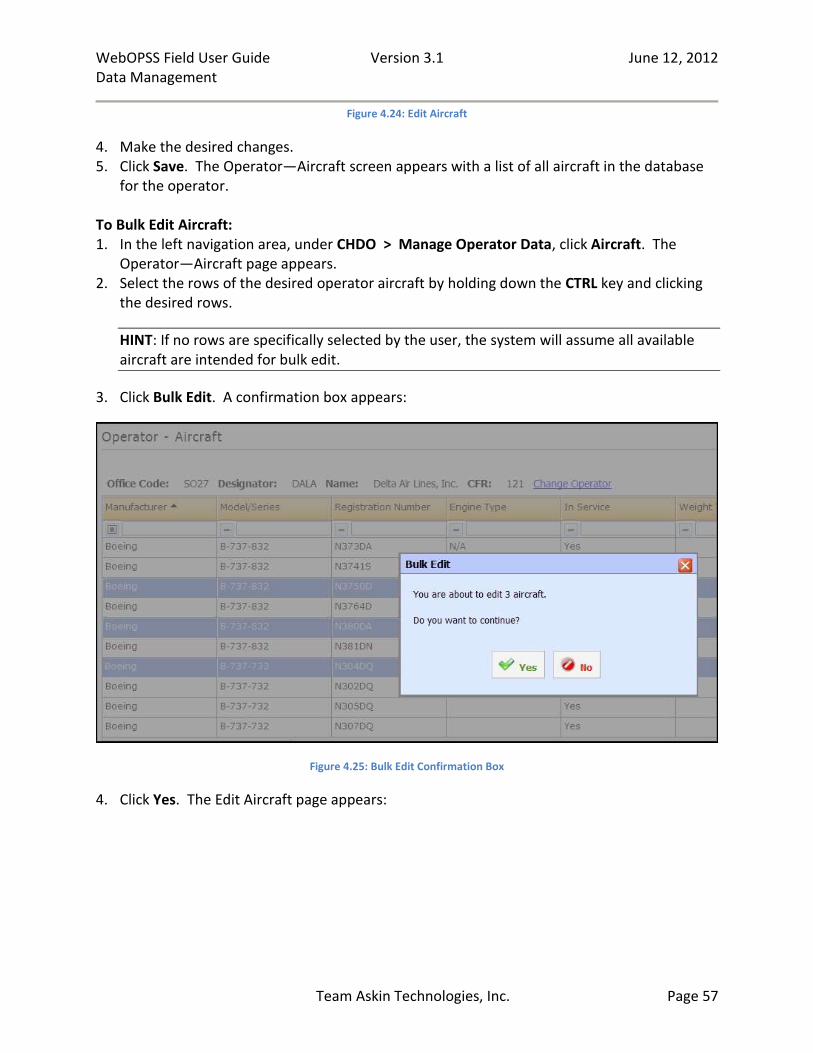
for the operator. To Bulk Edit Aircraft: 1. In the left navigation area, under CHDO > Manage Operator Data, click Aircraft. The
Operator—Aircraft page appears. 2. Select the rows of the desired operator aircraft by holding down the CTRL key and clicking
the desired rows.
HINT: If no rows are specifically selected by the user, the system will assume all available aircraft are intended for bulk edit.
3. Click Bulk Edit. A confirmation box appears:
Figure 4.25: Bulk Edit Confirmation Box
4. Click Yes. The Edit Aircraft page appears:

WebOPSS Field User Guide Version 3.1 June 12, 2012 Data Management
Team Askin Technologies, Inc. Page 58
Figure 4.26: Bulk Edit Aircraft

WebOPSS Field User Guide Version 3.1 June 12, 2012 Data Management
Team Askin Technologies, Inc. Page 59
NOTE: The Manufacturer, Model/Series, Registration, Nose Number, Serial Number, and CFR fields are not editable during a bulk edit. When editing aircraft with different CFR, users will not be able to modify Type Section 119, Kind of Operation, and Authorization.
5. Make the desired changes.
NOTE: For Demonstrated Seats, the field is currently enabled for 121, 125 and 125M aircraft only. Since 121/135 operators are allowed to maintain 121 and 135 aircraft, when the user is editing a set of 121, and 135 aircraft, the field will be enabled and the system will apply modifications made to this field for the 121 aircraft only. For all other scenarios the current business rule will be followed (it will be enabled for 121, 125 and 125M aircraft only). This also applies for 129 operators.
6. Under “Detail,” do one of the following, if applicable:
HINT: To select a radio button option, click the circle next to the desired option; a green dot in the circle indicates selected options. To deselect an option, click the circle again for the green dot disappears.
If no CRAF are to be applied, click the “No” option next to CRAF.
HINT: Clicking the “No” option next to CRAF selects the “No” option for all CRAF options.
If CRAF are to be applied, select “Yes” for the desired options:
Figure 4.27: Default CRAF Selection
HINT: Clicking “Yes” for any of the CRAF options selects the “Yes” option next to CRAF by default.
7. Under “Authorizations,” select the radio button for the desired authorization.
HINT: If users leave any authorization blank (i.e., do not select either “Add” or “Remove”), no change is made to the aircraft for that authorization.
WebOPSS Field User Guide Version 3.1 June 12, 2012 Data Management
Team Askin Technologies, Inc. Page 60
8. Click Save. A confirmation box appears. 9. Click Yes. The changes appear in the Operator—Aircraft table. To Delete an Operator Aircraft: 1. In the left navigation area, under CHDO > Manage Operator Data, click Aircraft. The
Operator—Aircraft page appears. 2. Select the row of the desired operator aircraft. 3. Click Delete. A confirmation box appears.
NOTE: If the deleted aircraft is the last MMS for a particular operator, the confirmation message that appears notifies the user that the MMS has Other Airport Data associated with it; if the user confirms deletion of the aircraft, the system not only deletes the aircraft, but also the authorization, runway, and any other associated data.
4. Click Yes. The aircraft is removed from the Operator—Aircraft table. To Copy an Operator Aircraft: 1. In the left navigation area, under CHDO > Manage Operator Data, click Aircraft. The
Operator—Aircraft page appears. 2. Select the row of the desired operator aircraft. 3. Do one of the following:
Click Edit to open the Edit Aircraft page, and then click Copy at the bottom of the form. The Copy Aircraft screen appears containing the copied aircraft information.
Click Copy. The Copy Aircraft screen appears containing the copied aircraft information.
4. Select the new Registration Number.
HINT: The registration number must be unique per operator.
5. Select the new Serial Number.
HINT: The serial number must be unique per operator by Make/Model/Series.
6. If desired, modify any other data in the appropriate fields. 7. Click Save. The Operator—Aircraft table changes to reflect the addition.
To Export an Operator’s Aircraft Data: 1. In the left navigation area, under CHDO > Manage Operator Data, click Aircraft. The
Operator—Aircraft page appears. 2. Click Export. The File Download box appears. 3. Do one of the following:
Click Open to open a Microsoft Excel file containing all of the Aircraft list data.

WebOPSS Field User Guide Version 3.1 June 12, 2012 Data Management
Team Askin Technologies, Inc. Page 61
Click Save. The user can save a file location on a local computer, then open the Excel file containing all of the Aircraft list data.
4.2.4 Airports
WebOPSS supports the ability for any authorized WebOPSS user to add, edit, delete, or export an operator’s airport information. When manipulating airport information, the user will see two lists: the Available Airport list and the Assigned Airport list. To assign an airport to an operator, select it, and use the arrows between the lists to move it back or forth. The user must select an airport from the Assigned Airport list to add, edit, or delete Other Airport Data. To Add Additional Airport Data: 1. In the left navigation area, under CHDO > Maintain Operator Data, click Airports. The
Operator—Airports page appears:
Figure 4.28: Operator—Airports
WebOPSS Field User Guide Version 3.1 June 12, 2012 Data Management
Team Askin Technologies, Inc. Page 62
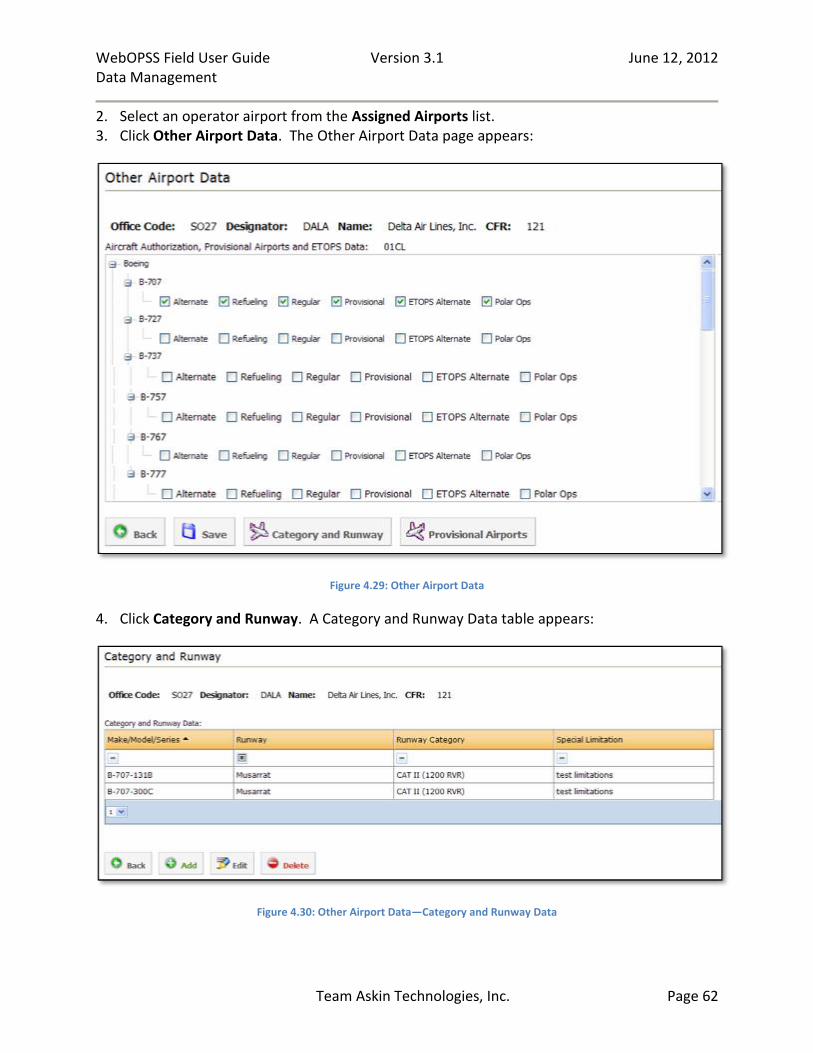
2. Select an operator airport from the Assigned Airports list. 3. Click Other Airport Data. The Other Airport Data page appears:
Figure 4.29: Other Airport Data
4. Click Category and Runway. A Category and Runway Data table appears:
Figure 4.30: Other Airport Data—Category and Runway Data

WebOPSS Field User Guide Version 3.1 June 12, 2012 Data Management
Team Askin Technologies, Inc. Page 63
NOTE: At least one aircraft provision must be selected on the Other Airport Data page. Otherwise the Add, Edit, and Delete buttons will appear grayed out (inaccessible).
5. Click Add. The Category and Runway Data table changes and aircraft options appear:
Figure 4.31: Adding Category and Runway Data
6. Click the desired aircraft in the Make/Model/Series column. 7. Select the Runway from the drop-down menu. 8. Select the Runway Category from the drop-down menu. 9. If desired, enter any Special Limitations in the text box. 10. Click Save. The Category and Runway Data table changes to reflect the addition. To Edit Airport Aircraft: 1. In the left navigation area, under CHDO > Manage Operator Data, click Airports. The
Operator—Airport page appears. 2. Select an operator airport from the Assigned Airports list. 3. Click Other Airport Data. The Other Airport Data page appears. 4. Check or uncheck the appropriate boxes to assign provisions to the desired aircraft. 5. Click Save. The changes appear on the Other Airport Data page
HINT: Users can modify the provisions for multiple aircraft before clicking Save.
To Edit Additional Airport Data: 1. In the left navigation area, under CHDO > Maintain Operator Data, click Airports. The
Operator—Airport screen appears. 2. Select an operator airport from the Assigned Airports list.
WebOPSS Field User Guide Version 3.1 June 12, 2012 Data Management
Team Askin Technologies, Inc. Page 64
3. Click Other Airport Data. The Other Airport Data page appears. 4. Click Category and Runway. A Category and Runway Data table appears. 5. Select the data row to be edited. 6. Click Edit. The Category and Runway Data table changes and aircraft options appear. 7. Make the appropriate changes. 8. Click Save. The changes appear on the Category and Runway Data table.
To Delete Additional Airport Data: 1. In the left navigation area, under CHDO > Maintain Operator Data, click Airports. The
Operator—Airport screen appears. 2. Select an operator airport from the Assigned Airport list. 3. Click Other Airport Data. The Other Airport Data page appears. 4. Click Category and Runway. A Category and Runway Data table appears. 5. Select the data row to be deleted. 6. Click Delete. A confirmation box appears. 7. Click Yes. The airport data is removed from the Category and Runway Data table.
4.2.5 Authorized Areas
Below is a high-level graphic depicting the Authorized Area process.
WebOPSS Field User Guide Version 3.1 June 12, 2012 Data Management
Team Askin Technologies, Inc. Page 65
FAA user
Is
Made
Up
of
Is
Made
Up
of
Reference
Documents
(Available
Templates)
Is
Made
Up
of
Creates /
Modifies /
Deletes
Authorized Areas
CFR DataHistory
Is
Made
Up
of
Any
Authorized
user
Applicable
Notes
Is
Made
Up
of
Is
Made
Up
of
Is
Made
Up
of
Tracking
category
Is
Made
Up
of
Assigns /
modifies
Authorizing Documents
Which are active
for the certificate holder
Management Maintenance
Authorized
Areas
Authorized
Areas by Certificate
Holder
CountriesCountries
Figure 4.32: Authorized Area Process
An Authorized Area is a geographical area defined by Headquarters. Certain documents may be associated with a specific Authorized Area. A Certificate Holder assigns an Authorized Area and describes its operations in that area. WebOPSS supports the ability for any authorized user to assign or remove Authorized Areas and to add or delete associated reference documents in an operator’s list of Authorized Areas. To assign an Authorized Area to an operator, select it from the Available Authorized Areas list
and click the down arrow ( ) between the lists to move it to the Assigned Authorized Areas list. Any authorized WebOPSS user can also specify whether a territory should be included or excluded in a group, identify territories which they are allowed to fly over, select tracking categories and add, edit, delete, or assign notes. When assigning an entire Authorized Area, it is not necessary to select (include) the specific areas within that selection. Specific selections need only be made where a defined area is to be Excluded or a territory is to be marked as Overflight.
WebOPSS Field User Guide Version 3.1 June 12, 2012 Data Management
Team Askin Technologies, Inc. Page 66
WebOPSS also allows Reference Documents to be attached to each Authorized Area. Whenever the user selects an Authorized Area from either the Available Authorized Areas or Assigned Authorized Areas lists, a list of Reference Documents associated with that Authorized Area appears at the bottom of the screen. To Add/Remove Territories: See “4.2.6 Territories” section on page 72. To Add Territory Notes: 1. In the left navigation area, under CHDO > Maintain Operator Data, click Authorized Areas.
The Operators—Authorized Areas page appears:
Figure 4.33: Authorized Areas
WebOPSS Field User Guide Version 3.1 June 12, 2012 Data Management
Team Askin Technologies, Inc. Page 67
Note: If any previously assigned Authorized Area has been inactivated by Headquarters, a red
inactive icon appears in the Status column. You are prompted to remove the inactive area(s) from Assigned Authorized Areas and reissue any associated authorizing documents. 2. Select an Authorized Area from the Assigned Authorized Areas table.
HINT: If the desired Authorized Area is not in the Assigned Authorized Areas table, users may have to search for and select the desired area in the Available Authorized Areas table,
and then click the down arrow ( ) to move the desired area to the Assigned Authorized Areas table.
3. Click Add/Remove Territories. The Assign Territories page appears:
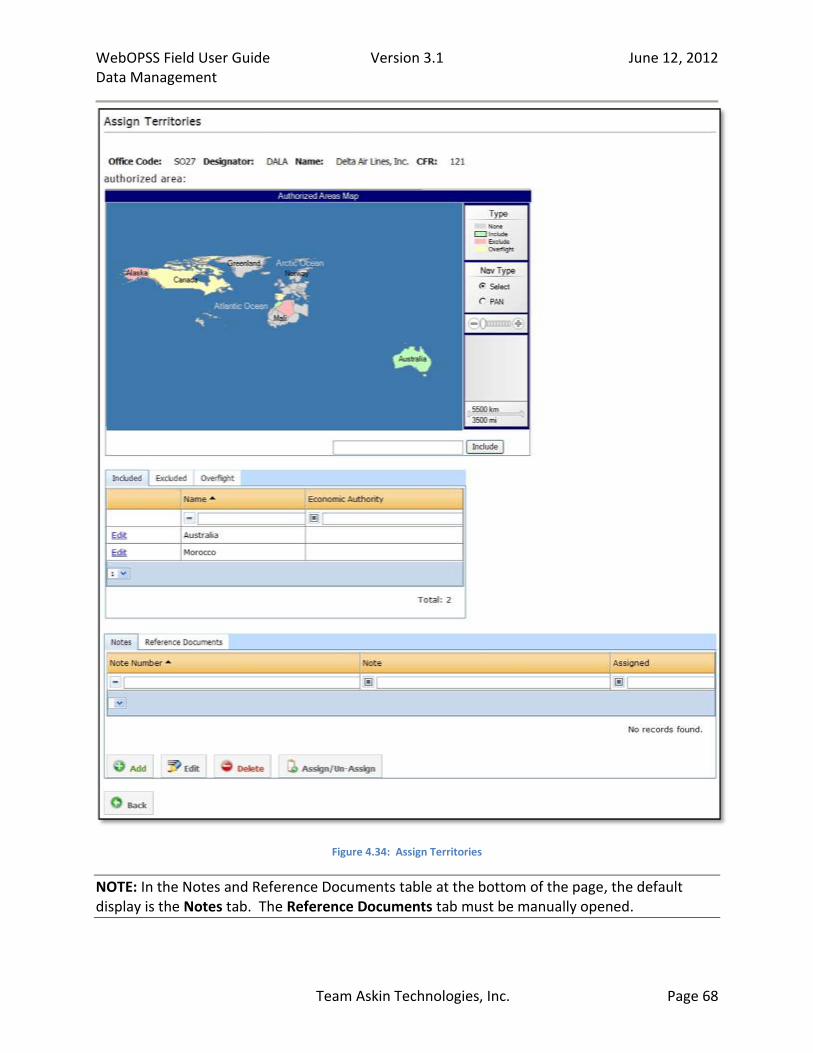
WebOPSS Field User Guide Version 3.1 June 12, 2012 Data Management
Team Askin Technologies, Inc. Page 68
Figure 4.34: Assign Territories
NOTE: In the Notes and Reference Documents table at the bottom of the page, the default display is the Notes tab. The Reference Documents tab must be manually opened.
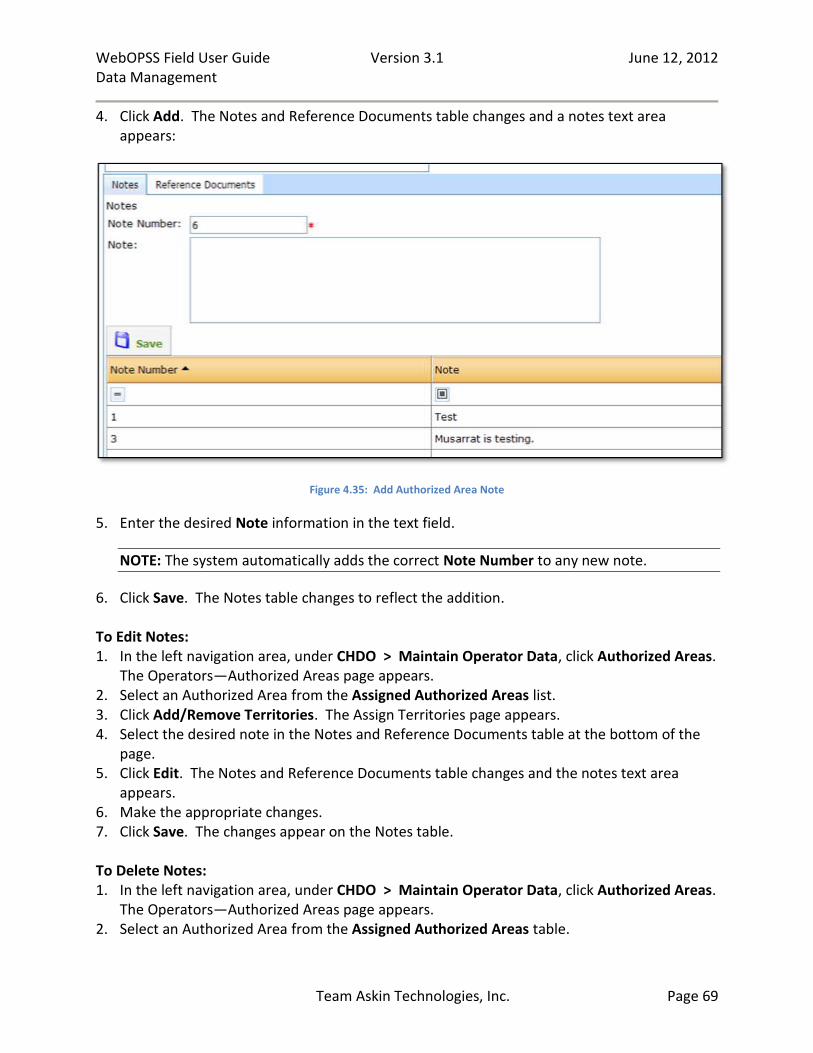
WebOPSS Field User Guide Version 3.1 June 12, 2012 Data Management
Team Askin Technologies, Inc. Page 69
4. Click Add. The Notes and Reference Documents table changes and a notes text area appears:
Figure 4.35: Add Authorized Area Note
5. Enter the desired Note information in the text field.
NOTE: The system automatically adds the correct Note Number to any new note.
6. Click Save. The Notes table changes to reflect the addition. To Edit Notes: 1. In the left navigation area, under CHDO > Maintain Operator Data, click Authorized Areas.
The Operators—Authorized Areas page appears. 2. Select an Authorized Area from the Assigned Authorized Areas list. 3. Click Add/Remove Territories. The Assign Territories page appears. 4. Select the desired note in the Notes and Reference Documents table at the bottom of the
page. 5. Click Edit. The Notes and Reference Documents table changes and the notes text area
appears. 6. Make the appropriate changes. 7. Click Save. The changes appear on the Notes table.
To Delete Notes: 1. In the left navigation area, under CHDO > Maintain Operator Data, click Authorized Areas.
The Operators—Authorized Areas page appears. 2. Select an Authorized Area from the Assigned Authorized Areas table.
WebOPSS Field User Guide Version 3.1 June 12, 2012 Data Management
Team Askin Technologies, Inc. Page 70
3. Click Add/Remove Territories. The Assign Territories page appears. 4. Select the desired note in the Notes table at the bottom of the page.
NOTE: Only notes that are not assigned to any territory can be deleted. However, users must remember that the Notes table will show all notes entered for all the assigned territories; i.e. though note #11 may not be assigned to the “Japan” Authorized Area, it will appear in the “Japan” Note table with a “No” under the “Assigned” column. Before deleting a note, users must verify, on the Operators—Authorized Areas page under the “Notes” column in the Assigned Authorized Areas table, that the desired note to be deleted is not listed for any other Assigned Authorized Area.
5. Click Delete. A confirmation window appears. 6. Click Yes. The note is removed from the Notes table. To Assign Notes: 1. In the left navigation area, under CHDO > Maintain Operator Data, click Authorized Areas.
The Operators—Authorized Areas page appears. 2. Select an Authorized Area from the Assigned Authorized Areas table. 3. Click Add/Remove Territories. The Assign Territories page appears. 4. Select the desired note in the Notes and Reference Documents table at the bottom of the
page. 5. Click Assign. The Notes table changes to display “Yes” in the “Assigned” column for the
selected note. To Add Reference Documents (pertaining to a selected Authorized Area): 1. In the left navigation area, under CHDO > Maintain Operator Data, click Authorized Areas.
The Operators—Authorized Areas page appears. 2. Select an Authorized Area from the Assigned Authorized Areas table. 3. Click Add/Remove Territories. The Assign Territories page appears. 4. Open the Reference Documents tab in the table at the bottom of the page:
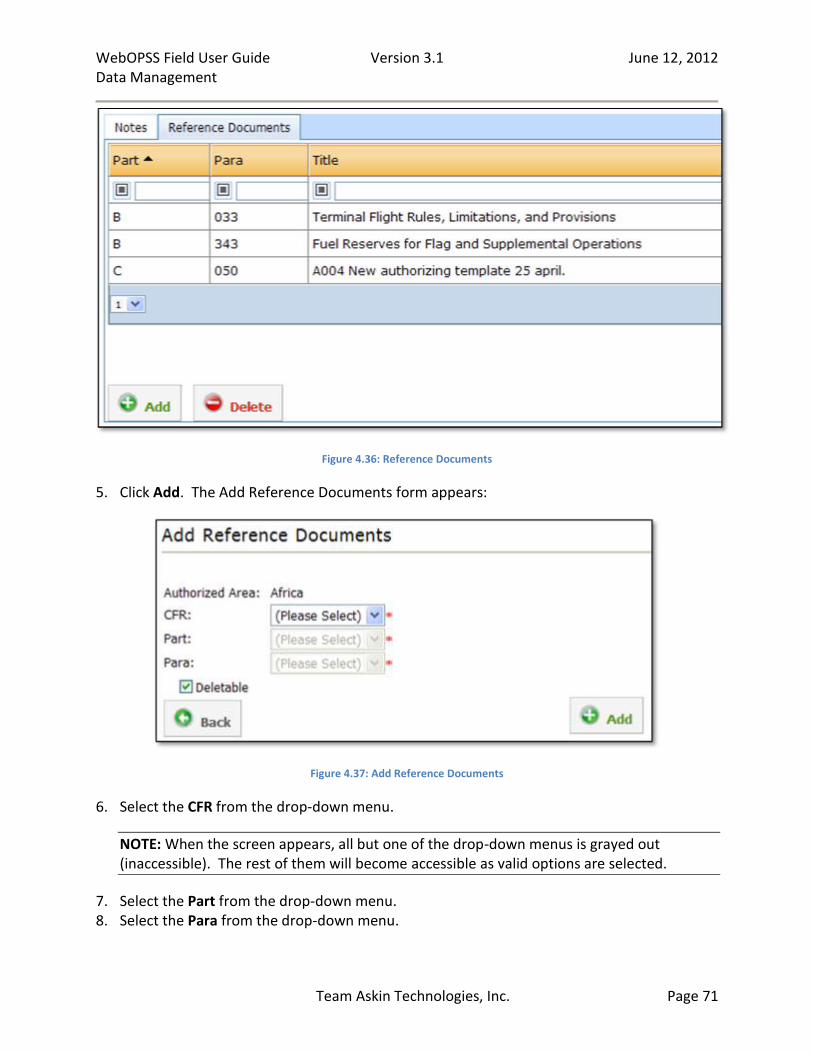
WebOPSS Field User Guide Version 3.1 June 12, 2012 Data Management
Team Askin Technologies, Inc. Page 71
Figure 4.36: Reference Documents
5. Click Add. The Add Reference Documents form appears:
Figure 4.37: Add Reference Documents
6. Select the CFR from the drop-down menu.
NOTE: When the screen appears, all but one of the drop-down menus is grayed out (inaccessible). The rest of them will become accessible as valid options are selected.
7. Select the Part from the drop-down menu. 8. Select the Para from the drop-down menu.
WebOPSS Field User Guide Version 3.1 June 12, 2012 Data Management
Team Askin Technologies, Inc. Page 72
9. Click Add. The new Reference Document is automatically saved and the screen resets to allow for another to be added.
10. To view the Reference Document just created, do one of the following:
Click Authorized Areas in the breadcrumb path at the top of the screen, then select the same Authorized Area selected in Step 2 above.
Click Back, then select the same Authorized Area selected in Step 2 above.
Follow steps listed in “To Add Reference Documents (pertaining to a selected Authorized Area)” section above.
To Delete Reference Documents: 1. In the left navigation area, under CHDO > Maintain Operator Data, click Authorized Areas.
The Operators—Authorized Areas screen appears. 2. Select an Authorized Area from the Assigned Authorized Areas list. 3. Click Add/Remove Territories. The Assign Territories page appears. 4. Open the Reference Documents tab in the table at the bottom of the page 5. Click Delete. A confirmation box appears. 6. Click Yes. The reference document is removed from the Reference Documents 7. table.
NOTE: Some reference documents may not be deletable if the “Deletable” box is not checked by HQ. For more information on HQ Authorized Areas, see the WebOPSS HQ User Guide.
4.2.6 Territories
The Certificate Holder may assign and modify the general Authorized Area to more specifically describe its qualities in that area. Any authorized WebOPSS user can:
Specify whether a territory should be included or excluded in a group
Identify territories that are allowable to fly over
Select tracking categories
Add, edit, delete, or assign notes When manipulating operator territories, the user will see two lists: Available Authorized Areas and Assigned Authorized Areas. If there are no Assigned Authorized Areas, the user must select a deviation from Available Authorized Areas before being able to find and modify it under Assigned Authorized Areas. To assign an Authorized Area to an operator, select it from the
Available Authorized Areas table and click the down arrow ( ) between the lists to move it to the Assigned Authorized Areas table. To Assign Territories: 1. In the left navigation area, under CHDO > Maintain Operator Data, click Authorized Areas.
The Operators—Authorized Areas page appears:

WebOPSS Field User Guide Version 3.1 June 12, 2012 Data Management
Team Askin Technologies, Inc. Page 73
Figure 4.38: Authorized Areas
2. Select an Authorized Area from the Assigned Authorized Areas table. 3. Click Add/Remove Territories. The Assign Territories page appears:
WebOPSS Field User Guide Version 3.1 June 12, 2012 Data Management
Team Askin Technologies, Inc. Page 74
Figure 4.39: Assign Territories
4. Under Nav Type on the right side of the map, do one of the following :
If the map is at the desired position for territory selection, leave the default selection of “Select” as is.
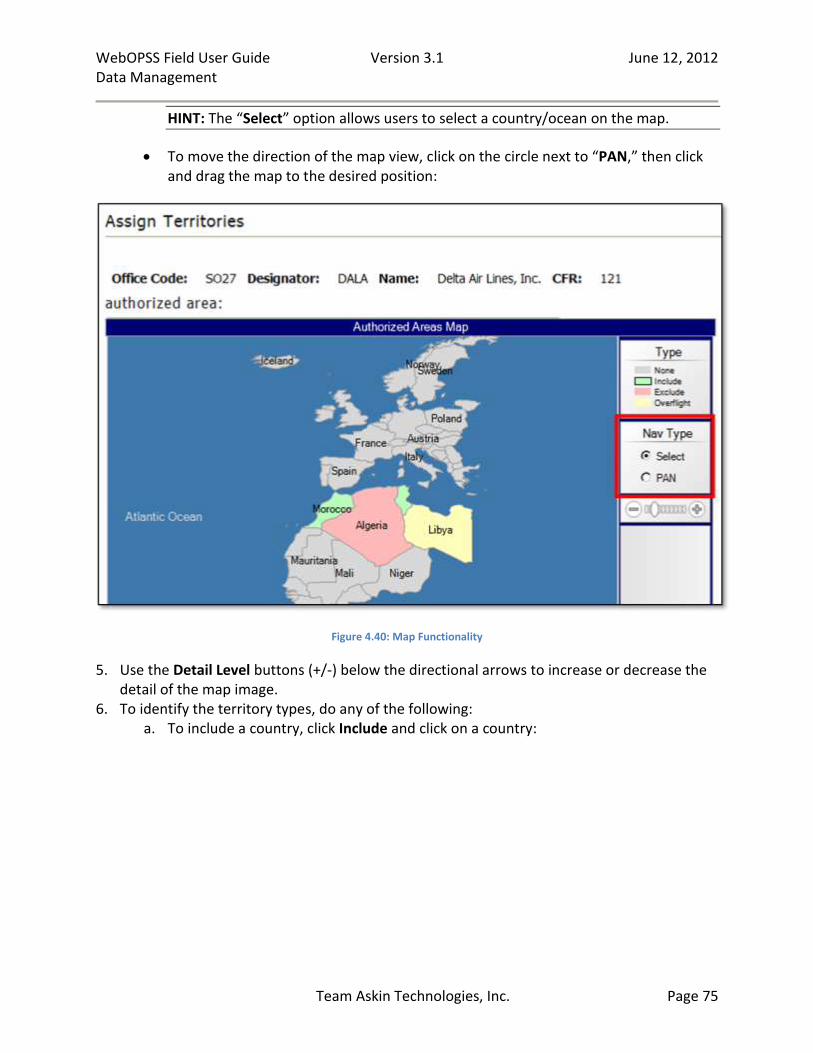
WebOPSS Field User Guide Version 3.1 June 12, 2012 Data Management
Team Askin Technologies, Inc. Page 75
HINT: The “Select” option allows users to select a country/ocean on the map.
To move the direction of the map view, click on the circle next to “PAN,” then click and drag the map to the desired position:
Figure 4.40: Map Functionality
5. Use the Detail Level buttons (+/-) below the directional arrows to increase or decrease the detail of the map image.
6. To identify the territory types, do any of the following: a. To include a country, click Include and click on a country:

WebOPSS Field User Guide Version 3.1 June 12, 2012 Data Management
Team Askin Technologies, Inc. Page 76
Figure 4.41: Include a Country
b. To exclude a country, click Exclude and click on a country:
Figure 4.42: Exclude a Country
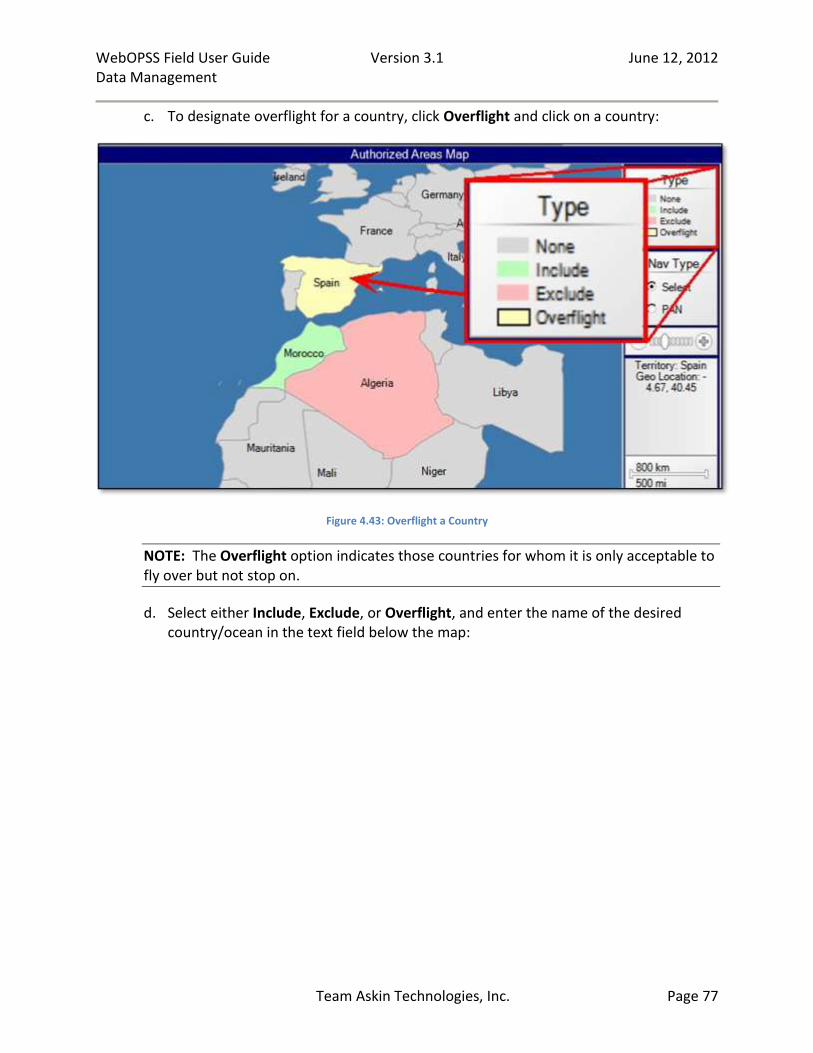
WebOPSS Field User Guide Version 3.1 June 12, 2012 Data Management
Team Askin Technologies, Inc. Page 77
c. To designate overflight for a country, click Overflight and click on a country:
Figure 4.43: Overflight a Country
NOTE: The Overflight option indicates those countries for whom it is only acceptable to fly over but not stop on.
d. Select either Include, Exclude, or Overflight, and enter the name of the desired country/ocean in the text field below the map:

WebOPSS Field User Guide Version 3.1 June 12, 2012 Data Management
Team Askin Technologies, Inc. Page 78
Figure 4.44: Selecting a Country for Include, Exclude, or Context
e. Select either Include, Exclude, or Overflight, and click and drag over the countries to be selected:
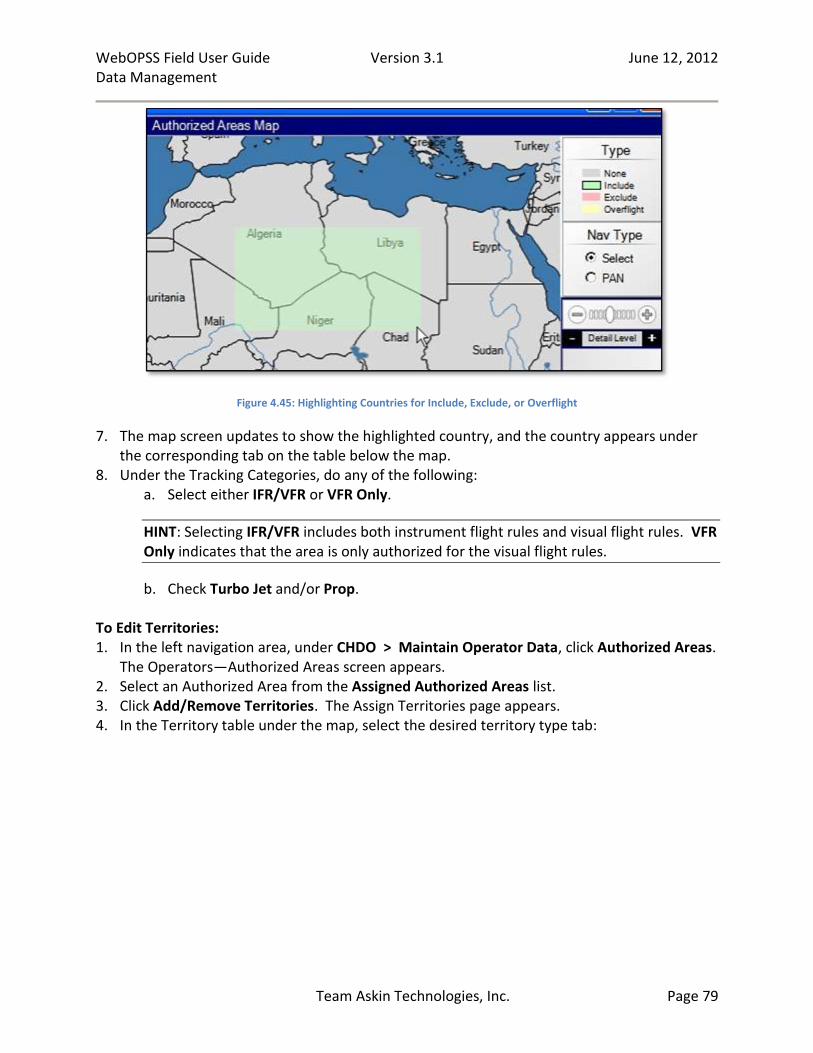
WebOPSS Field User Guide Version 3.1 June 12, 2012 Data Management
Team Askin Technologies, Inc. Page 79
Figure 4.45: Highlighting Countries for Include, Exclude, or Overflight
7. The map screen updates to show the highlighted country, and the country appears under the corresponding tab on the table below the map.
8. Under the Tracking Categories, do any of the following: a. Select either IFR/VFR or VFR Only.
HINT: Selecting IFR/VFR includes both instrument flight rules and visual flight rules. VFR Only indicates that the area is only authorized for the visual flight rules.
b. Check Turbo Jet and/or Prop. To Edit Territories: 1. In the left navigation area, under CHDO > Maintain Operator Data, click Authorized Areas.
The Operators—Authorized Areas screen appears. 2. Select an Authorized Area from the Assigned Authorized Areas list. 3. Click Add/Remove Territories. The Assign Territories page appears. 4. In the Territory table under the map, select the desired territory type tab:
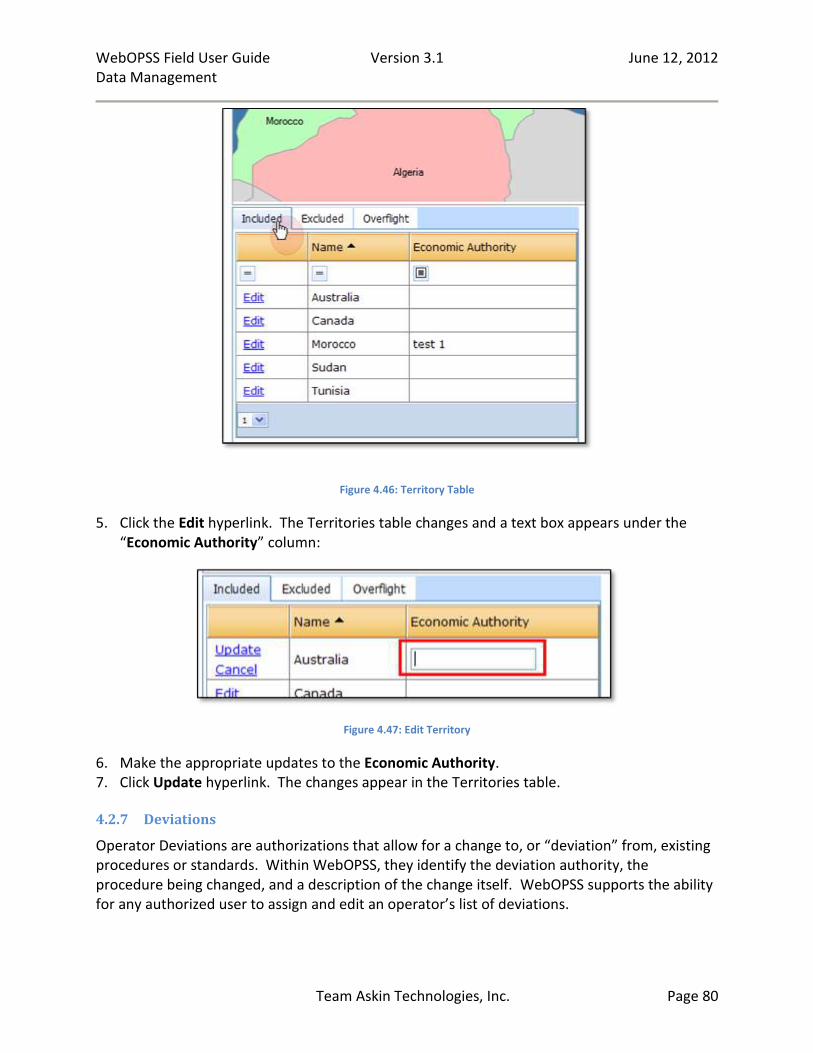
WebOPSS Field User Guide Version 3.1 June 12, 2012 Data Management
Team Askin Technologies, Inc. Page 80
Figure 4.46: Territory Table
5. Click the Edit hyperlink. The Territories table changes and a text box appears under the “Economic Authority” column:
Figure 4.47: Edit Territory
6. Make the appropriate updates to the Economic Authority. 7. Click Update hyperlink. The changes appear in the Territories table.
4.2.7 Deviations
Operator Deviations are authorizations that allow for a change to, or “deviation” from, existing procedures or standards. Within WebOPSS, they identify the deviation authority, the procedure being changed, and a description of the change itself. WebOPSS supports the ability for any authorized user to assign and edit an operator’s list of deviations.
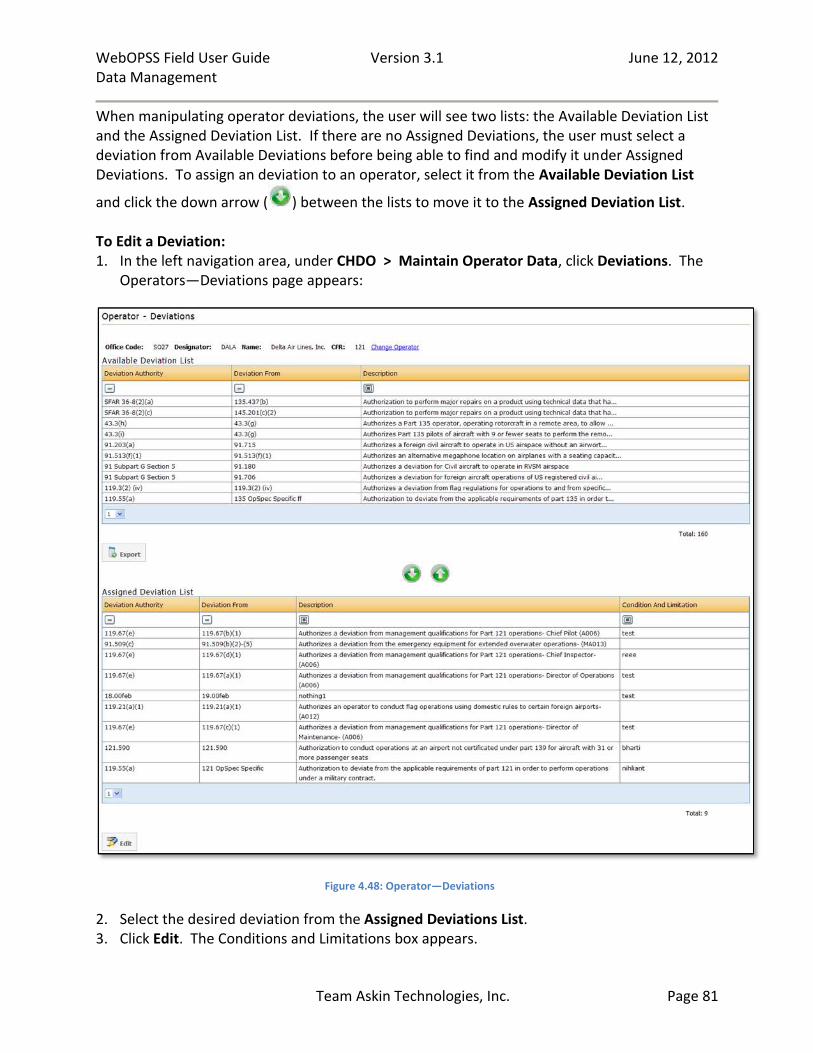
WebOPSS Field User Guide Version 3.1 June 12, 2012 Data Management
Team Askin Technologies, Inc. Page 81
When manipulating operator deviations, the user will see two lists: the Available Deviation List and the Assigned Deviation List. If there are no Assigned Deviations, the user must select a deviation from Available Deviations before being able to find and modify it under Assigned Deviations. To assign an deviation to an operator, select it from the Available Deviation List
and click the down arrow ( ) between the lists to move it to the Assigned Deviation List. To Edit a Deviation: 1. In the left navigation area, under CHDO > Maintain Operator Data, click Deviations. The
Operators—Deviations page appears:
Figure 4.48: Operator—Deviations
2. Select the desired deviation from the Assigned Deviations List. 3. Click Edit. The Conditions and Limitations box appears.
WebOPSS Field User Guide Version 3.1 June 12, 2012 Data Management
Team Askin Technologies, Inc. Page 82
HINT: The Conditions and Limitations text box allows up to 2,000 characters.
4. Enter the desired conditions and limitations that apply. 5. Click OK. The Assigned Deviations List changes to reflect the addition.
To Export an Assigned Deviation: 1. In the left navigation area, under CHDO > Maintain Operator Data, click Deviations. The
Operators—Deviations page appears. 2. Select the desired deviation from the Available Deviation List. 3. Click Export. The File Download box appears. 4. Do one of the following:
To open a Microsoft Excel file containing all of the operator history data, click Open.
To choose a file location on a local computer in order to open the Excel file containing all of the operator history data later, click Save.
4.2.8 DBAs
The WebOPSS system organizes DBA information and allows for authorized users to manipulate the data by adding, editing, and deleting information. To Add a DBA: 1. In the left navigation area, under CHDO > Maintain Operator Data, click DBAs. The
Operators—DBAs page appears:
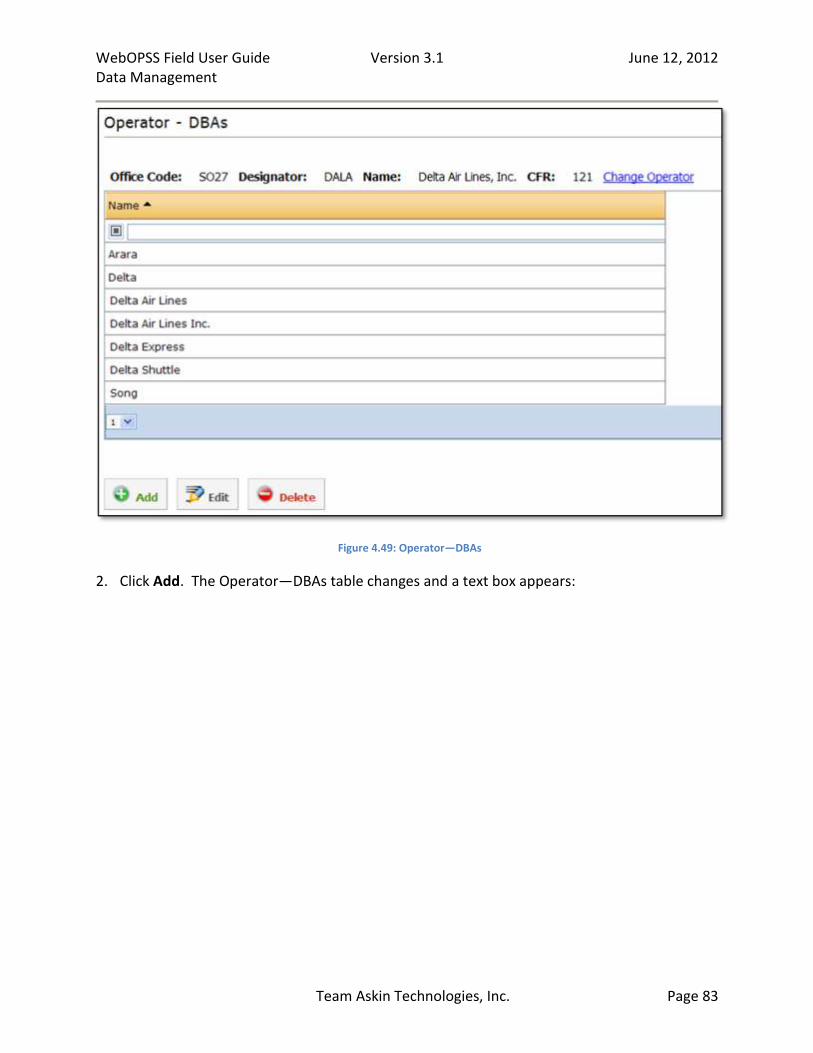
WebOPSS Field User Guide Version 3.1 June 12, 2012 Data Management
Team Askin Technologies, Inc. Page 83
Figure 4.49: Operator—DBAs
2. Click Add. The Operator—DBAs table changes and a text box appears:
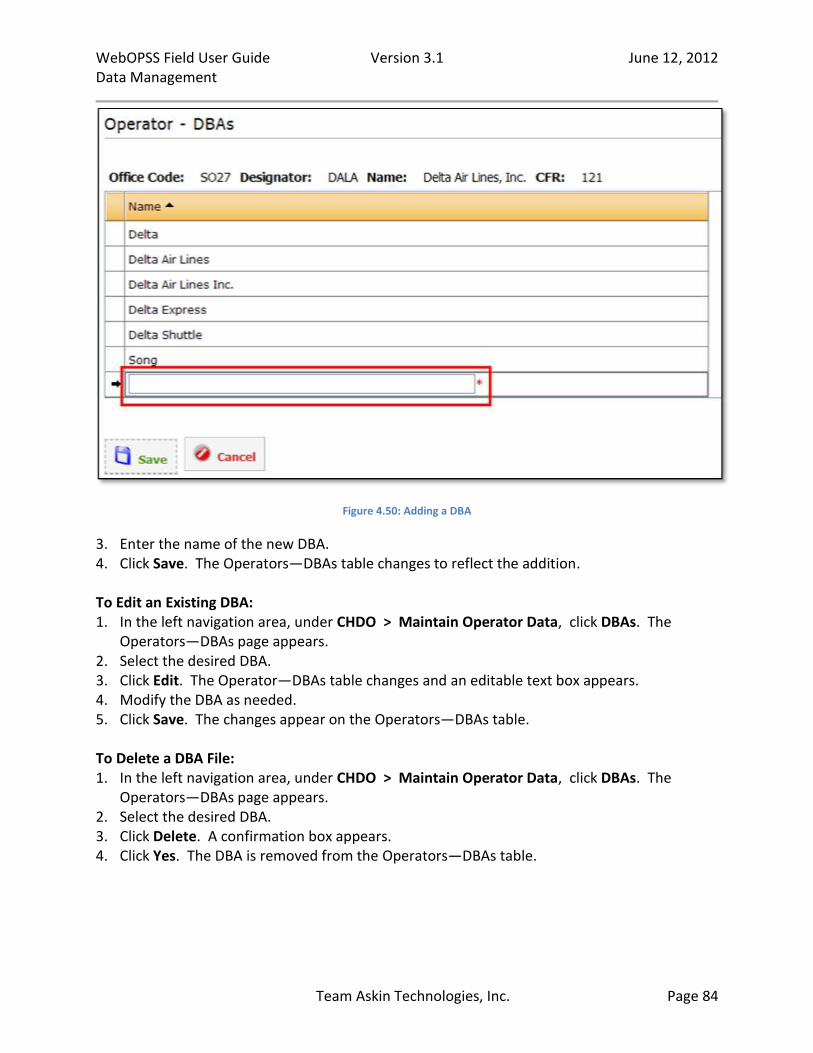
WebOPSS Field User Guide Version 3.1 June 12, 2012 Data Management
Team Askin Technologies, Inc. Page 84
Figure 4.50: Adding a DBA
3. Enter the name of the new DBA. 4. Click Save. The Operators—DBAs table changes to reflect the addition. To Edit an Existing DBA: 1. In the left navigation area, under CHDO > Maintain Operator Data, click DBAs. The
Operators—DBAs page appears. 2. Select the desired DBA. 3. Click Edit. The Operator—DBAs table changes and an editable text box appears. 4. Modify the DBA as needed. 5. Click Save. The changes appear on the Operators—DBAs table. To Delete a DBA File: 1. In the left navigation area, under CHDO > Maintain Operator Data, click DBAs. The
Operators—DBAs page appears. 2. Select the desired DBA. 3. Click Delete. A confirmation box appears. 4. Click Yes. The DBA is removed from the Operators—DBAs table.
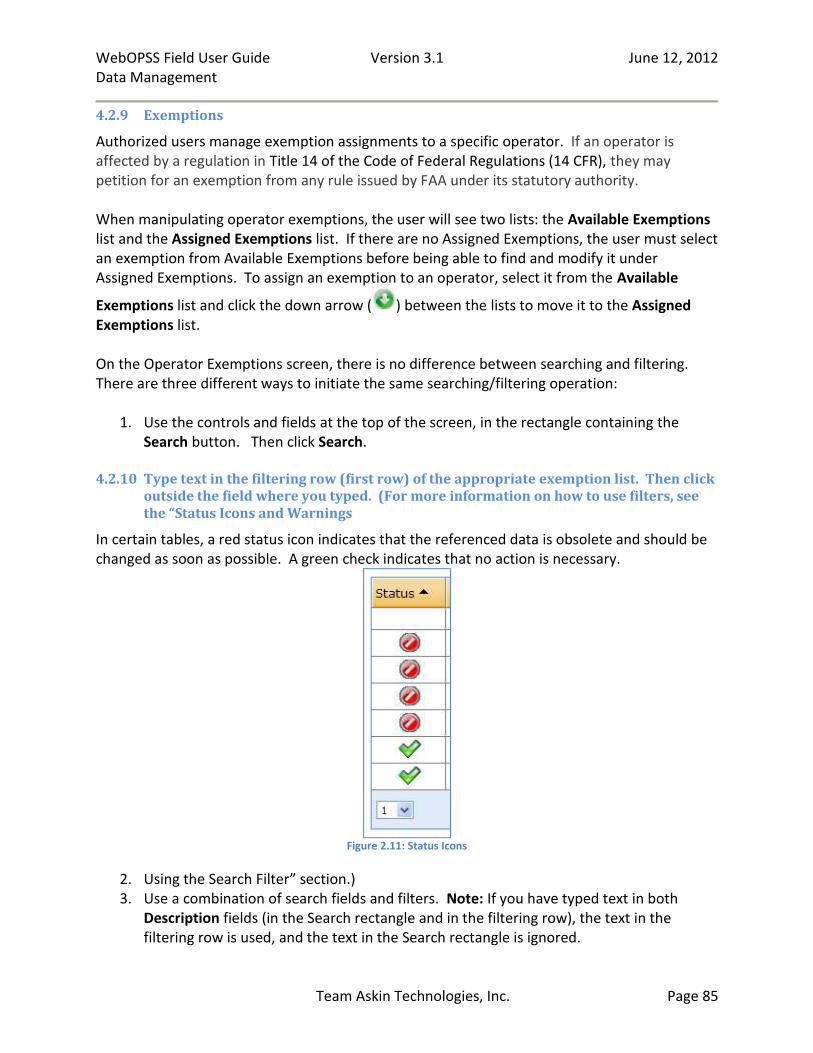
WebOPSS Field User Guide Version 3.1 June 12, 2012 Data Management
Team Askin Technologies, Inc. Page 85
4.2.9 Exemptions
Authorized users manage exemption assignments to a specific operator. If an operator is affected by a regulation in Title 14 of the Code of Federal Regulations (14 CFR), they may petition for an exemption from any rule issued by FAA under its statutory authority. When manipulating operator exemptions, the user will see two lists: the Available Exemptions list and the Assigned Exemptions list. If there are no Assigned Exemptions, the user must select an exemption from Available Exemptions before being able to find and modify it under Assigned Exemptions. To assign an exemption to an operator, select it from the Available
Exemptions list and click the down arrow ( ) between the lists to move it to the Assigned Exemptions list. On the Operator Exemptions screen, there is no difference between searching and filtering. There are three different ways to initiate the same searching/filtering operation:
1. Use the controls and fields at the top of the screen, in the rectangle containing the Search button. Then click Search.
4.2.10 Type text in the filtering row (first row) of the appropriate exemption list. Then click outside the field where you typed. (For more information on how to use filters, see the “Status Icons and Warnings
In certain tables, a red status icon indicates that the referenced data is obsolete and should be changed as soon as possible. A green check indicates that no action is necessary.
Figure 2.11: Status Icons
2. Using the Search Filter” section.) 3. Use a combination of search fields and filters. Note: If you have typed text in both
Description fields (in the Search rectangle and in the filtering row), the text in the filtering row is used, and the text in the Search rectangle is ignored.
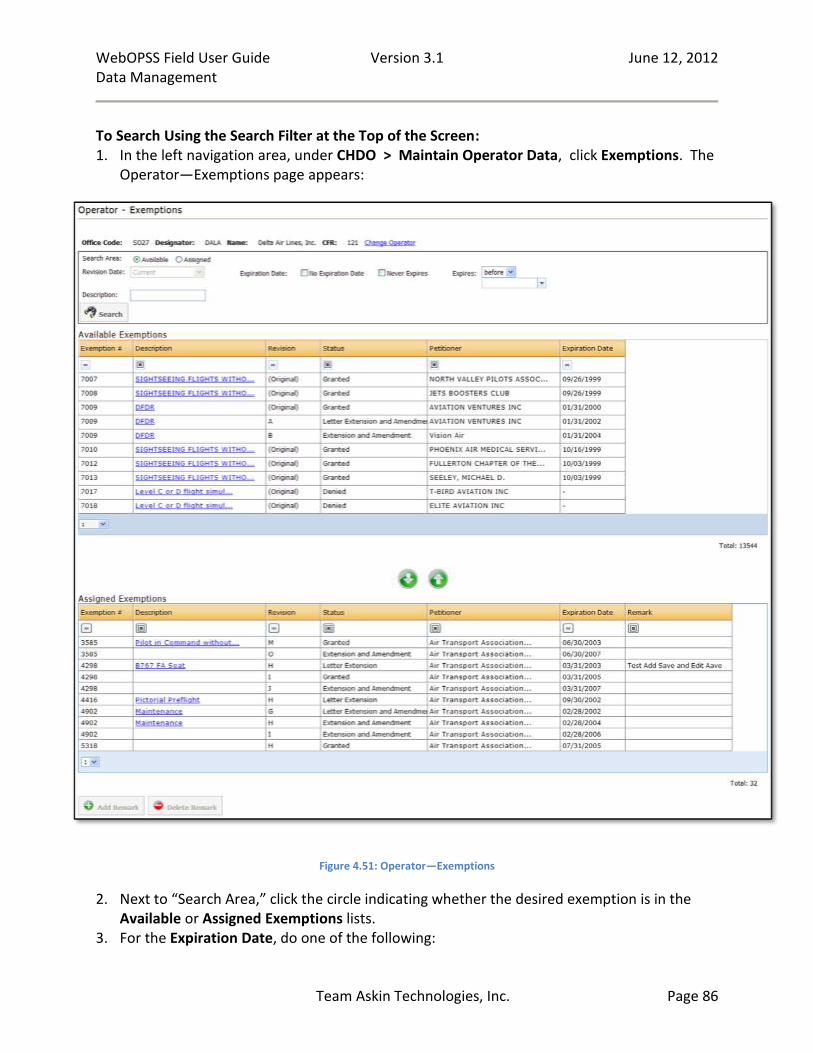
WebOPSS Field User Guide Version 3.1 June 12, 2012 Data Management
Team Askin Technologies, Inc. Page 86
To Search Using the Search Filter at the Top of the Screen: 1. In the left navigation area, under CHDO > Maintain Operator Data, click Exemptions. The
Operator—Exemptions page appears:
Figure 4.51: Operator—Exemptions
2. Next to “Search Area,” click the circle indicating whether the desired exemption is in the Available or Assigned Exemptions lists.
3. For the Expiration Date, do one of the following:
WebOPSS Field User Guide Version 3.1 June 12, 2012 Data Management
Team Askin Technologies, Inc. Page 87
If the exemption has an expiration date, uncheck either No Expiration Date or Never Expires.
NOTE: The No Expiration Date and Never Expires checkboxes appear checked by default.
If the exemption Expires before, on, or after a certain date, use the drop-down to indicate the condition, and then click in the empty text field below to choose a date from the calendar that appears.
4. Enter the Description in the text field. The search field is not case-sensitive. 5. Click Search. The exemption searched for should appear in its respective list. To Add an Exemption Remark: 1. In the left navigation area, under CHDO > Maintain Operator Data, click Exemptions. The
Operator—Exemptions page appears. 2. Select the desired exemption from the Assigned Exemptions table. 3. Click Add Remark. The Exemption Remark window appears.
HINT: The Exemptions Remark text field allows up to 4,000 characters.
4. Enter the desired remark text in the text field. 5. Click Save. The Assigned Exemptions table changes to reflect the addition. To Edit an Exemption Remark: 1. In the left navigation area, under CHDO > Maintain Operator Data, click Exemptions. The
Operator—Exemptions page appears: 2. Select the desired exemption from the Assigned Exemptions table.
NOTE: When the Operator—Exemptions page first opens, there is only the Add and Delete Remark buttons. The Edit Remark button will replace the Add Remark button when an exemption is selected from the Assigned Exemptions table that contains the remark text.
3. Click Edit Remark. The Exemption Remark window appears. 4. Enter the desired remark text in the text field. 5. Click Save. The changes appear in the Assigned Exemptions table. To Delete an Exemption Remark: 1. In the left navigation area, under CHDO > Maintain Operator Data, click Exemptions. The
Operator—Exemptions page appears. 2. Select the desired exemption from the Assigned Exemptions table.
WebOPSS Field User Guide Version 3.1 June 12, 2012 Data Management
Team Askin Technologies, Inc. Page 88
NOTE: When the Operator—Exemptions page first opens, the Delete Remark button is grayed out (inaccessible). It will become accessible when an exemption is selected from the Assigned Exemption list that contains Remark text.
3. Click Delete Remark. The remark is removed from the Assigned Exemptions table.
4.2.11 Insurance
WebOPSS supports the ability to organize insurance information in a table that an authorized user may view, but not manipulate. The user is able to see the particulars of each insurance policy and whether or not any aircraft are associated with that policy. To View the Insurance List: 1. In the left navigation area, under CHDO > Maintain Operator Data, click Insurance. The
Insurance Data table appears:
Figure 4.52: Operator—Insurance
HINT: The Insurance policies listed are based on most recent Status updates, so the historical data of each policy is not shown (i.e. when the policy is “Pending Review” or “Terminated,” etc.) Such information may appear—though not always—in the “Status Comments” section of the popup window seen when users click on the policy link.
2. Click on the desired hyperlink in the “Policy Number” column to view any aircraft associated with that policy as well as any policy status comments. The Associated Aircraft window appears displaying the aircraft information.
4.2.12 Personnel
WebOPSS supports the ability to add, edit, and delete Operator Personnel. To Add Operator Personnel: 1. In the left navigation area, under CHDO > Maintain Operator Data, click Personnel. The
Operator—Personnel page appears:

WebOPSS Field User Guide Version 3.1 June 12, 2012 Data Management
Team Askin Technologies, Inc. Page 89
Figure 4.53: Operator—Personnel
2. Click Add. The Add Personnel table appears:

WebOPSS Field User Guide Version 3.1 June 12, 2012 Data Management
Team Askin Technologies, Inc. Page 90
Figure 4.54: Adding Personnel
3. Enter the First Name in the text field. 4. If desired, enter the Middle Name or middle initial in the text field. 5. Enter the Last Name in the text field. 6. If desired, enter a Suffix in the text field. 7. Select an FAA Recognized Position Title from the drop-down menu. 8. If desired, enter the Equivalent Position Title in the text field. 9. If applicable, under the “Personnel Type” section select the boxes next to Management
Personnel, Other Designated Persons, and/or Agent for Service. 10. If applicable, under the “Authorized to Sign the Following Parts” section, select the boxes
next to the appropriate Part letters.

WebOPSS Field User Guide Version 3.1 June 12, 2012 Data Management
Team Askin Technologies, Inc. Page 91
11. Click Save. The Operator—Personnel page changes to reflect the new addition. To Edit Operator Personnel:
NOTE: When the screen appears, the “Edit,” “Delete,” and “Copy” buttons will appear grayed out (inaccessible). They will become accessible once a row in the table is selected.
1. In the left navigation area, under CHDO > Maintain Operator Data, click Personnel. The Operator—Personnel page appears.
2. Select the row of the desired personnel. 3. Click Edit. The Edit Personnel form appears. 4. Make the necessary changes to the operator personnel. 5. Click Save. The changes appear on the Operator—Personnel table. To Delete Operator Personnel:
NOTE: When the screen appears, the “Edit,” “Delete,” and “Copy” buttons will appear grayed out (inaccessible). They will become accessible once a row in the table is selected.
1. In the left navigation area, under CHDO > Maintain Operator Data, click Personnel. The Operator—Personnel page appears.
2. Select the row of the desired personnel. 3. Click Delete. A confirmation box appears. 4. Click Yes. The personnel name is removed from the Operator—Personnel table. To Copy Operator Personnel:
NOTE: When the screen appears, the “Edit, ” “Delete,” and “Copy” buttons will appear grayed out (inaccessible). They will become accessible once a row in the table is selected.
1. In the left navigation area, under CHDO > Maintain Operator Data, click Personnel. The Operator—Personnel page appears.
2. Select the row of the desired personnel. 3. Click Copy. The Copy Personnel page appears. 4. Enter the new personnel name into the First, Middle, and Last Name text fields. 5. Click Save. The Operator-Personnel table changes to reflect the addition.

WebOPSS Field User Guide Version 3.1 June 12, 2012 Data Management
Team Askin Technologies, Inc. Page 92
4.3 Inspectors
While WebOPSS roles are assigned at the office level, any user with permission can edit the Inspector information. For example, managers may edit the Inspector information of those inspectors assigned to their office. The sections that appear within the Edit User form will vary according to the roles-based security permissions designated to each user. To see more detailed information on assigning roles or for an explanation of the level of access and permissions available for a particular role see WebOPSS HQ User Guide. To Edit an Inspector: 1. In the left navigation area, under CHDO, click Maintain Inspectors. The Inspectors page
appears:
Figure 4.55: Inspectors
2. Do one of the following:
Select the row of the desired Inspector, then click Edit. The Edit User form appears.
Click the hyperlink in the “Inspector Name” column. The Edit User form appears:
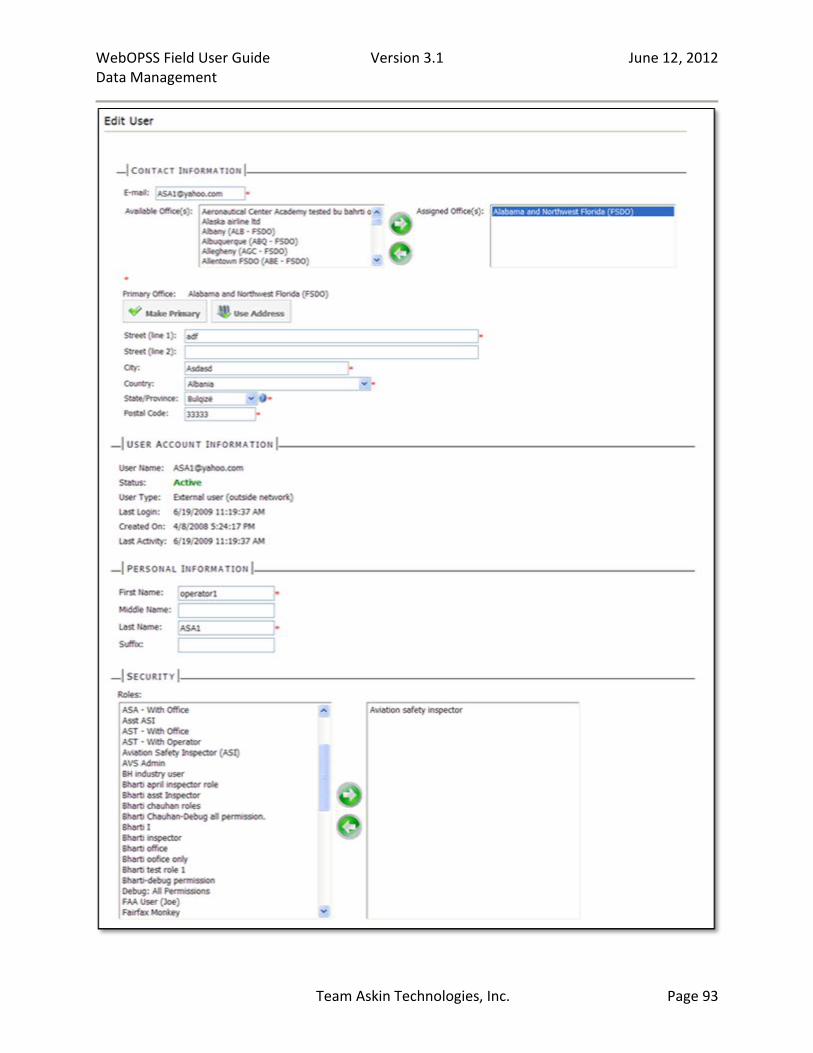
WebOPSS Field User Guide Version 3.1 June 12, 2012 Data Management
Team Askin Technologies, Inc. Page 93
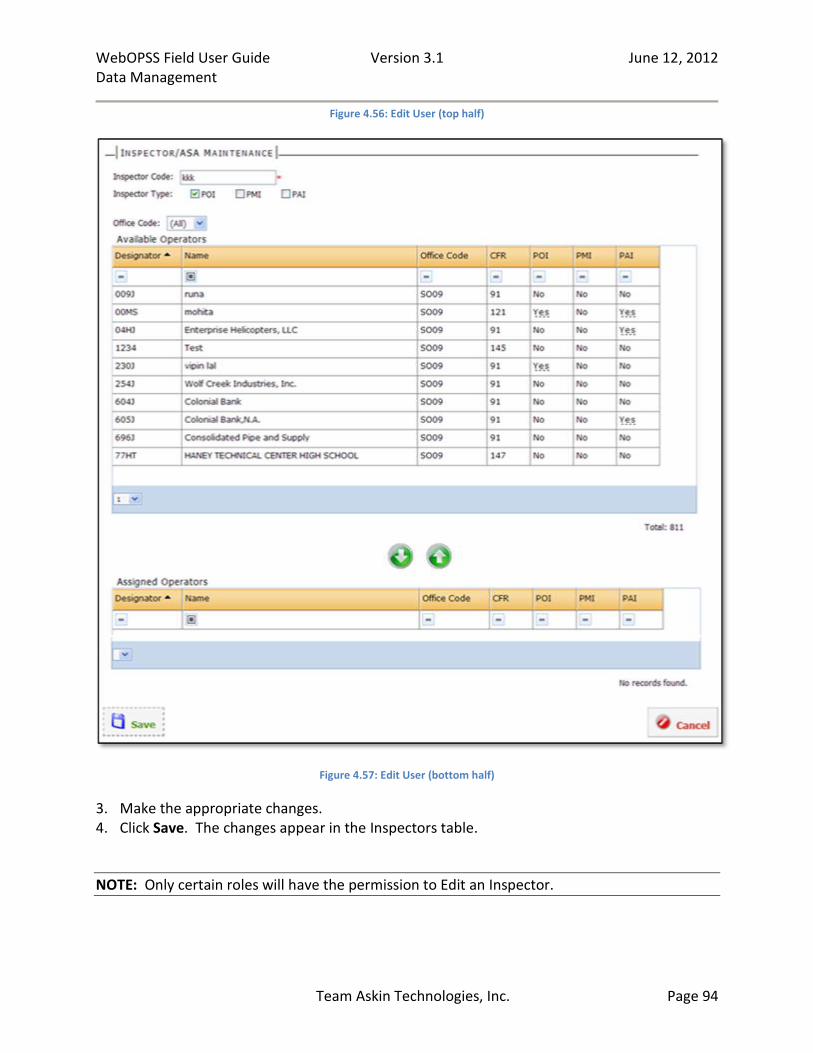
WebOPSS Field User Guide Version 3.1 June 12, 2012 Data Management
Team Askin Technologies, Inc. Page 94
Figure 4.56: Edit User (top half)
Figure 4.57: Edit User (bottom half)
3. Make the appropriate changes. 4. Click Save. The changes appear in the Inspectors table.
NOTE: Only certain roles will have the permission to Edit an Inspector.
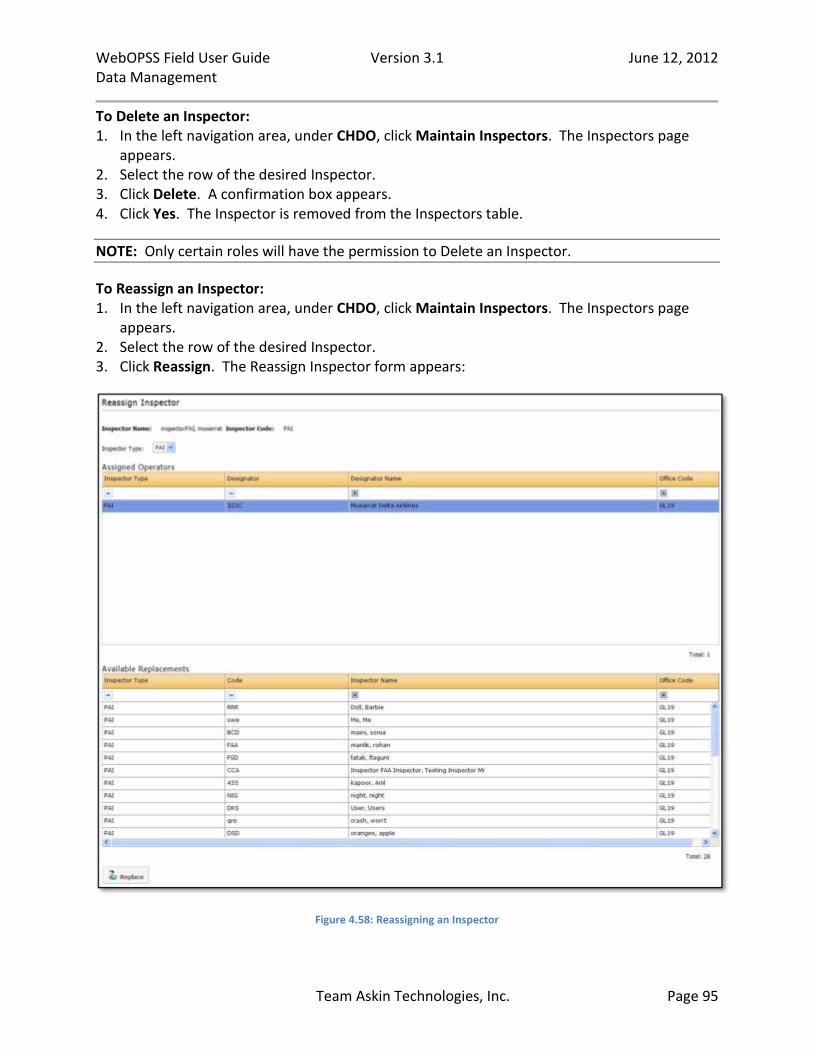
WebOPSS Field User Guide Version 3.1 June 12, 2012 Data Management
Team Askin Technologies, Inc. Page 95
To Delete an Inspector: 1. In the left navigation area, under CHDO, click Maintain Inspectors. The Inspectors page
appears. 2. Select the row of the desired Inspector. 3. Click Delete. A confirmation box appears. 4. Click Yes. The Inspector is removed from the Inspectors table.
NOTE: Only certain roles will have the permission to Delete an Inspector.
To Reassign an Inspector: 1. In the left navigation area, under CHDO, click Maintain Inspectors. The Inspectors page
appears. 2. Select the row of the desired Inspector. 3. Click Reassign. The Reassign Inspector form appears:
Figure 4.58: Reassigning an Inspector
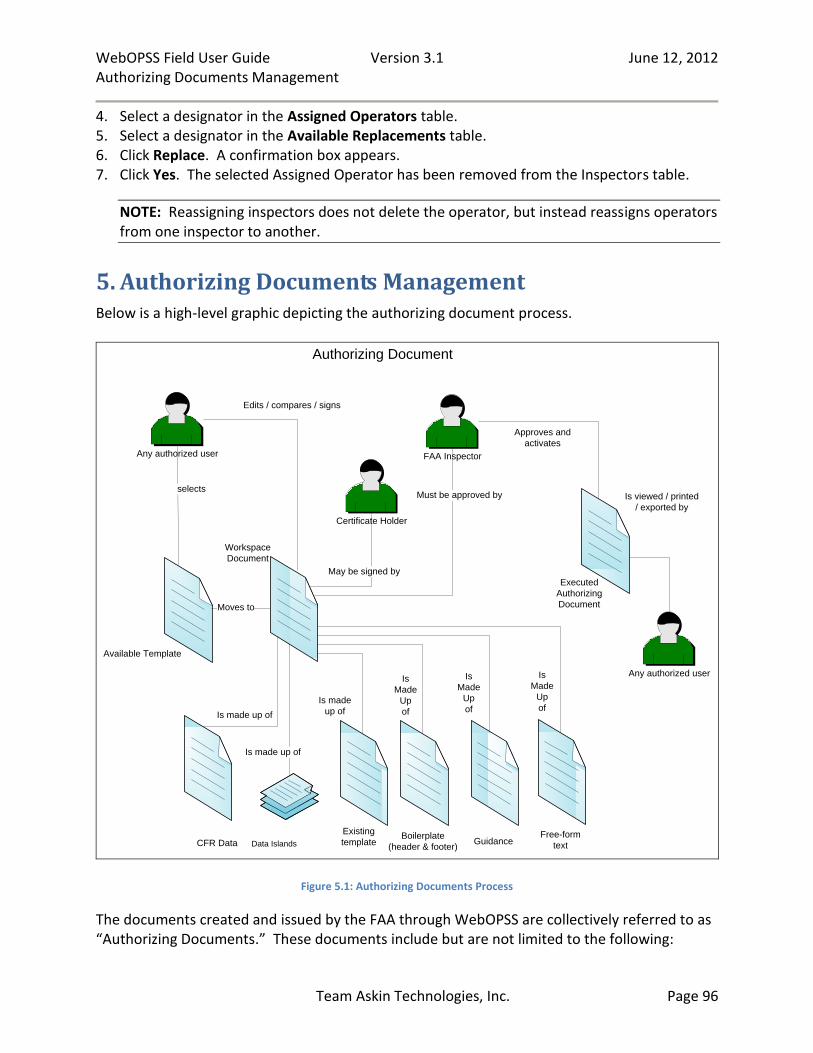
WebOPSS Field User Guide Version 3.1 June 12, 2012 Authorizing Documents Management
Team Askin Technologies, Inc. Page 96
4. Select a designator in the Assigned Operators table. 5. Select a designator in the Available Replacements table. 6. Click Replace. A confirmation box appears. 7. Click Yes. The selected Assigned Operator has been removed from the Inspectors table.
NOTE: Reassigning inspectors does not delete the operator, but instead reassigns operators from one inspector to another.
5. Authorizing Documents Management Below is a high-level graphic depicting the authorizing document process.
Available Template
Any authorized user
selects
Moves to
Executed
Authorizing
Document
May be signed by
FAA Inspector
Approves and
activates
Edits / compares / signs
Certificate Holder
Must be approved by
Any authorized user
Is viewed / printed
/ exported by
Workspace
Document
Authorizing Document
Existing
template
Is made up of
Data IslandsBoilerplate
(header & footer)
Is made
up of
Is
Made
Up
ofIs made up of
Guidance
Is
Made
Up
of
CFR DataFree-form
text
Is
Made
Up
of
Figure 5.1: Authorizing Documents Process
The documents created and issued by the FAA through WebOPSS are collectively referred to as “Authorizing Documents.” These documents include but are not limited to the following:
WebOPSS Field User Guide Version 3.1 June 12, 2012 Authorizing Documents Management
Team Askin Technologies, Inc. Page 97
Operations Specifications (OpSpec), which are used to issue specific operations allowed to operators.
Management Specifications (MSpec), which are issued to Program Managers who conduct fractional ownership operations under 14 CFR 0 91 K (14CFR 091K).
Letters of Authorization (LOA), which are used to issue certain authorizations to 14CFR 091 operations.
Letters of Deviation Authority (LODA), which are statements of conformance and limitations that applicants for deviations must give the FAA, as specified in 14 CFR § 21.605(a)(1).
Waivers, which constitute relief from the specific regulations stated, to the degree and for the period of time specified in the certificate (Waivers do not waive any state law or local ordinance).
Authorizing Documents are a collection of signed, legal documents used to administer Safety Standards and define the Provisions and Limitations within which an Air Operator or Agency may conduct business operations. An authorizing document is considered a legal contractual agreement between the FAA and the Industry customer. While the authorizing documents have different names and serve different purposes, the process of their creation is generally the same:
1. The system displays the available templates. (For more information, see “Templates” in the WebOPSS HQ User Guide.)
2. A user (whether from the FAA or Industry) selects a template. 3. The user specifies the data necessary to complete the document. 4. The user digitally signs the document. 5. WebOPSS validates the specifications and routes the document to the
appropriate FAA personnel for approval. 6. If necessary, the FAA user returns the document for further clarification.
Otherwise, the FAA user digitally signs the document. 7. The FAA user activates the document. 8. WebOPSS notifies the originator that the document has been signed/activated.
5.1 Authorizing Documents
The Authorizing Documents section allows the user to manage the document that were created in the Template Library (for more information on the Template Library, see the WebOPSS HQ User Guide). The Authorizing Documents page has four tabs from which the user can access and modify authorizing document information:
Available
Workspace
Issued
Archived

WebOPSS Field User Guide Version 3.1 June 12, 2012 Authorizing Documents Management
Team Askin Technologies, Inc. Page 98
NOTE: In the Authorizing Documents section, the default display is the Issued Tab. The other three tabs must be manually opened.
Both the Available and Issued tabs offer Control icons that indicate whether or not the document may have certain limiting conditions that might restrict it from being moved or issued:
Stop ( ): This icon appears in the “Control” column when a mandatory document revision in Available does not match up to the Issued revision. In other words, a new mandatory version of this document has been created since the older version was processed to Issued. This icon is only seen in Issued.
Go ( ): This icon appears in the “Control” column when the Available and Issued revisions match. When seen under Available, this means that the template can be safely moved to Workspace. When seen in Issued, this means that the most current version of the document exists in that tab.
Yield ( ): This icon appears in the “Control” column when a non-mandatory document revision in Available does not match up to the Issued revision. In other words, a new non-mandatory version of this template has been created since the older version was processed to Issued. This icon is only seen in Issued.
Expires ( ): This icon appears in the “Control” column when a document has an expiration date. By hovering the mouse over this icon, in both Available and Issued, users can see the specific expiration date.
Decommissioned ( ): This icon appears in the “Control” column when a document has been decommissioned. This icon is only seen in Issued.
While some of the document tabs offer functions specific to the types of document displayed in each, there are five functions, explained below, that are common to all of the tabs. To View a Document: 1. In the left navigation under CHDO, click Maintain Authorizing Documents. The Authorizing
Documents page appears:
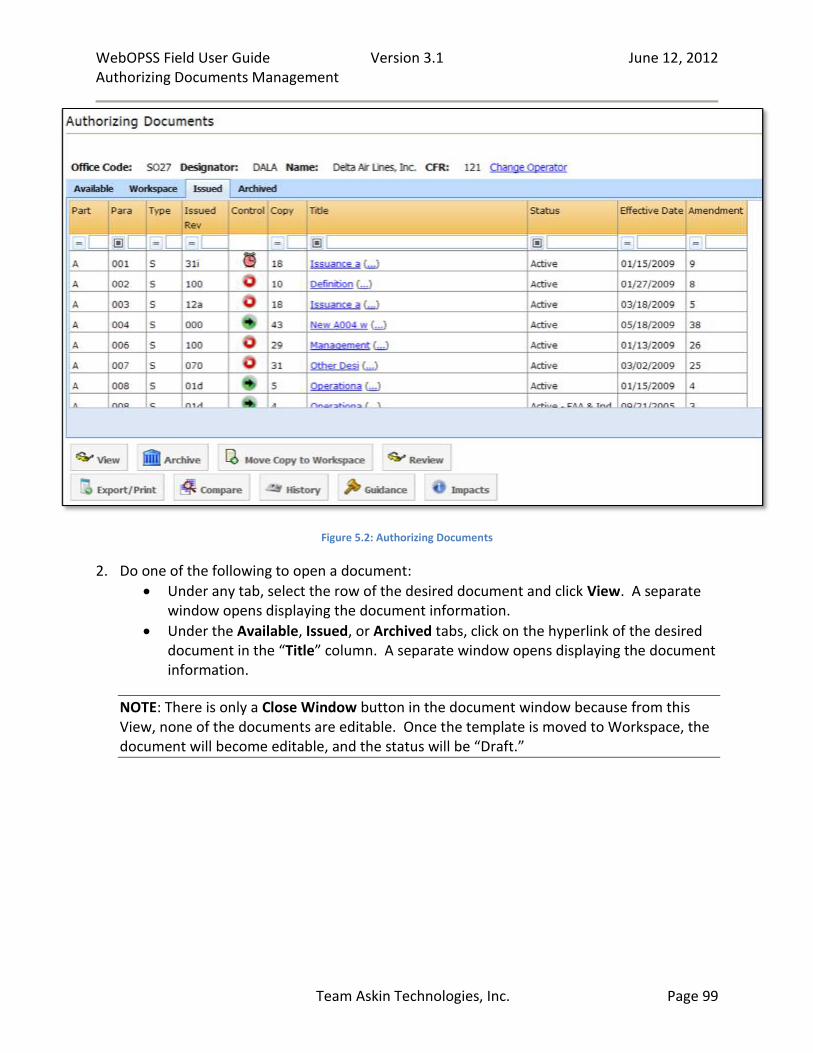
WebOPSS Field User Guide Version 3.1 June 12, 2012 Authorizing Documents Management
Team Askin Technologies, Inc. Page 99
Figure 5.2: Authorizing Documents
2. Do one of the following to open a document:
Under any tab, select the row of the desired document and click View. A separate window opens displaying the document information.
Under the Available, Issued, or Archived tabs, click on the hyperlink of the desired document in the “Title” column. A separate window opens displaying the document information.
NOTE: There is only a Close Window button in the document window because from this View, none of the documents are editable. Once the template is moved to Workspace, the document will become editable, and the status will be “Draft.”
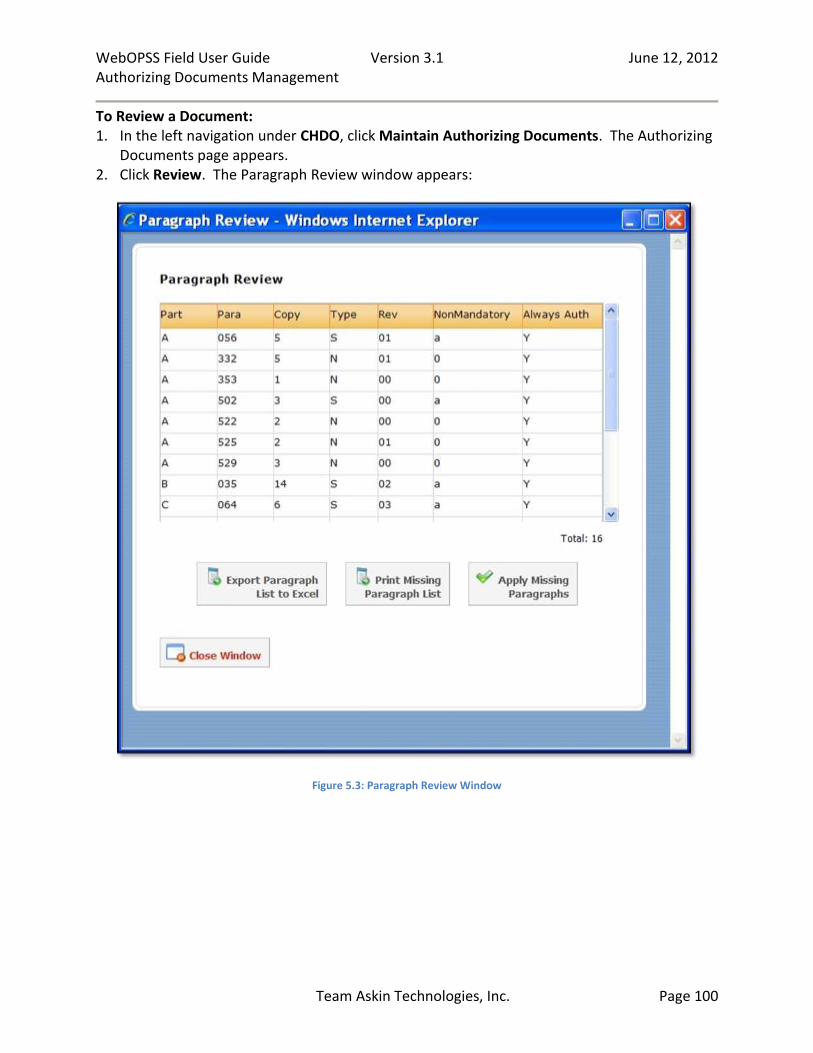
WebOPSS Field User Guide Version 3.1 June 12, 2012 Authorizing Documents Management
Team Askin Technologies, Inc. Page 100
To Review a Document: 1. In the left navigation under CHDO, click Maintain Authorizing Documents. The Authorizing
Documents page appears. 2. Click Review. The Paragraph Review window appears:
Figure 5.3: Paragraph Review Window
WebOPSS Field User Guide Version 3.1 June 12, 2012 Authorizing Documents Management
Team Askin Technologies, Inc. Page 101
3. To export the paragraph review list, do the following: a. Click Export Paragraph List to Excel. b. Click Open to open a Microsoft Excel document of the paragraph review list. c. Click Save. The user can select a file location on a local computer, then open the
Excel document of the paragraph review list. 4. To print the paragraph review list, do the following:
a. Click Print Missing Paragraph List. b. Select the desired printer/print options. c. Click Print.
5. To update the Authorizing Document Workspace with the missing paragraphs, click Apply Missing Paragraphs. A confirmation window appears.
6. Click OK. To Export/Print a Document(s): 1. In the left navigation under CHDO, click Maintain Authorizing Documents. The Authorizing
Documents page appears. 2. If a specific document is desired, open the appropriate tab and select the desired document
row.
NOTE: Users can only print up to 20 documents at a time. This may limit the document selections chosen if the user’s intention is to print them.
3. Under any of the tabs, click Export/Print. The Export/Print Options window appears:
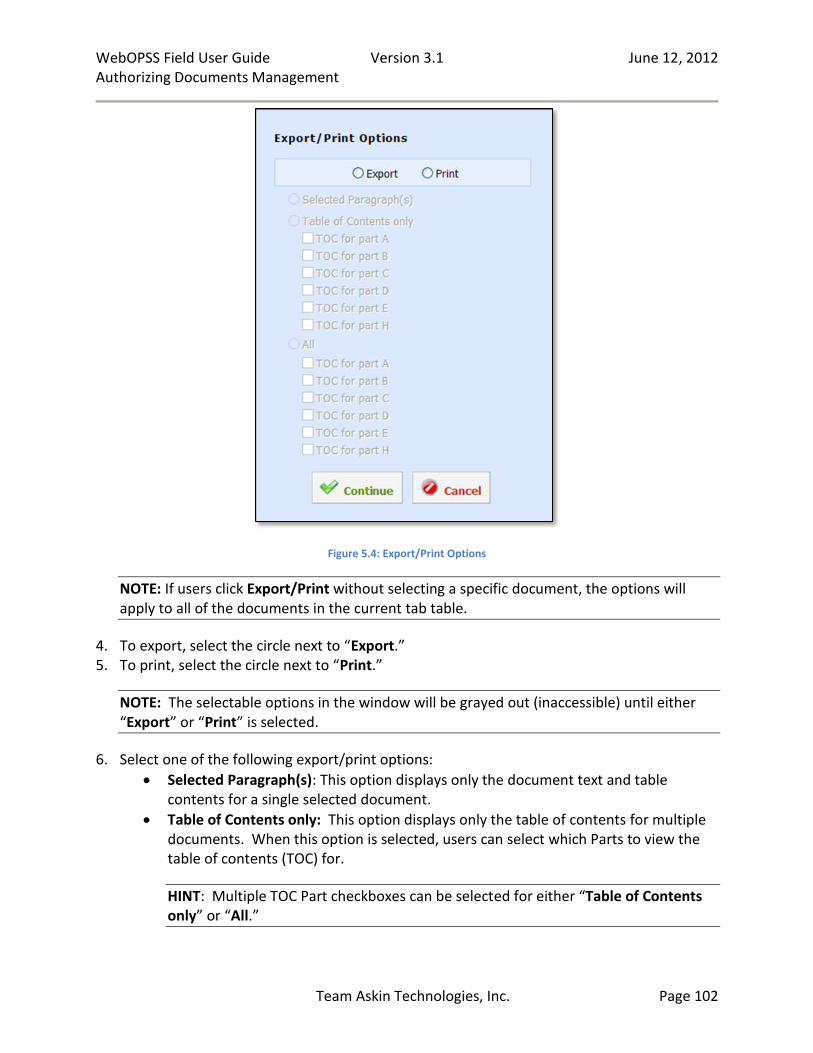
WebOPSS Field User Guide Version 3.1 June 12, 2012 Authorizing Documents Management
Team Askin Technologies, Inc. Page 102
Figure 5.4: Export/Print Options
NOTE: If users click Export/Print without selecting a specific document, the options will apply to all of the documents in the current tab table.
4. To export, select the circle next to “Export.” 5. To print, select the circle next to “Print.”
NOTE: The selectable options in the window will be grayed out (inaccessible) until either “Export” or “Print” is selected.
6. Select one of the following export/print options:
Selected Paragraph(s): This option displays only the document text and table contents for a single selected document.
Table of Contents only: This option displays only the table of contents for multiple documents. When this option is selected, users can select which Parts to view the table of contents (TOC) for.
HINT: Multiple TOC Part checkboxes can be selected for either “Table of Contents only” or “All.”
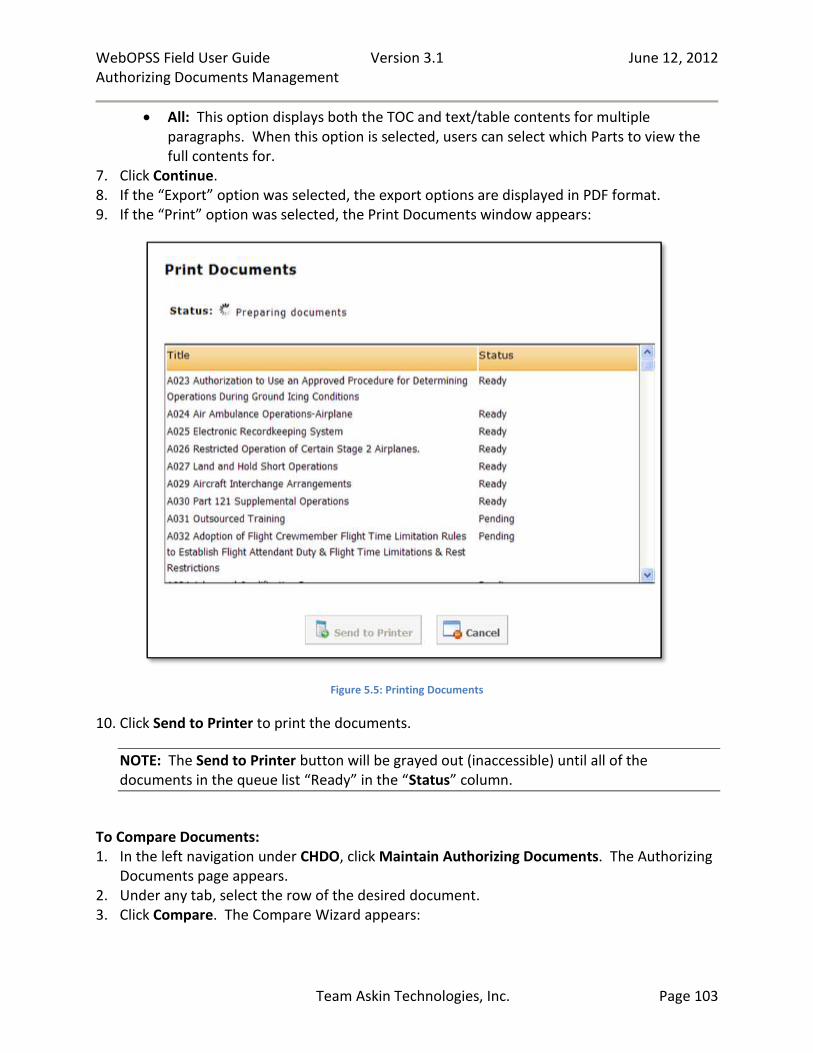
WebOPSS Field User Guide Version 3.1 June 12, 2012 Authorizing Documents Management
Team Askin Technologies, Inc. Page 103
All: This option displays both the TOC and text/table contents for multiple paragraphs. When this option is selected, users can select which Parts to view the full contents for.
7. Click Continue. 8. If the “Export” option was selected, the export options are displayed in PDF format. 9. If the “Print” option was selected, the Print Documents window appears:
Figure 5.5: Printing Documents
10. Click Send to Printer to print the documents.
NOTE: The Send to Printer button will be grayed out (inaccessible) until all of the documents in the queue list “Ready” in the “Status” column.
To Compare Documents: 1. In the left navigation under CHDO, click Maintain Authorizing Documents. The Authorizing
Documents page appears. 2. Under any tab, select the row of the desired document. 3. Click Compare. The Compare Wizard appears:
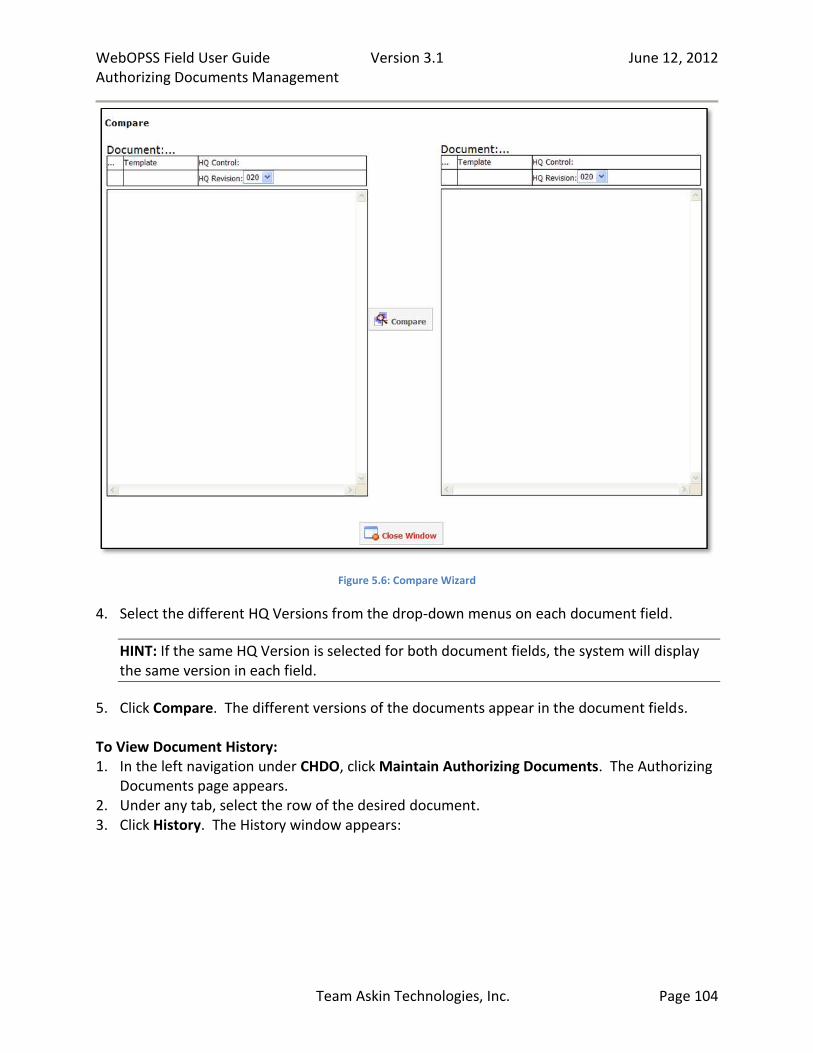
WebOPSS Field User Guide Version 3.1 June 12, 2012 Authorizing Documents Management
Team Askin Technologies, Inc. Page 104
Figure 5.6: Compare Wizard
4. Select the different HQ Versions from the drop-down menus on each document field.
HINT: If the same HQ Version is selected for both document fields, the system will display the same version in each field.
5. Click Compare. The different versions of the documents appear in the document fields. To View Document History: 1. In the left navigation under CHDO, click Maintain Authorizing Documents. The Authorizing
Documents page appears. 2. Under any tab, select the row of the desired document. 3. Click History. The History window appears:

WebOPSS Field User Guide Version 3.1 June 12, 2012 Authorizing Documents Management
Team Askin Technologies, Inc. Page 105
Figure 5.7: Paragraph History
To View Paragraph Guidance: See “5.2 Guidance” section on page 126. To View Paragraph Impacts: 1. In the left navigation under CHDO, click Maintain Authorizing Documents. The Authorizing
Documents page appears. 2. Under any tab, select the row of the desired document. 3. Click Impacts. The Impacts window appears:
Figure 5.8: Paragraph Impacts

WebOPSS Field User Guide Version 3.1 June 12, 2012 Authorizing Documents Management
Team Askin Technologies, Inc. Page 106
To Resolve Non-Compliant Insurance:
NOTE: If an operator contains any insurance that is in a non-compliant state, users will see a blinking notification at the top of the Authorizing Document page, above the operator information, regardless of which tab is selected.
1. In the left navigation under CHDO, click Maintain Authorizing Documents. The Authorizing Documents page appears.
2. Click on the blinking Insurance in a Non-Compliant State link:
Figure 5.9: Non-Compliant Insurance Link
3. A separate window appears displaying the Operator—Insurance page.
HINT: Inspector users are directed to this page so that they can view cancelled policies, associated aircraft, and policy comments.
5.1.1 Available
The table in the Available tab lists all documents that have a status of available for the CFR of the selected operator, displayed in descending order by Part and Para. While all four tabs list the document version under the Revision (Rev) columns for each respective tab, the Available list also displays whether or not the document exists in the Workspace or Issued tabs, and if it does, which version exists there.
To Move a Document to Workspace:
NOTE: The system will not move a document with the same version to Workspace if that same version already exists.
1. In the left navigation under CHDO, click Maintain Authorizing Documents. The Authorizing Documents page appears.
2. Open the Available tab:
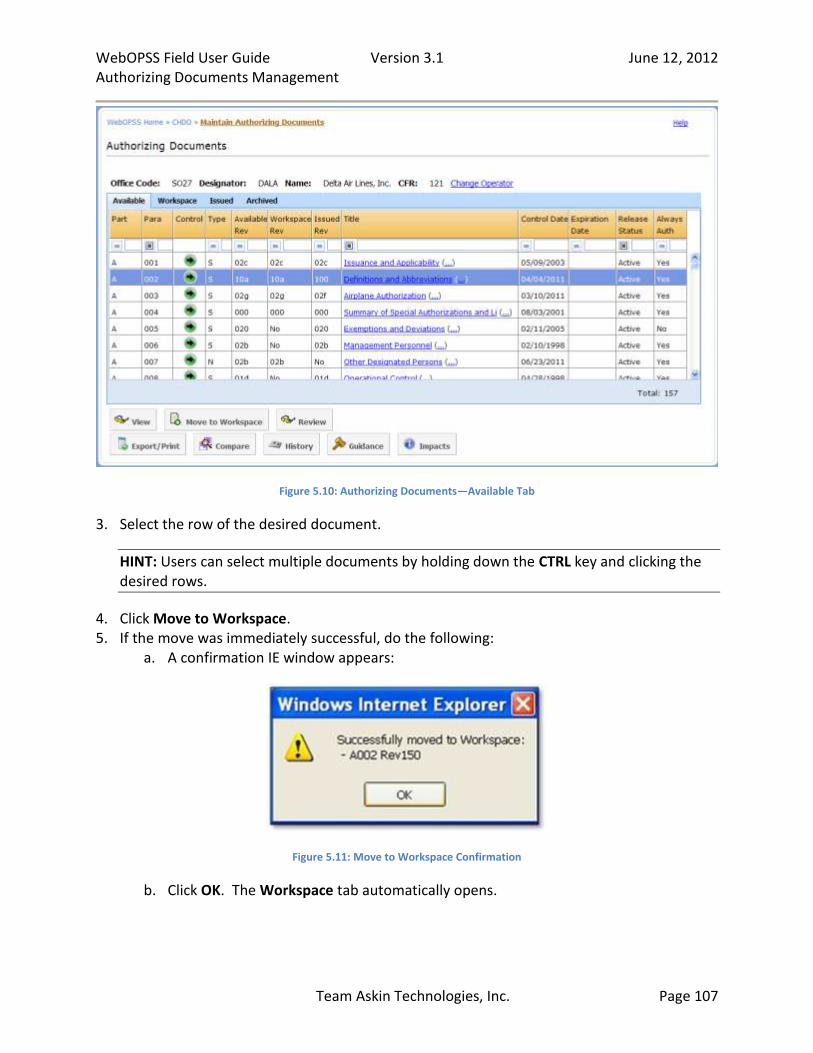
WebOPSS Field User Guide Version 3.1 June 12, 2012 Authorizing Documents Management
Team Askin Technologies, Inc. Page 107
Figure 5.10: Authorizing Documents—Available Tab
3. Select the row of the desired document.
HINT: Users can select multiple documents by holding down the CTRL key and clicking the desired rows.
4. Click Move to Workspace. 5. If the move was immediately successful, do the following:
a. A confirmation IE window appears:
Figure 5.11: Move to Workspace Confirmation
b. Click OK. The Workspace tab automatically opens.
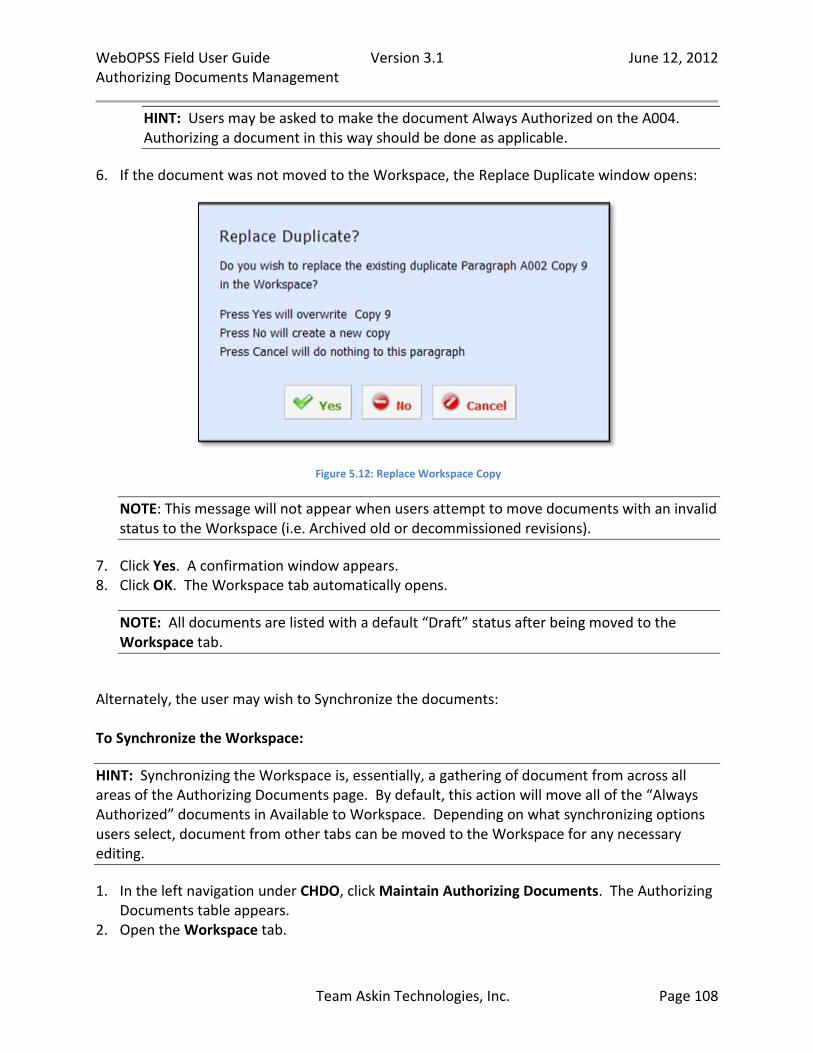
WebOPSS Field User Guide Version 3.1 June 12, 2012 Authorizing Documents Management
Team Askin Technologies, Inc. Page 108
HINT: Users may be asked to make the document Always Authorized on the A004. Authorizing a document in this way should be done as applicable.
6. If the document was not moved to the Workspace, the Replace Duplicate window opens:
Figure 5.12: Replace Workspace Copy
NOTE: This message will not appear when users attempt to move documents with an invalid status to the Workspace (i.e. Archived old or decommissioned revisions).
7. Click Yes. A confirmation window appears. 8. Click OK. The Workspace tab automatically opens.
NOTE: All documents are listed with a default “Draft” status after being moved to the Workspace tab.
Alternately, the user may wish to Synchronize the documents: To Synchronize the Workspace:
HINT: Synchronizing the Workspace is, essentially, a gathering of document from across all areas of the Authorizing Documents page. By default, this action will move all of the “Always Authorized” documents in Available to Workspace. Depending on what synchronizing options users select, document from other tabs can be moved to the Workspace for any necessary editing.
1. In the left navigation under CHDO, click Maintain Authorizing Documents. The Authorizing Documents table appears.
2. Open the Workspace tab.
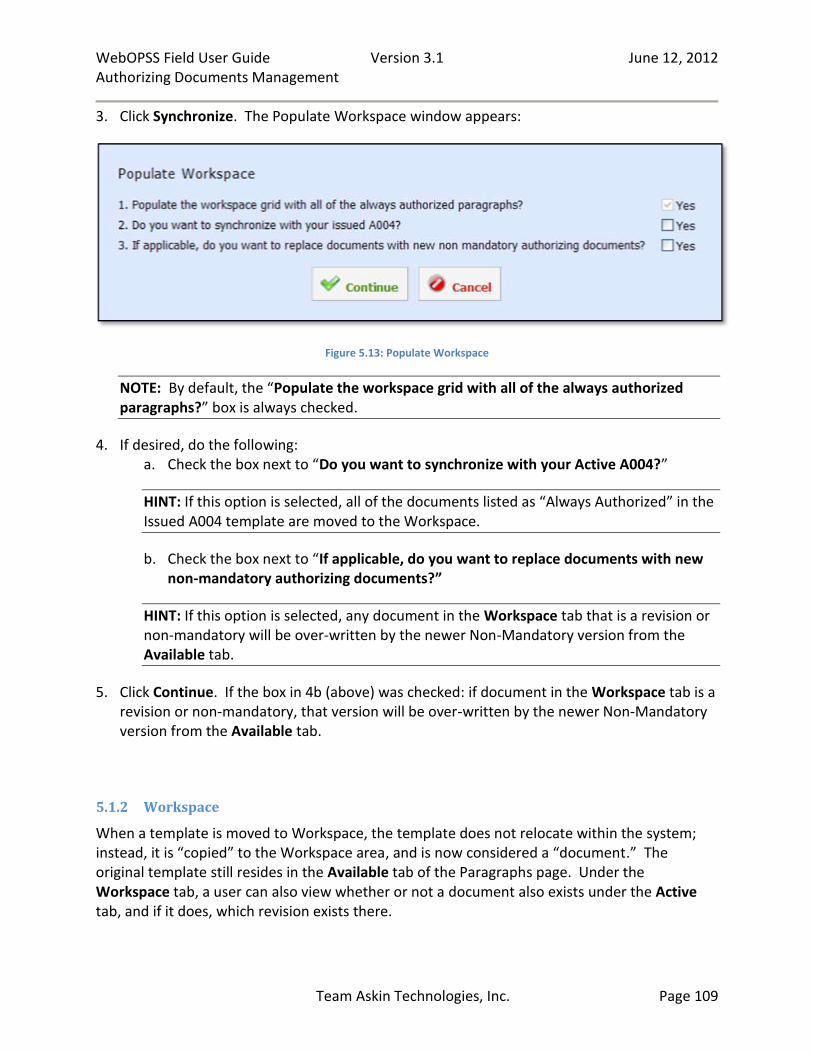
WebOPSS Field User Guide Version 3.1 June 12, 2012 Authorizing Documents Management
Team Askin Technologies, Inc. Page 109
3. Click Synchronize. The Populate Workspace window appears:
Figure 5.13: Populate Workspace
NOTE: By default, the “Populate the workspace grid with all of the always authorized paragraphs?” box is always checked.
4. If desired, do the following: a. Check the box next to “Do you want to synchronize with your Active A004?”
HINT: If this option is selected, all of the documents listed as “Always Authorized” in the Issued A004 template are moved to the Workspace.
b. Check the box next to “If applicable, do you want to replace documents with new non-mandatory authorizing documents?”
HINT: If this option is selected, any document in the Workspace tab that is a revision or non-mandatory will be over-written by the newer Non-Mandatory version from the Available tab.
5. Click Continue. If the box in 4b (above) was checked: if document in the Workspace tab is a revision or non-mandatory, that version will be over-written by the newer Non-Mandatory version from the Available tab.
5.1.2 Workspace
When a template is moved to Workspace, the template does not relocate within the system; instead, it is “copied” to the Workspace area, and is now considered a “document.” The original template still resides in the Available tab of the Paragraphs page. Under the Workspace tab, a user can also view whether or not a document also exists under the Active tab, and if it does, which revision exists there.

WebOPSS Field User Guide Version 3.1 June 12, 2012 Authorizing Documents Management
Team Askin Technologies, Inc. Page 110
Workspace Document Stages There are several stages that a document must go through during processing. The “Status” column in the Workspace lists where each document stands in this process:
Draft: This reflects a document that has been moved to the Workspace, but not yet edited.
Draft: In Process: This reflects a document that has been edited/reviewed and the changes made have been saved.
FAA Signed: This reflects that a document has been signed by an FAA Inspector.
Industry Signed: This reflects that a document has been signed by an industry user.
FAA & Industry Signed: This reflects that a template has been signed by both an FAA Inspector and an industry user when both were present at the same time in the same location. Unlike other templates with “…Signed” statuses, this designation allows for two signatures and will show two signature blocks on the printed document.
HINT: Documents with status listings of “Draft in Process” or “…Signed” can be redrafted.
Workspace Functionality When editing a document in a Workspace, the following icons and buttons may appear:
Help text icons ( ) exist to provide extra information to the user to mention what information is required in a specific table column or what action is required by the user for a data entry control (such as text boxes, labels, etc.); the icons always appear directly next to the item they provide help for. Hovering the mouse over the icon displays the message “Click for help,” and clicking on the icon opens a popup window containing the actual help text:
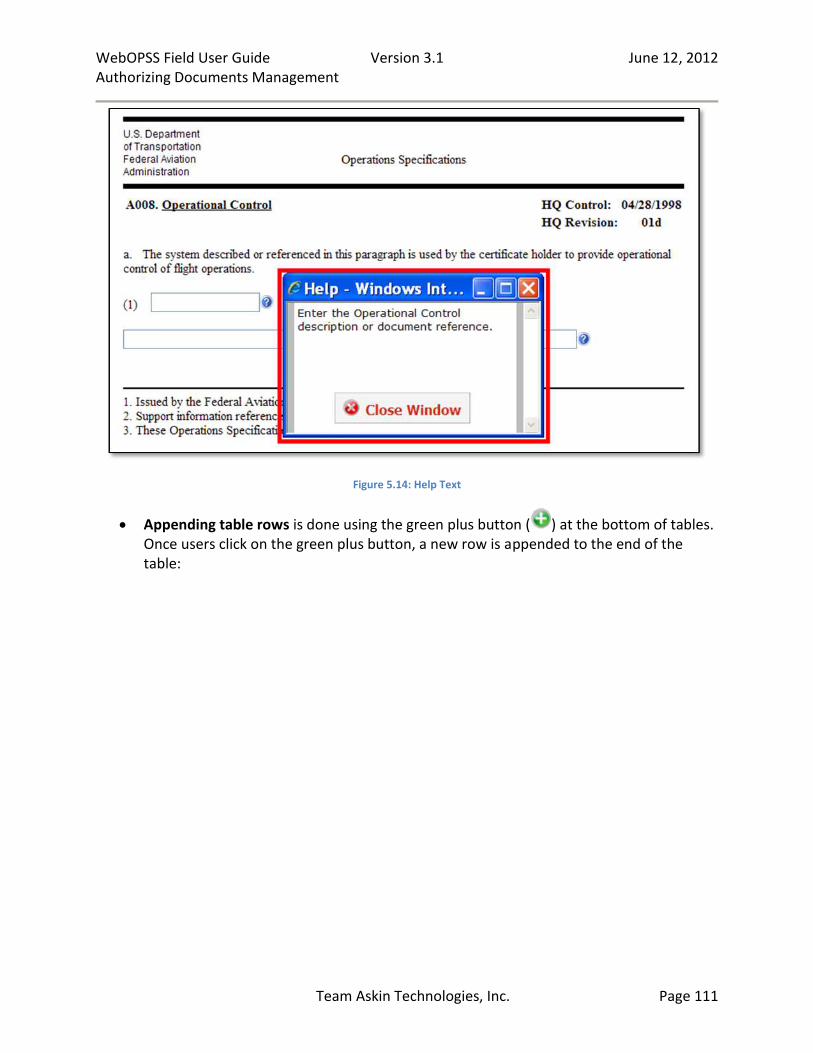
WebOPSS Field User Guide Version 3.1 June 12, 2012 Authorizing Documents Management
Team Askin Technologies, Inc. Page 111
Figure 5.14: Help Text
Appending table rows is done using the green plus button ( ) at the bottom of tables. Once users click on the green plus button, a new row is appended to the end of the table:
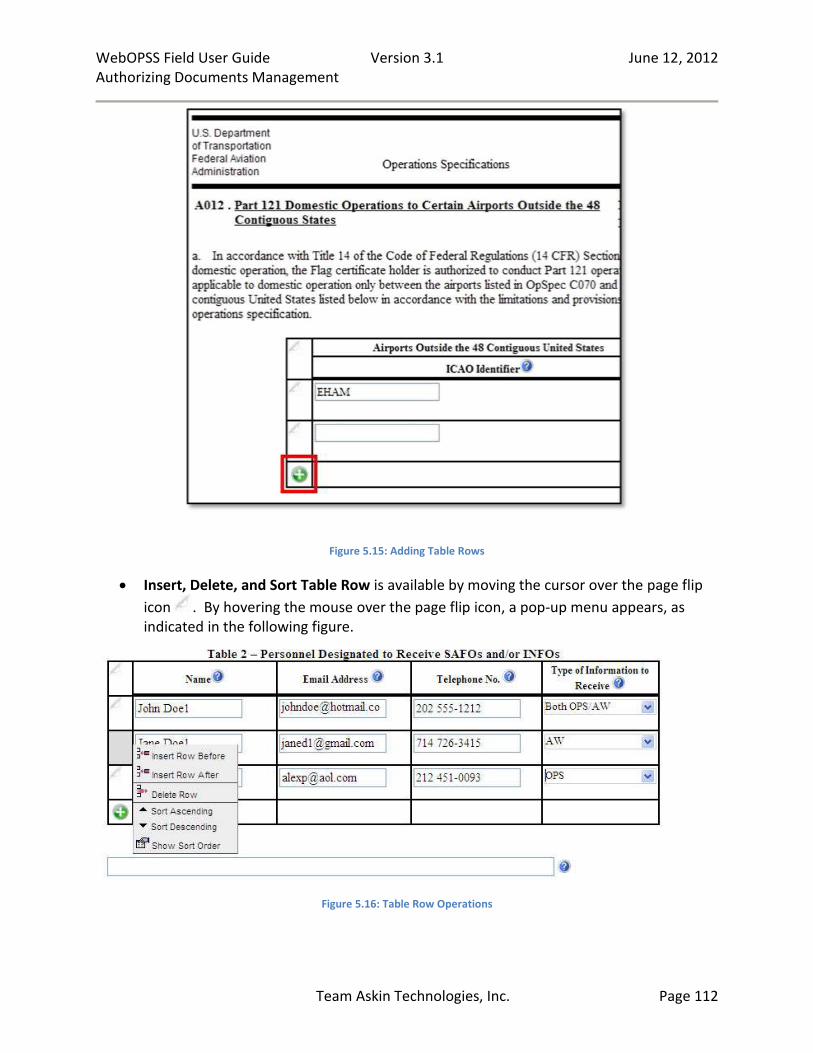
WebOPSS Field User Guide Version 3.1 June 12, 2012 Authorizing Documents Management
Team Askin Technologies, Inc. Page 112
Figure 5.15: Adding Table Rows
Insert, Delete, and Sort Table Row is available by moving the cursor over the page flip
icon . By hovering the mouse over the page flip icon, a pop-up menu appears, as indicated in the following figure.
Figure 5.16: Table Row Operations
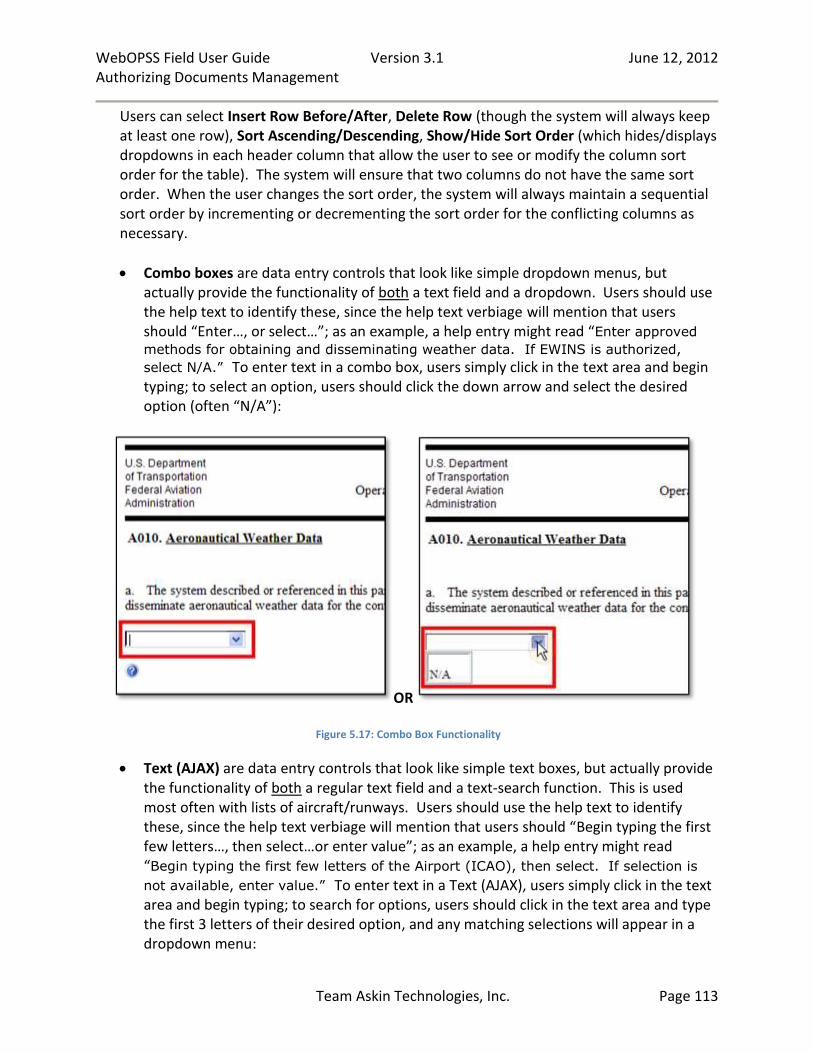
WebOPSS Field User Guide Version 3.1 June 12, 2012 Authorizing Documents Management
Team Askin Technologies, Inc. Page 113
Users can select Insert Row Before/After, Delete Row (though the system will always keep at least one row), Sort Ascending/Descending, Show/Hide Sort Order (which hides/displays dropdowns in each header column that allow the user to see or modify the column sort order for the table). The system will ensure that two columns do not have the same sort order. When the user changes the sort order, the system will always maintain a sequential sort order by incrementing or decrementing the sort order for the conflicting columns as necessary.
Combo boxes are data entry controls that look like simple dropdown menus, but actually provide the functionality of both a text field and a dropdown. Users should use the help text to identify these, since the help text verbiage will mention that users should “Enter…, or select…”; as an example, a help entry might read “Enter approved
methods for obtaining and disseminating weather data. If EWINS is authorized,
select N/A.” To enter text in a combo box, users simply click in the text area and begin typing; to select an option, users should click the down arrow and select the desired option (often “N/A”):
OR
Figure 5.17: Combo Box Functionality
Text (AJAX) are data entry controls that look like simple text boxes, but actually provide the functionality of both a regular text field and a text-search function. This is used most often with lists of aircraft/runways. Users should use the help text to identify these, since the help text verbiage will mention that users should “Begin typing the first few letters…, then select…or enter value”; as an example, a help entry might read “Begin typing the first few letters of the Airport (ICAO), then select. If selection is
not available, enter value.” To enter text in a Text (AJAX), users simply click in the text area and begin typing; to search for options, users should click in the text area and type the first 3 letters of their desired option, and any matching selections will appear in a dropdown menu:
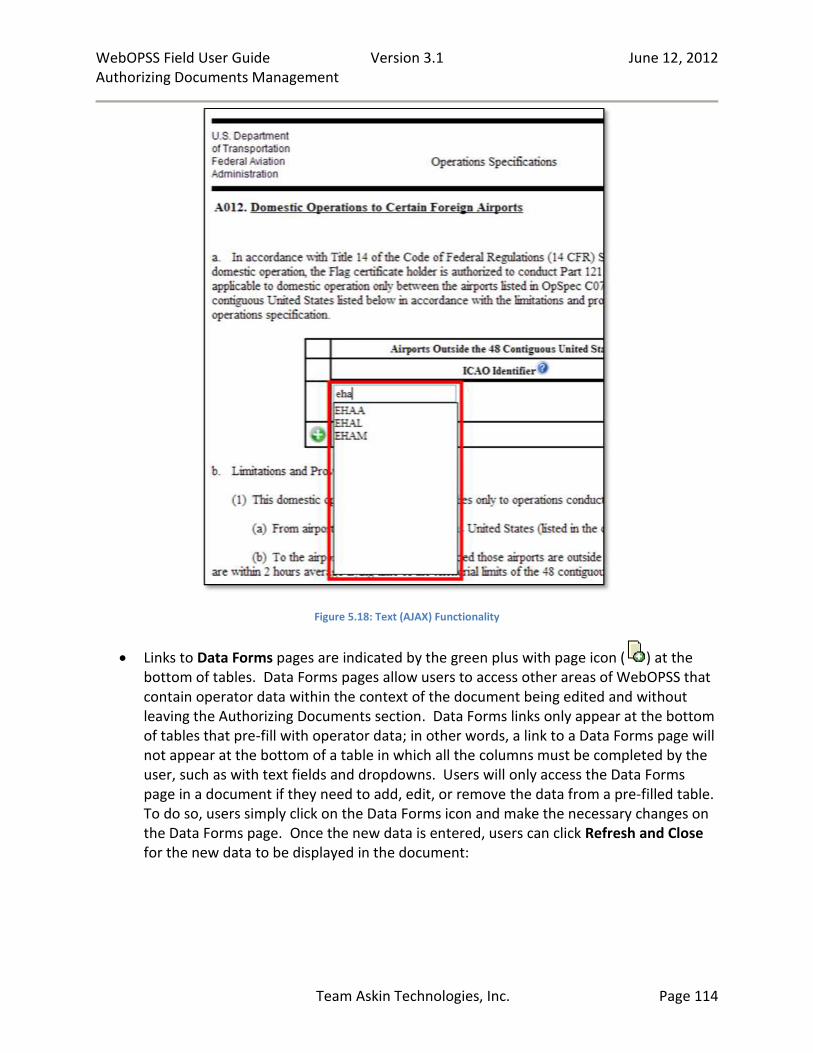
WebOPSS Field User Guide Version 3.1 June 12, 2012 Authorizing Documents Management
Team Askin Technologies, Inc. Page 114
Figure 5.18: Text (AJAX) Functionality
Links to Data Forms pages are indicated by the green plus with page icon ( ) at the bottom of tables. Data Forms pages allow users to access other areas of WebOPSS that contain operator data within the context of the document being edited and without leaving the Authorizing Documents section. Data Forms links only appear at the bottom of tables that pre-fill with operator data; in other words, a link to a Data Forms page will not appear at the bottom of a table in which all the columns must be completed by the user, such as with text fields and dropdowns. Users will only access the Data Forms page in a document if they need to add, edit, or remove the data from a pre-filled table. To do so, users simply click on the Data Forms icon and make the necessary changes on the Data Forms page. Once the new data is entered, users can click Refresh and Close for the new data to be displayed in the document:
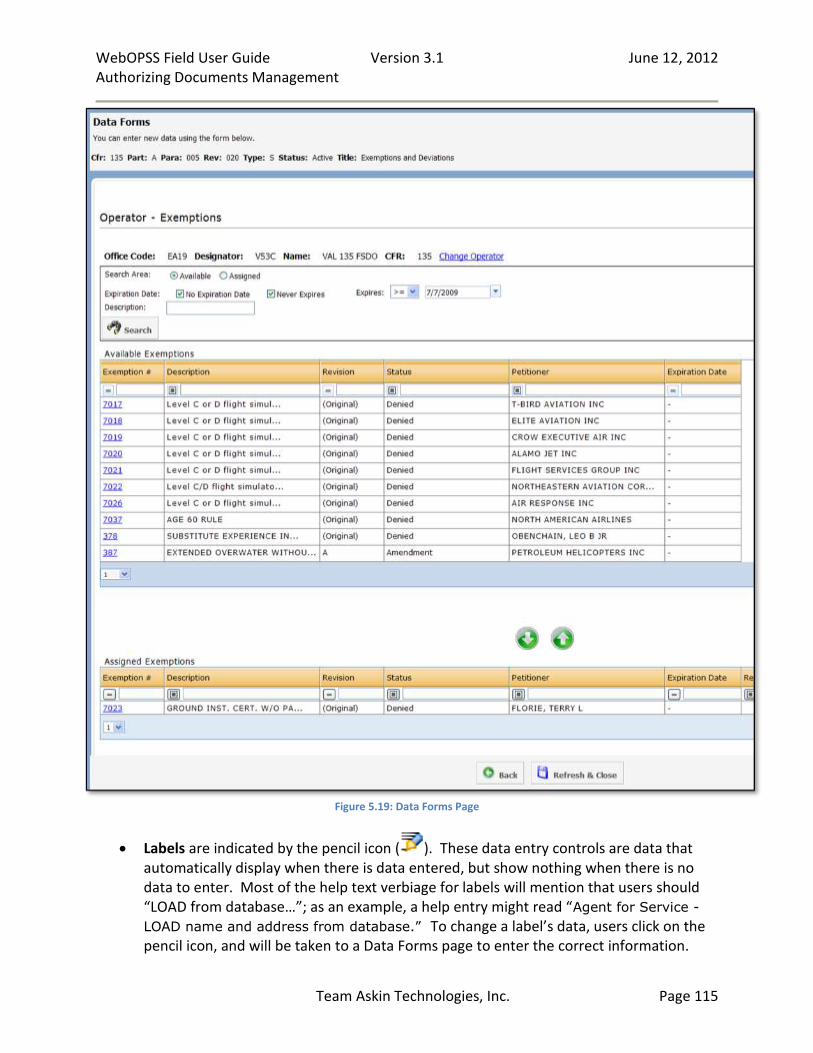
WebOPSS Field User Guide Version 3.1 June 12, 2012 Authorizing Documents Management
Team Askin Technologies, Inc. Page 115
Figure 5.19: Data Forms Page
Labels are indicated by the pencil icon ( ). These data entry controls are data that automatically display when there is data entered, but show nothing when there is no data to enter. Most of the help text verbiage for labels will mention that users should “LOAD from database…”; as an example, a help entry might read “Agent for Service -
LOAD name and address from database.” To change a label’s data, users click on the pencil icon, and will be taken to a Data Forms page to enter the correct information.
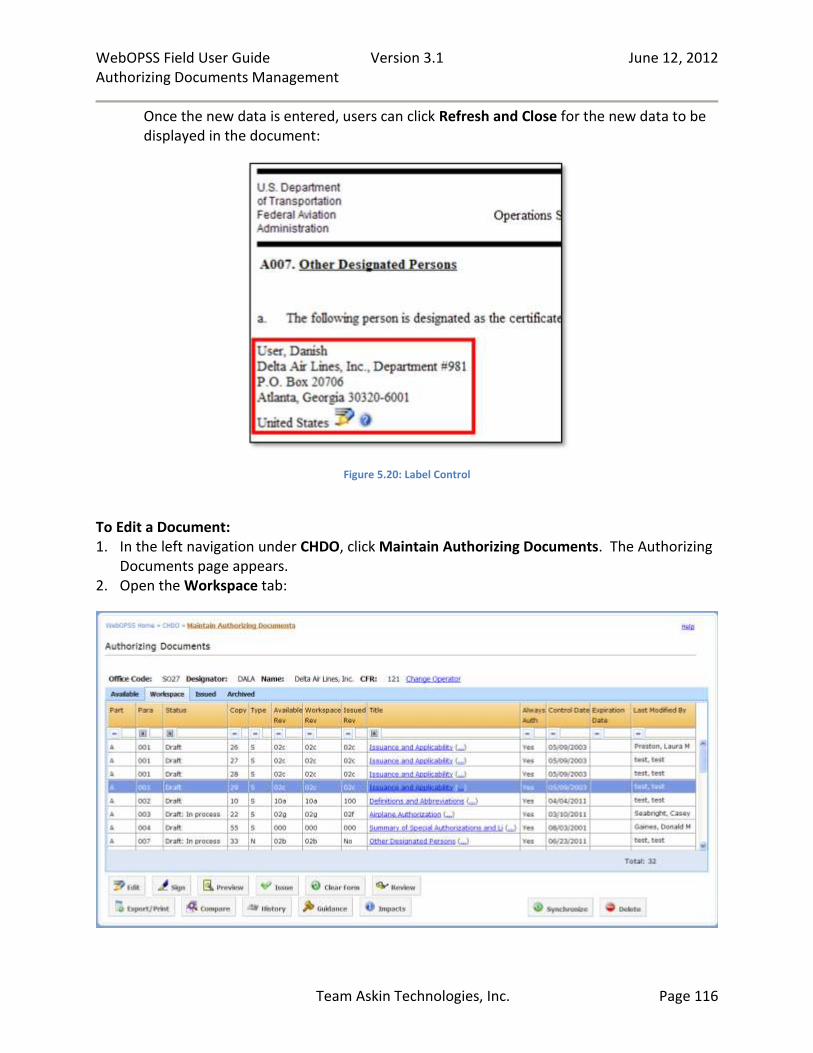
WebOPSS Field User Guide Version 3.1 June 12, 2012 Authorizing Documents Management
Team Askin Technologies, Inc. Page 116
Once the new data is entered, users can click Refresh and Close for the new data to be displayed in the document:
Figure 5.20: Label Control
To Edit a Document: 1. In the left navigation under CHDO, click Maintain Authorizing Documents. The Authorizing
Documents page appears. 2. Open the Workspace tab:
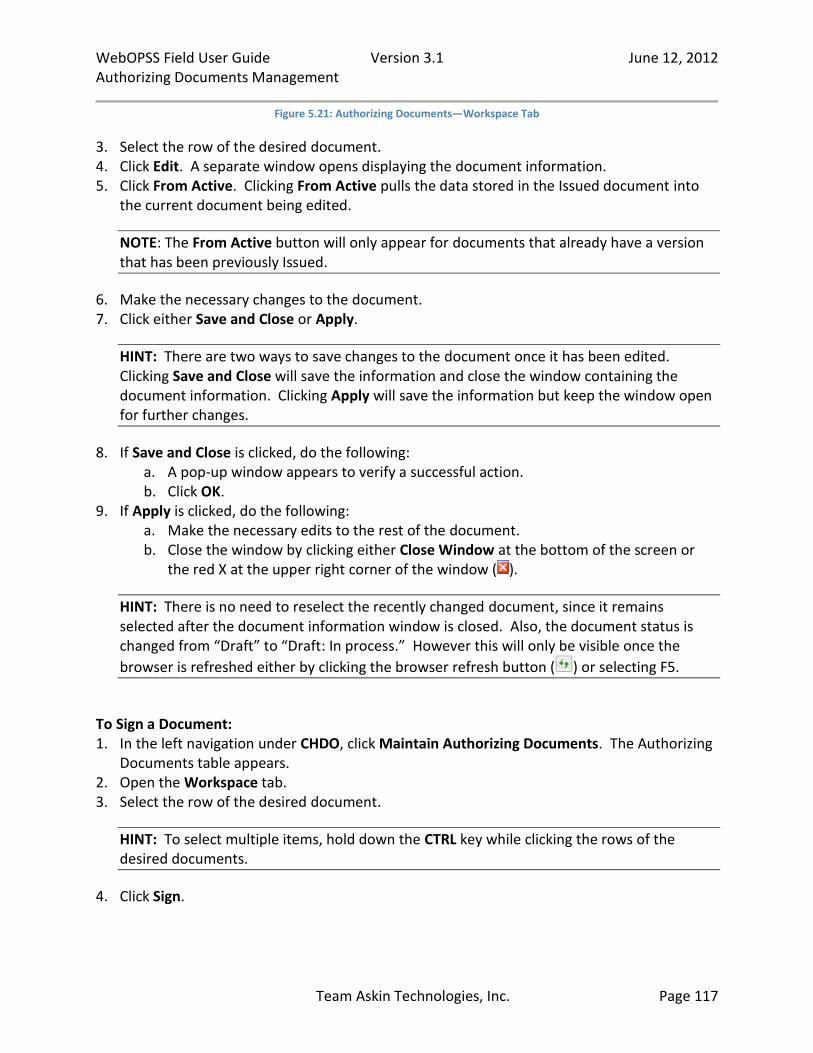
WebOPSS Field User Guide Version 3.1 June 12, 2012 Authorizing Documents Management
Team Askin Technologies, Inc. Page 117
Figure 5.21: Authorizing Documents—Workspace Tab
3. Select the row of the desired document. 4. Click Edit. A separate window opens displaying the document information. 5. Click From Active. Clicking From Active pulls the data stored in the Issued document into
the current document being edited.
NOTE: The From Active button will only appear for documents that already have a version that has been previously Issued.
6. Make the necessary changes to the document. 7. Click either Save and Close or Apply.
HINT: There are two ways to save changes to the document once it has been edited. Clicking Save and Close will save the information and close the window containing the document information. Clicking Apply will save the information but keep the window open for further changes.
8. If Save and Close is clicked, do the following: a. A pop-up window appears to verify a successful action. b. Click OK.
9. If Apply is clicked, do the following: a. Make the necessary edits to the rest of the document. b. Close the window by clicking either Close Window at the bottom of the screen or
the red X at the upper right corner of the window ( ).
HINT: There is no need to reselect the recently changed document, since it remains selected after the document information window is closed. Also, the document status is changed from “Draft” to “Draft: In process.” However this will only be visible once the
browser is refreshed either by clicking the browser refresh button ( ) or selecting F5.
To Sign a Document: 1. In the left navigation under CHDO, click Maintain Authorizing Documents. The Authorizing
Documents table appears. 2. Open the Workspace tab. 3. Select the row of the desired document.
HINT: To select multiple items, hold down the CTRL key while clicking the rows of the desired documents.
4. Click Sign.
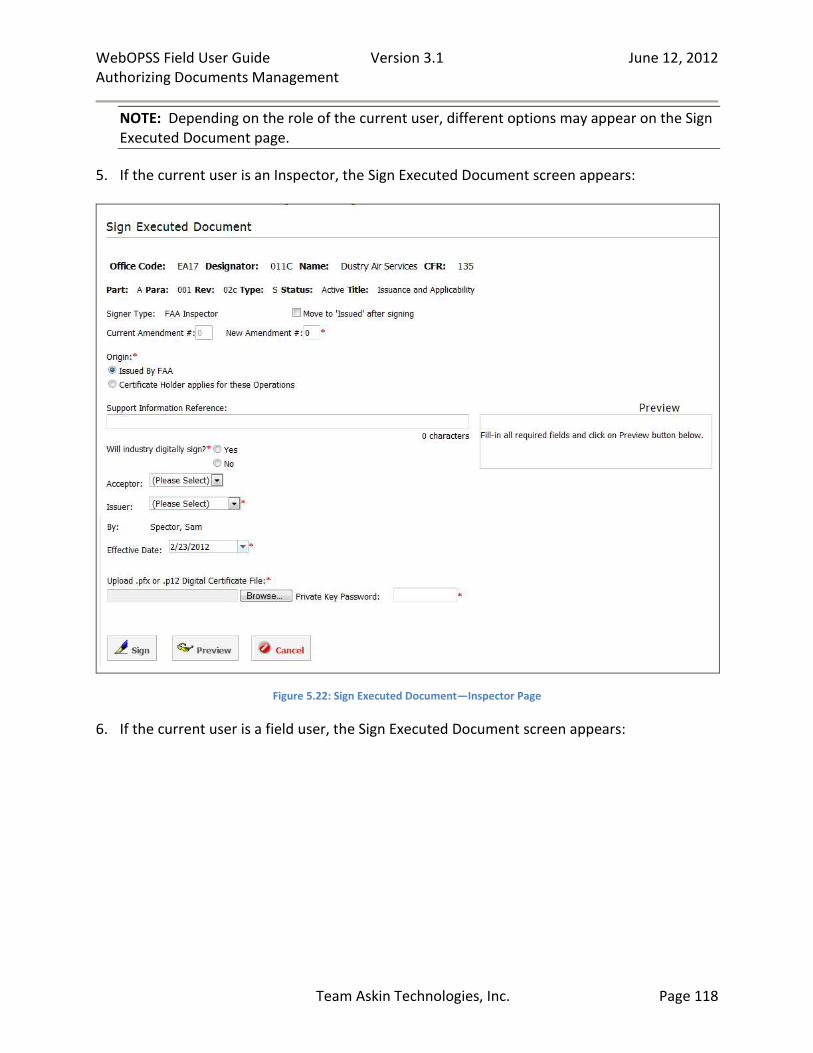
WebOPSS Field User Guide Version 3.1 June 12, 2012 Authorizing Documents Management
Team Askin Technologies, Inc. Page 118
NOTE: Depending on the role of the current user, different options may appear on the Sign Executed Document page.
5. If the current user is an Inspector, the Sign Executed Document screen appears:
Figure 5.22: Sign Executed Document—Inspector Page
6. If the current user is a field user, the Sign Executed Document screen appears:
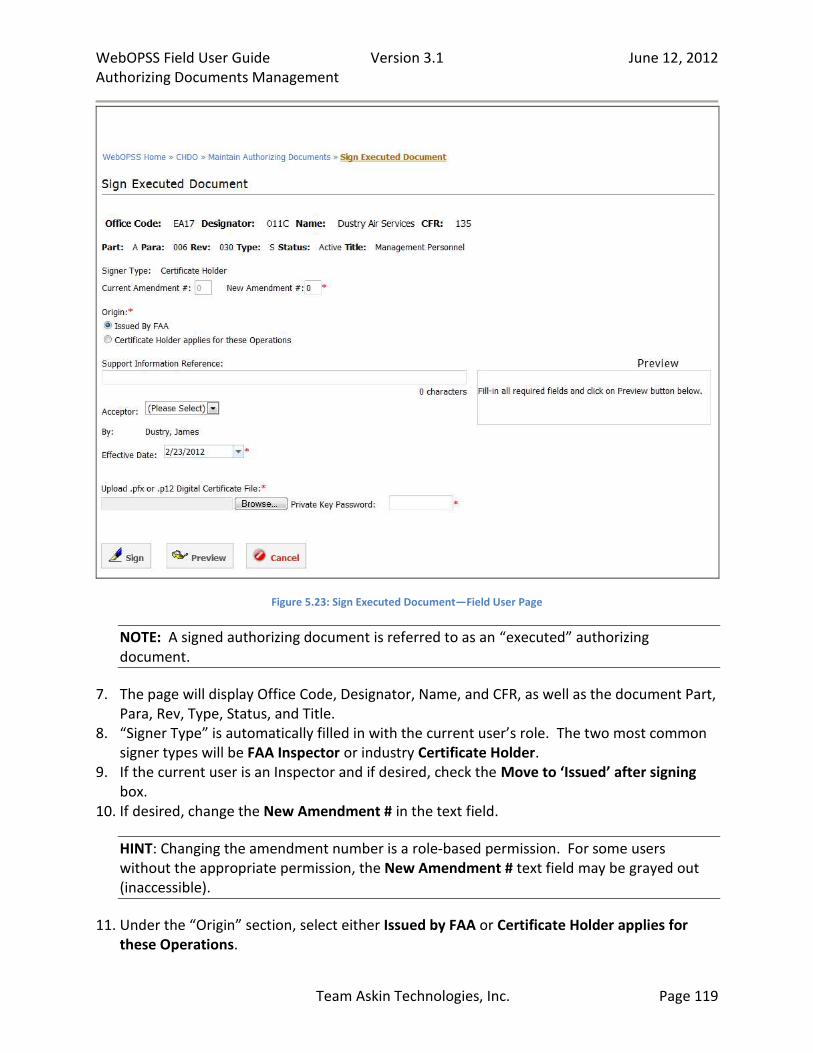
WebOPSS Field User Guide Version 3.1 June 12, 2012 Authorizing Documents Management
Team Askin Technologies, Inc. Page 119
Figure 5.23: Sign Executed Document—Field User Page
NOTE: A signed authorizing document is referred to as an “executed” authorizing document.
7. The page will display Office Code, Designator, Name, and CFR, as well as the document Part, Para, Rev, Type, Status, and Title.
8. “Signer Type” is automatically filled in with the current user’s role. The two most common signer types will be FAA Inspector or industry Certificate Holder.
9. If the current user is an Inspector and if desired, check the Move to ‘Issued’ after signing box.
10. If desired, change the New Amendment # in the text field.
HINT: Changing the amendment number is a role-based permission. For some users without the appropriate permission, the New Amendment # text field may be grayed out (inaccessible).
11. Under the “Origin” section, select either Issued by FAA or Certificate Holder applies for these Operations.

WebOPSS Field User Guide Version 3.1 June 12, 2012 Authorizing Documents Management
Team Askin Technologies, Inc. Page 120
12. If desired, enter support information in the Support Information Reference text field.
HINT: Support information can be entered by either party.
13. If the user is an Inspector, select the radio button next to Will industry digitally sign? 14. If desired, select the Acceptor from the dropdown list. If the answer to Will industry
digitally sign? in the previous step was No, then selecting an Acceptor becomes required.
HINT: Selecting acceptor name means that the current user is signing on behalf of the selected user.
15. If the current user is an Inspector, select the Issuer from the dropdown list. 16. If the current user is an Inspector, click in the Effective Date text field to choose a date from
the calendar that appears. 16. To Upload .pfx or .p12 Digital Certificate File, click the Browse button. 17. Find and select the digital certificate file.
NOTE: Users must supply a valid digital certificate. Invalid certificates are considered to be those which have expired since the date of issuance or which have been revoked (e.g. the user issued the certificate has since left the company). If users are unable to successfully sign with a digital certificate, go to Tools > Getting Help in the left navigation bar for Digital Certificate Support.
18. Click Open. 19. Enter the password for the digital certificate file in the Private Key Password field. 20. If desired, select the Preview button. The digital signature as it will appear on the
document in displayed in a Preview pane to the right of the Support Information Reference field.
NOTE: If too much Support Information has been entered making the signature no longer fit the space available on the document, yellow highlight will appear on the text which does not fit. A message will also appear at the top of the screen letting the user know how many characters of Support Information will need to be removed before proceeding.
Make any necessary changes and Click Preview button again to refresh the signature.
21. Click Sign. IMPORTANT NOTE: Because the format of the digital signature was changed in the March, 2012 release, already-signed documents which are sitting in the Workspace in CHDO->Maintain Authorizing Documents may have to be edited again and re-signed. You will know if the document has to be re-signed by looking at its Status in Workspace.
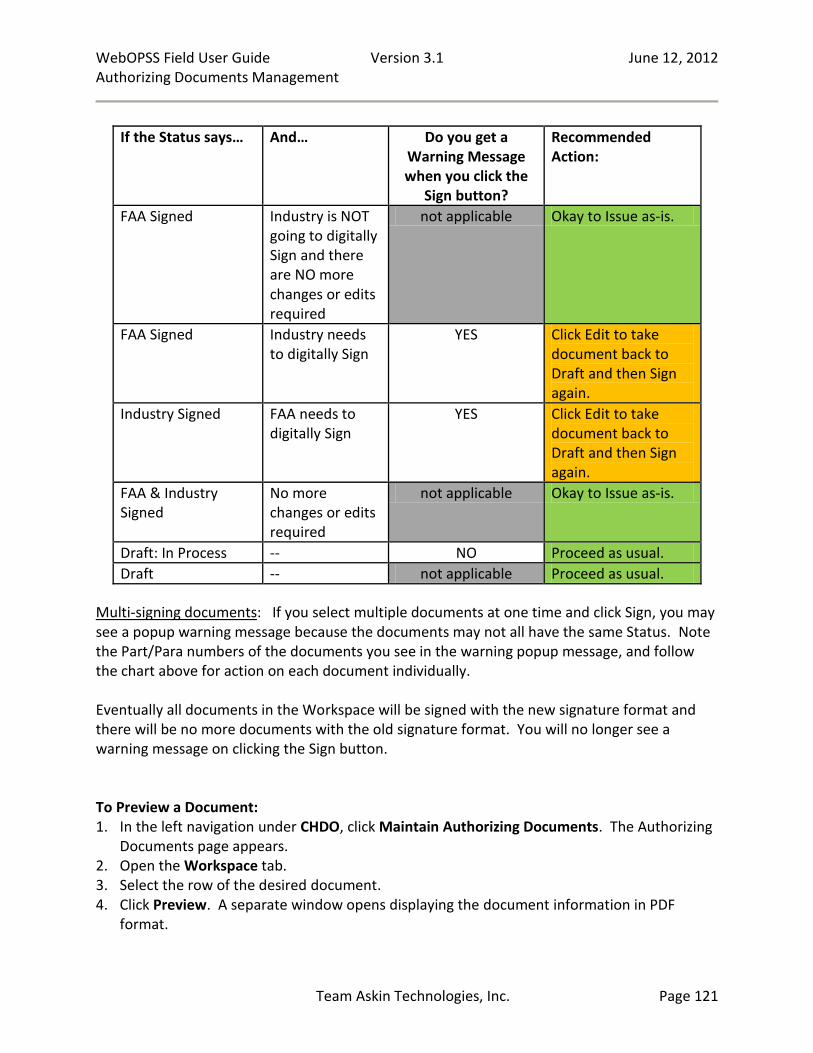
WebOPSS Field User Guide Version 3.1 June 12, 2012 Authorizing Documents Management
Team Askin Technologies, Inc. Page 121
If the Status says… And… Do you get a
Warning Message when you click the
Sign button?
Recommended Action:
FAA Signed Industry is NOT going to digitally Sign and there are NO more changes or edits required
not applicable Okay to Issue as-is.
FAA Signed Industry needs to digitally Sign
YES Click Edit to take document back to Draft and then Sign again.
Industry Signed FAA needs to digitally Sign
YES Click Edit to take document back to Draft and then Sign again.
FAA & Industry Signed
No more changes or edits required
not applicable Okay to Issue as-is.
Draft: In Process -- NO Proceed as usual.
Draft -- not applicable Proceed as usual.
Multi-signing documents: If you select multiple documents at one time and click Sign, you may see a popup warning message because the documents may not all have the same Status. Note the Part/Para numbers of the documents you see in the warning popup message, and follow the chart above for action on each document individually. Eventually all documents in the Workspace will be signed with the new signature format and there will be no more documents with the old signature format. You will no longer see a warning message on clicking the Sign button. To Preview a Document: 1. In the left navigation under CHDO, click Maintain Authorizing Documents. The Authorizing
Documents page appears. 2. Open the Workspace tab. 3. Select the row of the desired document. 4. Click Preview. A separate window opens displaying the document information in PDF
format.
WebOPSS Field User Guide Version 3.1 June 12, 2012 Authorizing Documents Management
Team Askin Technologies, Inc. Page 122
5. Close the document information window by either clicking the Close Window button at the bottom of the screen or the red X at the upper right corner of the window ( ).
To Issue a Document: 1. In the left navigation under CHDO, click Maintain Authorizing Documents. The Authorizing
Documents table appears. 2. Open the Workspace tab. 3. Select the row of the desired document.
HINT: The selected document must meet two criteria before being Issued: 1) it must be authorized in the active A004, and 2) it must have a status of either “FAA Signed,” “Industry Signed,” or “FAA & Industry Signed.”
4. Click Issue. A confirmation box appears. 5. Click Yes. A pop-up window appears to verify a successful action. To Reload a Document:
HINT: Clicking Reload while a document is highlighted clears all of the editable data from the template and sets it back to its original state before changes were made. This is similar to deleting a document from the Workspace tab, then moving the same document from the Available tab to the Workspace tab again. Additionally, the document status is changed from “Draft: In process” to “Draft.”
1. In the left navigation under CHDO, click Maintain Authorizing Documents. The Authorizing Documents screen appears.
2. Open the Workspace tab. 3. Select the row of the desired document. 4. Click the Reload button. A pop-up window appears to verify a successful action. 5. Click OK. To Delete a Document: 1. In the left navigation under CHDO, click Maintain Authorizing Documents. The Authorizing
Documents table appears. 2. Open the Workspace tab. 3. Select the row of the desired document. 4. Click Delete. A pop-up window appears to verify a successful action. 5. Click OK. The document has been removed from the workspace.
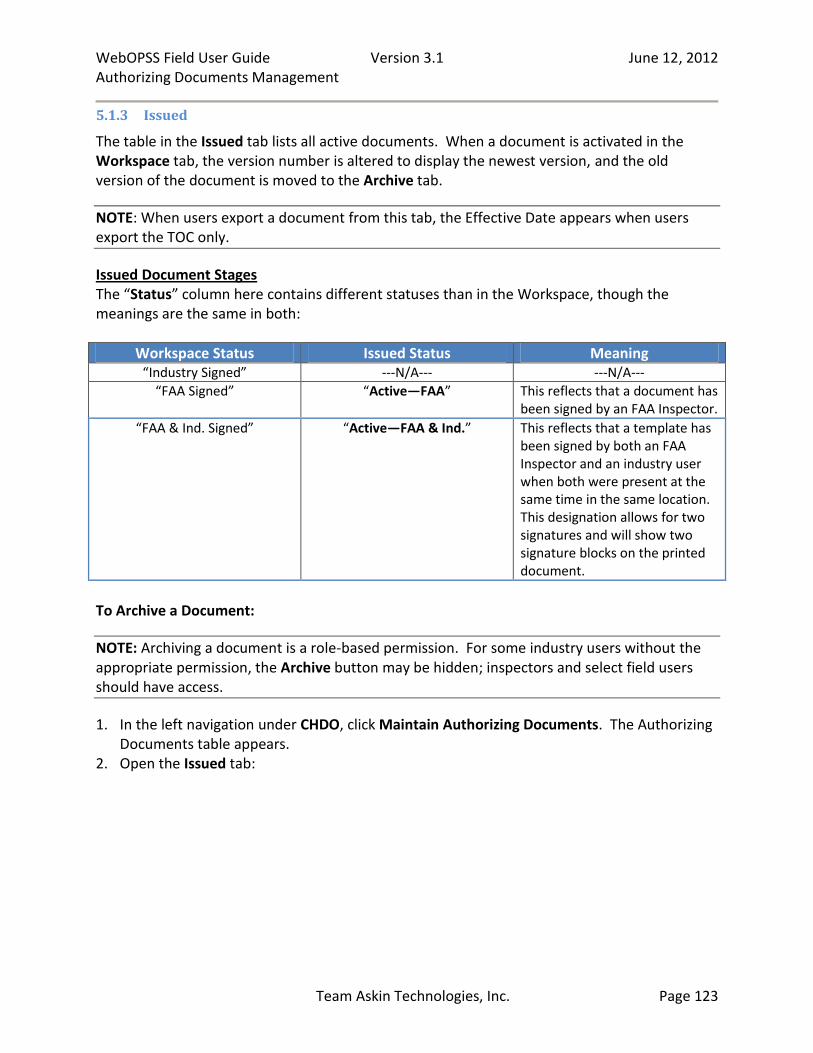
WebOPSS Field User Guide Version 3.1 June 12, 2012 Authorizing Documents Management
Team Askin Technologies, Inc. Page 123
5.1.3 Issued
The table in the Issued tab lists all active documents. When a document is activated in the Workspace tab, the version number is altered to display the newest version, and the old version of the document is moved to the Archive tab.
NOTE: When users export a document from this tab, the Effective Date appears when users export the TOC only.
Issued Document Stages The “Status” column here contains different statuses than in the Workspace, though the meanings are the same in both:
Workspace Status Issued Status Meaning “Industry Signed” ---N/A--- ---N/A---
“FAA Signed” “Active—FAA” This reflects that a document has been signed by an FAA Inspector.
“FAA & Ind. Signed” “Active—FAA & Ind.” This reflects that a template has been signed by both an FAA Inspector and an industry user when both were present at the same time in the same location. This designation allows for two signatures and will show two signature blocks on the printed document.
To Archive a Document:
NOTE: Archiving a document is a role-based permission. For some industry users without the appropriate permission, the Archive button may be hidden; inspectors and select field users should have access.
1. In the left navigation under CHDO, click Maintain Authorizing Documents. The Authorizing Documents table appears.
2. Open the Issued tab:
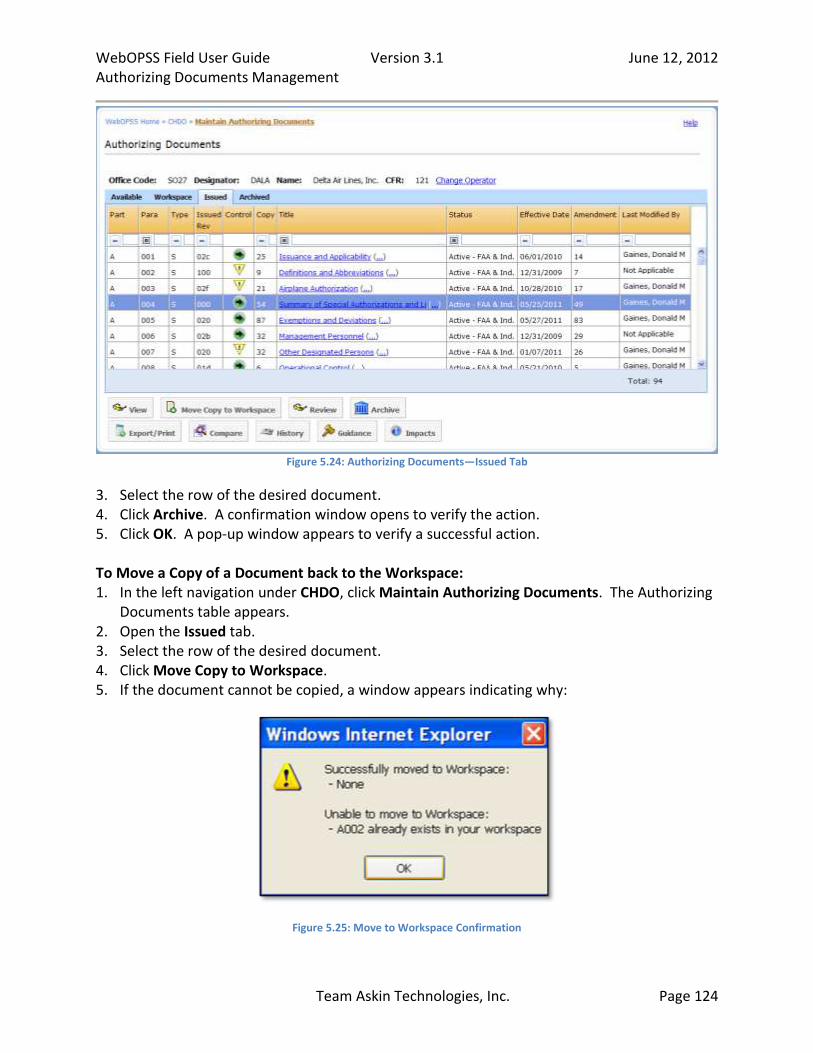
WebOPSS Field User Guide Version 3.1 June 12, 2012 Authorizing Documents Management
Team Askin Technologies, Inc. Page 124
Figure 5.24: Authorizing Documents—Issued Tab
3. Select the row of the desired document. 4. Click Archive. A confirmation window opens to verify the action. 5. Click OK. A pop-up window appears to verify a successful action. To Move a Copy of a Document back to the Workspace: 1. In the left navigation under CHDO, click Maintain Authorizing Documents. The Authorizing
Documents table appears. 2. Open the Issued tab. 3. Select the row of the desired document. 4. Click Move Copy to Workspace. 5. If the document cannot be copied, a window appears indicating why:
Figure 5.25: Move to Workspace Confirmation
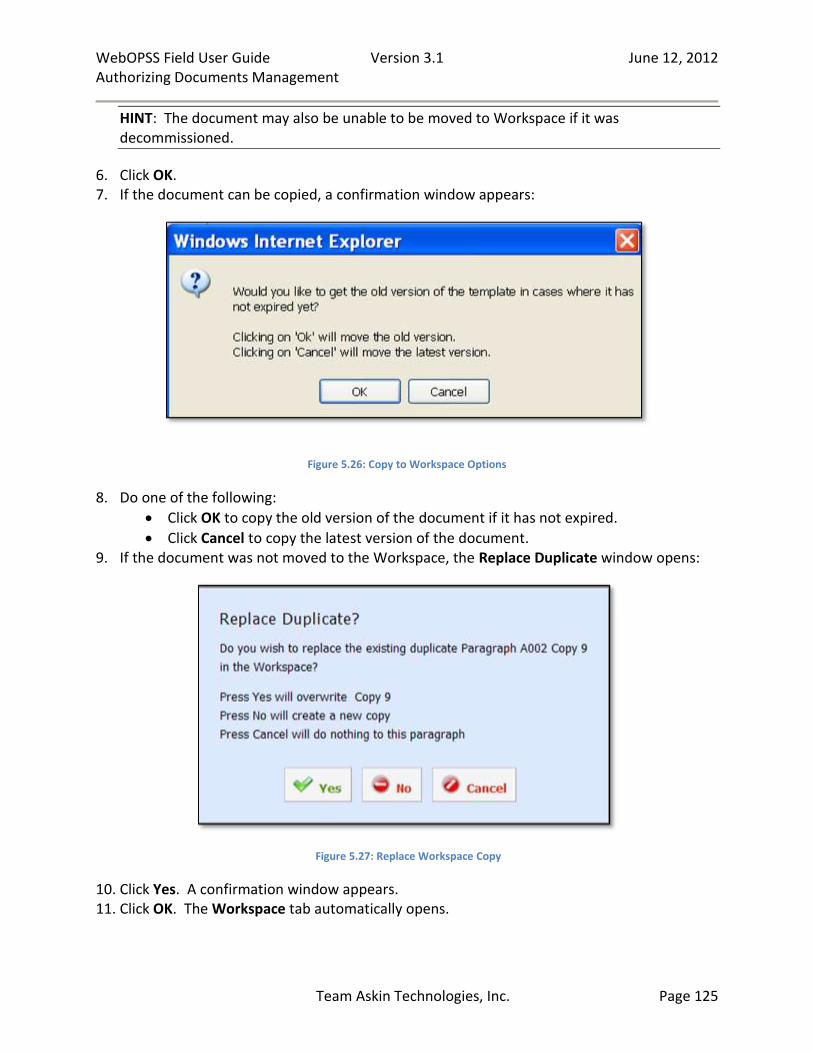
WebOPSS Field User Guide Version 3.1 June 12, 2012 Authorizing Documents Management
Team Askin Technologies, Inc. Page 125
HINT: The document may also be unable to be moved to Workspace if it was decommissioned.
6. Click OK. 7. If the document can be copied, a confirmation window appears:
Figure 5.26: Copy to Workspace Options
8. Do one of the following:
Click OK to copy the old version of the document if it has not expired.
Click Cancel to copy the latest version of the document. 9. If the document was not moved to the Workspace, the Replace Duplicate window opens:
Figure 5.27: Replace Workspace Copy
10. Click Yes. A confirmation window appears. 11. Click OK. The Workspace tab automatically opens.
WebOPSS Field User Guide Version 3.1 June 12, 2012 Authorizing Documents Management
Team Askin Technologies, Inc. Page 126
NOTE: All document are listed with a default “Draft” status after being moved to the Workspace tab.
5.1.4 Archived
The table in Archived lists all archived documents. Archived documents are the older versions of a document for which a new version has been created. When a document is activated in the Workspace, the version number is altered to display the newest version, and the old version of the document is moved to Archived.
5.2 Guidance
Below is a high-level graphic depicting the guidance process.
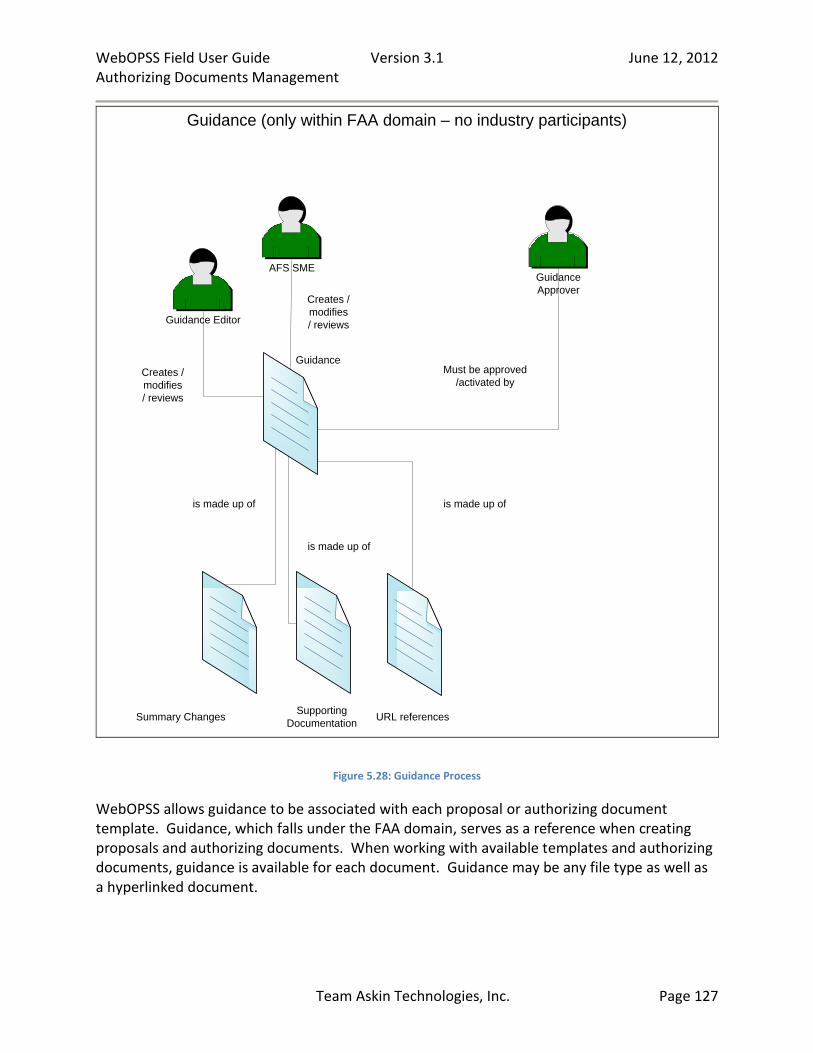
WebOPSS Field User Guide Version 3.1 June 12, 2012 Authorizing Documents Management
Team Askin Technologies, Inc. Page 127
Guidance
AFS SME
Creates /
modifies
/ reviews
Guidance
Approver
Must be approved
/activated by
Guidance Editor
Creates /
modifies
/ reviews
Supporting
DocumentationURL references
is made up of
Summary Changes
is made up of
is made up of
Guidance (only within FAA domain – no industry participants)
Figure 5.28: Guidance Process
WebOPSS allows guidance to be associated with each proposal or authorizing document template. Guidance, which falls under the FAA domain, serves as a reference when creating proposals and authorizing documents. When working with available templates and authorizing documents, guidance is available for each document. Guidance may be any file type as well as a hyperlinked document.
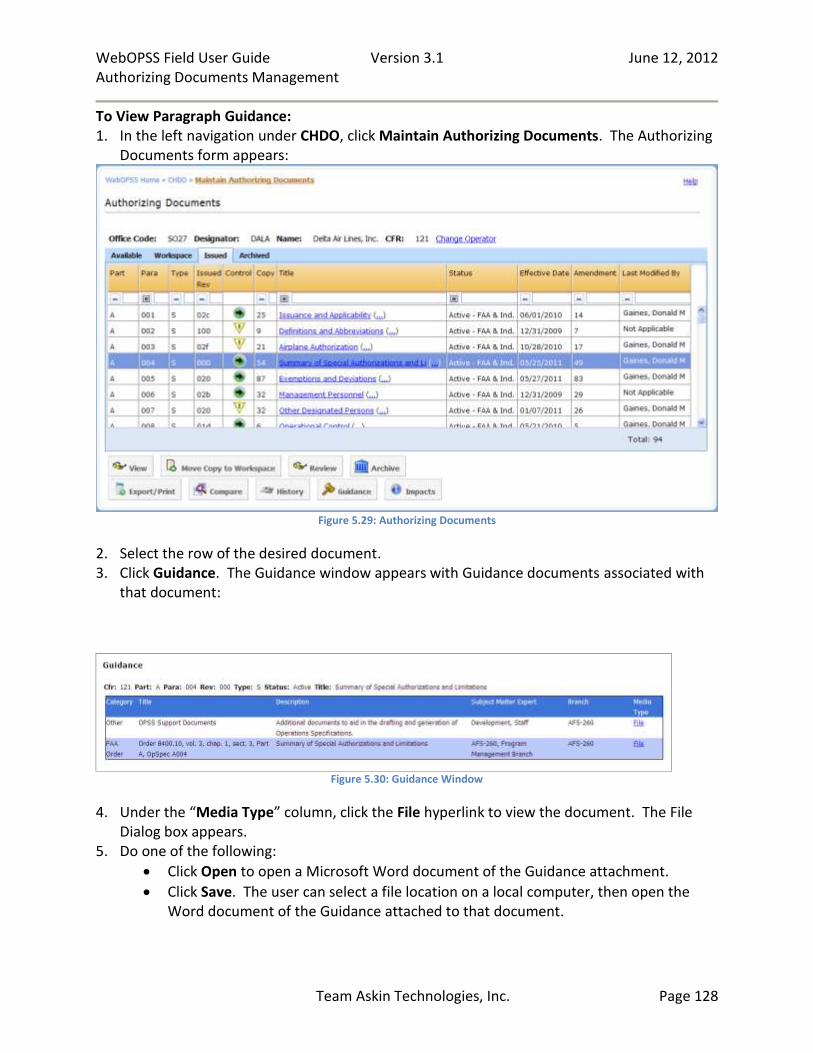
WebOPSS Field User Guide Version 3.1 June 12, 2012 Authorizing Documents Management
Team Askin Technologies, Inc. Page 128
To View Paragraph Guidance: 1. In the left navigation under CHDO, click Maintain Authorizing Documents. The Authorizing
Documents form appears:
Figure 5.29: Authorizing Documents
2. Select the row of the desired document. 3. Click Guidance. The Guidance window appears with Guidance documents associated with
that document:
Figure 5.30: Guidance Window
4. Under the “Media Type” column, click the File hyperlink to view the document. The File Dialog box appears.
5. Do one of the following:
Click Open to open a Microsoft Word document of the Guidance attachment.
Click Save. The user can select a file location on a local computer, then open the Word document of the Guidance attached to that document.
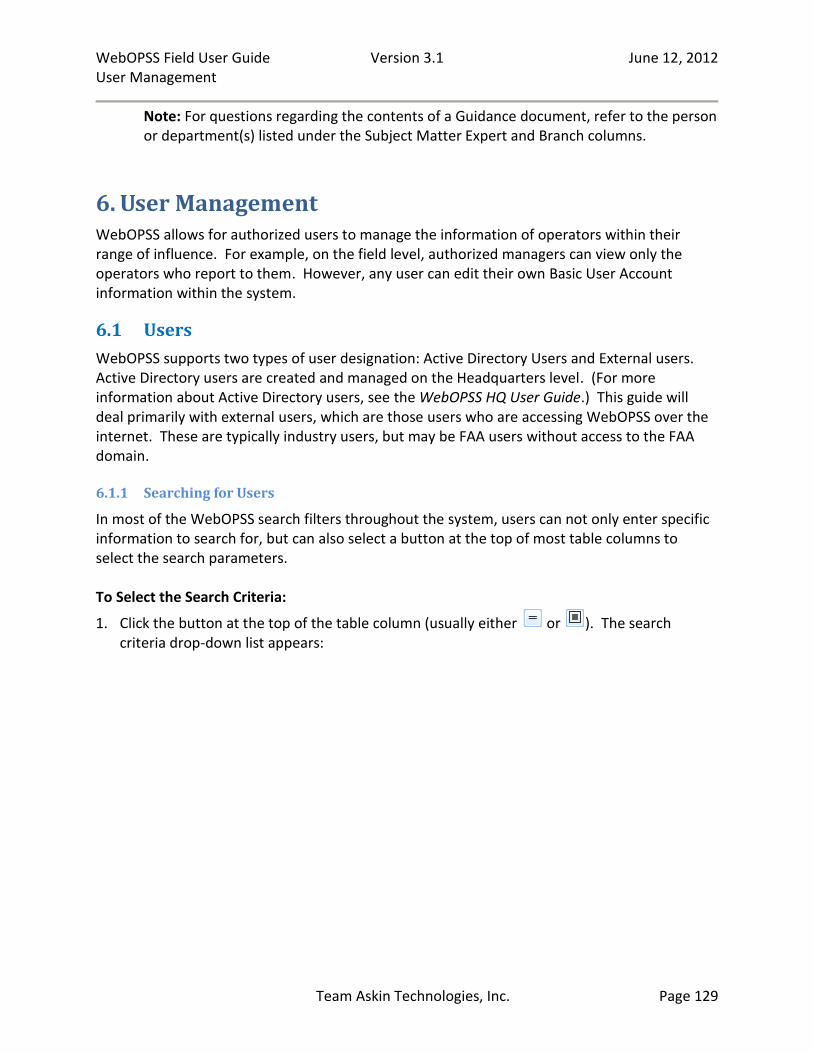
WebOPSS Field User Guide Version 3.1 June 12, 2012 User Management
Team Askin Technologies, Inc. Page 129
Note: For questions regarding the contents of a Guidance document, refer to the person or department(s) listed under the Subject Matter Expert and Branch columns.
6. User Management WebOPSS allows for authorized users to manage the information of operators within their range of influence. For example, on the field level, authorized managers can view only the operators who report to them. However, any user can edit their own Basic User Account information within the system.
6.1 Users
WebOPSS supports two types of user designation: Active Directory Users and External users. Active Directory users are created and managed on the Headquarters level. (For more information about Active Directory users, see the WebOPSS HQ User Guide.) This guide will deal primarily with external users, which are those users who are accessing WebOPSS over the internet. These are typically industry users, but may be FAA users without access to the FAA domain.
6.1.1 Searching for Users
In most of the WebOPSS search filters throughout the system, users can not only enter specific information to search for, but can also select a button at the top of most table columns to select the search parameters. To Select the Search Criteria:
1. Click the button at the top of the table column (usually either or ). The search criteria drop-down list appears:

WebOPSS Field User Guide Version 3.1 June 12, 2012 User Management
Team Askin Technologies, Inc. Page 130
Figure 6.1: Select Search Criteria
2. Select one of the following search criteria:
Equals ( ): this means that the filter will search for all entries containing only the search text.
Starts With ( ): this means that the filter will search for all entries that start with the search text.
Ends With ( ): this means that the filter will search for all entries that end with the search text.
Contains ( ): this means that the filter will search for all entries that contain all or part of the search text.
To Enter Search Text: 1. Double-click in the blank area to the right of the search criteria button, once the desired
search criteria is selected:
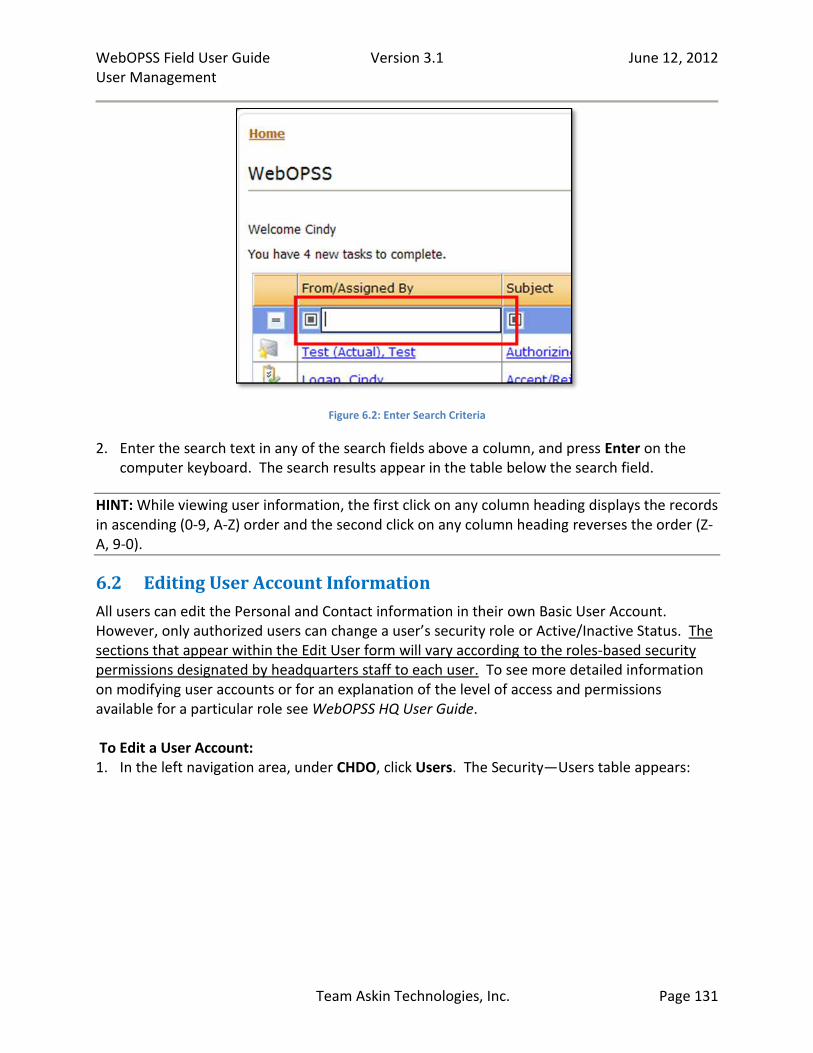
WebOPSS Field User Guide Version 3.1 June 12, 2012 User Management
Team Askin Technologies, Inc. Page 131
Figure 6.2: Enter Search Criteria
2. Enter the search text in any of the search fields above a column, and press Enter on the computer keyboard. The search results appear in the table below the search field.
HINT: While viewing user information, the first click on any column heading displays the records in ascending (0-9, A-Z) order and the second click on any column heading reverses the order (Z-A, 9-0).
6.2 Editing User Account Information
All users can edit the Personal and Contact information in their own Basic User Account. However, only authorized users can change a user’s security role or Active/Inactive Status. The sections that appear within the Edit User form will vary according to the roles-based security permissions designated by headquarters staff to each user. To see more detailed information on modifying user accounts or for an explanation of the level of access and permissions available for a particular role see WebOPSS HQ User Guide. To Edit a User Account: 1. In the left navigation area, under CHDO, click Users. The Security—Users table appears:
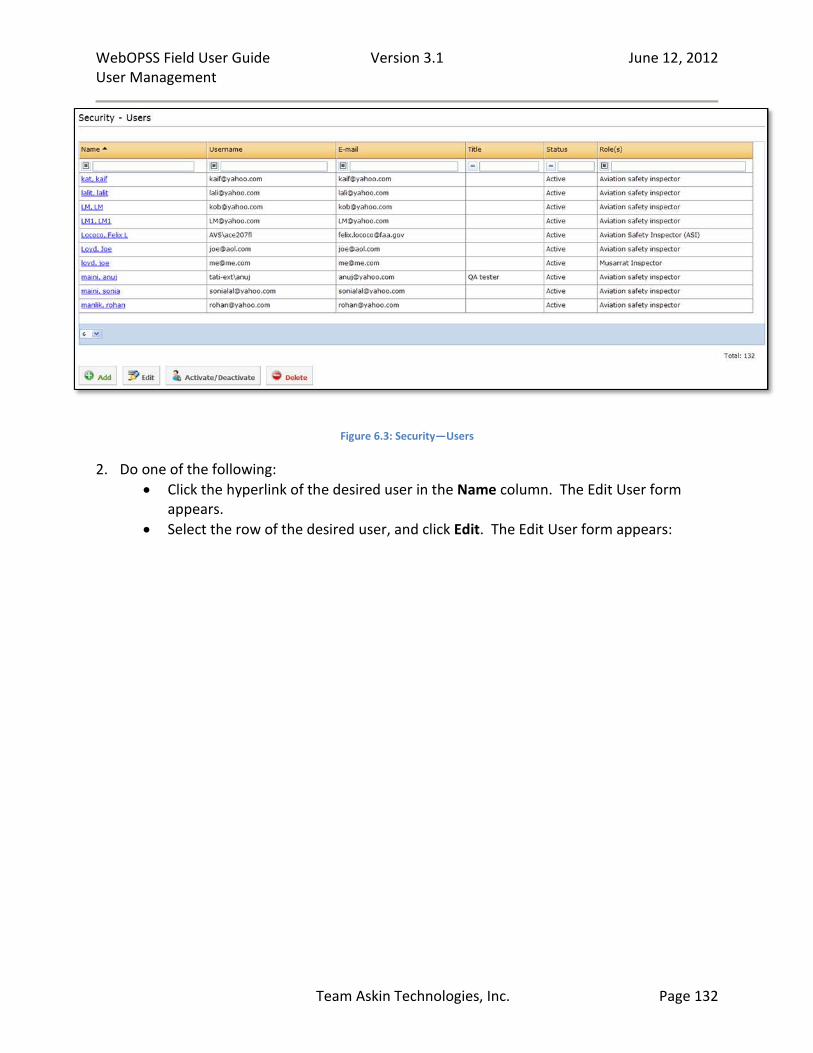
WebOPSS Field User Guide Version 3.1 June 12, 2012 User Management
Team Askin Technologies, Inc. Page 132
Figure 6.3: Security—Users
2. Do one of the following:
Click the hyperlink of the desired user in the Name column. The Edit User form appears.
Select the row of the desired user, and click Edit. The Edit User form appears:

WebOPSS Field User Guide Version 3.1 June 12, 2012 User Management
Team Askin Technologies, Inc. Page 133

WebOPSS Field User Guide Version 3.1 June 12, 2012 Reports
Team Askin Technologies, Inc. Page 134
Figure 6.4: Edit User (top half)
Figure 6.5: Edit User (bottom half)
3. Make the desired changes. 4. Click Save. The changes appear on the Security—Users table.
7. Reports WebOPSS supports the ability for any authorized user to generate a system report based on unique selection parameters.
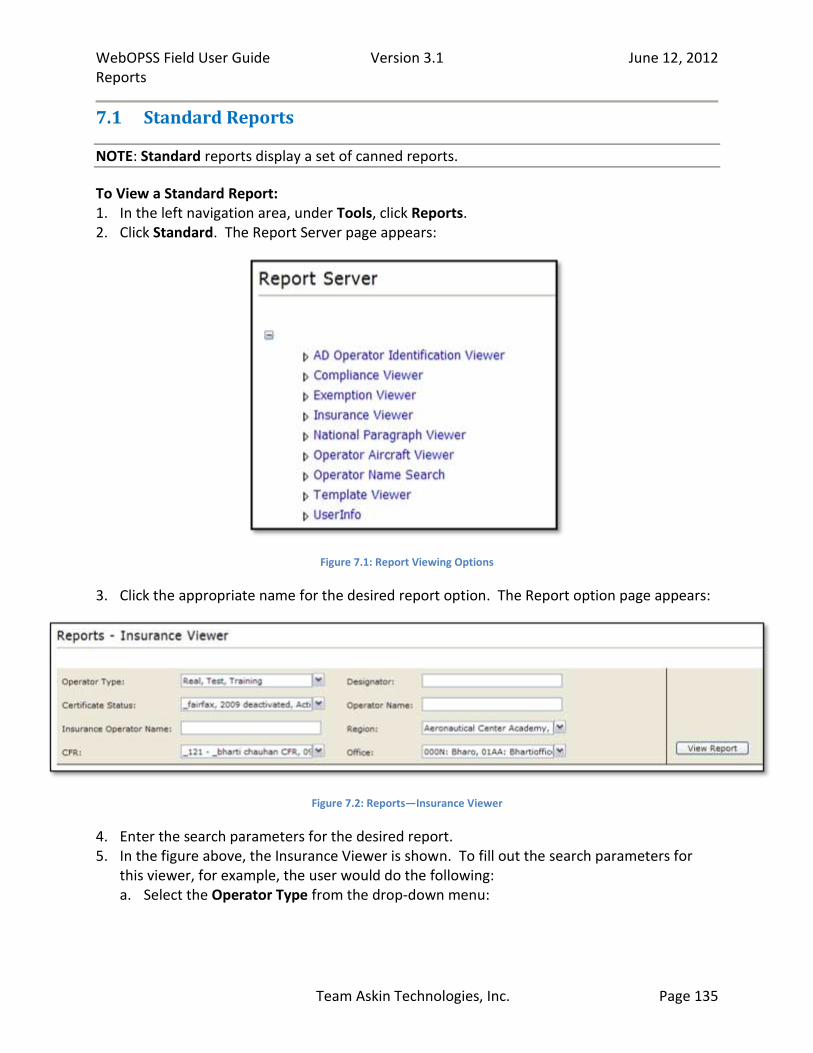
WebOPSS Field User Guide Version 3.1 June 12, 2012 Reports
Team Askin Technologies, Inc. Page 135
7.1 Standard Reports
NOTE: Standard reports display a set of canned reports.
To View a Standard Report: 1. In the left navigation area, under Tools, click Reports. 2. Click Standard. The Report Server page appears:
Figure 7.1: Report Viewing Options
3. Click the appropriate name for the desired report option. The Report option page appears:
Figure 7.2: Reports—Insurance Viewer
4. Enter the search parameters for the desired report. 5. In the figure above, the Insurance Viewer is shown. To fill out the search parameters for
this viewer, for example, the user would do the following: a. Select the Operator Type from the drop-down menu:
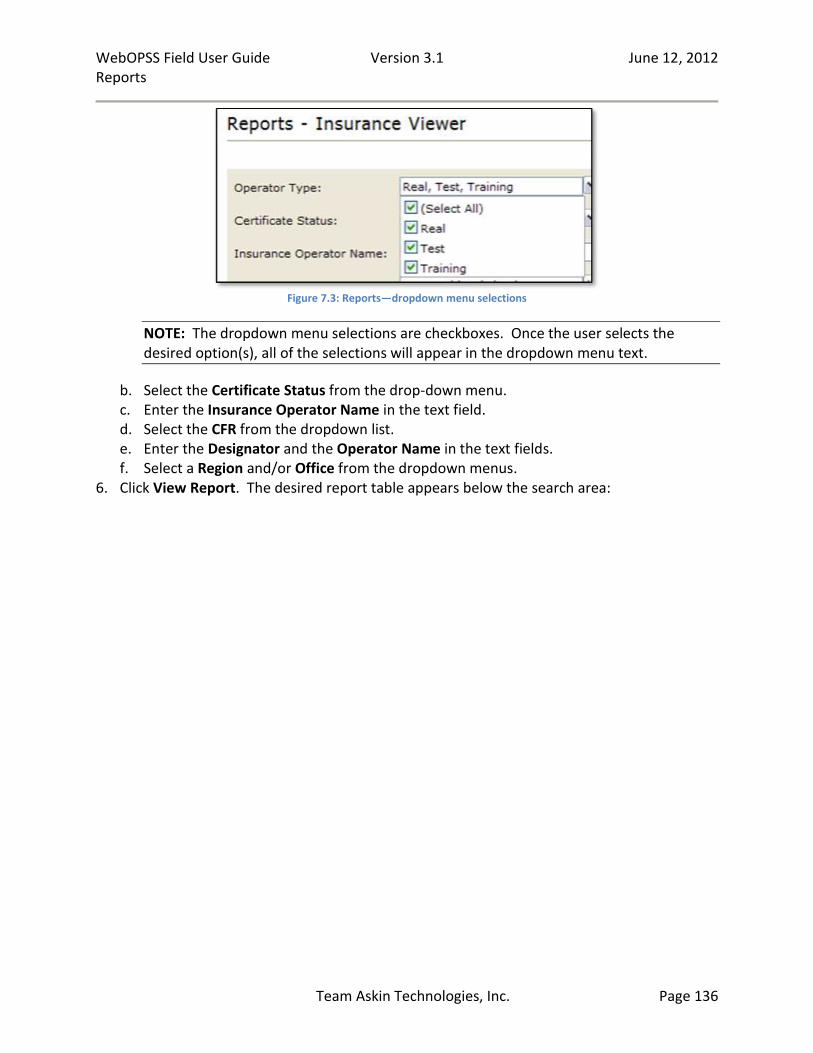
WebOPSS Field User Guide Version 3.1 June 12, 2012 Reports
Team Askin Technologies, Inc. Page 136
Figure 7.3: Reports—dropdown menu selections
NOTE: The dropdown menu selections are checkboxes. Once the user selects the desired option(s), all of the selections will appear in the dropdown menu text.
b. Select the Certificate Status from the drop-down menu. c. Enter the Insurance Operator Name in the text field. d. Select the CFR from the dropdown list. e. Enter the Designator and the Operator Name in the text fields. f. Select a Region and/or Office from the dropdown menus.
6. Click View Report. The desired report table appears below the search area:

WebOPSS Field User Guide Version 3.1 June 12, 2012 Reports
Team Askin Technologies, Inc. Page 137
Figure 7.4: Viewing a Report
7. To export the report, do the following: a. Select the file type from the drop-down menu directly under the search area:

WebOPSS Field User Guide Version 3.1 June 12, 2012 Tools
Team Askin Technologies, Inc. Page 138
Figure 7.5: Exporting a Report
b. Click Export. The File Dialog box appears. c. To open the report in the selected file type, click Open. d. To select a file location on a local computer in order to open the report later, click
Save.
7.2 Custom Reports
Custom reports display a set of customizable reports. Because they are set at an HQ level, access to them is permission-based, and they are only available to authorized users. For more information on HQ Custom reports, see the WebOPSS HQ User Guide.
8. Tools WebOPSS offers various help aids for users that support the following functions:
Getting Help: offers FAA Point of Contact, direction for User Guide help, and Digital Certificate Support contact.
About: offers information about the current WebOPSS build and lists the current user’s username and role.
FAQ: offers Frequently Asked Questions and their answers.
WebOPSS Transition CBT: offers interactive computer based training on basic WebOPSS functions in the transition from OPSS to WebOPSS.
CHDO User Manual: generates a PDF version of this document.
HQ User Manual: generates a PDF version of the WebOPSS Headquarters User Manual.
Feedback: offers the opportunity for user feedback.
Release notes: generates a Word document containing the latest build release notes.
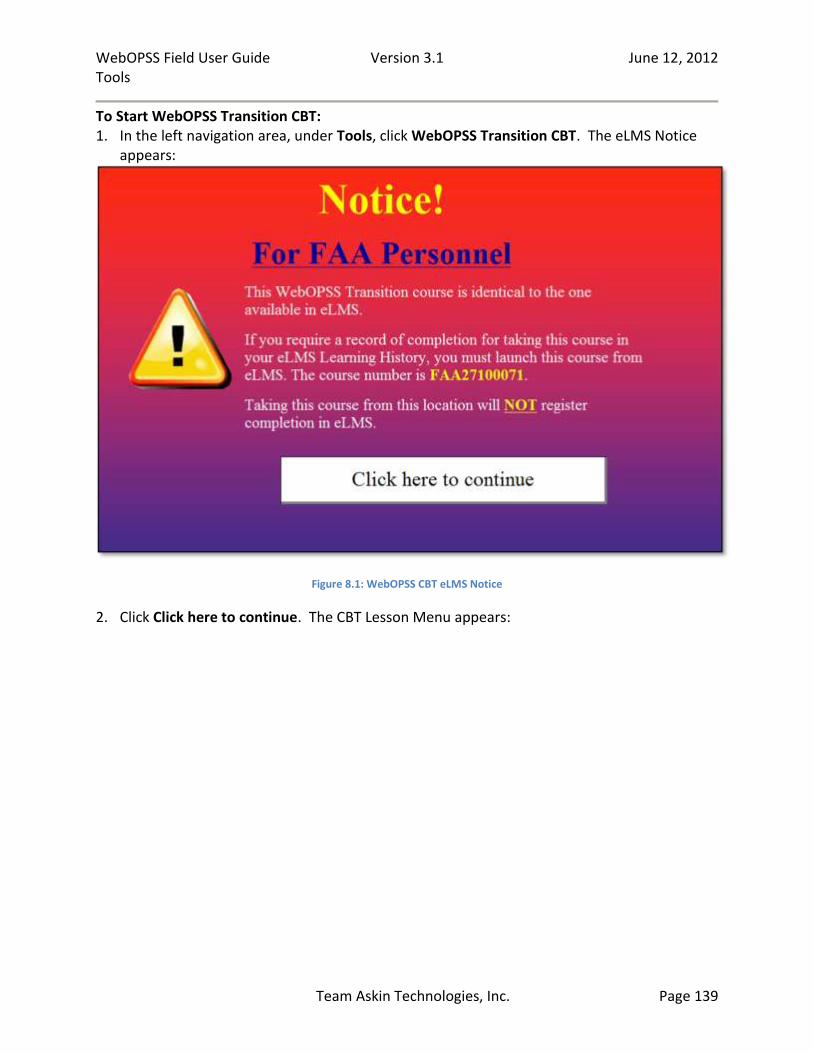
WebOPSS Field User Guide Version 3.1 June 12, 2012 Tools
Team Askin Technologies, Inc. Page 139
To Start WebOPSS Transition CBT: 1. In the left navigation area, under Tools, click WebOPSS Transition CBT. The eLMS Notice
appears:
Figure 8.1: WebOPSS CBT eLMS Notice
2. Click Click here to continue. The CBT Lesson Menu appears:
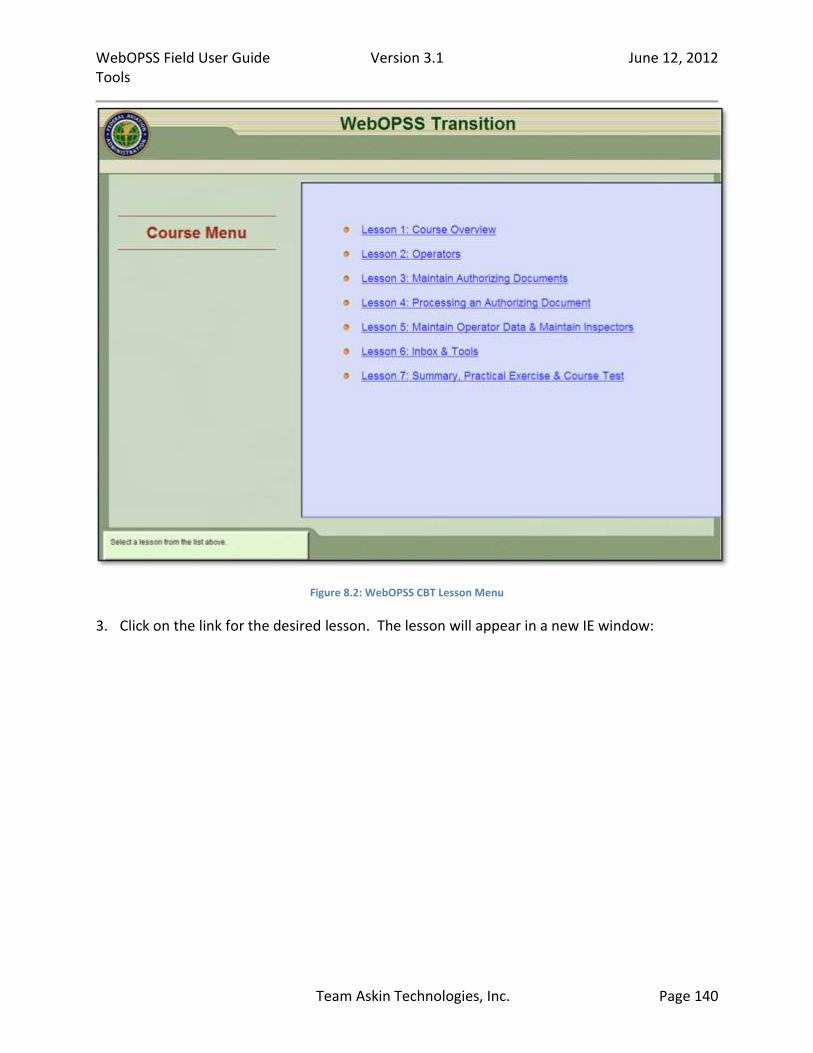
WebOPSS Field User Guide Version 3.1 June 12, 2012 Tools
Team Askin Technologies, Inc. Page 140
Figure 8.2: WebOPSS CBT Lesson Menu
3. Click on the link for the desired lesson. The lesson will appear in a new IE window:
WebOPSS Field User Guide Version 3.1 June 12, 2012 Tools
Team Askin Technologies, Inc. Page 141
Figure 8.3: WebOPSS CBT Lesson
4. Follow on-screen instruction to proceed. To View FAQs: 1. In the left navigation area, under Tools, click FAQ. The Frequently Asked Questions page
appears:
WebOPSS Field User Guide Version 3.1 June 12, 2012 Tools
Team Askin Technologies, Inc. Page 142
Figure 8.4: Frequently Asked Questions
2. To return to the WebOPSS Home page, click Back.
To View CHDO User Manual: 1. In the left navigation area, under Tools, click CHDO—User Manual. A window appears
displaying this Field User Guide as a PDF file. 2. To navigate the PDF, do one of the following:
Go to the Table of Contents page and click on the desired topic.
Click the page icon in the left navigation bar ( ) to go to a desired page.
Click the binoculars icon in the left navigation bar ( ) to search for desired terms. To View HQ User Manual: 1. In the left navigation area, under Tools, click HQ—User Manual. A window appears
displaying the HQ User Guide as a PDF file. 2. To navigate the PDF, do one of the following:
Go to the Table of Contents page and click on the desired topic.
Click the page icon in the left navigation bar ( ) to go to a desired page.
Click the binoculars icon in the left navigation bar ( ) to search for desired terms. To Offer Feedback: 1. In the left navigation area, under Tools, click Feedback. The Help—Feedback form appears:

WebOPSS Field User Guide Version 3.1 June 12, 2012 Tools
Team Askin Technologies, Inc. Page 143
Figure 8.5: Feedback
2. Enter the desired Feedback in the text field. 3. Click Submit. A confirmation message is displayed on the Feedback page. To View Release Notes: 1. In the left navigation area, under Tools, click Release Notes. The File Download box
appears. 2. Do one of the following:
Click Open to open a Microsoft Word file containing all of the Release note data.
Click Save. The user can save a file location on a local computer, then open the Word file containing all of the Release Note data.
For any questions regarding the information contained in this WebOPSS Field User Guide, please contact the WebOPSS Technical Support at (877) 287-6731 or email [email protected].