Embed Size (px)
Citation preview

Web Based Resource ManagementImplementation Guide
from REPLICON
version 2.0


i • • • •••
Copyright
© 2004-2005 Replicon, Inc. All rights reserved.
All parts of this manual are the property of Replicon, Inc. No parts of this manual may be reproduced in any manner whatsoever including mechanical or electronic media such as disk or tape. No part of this manual may be transmitted in any form by any means without the prior written permission of Replicon, Inc.
Web TimeSheet, Web Resource and associated logos are trademarks of Replicon, Inc.
This product includes software developed by XHEO (http://www.xheo.com).
Other product or service names mentioned in this document may be trademarks of Replicon, or of the respective owners of those trademarks.
Contacting RepliconReplicon, Inc.800, 910 - 7th Ave. S.W.Calgary, AB. Canada. T2P 3N8
Telephone: 1-403-262-6519Toll Free (North America) 877-737-5420 ext 3Toll-Free (Europe) 00-800-7375-4266 ext 3Toll-Free (Australia/New Zealand) 011-800-7375-4266 ext 3

ii
• • • •••

iii • • • •••
• • • • • • Contents
Chapter 1 About Web ResourceWeb Resource Concepts ..........................................................................................1
Chapter 2 Getting StartedWeb Resource Versions............................................................................................3
Demonstration Version ......................................................................................3Full Version........................................................................................................3
System Requirements ...............................................................................................4Minimum System Requirements........................................................................4Recommended System Requirements ..............................................................5
Preparing your System..............................................................................................8Configure your Hardware...................................................................................8Configure your System Software. ......................................................................8Install ASP.NET on Windows Server 2003........................................................8Configure your Browser .....................................................................................8
Installing Web Resource ...........................................................................................9Installing Over a Previous Version.....................................................................9Installing the Demonstration Version ...............................................................10Installing the Full Version.................................................................................15
Logging In for the First Time ...................................................................................20
Chapter 3 Using Web ResourceLogging In................................................................................................................23Calendar View.........................................................................................................24
Navigating the Calendars ................................................................................24Viewing Calendars...........................................................................................26
iv Contents
• • • •••
Administration..........................................................................................................29Adding Permission Types ................................................................................29Viewing Permission Types...............................................................................31Modifying System Preferences ........................................................................32Adding Categories ...........................................................................................34Viewing Categories..........................................................................................36Adding a License Key ......................................................................................37
Resources ...............................................................................................................38Adding Resources ...........................................................................................38Viewing Resources ..........................................................................................42
Projects ...................................................................................................................43Adding Projects................................................................................................43Viewing Projects ..............................................................................................48Copying Projects..............................................................................................49
Skills ........................................................................................................................50Adding Skills ....................................................................................................50Viewing Skills...................................................................................................51
Time Off...................................................................................................................52Adding Time Off Types ....................................................................................52Viewing Time Off Types...................................................................................53Booking Your Personal Time Off .....................................................................54Viewing Personal Time Off ..............................................................................55Booking a User’s Time Off...............................................................................56Viewing a User’s Time Off ...............................................................................57
Reports....................................................................................................................58Viewing Reports...............................................................................................58
Chapter 4 Using the Web TimeSheet IntegratorRunning the Integrator.............................................................................................67
Running the Integrator from your Desktop.......................................................67Transferring Resources ...................................................................................68Running the Integrator from the Command Line .............................................69Scheduling the Web TimeSheet Integrator......................................................71

1 • • • •••
Chapter 1
• • • • • • About Web Resource
Web Resource from Replicon, a web based resource management application, is designed to help you with resource tracking, skills management, and availability planning. It lets you define your resources, allocate them to projects, then view the results either on screen or in printed reports.
When defining your resources, you can associate them with custom defined skills and skill levels. You can allocate resources to projects when defining the project, or you can simply add placeholders in the project and add the resources later. When your schedules are complete, you can use the calendar views or the pre-defined reports to gain visibility into resource availability and utilization, and project staffing.
Web Resource ConceptsThe following is a list of concepts and terminology used in Web Resource.
• BookableThis is the ability of a resource to be booked on a project.
• Calendar viewThe calendar views allow you to view status in two different ways; by resources or by projects.
• Default dataWeb Resource includes a number of default data (this is different from the sample data available with the Demonstration Version). This default data includes definitions for permissions and for time off types.
• PermissionsPermission are rights that are given to users. These define the ability of a user to perform specified administrative and other tasks, including the ability to view, edit, add or remove specified information categories.

2 Chapter 1
• • • •••
• Permission TypesPermission types are named sets of permissions that can be modified by users as required.
• ProjectA project is a work activity that has a time duration with a start date and an end date, and a unique name. Resources can be allocated to a project.
• Project PlaceholderWhen creating a project, if you do not have the ability to identify named resources to allocate to any part of the project, you can insert placeholders. For example, you can insert a placeholder called Contractor for part or all of the project. When you have identified the actual resource, you can edit the project and replace the placeholder with the named resource.
• ReportsIn order to make it easier to print information from Web Resource, a number of standard reports are available.
• ResourcesResources are a category of users that can be allocated to projects. Resources have a name, a user name, an email address and a password, and have associated skills.
• Resource allocationResource allocation is the process of adding resources to projects.
• Sample dataSample data is available as an option with the Demonstration Version installation. This includes resources, projects and skills. This sample data makes it easier for you to evaluate Web Resource, and is typically removed before customer specific information is entered.
• SkillsSkills are job related abilities possessed by resources. Skills have unique names and can be associated with skill levels.
• Skill LevelsSkill levels can be defined as ability or seniority quantifiers that help distinguish resources with similar skills. For example, you may define a skill called Electrical Engineer, and then define a number of skill levels for this skill ranging from Junior through Intermediate to Senior Electrical Engineer.
• Time OffTime off can be defined as any time a resource is not available to be booked on a project. For example, vacation, statutory holidays, training, and similar out-of-office activities.
3 • • • •••
Chapter 2
• • • • • • Getting Started
This chapter explains how to install Web Resource and log in for the first time.
Web Resource VersionsWeb Resource is available from Replicon in the following versions:
Demonstration VersionThe demonstration version is designed to let you to evaluate the application using an easy-to-install procedure on a minimum hardware configuration (see the hardware requirements section that follows). This version has the following features:
• It does not require a pre-installed web server nor database• It is limited to 10 users• It has a 14 day time limited license• It includes sample data to make your evaluation easier• You can migrate any data to the full version later if you require• If you choose to migrate to the full version after you have evaluated the
demonstration version, you must purchase and install the software for the full version.
Full VersionThe full version has the following features:
• It requires a database to be pre-installed• It requires Internet Information Services (IIS) to be pre-installed• It supports a larger number of users• There is no sample data.

4 Chapter 2
• • • •••
System RequirementsDepending on the version you are planning to install, your system must meet the following hardware and software specifications.
Minimum System RequirementsApplication/Database Server• Hardware requirements:
• PC with P500 cpu or equivalent• 512MB memory• 50MB available disk space
• Operating system requirements - one of the following:• Microsoft Windows 2000 with SP1 or higher• Microsoft Windows Server 2003• Microsoft Windows XP Professional• Microsoft Windows XP Home - for the Demonstration Version only
Web Resource Client• Hardware requirements:
• PC with P500 cpu or equivalent• 512MB memory• 50MB available disk space
• Minimum screen resolution of 1024x768.
• Operating system requirements:• Microsoft Windows 98, or better
• Browser requirements• Internet Explorer 5.5 or higher• Mozilla Firefox 1.0
Note: Refer to the section Preparing your System for browser configuration information.
Getting Started 5 • • • •••
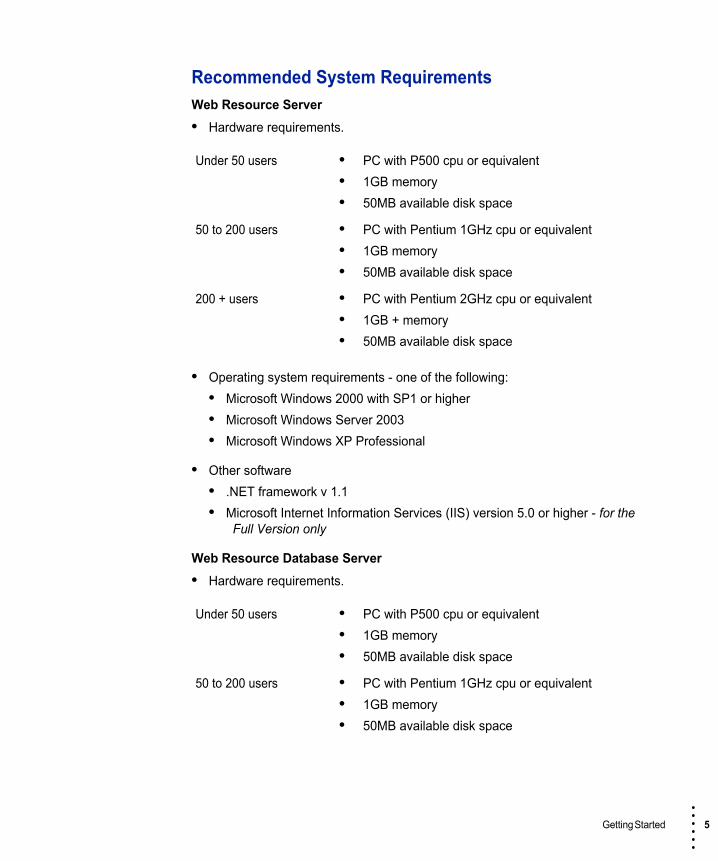
Recommended System RequirementsWeb Resource Server• Hardware requirements.
• Operating system requirements - one of the following:• Microsoft Windows 2000 with SP1 or higher• Microsoft Windows Server 2003• Microsoft Windows XP Professional
• Other software• .NET framework v 1.1• Microsoft Internet Information Services (IIS) version 5.0 or higher - for the
Full Version only
Web Resource Database Server• Hardware requirements.
Under 50 users • PC with P500 cpu or equivalent• 1GB memory• 50MB available disk space
50 to 200 users • PC with Pentium 1GHz cpu or equivalent• 1GB memory• 50MB available disk space
200 + users • PC with Pentium 2GHz cpu or equivalent• 1GB + memory• 50MB available disk space
Under 50 users • PC with P500 cpu or equivalent• 1GB memory• 50MB available disk space
50 to 200 users • PC with Pentium 1GHz cpu or equivalent• 1GB memory• 50MB available disk space

6 Chapter 2
• • • •••
• Minimum screen resolution of 1024x768.
• Operating system requirements - one of the following:• Microsoft Windows 2000 with SP1 or higher• Microsoft Windows 2003• Microsoft Windows XP Professional
• Other software• .NET framework v 1.1• Microsoft Internet Information Services (IIS) version 5.0 or higher - for the
Full Version only
• One of the following databases:• Microsoft Database Engine (MSDE)• Microsoft SQL Server 2000• Microsoft SQL Server 7 with SP3
Web Resource Client• Hardware requirements.
• PC with P500 cpu or equivalent• 512MB memory• 50MB available disk space
• Minimum screen resolution of 1024x768.
• Operating system requirements - one of the following:• Microsoft Windows 98/ME • Microsoft Windows NT 4.0 • Microsoft Windows 2000 • Microsoft Windows XP • Microsoft Windows Server 2003
• Browser requirements• Internet Explorer 5.5 or higher
200 + users • PC with Pentium 2GHz cpu or equivalent• 1GB + memory• 50MB available disk space

Getting Started 7 • • • •••
• Mozilla Firefox 1.0
Note: Refer to the section Preparing your System for browser configuration information.

8 Chapter 2
• • • •••
Preparing your SystemBefore you install Web Resource, make sure you have prepared your system as follows.
Configure your HardwareMake sure your hardware configuration meets the specifications required for the version of Web Resource you plan to install, as described in the System Requirements section.
Configure your System Software.Make sure your software configuration meets the specifications required for the version of Web Resource you plan to install, as described in the System Requirements section.
Install ASP.NET on Windows Server 2003If you plan to install Web Resource on Windows Server 2003, you must first have ASP.NET installed.
To install ASP.NET on a server running Windows Server 2003 using the Add or Remove Programs dialog box:
1. From the Start menu, point to Control Panel, then click Add or Remove Programs.
2. In the Add or Remove Programs dialog box, click Add/Remove Windows Components.
3. In the Components box in the Windows Components wizard, select the Application Server check box, then click Next.
4. When the Windows Components wizard has finished configuring Windows Server 2003, click Finish.
Configure your BrowserWeb Resource supports the following browsers:• Internet Explorer 5.5 or higher• Mozilla Firefox 1.0Configure your chosen browser as follows:• Disable pop-up blockers, both in your browser and in any browser plug-ins and
tool bars• If you are using Firefox, when asked if you want to save passwords for this site,
choose Never save. The save passwords feature inhibits some editing features in Web Resource.
• If you are using Internet Explorer, open up Tools>Internet Options>Advanced and select the checkbox for Print Background Colors and Images. This ensures the best results when printing.

Getting Started 9 • • • •••
Installing Web ResourceThe software for both the Demonstration version and the Full version of Web Resource are available from the Replicon web site.
You can either download the installation program to your local computer, or you can run the installation over the internet. Your choice will depend on where you are planning to install the application, and the speed of your connection.
Installing Over a Previous VersionIf you have a previous version of Web Resource installed, when you run the installation program, you will initially be asked to choose whether you want to update the installed version, or if you want to install a new version.
Select the installation option you want, and click Next to continue. Now go to one of the following sections:
• Installing the Demonstration Version• Installing the Full Version.

10 Chapter 2
• • • •••
Installing the Demonstration VersionYou can install the Demonstration version as follows:1. Run the installation program.
The Welcome screen appears. Click Next.
2. Read the license agreement. If you agree to the terms, click the I accept... radio button, and click Next.

Getting Started 11 • • • •••
3. Enter your e-mail address and the activation key you received from Replicon (the e-mail address must be the address associated with the activation key).Click Next.
4. Choose an installation location (or simply leave the default) and click Next.

12 Chapter 2
• • • •••
5. Web Resource can be installed with a sample database that contains information necessary to thoroughly evaluate the application. The sample database allows you to avoid time-consuming administrative tasks such as defining resources, setting up projects, and customizing your system configuration when you are evaluating the product.
Choose whether or not you want to install the sample data, then click Next.

Getting Started 13 • • • •••
6. You are ready to install the software. Click Install.
7. Wait for the software to be installed.
8. When the installation is complete, click Finish.

14 Chapter 2
• • • •••
9. The Web Resource software login screen will open in a browser. Go to the section called Logging In for the First Time, later in this document.
Getting Started 15 • • • •••
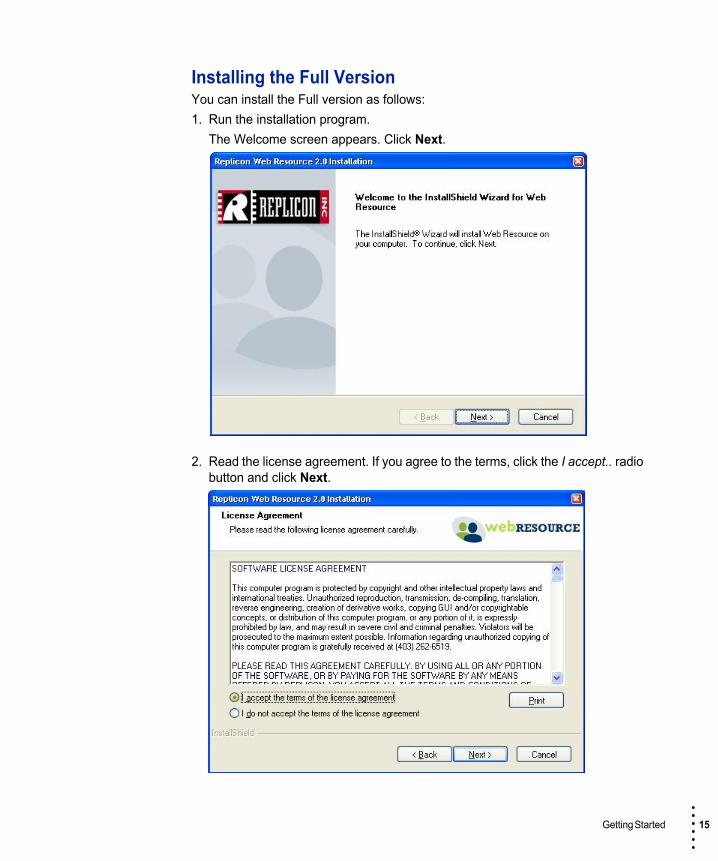
Installing the Full VersionYou can install the Full version as follows:1. Run the installation program.
The Welcome screen appears. Click Next.
2. Read the license agreement. If you agree to the terms, click the I accept.. radio button and click Next.

16 Chapter 2
• • • •••
3. Choose an installation location (or simply leave the default) and click Next.
4. Choose the web site where you want to install Web Resource, and choose your login authentication, and click Next.Note: With Built in Authentication, the login name and password are maintained by the application. With Integrated Windows Authentication, the system uses the user’s Windows credentials to log in.

Getting Started 17 • • • •••
5. Select the database you want to use, or click Use Existing Database to use a pre-installed database.
• If you select Default Database, the installation program will install the Microsoft SQL Server Desktop Engine (MSDE).
• If you select Microsoft SQL Server, you will be asked to specify the SQL server hosting the database, and an administrative login name and password for this database.Note: If you choose Use Windows Authentication with this selection, the installation program will use your Windows credentials to connect to the SQL server, and will create a database and database user. You will not receive any further prompts during this process.
• If you choose to use an existing database you will be asked to specify the database, as follows:- If the existing database you wish to use is a Microsoft Access database,
you will be asked to specify the source database.- If the existing database you wish to use is a Microsoft SQL database,
you will be asked to specify the SQL server, the database name, and the login name and password for this database.
When you are done, click Next.

18 Chapter 2
• • • •••
6. You are ready to install the software. Click Install.
7. Allow the program to install the software.

Getting Started 19 • • • •••
8. Review the System Configuration screen. If this is OK, click Next.
9. When the installation program is finished, click Finish.
10.The Web Resource software login screen will open in a browser. Go to the section called Logging In for the First Time, later in this document.

20 Chapter 2
• • • •••
Logging In for the First TimeWhen you have finished installing the software, the Log In screen will appear (if you chose to use Windows Authentication, you will be logged in using your Windows credentials.). This first screen may take a few seconds to appear.
1. You can log in for the first time as user admin with the password password. When you have entered your login name and password, click the Submit button.
If you installed the Demonstration version, you will be taken to the Web Resource Welcome screen. Go to Chapter 3, Using Web Resource, later in this document.
2. If you installed the Full version, the License Key Management screen appears.

Getting Started 21 • • • •••
3. You must now add a license before you can use the software.
You received a license file (called something like License.lic) as an attachment to an email from Replicon. Detach this file from the email.Save this file to the installation computer. To make it easier to find the file after saving it, you should save it to a suitable location such as the Web Resource ApplicationRoot directory on the installation computer. If you accepted the default installation location, this will be:c:\Program Files\Replicon Inc\Web Resource\ApplicationRoot
4. In the Find license file field, enter or browse to the path for the license key file and click Save. The License Key Management screen will be refreshed with your license details included.
5. You have successfully installed Web Resource. The Web Resource Welcome screen appears.
Go to Chapter 3, Using Web Resource, later in this document.

22 Chapter 2
• • • •••

23 • • • •••
Chapter 3
• • • • • • Using Web Resource
This is chapter describes how to use Web Resource.
Logging InTo login to Web Resource:
1. Start the application as follows:
• If you are running Web Resource on the server, click Start>Programs>Web Resource>Launch Web Resource.
• If you are running Web Resource on a client, open your browser and enter the URL for Web Resource:- for the demonstration version, this is http://<mysystem>:1888- for the full version, this is http://<mysystem>/resourcing
where <mysystem> is your computer name, DNS name, or IPaddress.
2. Enter your user name and password.
3. Click Submit.

24 Chapter 3
• • • •••
Calendar ViewTo drop down the calendar menu, point to Calendar in the main menu.
Navigating the CalendarsThe calendar views consist of the actual calendar, plus a number of controls that let you modify your view of the calendar. This section summarizes how you can control the calendar view.
Color LegendThe shading in the calendar, as shown in the legend at the top of the page, illustrates the availability status of resources.Filters
The Filters section allows you to limit the amount of information displayed in the calendar.
To expand the Filters section, click the + in the Filters box.
All calendars provide a Zoom display filter. This filter allows you to modify the calendar's granularity by selecting Day, Week, or Month.
Once you have selected the appropriate filters, click Apply to refresh the Calendar view.
View SettingsYou can modify the time period in view by using one or more of the time filters and controls, as follows.You can jump to a particular date by selecting the date from the calendar icon next to the Jump to field and clicking Go.You can jump to today's date by clicking Go to Today.You can move forward or backward in time, use the and navigation icons. The time period you move by when using these controls depends on the calendar View by granularity selected, as follows:
• If you have selected View by: Day, the icons move the timescale by 1
month, and the icons move the timescale by 1 week.

Using Web Resource 25 • • • •••
• If you have selected View by: Week, the icons move the timescale by 1
quarter, and the icons move the timescale by 1 month.
• If you have selected View by: Month, the icons move the timescale by
1 year, and the icons move the timescale by 1 quarter.
Note: As you modify the calendar granularity from Day through Week to Month, this change in granularity is illustrated by a graphic, similar to this , immediately below the date bar in the calendar.
Calendar WidthYou can expand and contract the time period in view using the The Calendar Width control. For example, if you click one of the bars toward the right end of the control, the display will increase the number of time periods being shown. Alternatively, clicking one of the bars toward the left end will display fewer time periods.
expand all/collapse allYou can expand or collapse the items in the calendar list (resources or projects) by clicking expand all or collapse all to the left of the calendar.
Calendar iconYou can open the calendar for a resource by clicking the calendar icon to the left of a resource name in the resource calendar list.
Resource or Project nameYou can open the appropriate Edit Resource or Edit Project page by clicking on a resource name or project name.
Project utilization/nameYou can open the appropriate Edit Project page by clicking the underlined project utilization percentage/name in the resource calendar view. If a project has multiple bookings this feature is not available.

26 Chapter 3
• • • •••
Viewing Calendars1. To view a specific calendar, point to Calendar in the main menu, and click one
of the following links:My CalendarMy Calendar provides a view of your project assignments.
My Allocation CalendarMy Allocation Calendar provides a view of your project assignments with time allocations that are color-coded based on whether your time has been under allocated or over allocated.
Resource CalendarThe Resource Calendar provides a view of the project assignments allocated to each resource.
The list can be filtered by Resource Enabled/Disabled, Booking availability, and/or Groups.

Using Web Resource 27 • • • •••
Allocation CalendarThe Allocation Calendar provides a view of the project assignments allocated to each resource with time allocations that are color-coded based on whether the resource's time has been under allocated or over allocated.
The list can be filtered by Resource Enabled/Disabled, Booking availability, and/or Groups.
Project Team CalendarThe Project team Calendar provides a view of the resources assigned to each project, with time allocations.
The list can be filtered by Project Enabled/Disabled, Project Type, Billable, and/or Project Status.

28 Chapter 3
• • • •••
Task Tree CalendarThe Task Tree Calendar provides a view of the resources assigned to each project and task.
The list can be filtered by Project Enabled/Disabled, Project Type, Billable, and/or Project Status.

Using Web Resource 29 • • • •••
AdministrationTo drop down the Administration menu, point to Administration in the main menu.
Adding Permission TypesA number of default permission types are included in Web Resource, as listed in the following table. You can either use these permission types, or you can create your own.
Default Permission Type Permissions Included
Admin All access and permissions
Project Manager Access: Login, My Calendar, Resource Calendar, Project Calendar, System Preferences, Resource Administration Reports, Resource Allocation Reports, Project Reports
Permissions: View Resources; View, Edit Add and Remove Projects; View Skills; View, Edit, Add and Remove Personal Time Off; View All Time Off
Resource Access: Login, My Calendar, My Assignments Report
Permissions: View, Edit, Add and Remove Personal Time Off
Supervisor Access: Login, My Calendar, Resource Calendar, Project Calendar, System Preferences, Resource Administration Reports, Resource Allocation Reports, Project Reports
Permissions: View and Edit Resources; View Projects; View Skills; View, Edit, Add and Remove Personal Time Off; View, Edit, Add and Remove All Time Off

30 Chapter 3
• • • •••
To add a permission type:
1. Point to Administration in the main menu and click Add permission type.
2. Enter a unique name in the Name field and a description in the Description field.
3. Check the boxes next to the selected actions you want to associate with this permission type.
4. Check the boxes next to the selected permissions you want to associate with this permission type.
5. When you are done, click the Save button, or click the Save & Add More button if you want to add another permission type. If you want to abort creating this permission type, click the Cancel button.

Using Web Resource 31 • • • •••
Viewing Permission TypesTo view permission types:
1. Point to Administration in the main menu and click List Permission Types.
2. To edit a permission type, click the icon next to the permission type you want to edit.
3. To delete a permission type, click the icon next to the permission type you want to delete.
4. To add a permsiion type from this screen, click Add and follow the instructions in the section called Adding Permission Types.

32 Chapter 3
• • • •••
Modifying System PreferencesThe system preferences determine the initial view for all users at login. Users can change these settings in the Calendar view, however the default settings selected and saved using the System Preferences screen will be re-applied the next time the user logs in.
To modify the default system settings:
1. Point to Administration in the main menu and click System Preferences.
2. Select the settings you require from the following options:
Option Description
Records per page Enter the required number of records you want to be displayed on each page. The recommended number is 10.
Calendar: Screen size You can control the total time period being displayed by using the Calendar Screen size setting. This setting acts in a similar fashion to a zoom control with six levels. If you choose level 1, the Calendar will show only one 'block' of time, depending on your choice in the Calendar View by setting. If you choose level 6, the Calendar view will show six 'blocks' of time.This control can be used to make sure you can display a time period that is compatible with your monitor resolution.
Calendar: View by When you are viewing the calendar, the display is organized in 'blocks' where each block represents either a week, a month or three months. You can choose to display one of these three options by selecting either Day, Week or Month.
Show weekends You can choose to show weekends or not by selecting Yes to show weekends, and No to hide weekends.
Percentage Allocation When you are viewing an allocation calendar, the bar colour indicates whether the resource is under allocated, on target, or over allocated. Use this field to set up the default limits for new users, which will be used to determine when a resource's time is under or over allocated.Target defines the target percentage.Tolerance is the amount above and below the target that determines when a resourceis over allocated or under allocated.

Using Web Resource 33 • • • •••
3. When you are done, click the Save button.
Allocation Calendar Colors You can change the colours used to indicate when a resource is under allocated, on target, or over allocated by clicking on the drop down menu next to each label. When you select a new color, the visual representation of that color will appear in the color box next to the drop down.
Web TimeSheet server address If you are integrating Web Resource with Web TimeSheet, you must enter the Web TimeSheet server address in this field. Contact your Web TimeSheet Administrator for this information.For more information on integration, refer to Chapter 4.
Hours per Day Set the default number of hours per day that will apply to all new resources. Hours per day will be used to determine the allocation percentage or allocated hours for each resource assigned to a project or task.
Resource Cost Per Hour Set the default cost per hour that will apply to all new resources. Cost per hour helps you forecast the cost of a project based on the allocated resources.
Placeholder Cost Per Hour Set the default cost per hour that will apply when you add a new placeholder to a project or task. This cost per hour helps you forecast the cost of a project before you have assigned named resources to the team.
Option Description

34 Chapter 3
• • • •••
Adding CategoriesCategories allow you to set up different types of groups for the purpose of organizing resources into meaningful collectives, such as departments or locations.
To add a new category:
1. Point to Administration in the main menu and click Add Category.
2. Under Define Category Details:
• In the Category Name field, enter a unique name for the category.• "In the Description field, enter any text that more clearly explains or defines
the category.3. When you are done, click the Save button, or click the Save & Add More button
if you want to add another category. If you want to abort the category, click the Cancel button.
4. If you clicked the Save button above, the category will be saved and a new page will appear allowing you to set up the groups associated with the category.
5. To add groups, click the Add button on the right hand side.
6. Under Define Group Details:
• In the Group Name field, enter a unique name for the group.• In the Description field, enter any text that more clearly explains or defines
the group.7. Under Add Resources:
• Select a user from the Resources drop down menu and click the Add button. Repeat this process for each new resource added to the group.
• To remove a resource, check the Remove check box.• When you are done, click the Save button, or click the Save & Add More
button if you want to add another group. If you want to abort the group, click the Cancel button.

Using Web Resource 35 • • • •••
Using the Advanced SearchYou can access the advanced search option by clicking To Advanced Search> on the right hand side of Resources.
To search for resources using Advanced Search, enter or select the necessary search criteria and click the Search button.
Note that you can search by full name or by specific letters using the Resource Name field. The search will return a list of all resources whose names (first or last) contain the specified letters.

36 Chapter 3
• • • •••
Viewing CategoriesTo view all available categories:
1. Point to Administration in the main men, then click List Categories..
2. To edit a category, click the icon next to the category you want to edit.
3. To delete a category, click the icon next to the category you want to delete.
4. To add a category from this screen, click Add and follow the instructions in the section called Adding Categories.

Using Web Resource 37 • • • •••
Adding a License FileTo add a license file:
1. Point to Administration in the main menu and click Licensing.
2. In the Find license file field, enter or browse to the path where the license file is located.
3. Click Save.
38 Chapter 3
• • • •••
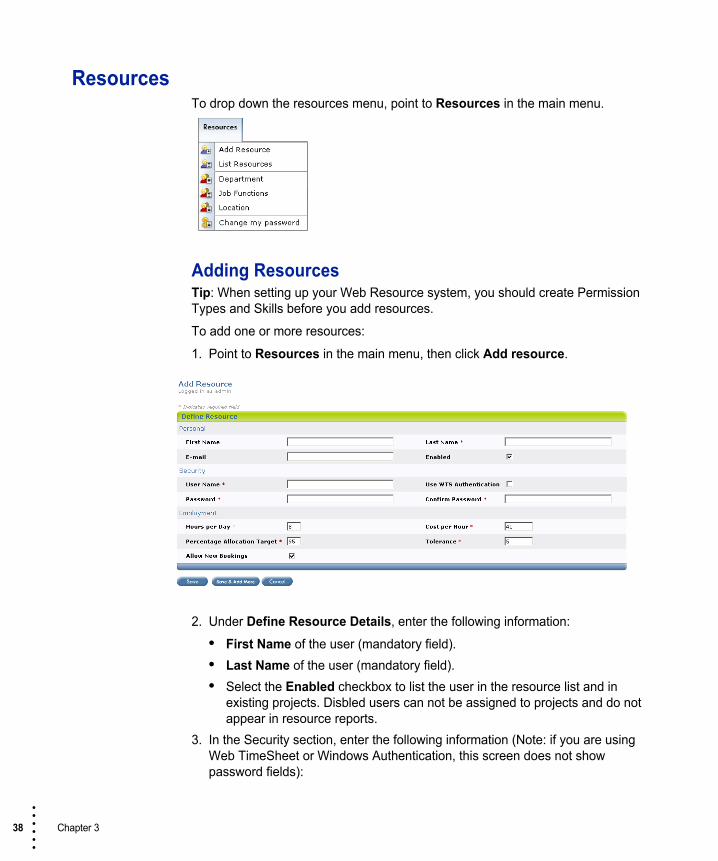
ResourcesTo drop down the resources menu, point to Resources in the main menu.
Adding ResourcesTip: When setting up your Web Resource system, you should create Permission Types and Skills before you add resources.
To add one or more resources:
1. Point to Resources in the main menu, then click Add resource.
2. Under Define Resource Details, enter the following information:
• First Name of the user (mandatory field).• Last Name of the user (mandatory field).• Select the Enabled checkbox to list the user in the resource list and in
existing projects. Disbled users can not be assigned to projects and do not appear in resource reports.
3. In the Security section, enter the following information (Note: if you are using Web TimeSheet or Windows Authentication, this screen does not show password fields):

Using Web Resource 39 • • • •••
• A unique User Name (mandatory field).• Select the Use WTS Authentication if you want the user to use Web
TimeSheet authentication in an integrated environment. • The user's Password (mandatory field), and confirm the password.
4. In the Employment section, enter the following information:
• The number of Hours Per Day the user works.• The user's Cost Per Hour.• The Percentage Allocation Target, which determines when a user's time is
considered on target (neither under allocated, nor over allocated).• The Tolerance, which determines how far above or below the Percentage
Allocation Target a user can be allocated before the user’s time is considered under allocated or over allocated.
• Select the Allow Bookings checkbox if the resource can be assigned to projects.
5. When you are done, click the Save button, or click the Save & Add More button if you want to add another user. If you want to abort adding this user, click the Cancel button.
6. If you clicked the Save button above, the user will be added and a new page will appear allowing you to add more advanced user information, including permissions, groups, and skills.
7. To add permission types, click the Edit button for Security Access and check the appropriate permission types for the user.

40 Chapter 3
• • • •••
Click the Save button to save the permission types and return to the previous screen.
8. To add the resource to existing groups, click the Edit button for Groups and check the appropriate groups (organized by category) for the user.
Click the Save button to save the groups and return to the previous screen.9. To add skills, click the Edit button for Skills and select the appropriate skills and
skill level for the user.
Click the Add button to add the skill to the list. To remove a skill, check the Remove checkbox.

Using Web Resource 41 • • • •••
Click the Save button to save the skills and return to the previous screen.

42 Chapter 3
• • • •••
Viewing ResourcesTo view all the available resources:
1. Point to Resources in the menu bar, and then click List resources.
2. To edit a resource, click the icon next to the resource you want to edit.
3. To delete a resource, click the icon next to the resource you want to delete.
4. To add a resource from this screen, click Add and follow the instructions in the section called Adding Resources.

Using Web Resource 43 • • • •••
ProjectsTo drop down the projects menu, point to Projects in the main menu.
Adding ProjectsTo add a new project:
1. Point to Projects in the main menu and click Add Project.
2. Under Define Project:• In the Project Name field, enter a unique name for the project.• In the first Duration field, select a start date by clicking the associated
calendar icon and selecting a date.• In the second Duration field, select an end date by clicking the associated
calendar icon and selecting a date.• In the Description field, enter any text that more clearly explains or defines
the project.• Check the Enabled check box to make the project available for resource
management.• Select the appropriate Project Type from the drop down menu.• Select the appropriate Billable option from the drop down menu.• Select the appropriate Project Status from the drop down menu.

44 Chapter 3
• • • •••
3. When you are done, click the Save button, or click the Save & Add More button if you want to add another project. If you want to abort the project, click the Cancel button.
4. If you clicked the Save button above, the project will be added and a new page will appear allowing you to set up more advanced project information, including calendar information, tasks, task assignments, and project team.
CalendarThe Calendar tab provides a view of the resources and time allocations for the project and its associated tasks. Use this tab to get the "big picture" for the project.
The Calendar tab uses the same controls as the calendars accessed from the Calendar menu. Refer to the section entitled Navigating the Calendars for further information about these controls.
Task TreeThe Task Tree tab is used to create and modify task names and durations within the project tree structure. The number of tasks and sub tasks is unlimited.

Using Web Resource 45 • • • •••
To add tasks:
1. Click the Task Tree tab. Note that the project name is already highlighted at the top of the left frame.
2. In the right frame, enter a unique Task Name for each task.
3. Select the Duration start and end dates for each task by clicking the associated calendar icon and selecting a date. Task durations are limited to the duration of the project.
4. Use the Move Up/Move Down buttons to change the order of the tasks.
5. Click the Apply button to add the new tasks. Note that the new tasks now appear in the left frame, under the project name.
6. To add sub tasks, click the name of the parent task in the left frame. Then follow the steps for adding tasks above.
Task AssignmentsThe Task Assignments tab is used to assign resources to the project and its associated tasks. You can assign named resources or placeholders, depending on whether you know who will be working on the project or task.

46 Chapter 3
• • • •••
Adding Resources1. Click the Task Assignments tab. Note that the project name is already
highlighted at the top of the left frame.
2. In the right frame, click the Edit button for Resources.
3. Select a user from the Resources drop down menu and click the Add button.
4. Once you have added a resource, specify whether you want to automatically calculate the duration, percent allocation, or total hours for the assignment. Calculations are based on the user's hours per day.
5. Enter the remaining fields (i.e., the fields that are not chosen for automatic calculation) and click the Calculate button.
6. Repeat this process for each new resource added to the project.

Using Web Resource 47 • • • •••
To add resource assignments to a task or sub task, click the task name in the left frame first, and then follow the instructions above.
Click the Show List button to return to the list of resources and placeholders for the selected task.
Using the Advanced SearchYou can access the advanced search option by clicking To Advanced Search> on the right hand side of Assignments.
To search for resources using Advanced Search, enter or select the necessary search criteria and click the Search button.
Note that you can search by full name or by specific letters using the Resource Name field. The search will return a list of all resources whose names (first or last) contain the specified letters.
Adding Placeholders1. Click the Task Assignments tab. Note that the project name is already
highlighted at the top of the left frame.
2. In the right frame, click the Edit button next to Placeholders.
3. Enter a Placeholder Name and click the Add button.
4. Repeat this process for each new placeholder added to the project.
To add placeholders to a task or sub task, click the task name in the left frame first, and then follow the instructions above.
Click the Show List button to return to the list of resources and placeholders for the selected task.

48 Chapter 3
• • • •••
Viewing ProjectsTo view all available projects:
1. Point to Projects in the main menu, then click List Projects.
2. To filter the list of projects, expand the Filters box by clicking the +. You can filter the list by Project Enabled/Disabled, Project Type, Billable, and/or Project Status. Click the Apply button to apply the filters to the project list.
3. To edit a project, click the icon next to the project you want to edit.
4. To delete a project, click the icon next to the project you want to delete.
5. To add a project from this screen, click Add and follow the instructions in the section called Adding Projects.

Using Web Resource 49 • • • •••
Copying ProjectsYou can copy existing projects to create new projects with the same (or similar) project attributes.
To copy projects:
1. Point to Projects in the main menu and click Copy Project.
2. Click the Copy From drop down menu and select the project you want to copy.
3. In the New Project Name field, enter a unique name for the new project.
4. Check the Enabled check box to make the new project available for resource management.
5. When you are done, click the Save button, or click the Save & Add More button if you want to add another project. If you want to abort the project, click the Cancel button.
If you clicked the Save button above, the project will be copied and a new page will appear allowing you to set up more advanced project information for the new project, including calendar information, tasks, task assignments, and project team.
Refer to the section called Adding Projects for further instructions on setting up the advanced project information.

50 Chapter 3
• • • •••
SkillsTo drop down the skills menu, point to Skills in the main menu.
Adding SkillsTo add a new skill:
1. Point to Skills in the main menu, then click Add skill.
2. Under Define Skill in the Skill Name field, enter a unique name for the new skill.
3. Under Skill Levels select a skill level from the drop-down menu, then click the Add button.
4. If the skill levels for the new skill are the same or similar to an existing skill, you can copy the skill levels from the existing skill. To copy skill levels, select a skill from the Copy Levels From drop down menu, then click the Add button.
5. When you are done, click the Save button, or click the Save & Add More button if you want to add another skill. If you want to abort adding this skill, click the Cancel button.

Using Web Resource 51 • • • •••
Viewing SkillsTo view a list of skills:
1. Point to Skills in the main menu, and then click List Skills.
2. To edit a skill, click the icon next to the skill you want to edit.
3. To delete a skill, click the icon next to the skill you want to delete.
4. To add a new skill, click Add and follow the instructions in the section called Adding Skills.

52 Chapter 3
• • • •••
Time OffTo drop down the time off menu, point to Time off in the main menu.
Adding Time Off TypesTo add a time off type:
1. Point to Time off in the main menu, then click Add time off type.
2. Under Define Time Off Type:
• In the Name field, enter a unique name for the time off type.• "In the Description field, enter any text that more clearly explains or defines
the time off type.3. When you are done click the Save button, or click the Save & Add More button
if you want to add another time off type. If you want to abort adding this time off type, click the Cancel button.

Using Web Resource 53 • • • •••
Viewing Time Off TypesTo view a time off type:
1. Point to Time off in the main menu, then click List time off types.
2. To edit a time off type, click the icon next to the time off type you want to edit.
3. To delete a time off type, click the icon next to the time off type you want to delete.
4. To add a new time off type, click Add and follow the instructions in the section called Adding Time Off Types.

54 Chapter 3
• • • •••
Booking Your Personal Time Off To book your personal time off:
1. Point to Time off in the main menu, then click Book My Time Off.
2. Under Book Time Off: • From the Time Off drop-down menu, select the time off type• In the first Duration field, click the associated calendar icon and select the
start date• In the second Duration field, click the associated calendar icon and select
the finish date3. When you are done click the Save button, or click the Save & Add More button
if you want to book more time off. If you want to abort booking time off, click the Cancel button.

Using Web Resource 55 • • • •••
Viewing Personal Time Off To view your booked time off:
1. Point to Time off in the main menu, and click View My Time Off.
2. To edit a time off booking, click the icon next to the booking you want to edit.
3. To delete a time off booking, click the icon next to the booking you want to delete.
4. To add a new time off booking, click Add and follow the instructions in the section called Booking Your Personal Time Off.

56 Chapter 3
• • • •••
Booking a User’s Time Off To book time off for any user:
1. Point to Time off in the main menu, then click Book User Time Off.
2. Under Book Time Off: • Enter the user name in the User Name field• From the Time Off drop-down menu, select the time off type• In the first Duration field, click the associated calendar icon and select the
start date• In the second Duration field, click the associated calendar icon and select
the finish date3. When you are done click the Save button, or click the Save & Add More button
if you want to book more time off. If you want to abort booking time off, click the Cancel button.

Using Web Resource 57 • • • •••
Viewing a User’s Time Off To view all the booked time off:
1. Point to Time off in the main menu, and click View Uuser Time Off.
2. To edit a time off booking, click the icon next to the booking you want to edit.
3. To delete a time off booking, click the icon next to the booking you want to delete.
4. To add a new time off booking, click Add and follow the instructions in the section called Booking a User’s Time Off.

58 Chapter 3
• • • •••
ReportsTo drop down the reports menu, point to Reports in the main menu.
Viewing ReportsTo view a report, point to Reports in the main menu, and click one of the following reports:
My AssignmentsThe My Assignments report provides a list of all the project and task assignments for the user currently logged in. The report can be filtered by date range.

Using Web Resource 59 • • • •••
Resource ListThe Resource List report provides a list of existing resources and their basic user information. Basic user information includes attributes that define the resource from a Human Resources perspective, such as email address, permissions, etc.The report can be filtered by Resource Enabled/Disabled, Booking status, and/or Groups.

60 Chapter 3
• • • •••
Resource DetailsThe Resource Details report provides a list of existing resources and their advanced user information. Advanced user information includes attributes that directly affect the projects and tasks to which the resources are assigned, such as cost, skills, etc. The report can be filtered by The report can be filtered by Resource Enabled/Disabled, Booking status, and/or Groups.

Using Web Resource 61 • • • •••
Resource AssignmentsThe Resource Assignments report provides an overview of the assignments and allocations for each resource. The report can be filtered by Project Type, Billable, Project Status, Date Range, and/or Groups.Report data can be grouped by category.

62 Chapter 3
• • • •••
Resource WorkloadThe Resource Workload report provides an overview of resource allocations by month. Allocations can be shown as either percentages or hours. The report can be filtered by Project Type, Billable, Project Status, Date Range, and/or Groups.Report data can be grouped by category.

Using Web Resource 63 • • • •••
Resource ConflictsThe Resource Conflicts report provides a list of resources that have been over allocated for a specific time period. The report can be filtered by Date Range and/or Groups, with the option to include time off hours.Report data can be grouped by category.

64 Chapter 3
• • • •••
Project ListThe Project List report provides a list of existing projects and their basic project information. Basic project information includes attributes that define a project at its topmost level, such as project type, project status, etc. The report can be filtered by Project Enabled/Disabled, Project Type, Billable, Project Status, Date Range, and/or Project.Report data can be sorted by Enabled, Type, Status, or Billable.

Using Web Resource 65 • • • •••
Project DetailsThe Project Details report provides a list of existing projects and their advanced project information. Advanced project information includes attributes that affect how a project is managed, such as task structure, assignments, etc. The report can be filtered by Project Enabled/Disabled, Allocations, Project Type, Billable, Project Status, Date Range, and/or Project.

66 Chapter 3
• • • •••
Project WorkloadThe Project Workload report provides an overview of the hours allocated to each project by month. The report can be filtered by Project Enabled/Disabled, Allocations, Project Type, Billable, Project Status, Date Range, and/or Project.
Once you have selected a report, choose the appropriate filters and click the Generate button.
To export a report to Microsoft Excel, click the Excel button.
To print a report, click the Print button.

67 • • • •••
Chapter 4
• • • • • • Using the Web TimeSheet Integrator
This chapter describes how you can transfer resource and project data from Web TimeSheet to Web Resource using the Web TimeSheet Integrator. The integrator is a stand alone application which is installed at the same time as Web Resource.
Running the IntegratorYou can run the integrator in the following ways:
• From your desktop Start menu.• From the command line.
Running the Integrator from your DesktopTo run the Web TimeSheet Integrator from your computer desktop click Start>Programs>Replicon Web Resource>Web TimeSheet Integrator. The integrator will open.

68 Chapter 4
• • • •••
Transferring ResourcesThe following limitations apply when transferring resource and project data from Web TimeSheet to Web Resource:
When transferring resources:
• Web TimeSheet login authentication is automatically enabled for transferred resources. To remove this, you must edit the resource information in Web Resource after the transfer.
• If the user already exists in Web Resource (that is, if the user names match), all Web TimeSheet fields (first name, last name, e-mail) will overwrite existing data.
• Permissions are set only once, and are taken from the selections chosen in the integrator during the initial transfer of new users.
• If the required fields for Web Resource are not completed in the Web TimeSheet data (for example, no first or last name) the resource will not be transferred.
• If the number of resources being transferred exceeds the Web Resource license count, the additional users will be transferred but will be disabled.
When transferring projects:
• If the required fields for Web Resource are not completed in the Web TimeSheet data (for example, no start or end date) the project will not be transferred.

Using the Web TimeSheet Integrator 69 • • • •••
• Projects in Web TimeSheet typical contain the project name, start and end dates, and users assigned to the project. During transfers, all users are set up in Web Resource with the same start and end dates. Changes made to user information in Web Resource for a project are not overwritten by subsequent updates, and new users added to the project in Web TimeSheet are merged with existing users.
To transfer resource data using the integrator:
1. Launch the integrator.
2. In the Web TimeSheet Connection Properties section, enter the following:
• In the URL field, enter your Web TimeSheet server address. You can find this address in the systeminfo.txt file located in the Web TimeSheet root installation directory on your local computer.
• In the Login Name field, enter your Web TimeSheet login name.• In the Password field, enter your Web TimeSheet password.
3. Click the Refresh Permission Types button to refresh the list of permissions available in Web Resource.
4. Select the permission(s) from the Permissions for New Resources box that has the permissions you want to apply to the transferred users. Users transferred from Web TimeSheet are transferred with the permissions of the role(s) you select.
5. If you do not want to transfer the users’ project assignments from Web TimeSheet, uncheck the Transfer Project Assignments check box.
6. Click the Integrate to Web Resource button to transfer user and project information from Web TimeSheet to Web Resource. All of the available users and projects in Web TimeSheet are transferred to Web Resource.
The integrator dialog box displays messages listing the users and projects that have been transferred successfully, and provides information on errors encountered when a transfer is unsuccessful.
Running the Integrator from the Command LineYou can set up the integrator to run from the command line, as follows:
1. You must run the installer from the desktop at least once before you can run it from the command line. To launch the installer, click Start>Programs>Replicon Web Resource>Web TimeSheet Integrator.
2. Configure the integrator to transfer data as described in the Transferring Resources section.

70 Chapter 4
• • • •••
3. Open the file Program Files\Replicon Inc\Web Resource\ApplicationRoot\bin\Integration.config file in a text editor. The contents of this file should look similar to this:<?xml version="1.0"?><configuration> <guiSettings> <wtsConnection uri="http://anthony2000:81" loginName="admin" /> <selectedPermissionType name="Resource" /> <selectedPermissionType name="Project Manager" /> <selectedPermissionType name="Admin" /> <selectedPermissionType name="HR Admin" /> <selectedPermissionType name="Supervisor" /> </guiSettings> <consoleSettings> <wtsConnection uri="" loginName="" /></consoleSettings></configuration>

Using the Web TimeSheet Integrator 71 • • • •••
4. Edit this file to add setting information from the <gui settings> section into the <console setting> section, so that it looks similar to this:<?xml version="1.0"?><configuration> <guiSettings> <wtsConnection uri="http://anthony2000:81" loginName="admin" /> <selectedPermissionType name="Resource" /> <selectedPermissionType name="Project Manager" /> <selectedPermissionType name="Admin" /> <selectedPermissionType name="HR Admin" /> <selectedPermissionType name="Supervisor" /> </guiSettings> <consoleSettings><wtsConnection uri="http://anthony2000:81" loginName="admin" /> <selectedPermissionType name="Resource" /> <selectedPermissionType name="Project Manager" /> <selectedPermissionType name="Admin" /> <selectedPermissionType name="HR Admin" /> <selectedPermissionType name="Supervisor" /></consoleSettings></configuration>
5. Save this file.
6. Open the command prompt:
• Click Start>Run• Enter cmd in the Open field• Click OKThe command window will open.
7. At the command prompt, navigate to the Web Resource bin directory, for example:C:\Program Files\Replicon Inc\Web Resource\ApplicationRoot\bin
8. Run the integrator executable by entering the following at the command prompt:Replicon.Helper.WTSIntegrationCMD.exe password
where: Replicon.Helper.WTSIntegrationCMD.exe is the name of the integrator executable, andpassword is your Web TimeSheet password

72 Chapter 4
• • • •••
9. The integrator will run and display messages in the command window.
If you want to schedule the integrator to run at specified intervals, you can write a batch script after you have completed the command line setup, and then use the Windows task scheduler (Start>Control Panel>Scheduled Tasks) to run the program.
Scheduling the Web TimeSheet IntegratorYou can schedule the command line version of the integrator to run at specified intervals, as follows:
1. Configure the command line executable as described previously.
2. Using a text editor, for example Notepad, create a batch script that calls the integrator executable. A sample batch file is shown below.
C:cd \"Program Files\Replicon Inc\Web Resource_2_3\ApplicationRoot\bin"Replicon.Helper.WTSIntegrationCMD.exe password
3. Save this file. Give the file a suitable name, for example integrator.bat, and save it to a suitable location where it can be referenced later.
4. Open the Windows task scheduler, click Start>Control Panel>Scheduled Tasks.
5. Click Add Scheduled Task.
6. Follow the instructions in the wizard and schedule the batch file, integrator.bat, to run at intervals of your choice.
The integrator will now run at the intervals you specified in the scheduler, using the parameters you configured. If you wish to change the parameters, you can do this as described in the section called Running the Integrator from the Command Line. Making parameter changes should not affect the schedule nor the batch file so long as the files names remain the same.