Embed Size (px)
Citation preview

www.eaton.com/lightingsystems 1
WaveLinx Mobile
WaveLinx Mobile Quick Start Guide
General information
WaveLinx Mobile is a unique mobile application to programming and use of the WaveLinx Wireless Connected Lighting system. WaveLinx Mobile eliminates the cost and complexity of programming advanced wireless lighting control systems by using Eaton’s patent pending Automatic Code Commissioning functionality. The purpose of this document is to guide the user on how to use Automatic Code Commissioning as well as what it provides to guarantee code conformance. This document will also explain the icons, terminology and provide a guide for navigation of WaveLinx Mobile screens and their functions.
Programming Steps
1. Create Areas 2. Drag devices into Areas and Zones
Automatic Code Commissioning gives you • Automatic ON to 50% light level • Automatic ON of plug load • Individual fixture daylight zones to 500 lux • Automatic OFF of lights & plug loads after 20 minutes of vacancy • Wallstation scene control
• Dominant button is 50% light level • Other buttons are default scene values
• Demand Response ready
Access Area list
Area name
Wireless Area
Controller(WAC) name
Area power measurement
Area raise/lower
Favorite Area
Access Area Scenes
Access Area menu
Area zones
Devices included in Area
All Available devices on WAC
Access WaveLinx Mobile menu

www.eaton.com/lightingsystems 2
Main screen icon list • Access WaveLinx Mobile menu
o Clicking this icon brings you to the WaveLinx Mobile menu which includes: o Version information and End User license agreement o Real-time or Demo mode selection o Find-devices, schedules, and WAC screen access
• Access Area list o Clicking the arrow displays a list of all the created areas on the currently active
Wireless Area Controller (WAC). Each WAC includes at least one default area where all WaveLinx devices are initially stored after construction grouping has occurred.
• Area name o Currently selected area. Double tap to edit area name and area fade times.
• Wireless Area Controller (WAC) name o Currently selected Wireless Area Controller (WAC)
• Area power measurement o Aggregated power measurement of all wireless devices within the selected area.
• Favorite area o Selecting favorite area star icon marks this area as a favorite. Each time the
application opens for this user it will open to this area. • Access Area scenes
o Navigates to the selected area scenes to be triggered or edited.
• Access Area menu o Navigates to the selected area occupancy sets, daylight sets, and demand
response settings. • Area raise/lower
o Raises/lowers all zones in the selected area. • Area zones
o Navigates to the selected area zones page to display and control wireless devices in that zone.
• Devices in area o A list (scrolls left/right) of all devices that have been added to the area. Includes
controllable devices and input devices. • All Available devices on WAC
o A list (scrolls left/right) of all devices that have been added to the Wireless Area Controller (WAC) but have not been assigned to an area.

www.eaton.com/lightingsystems 3
Area Scenes screen Each area supports several scenes that can be triggered or edited.
Area Menu screen Each area supports the creation, display and modification of Occupancy Sets, Daylight Sets and Demand Response values.
Scene selection button
Scene edit arrow
Area name
navigation
Area Occupancy Sets Area name
navigation
Area Daylight Sets
Area Demand Response
www.eaton.com/lightingsystems 4
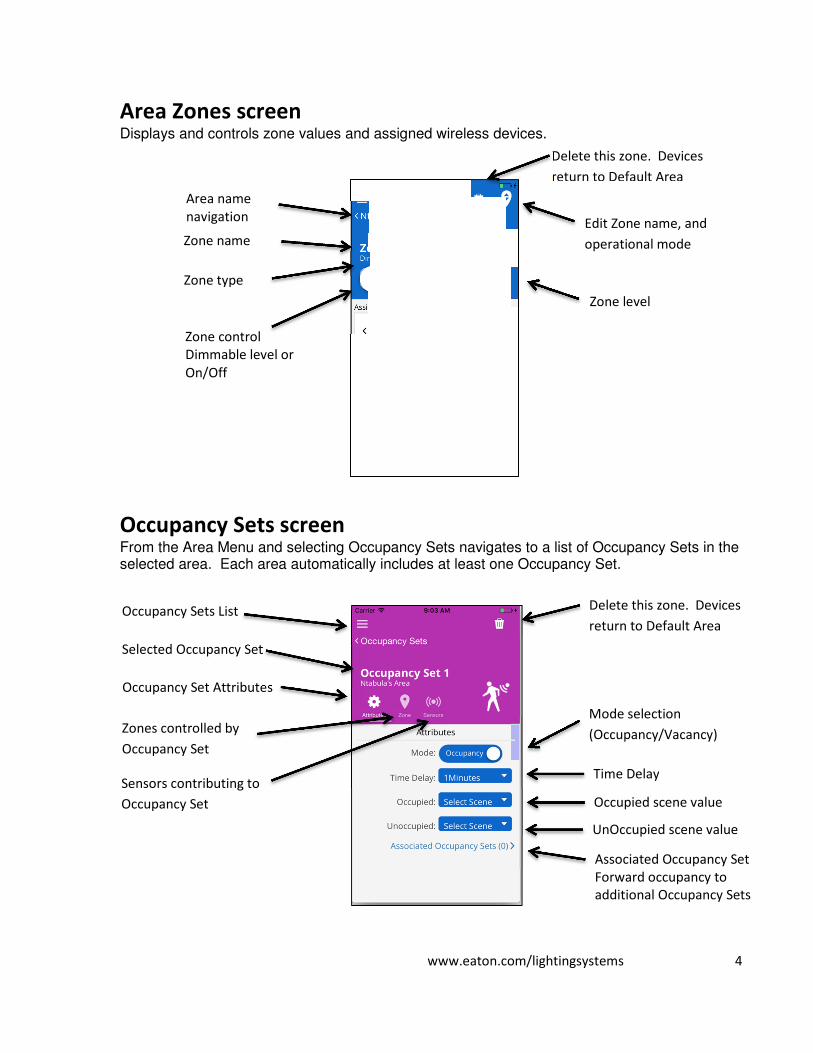
Area Zones screen Displays and controls zone values and assigned wireless devices.
Occupancy Sets screen From the Area Menu and selecting Occupancy Sets navigates to a list of Occupancy Sets in the selected area. Each area automatically includes at least one Occupancy Set.
Delete this zone. Devices
return to Default Area
Area name
navigation
Zone name
Zone type
Edit Zone name, and
operational mode
Zone level
Zone control
Dimmable level or
On/Off
Delete this zone. Devices
return to Default Area Occupancy Sets List
Selected Occupancy Set
Mode selection
(Occupancy/Vacancy)
Time Delay
Occupied scene value
UnOccupied scene value
Associated Occupancy Set
Forward occupancy to
additional Occupancy Sets
Occupancy Set Attributes
Zones controlled by
Occupancy Set
Sensors contributing to
Occupancy Set

www.eaton.com/lightingsystems 5
Daylight Sets screen From the Area Menu and selecting Daylight Sets navigates to a list of Daylight Sets in the selected area. Each area automatically includes at least one Daylight Set for each luminaire with an integrated sensor. Each Daylight Set uses closed loop daylighting and includes one luminaire and one contributing sensor.
Demand Response screen From the Area Menu and selecting Demand Response navigates to the Demand Response page.
Toggle display footcandles or
lux
Daylight Sets List
Selected Daylight Set
Daylight Set Attributes
Output controlled by
Daylight Set
Sensor contributing to
Daylight Set
Daylight reading at sensor
(ceiling)
Enter daylight reading at work
surface to maintain
Adjust output light level Calibrate output light level to
Work surface value and
sensor reading
Returns to Area Menu
Adjust the Demand
Response reduction to be
implemented on this area. List of zones affected by
this Demand Response
reduction.

www.eaton.com/lightingsystems 6
Schedules screen From the WaveLinx Mobile Menu schedules may be selected that are active on the selected Wireless Area Controller. Four events are available each with a time and list of multiple actions that can be associated to different areas including Occupied and UnOccupied settings for Partial On/Partial Off.
Schedules List
Schedules Description
Schedules Time Enable/Disable Event
Add actions to this Event
Action Number
(Up to 91 actions per
schedule event) Delete Action
Action settings
(Define UnOccupied
action per area )


![ggh]h[x^` lgh]h^hrdhevgh]h143.dou.spb.ru/attachments/article/110/Samoobsledovanie_16-17.pdf · ggh]h[x^` lgh]h^hrdhevgh]h ... 2](https://img.dokumen.tips/doc/110x75/5ec407e43728b22f01558437/gghhx-lghhhrdhevghh143douspbruattachmentsarticle110samoobsledovanie16-17pdf.jpg)


