Embed Size (px)
Citation preview
Plug-in Reference
Cristina Bachmann, Heiko Bischoff, Lillie Harris, Christina Kaboth, Insa Mingers, Matthias Obrecht, Sabine Pfeifer, Benjamin Schütte, Marita Sladek
This PDF provides improved access for vision-impaired users. Please note that due to the complexity and number of images in this document, it is not possible to include text descriptions of images.
The information in this document is subject to change without notice and does not represent a commitment on the part of Steinberg Media Technologies GmbH. The software described by this document is subject to a License Agreement and may not be copied to other media except as specifically allowed in the License Agreement. No part of this publication may be copied, reproduced, or otherwise transmitted or recorded, for any purpose, without prior written permission by Steinberg Media Technologies GmbH. Registered licensees of the product described herein may print one copy of this document for their personal use.
All product and company names are ™ or ® trademarks of their respective owners. For more information, please visit www.steinberg.net/trademarks.
© Steinberg Media Technologies GmbH, 2019.
All rights reserved.
WaveLab LE_9.5.40_en-US_2018-11-20
4 WaveLab-specific Plug-ins4 Resampler4 Leveler5 Peak Master5 Silence5 Stereo Expander
6 Steinberg VST 3 Plug-ins6 AutoPan7 Chorus8 Compressor10 Gate11 Limiter12 RoomWorks SE13 StereoDelay13 StereoEnhancer14 StudioEQ
17 Index
Table of Contents
3
WaveLab-specific plug-ins use the plug-in format of WaveLab, and cannot be used with other applications.
● WaveLab-specific plug-ins can only be used in the Master Section.
● You can specify which plug-ins should be available on the Effects pane of the Master Section by using the Plug-in Settings dialog.
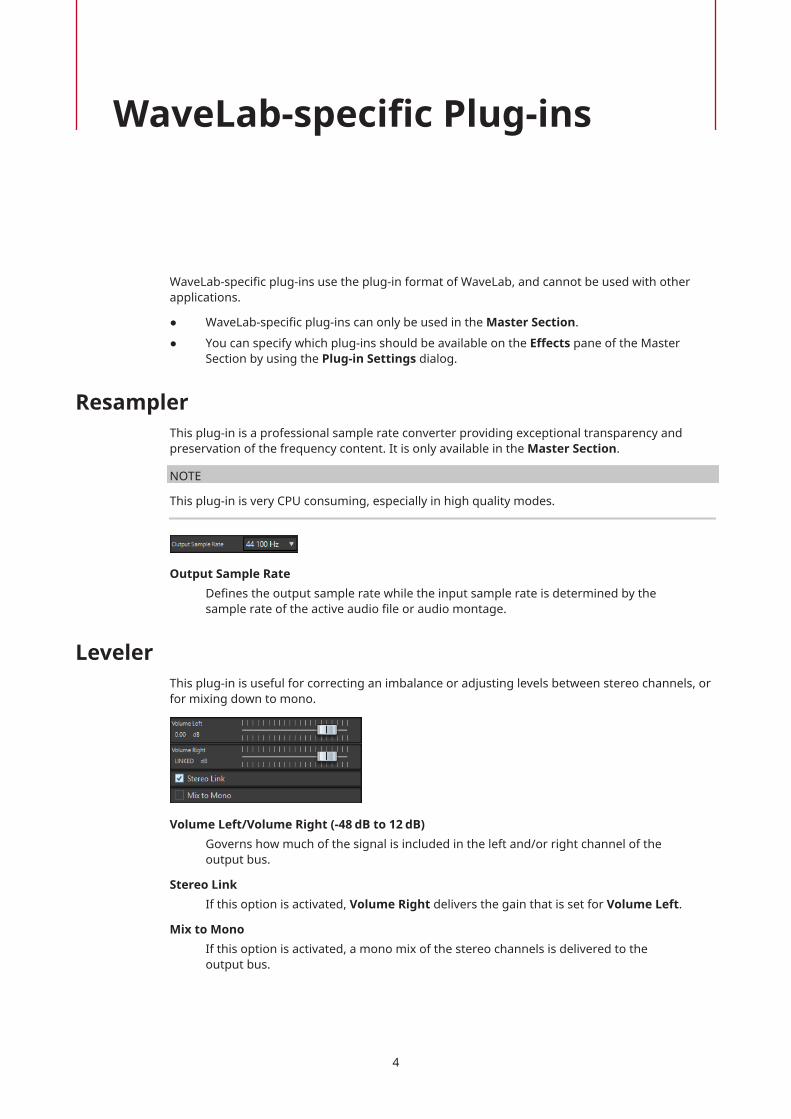
ResamplerThis plug-in is a professional sample rate converter providing exceptional transparency and preservation of the frequency content. It is only available in the Master Section.
NOTE
This plug-in is very CPU consuming, especially in high quality modes.
Output Sample RateDefines the output sample rate while the input sample rate is determined by the sample rate of the active audio file or audio montage.
LevelerThis plug-in is useful for correcting an imbalance or adjusting levels between stereo channels, or for mixing down to mono.
Volume Left/Volume Right (-48 dB to 12 dB)Governs how much of the signal is included in the left and/or right channel of the output bus.
Stereo LinkIf this option is activated, Volume Right delivers the gain that is set for Volume Left.
Mix to MonoIf this option is activated, a mono mix of the stereo channels is delivered to the output bus.
WaveLab-specific Plug-ins
4
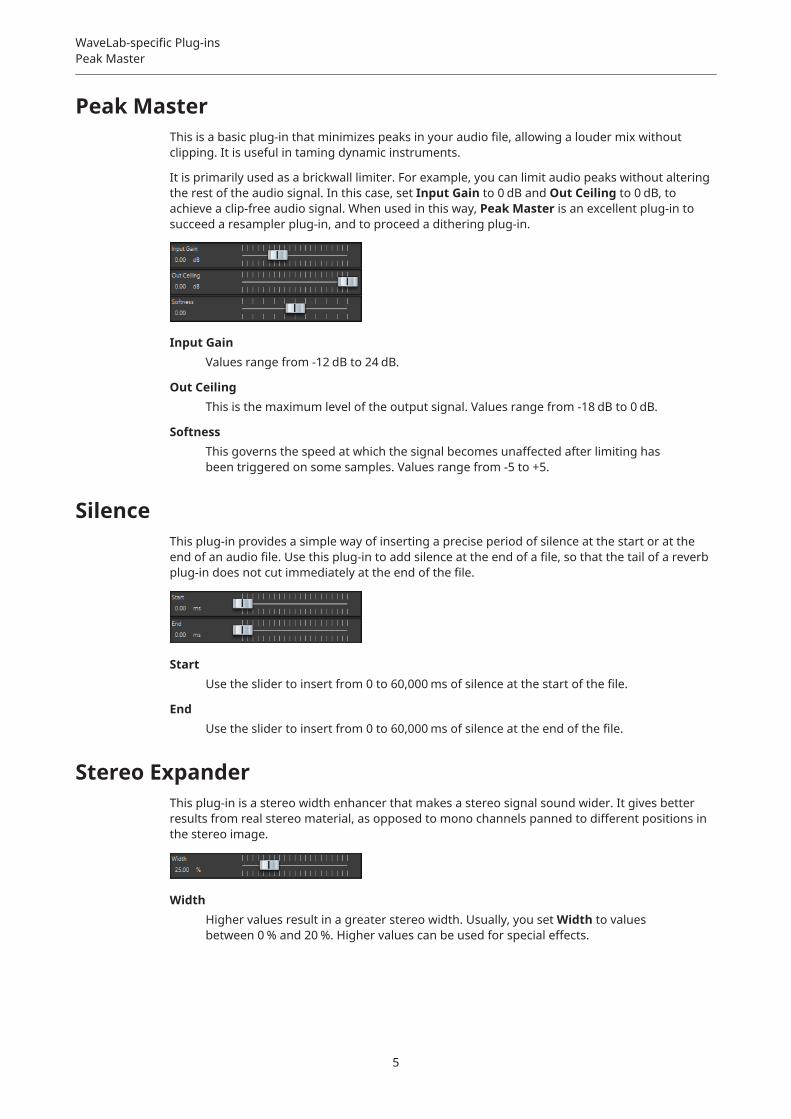
Peak MasterThis is a basic plug-in that minimizes peaks in your audio file, allowing a louder mix without clipping. It is useful in taming dynamic instruments.
It is primarily used as a brickwall limiter. For example, you can limit audio peaks without altering the rest of the audio signal. In this case, set Input Gain to 0 dB and Out Ceiling to 0 dB, to achieve a clip-free audio signal. When used in this way, Peak Master is an excellent plug-in to succeed a resampler plug-in, and to proceed a dithering plug-in.
Input GainValues range from -12 dB to 24 dB.
Out CeilingThis is the maximum level of the output signal. Values range from -18 dB to 0 dB.
SoftnessThis governs the speed at which the signal becomes unaffected after limiting has been triggered on some samples. Values range from -5 to +5.
SilenceThis plug-in provides a simple way of inserting a precise period of silence at the start or at the end of an audio file. Use this plug-in to add silence at the end of a file, so that the tail of a reverb plug-in does not cut immediately at the end of the file.
StartUse the slider to insert from 0 to 60,000 ms of silence at the start of the file.
EndUse the slider to insert from 0 to 60,000 ms of silence at the end of the file.
Stereo ExpanderThis plug-in is a stereo width enhancer that makes a stereo signal sound wider. It gives better results from real stereo material, as opposed to mono channels panned to different positions in the stereo image.
WidthHigher values result in a greater stereo width. Usually, you set Width to values between 0 % and 20 %. Higher values can be used for special effects.
WaveLab-specific Plug-insPeak Master
5
In WaveLab there is no limitation to the use of VST plug-ins. They can be used wherever plug-ins can be inserted.
● You can specify which VST plug-ins should be available in the Effects pane of the Master Section by using the Plug-in Settings dialog.
● You can exclude VST plug-ins completely from WaveLab.
● VST plug-ins have their own preset handling. You can save or load effect programs (presets).
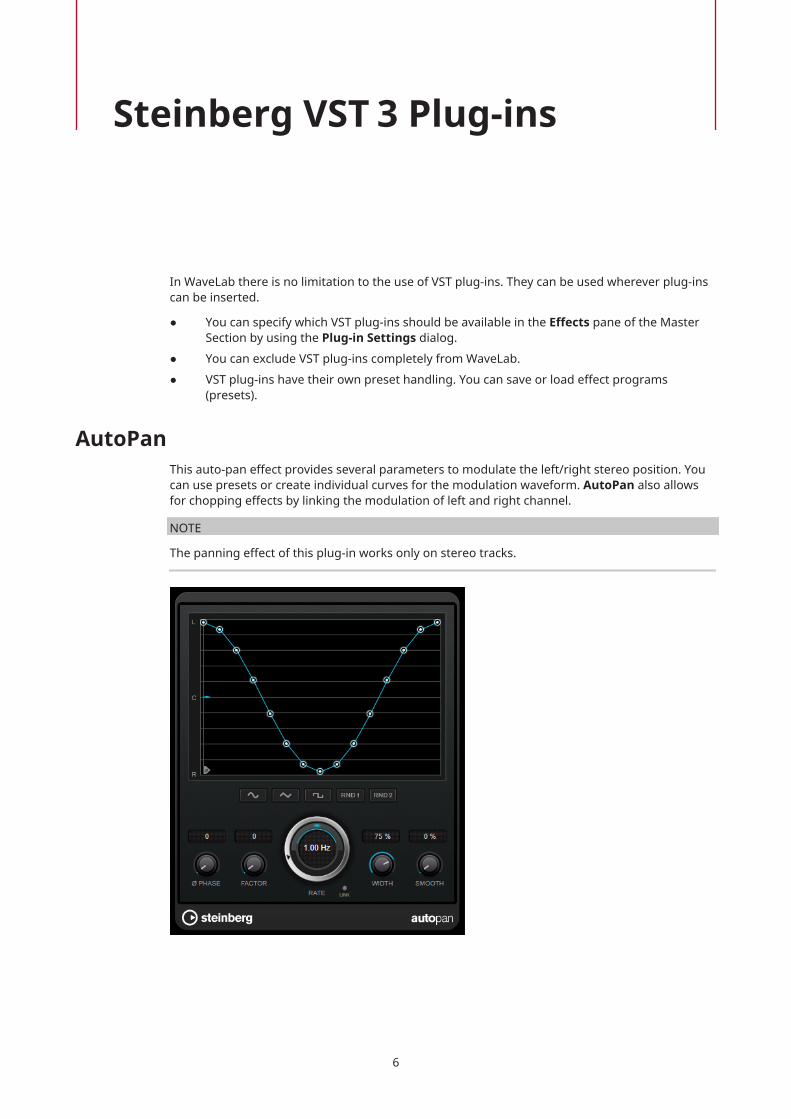
AutoPanThis auto-pan effect provides several parameters to modulate the left/right stereo position. You can use presets or create individual curves for the modulation waveform. AutoPan also allows for chopping effects by linking the modulation of left and right channel.
NOTE
The panning effect of this plug-in works only on stereo tracks.
Steinberg VST 3 Plug-ins
6
Waveform displayShows the shape of the modulation waveform and allows you to manually adjust the shape of the waveform. To draw an individual curve, click a node and move the mouse. To draw a straight line, Shift-click a node and move the mouse.
Waveform presetsAllows you to select presets for the modulation waveform.
● Sine creates a smooth sweep.
● Triangle creates a ramp, that is, a linear movement from full right to full left and back.
● Pulse creates an instant jump to full right, then to full left, and then back to center.
● Random One Shot creates a random curve. Click this button again to create a new random curve.
● Random Continuous automatically creates a new random curve after each period.
PhaseSets the offset for the starting point of the curve. If multiple AutoPan plug-ins are used on different tracks, for example, different offset settings for each track allow for a more organic overall sound.
RateSets the auto-pan speed in Hertz and shows the movement within the panorama.
LinkIf this button is activated, left and right channel are modulated simultaneously. This results in a chopping effect instead of auto-panning.In this mode, Width sets the intensity of the volume modulation.
WidthSets the amount of deflection to the left and right side of the stereo panorama. If Link is activated, this parameter sets the intensity of the volume modulation.
SmoothAllows you to smooth the transition between individual steps of the panorama curve.
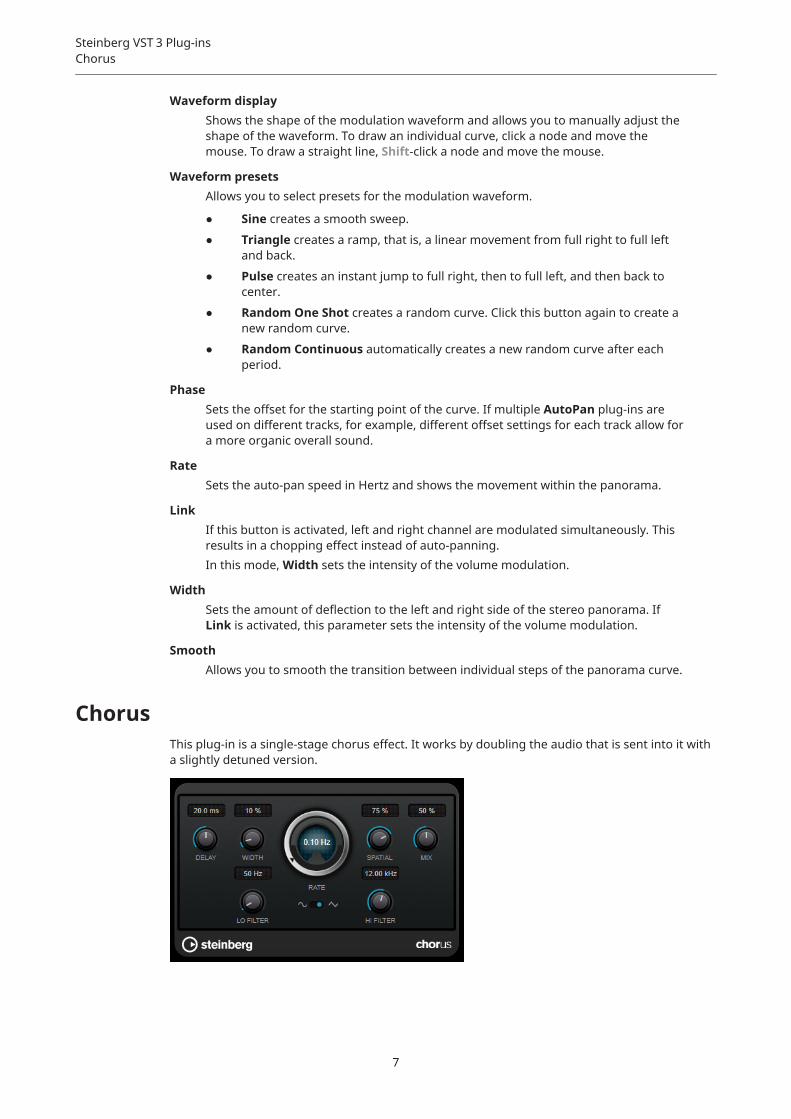
ChorusThis plug-in is a single-stage chorus effect. It works by doubling the audio that is sent into it with a slightly detuned version.
Steinberg VST 3 Plug-insChorus
7
DelayAffects the frequency range of the modulation sweep by adjusting the initial delay time.
WidthSets the depth of the chorus effect. Higher settings produce a more pronounced effect.
SpatialSets the stereo width of the effect. Turn clockwise for a wider stereo effect.
MixSets the level balance between the dry signal and the wet signal. If the effect is used as a send effect, set this parameter to the maximum value as you can control the dry/effect balance with the send.
Waveform ShapeAllows you to select the modulation waveform, altering the character of the chorus sweep. A sine and a triangle waveform are available.
Lo Filter/Hi FilterAllow you to roll off low and high frequencies of the effect signal.
NOTE
If side-chaining is supported, the modulation can also be controlled from another signal source via the side-chain input. If the side-chain signal exceeds the threshold, the modulation is controlled by the side-chain signal’s envelope. For a description of how to set up side-chain routing, see the Operation Manual.
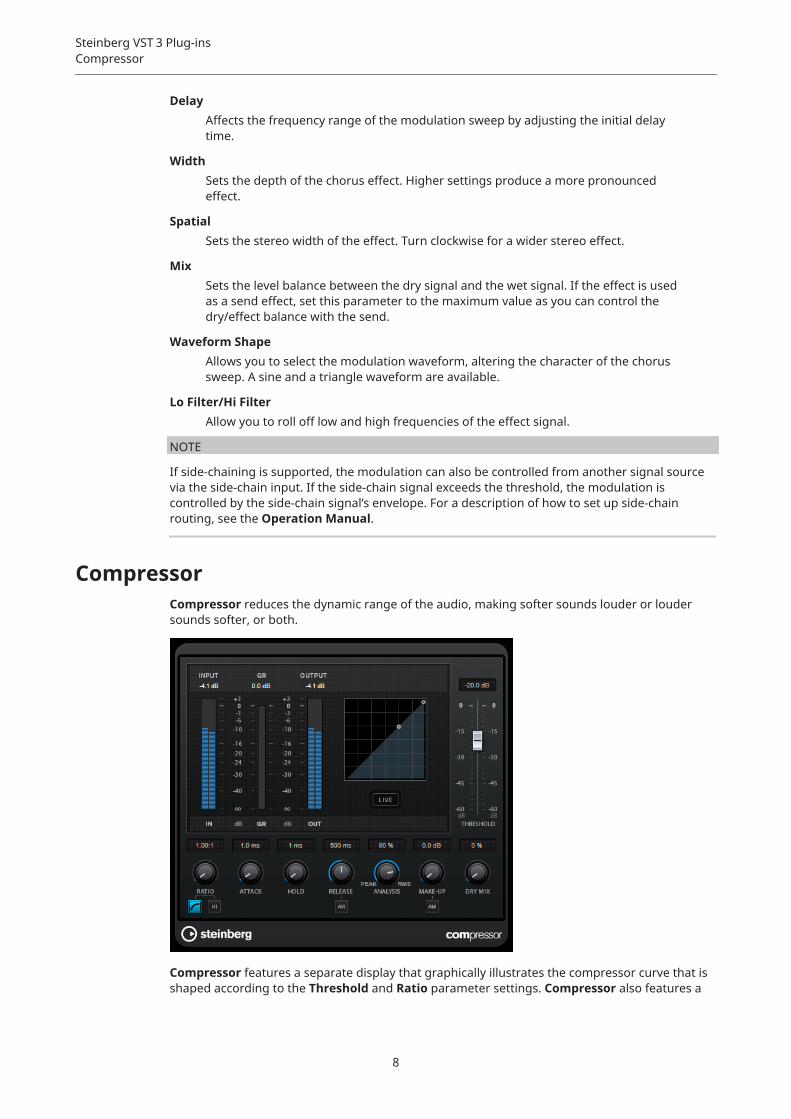
CompressorCompressor reduces the dynamic range of the audio, making softer sounds louder or louder sounds softer, or both.
Compressor features a separate display that graphically illustrates the compressor curve that is shaped according to the Threshold and Ratio parameter settings. Compressor also features a
Steinberg VST 3 Plug-insCompressor
8

Gain Reduction meter that shows the amount of gain reduction in dB, Soft knee/Hard knee compression modes, and a program-dependent auto feature for the Release parameter.
Threshold (-60 to 0 dB)Determines the level where the compressor kicks in. Only signal levels above the set threshold are processed.
RatioSets the amount of gain reduction applied to signals above the set threshold. A ratio of 3:1 means that for every 3 dB the input level increases, the output level increases by 1 dB.
Soft KneeIf this button is deactivated, signals above the threshold are compressed instantly according to the set ratio (hard knee). If Soft Knee is activated, the onset of compression is more gradual, producing a less drastic result.
High RatioSets the ratio to a fixed value of 20:1.
Make-Up (0 to 24 dB or Auto mode)Compensates for output gain loss, caused by compression. If the Auto button is activated, the knob becomes dark and the output is automatically adjusted for gain loss.
Dry MixMixes the dry input signal to the compressed signal.
Attack (0.1 to 100 ms)Determines how fast the compressor responds to signals above the set threshold. If the attack time is long, more of the early part of the signal passes through unprocessed.
Hold (0 to 5000 ms)Sets the time the applied compression affects the signal after exceeding the threshold. Short hold times are useful for DJ-style ducking, while longer hold times are required for music ducking, for example, when working on a documentary film.
Release (10 to 1000 ms or Auto mode)Sets the time after which the gain returns to its original level when the signal drops below the threshold. If the Auto Release button is activated, the plug-in automatically finds the best release setting for the audio material.
Analysis (Pure Peak to Pure RMS)Determines whether the input signal is analyzed according to peak or RMS values, or a mixture of both. A value of 0 is pure peak and 100 pure RMS. RMS mode operates using the average power of the audio signal as a basis, whereas Peak mode operates more on peak levels. As a general guideline, RMS mode works better on material with few transients such as vocals, and Peak mode works better for percussive material with a lot of transient peaks.
LiveIf this button is activated, the look-ahead feature of the effect is deactivated. Look-ahead produces more accurate processing, but adds a specific amount of latency as a trade-off. If Live mode is activated, there is no latency, which is better for live processing.
Steinberg VST 3 Plug-insCompressor
9
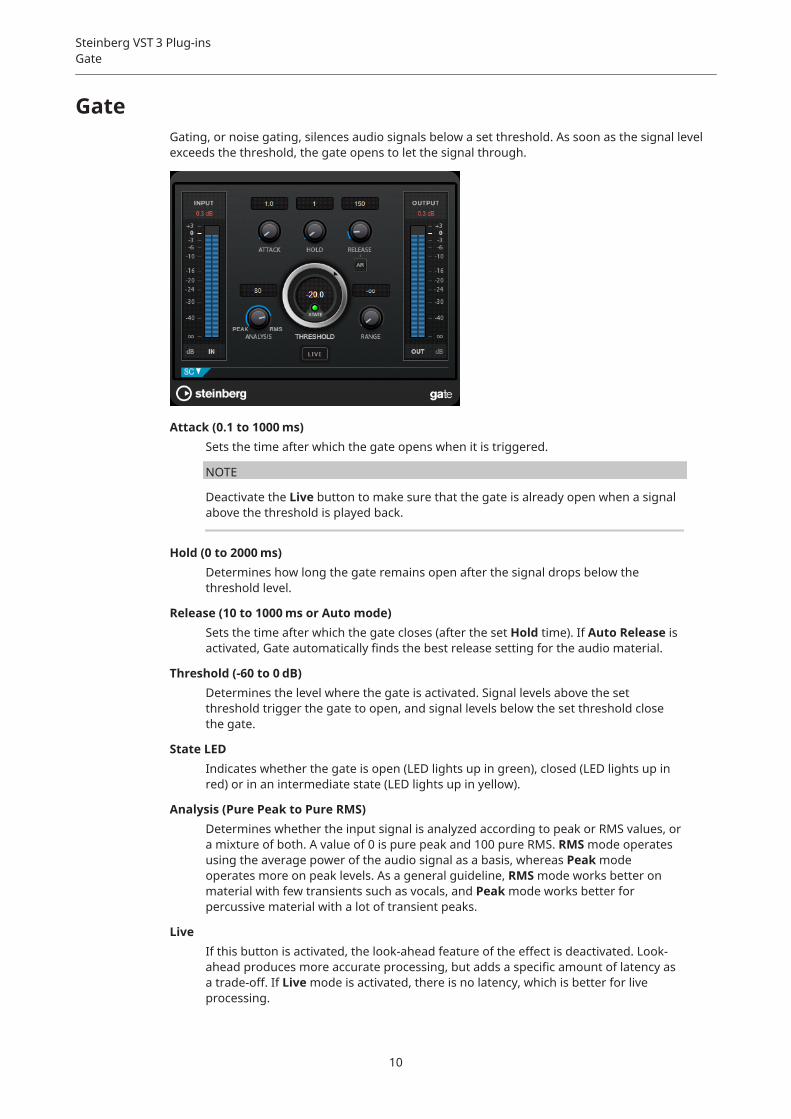
GateGating, or noise gating, silences audio signals below a set threshold. As soon as the signal level exceeds the threshold, the gate opens to let the signal through.
Attack (0.1 to 1000 ms)Sets the time after which the gate opens when it is triggered.
NOTE
Deactivate the Live button to make sure that the gate is already open when a signal above the threshold is played back.
Hold (0 to 2000 ms)Determines how long the gate remains open after the signal drops below the threshold level.
Release (10 to 1000 ms or Auto mode)Sets the time after which the gate closes (after the set Hold time). If Auto Release is activated, Gate automatically finds the best release setting for the audio material.
Threshold (-60 to 0 dB)Determines the level where the gate is activated. Signal levels above the set threshold trigger the gate to open, and signal levels below the set threshold close the gate.
State LEDIndicates whether the gate is open (LED lights up in green), closed (LED lights up in red) or in an intermediate state (LED lights up in yellow).
Analysis (Pure Peak to Pure RMS)Determines whether the input signal is analyzed according to peak or RMS values, or a mixture of both. A value of 0 is pure peak and 100 pure RMS. RMS mode operates using the average power of the audio signal as a basis, whereas Peak mode operates more on peak levels. As a general guideline, RMS mode works better on material with few transients such as vocals, and Peak mode works better for percussive material with a lot of transient peaks.
LiveIf this button is activated, the look-ahead feature of the effect is deactivated. Look-ahead produces more accurate processing, but adds a specific amount of latency as a trade-off. If Live mode is activated, there is no latency, which is better for live processing.
Steinberg VST 3 Plug-insGate
10
Side-Chain Section
Side-ChainActivates the internal side-chain filter. The input signal can then be shaped according to the filter parameters. Internal side-chaining is useful for tailoring how the gate operates.
MonitorAllows you to monitor the filtered signal.
Center (50 to 20000 Hz)If the Side-Chain button is activated, this sets the center frequency of the filter.
Q-FactorIf the Side-Chain button is activated, this sets the resonance or width of the filter.
Filter buttons (Low-Pass/Band-Pass/High-Pass)If the Side-Chain button is activated, you can use these buttons to set the filter type to low-pass, band-pass, or high-pass.
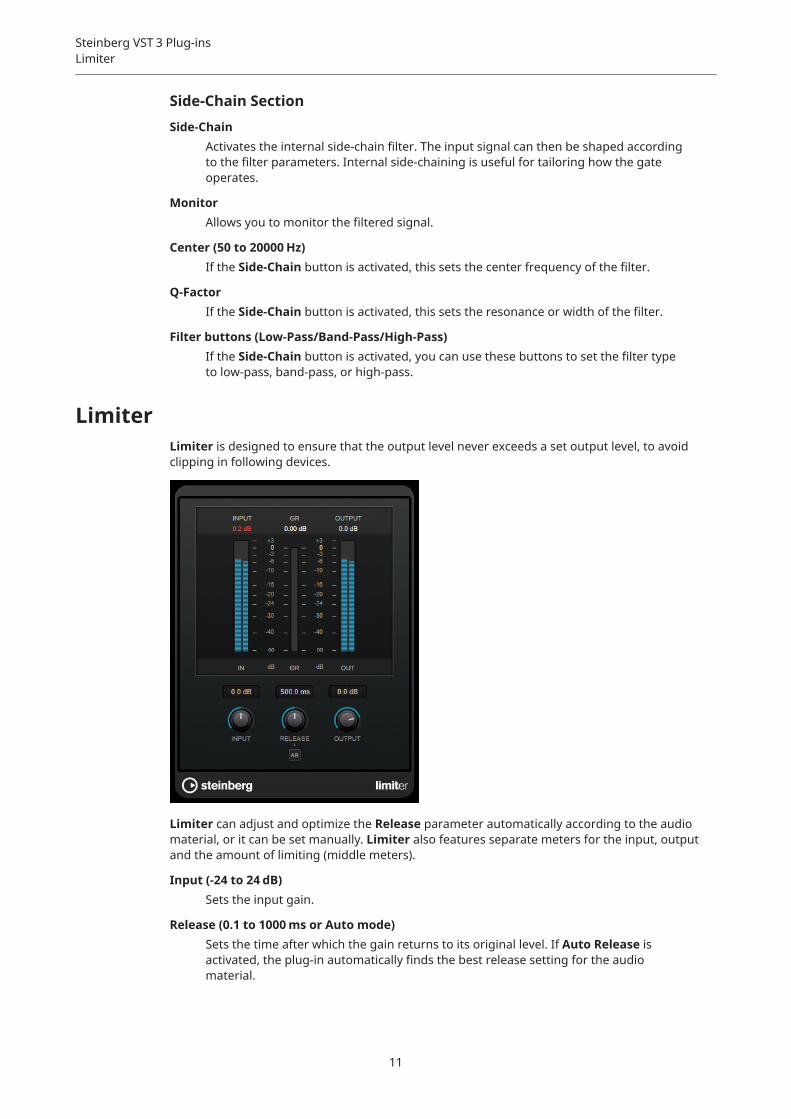
LimiterLimiter is designed to ensure that the output level never exceeds a set output level, to avoid clipping in following devices.
Limiter can adjust and optimize the Release parameter automatically according to the audio material, or it can be set manually. Limiter also features separate meters for the input, output and the amount of limiting (middle meters).
Input (-24 to 24 dB)Sets the input gain.
Release (0.1 to 1000 ms or Auto mode)Sets the time after which the gain returns to its original level. If Auto Release is activated, the plug-in automatically finds the best release setting for the audio material.
Steinberg VST 3 Plug-insLimiter
11
OutputSets the maximum output level.
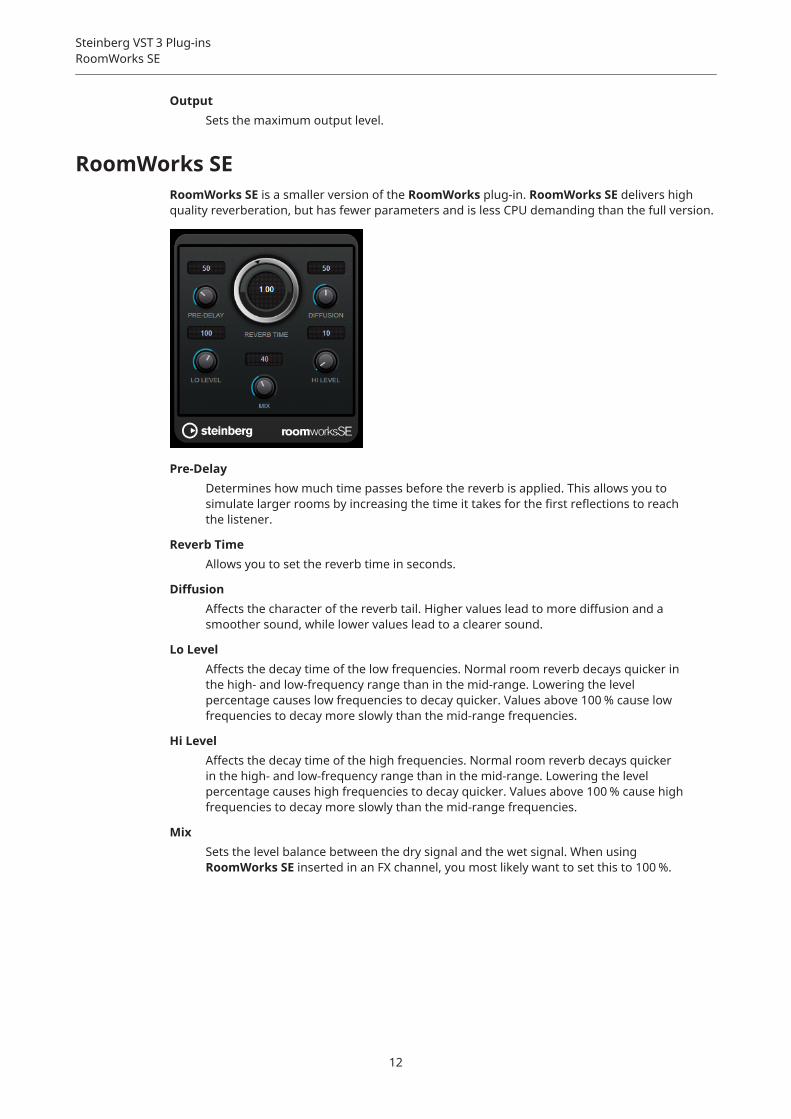
RoomWorks SERoomWorks SE is a smaller version of the RoomWorks plug-in. RoomWorks SE delivers high quality reverberation, but has fewer parameters and is less CPU demanding than the full version.
Pre-DelayDetermines how much time passes before the reverb is applied. This allows you to simulate larger rooms by increasing the time it takes for the first reflections to reach the listener.
Reverb TimeAllows you to set the reverb time in seconds.
DiffusionAffects the character of the reverb tail. Higher values lead to more diffusion and a smoother sound, while lower values lead to a clearer sound.
Lo LevelAffects the decay time of the low frequencies. Normal room reverb decays quicker in the high- and low-frequency range than in the mid-range. Lowering the level percentage causes low frequencies to decay quicker. Values above 100 % cause low frequencies to decay more slowly than the mid-range frequencies.
Hi LevelAffects the decay time of the high frequencies. Normal room reverb decays quicker in the high- and low-frequency range than in the mid-range. Lowering the level percentage causes high frequencies to decay quicker. Values above 100 % cause high frequencies to decay more slowly than the mid-range frequencies.
MixSets the level balance between the dry signal and the wet signal. When using RoomWorks SE inserted in an FX channel, you most likely want to set this to 100 %.
Steinberg VST 3 Plug-insRoomWorks SE
12

StereoDelayStereoDelay has two independent delay lines with freely specified delay time settings.
NOTE
This plug-in works only on stereo tracks.
FeedbackSet the number of repeats for each delay.
DelaySets the delay time in milliseconds.
MixSets the level balance between the dry signal and the wet signal. If the effect is used as a send effect, set this parameter to the maximum value as you can control the dry/effect balance with the send.
Lo FilterAffects the feedback loop of the effect signal and allows you to roll off low frequencies. The button below the knob activates/deactivates the filter.
PanSets the stereo position.
Hi FilterAffects the feedback loop of the effect signal and allows you to roll off high frequencies. The button below the knob activates/deactivates the filter.
StereoEnhancerStereoEnhancer expands the stereo width of (stereo) audio material. It cannot be used with mono files.
NOTE
This plug-in works only on stereo tracks.
Steinberg VST 3 Plug-insStereoDelay
13
DelayIncreases the amount of differences between the left and right channels to further increase the stereo effect.
WidthControls the width or depth of the stereo enhancement. Turn clockwise to increase the enhancement.
MonoSwitches the output to mono, to check for possible unwanted coloring of the sound which sometimes can occur when enhancing the stereo image.
ColorGenerates additional differences between the channels to increase the stereo enhancement.
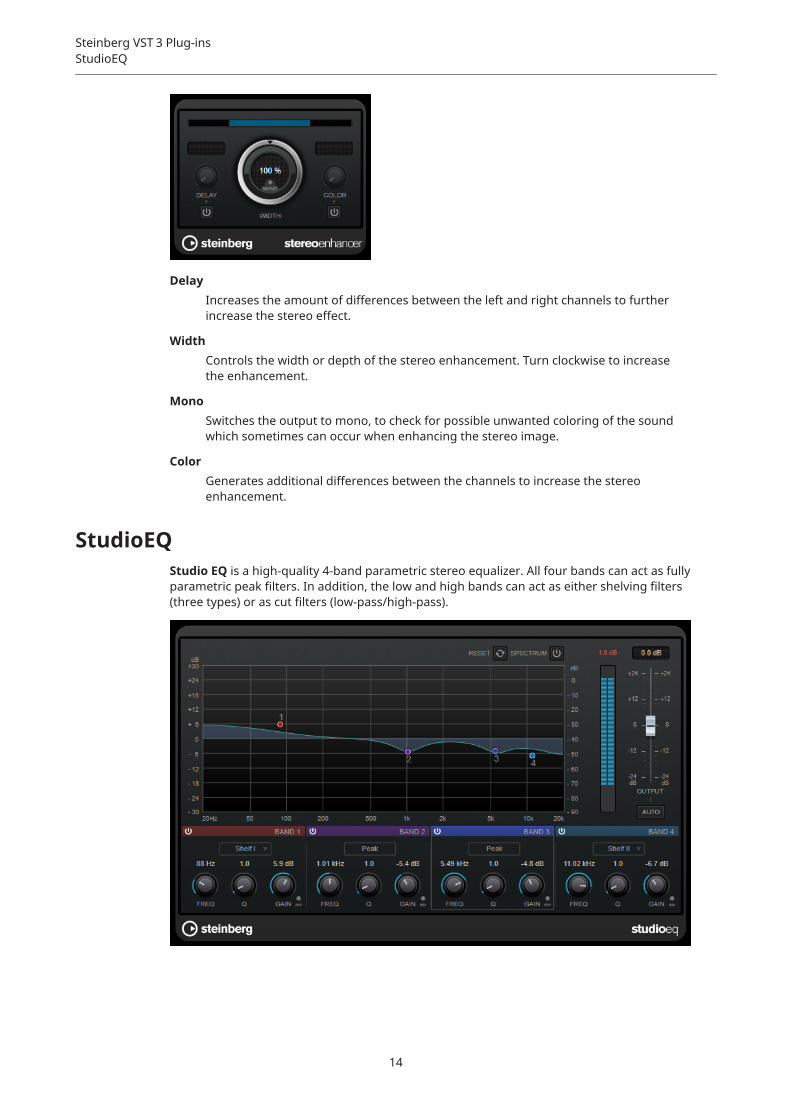
StudioEQStudio EQ is a high-quality 4-band parametric stereo equalizer. All four bands can act as fully parametric peak filters. In addition, the low and high bands can act as either shelving filters (three types) or as cut filters (low-pass/high-pass).
Steinberg VST 3 Plug-insStudioEQ
14
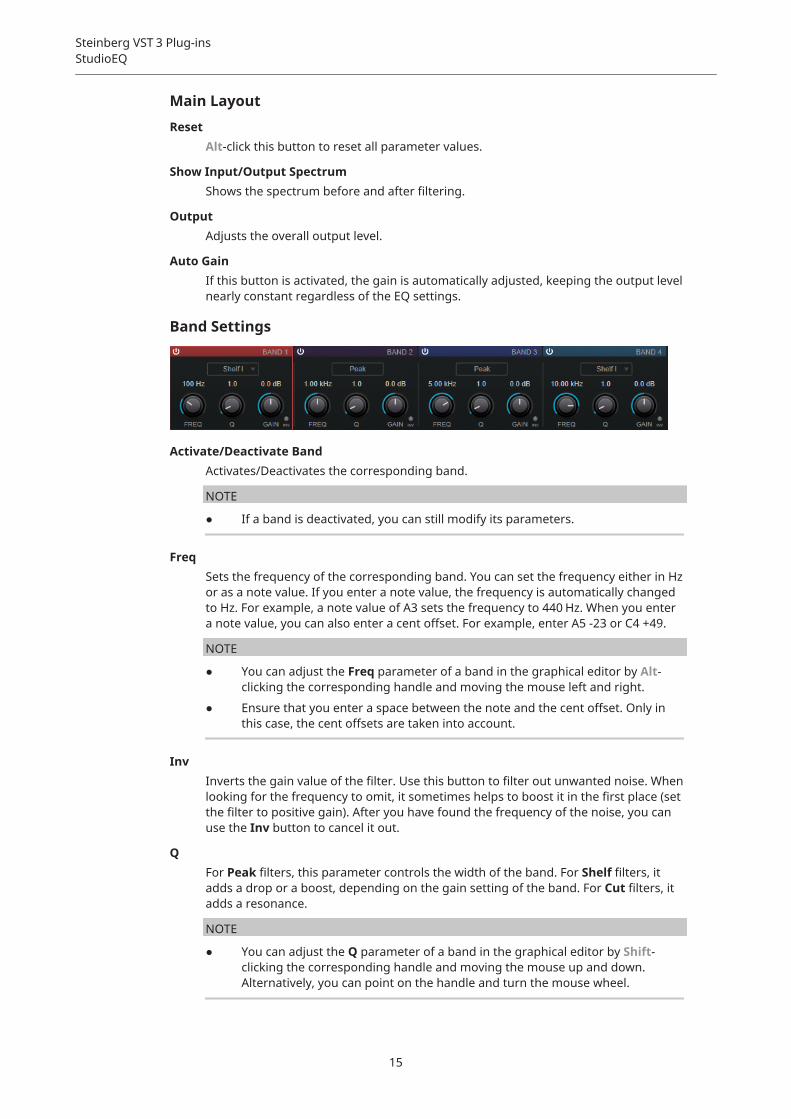
Main Layout
ResetAlt-click this button to reset all parameter values.
Show Input/Output SpectrumShows the spectrum before and after filtering.
OutputAdjusts the overall output level.
Auto GainIf this button is activated, the gain is automatically adjusted, keeping the output level nearly constant regardless of the EQ settings.
Band Settings
Activate/Deactivate BandActivates/Deactivates the corresponding band.
NOTE
● If a band is deactivated, you can still modify its parameters.
FreqSets the frequency of the corresponding band. You can set the frequency either in Hz or as a note value. If you enter a note value, the frequency is automatically changed to Hz. For example, a note value of A3 sets the frequency to 440 Hz. When you enter a note value, you can also enter a cent offset. For example, enter A5 -23 or C4 +49.
NOTE
● You can adjust the Freq parameter of a band in the graphical editor by Alt-clicking the corresponding handle and moving the mouse left and right.
● Ensure that you enter a space between the note and the cent offset. Only in this case, the cent offsets are taken into account.
InvInverts the gain value of the filter. Use this button to filter out unwanted noise. When looking for the frequency to omit, it sometimes helps to boost it in the first place (set the filter to positive gain). After you have found the frequency of the noise, you can use the Inv button to cancel it out.
QFor Peak filters, this parameter controls the width of the band. For Shelf filters, it adds a drop or a boost, depending on the gain setting of the band. For Cut filters, it adds a resonance.
NOTE
● You can adjust the Q parameter of a band in the graphical editor by Shift-clicking the corresponding handle and moving the mouse up and down. Alternatively, you can point on the handle and turn the mouse wheel.
Steinberg VST 3 Plug-insStudioEQ
15
GainSets the amount of attenuation/boost for the corresponding band.
NOTE
● You can adjust the Gain parameter of a band in the graphical editor by Ctrl/Cmd-clicking the corresponding handle and moving the mouse up and down.
● This parameter is not available for Cut filters.
Filter typeFor the low and high band, you can choose between three types of shelving filters, a peak filter (band-pass), and a cut filter (low-pass/high-pass). If Cut mode is selected, the Gain parameter is fixed.
● Shelf I adds resonance in the opposite gain direction slightly above the set frequency.
● Shelf II adds resonance in the gain direction at the set frequency.
● Shelf III is a combination of Shelf I and II.
Steinberg VST 3 Plug-insStudioEQ
16
AAutoPan 6
CChopper Effects
AutoPan 6Chorus Effects
Chorus 7Compressors
Compressor 8
DDelays
StereoDelay 13
GGates
Gate 10
LLeveler 4Limiters
Limiter 11
PPeak Master 5Plug-ins
VST 3 6WaveLab-specific 4
RResampler 4RoomWorks SE 12
SSample rate
Resampler 4Silence 5Stereo Expander 5StereoDelay 13StereoEnhancer 13
StudioEQ 14
Index
17