Embed Size (px)
Citation preview

1
295 East Corporate Place • Suite 100 • Chandler, AZ 85225Toll Free: 1.800.621.5886 • Phone: 480.893.7607 • Fax: 480.753.3397
[email protected] • www.1Paramount.com
004-027-8742-00 REV051811
WATER VALVEOWNER’S MANUAL
SAMPLE TITLE HERE
2
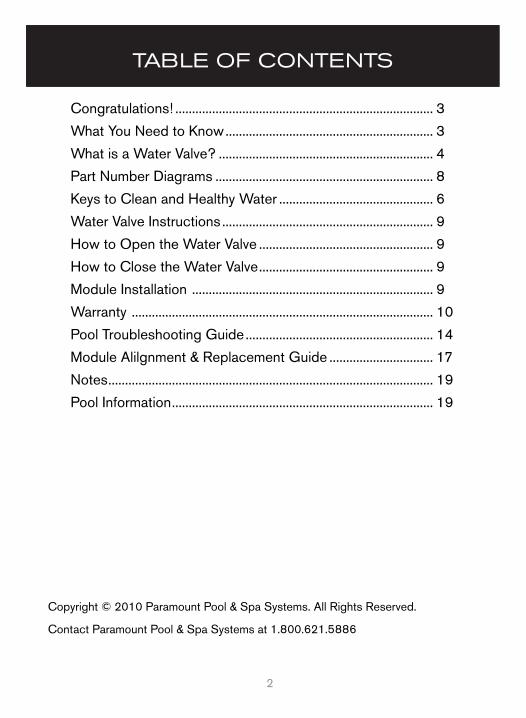
Congratulations! ............................................................................. 3
What You Need to Know .............................................................. 3
What is a Water Valve? ................................................................ 4
Part Number Diagrams ................................................................. 8
Keys to Clean and Healthy Water .............................................. 6
Water Valve Instructions ............................................................... 9
How to Open the Water Valve .................................................... 9
How to Close the Water Valve .................................................... 9
Module Installation ........................................................................ 9
Warranty .......................................................................................... 10
Pool Troubleshooting Guide ........................................................ 14
Module Alilgnment & Replacement Guide ............................... 17
Notes ................................................................................................. 19
Pool Information .............................................................................. 19
Copyright © 2010 Paramount Pool & Spa Systems. All Rights Reserved.
Contact Paramount Pool & Spa Systems at 1.800.621.5886
TABLE OF CONTENTS
3
CONGRATULATIONS
Paramount Pool & Spa Systems would like to thank you for your purchase. We design our products with you in mind and our goal is to make pool ownership more affordable and as carefree as possible.
Nothing, really! The Paramount Pool & Spa Systems Water Valve is fully automatic and operates whenever the pump is running. However, if you are interested and want to learn more, read the next two sections; What is the Water Valve and Keys to Clean and Healthy Water.
In the unlikely event that you have a problem with your new Water Valve, Check the Pool Trouble Shooting section. Unexpected things sometimes happen but are usually simple to correct.
WHAT YOU NEED TO KNOW
SAMPLE TITLE HERE
4
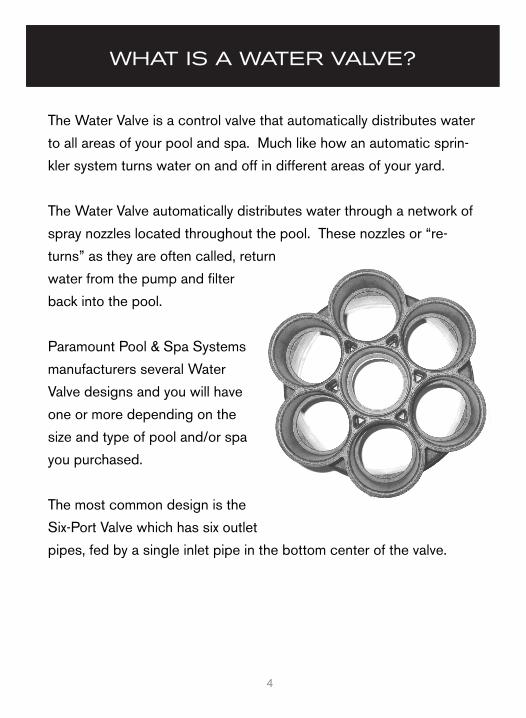
The Water Valve is a control valve that automatically distributes water
to all areas of your pool and spa. Much like how an automatic sprin-
kler system turns water on and off in different areas of your yard.
The Water Valve automatically distributes water through a network of
spray nozzles located throughout the pool. These nozzles or “re-
turns” as they are often called, return
water from the pump and filter
back into the pool.
Paramount Pool & Spa Systems
manufacturers several Water
Valve designs and you will have
one or more depending on the
size and type of pool and/or spa
you purchased.
The most common design is the
Six-Port Valve which has six outlet
pipes, fed by a single inlet pipe in the bottom center of the valve.
WHAT IS A WATER VALVE?
5
WHAT IS A WATER VALVE? (CONT.)
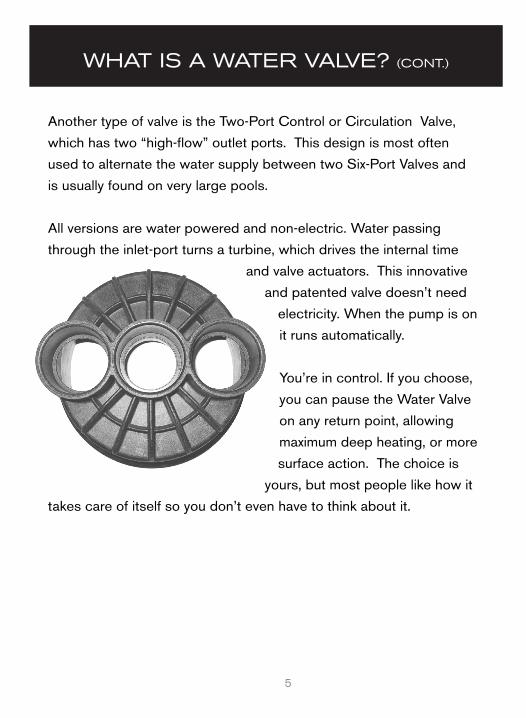
Another type of valve is the Two-Port Control or Circulation Valve,
which has two “high-flow” outlet ports. This design is most often
used to alternate the water supply between two Six-Port Valves and
is usually found on very large pools.
All versions are water powered and non-electric. Water passing
through the inlet-port turns a turbine, which drives the internal time
and valve actuators. This innovative
and patented valve doesn’t need
electricity. When the pump is on
it runs automatically.
You’re in control. If you choose,
you can pause the Water Valve
on any return point, allowing
maximum deep heating, or more
surface action. The choice is
yours, but most people like how it
takes care of itself so you don’t even have to think about it.
SAMPLE TITLE HERE
6
Paramount Pool & Spa Systems’ Water Valve is the key to clean and
healthy water. Dirt is a problem that needs quick removal.
The Water Valve makes it possible for your pump to blast all areas of
the pool with a strong jet of water, which is needed to distribute
chemicals and heat and to keep the pool surface clean and healthy.
Traditional pool design uses an old fashion method of returning
filtered water back to the pool through wall inlets near the surface
of the water. This is better than nothing, but returns don’t put the
heated and purified water on the bottom where it is really needed.
Worst of all, by returning heat and chemicals near the surface, the
wind and sun can quickly steal them from the water.
In contrast, a pool equipped with a state-of-the-art, Paramount Pool
& Spa Systems’ Water Valve returns fresh water to the floor of the
pool where it can quickly kill algae and bacteria before it grows. The
same powerful jets of water that will clean your pool, efficiently dis-
tribute warm, purified water throughout the pool, so the pool is ready
to enjoy when you are.
KEYS TO CLEAN AND HEALTHY WATER
7
WHAT IS A WATER VALVE? (CONT.)
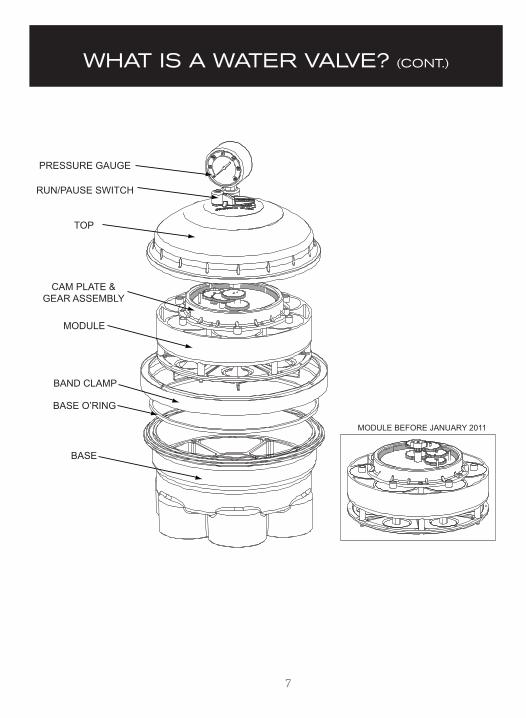
PRESSURE GAUGE
RUN/PAUSE SWITCH
TOP
CAM PLATE &GEAR ASSEMBLY
MODULE
BASE O’RING
BAND CLAMP
BASE
MODULE BEFORE JANUARY 2011
SAMPLE TITLE HERE
8
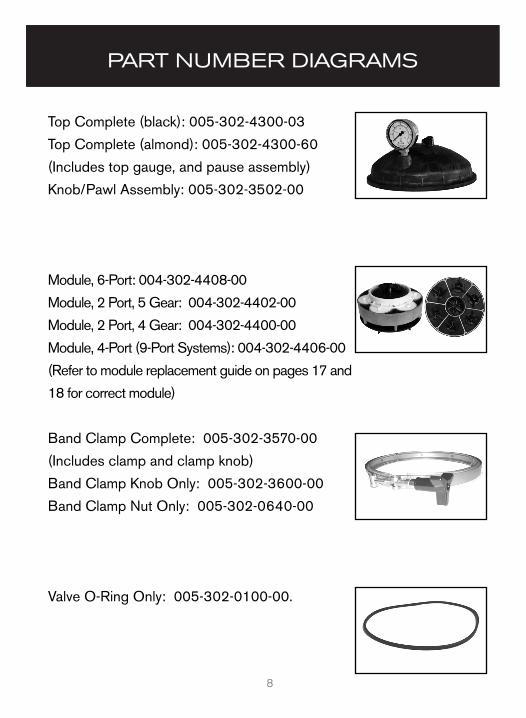
Top Complete (black): 005-302-4300-03
Top Complete (almond): 005-302-4300-60
(Includes top gauge, and pause assembly)
Knob/Pawl Assembly: 005-302-3502-00
Module, 6-Port: 004-302-4408-00
Module, 2 Port, 5 Gear: 004-302-4402-00
Module, 2 Port, 4 Gear: 004-302-4400-00
Module, 4-Port (9-Port Systems): 004-302-4406-00
(Refer to module replacement guide on pages 17 and
18 for correct module)
Band Clamp Complete: 005-302-3570-00
(Includes clamp and clamp knob)
Band Clamp Knob Only: 005-302-3600-00
Band Clamp Nut Only: 005-302-0640-00
Valve O-Ring Only: 005-302-0100-00.
PART NUMBER DIAGRAMS

9
WATER VALVE INSTRUCTIONS
How to Open the Water Valve1. TURN OFF THE PUMP. 2. To remove the Band Clamp, turn the Clamp Knob counter-clock-
wise until is comes off the bolt. Note: You may have a 7/16” Nut instead of a Clamp Knob. If this is the case, use a wrench to remove it.
3. Lift the top off the base. How to Close the Water Valve 1. Check the O-Ring (or square gasket) and groove for debris, which
could prevent a good seal. Remove any debris found and verify the O-Ring is in the groove properly.
2. Place the top on the base. You may face it any direction you like. 3. Place the Band Clamp around the Valve Shells and put the Clamp
Knob or 7/16” nut on the bolt. 4. Tighten the Band Clamp securely. Note: Tapping the Band Clamp
gently around the circle will help you tighten the bolt with less ef-fort.
5. Turn on the pump and inspect the Water Valve for any drips. NEVER stand over any pool equipment when starting the pump after working on it. If you find drips, turn off the pump and tighten the Band Clamp more. Note: Silicone lubricant makes O-Rings seal more effectively, but is rarely needed. NEVER use petroleum jelly on plastic or rubber.
Module Installation 1. TURN OFF THE PUMP. 2. Open the Water Valve. 3. Lift the Module out of the Base. Note: The Module is designed
to seal inside the Base so it may be difficult to lift. An easy solu-tion is to turn the pump on and off quickly. CAUTION: Make sure no one is standing nearby or that person could get wet when the Module pops out of the Base.
10
Paramount Pool & Spa Systems (PP&SS)295 E. Corporate Place, Suite 100Chandler, AZ 852251.800.621.5886www.1Paramount.com
U.S. Patents: 4,592,379 • 6,311,728 • 6,314,899 • 6,360,767 • Other patents pending
295 E Corporate Pl., Chandler, AZ, 85225Paramount Pool & Spa Systems
11
Paramount Pool & Spa Systems (PP&SS)295 E. Corporate Place, Suite 100Chandler, AZ 852251.800.621.5886www.1Paramount.com
U.S. Patents: 4,592,379 • 6,311,728 • 6,314,899 • 6,360,767 • Other patents pending
295 E Corporate Pl., Chandler, AZ, 85225Paramount Pool & Spa Systems
SAMPLE TITLE HERE
12
WATER VALVE INSTRUCTIONS (CONT.)
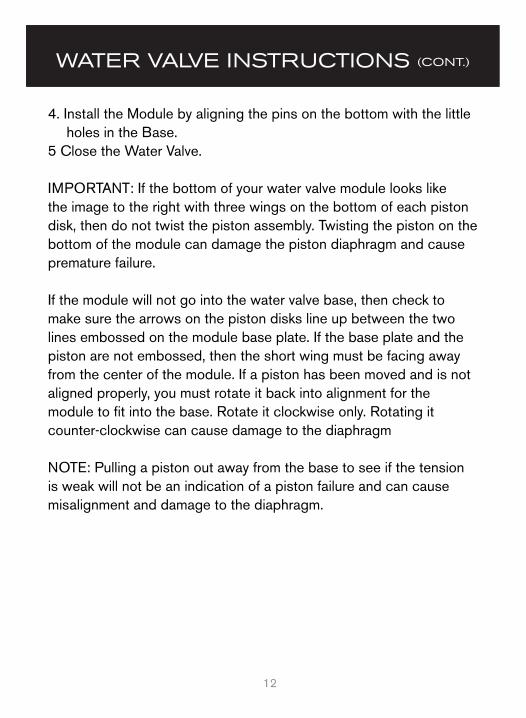
4. Install the Module by aligning the pins on the bottom with the little holes in the Base.
5 Close the Water Valve.
IMPORTANT: If the bottom of your water valve module looks likethe image to the right with three wings on the bottom of each pistondisk, then do not twist the piston assembly. Twisting the piston on thebottom of the module can damage the piston diaphragm and causepremature failure.
If the module will not go into the water valve base, then check tomake sure the arrows on the piston disks line up between the twolines embossed on the module base plate. If the base plate and thepiston are not embossed, then the short wing must be facing awayfrom the center of the module. If a piston has been moved and is notaligned properly, you must rotate it back into alignment for themodule to fit into the base. Rotate it clockwise only. Rotating itcounter-clockwise can cause damage to the diaphragm
NOTE: Pulling a piston out away from the base to see if the tensionis weak will not be an indication of a piston failure and can causemisalignment and damage to the diaphragm.
13
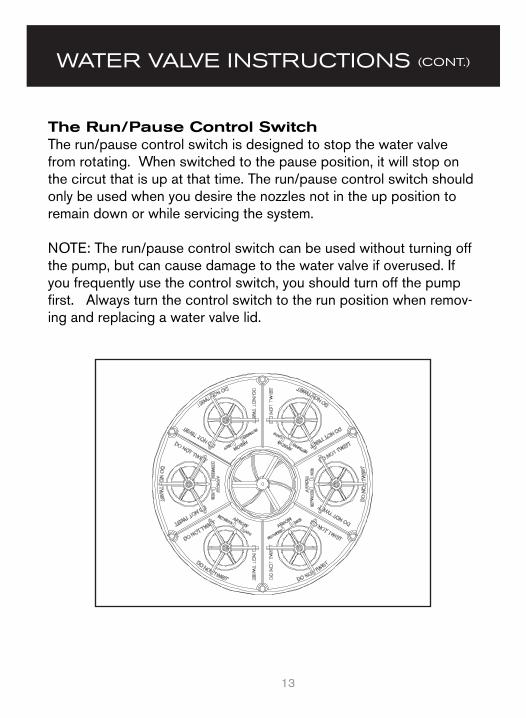
The Run/Pause Control Switch The run/pause control switch is designed to stop the water valve from rotating. When switched to the pause position, it will stop on the circut that is up at that time. The run/pause control switch should only be used when you desire the nozzles not in the up position to remain down or while servicing the system.
NOTE: The run/pause control switch can be used without turning off the pump, but can cause damage to the water valve if overused. If you frequently use the control switch, you should turn off the pump first. Always turn the control switch to the run position when remov-ing and replacing a water valve lid.
WATER VALVE INSTRUCTIONS (CONT.)
SAMPLE TITLE HERE
14
POOL TROUBLESHOOTING GUIDE
Here you will find the most common information needed for trouble-shooting your pool. Also, additional information is available on our website at www.1Paramount.com. The system doesn’t clean like it used to. If the nozzles are turning on and off in groups, but don’t clean as far as they once did, then the in-floor system isn’t getting enough water to run effectively. A quick way to check this is by looking at the pres-sure gauge; is it below 14 psi? •Servicethefiltrationsystem,cleanallbaskets,andbackwash the filter. •Makesureauxiliaryvalves,spajets,waterfalls,and manual surface returns are not open when the pool is in its cleaning mode. Dirt Collects around one nozzle and/or nozzle stays up all the time. When a nozzle stays up even when the pump is off, something is stuck in it. Try the following steps one at a time until the problem is solved: •Pushthenozzledownwithapoolpole. •Removethenozzleandrinsetoremovealldebris. •Neverremovemorethanonenozzleatatimeandreplaceit before removing another.
Replace the nozzle if it is damaged (Read Lifetime Limited Warranty). Nozzles are covered for life, to the original pool owner.
SAMPLE TITLE HERE
15
POOL TROUBLESHOOTING GUIDE (CONT.)
Nozzle pops up and down, but does not rotate. •Whenthenozzleisup,trypushingonitwithapoolpole.This may dislodge debris. •Removethenozzle,rinsetoremovealldebris. •Replaceifdamaged(ReadLifetimeLimitedWarranty). Nozzles have a lifetime warranty to the original pool owner. Clean Area Around One Zone Only When one set of nozzles comes on with the pump each day, but never rotates more than once a day, the Water Valve is not cycling. •“Pause”Modemaybeactive.Turntheknobontopofthe Water Valve to “Run”. •Theturbinemaybejammedwithdebris.OpentheWater Valve, remove the Module (see page 11), and inspect the turbine. •Lookfordebris. •Doestheturbinemovefreely?Ifyes,thedebrismaybein the pipe out of sight. Turn on the pump for a few seconds to clear the line. •Doesturningtheturbineturnthegears?Ifnot,replace the module.
One set of nozzles stay up whenever the pump is on. One set of nozzles stay up all the time, even though the other sets cycle up and down. •Apartinsidethemodulehasaproblem •Debrisisholdingonepistonopenallthetime.Remove the debris.

SAMPLE TITLE HERE
16
•Pistondiaphragmisbroken.Replacethemodule.
All nozzles are floating when the pump is on. When all nozzles are floating, or have water running through them all at the same time, check the module. •Moduleismissing.Replacethemodule. •Moduleisdamagedandallpistonsareopen.Replace the module. •Moduleisnotseatedproperly.Removemodule,removeany debris found inside the base and on the module, reinstall the module.
POOL TROUBLESHOOTING GUIDE (CONT.)
SAMPLE TITLE HERE
17
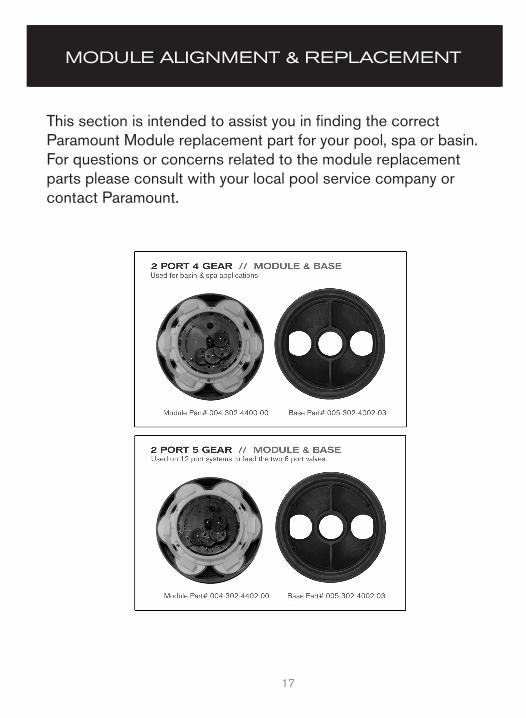
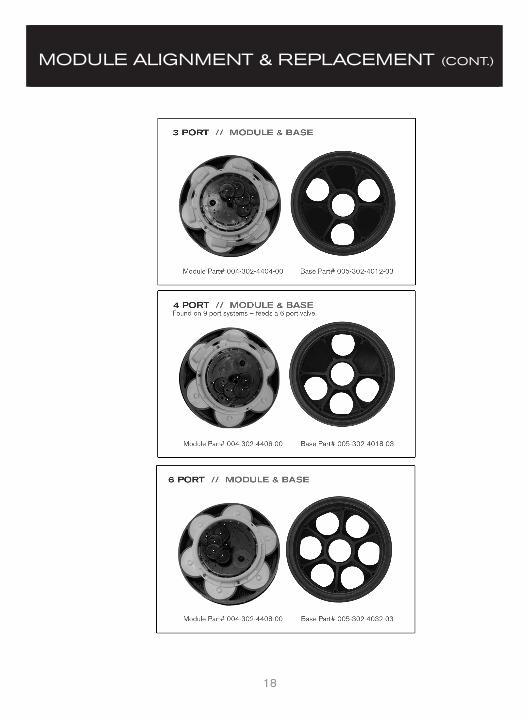
MODULE ALIGNMENT & REPLACEMENT
This section is intended to assist you in finding the correct Paramount Module replacement part for your pool, spa or basin. For questions or concerns related to the module replacement parts please consult with your local pool service company or contact Paramount.
SAMPLE TITLE HERE
18
MODULE ALIGNMENT & REPLACEMENT (CONT.)
19
POOL INFORMATION
Your Pool Builder will provide the below information upon request: Pool Builder:____________________________________ ________ Pool Start-up Date: _______________________________ _______ Filter Pressure (After Backwash):___________________________ Water Valve Pressure (After Backwash): ____________________Backwash Filter When Pressure Reaches: ___________________Gallons of Water in Pool: _________________________________ Gallons of Water in Spa: __________________________________
NOTES
20
295 East Corporate Place • Suite 100 • Chandler, AZ 85225Toll Free: 1.800.621.5886 • Phone: 480.893.7607 • Fax: 480.753.3397
[email protected] • www.1Paramount.com
IMPORTANTINFORMATION
ENCLOSEDCONTAINS:
YOUR OWNER’S MANUAL WARRANTY ACTIVATIONS CARD YOUR WARRANTY CERTIFICATE