Embed Size (px)
Citation preview

Waste Management
Thursday, May 22, 2008
Stephen Paff


i
Contents
WASTE MANAGEMENT OVERVIEW ................................................................................. 1
Waste Management Business Process Flow ..................................................................... 1
GETTING STARTED ............................................................................................................. 3
Logging in to Enviance Waste System .............................................................................. 3
System Model and Desktop ............................................................................................... 4
Responding to a Task ............................................................................................................ 5
Email Notification of Tasks ............................................................................................... 5
System Task Notifications ................................................................................................. 6
CREATING AND MANAGING WASTE PROFILES ............................................................ 6
Profile Manager ................................................................................................................. 6
Editing a Profile ................................................................................................................. 7
Saving Your Profile ........................................................................................................ 8
Creating a New Profile (Usually by Cloning) ................................................................ 9
Constituents Data .............................................................................................................. 9
Characteristics Profile Tab .............................................................................................. 10
Shipping Information Profile Tab .................................................................................... 11
Waste Codes Tab .............................................................................................................. 11
Land Ban Tab ................................................................................................................... 12
Adding Profile Forms and Emergency Response Guide (ERG) to Profile ................ 13
Regulatory Tab ................................................................................................................ 13
PROFILE APPROVALS ....................................................................................................... 14
Viewing Existing Approvals in the System ..................................................................... 14
Editing Approvals ............................................................................................................ 14
Creating Approvals .......................................................................................................... 15
Associating Profiles with Approvals ........................................................................... 15
Cloning Approvals ....................................................................................................... 16
CREATING AND MANAGING CONTAINERS .................................................................. 17
Detailed Instructions to Create Containers .................................................................... 17
Adding Contents (Material) to Containers .................................................................20
Creating Multiple Containers: Cloning ...................................................................... 21
Creating an Old Container .......................................................................................... 22
Moving Containers .......................................................................................................... 23

ii
Consolidating Containers ................................................................................................ 24
Tracking Cylinders and Small Items that are Commonly Consolidated ................... 24
CREATING AND MANAGING SHIPMENTS .................................................................... 26
Creating a New Shipment Using the Shipment Screen .................................................. 26
By Container ................................................................................................................ 28
Adding Subsequent Lines ............................................................................................ 31
Alternative Method to Create a Shipment: From Batch Screen .................................... 34
CREATING MANIFESTS, LDR AND LABELS ................................................................... 38
Manifest Printing ............................................................................................................. 38
LDR Printing ................................................................................................................... 40
LABEL Printing ............................................................................................................... 42
MANAGING SHIPMENTS AND RETURNS ...................................................................... 44
Shipping the Shipment .................................................................................................... 44
Resetting the Shipment ............................................................................................... 45
Managing Shipment Returns .......................................................................................... 45
TSDF Activities .................................................................................................................... 47
Receiving Manager .......................................................................................................... 47
Destruction Transactions ................................................................................................ 48
SAMPLING .......................................................................................................................... 49
Create Associated Samples for Batch Items ................................................................... 50
Create and Print Labels ................................................................................................... 51
Enter Sample Results for Batch ...................................................................................... 54
REPORTS ............................................................................................................................. 59
Embedded Reports .......................................................................................................... 59
Building Your Own Reports: New Ad-Hoc Reports ....................................................... 59
Standard Reports ............................................................................................................. 63
Texas STEERS Report ................................................................................................. 63
Biennial Report ............................................................................................................ 64
Saved Reports .................................................................................................................. 65
BASIC SYSTEM ADMINISTRATION ................................................................................. 66
Creating and Managing Generators ................................................................................ 66
Notification Defaults ................................................................................................... 66
Creating Locations ........................................................................................................... 67
Creating and Managing TSDFs and Transporters .......................................................... 69
Security Model ................................................................................................................. 69

iii
User Setup .................................................................................................................... 70
Group Setup ................................................................................................................. 70
Permissions .................................................................................................................. 71
Other Aspects of the System ........................................................................................... 72
CLASS EXERCISES ............................................................................................................. 73
Exercise 1: Basic System Login, Editing a Profile ......................................................... 73
Exercise 2: Creating and Managing Containers ........................................................... 73
Exercise 3: Create and Manage a Shipment .................................................................. 74
Exercise 5: Reports ......................................................................................................... 74


1
WASTE MANAGEMENT OVERVIEW This course provides training for the use of the Enviance Waste Manager system. The system provides comprehensive management of hazardous wastes, from cradle to grave. The Waste Manager system is accessible via the web at https://wm.enviance.com
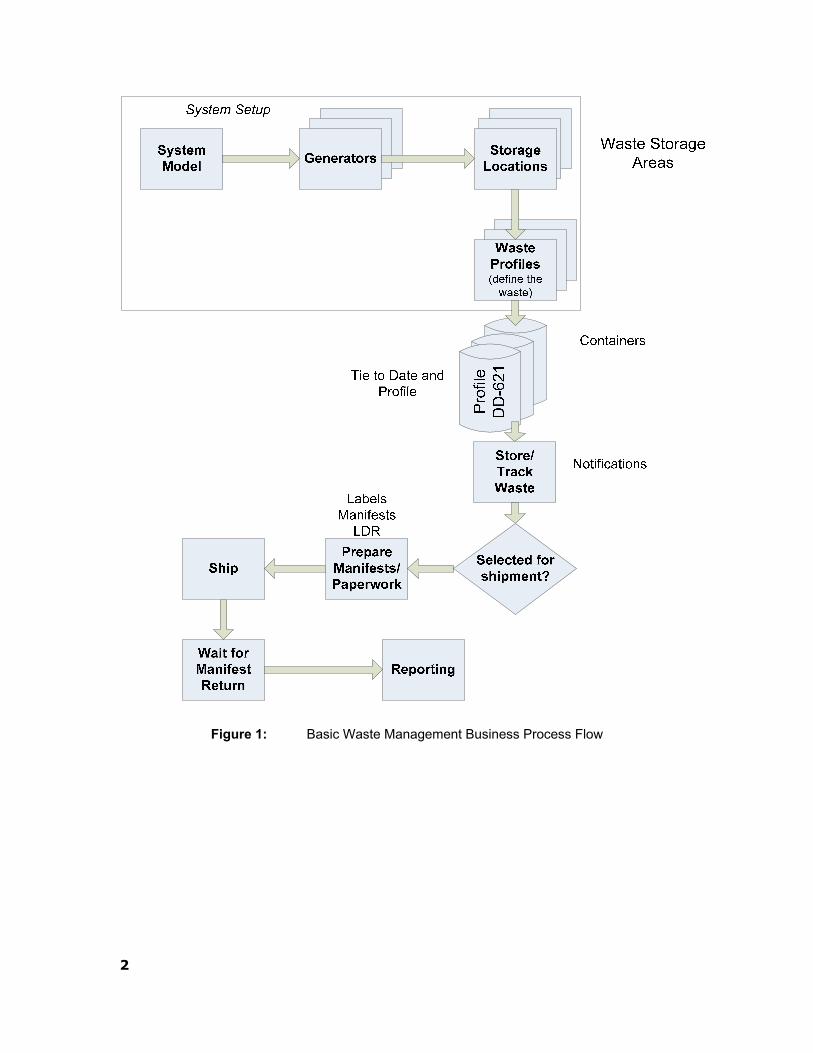
Waste Management Business Process Flow Figure 1 outlines a typical Waste Management business process flow. The steps inside the box near the top of the diagram are set up steps that are implemented initially then only occasionally changed or updated. These include initial system setup, creation of storage location, addition of transporters and TSDFs, and waste profiling.
Containerized wastes are created, and tracked into a storage location. There are automatic notifications set by the system to notify management if the containers are not shipped within a prescribed time period. The containers are selected for shipment, and a shipment is created. Users create manifests, Land Ban forms and Labels based on the shipment record. Once the material is shipped, the system tracks the manifest return and provides notifications if the manifest is not returned in a timely manner.
2
Figure 1: Basic Waste Management Business Process Flow

3
GETTING STARTED
Logging in to Enviance Waste System To log in to Enviance Waste from a web browser, access the following URL:
https://wm.enviance.com
On the login screen, enter your username and password. A username and an initial password will be assigned to you by your system administrator. Your username will be the same as your email address.
Your initial password will be given to you during class. For the purposes of this class, you will be given a username patterned like student##@enviance.com , and your instructor will supply the password.
Figure 2: Main log in screen
The system has been setup to require you to change your password the first time you log in. Therefore, you will see a screen that looks like the one below, and you will be required to enter your old password, and your new password (twice to verify it).

4
Figure 3: Forced password change
System Model and Desktop If the login authentication is successful, you will be connected and the System Model/Desktop will display.
Figure 4: The System View
After you log in to Enviance you will see four different areas which are described below
Area 1: This area is technically called the System Model Frame, but is normally referred to as the System Tree or just Tree.
Area 2: This area is referred to as the Content Frame, and it’s in this frame where you will perform most of your work. Because of this you can also refer to the content frame as your workspace. In the figure above, the Content Frame is displaying the Desktop, which is just one of the many functional areas that will display there.
Area 3: This area is referred to as the Navigation Frame or Menu. Notice that it is comprised of a toolbar consisting of 9 tabs. This toolbar is actually a menu and it is from this menu that you will navigate through the system. The number of tabs available for use is dependent on your user’s rights to your system model.
Area 4: This area is a utility area where you can access your system Profile (i.e., change your password), get online Help, view your calendar, or log out of the system. The Compliance Calendar gives you an overview of Tasks that are due for the day, week and month. Tasks may also be completed from the calendar.

5
Figure 5: Compliance calendar
Responding to a Task Task and task notifications are useful in the Waste Management system to enable you to perform routine or recurring activities. They are further useful because they can be augmented by Custom Reports to allow the task notification to include a report based on live system data.
Email Notification of Tasks Enviance can be configured to send Task Notifications directly to your email.
Upon receiving this notification simply log in to the system to review and complete the task.
Figure 6: Email notification for a task

6
System Task Notifications Task notifications will also appear in the system on your Desktop as well as the Compliance Calendar. To complete a task, simply click on the underlined area and bring up the task completion screen. Fill in all applicable fields and click Save. The task will now be recorded as being complete.
Figure 7: Tasks in the Desktop view
CREATING AND MANAGING WASTE PROFILES There are two inter-related screens associated with creating and managing waste profiles in the Waste Management system. Both can be found under the “Detail Manager” menu item:
• Profile Manager
• Approval Manager
The Profile Manager screen enables you to enter and record properties of waste profiles—basically defining what the waste is and to whom (which generator(s)) it belongs. The Approval Manager screen enables you to specify where the material may be shipped (which TSDF), and also to capture the costs associated with shipment.
Profile Manager To access the profile manager screen, click under the Detail Manager heading in the main menu, and select Profile Manager, as shown below:

7
Figure 8: Accessing the Profile Manager
A list of profiles will appear. To edit a profile, right click on the profile and select Edit.
Figure 9: Profile list under Profile Manager
Editing a Profile If you select a profile for editing, you will enter on the main profile screen (shown below). There are several sub-screens which allow you to enter the profile data in detail, as well. You can access these by clicking the Next link or the links (Constituent || Characteristics || Waste Codes||| etc.) that appear at the top of the screen.

8
Figure 10: Profile Main screen. Note the highlighted links which allow you to enter specific
sets of data (chemistry, physical properties, waste codes, etc.)
Saving Your Profile Once you are done editing your profile, click SAVE to save your changes. If you edit an existing profile, you will be confronted with a cryptic screen that asks:
Figure 11: Profile Confirmation Message
This message is confusing, but it relates to profile versions, so we will explain them here. The Waste Management system enables you to create and track different versions of the profile. This is useful if, for example, after some period of time you discover you need to add or remove a waste code from an existing profile, and do not wish to create a new one.

9
You can revise the profile, and the new waste code will be associated with subsequent containers, but not your previous ones.
So, this is what the Confirm Message means:
Yes Save the profile and do not create a new revision of the Profile
No Save the profile with a new version number
Cancel Do not save at all
In most cases, if there is a very significant change on the technical data associated with the profile (such as addition of a waste code, major change in chemistry, or change in classification), the protocol requires a new profile, not a revision. Therefore, most of the time users are instructed to click “Yes” at this juncture.
Creating a New Profile (Usually by Cloning) If you do need to create a new profile, you can do so by right-clicking and selecting “New”. However, since in most cases any new profile will be a variation of an existing profile, the best way to create a new profile is to right-click an existing profile, select “clone” to copy and create a new profile, and then edit the cloned version.
Constituents Data Constituents data are the chemical properties for your waste stream.
Figure 12: Constituents link
The most important section under constituents is the Chemistry section. You can associate additional chemicals to a profile by clicking the Associate link, and then entering the minimum, maximum and average concentrations. It is also possible to associate whole sets of chemical data (compositions) to a profile. These have to be set up in advance. In cases where you are building the waste profile based on product data such as MSDS, you can create or import a series of compositions based on the MSDS data and then use these compositions to build your profiles.
10
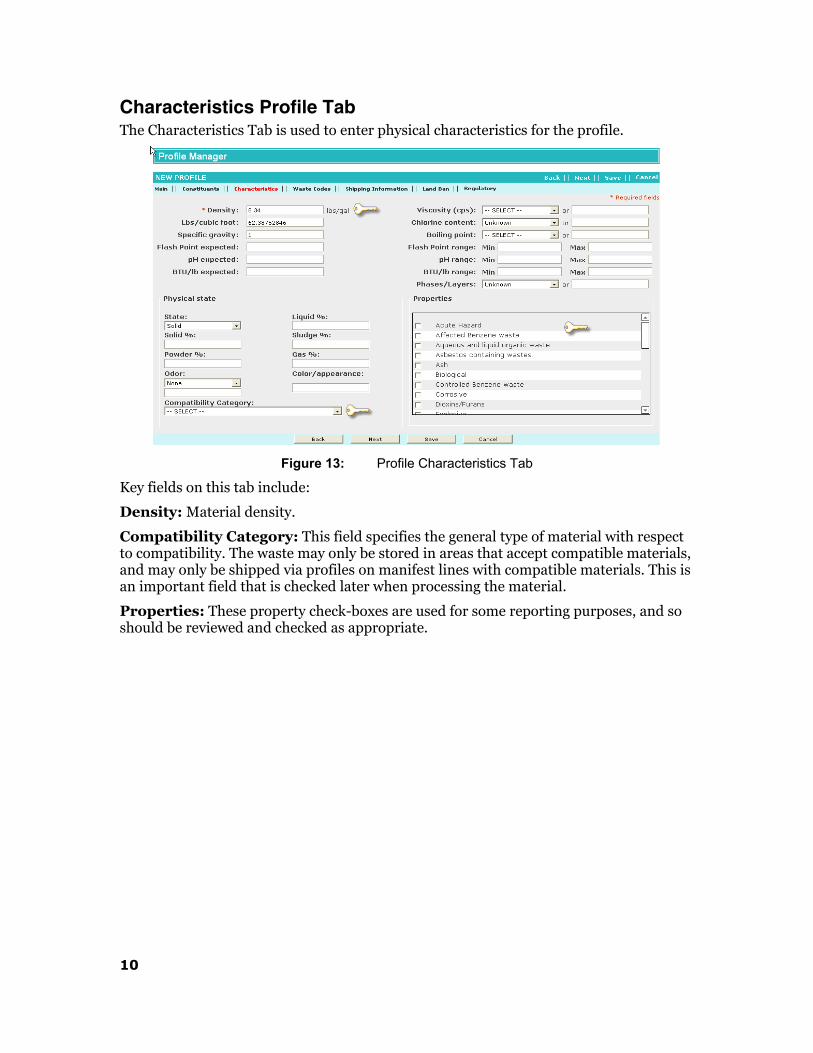
Characteristics Profile Tab The Characteristics Tab is used to enter physical characteristics for the profile.
Figure 13: Profile Characteristics Tab
Key fields on this tab include:
Density: Material density.
Compatibility Category: This field specifies the general type of material with respect to compatibility. The waste may only be stored in areas that accept compatible materials, and may only be shipped via profiles on manifest lines with compatible materials. This is an important field that is checked later when processing the material.
Properties: These property check-boxes are used for some reporting purposes, and so should be reviewed and checked as appropriate.

11
Shipping Information Profile Tab
Figure 14: Shipping Tab
Key fields on the profile Shipping Description screen include:
DOT Shipping Name: selected via the Select link. Allows you to select or edit the DOT shipping name.
Shipping Description: This is the full proper shipping description. The Build link automatically builds it based on the individual data items selected.
Waste Codes Tab To add Waste Codes to a profile, click the Waste Codes link. There you will see that there are three sections for profile waste codes:
• EPA Waste Codes
• State Waste Codes (not including Texas!)
• Texas Waste Code
The Texas Waste code has its own section because it is longer than the others, and because it is possible that the same waste code in two different generators inside of Texas could (theoretically) have two different Texas Waste Codes.
To associate EPA waste codes, click the Associate button (ref 1) and then select the waste code(s) you want to associate. To enter a Texas Waste Code, enter it either to apply to all generators or enter it individually to apply to each generator.

12
Figure 15: Profile Waste Code section
Land Ban Tab The system is structured such that Land Ban reports can be generated in two ways: either as a one page Federal report that is constructed each time or as a report that is based on a constant file attached to the profile. Data concerning each shipment will automatically be superimposed over the uploaded file. The Profile Report is a better mechanism based on the generating facility ’s operations.
To set up for a Profile-based LDR report, it is necessary to upload a file onto the profile Land Ban section. Click the Land Ban link, as shown below. Click the fields from the shipment that you want to appear on the first page of the manifest, and on subsequent pages (see Ref 1). A prompt for each field also appears, which you can optionally edit. Then click Browse, select a .pdf file from your hard-drive, and upload the file (ref 2).

13
Figure 16: Profile land ban link
Adding Profile Forms and Emergency Response Guide (ERG) to Profile As a convention, many plants print other documents, such as a copy of the signed/approved profile form and also the page out of the Emergency Response Guidebook (ERG) with each shipment line. The Enviance system does not technically have a separate ‘Profile’ or ‘ERG’ report capability associated with each shipment line. However, because these forms are ‘constant’, Enviance recommends appending them to the LDR report file. Then they will print each time with the shipment line.
Regulatory Tab Enter data on this tab as appropriate based on your waste stream. This data will be used by the system to generate reports such as the Biennial.

14
PROFILE APPROVALS Approvals tie a profile (which is a technical description of a waste stream) to the TSDF that has agreed to accept it. Thus, a profile may be approved at one or more facilities. The Approvals also allow you to enter pricing information (since the profile is usually approved for shipment to a TSDF at a given price).
Viewing Existing Approvals in the System 1. Locate the Waste Detail Manager menu and select Approval Manager.
2. The list of approvals in the system is displayed.
3. Click on the Approval Number link to view details.
4. Review Approval Records section to see disposal costs and associated profiles.
Editing Approvals 1. Right click on an approval and select Edit.
2. Edit the information as necessary.
3. You can add or edit cost information, associate new profiles, remove profiles, etc.
4. Approval Status must be Approved / Active in order to create shipments using this approval.
5. ** Ensure that the cost structure for the mercury surcharge is applied properly.
Figure 17: Approval Manager Screen

15
Creating Approvals 1. Locate Waste Detail Manager menu and select New > Approval.
2. Skip the custom field template.
3. Assign a unique approval number.
4. Select a TSDF
Complete remaining fields as required as shown in the figure above.
Key fields when creating an approval include:
Approval Number: This is a combination of the profile number followed by the TSDF approval number in parentheses.
TSDF: Defines the TSDF associated with the approval
Classification: Defines whether this is for containerized waste or equipment.
Approval Status: Set this to Approved/Active once the approval is complete, or you will not be able to fully approve the profile and ship the waste.
Profile: Defines which profile this approval relates to. Usually, only 1 profile is set up per Approval.
Enter the disposal pricing data, as shown below:
Figure 18: Entering price data on Approvals
Associate the Approval to one or more profiles, as shown below.
Figure 19: Approval Profile list
Associating Profiles with Approvals The Approval screen is designed to associate a family of similarly-priced profiles to one TSDF. Some facilities as a rule associate only 1 profile with each approval, so they can easily adjust the approval as prices are adjusted.
1. Right click on an approval and select Edit.
2. Scroll to the Profiles section

16
3. Click Associate.
4. Locate the profile you want and select it by checking the checkbox
5. Click Associate.
6. Click Save.
Cloning Approvals 1. If you need to create a new Approval and the CLIN, TSDF, etc. are the same
as an existing approval, the most efficient way to create that new approval is to Clone it.
2. Locate the existing approval in the Approval Manager.
3. Right click the existing approval and select Clone.
4. Edit the approval properties as needed.
5. Click Save.

17
CREATING AND MANAGING CONTAINERS Containers of all types of waste can be created in Enviance. The figure below guides you through the steps to create a new container:
1. Go to the storage area on the tree in which you want to create the container
2. Right click the area name and select New Container
3. Click Continue instead on the Custom Fields pop-up
4. The screen will auto-number the container.
5. In most cases, you will need to:
a. Click the profile link and select the appropriate profile
b. Click container specification link to select the appropriate container
c. Click the History or Next tab to move to the next page, and then ADD under contents to enter the quantity of material in the drum
6. In SOME cases, such as when the drum is really older than the current date, you may need to adjust the dates at the bottom half of the first screen:
a. Date Placed in Storage
b. Accumulation start date
These normally default to the day you create the drum, which is ok the vast majority of the time. However, especially as you create the drums initially in inventory, these fields need to be set – in tandem – to the appropriate
7. Save the container and click Cancel to exit the screen
Detailed Instructions to Create Containers To create a container, right click on the Area you wish to create the container in (ref 1). This will open up the tool box. Then select New (ref 2) and Container (ref 3) from the next menu. You will then be brought to the custom field screen.

18
Figure 20: Key clicks to create a new container
Click Continue which will bring you to the Container Manager Screen.
Figure 21: Container Manager Screen

19
On the Container Manager screen you have many choices. As you can see the numbering scheme is already populated for you. It is on this screen that you will select the type of waste, container type and waste material profile. The profile and the container types are selected by clicking on the Blue Linked areas which will bring up a list of profiles and containers.
Select the profile you want and click “Associate”.
Figure 22: Profile Selection for a container
After selecting the appropriate profile, click the blue container specification link to select the container type. The container list will pop up. Select the appropriate container and click Associate.
After selecting the Container specification, you need to specify how much material is in the container. Click the Next (or History) links to move to the next screen. Click the ADD button under the Contents area, as shown below.

20
Figure 23: Adding contents to the container.
Adding Contents (Material) to Containers The Add contents subscreen will pop up. Enter the estimated volume (or weight) for the container. (Generally you need only enter one or the other—the weight will estimate from your volume and the volume from your weight).
Figure 24: Entering the weight and volume on the content window.
After you have entered the appropriate weight and/or volume, click Add to add the content and close the screen. Note that the volumes are validated—meaning that if you try to place 65 gallons into a 55 gallon container the system will tell you it is impossible.
Once you have entered the contents, click Save to save your container and then Cancel to exit the screen.

21
If you look back into your storage area, you will see your new container, as shown below.
Figure 25: Viewing containers associated with an area
Creating Multiple Containers: Cloning Often you will need to create more than one identical container. To do so, create the first container per the instructions above, and then clone that container to as many as you need.
First, find the container you want to clone, select it in the View Container Window (left click), then right-click to pull up the menu. From the menu, select Clone, as shown below.
Figure 26: Using the right-click option to Clone a container
The clone container(s) popup window will appear. Enter the number of clones you wish to create, and then click “set contents to Current Weight and Volume”. This will clone all the dates, and all the contents of the existing container.

22
Figure 27: Entering clone details: generally enter the number of copies you want, enter the
accumulation date and then click "set contents to current...” to add materials to the clones.
If you create only one clone, the system will immediately open the Container window for editing. (This can be a little confusing, because if you create two containers via clone, it just creates them and leaves you back in the View Container window. The intent is to enable you to easily adjust the new container’s properties.) IF you create only one container, make sure you SAVE the container and then click Cancel to go back to the View Container window.
Creating an Old Container From time to time, you may encounter a container that inadvertently was missed, and perhaps it is a week or a few days old. You can adjust the dates in the system so that the notifications and so forth for the container will work correctly, by scrolling down on the main container screen, and adjusting the Date Placed in Storage and the Accumulation Start Date. You will need to adjust these in tandem, because the Date placed in Storage cannot be before the accumulation start date.
Figure 28: Adjusting the dates associated with a container

23
Moving Containers
Figure 29: Container Movement
The system enables tracking of container movements. The history of movements is also tracked.
1. Right click on the Area and select View Containers.
2. From the container list, select the container(s) to be moved. (Ctrl-click to select multiple containers.)
3. Right click on a container and select Move To. (Ref 2 on the figure above). The screen shown below will open. Within that screen, click the Associate button (ref 1), then select the location you are moving to and click Associate within the Search screen (ref 2), then click Move (ref 3).
Figure 30: Move Screen
4. The system will confirm your move and then return you to the View Container screen.

24
Consolidating Containers 1. Right click on a container and choose Consolidate To, or Consolidate
From (ref 3 in figure above)
2. Select the type of item (container, equipment, tank) then click ADD.
3. Search to find items to associate.
4. Select checkboxes, click Associate, or use the Select All button.
5. In the Consolidation form, enter Weight consolidated and UOM for each item, or select Total Weighty (ref 1 below). If you want to enter partial quantities, estimate the weight consolidated and use Pounds as the UOM (ref 2).
Figure 31: Consolidation screen. In this example, the system indicates that the user is
attempting to consolidate incompatible items. This consolidation will not be allowed to be completed unless a different destination container is selected.
6. The system will automatically check to ensure that you are consolidating compatible materials into a container that is compatible with those materials. It will show the items as red if they are incompatible, and prevent the consolidation
7. Click Save.
Tracking Cylinders and Small Items that are Commonly Consolidated One common container tracking situation is exemplified by small items such as spent propane cylinders. These are obtained from various generators throughout a plant, and then repacked into drums for shipment. Cylinders should be received as any other waste—one cylinder at a time. Then, they are consolidated into their destination drums. The figures below walk you through the process:
1. Create the propane cylinders using the appropriate profile as a “propane cylinder” container type.
2. Create the destination drum with the same profile (and the appropriate container type)

25
3. Consolidate FROM the propane cylinders to the Destination. Make sure you click the “Total Quantity” and the “End of Lifecycle” options when you consolidate.
Figure 32: Create propane cylinders in the system with container type Propane Cylinder.
Figure 33: Propane cylinders created
4. Create the destination container with the same profile (but with a drum container type such as DM-55 or DF-55)
Figure 34: Consolidating cylinders
5. Consolidate into the destination drum as appropriate. Do not forget to click “total quantity” (ref 1) AND the “end of lifecycle” (ref 2) options during the Consolidation.

26
CREATING AND MANAGING SHIPMENTS The Enviance system enables you to create and manage shipments for your containers. This is accomplished through the use of the Shipment and Shipment Return screens.
Creating a New Shipment Using the Shipment Screen To create a new shipment, navigate to your generator in the tree, right click, and select New > Shipment, as shown below:
Figure 35: Creating a new shipment
The shipment screen will then open. There are five key items that need to be specified on the shipment:
1. Shipment type
2. Generator
3. Facility receiving the waste
4. Transporter(s)
5. Material to be shipped
The figure on the next page shows a snapshot of the shipment screen.
Each of the key items is discussed below:
1. Shipment Type This field is important because it used to classify the shipments. The available choices are shown below:
Figure 36: Shipment types
Set the shipment as a whole to the “most hazardous” designation. Thus if any lines are RCRA hazardous, that should be the designations; if all are recycled except for one Texas hazardous stream, then set it to non-RCRA hazardous, and so forth.

27
2. If you created the shipment by right-clicking the generating facility on the tree, then the Generator field will be set to the generating facility. If it is not, you can use the “select” button near the bottom of that section to select the appropriate generator.
3. The quickest way to select the TSDF is to start typing the TSDF name in the Search TSDF Name field—after a few seconds, the program will provide you a list of all matching names. A list will appear, and you can select the right TSDF by clicking on the right name. If you need to search for the TSDF, you can do so using the “search” button near the bottom of that section.
4. The Search Transporter Name field works similarly to the corresponding TSDF field. Otherwise, you can click the “Add” button and select the Transporter from a list. Note that each manifest may have more than one transporter.
5. Line Items are discussed in the next section.
Figure 37: Shipment Main screen
28
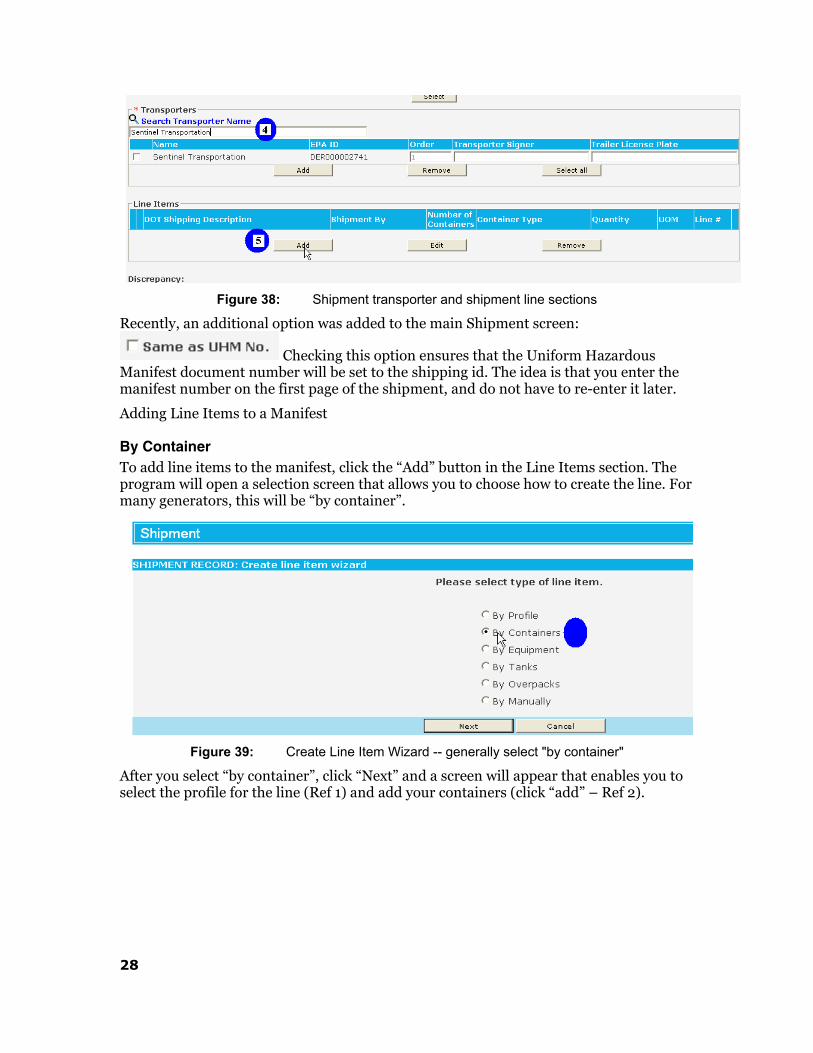
Figure 38: Shipment transporter and shipment line sections
Recently, an additional option was added to the main Shipment screen:
Checking this option ensures that the Uniform Hazardous Manifest document number will be set to the shipping id. The idea is that you enter the manifest number on the first page of the shipment, and do not have to re-enter it later.
Adding Line Items to a Manifest
By Container To add line items to the manifest, click the “Add” button in the Line Items section. The program will open a selection screen that allows you to choose how to create the line. For many generators, this will be “by container”.
Figure 39: Create Line Item Wizard -- generally select "by container"
After you select “by container”, click “Next” and a screen will appear that enables you to select the profile for the line (Ref 1) and add your containers (click “add” – Ref 2).

29
Figure 40: Container selection
Select the container(s) you want on the line and then the Associate button (Refs 3 and 4 below).
Figure 41: Select the containers and then "associate" them to the line
Finally, click “Create Line Item” to finish selecting containers and create the line on your shipment.
The system will open the Shipment Line Detail screen, shown below. From there, you can review or update the DOT shipping Description (ref 1), or Weights/ volumes for the line (Ref 2). You can also see the list of drums associated with the line, view more details concerning each item, or “Add” containers to the line.

30
Figure 42: Shipment Line Detail
There are two additional links on this screen: Approval Costs and Land Ban. Using the Approval Costs link, you can select an Approval for the line, and associate disposal costs. The Land Ban link allows you to view or update land ban printing data. It is discussed in more detail in the next module.

31
Figure 43: Optional Approval Costs link. Click "Select" (ref 1) to select an approval, then the
appropriate cost (ref 2), and then "Apply Costs" (ref 3) to associate costing.
Click the Save link on the upper right-hand corner of the screen to save your line and return to the main Manifest screen. Don’t forget this step.
Adding Subsequent Lines After you have saved your line, you will be returned to the Main manifest screen, where you can click “Add” to add an additional line, and repeat the process as you create the manifest.
Editing/ Removing Line Items
You may also click the check-box to the left of each line of the manifest, and then click “Edit” to edit the line, or click “Remove” to remove the line from the manifest.
Entering/ Updating the Manifest Details
Once you are finished entering each line, all that is left is to review the Manifest details, and print a copy of the manifest to be used to finalize the shipment.
Click on the “Manifest Information” link on the top left of the screen.

32
Figure 44: Manifest Information screen (enables you to enter and update Manifest details)
Key fields on this screen include:
Manifest Document Number: This is a required field that you normally don’t know as you create the manifest. Therefore the program adds an automatically generated number as a placeholder. It is important that this number be updated correctly after the manifest is printed.
Manifest: This sets the type of manifest to be printed (Universal Hazardous Manifest is the most prevalent). This is not relevant in our example here, but this field will have to be selected if you build the manifest based on the Batch screen.
Section 14: This field represents the data to be printed in Section 14 of the manifest. IT is automatically generated based on your line selections. In some cases, though, you may want to edit or adjust it.
Rebuild Section 14: This button automatically rebuilds Section 14. Note that you can select various fields to appear (such as the Profile Number, Approval Number (which is usually the TSDF profile approval number) or other fields as needed.
Once you are through reviewing and editing, click the Save link on the upper right-hand corner of the screen to save your data.
At this point, you are normally through creating the shipment, so you can click Cancel to exit the screen.

33
Adding a Line to a Shipment by Profile
The second key method of creating a shipment line is by profile. Choose this method if the shipment includes container that you are not tracking using the Waste Management system.
To select Shipment Line By Profile:
1. Click the Change button to search for an appropriate profile, and associate it. The profile data will automatically transfer to the Shipment.
2. Specify the number of containers and type. Enter the total weight or volume for the line (the other value will be calculated based on the profile density).
Figure 45: Creating a shipment by Profile
Figure 46: After selecting profile, specify the number of containers and the container type.
3. (Optionally) Check the “Provide additional container data” check-box. This will open a table where you can enter container id, weight and volume for each container on the line. Note that if you choose this option all fields are required, and both the weights and volumes must sum to the total weight and volumes entered on the line.

34
Figure 47: Additional Container Data
If you check the “Provide additional container data option” (Ref 1), then a table appears with a separate row for each container on your shipment (Ref 2), and you need to enter container numbers as well as weight and volumes (Ref 3a). The total of the weights and volumes in (3a) must match the line weights and volumes in 3b, or you will get an error message and will not be allowed to save your shipment line.
4. You can further specify PCB containers by clicking the optional Material Source Type (Ref 4). This allows you to enter data required for PCB tracking.
Alternative Method to Create a Shipment: From Batch Screen The standard method for creating a shipment assumes that the user decides to make a shipment, and then decides what drums are on that shipment. The program provides an alternative method to create a shipment, for use when you know the containers to be shipped more or less ahead of time—and you really want to specify them first, and then create the shipment. It is easier if you more or less already know what you want to ship.
This works as follows:
1. Go to the Container View
2. Select one or more containers
3. Right click the selected shipments, and select “New Batch”
4. The program will create a Batch screen entry
5. Elect to Create a Shipment from the Batch
6. Enter a few key fields on the shipment
7. Save and you are finished.
The figures below guide you through the process.
Step 1: Right-click on a storage location and select View Containers to get into the Container View
Step 2: Select multiple containers. (Left click the first, then hold the control key down while left-clicking to select the remainder)
Step 3: After you have selected the containers that you want, right click and select “New Batch” as shown below:

35
Figure 48: Creating a batch based on one or more containers.
The system will confirm that you want to create a new Batch, then open the Batch Screen. The Batch screen puts a rubber band around a set of containers and allows you to choose what you want to do with them. In this case, we want to ship.
Step 4: Select “Ship” and Save the Batch. Then enter the TSDF and Transporter and save again.
Figure 49: Batch screen
Step 5: Select “Ship” in the Apply Selected Action After Save field (ref 1). Then Save (ref 2). Note that if you needed to add another container to the Batch, you could have done so using the “Associate Container” button (ref 3). When you hit save, several new fields will appear on the screen.
Step 6: Click the link next to the TSDF field to select a TSDF (ref 1) and then the “Add” button below transporters to add a transporter (ref 2).

36
Figure 50: Fields to add TSDF and transporter to batch shipment
Step 7: Another new screen will appear, the Shipment Screen. In general, the first page will be filled in correctly. Click on the Manifest Details link and enter the Manifest Type (Ref 1) below.
Figure 51: When you create the shipment using the Batch screen, you have to select the
type of manifest (ref 1)
When you select the manifest type as Uniform Hazardous Manifest, the screen will reconfigure itself, and all data will be filled in except for the Section 14 data. Click what you want to see in Section 14 and then the “Rebuild Section 14” button to set up that section, as shown below.
Click Save and you are finished with the Shipment.

37
Figure 52: Click the data you want to see on Section 14 and then the "Rebuild Section 14"
button.

38
CREATING MANIFESTS, LDR AND LABELS This section explains how to create and print manifests, Land Disposal Restriction forms, and labels. It assumes that the shipment has already been created.
Manifest Printing 1. Log into system.
2. Right click on the generator and click View Shipments.
Figure 53: Viewing shipments
3. A list of open shipments will appear in the view area of the screen.
4. Right-click the Shipment you want, and click Edit.
The Shipment screen will open.
Figure 54: Click Edit to open the Shipment to print LDR & Manifest
5. Click the Manifest Details link on top of the page. You will notice some arbitrary number in the field marked “Uniform Hazardous Manifest Document Number”. This number is generated by the system and is usually wrong. You should over-write it with the correct number based on the Manifest you are about to print.
6. Now go to the bottom of the same screen and click the “Save Shipment and Print Manifest” button.

39
Figure 55: "Save Shipment and Print Manifest" button
A new screen will open up.
7. Click (ref 1) Print Data only, then click “Generate Report” button, then the “View Manifest” button.
Figure 56: Generate Report, then View Manifest
A “file download” box will appear, which you can open and print on your LexMark printer.
Figure 57: Manifest .pdf file

40
LDR Printing After you print the manifest, you can close the .Adobe viewer and also the Print Manifest dialog box. Now we want to print the LDR forms. To do this, we must first capture the change we just made in the Manifest number. So, we go back a screen.
1. Click on the Main link on the Shipment screen:
Figure 58: "Main" link on the shipment screen
2. Now scroll towards the bottom of the page to the Line Items section, and click the first line on the manifest (ref 1), and then the Edit button (ref 2). Notice, by the way, that there is a “Print Labels” button in this section as well. We will come back to that shortly.
Figure 59: Edit line item
When you click Edit, a new screen opens up. This screen has two links: “Line Item Details” and “Land Ban”. We are going to focus on the Land Ban but if you needed to update a weight or shipping description on the shipment line, you would do so on the “Line Item Details” link.
3. Click the “Land Ban” link.
A new section opens, showing the data that will be printed on top of the first page and then every other page of the LDR. If this doesn’t appear, or if it includes the wrong Manifest number (which is likely), you must click the “Reset LDR to Profile Settings” button (ref 1) to correct. The program will automatically update the data based on whatever you just entered.

41
Figure 60: Resetting the LDR data after entering the Manifest
4. Click Save and you will be returned to the Line Items section. You must update the Land Ban section for every line.
Note: Enviance has plans to correct this—the LDR data should update automatically when you reenter the manifest number. That will be corrected in a future release.
5. Once you are done updating the LDR for all lines on the manifest, click on the Manifest Details link again (ref 1 below), scroll to the bottom of the screen, and then click the “Save Shipment and Print LDR” button.
Figure 61: Click “Save Shipment & Print LDR”
6. A Popup window will open. Select “Profile LDR” (ref 1) and Generate (ref 2)

42
Figure 62: LDR popup window
Open the pdf file just like you did for the manifest and you will see the complete LDR form. Notice that all the Header information prints on top (ref 1) and then the ‘constant’ form appears below that. IF you have multiple lines on your shipment, the system will reprint the ‘first page’ header on each new LDR, but it will construct them all at the same time. So you may have a 20 page pdf to print out if you have 4 lines, each with a 5-page LDR.
Figure 63: Portion of LDR
LABEL Printing The Labels are printed separately for each line, so we navigate back to the Main section of the shipment, using the ‘Main’ link (ref 1), then navigate down the Line Items section. We select the line we want labels for, and then click the “Labels” button (ref 2).
1. Navigate back to Main, down to the Line section and then click "Print Labels" to print the labels.

43
Figure 64: In the Main tab, click Print Labels.
A new Label screen will open up. This screen shows you the data that is going to be printed on the label. You can edit or update the data but your changes won’t be saved. Otherwise, all you need to do is select the label format and create the label.
2. Select “Mesa Labels” (ref 1) and then either “FP-1” or “F2P” depending on which labels we have (Ref 2). Then click Create Labels” (ref 3).
Figure 65: Selecting label type and creating the label
The system will open a new screen that gives you two options: “Generate” or “Print on Blank”. The “Generate” option creates a label that looks exactly like a facsimile of the printed labels (i.e., yellow, with black into). The “Print on Blank” link sends just the data, so you can run the label through your printer and print there. This is the one you’ll most likely select each time.
The system creates a .pdf file, which you can open or save to your disk for future printing. Note that it only creates a single copy of the label. To print more than one, just select the number of copies when you print from Adobe.
3. After you print each set of labels, as appropriate, save the shipment and hit Cancel to close out the screen.

44
MANAGING SHIPMENTS AND RETURNS When you first create a shipment, the drums are not removed from inventory or their storage locations. Instead, they are given a status of “in staging” and they remain in the location they were originally stored. The idea is that creating the shipment really establishes just a ‘pick list’ for shipment, but the shipment is not finalized until the truck leaves the gate.
Therefore, the program gives you an opportunity to update shipment information until the truck leaves, and also to denote that the truck has left. The system also tracks the manifest return, and further allows you to update shipment data after you receive the manifest back from the TSDF. This section describes the screens and procedures to manage the shipments.
Shipping the Shipment To ship your shipment, follow the steps below:
1. Right click the generator, and select View Shipments to view the shipments.
2. Right click the appropriate Shipment and select Edit.
3. Update any line or manifest data that needs to be updated, including line weights or volumes if necessary.
4. Update the Shipped Date to the appropriate date.
5. Un-click the on hold field.
6. Save the Shipment.
Step 1: View Containers
Figure 66: Viewing available shipments from a generator. Notice you can also view
Shipment Returns.
Step 2: Right click the shipment you are shipping and select Edit
Step 3: If necessary, scroll down to the Line Detail area, select a line and “Edit” to update line weights or volumes. Or click on the manifest details link to update manifest data.
Step 4: Enter the Shipped date (ref 4)

45
Figure 67: Shipped date and on-hold checkbox
Step 5: Un-check the on hold checkbox field (ref 5)
Step 6: Save the manifest. A message confirms that the shipment is Pending Return.
If you look in the Container View for the containers on this shipment, they will now be gone (since they are presumably on the truck bound for the TSDF).
Resetting the Shipment Sometimes, after the shipment has been marked as shipped in the system, it becomes obvious that a major mistake was made, or perhaps the truck never left the facility. So it is necessary to “un ship” a shipment.
In the Enviance System, this is called “resetting” the shipment. To do so, first find the shipment in the shipment manager, by looking for shipments with a status of “pending return” (ref 1 in the shipment below). Search for shipments with the “search” button (ref 2). Select your shipment, right click and select “reset” (ref 3).
Managing Shipment Returns After your shipment has been received at the TSDF they generally return the signed and dated manifest for your records. This is called a “Manifest Return” in the Enviance system. The dates that the manifest is returned are tracked, and if a manifest is not returned within a prescribed time (usually 30 days) then the system will send out a notification.
The Shipment Return process is very straightforward:
1. List the Shipment Returns.
2. Select the one you want for Editing.
3. Enter the Return Date.
4. Enter material disposition.
a. Enter “Accept All” if the TSDF accepted all items without a formal discrepancy.
OR
b. Click individual items and enter data concerning them if there were discrepancies.
OR
c. Reject all items if the shipment was rejected back to you.

46
5. Save the Shipment Return
Step 1: To find your Shipment Return, right click on the generator and select Shipments then View Returns from the menu (very similar to shipments, except you want to view the returns)
Step 2: Find the Return you want, right click and select “Edit”
Step 3: Enter the date the manifest was returned to you and then click the Manifest Details link
Figure 68: Enter the Manifest return date (ref 1) and then click Manifest Detail (ref 2)
Step 4: Enter material disposition (“Accept All” if the manifest was accepted without significant change)
Figure 69: Manifest Detail on Shipment Return.
If there is a discrepancy with a particular drum, click that drum number and then click “Accept” (ref 2 shows both). A new sub-screen will open that enables you to enter the accept date for this particular drum, and also enter discrepancy data for this particular drum, including weight, management method, ultimate disposal site and notes.
Step 5: Click Save in the upper right hand corner to save the line.

47
TSDF Activities The system allows for the creation of internal TSDFs. Internal TSDFs are part of the system model. Thus, a utility may have multiple generators and an internal TSDF (with a Part B permit) to process certain wastes. TSDFs may receive wastes, and also destroy wastes.
Receiving Manager When you ship to the internal TSDF, the Waste Manager system creates a Receiving record, which enables the TSDF to recreate the material on their site when they approve the manifest.
1. Right click the TSDF, and select Shipments > View Receiving to view receiving records.
This will produce a list of manifest shipped to your site. Select the one you want to receive, right click and select Edit. The Receiving Manager screen will open.
Figure 70: Receiving Main screen
2. Enter the date the material was received, and click Manifest Detail to receive each item or line.
Figure 71: Receiving manifest detail screen

48
You can Accept one container at a time or accept all items on a line. In either case, you will be prompted for the location you are placing the containers, date accepted, container type and profile on-site.
3. Enter this data as appropriate and take the items off hold to complete the acceptance process. Then Save the manifest to complete the Receiving process.
Once Received, the manifest returns to the generator as a Manifest Return.
Destruction Transactions TSDFs may also destroy containers (for example, in an incinerator).
To destroy a container at a location, the location must first be set up as an ‘ultimate destruction location’, as shown below:
Figure 72: Ultimate Destruction checkbox
Then, from the menu, right click the location and select New > Destruction transaction to open the Destruction Manager screen.
Add containers to the destruction transaction, and select Process to complete the transaction. At that point, the containers will be removed from inventory.
Figure 73: Destruction Transaction

49
SAMPLING There are two methods for tracking samples in the system: Sample Manager and Samples created via the Batch mechanism. The Batch mechanism is more powerful of the two and is therefore the focus of this discussion.
You can create a new batch from the Containers or Equipment list, or from Batch Manager.
To create a new batch from the Containers or Equipment view:
1. From the Containers or Equipment list, select multiple items (using Ctrl+click) to add to the batch. Right click and choose New Batch.
Figure 74: Create a new Batch
The New Batch form appears, with the selected items. The Generator field is completed for you. The batch number will be automatically generated from the numbering schema set up for the Generator. (See Edit Generator Numbering Schemas, page 11-13.)
You may add additional items to the batch, if desired by clicking Associate Container or Associate Equipment button and selecting the items to add.
Alternately, you can create a new batch by selecting New > Batch from the Waste Detail Manager menu. Select the Generator, then click the Associate Container or Associate Equipment buttons to add items to the batch.
Figure 75: Creating a new Batch from the Waste Detail Manager

50
2. Enter a Group Reference name or number.
3. Associate containers as desired.
Figure 76: Associating containers to a sample. Notice the "Associate Sample" action is
selected in the “Apply seleted action after Save” field in the bottom left of the figure.
4. Select Associate Sample for the action to apply after saving.
5. Save.
The Samples page appears next.
Create Associated Samples for Batch Items When you create samples for a batch, a sample is created for each item (container or equipment) in the batch. You can edit the batch later to provide the lab results for each sample, in bulk or consecutively.
To create samples for a batch:
1. On the Associate Sample page, enter the Date, or select the date from the calendar.
This is the date the sample was taken, or is required (not the date of the lab work).
2. Enter a Chain of Custody number and select the Date of Chain of Custody.
3. Select the Analytes to test for.
Ph, Flash and PCB are selected by default. To test for Solvent, double click Solvent to add it to the Selected list.
To test for other analytes, enter the analyte in the box to the right and click Add Analyte to Selected. Your addition will be added to the Selected list.
To remove an analyte from the Selected list, double click it.

51
4. Choose a lab from the Lab list. After selecting the lab, you may select the chemist(s) to notify, if desired, and compose a message.
To send a message to one or more chemists, select the chemist(s) from the box (Ctrl-click to select more than one). Compose your email message in the box.
To email yourself (i.e., to keep a record of what you are working on), select Me, and compose a message as above.
If no message is required, select None. (The email box will be disabled.)
Figure 77: Associating analytes to a batch sample.
5. Review the list of items and associated samples.
Sample numbers are automatically assigned according to the numbering schema for the Generator.
If a sample is already associated with the object, the Existing Sample Number will be shown. Leave the New Sample Number blank to use the existing sample.
If you want to create a new sample for the item, enter a new sample number; the item will then have two samples associated with it. Sample numbers must be unique for each item.
Create and Print Labels Next you can create labels for printing and pasting on the samples. You can choose the properties to print on the labels, edit the label text, and set default values for the property.

52
Once you have set up your default print labels, you only need to select - Print Defaults from the Print Labels list and the default labels will appear as previously configured. (Print label defaults are saved for each user, not per system.)
If you do not want to print labels, select - Do not print labels from the Print Labels list, click Save, then Finish.
To set up your default labels or edit your default labels:
1. Select an item from the Print Labels dropdown list. The associated properties are displayed.
2. To select a property to include on the label, double click the property.
Figure 78: Setting up labels for printing
3. To re-order properties, select a property and click Up or Down to move it.
The property name will appear in the selected box on the right, and in the Default Labels section below.
Figure 79: Re-ordering fields for the labels
To edit the property name as it will appear on the label, edit the name in the Default Labels list. You can also enter Default Values for the property, if applicable.
Note: Labels and values cannot exceed 24 characters.

53
Figure 80: Save print defaults.
4. After setting up the print labels as desired, click Save Defaults.
After you have saved your default labels, next time you can simply select - Print Defaults from the Print Labels list and the Default Labels and Values lists will be automatically populated according to your saved defaults.
To print labels:
1. When you are done setting up labels, click Save.
The Print Labels page appears, displaying the labels as they will appear for printing. (If you chose not to print labels, the same page appears, but without the option to generate a pdf.)
Figure 81: Review and click Generate PDF to create label file for printing.
2. Click Generate PDF.
3. Save the pdf to your computer.

54
Figure 82: Save the .pdf file to your computer.
You can then open the pdf file and print the labels.
4. Click Finish.
When the lab results are returned, you can edit the batch and enter the results in bulk.
Enter Sample Results for Batch Once the lab results are returned, you can edit the batch to enter results for all items in the batch.
To enter lab results for the batch:
1. From Batch Manager, right click the batch and choose Sample.
Figure 83: Edit sample information.
Alternately, from Sample Manager, choose any sample from the batch, right click and choose Edit.

55
Figure 84: Edit a selected sample.
The items in the batch and the associated samples are listed at the top of the page. The first sample (or selected sample) is highlighted and its details are shown below.
To choose a different sample to update, click the Sample Number link.
If the list is large, you can close the sample list display by clicking the X in the Batch Number header.
Figure 85: Select sample to edit.
2. Complete the Sample Detail section.
Bear in mind that you will be able to apply the results to one or more, or all, samples in the batch when you are done.
3. Click Next to proceed to the Lab tab.

56
Figure 86: Lab tab for entering lab results
4. On the Lab tab, enter the lab analysis results. Then click Next to proceed to the Associations tab.
5. On the Associations tab, select the New Profile Number link for the container or equipment.
Figure 87: Associate profile from Association tab.
6. In the Profile selection window, find the waste profile to associate with the sample. Click Associate.

57
Once you have completed all information for the sample, you can then choose other items in the batch to which you want to apply the same results.
7. Check the items in the list on the top of the page to which to apply the results.
8. To apply the results to all samples in the batch, click Check All.
9. Click Save.
Figure 88: Save the edited sample information.
The Updated On column shows the date for those samples that have been saved. The next unedited sample in the batch is highlighted in the table.

58
Figure 89: Sample results saved.
For convenience, the field values for some fields are pre-populated from the last edited sample for the next sample, although values may be changed as necessary.
10. Repeat the procedure to enter the lab results for the next item.
You may apply each set of results to multiple samples, or continue to add consecutive results for each item individually.
When all samples have been edited and saved, the email button is enabled so you can email the results to the appropriate users.
11. Click Create and Send Email.
Figure 90: System preparing an email for Batch sample results.
A copy of the email message is displayed for your information.

59
REPORTS There are basically four types of reports within the Waste Management system. These include:
• Reports embedded into particular screens (such as Manifest or Label reports inside the Shipment screen, or the 1348 and 1390 reports associated with the Batch screen);
• Standard Reports (such as Annual or Biennial Reports) that are completely ‘packaged’ within the system;
• New ad hoc reports that the user can run on the fly;
• Saved ad hoc reports that the user creates and saves to be run repeatedly.
These four types of reports are discussed below.
Embedded Reports Reports relevant to DPE Beaumont that are embedded in various screens are shown in the table below. These are generally explained with the associated screen.
Report Screen or Access route Comments
Manifest Shipment Report; Manifest Details tab
Also can be accessed by right-clicking shipment
Universal Hazardous Waste Manifest; also various non-hazardous manifests or bills of lading that utilize the same or similar formats.
LDR reports Shipment Report
Also can be accessed by right clicking on shipments
Labels Shipment Report, Main tab (Line items section)
Also can be accessed from Detail Manager/ Label
Mesa labels
Building Your Own Reports: New Ad-Hoc Reports Locate the Report Manager menu and select the desired report type from the “New” submenu (Ref 1 below).

60
Figure 91: Customizable reports
Reference 2 on the figure above shows the list of available reports.
Follow the steps to build your desired report.
In the example below, we build a Shipment report. We selected New/Shipment report above. The screen shown below appears, and we enter a date range (ref 1). Then we select the major categories of things we want to see on this report (ref 2). The first and most obvious of these is “shipment” data, but we could also select shipment line data, inventory item data or even inventory item history. The complete list is shown under DETAILS in the figure below.
For each type of data, there are numerous specific fields we could select. These are listed under Attributes (ref 3). Choose the ones you want to see. In this example, we will select Shipment number, TSDF, date from the Shipment level and then profile, weight, and shipping description from the line data level.

61
Figure 92: Building a Shipment report, step 1: Major attributes (columns)
After we have selected the appropriate columns, the screen looks like the screenshot below, with the columns that were selected.
Figure 93: Selected columns for the report
We can further filter the report for specific data (such as TSDF name, to show only one TSDF name) under Step 2 of the report screen. In this case we filter to select only shipment to Ash Grove cement Company.
Figure 94: Filtering by TSDF
62
We have to be careful to spell the name accurately and completely if we use the equal sign in the filter. Otherwise, the system will never find an exact match.
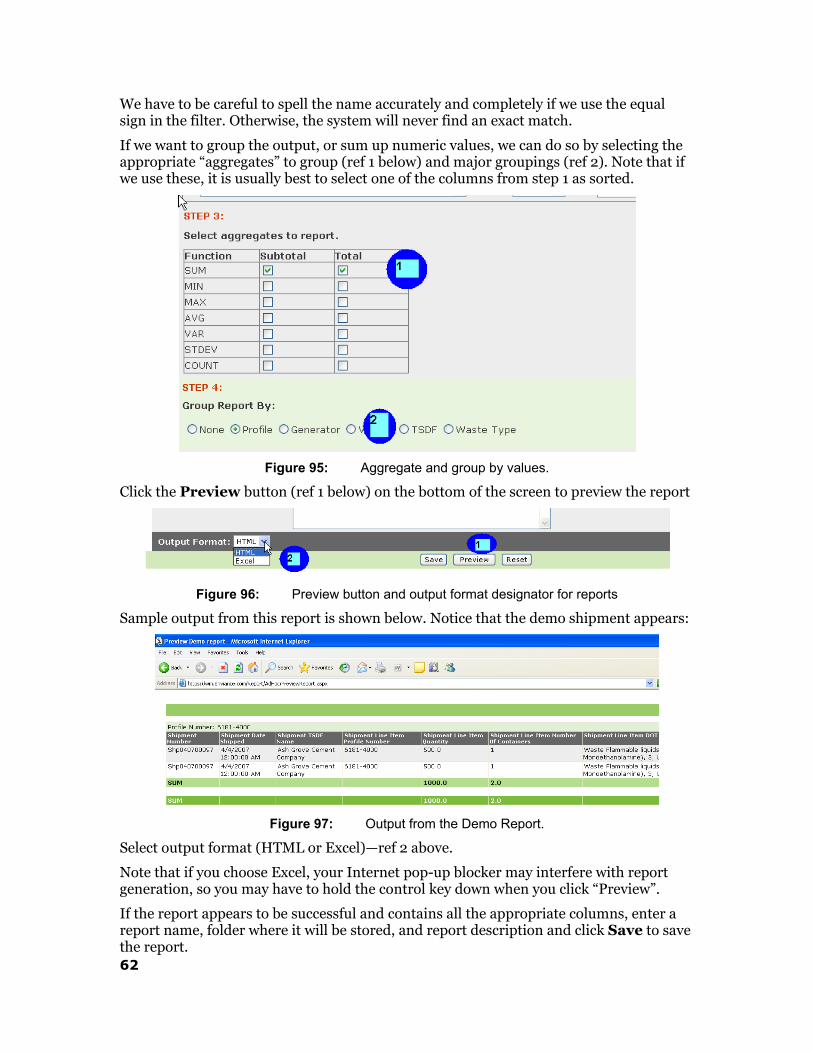
If we want to group the output, or sum up numeric values, we can do so by selecting the appropriate “aggregates” to group (ref 1 below) and major groupings (ref 2). Note that if we use these, it is usually best to select one of the columns from step 1 as sorted.
Figure 95: Aggregate and group by values.
Click the Preview button (ref 1 below) on the bottom of the screen to preview the report
Figure 96: Preview button and output format designator for reports
Sample output from this report is shown below. Notice that the demo shipment appears:
Figure 97: Output from the Demo Report.
Select output format (HTML or Excel)—ref 2 above.
Note that if you choose Excel, your Internet pop-up blocker may interfere with report generation, so you may have to hold the control key down when you click “Preview”.
If the report appears to be successful and contains all the appropriate columns, enter a report name, folder where it will be stored, and report description and click Save to save the report.

63
At this point, you can re-access the report by clicking the Report Manager button directly on the menu. A list of all saved reports (organized by folder) will appear. You can right click any of them to run.
Standard Reports In addition to the Ad Hoc reports, Enviance Waste Manager can utilize data from within your system to generate your waste-related regulatory reports such as STEERS, the Biennial Hazardous Waste Report or PCB Annual Document log. The most critical for DuPont Beaumont are the STEERS.
Texas STEERS Report The STEERS report in Enviance is designed to create a text file formatted in a way that can subsequently be uploaded into the Texas STEERS system. The file is a comma-delimited file, generally stored as a .csv file, which means it is readable by Excel as well. The process is that you select the generator you want to see, the date range for shipments, and then create the text file that you subsequently upload to STEERS.
Pull down the Reports menu and click “Texas STEERS” to open the Steers report:
The report opens to a select screen that allows you to enter a date range and select one or more generator.
Figure 98: STEERS select screen
Select the appropriate date range and the generator, and then click Submit. The report will open to give you an HTML (screen) output. Click “Generate Text File” (ref 1) to create the text file.
Figure 99: STEERS Report screen output
You can save the Text file and upload it to the STEERS system at your leisure.

64
Biennial Report The Enviance Waste Management system includes a standard Biennial report format.
1. To run the Biennial, click on the reports menu and select Biennial Report.
Figure 100: Selecting the Biennial Report
2. Select the report year (ref 1 below), and enter facility name search data (ref 2), then click Search (ref 2) to bring up the site as a generator (ref 3).
Figure 101: Capturing data for the Biennial
3. Click on the generator site to generate the report data. A data confirmation/entry screen will appear.
Figure 102: Biennial data entry/update screen

65
4. Enter or update the data as necessary, then click Generate to generate the report.
Other reports run similarly to the Biennial Report. Most are straightforward. Look in the Help manual or contact Enviance customer service if you have questions concerning them.
Saved Reports Finally, the Waste Management system can run your saved reports. Click the Report item on the menu to see saved reports.
Figure 103: Running a saved report.
Right click the report you wish to see, and hit Run to run it. You will be given the opportunity to adjust the dates and other parameters, and to specify the report output (Excel vs. HTML) as shown below.
Figure 104: Specifying Excel vs. HTML output for a report.

66
BASIC SYSTEM ADMINISTRATION
Creating and Managing Generators To create a new generator, right-click the system model and select New > Generator.
Specify whether the generator is also a TSDF (internal TSDF) and whether it is a temporary generator. The Inactive Date on temporary generators is required, and they are specially flagged as Temporary; otherwise they are the same as any generator.
Enter the generator status, time zone, and addresses. Three are provided for generator, mailing and billing. If the mailing is different it will appear on the manifest.
Figure 105: Creating a new generator
Most of the fields are self-explanatory. Note that to specify an emergency number for all manifests generated by this vendor, you have to add an Emergency contact type.
Figure 106: Emergency contact for Emergency number on manifest
Make sure you enter the EPA ID number found at the bottom of the screen, and any other regulatory id’s necessary. Then click Save to save the Generator.
Notification Defaults Each generator may have its own Notification criteria. These are important because they define how long the system will wait before notifying you that a drum or container needs to be shipped.
Figure 107: Edit notification criteria

67
Right click the generator and select Properties > Edit Notification Criteria. Notification criteria are specified according to material type and location type. Click Add to create a new one under a location type, and specify the default values.
Figure 108: Waste notifications
You can specify tank notifications, empty container notifications and manifest return notification time periods as well. These time periods become the defaults for each location – but they may be adjusted (tightened) as the locations are created.
Creating Locations The system supports the following types of locations:
• Satellite Accumulation
• Accumulation
• Permitted
• Universal
• Tanks
All can be created by right-clicking the generator or unit and selecting New > Area or >New Tank. The figure below shows the key components of the Area Manager screen.
When creating or editing an area, pay careful attention to the Waste Type fields—these designate what types of materials may be placed, created or stored in each area. If you have any doubt whether to include a waste type, the rule of thumb is to include it, because otherwise your users may be perplexed when the system refuses to let them move or create a drum at that location.
The distinctions among the first three location types are really semantic – they act the same, except that waste cannot be moved from one Satellite Area to another. The

68
difference is primarily in how the storage time limits are set up. The system automatically creates notifications based on the storage time limits for each location. When creating an area, you can specify default storage time limits based on material types. The figure below shows the creation of storage time limits for Hazardous wastes.
Figure 109: Editing an Area

69
Creating and Managing TSDFs and Transporters The Company Manager under the main menu enables you to create and manage TSDFs and Transporters.
You can select Company Manager New > TSDF or Transporter to create a new TSDF or transporter. The edit and creation screens for transporters and TSDFs are straightforward.
The figure below shows snippets from the TSDF Manager screen. Key fields are the EPA ID, status (no shipments can be sent to a Not Approved TSDF), and the Waste Categories. Waste Categories work similarly to the way they work for locations—you cannot ship materials to a TSDF unless the waste category on the profile is listed under the TSDF.
Figure 110: TSDF Manager
Security Model Security is handled at the System Model level. System Models must be created by Enviance.
Individual users may be established and associated within a system model. Users may be granted individual rights and permissions, but more commonly receive them through membership in a group. The key items in system security are users, groups and permissions. Users define who can get into the system. Their group specifies basic system access, and permissions define the objects they can access.

70
The procedure to create a new user is as follows:
1. Create the new user profile
2. If necessary, create the Group that you will use for that user
3. Assign the user to a Group
4. Assign Permissions to the Group
Each step is discussed in more detail below.
User Setup The figure below shows the basic setup for a user. The User Profile is accessible from the menu Admin >New > User Profile.
Figure 111: User Profile screen
The Default User View Settings section near the bottom of the screen allows you to specify—per user—what each user sees when they View Containers, Equipment or other objects within the system. It allows you to specify not only the columns, but the order the columns appear. This is a useful feature to customize each system model, as in some cases certain fields have far more importance than they might in another system.
Group Setup The figure below shows the steps necessary to establish a group in the system. A group is given a name. One or more users may be assigned to it, and then various permissions and rights are controlled by check-off boxes.

71
Figure 112: Creating a new group in the system using the Group Manager screen.
In general the check-off boxes under the Group Manager are self-explanatory, although they are explained more fully in the Help Manual. “View” grants read-only access; “Modify” allows the user to update existing objects; and “Full Control” allows for inserting new objects and deleting existing ones.
Permissions Permissions control access to the tree. They can be granted at any level within the tree, and to either individual users or groups. Good practice dictates that they be granted to a group, as shown below.
Figure 113: Permissions screen is specific to sections of the tree and groups or users.
The figure below illustrates what happens if you neglect to assign permissions. The user was set up with a group assignment, but no permissions to any objects within the System Model. Hence, they can see the System Model, but they cannot access anything underneath it.

72
Figure 114: A user with no generator permissions is very limited.
The Permissions cut across the individual objects: This user can click on Profile Manager and open the Profile Manager screen. Ironically, though, since they cannot see any of the individual generators, they cannot see any profiles!
Other Aspects of the System The Waste Management system is very comprehensive and in the interest of brevity, there are several aspects of the system not covered within this manual:
• Waste Detail Management
• Data Dictionary (code table) management
• Batching for Movements, Consolidations, Profile assignment or printing select reports
• Compatibility codes
• Preferences
• Data Importing
• Equipment Management
• Lab Packing
• Overpacks
• Spill Management
• Custom Field and Custom Template Management
These are covered in the system help, and will be touched on briefly during the class.

73
CLASS EXERCISES
Exercise 1: Basic System Login, Editing a Profile In this exercise, you will log into the system, select and edit a profile and save your result.
1. Log into the system
2. Open the system Model
3. Using the Detail Manager menu item, open the Profile Manager, and right-click to Edit a profile
4. Move to the constituents tab
5. Add Toluene or Benzene to the constituents
6. Save the result
NOTES:
Exercise 2: Creating and Managing Containers During this exercise, you will create a container at a storage location in the tree, then clone the container. You will move the container from one location to another.
1. Select a generator with at least 2 areas
2. Select one area and right click to View Containers
3. Right click a container and select New
4. Create a container with the following attributes:
a. DM-55 container type
b. The profile you used in the last exercise
c. 400 lbs material added
5. Clone the container – create 2 copies
6. Select one of the containers, and move it to another area of the model
NOTES:

74
Exercise 3: Create and Manage a Shipment In this exercise, you will create and manage a shipment.
1. Select your generator
2. Right click and create a new shipment
3. Select a TSDF (Onyx) and transporter (HazMat)
4. Add one line by container
5. Add one line by Profile
6. Save Shipment
7. Generate Manifest
8. Generate LDR (optional)
9. Ship the Shipment
Take a 30-second break while you imagine your shipment has been received and accepted by the TSDF, then:
10. Enter the Shipment Return data
NOTES:
Exercise 5: Reports In this exercise we’ll create a Biennial report submission for our generator, and also create an ad hoc report.
1. Create a Biennial Report for your generator
2. Create an Inventory report, showing for each item in inventory at your generator location:
a. Container number
b. Profile
c. Profile description
d. Area stored
e. Accumulation date
f. Days left in storage
Output to Excel. Save your report.
NOTES: