Embed Size (px)
Citation preview

VVV888 AAADDDMMMIIINNNIIISSSTTTRRRAAATTTOOORRR’’’SSS GGGUUUIIIDDDEEE

Copyright © 1985 – 2014 (manual and software) by RepSoft LLC d/b/a RPMS, All Rights Reserved.
RPMS and Rep Profit Management System are trademarks of RepSoft, LLC. Btrieve is a trademark of
Pervasive Software, Inc. Windows, when used in this manual, refers to the Microsoft Windows operating
system. All other product names referenced are believed to be registered trademarks of their respective
companies.

Introduction to the RPMS Administration System ......................................................................................... 1
Launch the Administration System ............................................................................................................ 1
The Function of the Administration System ............................................................................................... 2
Archive and Purge .......................................................................................................................................... 3
Purpose of Archive and Purge .................................................................................................................... 3
Archive / UnArchive Described ................................................................................................................. 3
How Archive / UnArchive Works .............................................................................................................. 4
Purge Described.......................................................................................................................................... 5
How Purge Works ...................................................................................................................................... 6
Audit ............................................................................................................................................................... 7
Purpose of Audit ......................................................................................................................................... 7
Audit Described .......................................................................................................................................... 7
How the Audit Summary Works ................................................................................................................ 7
Delete and Transfer ........................................................................................................................................ 9
Purpose of Delete and Transfer .................................................................................................................. 9
How the Delete and Transfer Works .......................................................................................................... 9
UnDelete ........................................................................................................................................................11
Purpose of UnDelete ..................................................................................................................................11
How the UnDelete Works..........................................................................................................................11
Preferences ....................................................................................................................................................13
Purpose of Preferences ..............................................................................................................................13
How Printable Forms Works .....................................................................................................................13
How Agency Information Works ..............................................................................................................14
How the QuickBooks® Deposits Works ...................................................................................................15
How the Book Date Control Works...........................................................................................................16
How the Inventory Cost Method Control Works .......................................................................................16
Changing the Inventory Cost Method ........................................................................................................17
How the QuickBooks® Bills Works .........................................................................................................17
Reorganize - Fix ............................................................................................................................................19
Purpose of Reorganize and Fix ..................................................................................................................19
How Reorganize and Fix Work .................................................................................................................19
Imap Management .........................................................................................................................................21
Purpose of Imap Management ...................................................................................................................21
How Imap Management Works .................................................................................................................21
User Passwords & Security ...........................................................................................................................25
Purpose of User Passwords........................................................................................................................25
How User Passwords Works .....................................................................................................................25
Security Feature .........................................................................................................................................26
Purpose of Security Feature .......................................................................................................................26
How the Security Feature Works ...............................................................................................................26
Update RPMS ................................................................................................................................................27
Purpose of Update RPMS ..........................................................................................................................27
How Update RPMS Works........................................................................................................................27
Next Invoice Number ....................................................................................................................................29
Purpose of Next Invoice Number ..............................................................................................................29
Re-assign Sales Reps .....................................................................................................................................31
Purpose of Re-assign Sales Reps ...............................................................................................................31
RPMS is Made for QuickBooks® .................................................................................................................33
Purpose of the RPMS to QuickBooks Integration Feature ........................................................................33
Data Shared Between RPMS and QuickBooks® ......................................................................................33
Setting Up the RPMS to QuickBooks® Integration ..................................................................................33
QuickBooks® Options on the Preferences Form .......................................................................................34
Set QuickBooks® Security Options in the RPMS Administration System ...............................................35

Authorizing RPMS in QuickBooks® ........................................................................................................36
For Each User of RPMS, after Authorization of RPMS in QuickBooks® ................................................38
Using QuickBooks and RPMS Simultaneously .........................................................................................40
Receive Payment in RPMS and Deposit to QuickBooks® ........................................................................41
How RPMS Payment Data Corresponds to QuickBooks® Deposits ........................................................43
Receive Inventory in RPMS for Accounts Payable in QuickBooks® .......................................................43
How RPMS Inventory Receipt Data Corresponds to QuickBooks® Bills ................................................45
Chapter 1 - Introduction to the RPMS Administrator’s System
1
Introduction to the RPMS Administration System
Launch the Administration System
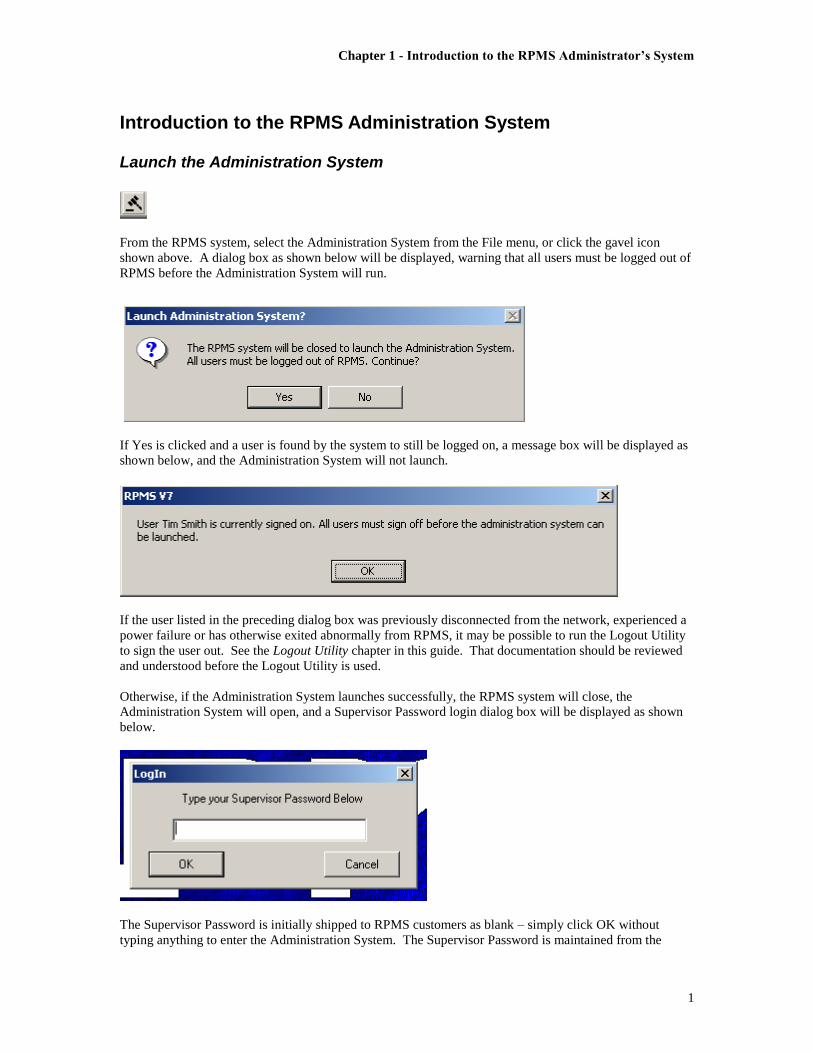
From the RPMS system, select the Administration System from the File menu, or click the gavel icon
shown above. A dialog box as shown below will be displayed, warning that all users must be logged out of
RPMS before the Administration System will run.
If Yes is clicked and a user is found by the system to still be logged on, a message box will be displayed as
shown below, and the Administration System will not launch.
If the user listed in the preceding dialog box was previously disconnected from the network, experienced a
power failure or has otherwise exited abnormally from RPMS, it may be possible to run the Logout Utility
to sign the user out. See the Logout Utility chapter in this guide. That documentation should be reviewed
and understood before the Logout Utility is used.
Otherwise, if the Administration System launches successfully, the RPMS system will close, the
Administration System will open, and a Supervisor Password login dialog box will be displayed as shown
below.
The Supervisor Password is initially shipped to RPMS customers as blank – simply click OK without
typing anything to enter the Administration System. The Supervisor Password is maintained from the
Chapter 1 - Introduction to the RPMS Administrator’s System
2
Preferences form. See Preferences in this guide. If you have previously reset and now don’t know or can’t
remember your RPMS Supervisor password, the license holder will need to contact RPMS technical
support.
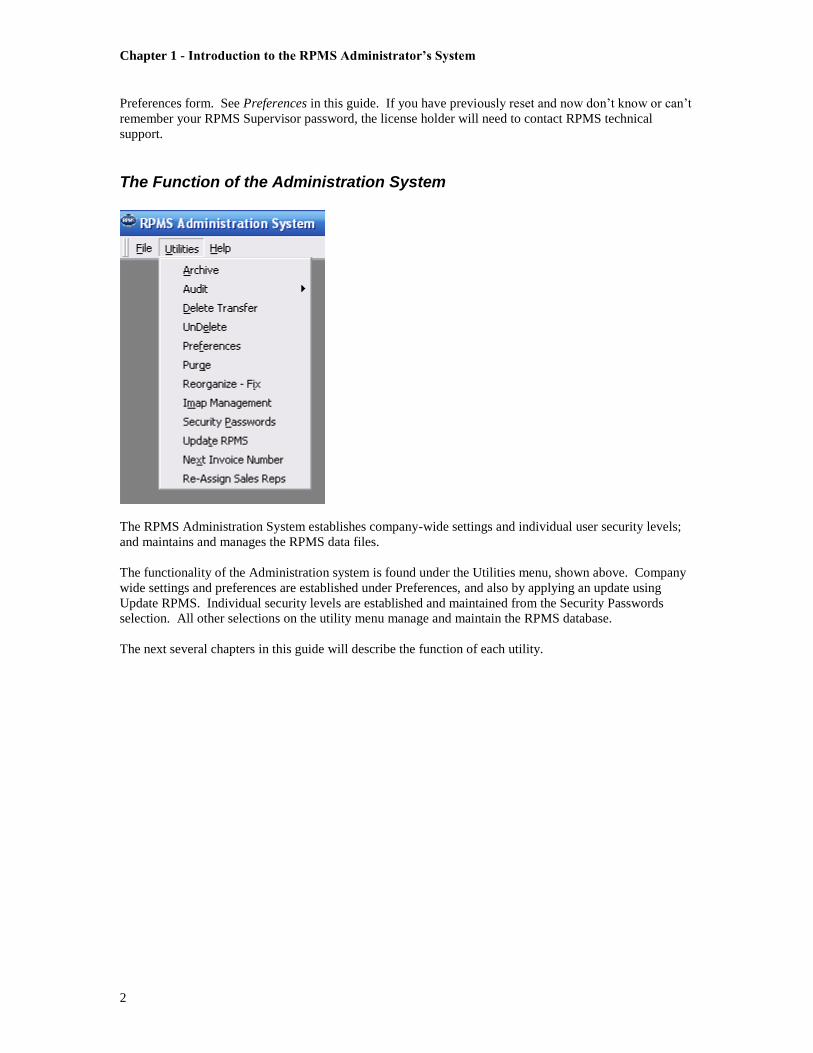
The Function of the Administration System
The RPMS Administration System establishes company-wide settings and individual user security levels;
and maintains and manages the RPMS data files.
The functionality of the Administration system is found under the Utilities menu, shown above. Company
wide settings and preferences are established under Preferences, and also by applying an update using
Update RPMS. Individual security levels are established and maintained from the Security Passwords
selection. All other selections on the utility menu manage and maintain the RPMS database.
The next several chapters in this guide will describe the function of each utility.
Chapter 2 – Archive and Purge
3
Archive and Purge
Purpose of Archive and Purge
RPMS Version 7 allows an unlimited accumulation of data. Periodically, less useful information may be
archived or purged to speed up some reports and to reduce the size of backups. For example, if your RPMS
Version 7 data includes history from 1997 through 2003, and you don’t really study 1997 data using RPMS
anymore, you may want to archive 1997. You may also wish to purge the details of completely paid
transactions. The Archive and Purge are described together in this chapter, but are different forms selected
from different items on the Utilities menu.
Archive / UnArchive Described
Archiving is the process of taking older historical and/or detail data and moving it to a static file where
limited management can occur. UnArchiving is the process of returning that data back to the regularly
managed file system.
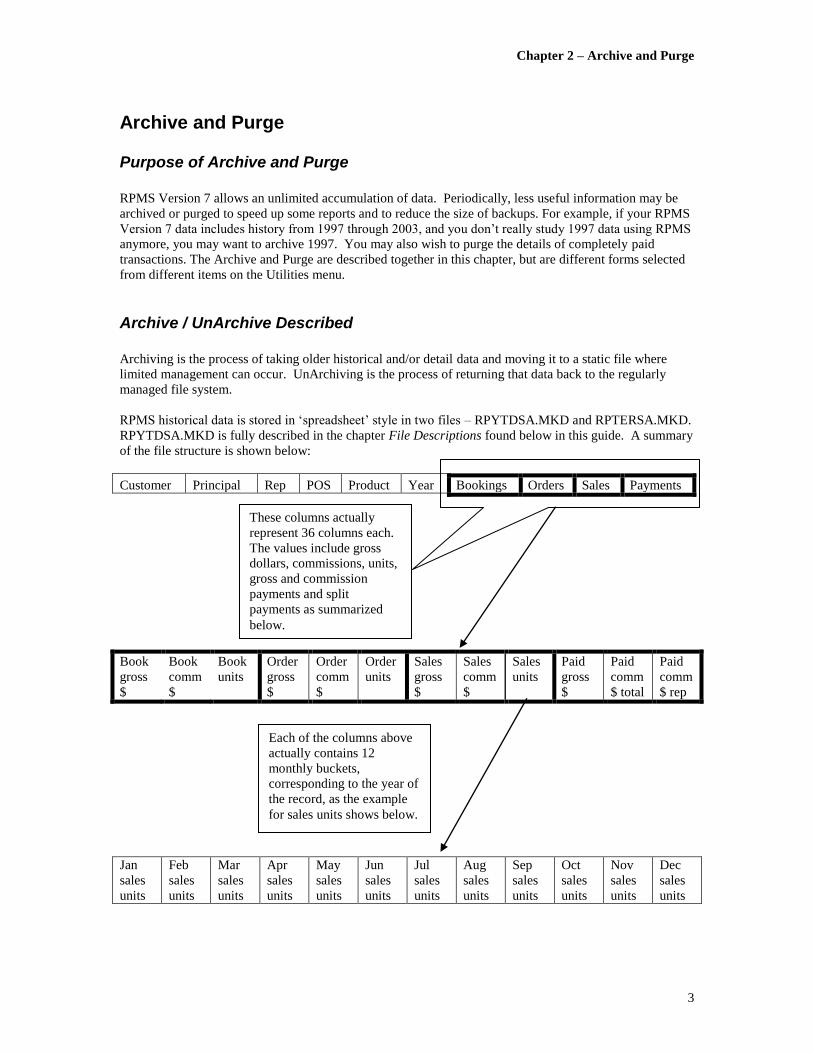
RPMS historical data is stored in ‘spreadsheet’ style in two files – RPYTDSA.MKD and RPTERSA.MKD.
RPYTDSA.MKD is fully described in the chapter File Descriptions found below in this guide. A summary
of the file structure is shown below:
Customer Principal Rep POS Product Year Bookings Orders Sales Payments
Book
gross
$
Book
comm
$
Book
units
Order
gross
$
Order
comm
$
Order
units
Sales
gross
$
Sales
comm
$
Sales
units
Paid
gross
$
Paid
comm
$ total
Paid
comm
$ rep
Jan
sales
units
Feb
sales
units
Mar
sales
units
Apr
sales
units
May
sales
units
Jun
sales
units
Jul
sales
units
Aug
sales
units
Sep
sales
units
Oct
sales
units
Nov
sales
units
Dec
sales
units
These columns actually
represent 36 columns each.
The values include gross
dollars, commissions, units,
gross and commission
payments and split
payments as summarized
below.
Each of the columns above
actually contains 12
monthly buckets,
corresponding to the year of
the record, as the example
for sales units shows below.
Chapter 2 – Archive and Purge
4
Because the historical arrays have the year embedded, they can be archived out to a similarly structured
file, which removes them from daily processing by snapshots, historical and summary reports, and daily
backups. This archive file is addressed only by the archive process itself, the Delete and Transfer function,
and Summary and History Reports.
Some RPMS Detail data is stored in the file RPCURSA.MKD. This file is a log of all transaction entry,
maintenance and payments. This file can be archived more regularly, based on the booking month and year
of the transaction.
Once the History and Summary files have been archived, an important system limitation comes into effect.
Summary and history reports can run accurately against only the unarchived data – so effectively a
boundary is established for comparative purposes.
For example, in the year 2008 your rep agency may decide to archive the years prior to 2004, in order to
speed up reports and snapshots. Summary and History reports can report 2004, but the comparative year of
2003 would be understated, since that data would reside only in the archives. To get an accurate
comparison, 2003 could be UnArchived.
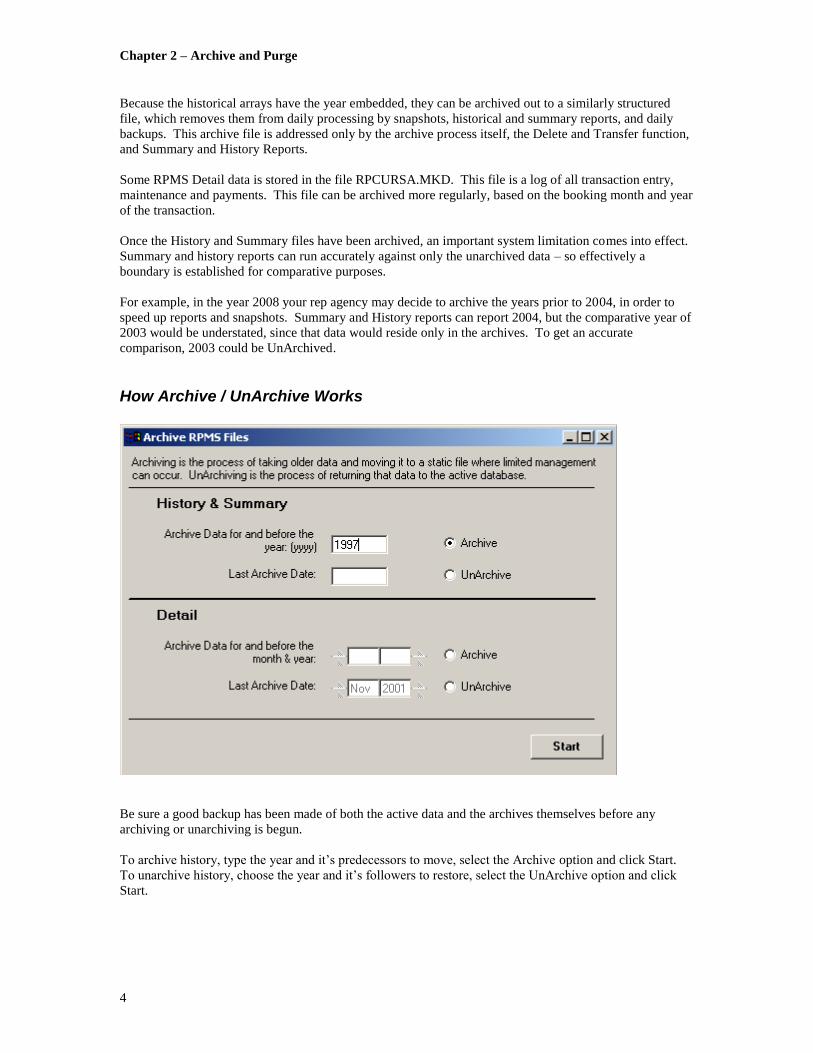
How Archive / UnArchive Works
Be sure a good backup has been made of both the active data and the archives themselves before any
archiving or unarchiving is begun.
To archive history, type the year and it’s predecessors to move, select the Archive option and click Start.
To unarchive history, choose the year and it’s followers to restore, select the UnArchive option and click
Start.

Chapter 2 – Archive and Purge
5
To Archive the detail data, select the booking month and year and it’s predecessors to move, select the
Archive option and click Start. To unarchive detail data, choose the booking month and year and it’s
followers to restore, select the UnArchive option and click Start.
Note that neither process has a cancel button – if this process is interrupted by catastrophic failure (like the
power going out) then the backup made at the beginning of the process should be restored.
Purge Described
Purging is the process of taking older detail data and deleting it from the system.
Some of the RPMS detail transaction data is stored in three different files. RPBOM.MKD is an Order
header file. RPBOS.MKD is an Invoice header file. RPBOD.MKD is a line item file.
When a transaction is added in RPMS, as many as six different detail records can be added, including
RPCURSA records for the booking, the order and the sale, and transaction detail records for the order
header, invoice header and line item. These files can become quite large, and are generally not referred to
as time goes on.
When a purge is run against paid transactions details, the orders, line items commissions and payments that
are purged can no longer be reviewed by the transaction maintenance and commission reconciliation
functions. The orders reports (Expedite, Closed & Order Date) and commission reports (Agency & Sales
Rep statements, Aging) are also impacted by the purge since they have the ability to report on fully shipped
and paid transactions.
Chapter 2 – Archive and Purge
6
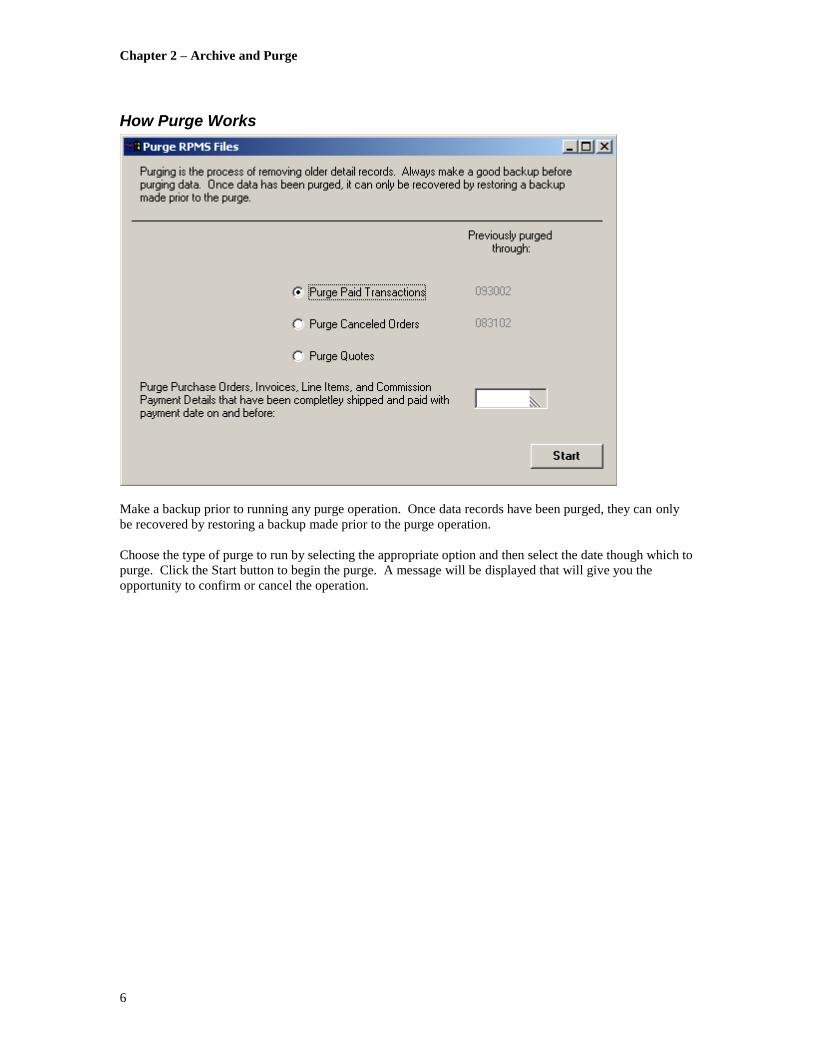
How Purge Works
Make a backup prior to running any purge operation. Once data records have been purged, they can only
be recovered by restoring a backup made prior to the purge operation.
Choose the type of purge to run by selecting the appropriate option and then select the date though which to
purge. Click the Start button to begin the purge. A message will be displayed that will give you the
opportunity to confirm or cancel the operation.

Chapter 3 – Audit
7
Audit
Purpose of Audit
The audit program corroborates data files in RPMS by comparing known values in independent files. In
this way, file damage can be discovered, and in some cases, recovered using utility programs.
Audit Described
The audit program corroborates data files in RPMS by comparing known values in counterpart files. There
are two types of audits, known as Audit Summary and Audit Detail. The Audit Summary runs relatively
quickly. The Audit Detail can take longer, depending on the number of records in the system.
The Audit Summary examines all RPMS records, and measures the values recorded by transactions. The
Audit Summary ensures:
That all RPMS data records can be read
That the bookings and payment histories should be equal in the files RPYTDSA and
RPTERSA.
That the booking and or payment history for a given month or month range can be
corroborated between the files RPCURSA and RPTERSA.
That the values in the line item file RPBOD are equivalent to the corresponding totals in the
header files RPBOM and RPBOS.
The Audit Detail checks for referential integrity. Referential integrity means that the codes stored in a
given file have a reference record that describes their meaning in another file. A file that is damaged can
lose records. Without a corresponding reference record the system cannot report meaningful information.
The Audit Detail checks the referential integrity of:
Line Items for Order and Invoice Headers
Invoice Headers for Order Headers
Classification code records for Customers or Contacts
Commission Payments for Invoice Headers
Communication Information records for Customers, Contacts, Principals or Points of Sale
Contacts for Customers, Principals or Points of Sale
Principal Lag Days for Principals
Principal Commission Exceptions for Principals and Customers
Products for Principals
Product Commission and Pricing Exceptions for Products and Customers
Agency to Sales Rep Commission Split Exceptions for Customers, Principals and Points of
Sale
Text notes for all types and data
Transaction histories and details for customers, principals, points of sale and sales reps
How the Audit Summary Works
The audit summary is selected from the Utilities menu, Audit, then Audit Summary. A sample Audit form
is shown below:

Chapter 3 – Audit
8
Each time the Audit Summary form is displayed, the results from the last file audit run from this computer
for this data set are shown. To re-audit the data, set the Bookings period and Payments period time frames
and then click the Start button. To print the results of the audit, click the Print button.
Chapter 4 – Delete and Transfer
9
Delete and Transfer
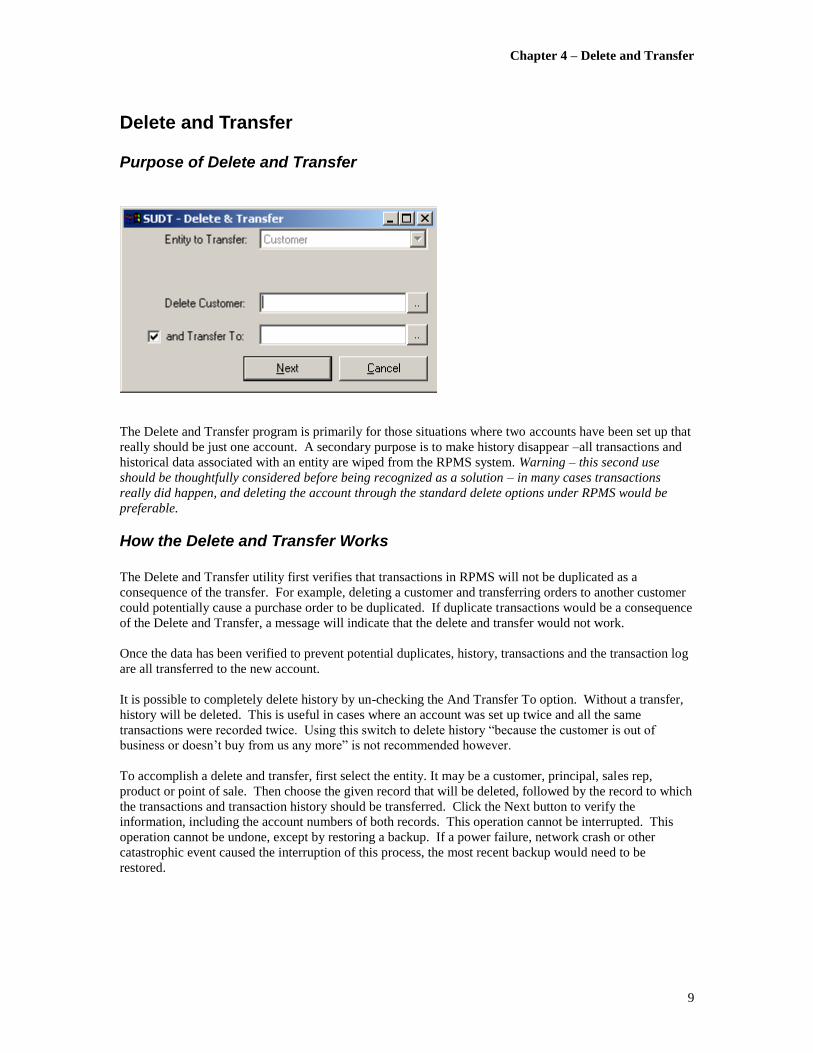
Purpose of Delete and Transfer
The Delete and Transfer program is primarily for those situations where two accounts have been set up that
really should be just one account. A secondary purpose is to make history disappear –all transactions and
historical data associated with an entity are wiped from the RPMS system. Warning – this second use
should be thoughtfully considered before being recognized as a solution – in many cases transactions
really did happen, and deleting the account through the standard delete options under RPMS would be
preferable.
How the Delete and Transfer Works
The Delete and Transfer utility first verifies that transactions in RPMS will not be duplicated as a
consequence of the transfer. For example, deleting a customer and transferring orders to another customer
could potentially cause a purchase order to be duplicated. If duplicate transactions would be a consequence
of the Delete and Transfer, a message will indicate that the delete and transfer would not work.
Once the data has been verified to prevent potential duplicates, history, transactions and the transaction log
are all transferred to the new account.
It is possible to completely delete history by un-checking the And Transfer To option. Without a transfer,
history will be deleted. This is useful in cases where an account was set up twice and all the same
transactions were recorded twice. Using this switch to delete history “because the customer is out of
business or doesn’t buy from us any more” is not recommended however.
To accomplish a delete and transfer, first select the entity. It may be a customer, principal, sales rep,
product or point of sale. Then choose the given record that will be deleted, followed by the record to which
the transactions and transaction history should be transferred. Click the Next button to verify the
information, including the account numbers of both records. This operation cannot be interrupted. This
operation cannot be undone, except by restoring a backup. If a power failure, network crash or other
catastrophic event caused the interruption of this process, the most recent backup would need to be
restored.

Chapter 4 - Delete and Transfer
10

Chapter 5 – Undelete
11
UnDelete
Purpose of UnDelete
The UnDelete program restores customers, points of sale, principals, products or sales reps that have been
deleted from RPMS.
How the UnDelete Works
When users delete a customer, points of sale, principal, product or sales rep from within RPMS, all that
really happens is the status of the record is changed to “D.” The RPMS program knows not to allow D
status records to be displayed on the list of those records, or to be added with new transactions, or to be
reported individually on reports. For reports the D status records are collectively accumulated under the
heading “Deleted.” In that way the values associated are measured, but the entities themselves don’t take
up space on the report.
The UnDelete function therefore simply displays those records that are D status and changes them back to
A status. To UnDelete a record, choose the entity of the D status records to be displayed. A message will
report that none are found if that is the case. Once the deleted record is displayed in the list, simply
highlight it and click the Undelete button.
Note that the UnDelete function works only with entities that have been deleted from their respective lists
within RPMS. Records deleted from the Administration system using the Delete and Transfer function
documented above CANNOT be UnDeleted. To restore those records, a backup of all data made prior to
the Delete and Transfer must be restored.

Chapter 5– UnDelete
12
Chapter 7 – Reorganize - Fix
13
Preferences
Purpose of Preferences
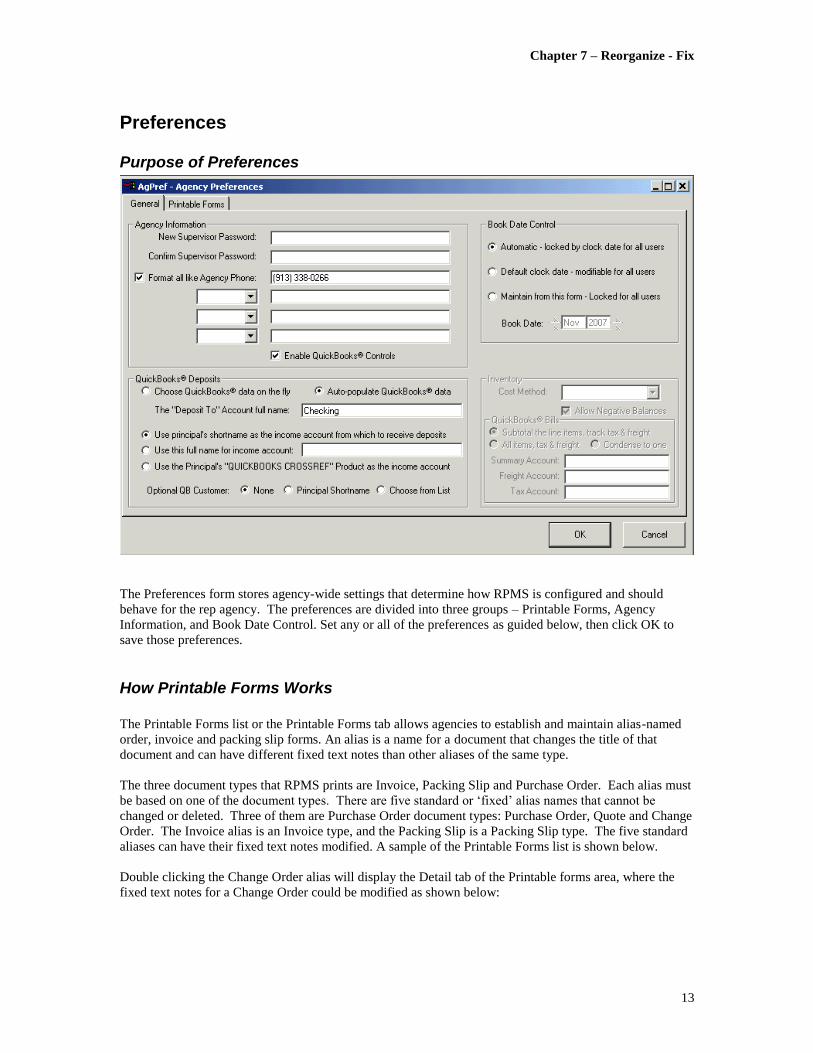
The Preferences form stores agency-wide settings that determine how RPMS is configured and should
behave for the rep agency. The preferences are divided into three groups – Printable Forms, Agency
Information, and Book Date Control. Set any or all of the preferences as guided below, then click OK to
save those preferences.
How Printable Forms Works
The Printable Forms list or the Printable Forms tab allows agencies to establish and maintain alias-named
order, invoice and packing slip forms. An alias is a name for a document that changes the title of that
document and can have different fixed text notes than other aliases of the same type.
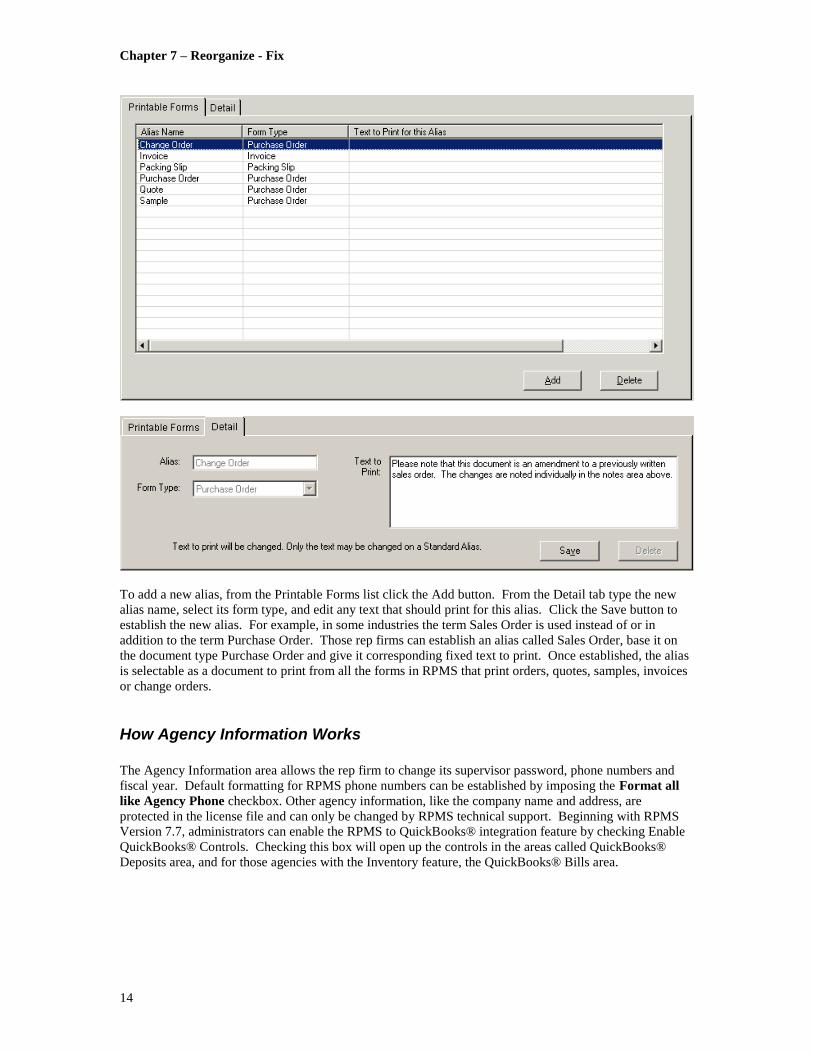
The three document types that RPMS prints are Invoice, Packing Slip and Purchase Order. Each alias must
be based on one of the document types. There are five standard or ‘fixed’ alias names that cannot be
changed or deleted. Three of them are Purchase Order document types: Purchase Order, Quote and Change
Order. The Invoice alias is an Invoice type, and the Packing Slip is a Packing Slip type. The five standard
aliases can have their fixed text notes modified. A sample of the Printable Forms list is shown below.
Double clicking the Change Order alias will display the Detail tab of the Printable forms area, where the
fixed text notes for a Change Order could be modified as shown below:
Chapter 7 – Reorganize - Fix
14
To add a new alias, from the Printable Forms list click the Add button. From the Detail tab type the new
alias name, select its form type, and edit any text that should print for this alias. Click the Save button to
establish the new alias. For example, in some industries the term Sales Order is used instead of or in
addition to the term Purchase Order. Those rep firms can establish an alias called Sales Order, base it on
the document type Purchase Order and give it corresponding fixed text to print. Once established, the alias
is selectable as a document to print from all the forms in RPMS that print orders, quotes, samples, invoices
or change orders.
How Agency Information Works
The Agency Information area allows the rep firm to change its supervisor password, phone numbers and
fiscal year. Default formatting for RPMS phone numbers can be established by imposing the Format all
like Agency Phone checkbox. Other agency information, like the company name and address, are
protected in the license file and can only be changed by RPMS technical support. Beginning with RPMS
Version 7.7, administrators can enable the RPMS to QuickBooks® integration feature by checking Enable
QuickBooks® Controls. Checking this box will open up the controls in the areas called QuickBooks®
Deposits area, and for those agencies with the Inventory feature, the QuickBooks® Bills area.

Chapter 7 – Reorganize - Fix
15
How the QuickBooks® Deposits Works
The QuickBooks® Deposits control area governs the way that RPMS will manage sending commission and
invoice payment information to QuickBooks deposits. For information about the entire RPMS to
QuickBooks integration feature, see chapter 10, RPMS is Made for QuickBooks®.
Within the QuickBooks Deposits area, choosing the radio option “Choose QuickBooks® options on the
fly” causes RPMS to read and load accounts and customers from QuickBooks before a payment is applied.
The data entry operator making the payment in RPMS can then choose which QuickBooks accounts to
update for that particular payment. This option should be selected if different types of payments require
updating different QuickBooks accounts. Choosing the option “Auto-populate QuickBooks® options”
causes the remaining settings to force certain QuickBooks accounts and (potentially) customers to be pre-
selected before payment. Choosing this option saves times if all payments should always be posted to the
same QuickBooks accounts.
If the “Auto-populate QuickBooks® options” radio option is selected, RPMS will specify a particular
QuickBooks deposit account, QuickBooks income account, and potentially a QuickBooks customer
account.
The “Deposit To” Account full name prompts for a deposit account to be used for writing payments
received in RPMS to deposits received in QuickBooks. You must use the QuickBooks full name for the
account, and the account must be a Bank account type. The full name is normally just the account’s name,
unless the account is a sub-account of another account. For sub-accounts, a full name is expressed as
Parent:AccountName. For example, if you have two checking accounts, in QuickBooks you could
consolidate both of them under the main account “Checking”. One might have a full-name of
“Checking:Neighborhood Bank” and the other could be named “Checking:First National Bank”. In that
circumstance you would avoid “Checking” as the Deposit To account name, because while that is a valid
account name to QuickBooks, it is ambiguous.
The Income account area has three radio button options that help determine the From Account in
QuickBooks that the deposit will use.
The option “Use principal’s short name as the income account from which to receive deposits” will
cause RPMS to look for an account in QuickBooks that has the same name as the principal’s shortname.
Choose this option when each principal has it’s own income account inside QuickBooks.
The option “Use this full name for income account” will cause RPMS to receive a deposit from the
named account for every payment. Use this option when all payments recorded in RPMS go to the same
income account.
The option “Use this principal’s “QUICKBOOKS CROSSREF” Product” as the income account will
cause RPMS to look inside RPMS at the principal’s product database in order to find a product called
QUICKBOOKS CROSSREF. The income account name will be the description(s) of that product. This
third option is useful when some, but not all, principals will use one given income account, while other
principals use another income account. For example, you may receive payments that are strictly
commission payments from principals, and choose to record that income under an account called “Other
Income:Commissions”, while your Buy/Sell payments from customers would be recorded under an account
called “Customer Payments”. You would choose the third option, and set up a product under each
commission-paying principal called QUICKBOOKS CROSSREF, and make the description “Other
Income:Commissions”. Then you would set up a product under the Buy/Sell principal called
QUICKBOOKS CROSSREF, and make it’s description “Customer Payments”.

Chapter 7 – Reorganize - Fix
16
The prompt Optional QB Customer determines whether or not RPMS will attempt to ascribe a
QuickBooks customer to the deposit, and if so, whether it will use a principal’s short name or let the RPMS
user choose from a list of accounts for QuickBooks.
How the Book Date Control Works
The Book Date control area governs book date usage for data entry operators. Review the explanation of
Bookings in the RPMS User’s Guide to understand the implications of the actual book date used. This
setting governs whether the book date will be maintained by the administrator, the users’ system clocks, or
defaulted to the users’ system clocks but modifiable. If bookings are irrelevant for your agency then
“Automatic – locked by clock date for all users” is the recommended setting.
If bookings are important to track, and if either the administrator is the sole data entry operator, or the
usage of book date can otherwise be maintained by well-understood agency rules, you may choose to use
the “Default clock date – modifiable for all users” setting.
If bookings are so important to track that only the system administrator should declare to which month
transactions should be booked, then the setting “Maintain from this form – Locked for all users” would be
most effective.The costs methods that can be established are Standard, Average, Last, LIFO and FIFO.
How the Inventory Cost Method Control Works
The Inventory feature of RPMS requires that the Inventory Cost Method be established. When stocked
products are sold from Inventory for rep firms that also have the Accounts Receivable feature, commission
dollars are automatically re-stated to be the gross profit of the line item – the cost of the item sold, based on
the Inventory Cost Method, subtracted from the selling price. The costs methods that can be established are
Standard, Average, Last, LIFO and FIFO.
Standard means that the costs of products are those that are entered and stored on the records of the
products themselves, and must be changed by a data entry operator. Receipt of product, even at another
cost, will not change the cost of a product.
Average means that the Inventory feature will calculate the cost of any given product to be the sum of the
costs of all units of that product in stock, divided by the total number of units in stock. For example,
assume there are 100 units of product J104 on hand, and the average cost is $3.00. If 100 more are
received at a cost of $4.00, the cost of the J104 will become $3.50.
Last means that the Inventory feature will value all the units of a product at the cost of the last product
received. Using the example above, all 200 J104 units would have a cost of $4.00
For both LIFO and FIFO cost methods, the cost of an item depends on its cost when received. A product’s
cost ‘layers’ are held with received cost. In LIFO (Last In, First Out) the most recently received cost layers
are depleted first. In FIFO (First In, First Out) the oldest received cost layers are depleted first.
For example, in LIFO, if 100 products are received at $3.00, and later 100 more are received at $4.00, the
next one sold (and 99 thereafter, unless more are received) will be shown to have cost $4.00.
Allow Negative Balances can be checked if the Cost Method is Standard, Average or Last. Checking this
box allows product to be declared as shipped even though the system believes that the inventory levels are
insufficient. Leaving the option unchecked will prevent inventory from being over-shipped.

Chapter 7 – Reorganize - Fix
17
Changing the Inventory Cost Method
The Inventory Cost Method can be changed from the Agency preferences form, but all repercussions
should be considered. The table below describes the consequences of changing from one cost method to
another.
Changing From Changing To Note
Standard
Average or
Last
The Cost field becomes protected on the product master record.
LIFO or
FIFO
Beginning Balance and Unit Cost must be initialized using the
Inventory Data Entry program.
Average
Standard The Cost field becomes unprotected on the product master record, and
must now be periodically maintained.
Last, LIFO or
FIFO
Beginning Balance and Unit Cost must be initialized using the
Inventory Data Entry program.
Last
Standard The Cost field becomes unprotected on the product master record, and
must now be periodically maintained.
LIFO, FIFO
or Average
Beginning Balance and Unit Cost must be initialized using the
Inventory Data Entry program.
LIFO or FIFO
Standard
The Cost field becomes unprotected on the product master record, and
must now be periodically maintained.
All LIFO/FIFO records are deleted
Beginning Balance and Unit Cost must be initialized using the
Inventory Data Entry program.
Average or
Last
All LIFO/FIFO records are deleted
Beginning Balance and Unit Cost must be initialized using the
Inventory Data Entry program.
FIFO or
LIFO The Layer Sequence File is reversed for all products.
How the QuickBooks® Bills Works
The QuickBooks® Bills area is enabled for agencies with the Inventory feature and with Enable
QuickBooks® controls selected. This area governs how inventory receipts will be passed to QuickBooks,
and how freight and tax (if any) will be handled.
Set the AP Account field to the specific Accounts Payable account that bills for inventory should increase.
If you don’t have a specific account for these types of bills, use the generic Accounts Payable account.
The Subtotal, All Items and Condense options establish what type of bill RPMS will pass to QuickBooks.
Choose All Items for a fully detailed bill with product line items, tax, and freight. For this option, note that
all product numbers must already be set up in QuickBooks. Select Condensed to send a single value of the
amount to pay, including the tax and freight values. Or choose Subtotal to pass one item as a subtotal of the
received line items and two expense items (as warranted) for the tax and freight.
For many users, a subtotaled or condensed bill is sufficient. Other users who employ stricter control over
accounts payable may want greater detail.
Freight Account must be established if All Items or Subtotal is selected above, and must be the
QuickBooks full name of an account that will carry the freight charges for a bill. No freight expense line
will be added to a bill for freight amounts of zero.

Chapter 7 – Reorganize - Fix
18
Tax Account must be established if All Items or Subtotal is selected above, and must be the QuickBooks
full name of an account that will carry the tax charges for a bill. No tax expense line will be added to a bill
for tax amounts of zero.
Summary Account must be established if Subtotal or Condense is selected above, and must be the
QuickBooks full name of an account that will carry the subtotal of the line items for a bill, or the or the
aggregate of the invoice amount.
Click OK to save the QuickBooks settings and other agency preferences.

Chapter 7 – Reorganize - Fix
19
Reorganize - Fix
Purpose of Reorganize and Fix
The Reorganize and Fix functions re-shuffle the RPMS data files, collapsing the space occupied by deleted
records. The Reorganize function rebuilds the data in the order of it’s primary key, in some circumstances
allowing for faster access of multiple records.
The Fix function rebuilds the file in the same way as the reorganize function, but will not stop when it
encounters unreadable records. It simply recovers as many records as possible. The Fix function should
only be used when restoring a backup is not possible.
How Reorganize and Fix Work
To reorganize a file, check the box of the file and click Reorganize. To fix a file, check the file’s checkbox
and click Fix. To Select All files for either reorganization or fixing, click Select All. To clear all the
selections, click Clear All.
The Reorganize and Fix functions read valid records from the current versions of RPMS data files and
write them out to a temporary file. When all the records have been written out to the temporary file, a new,
empty version of the data file is created, and the valid records are reloaded. If the “Use Null Files to Create
New Data Files” checkbox is checked, the RPMS system will create the new version of the data file by
copying an existing ‘NUL’ version of the data file. If that checkbox is unchecked, RPMS creates the new,
empty version of the file by issuing a command to the database record manager.

Chapter 7 – Reorganize - Fix
20
Normally, leaving the “Use Null Files” option unchecked is preferred. However, there are some
circumstances where the limited or partial use of more advanced versions of the Pervasive record manager
warrant checking the “Use Null Files” checkbox. If you have any trouble with the Fix or Reorganize, you
may be instructed by RPMS Technical Support to check the “Use Null Files” option.
Once either Reorganize or Fix has been clicked, a progress meter will be displayed that shows the progress
of the individual file and the progress of all files being reorganized or fixed.

Chapter 8 – Imap Management
21
Imap Management
Purpose of Imap Management
The Imap Management system allows RPMS E-Data users to .set up and maintain user-defined data import
maps. These maps allow RPMS to import flat Microsoft Excel files as simple invoices.
How Imap Management Works
To set up an Imap, it is first recommended that you open a sample of the Excel file that you want to map
using Microsoft Excel. It is also recommended that you set up the Imap on the same computer that will be
processing the Imap for data entry purposes.
Click the Add button to get to the Imap detail tab as shown below:

Chapter 8 – Imap Management
22
To add an Imap, choose a name and specify a sample file, then choose an option for each rule and specify
the detail of the rule in the corresponding textbox. Click Test to test your Imap, and click the Add button to
Add the Imap.
The Imap Name is the unique name you will assign to this particular map. The name can be up to 50
characters long and after adding will be listed among your available maps on the E-Data Wizard form.
A Sample File should be specified so that you can check your map definition upon completion. Use the
Browse button to select a file.
The Record Qualifier and Skip Top Rows selections help the map consider only valid records.
The Record Qualifier allows you to include or exclude certain records from the file, based on data criteria
in the file. If all the records in the file should be processed, use the selection “1. All Records OK”. If only
records that are not blank in a certain column should be included, select “2. Column Not Blank” and
declare the letter of the column that must not be blank in the corresponding text box. If disqualified records
have a certain label in a column select “3 Column <>” and in the textbox type the column, then ‘<>”, then
the text or value that disqualifies the record. For example, if the word “TOTAL” in column B disqualifies
the record as an invoices, in the corresponding textbox type “B <> TOTAL”. Likewise if only records that
have a certain value in a column should be considered, type the column letter, the ‘=’ sign, and the
qualifying value.
Choosing to Skip Top Rows over-rides anything in the Record Qualifier field. So for example, whether or
not one of the first two records is qualified or disqualified, if “2. Skip 2 Records” has been selected, neither
of the first two records of the Excel file will be processed.
If the Principal EDI ID occurs on every record, specify the column in the text box after selecting “1.
Column”. If the principal’s EDI ID only occurs once in the file, choose “2. Column and Row” then type the
column letter, a colon character, and the row number – for example “A:2”. If the principal’s EDI ID does
not occur at all in the data, the principal EDI ID to use for every record can be specified in the text box
itself by choosing “3. Hard Coded”.

Chapter 8 – Imap Management
23
The principal’s identifier for the customer can be defined to be found in either one column or two. When a
two-column designation is used, the customer has both a ‘main’ and ‘sub’ ID that must be set up in cross-
referencing for the given principal. For more information, see the chapter RPMS Lists in the RPMS User’s
Guide, and the chapter E-Data Wizard.
The Invoice # option dictates whether the invoice number for the transaction will be found in a column, or
invented by RPMS. Sometimes sales reports don’t have invoice numbers, so the Imap will invent invoice
numbers when that happens.
The Invoice Date may be found in a single column for each invoice, or may exist once on the spreadsheet
in a particular column and row, or may be declared when the map is processed (at “run time.”)
The Invoice Amount should be listed either individually in a single column, or be the product of two
columns, i.e. a quantity column and a unit price column. If the invoice amount is a product of two columns,
declare the two column letters separated by a colon.
The Commission amount for the invoice can be determined in one of eight different ways.
1. $ Amount in Column
2. Rate in Column
3. % in Column
4. A Rate
5. B Rate
6. C Rate
7. Hard Coded Rate
8. Commission Hierarchy
The first, and preferred way is to retrieve the $ amount directly from one of the columns using option 1.
This method avoids rounding disparities with your principal.
The second method and third method are similar but will create very different results. If a commission
dollar amount is not available, but a rate or percentage is available, you can use the listed rate or
percentage. The difference between ‘rate’ and ‘percentage’ is the value that Excel determines is in the data.
For example, some spreadsheets may contain the number 5 to represent 5%. RPMS calls that a rate, and
option 2 would be used. Other spreadsheets may contain .05 to mean the same thing, and we call that a
percentage and option 3 should be selected. Sometimes cells can contain something like 5 % and it is
unclear what to use. To determine what value Excel will export to RPMS, copy the cell (right click, Copy)
and then in another cell, right click and “paste special” choosing value. If the actual value Excel sees shows
as .05 use option 3.
The A, B, or C default rates from the principal can be used if selected here, or a custom rate can be typed in
to be used on every invoice by selecting option 7. If RPMS should determine the rate based on the
commission hierarchy, select option 8.
Once all the fields have been filled out, Test the map results by clicking the Test button. A text file
representation of the translated file will be displayed in a text box. If all the data seems to be under its
correct heading, Save the map by clicking the Save button. The map will now be available to use with the
E-Data Wizard.
To edit or change an Imap at a later time, double click the Imap from the list, make any changes, then click
the Save button. To change the name of an Imap, you will have to add a new Imap, then delete the previous
version.
It is not necessary to keep the declared sample file in its referenced location after a map has been saved or
edited. However, in order to edit and then re-save the Imap, a valid sample file must be declared.

Chapter 8 – Imap Management
24
To troubleshoot an Imap, double click it and use the Test button, declaring the file you are trying to process
as the Sample file.
While you are editing or adding an Imap, you may find it helpful to have the file open in Excel at the same
time.
.
Chapter 9– User Passwords & Security
25
User Passwords & Security
Purpose of User Passwords
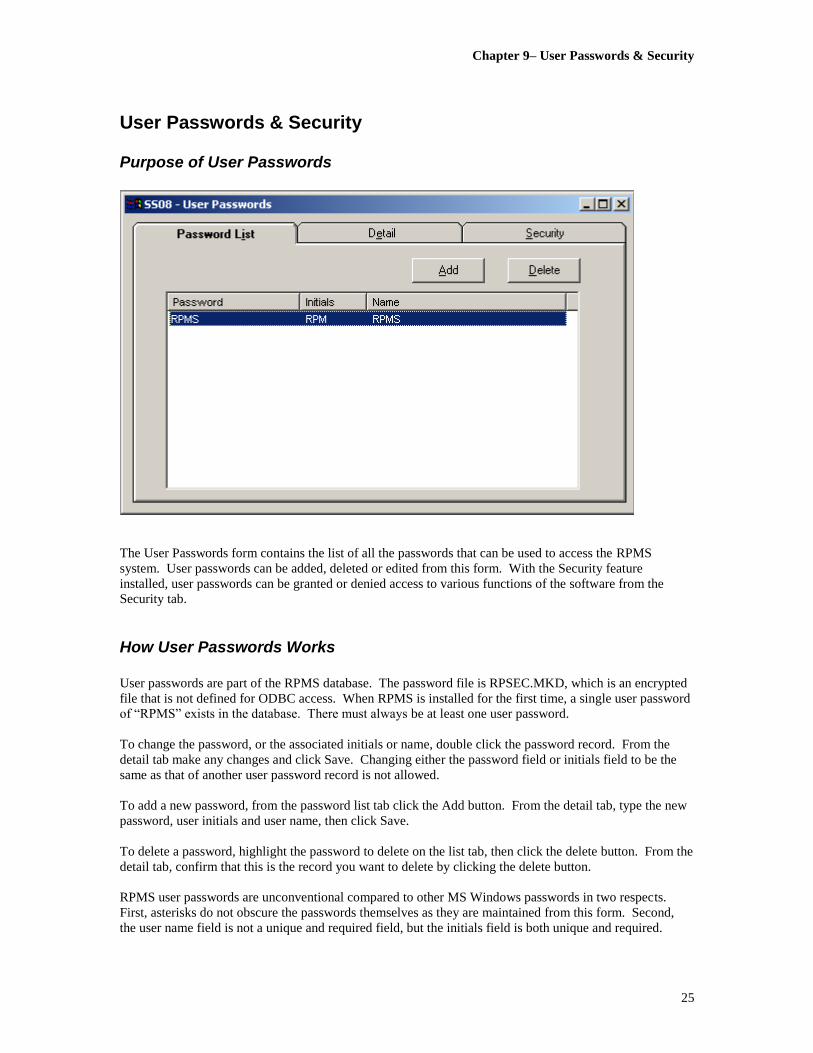
The User Passwords form contains the list of all the passwords that can be used to access the RPMS
system. User passwords can be added, deleted or edited from this form. With the Security feature
installed, user passwords can be granted or denied access to various functions of the software from the
Security tab.
How User Passwords Works
User passwords are part of the RPMS database. The password file is RPSEC.MKD, which is an encrypted
file that is not defined for ODBC access. When RPMS is installed for the first time, a single user password
of “RPMS” exists in the database. There must always be at least one user password.
To change the password, or the associated initials or name, double click the password record. From the
detail tab make any changes and click Save. Changing either the password field or initials field to be the
same as that of another user password record is not allowed.
To add a new password, from the password list tab click the Add button. From the detail tab, type the new
password, user initials and user name, then click Save.
To delete a password, highlight the password to delete on the list tab, then click the delete button. From the
detail tab, confirm that this is the record you want to delete by clicking the delete button.
RPMS user passwords are unconventional compared to other MS Windows passwords in two respects.
First, asterisks do not obscure the passwords themselves as they are maintained from this form. Second,
the user name field is not a unique and required field, but the initials field is both unique and required.
Chapter 9 – User Passwords & Security
26
Security Feature
Purpose of Security Feature
The Security feature of RPMS allows you to limit individual user access to various system functions.
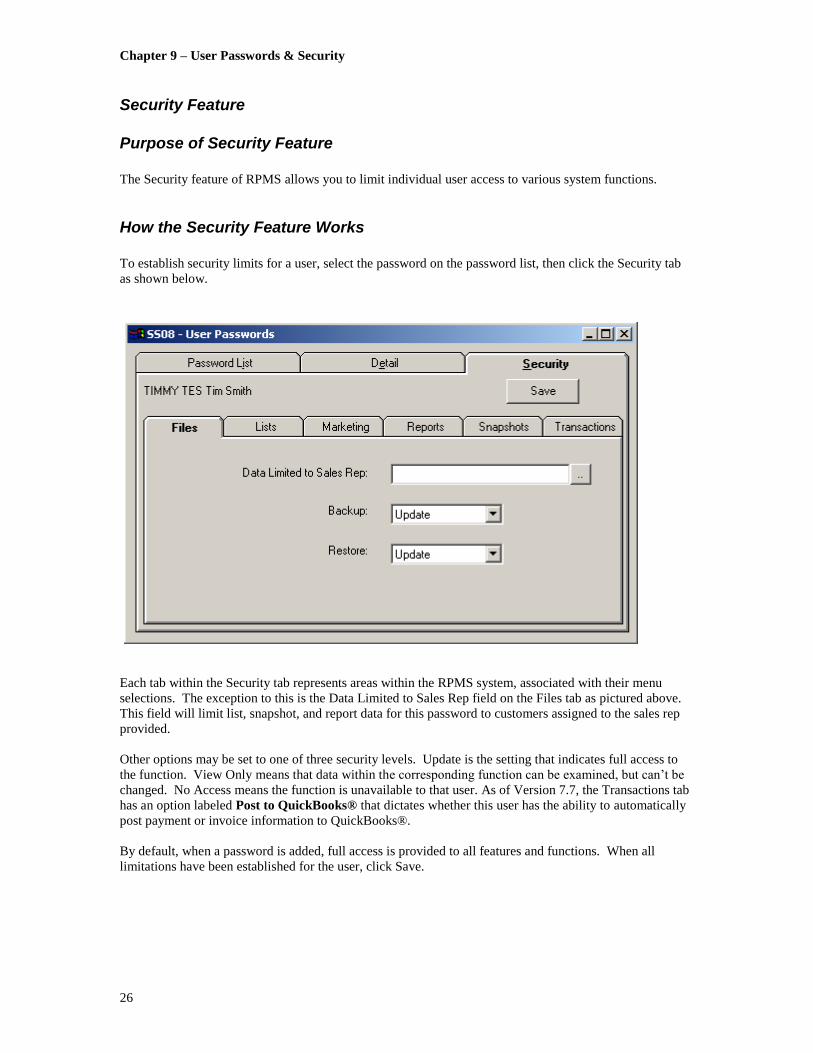
How the Security Feature Works
To establish security limits for a user, select the password on the password list, then click the Security tab
as shown below.
Each tab within the Security tab represents areas within the RPMS system, associated with their menu
selections. The exception to this is the Data Limited to Sales Rep field on the Files tab as pictured above.
This field will limit list, snapshot, and report data for this password to customers assigned to the sales rep
provided.
Other options may be set to one of three security levels. Update is the setting that indicates full access to
the function. View Only means that data within the corresponding function can be examined, but can’t be
changed. No Access means the function is unavailable to that user. As of Version 7.7, the Transactions tab
has an option labeled Post to QuickBooks® that dictates whether this user has the ability to automatically
post payment or invoice information to QuickBooks®.
By default, when a password is added, full access is provided to all features and functions. When all
limitations have been established for the user, click Save.

Chapter 10 – Update RPMS
27
Update RPMS
Purpose of Update RPMS
The Update RPMS function allows you to apply a code to upgrade your system license file. The system
license file governs maintenance release eligibility codes (EMA), additional features and modules, E-Data
maps and other features.
How Update RPMS Works
To update the RPMS license file, select Utilities, Update RPMS to display the form shown below.
Type or paste the supplied code and click Save.
WARNING: Use caution when typing codes, and only enter codes sent to you by RPMS. While most
incorrect codes will be harmless, it is theoretically possible to enter a code that downgrades your system.

Chapter 10 – Update RPMS
28
This page left blank intentionally.
Chapter 11– Next Invoice Number
29
Next Invoice Number
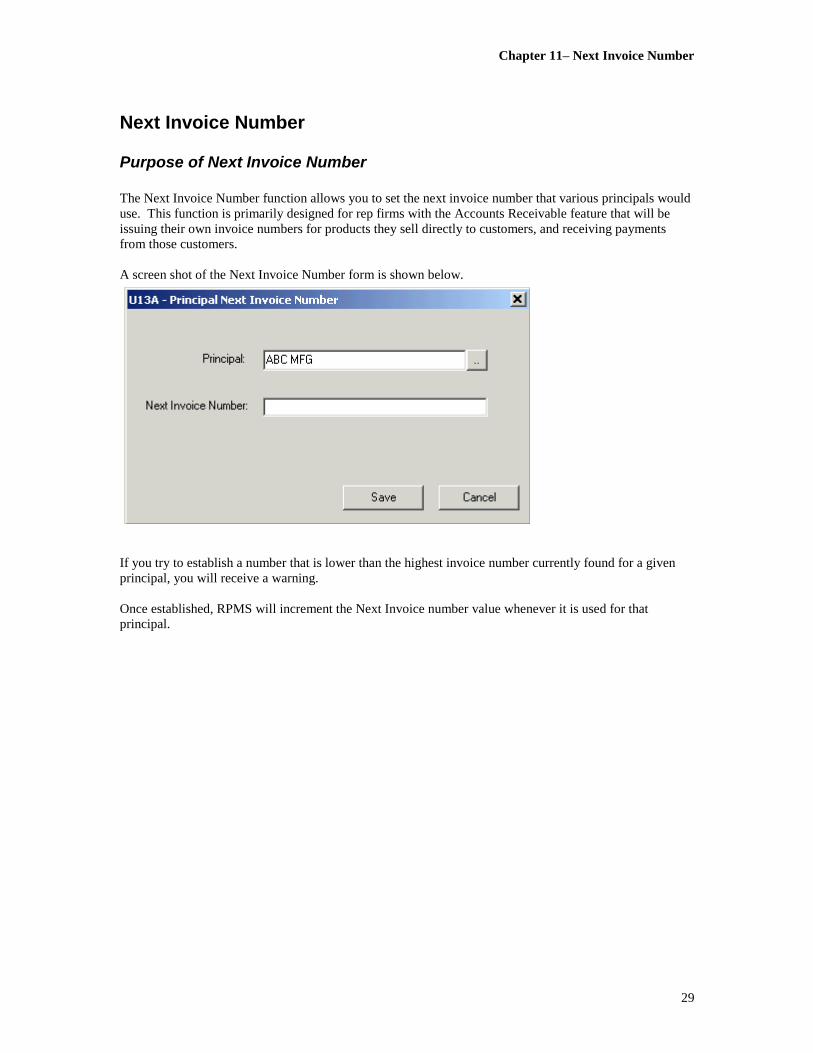
Purpose of Next Invoice Number
The Next Invoice Number function allows you to set the next invoice number that various principals would
use. This function is primarily designed for rep firms with the Accounts Receivable feature that will be
issuing their own invoice numbers for products they sell directly to customers, and receiving payments
from those customers.
A screen shot of the Next Invoice Number form is shown below.
If you try to establish a number that is lower than the highest invoice number currently found for a given
principal, you will receive a warning.
Once established, RPMS will increment the Next Invoice number value whenever it is used for that
principal.

Chapter 11 – Next Invoice Number
30
This page left blank intentionally.
Chapter 12– Re-Assign Sales Reps
31
Re-assign Sales Reps
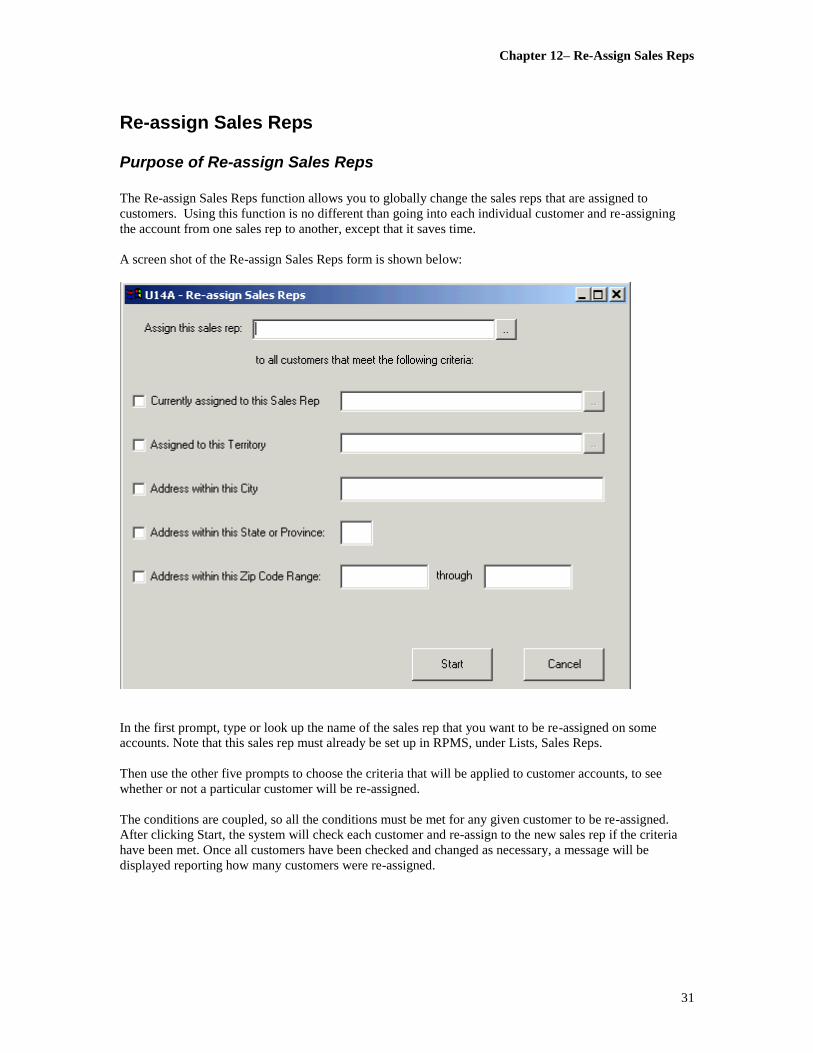
Purpose of Re-assign Sales Reps
The Re-assign Sales Reps function allows you to globally change the sales reps that are assigned to
customers. Using this function is no different than going into each individual customer and re-assigning
the account from one sales rep to another, except that it saves time.
A screen shot of the Re-assign Sales Reps form is shown below:
In the first prompt, type or look up the name of the sales rep that you want to be re-assigned on some
accounts. Note that this sales rep must already be set up in RPMS, under Lists, Sales Reps.
Then use the other five prompts to choose the criteria that will be applied to customer accounts, to see
whether or not a particular customer will be re-assigned.
The conditions are coupled, so all the conditions must be met for any given customer to be re-assigned.
After clicking Start, the system will check each customer and re-assign to the new sales rep if the criteria
have been met. Once all customers have been checked and changed as necessary, a message will be
displayed reporting how many customers were re-assigned.

Chapter 12 – RPMS is Made for QuickBooks®
32
This page left blank intentionally.

Chapter 13– RPMS is Made for QuickBooks®
33
RPMS is Made for QuickBooks®
Purpose of the RPMS to QuickBooks Integration Feature
RPMS is a versatile and powerful orders, sales and commission management system designed for
manufacturers rep agencies, and for distributors that also receive commissions. The reason that a rep-
specific product like RPMS exists is because of the need to track gross sales between principals and
customers, in addition to tracking commissions paid. Most general accounting packages can do one of those
things, but not both. But RPMS does not provide a general ledger or accounts payable system, because of
the wide availability of inexpensive and generally suitable products available to fulfill that need.
QuickBooks® by Intuit (www.intuit.com) is the world’s most widely used business accounting software,
featuring excellent ease of use and rapid implementation. By integrating RPMS and QuickBooks together,
manufacturers’ rep agencies achieve the best of both worlds. Orders, sales, commissions, and the myriad
business relationships of multiple-line representatives are the specialty of RPMS. Assembling all the detail
into a tightly summarized, accurate and accountable general ledger is the province of QuickBooks. This
guide describes the information shared between RPMS and QuickBooks, and the process of implementing
the two software applications to work together. The RPMS administrator, the QuickBooks administrator,
and your network administrator should all read this guide to successfully implement the RPMS to
QuickBooks Integration.
Data Shared Between RPMS and QuickBooks®
Beginning with RPMS Version 7.7, commission payment information recorded in RPMS can be sent
directly and automatically into QuickBooks deposits, without duplicate data entry. RPMS can also post
one or more invoice payments as a deposit for rep agencies with the Accounts Receivable feature; and can
post inventory purchases as payable records (bills) for those rep firms with the Inventory feature. RPMS
integrates with QuickBooks Pro, Premier and Enterprise desktop editions for Windows, versions 2002
through 2014.
Setting Up the RPMS to QuickBooks® Integration
The RPMS to QuickBooks Integration feature is not currently available on RPMSCloud.
Install or update RPMS on a user’s workstation that has the QuickBooks program installed. Follow the
installation or update instructions for RPMS. If you have a local area network, the data folder for RPMS
can be specified to be anywhere on your company network that is available to that workstation and that
user, as always. The RPMS data does NOT need to be installed in the same folder as the QuickBooks
company file.
RPMS is sold with a ‘floating’ license, so you can install the program on multiple workstations, provided
the simultaneous use count does not exceed the number of RPMS seat licenses. At this time, RPMS and
QuickBooks must both be installed on any computer that wants to update QuickBooks from within RPMS.
Also at this time the RPMS to QuickBooks integration is not supported on Microsoft Vista operating
systems. QuickBooks requires Vista’s UAC (User Authentication Control) to be enabled on Vista
machines with integrated applications. It is possible to run the RPMS to QuickBooks integration system on
Vista without UAC enabled, if the user is logged in as a Standard User, but installed both RPMS and
QuickBooks as an Administrator. However, because this scenario is not supported by QuickBooks, RPMS
currently requires the RPMS to QuickBooks integration module to be run from a Windows 7 or later
operating system.
Chapter 13 – RPMS is Made for QuickBooks®
34
QuickBooks® Options on the Preferences Form
This description of the QuickBooks Options is also available in Chapter 6, Preferences. The QuickBooks
administrator and the RPMS administrator should jointly determine and set these options.
Once RPMS and QuickBooks are installed together on some computer, launch RPMS. Click Files, then
Administration System. Type the Supervisor’s password. Click Utilities, then Preferences, to see the RPMS
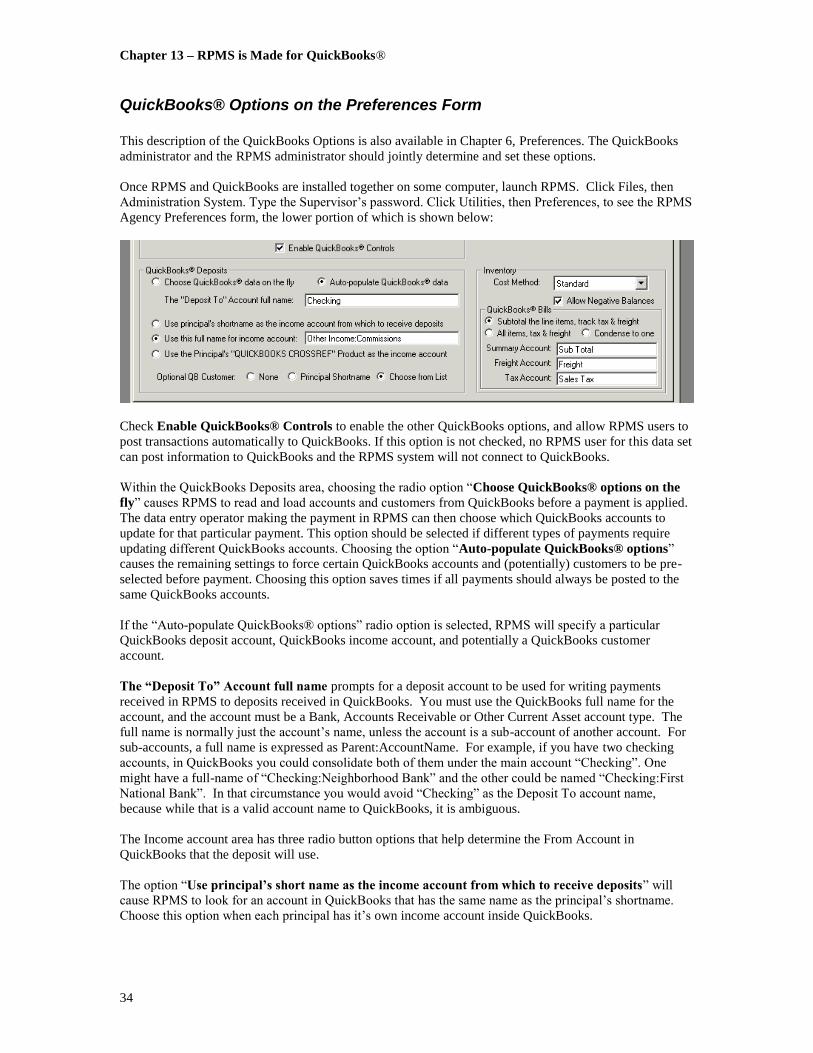
Agency Preferences form, the lower portion of which is shown below:
Check Enable QuickBooks® Controls to enable the other QuickBooks options, and allow RPMS users to
post transactions automatically to QuickBooks. If this option is not checked, no RPMS user for this data set
can post information to QuickBooks and the RPMS system will not connect to QuickBooks.
Within the QuickBooks Deposits area, choosing the radio option “Choose QuickBooks® options on the
fly” causes RPMS to read and load accounts and customers from QuickBooks before a payment is applied.
The data entry operator making the payment in RPMS can then choose which QuickBooks accounts to
update for that particular payment. This option should be selected if different types of payments require
updating different QuickBooks accounts. Choosing the option “Auto-populate QuickBooks® options”
causes the remaining settings to force certain QuickBooks accounts and (potentially) customers to be pre-
selected before payment. Choosing this option saves times if all payments should always be posted to the
same QuickBooks accounts.
If the “Auto-populate QuickBooks® options” radio option is selected, RPMS will specify a particular
QuickBooks deposit account, QuickBooks income account, and potentially a QuickBooks customer
account.
The “Deposit To” Account full name prompts for a deposit account to be used for writing payments
received in RPMS to deposits received in QuickBooks. You must use the QuickBooks full name for the
account, and the account must be a Bank, Accounts Receivable or Other Current Asset account type. The
full name is normally just the account’s name, unless the account is a sub-account of another account. For
sub-accounts, a full name is expressed as Parent:AccountName. For example, if you have two checking
accounts, in QuickBooks you could consolidate both of them under the main account “Checking”. One
might have a full-name of “Checking:Neighborhood Bank” and the other could be named “Checking:First
National Bank”. In that circumstance you would avoid “Checking” as the Deposit To account name,
because while that is a valid account name to QuickBooks, it is ambiguous.
The Income account area has three radio button options that help determine the From Account in
QuickBooks that the deposit will use.
The option “Use principal’s short name as the income account from which to receive deposits” will
cause RPMS to look for an account in QuickBooks that has the same name as the principal’s shortname.
Choose this option when each principal has it’s own income account inside QuickBooks.

Chapter 13– RPMS is Made for QuickBooks®
35
The option “Use this full name for income account” will cause RPMS to receive a deposit from the
named account for every payment. Use this option when all payments recorded in RPMS go to the same
income account.
The option “Use this principal’s “QUICKBOOKS CROSSREF” Product” as the income account will
cause RPMS to look inside RPMS at the principal’s product database in order to find a product called
QUICKBOOKS CROSSREF. The income account name will be the description(s) of that product. This
third option is useful when some, but not all, principals will use one given income account, while other
principals use another income account. For example, you may receive payments that are strictly
commission payments from principals, and choose to record that income under an account called “Other
Income:Commissions”, while your Buy/Sell payments from customers would be recorded under an account
called “Customer Payments”. You would choose the third option, and set up a product under each
commission-paying principal called QUICKBOOKS CROSSREF, and make the description “Other
Income:Commissions”. Then you would set up a product under the Buy/Sell principal called
QUICKBOOKS CROSSREF, and make it’s description “Customer Payments”.
The prompt Optional QB Customer determines whether or not RPMS will attempt to ascribe a
QuickBooks customer to the deposit, and if so, whether it will use a principal’s short name or let the RPMS
user choose from a list of accounts for QuickBooks.
The QuickBooks® Bills area is enabled for installations with the Inventory feature, and governs how
inventory receipts will be passed to QuickBooks, and how freight and tax (if any) will be handled.
Set the AP Account field to the specific Accounts Payable account that bills for inventory should increase.
If you don’t have a specific account for these types of bills, use the generic Accounts Payable account.
The Subtotal, All Items and Condense options establish what type of bill RPMS will pass to QuickBooks.
Choose All Items for a fully detailed bill with product line items, tax, and freight. For this option, note that
all product numbers must already be set up in QuickBooks. Select Condensed to send a single value of the
amount to pay, including the tax and freight values. Or choose Subtotal to pass one item as a subtotal of the
received line items and two expense items (as warranted) for the tax and freight.
For many users, a subtotaled or condensed bill is sufficient. Other users who employ stricter control over
accounts payable may want greater detail.
Freight Account must be established if All Items or Subtotal is selected above, and must be the
QuickBooks full name of an account that will carry the freight charges for a bill. No freight expense line
will be added to a bill for freight amounts of zero.
Tax Account must be established if All Items or Subtotal is selected above, and must be the QuickBooks
full name of an account that will carry the tax charges for a bill. No tax expense line will be added to a bill
for tax amounts of zero.
Summary Account must be established if Subtotal or Condense is selected above, and must be the
QuickBooks full name of an account that will carry the subtotal of the line items for a bill, or the or the
aggregate of the invoice amount.
Click OK to save the QuickBooks settings and other agency preferences.
Set QuickBooks® Security Options in the RPMS Administration System
For RPMS agencies with the Security feature, the right to post transactions to QuickBooks must be further
specified for each individual user. See the User Passwords & Security in this guide for information about
adding and administering RPMS passwords. The RPMS Security option for QuickBooks is on the
Transactions tab, and is labeled Post to QuickBooks®.

Chapter 13 – RPMS is Made for QuickBooks®
36
Agencies without the security feature will still need to click the Save button on existing passwords to
ensure that password’s inheritance of the new Post to QuickBooks® capability.
Authorizing RPMS in QuickBooks®
Once the RPMS administrator has set the QuickBooks Options and closed the RPMS Administration
system, start QuickBooks from a computer that also has RPMS installed. Log in to QuickBooks as the
QuickBooks Administrator. Then start RPMS from that same computer.
This portion of the authorization procedure is described in more detail below under For Each User of
RPMS, after Authorization of RPMS in QuickBooks®
In RPMS, click Files, then Preferences. On the tab Other Products & Settings, click the binoculars button
next to the QuickBooks Path prompt. Use the standard Open dialog box that results to select the
QuickBooks company file that this RPMS user’s computer should update.
Once you have the path to QuickBooks in the text box, click the “Test” button.
The very first time an RPMS application finds and attempts to connect with the QuickBooks company file,
the QuickBooks program must already be launched and running in the foreground on the same computer,
with the company file open and the administrator user logged in. These requirements prevent other
unauthorized applications from gaining access to QuickBooks.
If this is the first time that an RPMS application has attempted to connect to the company file, an
authorization page will be displayed in QuickBooks, allowing the QuickBooks administrator to dictate
whether RPMS can update the QuickBooks files.
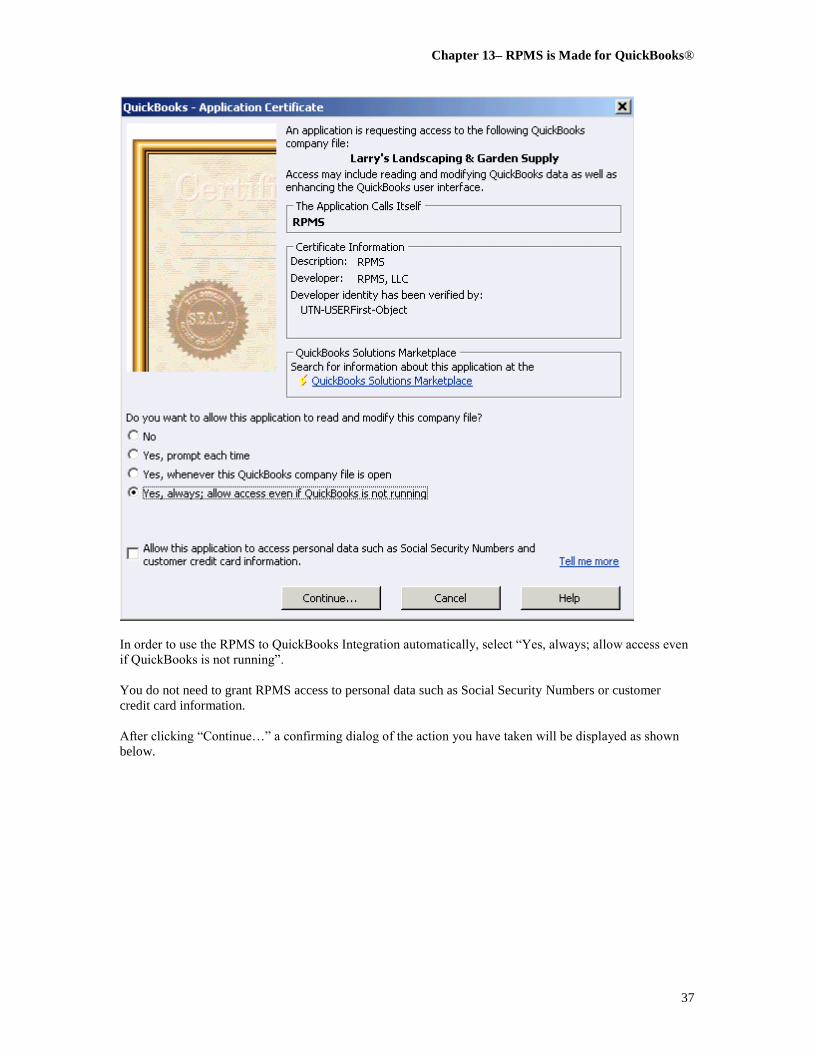
The sample Authorization dialog, shown below, declares that RPMS is an Application with a Certificate.
RPMS has an embedded digital certificate issued by Comodo and verified by UTN-USERFirst-Object.
Chapter 13– RPMS is Made for QuickBooks®
37
In order to use the RPMS to QuickBooks Integration automatically, select “Yes, always; allow access even
if QuickBooks is not running”.
You do not need to grant RPMS access to personal data such as Social Security Numbers or customer
credit card information.
After clicking “Continue…” a confirming dialog of the action you have taken will be displayed as shown
below.

Chapter 13 – RPMS is Made for QuickBooks®
38
If this QuickBooks company file already acknowledges RPMS as an integrated application, QuickBooks
will not show the application and confirmation dialog boxes displayed above.
If RPMS is subsequently removed from QuickBooks as a known integrated application, RPMS will no
longer be able to automatically connect to QuickBooks, and this Authorizing RPMS in QuickBooks process
will have to be repeated.
For Each User of RPMS, after Authorization of RPMS in QuickBooks®
This portion of the documentation is repeated in the Preferences description of the RPMS User’s Guide.
After RPMS has been authorized to the QuickBooks company file by the QuickBooks administrator, each
individual user that wants to update QuickBooks automatically must establish their own path to the
QuickBooks company file, by following this procedure.
After logging in to RPMS, click Files, then Preferences. On the tab Other Products & Settings, click the
binoculars button next to the QuickBooks Path prompt. The lower portion of that tab is shown below:
Use the standard Open dialog box that results to select the QuickBooks company file that this RPMS user’s
computer should update. If the QuickBooks Path option is disabled, it means that the QuickBooks controls
for this RPMS data set have not been enabled; or, your user password does not have appropriate Security
rights to post transactions to QuickBooks. Check with your RPMS system administrator.
Chapter 13– RPMS is Made for QuickBooks®
39
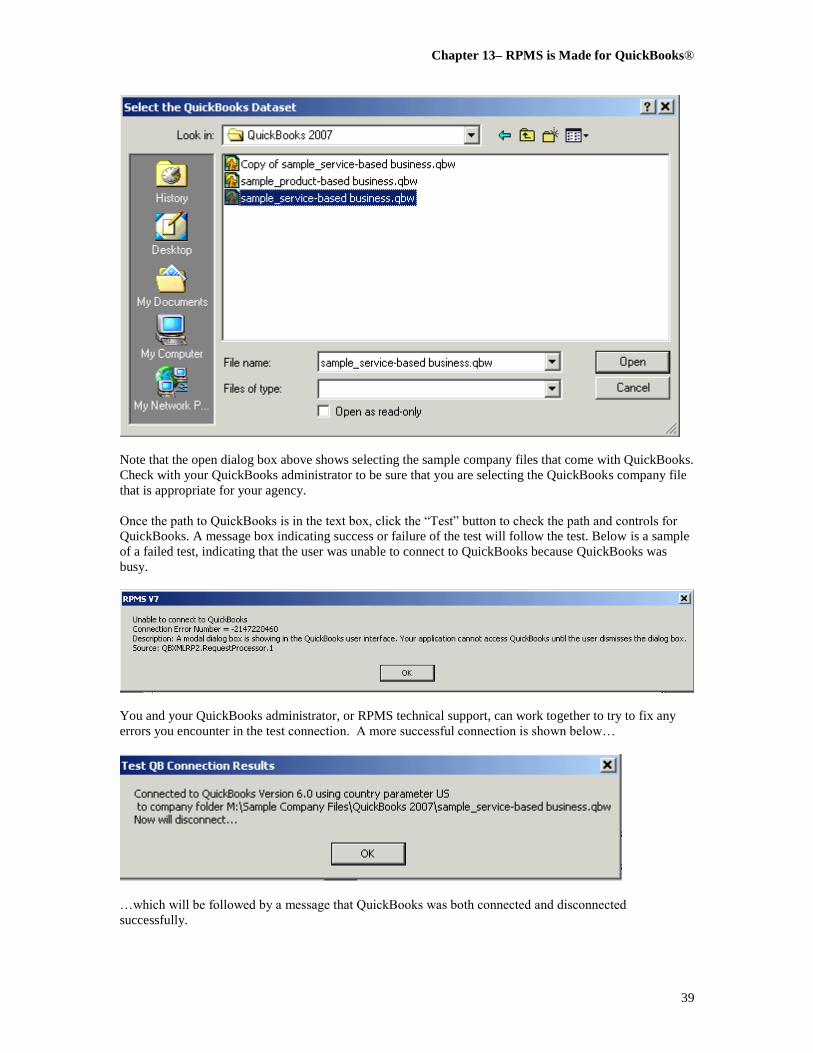
Note that the open dialog box above shows selecting the sample company files that come with QuickBooks.
Check with your QuickBooks administrator to be sure that you are selecting the QuickBooks company file
that is appropriate for your agency.
Once the path to QuickBooks is in the text box, click the “Test” button to check the path and controls for
QuickBooks. A message box indicating success or failure of the test will follow the test. Below is a sample
of a failed test, indicating that the user was unable to connect to QuickBooks because QuickBooks was
busy.
You and your QuickBooks administrator, or RPMS technical support, can work together to try to fix any
errors you encounter in the test connection. A more successful connection is shown below…
…which will be followed by a message that QuickBooks was both connected and disconnected
successfully.
Chapter 13 – RPMS is Made for QuickBooks®
40
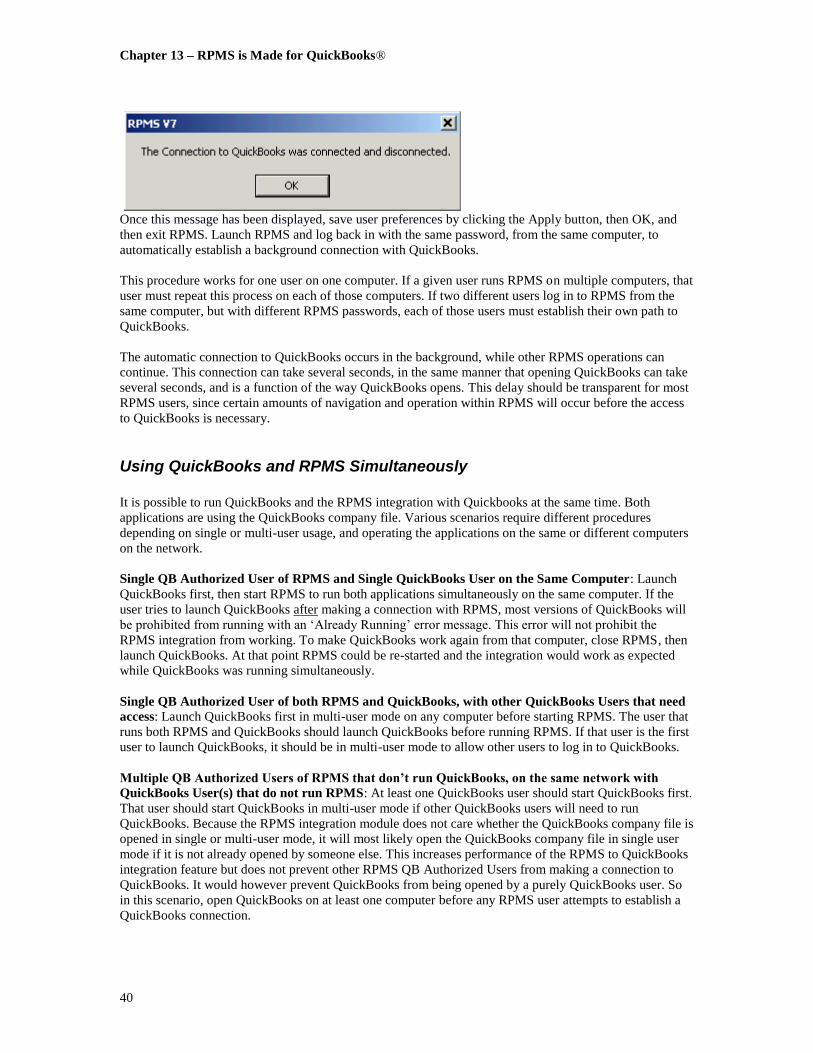
Once this message has been displayed, save user preferences by clicking the Apply button, then OK, and
then exit RPMS. Launch RPMS and log back in with the same password, from the same computer, to
automatically establish a background connection with QuickBooks.
This procedure works for one user on one computer. If a given user runs RPMS on multiple computers, that
user must repeat this process on each of those computers. If two different users log in to RPMS from the
same computer, but with different RPMS passwords, each of those users must establish their own path to
QuickBooks.
The automatic connection to QuickBooks occurs in the background, while other RPMS operations can
continue. This connection can take several seconds, in the same manner that opening QuickBooks can take
several seconds, and is a function of the way QuickBooks opens. This delay should be transparent for most
RPMS users, since certain amounts of navigation and operation within RPMS will occur before the access
to QuickBooks is necessary.
Using QuickBooks and RPMS Simultaneously
It is possible to run QuickBooks and the RPMS integration with Quickbooks at the same time. Both
applications are using the QuickBooks company file. Various scenarios require different procedures
depending on single or multi-user usage, and operating the applications on the same or different computers
on the network.
Single QB Authorized User of RPMS and Single QuickBooks User on the Same Computer: Launch
QuickBooks first, then start RPMS to run both applications simultaneously on the same computer. If the
user tries to launch QuickBooks after making a connection with RPMS, most versions of QuickBooks will
be prohibited from running with an ‘Already Running’ error message. This error will not prohibit the
RPMS integration from working. To make QuickBooks work again from that computer, close RPMS, then
launch QuickBooks. At that point RPMS could be re-started and the integration would work as expected
while QuickBooks was running simultaneously.
Single QB Authorized User of both RPMS and QuickBooks, with other QuickBooks Users that need
access: Launch QuickBooks first in multi-user mode on any computer before starting RPMS. The user that
runs both RPMS and QuickBooks should launch QuickBooks before running RPMS. If that user is the first
user to launch QuickBooks, it should be in multi-user mode to allow other users to log in to QuickBooks.
Multiple QB Authorized Users of RPMS that don’t run QuickBooks, on the same network with
QuickBooks User(s) that do not run RPMS: At least one QuickBooks user should start QuickBooks first.
That user should start QuickBooks in multi-user mode if other QuickBooks users will need to run
QuickBooks. Because the RPMS integration module does not care whether the QuickBooks company file is
opened in single or multi-user mode, it will most likely open the QuickBooks company file in single user
mode if it is not already opened by someone else. This increases performance of the RPMS to QuickBooks
integration feature but does not prevent other RPMS QB Authorized Users from making a connection to
QuickBooks. It would however prevent QuickBooks from being opened by a purely QuickBooks user. So
in this scenario, open QuickBooks on at least one computer before any RPMS user attempts to establish a
QuickBooks connection.

Chapter 13– RPMS is Made for QuickBooks®
41
Example: Assume that Alan and Barbara are QuickBooks users that do not use RPMS, and that Charlene
and David are QB Authorized RPMS users that connect to the QuickBooks company file to post deposits
and bills, but otherwise do not run QuickBooks. Below are several scenarios of operation to start a day,
after all computers have been re-booted and at the beginning of a day:
Alan opens QuickBooks first in multi-user mode – all other users can log in and work as
expected.
Barbara opens QuickBooks first in single-user mode. Charlene and David can run RPMS as
expected and update the QB company file, but Alan will be prevented from opening
QuickBooks.
Charlene launches RPMS, then Alan opens QuickBooks in multi-user mode. Barbara and
David will be able to work as expected.
David launches RPMS, then Barbara opens QuickBooks in single-user mode. Charlene will
be able to run RPMS and update the QB company file, but Alan will be prevented from
running QuickBooks.
Receive Payment in RPMS and Deposit to QuickBooks®
This portion of the documentation is repeated in the Commission Reconciliation section of the RPMS
User’s Guide.
When records have been selected in the RPMS commission reconciliation process to pay and the Apply
button has been clicked, RPMS checks to see whether a connection to QuickBooks is necessary. If the
connection has been attempted but was not yet successful, a message similar to the one shown below will
be displayed.
There are many reasons that a connection to QuickBooks would be unavailable. A common problem is that
the computer that runs QuickBooks is not turned on, or is not hooked up to the local network. Other
problems can include network-mapping problems, disabling of RPMS authorization within QuickBooks, or
that not enough time has gone by to establish the RPMS to QuickBooks connection. A user presented with
this message can work with the network system administrator, the QuickBooks administrator, and RPMS
technical support to resolve the problem before clicking Yes. If after clicking Yes the system is still unable
to connect to QuickBooks, a message will relay that information to the user and the QuickBooks controls
on the payment dialog shown below will be disabled.
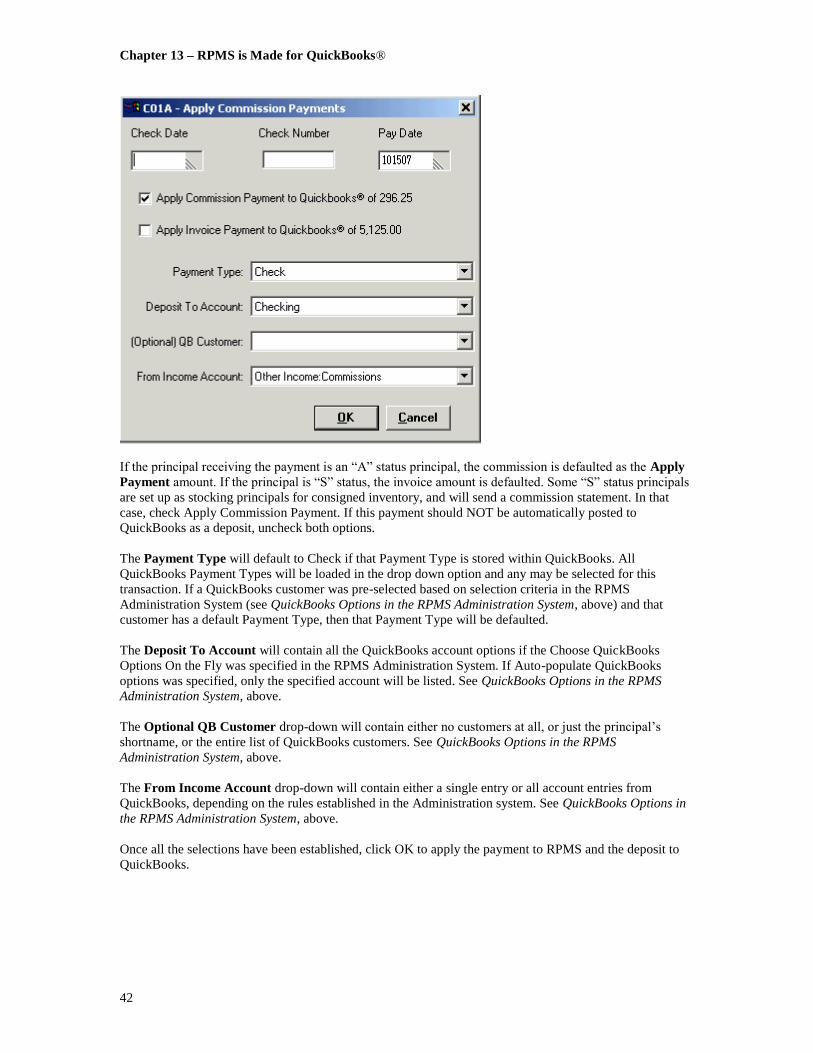
On the RPMS receive payment screenshot below, the QuickBooks prompts are displayed below the Check
Date, Check Number and Pay Date prompts.
Chapter 13 – RPMS is Made for QuickBooks®
42
If the principal receiving the payment is an “A” status principal, the commission is defaulted as the Apply
Payment amount. If the principal is “S” status, the invoice amount is defaulted. Some “S” status principals
are set up as stocking principals for consigned inventory, and will send a commission statement. In that
case, check Apply Commission Payment. If this payment should NOT be automatically posted to
QuickBooks as a deposit, uncheck both options.
The Payment Type will default to Check if that Payment Type is stored within QuickBooks. All
QuickBooks Payment Types will be loaded in the drop down option and any may be selected for this
transaction. If a QuickBooks customer was pre-selected based on selection criteria in the RPMS
Administration System (see QuickBooks Options in the RPMS Administration System, above) and that
customer has a default Payment Type, then that Payment Type will be defaulted.
The Deposit To Account will contain all the QuickBooks account options if the Choose QuickBooks
Options On the Fly was specified in the RPMS Administration System. If Auto-populate QuickBooks
options was specified, only the specified account will be listed. See QuickBooks Options in the RPMS
Administration System, above.
The Optional QB Customer drop-down will contain either no customers at all, or just the principal’s
shortname, or the entire list of QuickBooks customers. See QuickBooks Options in the RPMS
Administration System, above.
The From Income Account drop-down will contain either a single entry or all account entries from
QuickBooks, depending on the rules established in the Administration system. See QuickBooks Options in
the RPMS Administration System, above.
Once all the selections have been established, click OK to apply the payment to RPMS and the deposit to
QuickBooks.

Chapter 13– RPMS is Made for QuickBooks®
43
How RPMS Payment Data Corresponds to QuickBooks® Deposits
On the QuickBooks deposit screenshot below, the relevant fields in QuickBooks are pointed out and
corresponded to the settings or data from RPMS.
Receive Inventory in RPMS for Accounts Payable in QuickBooks®
This portion of the documentation is repeated in the Inventory section of the RPMS User’s Guide.
As ordered inventory is received in RPMS, a bill can be created and passed into QuickBooks, updating the
Accounts Payable. Whenever R (Receive) or P (Partially Receive) is applied against an inventory order,
RPMS checks to see whether a connection to QuickBooks is necessary. If the connection has been
attempted but was not yet successful, a message would be displayed as shown below, allowing an attempt
at re-connection.
There are many reasons that a connection to QuickBooks would be unavailable. A common problem is that
the computer that runs QuickBooks is not turned on, or is not hooked up to the local network. Other
problems can include network-mapping problems, disabling of RPMS authorization within QuickBooks, or
The “Deposit To”
account from settings
The pay date from
the payment dialog
The check number from
the payment dialog box
The optional customer,from settings and the
principal making the
payment
The income account, from
settings and/or the principal
The paymentmethod from the
payment dialog
box
The commission
or invoiceamount, as
selected on the
payment dialog
box

Chapter 13 – RPMS is Made for QuickBooks®
44
that not enough time has gone by to establish the RPMS to QuickBooks connection. A user presented with
this message can work with the network system administrator, the QuickBooks administrator, and RPMS
technical support to resolve the problem before clicking Yes. If after clicking Yes the system is still unable
to connect to QuickBooks, a message will relay that information to the user and the QuickBooks controls
on the Assign Invoice dialog shown below will be disabled.
On the Assign Invoice dialog shown below, the QuickBooks prompts are displayed below the Invoice
Number and Received Date.
The Invoice Number will be sent to QuickBooks as the Reference Number for this bill.
The Received Date will be sent to QuickBooks as the Transaction Date for this bill.
The Post to QuickBooks® Payables option governs whether or not this transaction will be sent by this
user to QuickBooks. If this option is not enabled, the user may not have the appropriate rights to send data
to QuickBooks, or QuickBooks may not currently be available.
The Items Subtotal will be sent to QuickBooks either be added in to a single sum with tax and freight; or
will be shown as it’s own value; or will be broken into the distinct line items of this invoice. The method
used is governed by settings in the Administration system – see QuickBooks® Options in the RPMS
Administration System above.
Freight Amount is pulled over from the detail of the order, but may need adjustment for this invoice.
Changing the Freight Amount does NOT change the freight amount recorded in the RPMS order, if any.
Tax Amount can be added, if any tax was charged for this invoice.
Terms are pulled over from the detail of the order IF they match an available Terms value in QuickBooks.
Otherwise, terms may be selected from the list of QuickBooks terms values. Changing or setting the Terms
value does not change or set the Terms value for the order in RPMS.
Due Date is a date field that can be added to this bill, to establish pay precedence in QuickBooks.

Chapter 13– RPMS is Made for QuickBooks®
45
The Vendor in QuickBooks will be the RPMS Vendor – you must have the identical vendor name set up in
both applications. The memo for the bill in QuickBooks will be the RPMS Order number.
How RPMS Inventory Receipt Data Corresponds to QuickBooks® Bills
On the QuickBooks Enter Bills screenshot below, the relevant fields in QuickBooks are pointed out and
corresponded to the settings or data from RPMS. This screen shows the “Subtotal the line items, track tax
& freight” method of creating bills.
The screen shots below shows the difference on the Expenses and Items split list tabs for the “All items, tax
and freight” method of creating bills.
The vendor from
the RPMS vendor
shortname
The received date
The invoice number
The total due from
subtotal of items,taxes, and freight
The due date from the
assign invoice dialog
Terms from the assign
invoice dialog
The RPMS inventory
order number
With the “subtotal” method,
the tax line, freight line and
subtotal of line items arestored on three expense lines,
mapped to expense accounts
according to settings
Using the All itemsmethod, tax and freight
are mapped to the
expense tab…

Chapter 13 – RPMS is Made for QuickBooks®
46
Finally, the screen shot shows how the Expenses split list tab would appear for the “Condensed” method of
creating bills.
…and all the line items are
detailed on the Items tab. Forthe All Items method, the
products MUST be set up in
QuickBooks.
All the items, plus the tax andthe freight are summed together
in one entry. The account is the
Summary Account chosen in
the Administration system.