Embed Size (px)
Citation preview

VST-AU JUNO-106 Editor™ 1.2.0User Manual
Windows XP, Vista, Windows 7
OSX 10.5, 10.6

VST-AU JUNO-106 Editor™ 1.2.0User Manual
Table of Contents» Introduction» Installation» MIDI Setup» Working with the VST-AU JUNO-106 Editor™» Graphical User Interface» Working with Patches» MIDI Implementation» Legal Information
IntroductionThank you for choosing the reKon audio VST-AU JUNO-106 Editor™. The VST-AU JUNO-106 Editor™ (alsoreferred to in this manual as 'Editor') is a real-time MIDI Synth Editor that allows you full control of every parameterof the sound on the Roland JUNO-106™ and HS-60™ synthesizers (also referred to in this manual as 'Synth').With it, you can view, manage and edit all your Patches with detail on the computer, visually. All parameters arefully automatable in your favorite VST or AU Host (see product web page for current Host support), giving you theability to visually program the JUNO-106 to your music via the Host sequencer. This ability to model your SynthPatches in real-time, inside your main music production environment is part of what makes the VST-AU JUNO-106Editor™ unique when compared to other hardware Synth Editors. If you don't need or use a DAW Host, you canstill manage the Patches with the Standalone version.
Complete Synth Editor
The VST-AU JUNO-106 Editor™ is a visual editor allowing you to view and edit every parameter of a RolandJUNO-106 or HS-60 Patch.
Advanced Patch Librarian
The VST-AU JUNO-106 Editor™ includes an advanced 'Patch Manager' view that allows you to rename andarrange Patches to create your Bank. Drag and drop Patches where you want them with a complete overview ofthe Bank in either Swap, Copy, or Move mode. You can load and save your Patches and Banks as standard .FXB/.FXP files.
Patch Randomizer
The VST-AU JUNO-106 Editor™ also includes a 'Patch Randomizer' that allows you to easily create randomlygenerated Patches.
MIDI Input and Output Monitoring
The 'MIDI Monitor' view allows you to view all MIDI data coming into and out of the VST-AU JUNO-106 Editor™ forboth the Host and Editor MIDI data paths. Easily switch between Host and Editor views. You can even copy thedata from the event logs for pasting and saving into standard text editors or other applications.
MIDI Setup
The VST-AU JUNO-106 Editor™ is based on an entirely new framework that allows you to select the MIDI inputand output ports and channels directly from within the Editor itself. This allows you to send and receive MIDI datadirectly to and from your Synth. You are no longer limited by any Host MIDI incapabilities. 'MIDI Setup' also allowsyou to filter out specific MIDI data for both Host and Editor MIDI data paths or toggle MIDI In and Out operations.
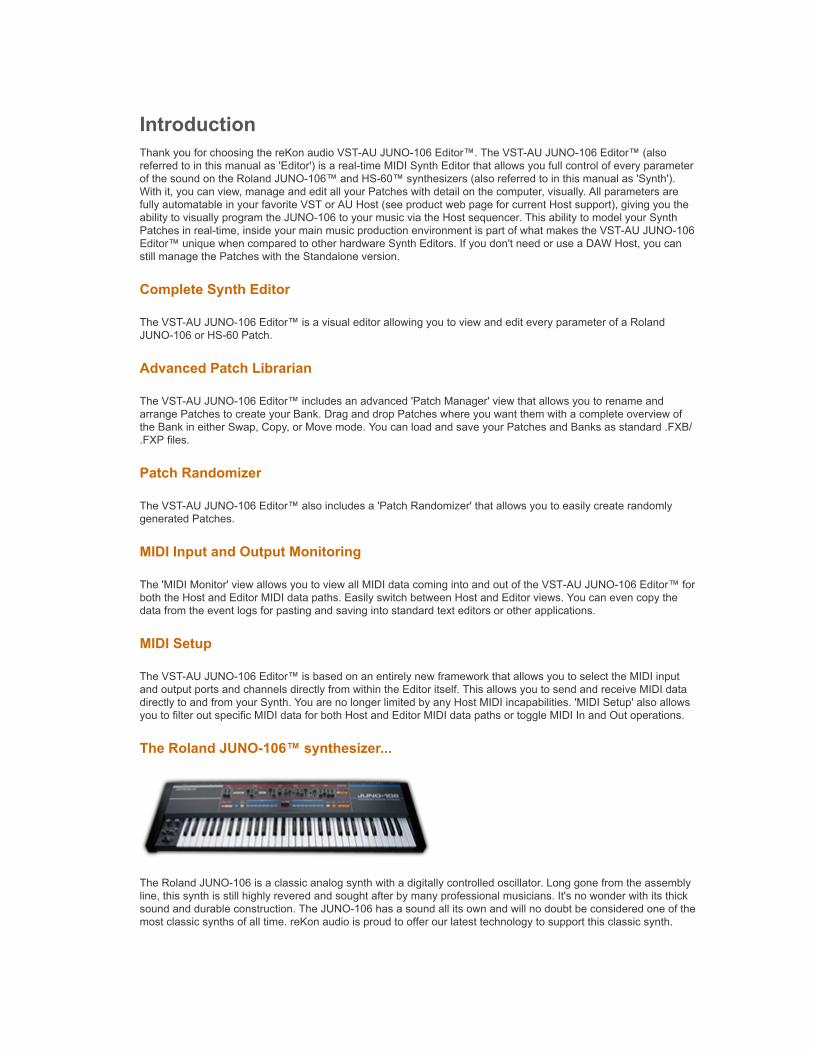
The Roland JUNO-106™ synthesizer...
The Roland JUNO-106 is a classic analog synth with a digitally controlled oscillator. Long gone from the assemblyline, this synth is still highly revered and sought after by many professional musicians. It's no wonder with its thicksound and durable construction. The JUNO-106 has a sound all its own and will no doubt be considered one of themost classic synths of all time. reKon audio is proud to offer our latest technology to support this classic synth.

We've made giant strides in our new software products to offer not only an editor that supports sysex MIDI data,but also include a patch librarian, advanced patch randomizer, midi monitors, full automation support, and supportfor Audio Unit hosts and even offer it up as a standalone application.

InstallationThis product includes an installer which will help you with the installation of the product. Please follow the detailedinstructions below to install and register your License Key to begin using the software product.
WINDOWS USERS:
1. Be sure to read this User Manual before you begin using this product. It contains detailed information regardingthe MIDI setup procedures required to successfully connect to your computer and synthesizer.
2. Run the installer file. This will install the VST and Standalone application and related files to the following folderson your computer:
For 32-bit Windows operating systems:VST: c:/Program Files/Common Files/VST2/reKon audio/VST-AU JUNO-106 Editor/Standalone: c:/Program Files/reKon audio/VST-AU JUNO-106 Editor/
For 64-bit Windows operating systems:VST: c:/Program Files (x86)/Common Files/VST2/reKon audio/VST-AU JUNO-106 Editor/Standalone: c:/Program Files (x86)/reKon audio/VST-AU JUNO-106 Editor/
*Note that this product is a 32-bit product and is not designed to run natively in 64-bit DAW Hosts. Bridgeapplications may or may not work.
3. Place your provided license key (.rkl file) into each of the folders from step 2 to begin using the product.
MAC OSX USERS:
1. Be sure to read the provided PDF manual before you begin using this product. It contains detailed informationregarding the 'MIDI Setup' procedures required to successfully connect to your computer and synthesizer.
2. Run the installer file. This will install the VST, AU and Standalone application and related files to the followingfolders on your computer:
AU: Library/Audio/Plug-Ins/Components/reKon audio/VST-AU JUNO-106 Editor/VST: Library/Audio/Plug-Ins/VST/reKon audio/VST-AU JUNO-106 Editor/Standalone: Applications/reKon audio/VST-AU JUNO-106 Editor/
*Note that you may need to copy the VST and Component folder files to your ~User/Library/Audio/Plug-Ins/ folderfor your Host to be able to find them.
3. Place your provided license key (.rkl file) into each of the folders from step 2 to begin using the product.

MIDI SetupAssumptions
It is assumed that the user is familiar with the basic functionality of the hardware synthesizer, its User Manual andthe basic concept of MIDI itself. Without this knowledge, utilizing the Editor may be a bit more challenging to set upand use properly. By familiarizing yourself with the the synthesizer manufacturers User Manual, this User Manual,and having a basic understanding of MIDI, you should be able to get up and running in a short amount of time.
Setting Up the Synth
Make sure you have your MIDI ports and channels set up and matching properly and that all cables are workingand connected properly.
Setting Up the Plug-in for your Host (DAW)
The setup procedure will vary by Host. Each Host will support plug-ins differently. Please refer to the 'SupportedHosts' list for this products support web page on the reKon audio web site at www.rekonaudio.com. Also, pleaserefer to the setup instructions provided with your Host application for setting up a VST or AU plug-in.
Syncing both the DAW Host and the Editor with the Synth
The Editor gives you several options for routing MIDI data bidirectionally. As a result, you can send Host MIDI datainto the Editor, which in turn, will get sent on to the Synth via the Editors MIDI Out port. In this process, the MIDIdata is actually transferring between two separate MIDI systems; the Host's, and the Editor's. This transfer processmay work fine for previewing your sounds, and possibly smaller projects, but will likely not suffice for a lot ofsequenced data. If you are having issues with syncing and hearing delayed or offset playback from the Synth whenusing the Host to send MIDI data to the Synth through the Editor, then you can create a setup that prevents thelatency/syncing issues.
You can use a Virtual MIDI Cable and a MIDI Routing Application to allow BOTH the DAW host and the Editordirect access to the same MIDI Output port using their own systems. This allows you to have the DAW hostsequencer send it's data straight to the synth. And, the Editor will have it's direct connection to the synth as well.
Here's how to set it all up. (In this example, the following tools were used. Other tools may work in a similar way):
• Windows 7 64bit (with a MOTU MIDI Express XT using port 8 to connect to the Synth MIDI In and Out)• MIDI-Ox (a free MIDI Routing App)• LoopBe (Virtual MIDI Cable). (MIDI Yoke and Maple MIDI will work with 32bit Win OS, but not 64bit Win
OS).• Any reKon audio VST-AU Editor™ product.• Cubase 5 32bit (DAW host).
1. Open the DAW host. In the DAW host MIDI setup (typically found under 'Preferences') disable the port that youare using to connect the synth to the editor. (ex. port 8).
2. Using a Virtual MIDI Cable (MIDI Yoke, Maple MIDI or LoopBe for Windows, it's free. Use 'Audio MIDI Setup'app on Mac and create a virtual device, also free). Make sure the VMC is installed and working properly first!
3. Using a MIDI Routing app (MIDI-Ox for Windows, it's free. Use 'Audio MIDI Setup' app on Mac, also free). OpenMIDI-Ox and make the following connections:
1. Open the 'Options/MIDI Devices' view and make sure you have selected the MIDI Out port you areusing to connect to the synth (ex. port 8).
2. Open the 'MIDI Port Routing' view and disconnect all cables first. Then connect the 'LoopBe MIDI Input'port to the MIDI port going to the synth (ex. port 8 Output).
3. Also connect the 'LoopBe MIDI Output' port to the 'MIDI-OX Event Port'.4. Also connect the 'MIDI-OX Event Port' to the port connected to the synth (ex. port 8).5. Load the VST-AU Editor plug-in. (see your host documentation for using soft-synth plug-ins).

6. Open the 'MIDI Setup' view in the VST-AU Editor.7. Set the 'Editor MIDI In' and 'Editor MIDI Out' ports and channels to that connected to the synth (ex. port
8).8. In the DAW host, select the track that was created for the plug-in.9. A. Note that you do not need (or want, in this case) to connect the MIDI tracks I/O's to any MIDI Inputs
or Outputs, or to the Editor. Instead, you can use this track to send Note On/Off, Pitch, Modwheel, etc.data straight to the synth by doing the following:- Set the track's MIDI Input to a MIDI Controller Keyboard.- Set the track's MIDI Output to the 'LoopBe Internal MIDI' port. This will send the Note On/Off, Pitch,Modwheel data to the synth directly from your Host sequencer track instead of through the Editor.
In this arrangement, the Editor has direct access to the synth AND the DAW Host sequencer also has directaccess to the synth.
Your music should now be in sync with the DAW host and still have automation control through the plug-in. TheEditor also has direct communication with the synth.
IMPORTANT NOTE!!! When using the plug-in in a Host application, you must first disable the MIDI port thatyou will be using the hardware Synth/ Editor on in the Host's MIDI setup. This will then make that portavailable for use within the plug-ins' MIDI setup. Failing to do this will not allow the MIDI port in the plug-in towork and the software will not be able to communicate with the hardware. You can use a virtual MIDI port(loopBe, etc.) if you wish to have your MIDI ports available to both the Host and the Editor.
Setup Example for Cubase 4-6
To setup the VST-AU JUNO-106 Editor™ for Cubase SX 2-3 or Cubase 4-6:
1. First be sure to open Cubase 'MIDI Setup' dialog and deactivate the MIDI ports you will be using to connect theSynth to the Editor. Be sure to check your Host's VST Instrument plug-ins folder to make sure the Editor gotinstalled there properly. Also make sure the License Key and Preferences files are copied to the same folder as theplug-in.2. Open Cubase.3. Create a new project.4. Open your 'VST Instruments' panel and then select the 'VST-AU JUNO-106 Editor™' VST in a VST slot. Add aMIDI Track for this if you want one (useful for MIDI keyboard control to the Synth).5. Click the 'MIDI Setup' button in the Editor and select the MIDI Input and Output port your Synth is attached to.6. Open the 'MIDI Monitor' view to make sure data is transmitted properly between Synth and Editor.7 If you are running the software for the first time, you will need to load the default bank file into the editor via the'Patch Manager'. Once loaded and saved in your host, your host should remember the settings you last usedautomatically. You should always save your bank files manually to be certain you are not losing anything important.
Automation:1. Select the track the Editor is on. In the 'VST Instrument' track you will see one automated parameter showingcalled 'Volume', you can use the menu there to select the parameter(s) you wish to automate. Please refer to theCubase User Manual for more information on using automation.
Setup Example for Ableton Live 8
To setup the VST-AU JUNO-106 Editor™ for Ableton Live 8:
1. First be sure to open Live's 'Preferences' dialog and deactivate the MIDI ports you will be using to connect theSynth to the Editor. Be sure to check your Host's VST Instrument plug-ins folder to make sure the Editor gotinstalled there properly. Also make sure the License Key and Preferences files are copied to the same folder as theplug-in.2. Open Ableton Live 8. Create an Empty Project.3. Drag the plug-in from the 'Plug-In Devices' box to the track screen The Editor should appear.4. In the Instrument track that was created, click the 'MIDI From' combo box and select a MIDI port that you wish touse for a MIDI controller keyboard. Activate this track to allow MIDI to go through.5. Open the 'MIDI Setup' view in the editor and select the MIDI ports that are connected to your Synth for both theEditor MIDI In and Editor MIDI Out sections. Close the MIDI Setup view.

6. Turn a knob in the editor, you should see MIDI data being sent out to the port you selected in step 5. Open the'MIDI Monitor' view to make sure data is transmitted properly between Synth and Editor.7. If you are running the software for the first time, you will need to load the default bank file into the editor via the'Patch Manager'. Once loaded and saved in your host, your host should remember the settings you last usedautomatically. You should always save your bank files manually to be certain you are not losing anything important.8.Create another 'Audio' track and route the audio from the audio port your Synth is connected to.
Automation:1. Select the track the Editor is on. In the 'Info View' panel in Live, click the 'Configure' button. Now select theparameters you wish to automate by clicking on them in the Editor. When you are done, click the 'Configure' buttonagain. You can now automate these parameters in your Live tracks. Please refer to the Live User Manual for moreinformation on using automation.
*Note that Live 8 does not automatically create or show automated parameters for plug-ins that have morethan 32 parameters. You have to add them manually using 'configure' mode. See the Live User Manualsection 16.2.1 for more information on the subject.
Setup Example for Logic Pro 9
To setup the VST-AU JUNO-106 Editor™ for Logic Pro 9:
1.Be sure to check your Host's Instrument plug-ins folder to make sure the Editor got installed there properly. Alsomake sure the License Key and Preferences files are copied to the same folder as the plug-in.2. Open Logic Pro 9. Create an Empty Project.3. In the 'New Tracks' dialog that automatically pops up, select 'Type= Software Instrument'. Click 'Create' button.4. In the Instrument track that was created, click the 'I/O' button (located on the far left near the bottom right belowthe 'I/O' label and above the 'Stereo Out' button).5. Select the editor under 'AU Instruments/reKon audio/VST-AU JUNO-106 Editor'. The plug-in should appear.6. Open the 'MIDI Setup' view in the editor and select the MIDI ports that are connected to your Synth for both theEditor MIDI In and Editor MIDI Out sections. Close the MIDI Setup view.7. Turn a knob in the editor, you should see MIDI data being sent out to the port you selected in step 5. You canopen the MIDI Monitor to verify this as well and see what messages are being sent or your MIDI hardware MIDIactivity LED's.8. Open the 'Patches' window and load in a bank of patches. You can use the default bank provided with thesoftware to start with. When you change patches, the editor patch data will be sent to the synth.9. In Logic, create another 'Audio' track and route the audio from the audio port your Synth is connected to.
Automation:1. Select the track the Editor is on and click the 'View' menu and select 'Automation' (or use the 'A' key). You willsee the automation lanes for the Editor. You can add automation lanes for parameters you wish to automate.Please refer to the Logic User Manual for more information on using automation.
*Note that Logic Pro does not have a MIDI Setup dialog that would allow you to select the ports you wish toactivate or deactivate. It uses the Mac IAC driver (OSX Audio/MIDI Setup application) for its MIDI ports. As aresult, choose routings carefully to avoid MIDI feedback loops or breaking the Editor's MIDI connection.
NOTES- Setup for other Hosts is similar to those listed above. Please refer to your Hosts documentation for settingup a plug-in.
Setting Up the Plug-in for Standalone
The setup procedure for Standalone operation is fairly straightforward...
1. If other Audio/MIDI applications are already open, then take this into consideration when using the Standaloneapplication. Make sure the MIDI port you will be using is available for use with the VST-AU JUNO-106 Editor™.

2. Open the VST-AU JUNO-106 Editor™.3. Open the 'Devices' dialog and select the preferred audio card settings and 'Host' MIDI Input. This is useful forcontrolling the Synth from a remote MIDI keyboard.4. Click the 'MIDI Setup' button in the Editor and select the MIDI Input and Output port your Synth is attached to.5. Open the 'MIDI Monitor' view to make sure data is transmitted properly between Synth and Editor.
Working With the VST-AU JUNO-106 Editor™About Sound
The VST-AU JUNO-106 Editor™ is a plug-in that deals only with MIDI data. As a result the VST-AU JUNO-106Editor™ makes no sound of its own. It is not an emulation software synth. The sound comes from the actualhardware synth itself, which is what you want (pure analog hardware generated sound, but with plug-in control).Connect your Synth to your audio card inputs as you normally would and use the Host to manage the audio tracks.
Using the Controls
Most controls on the VST-AU JUNO-106 Editor™ are self explanatory as to their use. The display readouts willvary based on the related ranges and values for that particular control.
Mouse Wheel Support
You can use the mouse wheel to change knob and slider parameters in single increments for fine-tuned parametercontrol.
Receiving MIDI Data
The VST-AU JUNO-106 Editor™ can receive and interpret MIDI pitch wheel, modulation and control change data.All Editor controls will respond to their correlated MIDI messages from the hardware itself. All controls respond totheir correlated MIDI CC numbers as listed in the JUNO-106 User Manual.
The MIDI LED Indicators
When the VST-AU JUNO-106 Editor™ receives or transmits Host or Editor MIDI data, the corresponding MIDILED's will blink to notify you. You can turn off the MIDI LED's in the 'MIDI Setup' view.
The About Screen
To view the About screen, click on the VST-AU JUNO-106 Editor™ logo button. The about screen shows yourregistered name and serial number as well as the product version.

The Graphical User InterfacesUsing The Graphical User Interface
The graphical user interface of the VST-AU JUNO-106 Editor™ is designed for maximum ease of use, giving youeasy access to all of the parameters right on one screen. You are also able to rename, modify and browse thePatches right inside the Editor itself. All controls are handled via either a slider, knob, combo box, button or text editbox.
The Main User Interface
The VST-AU JUNO-106 Editor™ main screen (not to scale)...
The Patch Interface
The 'Patch' area allows you to access all the functions of the Patch:
1. Patch Name - Shows the Patch name. Click on this to edit the Patch name (limit 16 characters). Some hosts donot allow plug-ins to use keystrokes on the main plug-in window. You can still use the Patch Manager to renamethe Patch in this case.2. Patch Number - Shows the Patch number. Click on this to select the Patch number from a list.3. Patch Increment - Move up one Patch.4. Patch Decrement - Move down one Patch.5. COPY button - Copy this Patch to clipboard.6. PASTE button - Paste from clipboard to Patch.7. RAND button - Opens the 'Randomize' view (see Randomize' section).8. PATCH button - Opens the 'Patch Manager' view (see 'Patch Manager' section).9. SETUP button - Opens the 'MIDI Setup' view (see 'MIDI Setup' section).10. MON button - Opens the 'MIDI Monitor' view (see 'MIDI Monitor' section).

MIDI Setup
To access the 'MIDI Setup' view, click the 'MIDI Setup' button. The 'MIDI Setup' view allows you to connect andcontrol the MIDI data coming into and out of the Editor and Host. You will need to open this view directly afterinstantiating the software in order to setup up communication between the Synth and Editor. Once you have donethis, the software will remember your settings. You can toggle the filtering of specific MIDI data for both the Hostand Editor MIDI data paths.
If you carefully inspect the diagram in the middle, you can see exactly what data gets routed where. To makethings a bit easier to differentiate, there is a color coding scheme for the MIDI data. The 'MIDI Monitor' view willshow messages in these same colors.
IMPORTANT NOTICE!!! Since this software allows you to route and filter MIDI data bidirectionally, it is best toactivate only the check boxes for the specific messages you require. Otherwise, it may be possible to create aMIDI feedback loop under certain circumstances. It is up to the user to determine and understand the routingsand connections being made to and from the Editor and also diagnose where any problems may beoccurring.

Host MIDI Setup
The top portion of the screen is for the 'Host' MIDI IN and Out data path. This is data that comes from and goes tothe DAW Host. MIDI port selection is achieved in the Host's MIDI setup.
Host MIDI In (data from Host):The left portion is the Host MIDI In'. This is data that comes from the Host into the Editor. You may want to activatethese if you are using a MIDI keyboard controller for sending Note, Pitch, Modwheel data to/from the Synth or ifyou are sending Host sequencer Note, Pitch, Modwheel data to the Synth through the Editor. You can activatethese with the button on the top right of the module. Set the filtering options. Only activate the data paths andmessages that you need. It is recommended to turn off the 'Program Change' functionality for all modules to avoidconflicts with the Editor.
Host MIDI Out (data to Host):The right portion is the 'Host MIDI Out'. This is data that comes from the Editor to the Host. You may want toactivate these if you are sending data from the Synth or Editor for track recording in the Host. Set the filteringoptions. Only activate the data paths and messages that you need. It is recommended to turn off the 'ProgramChange' functionality for all modules to avoid conflicts with the Editor. Be sure to read the section on 'A note onSysex MIDI and Host Plug-in Capabilities' as you normally cannot send Sysex MIDI data to a Host. Also, Hosts willdiffer on how and what MIDI data they can interpret. Please refer to your Host User Manual for this information.
Editor MIDI Setup
The bottom portion of the screen is for the 'Editor' MIDI IN and Out data path. These should be activated to allowcommunication between the Editor and the Synth. You can activate these with the button on the top right of themodule.
Editor MIDI In (data from Synth):The left portion is the 'Editor MIDI In'. This is data that comes from the Synth into the Editor. All Editor controls willrespond to their correlated MIDI messages from the hardware itself. All controls respond to their correlated MIDICC numbers as listed in the JUNO-106 Users Manual. Set the MIDI port and channel that the Synth is connectedto. Set the filtering options. Only activate the data paths and messages that you need. It is recommended to turn offthe 'Program Change' functionality for all modules to avoid conflicts with the Editor.
Editor MIDI Out (data to Synth):The right portion is the 'Editor MIDI Out. This is data that comes from the Editor to the Synth. Set the MIDI port andchannel that the Synth is connected to. Set the filtering options. Only activate the data paths and messages thatyou need. It is recommended to turn off the 'Program Change' functionality for all modules to avoid conflicts withthe Editor. You will need all the other options turned on except the 'MIDI Clock' data for proper communicationbetween Synth and Editor.

The MIDI Monitor
To access the 'MIDI Monitor' view, click the 'MIDI Monitor' button. The 'MIDI Monitor' allows you to view all MIDIdata that is coming into or out of the Host and Editor. By default the view will show MIDI In/Out data from the EditorMIDI data path. You can switch between Host and Editor MIDI In and MIDI Out views independently. The colors ofmessages are related to the color coding found in the 'MIDI Setup' diagram. The 'Clear' button will clear the data inthat view. The log view will show up to 1500 messages before clearing itself automatically. You can copy the datain the log view to other applications if necessary. The 'All' button will select and automatically copy to the clipboardthat entire view's data. You can turn on/off the view with the button on the right.

The Patch Manager
To access the 'Patch Manager' view, click the 'Patch Manager' button. The 'Patch Manager' allows you to load andsave Patches and Banks as .FXB/.FXP files. The 'Patch Manager' also allows you to view and organize yourPatches and Banks the way you like. Patch slots allow you to rename and organize your Patches by simplydragging and dropping them to another slot in either Swap, Copy, or Move mode. To do this, click on the Patchnumber box (with red numbers) and while holding down the mouse button drag this Patch to another location bydropping it on the Patch name box (with white letters). A valid drop target will be indicated by a red outline. You canalso double click on a Patch number to go to that Patch. It is recommended that you use only the 'Patch Manager'to load and save .FXB/.FXP files, as some Hosts may add data to the header of the file and this may corrupt theinterpretation of the file when reloading it.
The Patch Randomizer
The Patch randomizer allows you to easily create randomly generated Patches. Note that randomization applies tothe currently selected Patch and will overwrite the existing Editor Patch data. The randomized Patch will also besent to the Synth. The Patch is named 'Random Patch #'. You may want to rename the randomized Patch. Pressthe 'RAND' button to open the randomize view.

Working With PatchesHow Patches work
A Patch in the Editor represents a Patch on the Synth. When you change Patches in the Editor, the Patch data issent to the Synth in the form of MIDI Sysex messages to the Synths edit buffer. As a result, this data is sent to theSynth, but NOT permanently stored in the Synth. This allows you to listen to Patches from the Editor while stillpreserving your original Patches that reside in the Synth. If you wish to store the Patch data the Editor sent theSynth, then use the SET PATCH button. Or, store it on the Synth by using the Synths' 'write' function (refer to theJUNO-106 manual for information on how to store a Patch).
Using the Patch Manager
The 'Patch Manager' is the easiest way to work with Patches. For more information refer to the 'Patch Manager'section of this manual. It is recommended that you use only the 'Patch Manager' to load and save .FXB/.FXP files,as some Hosts will add data to the header of the file and this may corrupt the interpretation of the file whenreloading it.
Changing the Current Patch
Use the arrow inc/dec buttons to the right of the display to change the currently selected Patch.
Renaming the Current Patch
To rename your Patch, simply click on the name in the display readout and type the new name of your Patch, thenhit the 'Enter' key. JUNO-106 Patch names are limited to 24 characters. If you cannot type in text, then try using thePatch Manager to rename patches instead.
Using the Copy/Paste Button
You can easily copy and paste Patches to and from the currently selected Patch to another location. First select thePatch you wish to copy by navigating to it. Now, click the 'Copy' button (you will notice the 'Copy' button light up).Next, navigate to the Patch you wish to paste to. Now click the 'Paste' button (the 'Copy' button will turn off). Thistool is invaluable for creating variations of your favorite Patches and allows you to quickly build your library up.

MIDI Implementation ChartThe following MIDI data is transmitted (Tx) and Received (Rx) from the Editor and may be filtered as well...
Message Tx Rx NotesChannel o o 1-16Mode x x Omni modeNote On/Off o o note numbers 0-127Velocity o o 0-127Aftertouch o o 0-127Poly Pressure o o 0-127Pitch bend o o 0-127Modulation o o 0-127Continuous Controller (+NRPN) o o 0-127Program Change o o 0-127System Common x xSystem Real-time x xSystem Exclusive o o
x = noo = yes
For a full list of the parameters and their value ranges, please refer to the JUNO-106 User Manual.

Legal InformationLicense Agreement
1. This is an agreement between Licensor and Licensee, who is being licensed to use the named Software.
2. Licensee acknowledges that this is only a limited nonexclusive license. Licensor is and remains the owner of alltitles, rights, and interests in the Software.
3. This License permits Licensee to install the Software on more than one computer system, as long as theSoftware will not be used on more than one computer system simultaneously. Licensee will not make copies of theSoftware or allow copies of the Software to be made by others, unless authorized by this License Agreement.Licensee may make copies of the Software for backup purposes only.
4. This Software is subject to a limited warranty. Licensor warrants to Licensee that the physical medium on whichthis Software is distributed is free from defects in materials and workmanship under normal use, the Software willperform according to its printed documentation, and to the best of Licensor's knowledge Licensee's use of thisSoftware according to the printed documentation is not an infringement of any third party's intellectual propertyrights. This limited warranty lasts for a period of 365 days after delivery. To the extent permitted by law, THEABOVE-STATED LIMITED WARRANTY REPLACES ALL OTHER WARRANTIES, EXPRESS OR IMPLIED, ANDLICENSOR DISCLAIMS ALL IMPLIED WARRANTIES INCLUDING ANY IMPLIED WARRANTY OF TITLE,MERCHANTABILITY, NONINFRINGEMENT, OR OF FITNESS FOR A PARTICULAR PURPOSE. No agent ofLicensor is authorized to make any other warranties or to modify this limited warranty. Any action for breach of thislimited warranty must be commenced within one year of the expiration of the warranty. Because some jurisdictionsdo not allow any limit on the length of an implied warranty, the above limitation may not apply to this Licensee. Ifthe law does not allow disclaimer of implied warranties, then any implied warranty is limited to 365 days afterdelivery of the Software to Licensee. Licensee has specific legal rights pursuant to this warranty and, depending onLicensee's jurisdiction, may have additional rights.
5. Notwithstanding the foregoing, LICENSOR IS NOT LIABLE TO LICENSEE FOR ANY DAMAGES, INCLUDINGCOMPENSATORY, SPECIAL, INCIDENTAL, EXEMPLARY, PUNITIVE, OR CONSEQUENTIAL DAMAGES,CONNECTED WITH OR RESULTING FROM THIS LICENSE AGREEMENT OR LICENSEE'S USE OF THISSOFTWARE. Licensee's jurisdiction may not allow such a limitation of damages, so this limitation may not apply.
6. Licensee agrees to defend and indemnify Licensor and hold Licensor harmless from all claims, losses,damages, complaints, or expenses connected with or resulting from Licensee's business operations.
7. Licensor has the right to terminate this License Agreement and Licensee's right to use this Software upon anymaterial breach by Licensee.
8. Licensee agrees to return to Licensor or to destroy all copies of the Software upon termination of the License.
9. This License Agreement is the entire and exclusive agreement between Licensor and Licensee regarding thisSoftware. This License Agreement replaces and supersedes all prior negotiations, dealings, and agreementsbetween Licensor and Licensee regarding this Software.
10. This License Agreement is valid without Licensor's signature. It becomes effective upon the earlier ofLicensee's signature or Licensee's use of the Software.
Disclaimer
By installing and using this product you agree to the terms and conditions set forth in the License Agreement asillustrated in the installation of the software.
This product is not affiliated or associated with Roland Music or the JUNO-106 product itself.
Roland, and the JUNO-106 and JUNO-106 Plus names and logos are the property of Roland Music, GmbH.Steinberg and the VST name and logos are the property of Steinberg Media, GmbH. Apple Computer and theAudio Units name and logos are the property of Apple Computer.