Embed Size (px)
Citation preview

Hargray’s
Voyager HD/DVRuser guide

Hargray’s Voyager HD/DVR

Hargray’s Voyager HD/DVR
Welcome Hargray’s Voyager HD/DVR is the on-screen interface of your Set Top
Box (STB) that you use to navigate, control and interact with your cable
television (CATV) service.
The user interface and your STB bring a rich, new set of interactive
services directly to you.
Available STB services may include some or all of the following
features:
• Digital Video Recorder (DVR) — Allows you to record your favorite
programs so that you can still go to your friend’s house for dinner and
not miss your favorite television show
• Pause Live Television — Allows you to pay for the pizza and come
back to the show where you left it
• High-Definition (HD) — Provides crystal-clear pictures and sound when
compared to standard definition — you won’t want to watch television
any other way once you’ve experienced HD
• On-Demand (OD) — Gives you access to an enormous library of
movies and programs that you can watch — when you want to watch
them
Hargray’s Voyager HD/DVR
Content
Welcome ................................................................................................ 3
Universal Remote Control ...................................................................... 6
Select Television and Viewing Preferences with the Menu ...................8
Configure System Preferences with the Settings Option ......................9
Set the Video Appearance ..................................................................9
Set the Audio Preferences ...............................................................10
Set Favorite Channels .......................................................................11
Remove Channels from the Channel List .........................................12
Set Closed Captioning ......................................................................13
Turn Closed Captioning On and Off ...........................................13
Change the Closed Captioning Look ..........................................13
Change the Background Style and Color of Closed Captioning ....14
Change the Character Color and Size of Closed Captioning ......14
Save Closed Captioning Changes ..............................................14
Set Recording Options .....................................................................14
Set Default Series Settings ........................................................15
Set Default Recording Settings .................................................15
Set Parental Controls ........................................................................16
Setting the PIN the First Time ...................................................16
Select Other Parental Control Protection Options .....................17
Set Caller ID Preferences (Optional) .................................................18
Select a Future Program in the Guide ..............................................19
Search Guide Using the Calendar .........................................................19
Control Live Television and Recordings ................................................20
Pause and Rewind Live Television ...................................................20
Skip Backward in DVR Recordings ...................................................20
Use the Info Banner to Control Live Television
and DVR Recordings ...................................................................20-21
Play, Pause, Fast-Forward or Rewind Programs ...................................22
Live Television Status Bar ................................................................22
Recordings Status Bar ......................................................................23
Action Tab ........................................................................................23
Play, Pause, Fast-Forward or Rewind ...............................................24

Record Programs ..................................................................................25
Instant Recording .............................................................................25
Schedule Recordings ............................................................................25
Quickly Record a Program or Program Series ..................................25
Record a Single Program ..................................................................26
Record a Series of Programs ......................................................26-27
Manually Record a Program .............................................................28
DVR Folders ................................................................................28-29
Modify Your Scheduled Recordings .................................................30
Cancel a Scheduled Recording .........................................................31
Watch a Recording ...........................................................................31
Protect a Recording from Automatic Erasure ..................................31
Check Available Recording Space ....................................................32
Change Save Time of a Recording ...................................................32
Erase a Recording ............................................................................32
Reprioritize a Series of Scheduled Recordings ................................33
Multiroom DVR (Optional) ....................................................................33
Select a Name for the DVR ..............................................................34
Give the DVR a Unique Name ..........................................................34
Play a Recording on a Non-DVR Set Top Box ...................................35
Pay-Per-View (Optional) ........................................................................35
Purchase an Upcoming PPV Event .............................................35-36
Purchase a PPV Event in Progress ...................................................37
Record a Purchased Event ...............................................................38
Cancel a Purchase ............................................................................38
View PPV Purchase History Information and Upcoming Events ......39
View PPV Purchase History Information (Past Events) ....................40
On-Demand Programs (Optional) .........................................................41
Access the On-Demand Menu .........................................................41
Purchase an On-Demand Program ...................................................42
Hargray’s Voyager HD/DVR
6
I
Key Controls
On-Demand ControlPerform standard VCR and DVD functions when in VCR and DVD mode, and On-Demand functions when in cable mode.
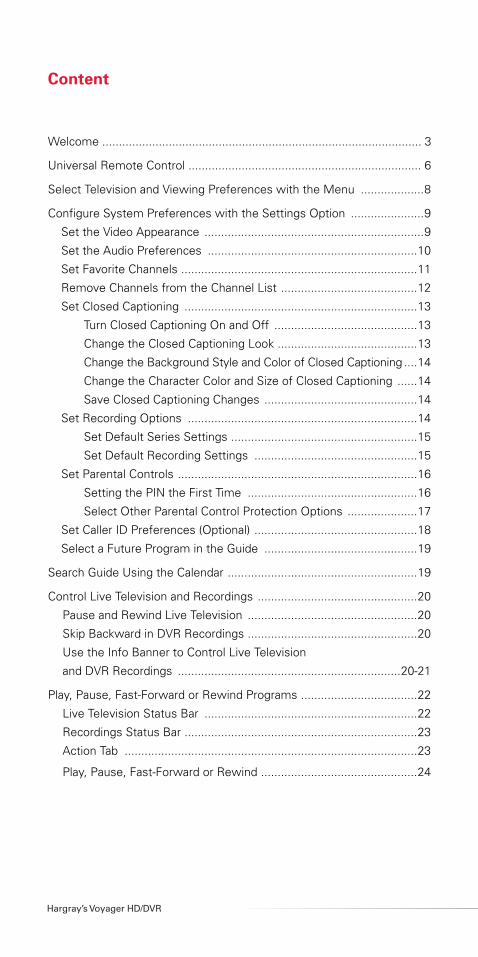
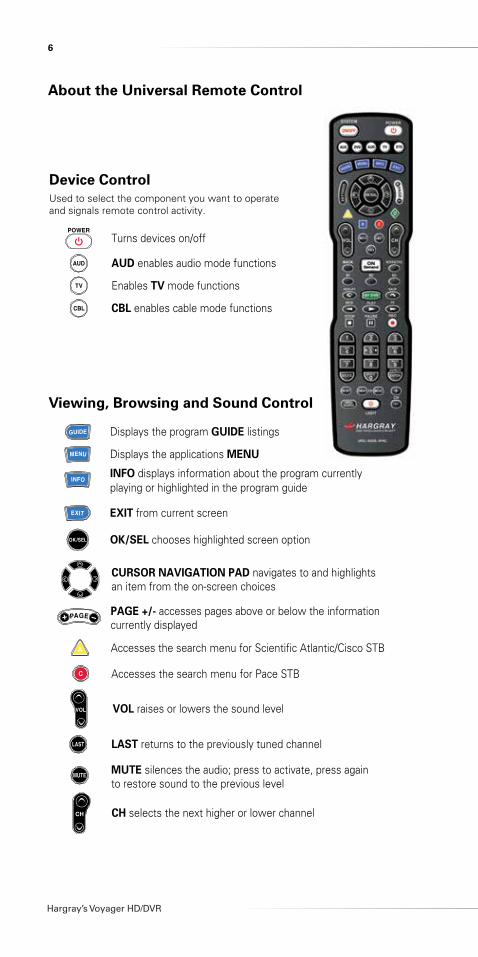
Device ControlUsed to select the component you want to operate and signals remote control activity.
Numeric Keys
Turns devices on/off
Enables TV mode functionsReplays the previous few seconds of a program
ON DEMAND provides direct access to On-Demand channel
AUD enables audio mode functions
CBL enables cable mode functions
Viewing, Browsing and Sound Control
Displays the program GUIDE listings
EXIT from current screen
INFO displays information about the program currently playing or highlighted in the program guide
Displays the applications MENU
CURSOR NAVIGATION PAD navigates to and highlights an item from the on-screen choices
OK/SEL chooses highlighted screen option
PAGE +/- accesses pages above or below the informationcurrently displayed
LAST returns to the previously tuned channel
CH selects the next higher or lower channel
REW rewinds 7 seconds, and FF fast-forwards
PLAY On-Demand or recorded content
REC records the selected program
STOP On-Demand or recorded content
PAUSE On-Demand or recorded content
VOL raises or lowers the sound level
MUTE silences the audio; press to activate, press againto restore sound to the previous level
Enter numbers to tune to channels. Also, make numeric entries on on-screen menus. NOTE: You can also use or the program guide as alternative ways to tune to channels
DELETE removes, cancels or erases
ASPECT/ENTER changes the HD screen viewing aspect ratio through the cable STB
VIDEO SOURCE selects the video source from availablevideo components through the cable STB
LIGHT button backlights all keypad buttons;press again to turn off (or simply wait 10 seconds forautomatic shut-off)
MY DVR displays a list of programs you have recorded, allowing you to select one for viewing
MY DVR
DELETE
ENTER
Accesses the search menu for Scientific Atlantic/Cisco STB
Accesses the search menu for Pace STB
I
Key Controls
On-Demand ControlPerform standard VCR and DVD functions when in VCR and DVD mode, and On-Demand functions when in cable mode.
Device ControlUsed to select the component you want to operate and signals remote control activity.
Numeric Keys
Turns devices on/off
Enables TV mode functionsReplays the previous few seconds of a program
ON DEMAND provides direct access to On-Demand channel
AUD enables audio mode functions
CBL enables cable mode functions
Viewing, Browsing and Sound Control
Displays the program GUIDE listings
EXIT from current screen
INFO displays information about the program currently playing or highlighted in the program guide
Displays the applications MENU
CURSOR NAVIGATION PAD navigates to and highlights an item from the on-screen choices
OK/SEL chooses highlighted screen option
PAGE +/- accesses pages above or below the informationcurrently displayed
LAST returns to the previously tuned channel
CH selects the next higher or lower channel
REW rewinds 7 seconds, and FF fast-forwards
PLAY On-Demand or recorded content
REC records the selected program
STOP On-Demand or recorded content
PAUSE On-Demand or recorded content
VOL raises or lowers the sound level
MUTE silences the audio; press to activate, press againto restore sound to the previous level
Enter numbers to tune to channels. Also, make numeric entries on on-screen menus. NOTE: You can also use or the program guide as alternative ways to tune to channels
DELETE removes, cancels or erases
ASPECT/ENTER changes the HD screen viewing aspect ratio through the cable STB
VIDEO SOURCE selects the video source from availablevideo components through the cable STB
LIGHT button backlights all keypad buttons;press again to turn off (or simply wait 10 seconds forautomatic shut-off)
MY DVR displays a list of programs you have recorded, allowing you to select one for viewing
MY DVR
DELETE
ENTER
Accesses the search menu for Scientific Atlantic/Cisco STB
Accesses the search menu for Pace STB
About the Universal Remote Control

7
I
Key Controls
On-Demand ControlPerform standard VCR and DVD functions when in VCR and DVD mode, and On-Demand functions when in cable mode.
Device ControlUsed to select the component you want to operate and signals remote control activity.
Numeric Keys
Turns devices on/off
Enables TV mode functionsReplays the previous few seconds of a program
ON DEMAND provides direct access to On-Demand channel
AUD enables audio mode functions
CBL enables cable mode functions
Viewing, Browsing and Sound Control
Displays the program GUIDE listings
EXIT from current screen
INFO displays information about the program currently playing or highlighted in the program guide
Displays the applications MENU
CURSOR NAVIGATION PAD navigates to and highlights an item from the on-screen choices
OK/SEL chooses highlighted screen option
PAGE +/- accesses pages above or below the informationcurrently displayed
LAST returns to the previously tuned channel
CH selects the next higher or lower channel
REW rewinds 7 seconds, and FF fast-forwards
PLAY On-Demand or recorded content
REC records the selected program
STOP On-Demand or recorded content
PAUSE On-Demand or recorded content
VOL raises or lowers the sound level
MUTE silences the audio; press to activate, press againto restore sound to the previous level
Enter numbers to tune to channels. Also, make numeric entries on on-screen menus. NOTE: You can also use or the program guide as alternative ways to tune to channels
DELETE removes, cancels or erases
ASPECT/ENTER changes the HD screen viewing aspect ratio through the cable STB
VIDEO SOURCE selects the video source from availablevideo components through the cable STB
LIGHT button backlights all keypad buttons;press again to turn off (or simply wait 10 seconds forautomatic shut-off)
MY DVR displays a list of programs you have recorded, allowing you to select one for viewing
MY DVR
DELETE
ENTER
Accesses the search menu for Scientific Atlantic/Cisco STB
Accesses the search menu for Pace STB

Hargray’s Voyager HD/DVR
8
Select Television and Viewing Preferences with the MenuThe menu makes it easy to set your television and viewing preferences. Use the remote control to navigate through the menu and all of its options.1. Press MENU or SETTINGS on your remote control.2. Press3or4to navigate through the following menu options:
• Television — Access program guide and favorite channels, search for programs and watch live television
• Recorded Television — Access the list of recordings (My Recordings) and programs scheduled to record, and add programs to be recorded
• On-Demand — Order movies, television series and documentaries to watch in the comfort of your home
• Applications — Access interactive online content (depends on your service provider configurations)
• Settings — Select settings for language, parental control and other system options

9
Configure System Preferences with the Settings OptionThe Settings option allows you to configure system preferences, such as Video Appearance, Parental Controls, Recording Settings, Audio and Video Settings, General Settings and Troubleshooting.
Set the Video Appearance1. Press MENU.2. Press3or4to navigate to Settings.3. Press6or5to navigate to Appearance and press SELECT.4. Press6or5to navigate through the following Video Appearance
settings:• Television Type — options include:
– 4:3 SDTV (designed for SD content on SD screens)– 16:9 SDTV (designed for SD content on HD screens)– 720p HDTV (designed for HD content on HD screens)– 1080i HDTV (designed for HD content on HD screens)
Note: When an HDTV setting is selected, the STB performs a test to ensure that your television is compatible with the selection. Follow the on-screen instructions to start the test.
• Video Output — options include:– Normal (image appears as transmitted)– Stretch (stretch image horizontally, but not vertically — usually
best for 4:3 content on a 16:9 screen)– Zoom 25% (stretch vertically and horizontally 25% — may crop
image at top and bottom of screen)– Zoom 50% (stretch vertically and horizontally 50% — may crop
image at top and bottom of screen)• Theme — Blue
Note: Theme options may also include those specific to your service provider.Important: Changing themes will cause your STB to reset.
5. Press6or5to navigate to the Save or Cancel options. Press
3or4and then press SELECT to save or cancel your changes.

Hargray’s Voyager HD/DVR
10
Set the Audio Preferences1. Press MENU.2. Press3or4to navigate to Settings.3. Press6or5to navigate to Audio and press SELECT.4. Press6or5to navigate through the following audio settings:
• Audio Output options include: Dolby™ Digital or OtherNote: Selecting between the Digital Audio Output options may momentarily freeze the on-screen video.
• Audio Range options include: Normal, Narrow or WideNote: These options impact the difference in audio level between the most quiet part of a program and the loudest part of a program. We recommend using the Normal or Narrow settings.
• Volume Control options include: Fixed or VariableNotes:
• If you choose Fixed, we recommend that you configure your remote to control the television volume. Refer to your remote control user guide for more information.
• If you choose Variable, set the volume near the highest level from the STB and then adjust your television volume to the appropriate listening level.
• Preferred Audio Language options include: English, Español or FrançaisNote: The Audio Language is the primary audio stream used when multiple streams are contained within a program. (This is not the screen language.)
• Described Video options include: Enabled or DisabledNotes:
• Described Video provides visually impaired viewers with audio descriptions of key elements in a program, such as what is happening on the screen during pauses in the dialog.
• When this option is enabled, you can use the Action toolbar to select a Described Video Service (DVS) for any digital program you are watching. If you are watching an analog program, you can use the Action toolbar to select a secondary audio program (SAP) if the program provides a second audio source. For more information, see Use the Info Banner to Control Live Television and DVR Recordings later in this guide.
5. Press6or5to navigate to the Save or Cancel options. Press3or4and then press SELECT to save or cancel your changes.

11
Set Favorite Channels1. Press MENU.2. Press3or4to navigate to Settings.3. Press6or5to navigate to Channel Setup and press SELECT.4. Press3or4to navigate to Set Favorites.5. Press6or5to select a channel you want to add to the Favorites
list and press SELECT. A check mark appears next to the selected channel. (Press SELECT again to deselect the channel.)
Tips:• You can also set your Favorite channels via the main Menu screen.
(Press MENU, select the TV option, and then navigate to the Favorites option.)
• To add all channels to your Favorites list, choose Select All and press SELECT. The options Clear All, Select All and Select All Subscribed may not be available. Those options are determined by the version of Videoscape Voyager Vantage client software installed on the STB.

Hargray’s Voyager HD/DVR
12
Remove Channels from the Channel List1. From the Channel Setup menu, press3or4to navigate to Hide
Channels.2. Press6or5to select a channel you want to remove from the
channel list and press SELECT. An “X” appears next to the selected channel. (Press SELECT again to deselect the channel.) Tip: To ensure that all channels are displayed in the channel list, select Clear All. The options Clear All, Select All and Select All Subscribed may not be available. Those options are determined by the version of Videoscape Voyager Vantage client software installed on the STB.

13
Set Closed Captioning1. Press MENU.2. Press3or4to navigate to Settings.3. Press6or5to navigate to Closed Captions and press SELECT.4. Press6or5to navigate through the closed-caption options:
• Standard CC (see box below for a description of these options)• Digital CC (see box below for a description of these options)• Background Style• Background Color• Character Color• Character Size• StyleNote: All options are discussed in detail later in this section.
Turn Closed Captioning On and Off1. While watching live television or a recording, press INFO to display
the Live Television Action toolbar or Recorded Program Action toolbar over the live television show or recording.
2. Press4until the Closed Caption icon is highlighted and press ENTER to switch from Off to On or from On to Off .
3. Press INFO again to close the toolbar and banner.
Change the Closed Captioning LookDepending on the program or caption provider, you may or may not be able to change how the closed captioning looks on the television screen.1. From the Closed Captions menu, press6or5to navigate to Style.2. Press3or4to navigate through the Style settings options:
• Set By Viewer — style is set by you; use the procedures in the remainder of this section to change the caption styles
• Set By Program — style is set by the caption provider for each program, and you cannot change the settings
Who Provides Closed-Captioning ServiceSeveral companies (sources) provide closed-captioning service to television networks and production companies for analog and digital programming.
Closed-Captioning Sources — Standard Service• Std CC1 is the primary caption service for non-digital programming.• Std CC2 through Std CC4 are text services that may contain different
information, including alternative languages.• T1 through T4 are text services that may also provide additional
information from the closed-caption provider.
Closed-Captioning Sources — Digital Service• Digital 1 is the primary caption source.• Digital 2 is the suggested choice for alternative languages.• Digital 3 through Digital 6 are undefined at this time.

Hargray’s Voyager HD/DVR
14
Change the Background Style and Color of Closed Captioning1. From the Closed Captions menu, press 6or5 to navigate to
Background Style.2. Press 3or4 to navigate through the Background Style choices:
• Default — the background is determined by the caption provider• Solid — hides the video behind the captions• Clear — allows video to be seen behind the captions• Slight — shows both the background and the video behind it• Flashing — a solid background turning on and off at a rate
determined by the caption provider3. Press 6or5 to navigate to Background Color.4. Press 3or4 to navigate through the Background Color choices
(several color choices are available).
Change the Character Color and Size of Closed Captioning1. From the Closed Captions menu, press 6or5 to navigate to
Character Color.2. Press 3or4 to navigate through the Character Color choices
(several color choices are available).3. Press 6or5 to navigate to Character Size.4. Press 3or4 to navigate through the Character Size choices
(choose from Small, Standard or Large).
Save Closed Captioning ChangesWhen you finish making all closed-captioning changes, from the Closed Captions menu, press 6or5 to navigate to the Save or Cancel options. Press SELECT to save or cancel your changes.
Set Recording OptionsThe DVR Settings options allow you to configure default recording parameters for a single program and a series of programs.• Default Series Settings options include: Episodes, Time, Day, Save
Until, Lock Start and Stop• Default Recording Settings options include: Save Until, Lock, Start
and StopImportant: The DVR is not intended to be a long-term storage device. When saving recordings, consider the impact of the save time on your storage space.

15
Set Default Series Settings1. Press MENU.2. Press3or4to navigate to Settings and press SELECT.3. Press6to navigate to DVR Settings and press SELECT.4. Press6to navigate to Default Series Settings and press SELECT.5. Press6or5to navigate through the following options and press
SELECT to set each option:• Episode options include: New Episodes Only and All Episodes• Time options include: This Timeslot Only and Any Timeslot• Day options include: This Day of the Week Only and Any Day of
the Week• Save Until options include: I Erase, 3 Days Later, 1 Week (7 days)
Later, 2 Weeks (14 days) Later and Space is Needed• Lock options include: Unlocked and Locked• Start options include: On Time, 5 Minutes Before, 15 Minutes
Before, 30 Minutes Before, 1 Hour Before and 3 Hours Before• Stop options include: On Time, 5 Minutes After, 15 Minutes After,
30 Minutes After, 1 Hour After and 3 Hours After6. Press6to navigate to Save and press SELECT.7. Press EXIT to close the DVR Settings window.
Set Default Recording Settings1. Press MENU.2. Press 3or4to navigate to Settings and press SELECT.3. Press6to navigate to DVR Settings and press SELECT.4. Press6to navigate to Default Recording Settings and press
SELECT.5. Press6or5to navigate through the following options and press
SELECT to set each option:• Save Until options include: I Erase, 3 Days Later, 1 Week (7 days)
Later, 2 Weeks (14 days) Later and Space is Needed• Lock options include: Unlocked and Locked• Start options include: On Time, 5 Minutes Before, 15 Minutes
Before, 30 Minutes Before, 1 Hour Before and 3 Hours Before• Stop options include: On Time, 5 Minutes After, 15 Minutes After,
30 Minutes After, 1 Hour After and 3 Hours After6. Press6to navigate to Save and press SELECT.7. Press EXIT to close the DVR Settings window.

Hargray’s Voyager HD/DVR
16
Set Parental ControlsControl access to the programs and movies your children watch on television.
Setting the PIN the First Time1. Press MENU.2. Press3or4to navigate to Settings.3. Press6or5to navigate to Parental Control and press SELECT.4. Enter your PIN to proceed. (The default PIN is 0000.)5. Press3or4to navigate to Parental PIN.6. Press6or5to navigate through the following options:
• Enabled• Disabled• Change
7. Highlight Change and press SELECT.8. To change your PIN, enter the 4-digit code of your choice and press
SELECT. (You will be asked to enter this new 4-digit code again to confirm your new code choice.)
Tip: Remember your PIN. Use the PIN to lock and unlock television programs and channels for viewing. To have your PIN reset, contact your service provider.

17
Select Other Parental Control Protection Options1. Press MENU.2. Press3or4to navigate to Settings.3. Press6or5to navigate to Parental Control and press SELECT.4. Enter your PIN to proceed.5. Press3or4to navigate through the following protection options:
• Block Channels (move through your entire channel line-up and select channels to block)
• Block Ratings (Ratings at or above the selected rating will be blocked. Options are determined by your service provider and may include: NR, TV-Y, TV-Y7, G/TV-G, PG/TV-PG, PG-13, TV-14, TV-MA, R, NC-17, NR-Adult and No Rating Blocked)
• Block Content (options are determined by your service provider and include blocking by content advisory settings such as Violence, Adult Language, Adult Content and Nudity)
• Hide Blocked Titles options include: Yes and No• Block Unrated Programs options include: Yes and No• Purchase PIN (enter the Purchase PIN and Enable, Disable or
Change this PIN) Note: Purchase PIN is used to authorize On-Demand, PPV and other billing-related purchases.

Hargray’s Voyager HD/DVR
18
Set Caller ID Preferences (Optional)The Caller ID feature displays the incoming Caller ID on-screen as shown in the following example.
You can adjust the length of time that the Caller ID is shown on-screen or turn Caller ID off.Note: Caller ID is an optional feature that may or may not be supported by your service provider.1. Press MENU.2. Press3or4to navigate to Settings.3. Press6or5to navigate to Phone Caller ID and press SELECT.4. Press6or5to navigate to Notifications Display.5. Press3or4to navigate through the Notifications Display choices:
• Show (default setting; will always show incoming Caller ID display on-screen)
• Don’t Show (disables the Caller ID notification on-screen display)• Don’t Show Until Tomorrow (disables the Caller ID notification on-
screen display until the next calendar day)6. Press6or5to navigate to Notifications Timeout.7. Press3or4to navigate through the timeout length values:
• 5 seconds (default setting; display notification will disappear after 5 seconds)
• 10 seconds• 20 seconds• 30 seconds
8. Press6or5to navigate to the Save or Cancel options, and then press SELECT to save or cancel your changes.

19
Select a Future Program in the Guide1. Press3654to navigate through the program listings.2. Highlight the future program you are interested in and press SELECT.
A list of future program options is displayed over the guide.3. Press6or5to navigate through the following program options:
• Record This Program (selecting this option sets your DVR to record this program)
• Record Series (sets your DVR to automatically record all episodes of this program according to the settings you define)
• Set a Reminder (displays an on-screen banner prior to the start of the future program to remind you to watch the program; when selected, a “clock” icon appears next to the future program in the guide)
• Watch This Channel Now (tunes to the selected channel immediately)
• Set This Channel as a Favorite (adds this channel to your Favorites list)
• Lock This Channel (adds this channel to your list of channels blocked by parental controls)
Search Guide Using the Calendar1. Press GUIDE to display the program guide.2. Press the BLUE key. A calendar screen is displayed over the guide.3. Press3654to navigate through the days in the calendar.4. Select a day and press SELECT.5. The guide will jump to your selected day.6. Press the RED key to return to the current time and channel.

Hargray’s Voyager HD/DVR
20
Control Live Television and Recordings
Pause and Rewind Live TelevisionOn DVR platforms, the program you are watching is being saved (buffered) in the background using a 2-hour time-shift buffer. Use the recording-related keys on the remote control to watch television the way you want to watch it. Pause the live program if you need to step away for a few minutes, then press PLAY to resume or REW to review a scene when you return.
The DVR continues temporary recordings in the time-shift buffer until:• You reach 2 hours• You tune to another channel• You turn off the DVR
Tip: Press STOP on the remote control to stop the playback of a DVR recording or an On-Demand program.
Skip Backward in DVR RecordingsPress the ⤺ key on the remote control to jump 10 seconds back.
Note: This value is determined by your service provider and may vary.
Use the Info Banner to Control Live Television and DVR RecordingsThe Info banner provides a quick and easy way to access additional program information and options while watching live television recordings.
1. While watching live television or a recording, when you tune to a new program, press any directional arrow key or LIVE TV to display information about the program. The information is displayed as a banner over the program/recording along with the title of the “Up Next” program.

21
2. Press INFO to display the detailed program information banner and the action toolbar for the live television show or recording.• Live Television Action toolbar (displayed over live television
program being viewed):
• Recorded Program Action toolbar (displayed over recording being viewed):
3. Press3or4to navigate through the action toolbar options and press SELECT to select a live television or recorded program option. See the box below for a full list of action toolbar icons and their functions.
Action Toolbar Icons

Hargray’s Voyager HD/DVR
22
Play, Pause, Fast-Forward or Rewind ProgramsThe status bar appears whenever you press PLAY, PAUSE, FF, ⤺ or REW while watching a live television program or a recording.
Live Television Status BarThe DVR can save up to 2 hours of a live program. This 2-hour period is represented by the status bar. For example, the status-bar illustration below shows that viewing of this program began at 3:33pm and that the DVR will hold (buffer) the program for 2 hours, until 5:33pm. At 5:33pm, when the 2 hours expires, the DVR will continually lose the oldest portion of the program. Or, when the channel is changed, the status bar will be reset.

23
Recordings Status BarWhen viewing a recording, the status bar represents the length of the recording. The green progress bar lets you know that you are controlling a recording and not live television. (The Live Television status bar uses a red progress bar.)
Action TabThe Action tab appears on the status bar whenever you press PAUSE, FF or REW while watching a live program or recording.

Hargray’s Voyager HD/DVR
24
Play, Pause, Fast-Forward or RewindThe Action tab icons provide immediate on-screen feedback to help you control a live program or recording.Play, Pause, Fast-Forward, or Rewind The Action tab icons provide immediate, on-screen feedback to help you control a live program or recording.
Action Remote Key Press Action Tab Shows
On-screen Message Shows
Play 00:27
Pause 3:45p
Fast-forward
speed up by 8x (press twice)
speed up by 16x (press 3 times)
speed up by 64x (press 4 times)
Rewind 3:45p
rewind by 8x (press twice) 3:45p
rewind by 16x (press 3 times) 3:45p
rewind by 64x (press 4 times) 3:45p
Jump back 3:45p 10 seconds
Stop
Note: This example shows the on-screen message options for a
erent options are given for a VOD program.
3:45p
3:45p
3:45p
3:45p
(current time marker moves left)

25
Record Programs
Instant RecordingTo record the live program that you are currently watching, press RECORD on the remote control. Press RECORD again to stop the recording.
Tip: You do not have to press STOP to stop recording the program when it ends. The recording will automatically stop based on the program run time.
Schedule RecordingsPrograms you want to record can be scheduled in advance from the program guide.
Quickly Record a Program or Program SeriesWhen you use this method to record a program or a program series, the DVR STB uses the settings that you selected in Set Recording Options earlier in this guide.
To specify parameters for the recording, see Record a Single Program or Record a Series of Programs later in this guide.1. Press GUIDE.2. Press3654to navigate through the program listings.3. Highlight the future program you want to record.4. Press the RECORD key:
• ONCE to record the selected program with the default recording options
• TWICE to record the program series with the default series recording options
• 3 times to cancel the recording5. A red Record icon (i) appears in the program guide next to the
program to be recorded.

Hargray’s Voyager HD/DVR
26
Record a Single ProgramUse this method to record a program and specify the recording parameters. To record the program using default recording parameters, see Quickly Record a Program or Program Series earlier in this guide.1. Press GUIDE.2. Press3654to navigate through the program guide.3. Highlight the program that you want to record and press SELECT.4. Press6or5to navigate to Record This Program and press
SELECT.5. Press6or5to navigate through the following options, and press
SELECT to set each option:• Save Until options include: I Erase, 3 Days Later, 1 Week (7 days)
Later, 2 Weeks (14 days) Later and Space is Needed• Lock options include: Unlocked and Locked• Start options include: On Time, 5 Minutes Before, 15 Minutes
Before, 30 Minutes Before, 1 Hour Before and 3 Hours Before• Stop options include: On Time, 5 Minutes After, 15 Minutes After,
30 Minutes After, 1 Hour After and 3 Hours After6. Press6to navigate to Save and press SELECT. In the program
guide, the Record icon (i) appears next to this program.
Record a Series of ProgramsUse this method to record a program series and specify recording parameters. To record a program series using default recording parameters, see Quickly Record a Program or Program Series earlier in this guide.1. Press GUIDE.2. Press3654to navigate through the program listings.3. Highlight the future program series you want to record and press
SELECT.4. Press6to navigate to Record Series and press SELECT.5. Press6or5to navigate through the following options, and press
SELECT to set each option:• Episode options include: New Episodes Only and All Episodes• Time options include: This Tmeslot Only and Any Timeslot• Day options include: This Day of the Week Only and Any Day of
the Week• Save Until options include: I Erase, 3 Days Later, 1 Week (7 days)
Later, 2 Weeks (14 days) Later and Space is Needed• Lock options include: Unlocked and Locked• Start options include: On Time, 5 Minutes Before, 15 Minutes
Before, 30 Minutes Before, 1 Hour Before and 3 Hours Before• Stop options include: On Time, 5 Minutes After, 15 Minutes After,
30 Minutes After, 1 Hour After and 3 Hours After6. Press6to navigate to Save and press SELECT. In the program
guide, the Series Record icon ( ) appears next to this episode.

27
You can also set up a series of recordings from the Scheduled Recordings Menu option.1. Press MENU, select Recorded Television > Scheduled Recordings
and press SELECT.2. Highlight a recording from any of the My Recordings menu options
(By Date, By Title, By Channel) and press SELECT.3. Press6or5to navigate to Record Series (or Modify Series, if
already part of a series) and press SELECT. The Series Options menu appears.
4. Press6or5to navigate through the following options and press SELECT to set each option:• Episode options include: New Episodes Only and All Episodes• Time options include: This Tmeslot Only and Any Timeslot• Day options include: This Day of the Week Only and Any Day of
the Week• Save Until options include: I Erase, 3 Days Later, 1 Week (7 days)
Later, 2 Weeks (14 days) Later and Space is Needed• Lock options include: Unlocked and Locked• Start options include: On Time, 5 Minutes Before, 15 Minutes
Before, 30 Minutes Before, 1 Hour Before and 3 Hours Before• Stop options include: On Time, 5 Minutes After, 15 Minutes After,
30 Minutes After, 1 Hour After and 3 Hours After5. Press6or5to navigate to the Save or Cancel options, and then
press SELECT to save or cancel your changes.

Hargray’s Voyager HD/DVR
28
Manually Record a ProgramYou can manually record a timeslot on a particular channel.1. Press MENU and select Recorded Television.2. Press6or5to navigate to Add a Recording and press SELECT.3. Press6to navigate to Set Recording Manually and press SELECT.4. Press6or5to navigate through the following manual recording
options and press3or4to set each option:• Channel (options include scrolling through a list of channels or
entering a channel number with the number keys)• Date (options include the current day or any day in the future)• Start Time (options include 15-second increments)• End Time (options include 15-second increments)• Save Until options include: I Erase, 3 Days Later, 1 Week (7 days)
Later, 2 Weeks (14 days) Later and Space is Needed• Lock options include: Unlocked and Locked
5. Press6to navigate to Save and then press SELECT.
DVR FoldersWhen you record programs with the same title, the DVR automatically groups like-titled programs to a folder. You can configure save, protection and deletion options from the folder level. Configuring these options from the folder level saves time because you do not have to go program by program and change configuration settings.
29
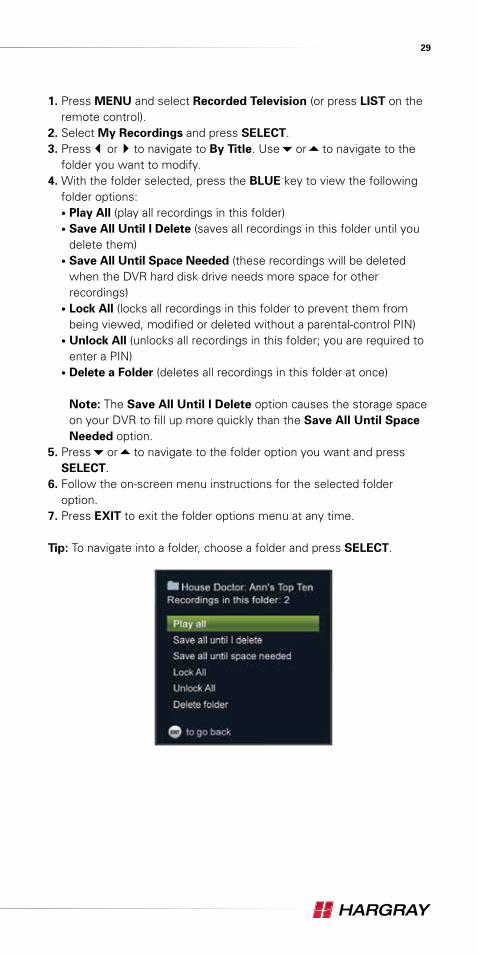
1. Press MENU and select Recorded Television (or press LIST on the remote control).
2. Select My Recordings and press SELECT.3. Press3or4to navigate to By Title. Use6or5to navigate to the
folder you want to modify.4. With the folder selected, press the BLUE key to view the following
folder options:• Play All (play all recordings in this folder)• Save All Until I Delete (saves all recordings in this folder until you
delete them)• Save All Until Space Needed (these recordings will be deleted
when the DVR hard disk drive needs more space for other recordings)
• Lock All (locks all recordings in this folder to prevent them from being viewed, modified or deleted without a parental-control PIN)
• Unlock All (unlocks all recordings in this folder; you are required to enter a PIN)
• Delete a Folder (deletes all recordings in this folder at once)
Note: The Save All Until I Delete option causes the storage space on your DVR to fill up more quickly than the Save All Until Space Needed option.
5. Press6or5to navigate to the folder option you want and press SELECT.
6. Follow the on-screen menu instructions for the selected folder option.
7. Press EXIT to exit the folder options menu at any time.
Tip: To navigate into a folder, choose a folder and press SELECT.
Hargray’s Voyager HD/DVR
30
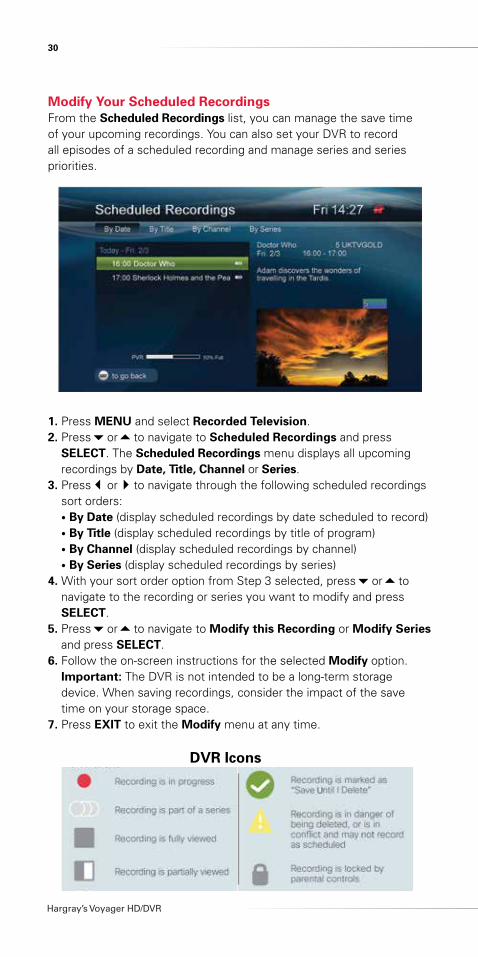
Modify Your Scheduled RecordingsFrom the Scheduled Recordings list, you can manage the save time of your upcoming recordings. You can also set your DVR to record all episodes of a scheduled recording and manage series and series priorities.
1. Press MENU and select Recorded Television.2. Press6or5to navigate to Scheduled Recordings and press
SELECT. The Scheduled Recordings menu displays all upcoming recordings by Date, Title, Channel or Series.
3. Press3or4to navigate through the following scheduled recordings sort orders:• By Date (display scheduled recordings by date scheduled to record)• By Title (display scheduled recordings by title of program)• By Channel (display scheduled recordings by channel)• By Series (display scheduled recordings by series)
4. With your sort order option from Step 3 selected, press6or5to navigate to the recording or series you want to modify and press SELECT.
5. Press6or5to navigate to Modify this Recording or Modify Series and press SELECT.
6. Follow the on-screen instructions for the selected Modify option. Important: The DVR is not intended to be a long-term storage device. When saving recordings, consider the impact of the save time on your storage space.
7. Press EXIT to exit the Modify menu at any time.
DVR Icons

31
Cancel a Scheduled Recording1. Press MENU and select Recorded Television.2. Press6or5to navigate to Scheduled Recordings and press SELECT.3. Press3or4to navigate through the following sort order options:
• By Date (display scheduled recordings by date scheduled to record)• By Title (display scheduled recordings by title of program)• By Channel (display scheduled recordings by channel)• By Series (display scheduled recordings by series)
4. With your sort order option from Step 3 selected, press6or5to navigate to the recording you want to cancel and press SELECT.
5. Press6or5to navigate to Cancel this Recording or Cancel Series (if recording is part of a series) and press SELECT.
Watch a Recording1. Press MENU and select Recorded Television.2. Press6or5to navigate to My Recordings and press SELECT.3. Press3or4to navigate through the following My Recordings sort
orders:• By Date (display recorded programs by date recorded)• By Title (display recorded programs by title of program)• By Channel (display recorded programs by channel)
4. Based on the sort order you selected in Step 3, press6or5to navigate to the recording you want to watch and press SELECT.
5. Press6or5to navigate to Play from Start and press SELECT.Tips:• Press PLAY on the remote control to immediately begin playback of
a recording.• If you want to resume playback from where you left off, select
Resume Playing and press SELECT.• If you want to play back a recording from the starting point of the
recording, select Play from Start and press SELECT.
Protect a Recording from Automatic ErasureThe Save Until feature protects a recording from being automatically erased whenever additional space is needed to record a new program. Recordings tagged with Save Until I Erase remain on the DVR hard drive until you decide to erase them.1. Press MENU and select Recorded Television.2. Press6or5to navigate to My Recordings and press SELECT.3. Press3or4to navigate through the following My Recordings sort
orders:• By Date (display recorded programs by date recorded)• By Title (display recorded programs by title of program)• By Channel (display recorded programs by channel)
4. Based on the sort order you selected in Step 3, press6or5to navigate to the recording you want to set protection options for and press SELECT.
5. Press6or5to navigate to Save Until I Delete and press SELECT. A check mark is displayed next to the recording to indicate that it is protected.

Hargray’s Voyager HD/DVR
32
Check Available Recording Space1. Press MENU and select Recorded Television.2. Press6or5to navigate to My Recordings or Scheduled
Recordings and press SELECT.3. A Percentage Used storage bar is displayed on-screen (location will
depend on the selected theme/screen layout). This bar shows the percentage of recording space currently used.
Note: If the bar indicates that more than 90% of the space is full, consider changing some of your save options or deleting older recordings.
Change Save Time of a RecordingImportant: The DVR is intended to be a short-term storage device. Use the following guidelines to make the most efficient use of your DVR storage space.1. Press MENU and select Recorded Television.2. Press6or5to navigate to My Recordings and press SELECT.3. Press3or4to navigate through the following My Recordings sort
orders:• By Date (display recorded programs by date recorded)• By Title (display recorded programs by title of program)• By Channel (display recorded programs by channel)
4. Based on the sort order you selected in Step 3, press6or5to navigate to the recording you want to change the save time for and press SELECT.
5. Press6or5to navigate to one of the Save Until options and press SELECT.• Save Until I Delete (keeps recording until you delete it)
Note: This option causes the storage space on your DVR to fill up more quickly than the other save options.
• Save Until Space is Needed (automatically erases recording whenever additional space is needed to record a new program)
Erase a Recording1. Press MENU and select Recorded Television.2. Press6or5to navigate to My Recordings and press SELECT.3. Press3or4to navigate through the following My Recordings sort
orders:• By Date (display recorded programs by date recorded)• By Title (display recorded programs by title of program)• By Channel (display recorded programs by channel)
4. Based on the sort order you selected in Step 3, press6or5to navigate to the recording you want to delete and press SELECT.
5. Press6or5to navigate to Delete and press SELECT.6. Press3or4to select Yes or No and press SELECT.
Tip: The RED key on the remote can also be used to delete a recording.

33
Reprioritize a Series of Scheduled RecordingsYou can reorder the series of scheduled recordings for this STB. Series that are higher in the priority list have a greater chance of being recorded without interruption.1. Press MENU and select Recorded Television.2. Press6or5to navigate to the Scheduled Recordings and press
SELECT.3. Press4to navigate to By Series.4. Press the BLUE key. A number appears to the left of each series to
indicate priority, and the sorter tool ( ) highlights the first series in the list.
5. Reprioritize the series:• Press6or5to navigate through the list and highlight the series
that you want to reprioritize.• Move the highlighted series up or down the priority list by pressing
the 6or5 on the key or pressing + or - on the key.6. When you are finished reprioritizing the series, press the MENU,
BACK, EXIT or BLUE key to save your changes.
Multiroom DVR (Optional)Multiroom DVR (MR-DVR) capability allows you to share recordings with other non-DVR STBs within your home network. Whenever you record a program with the DVR STB, the recording is automatically available to all other STBs in the home network, even non-DVR STBs. With the MR-DVR feature, you can:• Browse the My Recordings list from any STB in the home network to
find a recording to playback.• Use full DVR features, such as fast-forward, rewind, pause or skip, to
control the recording.• Pause or stop a program in one room and resume it in another.
I
Key Controls
On-Demand ControlPerform standard VCR and DVD functions when in VCR and DVD mode, and On-Demand functions when in cable mode.
Device ControlUsed to select the component you want to operate and signals remote control activity.
Numeric Keys
Turns devices on/off
Enables TV mode functionsReplays the previous few seconds of a program
ON DEMAND provides direct access to On-Demand channel
AUD enables audio mode functions
CBL enables cable mode functions
Viewing, Browsing and Sound Control
Displays the program GUIDE listings
EXIT from current screen
INFO displays information about the program currently playing or highlighted in the program guide
Displays the applications MENU
CURSOR NAVIGATION PAD navigates to and highlights an item from the on-screen choices
OK/SEL chooses highlighted screen option
PAGE +/- accesses pages above or below the informationcurrently displayed
LAST returns to the previously tuned channel
CH selects the next higher or lower channel
REW rewinds 7 seconds, and FF fast-forwards
PLAY On-Demand or recorded content
REC records the selected program
STOP On-Demand or recorded content
PAUSE On-Demand or recorded content
VOL raises or lowers the sound level
MUTE silences the audio; press to activate, press againto restore sound to the previous level
Enter numbers to tune to channels. Also, make numeric entries on on-screen menus. NOTE: You can also use or the program guide as alternative ways to tune to channels
DELETE removes, cancels or erases
ASPECT/ENTER changes the HD screen viewing aspect ratio through the cable STB
VIDEO SOURCE selects the video source from availablevideo components through the cable STB
LIGHT button backlights all keypad buttons;press again to turn off (or simply wait 10 seconds forautomatic shut-off)
MY DVR displays a list of programs you have recorded, allowing you to select one for viewing
MY DVR
DELETE
ENTER
Accesses the search menu for Scientific Atlantic/Cisco STB
Accesses the search menu for Pace STB
Hargray’s Voyager HD/DVR
34
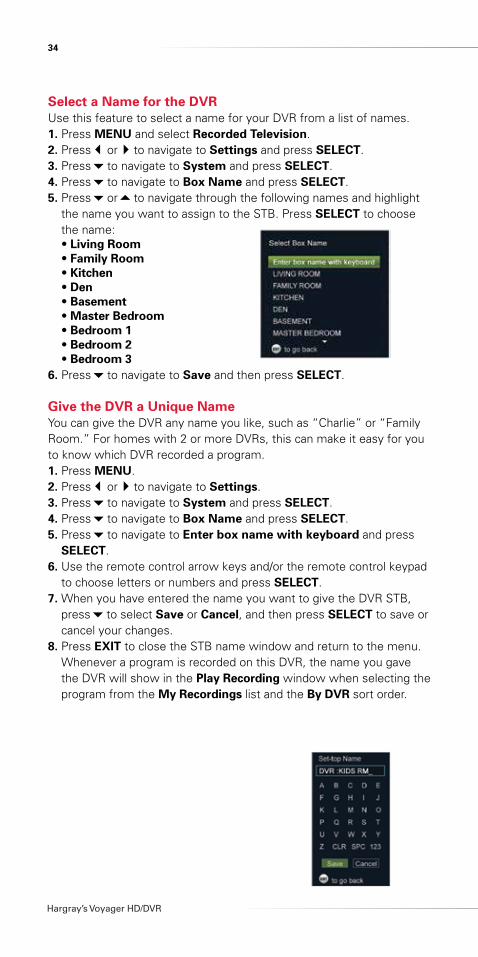
Select a Name for the DVRUse this feature to select a name for your DVR from a list of names.1. Press MENU and select Recorded Television.2. Press3or4to navigate to Settings and press SELECT.3. Press6to navigate to System and press SELECT.4. Press6to navigate to Box Name and press SELECT.5. Press6or5to navigate through the following names and highlight
the name you want to assign to the STB. Press SELECT to choose the name:• Living Room• Family Room• Kitchen• Den• Basement• Master Bedroom• Bedroom 1• Bedroom 2• Bedroom 3
6. Press6to navigate to Save and then press SELECT.
Give the DVR a Unique NameYou can give the DVR any name you like, such as “Charlie” or “Family Room.” For homes with 2 or more DVRs, this can make it easy for you to know which DVR recorded a program.1. Press MENU.2. Press3or4to navigate to Settings.3. Press6to navigate to System and press SELECT.4. Press6to navigate to Box Name and press SELECT.5. Press6to navigate to Enter box name with keyboard and press
SELECT.6. Use the remote control arrow keys and/or the remote control keypad
to choose letters or numbers and press SELECT.7. When you have entered the name you want to give the DVR STB,
press6to select Save or Cancel, and then press SELECT to save or cancel your changes.
8. Press EXIT to close the STB name window and return to the menu. Whenever a program is recorded on this DVR, the name you gave the DVR will show in the Play Recording window when selecting the program from the My Recordings list and the By DVR sort order.
35
Play a Recording on a Non-DVR Set Top Box1. Press MENU.2. Press3or4to navigate to Recorded Television and press SELECT.3. Press6or5to navigate to My Recordings and press SELECT.4. Press3or4to navigate through the following My Recordings sort
orders:• By Date (display recorded programs by date recorded)• By Title (display recorded programs by title of program)• By Channel (display recorded programs by channel)• By DVR (display recorded programs sorted by the DVR that
recorded the program)5. Based on the sort order you selected in Step 4, press6or5to
navigate to the recording you want to watch and press SELECT.6. Press6or5to navigate to Play or Play from Start and press
SELECT. Note: Depending on the software version, other functions and scheduled features may also take place on non-DVR STBs (MR-DVR clients) as described in the previous DVR section.
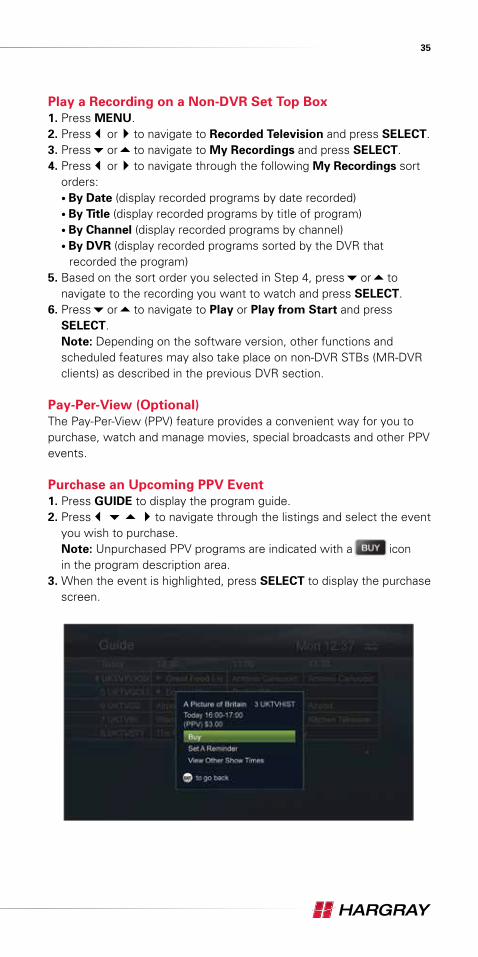
Pay-Per-View (Optional)The Pay-Per-View (PPV) feature provides a convenient way for you to purchase, watch and manage movies, special broadcasts and other PPV events.
Purchase an Upcoming PPV Event1. Press GUIDE to display the program guide.2. Press3654to navigate through the listings and select the event
you wish to purchase. Note: Unpurchased PPV programs are indicated with a icon in the program description area.
3. When the event is highlighted, press SELECT to display the purchase screen.

Hargray’s Voyager HD/DVR
36
4. Press SELECT to choose Buy and purchase the event.Notes:• If you have configured a Purchase PIN for PPV and On-Demand
purchases, you will be asked to confirm the purchase by entering a 4-digit PIN.
• appears in the program guide to indicate the events you have purchased. The name you gave the DVR will show in the Play Recording window when selecting the program from the My Recordings list and the By DVR sort order.
When tuning to an event you have purchased, the flag is also shown in the Information banner.

37
Purchase a PPV Event in ProgressAfter a PPV event has begun, you can purchase the event within the purchase window (as determined by your service provider). After this period, the event can no longer be purchased.
Use the remote control for the following procedure.1. Press GUIDE to display the program guide.2. Press3654to navigate through the listings and select the
current event you wish to purchase.3. When the event is highlighted, press SELECT to tune to the
unpurchased event and display the purchase screen, similar to the example below. You can also directly tune to the PPV event or use the Now/Next banner to tune to the PPV.
4. Press SELECT to choose Buy and purchase the event. Note: If you have configured a Purchase PIN for PPV and On-Demand purchases, you will be asked to confirm the purchase by entering a 4-digit PIN.
5. You are notified that your purchase is being processed. When the purchase is complete, the event is displayed and the Information banner appears briefly at the bottom of the event, similar to the following example:

Hargray’s Voyager HD/DVR
38
Record a Purchased EventAfter an event has been purchased, you have the option to record the event.
Use the remote control for the following procedure.1. Press GUIDE to display the program guide.2. Press3654to navigate through the listings and select the
purchased event to record.3. When the event is highlighted, press SELECT to display more
information about this event.4. Press SELECT to choose Record. The Event Options window
closes and theiicon appears next to the program in the guide; the icon appears in the program description area.
Cancel a PurchaseIf you have tuned to the event during the event Cancel window (as defined by your service provider), you can cancel the event by selecting the Cancel option from the Action toolbar. However, if the event is beyond the cancel window, the Action toolbar option is not available or Guide cancel options are not available; follow this procedure to cancel the event:1. Press GUIDE to display the program guide.2. Press3654to navigate through the listings and select the
purchased event to cancel.3. When the event is highlighted, press SELECT to display more
information about this event. The Event Options window opens, similar to the following example.
4. Press6or5to navigate to Cancel Purchase, and then press SELECT. A message window appears, similar to the following example, prompting you to confirm the cancellation.

39
View PPV Purchase History Information and Upcoming EventsThe Upcoming PPV Purchases feature allows you to view information about upcoming and currently playing events that you have purchased.1. Press MENU.2. Press6to move down the menu options and select PPV Purchases.
The PPV Purchases option is highlighted.3. Press SELECT. The PPV Purchases window appears, similar to the
example below. This window lists purchases in order by event show time. Note: If you have configured a Purchase PIN for PPV and On-Demand purchases, you will be asked to confirm access to purchase information by entering a 4-digit PIN.
4. To select a purchase in the list, press6or5until the purchase is highlighted, and then press SELECT. An informational window opens.Notes:• The Watch option is shown only if the event is currently playing.• The Record option is shown only if the event has not already been
set to record.5. To close the window, press EXIT on the remote control.

Hargray’s Voyager HD/DVR
40
View PPV Purchase History Information (Past Events)The PPV Purchases feature allows you to view information about past events that you have purchased.1. Press MENU to display the program guide.2. Press6to move down the menu options and select PPV Purchases.
The PPV Purchases option is highlighted.3. Press SELECT. The PPV Purchases window appears, with
Upcoming preselected. Note: If you have configured a Purchase PIN for PPV and On-
Demand purchases, you will be asked to confirm access to purchase information by entering a 4-digit PIN.
4. Press4to select Past. The Past window appears, similar to the following example. This window lists purchases in order from the most recent to the least recent purchase. Note: Program descriptions may not appear for past events.
5. To close the window, press EXIT on the remote control.

41
On-Demand Programs (Optional)The On-Demand (OD) menu gives you a selection of OD programs, such as movies, television series, documentaries and children’s programming.
Note: OD options may vary. Contact your service provider for more information.
Access the On-Demand Menu1. Press the ON DEMAND key to display the On-Demand menu.
Note: You can also press MENU to access the On-Demand menu.2. Press6or5to navigate through the following On-Demand menu
options:• Search (use a keyword search to locate programs)
Note: The Search option is determined by your service provider and may not be available.
• My Rentals (view your current program rentals and any services to which you are subscribed)
• Browse On-Demand (browse through the latest OD titles available for purchase)
3. Press SELECT.
Hargray’s Voyager HD/DVR
42
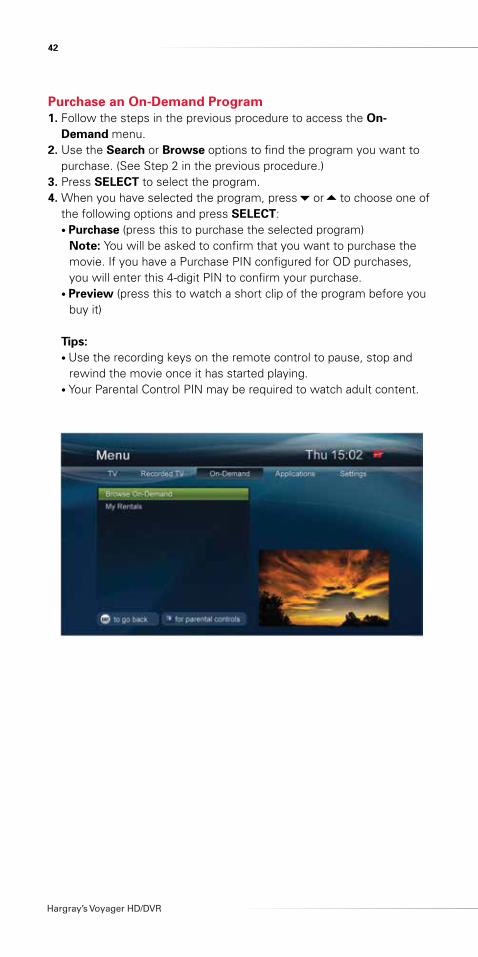
Purchase an On-Demand Program1. Follow the steps in the previous procedure to access the On-
Demand menu.2. Use the Search or Browse options to find the program you want to
purchase. (See Step 2 in the previous procedure.)3. Press SELECT to select the program.4. When you have selected the program, press6or5to choose one of
the following options and press SELECT:• Purchase (press this to purchase the selected program)
Note: You will be asked to confirm that you want to purchase the movie. If you have a Purchase PIN configured for OD purchases, you will enter this 4-digit PIN to confirm your purchase.
• Preview (press this to watch a short clip of the program before you buy it)
Tips:• Use the recording keys on the remote control to pause, stop and
rewind the movie once it has started playing.• Your Parental Control PIN may be required to watch adult content.


Voyager_10292013
Contact us 1.877.HARGRAY | hargray.com