Embed Size (px)
Citation preview

USER MANUAL
V1
VOX
US 2.0 & A AB S TT N D D VEEX ER AL HAR RI
W COWW MVO DU .. XPRO CTS

E UUS R MAN AL
. . a Int r . . . . .. .. .. .. .. .. . . . . . . .. .. .. .. .. . . . . . . .. .. .. .. .. . . . . . . 82 1 M in e face .. .. .. .. . . . . . .. .. .. .. .. .. .. . . . . .. .. .. .. .. .. .. . . . . .. .. .. .. .. .. .
2.2. as Set i g te face .. .. .. .. .. .. .. .. .. ... .. .. .. .. .. .. .. .. .. .. ... .. .. .. .. .. .. .. .. .. .. ... .. .. 9T k t n In r . . . . . . . . . . . . . . . . . . . . . . . . . . . . . . . . . .
2.3. he example c se for add a ask .. .. .. ............ .. .. .. .. .. .. .. ............ .. .. .. .. .. .. .. ...... 10T a t . . . . . . . . . . . . . . . . . . .
T N :CON E TS
cu y n escr p i . . . . . . . . . . . . . . . . . . . . . . . . . . . . .1. Se rit Functio d i t on...... . . . . ........ . . . . ...... . . . . ........ . . . . ........ . . . ........ . . . . 3
1.2. Set Passwo d........ .. .. .. .. .. .................. .. .. .. .. .. .................. .. .. .. .. .. .................. .. .. .. 3r . . . . . . . . . . . . . . . . . . . . . .
. . a In r . . . . . . . . . . . . . . . . . . . . . . . . . . . . . . . . . . . . . . 31 1 M in te face .. .. .. .. .. .. .. .. .. ... .. .. .. .. .. .. .. .. .. .. ... .. .. .. .. .. .. .. .. .. .. ... .. .. .. .. .. .
i . . . . . . . . . . . . . . . . . . .1.3. Disable Secur ty .. .. .. ..................... .. .. .. .. ..................... .. .. .. .. ..................... .. .. .. .. .. 4
e .1.4. Unlock Devic .................................................................................................. .................. 5
. . o Dev . . . . . . . . . .. .. .. . . . . . . . . .. .. .. . . . . . . . . . .. .. . . . . .1 5 L ck ice .. .. .. .. .. .. .. .. .. . . .. .. .. .. .. .. .. .. .. . . .. .. .. .. .. .. .. .. .. .. . .. .. .. .. .. .. 7
2. Bac u i n s r ptio . . . .. . . . . . . . . . . . . . . .. . . . . . . . . . . . . . . .. . . . . . . . .. . . .kup F nct o de c i n. . . . . . . . . . . .. . . . . . . . . . . . . . . .. . . . . . . . . . . . . . . . . . . 8
VOX
USB 2.0 & SATA E R AL A D I EXTE N H R DR V
V1
WW
WC
OM
VO
P.
XR
OD
UC
TS.
2
1Gree .1701 n Dr
t Of I ust , CA 17Ci y nd ry 9 45
VOX EXTERNA H RD DRIVL A E
1.0 INTRODUCTION
2.0 SYSTEM REQUIREMENTS
3.0 PACKING LIST
4.0 HARDWARE SETUP
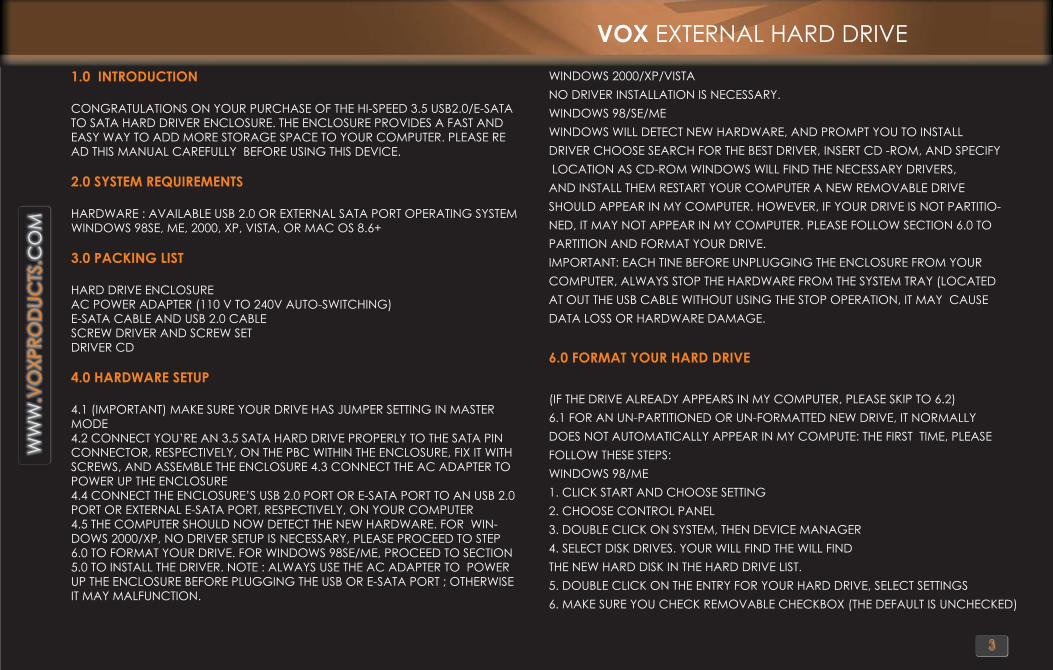
CONGRATULATIONS ON YOUR PURCHASE OF THE HI-SPEED 3.5 USB2.0/E-SATATO SATA HARD DRIVER ENCLOSURE. THE ENCLOSURE PROVIDES A FAST ANDEASY WAY TO ADD MORE STORAGE SPACE TO YOUR COMPUTER. PLEASE READ THIS MANUAL CAREFULLY BEFORE USING THIS DEVICE.
HARDWARE : AVAILABLE USB 2.0 OR EXTERNAL SATA PORT OPERATING SYSTEM WINDOWS 98SE, ME, 2000, XP, VISTA, OR MAC OS 8.6+
HARD DRIVE ENCLOSUREAC POWER ADAPTER (110 V TO 240V AUTO-SWITCHING)E-SATA CABLE AND USB 2.0 CABLESCREW DRIVER AND SCREW SETDRIVER CD
4.1 (IMPORTANT) MAKE SURE YOUR DRIVE HAS JUMPER SETTING IN MASTER MODE4.2 CONNECT YOU’RE AN 3.5 SATA HARD DRIVE PROPERLY TO THE SATA PIN CONNECTOR, RESPECTIVELY, ON THE PBC WITHIN THE ENCLOSURE, FIX IT WITHSCREWS, AND ASSEMBLE THE ENCLOSURE 4.3 CONNECT THE AC ADAPTER TOPOWER UP THE ENCLOSURE4.4 CONNECT THE ENCLOSURE’S USB 2.0 PORT OR E-SATA PORT TO AN USB 2.0 PORT OR EXTERNAL E-SATA PORT, RESPECTIVELY, ON YOUR COMPUTER4.5 THE COMPUTER SHOULD NOW DETECT THE NEW HARDWARE. FOR WIN-DOWS 2000/XP, NO DRIVER SETUP IS NECESSARY, PLEASE PROCEED TO STEP 6.0 TO FORMAT YOUR DRIVE. FOR WINDOWS 98SE/ME, PROCEED TO SECTION5.0 TO INSTALL THE DRIVER. NOTE : ALWAYS USE THE AC ADAPTER TO POWER UP THE ENCLOSURE BEFORE PLUGGING THE USB OR E-SATA PORT ; OTHERWISE IT MAY MALFUNCTION.
WINDOWS 2000/XP/VISTA
WINDOWS 98/SE/ME
WINDOWS WILL DETECT NEW HARDWARE, AND PROMPT YOU TO INSTALL
DRIVER CHOOSE SEARCH FOR THE BEST DRIVER, INSERT CD -ROM, AND SPECIFY
LOCATION AS CD-ROM WINDOWS WILL FIND THE NECESSARY DRIVERS,
AND INSTALL THEM RESTART YOUR COMPUTER A NEW REMOVABLE DRIVE
SHOULD APPEAR IN MY COMPUTER. HOWEVER, IF YOUR DRIVE IS NOT PARTITIO-
NED, IT MAY NOT APPEAR IN MY COMPUTER. PLEASE FOLLOW SECTION 6.0 TO
PARTITION AND FORMAT YOUR DRIVE.
IMPORTANT: EACH TINE BEFORE UNPLUGGING THE ENCLOSURE FROM YOUR
COMPUTER, ALWAYS STOP THE HARDWARE FROM THE SYSTEM TRAY (LOCATED
AT OUT THE USB CABLE WITHOUT USING THE STOP OPERATION, IT MAY CAUSE
DATA LOSS OR HARDWARE DAMAGE.
(IF THE DRIVE ALREADY APPEARS IN MY COMPUTER, PLEASE SKIP TO 6.2)
6.1 FOR AN UN-PARTITIONED OR UN-FORMATTED NEW DRIVE, IT NORMALLY
DOES NOT AUTOMATICALLY APPEAR IN MY COMPUTE: THE FIRST TIME, PLEASE
FOLLOW THESE STEPS:
WINDOWS 98/ME
1. CLICK START AND CHOOSE SETTING
2. CHOOSE CONTROL PANEL
3. DOUBLE CLICK ON SYSTEM, THEN DEVICE MANAGER
4. SELECT DISK DRIVES. YOUR WILL FIND THE WILL FIND
THE NEW HARD DISK IN THE HARD DRIVE LIST.
5. DOUBLE CLICK ON THE ENTRY FOR YOUR HARD DRIVE, SELECT SETTINGS
6. MAKE SURE YOU CHECK REMOVABLE CHECKBOX (THE DEFAULT IS UNCHECKED)
NO DRIVER INSTALLATION IS NECESSARY.
6.0 FORMAT YOUR HARD DRIVE
3
WW
WC
OM
VO
P.
XR
OD
UC
TS.
VOX EXTERNA H RD DRIVL A E
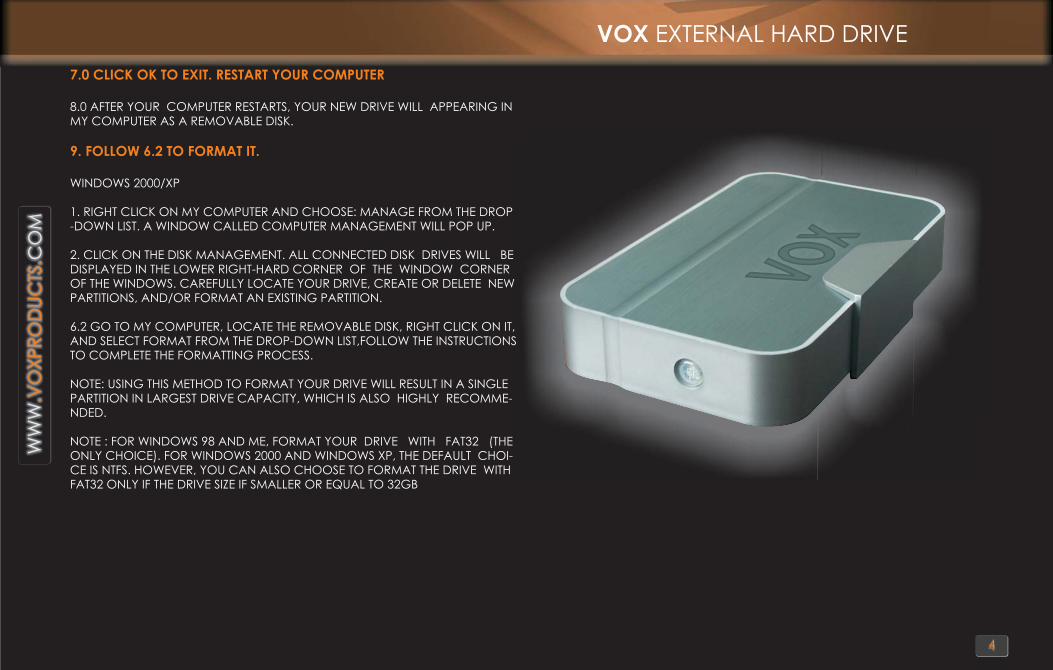
7.0 CLICK OK TO EXIT. RESTART YOUR COMPUTER
9. FOLLOW 6.2 TO FORMAT IT.
8.0 AFTER YOUR COMPUTER RESTARTS, YOUR NEW DRIVE WILL APPEARING INMY COMPUTER AS A REMOVABLE DISK.
WINDOWS 2000/XP
1. RIGHT CLICK ON MY COMPUTER AND CHOOSE: MANAGE FROM THE DROP-DOWN LIST. A WINDOW CALLED COMPUTER MANAGEMENT WILL POP UP.
2. CLICK ON THE DISK MANAGEMENT. ALL CONNECTED DISK DRIVES WILL BEDISPLAYED IN THE LOWER RIGHT-HARD CORNER OF THE WINDOW CORNER OF THE WINDOWS. CAREFULLY LOCATE YOUR DRIVE, CREATE OR DELETE NEWPARTITIONS, AND/OR FORMAT AN EXISTING PARTITION.
6.2 GO TO MY COMPUTER, LOCATE THE REMOVABLE DISK, RIGHT CLICK ON IT,AND SELECT FORMAT FROM THE DROP-DOWN LIST,FOLLOW THE INSTRUCTIONSTO COMPLETE THE FORMATTING PROCESS.
NOTE: USING THIS METHOD TO FORMAT YOUR DRIVE WILL RESULT IN A SINGLE PARTITION IN LARGEST DRIVE CAPACITY, WHICH IS ALSO HIGHLY RECOMME-NDED.
NOTE : FOR WINDOWS 98 AND ME, FORMAT YOUR DRIVE WITH FAT32 (THE ONLY CHOICE). FOR WINDOWS 2000 AND WINDOWS XP, THE DEFAULT CHOI-CE IS NTFS. HOWEVER, YOU CAN ALSO CHOOSE TO FORMAT THE DRIVE WITHFAT32 ONLY IF THE DRIVE SIZE IF SMALLER OR EQUAL TO 32GB
4
WW
WC
OM
VO
P.
XR
OD
UC
TS.
VOX EXTERNA H RD DRIVL A E
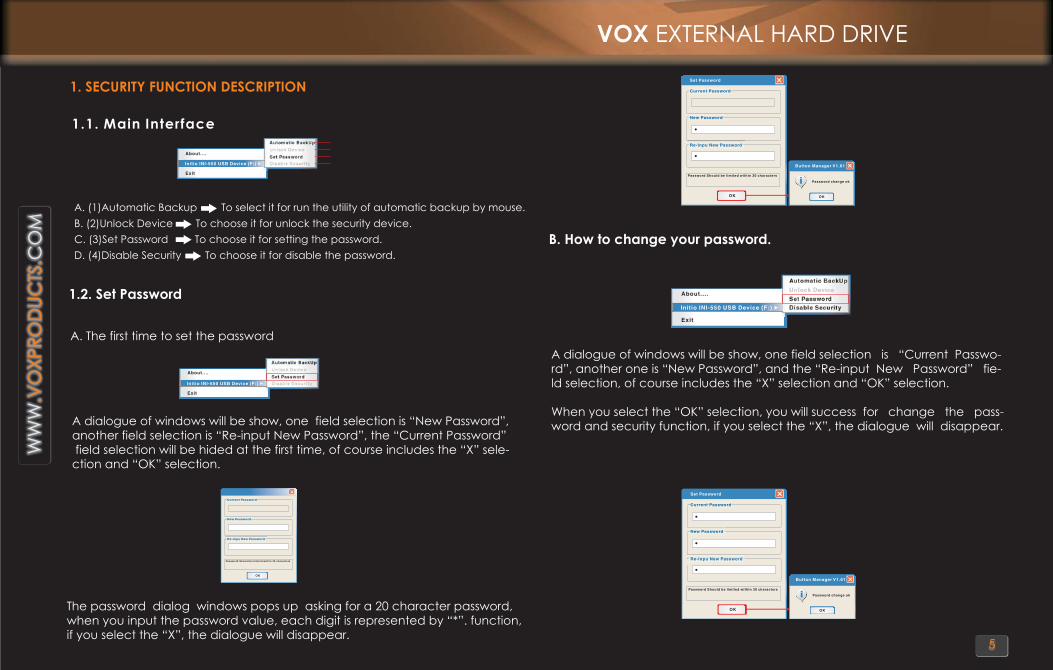
1. SECURITY FUNCTION DESCRIPTION
1.1. Main Interface
Set Password
Automatic BackUp
Unlock Device
Disable Security
About....
Exit
Initio INI-550 USB Device (F:)
Set Password
Automatic BackUp
Unlock Device
Disable Security
Exit
Initio INI-550 USB Device (F:)
About....
Current Password
New Password
Re-Inpu New Password
Password Should be limited within 30 characters
OK
A. (1)Automatic Backup
B. (2)Unlock Device
C. (3)Set Password
1.2. Set Password
A dialogue of windows will be show, one field selection is “New Password”, another field selection is “Re-input New Password”, the “Current Password” field selection will be hided at the first time, of course includes the “X” sele-ction and “OK” selection.
The password dialog windows pops up asking for a 20 character password,when you input the password value, each digit is represented by “*”. function, if you select the “X”, the dialogue will disappear.
D. (4)Disable Security
To select it for run the utility of automatic backup by mouse.
To choose it for unlock the security device.
To choose it for setting the password.
To choose it for disable the password.
A. The first time to set the password
A dialogue of windows will be show, one field selection is “Current Passwo-rd”, another one is “New Password”, and the “Re-input New Password” fie-ld selection, of course includes the “X” selection and “OK” selection.
When you select the “OK” selection, you will success for change the pass-word and security function, if you select the “X”, the dialogue will disappear.
B. How to change your password.
Current Password
New Password
Re-Inpu New Password
Password Should be limited within 30 characters
OK
Set Password
OK
Button Manager V1.61
Password change oki
Set Password
Automatic BackUp
Unlock Device
Disable Security
About....
Exit
Initio INI-550 USB Device (F:)
Current Password
New Password
Re-Inpu New Password
Password Should be limited within 30 characters
OK
Set Password
OK
Button Manager V1.61
Password change oki
5
WW
WC
OM
VO
P.
XR
OD
UC
TS.
VOX EXTERNA H RD DRIVL A E

1.3. Disable Security
A message will be showed when you select the “Disable Security” item, it’swarning about the security protection will be disable, you can select “Yes”to agree it or select “No” to against the message. A dialogue of windowswill be show when you selected “Yes” selection, only one field selection is“Current Password”, of course includes the “X” selection and “OK”selection.
Set Password
Automatic BackUp
Unlock Device
Disable Security
About....
Exit
Initio INI-550 USB Device (F:)
Yes
Button Manager V1.61
Disable Security
Security protection will be disabled?
No
Disable Security
Current Password
Password Should be limited within 30 characters
OK
The Disable Security box ask to pass the Current Password, of course includesthe “OK” selection and the “X” cancel selection. When you select the “OK” selection, you will pass the password and disable the security protection, if you select the “X”, you can cancel the action selection is “Current Password” of course includes the “X” selection and “OK” selection.
Disable Security
Current Password
Password Should be limited within 30 characters
OK OK
Button Manager V1.61
Disable Security is oki
1.4. Unlock Device
A dialogue of windows will be show, only one field selection is “CurrentPassword”, of course includes the “X” selection and “OK” selection, andadd a button of “If you forget password”.
The Unlock Device box ask to input the current password, of course inclu-des the “OK’ selection and the “X” selection.After you input the current password and click the “OK” selection, you willpass the password and unlock the security function. If you select the “X”, the dialogue will disappear.
A. Unlock device with password.
To select the icon of uti l ity on the tool bar with left key of mouse.
Set Password
Automatic BackUp
Unlock Device
Disable Security
About....
Exit
Initio INI-550 USB Device (F:)
Unlock Device
Current Password
Password Should be limited within 30 characters
OK
If you forget password
Unlock Device
Current Password
Password Should be limited within 30 characters
OK
If you forget password
OK
Button Manager V1.61
Unlock Security is oki
Unlock Device
Stopeed Time : 00:00:00
Processing
6
WW
WC
OM
VO
P.
XR
OD
UC
TS.
VOX EXTERNA H RD DRIVL A E
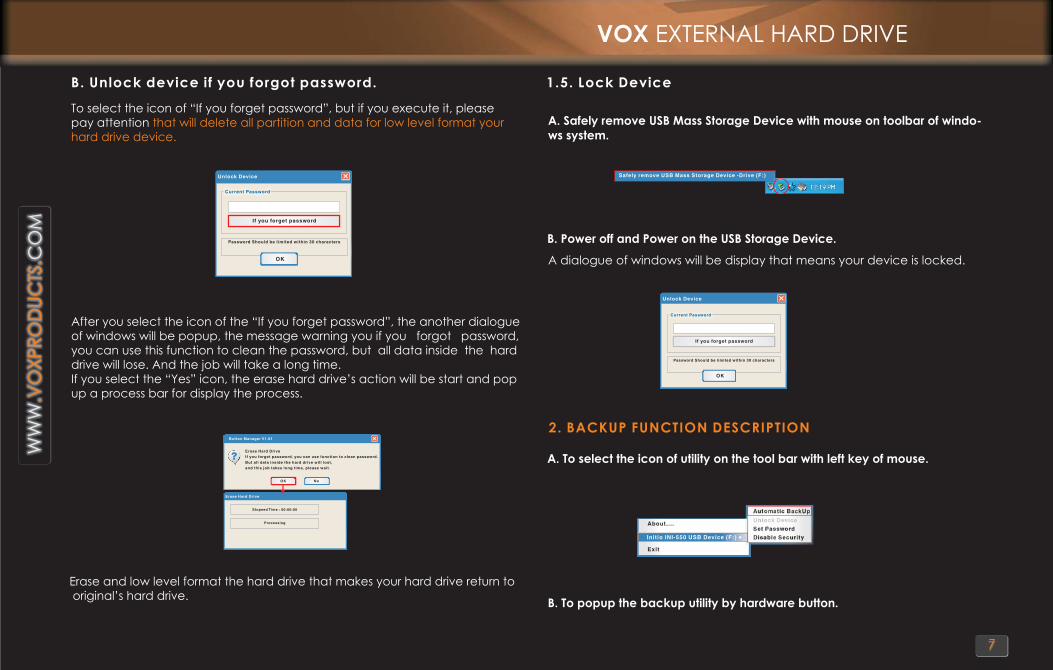
B. Unlock device if you forgot password.
To select the icon of “If you forget password”, but if you execute it, pleasepay attention that will delete all partition and data for low level format yourhard drive device.
After you select the icon of the “If you forget password”, the another dialogueof windows will be popup, the message warning you if you forgot password,you can use this function to clean the password, but all data inside the harddrive will lose. And the job will take a long time.If you select the “Yes” icon, the erase hard drive’s action will be start and popup a process bar for display the process.
Unlock Device
Current Password
Password Should be limited within 30 characters
OK
If you forget password
Erase Hard Drive
Stopeed Time : 00:00:06
Processing
OK
Button Manager V1.61
Erase Hard DriveIf you forget password, you can use function to clean password.?
No
But all data inside the hard drive will lost,and this job takes long time, please wait.
Erase and low level format the hard drive that makes your hard drive return to original’s hard drive.
1.5. Lock Device
A. Safely remove USB Mass Storage Device with mouse on toolbar of windo-
ws system.
Safely remove USB Mass Storage Device -Drive (F:)
B. Power off and Power on the USB Storage Device.
A dialogue of windows will be display that means your device is locked.
Unlock Device
Current Password
Password Should be limited within 30 characters
OK
If you forget password
2. BACKUP FUNCTION DESCRIPTION
A. To select the icon of utility on the tool bar with left key of mouse.
Set Password
Automatic BackUp
Unlock Device
Disable Security
About....
Exit
Initio INI-550 USB Device (F:)
B. To popup the backup utility by hardware button.
7
WW
WC
OM
VO
P.
XR
OD
UC
TS.
VOX EXTERNA H RD DRIVL A E

2.1. Main Interface
To select the icon of “If you forget password”, but if you execute it, pleasepay attention
that will delete all partition and data for low level format your hard drive device.
1.
2.
3.
4.
5.
Backup Version
Task menu, the task be assigned will list in this windows.
Open the task file that be saved ago.
Save the task of list to the file of *.iniBackup.
Display the disk property of system.
6.
7.
Add a new task that will pop up the menu of “Edit Task” after you clickthe “Add” button.
Open a new list of task.
Delete the task that be selected.
8.
9.
10.
11.
Modify the setting of task.
Execute all of task list in the menu of windows.
Close the windows.
The windows displays the path of loading task file, you can load thetask file of path by click “Open” selection. If you hit the mark in the item of “Loaded task file”, the task file will be loaded automatically when you’re pushing the button of hardware.
2.2. Task Setting Interface
1. Source Directory
2. Destination Directory
3. Active
Setting the source path of backup.
Open the task file that be saved ago.
If you hit the selection of “Active”, the backup task will be executed when you execute the backup utility by hardware button or through the “Execute” icon of task task list in the menu of windows.
5. All Files If you choose the selection of “All Files”, all of files will be saved.
6. Newer
7. Archive
8. Backup
If you choose the selection of “Newer”, all of new files will be saved.
If you choose the selection of “Archive”, all of archive files will be saved.
If you choose the selection of “Backup”, the backup functionwill backup file system from source directory to target directory.
Edit Task
4. All Files + Subdirectory If you choose the selection of “All Files + Sub-directory”, all of files and subdirectories will be saved in the path of setting.
9. Restore
10. Copy
If you choose the selection of “Restore”, the restore functionwill restore file system from source directory to replace the existing files of target directory.
If you choose the selection of “Copy”, the copy function willcopy file system from source directory to target directory.
WW
WC
OM
VO
P.
XR
OD
UC
TS.
8
VOX EXTERNA H RD DRIVL A E
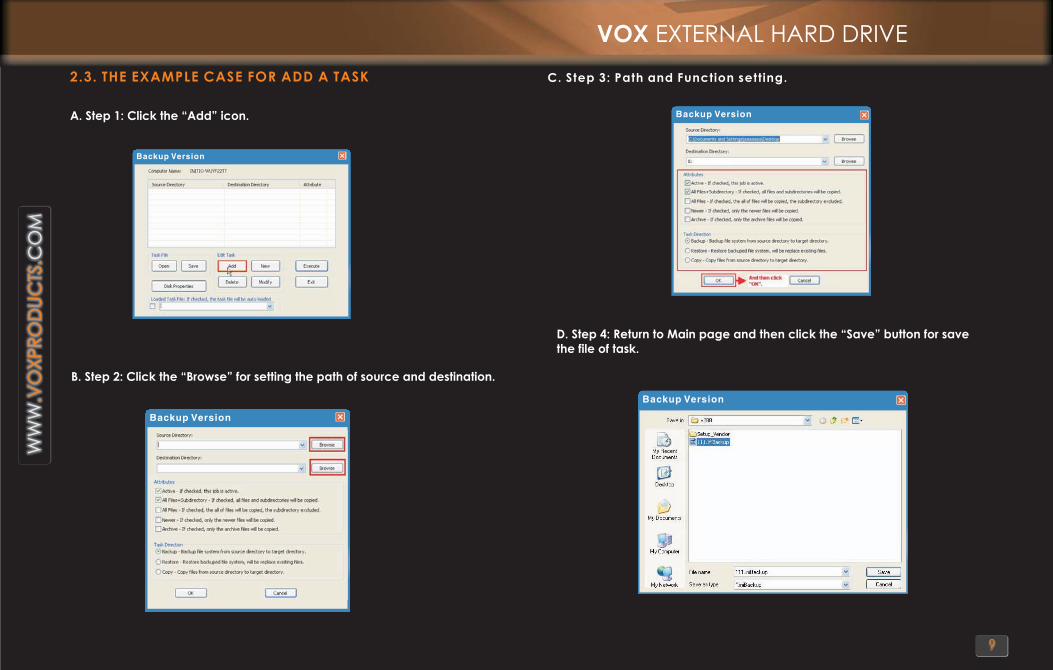
2.3. THE EXAMPLE CASE FOR ADD A TASK
A. Step 1: Click the “Add” icon.
Backup Version
Backup Version
B. Step 2: Click the “Browse” for setting the path of source and destination.
Backup Version
Backup Version
C. Step 3: Path and Function setting.
D. Step 4: Return to Main page and then click the “Save” button for save
the file of task.
9
WW
WC
OM
VO
P.
XR
OD
UC
TS.
VOX EXTERNA H RD DRIVL A E

F. Step 6: Push the hardware button to start the backup action
automatically.
Backup from (C: /Documents and Settings/aaa/Desktop) to /E: Backup_Drive C: / Documents
Backup Version
To select the Item for launch the utility automatically
by push button of hardware.
10
WW
WC
OM
VO
P.
XR
OD
UC
TS.
E. Step 5: Return to Main page and follow the below steps for finish the setting.
1. Open a task file that be saved ago.
2. To select the item of “Loaded Task File” for launch this backup utility auto-matically by hardware button.
3. Close the windows of backup utility.
VOX EXTERNA H RD DRIVL A E
Please read our policy and disclaimers carefully. They are intended to be in-
formative and instructive as to ease the Returns Process and to properly info-
rm about our warranties.
COMPANY DISCLAIMER:
VOX reserves the right to adjust prices and information for all manufactured
and advertised products. Such changes may occur due to product discon-
tinuation, fluctuating market conditions, or typographical errors. VOX will to
its best ability try to avoid printing any misleading or erroneous information.
VOX will at its sole discretion reserve the right to refuse service or conduct
business with any customer or partner if at any moment VOX deems any
actions inappropriate.
WARRANTY: THESE WARRANTIES REPLACE ALL OTHER WARRANTIES, EXPRE-
SSED OR IMPLIED INCLUDING, BUT NO LIMITED TO, THE IMPLIED WARRANTIES
OF MERCHANTABILITY AND FITNESS FOR A PARTICULAR PURPOSE.VOX DIS-
CLAIMS ALL OTHER WARRANTIES, EXPRESSES OR IMPLIED INCLUDING,
WITHOUT LIMITATION, IMPLIED WARRANTIES OF MERCHANTABILITY AND FITNE-
SS FOR A PARTICULAR PURPOSE. SOME JURISDICTIONS DO NOT ALLOW THE
EXCLUSION OF IMLPLIED WARRANTIES SO THIS LIMITATION MAY NOT APPLY
TO YOU. ALL EXPRESSED AND IMPLIED WARRANTIES ARE LIMITED IN DURATIO
TO THE LIMITED WARRANTY PERIOD. NO WARRANTIES APPLY AFTER THAT -
SOME JURISDICTIONS DO NOT ALLOW LIMITATION ON HOW LONG AN IMP-
LIED WARRANTY LASTS, SO THIS LIMITATION MAY NOT APPLY TO YOU. LIMITA-
TIONS OF LIABILITY VOX'S RESPONSABILITY UNDER THIS, OR ANY OTHER WARRA-
NTY, IMPLIED OR EXPRESSED, IS LIMITED TO REPAIR, REPLACEMENT OR REFUND
AS SET FORTH ABOVE. THESE REMEDIES ARE THE SOLE AND EXCLUSICE REME-
DIES DOR ANY BREACH OF RESULTING FROM ANY BREACH OF WARRANTY
OR UNDER ANY OTHER LEGAL THEORY INCLUDING, BUT NOT LIMITED TO, LOST
PROFITS, DOWNTIME, GOODWILL, DAMAGE TO OR REPLACEMENT OF
11
WW
WC
OM
VO
P.
XR
OD
UC
TS.
PERTY, AND ANY COSTS OF RECOVERING, PROGRAMMI
NG, OR REPRODUCING ANY PROGRAM OR DATA STORED IN OR USED WITH A
SYSTEM CONTAINING YOUR PRODUCT. SOME JURISDICTIONS DO NOR ALLOW
THE EXCLUSION OR LIMITATION OF INCIDENTAL OR CONSEQUENTIAL DAMA-
GES, SO THE ABOVE LIMITATIONS OR EXCLUSIONS MAY NOT APPLY TO YOU.
SECTION 6.3: LIMITED WARRANTY, PART 2
EXTENT OF LIMITED WARRANTY VOX DOES NOT WARRANT THAT YOUR PRODUCT
WILL BE FREE FROM DESIGN DEFECTS OR ERRORS KNOWN AS "ERRATA". CURRE-
NT CHARACTERIZED ERRATA ARE AVAILABLE UPON REQUEST.THIS LIMITED WARR-
ANTY DOES NOT COVER ANY COST RELATING TO REMOVAL OR REPLACEMENT
OF ANY PART THAT IS SOLDERED OR OTHERWISE AFFIXED TO YOUR SYSTEM'S
MOTHERBOARD. THIS LIMITED WARRANTY DOES NOT COVER ANY EXTERNAL
HARD DRIVES (HDD) THAT HAVE BEEN OPENED. THIS LIMITED WARRANTY DOES
NOT COVER DAMAGES DUE TO EXTERNAL CAUSES, INCLUDING ACCIDENT,
PROBLEMS WITH ELECTRICAL POWER, USAGE NOT IN ACCORDANCE WITH PRO-
DUCT INSTRUCTIONS, MISUSE, NEGLECT, ALTERATION, REPAIR, IMPROPER INSTA-
LLATION, OR IMPROPER TESTING, NOR IS VOX HELD LIABLE FOR ANY BODILY DA-
MAGE THAT MAY RESULT DURING THE INSTALLATION, MAINTENANCE, REPAIR,
OR IS OTHERWISE ASSOCIATED WITH THIS PRODUCT.VOX IS FREE FROM ANY LE-
GAL ACTIONS THAT MAY RESULT IN DEATH, PAIN AND ANGUISH, OR ANY OTHER
FORM OF PERSONAL DAMAGE THAT MAY OCCUR BY PURCHASING THIS PRO-
DUCT. YOU THE BUYER AGREE TO THIS WARRANTY AND ITS TERMS SET WITHIN ITS
EXPRESSED AND IMPLIED LIMITED WARRANTY. THIS LIMITED WARRANTYGIVES YOU
SPECIFIC LEGAL RIGHT, AND YOU MAY ALSO HAVE OTHER RIGHTS THAT VARY
FROM JURISDICTION TO JURISDICTION.PLEASE NOTE: WARRANTY MAY CHANGE
AT ANYTIME.PLEASE CONSULT OUR WEBSITE FOR ANY CURRENT UPDATES ON
THESE CHANGES. VOX IS NOT RESPONSIBLE FOR NOTIFYING THE USER OF ANY
CHANGES TO THE WARRANTY. TO ENSURE FULL WARANTY ON VOX PRODUCTS,
PLEASE REGISTER IN OUR WEBSITE UPON PURCHASE.
EQUIPMENT AND PRO
VOX EXTERNA H RD DRIVL A E
12
WW
WC
OM
VO
P.
XR
OD
UC
TS.
RETURN POLICY
-VOX warrants its products to be free from defects in manufacturing and
workmanship under normal use for one (1) year time frame. Any VOX pro-
duct that fails will be exchanged or repaired with the same or equivalent
item.
-Returns or exchanges must first be directed to the place of purchase. If
warranty period has expired with Dealer, VOX will handle these returns or
exchanges.
-The warranty period is defined by the manufacturing date. If you find a big
time-gap between manufacturing date and purchase date, you will have
to ask your dealer to compensate for the time difference.
-VOX will NOT accept any request to make "trade-ups" to any newer models.
-An RMA (Return Merchandise Authorization) Request must be submitted
along with the product.
-You can obtain an RMA number by going to the General Request section
of the Support page and filling out the necessary information. Note: RMA
number is only valid for 10 days after issuance date.
-You will then be issued an RMA number which can be used to submit, then
later check on the status of your request**its is mandatory to obtain an RMA
Number prior to returning any merchandise***
-You will receive a replacement only under the following conditions:
1)That the merchandise purchased was through aVOX Authorized Distributor.
2) That the product is accompanied by a Sales receipt, as "Proof of Purcha-
se" clearly showing purchase date & model.
3) You submit a valid RMA number clearly visible on the product being retu-
rned.
4) That the Replacement is NOT caused by Physical Damage to the product.
-Upon receipt of your defective unit, a replacement part will be returned
back to you. However, the warranty extension on the new replacement unit
will only be thirty (30) days.
-VOX will only be responsible for the repair of the product itself, and not to
any other component that is part of your system. For other defective compo-
nents, you will be responsible to contact each individual manufacturer and re-
quest the necessary replacements from them. It is recommended yet not man-
datory to use a trustworthy carrier who offers tracking services. It is also reco-
mmended yet not mandatory to purchase insurance on the product, this will
limit the risk of any loss during delivery to VOX warehouse.
EXCHANGES
-If it has been determined that an exchange in product is necessary, and the
proper RMA procedures have been executed, the exchanged merchandise
will be delivered within (30) days after receipt in VOX warehouse.
-VOX will inspect and test product for defects in manufacturing, and exchan-
ge will be processed contingent upon test results.
SHORTAGES
-VOX will try to send completed orders at all times. There may be instances
were an oversight might occur.
-If this should happen, it is your responsibility to notify VOX by telephone within
5 days of the receiving date, advising of the shortage in your order. All short-
ages will be re-sent immediately. Allow time for Ground U.P.S. to deliver.
DAMAGES
-If product(s) upon arrival are found to have visible physical damage, do not
accept from delivering courier and report immediately to the Customer Ser-
vice Department at VOX by calling 626-581-9887 extension 100.
-If after receiving package you discover product(s) are defective, do no atte-
mpt to use the product(s).Proceed to return the merchandise as directed and
expect re-delivery of the product. ***EXCLUDES PHYSICAL DAMAGE***
VOX EXTERNA H RD DRIVL A EVOX EXTERNA H RD DRIVL A E

13
WW
WC
OM
VO
P.
XR
OD
UC
TS.
nicians, it is determined that the product was damaged due to misuse or
abuse, the warranty shall be voided.
-Any damage inflicted upon the product(s) which is not a manufacturer
defect, will not be covered by the warranty.
-Only after inspection of merchandise at VOX, conducted by Certified Tech
DELIVERY
7-10 business days for delivery. Expedited delivery options are available at
additional cost
-Deliveries are made via U.P.S. Ground services, which usually take between
LIMITATION OF LIABILITY
-Any liability for consequential and incidental damages is expressly explai-
ned in VOX's liability, and in all events is limited to, and shall not exceed the
purchased price.
RETURNS
-If you are dissatisfied with any VOX product(s) purchases you must return to
the place of purchase for either a full refund or exchange of replacement.
- Only after the warranty time period has expired with the Dealer, will VOX
assist you with any returns.
-All returns must be accompanied by an RMA. You can obtain an RMA
number by going to the General Request section of the Support page and
filling out the necessary information.
SHIPPING CHARGES
-VOX will pay for shipping cost incurred for sending the replacements to the
customer.
-It is recommended yet not mandatory to use a trustworthy carrier who offers
tracking services. It is also recommended yet not mandatory to purchase
insurance on the product, this will limit the risk of any loss during delivery to
VOX warehouse.
-Replacement will be returned using the same shipping services as they were
originally sent, unless expedited services are paid for by sender.
-If product(s) are returned for non-acceptance of delivery, the sender will be
charged shipping cost, plus the 15% restocking fee.
-Sender will be responsible for ALL shipping cost to VOX warehouse.
PROCEDURE FOR RETURNING PRODUCT(S)
2. Send a copy of the original invoice.
3. Pack the defective product (s) and send to:
VOX-RMA DEPT
17011 Green Drive
City of Industry, CA. 91745
4. Be sure to give at least 30 days for replacement to be returned.
NOTE: you can check RMA status by logging to
-1. Obtain RMA number
www.voxproducts.com
VOX EXTERNA H RD DRIVL A E

Power Connector
On/Off
USB 2.0 Port
E-SATA
14
INTERFACE USB 2.0 eSATA
SEEK TIME MAX 1.1 MILLISECONDS
DATA TRANSFER SPEED MAX. 3GB (eSATA MODE)
MAX. 480 Mbps (USB 2.0 MODE)
POWER CONSUMPTION AVERAGE 1.2 A
POWER SUPPLY 5V/2A, 12V/2A
OPERATING ENVIRONMENT 0 TO 50% 10-90%
WEIGHT 2.4 LBS (1.1 KG)
T CH ICAL PE SE N S CIFICATION
WW
WC
OM
VO
P.
XR
OD
UC
TS.
VOX EXTERNA H RD DRIVL A E
15
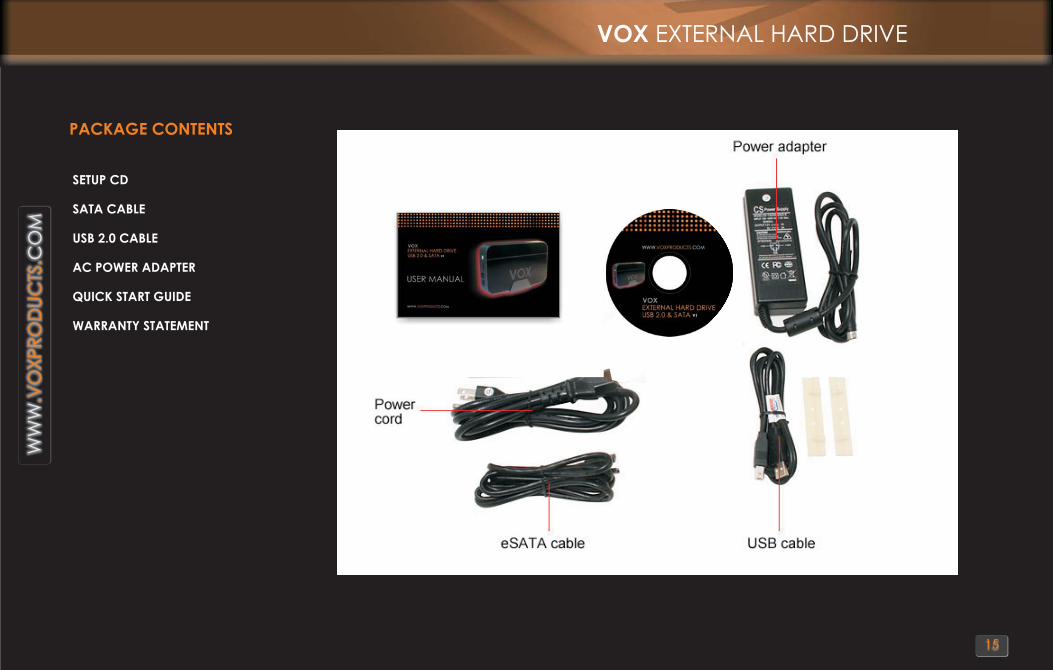
SETUP CD
SATA CABLE
USB 2.0 CABLE
AC POWER ADAPTER
QUICK START GUIDE
WARRANTY STATEMENT
PACKAGE ONTENTS C
WW
WC
OM
VO
P.
XR
OD
UC
TS.
VOX EXTERNA H RD DRIVL A E
S N AU ER MA U L
V1
VOX
USB 2.0 & SATA EXTERN L HA DRIVEA RD
SERIAL
Windows VistaUSB
HI-SPEED
CERTIFIED
TM
USB 2.0 WindowsxpTM
WWW COM. OXPR DV O UCTS.