Embed Size (px)
Citation preview

1
Vouchers – Quick Reference
When the distributor receives an invoice for items they purchased, they are entered in Voucher Batch
Maintenance.
TAB 1 – General
Batch – System-generated batch number. It will be created when you click ‘Save’. The space next to the
batch number is for a description of the batch. For example, you could enter the user who entered the
batch along with the date the batch was created.
Batch total (Optional) – Enter the total amount of invoices being entered. If a total is entered here, the
system will keep track of the amounts entered and let you know how much is remaining to apply. This
will display in the upper right corner of the screen. This is useful when there are a larger number of
invoices being entered.

2
On hold (checkbox) – Indicates whether this batch is allowed to be posted via Post Voucher Batch
Process. This defaults to unchecked.
Created by – The system auto populates this information. It is the user ID of the person who created the
batch. The user ID is determined by how the person was logged into the computer where the batch is
being entered.
Date created – The system auto populates this information. It is the current system date.
TAB 2 – Vouchers
Move to tab 2 to enter vouchers (vendor invoices) for purchase orders.
Click the ‘Create’ button to create a new voucher. Click the ‘Change’ button to modify or edit any
existing vouchers in the batch. Click the ‘Remove’ button to delete any vouchers from the batch.
When you click the ‘Create’ button, the Batch Voucher Maintenance screen will display.

3
TAB 1 – General
Type - The type of voucher being processed through Accounts Payable. Choices are:
Voucher (PO Required) - A voucher which requires a purchase order from the vendor (for
example, a standard trade inventory item).
Voucher (PO Not Required) - A voucher which does not require a purchase order from the
vendor (for example, an expense item).
Credit Adjustment - A voucher which creates an adjustment that credits the vendor (for
example, you originally underpaid on a previous voucher). A credit adjustment can be manually
entered, or automatically created when the accepted cost on a voucher is less than your
expected cost.

4
Debit Adjustment - A voucher which creates an adjustment that debits the vendor (for example,
you originally overpaid on a previous voucher, or you have returned goods to the vendor for
credit). A debit adjustment can be manually entered, or automatically created when the
accepted cost on a voucher is greater than your expected cost. Debit vouchers are also
automatically created when a vendor return is shipped and finalized.
Purchase order - The purchase order number to be associated with this voucher. This field is only
required for a Type of 'Voucher (PO Required)’.
Vendor purchase-from - The vendor branch (for a debit/credit adjustment) or purchase-from branch
(for a standard voucher) to be assigned to the voucher.
Adjusted voucher - The voucher number to be associated with this adjustment. This field is only used for
a Type of 'Credit Adjustment' or 'Debit Adjustment'. The adjusted voucher must exist in the system for
the vendor purchase-from branch entered above. If you are applying a debit adjustment or credit
adjustment to the vendor’s account rather than to a specific voucher, then leave this field blank.
Location - The location that is responsible for the expense side of the general ledger transaction
associated with this voucher.
Invoice-to location - The invoice-to location that is associated with the Location entered for this voucher
(invoice-to locations are assigned to a location using Location Maintenance). This field is always
disabled and required.
Vendor invoice – The identifying number from an invoice you receive from a vendor, up to 20 characters
long.
Invoice date - The date that is printed on the vendor's invoice. This date will default to the current
system date, so be sure that it is changed to reflect the date on the vendor’s invoice.
Total invoice amount - The invoice amount that is on the vendor’s invoice. This amount should include
any tax or freight amounts being charged. For a credit or debit adjustment, this is the amount of the
credit/debit adjustment.
Freight amount – Enter the freight amount being charged on the vendor’s invoice.
Tax amount – Enter the tax amount being charged on the vendor’s invoice.
Net invoice amount – This amount is equal to the ‘Total Invoice amount’ minus ‘Freight Amount’ minus
‘Tax Amount’. This is also the total that the system will validate against the line totals to determine if
posting is allowed. If the Net invoice amount does not match the total accepted costs on the lines, then
the batch cannot be posted (Post Voucher Batch Process).

5
Recurring voucher – If this voucher was generated by running Recurring Voucher Process, the recurring
voucher number will be defaulted here.
Payment terms - The payment parameters to be used for the voucher. The payment terms describe how
much of the invoice must be paid, and when it must be paid.
Due date - The date on which the invoice is due to be paid.
Accepted date - A date specified by the vendor, indicating when the voucher will qualify for a discount.
For a Type of 'Voucher (PO Required)', this date will be calculated using the Invoice date and Payment
terms. For a Type of 'Voucher (PO Not Required)', if this field is left blank, the system will automatically
insert the due date. For debits/credits, this field is disabled.
Terms due date – The date on which the invoice is due to be paid.
Accepted amount - The amount of discount that you have received on the voucher. This field is disabled
for credit/debit adjustments.
Date – The date up to which this voucher qualifies for a terms discount.
Percent – The discount percentage that will be applied for the terms discount.
Amount – The total discount amount of the terms discount.
Post (checkbox) – Indicates whether this voucher is allowed to be posted when the batch is posted via
Post Voucher Batch Process.
Pay (checkbox) – Indicates whether this voucher is allowed to be selected for payment on a check run in
Voucher Payment Select Process.

6
TAB 2- Shipping
Ship date - The date from the vendor invoice indicating when the items were shipped. This field is
enabled for Types of 'Voucher (PO Required)' and 'Voucher (PO Not Required)'. For credit
adustments/debit adjustments, this field is disabled.
NOTE: This field does not default from the purchase order.
Ship method - The shipping method from the invoice indicating how the items were shipped. This field is
enabled for Types of 'Voucher (PO Required)' and 'Voucher (PO Not Required)'. For credit
adjustments/debit adjustments, this field is disabled.
NOTE: This field does not default from the purchase order.
FOB - The FOB setting from the invoice indicating when the transfer of ownership for the items takes
place. This field is enabled for Types of 'Voucher (PO Required)' and 'Voucher (PO Not Required)'. For
credit adjustments/debit adjustments, this field is disabled.
NOTE: This field does not default from the purchase order.

7
Freight terms - The freight terms from the invoice indicating how the shipping is paid. This field is
enabled for Types of 'Voucher (PO Required)' and 'Voucher (PO Not Required)'. For credit
adjustments/debit adjustments, this field is disabled.
NOTE: This field does not default from the purchase order.
Freight adder - An additional freight amount to be added to a customer's standard freight charge. A
freight adder is often used for drop shipments. This freight amount will be added onto the customer’s
invoice, but will not affect accounts payable.
The Freight adder will be set to zero in the Shipment Confirmation Process in the following scenarios:
When the Freight charge is zero
When the Freight terms for this order are "Collect"
If a valid Freight charge is entered, the Freight adder will be reset using either the location, customer, or
customer ship-to default value.
If you want to apply the freight adder to drop shipments, be sure to enter a freight code in the Drop
ship freight code field in Location Master Maintenance.
If the Outbound freight absorbed check box is selected, then the freight adder will be absorbed and will
reduce your gross margin.
Ship method - The shipping method from the invoice indicating how the items were shipped. This field is
enabled for Types of 'Voucher (PO Required)' and 'Voucher (PO Not Required)'. For credits/debits, this
field is disabled.
NOTE: This field does not default from the purchase order.
Tracking numbers - An identification number that is assigned to a shipment from a vendor. One or more
tracking numbers can be entered for a voucher in Batch Voucher Maintenance and maintained in
Voucher Maintenance. If a tracking number is entered on a voucher for a drop shipment, it will be
printed on the customer invoice.
Freight multiplier - A multiplier is often used to compensate for freight charged to you by the vendor.
For example, if the freight charge from your warehouse to the customer is $10.00, and the freight
charge from the vendor to your warehouse was $10.00, if you want to pass the freight charge on to your
customer, enter a freight multiplier of "2.00". The freight amount will not be exact in all cases, but it
should come close.

8
If the freight terms on the order are "Collect", any freight charge, freight multiplier, or freight adder
contained on an order will not be charged. If the Outbound freight absorbed check box is selected, then
the freight adder will be absorbed and will reduce your gross margin.
Notes - A field for entry of any additional notes relating to the shipment of the voucher, up to 1000
characters long. These notes do not appear on any reports or inquiry screens.
TAB 3 – Remit-to
This tab displays the vendor remit-to address on the left, and the vendor purchase-from address on the
right. This information defaults from Vendor Maintenance and Vendor Purchase-From Maintenance,
respectively.
9
TAB 4 – Lines
Go to the Lines tab to view the lines for the voucher. After entering the information in TAB 1 – General,
the system will try to match PO lines to the total invoice amount entered. This means it will auto
populate this grid with the lines it thinks match up to your invoice total. Click the ‘Reselect’ button to
reselect the lines you want to voucher, if needed. Click the ‘Change’ button to make changes to any of
the lines. Click the ‘Remove’ button to delete any voucher lines.
EXPECTED COST/ACCEPTED COST on Invoices for Trade PO’s (Voucher Type: PO Required)
Occasionally, the vendor will invoice the distributor for a different cost than what was on the purchase
order. When this happens, the distributor must decide which cost they will pay.
For example, the distributor purchased item ABC on PO 123456 on June 15. The replacement cost for
item ABC is $212.50. However, this is an outdated price. The vendor instituted a price update for item
ABC on June 1, but the distributor had not yet imported the new pricing when the PO was created.
When the vendor invoices the distributor for item ABC, they are invoiced at the updated cost of
$215.00. The Expected Cost is the cost on the PO ($212.50) and if the distributor decides to pay the
vendor the updated price, then that is the Accepted Cost ($215.00).
To summarize:
Expected Cost is the cost you received the item at. (i.e. the cost on the purchase order line at the time
Purchase Order Receiving Process was run.)
Accepted Cost is the cost the distributor agrees to pay the vendor.
In most cases, these two costs will be equal. (TrulinX automatically defaults the expected cost in the
accepted cost field). However, if the distributor is paying a different cost than the expect cost, the
accepted cost must be changed to the amount they agree to pay.
When the Accepted Cost is higher than the Expected Cost, the system will post the difference to the
Inventory Adjustment Expense account in the general ledger automatically.
When the Accepted Cost is lower than the Expected Cost, the distributor must run Debit Memo Print to
notify the vendor and to advise them that a credit is owed for the difference.
NOTE: The total accepted cost of the lines MUST match the Net Invoice Amount on the General tab in
order for the batch to be allowed to post in Post Voucher Batch Process! If they don’t match, a message
will appear in the grid saying the batch is out of balance. This message will also appear on the Voucher
Register Report.

10
What Fields To Change When Accepted Cost Differs from Expected Cost
1) Example 1: The vendor invoices the distributor for more than what was expected. In this case,
the expected cost was $23.78, but the vendor invoiced at a cost of $25.00. The distributor is
paying the lower cost. In this case, change the Unit cost to equal the cost the vendor invoiced at
($25.00) and also the Extended Cost to equal the vendor cost x the quantity (1 @
$25.00=$25.00). The Accepted Cost will stay at $23.78 and the Accepted extended cost will be
equal to that cost times the quantity (1 x $23.78=$23.78). Since the distributor is charged more
than what they are paying, a credit of $1.22 is owed to the distributor. When Debit Memo Print
is run, that amount will appear on the debit memo. (NOTE: In TrulinX, a “credit” is called a debit.
Hence, the name “Debit” Memo Print).

11

12
Example 2: The vendor charges the distributor for more than the expected cost, and the
distributor is paying the higher cost. In this case, the Expected Cost is $15.44, but the invoiced
cost is $16.00. Change the Accepted unit cost to the higher cost ($16.00). The Accepted
extended cost will automatically calculate using the Accepted qty x Accepted unit cost (1 x
$16.00=$16.00). Notice the variance of .56. This amount will be posted to the Inventory
Adjustment Expense account in the general ledger.

13
EXPENSE Vouchers and Lines Tab
Expense vouchers are vendor invoices for expense items rather than inventory items. For
example, you order office supplies from Staples and they invoice you for the items. In this case,
the ‘Voucher Type is changed to ‘PO Not Required’. Entry is required under the General tab, but
no line costs are entered. Instead, after entry in the General tab, you must go to TAB 5 – G/L
Distribution and enter the G/L class (G/L account) that you wish to post the expense amount to.

14
DEBIT ADJUSTMENT ENTRY
To reduce the balance on a voucher or the overall vendor account, enter a Debit Adjustment in
Voucher Batch Maintenance. The ‘Voucher Type’ must be changed to ‘Debit Adjustment’, and
the ‘Total Invoice Amount’ must be a negative amount. If you are adjusting a specific voucher,
enter the voucher number in the ‘Adjusted voucher’ field. If you entering an adjustment for the
vendor account overall, leave the ‘Adjusted voucher’ field blank.
Like expense vouchers, no line details are entered for debit adjustments. Instead, go to TAB 5 –
G/L Distribution to enter the G/L class (account number) that you want to post this adjustment
to.
Note that in cases where a debit adjustment is being entered because a PO line was vouchered
in error, TrulinX recommends that you post these to the Inventory Adjustment Expense account.
However, the distributor should always consult with their accountant on recommendations
before making G/L postings.

15

16
CREDIT ADJUSTMENTS
To increase the balance on a voucher or the overall vendor account, enter a Credit Adjustment
in Voucher Batch Maintenance. The’ Voucher Type’ must be changed to ‘Credit Adjustment’,
and the ‘Total Invoice Amount’ must be a positive amount. If you are adjusting a specific
voucher, enter the voucher number in the ‘Adjusted voucher’ field. If you entering an
adjustment for the vendor account overall, leave the ‘Adjusted voucher’ field blank.
Like expense vouchers, no line details are entered for credit adjustments. Instead, go to TAB 5 –
G/L Distribution to enter the G/L class (account number) that you want to post this adjustment
to.
17

18
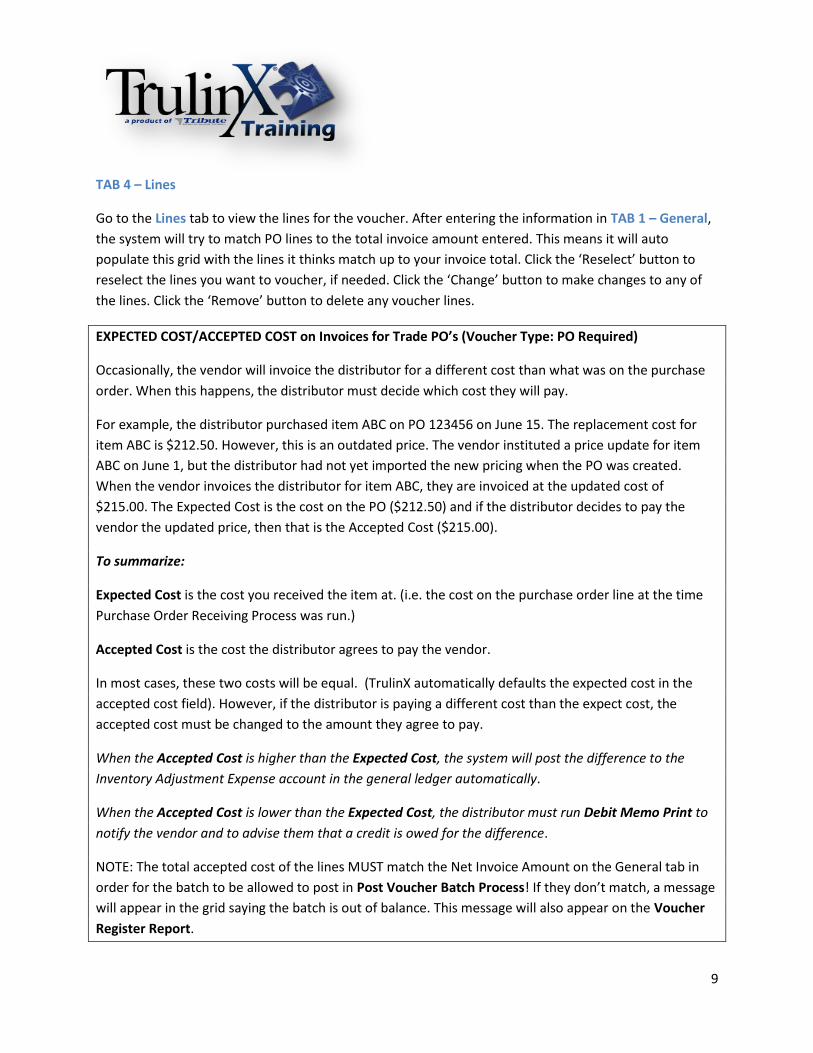
TAB 5 – G/L Distribution
When you want to process vouchers (invoices and adjustments) in the TrulinX system, you first
need to create a batch. Once the batch is created, you then add vouchers and lines to the batch.
For voucher lines containing standard inventory items, the system will also add in the proper
general ledger distribution information. However, for items that are not standard inventory
items, or for adjustments, you will need to manually designate the general ledger class to be
used for distribution.
For voucher lines, use the G/L Distribution tab on the Batch Voucher Line Maintenance screen.
This will open the Batch Voucher Line G/L Distribution Maintenance screen.

19
DROP SHIP VOUCHER ENTRY
The voucher entry for a drop ship PO is identical to entering a voucher for a stock PO. However, there
are two things to be aware of:
1) When you enter the PO number in Voucher Batch Maintenance, the user will get a popup (see
below). This is informational only and does not prevent the user from continuing. Simply click
the ‘Ok’ button and continue.
2) The distributor has the opportunity to enter a freight adder amount under the Shipping tab.
(See page 6-7 of this document). Any amount entered in the freight adder field will be passed on
to the customer invoice. The distributor would typically do this in cases where they are being
charged freight by the vendor and want to pass that charge onto the customer to recover the
freight expense.


![CCNP BCMSN Quick Reference Sheets - Lagout Quick Reference... · CCNP BCMSN Quick Reference Sheets Exam 642-812 ... [ 4 ] CCNP BCMSN Quick Reference Sheets. ... switch would be used](https://img.dokumen.tips/doc/110x75/5a7a6ec87f8b9a05538dccf5/ccnp-bcmsn-quick-reference-sheets-lagout-quick-referenceccnp-bcmsn-quick-reference.jpg)