Embed Size (px)
Citation preview

November 1999
������� Telecommunication Systems Division
®
Voice Processing Systems
Release 3
Installation andMaintenance Manual

Publication InformationToshiba America Information Systems, Inc., Telecommunication Systems Division, reserves the right, without prior notice, to revise this information publication for any reason, including, but not limited to, utilization of new advances in the state of technical arts or to simply change the design of this document.
Further, Toshiba America Information Systems, Inc., Telecommunication Systems Division, also reserves the right, without prior notice, to make such changes in equipment design or components as engineering or manufacturing methods may warrant.
STG-MA-IM/R3-VA4025063
Version A, November 1999
© Copyright 1999Toshiba America Information Systems, Inc.Telecommunication Systems DivisionAll rights reserved. No part of this manual, covered by the copyrights hereon, may be reproduced in any form or by any means—graphic, electronic, or mechanical, including recording, taping, photocopying, or information retrieval systems—without express written permission of the publisher of this material.
Stratagy and Perception are registered trademarks of Toshiba America Information Systems, Inc.
Strata is a registered trademark of Toshiba Corporation.
Trademarks, registered trademarks, and service marks are the property of their respective owners.
Stratagy Voice Processing
General End User InformationThe Stratagy Voice Processing Systems are registered in accordance with the provisions of Part 68 of the Federal Communications Commission’s Rules and Regulations.
FCC RequirementsMeans of Connection: The Federal Communications Commission (FCC) has established rules which permit the Stratagy systems to be connected directly to the telephone network. Connection points are provided by the telephone company—connections for this type of customer-provided equipment will not be provided on coin lines. Connections to party lines are subject to state tariffs.
Incidence of Harm: If the system is malfunctioning, it may also be disrupting the telephone network. The system should be disconnected until the problem can be determined and repaired. If this is not done, the telephone company may temporarily disconnect service. If possible, they will notify you in advance, but, if advance notice is not practical, you will be notified as soon as possible. You will be informed of your right to file a complaint with the FCC.
Service or Repair: For service or repair, contact your local Toshiba telecommunications distributor. To obtain the nearest Toshiba telecommunications distributor in your area, call Toshiba America Information Systems, Inc., Telecommunication Systems Division in Irvine, CA (949) 583-3700.
Telephone Network Compatibility: The telephone company may make changes in its facilities, equipment, operations, and procedures. If such changes affect the compatibility or use of the Stratagy system, the telephone company will notify you in advance to give you an opportunity to maintain uninterrupted service.
Notification of Telephone Company: Before connecting a Stratagy system to the telephone network, the telephone company may request the following:
� Your telephone number.
� FCC registration number:Stratagy Flash: EBZUSA-25267-VM-TStratagy 6D/Stratagy 24D: EBZTAI-23157-VM-TStratagy DK: 3Y6USA-21691-KX-TStratagy 24 Plus: FCC File #MC1080
� Ringer equivalence number: 0.6B. The ringer equivalence number (REN) is useful to determine the quantity of devices which you may connect to your telephone line and still have all of those devices ring when your number is called. In most areas, but not all, the sum of the RENs of all devices connected to one line should not exceed five (5.0B). To be certain of the number of devices you may connect to your line, as determined by the REN, you should contact your local telephone company to ascertain the maximum REN for your calling area.
� Network connection information USOC jack required: RJ-11C, RJ-14C.
Radio Frequency InterferenceWarning: This equipment generates, uses, and can radiate radio frequency energy and if not installed and used in accordance with the manufacturer’s instruction manual, may cause interference to radio communications. It has been tested and found to comply with the limits for a Class A computing device pursuant to Subpart J of Part 15 of FCC Rules, which are designed to provide reasonable protection against such interference when operated in a commercial environment. Operation of this equipment in a residential area is likely to cause interference, in which case, the user, at his/her own expense, will be required to take whatever measures may be required to correct the interference.
This system is listed with Underwriters Laboratory.
Important Notice — Busy-hold MusicIn accordance with U.S. Copyright Law, a license may be required from the American Society of Composers, Authors and Publishers, or other similar organization, if radio or TV broadcasts are transmitted through the busy-hold music feature of this voice processing system. Toshiba America Information Systems, Inc., hereby disclaims any liability arising out of the failure to obtain such a license.
UL®
ITE 7B61
LISTED
C US UL®
Telephone Equipment
6D40
LISTED
C US
UL®ITE
E199948
CUS LISTED
Stratagy Flash Stratagy 6D/Stratagy 24D
Stratagy 24 Plus

Before You Install the Stratagy R3...This checklist has been included with the Stratagy® Voice Processing system to assist you in a successful installation. Prior to installing the Stratagy Voice Processing system, please read and complete both sides of this checklist.
CAUTION! After making any significant program changes to the Stratagy, the system should be properly shutdown and restarted. This copies the most current database to the C:\Stratagy\Archive\Good directory for use by the Automatic System Recovery feature (see “Automatic System Recovery” in the R3 Stratagy I&M Manual). Failure to do so could result in the loss of customer information if the system looses power before it is properly shutdown and rebooted
1 ������������ ������������ ��������������Remember to always wear an anti-static wrist strap when handling electronic components.
❐ Check the items contained in the package against the packing list. Inspect all equipment for damage. If equipment is missing or damaged, contact the shipping company or your dealer sales specialist immediately.
❐ Save the original shipping box for re-use when transporting the system. The original packing material has been specifically designed to offer the Stratagy system with maximum protection.
❐ After removing the Stratagy system from the box, take the cover off of the system and verify each card in the system is properly seated in its slot and all cables are plugged all the way into their sockets. Once all connections are verified, reinstall the cover.
2 ���� �������� �����
❐ Always connect the Stratagy system to a dedicated 110VAC or 220VAC outlet.
❐ If your Stratagy installation is in an area with unreliable power, you should also install a Power Conditioner to avoid any failures that can be caused by power fluctuations, including hardware failure and file corruption. A Toshiba recommended ONEAC™ Model ON400 (400 VA, 1/2 hour) UPS with Power Conditioner and Ground Bar is available (Part Number: ON400XRA-G0).
3 ������������� ����
❐ Local Administration can be performed on all PC-based Stratagy systems. The Stratagy 6D and 24D require an optional keyboard and monitor.
Note In order to maintain Stratagy system integrity, customer-supplied anti-virus software should be resident and active on any PC that is connected to the Stratagy system. Refer to Stratagy Technical Bulletin TB40-0017 for further information.
❐ Telephone Administration is available on all Stratagy systems. A special System Administrator User ID mailbox (User ID 999) can be used by the System Administrators to add, delete and reset user mailboxes, change the time on the Stratagy system, reset User ID security code, add user’s name to directory, record the system announcement and busy music, and shut down the system using the telephone dial pad.
❐ Remote Administration on the Stratagy 24D and 24 Plus systems require an external modem be connected to the Stratagy’s COM 2 port. (See the Stratagy I&M Manual for installation details.)
Note Stratagy 6D comes equipped with an internal modem.
Copyright Toshiba America Information Systems, Inc. November 1999

4 ���������������������� ����The Stratagy Voice Processing system works with all Strata DK424/DK280, DK40i/DK40/DK16e/DK16, DK14/DK8and DK24/DK56/DK96 (Release 4) systems.
❐ Make sure there are enough single line (analog) station ports on the Strata DK to support the number of Stratagy ports required.
❐ Strata DK needs to recognize the Stratagy’s DTMF signaling. Make sure an RRCS is installed on the DK424/DK280 RCTU, a K4RCU3, K5RCU, or K5RCU2 in the DK40i/DK40/DK16e/DK16, a QRCU in the DK14/DK8 or CRCU in the DK24/DK56/DK96.
❐ Run Program 03 and assign these code(s) where the DTMF receiver is installed:
Note When DK14/DK8 is powered On, Program 03 automatically assigns the correct code for the QRCU.
5 ������������ �����We recommend Simplified Message Desk Interface (SMDI) integration for optimum performance of both the Stratagy and Strata systems.
❐ The Strata DK telephone system must be equipped with a PIOU/PIOUS, RSSU, or RSIU/RSIS card for SMDI integration.
❐ Strata DK424/DK280: SMDI is available on all processors. The A processor must have Release 3.1 software or higher.
❐ In the Strata DK’s Program 03, set code 43 for PIOU/PIOUS, RSSU or code 49 for RSIU/RSIS cards.
❐ A serial cable must be installed between the PIOU/PIOUS/RSSU/RSIU and the Stratagy.
❐ Refer to the Stratagy I&M Manual for complete instructions on configuring Stratagy Voice Processing systems for SMDI integration.
6 ������ ����� �������!!!
❐ Make sure you have your Stratagy I&M Manual and Strata DK I&M and Programming Manuals on hand for the installation. Be sure to read the R3 Stratagy I&M Manual before installing the system.
❐ Remember to back up your database after installation.
If you have read and completed this checklist, installation will be a breeze!
OK, let’s get started!
DK424/DK280 DK40i/DK40/DK16e/DK16 DK24/DK56/DK96
Code 92, 93, or 94 for slot 00 Code 92 for slot 00 Code 92 or 93
4011031

Contents
IntroductionOrganization........................................................................................................................................... xiConventions...........................................................................................................................................xii
Action/Response Table..................................................................................................................xiiiRelated Documents/Media ...................................................................................................................xiii
Chapter 1 – Installation
Installers and System Administrators...................................................................................................1-1Installer ..........................................................................................................................................1-1System Administrator ....................................................................................................................1-2
Pre-installation Instructions .................................................................................................................1-2Conduct a Pre-installation Company Survey.................................................................................1-2Determine Stratagy Hardware Sizing ............................................................................................1-2Select the Hardware Site (PC-based Systems) ..............................................................................1-4Determine Stratagy’s Configuration and Integration ....................................................................1-4Determine Stratagy’s Customized User ID Mailboxes .................................................................1-5Fill out Checklists and Forms........................................................................................................1-5
Step 1: Unpack and Inspect ................................................................................................................1-6Step 2: Setting Up Stratagy System Hardware ..................................................................................1-6
Stratagy Flash and Stratagy DK ....................................................................................................1-6Stratagy 6D....................................................................................................................................1-7Stratagy 24D..................................................................................................................................1-8Stratagy 24 Plus .............................................................................................................................1-9
Step 3: Connect Stratagy to Your Telephone System ......................................................................1-10Step 4: Verify System’s Basic Functions .........................................................................................1-12Step 5: Access Stratagy ....................................................................................................................1-12Step 6: Configure Stratagy ...............................................................................................................1-12Step 7: Program the Mailboxes ........................................................................................................1-12Step 8: Program the Applications ....................................................................................................1-13
New User Tutorial Introductory Recording.................................................................................1-13Step 9: Record Special Greetings .....................................................................................................1-13Step 10: Shut Down Stratagy System ..............................................................................................1-14Step 11: (Optional) Back up Database, Mailbox Names and Greetings ..........................................1-14
Chapter 2 – Access and Use Stratagy
Access Stratagy ....................................................................................................................................2-2Direct Access .......................................................................................................................................2-2Local Access ........................................................................................................................................2-3
Before You Start............................................................................................................................2-3Step 1: Connect the Cable ............................................................................................................2-3
Stratagy R3 I&M 11/99 i

ContentsChapter 3 – Configure Stratagy
ii
Step 2: Install Stratagy Remote Software on Local System.........................................................2-3Step 3: Access Stratagy Locally ...................................................................................................2-4Step 4: Use Stratagy Locally ........................................................................................................2-4Step 5: Exit Stratagy Locally........................................................................................................2-4
Remote Access .....................................................................................................................................2-5Before You Start............................................................................................................................2-5Step 1: Install the Modem on the Stratagy System.......................................................................2-5Step 2: Connect the Modem on the Stratagy System ...................................................................2-5Step 3: Configure the Modem on the Portable or Desktop PC.....................................................2-6Step 4: Load the Stratagy Remote Software on the Portable or Desktop PC...............................2-6Step 5: Access Stratagy Remotely................................................................................................2-6Step 6: Use Stratagy Remotely.....................................................................................................2-7Step 7: Exit Stratagy Remotely ....................................................................................................2-8
System Startup .....................................................................................................................................2-8Use Stratagy .........................................................................................................................................2-8
Navigate the System ......................................................................................................................2-9Online Help Function.........................................................................................................................2-10
Help Line .....................................................................................................................................2-10Detailed Help...............................................................................................................................2-10
System Shutdown...............................................................................................................................2-10Methods of Shutdown..................................................................................................................2-10
Main Menu Options ...........................................................................................................................2-12Filecopy .......................................................................................................................................2-12Change System Date and Time ...................................................................................................2-13Daylight Saving Time..................................................................................................................2-13
Main Menu Field Descriptions...........................................................................................................2-14
Chapter 3 – Configure Stratagy
Configuration Utility............................................................................................................................3-2Step 1: Access the Utility .............................................................................................................3-4Step 2: Use the Utility .................................................................................................................3-4Step 3: Exit the Utility ..................................................................................................................3-4
System Configuration..........................................................................................................................3-5Modify System Configuration Parameters ....................................................................................3-5
Install from A: Drive............................................................................................................................3-6Toshiba Plug and Play..........................................................................................................................3-6
Change the Toshiba Plug and Play Selection ................................................................................3-7Toshiba Switch Integration ..................................................................................................................3-8
Change Toshiba Switch Integration ..............................................................................................3-8Other Switch Integrations ....................................................................................................................3-9
Telephone System Dial Codes.......................................................................................................3-9Telephone System Tone Patterns ................................................................................................3-14System Integration Patterns .........................................................................................................3-21Integration Helper........................................................................................................................3-23Define the Integration Strings Stratagy Matches.........................................................................3-25
Add or Delete Voice Cards ................................................................................................................3-27Archive MSG.LOG to A:Drive..........................................................................................................3-27System Parameters .............................................................................................................................3-27
Serial Port Definition...................................................................................................................3-40Serial Port Definition (Remote PC — Stratagy Admin) .............................................................3-42
Stratagy R3 I&M 11/99

ContentsChapter 4 – How Stratagy Operates
Fax Configuration........................................................................................................................3-42AMIS Configuration....................................................................................................................3-42SMDI/Serial Integration Definition.............................................................................................3-42Per Port Definitions .....................................................................................................................3-42Switch Interface Definition .........................................................................................................3-43Fixed Length User IDs ................................................................................................................3-44
Chapter 4 – How Stratagy Operates
User IDs ...............................................................................................................................................4-1Reserved User IDs .........................................................................................................................4-2
Call Processing Control........................................................................................................................4-3Chains ............................................................................................................................................4-3Groups ...........................................................................................................................................4-3Menus ............................................................................................................................................4-3Token Programming Language .....................................................................................................4-3
User ID Mailboxes ...............................................................................................................................4-3Types of Mailboxes .......................................................................................................................4-3Customizing Mailboxes.................................................................................................................4-4
How Stratagy Processes .......................................................................................................................4-5User IDs.........................................................................................................................................4-5User ID Mailboxes.........................................................................................................................4-8
Chapter 5 – Feature Programming
Features Set on System-wide Basis......................................................................................................5-1Automatic System Recovery .........................................................................................................5-1Caller Confirmation Prior to Transferring.....................................................................................5-1Disk Space Notification.................................................................................................................5-2Fax Messaging...............................................................................................................................5-2Fax Tone Detection .......................................................................................................................5-2Future Delivery..............................................................................................................................5-2Greeting—Company......................................................................................................................5-2Greeting—Port-Selectable.............................................................................................................5-2Interactive Voice Response (IVR).................................................................................................5-2Message Delete—Continuous/Message Playback—Continuous ..................................................5-3Message Pause During Playback/Recording .................................................................................5-3Message Playback Control ............................................................................................................5-3Message Purging............................................................................................................................5-3Multiple System Languages ..........................................................................................................5-3Networking (AMIS) ......................................................................................................................5-3Reports...........................................................................................................................................5-3Screen Advertisement....................................................................................................................5-4Shutdown using the Telephone Dial Pad.......................................................................................5-4System Administrator’s Mailbox...................................................................................................5-4Token Programming ......................................................................................................................5-4Universal Ports ..............................................................................................................................5-4User ID—Variable/Fixed Length ..................................................................................................5-4Varied Sampling Rates ..................................................................................................................5-4
Set on User ID Mailbox Basis..............................................................................................................5-5Automatic Scheduler .....................................................................................................................5-5
Stratagy R3 I&M 11/99 iii

ContentsChapter 6 – Users Menu
iv
Called Identification ......................................................................................................................5-5Call Screening................................................................................................................................5-5Call Transfer ..................................................................................................................................5-5Chaining.........................................................................................................................................5-6Directory........................................................................................................................................5-6Distribution Lists ...........................................................................................................................5-6Do Not Disturb ..............................................................................................................................5-6Extensions—Scheduled .................................................................................................................5-6Greetings........................................................................................................................................5-6Greeting Restart .............................................................................................................................5-7Group Partitions—Call Blocking ..................................................................................................5-7Guest Users....................................................................................................................................5-7Message Speed Control .................................................................................................................5-7Message Copy................................................................................................................................5-8Message Copy with Delete ............................................................................................................5-8Message Date and Time Control ...................................................................................................5-8Message Length Control................................................................................................................5-8Message Retrieval Control ............................................................................................................5-8Messages—New, Pending and Saved ...........................................................................................5-8Messages—Urgent.........................................................................................................................5-8Message Volume Control ..............................................................................................................5-9Name (and Extension) Control ......................................................................................................5-9Notification—Message..................................................................................................................5-9Office Paging.................................................................................................................................5-9Programmable Dial Actions ..........................................................................................................5-9Ring Duration ................................................................................................................................5-9Shared Extensions..........................................................................................................................5-9Single-digit Menus ......................................................................................................................5-10User ID Security Code.................................................................................................................5-10Voice Forms ................................................................................................................................5-10
Chapter 6 – Users Menu
Access and Exit the Menu....................................................................................................................6-1Access Users Menu .......................................................................................................................6-1Access a Screen .............................................................................................................................6-2Exit Users Menu ............................................................................................................................6-2
Menu Options.......................................................................................................................................6-2Create User ID Mailbox .......................................................................................................................6-2Modify User ID Mailbox .....................................................................................................................6-3Copy Mailbox(es).................................................................................................................................6-4Delete Mailbox.....................................................................................................................................6-5BoxList .................................................................................................................................................6-6AmisNodeList ......................................................................................................................................6-6Users Menu Field Descriptions............................................................................................................6-7
Options Screen.............................................................................................................................6-10Group/Chains Screen...................................................................................................................6-16Info/Status Screen........................................................................................................................6-20
Stratagy R3 I&M 11/99

ContentsChapter 7 – Auto (Scheduling) Menu
Chapter 7 – Auto (Scheduling) Menu
How Stratagy Uses Auto Scheduling Records.....................................................................................7-1Access/Exit the Menu ..........................................................................................................................7-2
Access Auto Menu.........................................................................................................................7-2Exit Auto Menu .............................................................................................................................7-2
Menu Options.......................................................................................................................................7-2Create Auto Scheduling Records .........................................................................................................7-3Modify Auto Scheduling Records........................................................................................................7-3Disable Auto Scheduling Records .......................................................................................................7-4 Auto (Scheduling) Menu Field Descriptions ......................................................................................7-5
Chapter 8 – Notify Menu
How Stratagy Uses Notify Records .....................................................................................................8-1Templates .............................................................................................................................................8-2
View Existing Templates...............................................................................................................8-2Access/Exit the Menu ..........................................................................................................................8-2
Access the Notify Menu ................................................................................................................8-2Exit Notify Menu...........................................................................................................................8-2
Menu Options.......................................................................................................................................8-3Create Notify Records/Templates ........................................................................................................8-3 Modify Notify Records/Templates .....................................................................................................8-4Disable Notify Records/Templates ......................................................................................................8-5Notify Menu Field Descriptions...........................................................................................................8-6
Chapter 9 – Token Programming
Using the Token Programming Language ...........................................................................................9-1Users Menu’s Extension Field.......................................................................................................9-1Auto’s Extension Field ..................................................................................................................9-1Notify’s Method Field ...................................................................................................................9-1
Singular Tokens ...................................................................................................................................9-2Replaced or Variable Tokens ...............................................................................................................9-4Defined Tokens ....................................................................................................................................9-7
Chapter 10 – Customization Examples
Users Menu Examples........................................................................................................................10-1Using a Status User ID to Check Message Count for Multiple User IDs ...................................10-2System Paging a User for Special Callers ...................................................................................10-3System Paging for Ring No Answer............................................................................................10-4Switching and Maintaining Languages .......................................................................................10-6Order Shipment Information .......................................................................................................10-9Holiday Greetings—Holiday Divert Mailbox ...........................................................................10-11Transferring a Caller Directly to a Mailbox ..............................................................................10-13
Notify Menu Examples ....................................................................................................................10-14Message Waiting Light Control When Light On and Off Codes Differ ...................................10-14Message Waiting Light Control When Light On and Off Codes Are the Same .......................10-15Voice Notification .....................................................................................................................10-16Log On After Notification .........................................................................................................10-17Notification to a Pager...............................................................................................................10-18
Stratagy R3 I&M 11/99 v

ContentsChapter 11 – SMDI Serial Integration
vi
Notification to a Pager on Urgent Messages Only ....................................................................10-20Relay Paging to a Pager.............................................................................................................10-21Emergency Lists ........................................................................................................................10-22
Auto Menu Examples.......................................................................................................................10-23Time of Day Greetings ..............................................................................................................10-23Holiday Greetings—Same Day Each Year ...............................................................................10-26Holiday Greetings—Different Day Each Year..........................................................................10-27Extension Change ......................................................................................................................10-28Unsupervised Conferencing ......................................................................................................10-29
Chapter 11 – SMDI Serial Integration
Step 1: Enable SMDI .......................................................................................................................11-2Step 2: Connect SMDI .....................................................................................................................11-3Step 3: Test SMDI ............................................................................................................................11-3Step 4: (Optional) Validate the Link ................................................................................................11-4SMDI Calling Party Identification .....................................................................................................11-5
Calling Party ID in Message Header ...........................................................................................11-5Call Routing Based on Caller ID.................................................................................................11-5
Chapter 12 – AMIS Networking
AMIS Mailboxes................................................................................................................................12-1Gateway Mailboxes .....................................................................................................................12-1Proxy Mailboxes..........................................................................................................................12-2
AMIS Node ........................................................................................................................................12-2System Identification Number ...........................................................................................................12-2Configuring Stratagy for AMIS .........................................................................................................12-3
Step 1: Set AMIS Parameters .....................................................................................................12-3Step 2: Create and Program AMIS Mailboxes ...........................................................................12-5
Testing AMIS.....................................................................................................................................12-7AMIS Operation.................................................................................................................................12-7
Private/Urgent Message Handling...............................................................................................12-8Notification..................................................................................................................................12-8
AmisNodeList ....................................................................................................................................12-9
Chapter 13 – Faxes
How Fax Operates..............................................................................................................................13-1Fax Messaging.............................................................................................................................13-1Fax on Demand (one-call fax) .....................................................................................................13-1Fax Back (two-call fax) ...............................................................................................................13-1
Fax/Modems.......................................................................................................................................13-2Fax Document Conflict ......................................................................................................................13-2
Mailbox Setup..............................................................................................................................13-2Mailbox Functionality .................................................................................................................13-3
Fax Installation...................................................................................................................................13-3
Stratagy R3 I&M 11/99

ContentsChapter 14 – Backup and Restore
Chapter 14 – Backup and Restore
Backup Utility Menu Options ............................................................................................................14-2Backup................................................................................................................................................14-3Restore................................................................................................................................................14-7Reconfigure the Backup Utility .......................................................................................................14-11
Reconfigure from the Backup Main Menu................................................................................14-12Reconfigure from the Alert Screen............................................................................................14-14
Chapter 15 – System Reports
View System/User Activity................................................................................................................15-1Main Menu Statistics ...................................................................................................................15-1Users Menu Statistics ..................................................................................................................15-2
Listen to System Activity...................................................................................................................15-2Report Types ......................................................................................................................................15-2
Log Information...........................................................................................................................15-3Users Menu Information..............................................................................................................15-3
Report Definitions..............................................................................................................................15-3Create Report Definitions............................................................................................................15-4Load Exist Report Definition ......................................................................................................15-5
Run Report .........................................................................................................................................15-5View Report .......................................................................................................................................15-6Print Report ........................................................................................................................................15-7Save Report to Floppy Disk ...............................................................................................................15-7Automatic Report Generation ............................................................................................................15-7Report Menu Field Descriptions ........................................................................................................15-8
Chapter 16 – Maintenance and Upgrades
Prior to Installing/Upgrading .............................................................................................................16-1Hard Drive Maintenance ....................................................................................................................16-1
Replace Stratagy 6D or Stratagy 24D Hard Drive ......................................................................16-2Replace Stratagy 24 Plus Hard Drive ..........................................................................................16-3
Upgrade/Reload Stratagy System Software .......................................................................................16-4Stratagy Flash and Stratagy DK ..................................................................................................16-4Stratagy 6D and 24D ...................................................................................................................16-4
Add PC-based Stratagy Voice Boards ...............................................................................................16-7Step 1: Install Stratagy Voice Boards.........................................................................................16-7Step 2: Connect Voice Board(s) to the Telephone Lines .........................................................16-21Step 3: Configure Software for New Voice Boards .................................................................16-24
Upgrade Stratagy R2 Software/Hardware to R3..............................................................................16-25Step 1: Install Voice Boards and R3 Software .........................................................................16-25Step 2: Configure Software for New Voice Boards .................................................................16-28Step 3: Add User ID Mailboxes 982 and 983...........................................................................16-28
Installation........................................................................................................................................16-28Screen Savers.............................................................................................................................16-28Fax/Modems ..............................................................................................................................16-28
JOVE File Editor..............................................................................................................................16-29Run JOVE Editor.......................................................................................................................16-29
Stratagy R3 I&M 11/99 vii

ContentsChapter 17 – Troubleshooting
viii
Chapter 17 – Troubleshooting
Determine Problem ............................................................................................................................17-1Initial Power Up .................................................................................................................................17-2Stratagy Diagnostic Utilities ..............................................................................................................17-3
View/Print Files...........................................................................................................................17-4Delete a Log File .........................................................................................................................17-4VMBEDIT...................................................................................................................................17-4STRATAGY.LOG.......................................................................................................................17-7MSG.LOG ...................................................................................................................................17-7Trace ............................................................................................................................................17-8USERID.LOG............................................................................................................................17-14FAX.LOG..................................................................................................................................17-14
Norton Utilities.................................................................................................................................17-15Speed Disk.................................................................................................................................17-15Disk Doctor................................................................................................................................17-17Run Surface Test .......................................................................................................................17-19
Automatic System Recovery............................................................................................................17-21
Appendix A – Checklists/Forms
Pre-installation Company Survey .......................................................................................................A-2Pre-installation Checklist ....................................................................................................................A-3Installation Checklist...........................................................................................................................A-4Users Form..........................................................................................................................................A-5Auto (Scheduling) Form .....................................................................................................................A-6Notify Form.........................................................................................................................................A-7Greeting Scripts Form.........................................................................................................................A-8
Appendix B – Special Greeting User ID Mailboxes
Record Mailbox Greetings .................................................................................................................. B-1Company Greeting........................................................................................................................ B-3Caller Instructions......................................................................................................................... B-3Sample Initial Greetings ............................................................................................................... B-4
Directory Mailbox............................................................................................................................... B-4Operator Mailbox Greeting ................................................................................................................. B-6
Glossary.............................................................................................................................................. GL-1
Index ......................................................................................................................................................IN-1
Stratagy R3 I&M 11/99

Introduction
This Installation and Maintenance (I&M) Manual provides detailed step-by-step instructions for installing, programming, and maintaining Stratagy automated attendant and voice processing systems. It is intended for qualified Service Technicians (Installers) and System Administrators.
OrganizationThis manual is divided into the following chapters:
� Chapter 1 – Installation covers the unpacking, installing and setting up of Stratagy systems.
� Chapter 2 – Access and Use Stratagy gives information on how to access the Stratagy systems, on-line help functions, system shutdown, main menu options and a description of the main menu fields.
� Chapter 3 – Configure Stratagy provides detailed information about defining the Stratagy system configuration and integration.
� Chapter 4 – How Stratagy Operates gives you an overview of the basic concepts of the system — user ID mailboxes, call processing, etc.
� Chapter 5 – Feature Programming covers the basic system features and how to program each one.
� Chapter 6 – Users Menu gives User Menu screens and field descriptions. It also provides instructions on creating, modifying, copying and deleting mailboxes.
� Chapter 7 – Auto (Scheduling) Menu describes how Stratagy uses Auto Scheduling records and provides a complete description of the Auto (Scheduling) Menu field descriptions.
� Chapter 8 – Notify Menu gives instructions on creating, modifying and disabling notifying records and templates.
� Chapter 9 – Token Programming provides detailed instructions for customizing and administering the Stratagy system. A complete list of tokens and descriptions are included.
� Chapter 10 – Customization Examples shows how to customize User IDs to record messages from callers, provide information to callers, or direct the flow of a call.
� Chapter 11 – SMDI Serial Integration gives instructions on enabling, connecting, testing and validating Simplified Message Desk Interface (SMDI).
� Chapter 12 – AMIS Networking provides a complete list of Audio Messaging Interchange Specification (AMIS) parameters and information on configuring Stratagy for AMIS.
� Chapter 13 – Faxes contains information on fax installation and programming.
� Chapter 14 – Backup and Restore information on backing up and restoring Stratagy database, mailbox greetings and messages.
� Chapter 15 – System Reports covers running, viewing, saving and printing reports.
Stratagy R3 I&M 11/99 xi

IntroductionConventions
xii
� Chapter 16 – Maintenance and Upgrades contains hardware maintenance and upgrade procedures for reloading software, installing voice boards, and replacing hard drives.
� Chapter 17 – Troubleshooting contains information on Stratagy diagnostic and Norton utilities.
� Appendix A – Checklists/Forms provides surveys, checklists, and forms to assist in the installation of Stratagy systems.
� Appendix B – Special Greeting User ID Mailboxes gives instructions on setting up the Initial Greeting, Directory and Operator Mailbox greetings.
� Glossary/Index
ConventionsThis manual uses these conventions:
Conventions Description
NoteElaborates specific items or references other information. Within some tables, general notes apply to the entire table and numbered notes apply to specific items.
Important! Calls attention to important instructions or information.
CAUTION! Advises you that hardware, software applications, or data could be damaged if the instructions are not followed closely.
WARNING! Alerts you when the given task could cause personal injury or death.
� ����"��� Represents telephone buttons.
Courier Shows a computer keyboard entry or screen display.
Helvetica Bold represents tokens. For example: M( ).
Italics represent parameter and menu/screen field names, and book titles. For example: hot_box parameter, Extension field.
“Type” Indicates entry of a string of text.
“Press” Indicates entry of a single key. For example: Type prog then press Enter.
Plus (+)
Shows a multiple PC keyboard or phone button entry. Entries without spaces between them show a simultaneous entry. Example: Esc+Enter. Entries with spaces between them show a sequential entry. Example: # + 5.
Tilde (~) Means “through.” Example: 350~640 Hz frequency range.
➤ Denotes the step in a one-step procedure.
➤ Denotes a procedure.
Stratagy R3 I&M 11/99

IntroductionRelated Documents/Media
Action/Response Table
Related Documents/MediaNote Some documents listed here may appear in different versions on the CD-ROM, FYI, or in
print. To find the most current version, check the version/date in the Publication Information on the back of the document’s title page.
You can find additional detailed information about Stratagy in the following companion documents:
� Stratagy General Description provides a system overview, available hardware, and features of the Stratagy systems.
� Stratagy User Guide explains the telephone operating procedures for the telephone user. Incorporates the tear-out (wallet-size) Quick Reference Guide and a User Flowchart outlining Stratagy’s features and operation.
� Stratagy Quick Reference Guide provides a quick reference for frequently-used Stratagy voice processing features.
� Stratagy System Administrator Guide provides instructions on using the System Administrator Menu and backup information from selected chapters from this manual.
� Stratagy DK Installation Guide provides installation and maintenance requirements and procedures for the Stratagy DK.
� Stratagy Flash Installation Guide provides installation and maintenance requirements and procedures for the Stratagy Flash.
� Stratagy Library CD-ROM contains a copy of all Stratagy documentation and enables you to view, print, navigate and search publications.
For authorized users, Internet site FYI (http://fyi.tsd.toshiba.com) contains all current Stratagy documentation and enables you to view, print, and download current publications.
See Figure 10Grey words within the printed text denote cross-references. In the electronic version of this document (Library CD-ROM or FYI Internet download), cross-references appear in blue hypertext.
1. Actions you perform appear in this column. They can consist of either a single step or a series of numbered steps.
The immediate response to the action performed appears in this column. Additional notes and comments are also included.
2. When the action you perform results in a screen, menu, dialog box, etc., the example to the right displays.
Conventions Description
407
5
Stratagy R3 I&M 11/99 xiii

IntroductionRelated Documents/Media
xiv
Stratagy R3 I&M 11/99
Installatio
n
Installation 1
This chapter describes the Stratagy hardware and provides step-by-step instructions on installing the Stratagy systems. It discusses:
� Installers and System Administrators
� Pre-installation instructions
� Unpack and inspect the system
� Installing Stratagy voice boards
� Setting up Stratagy system hardware
� Powering up Stratagy and verifying basic functions
� Physically connecting Stratagy to your telephone system
See Chapter 2 – Access and Use Stratagy, for information about installing modems for remote access. See Chapter 13 – Faxes, for information about installing fax/modems on the Stratagy 24D and Stratagy 24 Plus.
Installers and System AdministratorsService Technicians install, upgrade, and maintain the Stratagy system. System Administrators’ functions vary by company.
InstallerThis manual is designed for a trained installer with some familiarity of PCs, an understanding of telephone systems and a general knowledge of Stratagy. To install, upgrade, or maintain the system, you must know:
� Stratagy features (refer to the Stratagy General Description)
� Stratagy operation, customization, and administration
� Stratagy installation procedures
� The telephone system to which you will connect Stratagy. (Refer to the appropriate installation documentation.)
� Personal Computer (PC) terms, such as: I/O, serial port, parallel port, RS-232, Random Access Memory (RAM), and Disk Operating System (DOS).
� How to safely open a PC and install/remove cards.
� How to identify basic components of a PC: e.g., motherboard, I/O controller, video card, I/O ports, modem.
Stratagy R3 I&M 11/99 1-1

InstallationPre-installation Instructions
1-2
� How to connect the monitor and keyboard, and how to power on the PC.
� Telephony terms, such as: station side, Central Office (CO), single-line, hunt group, coverage path, hookflash, call forward on ring-no-answer, call forward busy, call forward-all calls, Dual Tone Multi-frequency (DTMF), and tone patterns.
� The difference between an RJ11 and RJ14 connector.
� The separation of the telephone switch and Stratagy.
� How to use a test set or line monitor to analyze test calls.
If you are unfamiliar with any of the above, please take the time to learn the necessary information before you attempt to install Stratagy.
System AdministratorSee the Stratagy System Administrator Guide on the Stratagy Library CD-ROM for information on the System Administrator’s duties.
Pre-installation InstructionsThe pre-installation requirements include:
� Conduct a pre-installation survey to determine how to configure and customize the Stratagy system.
� Determine Stratagy hardware sizing.
� Select and prepare the hardware site.
� Determine Stratagy’s configuration and integration.
� Customize User ID mailboxes to define the automated attendant and voice messaging system.
� Fill out checklists and forms.
We provide a Stratagy Pre-installation Checklist in Appendix A – Checklists/Forms to assist you in tracking your progress in meeting these requirements and to help you verify that you have completed the necessary steps involved in installation.
Conduct a Pre-installation Company SurveyWhen conducting a pre-installation survey, you must obtain information about the company, its telephone system, the desired Auto Attendant (AA) and voice mail functions, and the company’s Audio Messaging Interchange Specification (AMIS) and fax/modem requirements. As appropriate, use the items suggested below and include any additional questions. See “Pre-installation Company Survey” on Page -2 for a survey form.
Determine Stratagy Hardware SizingTo determine which Stratagy system will be needed for the installation, it is important that you determine the number of ports and the size of hard drive that will be required to support the applications.
Number of Ports
The amount of ports that are required for an installation is dependent on the application.
� Is Stratagy the primary answering position?
Stratagy R3 I&M 11/99

InstallationPre-installation Instructions
Installatio
n
� Will Stratagy be responsible for Telephone Answering/Voice Messaging for users?
� Or, will Stratagy be responsible for all of these applications?
It is essential to understand the application fully before sizing port quantity. Issues to be taken into consideration when calculating the number of ports required for an application are:
Primary Answering Position
Will Stratagy be responsible for answering all or a majority of the incoming calls? If so then:
� How many CO lines are directed by telephone system programming to the Stratagy?
An acceptable ratio for an initial installation would be two CO Lines to every one Stratagy voice port.
� Is Stratagy going to be programmed with menu options and information mailboxes?
These applications require increased port time. The 2-to-1 ratio should be sufficient. However, attempts should be made to streamline these applications and design them to efficient conclusions: e.g., recording a message or hanging up.
� How many calls per hour are projected for Stratagy to answer?
If the calls per hour are extensive, either more ports will be required above the 2 to 1 ratio, or an overflow position could be defined for the voice mail in the telephone system’s programming for peak times.
Telephone Answering/Voice Messaging
In a typical installation, the voice processing system is designated to take messages for users when they are either on the telephone or away from their desks; this is termed telephone answering. In addition, the voice processing system can be accessed by users to listen to messages and record new messages for another user or a group of users; this is termed Voice Messaging.
The amount of ports depends on the application and call traffic. When sizing Stratagy voice ports for Telephone Answering and Voice Messaging, consider:
� The quantity of calls that users receive.
� What proportion of time are users unavailable for taking calls?
� Will users be accessing Stratagy often to leave messages for other users?
Some acceptable port quantities to support Telephone Answering and Voice Messaging are:
Both Applications
If Stratagy is going to be responsible for both applications—Primary Answering and Telephone Answering/Voice Messaging, use the larger of the two quantities calculated above. For example, if you calculated that four ports would be needed for Primary Answering and two ports for Telephone Answering/Voice Messaging, four ports would be required for the installation of Stratagy.
Users (up to) Ports
25 2
50 4
200 8
500 16
1000 24
Stratagy R3 I&M 11/99 1-3

InstallationPre-installation Instructions
1-4
Hard Drive
Stratagy PC-based systems come equipped with 120 hours of storage on all models. This averages out to over 30 minutes per user, for 200 users. Even though mailbox greetings and names subtract from the 120 hours, this drive size should be more than sufficient for most applications.
If implementing a fax application on the Stratagy, consideration must be taken for the space on the hard drive for document files to be stored. The amount of storage space that a document would require on a hard drive is extremely subjective. This is because there is no real standard for a document. There are issues with font styles, graphics, and density of characters per page that make a standard very difficult to obtain.
As an example, a single-page document typed with Microsoft® Word with a 10 point Arial font, at 50 lines and 100 characters per line, requires approximately 20 seconds of storage on the hard drive.
Select the Hardware Site (PC-based Systems)Since the Stratagy system PC hardware and the telephone system must be physically connected, locate the PC by the telephone system. A remote system can be located anywhere it is appropriate to place a PC.
Power Requirements
We recommend the following for the Stratagy system PC desktop and tower:
� A 15A circuit breaker and dedicated AC circuit, which does not have an On/Off wall switch (avoids accidental power turn-off)
� A Uninterruptible Power Supply (UPS) in areas where the power source is not stable (frequent power failures, brownouts, etc.)
Environmental Considerations
The area in which you locate the Stratagy PC affects its operation. Place it in an appropriate area that is:
� Dry, clean, well ventilated and lighted (avoid placing it in direct sunlight), and easily accessible
� Not subject to extreme hot or cold; corrosive fumes, dust, or other airborne contaminants; or excessive vibration
For more details about environmental and electrical specifications, see the Stratagy General Description.
Determine Stratagy’s Configuration and IntegrationDetermining Stratagy’s configuration and integration definitions involves the following (see Chapter 3 – Configure Stratagy).
� Define Stratagy system configuration options: setting system-wide parameters for Stratagy control, including system password, timeout values, PC configurations, and per port options.
� Define the telephone system dial codes, telephone system tone patterns, and system integration patterns.
Stratagy R3 I&M 11/99

InstallationPre-installation Instructions
Installatio
n
Each Stratagy system has been pre-installed at the factory for out-of-box (plug and play) operation on a specific Toshiba telephone system:
Note Older Strata DK products are not listed on the Toshiba Plug and Play menu but are available on the Toshiba Switch Integration Menu. The menu does not build a system database or message waiting strings for the mailboxes. These must be programmed manually.
All dial codes, tone patterns, and integration patterns specific to the system have been pre-installed at the factory for each Stratagy system.
Important! Strata DK systems must be configured for the appropriate voice mail system settings individually. See the specific Strata DK Installation and Maintenance manual for these procedures.
� If you have a Toshiba telephone system, Stratagy automatically defines these parameters once you select the appropriate system during installation (if not pre-installed).
� If you are defining how Stratagy and another manufacturer’s telephone systems communicate together, you will also need to reference the telephone manufacturer’s installation documentation.
Determine Stratagy’s Customized User ID MailboxesDetermine the User IDs that must be customized to define the Automated Attendant and voice messaging system.
Note With Toshiba Plug and Play, the Strata DK default station (extension number) User ID mailboxes have been pre-installed for the specific Stratagy and Strata DK systems described above.
For your convenience, Appendix A – Checklists/Forms provides the following: Users Form, Auto (Scheduling) Form, Notify Form, and Greeting Scripts Form.
Fill out Checklists and FormsThe following checklists, forms, and surveys are available in Appendix A – Checklists/Forms and simplify the installation process. Make copies as needed.
� Pre-installation Company Survey
� Stratagy Pre-installation Checklist
� Stratagy Installation Checklist
� Users Form
� Auto (Scheduling) Form
� Notify Form
� Greeting Scripts Form
Stratagy System Strata System
DK DK424A, B, C/D
Flash DK14, DK40i, DK40
6D DK40i, DK40
24D, 24 Plus DK424A, B, C/D
Stratagy R3 I&M 11/99 1-5

InstallationStep 1: Unpack and Inspect
1-6
Step 1: Unpack and Inspect1. When you receive the system, examine all packages carefully and note any visible damage.
If you find any damage, do not open the packages. Contact the delivery carrier immediately and make the proper claims.
2. Check the items contained in the packages against the packing list and inspect all equipment for damage. You should have received a documentation package along with the Stratagy 6D, 24D, or 24 Plus.
If equipment is missing or damaged, contact your supplier immediately.
3. Remove any shipping tape and packing material used to protect the system during shipment.
Retain the packing materials for re-use when transporting system hardware.
Step 2: Setting Up Stratagy System Hardware
Stratagy Flash and Stratagy DKSee the Stratagy DK Installation Guide and Stratagy Flash Installation Guide for detailed information on setting up the Stratagy DK and Stratagy Flash, respectively.
WARNING! To avoid electrical shock:
� Make sure that the Stratagy power switch is Off and that the UPS is powered Off before continuing.
� The Stratagy is equipped with a three-wire grounding plug that only fits into a grounded power outlet. This is a safety feature. If you are unable to insert the plug into the outlet, contact an electrician to replace the outlet. Do not defeat the purpose of the grounding plug.
Stratagy R3 I&M 11/99

InstallationStep 2: Setting Up Stratagy System Hardware
Installatio
n
Stratagy 6D(For a diagram of the front and back panels, see Figure 1-1.)
1. Place the Stratagy 6D in the site determined by the pre-installation company survey.
2. (Optional) Install additional voice board (see “Add PC-based Stratagy Voice Boards” on Page 16-7).
3. (Optional) Install the customer-supplied monitor and keyboard (see Chapter 16 – Maintenance and Upgrades for installation instructions).
4. Set the power switch, located on the back panel, to an input power source of either 110VAC or 220VAC (50~60 Hz), depending upon the available input power.
5. If using a UPS, plug it into a dedicated outlet. A UPS is required in areas where the power source is not stable (frequent power failures, brownouts, etc.).
6. Connect the PC power cable to the rear of the Stratagy 6D and to the UPS (or dedicated 110VAC/220VAC outlet if not using a UPS).
7. If installing a printer, connect the pin data cable from the printer to the 25-pin parallel printer port (LPT1) on the back panel.
Important! The printer must use a parallel interface.
Figure 1-1 Stratagy 6D Front and Back Panel
..
....
....
3528
AuxiliaryPower Outlet
AC Power CordConnector
KeyboardConnection
Reset Button
Power LED Power Switch
Reset Turbo
Hard Drive LED
COM 1 Port
Printer Port
Monitor COM2 Port(Modem Connections)
Voice Ports 1~2
Stratagy R3 I&M 11/99 1-7

InstallationStep 2: Setting Up Stratagy System Hardware
1-8
Stratagy 24D(For a diagram of the front and back panels, see Figure 1-2.)
1. Place the Stratagy 24D in the site determined by the pre-installation company survey.
2. (Optional) Install additional voice board(s) (see “Add PC-based Stratagy Voice Boards” on Page 16-7).
3. (Optional) Install the customer-supplied monitor and keyboard (see Chapter 16 – Maintenance and Upgrades for installation instructions).
4. Set the power switch, located on the back panel, to an input power source of either 110VAC or 220VAC (50~60 Hz), depending upon the available input power.
5. If using a UPS, plug it into a dedicated outlet. A UPS is required in areas where the power source is not stable (frequent power failures, brownouts, etc.).
6. Connect the PC power cable to the rear of the Stratagy 24D and to the UPS (or dedicated 110VAC/220VAC outlet if not using a UPS).
7. If installing a printer, connect the pin data cable from the printer the 25-pin parallel printer port (LPT1) on the back panel.
Important! The printer must use a parallel interface.
Figure 1-2 Stratagy 24D Front and Back Panel
AuxiliaryPower Outlet
110/220VACPower Switch
AC Power CordConnector
KeyboardConnection
Reset ButtonPower LED
Hard Drive LED
Reset
Power Switch
COM3 (available for SMDI or IVR)
COM2 (default: fax 2)
COM4 (default: remote access)
Printer Port
Monitor Connection
Voice Ports
COM1 (default: fax 1)
3527
Stratagy R3 I&M 11/99

InstallationStep 2: Setting Up Stratagy System Hardware
Installatio
n
Stratagy 24 Plus(For a diagram of the front and back panels, see Figure 1-3.)
1. Place the Stratagy 24 Plus in the site determined by the pre-installation company survey.
2. (Optional) Install additional voice board(s) (see “Add PC-based Stratagy Voice Boards” on Page 16-7).
3. Attach the keyboard to the Stratagy 24 Plus by connecting the round keyboard connector to the matching connector located in a round hole in the back panel.
4. Place the monitor on top or next to the Stratagy 24 Plus and connect the 15-pin monitor data cable to the video/printer adapter card’s 15-pin connector located on the back panel. Tighten the screws with a small flathead screwdriver.
5. Set the power switch, located on the back panel, to an input power source of either 110VAC or 220VAC (50~60 Hz), depending upon the available input power.
6. If using a UPS, plug it into a dedicated outlet. A UPS is required in areas where the power source is not stable (frequent power failures, brownouts, etc.).
7. Connect the PC power cable to the rear of the Stratagy 24 Plus and to the UPS (or dedicated110VAC/220VAC outlet if not using a UPS).
8. If installing a printer, connect the pin data cable from the printer the 25-pin parallel printer port (LPT1) on the back panel.
Important! The printer must use a parallel interface.
Figure 1-3 Stratagy 24 Plus Front and Back Panel
4054
Power LED
Power Switch
Hard Drive LED
Reset Button
Floppy Disk Drive
Hard Drive
Key Lock
AuxiliaryPower Outlet
110/220VPower Switch
AC Power CordConnector
Not Used
COM3(default: availablefor SMDI or IVR)
Printer Port
COM2 (default: fax 2)
Keyboard Connection
COM1 (default: fax 1)
Monitor Connection
Voice Ports
COM4(default: remote access)
To Printer(optional)
���
Stratagy R3 I&M 11/99 1-9

InstallationStep 3: Connect Stratagy to Your Telephone System
1-10
Step 3: Connect Stratagy to Your Telephone SystemImportant! Before connecting Stratagy to your telephone system, first configure the voice mail
system settings for your telephone system. Refer to your telephone system’s installation documentation.
To connect Stratagy to your telephone system, you need to know:
� Customer-supplied parts – All modular cords, connectors, cables, and connection blocks are customer-supplied.
� Location of the ports
� Stratagy 6D – The Stratagy 6D comes standard with two voice ports built into the motherboard. Each connector represents one port for a total of two ports. See Figure 1-1 on Page 1-7 and Figure 1-4 on Page 1-10.
� Stratagy 24D – The Stratagy 24D comes standard with four voice ports built into the motherboard. Each connector represents two ports for a total of four ports. See Figure 1-2 on Page 1-8 and Figure 1-5 on Page 1-11.
� Stratagy 24 Plus – The Stratagy 24 Plus comes standard with a Dialog/4 voice board. Each connector represents two ports for a total of four ports. See Figure 1-3 on Page 1-9 and Figure 1-5 on Page 1-11.
� Numbering of ports – Ports are numbered from 1 up to a maximum of 24 (depending upon your system hardware), with port 1 starting with the lowest addressed voice board. See Figure 1-1 on Page 1-7 and Figure 1-2 on Page 1-8.
� RJ11 modular jacks and voice board ports – RJ11 jacks use only the inner pair of wires, which represents only one analog extension (1 port). Stratagy 6D built-in voice ports and ProLine/2V voice board ports are RJ11 modular jacks.
RJ11
RJ11
StratagyVoice Board Jacks
To TelephoneSystem
Standard One-pairTelephone Lines
4195
Figure 1-4 Connecting Stratagy Voice Board with RJ11 Jacks to a Telephone System
Stratagy R3 I&M 11/99
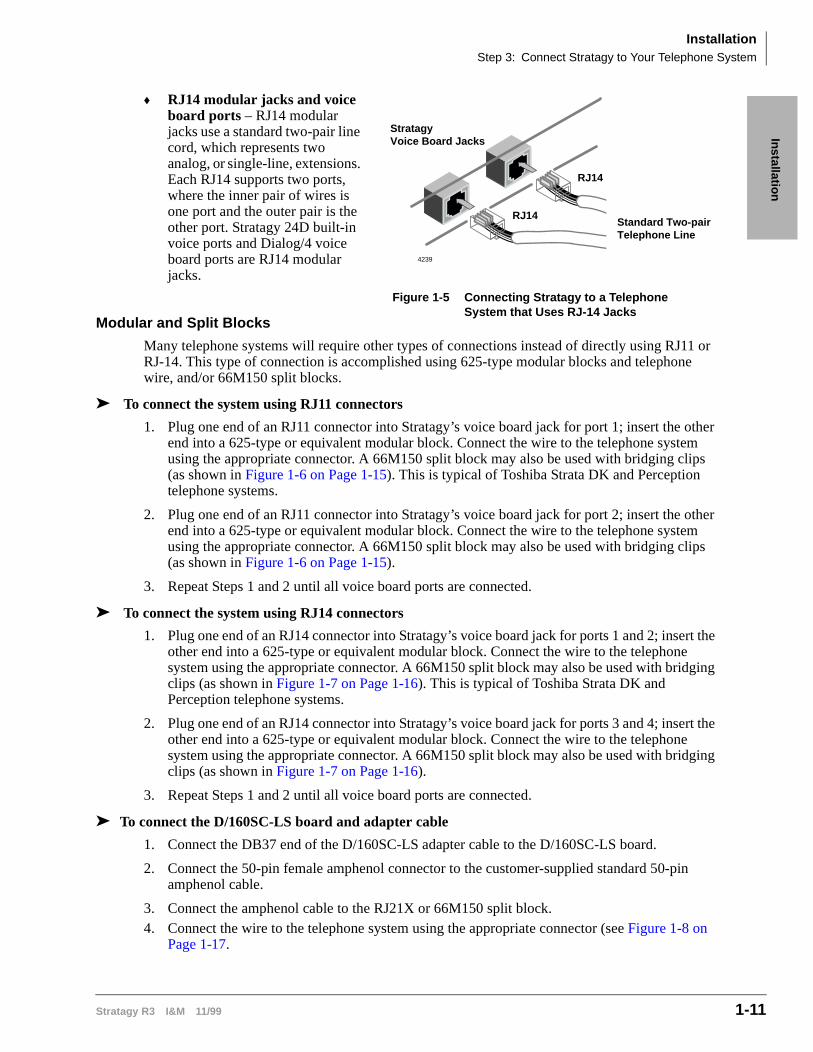
InstallationStep 3: Connect Stratagy to Your Telephone System
Installatio
n
� RJ14 modular jacks and voice board ports – RJ14 modular jacks use a standard two-pair line cord, which represents two analog, or single-line, extensions. Each RJ14 supports two ports, where the inner pair of wires is one port and the outer pair is the other port. Stratagy 24D built-in voice ports and Dialog/4 voice board ports are RJ14 modular jacks.
Modular and Split Blocks
Many telephone systems will require other types of connections instead of directly using RJ11 or RJ-14. This type of connection is accomplished using 625-type modular blocks and telephone wire, and/or 66M150 split blocks.
➤ To connect the system using RJ11 connectors
1. Plug one end of an RJ11 connector into Stratagy’s voice board jack for port 1; insert the other end into a 625-type or equivalent modular block. Connect the wire to the telephone system using the appropriate connector. A 66M150 split block may also be used with bridging clips (as shown in Figure 1-6 on Page 1-15). This is typical of Toshiba Strata DK and Perception telephone systems.
2. Plug one end of an RJ11 connector into Stratagy’s voice board jack for port 2; insert the other end into a 625-type or equivalent modular block. Connect the wire to the telephone system using the appropriate connector. A 66M150 split block may also be used with bridging clips (as shown in Figure 1-6 on Page 1-15).
3. Repeat Steps 1 and 2 until all voice board ports are connected.
➤ To connect the system using RJ14 connectors
1. Plug one end of an RJ14 connector into Stratagy’s voice board jack for ports 1 and 2; insert the other end into a 625-type or equivalent modular block. Connect the wire to the telephone system using the appropriate connector. A 66M150 split block may also be used with bridging clips (as shown in Figure 1-7 on Page 1-16). This is typical of Toshiba Strata DK and Perception telephone systems.
2. Plug one end of an RJ14 connector into Stratagy’s voice board jack for ports 3 and 4; insert the other end into a 625-type or equivalent modular block. Connect the wire to the telephone system using the appropriate connector. A 66M150 split block may also be used with bridging clips (as shown in Figure 1-7 on Page 1-16).
3. Repeat Steps 1 and 2 until all voice board ports are connected.
➤ To connect the D/160SC-LS board and adapter cable
1. Connect the DB37 end of the D/160SC-LS adapter cable to the D/160SC-LS board.
2. Connect the 50-pin female amphenol connector to the customer-supplied standard 50-pin amphenol cable.
3. Connect the amphenol cable to the RJ21X or 66M150 split block.4. Connect the wire to the telephone system using the appropriate connector (see Figure 1-8 on
Page 1-17.
RJ14
RJ14
4239
StratagyVoice Board Jacks
Standard Two-pairTelephone Line
Figure 1-5 Connecting Stratagy to a Telephone System that Uses RJ-14 Jacks
Stratagy R3 I&M 11/99 1-11

InstallationStep 4: Verify System’s Basic Functions
1-12
Step 4: Verify System’s Basic FunctionsFollow the instructions below to power up Stratagy and verify that the basic functions of Stratagy are working once you have set up the system or have moved Stratagy to a different site.
Note that each Stratagy system has been pre-installed at the factory for out-of-box (plug and play) operation on a specific Toshiba telephone system. This includes the integration and configuration parameters, default station (extension number) User ID mailboxes, and company greeting and instructions. The systems are:
Stratagy 6D – Strata DK14/DK40i/DK40Stratagy 24D, Stratagy 24 Plus – Strata DK424
This is the out-of-box Toshiba Plug and Play operation for all Stratagy systems. Therefore, whether or not you have the specific telephone system associated with your Stratagy system you will be able to verify basic functions.
➤ To verify that Stratagy is functioning properly and the boards did not dislodge during shipment
1. Power up the system.
2. Let it proceed without any action from you. Wait approximately three minutes.
The system should display the Main Menu on the Stratagy monitor or on the portable/desktop PC if using Remote software.
➤ To verify that each port works, voice playback and basic auto attendant functions
➤ Dial the extension number for each port. Stratagy should (for each port):
� Answer and play the Toshiba Plug and Play company greeting (“Thank you for calling…”), greeting 1 in User ID mailbox 990.
� Continue to play the Toshiba Plug and Play caller instructions greeting (“To reach the person…”), greeting 1 in User ID mailbox 991.
Step 5: Access Stratagy➤ Access Stratagy using the direct, local or remote method (“Access Stratagy” on Page 2-2).
Step 6: Configure Stratagy➤ Configure Stratagy using the Stratagy Configuration Utility. See Chapter 3 – Configure
Stratagy for instructions on using the utility.
Step 7: Program the Mailboxes➤ Program the User mailboxes for the customer’s application. See Chapter 6 – Users Menu,
Chapter 7 – Auto (Scheduling) Menu and Chapter 8 – Notify Menu for complete details on using the screens.
Stratagy R3 I&M 11/99

InstallationStep 8: Program the Applications
Installatio
n
Step 8: Program the ApplicationsNote See Chapter 9 – Token Programming for complete details on all the Stratagy tokens.
New User Tutorial Introductory RecordingThe New User Tutorial feature plays a introduction prompt prior to beginning the tutorial. Stratagy comes with a default recording that is saved in the system as a voice file called ‘TUTORIAL.VOX’. This file can be found in the STRATAGY directory on the hard drive.
This prompt can be rerecorded to personalize the introductory recording. For example the recording could say,
“The following is a new user tutorial that will walk you through the set up of your mailbox... Please see Jane Doe your Installation Coordinator for XYZ Telecom if you have any questions.”
The default recording can be rerecorded by the use of Token Programming.
Rerecord Tutorial
1. Create a new User ID in the system.
2. In the Extension field enter:
@KR(C:\\STRATAGY\\TUTORIAL.VOX)G(991)
@ Stop normal processing
KR Record a voice file.
( ) file name and location within parentheses
G(991) Go to User ID 991
3. Call into the Stratagy system and dial the newly created mailbox. A beep will be heard to indicate the start of recording.
4. Record the new TUTORIAL.VOX., finish recording by pressing #.
5. To rerecord, redial the mailbox number.
6. To playback the new recording, create an additional User ID with the following Token string in its Extension field:
@P(X,C:\\STRATAGY\\TUTORIAL.VOX)G(991)
@ Stop normal processing
X Valid DOS file name.
( ) file name and location within parentheses
G(991) Go to User ID 991
7. As with all Token Programming, make sure that the Do Not Disturb feature is Off or the token program will not run.
Step 9: Record Special Greetings➤ Record the initial greetings (company greeting, caller instructions), directory mailbox
instructions and operator mailbox greeting. See Appendix B – Special Greeting User ID Mailboxes for instructions.
Stratagy R3 I&M 11/99 1-13

InstallationStep 10: Shut Down Stratagy System
1-14
Step 10: Shut Down Stratagy System➤ With restore_config set to true, shut down and restart with the current software version
(“System Shutdown” on Page 2-10) to save the revised configuration files, etc. This ensures that if an error is encountered during boot up the Stratagy DK reboots using the most current database.
Note The restore_config parameter defaults to true in the Stratagy System Configuration file (see Chapter 3 – Configure Stratagy) and enables the Automatic System Recovery process. Stratagy uses the Automatic System Recovery process (see Page 17-21) to restore the last known good configuration if it encounters a problem on restart.
Step 11: (Optional) Back up Database, Mailbox Names and Greetings
➤ Back up your new database, mailbox names and greetings. See “Backup” on Page 14-3 for instructions.
Stratagy R3 I&M 11/99

InstallationStep 11: (Optional) Back up Database, Mailbox Names and Greetings
Installatio
n
Figure 1-6 Connect Stratagy (RJ11) to a Telephone System that Uses Modular Jack and Split Block
1
2
3
4
5
6
7
8
9
10
11
12
13
14
15
16
17
18
19
20
21
22
23
24
25
26
27
28
29
30
31
32
33
34
35
36
37
38
39
40
41
42
43
44
45
46
47
48
49
50
1
2
3
4
5
6
7
8
9
10
11
12
13
14
15
16
17
18
19
20
21
22
23
24
25
26
27
28
29
30
31
32
33
34
35
36
37
38
39
40
41
42
43
44
45
46
47
48
49
50
W-BL
BL-W
W-O
O-W
W-GN
GN-W
W-BR
BR-W
W-S
S-W
R-BL
BL-R
R-O
O-R
R-GN
GN-R
R-BR
BR-R
R-S
S-R
BK-BL
BL-BK
BK-O
O-BK
BK-GN
GN-BK
BK-BR
BR-BK
BK-S
S-BK
Y-BL
BL-Y
Y-O
O-Y
Y-GN
GN-Y
Y-BR
BR-Y
Y-S
S-Y
V-BL
BL-V
V-O
O-V
V-GN
GN-V
V-BR
BR-V
V-S
S-V
26
1
27
2
28
3
29
4
30
5
31
6
32
7
33
8
34
9
35
10
36
11
37
12
38
13
39
14
40
15
41
16
42
17
43
18
44
19
45
20
46
21
47
22
48
23
49
24
50
25
BridgingClips
To RSTU2 or PSTU or PSTU2 w/Female Connector
25-P
air
Cab
le w
/Mal
e am
p C
on
nec
tor
66M150 Split Block
GN
6 5 4 3 2 1
Y
BL
R
BK
W
1 2 3 4 5 6
Jacketed Twisted Station Cable24 AWG
ModularCord
Tip 1Ring 1
T2R2
T3R3
T4R4
T5R5
T6R6
T7R7
T8R8
Not Used
Not Used
Not Used
Not Used
Not Used
Not Used
Not Used
Not Used
Tip Ring
4194
Standard Telephone,Voice Mail Port
R1 T1
Stratagy R3 I&M 11/99 1-15

InstallationStep 11: (Optional) Back up Database, Mailbox Names and Greetings
1-16
Figure 1-7 Connect Stratagy (RJ14) to a Telephone System that Uses Modular Jack and Split Block
1
2
3
4
5
6
7
8
9
10
11
12
13
14
15
16
17
18
19
20
21
22
23
24
25
26
27
28
29
30
31
32
33
34
35
36
37
38
39
40
41
42
43
44
45
46
47
48
49
50
1
2
3
4
5
6
7
8
9
10
11
12
13
14
15
16
17
18
19
20
21
22
23
24
25
26
27
28
29
30
31
32
33
34
35
36
37
38
39
40
41
42
43
44
45
46
47
48
49
50
W-BL
BL-W
W-O
O-W
W-GN
GN-W
W-BR
BR-W
W-S
S-W
R-BL
BL-R
R-O
O-R
R-GN
GN-R
R-BR
BR-R
R-S
S-R
BK-BL
BL-BK
BK-O
O-BK
BK-GN
GN-BK
BK-BR
BR-BK
BK-S
S-BK
Y-BL
BL-Y
Y-O
O-Y
Y-GN
GN-Y
Y-BR
BR-Y
Y-S
S-Y
V-BL
BL-V
V-O
O-V
V-GN
GN-V
V-BR
BR-V
V-S
S-V
26
1
27
2
28
3
29
4
30
5
31
6
32
7
33
8
34
9
35
10
36
11
37
12
38
13
39
14
40
15
41
16
42
17
43
18
44
19
45
20
46
21
47
22
48
23
49
24
50
25
BridgingClips
To RSTU2 or PSTU or PSTU2 w/Female Connector
25-P
air
Cab
le w
/Mal
e am
p C
onne
ctor
66M150 Split Block
GN
6 5 4 3 2 1
Y
BL
R
BK
W
1 2 3 4 5 6
Jacketed Twisted Station Cable24 AWG
ModularCord
Tip 1Ring 1
T3R3
T4R4
T5R5
T6R6
T7R7
T8R8
Not Used
Not Used
Not Used
Not Used
Not Used
Not Used
Not Used
Not Used
Ring 2 Tip 2
4193
Standard Telephone,Voice Mail Port
Tip 1 Ring 1
T1
R2
Tip 2Ring 2
R1
T2
Stratagy R3 I&M 11/99
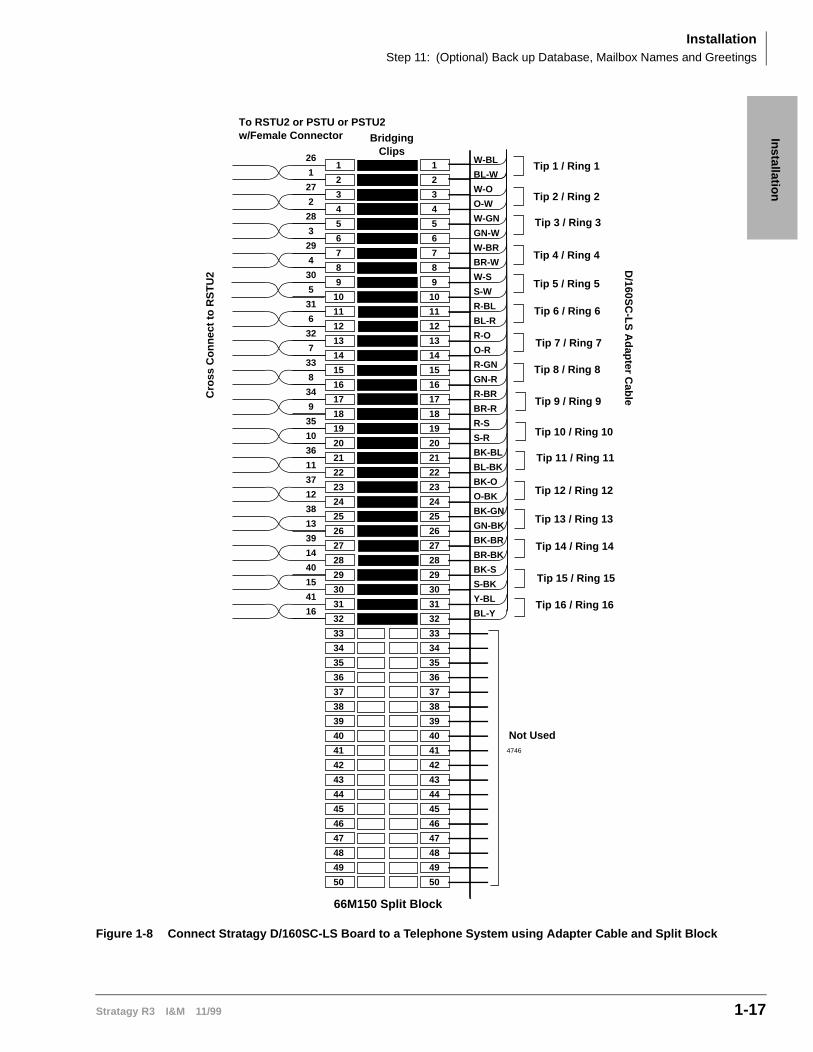
InstallationStep 11: (Optional) Back up Database, Mailbox Names and Greetings
Installatio
n
Figure 1-8 Connect Stratagy D/160SC-LS Board to a Telephone System using Adapter Cable and Split Block
66M150 Split Block
4746
1
2
3
4
5
6
7
8
9
10
11
12
13
14
15
16
17
18
19
20
21
22
23
24
25
26
27
28
29
30
31
32
33
34
35
36
37
38
39
40
41
42
43
44
45
46
47
48
49
50
1
2
3
4
5
6
7
8
9
10
11
12
13
14
15
16
17
18
19
20
21
22
23
24
25
26
27
28
29
30
31
32
33
34
35
36
37
38
39
40
41
42
43
44
45
46
47
48
49
50
26
1
27
2
28
3
29
4
30
5
31
6
32
7
33
8
34
9
35
10
36
11
37
12
38
13
39
14
40
15
41
16
W-BL
BL-W
W-O
O-W
W-GN
GN-W
W-BR
BR-W
W-S
S-W
R-BL
BL-R
R-O
O-R
R-GN
GN-R
R-BR
BR-R
R-S
S-R
BK-BL
BL-BK
BK-O
O-BK
BK-GN
GN-BK
BK-BR
BR-BK
BK-S
S-BK
Y-BL
BL-Y
Tip 2 / Ring 2
Tip 1 / Ring 1
Tip 3 / Ring 3
Tip 4 / Ring 4
Tip 5 / Ring 5
Tip 6 / Ring 6
Tip 8 / Ring 8
Tip 7 / Ring 7
Tip 10 / Ring 10
Tip 9 / Ring 9
Tip 11 / Ring 11
Tip 12 / Ring 12
Tip 13 / Ring 13
Tip 14 / Ring 14
Tip 16 / Ring 16
Tip 15 / Ring 15
Not Used
To RSTU2 or PSTU or PSTU2 w/Female Connector Bridging
Clips
Cro
ss C
on
nec
t to
RS
TU
2
D/160S
C-L
S A
dap
ter Cab
le
Stratagy R3 I&M 11/99 1-17

InstallationStep 11: (Optional) Back up Database, Mailbox Names and Greetings
1-18
Stratagy R3 I&M 11/99
Access an
d U
se S
tratagy
Access and Use Stratagy 2
Note See Stratagy Flash Installation Guide and the Stratagy DK Installation Guide for detailed information on accessing and using the Stratagy Flash and Stratagy DK.
This chapter discusses how to start up, use and shut down the Stratagy system for maintenance and other functions. More specifically, this chapter discusses:
� Access Stratagy – Compares the three methods for accessing Stratagy: directly, locally, or remotely.
� Direct Access – Access Stratagy through a monitor and keyboard.
� Local Access – Access Stratagy via a cable connecting the Stratagy system with a portable or desktop PC.
� Remote Access – Access Stratagy via a modem from a portable or desktop PC.
� System Startup – How the Stratagy system starts up.
� Use Stratagy – Navigating through the menus and using online help.
� Online Help Function – Describes help line and detailed help.
� System Shutdown – Exiting the Stratagy program and accessing the Stratagy Configuration Utility.
� Main Menu Options – Using the Main Menu for customization and administration.
� Filecopy – Using Filecopy to copy files to and from DOS.
� System Date and Time – Using the Date/Time option to set the system date and time.
� Main Menu Field Descriptions – shows the main menu and gives a definition of each field.
Stratagy R3 I&M 11/99 2-1

Access and Use StratagyAccess Stratagy
2-2
Access StratagyThere are three ways to access the Stratagy system: direct, local and remote:
To perform these functions, the Stratagy systems that are not equipped with a monitor and keyboard, are accessible through local or remote access. The Stratagy 24 Plus provides direct access through its monitor and keyboard.
For initial installations, use local access for Stratagy 6D and 24D. Access the Stratagy 24 Plus directly through its monitor and keyboard. When modifying an existing installation, use whichever access method is convenient.
Direct AccessDirect access refers to accessing the Stratagy system through a monitor and keyboard.
The Stratagy 24 Plus that comes standard with a monitor and keyboard can use the Direct Access method. The Stratagy 6D and Stratagy 24D can provide direct access if equipped with an optional monitor and keyboard.
Method Description Requirements
DirectAccess Stratagy through monitor and keyboard connected directly to the Stratagy unit.
Stratagy 24 Plus: None
Stratagy 6D, 24D: Customer-supplied monitor and keyboard
Note Not supported by Stratagy Flash or Stratagy DK.
LocalAccess Stratagy via a cable connecting the Stratagy system with a portable or desktop PC.
Stratagy Flash, Stratagy DK:
� Customer-supplied portable/desktop PC� Stratagy Admin software� Customer-supplied Stratagy Admin Cable
(SG-ADMCBL)
Stratagy 6D, 24D, 24 Plus:
� Customer-supplied portable/desktop PC� Stratagy Remote software� Customer-supplied null-modem cable
RemoteAccess Stratagy via a modem from a PC located at this or another site.
Stratagy Flash/Stratagy DK:
� Stratagy Admin software� Customer-supplied modem for Stratagy
Flash
Note Stratagy DK has an internal modem.
Stratagy 6D, 24D, 24 Plus:
� Stratagy Remote software� Customer-supplied modem for Stratagy 24D
or Stratagy 24 Plus
Note Stratagy 6D has an internal modem.
Stratagy R3 I&M 11/99

Access and Use StratagyLocal Access
Access an
d U
se S
tratagy
Local AccessLocal access refers to accessing the Stratagy system via a cable connecting the Stratagy system with a portable or desktop PC. To perform local access, you must:
� Connect the local system to the Stratagy system each time you access Stratagy locally.
� Prepare the PC system by loading the Stratagy Remote software. (You only need to perform this procedure once.)
� Access, use, and exit local access.
Note You cannot access Stratagy locally when the Stratagy system’s fax/modems are sending or receiving faxes.
Before You StartIt is recommended that you:
1. Back up your database prior to starting this procedure. (See Chapter 14 – Backup and Restore for instructions.)
2. Make a backup copy of the installation disks and store them in a safe place.
Step 1: Connect the CableImportant! Remote software only works when using COM1 or COM2 on the local portable or
desktop PC. Do not use higher-numbered COM ports.
➤ Stratagy 6D with two COM ports
Use COM1, which has a 9-pin male connector (see Figure 1-1 on Page 1-7).
➤ Stratagy 24D and Stratagy 24 Plus with four COM ports
Use COM4, which has a 25-pin male connector (see Figure 1-2 on Page 1-8 and Figure 1-3 on Page 1-9). You may need to use an adapter with the null modem cable to connect the portable or desktop PC to the Stratagy system.
Step 2: Install Stratagy Remote Software on Local System
Important!
� Do not implement the Stratagy Remote software on a system where a screen saver program is enabled; local access may not work.
� If you are running Microsoft® Windows®, exit the program. Do not use Windows’ MS-DOS® Prompt option.
1. Insert the floppy disk that contains the Stratagy Remote software into the floppy-disk drive of the portable PC.
Stratagy R3 I&M 11/99 2-3

Access and Use StratagyLocal Access
2-4
Step 3: Access Stratagy Locally
Note Prior to accessing Stratagy, verify that Stratagy is operational by making a test call into the system.
Important! If you are running Windows, exit Windows. Do not use Windows’ MS-DOS Prompt option.
Step 4: Use Stratagy Locally➤ Both the portable or desktop PC and the Stratagy system are active simultaneously. Use the
portable or desktop PC as you would from the Stratagy monitor and keyboard. However, you cannot upload or download files from the portable or desktop PC to the Stratagy system. See “Use Stratagy” on Page 2-8 for details on how to use the Stratagy system.
Step 5: Exit Stratagy Locally
2. From the DOS prompt (C:\), type:
copy a:remote.com
This example assumes that your floppy-disk drive is drive A:.
The Stratagy Remote software is copied to the portable or desktop PC’s C: hard drive.
3. When the copy is complete, remove the floppy disk.
➤ If your local system uses COM1, at the (C:\) prompt type: remote /n /f
...or if your local system uses COM2, type:remote /2 /n /f
The n and f must be lower case.
When entered correctly, the screen displays the same information as would be displayed on the Stratagy monitor.
The screen may be blank because of Stratagy’s screen saver. If so, press the spacebar.
1. Leave the Stratagy system in the correct state.
For example, if you want Stratagy up and running in call processing mode, leave Stratagy at the Main Menu. If you leave the Stratagy system at the Stratagy Configuration Utility Menu, etc., it remains there and call processing does not function.
2. Press Alt+X to disconnect from the Stratagy system.
The system prompts: OK to Exit (Y/N)
3. Type N to continue accessing the Stratagy system
...or Y to exit the Stratagy system.
4. Disconnect the null-modem cable.
Stratagy R3 I&M 11/99

Access and Use StratagyRemote Access
Access an
d U
se S
tratagy
Remote AccessRemote access refers to accessing the Stratagy system via modem from a portable or desktop PC located at this or another site.
Before You Start To perform remote access, you must:
1. Prepare the Stratagy system by installing and connecting the modem. (You only need to perform this procedure once.)
2. Prepare the portable or desktop PC by:
� Configuring the modem
� Loading the Stratagy Remote software (You only need to perform this procedure once.)
3. Access, use, and exit remote access.
You cannot access Stratagy remotely when the Stratagy system’s fax/modems are sending or receiving faxes.
It is recommended that you:
1. Backup your database prior to starting this procedure. (See Chapter 14 – Backup and Restore for instructions.)
2. Make a copy of the Installation Disks as a backup copy and store them in a safe place.
Important! Do not implement the Stratagy Remote software on a system where a screen saver program is enabled; remote access may not work.
Step 1: Install the Modem on the Stratagy System➤ For Stratagy 24D and Stratagy 24 Plus, follow the manufacturer’s instructions. The Stratagy
systems offer an optional external 2400 baud modem (SG-RMOD), which we recommend you use. (Stratagy 24D and 24 Plus support only 2400 baud communication.)
Note Stratagy 6D comes standard with an internal modem.
See Chapter 13 – Faxes for information about installing fax/modems for fax applications.
Step 2: Connect the Modem on the Stratagy System1. Connect the modem to the Stratagy ports. The default settings are configured for remote
access as follows:
� Stratagy 24D and Stratagy 24 Plus with four COM ports use COM4 (see Figure 1-2 on Page 1-8 and Figure 1-3 on Page 1-9).
� Stratagy 6D with two COM ports uses COM2 (see Figure 1-1 on Page 1-7).
2. Connect the modem telephone line. Use either a station connected to the telephone system or a dedicated CO.
Stratagy R3 I&M 11/99 2-5

Access and Use StratagyRemote Access
2-6
Step 3: Configure the Modem on the Portable or Desktop PC➤ Verify that:
� COM1 uses IRQ4 and that no other devices on COM1 are using IRQ4.
� COM2 uses IRQ3 and that no other devices on COM2 are using IRQ3.
Step 4: Load the Stratagy Remote Software on the Portable or Desktop PCImportant! If you are running Windows, exit the program. Do not use Windows’ MS-DOS
Prompt option.
Step 5: Access Stratagy Remotely
Note Prior to accessing Stratagy, verify that Stratagy is operational by making a test call into the system.
Important! If you are running Windows, exit Windows. Do not use Windows’ MS-DOS Prompt option.
1. Insert the floppy disk that contains the Stratagy Remote software into the floppy-disk drive of the portable PC.
2. From the (C:\) prompt, type:
copy a:remote.com
This example assumes that your floppy-disk drive is drive A:.
The Stratagy Remote software is copied to the portable or desktop PC’s C: hard drive.
3. When the copy is complete, remove the floppy disk.
1. If your remote portable or desktop PC uses COM1, at the (C:\) prompt type: remote
...or if your remote portable or desktop PC uses COM2, type: remote /2
The remote PC prompts:
Phone number?
Stratagy R3 I&M 11/99

Access and Use StratagyRemote Access
Access an
d U
se S
tratagy
Step 6: Use Stratagy Remotely➤ Both the remote and the Stratagy system are active simultaneously. Use the remote as you
would from the Stratagy monitor and keyboard. However, you cannot download or upload files from the portable or desktop PC to the Stratagy System. See “Use Stratagy” on Page 2-8 for details on how to use the Stratagy system.
Restart Stratagy from the Configuration Utility Menu
CAUTION! If it is necessary to shut down the system to access the Stratagy Configuration Utility menu, do not press the Esc key to restart Stratagy. Pressing the Esc key reboots the entire computer and disengages the Remote program.
2. If there is a direct line to the Stratagy system’s remote modem and you do not need to talk to the operator, type the exact digits the Stratagy Remote software must dial to access the Stratagy system modem
For example, if the remote modem is on the station side of a switch and the Stratagy system modem is also on the station side of a switch that is answered by Stratagy, you might use 9,17145555555,,,,,,102, where:
...or if there is no direct line to the Stratagy system’s Remote modem, or you need to first talk to an operator, you can manually dial the number. When modem tone is returned, type local, or type a comma.
Once connected, the screen clears. The Stratagy Remote software prompts:
Password?
3. Type the remote access password. (The password is CommLine, with the “C” and “L” uppercase.)
The Main Menu displays.
Note The screen may be blank because of Stratagy’s screen saver. If so, press the spacebar.
1. Press Ctrl+C to terminate the batch job and type y for yes.
The C:\STRATAGY> prompt appears.
2. Type Stratagy and press Enter.
This restarts Stratagy software only, and enables the Remote program to continue to operate.
9 Dials 9 for an outside line.
, Pauses 2 seconds.
17145555555 Dials the Stratagy system’s telephone number
,,,,,, Pauses 12 seconds (2 seconds x 6).
102 Dials the extension of the Stratagy system modem.
Stratagy R3 I&M 11/99 2-7

Access and Use StratagySystem Startup
2-8
Step 7: Exit Stratagy Remotely
System StartupWhen the Stratagy system powers up or Stratagy Admin on a remote PC (Stratagy Flash and Stratagy DK) is accessed, the software automatically displays the Main Menu. From the Main Menu, you can customize User ID mailboxes, maintain the system, and perform administrative functions. Or, you can shut down Stratagy and use the Stratagy Configuration Utility to backup or configure Stratagy with your telephone system.
Use StratagyThe Stratagy system provides a series of menus to assist you in customizing User ID mailboxes and performing administrative functions. In addition, Stratagy’s online help provides clarification as needed.
When you are finished customizing Stratagy or performing administrative functions, be sure to leave the system with the Main Menu on the screen. The Stratagy screen saver only works from the Main Menu.
1. Leave the Stratagy system in the correct state.
For example, if you want Stratagy up and running in call processing mode, leave Stratagy at the Main Menu. If you leave the Stratagy system at the Stratagy Configuration Utility Menu, etc., it remains there and call processing does not function.
2. Press Alt+X to exit remote software and disconnect from the Stratagy system.
The system prompts: OK to Exit (Y/N)
3. Type N to continue accessing the Stratagy system
...or Y to exit the Stratagy system.
Stratagy R3 I&M 11/99

Access and Use StratagyUse Stratagy
Access an
d U
se S
tratagy
Navigate the SystemUsing the Stratagy menus, you can navigate the system to customize User ID mailboxes and perform administrative functions. The Main Menu is the core of the program. The administrative functions (report generation, system shutdown, and filecopy) are available from the Main Menu. The Users Menu, from which all User ID mailbox customization takes place, is also a Main Menu option. For an illustration of how the menus are arranged, see Figure 2-1.
Figure 2-1 Navigating the Stratagy System
All screens/menus use the standard keys shown in Table 2-1.
Table 2-1 Standard Keys
Key Movement
arrow (↑↓) moves cursor to next field
F1 provides help text
Esc regresses one screen
spacebar toggles Enable/Disable, On/Off, Yes/No fields
Page Up/DownUsers Menu: scrolls User IDsAuto/Notify Menus: scrolls record summary information
Tab moves cursor through fields
Enter selects highlighted options
Home moves cursor to first field
End moves cursor to last field
Main Menu(select menu item)
Users Menu(Info/Status
OptionsGroup/Chains)
Reports Menu
Notify Menu
Auto Menu
EnterPassword
Shutdown
Filecopy
Load
Save
Run
View
File
Table
Date/Time
Save
Copy
Delete
Templates
AMISNodeList
BoxList
Save
Save
2461
QuitAvailable onStratagy Admin
Stratagy R3 I&M 11/99 2-9

Access and Use StratagyOnline Help Function
2-10
Online Help FunctionStratagy’s online help function is content-specific and is available on a field-by-field basis. Stratagy provides two types of online help—the help line and detailed help.
Help LineThe help line automatically displays the information about the current field at the bottom of the screen.
Detailed HelpAdditional help is available for most of the fields. To display the detailed help for a field, highlight the field and press F1. Use the arrow keys (↑↓) to scroll through the information. To exit detailed help, press Esc.
System Shutdown
Notes
� See Stratagy Flash Installation Guide and the Stratagy DK Installation Guide for detailed information on shutting down the Stratagy Flash and Stratagy DK.
� If the system was upgraded from Release 2 to Release 3, you must add Mailbox 982 and 983.
Occasionally you will need to shut down, or exit, Stratagy call processing. Circumstances include:
� Turning power off to perform hardware maintenance
� Backing up or restoring Stratagy using the Stratagy Backup Utility
� Upgrading the system
� Configuring Stratagy using the Stratagy Configuration Utility
� Moving the system to another location
Methods of ShutdownStratagy can be shut down in two ways:
� From a telephone dial pad
� From the Shutdown function on the Stratagy’s Main Menu
Shutdown using the Telephone Dial Pad
Important! It is extremely important that the security code for mailbox 983 be changed. If the security code is not changed, it is possible for someone who knows Stratagy’s default password scheme to call into the system and shut it down.
➤ To enable shutdown procedure and change mailbox 983 security code
1. From the Main Menu, press Alt+U.
The Users Menu, Options screen displays.
2. In the User ID field, type 983 and press Enter.
The Options screen displays box 983.
Stratagy R3 I&M 11/99

Access and Use StratagySystem Shutdown
Access an
d U
se S
tratagy
➤ To shut down the Stratagy using the telephone dial pad
Shutdown using the Stratagy Main Menu
3. Using the arrow down key, place the cursor in the Security Code field.
4. Type the new security code.
Note For added security, the security code does not appear on the screen as you type it.
5. Navigate to the Do Not Disturb field.
6. Press the spacebar to change the field from On to Off.
Note Changing the Do Not Disturb option enables the token programming residing in the Extension field of the mailbox. It is the token string in this mailbox that performs the shutdown procedure.
7. Press Alt+S to save the changes.
1. From the telephone dial pad, call Stratagy.
Once you dial into Stratagy, the system answers with the standard company greeting.
Stratagy prompts you to enter the User ID.
2. Enter $%&. Stratagy prompts you to enter the security code.
Important! You must wait until the entire prompt has been played before entering the security code. If the code is entered prior to the completion of the prompt, the shutdown does not occur.
3. Enter the new security code (the default is $%&$$') and press #.
All inactive channels are taken off-hook. All active channels are given a 60 second time delay to complete processing the current activity. After 60 seconds, they are disconnected and the system shuts down.
Important! For security reasons, you should change the default security code.
1. From the Main Menu, select Shutdown by pressing Alt+S.
Stratagy prompts: Password?
2. Type the password and press Enter. (The default password is Stratagy, with the first letter uppercase).
Stratagy prompts:
Shutdown the entire system? [NY]
3. Type N to cancel shutdown and return to the Main Menu
...or type Y to continue.
Stratagy reconfirms:
Really SHUTDOWN the entire system? [NY]
Stratagy R3 I&M 11/99 2-11

Access and Use StratagyMain Menu Options
2-12
Main Menu OptionsFrom the Main Menu (see Figure 2-2 on Page 2-14), you can access the following options:
� Users (Alt+U): accesses the Users Menu (customizing User ID mailboxes). See Chapter 6 – Users Menu for information on using the Users Menu screens.
� Reports (Alt+R): generates reports. See “Run Report” on Page 15-5 for more information.
� Shutdown (Alt+S): shuts down the system. See “System Shutdown” on Page 2-10 in this chapter.
� Filecopy (Alt+F): uses the Filecopy Utility. See “Filecopy” on Page 2-12 in this chapter.
� Date/Time: sets system date and time. See “Change System Date and Time” on Page 2-13 in this chapter.
➤ To access the options
1. Press Alt+ the first character of the option (e.g., Alt+U for the Users Menu).
2. Type the password. (The default password is Stratagy, with the first letter uppercase.)
FilecopyUse the Filecopy Main Menu option to copy files to and from the Stratagy computer’s hard drive without shutting down Stratagy.
➤ To copy files to and from Stratagy
4. Type N to cancel shutdown and return to the Main Menu
...or type Y to continue.
Stratagy starts shutdown. If any ports are in use, Stratagy delays shutting down the system for 60 seconds. At that time, Stratagy completes shutdown, cutting off any callers or users that are still active.
When shutdown is complete, the system displays the Stratagy Configuration Utility Menu.
You can turn off the Stratagy system power if you wish.
1. From the Main Menu, select Filecopy by pressing Alt+F.
Stratagy prompts: Password?
2. Type the password and press Enter. (The default password is Stratagy, with the first letter uppercase.)
3. Type the source file name in the Copy From field and press Enter. Include disk drive, directory, etc., as appropriate.
4214
Stratagy R3 I&M 11/99

Access and Use StratagyMain Menu Options
Access an
d U
se S
tratagy
Change System Date and Time
Daylight Saving TimeThe system time can be configured to change automatically to daylight saving time. See “daylight_saving_time” on Page 3-30 for more information.
4. Type the destination file name in the Copy To field and press Enter. Include disk drive, directory, etc., as appropriate.
Stratagy copies the file and when complete, displays the Main Menu.
Note Filecopy is unavailable when the Stratagy system’s fax/modems are sending or receiving faxes.
1. From the Main Menu, select Date/Time by pressing Alt+D.
Stratagy prompts: Password?
2. Type the password and press Enter. (The default password is Stratagy, with the first letter uppercase.)
The following screen displays:
The current date and time settings display, with the date field highlighted.
Use the arrow keys (↑↓) to move between the date and time fields.
3. Press Enter to move to the next field
...or type the new date and time settings.
The date format is: mm/dd/yyyy
The time format (24-hour clock) is: hh:mm:ss
4. Press Esc. The Main Menu displays.
4071
Stratagy R3 I&M 11/99 2-13

Access and Use StratagyMain Menu Field Descriptions
2-14
Main Menu Field Descriptions
Figure 2-2 Main Menu with Sample Data
Table 2-2 Main Menu Screen Fields
Menu Bar Access Options (select)
UsersPress Alt+U to access the Users Menu.
See the Programming Section.
ReportsPress Alt+R to generate reports.
See “Run Report” on Page 15-5 for more information.
ShutdownPress Alt+S to shut down the Stratagy system.
See “System Shutdown” on Page 2-10 for more information.
FilecopyPress Alt+F to use the Filecopy Utility.
See “Filecopy” on Page 2-12 for more information.
Date/TimePress Alt+D to set the system date and time.
See “Change System Date and Time” on Page 2-13 for more information.
Daylight time
(Display only) The menu displays Daylight time from the first Sunday in April until the last Sunday in October. The system must be set for daylight savings time, using the daylight_saving_time parameter. See Chapter 3 – Configure Stratagy.
If not set for Daylight time, Standard time is displayed.
Main Menu title.
SystemInformation
PortActivity
Statistics
Menu Bar
Filecopy option for Stratagy Flash and Stratagy DK is replaced with Tools option.
4061
Stratagy R3 I&M 11/99

Access and Use StratagyMain Menu Field Descriptions
Access an
d U
se S
tratagy
System Information(Display only, in addition to the fields, the screen displays the Stratagy voice processing model number, software version, voice board driver, and TAIS, Inc. Toshiba telephone system name and model number.)
Usage
System usage (n/pp%).
n: number of times all ports were busy
pp%: percent of time the CPU is idle
Users Number of defined User ID mailboxes.
SpaceAvailable remaining hard drive space in time (hh:mm) and percent of total hard drive space (nn%).
Calls Number of calls Stratagy answered since system started.
NotifyUser ID mailbox the system is currently notifying.
Scan displays when the system is scanning mailboxes to determine where notification is needed.
Notify AtDate (mm/dd/yy) and time (hh:mm) of last notification. Time is in military format (24-hour clock).
Time Current date (mm/dd/yy) and time (hh:mm:ss). Time is in military format (24-hour clock).
StartedDate (mm/dd/yy) and time (hh:mm:ss) the system was last started. Time is in military format (24-hour clock).
ShutdownThe next date (mm/dd/yy) and time (hh:mm) Stratagy is scheduled to perform a scheduled shutdown for disk maintenance. Stratagy shuts down automatically and restarts. Time is in military format (24-hour clock).
Faxes
Fax status.
IDLE: no activitySND: sendRCV: receiveblank: no fax connected
Port
Port number of each port, followed by the port’s mode. For example, 1/A, 2/A, 3/N.
Port Number: port number (1, 2, etc.) of each installed port channel. The ports may or may not be active (connected to a station port of the telephone system or a CO trunk/line).
Port Mode: this port number’s mode.
A: answering port (if all ports are A, the system is in floating notification mode)
N: notification port only (or system in process of notifying)
Note If mode is N and status is idle, port has been designated exclusively for notification. In this mode, port no longer accepts incoming calls. See “n_ochan” on Page 3-35 for more information.
User IDCurrent User ID mailbox the port is accessing. If the port’s status is IDLE, the last User ID mailbox accessed displays.
Table 2-2 Main Menu Screen Fields (continued)
Stratagy R3 I&M 11/99 2-15

Access and Use StratagyMain Menu Field Descriptions
2-16
Status
Function system is performing on the port. Includes:
IDLE: Port is idle and available for calls.GREETING: Mailbox greeting is currently playing.RECORDING: Message currently being recorded.DIAL: Stratagy is dialing out.RING: Incoming call ringing is recognized.BUSY: Dialed extension is busy.PCPM: System tone patterns being analyzed.MAIL: System prompts during message taking.ANSWER: Stratagy has detected an answer after dialing out (transfer, paging).MENU: #: Mailbox user menu choices are playing.EXECUTE: Executing program of a mailbox (token programming).CHAIN: Done, busy, or RNA chain is being executed. System accepting new
incoming digits while greeting of a Mailbox is playing.LOGIN: User in process of logging on to Mailbox.FIND: Directory mailbox executing.NO ANSWER: No answer detected during transfer or dial out.
Calls Number of calls made or answered by the port.
LastLast time (hh:mm) the port started activity.
NEVER displays if the port has had no activity since the system was last started.
Table 2-2 Main Menu Screen Fields (continued)
Stratagy R3 I&M 11/99

Co
nfig
ure S
tratagy
Configure Stratagy 3
Note For configuring the Stratagy Flash and Stratagy DK, see the Stratagy Flash Installation Guide and the Stratagy DK Installation Guide for complete instructions.
CAUTION! After making any significant program changes to the Stratagy, the system must be properly shutdown and restarted using “Shutdown and Restart Current Version” from the Shutdown menu. This procedure copies the most current database to the C:\Stratagy\Archive\Good directory for use by the Automatic System Recovery feature (see “Automatic System Recovery” on Page 17-21). If this procedure is not followed and the system loses power, loss of customer information will result
This chapter provides detailed information about configuring Stratagy and discusses:
� Configuration Utility
� System Configuration
� Install from A: Drive
� Toshiba Plug and Play
� Toshiba Switch Integration
� Other Switch Integrations
� Add or Delete Voice Cards
� Archive MSG.LOG to A: Drive
� System Parameters
Note See Chapter 14 – Backup and Restore for information about using the Stratagy Configuration Utility to back up and restore Stratagy.
Stratagy R3 I&M 11/99 3-1

Configure StratagyConfiguration Utility
3-2
Configuration UtilityImportant! Available on Stratagy 6D, Stratagy 24D, and Stratagy 24 Plus systems. For
instructions on using the Stratagy Admin Tools Utility, see the Stratagy DK or Stratagy Flash Installation Guides.
The Stratagy Configuration Utility is available in the Stratagy software on the system. The Stratagy Configuration Utility Menu automatically displays after exiting Stratagy call processing. This utility through a series of menus and submenus enables you to:
� Define Stratagy system configuration options—involves setting system-wide parameters for Stratagy control, including system password, timeout values, computer configurations, and per-port options.
� Install Stratagy software from the floppy-disk drive. It may also be required to re-install Stratagy System or Prompt software.
� Select a Toshiba telephone switch or plug and play integration. If you have a Toshiba telephone system, selecting the appropriate system automatically defines the telephone system dial codes, telephone system tone patterns, and system integration patterns.
� Define how Stratagy and other manufacturer’s telephone systems communicate together—if you do not have a Toshiba telephone system, selecting the appropriate system defines the telephone system dial codes. You then need to define the telephone system tone patterns and system integration patterns.
� Telephone system dial codes: how Stratagy controls certain dialing actions on the telephone system.
� Telephone system tone patterns: tone patterns Stratagy must recognize when performing supervised call transfers, etc.
� System integration patterns: if the telephone system supports integration, defines integration behavior of Stratagy with your telephone system.
Once configured, Stratagy should be completely connected to your telephone system. The next step is to customize Stratagy by programming the User IDs to define the automated attendant and voice message system.
See Figure 3-1 for an illustration of how the menus/submenus are arranged.
Stratagy R3 I&M 11/99

Configure StratagyConfiguration Utility
Co
nfig
ure S
tratagy
Figure 3-1 Navigating the Stratagy Configuration Utility Menu
StratagyConfigurationUtility Menu
(select menu item)
Backup Utility(See Chapter 14 –
Backup and Restore.)
Stratagy System Configuration
Telephone SystemsDial Codes
(select dial codes)
Install from A: Drive(See Chapter 16 –
Maintenance & Upgrades.)
Toshiba Plug and Play
System IntegrationPatterns
Telephone SystemsTone Patterns
Toshiba Switch Integrations(select option)
Other Switch Integrations
Parameters
Strata DK424 A, B, C/D
Strata DK424 A, B, C/D with SMDI
Strata DK424 E/F
Strata DK424 E/F with SMDI
Strata DK14/40/40i
Strata DK14/40/40i with SMDI
Integration Helper
PBXpertTM
2465
Add or Delete Voice Cards(See Chapter 16 –
Maintenance & Upgrades.)
Archive MSG.LOGto A:Drive
(See Chapter 17 – Troubleshooting)
Stratagy R3 I&M 11/99 3-3

Configure StratagyConfiguration Utility
3-4
Step 1: Access the UtilityImportant! To access the Stratagy Configuration Utility Menu, you must exit Stratagy call
processing first. Stratagy does not process calls while accessing the Stratagy Configuration Utility.
Step 2: Use the Utility
Step 3: Exit the Utility
1. From the Main Menu, select Shutdown by pressing Alt+S.
Stratagy prompts: Password?
2. Type the password and press Enter. (The default password is Stratagy with the first letter uppercase.)
Note We recommend that you change this password in the Stratagy System Configuration before exiting the Stratagy Configuration Utility.
Stratagy prompts:
Shutdown the entire system? [NY]
3. To shutdown the system, type Y.
Stratagy confirms:
Really SHUTDOWN the entire system? [NY]
4. Type Y again. Stratagy starts shutdown. If any ports are in use, Stratagy delays shutting down the system for 60 seconds. At that time, Stratagy completes shutdown, cutting off any callers or users that are still active.
When shutdown is complete, the Configuration Utility menu displays.
1. Select an option by pressing the option number, or use the arrow keys (↑↓) to highlight the option, and press Enter.
The option screen displays.
2. When finished, press Esc.
The Stratagy Configuration Utility screen displays.
➤ From the Stratagy Configuration Utility Menu, press Esc.
Stratagy reboots with new data configured.
The Stratagy Main Menu displays and Stratagy resumes call processing.
407
5
Stratagy R3 I&M 11/99

Configure StratagySystem Configuration
Co
nfig
ure S
tratagy
System ConfigurationUse this function to change Stratagy’s system options and parameters, define timeout values and computer configurations, and control per port options. See “System Parameters” on Page 3-27 for a list of the parameters, their definitions and default settings.
Most Stratagy System Configuration options do not require modification. We recommend that you modify the system password immediately. All other options have default values, but can be modified as required.
We recommend that you use the Stratagy Backup Utility initially and periodically to preserve system data. Before making changes to this selection, ensure you have a current backup. See Chapter 14 – Backup and Restore.
Modify System Configuration Parameters
1. From the Stratagy Configuration Utility screen, press 2.
The Stratagy System Configuration Screen is split into two areas: the left lists the actual parameters and their values, the right lists context-sensitive help for each parameter.
2. Highlight the parameter by using the arrow (↑↓)
...or Page Up and Page Down keys. Press Enter.
3. Modify the parameter using the line editor at the top of the screen.
If a line begins with a #, it is a heading or a parameter that is “commented out” and is not active. To enable a parameter that is commented out, remove the starting # and set the value.
4. Press Enter. The changes are saved and transferred to the screen.
5. Press Esc. The changes are saved. The Stratagy Configuration Utility screen displays.
We recommend that you back up the current database at this time by selecting the Stratagy Backup Utility. See Chapter 14 – Backup and Restore.
6. Press Esc again. Stratagy reboots and returns to the Main Menu for call processing or Stratagy programming.
407
3
Stratagy R3 I&M 11/99 3-5

Configure StratagyInstall from A: Drive
3-6
Install from A: DriveUse this function to re-install or upgrade Stratagy software from floppy disks using the Stratagy floppy-disk drive A:. See “Install from A: Drive” on Page 16-4 for instructions on using this option.
Toshiba Plug and PlayUse this function to change the Stratagy system to a different Toshiba Plug and Play capability than the one pre-installed by the factory. If you are modifying an existing Stratagy system, selecting this function:
� Changes all the settings to the new Toshiba telephone system default values
� Deletes the User ID mailbox customizations
� Builds the mailboxes that match the default Strata extension numbers
Each Stratagy system comes pre-installed at the factory for the following out-of-box (Toshiba Plug and Play) operation:
� Stratagy 6D — Strata DK14/DK40i/DK40
� Stratagy 24D, Stratagy 24 Plus — Strata DK424
The pre-installation includes the following preprogrammed items for the specific Stratagy and Strata DK systems:
� Dial codes, tone patterns, and integration patterns
� Default User ID mailboxes that correlate with the extension numbers of the defined telephone system.
In addition, all callers into a Stratagy system automatically hear the following greetings and are transferred to a Strata DK station.
� User ID 990 (Company Greeting) contains a greeting that says “Thank you for calling”
� User ID 991 (Caller Instructions) says “To reach the party… dial the extension…”
� If the Strata DK station (extension number) is busy or does not answer, Stratagy automatically plays a greeting that says “User ID XXX (Strata DK dialed station number) is not available or busy,” then prompts the caller to leave a message, etc.
Note The above Strata DK must be configured for the appropriate voice mail system settings individually. See the Strata DK Installation and Maintenance Manual and/or Strata DK Programming Manual for these procedures.
Important! We recommend that you use the Stratagy Backup Utility initially and periodically to preserve system data. Before making changes to this selection, ensure you have a current backup. See Chapter 14 – Backup and Restore.
Stratagy R3 I&M 11/99

Configure StratagyToshiba Plug and Play
Co
nfig
ure S
tratagy
Change the Toshiba Plug and Play Selection
1. From the Stratagy Configuration Utility Menu, press 4.
2. To select a plug-and-play option, press the option number
...or use the arrow keys (↑↓) to highlight the option. Press Enter.
3. Press 2. The Stratagy utility automatically defines the telephone system dial codes, telephone system tone patterns, system integration patterns and default mailboxes for the specific telephone system.
The Stratagy Configuration Utility Menu displays. The Toshiba telephone system is complete.
4. Press Esc. Stratagy reboots and returns to the Main Menu for call processing or Stratagy programming.
The selected system displays in the Main Menu. No other Stratagy programming is necessary
4074
4183
Stratagy R3 I&M 11/99 3-7

Configure StratagyToshiba Switch Integration
3-8
Toshiba Switch IntegrationUse this function to change the Toshiba Switch Integration capability that has been pre-installed by the factory. This selection defines the:
� Toshiba telephone system dial codes
� Toshiba telephone system tone patterns
� Toshiba system integration patterns
No other Stratagy system steps are necessary. If you are modifying an existing Stratagy system, selecting this function changes all the settings to the new Toshiba telephone system values. The User ID mailbox customizations are not deleted or changed.
Important! We recommend that you use the Stratagy Backup Utility initially and periodically to preserve system data. Before making changes to this selection, ensure you have a current backup. See Chapter 14 – Backup and Restore.
Change Toshiba Switch Integration
1. From the Stratagy Configuration Utility Menu, press 5.
2. Highlight an option and press Enter.
The Stratagy utility automatically defines the Toshiba telephone system dial codes, Toshiba telephone system tone patterns, and Toshiba system integration patterns for the specific telephone system.
The Stratagy Configuration Utility Menu displays. Toshiba telephone system integration is complete.
3. Press Esc. Stratagy reboots and returns to the Main Menu for call processing or Stratagy programming.
The selected system displays in the Main Menu. No other Stratagy system steps are necessary
4077
Stratagy R3 I&M 11/99

Configure StratagyOther Switch Integrations
Co
nfig
ure S
tratagy
Other Switch IntegrationsUse this function to initially configure or modify the following items for non-Toshiba telephone systems:
� Telephone system dial codes
� Telephone system tone patterns
� System integration patterns
CAUTION! Be sure to configure the Stratagy system in the above-listed order.
Important! We recommend that you use the Stratagy Backup Utility initially and periodically to preserve system data. Before making changes to this selection, ensure you have a current backup. See Chapter 14 – Backup and Restore.
Telephone System Dial CodesStratagy controls certain actions on your telephone system by using defined telephone system dial codes. To define the dial codes you can either:
� Select a predefined telephone system dial code from a list of pre-programmed codes
� Modify a telephone system dial code parameter
With this option, preset dial codes for other manufacturers’ systems can be enabled or modified.
Select a Predefined Dial Code
1. From the Stratagy Configuration Utility Menu, press 6.
2. From the Other Switch Integrations Menu, press 1.
4078
4079
Stratagy R3 I&M 11/99 3-9

Configure StratagyOther Switch Integrations
3-10
3. From the Telephone System Dial Codes screen, press F1.
4. To select a default setting, use the arrow keys (↑↓) and/or Page Up and Page Down keys to highlight your selection and press Enter
...or to cancel without selecting a dial code, press Esc.
The Telephone Dial Codes screen displays.
Note Select a default dial code only for non-Toshiba telephone systems and only during initial configuration.
5. From the Telephone Dial Codes screen, press Esc.
The Other Switch Integrations screen displays.
6. From the Other Switch Integrations screen, press Esc.
The Stratagy Configuration Utility Menu displays.
7. From the Stratagy Configuration Utility Menu, press Esc.
Stratagy reboots and displays the Stratagy Main Menu for call processing or Stratagy programming.
Note The Main Menu does not display the name of the selected non-Toshiba telephone system.
4667
Stratagy R3 I&M 11/99

Configure StratagyOther Switch Integrations
Co
nfig
ure S
tratagy
Modify a Dial Code
If the telephone system you desire does not appear when F1 is used from the Telephone System Dial Codes Screen or further modifications to the dial codes are needed, you can modify a dial code parameter.
1. From the Stratagy Configuration Utility Menu, press 6.
2. From the Other Switch Integrations Menu, press 1.
3. Use the arrow keys (↑↓) and/or Page Up and Page Down keys to highlight the dial code parameter and press Enter.
The line appears at the top of the screen.
4. Modify the dial code using the line editor at the top of the screen.
See Table 3-1 on Page 3-12 for a listing of the dial code parameters and their definitions and settings.
5. Press Enter to save your changes
...or Esc to cancel your changes.
Your changes are transferred to the screen.
6. From the Telephone System Dial Codes screen, press Esc.
The Other Switch Integrations screen displays.
7. From the Other Switch Integrations screen, press Esc.
The Stratagy Configuration Utility Menu displays.
8. From the Stratagy Configuration Utility Menu, press Esc.
Stratagy reboots and displays the Stratagy Main Menu for call processing or Stratagy programming.
4078
4079
Stratagy R3 I&M 11/99 3-11

Configure StratagyOther Switch Integrations
3-12
Table 3-1 Telephone System Dial Codes - Definitions and Settings
Parameter/Description
# Dial code to put a caller on transfer hold:
The code Stratagy sends the telephone system, before attempting to transfer a call to an extension, to put the current call on “transfer hold” and send the transfer (or intercom) dial tone.
Typical value: F- (hookflash)
# Dial code to use when there is no transfer dialtone:
The code Stratagy dials to return to the caller when:
Stratagy is configured to verify transfer dial tone exists before attempting to transfer a call to the requested extension –and–transfer dial tone is not available.
When this occurs, Stratagy treats the attempted transfer the same as a busy extension.
Typical value: F- (hookflash)
# Dial code to return to caller after Ring No Answer:
The code Stratagy dials, during supervised call transfers, to request the telephone switch reconnect the caller to Stratagy when:
The attempted extension rings–and–does not answer within a specified number of rings (configurable per User ID in Users Menu Maximum Rings field).
Typical value: F- (hookflash)
# Dial code to return to caller when there is a Busy:
The code Stratagy dials, during supervised call transfers, to request the telephone switch reconnect the caller to Stratagy when the extension is busy.
Typical value: F- (hookflash)
# Dial code to use after a call screening reject:
The code Stratagy dials, during supervised call transfers, to reconnect the caller and play the User ID’s current greeting when:
Call Screening is On–and–the extension called rejects the caller.
Typical value: F- (hookflash)
# Dial code to connect the caller to the extension:
The code Stratagy dials, during supervised call transfers, to complete the call transfer after:
Detecting an answer at the called extension–or–the extension called accepts the call when Call Screening is On.
Typical value: H (hang up)
Stratagy R3 I&M 11/99

Configure StratagyOther Switch Integrations
Co
nfig
ure S
tratagy
# Number of seconds to wait for dialtone detection:
The longest amount of time Stratagy waits for the telephone system to give Stratagy one second of dial tone. Setting this value to a number greater than zero enables Stratagy’s dial tone detection.
If your telephone system has a limited number of DTMF receivers or intercom paths for call transfers, there is always the possibility that one may not be available to Stratagy to perform a call transfer.
Typical value: 4
# Number of 1/100 seconds to use for Flash time:
Time Stratagy must remain on-hook while performing a hookflash.
Typical value: 55 (just over one-half second)
# Which DTMF tone to listen to for answer detection:
Some telephone systems play a specific DTMF tone during a call transfer when the called extension answers. This provides faster answer detection and call processing. If your telephone system supports this feature, enter the DTMF tone.
Typical value: a
# Which DTMF tone to listen to for hangup detection:
Some telephone systems play a specific DTMF tone whenever a caller hangs up. This provides faster hang up detection and call processing. If your telephone system supports this feature, enter the DTMF tone.
Typical value: d
# What to dial before dialing the User ID extension:
The code Stratagy dials after dial tone detection and before dialing the extension number.
Typical value: left blank
# What to dial after dialing the User ID extension:
Code Stratagy dials after dialing the extension number.
Some applications use 1- to eliminate (system wide) voice announce during a call transfer by Stratagy (necessary if you want Stratagy to perform supervised transfers). Use H to force all call transfers to be blind, or unsupervised.
# What to dial when the system first starts up:
Initialization codes Stratagy dials when it first starts-up, e.g., removing call forwarding on the Stratagy ports.
# What to dial when the system performs a shutdown:
Codes Stratagy dials when it shuts down; e.g., enabling call forwarding on the Stratagy ports.
# What to dial when a port goes off-hook:
Codes Stratagy dials whenever it goes off-hook to enable a special feature, such as special types of serial, or RS-232, integrations.
Table 3-1 Telephone System Dial Codes - Definitions and Settings (continued)
Parameter/Description
Stratagy R3 I&M 11/99 3-13

Configure StratagyOther Switch Integrations
3-14
Telephone System Tone PatternsThe tone patterns for Toshiba telephone systems are automatically defined during setup. For non-Toshiba telephone systems, you must use this option to initially define the actual telephone system tone patterns Stratagy must recognize when performing supervised call transfers. This option consists of a utility called PBXpert.
PBXpert
Note For additional information on using PBXpert, you can download Dialogic’s PBXpert User’s Guide for MS-DOS by accessing the Dialogic website at www.dialogic.com. Click on Products – Alphabetical List and then PBXpert.
PBXpert enables a Dialogic voice board to “learn” the tone patterns (frequency and cadence) of a non-Toshiba telephone system that define dial, ringback, busy, disconnect and reorder. These five tone definitions form a tone set and are saved in a Tone Set File (TSF).
PBXpert’s functions are available from a menubar on the Main Menu (see Figure 3-2).
Figure 3-2 PBXpert Main Menu Functions
Prior to Running PBXpert
1. Define the Telephone System Dial Codes.
2. Connect port 1 and port 2 to valid, working extensions on the telephone system.
3. Know the extension number that is connected to port 1.
4. Verify that the extension connected to port 1 is not in any hunt group and does not have any call forwarding defined.
5. Verify that the extension connected to port 2 has outside line access and can dial a test telephone number that will be answered (calling time or weather are good choices).
6. Define a non-Stratagy extension connected to a telephone that will not be answered.
4179
File Edit Tone Set Learn Config Help
NewOpenReloadCloseSaveSave AsInfoReportExit
AddDeleteCopyCopy AllAdd/DelPasteRenameDuplicateClear Scratch Pad
ModifyViewView Cons.ConsolidateTest
Learn NewRe-Learn
SetupDialogic CPBAdvancedRestore Defaults
IndexAbout
Stratagy R3 I&M 11/99

Configure StratagyOther Switch Integrations
Co
nfig
ure S
tratagy
Step 1: Add New Tone Set Using PBXpert
Important! Before running PBXpert, you must have completed the procedures under “Prior to Running PBXpert” on Page 3-14.
1. From the Stratagy Configuration Utility Menu, press 6.
2. From the Other Switch Integrations Menu, press 2.
The screen displays the messages:
This will restart system with PBXpert driver options!
Are you sure you want to run this routine? [y/n]
3. Enter y to continue
...or n to return to the Other Switch Integrations screen.
4. Press Alt+C and Enter to access the Configuration Setup option.
5. From the PBXpert Configuration screen, fill in the screen fields (e.g., dialing prefix/extension).
6. Press Alt+O for OK. A list of available Tone Sets display on the screen.
7. Press Ctrl+N to start a new tone set file.
Screen changes to Tone Sets - untitled.
4099
4169
4259
Stratagy R3 I&M 11/99 3-15

Configure StratagyOther Switch Integrations
3-16
8. Press Alt+L and Enter to access the Learning option.
9. From the Tone Set Name dialog box, type in the Make and Model of the tone set the system is going to learn. Press Alt+0.
Example: Make: NEW Model: KTS
10. Press Enter to continue.
11. From the Learn Window, define the seven parameters listed at the top of the Window. See Table 3-2 on Page 3-19 for a list of the parameters and their definitions.
4260
4182
4265
Stratagy R3 I&M 11/99

Configure StratagyOther Switch Integrations
Co
nfig
ure S
tratagy
12. From the Learn Window, check the tones you want to learn. The spacebar toggles the check mark On/Off.
13. Press Alt+S. PBXpert obtains the tone patterns checked in Step 12 and displays them on the screen.
When the process is complete, the screen displays the message:
14. Press Enter.
15. (Optional) To edit the file, press Alt+E.
Single-tones display dual-tones. The value for Freq. 2 is the same as Freq. 1.
4263
4264
4262
Stratagy R3 I&M 11/99 3-17

Configure StratagyOther Switch Integrations
3-18
16. (Optional) Make your changes and press Alt+O
...or Alt+C to cancel changes and return to the previous screen.
17. Press Alt+V. The Tone Sets Untitled screen displays with the new file name listed.
18. Press Ctrl+S.
19. Type the pathname in the Dir field and the filename in the File field. Highlight OK and press Enter.
The new tone set file is saved (e.g., c:\dialogic\bin\toshiba.tsf).
20. Press Alt+x. The Other Switch Integrations Menu displays.
21. From the Other Switch Integrations Menu, press Esc.
The Stratagy Configuration Utility screen displays.
Important! We recommend that you back up the current database at this time by selecting the Stratagy Backup Utility. See Chapter 14 – Backup and Restore.
22. Press Esc again. Stratagy reboots and returns to the Main Menu for call processing or Stratagy programming.
4258
Stratagy R3 I&M 11/99

Configure StratagyOther Switch Integrations
Co
nfig
ure S
tratagy
Step 2: Enable New TSF
Table 3-2 PBXpert - Definitions and Settings
Parameter/Description
Dialing Prefix/Ext:
Enter any characters that must precede a phone number. An extension to dial when learning PBX tones can also be entered in this field. If you enter an extension, do not enter a phone number in the next field.
Typical value: 1
Phone Number:
Phone number Stratagy dials to learn network tones. This number must be the phone number of the line connected to the Inbound Channel.
Outbound Channel:
Channel number of the voice board performing the learning (i.e., calling channel).
Inbound Channel:
Channel number of the voice board used to set up the required tone scenarios on the PBX or network (i.e., called channel).
Reorder Dial String:
Character string that generates a reorder tone from the PBX or network.
Note If you do not enter a value in this field, do not check the reorder tone in the Learning Window.
Merge Current Definition:
Used only during re-learning process. If you enter Yes, the current tone definitions and the re-learned tone definitions are combined. If No, the re-learned tone definitions overwrite the current ones.
Learn Discnct on Outbound Channel:
Used only if you select disconnect tone on Learn Window.
Outbound Channel: Select if the calling extension receives a disconnect when the called extension hangs up.
Inbound Channel: Select if the called extension receives the disconnect when the calling extension hangs up.
1. From the Main Menu, select Shutdown by pressing Alt+S.
Stratagy prompts: Password?
2. Type the password and press Enter. (The default password is Stratagy with the first letter uppercase.)
Note We recommend that you change this password in the Stratagy System Configuration before exiting the Stratagy Configuration Utility.
Stratagy prompts:
Shutdown the entire system? [NY]
3. Type Y. Stratagy confirms:
Really SHUTDOWN the entire system? [NY]
Stratagy R3 I&M 11/99 3-19

Configure StratagyOther Switch Integrations
3-20
4. Type Y again. Stratagy starts shutdown. If any ports are in use, Stratagy delays shutting down the system for 60 seconds. At that time, Stratagy completes shutdown, cutting off any callers or users that are still active.
When shutdown is complete, the menu displays.
5. Press Ctrl+C to exit the Stratagy Configuration Utility menu.
Terminate batch job? (Y/N)?
6. Type Y.
7. At the C:\Stratagy> prompt, type cls.
The screen clears.
8. Using JOVE (see “JOVE File Editor” on Page 16-29), modify the autoexec.bat file to include the pathway for the new TSF.
After the line
c:\dialogic\bin\40drv -i48 -c0 -e256 -ml -sd000/d3ff -y -G150 -h5
Add the following new line:
TONEDNLD -fc:\dialogic\bin\toshiba.tsf -h5
where: toshiba.tsf is the file name you saved in Step 3 “Add New Tone Set Using PBXpert” on Page 3-15.
9. Save the autoexec.bat file and reboot the system.
The file downloads the new definition contained in your TSF (e.g., toshiba.tsf) to the voice driver after the driver is loaded.
4075
Stratagy R3 I&M 11/99

Configure StratagyOther Switch Integrations
Co
nfig
ure S
tratagy
System Integration PatternsIf your telephone system supports integration, this selection controls the definition of its integration. Perform this step only to refine, verify, or modify the integration of the Stratagy system with your telephone system.
Some of the pre-defined telephone system dial codes already contain integration information, while others are configurable. If there are no integration definitions and you know that your telephone system supports inband DTMF integration, use the Integration Helper program to assist you in defining the integration patterns.
Define the System Integration Pattern Fields
1. From the Stratagy Configuration Utility Menu, press 6.
2. From the Other Switch Integrations Menu, press 3.
3. Define Integration Timeout by 1/10—amount of time Stratagy waits for integration information from the telephone system.
Possible values: 0~99 (disable integration) (in 10ths of seconds).
Suggested value: 10 (10 10ths = 1 second)
4100
4668
Stratagy R3 I&M 11/99 3-21

Configure StratagyOther Switch Integrations
3-22
4. Define the remaining fields (i.e., integration strings) that Stratagy should match.
If there are no integration definitions and you know that your telephone system supports inband DTMF integration, use the “Integration Helper” on Page 3-23. Otherwise, proceed to “Define the Integration Strings Stratagy Matches” on Page 3-25.
See Table 3-3 for definitions.
5. Press Esc. The Other Switch Integrations screen displays.
6. Press Esc. The Stratagy Configuration Utility Menu displays.
Important! We recommend that you back up the current database at this time by selecting the Stratagy Backup Utility. See Chapter 14 – Backup and Restore.
7. Press Esc again. Stratagy reboots and the Main Menu displays for call processing or Stratagy programming.
Note The Main Menu does not display the name of the selected non-Toshiba telephone system.
Table 3-3 Telephone System Integration Patterns – Definitions and Settings
Parameter/Definitions
Direct call
Integration strings that Stratagy should match for a Direct call.
Example:***1eee
Forward from Ring No Answer
Integration strings that Stratagy should match for a forward from Ring No Answer.
Example:#02#sss#rrr#
Forward from Busy
Integration strings that Stratagy should match for a forward from Busy.
Example:#02#sss#bbb#
Stratagy R3 I&M 11/99

Configure StratagyOther Switch Integrations
Co
nfig
ure S
tratagy
Modify Integration Patterns
Remove an Integration Pattern
1. Use the arrow keys (↑↓), or Page Up and Page Down, to highlight the integration pattern parameter. Press Enter.
2. Press Del or the spacebar when the integration pattern parameter displays in the line editor at the top of the screen.
Integration Helper
Note Use the Integration Helper only when initially configuring non-Toshiba telephone systems.
Prior to running the Integration Helper
1. Enable your telephone system for “voice mail” integration.
2. Program a test extension (Station A) for call coverage, or call forwarding, to Stratagy.
3. Have a second extension (Station B) available for placing test calls.
1. From the System Integration Patterns screen, use the arrow keys (↑↓)
...or Page Up and Page Down to highlight the integration pattern parameter. Press Enter.
2. Modify the integration pattern using the line editor at the top of the screen.
3. Press Enter to save your changes
...or Esc to escape without keeping your changes.
4. When you have finished defining the System Integration Patterns, press Esc.
The Other Switch Integrations Menu displays.
Stratagy R3 I&M 11/99 3-23

Configure StratagyOther Switch Integrations
3-24
Access and Use Integration Helper
1. From the System Integration Patterns Screen, press F1.
2. Make a series of test calls that generate integration information for the Integration Helper to capture. The screen displays:
Waiting for a call on any port...To abort press ESC
Place test calls of the following types:
� Available extension calling test extension for Ring No Answer.
� Place a test call by calling from (Station B) available extension to your test extension (Station A).
� After a Ring No Answer condition occurs, the call should forward to Stratagy’s Integration Helper, which answers the call and captures the digits it hears played by the telephone system.
� After the Integration Helper has captured the digits, press R for Ring No Answer.
� Available extension calling test extension while test extension is Busy.
� Verify that the test extension (Station A) has been call forwarded Busy to the Stratagy ports.
� Make the test extension busy.
� From the available extension (Station B), call the test extension that should forward to the Integration Helper immediately.After the Integration Helper has captured the digits (if any), press B for Busy.
� Test extension calling directly to Stratagy.
� From the test extension (Station A), call Stratagy.
� After the Integration Helper has captured the digits (if any), press D for Direct call.
Note Some telephone systems use different codes depending upon whether the call to Stratagy was made by dialing an extension or by pressing a message light. Run both tests if you suspect this to be true of your telephone system.
� Available extension using CO line to call in and ring test extension for Ring No Answer.
� From the available extension, select an outside CO line and call in to where you are installing Stratagy.
� When the Receptionist answers, ask to be transferred (unsupervised, or blind) to the test extension that should forward to Stratagy after some rings.
� After the Integration Helper has captured the digits, press R for Ring No Answer.
� Available extension using CO line to call in while test extension is Busy.
� Make the test extension busy.
� From the available extension, select an outside CO line and call the company where you are located.
� When the Receptionist answers, ask to be transferred (unsupervised, or blind) to the test extension, which should forward to Stratagy immediately.
� After the Integration Helper has captured the digits, press B for Busy.
Stratagy R3 I&M 11/99

Configure StratagyOther Switch Integrations
Co
nfig
ure S
tratagy
� Some telephone systems support an immediate record integration (i) feature. If your telephone system uses this feature, run a series of test calls.
3. When you have finished, press Esc to return to the System Integration Patterns Screen, which should now be filled with the captured codes and descriptions of those codes.
Define the Integration Strings Stratagy Matches➤ Define the actual received codes with the call and the extension information. There are six
character codes. Each character code represents a call state, and the placement and quantity of the code represents the extension information.
The character codes are:
r ring no answer
b busy
e direct dial (to access User ID directly by asking for security code)
s information regarding where the call came from (for handling message replies)
i immediate record (play the record tone and start taking a message)
x a wild card that matches anything (use this carefully)
You have complete control for changing Stratagy’s integration behavior based upon your specific requirements. For example, if your customer does not want to allow for Busy extensions, then simply modify the integration character codes and replace the b’s with r’s.
Use Character Codes
The following example illustrates using the character codes.
� Direct Call
Start with the Direct test call. There is a integration pattern labeled Direct Call in the description field. Part of the integration pattern should contain the extension number from where you called. Edit the integration pattern to replace the extension number with one or more e’s.
Example:integration pattern displayed: ***1120test extension you called from: 120edit the dial code to read: ***1eee
� Forward from Ring No Answer
Under the Forward from Ring No Answer you should have two patterns. Both integration patterns should contain the extension number that was call forwarded to Stratagy. Part of one pattern probably contains the available extension number you called from. The other integration pattern may or may not contain information pertaining to the CO line where the call came from.
Example:integration pattern displayed: #02#101#120# and #03##120available extension you called from: 101test extension that was call forwarded: 120edit the dial codes to read: #02#sss#rrr# and #03##rrr# respectively
Stratagy R3 I&M 11/99 3-25

Configure StratagyOther Switch Integrations
3-26
� Forward from Busy
The Forward from Busy is modified in the same way as the Forward from Ring No Answer above except that you use character code b instead of r.
Different Masks
Check that the integration patterns do not have the same “mask.” If you do have one or more masks that are the same, you must modify them to be different or delete the extra ones. To test that integration pattern masks are different, do the following:
1. List the dial codes on a piece of paper.
2. Compress the dial codes by re-writing them without any character codes.
What is left are dial code masks that must all be different.
Example:Using the following dial codes: ***1eee, #02#sss#rrr#, and #03##rrr#the integration pattern masks would be: ***1, #02###, and #03###that are all different.
Additional Integration Patterns
Sometimes it is useful to have additional integration patterns that match the same way as the actual integration patterns except for the first character. For example you might want to add a second integration pattern for Direct calls (which had ***1eee in our example) as **1eee. This helps to eliminate timing problems that sometimes arise from some telephone systems and Stratagy.
How Stratagy Matches Integration Patterns
The integration pattern strings are always sorted in like categories. When Stratagy receives a call, it uses a buffer to match against the defined integration pattern strings, and selects the first string that it matches.
Example 1:integration pattern strings:01rrr02bbb03eeexxrrr
call Stratagy receives:02100
integration pattern string Stratagy matches:02bbb
Example 2:integration pattern strings:xxrrr01rrr02bbb03eee
call Stratagy receives:02100
integration pattern string Stratagy matches:xxrrr (if on top, xxrrr always matched)
Stratagy R3 I&M 11/99

Configure StratagyAdd or Delete Voice Cards
Co
nfig
ure S
tratagy
Add or Delete Voice CardsSee “Configure Software for New Voice Boards” on Page 16-24 for instructions.
Archive MSG.LOG to A:DriveSee “Archive MSG.LOG to A:Drive (PC-based Stratagy Systems)” on Page 17-7 for instructions on using this option.
System ParametersMost Stratagy System Configuration options do not require modification. We recommend that you modify the system password immediately. All other options have default values, but can be modified as required.
All Stratagy System Configuration parameters are available for the Stratagy 24D and Stratagy 24 Plus. Fax settings are not available for the Stratagy 6D, Stratagy Flash, or Stratagy DK.
Parameter Description
active_hold
Controls what a caller must do to hold for a busy extension.
True: Caller must continue pressing�(�to hold for a busy extension, enter another extension, or leave a message at the tone.
False: Caller selects (�once to hold for a busy extension and the system enables the caller to hold until he/she is either transferred, selects another extension, or presses(again to leave a message.
Possible values: true, falseDefault: true
adpcm_hq
Sets the sampling rate for outgoing greetings. The higher the sampling rate, the better the sound quality; however, the amount of disk space used is also higher.
CAUTION! If you change this parameter on an active system, all previously recorded greetings are lost.
Possible values: 24, 32, 64Recommended value: 64 (Stratagy Flash: 24)Default: 64
adpcm_nq
Sets the sampling rate for incoming messages. The higher the sampling rate, the better the sound quality; however, the amount of disk space used is also higher.
CAUTION! If you change this parameter on an active system, all previously recorded messages are lost.
Possible values: 24, 32, 64Recommended value: 32 (Stratagy Flash: 24, Stratagy DK: 64)Default: 32
Stratagy R3 I&M 11/99 3-27

Configure StratagySystem Parameters
3-28
adpcm_pq
Sets the sampling rate for the system prompt file. This is predetermined by the sampling rate at which the system prompt file was recorded.
CAUTION! Do not change this value unless you have installed the appropriate system prompt file.
Possible values: 24, 32, 64Recommended value: 64 (Stratagy Flash: 24)Default: 64
advertising
Advertising string that displays when the Main Menu screen blanks after a specified number of minutes of inactivity (per tmo_blank).
Possible values: 58-character string. The single quotes are required.Default: No default
area_office
When SMDI is being used on a Centrex switch, the value set in this parameter identifies which calls are from voice mail subscribers by specifying the first few digits (e.g., area and office codes) that are shared by all subscribers.
Example: In this example, the area_office parameter is set to ‘714583’.
When a call arrives from any telephone number with the first digits of “714583,” the SMDI subsystem processes it as a subscriber call. If a call arrives and the switch tells Stratagy that the first six digits are not “714583,” the SMDI subsystem treats the caller as external. Note that the value of area_office does not need to be only six digits long. If subscribers share the first five digits of their telephone numbers, then just those five digits should be stored in this field.
Possible values: up to 10 numeric digits, any combinationDefault: (no default) (To enable, remove the starting # and set the value.)
auto_report
Report definition file, (created using Stratagy’s Main Menu’s Reports option (see Chapter 17—System Tracking). Generates a report automatically at the time specified by auto_report_time.
Example: ‘daily.rpt’
Possible values: valid DOS file name. The single quotes are required.Default: (no report name)
auto_report_time
Time of day the automatic report generates using the file specified in auto_report. The value is in 24-hour format with the colon (:) omitted.
Example: 1:30 a.m. is 01302:15 p.m. is 1415
Possible values: 0 (does not generate the auto_report), 0001~2400Default: 0
begin_rec_prompt
Whether the system says “Begin recording at the tone, ... or hang up” before taking a message. This also affects the “to re-record press 2” and “to append press 3” menu selections given after a recording.
True: The system plays the above prompt.False: The caller only hears a tone.
Possible values: true, falseDefault: true
Parameter Description
Stratagy R3 I&M 11/99
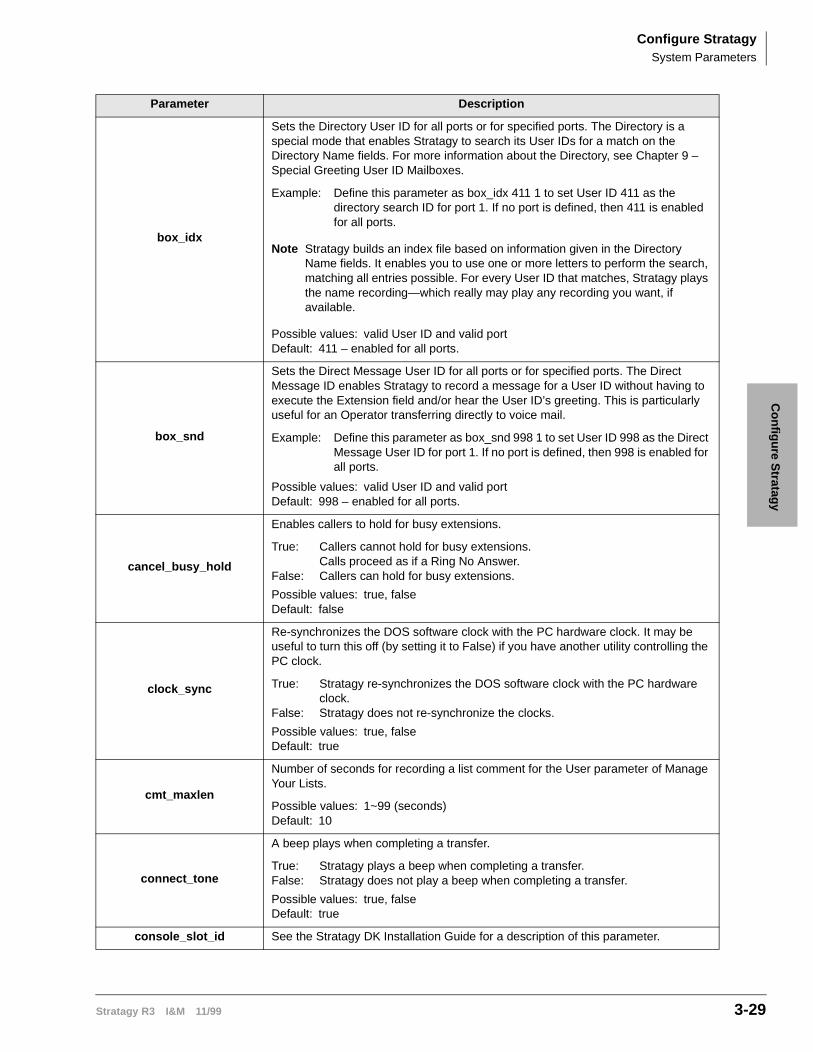
Configure StratagySystem Parameters
Co
nfig
ure S
tratagy
box_idx
Sets the Directory User ID for all ports or for specified ports. The Directory is a special mode that enables Stratagy to search its User IDs for a match on the Directory Name fields. For more information about the Directory, see Chapter 9 –Special Greeting User ID Mailboxes.
Example: Define this parameter as box_idx 411 1 to set User ID 411 as the directory search ID for port 1. If no port is defined, then 411 is enabled for all ports.
Note Stratagy builds an index file based on information given in the Directory Name fields. It enables you to use one or more letters to perform the search, matching all entries possible. For every User ID that matches, Stratagy plays the name recording—which really may play any recording you want, if available.
Possible values: valid User ID and valid portDefault: 411 – enabled for all ports.
box_snd
Sets the Direct Message User ID for all ports or for specified ports. The Direct Message ID enables Stratagy to record a message for a User ID without having to execute the Extension field and/or hear the User ID’s greeting. This is particularly useful for an Operator transferring directly to voice mail.
Example: Define this parameter as box_snd 998 1 to set User ID 998 as the Direct Message User ID for port 1. If no port is defined, then 998 is enabled for all ports.
Possible values: valid User ID and valid portDefault: 998 – enabled for all ports.
cancel_busy_hold
Enables callers to hold for busy extensions.
True: Callers cannot hold for busy extensions.Calls proceed as if a Ring No Answer.
False: Callers can hold for busy extensions.
Possible values: true, falseDefault: false
clock_sync
Re-synchronizes the DOS software clock with the PC hardware clock. It may be useful to turn this off (by setting it to False) if you have another utility controlling the PC clock.
True: Stratagy re-synchronizes the DOS software clock with the PC hardware clock.
False: Stratagy does not re-synchronize the clocks.
Possible values: true, falseDefault: true
cmt_maxlen
Number of seconds for recording a list comment for the User parameter of Manage Your Lists.
Possible values: 1~99 (seconds)Default: 10
connect_tone
A beep plays when completing a transfer.
True: Stratagy plays a beep when completing a transfer.False: Stratagy does not play a beep when completing a transfer.
Possible values: true, falseDefault: true
console_slot_id See the Stratagy DK Installation Guide for a description of this parameter.
Parameter Description
Stratagy R3 I&M 11/99 3-29

Configure StratagySystem Parameters
3-30
daylight_saving_time
Resets Stratagy’s system time to daylight savings time.
Note The current setting is displayed at the top right corner of the Main Menu.
True: Stratagy sets the system automatically to daylight savings time at 2:00 a.m. the first Sunday in April and the last Sunday in October.
False: Stratagy does not reset system time and continues with standard time (Stratagy clock).
Important! (Stratagy DK only) Setting the ksu_time parameter to true disables this setting.
Possible values: true, falseDefault: true
db_locking
Locks a database’s records before Stratagy reads them.
True: Stratagy tries to lock a database’s records before reading them (read only).
False: Stratagy does not lock the database’s records.
Possible values: true, falseDefault: false
defaults_box
Designates the User ID Defaults Box Stratagy uses for the default values when creating a new User ID. The field values in the Defaults Box User ID are copied into a new User ID upon initialization.
� User’s Information fields are not copied. The User ID field contains the new User ID you specified. Comment, Extension, and Directory Name fields are not defined. If a Security Code is defined, Stratagy uses it instead of the User ID as the default.
� Since guests can only access the User ID that created it and other guests of that User ID, Stratagy defines Group1 as the User ID of the mailbox that created it. For example, if the Guest User ID was created by User ID 76, then Group 1’s value is 76.
� All other Users Menu Options and Group/Chains fields are copied. All Notify and Auto records are copied.
� Define the Defaults Box settings before creating User IDs. This initializes all new User IDs with a minimum number of settings. This is useful for setting default settings such as message light On/Off.
Except for Group field values, this parameter operates in the same manner as the guest_defaults parameter.
Possible values: valid User IDDefault: 997
dir_play_uid
Directory search feature plays the User ID of the mailboxes that it finds.
True: If a name recording is available, the caller hears both the name recording and the digits for that person’s User ID. If a name recording is not available, just the digits play.
False: If a name recording is available, the caller hears only the recording. If there is no name recording, Stratagy does not present the entry.
Possible values: true, falseDefault: true
Parameter Description
Stratagy R3 I&M 11/99

Configure StratagySystem Parameters
Co
nfig
ure S
tratagy
diskwarn
Percentage threshold Stratagy uses for causing a Disk Notify to execute. This is a remaining percentage threshold.
Example: To have Stratagy notify you when the remaining hard drive space falls below 20%, use a value of 20.
For Stratagy to notify a user (usually the System Administrator) when hard drive space is low, create a Notify record with the Type field set to DISK (Chapter 8 – Notify Menu).
Possible values: 1~99Default: 5
dss_active See the Stratagy DK Installation Guide for a description of this parameter.
dtmf_dly
Controls the time between DTMF tones when Stratagy is dialing.
0: The time is country-dependent (50 ms in the US, 80 ms in the UK). This is appropriate for almost all cases.
Possible values: 0, 3~19 (units of 10 ms)Default: 0 Stratagy DK, 6D, 24D, 24 Plus only
dtmf_gate
Stratagy, before dialing any User ID Extension field, first verifies that DTMF was entered since the call last accessed the User ID (usually Caller Instructions User ID 991) specified in the Done chain of the initial User ID (usually Company Greeting User ID 990).
This “gate” prevents the transfer of a dead/phantom call to the Operator on those switches that do not have disconnect supervision.
True: Stratagy gates by requesting the caller to “Say yes at the tone” to complete the chain and transfer.
False: Stratagy does not complete the chain and transfer by requesting the caller to “Say yes at the tone.”
Note Regardless of this parameter setting, Stratagy does not perform the “gate” action when the Extension field begins with @.
Possible values: true, falseDefault: true
dtmf_on
Controls length the system plays the DTMF tones.
Example: 20 is .2 sec (200 ms).
Possible values: 10, 20, ..., 90 (units of 10 ms)Default: 20 (.2 sec)
error_box
Box that receives a notification if the system encounters a panic error on startup. The notification runs when the system successfully recovers.
Possible values: valid User IDDefault: 999
Parameter Description
Stratagy R3 I&M 11/99 3-31

Configure StratagySystem Parameters
3-32
future_delivery
Future delivery enables users to specify the time and/or date when a message is delivered. When the messages are awaiting future delivery, they are stored in the User ID specified in this parameter. Therefore, the Future Delivery User ID cannot be used for any other purpose. The future delivery messages in this User ID cannot be deleted or listened to by accessing this User ID mailbox. This User ID mailbox cannot be accessed by a security code.
The originator of the future delivery message can delete or listen to the message from his\her User ID, using the Future Delivery Review parameter of Play Messages.
Possible values: valid User IDDefault: 995 Stratagy DK, 6D, 24D, 24 Plus only
gain_norm
Starting volume of the ports.
1. The ^( ) token enables you to change the volume of the current port to the specified level (see Chapter 9 – Token Programming).
2. For the user, the current port volume can be set through the Users Menu’s Message Volume field and by the user with the Play Message Controls (see Chapter 6 – Users Menu).
Possible values: -10, -9, ..., 0, ..., 4, 5Default: 0
guest_defaults
Designates the Guest User ID Defaults Box Stratagy uses when creating a new Guest User ID. The field values in the Guest Defaults User ID are copied into a Guest User ID upon initialization.
� User’s Information fields are not copied. The User ID field contains the new User ID you specified. Comment, Extension, and Directory Name fields are not defined. If a Security Code is defined, Stratagy uses it instead of the User ID as the default.
� Since guests can only access the User ID that created it and other guests of that User ID, Stratagy defines Group1 as the User ID of the mailbox that created it. For example, if the Guest User ID was created by User ID 76, then Group 1’s value is 76.
� All other Users Menu Options and Group/Chains fields are copied. All Notify and Auto records are copied.
� Define the Guest User ID Defaults Box settings before creating Guest User IDs. This initializes all new Guest User IDs with a minimum number of settings. This is useful for setting default settings such as message light On/Off.
Except for the Group field values, operates the same way as the defaults_box parameter.
Possible values: valid User IDDefault: 996 Stratagy DK, 6D, 24D, and 24 Plus only
guest_max
Highest numbered Guest User ID. When used with the guest_min parameter, limits the number of Guest User IDs that can be created.
Example: If this value is 90199, then the last Guest User ID that may be created is User ID 90199.
Possible values: valid User ID larger than the guest_min parameter settingDefault: 90199 Stratagy DK, 6D, 24D, and 24 Plus only
Parameter Description
Stratagy R3 I&M 11/99

Configure StratagySystem Parameters
Co
nfig
ure S
tratagy
guest_min
Lowest numbered Guest User ID. When used with the guest_max parameter, limits the number of Guest User IDs that can be created.
Examples: If this value is 90000, then the first Guest User ID that is created has User ID 90000. The second guest has User ID 90001, etc.
Possible values: valid User ID smaller than guest_max parameter settingDefault: 90000 Stratagy DK, 6D, 24D, and 24 Plus only
hangup_supervision
Whether the switch supports Loop Current Off/Drop for hang up supervision.
True: If your switch supports Loop Current Off/Drop for hang up supervision, this parameter should be true. Even if your switch does not support this capability, it usually has NO NEGATIVE EFFECT when set to true.
False: If you notice call transfer problems such as disconnects or three-way conferencing, try setting this parameter to false. If the problems are not solved by setting this parameter to false, set it back to true.
Possible values: true, falseDefault: true
hot_box
User ID Stratagy “jumps” to when Stratagy detects a specific tone. Used to handle incoming faxes, detect connections from TDD machines for deaf communication, etc.
Up to 24 tones can be detected and directed to a mailbox by entering a User ID followed by a number (1~24). To add a specific tone, such as a Fax connect tone, to the tone table, it must be one of the first four tones defined, and it must be marked as a “terminating tone.” The PCPM code associated with the tone must be in the range 13~36, which corresponds to hot_boxes 1~24.
If no number is defined after the User ID, Stratagy directs calls that emit an industry standard Fax CNG tone of a specific frequency (factory defined in the tone table) to the defined User ID.
Syntax: set hot_box XXX Y
Where: XXX = User ID Y = hot box number (1~24)If Y is omitted, all 24 hot boxes are set to the User ID entered. For example:
set hot_box 994 sets all 24 to User ID 994
set hot_box 994 1 sets the first hot_box to User ID 994
Possible values: valid User ID, possibly followed by a hot_box value (1~24)Default: 994
ksu_time See the Stratagy DK Installation Guide for a description of this parameter.
lcoff
Minimum duration of loop current off before the RDSP driver posts event 20 to the System Event Queue. In 10 ms units.
Default: comment line (#set lcoff -10)To enable, remove the starting # and set the value.
lcvalid
Delay that must occur after dialing a digit string and before the RDSP driver considers the loop current drop to be answered. In 10 ms units.
Default: comment line (#set lcvalid 10)To enable, remove the starting # and set the value.
Parameter Description
Stratagy R3 I&M 11/99 3-33

Configure StratagySystem Parameters
3-34
lcwait
Delay that must occur after loop current drops and before the RDSP driver posts event 18 to the System Event Queue. In 10 ms units.
Default: comment line (#set lcwait 10)To enable, remove the starting # and set the value.
login_pound
Stratagy prompts “Finish by pressing the pound sign” when requesting the User ID or the security code during log on.
If the system is configured with fixed-length User IDs (by changing the values of a fixed_lenX parameter), users may be confused if they hear this prompt and attempt to enter a pound sign (#).
True: Stratagy says the prompt.False: Stratagy does not say the prompt.
Possible values: true, falseDefault: true
lognam
System log file name. This log file contains start-up information, any execution error information, system actions, and shutdown information.
Note It is a good idea to periodically archive or delete this file once or twice a year, whenever you perform preventive maintenance.
Possible values: valid DOS file name. The single quotes are required.Default: ‘Stratagy.LOG’
lpt_port
Printer port Stratagy uses when asked to print a report.
Possible values: 0 (no printer), 1, 2 (port number)Default: 0 Stratagy 6D, Stratagy 24D and Stratagy Plus only
max_dl_inits
Number of simultaneous ports that can go off-hook and dial the telephone system initialization code. This is necessary because some switches are blocking.
Possible values: 1, 2, ..., number of portsDefault: 2
max_prompt
Number of times a prompt should repeat before hanging up.
Possible values: 1~9Default: 2
minmsg
Sets the threshold for keeping or discarding messages. A message recording to be considered valid and kept must be at least as long as this setting. Shorter recordings are discarded. In 100 ms units.
Default: 10 (1 second)
msg_log
Logs every received message and User ID that checks for messages, along with the DTMF entered.
Note When active, grows quickly. Archive or delete frequently.
Possible values: valid DOS file name. The single quotes are required.Default: ‘MSG.LOG’ (To enable, remove the starting # and set the value.)
msg_pending_threshold
Number of seconds that a message must play before it is considered “pending.”
Possible values: 3~10 secondsDefault: 5
Parameter Description
Stratagy R3 I&M 11/99

Configure StratagySystem Parameters
Co
nfig
ure S
tratagy
nam_maxlen
Maximum number of seconds for recording a User ID’s name and extension. The name and extension recording is used for directory access and whenever Stratagy tries to identify the User ID.
Possible values: 1~99 (seconds)Default: 5
n_msg_scan
Threshold for message count. When a user logs onto their mailbox, if the total number of messages (i.e., new, saved, pending, urgent) is less than the number defined in this parameter, Stratagy scans the number of messages and reconciles the message count if an error is encountered.
Possible values: 0~99Default: 0 (no message scan at log in time)
n_ochan
Number of dedicated ports (starting with the highest port) to reserve for outbound notify ports. This number must not exceed the total number of available ports. When set, the defined port does not accept incoming calls.
Important! If the value is set to 0, Stratagy attempts to use the highest numbered IDLE port. The danger of this is that Stratagy may inadvertently begin a notification on a port with an incoming call.
Possible values: 0~24 (number of ports)Default: 0
notify_restriction
Restricts Notify to only the defined port. The port still takes incoming calls. This is particularly useful for those switches that require message lights to be turned off by the same port that turned them on.
Possible values: 1, 2, ..., highest port numberDefault: 1 (To enable, remove the starting # and set the value.)
partial_q_ok
Enables the Q( ) token to save the message even though all prompts are not completed.
True: Q( ) token saves the messages.False: Messages are not saved if prompts are not completed.
Possible values: true, falseDefault: false (To enable, remove the starting # and set the value.)
password
Sets the system password. The password is case sensitive; i.e., uppercase letters are different from lowercase letters.
Possible values: up to eight alphabetical characters. The single quotes are required.
Default: ‘Stratagy’
pbx_typeSee the Stratagy DK or Stratagy Flash Installation Guides for a description of this parameter.
play_caller_id
Determines whether outside Caller ID is announced when the Caller ID is available.
Note This parameter works in conjunction with SMDI integration.
True: When a message plays from an outside caller and a caller ID is available, the ID is announced in the place of the from field during the message header playback.
False: Caller ID never plays.
Possible values: true, falseDefault: true
Parameter Description
Stratagy R3 I&M 11/99 3-35

Configure StratagySystem Parameters
3-36
play_skip
Number of seconds to rewind or skip forward during message playback when a user presses(or�#.
Possible values: 1~99 (seconds)Default: 5
please_hold
System announces “Please hold while I try that extension” before transferring a caller.
True: The system plays the above prompt.False: The system does not play the above prompt and immediately executes the
dl_dtwait string or the Extension string, as appropriate.
Possible values: true, falseDefault: true
prompt_file
Default prompt file that Stratagy uses on an incoming call. This enables you to redefine the default language prompt file from English. It does not preclude you from changing the prompt file during the call.
Possible values: valid prompt file. The single quotes are required.Default: ‘English’
purge
Number of days before a message is set for purging/deletion. Whenever a user accesses his/her User ID and presses�)�to Play Messages, the system tells the user how many messages will be automatically deleted when he/she exits the Main Menu.
CAUTION! Once a message is deleted by purging, there is no way to retrieve it.
Possible values: 0 (purging disabled), 1~99 (days)Default: 0
restore_config
If the Stratagy system encounters a panic error on start-up, this parameter determines whether Stratagy restores the last known good configuration during the Automatic System Recovery process.
Note If you set this parameter to True, you must shut down and restart on the current software version. This ensures that if an error is encountered during boot up the Stratagy reboots using the most current database.
True: System restores the last known good configuration if it panics on start-up.False: System does not restore the last known good configuration if it panics on
start-up.
Possible values: true, falseDefault: true
restore_original
If the Stratagy system encounters a panic error on startup, this parameter determines whether Stratagy restores the original configuration during the Automatic System Recovery process.
True: System restores the original configuration if it panics on start-up.False: System does not restore the original configuration if it panics on start-up.
Possible values: true, falseDefault: true
Parameter Description
Stratagy R3 I&M 11/99

Configure StratagySystem Parameters
Co
nfig
ure S
tratagy
screen_save
Screen trace log file name. This log file contains all the tracing information when screen tracing is turned on. See Chapter 15 – System Reports.
Possible values: valid DOS file name. The single quotes are required.Default: ‘SCREEN.SAV’ (To enable, remove the starting # and set the value.)
Stratagy 6D, 24D, and 24 Plus only
security_max_length
Maximum length of the security code that Stratagy accepts as a new security code when a user attempts to change it from a telephone.
Setting this parameter equal to the security_min_length parameter, creates “fixed-digit” security codes. When fixed-digit security codes are enabled, there is no longer a requirement for the user to press # after entering a security code during log on.
CAUTION! Security_max_length must be equal to, or greater than, the security_min_length parameter setting.
Possible values: 1~16Default: 16
security_min_length
Minimum length security code that Stratagy accepts as a new security code when a user attempts to change it from a telephone.
Possible values: 1~16Default: 1
short_direct_send
What Stratagy plays when the Direct Message User ID (usually 998) is entered followed by the User ID. (The Direct Message User ID is set using the box_snd parameter.)
True: “You entered” and the User ID’s name recording plays.False: User ID’s current greeting plays (as if a Ring No Answer was received).
Possible values: true, falseDefault: false
shutdown
Designated day and time Stratagy performs automatic shutdown for hard drive maintenance.
The first value between the single quotes is the day of week, where:
0 Sunday 4 Thursday1 Monday 5 Friday2 Tuesday 6 Saturday3 Wednesday -1 everyday
The second value between the single quotes is the hour and minute when the shutdown occurs. Use the 24-hour format with the colon (:) omitted.
Example: 3:30 a.m. on Monday is ’1 330’
Default: ‘2 130’ (Tuesday at 1:30 a.m.)
skip_name_announce
Sets the name announcement at user log on.
True: System skips the name announcement at log-on.False: System announces the user’s name at log-on.
Possible values: true, falseDefault: false
Parameter Description
Stratagy R3 I&M 11/99 3-37

Configure StratagySystem Parameters
3-38
tape_length
When a User selects option�)�(Play Messages), and then�'%�(continuous play) or '*�(continuous delete), this parameter defines the total number of minutes to play or delete. Usually defines the length of one side of a tape that might be used for recording a set of messages in a User ID.
Possible values: 00, 10~99 (minutes). Setting the value to 00 disables the Playback and Delete Continuous features.
Default: 30
timestamp_forwards
Controls the date/time stamp the system uses on a forwarded message.
True: Uses the date/time that the message was forwarded.False: Uses the original date and time the message was first recorded.
Possible values: true, falseDefault: true
tmo_2digit_menu
Amount of time Stratagy waits to receive the second digit after receiving the first digit of a two-digit menu selection.
Example: When playing a message, ( means rewind 5 seconds, while ()�means replay the current message. If the user presses ( and doesn’t enter the ) until after this time elapses, Stratagy processes the digit entered and rewinds 5 seconds.
Possible values: 10~99 (units of 100 ms)Default: 12 (1.2 seconds)
tmo_blank
Total number of minutes Stratagy waits before blanking the Main Menu screen to prevent screen burn-in.
Note This parameter only blanks the screen if the current screen is the Main Menu.
The advertising parameter contains the string that displays when the Main Menu screen is blanked.
Possible values: 0 (disabled), 1~99 (minutes)Default: 5
tmo_dtmf
Amount of time Stratagy waits to determine the caller has finished entering DTMF digits (provided the caller does not press #).
Possible values: 10~99 (units of 100 ms)Default: 12 (1.2 seconds)
tmo_dtmf_login
Amount of time Stratagy waits to determine the caller has finished entering DTMF digits (provided that the caller does not press #) when entering the User ID and security code during the log in process.
Possible values: 10~99 (units of 100 ms)Default: 20 (2 seconds)
tmo_hold
Number of seconds before Stratagy attempts to transfer a call after the caller has pressed ( to hold for a busy extension.
When a caller presses ( to hold for a busy extension, Stratagy plays a file called C:\Stratagy\HOLD.VOX and then attempts to transfer the call. If that file is missing, Stratagy is silent for the number of seconds specified by this parameter.
Note To have callers hear a specialty recording while on hold, record over HOLD.VOX by accessing the System Administration Menu. See the System Administrator Guide for details.
Default: 20 (seconds)
Parameter Description
Stratagy R3 I&M 11/99

Configure StratagySystem Parameters
Co
nfig
ure S
tratagy
tmo_idle
When this value is greater than 0, it enables a special function in Stratagy to gooff-hook and back on-hook whenever a port is idle for the specified number of seconds. This is necessary only when under rare circumstances a telephone switch may not release a station that is connected to Stratagy even after Stratagy has gone on-hook.
Possible values: 0 (disabled), any number (seconds)Default: 0
tmo_menu
Amount of time Stratagy waits before repeating a choice menu.
Possible values: 1~99 (units of 100 ms)Default: 20 (2 seconds)
tmo_pickup
Minimum amount of time the system waits between an on-hook and off-hook event.
Possible values: 10~99 (units of 100 ms)Default: 20 (2 seconds)
tmo_resume
Number of seconds Stratagy pauses while playing or recording a message. If this period elapses and the user does not tell Stratagy to resume, Stratagy automatically continues to play messages (during playback) or cancels the recording (during recording).
Possible values: 0~ 255 (seconds)Default: 30 (seconds)
tmo_serial
Maximum number of seconds Stratagy waits for a response when communicating with peripheral devices through a serial port. Otherwise, Stratagy could potentially wait forever.
Possible values: 2~99 (seconds)Default: 2 Stratagy 6D, 24D and 24 Plus only.
tmo_silence
Maximum amount of silence time the system waits before deciding to finish a recording and hang up.
Possible values: 3~15 (seconds)Default: 15 (Stratagy DK = 5)
tmo_sound
Maximum amount of sound/dial tone time the system waits before deciding to finish a recording and hang up.
Possible values: 0~9 (seconds)Default: 0 (Stratagy DK = 5)
trace_capSee the Stratagy DK or Stratagy Flash Installation Guides for a description of this parameter.
use_pvc
Whether Stratagy enables the voice board driver’s Positive Voice Control feature when dialing and expecting a voice to answer.
True: Driver’s Positive Voice Control feature enabled.False: Driver’s Positive Voice Control feature not enabled. On some switches,
setting this value to false avoids false answer detects.
Possible values: true, falseDefault: true
Parameter Description
Stratagy R3 I&M 11/99 3-39

Configure StratagySystem Parameters
3-40
user_log
Whether the system makes an entry in the specified log file whenever a User ID is accessed via DTMF. The log entry consists of the date, time and User ID. This is useful for creating a data file that can later be analyzed for call distributions and dates, days, and times mailboxes are accessed.
Note When active, grows quickly. Archive or delete frequently.
Possible values: valid DOS file name. The single quotes are required.Default: ‘USERID.LOG’(To enable, remove the starting # and set the value.)
Serial Port Definition
baud1
Baud rate for logical serial port 1. This operates on the physical COM port as defined by serial_port1.
Possible values: 300, 1200, 2400, 9600, 19200.Default: 2400
baud2
Baud rate for logical serial port 2. This operates on the physical COM port as defined by serial_port2.
Possible values: 300, 1200, 2400, 9600, 19200.Default: 2400
baud3
Baud rate for logical serial port 3. This operates on the physical COM port as defined by serial_port3.
Possible values: 300, 1200, 2400, 9600, 19200.Default: 2400 (To enable, remove the starting # and set the value.)
Stratagy 24D and 24 Plus only
baud4
Baud rate for logical serial port 4. This operates on the physical COM port as defined by serial_port4.
Possible values: 300, 1200, 2400, 9600, 19200.Default: 2400 (To enable, remove the starting # and set the value.)
Stratagy 24D and 24 Plus only
databits1
Number of data bits for logical serial port 1.
Possible values: 7, 8Default: 8
databits2
Number of data bits for logical serial port 2.
Possible values: 7, 8Default: 8
databits3
Number of data bits for logical serial port 3.
Possible values: 7, 8Default: 8 (To enable, remove the starting # and set the value.)
Stratagy 24D and 24 Plus only
databits4
Number of data bits for logical serial port 4.
Possible values: 7, 8Default: 8 (To enable, remove the starting # and set the value.)
Stratagy 24D and 24 Plus only
parity1
Parity to use for logical serial port 1.
Possible values: none, even, odd, mark, spaceDefault: none
Parameter Description
Stratagy R3 I&M 11/99

Configure StratagySystem Parameters
Co
nfig
ure S
tratagy
parity2
Parity to use for logical serial port 2.
Possible values: none, even, odd, mark, spaceDefault: none
parity3
Parity to use for logical serial port 3.
Possible values: none, even, odd, mark, spaceDefault: none (To enable, remove the starting # and set the value.)
Stratagy 24D and 24 Plus only
parity4
Parity to use for logical serial port 4.
Possible values: none, even, odd, mark, spaceDefault: none (To enable, remove the starting # and set the value.)
Stratagy 24D and 24 Plus only
serial_port1
In order for Stratagy to communicate with peripheral devices connected to COM/RS232 ports, it needs to know which ports are connected. There is a mapping from the port that Stratagy knows to the physical port on the computer. This mapping is defined by this parameter. To define serial port 1 as active, simply define the COM port where it should be mapped.
Examples: Set this parameter to 1 to connect serial port 1 (Stratagy) to COM1.
Possible values: 0 (not connected), 1 (COM1), 2 (COM2), 3 (COM3), 4 (COM4)Default: 0
serial_port2
In order for Stratagy to communicate with peripheral devices connected to COM/RS232 ports, it needs to know which ports are connected. There is a mapping from the port that Stratagy knows to the physical port on the computer. This mapping is defined by this parameter. To define serial port 2 as active, simply define the COM port where it should be mapped.
Examples: Set this parameter to 2 to connect serial port 2 (Stratagy) to COM2.
Possible values: 0 (not connected), 1 (COM1), 2 (COM2), 3 (COM3), 4 (COM4)Default: 0
serial_port3
In order for Stratagy to communicate with peripheral devices connected to COM/RS232 ports, it needs to know which ports are connected. There is a mapping from the port that Stratagy knows to the physical port on the computer. This mapping is defined by this parameter. To define serial port 3 as active, simply define the COM port where it should be mapped.
Examples: Set this parameter to 3 to connect serial port 3 (Stratagy) to COM3.
Possible values: 0 (not connected), 1 (COM1), 2 (COM2), 3 (COM3), 4 (COM4)Default: 0 (To enable, remove the starting # and set the value.)
Stratagy 24D and 24 Plus only
serial_port4
In order for Stratagy to communicate with peripheral devices connected to COM/RS232 ports, it needs to know which ports are connected. There is a mapping from the port that Stratagy knows to the physical port on the computer. This mapping is defined by this parameter. To define serial port 4 as active, simply define the COM port where it should be mapped.
Example: Set this parameter to 4 to connect serial port 4 (Stratagy) to COM4.
Possible values: 0 (not connected), 1 (COM1), 2 (COM2), 3 (COM3),4 (COM4)Default: 0 (To enable, remove the starting # and set the value.)
Stratagy 24D and 24 Plus only
Parameter Description
Stratagy R3 I&M 11/99 3-41

Configure StratagySystem Parameters
3-42
stopbits1
Number of stop bits to use for logical serial port 1.
Possible values: 0, 1, 2Default: 1
stopbits2
Number of stop bits to use for logical serial port 2.
Possible values: 0, 1, 2Default: 1
stopbits3
Number of stop bits to use for logical serial port 3.
Possible values: 0, 1, 2Default: 1 (To enable, remove the starting # and set the value.)
Stratagy 24D and 24 Plus only
stopbits4
Number of stop bits to use for logical serial port 4.
Possible values: 0, 1, 2Default: 1 (To enable, remove the starting # and set the value.)
Stratagy 24D and 24 Plus only
Serial Port Definition (Remote PC — Stratagy Admin)
admin_portSee the Stratagy DK or Stratagy Flash Installation Guides for a description of this parameter.
Fax ConfigurationIncorporated directly into Stratagy are fax Class 2 drivers. To use the fax features, you must install a fax/modem (SG-FMOD). Additionally, the fax parameters (see Table 13-2 on Page 13-7) must be set for Stratagy to communicate correctly with the fax.
Fax parameters are supported only by Stratagy 24D and Stratagy 24 Plus.
AMIS Configuration Audio Messaging Interchange Specification (AMIS) is the analog networking protocol that enables Stratagy to pass voice messages to any remote voice mail system that supports the AMIS protocol.
See Table 12-1 on Page 12-4 of Chapter 12 – AMIS Networking for complete descriptions of all AMIS parameters.
SMDI/Serial Integration DefinitionStratagy can enable Simplified Message Desk Interface (SMDI) protocol to provide a RS-232 integration with telephone systems that also have SMDI capabilities. This integration is used with Centrex installations.
See Table 11-1 on Page 11-2 of Chapter 11 – SMDI Serial Integration for complete descriptions of all SMDI parameters.
Per Port Definitions
box_grt
Sets the starting User ID for the port given as the last value.
Examples: box_grt 990 1 means that on port 1, a new call starts at User ID 990.
Possible values: valid User ID and valid portDefault: 990 1
990 2...990 24
Parameter Description
Stratagy R3 I&M 11/99

Configure StratagySystem Parameters
Co
nfig
ure S
tratagy
n_rings
Number of rings to wait before answering per port. This is useful for those telephone systems that do not allow incoming lines to ring in a station hunt group or do not provide delayed ringing. Also, it may be used to set up backup answering for a secondary attendant operation.
Note There is a side effect. When a user wants to pickup his messages, he must wait the specified number of rings before Stratagy answers.
Example: To have port 1 answer on the second ring, use set n_rings 2 1.
Possible values: 1~9 (number of rings); valid port numberDefault: 1 1
1 2...1 24
Switch Interface Definition
Note These parameters are available for Stratagy 6D, Stratagy 24D and Stratagy 24 Plus only.
did_dtmf
How DID digits are passed to Stratagy.
True: Stratagy expects the DID digits as DTMF.False: Stratagy expects the digits as loop pulse.
Possible values: true, falseDefault: true (To enable, remove the starting # and set the value.)
did_mode
Type of line connected to Stratagy.
True: Stratagy assumes DID lines.False: Stratagy assumes a T1 line.
Possible values: true, falseDefault: true (To enable, remove the starting # and set the value.)
ring_mode
Method new calls are indicated when DID or T1 lines are connected to Stratagy.
True: New calls are indicated by ring voltage.False: New calls are seen when loop current first comes on.
Possible values: true, falseDefault: true (To enable, remove the starting # and set the value.)
t1_mode
Whether Stratagy waits for a wink complete before processing the call.
True: Waits.False: Does not wait.
Possible values: true, falseDefault: true (To enable, remove the starting # and set the value.)
Parameter Description
Stratagy R3 I&M 11/99 3-43

Configure StratagySystem Parameters
3-44
Fixed Length User IDsThe fixed length of a User ID is based on its first digit.
fixed_len0
Maximum digits Stratagy expects when a caller dials a User ID beginning with zero.
There is only one User ID mailbox that can have zero as its first digit, and that is User ID 0. If the value of this parameter is changed to 1, and a caller dials 0 in a place where a User ID mailbox number is expected, then Stratagy immediately accepts the 0 as the User ID mailbox number and goes to the next processing step. If the parameter’s value is left at 8, then a timeout or pound sign (#) is required to terminate the User ID. This latter procedure is compatible with earlier versions of Stratagy.
Possible values: 1~8Default: 8
fixed_len1
Maximum digits Stratagy expects when a caller dials a User ID beginning with one.
When changing this value, make certain that it is still possible to log in and send messages to all existing User ID mailboxes that begin with this digit. For example, if there are five-digit User ID mailboxes that begin with this digit, then you should not set the value of this parameter less than five. Check all User ID mailboxes, including users, guests, and reserved (411, 990, etc.)
Possible values: 1~8 Default: 8
fixed_len2
Maximum digits Stratagy expects when a caller dials a User ID beginning with two.
When changing this value, make certain that it is still possible to log in and send messages to all existing User ID mailboxes that begin with this digit. For example, if there are five digit User ID mailboxes that begin with this digit, then you should not set the value of this parameter less than five. Check all User ID mailboxes, including users, guests, and reserved (411, 990, etc.)
Default: 1~8Default: 8
fixed_len3
Maximum digits Stratagy expects when a caller dials a User ID beginning with three.
When changing this value, make certain that it is still possible to log in and send messages to all existing User ID mailboxes that begin with this digit. For example, if there are five digit User ID mailboxes that begin with this digit, then you should not set the value of this parameter less than five. Check all User ID mailboxes, including users, guests, and reserved (411, 990, etc.)
Possible values: 1~8Default: 8
fixed_len4
Maximum digits Stratagy expects when a caller dials a User ID beginning with four.
When changing this value, make certain that it is still possible to log in and send messages to all existing User ID mailboxes that begin with this digit. For example, if there are five digit User ID mailboxes that begin with this digit, then you should not set the value of this parameter less than five. Check all User ID mailboxes, including users, guests, and reserved (411, 990, etc.)
Possible values: 1~8 Default: 8
Parameter Description
Stratagy R3 I&M 11/99

Configure StratagySystem Parameters
Co
nfig
ure S
tratagy
fixed_len5
Maximum digits Stratagy expects when a caller dials a User ID beginning with five.
When changing this value, make certain that it is still possible to log in and send messages to all existing User ID mailboxes that begin with this digit. For example, if there are five digit User ID mailboxes that begin with this digit, then you should not set the value of this parameter less than five. Check all User ID mailboxes, including users, guests, and reserved (411, 990, etc.)
Possible values: 1~8Default: 8
fixed_len6
Maximum digits Stratagy expects when a caller dials a User ID beginning with six.
When changing this value, make certain that it is still possible to log in and send messages to all existing User ID mailboxes that begin with this digit. For example, if there are five digit User ID mailboxes that begin with this digit, then you should not set the value of this parameter less than five. Check all User ID mailboxes, including users, guests, and reserved (411, 990, etc.)
Possible values: 1~8Default: 8
fixed_len7
Maximum digits Stratagy expects when a caller dials a User ID beginning with seven.
When changing this value, make certain that it is still possible to log in and send messages to all existing User ID mailboxes that begin with this digit. For example, if there are five digit User ID mailboxes that begin with this digit, then you should not set the value of this parameter less than five. Check all User ID mailboxes, including users, guests, and reserved (411, 990, etc.)
Possible values: 1~8Default: 8
fixed_len8
Maximum digits Stratagy expects when a caller dials a User ID beginning with eight.
When changing this value, make certain that it is still possible to log in and send messages to all existing User ID mailboxes that begin with this digit. For example, if there are five digit User ID mailboxes that begin with this digit, then you should not set the value of this parameter less than five. Check all User ID mailboxes, including users, guests, and reserved (411, 990, etc.)
Possible values: 1~8Default: 8
fixed_len9
Maximum digits Stratagy expects when a caller dials a User ID beginning with nine.
When changing this value, make certain that it is still possible to log in and send messages to all existing User ID mailboxes that begin with this digit. For example, if there are five digit User ID mailboxes that begin with this digit, then you should not set the value of this parameter less than five. Check all User ID mailboxes, including users, guests, and reserved (411, 990, etc.)
Possible values: 1~8Default: 8
Parameter Description
Stratagy R3 I&M 11/99 3-45

Configure StratagySystem Parameters
3-46
Stratagy R3 I&M 11/99
Ho
w S
tratagy O
perates
How Stratagy Operates 4
Stratagy connects to standard analog extensions on the telephone system. To the telephone system, Stratagy looks like several ordinary telephones, not special digital or “fancy” telephone sets.
The telephone system controls the incoming calls until it directs them to Stratagy by ringing its “telephone” or port. Once a call rings on a Stratagy port, Stratagy answers and then performs the actions it is programmed to perform.
Stratagy’s design revolves around User ID mailboxes. How a User ID has been customized determines what a caller hears and is able to do (see Chapter 3 – Configure Stratagy for details). For example, if User ID 990 contains the initial company greeting, a caller accessing User ID 990 hears the greeting recorded as the greeting for User ID 990.
Call processing control in Stratagy involves User IDs, chains, groups, menus, and a token programming language. Using these control structures, you can define virtually any call handling method.
This chapter discusses:
� User IDs
� Call processing control
� User ID mailboxes
� How Stratagy processes User IDs and User ID mailboxes
User IDsAll of Stratagy’s User IDs are stored in a flatfile database. As a result, every User ID in Stratagy must be unique; you cannot have two User IDs with the same number.
Whenever a caller enters a User ID, Stratagy always accesses the same User ID. The exception is single-digit menus. If you define a single-digit menu key (0~9), Stratagy processes the User ID given for the menu key rather than the User ID with the single digit number. For example, if a caller were in User ID 100 and User ID 100 had a single-digit key 0 mapped to User ID 222, then by pressing 0 the caller would be sent to User ID 222 rather than to the operator defined by User ID 0.
Stratagy R3 I&M 11/99 4-1
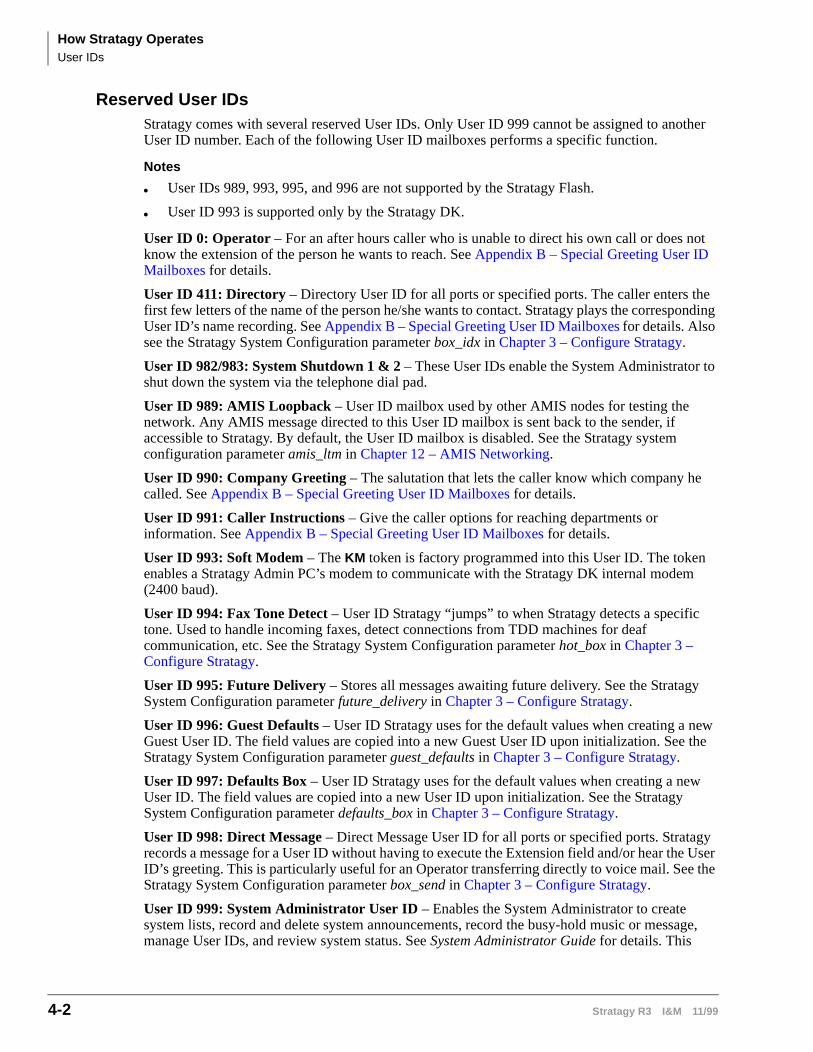
How Stratagy OperatesUser IDs
4-2
Reserved User IDsStratagy comes with several reserved User IDs. Only User ID 999 cannot be assigned to another User ID number. Each of the following User ID mailboxes performs a specific function.
Notes
� User IDs 989, 993, 995, and 996 are not supported by the Stratagy Flash.
� User ID 993 is supported only by the Stratagy DK.
User ID 0: Operator – For an after hours caller who is unable to direct his own call or does not know the extension of the person he wants to reach. See Appendix B – Special Greeting User ID Mailboxes for details.
User ID 411: Directory – Directory User ID for all ports or specified ports. The caller enters the first few letters of the name of the person he/she wants to contact. Stratagy plays the corresponding User ID’s name recording. See Appendix B – Special Greeting User ID Mailboxes for details. Also see the Stratagy System Configuration parameter box_idx in Chapter 3 – Configure Stratagy.
User ID 982/983: System Shutdown 1 & 2 – These User IDs enable the System Administrator to shut down the system via the telephone dial pad.
User ID 989: AMIS Loopback – User ID mailbox used by other AMIS nodes for testing the network. Any AMIS message directed to this User ID mailbox is sent back to the sender, if accessible to Stratagy. By default, the User ID mailbox is disabled. See the Stratagy system configuration parameter amis_ltm in Chapter 12 – AMIS Networking.
User ID 990: Company Greeting – The salutation that lets the caller know which company he called. See Appendix B – Special Greeting User ID Mailboxes for details.
User ID 991: Caller Instructions – Give the caller options for reaching departments or information. See Appendix B – Special Greeting User ID Mailboxes for details.
User ID 993: Soft Modem – The KM token is factory programmed into this User ID. The token enables a Stratagy Admin PC’s modem to communicate with the Stratagy DK internal modem (2400 baud).
User ID 994: Fax Tone Detect – User ID Stratagy “jumps” to when Stratagy detects a specific tone. Used to handle incoming faxes, detect connections from TDD machines for deaf communication, etc. See the Stratagy System Configuration parameter hot_box in Chapter 3 – Configure Stratagy.
User ID 995: Future Delivery – Stores all messages awaiting future delivery. See the Stratagy System Configuration parameter future_delivery in Chapter 3 – Configure Stratagy.
User ID 996: Guest Defaults – User ID Stratagy uses for the default values when creating a new Guest User ID. The field values are copied into a new Guest User ID upon initialization. See the Stratagy System Configuration parameter guest_defaults in Chapter 3 – Configure Stratagy.
User ID 997: Defaults Box – User ID Stratagy uses for the default values when creating a new User ID. The field values are copied into a new User ID upon initialization. See the Stratagy System Configuration parameter defaults_box in Chapter 3 – Configure Stratagy.
User ID 998: Direct Message – Direct Message User ID for all ports or specified ports. Stratagy records a message for a User ID without having to execute the Extension field and/or hear the User ID’s greeting. This is particularly useful for an Operator transferring directly to voice mail. See the Stratagy System Configuration parameter box_send in Chapter 3 – Configure Stratagy.
User ID 999: System Administrator User ID – Enables the System Administrator to create system lists, record and delete system announcements, record the busy-hold music or message, manage User IDs, and review system status. See System Administrator Guide for details. This
Stratagy R3 I&M 11/99
How Stratagy OperatesCall Processing Control
Ho
w S
tratagy O
perates
mailbox has a pre-programmed extension of H( ) for Hang-up. This enables (999) its use as a disconnect code for telephone systems that provide this feature.
Call Processing ControlCall processing control in Stratagy goes beyond the definition of unique User IDs. Stratagy provides four additional structures: chains, groups, menus, and a token programming language. These control structures enable more complex control so that you can define virtually any call handling method.
ChainsChains are how you tell Stratagy what to do when one of three conditions apply:
� Done – The Done chain instructs Stratagy where to send a caller who remains on the line after leaving a message or after listening to an announcement only mailbox.
� Ring No Answer (RNA) – The RNA chain instructs Stratagy where to send a caller when there is a RNA at a User ID’s extension.
� Busy – The Busy chain instructs Stratagy where to send a caller when a User ID’s extension is Busy.
GroupsGroups control which User IDs a call may access. Each User ID mailbox user can be a member of up to four groups. To be able to access another User ID, the caller User ID must share at least one group number with the currently accessed User ID.
MenusMenus define the destination for a caller that presses one of ten possible single-digit menu options while listening to a mailbox’s greeting. Menus can accommodate an unlimited number of special applications.
Token Programming LanguageStratagy’s programming language enables Stratagy to perform such versatile features as Fax on Demand, message waiting light control, and confirming digits entered by a caller. A series of tokens instruct Stratagy what actions to perform. See Chapter 9 – Token Programming for details.
User ID Mailboxes
Types of MailboxesUser IDs fall into one of several general categories, based on how they are customized.
User
A typical User ID mailbox records messages from callers. A user can periodically check the User ID for messages, or be notified by a variety of automatic notification methods. Typically, there is one user for each User ID, although several User IDs may share a single extension because the users themselves share a single telephone line.
Stratagy R3 I&M 11/99 4-3

How Stratagy OperatesUser ID Mailboxes
4-4
Information
An information User ID mailbox does not accept messages from callers. Instead, Stratagy plays its greeting to callers in order to provide them with information, such as the company’s hours of operation and location. No user or telephone extension corresponds to this type of User ID.
Control
Using Stratagy’s Token Programming Language, a control User ID mailbox, directs the flow of a call. Typically, it interacts with the caller in some way, then transfers the call to one or more additional User IDs for further processing.
For example, a User ID might ask the caller to input his or her telephone number. If the telephone number is seven digits long, Stratagy assumes it is valid and the User ID passes control to a second User ID that makes use of that telephone number in some way (such as faxing a document to it). If the telephone number is not seven digits long, Stratagy might transfer to a third User ID, which would be an information box whose recording informs the caller that the telephone number was not the right length. The User ID might then transfer control back to the original User ID to give the caller another chance to enter the correct number of digits.
Customizing MailboxesCustomizing User ID mailboxes involves defining User IDs using the following menus:
� Users Menu—The Users Menu consists of three screens (Info/Status, Options, Group/Chains) that enable you to define, delete, and list User ID mailboxes. Features to define include: company directory entries, Do Not Disturb, Call Screening, Greetings, and control structures such as Chains, Groups, and Menus. Once you have defined and saved a User ID, you can customize it using the Auto and Notify Menus. (See Chapter 6 – Users Menu for detailed information.)
� Auto (Scheduling) Menu—With the Auto Menu, you can set up automatic changes for each User ID Mailbox. You can set these changes to occur at a specified time, on certain days of the week, or on a specified date. For example, you can set up different daytime and nighttime greetings. (See Chapter 7 – Auto (Scheduling) Menu for detailed information.)
� Notify Menu—The Notify Menu enables you to program Stratagy to automatically call a user to notify him of messages. Notification methods include beepers, other telephones, and office paging systems. (See Chapter 8 – Notify Menu for detailed information.)
In addition to the programming capabilities provided by the Users, Auto, and Notify Menus, Stratagy provides:
� Token Programming Language—Enables you to obtain additional features. These include Fax on Demand and message waiting light control. See Chapter 9 – Token Programming for details.
� Reserved User ID Mailboxes—These mailboxes have pre-programmed common features. See “Reserved User IDs” on Page 4-2 for more information.
� Notify Templates—Notify contains templates (e.g., message waiting light control and pagers) you can use for defining User ID Notify records.
See Appendix A – Checklists/Forms for forms to use for defining the Users, Auto, and Notify Menus. See Chapter 10 – Customization Examples for sample customized User ID mailboxes. See Chapter 13 – Faxes for information about programming User ID mailboxes using the fax feature. If you have questions about customizing User ID mailboxes, please contact Toshiba Technical Support.
Stratagy R3 I&M 11/99

How Stratagy OperatesHow Stratagy Processes
Ho
w S
tratagy O
perates
How Stratagy Processes
User IDsWhenever a call rings a port on Stratagy, Stratagy answers and begins processing the call starting at a predefined User ID. After processing the initial User ID, Stratagy continues processing by following a chain to the next User ID. At any time, should a caller enter DTMF, Stratagy translates the DTMF to a User ID and continues processing at that User ID. Therefore, movement between User IDs is accomplished automatically by following chains or by DTMF entry. (And a third way: Stratagy’s Token Programming Language.)
How Stratagy Processes Movement Between User IDs
The process described is the default setup in Stratagy (see Figure 4-1). For example, User ID 990 (Company Greeting) and User ID 991 (Caller Instructions) are defaults; you can assign other User ID mailboxes to perform these functions. In addition, you may override any of the described processing by changing the chain and User ID definitions.
1. New Call – The process starts with an incoming call. Stratagy directs the call to the Company Greeting User ID.
2. Company Greeting User ID (Default: User ID 990) – The Company Greeting User ID plays the opening greeting (“Thank you for calling... ”). Stratagy determines whether the caller entered DTMF during the greeting.
� Yes – Stratagy directs the call to that DTMF and processes the User ID. It then follows the Done chain of the User ID. If there is no Done chain for this User ID, it follows the Done chain for the Company Greeting User ID.
� No – Stratagy directs the call as per the Company Greeting User ID 990’s Done chain to the Company Instructions User ID.
3. Caller Instructions User ID (Default: User ID 991) – The Company Instructions User ID plays the caller instruction message, which is a menu of dialing choices (“To reach... enter...”). Stratagy determines whether the caller entered DTMF during the message.
� Yes – Stratagy directs the call to that DTMF and processes the User ID. It then follows the Done chain of the User ID. If there is no Done chain for this User ID, it follows the Done chain for the Company Greeting User ID.
� No – Stratagy looks at the value of the Stratagy System Configuration parameter dtmf_gate.
4. dtmf_gate — Stratagy determines if the Stratagy System Configuration parameter dtmf_gate is True. See Chapter 3 – Configure Stratagy for information on configuring dtmf_gate.
� Yes – Stratagy prompts the caller to say “yes” to the tone. If Stratagy detects any sound, Stratagy transfers the call to the Operator User ID. If not, Stratagy hangs up.
� No – Stratagy transfers the call to the Operator User ID.
5. Operator User ID (Default User ID 0) – This is the end of the Company Instructions User ID’s Done chain.
If a caller presses +�after recording a message for a User ID, the message is sent to the destination mailbox, the prompt, “message sent” plays and the call transfers to the Operator.
Stratagy R3 I&M 11/99 4-5
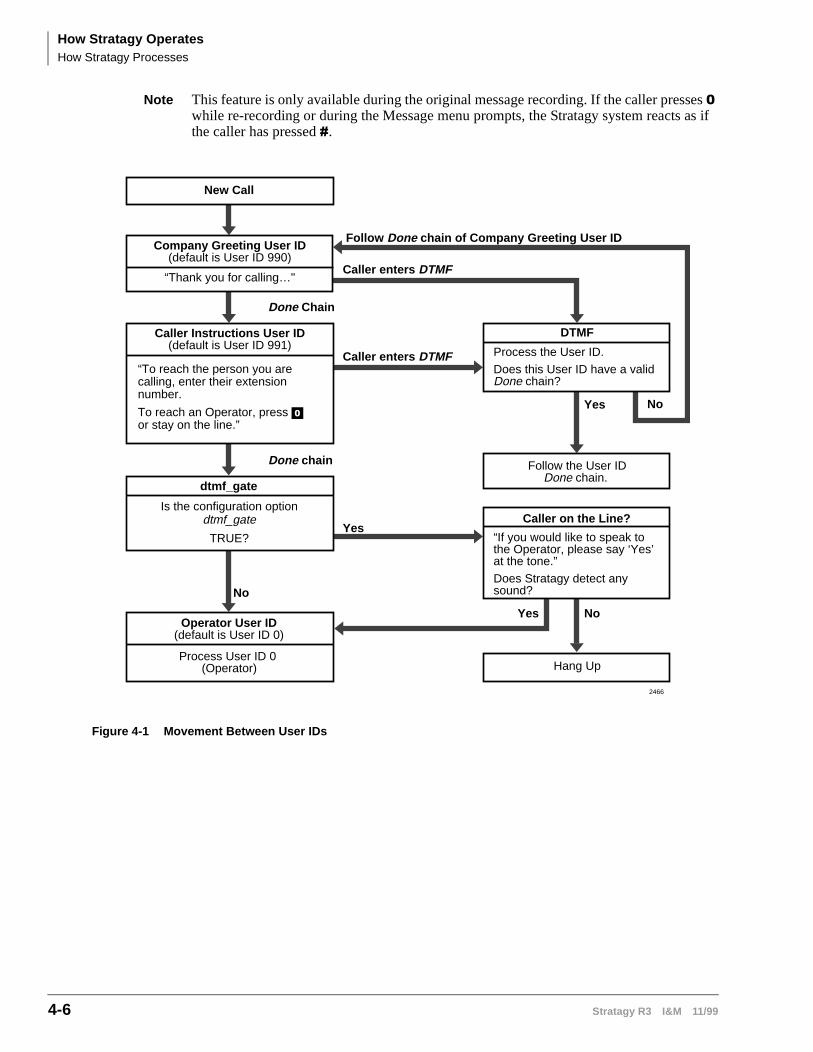
How Stratagy OperatesHow Stratagy Processes
4-6
Note This feature is only available during the original message recording. If the caller presses + while re-recording or during the Message menu prompts, the Stratagy system reacts as if the caller has pressed #.
Company Greeting User ID(default is User ID 990)
New Call
Follow the User IDDone chain.
Hang Up
Caller enters DTMF
Yes
Done Chain
Done chain
“Thank you for calling…"
dtmf_gate
Is the configuration option dtmf_gate
TRUE?
Process the User ID.Does this User ID have a valid Done chain?
Operator User ID(default is User ID 0)
Process User ID 0 (Operator)
No
Caller Instructions User ID(default is User ID 991)
“To reach the person you are calling, enter their extension number.
To reach an Operator, press or stay on the line.”
Caller enters DTMF
Follow Done chain of Company Greeting User ID
NoYes
Yes No
DTMF
“If you would like to speak to the Operator, please say ‘Yes’ at the tone.”Does Stratagy detect any sound?
Caller on the Line?
2466
Figure 4-1 Movement Between User IDs
Stratagy R3 I&M 11/99

How Stratagy OperatesHow Stratagy Processes
Ho
w S
tratagy O
perates
Not Successful
Successful
YesNo
No
No
Yes
Records caller’s message.
No
Yes
Call Screening
Is Screen Calls ON?
Do Not Disturb
Is Do Not Disturb ON?
Evaluate Extension
Is the firstcharacter “@”?
Suppress Normal Process
Processes Token Programming Language
Transfer Hold
Processes TokenProgramming Language
(usually dials the extension).
Follows the Done chain of theCompany Greeting User ID
(default 990)
Connects the Caller
Yes
No
No
Start
Stratagy directs callto this User ID.
Yes
Answer
If ID Call? is YES, Stratagy plays the tone and then the User ID's recorded name.
Otherwise, Stratagy plays a tone.
Call Screening
Is Screen Calls ON?
Busy
If the User ID’s Busy chain is defined, Stratagy follows it.
Otherwise, plays either the system busy greeting or the custom busy greeting, per the User ID’s configuration.
Caller Response
If the caller enters another User ID, Stratagy startsprocessing at that User ID.
If the User ID's Busy Hold is YES and the caller presses
*
to hold, Stratagy starts a hold queue for the User ID.
If the caller does nothing,Stratagy continues.
Ring No Answer
If the User ID’s RNA chain is defined, Stratagy follows it.
Otherwise, continues.
Greeting
Plays thecurrent greeting.
Store Messages
Is Store MessagesYES?
Copy Message To
If Copy Message To defines a valid User ID, copies/records the message to that User ID.
Done
If the User ID’s Done chain is defined, Stratagy follows it.
Otherwise, follows the Done chain of the Company Greeting User ID (default 990).
Play Caller Name
User accepts, rejects, ortransfers call. To accept call,press 1 . To reject call, press 2and hang up. To transfer callwith an announcement, press3 . To transfer call without anannouncement, press 4.
If the user presses and hangs up or does nothing, Stratagy continues as if it received a Ring No Answer after dialing the extension.
If the user presses or , dials the extension, and hangs up. Stratagy directs the call to Start for the extension transferred to.
Otherwise, continues.
Records Caller's Name
2467
Figure 4-2 User ID Mailbox Processing
Stratagy R3 I&M 11/99 4-7

How Stratagy OperatesHow Stratagy Processes
4-8
User ID MailboxesStratagy processes a User ID mailbox (see Figure 4-2) based on:
� User ID mailbox field settings
� Whether an Answer, Busy, or RNA condition exists.
How Stratagy Processes User ID Mailboxes
1. Start – Stratagy directs the call to this User ID.
2. Do Not Disturb – Stratagy determines whether the User ID mailbox field Do Not Disturb is On.
� Yes – Stratagy directs the call to the RNA greeting and proceeds with the RNA condition.
� No – Stratagy determines whether Call Screening is On.
3. Call Screening – Stratagy determines if Screen Calls is On.
� Yes – Stratagy records the caller’s name and then proceeds to dial the Extension.
� No – Stratagy dials the Extension.
4. Evaluate Extension – Stratagy determines if the Extension’s first character is @.
� Yes – Stratagy suppresses the normal process. Stratagy processes the Token Programming Language, then proceeds to the RNA condition. If there is an error during processing, Stratagy follows the Done chain of the Company Greeting User ID.
� No – Stratagy places the call on transfer hold. Stratagy processes the Token Programming Language, then proceeds to the Answer, Busy, or RNA condition, as appropriate (see Table 4-3).
Table 4-3 Call Flow
Answer Busy Ring No Answer
Stratagy determines if ID Call is Yes.Yes – Stratagy plays the user’s
recorded name. If the recording does not exist, Stratagy plays a tone. Stratagy proceeds to Call Screening.
No – Stratagy proceeds to Call Screening.
Stratagy determines if the Busy chain is defined.Yes – Stratagy follows this User
ID’s Busy chain.
No – Stratagy proceeds to play the busy greeting.
Stratagy determines if the Ring No Answer chain is defined.Yes – Stratagy follows the User
ID’s Ring No Answer chain.
No – Stratagy plays the current greeting.
Call Screening – Stratagy determines if Screen Calls is On. Yes – Stratagy plays the name the
caller recorded.
No – Stratagy connects the caller.
Play Busy Greeting – Stratagy determines if there is a custom busy greeting.Yes – Stratagy plays the user’s
custom busy greeting.No – Stratagy plays the system
busy greeting.
Play the Current Greeting – Stratagy determines if there is a custom greeting.Yes – Stratagy plays the user’s
custom greeting.No – Stratagy plays the system
greeting.
Stratagy R3 I&M 11/99

How Stratagy OperatesHow Stratagy Processes
Ho
w S
tratagy O
perates
Play Caller Name – User Accepts, Rejects, or Transfers. Stratagy plays “To accept... “Accepts Call – User accepts call
(presses�)). Stratagy proceeds to connect the caller.
Rejects Call – User rejects call (presses ,) and hangs up. Stratagy proceeds to the Ring No Answer condition.
Transfers Call with Announcement – User transfers call with announcement (presses &). The user dials the extension to transfer the call and hangs up. Stratagy plays “Your call is being transferred to” with the name recording or User ID of the extension where the call is being transferred and Stratagy transfers the call. Stratagy proceeds to Start for the extension transferred to.
Transfers Call without Announcement – User transfers the call without announcement (presses -). The user dials the extension to transfer the call and hangs up. Stratagy asks the caller to continue to hold and transfers the call. Stratagy proceeds to Start for the extension transferred to.
Caller Response – Stratagy directs the call depending upon the caller’s response.Hold – If the User ID’s Busy Hold is
YES and the caller presses
( to hold, Stratagy starts a hold queue for this User ID.
Another User ID – If the caller enters another User ID, Stratagy processes that User ID.
Nothing – If the caller does nothing, Stratagy determines if Store Messages is YES.
Store Messages – Stratagy determines if Store Messages is Yes.Yes – Stratagy records the caller’s
message. Then determines if there is a Copy Message To mailbox.
No – Stratagy determines if there is a Copy Message To mailbox.
Store Messages – Stratagy determines if Store Messages is Yes.Yes – Stratagy records the caller’s
message. Then determines if there is a Copy Message To.
No – Stratagy determines if there is a Copy Message To.
Copy Message To – Stratagy determines if Copy Message To contains a valid User ID.Yes – Stratagy copies/records that
message to that User ID. Stratagy then proceeds to the User ID Done chain.
No – Stratagy proceeds to the User ID Done chain.
Copy Message To – Stratagy determines if Copy Message To contains a valid User ID.Yes – Stratagy copies/records that
message to that User ID. Stratagy then proceeds to the User ID Done chain.
No – Stratagy proceeds to the User ID Done chain.
User ID Done Chain – Stratagy determines if this User ID Done chain is defined.Yes – Stratagy follows the User ID
Done chain.
No – Stratagy follows the Done chain of the Caller Instructions User ID.
Connect the Caller – If the user accepts the call, Stratagy connects the caller and the user.
User ID Done Chain – Stratagy determines if the User ID Done chain is defined.Yes – Stratagy follows the User ID
Done chain.
No – Stratagy follows the Done chain of the Caller Instructions User ID.
Caller Instructions User ID Done Chain – Stratagy follows the Done chain of the Company Greeting User ID (default 990).
Caller Instructions User ID Done Chain – Stratagy follows the Done chain of the Caller Instructions User ID (default 991).
Table 4-3 Call Flow (continued)
Answer Busy Ring No Answer
Stratagy R3 I&M 11/99 4-9

How Stratagy OperatesHow Stratagy Processes
4-10
Stratagy R3 I&M 11/99
Featu
re Pro
gram
min
g
Feature Programming 5
This chapter lists (in alphabetical order) Stratagy’s programmable features and gives instructions on programming each feature. All features are categorized as:
� System – Features set on a system-wide basis.
� User ID Mailbox – Features set on a User ID mailbox basis.
For descriptions of these features, see the Stratagy General Description. For additional information, see:
� Parameters – Chapter 3 – Configure Stratagy
� Tokens – Chapter 9 – Token Programming
� Menus – Chapter 6 – Users Menu, Chapter 7 – Auto (Scheduling) Menu, and Chapter 8 – Notify Menu
Note Copies of the menus are available in Appendix A – Checklists/Forms. We recommend that you fill in the appropriate forms and give copies to the System Administrator for their reference.
Features Set on System-wide BasisThe settings for the following features apply to all users on the system.
Automatic System RecoveryThis feature defaults to enabled (True). To disable this feature, reset the restore_original and restore_config parameters to False.
To receive notification of an unsuccessful startup, use the error_box parameter to designate a User ID Mailbox to receive the message. The Notify menu for the mailbox should be set for a PANIC notification type.
Caller Confirmation Prior to TransferringThis feature defaults to enabled (True). To disable this feature, reset the dtmf_gate parameter to False.
When enabled, the system states, “Say yes at the tone.” A verbal response completes the transfer to a company operator and “no response” causes the system to disconnect the call.
Stratagy R3 I&M 11/99 5-1

Feature ProgrammingFeatures Set on System-wide Basis
5-2
Disk Space NotificationThis feature defaults to 5% free disk space. To reset the feature, use the diskwarn parameter (values = 1~99). The value (percentage) becomes the threshold or percentage of available disk space that remains on the hard drive.
To receive notification when the threshold has been reached, set User ID 999’s Type field (Notify Menu) to DISK. Time intervals between notification, alternate notification destinations, etc., can also be programmed using the Auto (Scheduling) Menu.
Fax MessagingSee Chapter 13 – Faxes for complete instructions on programming the fax features.
Fax Tone DetectionThis feature sends fax tone detection to User ID 994 (default). To change the User ID, set the hot_box parameter for the new destination extension of the fax machine. The designated User ID accepts the fax tone and a blind transfer to the extension connected to the fax machine follows.
Future DeliveryDedicate a User ID (default User ID 995) mailbox for storing all future delivery messages using the future_delivery parameter. The messages stored in the mailbox cannot be deleted or played by the Administrator.
Note Not supported by the Stratagy Flash.
Greeting—CompanyYou must record all company greetings using the “Information User IDs,” such as the initial greeting User ID (typically “990”). A company, for instance, can have a standard greeting play during regular business hours, and a second greeting play after hours which informs callers that the business is closed, etc.
A third greeting can also be recorded which explains that “the company is closed for the holiday.” Since the Auto Scheduler permits holidays to be programmed up to a year in advance, and repeats automatically at one year intervals, the holiday greeting can play automatically on each holiday.
Greeting—Port-SelectableThis feature defaults to User ID Mailbox 990 for all ports. This feature should be configured to start processing with the appropriate User ID based on the expected use of the Stratagy ports. If you need to change the default, use the box_grt parameter.
After verifying the box_grt parameter setting is correct, the User IDs must be created and configured, and their greetings recorded to give callers the desired information.
Interactive Voice Response (IVR)All of the IVR features are implemented using Stratagy’s flexible token programming language. This means that a combination of User IDs can be used to implement a sophisticated IVR application.
Enter the selected programming tokens in the Extension field (Users Menu Options screen) of the appropriate User ID. The size and sophistication of the customer application determines the number of User IDs and the tokens required. (See Chapter 10 – Customization Examples for
Stratagy R3 I&M 11/99

Feature ProgrammingFeatures Set on System-wide Basis
Featu
re Pro
gram
min
g
examples on using tokens for IVR applications.) Stratagy can contain up to 100 million User IDs, many of which can be used simultaneously in this type of application.
Note The Stratagy Flash does not support some IVR related prompts (e.g., monies).
Message Delete—Continuous/Message Playback—ContinuousThis feature defaults to 30 minutes for continuous delete or playback. To change the setting use the tape_length parameter (values are 10~99 minutes).
Note The time period set is normally the length of a continuous recording.
Message Pause During Playback/RecordingThis feature is set to a default pause of 30 seconds. To change the setting, use the tmo_resume parameter (system values are 0~255).
Message Playback ControlThis feature is set to a default of five seconds. To change the setting, use the play_skip parameter (possible values are 1~99 seconds).
Message PurgingThis feature defaults to disabled. To enable it, use the purge parameter (possible values: 1~99 days).
Multiple System LanguagesThis feature defaults to English prompts. To change the setting, you must:
� Load the desired additional prompt file(s) during system installation and configuration.
� Configure the system for the new language using the prompt_file parameter.
� Record a prompt to instruct callers on the steps for changing the file during a call.
Networking (AMIS)An AMIS Analog protocol must be implemented on the other voice messaging system for AMIS networking to function. If the networking feature is being used to network Stratagy with another vendor’s systems, planning and coordination between the two locations’ Administrators is required to create a workable numbering plan.
The feature defaults to disabled. To enable the feature, remove the comment sign (#) and set the amis_enabled to True. See “amis_enabled” on Page 12-4 for more instructions on setting the AMIS parameters.
ReportsSee Chapter 15 – System Reports for procedures on using the Report feature. To schedule an automatic report, use the auto_report and auto_report_time parameters. Reports can be scheduled in advance (24-hour format).
Stratagy R3 I&M 11/99 5-3

Feature ProgrammingFeatures Set on System-wide Basis
5-4
Screen AdvertisementThis feature is enabled (defaults to 5 minutes). To change the setting, use the tmo_blank parameter (valid entries are 1~99 min.) or to disable the feature set the parameter to 0.
Note The screen saver activates only when the Main Menu is displayed.
To program an advertisement or slogan (58-characters long) that displays instead of the blank screen use the advertising parameter.
Shutdown using the Telephone Dial PadChange Security Code for User ID 983 and set DND to Off.
System Administrator’s MailboxSee System Administrator Guide for information.
Token ProgrammingA token or group of tokens placed together to perform a specific function is referred to as a token string. A token string that performs call processing applications (offsite call transfer via Centrex lines, Fax Back, Fax on Demand, Holiday Application, etc.) are placed in the Extension field of a User ID. Tokens can also be used in the Method field (Notify Menu) to customize notification templates.
See Chapter 9 – Token Programming for a list of tokens and descriptions and Chapter 10 – Customization Examples for example token applications.
Universal PortsThe number of ports reserved for outbound notification is set in the n_ochan parameter(default = 0). When Stratagy is configured for 24 ports, at least 1 channel must be reserved for outbound notification.
You can also restrict Notify to only a defined port in the notify_restriction parameter(defaults to 1).
User ID—Variable/Fixed LengthTo set the length of User IDs, use the fixed_len0~9 parameters. System defaults to 8 digits.
Varied Sampling RatesUse the following parameters to reset the sampling rates:
� adpcm_hq parameter for greetings and name recordings
� adpcm_nq parameter for incoming messages
� adpcm_pq parameter for system prompt file
Note Once the rates have been set, they cannot be changed since greetings or messages previously recorded are lost.
Stratagy R3 I&M 11/99

Feature ProgrammingSet on User ID Mailbox Basis
Featu
re Pro
gram
min
g
Set on User ID Mailbox BasisThe settings for the following features apply to only the User ID mailbox where the programming is done.
Automatic SchedulerSet this feature using the Auto (Scheduling) Menu. You can program the following features to occur automatically at a preset time, day, or date:
� Audiotex
� Call Screening (toggle On or Off)
� Company Greeting (toggle On or Off)
� Personal Greetings (change the Personal Greeting that plays by time of day)
� DND (toggle On or Off)
� Scheduled Extensions (change where a call is transferred to when a caller dials the User ID from the Stratagy automated attendant)
� Message Notification
� Ring Duration (number of rings when a call is transferred to an extension by the Stratagy automated attendant before it is considered Ring No Answer (RNA).
Called IdentificationThis feature defaults to disabled (No). To enable it, set the ID Call? field (Users Menu Options Screen) to Yes.
SMDI Caller ID
To configure this feature, use the play_caller_id parameter and the %K token. See “SMDI Calling Party Identification” on Page 11-5 for details.
Call ScreeningThis feature defaults to disabled (Off).
To enable it, set the Screen Calls field (Users Menu Options Screen) to On. This enables the user to turn this feature On or Off from the phone’s dial pad. If you set the Screen Calls Lock field to On, the user is prevented from changing the Call Screening feature in this manner, and only the Administrator can change it.
This feature can also be set to switch automatically to Call Screening mode and back again at a certain time/day/date, using the Auto (Scheduling) Menu.
Call TransferAll Stratagy call transfers are controlled by the User ID and Extension fields (Users Menu Options screen). Entering only the destination extension results in a supervised call transfer. Other call transfer types are implemented with Tokens.
Note XXXH = blind transfer to extension XXX.XXXU = release the call to extension XXX if ring tone is detected.
Stratagy R3 I&M 11/99 5-5

Feature ProgrammingSet on User ID Mailbox Basis
5-6
ChainingStratagy’s chaining feature enables the flow of control during call processing to be directed from one User ID to another, based on the results of dialing the Extension field (Users Menu Groups/Chains screen).
Note The User ID can not be configured in Do Not Disturb mode.
The three possible chaining conditions are Done, RNA and Busy.
DirectorySet the box_idx parameter for the User ID Mailbox that searches the directory for user names (default is 411). You can also designate a different mailbox for different ports.
Distribution ListsSet the cmt_maxlen parameter for the time allowed for recording a list comment (defaults to 10).
Do Not DisturbThis feature defaults to disabled (Off).
To activate this feature, set the Do Not Disturb field (Users Menu Options Screen) to On. This enables the user to turn this feature On or Off from the phone’s dial pad. If you set the Do Not Disturb Lock field to On, the user is prevented from changing the DND feature in this manner, and only the Administrator can change it.
This feature can also be set to switch automatically to DND mode and back again at a certain time/day/date, using the Auto (Scheduling) Menu.
Extensions—Scheduled Set the scheduled extensions in the Auto (Scheduling) Menu.
Greetings
Busy Greeting
This feature defaults to the System Busy Greeting (SYS). To change it to a custom busy greeting, set the Busy Greeting field (Users Menu Options Screen) to CUS.
The amount of time allowed for recording the greeting is 45 secs (30 secs for the Stratagy Flash). To increase or decrease the time, set the Busy Greeting Max. field (Users Menu Options Screen) to 1~999. Setting this field to 0 prevents the user from recording or changing a custom Busy Greeting.
Personal Greeting
By setting the Current Greeting Max field (Users Menu Options screen) to zero, the Administrator can prevent the user from recording a new greeting or changing (recording over) an existing greeting. This has the effect of locking the greeting recording(s), and prevents the user from changing the current greeting number. If the user’s greetings are not locked, the user can change the greeting number and/or record new greetings (up to the permitted length).
Stratagy R3 I&M 11/99

Feature ProgrammingSet on User ID Mailbox Basis
Featu
re Pro
gram
min
g
Greeting RestartAfter a caller has left a voice message for a User ID, the call can either be transferred back to the initial “company” greeting User ID or the system can say “Thank you for calling, good-bye” and disconnect. By default a caller is returned to the “instruction greeting” (User ID 991). This can be chained via the Done chain in the user’s mailbox.
Group Partitions—Call BlockingDefine the group(s) that a User ID belongs to by filling in the group number(s) on the Users Menu Groups/Chains screen. User IDs can only access other User IDs that are defined as being in the same group.
Guest UsersThis feature defaults to disabled (-1). To enable it, enter 0~99 (number of guest User IDs the user can create) in the Guests field (User Menu Options screen).
Note Stratagy Flash does not support this feature.
The Administrator also controls the configuration of each created Guest User ID through the use of the guest_defaults parameter. The parameter is set to a standard system template, User ID 996, but a new template can be created and used in its place.
Guest Users Limit
This feature is set in two ways:
� System Limit: The Guest Users Limit for the entire system is set by entering values in the guest_min (default 90000) and guest_max (default 90199) parameters. The difference of the entries is the maximum number of guest user IDs that can be created by all users on the system.
� User ID Limit: A limit is set (default: -1) for each User ID by entering a value in the Guests field on the User’s Options screen. Valid entries are:
� 0~99 enables the user to create that number of guest user IDs.
� -1 stops the User from using the Guest Users feature.
The Administrator can also change the number remaining in the field to 0 at any time. The user has access to the previously-created Guest User IDs but cannot create new ones.
If the Administrator changes the number remaining in the field to -1 after Guest User IDs have been created, the Guest User IDs are not deleted but the user does not have access to them. Any new IDs cannot be created.
Message Speed ControlThis feature defaults to 0 (normal). If not reset, the system lacks an alternate rate speed and only plays at one speed. To reset the feature use the Alternate Rate field (Users Menu Options screen) to increase the alternate playback speed to 1~4. The user can toggle between the normal speed and the faster (alternate) speed by pressing ##.
Stratagy R3 I&M 11/99 5-7

Feature ProgrammingSet on User ID Mailbox Basis
5-8
Message CopyTo enable this feature enter a User ID mailbox number in the Copy Message To field (Users Menu Options screen).
Set the Store Messages field (Users Menu Options screen) to Yes. Stratagy stores the message in both the accessed User ID mailbox and the User ID mailbox shown in the Copy Message To field. Any messages already stored in the originating User ID are not copied.
Message Copy with DeleteTo enable this feature enter a User ID mailbox number in the Copy Messages To field (Users Menu Options screen). Set the Store Messages field to No. Stratagy stores the message only in the Copy Message To User ID Mailbox. The first User ID does not store messages.
Message Date and Time ControlThis feature defaults to enabled (Yes) and the date/time is played automatically before the message. To disable this feature, change the Play Date/Time? field (Users Menu Options screen) to No.
Message Length ControlThis feature defaults to 180 seconds (30 secs. in the Stratagy Flash). To change the feature, reset the Store Messages (Max) field (User Menu Options screen) to a value from 1~999 (seconds). If set to 0, messages can have any length up to Stratagy’s disk capacity.
Message Retrieval ControlThis feature defaults to First-in, First-out order. To reset this feature, use the Message Order field (User Menu Options screen).
Messages—New, Pending and SavedSet Saved Msg Que field (Users Menu Options Screen) to Yes to create two queues, new and saved, or No for one queue for all messages.
Pending Messages
Any message listened to for a shorter amount of time than that specified in the msg_pending_threshold parameter is kept as a new message. The message remains in the New Message Queue and the Message Waiting Off notification type is not processed. A message that is listened to longer than the time specified but is not listened to all the way through or manually saved (by pressing ,) or deleted (by pressing &) is considered a Pending Message. The message remains in the New Message Queue and the Message Waiting Off notification type is processed.
This feature defaults to disabled. To enable it set the Message Pending (Users Menu Options screen) field to On. To reset the threshold time, use the msg_pending_threshold (default 5 seconds) parameter (values are 3~10 seconds).
Messages—UrgentSet the Type field (Notify Menu) to URGENT to notify the user of urgent messages.
Stratagy R3 I&M 11/99

Feature ProgrammingSet on User ID Mailbox Basis
Featu
re Pro
gram
min
g
Message Volume ControlThis feature is set to normal/average sound (defaults to 0). To reset the feature, enter -8 (softest) to 8 (loudest) in the Message Volume field (Users Menu Options screen).
Changing the gain_norm parameter setting also affects this feature.
Name (and Extension) ControlThis feature defaults to enabled (Yes). To disable this feature, set the Record Name? field (Users Menu Options screen) to No.
The amount of recording time defaults to 5 seconds. To change the amount of recording time reset the nam_maxlen parameter to 1~99 seconds.
Notification—MessageActivate the Notify Menu. Notification records can become templates and used repeatedly (e.g., pager notification, turning on/off a message waiting light, etc.). Since the Method field (Notify Menu) can consist of a number of different programming tokens, an almost unlimited range of actions is available.
You can dedicate (reserve) a port(s) for outbound notifications, using the n_ochan parameter. If no port is dedicated for notification use, Stratagy attempts to use the highest numbered IDLE port.
Office PagingThis feature is set using the Type field (Notify Menu) to RELAY. See Chapter 10 – Customization Examples for examples on setting up a notification to a pager.
Programmable Dial ActionsEnter the token programming sequence into the Extension field (Users Menu Options screen). The default is usually the same as the User ID number, since users’ ID numbers are often the same as their telephone extension number.
Ring DurationThis feature defaults to four maximum rings per call. To reset this feature use the Maximum Rings field (Users Menu Options screen). Valid entries are 1~9 and 0 (sets the ring duration to system default).
This value can also be changed automatically at a certain time/day/date using the Auto (Scheduling) Menu.
Shared ExtensionsEach User ID is set to have the same shared Extension number, and the ID Call? field must be set to Yes.
Stratagy R3 I&M 11/99 5-9

Feature ProgrammingSet on User ID Mailbox Basis
5-10
Single-digit MenusDefine the single-digit menu numbers (up to 10) for each User ID on the Group/Chains screen of the Users Menu. Leaving a given number’s field blank indicates the digit has no special significance while this User ID is processed. A greeting must be recorded that the caller hears. An example is: “I’m not available to answer your call. Press 1 to leave a message, 2 to talk to my personal assistant, 3 to page me, 4 to send me a fax or 0 to talk to the operator.”
The token programming language provides a special token M for prompting and processing menu choices.
Note Single-digit menu 0 is normally reserved for the operator.
User ID Security CodeSpecify the initial security code in the Security Code field (Users Menu Options screen). Minimum and maximum length restrictions can be set using the security_min_length (default = 1, values 1~8) and security_max_length parameters (default = 16, valid entries are 1~16).
Using the System Administrator’s User ID mailbox 999, the Administrator can reset the code for a User ID at any time. Although the Administrator can reset the code, he/she does not have access to existing User ID security codes.
The default security code for User ID mailboxes is: User ID + Security Code for Defaults Box 997. Since the Defaults Box’s security code defaults to 997, any User ID created would have a default security code of User ID + 997. For example, User ID 234’s default security code would be 234997.
If you change the Defaults Box’s security code (for example to 555), all new mailboxes created have the new default security code (234555).
Voice FormsProgram the Q (Question and Answer) token into the User ID. Each question is recorded as a greeting, either in that User ID or in others. The Q token specifies which greetings play and in what order. Up to 20 questions are allowed.
Stratagy R3 I&M 11/99

Users M
enu
Users Menu 6
The Users Menu screens is where User IDs are created, modified, saved, and deleted. Features available through the Users Menu include:
� Company directory entries
� Basic options (RNA, DND, call screening, message storage, message playback, etc.)
� AMIS options
� User information and statistics
� Control structures (chains, groups, and menus)
Once you have defined and saved a User ID, you can further customize it using the Auto and Notify Menus. See Chapter 7 – Auto (Scheduling) Menu and Chapter 8 – Notify Menu.
This chapter discusses:
� Access and exit the menu
� Menu options
� Create, modify, copy or delete a mailbox
� Boxlist
� AmisNodeList
� Users Menu field descriptions
Access and Exit the MenuSee Chapter 2 – Access and Use Stratagy for information about the Main Menu.
Access Users Menu
1. From the Main Menu, press Alt+U.
Stratagy prompts you for your password.
2. Enter the password (the default password is Stratagy, with the first letter uppercase) and press Enter.
The password does not display as you type. If you enter it incorrectly, you must select the Users Menu again.
The Options screen displays, from which you can access the other Users Menu screens (Info/Status and Group/Chains).
Stratagy R3 I&M 11/99 6-1

Users MenuMenu Options
6-2
Access a Screen
Exit Users Menu
Menu OptionsThe Users Menu (see Figure 6-1 and Table 6-1 on Page 6-7) consists of three screens:
� Options (see Figure 6-2 and Table 6-2 on Page 6-10) – Basic (RNA, DND, Call Screening and message information) and AMIS options for the User ID mailbox.
� Group/Chains (see Figure 6-3 and Table 6-3 on Page 6-16) – Chain, group and menu information for the User ID mailbox.
� Info/Status (see Figure 6-4 and Table 6-4 on Page 6-20) – Displays statistics for the User ID mailbox that can be used to generate reports.
Create User ID MailboxNote When you create a User ID mailbox, Stratagy uses the Defaults Box User ID (default 997)
as a template for the new User ID mailbox.
➤ Press Alt+O The Options Screen displays.
...or Alt+G The Group/Chains Screen displays.
...or Alt+I The Info/Status Screen displays.
1. Press Alt+S. Your changes are saved.
Important! To save your modifications to the current User ID mailbox, you must press Alt+S before pressing Esc.
2. Press Esc. The Main Menu displays.
1. From the Users Menu, Options screen, type a unique number in the User ID field and press Enter.
Stratagy initializes the remaining fields with the values specified in the Defaults Box User ID.
2. To change any field settings, place the solid color edit block that appears on the screen next to the field name. Type the information in the field and press Enter
...or for some fields, press the spacebar to toggle the value.
Notes
� Use Enter or the arrow keys (↑↓) to move between fields.
� To display detailed help for the current field, press F1. See “Online Help Function” on Page 2-10.
Stratagy R3 I&M 11/99

Users MenuModify User ID Mailbox
Users M
enu
Modify User ID Mailbox
3. When finished, press Alt+S.
4. If necessary access the Groups/Chains screen and make any required changes to the field settings.
The Groups/Chains screen displays.
5. When finished, press Alt+S.
The User ID mailbox is saved and the Box Created and Box Saved fields of the Info/Status Screen change from NEVER to the current date and time.
6. As appropriate, continue defining the User ID mailbox using the Auto and Notify Menus.
See Chapter 7 – Auto (Scheduling) Menu and Chapter 8 – Notify Menu for detailed information.
1. From the Users Menu, Options screen, type the User ID mailbox number in the User ID field. Press Enter.
Stratagy automatically loads the User ID mailbox. If the User ID does not exist, Stratagy assumes that you are creating a new User ID mailbox (see “Create a Mailbox” above).
Note To determine whether a particular User ID has already been created, look at the Box Created field in the Info/Status Screen.
2. Access the Users Menu screens as needed and define the User fields (user’s information, basic options, AMIS options, groups, chains, menus).
Notes
� Use Enter or the arrow keys (↑↓) to move between fields.
� To display detailed help for the current field, press F1.
3. When finished, press Alt+S.
The User ID mailbox is saved.
4. As appropriate, continue defining the User ID mailbox using the Auto and Notify Menus.
See Chapter 7 – Auto (Scheduling) Menu and Chapter 8 – Notify Menu for detailed information.
Stratagy R3 I&M 11/99 6-3

Users MenuCopy Mailbox(es)
6-4
Copy Mailbox(es)When you copy a User ID mailbox, Stratagy uses the existing mailbox as a template to create the new mailboxes.
Notes
� User’s Information fields are not copied. The User ID field contains the new User ID you specified. Comment, Extension, and Directory Name fields are not defined. If the Security Code field is defined in the Defaults Box User ID, Stratagy uses it instead of the User ID.
� All other Users Menu Options and Group/Chains fields are copied. All Notify and Auto records are copied.
1. From the Users Menu, Options screen, type the User ID mailbox number in the User ID field. Press Enter.
Stratagy automatically loads the User ID mailbox.
2. Press Alt+C.
3. Type the range. Press Enter.
Stratagy creates the specified range of User ID mailboxes using the displayed User ID mailbox as a template.
4. To customize the first User ID mailbox copied, define the User fields (user’s information, basic options, AMIS options, groups, chains, menus).
Note Use Enter or the arrow keys (↑↓) to move between fields.
5. Press Alt+S. The changes are saved.
6. As appropriate, continue defining the User ID mailbox using the Auto and Notify Menu.
See Chapter 7 – Auto (Scheduling) Menu and Chapter 8 – Notify Menu for detailed information.
7. Repeat Steps 4~6 for each of the User ID mailboxes copied.
4184
Stratagy R3 I&M 11/99
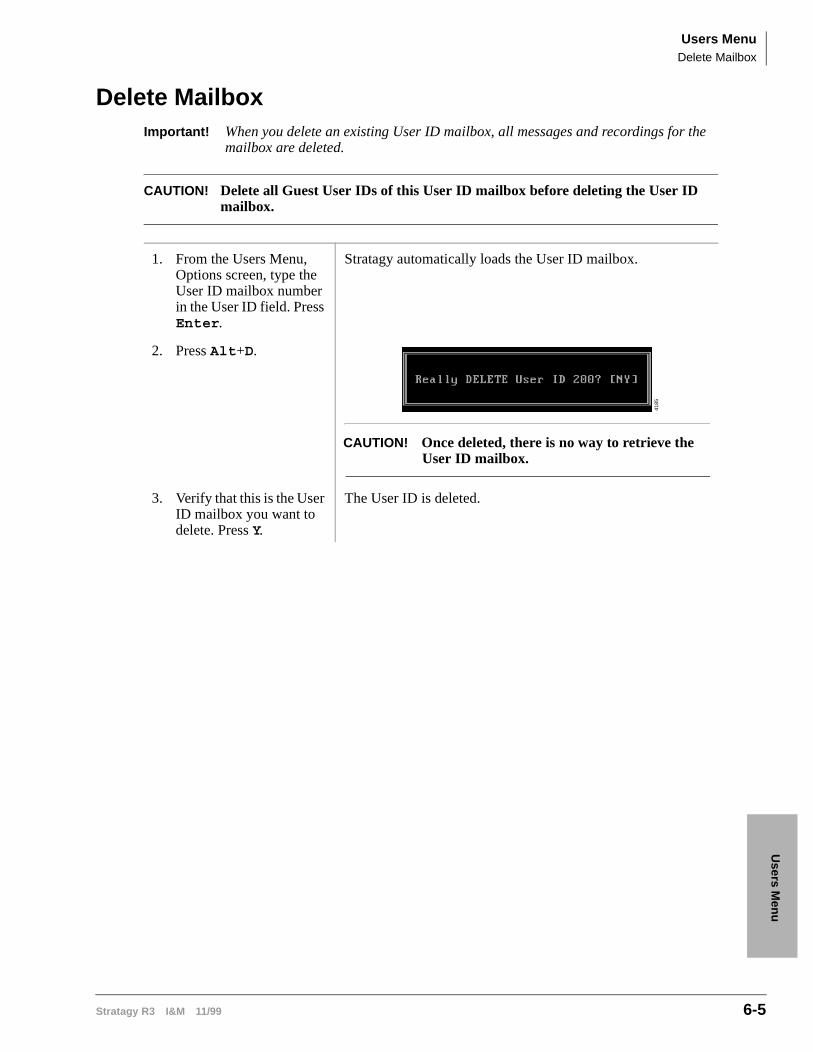
Users MenuDelete Mailbox
Users M
enu
Delete MailboxImportant! When you delete an existing User ID mailbox, all messages and recordings for the
mailbox are deleted.
CAUTION! Delete all Guest User IDs of this User ID mailbox before deleting the User ID mailbox.
1. From the Users Menu, Options screen, type the User ID mailbox number in the User ID field. Press Enter.
Stratagy automatically loads the User ID mailbox.
2. Press Alt+D.
CAUTION! Once deleted, there is no way to retrieve the User ID mailbox.
3. Verify that this is the User ID mailbox you want to delete. Press Y.
The User ID is deleted.
4185
Stratagy R3 I&M 11/99 6-5

Users MenuBoxList
6-6
BoxListThis is a list of User ID mailboxes. The User IDs appear in numerical order. Each entry on the list contains the Comment, Extension, Name (Directory Name 1, Directory Name 2), and Messages (Messages Current) field information. For field definitions, see “Options Screen” on Page 6-10.
View Existing User ID Mailboxes
Access a Specific User ID from BoxList Screen
AmisNodeListThe AmisNodeList lists mailboxes that have “Gateway Box” set to Yes. See “AmisNodeList” on Page 12-9 for information on using this feature.
1. Press Alt+T.
2. Press Enter.
3. Use the arrow keys (↑↓) or the Page Up/Down keys to scroll through the list.
4. Press Esc. The Users Menu displays.
1. From the Table BoxList screen, use the arrow keys (↑↓) to highlight the User ID.
2. Press Enter. The Users Menu displays the selected User ID’s information.
4064
4669
Stratagy R3 I&M 11/99

Users MenuUsers Menu Field Descriptions
Users M
enu
Users Menu Field Descriptions
Figure 6-1 Options Screen with Sample Data
Table 6-1 Users Menu Screen Fields
Menu Bar Access and viewing options
Save Press Alt+S to save the current User ID mailbox.
Delete Press Alt+D to delete the current User ID mailbox.
Copy Press Alt+C to copy the current User ID mailbox.
Auto Press Alt+A to access the Auto Menu.
Notify Press Alt+N to access the Notify Menu.
Table
Press Alt+T to select a table:
BoxList: Press Enter to list all User ID mailboxes.
AmisNodeList:Use the arrow keys (↑↓) to highlight AmisNodeList and then press Enter to list all Amis nodes.
Esc/EXIT Press Esc to exit the Users Menu and return to the Main Menu.
Pg/Dn NEXT Press Page Down to view the next User ID mailbox.
PgUp/PREV Press Page Up to view the previous User ID mailbox.
Options Press Alt+O to access the current User ID’s basic and AMIS options.
Info/Status Press Alt+I to view the current User ID’s statistics.
Group/Chains Press Alt+G to access the current User ID’s group, chain, and menu options.
User’sInformation
Menu Bar
4067
Stratagy R3 I&M 11/99 6-7

Users MenuUsers Menu Field Descriptions
6-8
User’s InformationMinimum information Stratagy requires for a standard User ID that transfers calls and takes messages.
User ID
User ID mailbox number. Usually associated with a telephone extension (for simplicity). Employees without a telephone extension can have a mailbox from which they can send and receive messages. Mailboxes can be used for special functions such as directories or question and answer surveys.
Possible values: 0~99999999 (must be unique).
Comment
Notation or reminder about the function of the mailbox.
For example, a User ID may be identified by function (extension, information box, etc.) or contents (greeting, directory, etc.).
Extension
Programmed dial actions Stratagy performs to transfer a call that has accessed the User ID (i.e., Do Not Disturb is Off). Includes transfer to a User ID mailbox, a remote number, or paging. Normally a simple extension number.
Default: value entered in User ID field.
Directory Name 1
The first of two names Stratagy searches when a caller uses the directory (default 411).
For most companies, this is the User ID owner’s first name. For User IDs that do not appear in the directory, leave this field blank.
Notes
� It is important that each user record his/her name.
� When the System Administrator enters a user’s name into the directory using the telephone dial pad, the name is stored in the Options screen Directory Name 1 and Name 2 fields as numeric digits. For administration clarity, it is advisable to change the digits to their alpha equivalents.
The directory works as follows. If a caller wants to speak with Donna, the caller would enter digits corresponding to these letters on the tone-dialing telephone (i.e., &***,). For the first User ID Directory Name field that matches the caller’s entry, Stratagy plays the name recording. Depending upon the Stratagy System Configuration parameter dir_play_uid, Stratagy also plays the digits of the User ID field. If no name recording is available, depending on the dir_play_uid setting, Stratagy does not present an entry or play the digits of the User ID field.
Since Stratagy plays the name recording of all User IDs that match a caller’s entry for the company directory, you can use this capability as a general search and playback system. The User ID used for directory searching can be defined on a per-port basis using the box_idx Stratagy System Configuration parameter.
For details about the Stratagy System Configuration parameters, see Chapter 3 – Configure Stratagy.
Directory Name 2
The second of two names Stratagy searches when a caller uses the directory (default 411).
For most companies, this is the User ID owner’s last name or another way to reference this User ID, such as a variation in spelling (Cathy, Kathy) or a nickname (Michael, Mike). It can also be used for the name of an additional user when a User ID is shared.
For User IDs that do not appear in the directory, leave this field blank.
Table 6-1 Users Menu Screen Fields (continued)
Stratagy R3 I&M 11/99

Users MenuUsers Menu Field Descriptions
Users M
enu
Security Code
Password that permits the user access to this User ID mailbox. The security code ensures that only appropriate users can change greeting, record custom busy message, listen to messages left for this User ID, or change option settings.
The initial value is the number of the new mailbox plus the value in the Defaults Box User ID (default 997) Security Code field.
For example, the security code for default box 997 is 997. If a mailbox 234 is created, the default security code for the new mailbox is 234997. The only exception to this rule is the security code for the Defaults Box User ID (default 997). Its security code would be 997.
If the security code of the Defaults Box User ID (default 997) is changed, only the mailboxes created after rebooting the system have the new default security code.
If the security code is set to something untypeable at a telephone (such as an X), no one can log into the User ID mailbox.
The user can change the password to assure confidentiality. For added security, the code does not display on the screen. You cannot view the security code; you can only change it.
Table 6-1 Users Menu Screen Fields (continued)
Stratagy R3 I&M 11/99 6-9

Users MenuUsers Menu Field Descriptions
6-10
Options Screen
Figure 6-2 Options Screen with Sample Data
Table 6-2 Options Screen Fields
Menu Bar See “Users Menu Field Descriptions” on Page 6-7 for a definition of the fields.
User’s Information See “Users Menu Field Descriptions” on Page 6-7 for a definition of the fields.
Basic Options RNA, DND, Call Screening, and message information for the User ID mailbox.
Ring No Answer (RNA)
Maximum Rings
When transferring a call to the User ID, the number of rings Stratagy waits before determining a RNA status. This option only works when Stratagy is controlling the call transfer during a monitored, or supervised transfer.
For example, if the telephone is not answered within four rings, Stratagy may play this User ID’s greeting and take a message, or transfer the call to another extension if an RNA chain is being used.
Possible values: 0 (uses system default), 1~9Default: 4
User’sInformation
Menu Bar
AMIS Options(not supported
by StratagyFlash) 4062
Alternate Rate field is replaced by DSS Port field on Stratagy DK and not supported by the Stratagy Flash.
BasicOptions
Message Volume field (not supported
by Stratagy DK)
Guests (not supported by Stratagy Flash)
Stratagy R3 I&M 11/99

Users MenuUsers Menu Field Descriptions
Users M
enu
Do Not Disturb (DND)
Do Not Disturb
Whether Stratagy transfers callers directly to a user’s mailbox without ringing the user’s phone. If Lock Do Not Disturb is set to Off, the user can toggle this feature on or off through the telephone.
If the intention of the User ID is to offer recorded information, set Do Not Disturb to On and Lock Do Not Disturb to On.
On: Do Not Disturb is On. Calls to this User ID are never transferred to an extension. The greeting plays immediately.
Off: Do Not Disturb is off.
Possible values: On, OffDefault: Off (DND not active)
Lock
Locks the current Do Not Disturb setting. The current Do Not Disturb setting cannot be changed by the user through the telephone.
If the intention of the User ID is to offer recorded information, set Do Not Disturb to On and Lock Do Not Disturb to On.
On: User is not permitted to access or change the Do Not Disturb setting through the telephone.
Off: User can change the Do Not Disturb setting.
Possible values: On, OffDefault: Off (not locked)
Call Screening
Screen Calls
Whether Stratagy asks the caller to record his name before attempting a transfer to the user’s extension, enabling a user to accept, decline, or transfer the call:
On: Stratagy asks the caller to record his name, and then attempts to reach the user. If the user answers, Stratagy plays that recording. The user can press:) to accept the call. Stratagy connects the caller to the user.
, to reject the call and hang up. Stratagy reconnects the caller and plays the user’s mailbox greeting. Stratagy follows the procedures used for the Ring No Answer chain.
& to transfer the call with an announcement. The user dials the extension to transfer the call and hangs up. Stratagy plays “Your call is being transferred to” and the name recording or the User ID of the extension where the call is being transferred. Stratagy transfers the caller to the new extension.
- to transfer the call without announcement. The user dials the extension to transfer the call and hangs up. Stratagy asks the caller to continue to hold and transfers the caller to the new extension.
Off: Stratagy transfers the caller to the extension without inquiry.
Possible values: On, OffDefault: Off (Call screening is off)
Lock
Locks the current Screen Calls setting. The current Screen Calls setting cannot be changed by the user through the telephone.
On: User is not permitted to access or change the Screen Calls setting through the telephone.
Off: User can change Screen Calls selection.
Possible values: On, OffDefault: Off (not locked)
Table 6-2 Options Screen Fields (continued)
Stratagy R3 I&M 11/99 6-11

Users MenuUsers Menu Field Descriptions
6-12
Messages and Greetings
Store Messages
Whether Stratagy enables the User ID mailbox to store messages.
Certain applications require a User ID mailbox to play information only and not record messages. To prevent Stratagy from taking messages after the User ID’s greeting plays, set Store Messages to No and Copy Messages To to blank.
Yes: This User ID mailbox may store messages.No: This User ID mailbox may not store messages.
Note If Copy Message To has a valid User ID, the message is recorded, then stored in the Copy Message To User ID mailbox.
Possible values: Yes, NoDefault: Yes (Store Messages is On)
Max (Store Messages)
Maximum message length in seconds a caller is given when leaving a message.
Possible values: 0 (unlimited), 1 ~ 999 (seconds)Default: 180 (180 seconds = 3 minutes)
Copy Messages To
User ID mailbox which receives a copy of this User ID mailbox’s messages.
Note Messages can only be copied once. Stratagy does not chain copy to multiple mailboxes.
If Store Messages is set to Yes, Stratagy stores the message in both the accessed User ID mailbox and the Copy Messages To User ID mailbox.
If Store Messages is set to No, Stratagy stores the message only in the Copy Messages To User ID mailbox.
Certain applications require a User ID mailbox to play information only and not record messages. To prevent Stratagy from taking messages after the User ID’s greeting plays, set Store Messages to No and Copy Messages To to blank.
Possible values: blank, valid User ID mailboxDefault: blank (Copy Messages To is off)
Message Volume
Volume at which messages are played back to the user. This value can be set by the user through the telephone, using the Play Message Controls.
Note The Stratagy DK does not support this feature.
Possible values: -8 (softest) ~ 8 (loudest)Default: 0
Guests
Number of Guest User IDs the User ID can create. For each Guest User ID created, the value decrements by 1. For example, if the Guests field was set to 5 and the user created 3 Guest User IDs, Guests would now display 2.
0 ~ 99: Number of Guest User IDs the user can create.-1: User cannot use the Guest User ID feature
Note The Stratagy Flash does not support this feature.
Possible values: -1 (cannot use Guest User IDs) 0 ~ 99Default: -1
Table 6-2 Options Screen Fields (continued)
Stratagy R3 I&M 11/99

Users MenuUsers Menu Field Descriptions
Users M
enu
Message Pending
Messages that a user partially hears (five seconds or longer set by msg_pending_threshold parameter) are called Pending messages. They remain in the New Message Queue, the Message Waiting LED is turned off, and a Return Receipt is sent, if applicable.
Note If the Saved Msg Que field is set to No, the setting for this field has no effect on the voice mail system.
Yes: This User ID mailbox may store pending messages.No: This User ID mailbox may not store pending messages.
Possible values: Yes, NoDefault: No (Message Pending is Off)
Current Greeting
Which of eight User ID greetings plays. This value can be set by the user through the telephone unless Current Greeting Max is set to 0.
Each mailbox user may record up to seven custom greetings. The system default greeting is “Please leave a message for [name],” as per the user’s name recording.
Possible values: 0, 1~7Default: 0 (system greeting)
Max (Current Greeting)
Maximum greeting length (seconds) for each custom greeting recorded by the user. Whether the user can change the current greeting.
Possible values: 0 (user cannot record or change greetings), 1~999Default: 45
Busy Message
Greeting caller receives when the extension is busy. This value can be set by the user through the telephone unless Busy Greeting Max is set to 0. (See “Manage Your Mailbox” in the Stratagy User Guide for more information.)
SYS: System busy greeting. Stratagy advises the caller that he may hold for the extension by pressing (, dial another extension, or leave a message by waiting for the tone. If the caller chooses to hold, Stratagy informs the caller of his position in the hold queue and then plays 30 seconds of the Busy-Hold Music file before trying the extension again. After each transfer attempt, the caller is given the same options.
CUS: Custom busy greeting.
Possible values: CUS, SYSDefault: SYS
Max (Busy Message)
Maximum greeting length (seconds) for the custom busy greeting recorded by the user. Whether the user can change the busy greeting.
Possible values: 0 (user cannot record or change greeting), 1~999Default: 45 (seconds)
ID Call?
Identify callee. Play the name recording of the User ID mailbox the caller dialed.
Yes: Stratagy plays the name recording of the User ID accessed to reach the extension. Used when more than one User ID mailbox is assigned to the same telephone extension.
No: Stratagy plays a connection tone to the answering party.
Possible values: Yes, NoDefault: No
Table 6-2 Options Screen Fields (continued)
Stratagy R3 I&M 11/99 6-13

Users MenuUsers Menu Field Descriptions
6-14
Busy Hold
Whether a caller can press ( to hold when the extension is busy.
Yes: The caller can press ( to hold.No: The caller cannot hold.
Possible values: Yes, NoDefault: Yes
Play Date/Time?
During message playback, play the date and time a message was recorded.
Yes: Play the date and time before playing the message.
No: Do not play date and time.
Possible values: Yes, NoDefault: Yes (play date and time).
Slow Menu
Length of time Stratagy pauses between User ID mailbox menu choices when stating them to the user (e.g. Main Menu options).
Yes: Add extra time between menu choices.No: Do not add extra time.
Possible values: Yes, NoDefault: No
Record Name?
Whether the user can record his/her name for playback/identification to a caller.
Yes: User can record his/her name No: User cannot record his/her name.
Possible values: Yes, NoDefault: Yes
Saved Msg Que
Whether Stratagy uses separate message lists of new and saved messages.
Yes: Two message queues: new and saved.
No: One message queue.
Possible values: Yes, NoDefault: Yes
CAUTION! Delete all messages in this mailbox before changing the number of message queues.
Message Order
Order in which Stratagy plays back caller messages to the user.
FIFO: First-In First-Out. Stratagy plays the oldest messages first.
LIFO: Last-In First-Out. Stratagy plays the most recent message first.
Possible values: FIFO, LIFODefault: FIFO
Caller Menu
Whether Stratagy presents a message menu to outside callers.
Yes: Before pressing # to send a message, outside callers can review, re-record, append, add destinations, set urgent or private, or cancel.
No: Outside callers can only press # to send a message.
Possible values: Yes, NoDefault: Yes
Table 6-2 Options Screen Fields (continued)
Stratagy R3 I&M 11/99

Users MenuUsers Menu Field Descriptions
Users M
enu
Alternate Rate(replaced by DSS Port field on Stratagy DK
menu)
Alternate speed Stratagy uses while playing messages. While listening to a message, the user can press ## to toggle between the two speeds.
Notes
� Alternate rate can only be implemented while listening to a message.
� This feature is not supported by the Stratagy Flash.
Possible values: 0 (normal), 1 ~ 4 (fastest)Default: 0 (normal)
DSS Port(available only on
Stratagy DK menu)
See the Stratagy DK Installation Guide for a detailed explanation.
Use At Login
Whether Stratagy plays messages at the alternate rate when a user logs in.
Yes: Stratagy uses the alternate rate.No: Stratagy uses the normal rate.
Possible values: Yes, NoDefault: No
AMIS Options AMIS information for the User ID mailbox.
Gateway Box
Whether this User ID mailbox is an AMIS gateway.
Note The Stratagy Flash does not support this feature.
Possible values: Yes, NoDefault: No
AmisSysNumber
Telephone number of the AMIS gateway box used to identify incoming AMIS calls. This number is the same as to the identification number of a remote node.
Note The Stratagy Flash does not support this feature.
Format: 1#area code#number
Example: 1#714#5551212
Table 6-2 Options Screen Fields (continued)
Stratagy R3 I&M 11/99 6-15

Users MenuUsers Menu Field Descriptions
6-16
Group/Chains Screen
Figure 6-3 Groups/Chains Screen with Sample Data
Table 6-3 Groups/Chains Screen Fields
Menu Bar See “Users Menu Field Descriptions” on Page 6-7 for a definition of the fields.
User’s Information See “Users Menu Field Descriptions” on Page 6-7 for a definition of the fields.
Chains Chain information for the User ID mailbox.
Chains are how you tell Stratagy what to do with a call when one of three specific conditions apply: Done, RNA, Busy.
CAUTION! Avoid programming chains that contain loops. For normal Stratagy operation, we recommend that you program all chains to eventually end at System Administrator User ID 999 (which defaults to disconnect, @H) and never change the User ID 999 default.
Stratagy, by enabling you to program chains, provides the flexible call routing solutions needed for many varied customer applications. If you create a loop when programming Stratagy with chains of User IDs, all Stratagy ports become busy and you must reboot the system.
Conditions which create loops include:
� The most common condition is usually triggered by no caller DTMF action followed by a hang up.For the following explanation, assume that the reserved User IDs are set to their default values.
Operator User ID 0Caller Instructions User ID 991System Administrator User ID 999
User’sInformation
Chains/Groups
Menu Bar
Menus
4671
Stratagy R3 I&M 11/99

Users MenuUsers Menu Field Descriptions
Users M
enu
By default, if there is no caller DTMF action, all Stratagy User IDs return to Caller Instructions User ID 991 when done. User ID 991 defaults to dtmf_gate, which defaults to True. At dtmf_gate, Stratagy asks the caller to say “yes” if he would like to transfer to the Operator. If Stratagy detects any verbal response, Stratagy transfers the caller to the extension for the Operator User ID 0. If there is no response, Stratagy disconnects the caller. This is normal operation for Stratagy (see Chapter 5—How Stratagy Operates for more information).
However, some applications require dtmf_gate to be False, so there is no query of the caller. If the gate is False and the Operator User ID 0 Done chain is set to Caller Instructions User ID 991 (or no Done chain, defaulting to 991), a loop has been created and Stratagy ports eventually lock up. To avoid this, you can program User ID 0 to have System Administrator User ID 999 as its Done chain (User ID 999 defaults to disconnect, @H).
� Programming one or more User IDs Done chains to loop back to the same User IDs causes Stratagy ports to lock up. For example; do not program User ID 200 Done chain to User ID 200. And, do not program User ID 200 Done chain to User ID 201 and User ID 201 Done chain to User ID 200, etc.
Chain Done
Instructs Stratagy where to send a caller who remains on the line after leaving a message or after listening to an announcement only User ID mailbox.
blank: Stratagy uses the Done chain of the Company Greeting User ID (generally 990), that normally points to User ID 991 (Caller Instructions User ID).
Possible values: blank, another User IDDefault: blank (Done chain of the Company Greeting User ID)
Chain RNA
Instructs Stratagy where to send a caller when there is a Ring No Answer at this User ID’s extension. Defining an RNA chain enables Stratagy to control extension hunting.
Possible values: blank, another User IDDefault: blank (plays the current greeting for the mailbox)
Chain Busy
Instructs Stratagy where to send a caller when this User ID’s extension is Busy.
Possible values: blank, another User IDDefault: blank (plays the busy greeting for the mailbox and takes a message)
Chain Delay
Number of tenths of seconds Stratagy waits after playing this User ID’s greeting before continuing processing. Callers may enter DTMF to transfer processing to another User ID.
Possible values: 10ths of seconds (a value of 10 equals 1 second)Default: 0 (no additional delay)
Table 6-3 Groups/Chains Screen Fields (continued)
Stratagy R3 I&M 11/99 6-17

Users MenuUsers Menu Field Descriptions
6-18
Groups Group information for the User ID mailbox.
Groups control which User IDs a call can access. Each User ID mailbox user can be a member of up to four groups. To be able to access another User ID, the caller User ID must share at least one group number with the currently accessed User ID. If all groups are set to 0, then no other User ID may be accessed.
For example, assume the following:
User ID Group 1 Group 2 Group 3 Group 4100 1 0 0 0222 1 5 0 0303 5 7 0 0440 7 0 0 0
For the above example, User ID 100 may access User ID 222 only. User ID 222 may access User IDs 100 and 303. User ID 303 may access User IDs 222 and 440. User ID 440 may access User ID 303 only.
Groups are useful for isolating different departments in the same company or different companies sharing one system. For example, suppose two companies share the same President, Vice President, and Controller and you would want them accessible to all companies; but each company has a different Human Resources department that you may want to prevent caller access from one to the other.
Group 1
First of four groups.
Possible values: 0(not in use), 1~99,999,999Default: 1 (Group 1. This is Stratagy’s default; and may have been redefined
during configuration.)
Group 2
Second of four groups.
Possible values: 0 (not in use), 1~99,999,999Default: 0 (not in use. This is Stratagy’s default; and may have been redefined
during configuration.)
Group 3
Third of four groups.
Possible values: 0 (not in use), 1~99,999,999Default: 0 (Not in use. This is Stratagy’s default; and may have been redefined
during configuration.)
Group 4
Fourth of four groups.
Possible values: 0 (not in use), 1 ~ 99,999,999Default: 0 (not in use. This is Stratagy’s default; and may have been redefined
during configuration.)
Table 6-3 Groups/Chains Screen Fields (continued)
Stratagy R3 I&M 11/99

Users MenuUsers Menu Field Descriptions
Users M
enu
Menus Menu information for the User ID mailbox.
Menus define the destination the call is sent when the caller presses 1 of the 10 possible menu options while listening to the mailbox’s greeting. Menus can accommodate an unlimited number of special applications.
Each User ID mailbox may reference up to 10 single-digit menu selections. Each menu selection may be assigned to a particular User ID. If the caller dials an assigned menu selection, Stratagy transfers the caller to the assigned User ID. Stratagy processes unassigned menu digits normally. For example, if the menu digit 0 is not defined and the caller dials 0, Stratagy selects User ID 0 (typically, the operator).
A special function User ID mailbox set up for customer service using menus might be defined as follows. For Sales Assistance, press 1; for Product Information, press 2; for Service, press 3; or press 0 for the operator. The menu set up would look like:
1: 222 2: 350 3: 5164: 5: 6:7: 8: 9:
0: 240If the caller selects 1 (Sales Assistance), the call would be transferred to User ID mailbox 222. If the caller selects 2 (Product Information), the call would be transferred to User ID mailbox 350. If the caller selects 3, the call would be transferred to User ID mailbox 516 (Service). If the caller selects 0 (Operator), the call would be transferred to the customer service secretary at extension 240. If the caller presses a menu digit that does not contain a User ID, the call would be transferred to that User ID(e.g., pressing 7, would transfer the call to User ID 7).
Table 6-3 Groups/Chains Screen Fields (continued)
Stratagy R3 I&M 11/99 6-19
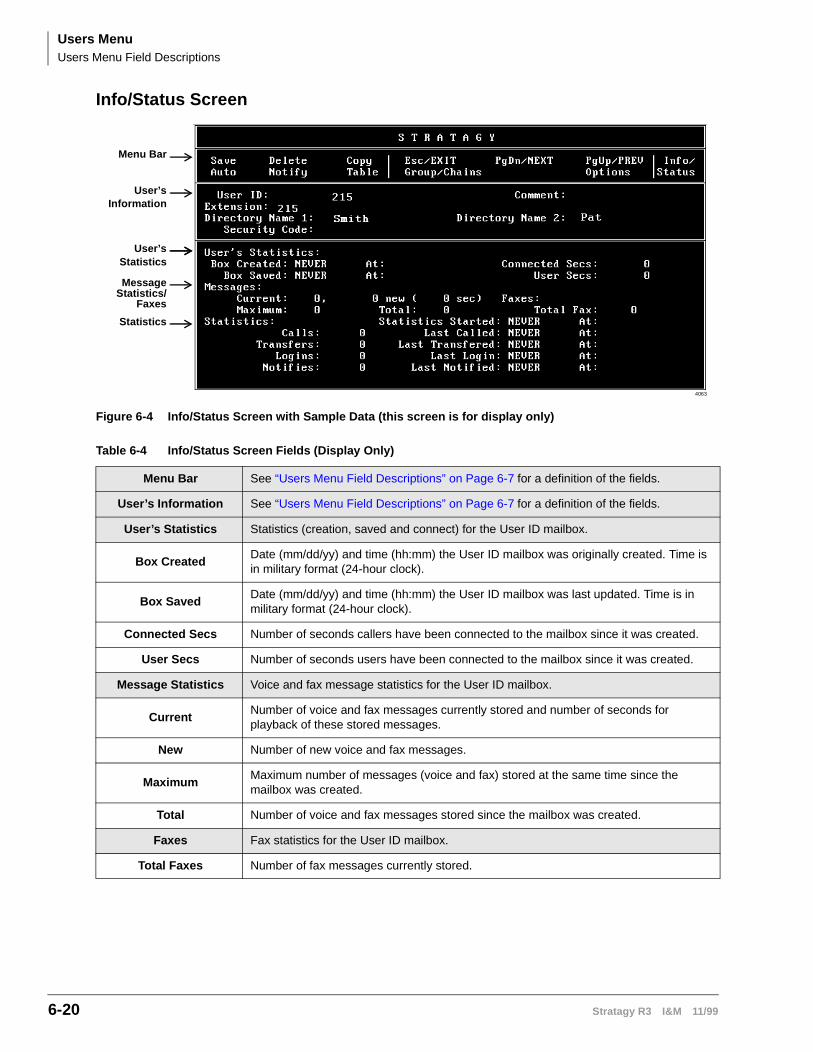
Users MenuUsers Menu Field Descriptions
6-20
Info/Status Screen
Figure 6-4 Info/Status Screen with Sample Data (this screen is for display only)
Table 6-4 Info/Status Screen Fields (Display Only)
Menu Bar See “Users Menu Field Descriptions” on Page 6-7 for a definition of the fields.
User’s Information See “Users Menu Field Descriptions” on Page 6-7 for a definition of the fields.
User’s Statistics Statistics (creation, saved and connect) for the User ID mailbox.
Box CreatedDate (mm/dd/yy) and time (hh:mm) the User ID mailbox was originally created. Time is in military format (24-hour clock).
Box SavedDate (mm/dd/yy) and time (hh:mm) the User ID mailbox was last updated. Time is in military format (24-hour clock).
Connected Secs Number of seconds callers have been connected to the mailbox since it was created.
User Secs Number of seconds users have been connected to the mailbox since it was created.
Message Statistics Voice and fax message statistics for the User ID mailbox.
CurrentNumber of voice and fax messages currently stored and number of seconds for playback of these stored messages.
New Number of new voice and fax messages.
MaximumMaximum number of messages (voice and fax) stored at the same time since the mailbox was created.
Total Number of voice and fax messages stored since the mailbox was created.
Faxes Fax statistics for the User ID mailbox.
Total Faxes Number of fax messages currently stored.
User’sInformation
User’sStatistics
Menu Bar
Statistics
MessageStatistics/
Faxes
4063
Stratagy R3 I&M 11/99

Users MenuUsers Menu Field Descriptions
Users M
enu
Statistics Call, transfer, log in and notify statistics for the User ID mailbox.
Statistics StartedLast time statistics were reset. Statistics can be reset by selecting reset after running a System Report, using the Report option on the Main Menu, or by using the System Administrator User ID option of Reset User ID.
CallsNumber of times the User ID mailboxes was accessed by a caller since statistics were last reset.
Last CalledDate (mm/dd/yy) and time (hh:mm) of the last call. Time is in military format (24-hour clock).
TransfersNumber of times Stratagy successfully completed a call transfer to the extension associated with this User ID since statistics were last reset.
Last TransferredDate (mm/dd/yy) and time (hh:mm) of the last transfer. Time is in military format (24-hour clock).
LoginsNumber of times the mailbox user accessed the mailbox for message retrieval or other mailbox functions since statistics were last reset.
Last LoginLast time (date and time) the mailbox user accessed the mailbox for message retrieval or other mailbox functions since statistics were last reset. Time is in military format (24-hour clock).
Notifies Number of times the mailbox user was notified of new messages.
Last NotifiedLast time (date and time) the mailbox user was notified of new messages. Time is in military format (24-hour clock).
Table 6-4 Info/Status Screen Fields (Display Only) (continued)
Stratagy R3 I&M 11/99 6-21

Users MenuUsers Menu Field Descriptions
6-22
Stratagy R3 I&M 11/99
Au
to (S
ched
ulin
g)
Men
u
Auto (Scheduling) Menu 7
Customizing User ID mailboxes involves defining User IDs using the Users, Auto (Scheduling), and Notify Menus. This chapter discusses the following Auto (Scheduling) Menu functions:
� How Stratagy uses Auto Scheduling records
� Access and exit the menu
� Menu options
� Create, modify, or disable auto scheduling records
� Auto (Scheduling) Menu field descriptions
How Stratagy Uses Auto Scheduling RecordsThe Auto (Scheduling) Menu enables you to set up automatic changes for each User ID mailbox. You can set these changes to occur at a specific time, on certain days of the week, or on a specified date. For example, based on your Auto definition, Stratagy can answer your company’s telephone during the day with your daytime (open) greeting and during off-hours with your nighttime (closed) greeting.
By defining Auto fields, you can schedule when a User ID mailbox can change the:
� DND setting
� Call Screening setting
� Greeting number
� Destination defined in the Extension field
� Number of rings before taking a message for this extension
The following concepts are the keys to understanding how Stratagy uses Auto Scheduling records:
� Stratagy waits for the right date, time, and day, and then makes the specified changes.
� The changes remain in effect until you either disable the Auto Scheduling record or another record with different options is scheduled to start.
� If the re-schedule information does not fall on a valid day, Stratagy increments the Next Change date until it falls on a valid day as defined by the Days of the Week, Restricted To field.
For example, to schedule a greeting to play on Thanksgiving Day each year you would set the following fields to:
� Enabled—Yes
� Change On—11/24/99 (Thanksgiving Day in 1999)
Stratagy R3 I&M 11/99 7-1

Auto (Scheduling) MenuAccess/Exit the Menu
7-2
� At—8:00
� And Every Month(s)—12
� Restrict To: MTWTFSSNNNYNNN
Stratagy checks for the next Thursday after 11/24/99 and displays Next Change:11/28/99, which is the next day that meets the criteria specified in the record.
See Appendix A – Checklists/Forms for a form to use for defining Auto records. See Chapter 4 – How Stratagy Operates for information about customizing User ID mailboxes. See Chapter 6 – Users Menu and Chapter 8 – Notify Menu for information about the other menus. See Chapter 10 – Customization Examples for sample customized User ID mailboxes.
Access/Exit the MenuSee Chapter 6 – Users Menu for information about accessing and exiting the Users Menu.
Access Auto Menu
Exit Auto Menu
Menu OptionsThe Auto (Scheduling) Menu (see Figure 7-1 and Table 7-1 on Page 7-5) consists of four sections:
� Menu Bar: access and viewing options (select).
� User’s Information: overlay of information about this User ID mailbox from the Users Menu (display).
� Auto Scheduling Record Summary: 10 one-line descriptions of existing schedules (display).
� Auto Scheduling Record Options: Auto fields for the record highlighted in the Auto Record Summary (modify).
➤ While viewing a specific User ID mailbox record, press Alt+A.
The Auto Menu displays.
1. Press Alt+S. Your changes are saved.
Important! To save your modifications to the current User ID mailbox, you must press Alt+S before pressing Esc.
2. Press Esc. The Users Menu displays.
Stratagy R3 I&M 11/99

Auto (Scheduling) MenuCreate Auto Scheduling Records
Au
to (S
ched
ulin
g)
Men
u
Create Auto Scheduling RecordsImportant! When creating Auto (Schedule) records, be careful that records do not overlap, begin
or end at the exact same time.
Modify Auto Scheduling Records
1. In the Auto Record Summary section of the Auto Menu, highlight the first available <Disabled> description line.
Note Use the PgDn and PgUp keys to move between lines.
2. Press the spacebar to toggle the Auto Record Options Enabled field to YES.
3. To change any field settings, place the solid color edit block that appears on the screen next to the field name. Type the information in the field and press Enter
...or for some fields, press the spacebar to toggle the value.
Notes
� Use Enter or the arrow keys (↑↓) to move between fields.
� To display detailed help for the current field, press F1. See “Online Help Function” on Page 2-10.
4. When finished, press Alt+S.
5. Press Y. Stratagy automatically transfers the data to the description line in the Auto Scheduling Record Summary highlighted in Step 1.
1. In the Auto Scheduling Record Summary section of the Auto Menu, highlight the record you want to define.
Note Use the PgDn and PgUp keys to move between lines.
2. If appropriate, press the spacebar to toggle the Auto Scheduling Record Options Enabled field to YES.
4064
Stratagy R3 I&M 11/99 7-3

Auto (Scheduling) MenuDisable Auto Scheduling Records
7-4
Disable Auto Scheduling Records
3. Define the Auto Scheduling Record Options fields.
Note To display detailed help for the current field, press F1.
4. When finished, press Alt+S.
5. Press Y. Stratagy automatically transfers the data to the description line in the Auto Scheduling Record Summary highlighted in Step 1.
1. In the Auto Scheduling Record Summary section of the Auto Menu, highlight the appropriate <Enabled> description line.
Note Use the PgDn and PgUp keys to move between lines.
2. Press the spacebar to toggle the Auto Scheduling Record Options Enabled field to NO.
3. When finished, press Alt+S.
4. Press Y. Stratagy automatically changes the description line in the Auto Scheduling Record Summary highlighted in Step 1 to <Disabled>.
4064
4064
Stratagy R3 I&M 11/99

Auto (Scheduling) MenuAuto (Scheduling) Menu Field Descriptions
Au
to (S
ched
ulin
g)
Men
u
Auto (Scheduling) Menu Field Descriptions
Figure 7-1 Auto Menu with Sample Data
Table 7-1 Auto Menu Screen Fields
Menu Bar Access and viewing options
Save Press Alt+S to save the current Auto record.
Esc/EXIT Press Esc to exit the Auto Menu and return to the Users Menu.
PgDn/NEXT Press Page Down to view the next Auto record for this User ID.
PgUp/PREV Press Page Up to view the previous Auto record for this User ID.
Auto Menu title.
User’s Information Display only—changes to these fields must be made in the Users Menu—see Chapter 6.
User ID User ID mailbox number.
Comment Notation or reminder about the functions of this mailbox.
Security Code Password that permits the user access to the User ID mailbox. (Does not display.)
ExtensionProgrammed dial actions Stratagy performs to transfer a call that has accessed the User ID (i.e., Do Not Disturb is Off). Includes transfer to a User ID mailbox, a remote number, or paging.
Directory Name 1The first of two names Stratagy searches when a caller uses the directory (default 411).
Directory Name 2The second of two names Stratagy searches when a caller uses the directory (default 411).
Auto Scheduling Record Summary
Display only—one-line descriptions of each existing Auto Scheduling record
User’sInformation
Menu Bar
AutoScheduling
RecordOptions
AutoScheduling
RecordSummary
4068
Stratagy R3 I&M 11/99 7-5
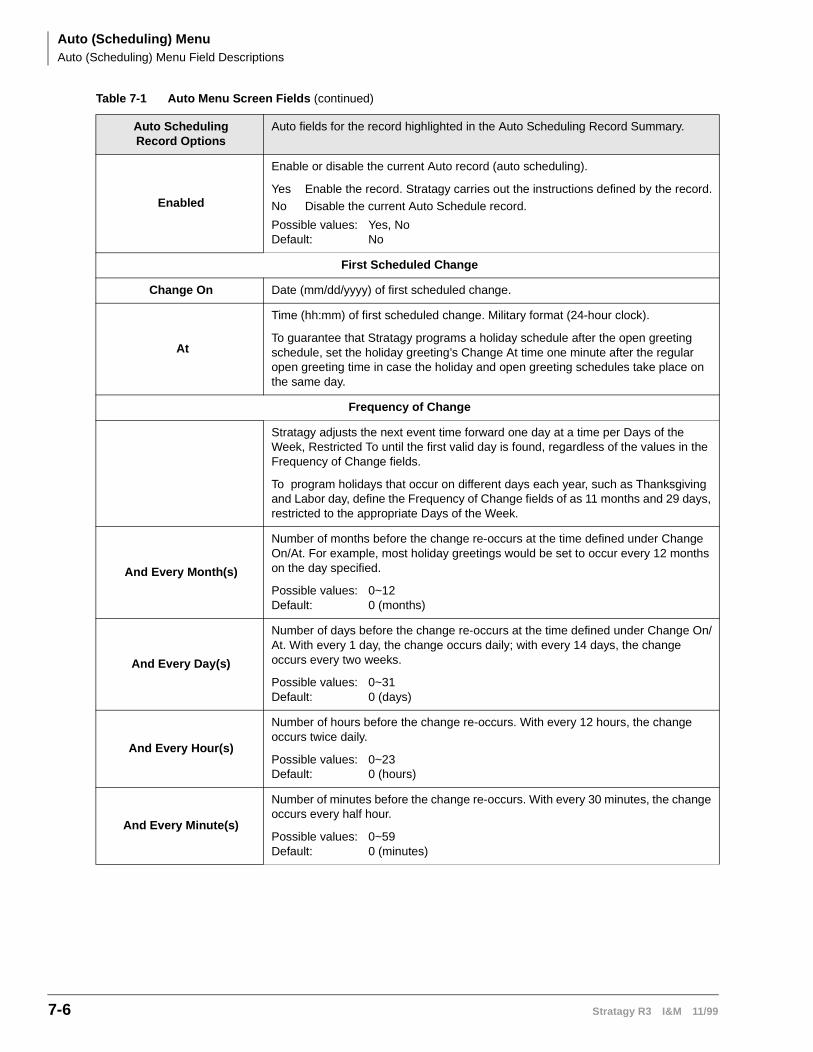
Auto (Scheduling) MenuAuto (Scheduling) Menu Field Descriptions
7-6
Auto Scheduling Record Options
Auto fields for the record highlighted in the Auto Scheduling Record Summary.
Enabled
Enable or disable the current Auto record (auto scheduling).
Yes Enable the record. Stratagy carries out the instructions defined by the record.No Disable the current Auto Schedule record.
Possible values: Yes, NoDefault: No
First Scheduled Change
Change On Date (mm/dd/yyyy) of first scheduled change.
At
Time (hh:mm) of first scheduled change. Military format (24-hour clock).
To guarantee that Stratagy programs a holiday schedule after the open greeting schedule, set the holiday greeting’s Change At time one minute after the regular open greeting time in case the holiday and open greeting schedules take place on the same day.
Frequency of Change
Stratagy adjusts the next event time forward one day at a time per Days of the Week, Restricted To until the first valid day is found, regardless of the values in the Frequency of Change fields.
To program holidays that occur on different days each year, such as Thanksgiving and Labor day, define the Frequency of Change fields of as 11 months and 29 days, restricted to the appropriate Days of the Week.
And Every Month(s)
Number of months before the change re-occurs at the time defined under Change On/At. For example, most holiday greetings would be set to occur every 12 months on the day specified.
Possible values: 0~12Default: 0 (months)
And Every Day(s)
Number of days before the change re-occurs at the time defined under Change On/At. With every 1 day, the change occurs daily; with every 14 days, the change occurs every two weeks.
Possible values: 0~31Default: 0 (days)
And Every Hour(s)
Number of hours before the change re-occurs. With every 12 hours, the change occurs twice daily.
Possible values: 0~23Default: 0 (hours)
And Every Minute(s)
Number of minutes before the change re-occurs. With every 30 minutes, the change occurs every half hour.
Possible values: 0~59Default: 0 (minutes)
Table 7-1 Auto Menu Screen Fields (continued)
Stratagy R3 I&M 11/99

Auto (Scheduling) MenuAuto (Scheduling) Menu Field Descriptions
Au
to (S
ched
ulin
g)
Men
u
Days of the Week
Restricted To
Days of the week to which the change is restricted.
Y: Change occurs on this day of the week.N: Change does not occur on this day of the week.
Stratagy adjusts the next event time forward one day at a time until the first valid day is found, regardless of the values in the Frequency of Change fields.
In the following example, the change is scheduled for Monday through Friday only.
Restricted To: MTWTFSS
YYYYYNN
Possible values: Y, NDefault: Y
Next Change
Next ChangeDisplay only—date and time the next change occurs (mm/dd/yyyy hh:mm). Time is expressed in military format (24-hour clock). If an Auto Scheduling record is disabled, this field displays NEVER.
User ID Settings
Extension
New extension Stratagy rings when the record is active. More specifically, programmed dial actions Stratagy performs after the change occurs to transfer a call that has accessed the User ID (i.e., Do Not Disturb is Off). For example, ring a different extension after hours rather than during the day.
Possible values: include User ID mailbox, telephone extension, Token Programming Language
Default: Users Menu’s Extension value for the User ID
Rings
When the change occurs, the maximum number of rings Stratagy must wait when transferring a call to the User ID before determining a Ring No Answer.
Possible values: 0 (uses system default), 1~9Default: 0
Do Not Disturb
Value for Do Not Disturb when the change occurs, even if the Users Menu’s Lock Do Not Disturb is On.
On: Stratagy plays the User’s mailbox greeting to the caller without attempting to ring the extension.
Off: Stratagy follows the dialing instructions provided in the Extension field.
Possible values: On, OffDefault: Off (DND not active)
Table 7-1 Auto Menu Screen Fields (continued)
Stratagy R3 I&M 11/99 7-7

Auto (Scheduling) MenuAuto (Scheduling) Menu Field Descriptions
7-8
Call Screening
Value for Call Screening when the change occurs, even if the Users Menu’s Lock Call Screening is On.
On: Stratagy asks the caller to record his name, and then attempts to reach the user. If the user answers, Stratagy plays that recording. The user can press:) to accept the call. Stratagy connects the caller to the user.
, to reject the call and hang up. Stratagy reconnects the caller and plays the user’s mailbox greeting. Stratagy follows the procedures used for the Ring No Answer chain.
& to transfer the call with an announcement. The user dials the extension to transfer the call and hangs up. Stratagy plays “Your call is being transferred to” and the name recording or the User ID of the extension where the call is being transferred. Stratagy transfers the call to the new extension.
- to transfer the call without announcement. The user dials the extension to transfer the call and hangs up. Stratagy asks the caller to continue to hold and transfers the call to the new extension.
Off: Stratagy transfers the call to the extension without inquiry.
Possible values: On, OffDefault: Off (Call Screening is off)
Greeting #
Which of eight greetings—the system greeting or one of seven User ID greetings—this extension/mailbox plays when the change occurs. Plays even if Users Menu’s Current Greeting Max is set to 0 (user cannot change greeting).
Possible values: 0, 1~7Default: 0 (system greeting)
Table 7-1 Auto Menu Screen Fields (continued)
Stratagy R3 I&M 11/99

No
tify Men
u
Notify Menu 8
Customizing User ID mailboxes involves defining User IDs using the Users, Auto (Scheduling), and Notify Menus. This chapter discusses the following Notify Menu functions:
� How Stratagy uses Notify records
� Templates
� Access/exit the menu
� Menu Options
� Create, modify, or disable records/templates
� Notify Menu field descriptions
How Stratagy Uses Notify RecordsThe Notify Menu enables you to program Stratagy to automatically notify a caller of messages, or a System Administrator of low-disk space or unsuccessful system startup. There are ten Notify records available for each User ID. Each record represents one method of notifying the user of new messages.
The six types of notification (normal, relay, pickup, disk, urgent and panic) are based on the action that activates the notification. Notification methods are programmed using the Token Programming Language (see Appendix B – Special Greeting User ID Mailboxes) and include message waiting lights, beepers, pagers, other telephones (inside extensions or outside numbers), and office paging systems.
By using available templates (predefined notification instructions), fields may be defined and assigned to one or more mailboxes that require the same type of notification (for example, message waiting lights). Stratagy accommodates variable information, such as the User’s extension number when lighting a message light, to streamline notification set up.
Notification can occur based on the following:
� Days of the week
� Hours of the day
� Time interval between notifications (e.g., every 30 minutes)
� Number of times to repeat notification process (e.g., two times)
See Appendix A – Checklists/Forms for a form to use when defining Notify records.See Chapter 4 – How Stratagy Operates for information about customizing User ID mailboxes. See Chapter 6 – Users Menu and Chapter 7 – Auto (Scheduling) Menu for information about the other menus. See Chapter 10 – Customization Examples for sample customized User ID mailboxes.
Stratagy R3 I&M 11/99 8-1

Notify MenuTemplates
8-2
TemplatesTemplates are general notification actions which may be used for any number of Notify records and User ID mailboxes. By having User IDs share templates, you can make changes to all notification records for those User IDs by simply changing one template.
Stratagy provides a group of preset templates covering notification methods for Toshiba telephone systems, SMDI, AMIS, and paging applications. These default templates can be used as is or modified for other related purposes. See “Create Notify Records/Templates” on Page 8-3 and “Modify Notify Records/Templates” on Page 8-4 for instructions on creating and modifying templates.
View Existing Templates
Access/Exit the MenuSee Chapter 6 – Users Menu for information about accessing and exiting the Users Menu.
Access the Notify Menu
Exit Notify Menu
1. From the Notify Menu, press Alt+T.
A dialog box with a list of templates displays.
2. Highlight the template you want, using the Page Down and Page Up keys and press Enter.
Stratagy displays the template information in the appropriate Notify Record Options fields.
➤ While viewing a specific User ID mailbox record, press Alt+N.
The Notify Menu displays.
1. Press Alt+S. Your changes are saved.
Important! To save your modifications to the current User ID mailbox, you must press Alt+S before pressing Esc.
2. Press Esc. The Users Menu displays.
Stratagy R3 I&M 11/99

Notify MenuMenu Options
No
tify Men
u
Menu OptionsThe Notify Menu (see Figure 8-1 and Table 8-1 on Page 8-6) consists of four parts:
� Menu Bar: access and viewing options (select).
� User’s Information: overlay of information about this User ID mailbox from the Users Menu (display).
� Notify Record Summary: ten one-line descriptions of existing notifications (display).
� Notify Record Options: Notify fields for the record highlighted in the Notify Record Summary (modify).
Create Notify Records/Templates
1. In the Notify Record Summary section of the Notify Menu, highlight the first available <Disabled> description line.
Note Use the PgDn and PgUp keys to move between lines.
2. Press the spacebar to toggle the Notify Record Options Enabled field to YES.
3. Define the Notify Record Options fields
Note Use Enter or the arrow keys (↑↓) to move between fields. To display detailed help for the current field, press F1.
...or press Alt+t to select a template.
Highlight the template, using the Page Down and Page Up keys and press Enter.
Stratagy displays the template information in the appropriate Notify Record Options fields.
4066
Stratagy R3 I&M 11/99 8-3

Notify MenuModify Notify Records/Templates
8-4
Modify Notify Records/TemplatesImportant! Modifying the template changes the template for all User IDs using the template.
4. (Optional) If you are using a template and the Method field contains the characters %V, fill in the Variable field with the appropriate telephone number or information.
5. Press Alt+S.
6. Type Y.
7. Type Y again. Stratagy adds this Notify record to the template database, overwrites the default notification template with this information and automatically transfers the data to the description line in the Notify Record Summary highlighted in Step 1.
1. In the Notify Record Summary section of the Notify Menu, highlight the first available <Disabled> description line.
Note Use the PgDn and PgUp keys to move between lines.
2. If appropriate, press the spacebar to toggle the Notify Record Options Enabled field to YES.
3. Define the Notify Record Options fields. Use Enter or the arrow keys (↑↓) to move between fields.
To display detailed help for the current field, press F1.
4187
4189
Stratagy R3 I&M 11/99

Notify MenuDisable Notify Records/Templates
No
tify Men
u
Disable Notify Records/Templates
4. When finished, press Alt+S.
Your changes are saved and Stratagy prompts:
C: (cancel) Prevent the Notify record from overwriting the existing template.
R: (replace template) Overwrite the old template with this new Notify record.
A: (add) Add this Notify record to the templatedatabase as a new template.
Important! Replacing an existing template affects all User ID mailboxes currently using the template unless the change is confined to the Notify record’s Variable field.
5. Enter C for cancel, R for replace template or A for add.
Stratagy automatically transfers the data to the description line in the Notify Record Summary highlighted in Step 1.
1. In the Notify Record Summary area of the Notify Menu, highlight the appropriate <Enabled> description line.
Note Use the PgDn and PgUp keys to move between lines.
2. Press the spacebar to toggle the Notify Record Options Enabled field to NO.
3. Press Alt+S.
4. Press Y. Stratagy automatically disables the appropriate description line in the Notify Record Summary. In addition, Stratagy keeps the original information so you can reactivate the Notify record by changing the Enabled field to YES.
4188
4189
Stratagy R3 I&M 11/99 8-5

Notify MenuNotify Menu Field Descriptions
8-6
Notify Menu Field Descriptions
Figure 8-1 Notify Menu with Sample Data
Table 8-1 Notify Menu Screen Fields
Menu Bar Access and viewing options (select)
Save Press Alt+S to save the current new or modified Notify record.
Templates Press Alt+T to view existing template (pre-set notification instructions).
Esc/EXIT Press Esc to return to the Users Menu.
Page Down/NEXT Press Page Down to view the next Notify record for the User ID.
Page Up/PREV Press Page Up to view the previous Notify record for the User ID.
Notify Menu title.
User’s InformationDisplay only—changes to these fields must be made in the Users Menu—see Chapter 6 – Users Menu.
User ID User ID mailbox number.
Comment Notation or reminder about the function of the mailbox.
Security Code Password that permits the user access to the User ID mailbox. (Does not display.)
ExtensionProgrammed dial actions Stratagy performs to transfer a call that has accessed the User ID (i.e., Do Not Disturb is Off). Includes transfer to a User ID mailbox, a remote number, or paging.
Directory Name 1 The first of two names Stratagy searches when a caller uses directory (default 411).
Directory Name 2The second of two names Stratagy searches for when a caller uses the directory (default 411).
Notify Record Summary
Display only—10 one-line descriptions of existing notifications.
User’sInformation
Menu Bar
Notify RecordOptions
Notify RecordSummary
4065
Stratagy R3 I&M 11/99

Notify MenuNotify Menu Field Descriptions
No
tify Men
u
Notify Record Options
Notify fields for the record highlighted in the Notify Record Summary area.
Enabled
Enable or disable the current Notify record.
Yes: Enable the record. Stratagy carries out the instructions defined by the record.No: Disable the current Notify record.
Important! Using Stratagy’s User Notification option for his/her User ID mailbox, a user can enable or disable an existing Notify record and modify the contents of the record’s Variable field.
Possible values: Yes, NoDefault: No (disabled)
Frequency of Notification
MTWTFSS
Days of the week to which notification is restricted.
Y: Notification occurs on this day of the week.N: Notification does not occur on this day of the week.
In the following example, notification is scheduled for Monday, Wednesday, and Friday only.
Restricted To: MTWTFSS
YNYNYNN
Possible values: Y, NDefault: Y
From
Start notification time (hh:mm). Military format (24-hour clock); e.g., 5:30 p.m. is represented as 17:30. Always less than To. To specify 24 hours, set From at 00:00 and To at 23:59.
Default: 00:00
To
End notification time (hh:mm). Military format (24-hour clock). Always more than From. To specify 24 hours, set From at 00:00 and To at 23:59.
Default: 23:59
Notify After
Number of minutes before Stratagy attempts the first notification to a user after someone leaves a new message.
Important! If this is the only enabled Notify record, use the default value 0. If there is more than one enabled Notify record for the same date and time, set Notify After to a different number of minutes for each record. This avoids potential conflict.
Possible values: 0~ 60Default: 0 (immediately)
Continue Every
Number of minutes before Stratagy re-attempts notification after the first notification. For example, every 60 minutes means notify this user every hour after the first notification.
Possible values: 0~60Default: 60 (minutes)
Max Times
Number of notification attempts when new messages exist in this user’s mailbox.
Stratagy counts only successful tries; i.e., successfully performing each action in the Method field.
Possible values: 0~999Default: 0 (Stratagy continues until the user has played every new message.)
Table 8-1 Notify Menu Screen Fields (continued)
Stratagy R3 I&M 11/99 8-7

Notify MenuNotify Menu Field Descriptions
8-8
Notify Features
TitleComment or reminder that identifies the type or purpose of this Notify record/template. For example, message light on, digital pager, home. (Field is 16 characters long.)
Type
Notification type for this record. To select the type:
1. When the cursor is in the Type field to display the options, press F2.
2. Use the arrow keys (↑↓) to highlight the type you want.
3. Press Enter to select the type.
NORMAL: Notify user of new messages in his mailbox by lighting the message light or calling a telephone number.
Notification begins when a message is left in the User ID mailbox.User notified of new messages in his mailbox by lighting the message light, calling a home telephone, calling a cellular telephone, or calling any off-premise location.Notification ends when the user picks up messages or when the maximum number of tries (Max Times) has been reached.
RELAY: Notify user by relaying the caller’s telephone number to the user’s beeper display.
Notification begins when a caller uses the relay paging feature to record a telephone number. Stratagy prompts the caller to:
1. Press � while connected to the personal greeting of the user’s mailbox.2. Enter his/her telephone number and press #.Stratagy stores the telephone number in the Method field token %R.
User notified when the caller’s telephone number is relayed to the user’s beeper display or forwarded to a voice answered telephone.
Notification ends when the maximum number of tries (Max Times) has been reached.
PICKUP: Turn off a message waiting light after a user has retrieved messages from his mailbox.
Notification begins after the user picks up all new messages and exits from the Play Messages selection.Notification ends when the maximum number of tries (Max Times) has been reached. Therefore, be sure to enter 1 when you define Max Times.
DISK: Notify user (usually System Administrator) when available hard drive space is low.
Notification begins when the available hard drive storage space reaches the predefined limit (set using the Stratagy system configuration parameter diskwarn). The default is 5%.Notification ends when the maximum number of tries (Max Times) has been reached.
URGENT: Notify user of an urgent message in his mailbox.
Notification begins when a User ID mailbox receives a message the caller marked as urgent.
Notification ends when the maximum number of tries (Max Times) has been reached.
PANIC: Automatically notifies the System Administrator or support personnel that an error has occurred on the system whenever an unsuccessful restart occurs during the Automatic System Recovery.
Possible values: NORMAL, RELAY, PICKUP, DISK, URGENT, PANICDefault: NORMAL
Table 8-1 Notify Menu Screen Fields (continued)
Stratagy R3 I&M 11/99

Notify MenuNotify Menu Field Descriptions
No
tify Men
u
Variable
Value Stratagy inserts in place of the %V in the Method field. Typically, this is pager or similar value associated with the record rather than the template.
The uses include:
� Notification templates can be used for many users.
� Field personnel can be notified at different destinations during the day or week.
Important! Using Stratagy’s User Notification option for his/her User ID mailbox, a user can enable or disable an existing Notify record and modify the contents of the record’s Variable field.
Possible values: blank, telephone number, extension, Token Programming LanguageDefault: blank
Method
Programmed dial actions Stratagy performs to notify the user.
Possible values: include User ID mailbox, telephone extension, Token Programming Language
Default: blank
Table 8-1 Notify Menu Screen Fields (continued)
Stratagy R3 I&M 11/99 8-9

Notify MenuNotify Menu Field Descriptions
8-10
Stratagy R3 I&M 11/99
Token
Pro
gram
min
g
Token Programming 9
Stratagy’s Token Programming Language consists of commands, or tokens, that instruct Stratagy what actions to perform. The tokens that are generally used are simple and perform standard expected actions such as dialing an extension.
The Token Programming Language gives the system versatility. Its capabilities include, but are not limited to:
� Fax back
� Confirming digits entered by a caller
� Relaying messages to digital pagers
� Controlling message waiting lights
The Token Programming Language uses three types of tokens: singular, defined, and replaced. For a detailed description of each token, see Tables 9-1~9-3.
Using the Token Programming LanguageThe Token Programming Language may be used in the following fields:
Users Menu’s Extension FieldTypically the Users Menu’s Extension field contains the actual telephone station/extension number for the corresponding User ID. It may contain tokens. Or, it may be empty.
Auto’s Extension FieldThe default value for the Auto record’s Extension field is the value in the User’s Extension field. However, it may contain tokens. When the Auto record is active, Stratagy uses this Extension field rather than the Users Menu’s Extension field.
Notify’s Method FieldThe Notify record’s Method field must always be defined for Stratagy to perform the proper type of notification.
To program the Extension or Method fields, enter a series of commands, or tokens, that instruct Stratagy what actions to perform. A field would, therefore, contain TokenTokenToken...Token, where Token defines how to perform the actions.
Stratagy R3 I&M 11/99 9-1

Token ProgrammingSingular Tokens
9-2
All tokens are available for the Stratagy 24D and Stratagy 24 Plus. Fax tokens are not available for the Stratagy Flash, Stratagy DK, Stratagy 24 Plus or the Stratagy 6D. Some IVR tokens are not available for the Stratagy Flash.
Stratagy provides reserved User ID mailboxes that have common features pre-programmed, including future delivery, guest defaults, and fax tone detect. Notify contains templates (e.g., message waiting light control and pagers) you can use for defining User ID Notify records.
See Chapter 10 – Customization Examples for examples on how to use the Token Programming Language. See Chapter 13 – Faxes for information on programming fax features.
Singular TokensSingular Tokens are single character commands that perform a single action that cannot be modified. For example, the token 1 performs the action of playing DTMF 1.
Table 9-1 Singular Tokens
Token Syntax Description
@ @
Suppress normal process—prevents Stratagy from normally processing an Extension or Method field.
� Normally when Stratagy evaluates an Extension field, it plays the “Please hold...” prompt to the caller, puts the caller on transfer hold, and then evaluates the tokens in the field. If the first character in the field is the @ token, however, Stratagy immediately begins processing the next token without performing the transfer procedure.
� In the case of the Method field, Stratagy does not attempt to access a port for an outbound notification call.
1 1 Plays DTMF tone 1.
2 2 Plays DTMF tone 2.
3 3 Plays DTMF tone 3.
4 4 Plays DTMF tone 4.
5 5 Plays DTMF tone 5.
6 6 Plays DTMF tone 6.
7 7 Plays DTMF tone 7.
8 8 Plays DTMF tone 8.
9 9 Plays DTMF tone 9.
0 0 Plays DTMF tone 0.
* * Plays DTMF tone *.
# # Plays DTMF tone #.
A A Plays DTMF tone A.
B B Plays DTMF tone B.
C C Plays DTMF tone C.
D D Plays DTMF tone D.
Stratagy R3 I&M 11/99

Token ProgrammingSingular Tokens
Token
Pro
gram
min
g
- (dash) - Short pause—pauses 0.5 (one-half) second.
, (comma) , Long pause—pauses two seconds.
~ ~ Timed break recall—pulse dials the digit 1 to effect a timed break recall.
E EEarth recall—performs an earth recall. This is used in place of the hookflash (the F token) on some switches.
F FHookflash—performs a hookflash. The length of the hookflash specified under the Telephone System Dial Codes option # Number of 1/100 seconds to use for flash time. (See Chapter 3 – Configure Stratagy.)
H HGo on hook—immediately hangs up. If entered after an extension number, performs an immediate hang-up without waiting for system tone cadences. This is called a Blind Transfer.
U U
Return to transferring User ID if Extension field number busy—if entered after a number in the Extension field, performs a partially supervised transfer. If ringing is returned, the system hangs up for a blind transfer. If busy is returned, the Stratagy retrieves the call to be processed by the transferring User ID.
X X
Remember event—message waiting light control—creates the file LIGHT.ON in the User ID’s directory. Used with the Y and Z tokens to control Stratagy’s processing of tokens, particularly in situations where Stratagy should perform an action once regardless of the number of times the tokens are attempted.
A message waiting light that uses the same codes to turn on the light as it does to turn off the light; i.e., a toggle. See Chapter 10 – Customization Examples for details.
Y Y
Forget event – message waiting light control—deletes the LIGHT.ON file in the User ID’s directory.
A message waiting light that uses a different code to turn off the light than to turn on the light. See Chapter 10 – Customization Examples for details.
Z ZTest event – message waiting light control—tests for the existence of the LIGHT.ON file in the User ID’s directory. If the file is there, immediately stops processing the rest of the tokens for this User ID.
Table 9-1 Singular Tokens (continued)
Token Syntax Description
Stratagy R3 I&M 11/99 9-3

Token ProgrammingReplaced or Variable Tokens
9-4
Replaced or Variable TokensReplaced or Variable Tokens are specified with a preceding % sign and cause Stratagy to replace the token given with the value associated with the token. For example, The token %M would be replaced with the current number of messages for the current User ID being accessed.
Table 9-2 Replaced Tokens
Token Description
%A
Public network line access codes—replaced with the value of the Stratagy System configuration parameter fax_dl_init (public network line access) (Chapter 3 – Configure Stratagy)
Syntax %A
%B1~%B6
Board serial number—replaced with the appropriate value that represents the serial number of the appropriate voice board.
%B1 voice board 1
%B2 voice board 2
%B3 voice board 3
%B4 voice board 4
%B5 voice board 5
%B6 voice board 6
Syntax %B1, %B2, %B3, %B4, %B5, %B6
%CReplaced with the current port number.
Syntax %C
%D
Hard drive space remaining—replaced with the value that represents the percent of free hard drive space at the time it is used.
Syntax %D
Example P(%D,N)
Says (plays) the percentage of free hard drive space as a number.
%EExtension field—replaced with the contents of the current User ID’s Extension field.
Syntax %E
%F
User ID’s Directory Name 1, Directory Name 2, or Comment field—replaced with the contents of the Users Menu’s Directory Name 1, Directory Name 2, or Comment field for the User ID.
Syntax %F(n[,uid])
where:
n Number representing one of the following Users Menu fields.1 Directory Name 12 Directory Name 23 Comment
uid Valid User ID. Defaults to current User ID if not specified.
Example %F(3)
Replaced with the contents of the Users Menu’s Comment field for the current User ID.
Stratagy R3 I&M 11/99

Token ProgrammingReplaced or Variable Tokens
Token
Pro
gram
min
g
%KValue held in the Calling Party ID buffer.
Syntax %K
%MNumber of messages—replaced with the total number of messages for the current User ID.
Syntax %M
%NNumber of new messages—replaced with the number of new messages for the current User ID.
Syntax %N
%P
Previously accessed User ID—replaced with the User ID previously accessed
Syntax %P
Example
If while accessing User ID 100 a caller enters 222, then while User ID 222 is accessed %P has the value 100.
%R
Relay page DTMF—replaced with the DTMF digits entered by the caller who invoked RELAY paging notification. Used mostly for sending a telephone number directly to a User’s pager/beeper from his User ID.
Syntax %R
%S0~%S19
Store value—Stratagy has twenty storage tokens (variables) that enable you to input, modify, retrieve, and output values. Upon each new call, all the variables are initialized to null (no defined value).
%S0 storage token 0 %S10 storage token 10
%S1 storage token 1 %S11 storage token 11
%S2 storage token 2 %S12 storage token 12
%S3 storage token 3 %S13 storage token 13
%S4 storage token 4 %S14 storage token 14
%S5 storage token 5 %S15 storage token 15
%S6 storage token 6 %S16 storage token 16
%S7 storage token 7 %S17 storage token 17
%S8 storage token 8 %S18 storage token 18
%S9 storage token 9 %S19 storage token 19
Each port has a unique set of twenty %S tokens which do not conflict. Therefore, two different ports may use the same %S token without disrupting each other’s value.
Syntax %S0, %S1, %S2, %S3, %S4, %S5, %S6, %S7, %S8, %S9, %S10, %S11, %S12, %S13, %S14, %S15, %S16, %S17, %S18, %S19
%T
Connect time—replaced with the current connect time, i.e., the total number of seconds that the port/call has been active.
Syntax %T
Table 9-2 Replaced Tokens (continued)
Token Description
Stratagy R3 I&M 11/99 9-5

Token ProgrammingReplaced or Variable Tokens
9-6
%UUser ID—replaced with the current User ID number.
Syntax %U
%V
Variable—replaced with the value of the current Notify record’s Variable field. Useful for defining notification templates for User IDs that perform the same type of notification with a difference only in the telephone number that Stratagy should dial, e.g., pager/beeper telephone numbers.
Syntax %V
%W
Current day of the week—replaced with the current day of the week, where:
1 Sunday 5 Thursday2 Monday 6 Friday3 Tuesday 7 Saturday4 Wednesday
Syntax %W
%X
Transfer hold codes—replaced with the value of the Telephone System Dial Codes that puts a caller on transfer hold (# Dial code to put a caller on transfer hold). See Chapter 3 – Configure Stratagy.
Syntax %X
%Y
Current date—replaced with the current date (mmddyyyy). This is the same format used in the P( ) token for dates.
Syntax %Y
Example P(%Y,D)
Says the current date: month, day, year.
%Z
Current time—replaced with the current time in 24-hour format (hhmm). This is the same format used in the P( ) token for time.
Syntax %Z
Example P(%Z,T)
Says the current time in 24-hour format: hours, minutes.
LEN[ ]
Length—replaced with the total number of characters in the %Sn variable.
Syntax LEN[%Sn]
where:
%Sn One of the %S storage variables (range: 0~19).
Example P(LEN[%S1],N)
Says the number of characters in %S1 as a number.
Table 9-2 Replaced Tokens (continued)
Token Description
Stratagy R3 I&M 11/99

Token ProgrammingDefined Tokens
Token
Pro
gram
min
g
Defined TokensDefined Tokens are expressed with left and right parentheses surrounding one or more definitions that determine how the token should work. For example, the Goto token G( ) only takes one definition. Stratagy immediately “goes to” the User ID specified for processing. For G(123), Stratagy continues processing at User ID 123.
Strings that contain a space, comma or quotes, must be enclosed with quotes (e.g., “9,%S1”) or Stratagy may misread the token.
Table 9-3 Defined Tokens
Token Description
G( )
Go to User ID—immediately continues processing at the User ID specified. Stratagy continues standard processing at the User ID per the User ID mailbox processing diagram (Chapter 4 – How Stratagy Operates).
Syntax G(uid)
where:
uid User ID
Example G(299)
Goes to User ID 299.
H( )
Hang-up process—defines the specified uid as the uid that Stratagy processes when it detects a hang-up condition. This is useful for performing cleanup and/or exit routines when a caller hangs up.
Syntax H(uid)
where:
uid Valid User ID
I( ) If conditional—if the relationship between the first string and the second string is true, then continue processing at the User ID specified by uid. Otherwise, processing continues with the next token.
Syntax I(string,relationship,string,uid)
where:
string Any quoted set of characters, numbers, and/or variables.
relationship Either >, <.=,! which test for greater than, less than, equal, or not equal.
uid Valid User ID. Can be a variable.
Examples
I("111",<,"222",1000)
Immediately continues processing at User ID 1000.
I("111",>,"222",1000)
Does not continue processing at User ID 1000 and instead continues with the next token.
I("%S1",=,"1234",2000)
Continues processing at User ID 2000 only if %S1 has the value 1234.
I("%S1",=,"SPANISH",2000)
Continues processing at User ID 2000 only if %S1 = SPANISH.
Stratagy R3 I&M 11/99 9-7

Token ProgrammingDefined Tokens
9-8
J( )
Receive fax—the J( ) token enables you to receive faxes as User ID messages or for later transmission with the T( ) token.
See Chapter 13 – Faxes for details about fax programming.
The J( ) token is supported by the Stratagy 24D and Stratagy 24 Plus.
Syntax J(file,string)J(file,"",tokens)
where:
file File name of the fax you want to receive. Valid DOS file name. If it consists of only numbers, it is assumed to be a User ID and the received fax is stored as a message.
string DTMF digits representing the telephone number that should be dialed to connect to the fax device that sends the transmission. If it is the empty string, i.e., ””, then Stratagy implements the defined tokens.
" " Empty string. Stratagy implements the defined tokens.
tokens Stratagy implements the defined tokens to deliver the fax call to the appropriate Stratagy fax/modem.
Examples
J(C:\\FAXES\\FAX1,"")
Causes Stratagy to set up one of the fax/modems to wait for a call and accept a fax called C:\FAXES\FAX1. This is useful for loading a fax into Stratagy.
J(123,"","P(G1)F-%FH")
Sets up a personal fax mail User ID that enables one-call fax transmission (fax on demand).
123 User ID 123 is the fax mail User ID.
" " Empty string. Stratagy implements the defined tokens.
P(G1) Plays greeting 1: “Start your fax machine at the tone.”
F Performs a hookflash to put the call on hold.
- Pauses (0.5 second).
%F Dials the extension of the fax port being used.
H Hangs up (completes an unsupervised transfer).
Note Use two backslashes \\ to signify one backslash \.For example, to specify the file name C:\STRATAGY\NEW.TXT, use C:\\STRATAGY\\NEW.TXT.
CAUTION! When creating applications using the J( ), T( ), and >( ) tokens, you must use the identical syntax for file identification. Otherwise, fax transmission or reception may fail.
KB( )
Plays a tone on the channel.
Syntax KB(freq,ms)
where:
freq Frequency of the tone.
ms Duration (in milliseconds) of the tone.
Table 9-3 Defined Tokens (continued)
Token Description
Stratagy R3 I&M 11/99

Token ProgrammingDefined Tokens
Token
Pro
gram
min
g
KC( )
Compare security code—the KC( ) token compares value of sec to the security code for the User ID. If equal, processing continues with the next token. Otherwise, processing proceeds to the value defined in the Done chain.
Syntax KC(uid,sec)
where:
uid Valid User ID. Can be a variable.
sec Value to be compared with the security code. Can be a variable.
Example KC(375,23456)
Compares 23456 with the value of User ID 375’s security code. If equal, processes the next token. Otherwise, proceeds to the value defined in the Done chain.
KD( )
Delete User ID mailbox message—deletes the message in the specified message queue from the User ID mailbox.
Syntax KD(msg,msgq[,uid])
where:
msg Message number. Can be a variable.
msgq Message queue. Can be a variable.
U Urgent Message Queue
N New Message Queue
S Saved Message Queue
uid Valid User ID. Can be a variable. Defaults to current User ID if not specified.
Example KD(2,U)
Deletes message number 2 in the Urgent Message Queue for the current User ID.
Table 9-3 Defined Tokens (continued)
Token Description
Stratagy R3 I&M 11/99 9-9

Token ProgrammingDefined Tokens
9-10
KF
Suppresses DTMF_gate function.
Syntax @KFV(CALLERID.txt,field,%K,field,%Sn)G(%Sn)
where:
@ Suppress normal process.
KF Suppress DTMF gate function.
V Searches Callerid.txt file.
Callerid.txt File to be searched.
field Field in Callerid.txt file that is searched for %K match (e.g., phone number).
%K Value held in Calling Party ID buffer.
field If a match to %K is found, this field is searched for the associated value (e.g., User ID) and the value is stored in %Sn.
%Sn One of the %S storage variables (range: 0~19).
G (%Sn) Goes to mailbox number stored in %Sn.
Example @KFV(CALLERID.txt,1,%K,2,%S2)G(%S2)
@ Suppress normal process
KF Suppress DTMF gate.
V(CALLERID.TXT,1,%K,2,%S2)
Searches field 1 of the callerid.txt for a value that matches %K. If a match is found, Stratagy stores the value in field 2 of the callerid.txt as %S2. If no match is found, the remaining values in the token string are ignored and Stratagy executes the Done chain.
G(%S2) Goes to mailbox number stored in %S2 (e.g., user ID 890).
KI( )
Position of substring in string—the KI( ) token searches string for the first occurrence of substring. The result of the search is the position of the substring within the string, and it is stored as the variable.
Syntax KI(substring,string,%Sn)
where:
substring Any alphanumeric substring. Can be a variable.
string Any alphanumeric string. Can be a variable.
%Sn One of the %S storage variables (range: 0~19).
Example KI(”d”,”abcdefg”,%S0)
Searches string “abcdefg” for the first occurrence of substring “d,” and places the value of the position of the substring within the string in storage variable 0. The result is the %S0 variable containing 4, because “d” is the fourth character in the string.
Table 9-3 Defined Tokens (continued)
Token Description
Stratagy R3 I&M 11/99

Token ProgrammingDefined Tokens
Token
Pro
gram
min
g
KL( )
Logs caller into User ID.
Note Cannot be used in the Notify Menu.
Syntax KL(uid)
where:
uid Valid User ID.
Example KL(239)
Logs the caller into User ID 239
KM See Stratagy DK Installation Guide for syntax/description information.
KN( )
Access AMIS networking—the KN( ) token enables access to AMIS networking (see Chapter 12 – AMIS Networking).
Syntax KN(phone[,mbx])
where:
phone DTMF digits representing the telephone number to dial to connect to the AMIS network.
mbx Valid mailbox on remote system or current User ID (Proxy Box). If not defined, Stratagy uses value defined when AMIS message was addressed via the Gateway Box. See Chapter 12 – AMIS Networking for details.
Example KN(9-1-7145555555,345)
9 Dials for an outside line.
- Pauses (0.5 second).
1 Dials 1 for long distance access.
- Pauses (0.5 second).
7145555555 Dials the telephone number.
345 Dials the User ID.
KR( )
Creates a recording—if the destination is an existing User ID, Stratagy inserts the recording into that mailbox as a new message. Otherwise, the destination is assumed to be the name of an existing file and the recording is placed there.
Syntax KR(dest)
where:
dest Destination—User ID or file (valid DOS file name). Can be a variable.
Example KR(532)
Inserts the recording in User ID 532 as a new message.
KT( ) See Stratagy DK Installation Guide for syntax/description information.
Table 9-3 Defined Tokens (continued)
Token Description
Stratagy R3 I&M 11/99 9-11

Token ProgrammingDefined Tokens
9-12
KV( )
Delete record from a database—for the file specified, deletes the first record with the value in that field (if any).
If file ends with .DBF, Stratagy assumes it is in dBase format. Otherwise, Stratagy assumes it is the name of an ASCII file with columns separated by commas.
Syntax KV(file,field,value)
where:
file dBase file (.DBF) or ASCII file with columns separated by commas (comma delimited). Valid DOS file name. Can be a variable.
field dBase file field name or ASCII file column number. (1 is the value of the field before the comma.) Can be a variable.
value Any alphanumeric string. Can contain %S variables.
Example KV(xyz.dbf,client,”abc”)
For dBase file xyz.dbf, deletes the first record where the field named client contains the string “abc.”
L( )
Switch system language—immediately changes the system prompts to use the specified file (usually the specified file’s name indicates the language). All system prompts change, including User mode prompts.
Syntax L(language_file)
where:
language_file File name in the Stratagy directory that represents a Stratagy system language file which has the DOS suffix .IDX.
Examples
L(ENGLISH)
Uses the ENGLISH.IDX system prompt file in the C:\STRATAGY directory.
L(SPANISH)
Uses the SPANISH.IDX system prompt file in the C:\STRATAGY directory.
Table 9-3 Defined Tokens (continued)
Token Description
Stratagy R3 I&M 11/99

Token ProgrammingDefined Tokens
Token
Pro
gram
min
g
M( )
Audiotex menu—the M( ) token enables you to specify fast single-digit entry for audiotex menu selections. While Stratagy processes this token, it plays (or says) the specified greeting while waiting for a single DTMF digit to be pressed by the caller. When the caller presses the single DTMF digit, Stratagy looks up the menu selection that matches and continues processing at the specified User ID. Therefore, this eliminates the normal delay for determining completed DTMF entry.
Note While this Token is active, no other digits, except the defined menu selections, is recognized.
Syntax M(Gn,count,delay)
where:
Gn User ID’s greeting number (range: 1~7).
count Number of times to play the greeting.
delay Time (in 10ths of seconds) to wait after each saying of the greeting.
Example M(G1,2,20)
Plays greeting 1 up to two times with a 2 second delay after each time the greeting plays, waiting for the caller to press a DTMF.
� If the caller presses 5, Stratagy immediately continues processing at the User ID specified in the Menu 5 field.
� If the caller makes no selection, Stratagy continues processing at the next token.
� If the caller makes an invalid selection, Stratagy continues processing at the Done chain.
N( ) Update database record—the N( ) token enables you to update the values of a database record. It searches a file for the first record that has s-value in s-field. It updates the record by placing n-value in r-field, and then saves that record back to the database.
Syntax N(file,s-field,s-value,r-field,n-value[,r-field,n-value...])
where:
file dBase file (.DBF) or ASCII file with columns separated by commas (comma delimited). Valid DOS file name. Can be a variable.
s-field Search dBase file field name or ASCII file column number. (1 is the value of the field before the comma.) Can be a variable.
s-value Search alphanumeric string. Can contain %S variables.
r-field Replacement dBase file field name or ASCII file column number to update.
n-value New alphanumeric string. Can contain %S variables.
Table 9-3 Defined Tokens (continued)
Token Description
Stratagy R3 I&M 11/99 9-13

Token ProgrammingDefined Tokens
9-14
N( )(continued)
ExamplesSuppose an ASCII file contains a listing of dealers, available parts, and orders on those parts. You could use the R( ) token to obtain information about how many parts the dealer wants to order and then use the N( ) token to update the database.
R(G1,%S1,40)
G1 Plays greeting 1: “Please enter your dealer number.”
%S1 Stores the caller’s entry in variable %S1.
40 Waits 4 seconds (40 ÷ 10 = 4) for DTMF after playing the greeting.
R(G2,%S2,20)
G2 Plays greeting 2: “Please enter the number of telephones you want to order.”
%S2 Stores the caller’s entry in variable %S2.
20 Waits 2 seconds (20 ÷ 10 = 2) for DTMF after playing the greeting.
R(G3,%S5,20)
G3 Plays greeting 3: “Please enter the number of key systems you want to order.”
%S5 Stores the caller’s entry in variable %S5.
20 Waits 2 seconds (20 ÷ 10 = 2) for DTMF after playing the greeting.
N(ORDERS.DOC,5,%S1,9,%S2,12,%S5)
� Searches ORDERS.DOC for the first record that has the value of %S1 in field 5.
� Replaces the current value of field 9 with %S2.
� Replaces the current value of field 12 with %S5.
� Saves the record back to the database.
O( )
Timed on-hook—an on-hook condition for the specified amount of time. Depending upon the value of tenths, you can effect a flash, or even a hang-up condition. This is useful for generating an intermediate hang-up condition during token processing without terminating the actual continued token processing.
Syntax O(tenths)
where:
tenths Time in tenths of seconds.
Example O(60)
Goes on-hook for 6 seconds (60 ÷ 10 = 6).
Table 9-3 Defined Tokens (continued)
Token Description
Stratagy R3 I&M 11/99

Token ProgrammingDefined Tokens
Token
Pro
gram
min
g
P( )
Play—the P( ) token enables you to communicate information in a variety of ways to a caller or to a user when used in a Notify record’s Method field. While Stratagy is playing, the skip ((, #) and volume (%, +) keys on the telephone work.
Syntax Prepeat(item)
where:
repeat Number of times to play the item. If omitted, defaults to 1.
item Each item causes Stratagy to say specific information. The items are defined as follows:
where:
A, string Alphanumeric string.
D Percentage of remaining disk space.
G[n, uid] Greeting n of the current User ID or User ID uid.
M[, uid] Total number of messages and number of new messages for the current User ID or User ID uid.
Mn[, uid] Message n in the Saved Message Queue, if enabled, of the current User ID or User ID uid.
MNn[, uid] Message n in the New Message Queue of the current User ID or User ID uid.
MSn[, uid] Message n in the Saved Message Queue of the current User ID or User ID uid.
MUn[, uid] Message n in the Urgent Message Queue of the current User ID or User ID uid.
nn,V System prompt nn.
R DTMF digits entered by a caller who has invoked relay paging (used only in the Notify record Method field).
%Sn DTMF digits currently represented by the variable %Sn, where n is a number from 0 to 9. This is most effective for repeating the DTMF entered by a caller for confirmation.
%Sn, N DTMF digits currently represented by the variable %Sn, as a number where the range is assumed to be between 0 and 999 million.
%Sn, D DTMF digits currently represented by the variable %Sn, as a date, where the format is assumed to be either mmddyy (which assumes a year in the 1900s) or mmddyyyy.
%Sn, T DTMF digits currently represented by the variable %Sn, as a time of day, where the format is assumed to be hhmm.
%Sn, $ DTMF digits currently represented by the variable %Sn, as a dollar amount, where the last two digits are assumed to be cents.
%Sn, F The same as %Sn, $ except Stratagy uses francs and centimes.
%Sn, P The same as %Sn, $ except Stratagy uses pesos and centavos.
U[, uid] “Name and extension” recording for the current User ID or User ID uid. If there is no recording, Stratagy says the current User ID digits or User ID digits uid.
V Digits in the Notify record’s Variable field.
X, file Voice file defined by file.
Examples
P(G1)
Stratagy plays greeting 1 for the current User ID. This enables you to record and play any prompt.
P(06261994,D)
Stratagy says “June twenty-sixth, nineteen ninety-four.”
P(06261994,$)
Stratagy says “Sixty-two thousand six hundred nineteen dollars and ninety-four cents.”
Table 9-3 Defined Tokens (continued)
Token Description
Stratagy R3 I&M 11/99 9-15

Token ProgrammingDefined Tokens
9-16
Q( )
Question and answer (Voice Forms)—the Q( ) token enables you to ask a caller a series of questions and store all the caller’s responses as a single message or multiple messages in the current User ID.
Record each question as a greeting. Stratagy plays each question/greeting with a tone, records a response, and then plays the next question/greeting until all the specified questions/greetings have been played.
You can ask the caller up to 20 questions. To play more than seven questions (using greetings 1 to 7 for the current User ID), use questions from other User IDs by specifying which User ID’s greeting to access with a # sign followed by the uid. For example, G7#123 would use greeting 7 from User ID 123.
Syntax Q(Gn,...,E...)
where:
Gn Greeting number (range: 1~7).
E Groups the responses to the previous greetings as a single message.
... Additional greetings or groupings.
Examples
Q(G1,G2,G3,G4,G5,G6,G7,G1#9000,G2#9000)
Stratagy asks nine questions as recorded in the specified greetings (seven greetings from the current User ID and two greetings from User ID 9000), records nine responses, and stores the responses as one message.
Q(G1,G2,E,G3,E)
Stratagy groups the responses to greetings 1 and 2 as one message and the response to greeting 3 as a different message.
R( )
Read DTMF from a caller—the R( ) token enables you to obtain caller information while prompting the caller with the specified recorded greeting. The token plays the greeting specified for the current User ID and enables the caller to make DTMF entry which is stored in the specified %S variable. Stratagy interrupts the greeting as soon as the caller enters the first DTMF tone. If there is no caller DTMF entry, Stratagy initializes the %S variable to empty, i.e., ””.
Syntax R(Gn,%Sm,delay)
where:
Gn Greeting number for the current User ID (range 1~7).
%Sm One of the %S storage variables (range: 0~19).
delay Time in tenths of seconds to wait for DTMF after playing the greeting (range: 0~99). If omitted, defaults to 0.
ExampleTo prompt and have a caller enter a telephone number and have Stratagy store that telephone number to be used later, you could:
Record in greeting 1: “Enter your telephone number. Finish by pressing the # sign.”
Use R(G1,%S6,20):
G1 Plays greeting 1.
S6 Stores the caller’s entry in variable %S6.
20 Waits 2 seconds (20 ÷ 10 = 2) for DTMF after playing the greeting.
Table 9-3 Defined Tokens (continued)
Token Description
Stratagy R3 I&M 11/99

Token ProgrammingDefined Tokens
Token
Pro
gram
min
g
S( )
Serial port access—the S( ) token gives Stratagy access to serial ports. By communicating over serial ports, Stratagy can access other computers and store and/or retrieve information from remote databases.
Once an S( ) token has been executed, the serial port is locked for exclusive access by the current User ID. The lock is removed only when Stratagy finishes executing the User ID's Extension field. This enables several related S( ) tokens to be executed while the port is locked.
To properly use this token, the physical serial port must have certain configuration parameters defined. These parameters are grouped together under “Serial Port Descriptions” of the Stratagy System Configuration options (Chapter 3 – Configure Stratagy).
The S( ) token is supported by Stratagy 6D, 24D and 24 Plus.
Syntax S(port,S,%Sn,termination,length,timeout)
where:
port Logical serial port (1 or 2) mapped onto a physical port number by the Stratagy System Configuration parameter serial_port1 for logical port 1 or serial_port2 for logical port 2 (Chapter 3 – Configure Stratagy).
S String sent out on the specified port. It may contain any alphanumeric characters, %S variables, and the following special characters:
\A Attention (bell sound), or Ctrl+G
\N Newline, or Ctrl+J
\R Return, or Ctrl+M
\T Tab, or Ctrl+I
\\ Backslash, the actual \ character
%Sn One of the %S storage variables (range: 0~19), which stores any response from the serial port. If omitted, Stratagy does not wait for a response.
length Maximum number of characters to expect as input on the serial port. If the maximum number of characters is received, processing continues immediately with whatever characters that were received in the %Sn variable. If this option is omitted, it defaults to the maximum length of %Sn (128 characters).
termination List of characters that defines when Stratagy should stop reading from the serial port for storing in the specified %Sn variable. If omitted, defaults to “\N\R” as specified under “S”. The terminating character, if any, is not part of %Sn.
timeout Maximum time (tenths of seconds) Stratagy waits for input on the serial port when reading into the %Sn variable. When the timeout expires, Stratagy continues processing with the next token. Whatever characters, if any, received up to that point are placed in the %Sn variable. If this option is omitted, the default is the value of the Stratagy System Configuration parameter tmo_serial (Chapter 3 – Configure Stratagy).
Example S(1,”GET INFO”,%S1,”\N”,80,40)
where:
1 Logical serial port.
”GET INFO” String sent out of port by Stratagy.
%S1 Store response in %S1 variable.
\N Newline (Line feed)
80 Maximum number of characters expected as input from serial port.
40 Four-second time out waiting for input from serial port.
Table 9-3 Defined Tokens (continued)
Token Description
Stratagy R3 I&M 11/99 9-17

Token ProgrammingDefined Tokens
9-18
T( )
Transmit fax—performs fax transmissions to either a specified telephone number or to a connected call. For a two-call fax back, use the two-option syntax. For a one-call fax on demand, use the three-option syntax.
If Stratagy has a free fax port available, transmission begins shortly on that port. Otherwise, the request is queued for transmission along with any other such requests. Normally you will install your fax software so that if a transmission fails (for instance, if the remote fax is busy), then the request is retried automatically at a later time, up to a maximum number of retries.
Naturally, you must have installed and configured at least one fax/modem on Stratagy. See Chapter 13 – Faxes for details about fax programming.
The T( ) token is supported by Stratagy 24 and 24 Plus.
Syntax T(file,string)T(file,"",tokens)
where:
file File name of the fax you want to transmit. Valid DOS file name.
string DTMF digits representing the telephone number to dial to connect to the fax device that accepts the transmission. It can contain %S storage variables. If it is the empty string, i.e., ””, then Stratagy waits until a call rings into the fax port.
"" Empty string. Stratagy implements the defined tokens.
tokens Stratagy implements the defined tokens to transfer the call to the Stratagy fax/modem so fax transmission can begin. Typically it would be P(G1)F-%FH, which enables one-call fax transmission.
P(G1) Plays greeting 1: “Start your fax machine at the tone.”
F Performs a hookflash to put the call on hold.
- Pauses (0.5 second).
%F Dials the extension of the fax port being used.
H Hangs up (completes an unsupervised transfer).
Examples
T(FAX1.TXT,"9,%S1")
Causes Stratagy to fax the specified file to the caller’s fax number previously obtained and stored in %S1.
FAX1.TXT Name of the file to transmit.
9 Dials 9 for an outside line.
, Pauses (2 seconds).
%S1 Dials the DTMF digits stored in %S1.
T(FAX2.TXT,"","P(G1)F-%FH")
Transfers call to fax/modem extension and transmits the specified file.
FAX2.TXT Name of the file to transmit.
" " Empty string. Stratagy implements the defined tokens.
P(G1) Plays greeting 1:”Start your fax machine at the tone.”
F Performs a hookflash to put the call on hold.
- Pauses (0.5 second).
%F Dials the extension of the fax port being used.
H Hangs up (completes an unsupervised transfer).
Table 9-3 Defined Tokens (continued)
Token Description
Stratagy R3 I&M 11/99

Token ProgrammingDefined Tokens
Token
Pro
gram
min
g
T( )(continued)
Note Use two backslashes \\ to signify one backslash \. For example, to specify the file name C:\STRATAGY\NEW.TXT, use C:\\STRATAGY\\NEW.TXT.
CAUTION! When creating applications using the J( ), T( ), and >( ) tokens, you must use the identical syntax for file identification. Otherwise, fax transmission or reception may fail.
V( )
Search for value—the V( ) token searches the specified file, in the specified field, for the value given by item. If Stratagy finds the value, it stores the contents of the second field into variable %Sn. If Stratagy does not find the value, the token terminates and returns to the Done state.
If file ends with .DBF, Stratagy assumes it is in dBase format. Stratagy assumes field names instead of field numbers and invokes dBase file processing (including record locking, if specified). Otherwise, Stratagy assumes that it is the name of an ASCII file with columns separated by commas.
There may be several pairs of fields and %Sn values, and Stratagy retrieves them.
The V( ) token is supported by Stratagy 6D, Stratagy 24D, and Stratagy 24 Plus.
Syntax V(file,field,item,field,%Sn[,field,%Sn...])
where:
file dBase file (.DBF) or ASCII file with columns separated by commas (comma delimited). Valid DOS file name. Can be a variable.
field dBase file field name or ASCII file column number. (1 is the value of the field before the comma.) Can be a variable.
item An alphanumeric string. Can contain %S variables.
%Sn One of the %S storage variables (range: 0~19).
ExamplesA caller enters his customer number to hear his credit line:
@R(G1,%S1,20)
G1 Plays greeting 1: “Please enter your customer number.”
%S1 Stores the caller’s entry in variable %S1.
20 Waits 2 seconds (20 ÷ 10 = 2) for DTMF after playing the greeting.
@V(credit.doc,1,%S1,2,%S2)
� Searches CREDIT.DOC for customer number %S1 in field 1.
� Stores the contents of field 2 in variable %S2.
P(G2)P(%S2,$)
P(G2) Plays Greeting 2: “Your credit line is ”
P(%S2,$) Says the value stored in %S2 as a dollar amount: “five thousand dollars.”
Table 9-3 Defined Tokens (continued)
Token Description
Stratagy R3 I&M 11/99 9-19

Token ProgrammingDefined Tokens
9-20
W( )
Wait (pause) for event—general wait token that enables Stratagy to wait for confirmation of specific events. It is useful for confirming dial tone and for notification to confirm that the appropriate answer has occurred. If the event does not occur, Stratagy terminates all remaining token processing.
Syntax W(n)W(n,P)W(n,V)W(n,T)
where:
n Wait (pause) for n tenths of a second.
n, P Wait up to n rings for a pager/beeper to answer.
n, V Wait up to n rings for a voice to answer.
n, T Wait up to n seconds to hear a dial tone.
Example W(3,P)
Waits up to 3 rings for a paging/beeping system to answer. You can use this to confirm that the paging company answered before playing DTMF to the paging company for pager notification of messages.
X( )
Creates a zero length file called file.
Syntax X(file)
where:
file Valid DOS file name.
Example X(NEW.TXT)
Creates zero length file NEW.TXT.
Y( )
Deletes file.
Syntax Y(file)
where:
file Valid DOS file name. Can be a variable.
Example Y(OLD.TXT)
Deletes the file OLD.TXT.
Z( )
Execute Done chain User ID—checks for the existence of file. If the file exists, Stratagy executes the Done chain User ID. If the file does not exist, the system processes additional tokens.
Syntax Z(file)
where:
file Valid DOS file name. Can be a variable.
Example Z(CHECK.TXT)
Stratagy checks if the file CHECK.TXT exists. If the file exists, Stratagy executes the RNA chain User ID.
Table 9-3 Defined Tokens (continued)
Token Description
Stratagy R3 I&M 11/99

Token ProgrammingDefined Tokens
Token
Pro
gram
min
g
+( )
Addition—enables you to perform modifications to values for calculation and control. Ideal for controlling limits and loops.
Syntax +(%Sn[,item])
where:
%Sn One of the %S storage variables (range: 0~19).
item Positive or negative value or another %S variable. Defaults to 1 if not specified.
=( )
Equate—gives the specified storage variable the value specified. The value may be a string or a numeric and should be quoted. The four-option syntax enables substring assignments.
Syntax =(%Sn,item)=(%Sn,item,start,end)
where:
%Sn One of the %S storage variables (range: 0~19).
item Any alphanumeric string. Can contain %S variables.
start Starting character position for assigning a portion of item.
end Ending character position to assign when used with start.
Examples
=(%S1,"FRENCH")
Gives %S1 the value of “FRENCH”.
=(%S1,"FRENCH",3,5)
Gives %S1 the value of ENC (E is the start character and C is the end character).
=(%S1,%S2,1,3)
where %S2 = 7530414. Extracts prefix of the telephone number in %S2 (the first through third number) and gives %S1 the value of 753.
Table 9-3 Defined Tokens (continued)
Token Description
Stratagy R3 I&M 11/99 9-21

Token ProgrammingDefined Tokens
9-22
?( )
Exists in file—searches the specified file for the specified item. Stratagy searches the file on a line-by-line basis and the item is found when it matches an entire line within the file. If the item is found, processing continues at the User ID specified; if not, processing continues with the next token.
One use of this token is to control the use of a Fax on Demand feature. If you find that someone is having a document faxed repeatedly to a phone number (perhaps the phone number of someone who does not want your fax), you can enter such numbers into a file, then program Stratagy to check an entered fax number against those in the file and, if found, branch to a User ID which plays a greeting saying that the entered phone number is invalid and then hang up. If the entered number were not found in the file, then processing would continue normally and the fax would be sent to the requester.
Note Use two backslashes \\ to signify one backslash \. For example, to specify the file name C:\STRATAGY\NEW.TXT, use C:\\STRATAGY\\NEW.TXT.
The ?( ) token is supported by Stratagy 6D, 24D and 24 Plus.
Syntax ?(item,fsile,uid)
where:
item Any alphanumeric string. Can contain %S variables.
file ASCII text file specified by a DOS file name. Can be a variable.
uid Valid User ID.
<( )
Start Incremental fax—enables you to have a caller request multiple fax documents and then to transmit the requested documents with one call.
The <( ) token must be used with the >( ) token. To fax multiple documents, first initiate the process with this token and as the caller requests faxes, add the requested document using the >( ) token. The fax is sent automatically after the caller hangs up.
See Chapter 13 – Faxes for details about fax programming.
The <( ) token is supported by Stratagy 24D and 24 Plus.
Syntax <(string)
where:
string DTMF digits representing the telephone number that should be dialed. Can contain %S variables. If it is the empty string, i.e., ””, then Stratagy waits until a call rings into the fax port.
Table 9-3 Defined Tokens (continued)
Token Description
Stratagy R3 I&M 11/99

Token ProgrammingDefined Tokens
Token
Pro
gram
min
g
>( )
Add incremental fax—enables you to transmit more than one requested document with one call. Before using this token, you must first start incremental faxing with the <( ) token. See the <( ) token for details.
See Chapter 13 – Faxes for details about fax programming.
Note Use two backslashes \\ to signify one backslash \. For example, to specify the file name C:\STRATAGY\NEW.TXT, use C:\\STRATAGY\\NEW.TXT.
CAUTION! When creating applications using the J( ), T( ), and >( ) tokens, you must use the identical syntax for file identification. Otherwise, fax transmission or reception may fail.
The >( ) token is supported by Stratagy 24D and 24 Plus.
Syntax >(file)
where:
file File name of the fax you want to transmit. Valid DOS file name.
¦( )
Append variables to file—writes all twenty %S variables (%S0~%S19) to the specified file. If the file already exists, the variable values are appended to the file; otherwise, the file is created. The values are separated by commas and terminated by a new line.
Note Use two backslashes \\ to signify one backslash \. For example, to specify the file name C:\STRATAGY\NEW.TXT, use C:\\STRATAGY\\NEW.TXT.
The ¦( ) token is supported by Stratagy DK, 6D, 24D, and 24 Plus.
Syntax ¦(file)
where:
file Valid DOS file name.
[( )
Read %S variables state—reads the values of all twenty %S variables (%S0~%S19) from the specified file. The format expected is a one line, comma delimited, ASCII file where the first value is %S0, the second is %S1, etc.
When the [( ) token is used with the ]( ) token, you can read, modify, and write (remember) %S variables.
Notes
� Use two backslashes \\ to signify one backslash \. For example, to specify the file name C:\STRATAGY\NEW.TXT, use C:\\STRATAGY\\NEW.TXT.
� To avoid potential simultaneous access errors: within the same User ID, if you read with the [( ) token, write with the ]( ) token.
The [( ) token is supported by Stratagy DK, 6D, 24D, and 24 Plus.
Syntax [(file)
where:
file ASCII file with columns separated by commas (comma delimited). Valid DOS file name. Can be a variable.
Table 9-3 Defined Tokens (continued)
Token Description
Stratagy R3 I&M 11/99 9-23

Token ProgrammingDefined Tokens
9-24
]( )
Write %S variables state—writes the values of all twenty %S variables (%S0~%S19) to the specified file. Typically, you would use this with the [( ) token which reads the %S variables.
Notes
� Use two backslashes \\ to signify one backslash \. For example, to specify the file name C:\STRATAGY\NEW.TXT, use C:\\STRATAGY\\NEW.TXT.
� To avoid potential simultaneous access errors: within the same User ID, if you read with the [( ) token, write with the ]( ) token.
The ]( ) token is supported by Stratagy DK, 6D, 24D, and 24 Plus.
Syntax ](file)
where:
file ASCII file with columns separated by commas (comma delimited). Valid DOS file name. Can be a variable.
^( )
Change port volume—changes the volume of the current port to the specified level.
Notes
� The Stratagy system configuration gain_norm parameter sets the starting volume for all ports (Chapter 3 – Configure Stratagy).
� For the user, the current port volume can be set through the Users Menu’s Message Volume field and by the user with the Play Message Controls (Chapter 6 – Users Menu).
Syntax (n)
where:
n Volume of current port(range: -8~8). -8 is the softest0 is the default initial volume8 is the loudest.
{ }
Input file—the { } token enables you to use an external file to be read for input of additional tokens.
Note Use two backslashes \\ to signify one backslash \. For example, to specify the file name C:\STRATAGY\NEW.TXT, use C:\\STRATAGY\\NEW.TXT.
The { } token is supported by Stratagy 6D, 24D, and 24 Plus.
Syntax {file}
where:
file ASCII text file containing valid Stratagy tokens. Valid DOS file name.
Table 9-3 Defined Tokens (continued)
Token Description
Stratagy R3 I&M 11/99

Cu
stom
ization
E
xamp
les
Customization Examples 10
Using Stratagy, you can customize User IDs to record messages from callers, provide information to callers, or direct the flow of a call. With this type of flexibility, you can define virtually any call handling method.
Stratagy provides reserved User ID mailboxes that have common features pre-programmed, including future delivery and guest defaults. Notify contains templates (e.g., message waiting light control and pagers) you can use for defining User ID Notify records.
This chapter provides examples, grouped by menu (i.e., Users, Notify, Auto), of some of Stratagy’s capabilities. Each example provides detailed information, including the programming and how it works. For examples that use the Token Programming Language, each token is defined.
Note See Chapter 13 – Faxes for details about programming fax features. See Chapter 9 – Token Programming for complete details about the Token programming language.
All the capabilities are available for the Stratagy 24D and Stratagy 24 Plus. Fax is not available for the Stratagy Flash, Stratagy DK or the Stratagy 6D. Some IVR tokens are not available for the Stratagy Flash.
Users Menu ExamplesThe following examples are included in this section:
� “Using a Status User ID to Check Message Count for Multiple User IDs” on Page 10-2
� “System Paging a User for Special Callers” on Page 10-3
� “System Paging for Ring No Answer” on Page 10-4
� “Switching and Maintaining Languages” on Page 10-6
� “Order Shipment Information” on Page 10-9
� “Holiday Greetings—Holiday Divert Mailbox” on Page 10-11
� “Transferring a Caller Directly to a Mailbox” on Page 10-13
Stratagy R3 I&M 11/99 10-1

Customization ExamplesUsers Menu Examples
10-2
Using a Status User ID to Check Message Count for Multiple User IDsThe creation of the status User ID involves using an optional argument.
Suppose that one person owns several User IDs that he/she has given out to different classes of callers (personal friends one number, business clients another, etc.). This person would like to be able to call in to check if any of these User IDs have messages waiting for him without having to access each User ID in turn.
The token string P(Gn) plays greeting n for the current User ID or P(M) plays the total number of messages and number of new messages for the current User ID. This is normally what you want.
However, the P( ) token takes an optional second argument, which in some cases indicates another User ID whose information is to be played. Using this feature, you can create a status User ID that tells the number of messages waiting in several other User IDs.
Program Example
In the following example:
� Message User IDs: 1000, 2000, 3000
� Status User ID: 9999
➤ To program the example
For User ID 9999, define the user’s record to contain:
How It Works
For each of the three User IDs, the name recording associated with the User ID plays, followed by the total number of messages and number of new messages waiting for that User ID.
Extension @P(U,1000)P(M,1000)P(U,2000)P(M,2000)P(U,3000)P(M,3000)
@ Suppress normal process
P(U,1000) Plays the name recording for User ID 1000. If no recording exists, says the User ID number.
P(M,1000) Says the total number of messages and number of new messages for User ID 1000.
P(U,2000) Plays the name recording for User ID 2000. If no recording exists, says the User ID number.
P(M,2000) Says the total number of messages and number of new messages for User ID 2000.
P(U,3000) Plays the name recording for User ID 3000. If no recording exists, says the User ID number.
P(M,3000) Says the total number of messages and number of new messages for User ID 3000.
Stratagy R3 I&M 11/99

Customization ExamplesUsers Menu Examples
Cu
stom
ization
E
xamp
les
System Paging a User for Special CallersPerhaps you would like to create a special User ID for family, friends, or special customers that would:
1. When accessed, page you over the telephone paging system in your office.
2. Let you know that you have an important call.
3. Transfer that call to your extension through a “back door,” even though your regular extension User ID may be in Do Not Disturb mode.
You would program Stratagy to:
1. Dial the telephone system’s paging access code.
2. Say something like “There is an important call for David.’’
3. Transfer the caller to a back door User ID.
Program Example
In the following example:
� Telephone system’s paging access code: 33*
� Special User ID: 5222
� Back door User ID: 6222
� System code to return to a caller placed on transfer hold: F-
➤ To program the example
1. Customize User ID 5222 by defining the Users record and recording the greeting.
2. Define the user’s record to contain:
3. Access the User ID mailbox via telephone. Record:
Greeting 1: “There is an important call for David.’’
How It Works
When Stratagy tries to transfer a caller that has entered User ID mailbox 5222, it:
1. Places the caller on transfer hold.
2. Dials the telephone system paging code.
3. Plays greeting 1.
4. Performs a hookflash to return to the caller.
5. Continues processing at User ID 6222, which should be configured to ring an extension that may be answered by the user.
Extension @F-33*P(G1)G(6222)
@ Suppresses normal process.
F- Performs a hookflash and pauses 0.5 second. (Some telephone systems requireF-F to return to a caller placed on transfer hold.)
33* Telephone system’s paging access code. (The code varies depending upon the telephone system.)
P(G1) Plays greeting 1 for this User ID.
G(6222) Goes to the User ID 6222.
Stratagy R3 I&M 11/99 10-3
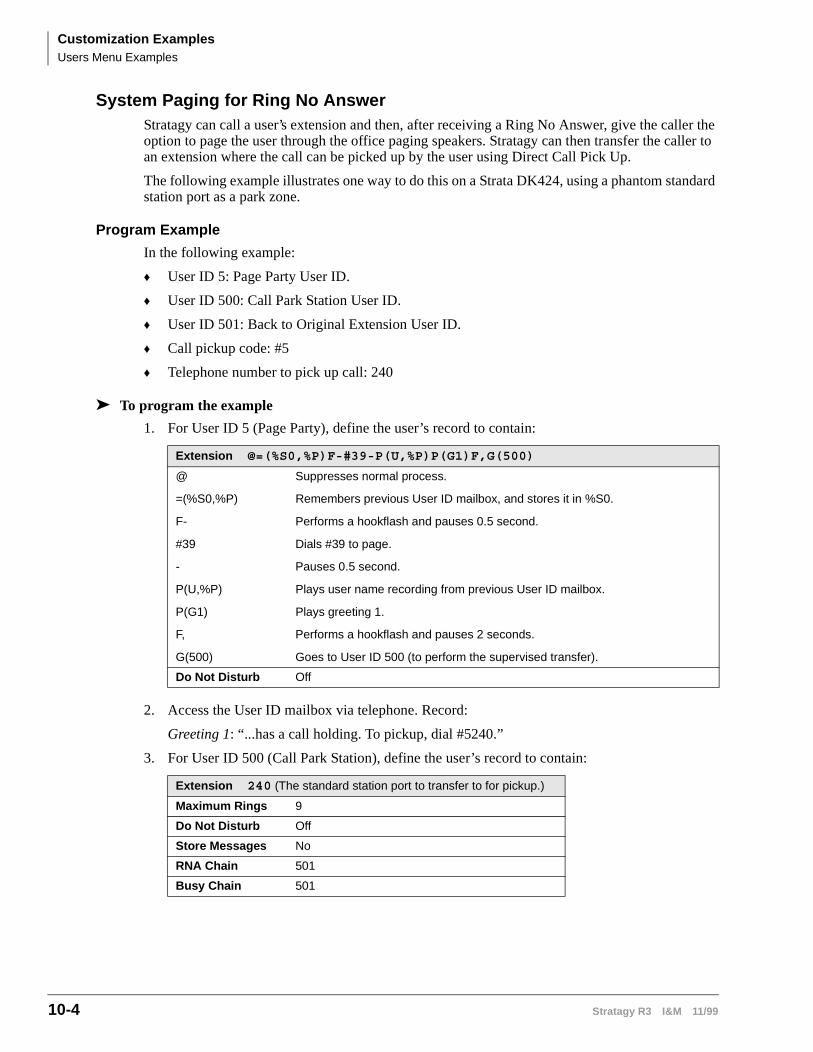
Customization ExamplesUsers Menu Examples
10-4
System Paging for Ring No AnswerStratagy can call a user’s extension and then, after receiving a Ring No Answer, give the caller the option to page the user through the office paging speakers. Stratagy can then transfer the caller to an extension where the call can be picked up by the user using Direct Call Pick Up.
The following example illustrates one way to do this on a Strata DK424, using a phantom standard station port as a park zone.
Program Example
In the following example:
� User ID 5: Page Party User ID.
� User ID 500: Call Park Station User ID.
� User ID 501: Back to Original Extension User ID.
� Call pickup code: #5
� Telephone number to pick up call: 240
➤ To program the example
1. For User ID 5 (Page Party), define the user’s record to contain:
2. Access the User ID mailbox via telephone. Record:
Greeting 1: “...has a call holding. To pickup, dial #5240.”
3. For User ID 500 (Call Park Station), define the user’s record to contain:
Extension @=(%S0,%P)F-#39-P(U,%P)P(G1)F,G(500)
@ Suppresses normal process.
=(%S0,%P) Remembers previous User ID mailbox, and stores it in %S0.
F- Performs a hookflash and pauses 0.5 second.
#39 Dials #39 to page.
- Pauses 0.5 second.
P(U,%P) Plays user name recording from previous User ID mailbox.
P(G1) Plays greeting 1.
F, Performs a hookflash and pauses 2 seconds.
G(500) Goes to User ID 500 (to perform the supervised transfer).
Do Not Disturb Off
Extension 240 (The standard station port to transfer to for pickup.)
Maximum Rings 9
Do Not Disturb Off
Store Messages No
RNA Chain 501
Busy Chain 501
Stratagy R3 I&M 11/99

Customization ExamplesUsers Menu Examples
Cu
stom
ization
E
xamp
les
4. For User ID 501 (Back To Original Extension), define the user’s record to contain:
How It Works
The user’s greeting says “... leave a message after the tone, or to page me press 5...” If the caller presses�., he/she is routed to User ID 5.
User ID 5 does the following:
1. Remembers the previous User ID mailbox and stores the number in %S0.
2. Dials #39 to page.
3. Plays the previous User ID mailbox’s name recording.
4. Plays greeting 1.
5. Goes to User ID 500 to perform the supervised transfer.
6. User ID 500 calls the standard station port that acts as a park zone. On a Ring No Answer, Stratagy flashes the caller back, then goes to User ID 501 via the RNA chain.
7. User ID 501 goes to the User ID stored in %S0. This sends the caller back to the original User ID.
8. Stratagy performs a hookflash and calls the original station again before taking a message.
Second User ID
There is no simple way to directly take a message without calling a second time. In order to do that a second User ID must be created for each station using this feature.
Each of these new User ID's have:
To make matters more complex, the user needs to record a greeting in both mailboxes. If you do this, the original User ID stored in %S0 could be translated to the message mailbox User ID with the following tokens:
Extension @G(%S0)
@ Suppresses normal process.
G(%S0) Goes to the User ID stored in %S0.
Do Not Disturb On
Store Messages No
Copy Message To <original mailbox>
Extension @=(%S1,%S0,2,3)G(7%S1)
@ Suppresses normal process.
=(%S1,%S0,2,3) Assigns characters 2~3 of %S0 to %S1. For example, if the User ID is “234”, %S1 equals “34”
G(7%S1) Goes to User ID 734. (Go to the User ID mailbox with the first number of 7 and the value of %S1 (34) combined.)
Stratagy R3 I&M 11/99 10-5

Customization ExamplesUsers Menu Examples
10-6
Every User ID using this feature would be required to have a corresponding message taking User ID, with a first digit of 7. In this example, the User ID mailbox 734 would be programmed as follows:
Switching and Maintaining LanguagesStratagy can support multiple languages simultaneously on any set of ports. The only requirements are that you install an alternative language and configure the User IDs to enable a caller to change to the alternate language. Additionally, you can control which User IDs a caller has access to when selecting a specific language.
When Stratagy answers a call, processing begins at the Company Greeting User ID (default is User ID 990). After playing the greeting, processing continues (by default) with the Caller Instructions User ID (default is User ID 991), which plays the caller instructions. During either the Company Greeting or Caller Instructions, you can give the caller the option to press a digit to hear the instructions in a different language. When the caller enters the digit, Stratagy accesses another User ID that contains the instructions in the proper language.
In order for callers to always access the proper language Caller Instructions User ID, you can program Stratagy to perform the following:
1. If French is selected, remember the language selected.
2. Before playing the default Caller Instructions User ID (991), determine which language Caller Instructions User ID should play.
Program Example
In the following example:
� The foreign language is French, and the French system prompts are in a file called FRENCH.IDX in the C:\STRATAGY directory.
� User ID 990: Company Greeting User ID (default); English and contains the choice to select French
� User ID 991: default Caller Instructions User ID (English)
� User ID 980: assigns French as the language selected
� User ID 981: French Caller Instructions User ID
� User ID 992: determines which language Caller Instructions User ID should play
➤ To program the example
1. For Greeting User ID 990, define the User’s record to contain:
Menu 1: 980 (if the caller selects 1, Stratagy transfers the caller to User ID 980)
Done Chain: 991 (default)
2. Access the User ID mailbox via telephone. Record:
Greeting 1: “Thank you for calling our company. For English please stay on the line. [In French] “For French, please press 1 now.”
Do Not Disturb On
Store Messages No
Copy Messages To 234
Stratagy R3 I&M 11/99

Customization ExamplesUsers Menu Examples
Cu
stom
ization
E
xamp
les
3. For Caller Instructions User ID 991, access the User ID mailbox via telephone. Record:
Greeting 1: “To reach the person you are calling, enter his extension. For information...”
4. For User ID 980, define the user’s record to contain:
5. For Greeting User ID 981, access the User ID mailbox via telephone. Record:
Greeting 1: [In French] “To reach the person you are calling, enter his extension. For information...”
6. For User ID 992, Define the user’s record to contain:
How It Works
The customization controls Stratagy’s standard processing by keeping the caller connected to the correct language Instruction User ID. This works because whenever a new call is answered, Stratagy initializes the %S tokens to ”” (empty string). Therefore, if the caller never presses 1 for French, the %S1 is never set to the value ”FRENCH” and control continues automatically from User ID 991 to User ID 992.
Figure 10-1 shows how switching and maintaining languages works for this example. When Stratagy answers the call, Company Greeting User ID 990 plays and offers the caller the choice of selecting French.
Extension @L(FRENCH)=(%S1,”FRENCH”)G(981)
@ Suppresses normal process.
L(FRENCH) Switches the system prompts to the file FRENCH.IDX in the C:\STRATAGY directory.
=(%S1,”FRENCH”) Assigns %S1 the value of “FRENCH”.
G(981) Goes to User ID 981.
Extension @I(%S1,=,”FRENCH”,981)G(991)
@ Suppresses normal process.
I(%S1,=,”FRENCH”,981) If %S1 equals “FRENCH”, go to User ID 981.
G(991) Goes to User ID 991.
Stratagy R3 I&M 11/99 10-7

Customization ExamplesUsers Menu Examples
10-8
Figure 10-1 Switching and Maintaining Languages
If the caller does not select French:
1. Stratagy processes User ID 992 which determines that French is not being used (%S1 does not have the value “FRENCH”).
2. Stratagy plays the English Caller Instructions User ID 991.
If the caller selects French:
1. Stratagy processes User ID 980, which assigns %S1 the value “FRENCH”.
2. Stratagy plays the French Caller Instructions User ID 981.
3. Stratagy determines if the User ID is valid.
4. If valid, Stratagy follows the User ID’s Done chain. If invalid, Stratagy processes User ID 992 which determines that French is being used (%S1 has the value “FRENCH”). Stratagy then processes the French Caller Instructions User ID 981.
Company Greeting User ID(default is User ID 990)
New Call
Caller presses
%S1 equals "FRENCH"
%S1 does not equal "FRENCH"
NO
YES
“Thank you for calling our company. For English please stay on the line. [In French] For French, please press now.”
Menu 1: 980 User ID 980
Extension:@L(FRENCH)=(%S1,"FRENCH")G(981)
French Caller InstructionsUser ID 981
Valid User ID?
“[In French] To reach the person you are calling . . .”
User ID 992
English Caller Instructions User ID(default is User ID 991)
“To reach the person your are calling . . .”
Extension:@I(%S1,=,"FRENCH",981)G(991)
Follow the User ID Done chain.2478
Stratagy R3 I&M 11/99

Customization ExamplesUsers Menu Examples
Cu
stom
ization
E
xamp
les
Order Shipment InformationThis example illustrates how you can interact with data files to retrieve useful information that Stratagy gives to callers by request. Stratagy does the following:
1. Asks the caller to enter an order number.
2. Determines whether the order has shipped. For example, by requesting it from another host computer (using the serial port access S( ) token), accessing a file on Stratagy’s hard drive, or accessing a file on a network server.
3. If the order has not shipped, tells the caller. Otherwise, tells the caller the date the order was shipped.
Program Example
In the followings example, Stratagy system’s hard drive contains the following files:
� SHIPPED: An ASCII text file with order numbers that have been shipped. One order number per line. For example:11111222223333312345
� SHIPDATE: An ASCII text file where each line contains an order number and its ship date separated by a comma. One per line. For example:11111,0630199922222,07011199933333,0706199912345,07121999
➤ To program the example
1. For User ID 2000, define the user’s record to contain:
2. Access the User ID mailbox via telephone. Record:
Greeting 1: “Please enter the five-digit order number now.”
3. For User ID 2001, access User Mode via telephone. Record:
Greeting 1: “Your order number must be five digits. Good-bye.”
Extension @R(G1,%S1,20)I(LEN[%S1],!,5,2001)G(2002)
@ Suppresses normal process.
R(G1,%S1,20) Plays greeting 1. Waits for the caller to enter a telephone number. Reads the DTMF the caller entered into variable %S1. Waits (20/10 = 2) seconds for DTMF.
I(LEN[%S1],!,5,2001) If the length of variable %S1 does not equal 5, goes to User ID 2001.
G(2002) Goes to User ID 2002.
Stratagy R3 I&M 11/99 10-9

Customization ExamplesUsers Menu Examples
10-10
4. For User ID 2002, define the user’s record to contain:
5. Access the User ID mailbox via telephone. Record:
Greeting 1: “Sorry, but your order has not yet shipped. Please call back tomorrow.”
6. For User ID 2003, define the user’s record to contain:
7. Access the User ID mailbox via telephone. Record:
Greeting 1: “Your order was shipped on.”
How It Works
The order shipment example works as follows.
1. Stratagy asks the caller to enter the order number.
2. Stratagy determines if the order number is five digits long.
If five digits long, Stratagy continues.
If not, Stratagy plays “Your order number must be five digits. Good-bye.”
3. Stratagy determines if the order number has shipped.
If shipped, Stratagy plays “Your order was shipped on” and the date of shipment.
If not, Stratagy plays “Sorry, but your order has not yet shipped. Please call back tomorrow.”
For example, if the caller entered order number 12345, Stratagy would play “Your order was shipped on July twelfth, nineteen ninety-nine.”
Extension @?(%S1,SHIPPED,2003)P(G1)
@ Suppresses normal process.
?(%S1,SHIPPED,2003) If variable %S1 exists in file shipped, goes to User ID 2003.
P(G1) Plays greeting 1.
Extension @V(SHIPDATE,1,%S1,2,%S2)P(G1)P(%S2,D)
@ Suppresses normal process.
V(SHIPDATE,1,%S1,2,%S2)In file SHIPDATE, searches field 1 for variable %S1. Stores field 2 in variable %S2.
P(G1) Plays greeting 1.
P(%S2,D) Plays the DTMF digits represented by the variable %S2 as a date.
Stratagy R3 I&M 11/99

Customization ExamplesUsers Menu Examples
Cu
stom
ization
E
xamp
les
Holiday Greetings—Holiday Divert MailboxWith only 10 Auto Scheduling entries per User ID, it can be difficult to make both the daily schedules (morning, afternoon, night, weekend) and the holiday schedules work in one mailbox. The following is an alternative method—using a Holiday Divert mailbox to search a list of holidays for the year and divert to a Holiday Greeting mailbox.
Program Example
In the following example:
� User ID 900: Holiday Divert
� User ID 900 sends the call to User ID 980 if it is a holiday; otherwise, the call is routed to User ID 900’s RNA chain for normal call processing.
� User ID 980: Holiday Greeting
� Greeting 2 plays: “Toshiba is closed for the holiday...”
� DOS text file HOLIDAYS.TXT lists all holiday dates.
� Stratagy System Configuration’s per Port Definitions box_grt parameter is configured to start at User ID 900 for all valid ports.
➤ To program the example
1. For User ID 900 (Holiday Divert), define the user’s record to contain:
2. For User ID 980 (Holiday Greeting), define the Users record to contain:
� Do Not Disturb: On (unless using a Menu token)
� Greeting: 2
3. Access the User ID mailbox via telephone. Record a generic holiday greeting:
Greeting 2: “Toshiba is closed for the holiday...”
Extension @?(%Y,HOLIDAYS.TXT,980)
@ Suppresses normal process.
?(%Y,HOLIDAYS.TXT,980)In file HOLIDAYS.TXT, search for the current date (%y). If found, goes to User ID 980.
Done Chain 991
RNA Chain 990
Stratagy R3 I&M 11/99 10-11

Customization ExamplesUsers Menu Examples
10-12
➤ To create the DOS text file
You can use this method to update HOLIDAYS.TXT without shutting down the system.
1. On another PC, use DOS Edit to create the DOS text file HOLIDAYS.TXT. Enter the holidays for the year (or the next ten years if you prefer) in the following format: mmddyyyy. One date per line. For example:
0220199804141998052919980704199809041998112419981225199801011999
2. Save as A:\HOLIDAYS.TXT
This copies the file HOLIDAYS.TXT to the floppy disk in floppy-disk drive A:. This example assumes that the non-Stratagy PC’s floppy-disk drive is drive A:.
3. Insert the floppy disk into the Stratagy system’s floppy-disk drive.
4. From the Main Menu, press Alt+F to select the Filecopy option.
5. From the Copy a File screen, type A:\HOLIDAYS.TXT in the Copy From: field and press Enter. This assumes that the Stratagy system’s floppy-disk drive is drive A:.
6. In the Copy To: field, type HOLIDAYS.TXT and press Enter. The file copies to the Stratagy system’s hard drive (drive C:).
7. Remove the floppy disk from the Stratagy system’s floppy-disk drive.
➤ To configure the Stratagy System
➤ Use the Stratagy System Configuration option of the Stratagy Configuration Utility to modify the Per Port Definition box_grt. See Chapter 3 – Configure Stratagy for detailed information. The following lines correspond to the number of ports installed on your system. In the example below, ports 1~4 start at User ID 900.
set box_grt 900 1set box_grt 900 2set box_grt 900 3set box_grt 900 4
How It Works
When a call rings in, Stratagy routes it to User ID 900 instead of User ID 990. The token string in User ID 900 checks HOLIDAYS.TXT for today's date. If it finds a match, the call is sent to User ID 980. Otherwise, the call is routed to the RNA chain (User ID 990) for normal call processing. User ID 980 acts as the generic holiday mailbox, having a greeting like “Toshiba is closed for the holiday...” User ID 980 could also have its own Auto schedule that changes the greeting each holiday season.
Stratagy R3 I&M 11/99

Customization ExamplesUsers Menu Examples
Cu
stom
ization
E
xamp
les
Transferring a Caller Directly to a MailboxWithout customizing Stratagy or the telephone system, the procedure an Operator uses to transfer a caller to a user’s personal greeting involves dialing:
<Stratagy pilot voice mail number> + 998# + <User ID> + #
Note User ID 998 (Direct Message) is the reserved User ID that enables Stratagy to record a message for a User ID without executing the Extension field or hear the User ID’s greeting. See Chapter 4 – How Stratagy Operates for more information.
You can customize Stratagy and the telephone system so that when the Operator presses a DSS key, Stratagy plays “Enter the destination User ID.” The Operator dials the User ID, and Stratagy plays its greeting. The example below illustrates this using Stratagy and the Strata DK.
Program Example
In the following example:
� User ID 800: User ID assigned to standard station port
� User ID 998: Direct Message (default)
� User ID 800 chains to User ID 998
➤ To program the example
➤ For User ID 800, set the Chain RNA field to 998.
➤ To program the telephone system
1. Program a DSS key that rings a spare standard station port.
2. Call forward the standard station port to voice mail.
3. Enter the voice mail ID digits for this station under #656, matching the new User ID (91 800 in this example).
How It Works
When the Operator presses the DSS key for the standard station port, the call forwards to voice mail. When Stratagy answers, the telephone system sends it the digits 91 800, routing the call to User ID 800. Stratagy handles a DTMF packet preceded by “91” as a Ring No Answer call, so it immediately jumps to the RNA chain (User ID 998; Direct Message). Now the Operator can dial the User ID and receive his/her greeting without the auto attendant attempting to transfer the call.
Stratagy R3 I&M 11/99 10-13
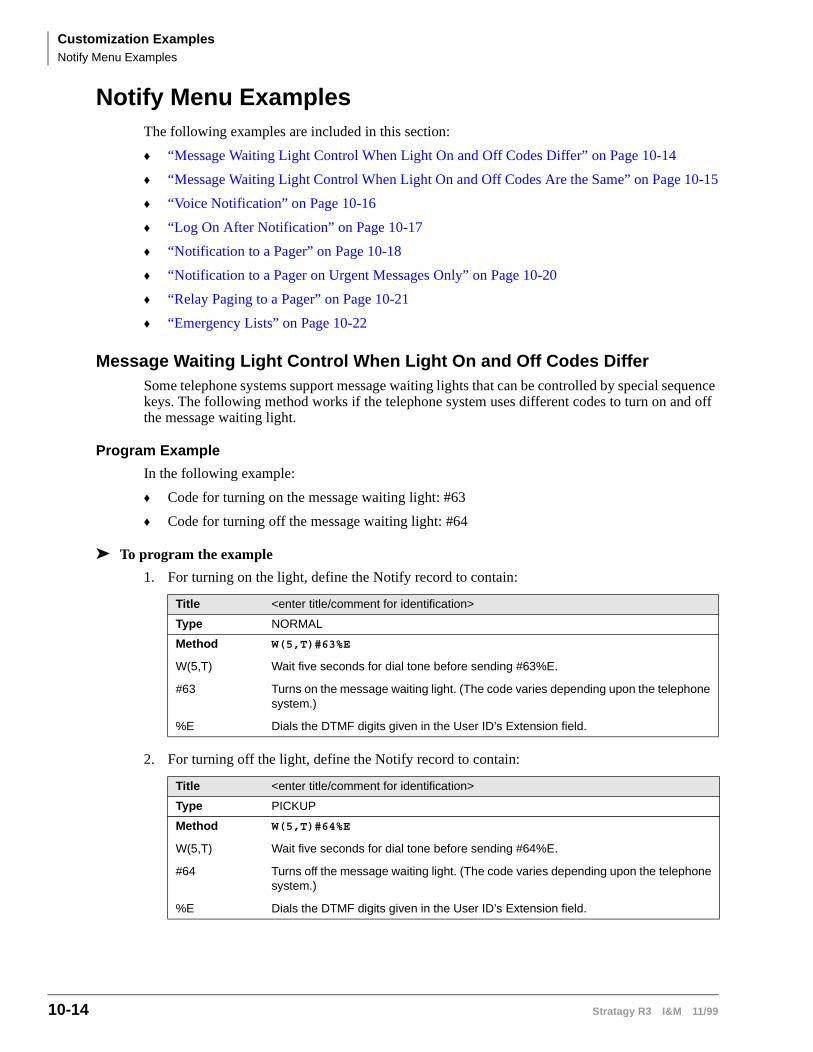
Customization ExamplesNotify Menu Examples
10-14
Notify Menu ExamplesThe following examples are included in this section:
� “Message Waiting Light Control When Light On and Off Codes Differ” on Page 10-14
� “Message Waiting Light Control When Light On and Off Codes Are the Same” on Page 10-15
� “Voice Notification” on Page 10-16
� “Log On After Notification” on Page 10-17
� “Notification to a Pager” on Page 10-18
� “Notification to a Pager on Urgent Messages Only” on Page 10-20
� “Relay Paging to a Pager” on Page 10-21
� “Emergency Lists” on Page 10-22
Message Waiting Light Control When Light On and Off Codes DifferSome telephone systems support message waiting lights that can be controlled by special sequence keys. The following method works if the telephone system uses different codes to turn on and off the message waiting light.
Program Example
In the following example:
� Code for turning on the message waiting light: #63
� Code for turning off the message waiting light: #64
➤ To program the example
1. For turning on the light, define the Notify record to contain:
2. For turning off the light, define the Notify record to contain:
Title <enter title/comment for identification>
Type NORMAL
Method W(5,T)#63%E
W(5,T) Wait five seconds for dial tone before sending #63%E.
#63 Turns on the message waiting light. (The code varies depending upon the telephone system.)
%E Dials the DTMF digits given in the User ID’s Extension field.
Title <enter title/comment for identification>
Type PICKUP
Method W(5,T)#64%E
W(5,T) Wait five seconds for dial tone before sending #64%E.
#64 Turns off the message waiting light. (The code varies depending upon the telephone system.)
%E Dials the DTMF digits given in the User ID’s Extension field.
Stratagy R3 I&M 11/99

Customization ExamplesNotify Menu Examples
Cu
stom
ization
E
xamp
les
How It Works
If your telephone system uses different codes for turning on and off the message light, Stratagy:
1. Turns on the light at the extension defined by the User ID’s Extension field.
2. Turns off the light at the extension defined by the User ID’s Extension field.
Message Waiting Light Control When Light On and Off Codes Are the SameIf your telephone switch uses the same code to turn on the message waiting light as it does to turn it off (i.e., toggles the light using a single code), then the method above will not work as you might expect. This is because every time a new message is saved, Stratagy performs the light on code regardless of whether the light was already on. Therefore, for the first new message, Stratagy turns the light on, but on the second new message, if the user has not picked up the first new message, Stratagy turns the light off since it was already on!
To solve this problem, do the following:
➤ To turn on the light
1. Check if you have already turned on the light (Z). If you haven’t continue to Step 2.
2. Turn on the light and remember that you have turned it on (X).
➤ To turn off the light
➤ Turn off the light and forget that you had turned it on (Y).
Program Example
In the following example—Code for turning on/off the message waiting light: #60
➤ To program the example
1. For turning on the light, define the Notify record to contain:
2. For turning off the light, define the Notify record to contain:
Title <enter title/comment for identification>
Type NORMAL
Method Z#60%EX
Z Tests for existence of LIGHT.ON file in the User ID’s directory. If it exists, Stratagy stops processing the string.
#60 Turns on/off the message waiting light. (The code varies depending upon the telephone system.)
%E Dials the DTMF digits given in the User ID’s Extension field.
X Creates the LIGHT.ON. file in the User ID’s directory.
Title <enter title/comment for identification>
Type PICKUP
Method #60%EY
#60 Turns on/off the message waiting light. (The code varies depending upon the telephone system.)
%E Dials the DTMF digits given in the User ID’s Extension field.
Y Deletes the LIGHT.ON file in the User ID’s directory.
Stratagy R3 I&M 11/99 10-15

Customization ExamplesNotify Menu Examples
10-16
How It Works
When Stratagy turns on the message light, it:
1. Checks if the light is already turned on (if the LIGHT.ON file exists in the User ID’s directory). If it exists, Stratagy stops processing the Method field.
2. Turns on the light at the extension defined by the User ID’s Extension field.
When Stratagy turns off the message light, it:
1. Turns off the light at the extension defined by the User ID’s Extension field.
2. Deletes the LIGHT.ON file in the User ID’s directory.
Voice NotificationYou can program Stratagy to notify a user via voice. Voice notification is commonly used in lieu of message waiting lights.
In the example below, assume you want Stratagy to notify a user of the number of new messages in his mailbox.
Program Example
In the following example:
� User ID: 405
� “name recording”: Ken
� Number of new messages in User ID mailbox 405: 3
➤ To program the example
Define the Notify record to contain:
How It Works
Per the notification schedule, Stratagy:
1. Dials the user’s telephone number.
2. Waits for a voice to answer.
3. Says the user’s recorded name: “Ken.”
4. Says the user’s total number of messages and number of new messages: “3.”
Title <enter title/comment for identification>
Type NORMAL
Method %EW(3,V)P(U)P(M)
%E Dials the DTMF digits given in the User ID’s Extension field. This should be the user’s telephone number.
W(3,V) Waits up to 3 rings for a voice to answer.
P(U) Plays the name recording for the current User ID. If there is no recording, says the User digits.
P(M) Plays the total number of messages and number of new messages for the current User ID.
Stratagy R3 I&M 11/99

Customization ExamplesNotify Menu Examples
Cu
stom
ization
E
xamp
les
Log On After NotificationYou can program Stratagy so that a user can log on to his/her mailbox when Stratagy calls the telephone to notify him/her of new messages.
Note For Strata DK systems, in order for the notify port to call back into voice mail, VM-VM Call Blocking must be removed from the notify ports (Program 31).
Program Example
In the following example:
� Dial 9 for an outside line
� The paging system uses the * to designate a “-” in the pager display
➤ To program the example
1. Define the Notify record.
2. Select the VOICE-HOME Notify template.
Title <enter title/comment for identification>
Type NORMAL
Variable <user’s telephone number>
Method 9,W(4,T)%V,,W(3,V),P(U)P(M)-R(G7,%S0,50)F-yyy-W(2,V)*%U#%S0#-
Note Add the underscored tokens, where yyy is the voice mail pilot number.
9 Dials 9 for an outside line.
, Pauses 2 seconds.
W(4,T) Waits up to 4 seconds to hear dial tone.
%V Dials the contents of the Notify record’s Variable field. This should be the user’s telephone number.
,, Pauses 4 seconds (2 seconds x 2).
W(3,V) Waits up to 3 rings for a voice to answer.
, Pauses 2 seconds.
P(U) Plays the name recording for the current User ID. If there is no recording, says the User ID digits.
P(M) Plays the total number of messages and number of new messages for the current User ID.
- Pauses 0.5 second.
R(G7,%S0,50) Plays greeting 7 and reads DTMF from the caller, storing the digits in %S0.
F- Performs a hookflash and pauses 0.5 second.
yyy Dials Stratagy’s voice mail pilot number (yyy).
- Pauses 0.5 second.
W(2,V) Waits up to 2 rings for a voice to answer.
* Dials *.
%U Dials the User ID.
Stratagy R3 I&M 11/99 10-17

Customization ExamplesNotify Menu Examples
10-18
Note In User Mode, the user can modify the Variable field using the Manage Mailbox’s User Options’ User Notification option.
When saving the record, add VOICE HOME LOGON as a new template.
3. Access the User ID mailbox via telephone. Record:
Greeting 7: "Please enter your security code."
How It Works
When the user’s User ID mailbox receives a new message, Stratagy:
1. Dials the user’s telephone number.
2. Waits for a voice to answer.
3. Says:
User’s name recording.
Total number of messages and number of new messages.
“Please enter your security code.”
4. Stores the DTMF digits for the security code that the caller enters.
5. Dials:
� Stratagy’s pilot number.
� The User ID.
� The stored security code DTMF digits.
The user has now been transferred to voice mail and logged on to his mailbox.
Notification to a PagerYou can program Stratagy to notify a user via his digital pager.
In the example below, assume you want Stratagy to notify the user of the total number of messages and the number of new messages in his User ID mailbox.
Program Example
In the following example:
� Dial 9 for an outside line
� The paging system uses the * to designate a “-” in the pager display
� User ID: 405
� Total number of messages in User ID 405: 5
� Number of new messages in User ID 405: 3
# Dials #.
%S0 Dials the DTMF digits entered by the caller and stored in %S0. This should be the User ID mailbox’s security code.
# Dials # to end call.
- Pauses 0.5 second.
Stratagy R3 I&M 11/99

Customization ExamplesNotify Menu Examples
Cu
stom
ization
E
xamp
les
➤ To program the example
Define the Notify record to contain:
How It Works
Per the notification schedule, Stratagy:
1. Dials the user’s digital pager’s telephone number.
2. When the pager answers:
� Relays the User ID.
� Relays the total number of messages.
� Relays the number of new messages.
For this example, the following displays on the pager: 405-5-3.
Title <enter title/comment for identification>
Type NORMAL
Variable <digital pager’s telephone number>
Method 9W(4,T)%V,,W(2,P)-%U*%M*%N#-
9 Dials 9 for an outside line.
W(4,T) Waits up to 4 seconds to hear dial tone.
%V Dials the contents of the Notify record’s Variable field. This should be the digital pager’s telephone number.
,, Pauses 4 seconds (2 seconds x 2).
W(2,P) Waits up to 2 rings for the pager/beeper to answer.
- Pauses 0.5 second to enable the pager’s answer confirmation tones.
%U Relays the User ID.
* Dials (. (Used by many paging systems to designate a “-” in the pager display.)
%M Relays the total number of messages in this User ID mailbox.
* Dials (. (Used by many paging systems to designate a “-” in the pager display.)
%N Relays the number of new messages in this User ID mailbox.
# Dials # to end call.
- Pauses 0.5 second.
Stratagy R3 I&M 11/99 10-19

Customization ExamplesNotify Menu Examples
10-20
Notification to a Pager on Urgent Messages OnlyYou can program Stratagy to light a message waiting light for all messages, while paging or calling the user offsite when he receives a message marked Urgent. To do this, for the particular paging Notify record, change the Type field from Normal to Urgent.
To program Stratagy to notify a user via his digital pager when he receives a message marked Urgent is similar to “Notification to a Pager.” To program Stratagy to light the message waiting light for all messages, see “Message Waiting Light Control When Light On and Off Codes Differ” on Page 10-14 or “Message Waiting Light Control When Light On and Off Codes Are the Same” on Page 10-15.
Program Example
In the following example:
� User ID: 405
� Dial 9 for an outside line
� The paging system uses the * to designate a “-” in the pager display
➤ To program the example
Define the Notify record to contain:
How It Works
When Stratagy receives an Urgent call for this User ID, Stratagy:
1. Dials the user’s digital pager’s telephone number.
2. When the pager answers, Stratagy relays the User ID.
For this example, the following displays on the pager: 405.
Title <enter title/comment for identification>
Type URGENT
Variable <digital pager’s telephone number>
Method 9W(4,T)%V,,W(2,P)-%U#-
9 Dials 9 for an outside line.
W(4,T) Waits up to 4 seconds to hear dial tone.
%V Dials the contents of the Notify record’s Variable field. This should be the digital pager’s telephone number.
,, Pauses 4 seconds (2 seconds x 2).
W(2,P) Waits up to 2 rings for the pager/beeper to answer.
- Pauses 0.5 second to enable the pager’s answer confirmation tones.
%U Relays the User ID.
# Dials # to end call.
- Pauses 0.5 second.
Stratagy R3 I&M 11/99

Customization ExamplesNotify Menu Examples
Cu
stom
ization
E
xamp
les
Relay Paging to a PagerWith relay paging, the caller enters his/her number on the telephone dial pad and Stratagy notifies the user by relaying the caller’s telephone number to the user’s pager display. A caller can page without redialing, or even knowing, the user’s pager number.
Program Example
In the following example:
� Dial 9 for an outside line
� The paging system uses the * to designate a “-” in the pager display
� User ID: 2765
� Caller’s telephone number: 583-3700
� To activate relay paging, the caller presses # when the User ID’s greeting plays
➤ To program the example
Define the Notify record to contain:
How It Works
Per the notification schedule, Stratagy:
1. Dials the user’s digital pager’s telephone number.
2. When the pager answers:
� Relays the User ID.
� Relays the caller’s telephone number.
For this example, the following displays on the pager: 2765-5833700.
Title <enter title/comment for identification>
Type RELAY
Variable <digital pager’s telephone number>
Method 9W(4,T)%V,,W(2,P)-%U*%R#-
9 Dials 9 for an outside line.
W(4,T) Waits up to 4 seconds to hear dial tone.
%V Dials the contents of the Notify record’s Variable field. This should be the digital pager’s telephone number.
,, Pauses 4 seconds (2 seconds x 2).
W(2,P) Waits up to 2 rings for the pager/beeper to answer.
- Pauses 0.5 second to enable the pager’s answer confirmation tones.
%U Relays the User ID.
* Dials *. (Used by many paging systems to designate a “-” in the pager display.)
%R Relays the DTMF digits entered by the caller. This should be the caller’s telephone number.
# Dials # to end call.
- Pauses 0.5 second.
Stratagy R3 I&M 11/99 10-21

Customization ExamplesNotify Menu Examples
10-22
Emergency ListsIn an emergency list, Stratagy is programmed to notify a series of users if a new message is not picked up. If the original recipient, after a specified time interval, has not picked up the new message, Stratagy continues to notify him/her but also begins notification to a second person.
After another time interval if the new message has still not been picked up, Stratagy continues to notify the first two people and starts notifying a third person. Stratagy continues the process until the message is picked up or everyone has been notified.
When creating an emergency list, carefully define the initial time to wait before starting the notification and the repeat time.
Program Example
Assume that you want to create three Notify records for one User ID. Each record contains a different telephone number to call; one for each of the three people who will potentially be notified.
➤ To program the example
1. Define the first Notify record to contain:
Notify After: 0
Continue Every: 5
Max Times: 0
2. Define the second Notify record to contain:
Notify After: 15
Continue Every: 5
Max Times: 0
3. Define the third Notify record to contain:
Notify After: 30
Continue Every: 5
Max Times: 0
How It Works
When the emergency occurs:
1. The first Notify record starts notification immediately.
2. If the message is not picked up, the first Notify record continues notification every 5 minutes.
3. After 15 minutes, if the message is not picked up, the second Notify record starts notification every 5 minutes in conjunction with the first Notify record.
4. After 30 minutes, if the message is not picked up, the third Notify record starts notification every 5 minutes in conjunction with the first and second Notify records.
5. All three Notify records continue every 5 minutes until the message is picked up.
Stratagy R3 I&M 11/99

Customization ExamplesAuto Menu Examples
Cu
stom
ization
E
xamp
les
Auto Menu ExamplesThe following examples are included in this section:
� “Time of Day Greetings” on Page 10-23
� “Holiday Greetings—Same Day Each Year” on Page 10-26
� “Holiday Greetings—Different Day Each Year” on Page 10-27
� “Extension Change” on Page 10-28
� “Unsupervised Conferencing” on Page 10-29
Time of Day GreetingsYou can program Stratagy so that your company has different greetings for mornings, afternoons, evenings, and weekends.
Program Example
In the following example, the User ID 990 (Company Greeting) assumptions are as follows.
The greetings:
Greeting 1 plays: “Thank you for calling Toshiba.”
Greeting 2 plays: “Good morning. Thank you for calling Toshiba.”
Greeting 3 plays: “Good afternoon. Thank you for calling Toshiba.”
The schedules:
morning greeting schedule starts at: 8:00 a.m. Monday through Friday
afternoon greeting schedule starts at: 12:01 p.m. Monday through Friday
evening greeting schedule starts at: 5:01 p.m. Monday through Thursday
weekend greeting schedule starts at: 5:01 p.m. Friday
➤ To program the example
Scheduling the greetings includes defining the Auto records and recording the greetings for User ID 990.
For the morning greeting, define the Auto record as follows:
Enabled Yes
Change On (date) 08/15/98
Change At (time) 08:00 (8:00 a.m.)
Every Month(s) 0
Every Day(s) 1
Every Hour(s) 0
Every Minute(s) 0
Restricted To (MTWTFSS) YYYYYNN
Extension (leave blank)
Rings (leave blank)
Do Not Disturb On
Call Screening Off
Greeting 2
Stratagy R3 I&M 11/99 10-23
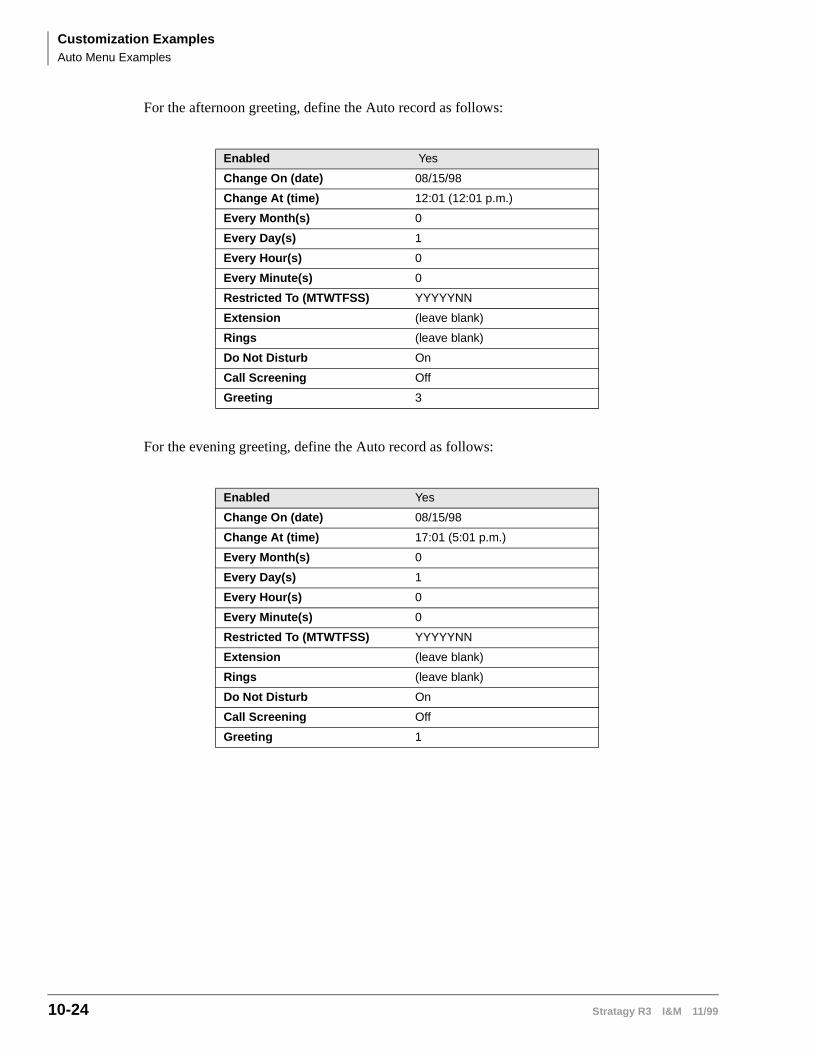
Customization ExamplesAuto Menu Examples
10-24
For the afternoon greeting, define the Auto record as follows:
For the evening greeting, define the Auto record as follows:
Enabled Yes
Change On (date) 08/15/98
Change At (time) 12:01 (12:01 p.m.)
Every Month(s) 0
Every Day(s) 1
Every Hour(s) 0
Every Minute(s) 0
Restricted To (MTWTFSS) YYYYYNN
Extension (leave blank)
Rings (leave blank)
Do Not Disturb On
Call Screening Off
Greeting 3
Enabled Yes
Change On (date) 08/15/98
Change At (time) 17:01 (5:01 p.m.)
Every Month(s) 0
Every Day(s) 1
Every Hour(s) 0
Every Minute(s) 0
Restricted To (MTWTFSS) YYYYYNN
Extension (leave blank)
Rings (leave blank)
Do Not Disturb On
Call Screening Off
Greeting 1
Stratagy R3 I&M 11/99

Customization ExamplesAuto Menu Examples
Cu
stom
ization
E
xamp
les
For the weekend greeting, define the Auto record as follows:
Access the User ID mailbox via telephone. Record:
Greeting 1: “Thank you for calling Toshiba.”
Greeting 2: “Good morning. Thank you for calling Toshiba.”
Greeting 3: “Good afternoon. Thank you for calling Toshiba.”
How It Works
If a caller accesses User ID 990 (Company Greeting) during the morning (8:01 a.m. to 12:00 noon Monday through Friday), Stratagy:
1. Plays User ID 990’s greeting 2 (Company Greeting).
2. Follows the User ID 990 chain to User ID 991 (Caller Instructions).
If a caller accesses User ID 990 (Company Greeting) during the afternoon (12:01 p.m. to 5:01 p.m. Monday through Friday), Stratagy:
1. Plays User ID 990’s greeting 3 (Company Greeting).
2. Follows the User ID 990 chain to User ID 991 (Caller Instructions).
If a caller accesses User ID 990 (Company Greeting) during the evenings (5:01 p.m. Monday through Thursday to 7:59 a.m. the next morning) and weekends (5:01 p.m. Friday to 7:59 a.m. Monday), Stratagy:
1. Plays User ID 990’s greeting 1 (Company Greeting).
2. Follows the User ID 990 chain to User ID 991 (Caller Instructions).
Enabled Yes
Change On (date) 08/15/98
Change At (time) 00:01 (12:01 a.m.)
Every Month(s) 0
Every Day(s) 1
Every Hour(s) 0
Every Minute(s) 0
Restricted To (MTWTFSS) NNNNNYY
Extension (leave blank)
Rings (leave blank)
Do Not Disturb On
Call Screening Off
Greeting 1
Stratagy R3 I&M 11/99 10-25

Customization ExamplesAuto Menu Examples
10-26
Holiday Greetings—Same Day Each YearCertain holidays, such as Independence Day (July 4th), Christmas (December 25), and New Year’s day (January 1st), occur on the same date each year.
To inform callers that your offices are closed for the holiday, you can record a greeting that plays only on the holiday.
Program Example
In the following example, the User ID 990 (Company Greeting) assumptions are:
� Greeting 1 plays: “Thank you for calling...”
� User ID 990 chains to User ID 991
The User ID 991 (Caller Instructions) assumptions are:
� Christmas greeting: greeting 4
� Start greeting time: 8:01 a.m.
� Days greeting plays: Monday through Friday
➤ To program the example
Scheduling the Christmas greeting includes defining the Auto record and recording the greeting for User ID 991.
1. Define the Auto record as follows:
2. Access the User ID mailbox via telephone. Record:
Greeting 4: “Our offices are closed December 25th to celebrate Christmas. We wish you all a happy holiday season. Please call back during regular business hours.”
How It Works
When December 25th falls on a weekday, if a caller accesses User ID 990 (Company Greeting) after 8:01 a.m., Stratagy:
1. Plays User ID 990’s greeting 1 (Company Greeting).
Enabled Yes
Change On (date) 12/25/99
Change At (time) 08:01 (8:01 a.m.)
Every Month(s) 12
Every Day(s) 0
Every Hour(s) 0
Every Minute(s) 0
Restricted To (MTWTFSS) YYYYYNN
Extension (leave blank)
Rings (leave blank)
Do Not Disturb On
Call Screening Off
Greeting 4
Stratagy R3 I&M 11/99

Customization ExamplesAuto Menu Examples
Cu
stom
ization
E
xamp
les
2. Follows the User ID 990 chain to User ID 991 (Caller Instructions).
3. Plays User ID 991’s greeting 4 (Christmas greeting).
To guarantee that Stratagy programs the holiday schedule after the open greeting schedule, the holiday schedule starting time was scheduled one minute after the regular open greeting schedule.
Holiday Greetings—Different Day Each YearCertain holidays, such as Thanksgiving and Labor Day, occur on different days each year.
To inform callers that your offices are closed for the holiday, you can record a greeting that plays only on the holiday.
Program Example
In the following example, the User ID 990 (Company Greeting) assumptions are:
� Greeting 1 plays: “Thank you for calling...”
� User ID 990 chains to User ID 991
The User ID 991 (Caller Instructions) assumptions are:
� Thanksgiving greeting: greeting 5
� Start greeting time: 8:01 a.m.
� Days greeting plays: Thursday
➤ To program this example
Scheduling the Thanksgiving greeting includes defining the Auto record and recording the greeting for User ID 991.
1. Define the Auto record as follows:
2. Access the User ID mailbox via telephone. Record:
Greeting 5: “Our offices are closed today so that we can celebrate Thanksgiving with our families. Please call back during regular business hours.”
Enabled Yes
Change On (date) 11/24/99
Change At (time) 08:01 (8:01 a.m.)
Every Month(s) 11
Every Day(s) 29
Every Hour(s) 0
Every Minute(s) 0
Restricted To (MTWTFSS) NNNYNNN
Extension (leave blank)
Rings (leave blank)
Do Not Disturb On
Call Screening Off
Greeting 5
Stratagy R3 I&M 11/99 10-27

Customization ExamplesAuto Menu Examples
10-28
How It Works
Every year on Thanksgiving, if a caller accesses User ID 990 (Company Greeting) after 8:01 a.m., Stratagy:
1. Plays User ID 990’s greeting 1 (Company Greeting).
2. Follows the User ID 990 chain to User ID 991 (Caller Instructions).
3. Plays User ID 991’s greeting 5 (Thanksgiving greeting).
To guarantee that Stratagy programs the holiday schedule after the open greeting schedule, the holiday schedule starting time was scheduled one minute after the regular open greeting schedule.
To program holidays that occur on different days each year, define the Frequency of Change fields as 11 months and 29 days, restricted to the appropriate Days of the Week.
Extension ChangeYou can program a User ID to automatically access a different telephone number for the user on a particular day of the week, time of day, etc. by entering the telephone number in the Auto Record’s Extension field.
Normally, Stratagy processes calls to the Users Menu Extension field; however, when a scheduled event occurs, Stratagy processes the calls using the Auto Record’s Extension field.
For this example, assume that an employee works in a different office on Fridays than he does on Monday through Thursday.
Program Example
In the following example:
� User ID: 6340
� Friday’s office telephone number: 3700
➤ To program the example
1. Define the Auto Record as follows.
How It Works
Every Friday after 8:00 a.m., if a caller accesses User ID 6340, Stratagy directs the call to extension 3700.
Enabled Yes
Change On (date) 08/09/98
Change At (time) 08:01 (8:00 a.m.)
Every Month(s) 0
Every Day(s) 7
Every Hour(s) 0
Every Minute(s) 0
Restricted To (MTWTFSS) NNNNYNN
Extension 3700
Rings (leave blank)
Do Not Disturb On
Call Screening Off
Greeting (leave blank)
Stratagy R3 I&M 11/99

Customization ExamplesAuto Menu Examples
Cu
stom
ization
E
xamp
les
Unsupervised ConferencingIf your telephone system supports unsupervised conferencing, you can schedule Stratagy to call an off-premise location for the conference call.
Program Example
In the following example:
� Conference code: *3
� Operation required to connect to calls in a conference: F-F-
� Telephone number: 583-3700
� Dial 9 for an outside line
➤ To program the example
Define the Auto record to contain:
How It Works
For the day and time scheduled, Stratagy:
1. Dials the off-premise location for the conference call.
2. Connects the calls in a conference.
3. Hangs up.
Extension *3-9W(2,T)5833700W(3,V)F-F-H
*3 Conference code. (The code varies depending upon the telephone system.)
- Pauses 0.5 second.
9 Dials 9 for an outside line.
W(2,T) Waits up to 2 seconds to hear dial tone.
5833700 Dials the telephone number 583-3700.
W(3,V) Waits up to 3 rings for a voice to answer.
F-F- Performs a hookflash and pauses 0.5 second. Repeats function. (The code varies depending upon the telephone system.)
H Hangs up immediately.
Stratagy R3 I&M 11/99 10-29

Customization ExamplesAuto Menu Examples
10-30
Stratagy R3 I&M 11/99
SM
DI S
erial Integ
ration
SMDI Serial Integration 11
Stratagy can enable Simplified Message Desk Interface (SMDI) protocol to provide a RS-232 integration with telephone systems that also have SMDI capabilities. This integration is used with Centrex installations and is an option for the Strata DK14/40i/40 and Strata DK424.
SMDI is the most efficient way of integrating Stratagy with a telephone system. SMDI relies on data, not DTMF, to provide detailed call information that Stratagy can quickly use to direct callers to user’s mailboxes. It provides calling party ID (to recognize users calling from their extensions) so that there is no need to enter their User ID, only their security code, to log on to their mailboxes.
Data messages or packets are sent into the system to provide information concerning the type of call that is ringing into Stratagy. Stratagy can use this status information to provide better call coverage and perform custom applications using the RNA and Busy Chain options.
There are four types of incoming packets:
� All Call Forwarded Calls
� No Answer Forwarded Calls
� Busy Forwarded Calls
� Direct Calls
Message Waiting is also enabled and disabled through this link.
An example of an SMDI packet is:
Note The above values are examples and can be different for each installation.
Packet:MD0010208d 0000000205 0000000223
MD001 Message Desk Number. This information is not utilized by Stratagy for call processing and is ignored.
0208 Terminal Number. This is the assigned number or extension number of the port that is ringing into Stratagy.
d Call Status. Defines the type of call that is ringing into Stratagy as a direct call.
0000000205 Number of the Called Extension. Number length is 10 digits. Numbers that are shorter than 10 digits are padded with zeros.
0000000223 Number of the Calling Extension. Number length is 10 digits. Numbers that are shorter than 10 digits are padded with zeros.
Stratagy R3 I&M 11/99 11-1

SMDI Serial IntegrationStep 1: Enable SMDI
11-2
Step 1: Enable SMDI1. Select the appropriate Strata DK system with SMDI integration from the Toshiba Plug and
Play screen. (See “Toshiba Plug and Play” on Page 3-6 for instructions.)
2. Define parameters in Stratagy System Configuration for SMDI/Serial Integration (see Table 11-1).
3. Define the Serial Ports used for the link (see Page 3-40). Strata DK settings are: 7, even, 1 stop.
4. Define Message Notification via SMDI in the Notify table of each mailbox. The S( ) token is used to send the proper commands for enabling and disabling Message Waiting over the serial port of the Stratagy. A number of default templates can be found in the Template table that works with most SMDI applications. (See “Templates” on Page 8-2.)
Example titles of the SMDI templates are:
COM1-3D LGHT On
COM1-3D LGHT Off
Where:COM1 defines the COM port used as 1, and 3D defines the digit length of the User ID as 3.
Note By selecting the template, the token programming sequence, starting with the S( ) token, is placed automatically by Stratagy in the Notify Menu’s Method field. To prevent Stratagy from physically taking a port off-hook, you must place an “@” sign before the S( ) token in the field.
Table 11-1 SMDI Parameters
Parameter Description
smdi_base_port
Some SMDI installations use logical terminal numbers that do not begin with 1 (for example, if it uses the extension or physical number to define the terminal). In these situations, you must define the extension number where port 1 is connected. The system assumes that the extension numbers are then connected in numerical order to the remaining ports.
Example: 208 (extension number of port in Strata DK)
Default: 1
smdi_port
Logical serial port Stratagy uses for SMDI integration.
Possible values: 0 (disables SMDI integration), 1, 2, 3, 4 (port number)Default: 0
smdi_pretimeout
Maximum number of seconds that an SMDI packet can precede the forwarded call.
Possible values: 5~50 (seconds)Default: 50
smdi_type
Protocol Stratagy uses with RS-232 data integration (outband integration).
‘smdi’: standard SMDI integration‘s75’: System 75 integration
Possible values: ‘smdi’, ‘s75’ The single quotes are required.Default: ’smdi’
Stratagy R3 I&M 11/99

SMDI Serial IntegrationStep 2: Connect SMDI
SM
DI S
erial Integ
ration
Step 2: Connect SMDISMDI connections use a RS-232 cable to connect the telephone system to one of Stratagy’s serial ports. Stratagy 24 and Stratagy 24 Plus’s serial port 3 is available for SMDI.
For a Centrex installation, a data modem provides the SMDI connection. SMDI interface requires that the Strata DK have a WSIU, TSIU, PIOU, PIOUS, RSSU or RSIU PCB installed.
Consult the Strata DK Installation and Maintenance Manual for installation instructions.
Step 3: Test SMDIAfter the SMDI feature has been enabled in Stratagy and the serial link has been established with the COM ports, the SMDI link can be tested.
Initial testing can be done by making test calls into Stratagy. Program a User ID with default options. Use the default System Greeting and default System Busy greetings for the mailbox.
1. Make a call into Stratagy from an extension that is the same number as the User ID.
Stratagy receives a Direct Call packet and prompts “Please enter your security code.”
Note If the system plays the Company Greeting, then the link is not working. Recheck the installation.
2. Call forward a telephone All Calls.
From another extension, call the forwarded telephone.
The System Greeting for the mailbox plays.
Note If the system plays the Company Greeting, then the link is not working. Recheck the installation.
3. Call forward a telephone for Busy.
Make the extension busy, then call the busy extension from another telephone.
The System Busy Greeting plays.
Note If the system plays the Company Greeting, then the link is not working. Recheck the installation.
4. If Steps 1, 2 and 3 were successful, make another call from an internal extension (that has a User ID assigned on the system) to the forwarded extension, and leave a message.
5. Log on to the User ID that has the message.
Play the message.
The header information for the message should include the User ID number of the extension that left the message.
If these tests are successful, the SMDI integration is working properly. If these tests fail, then the link must be monitored to validate whether the data is being sent from the host phone system or the data is not being processed correctly by Stratagy. Proceed to Step 4.
Stratagy R3 I&M 11/99 11-3

SMDI Serial IntegrationStep 4: (Optional) Validate the Link
11-4
Step 4: (Optional) Validate the LinkIf the tests in Step 3 on Page 11-3 fail, then the link must be monitored to validate whether the data is being sent from the host phone system or the data is not being processed correctly by Stratagy. To validate the link, you must perform the following procedure.
Note For further assistance, contact Toshiba Technical Support..
1. Connect a portable or desktop PC to the RS-232 serial connection from the Host telephone system.
Note The PC must have a communications program such as Microsoft Windows Terminal or ProComm. The data packets are in ASCII format.
2. Make calls into the Stratagy voice ports.
As calls ring in, data packets should be received on the PC. If packets are being sent, then Stratagy is not processing them correctly. Continue to Step 3.
Note If packets are not seen, the host phone system may not be sending the packets or there is a bad cable or connection.
3. Re-check configuration parameters in the Stratagy. Validate the data protocol parameters and COM port are properly defined in the Serial Port Definition of the Stratagy System Configuration.
4. Call each port individually and validate by the packet information that the Terminal number for the first port correlates with the value defined by smdi_base_port in the Stratagy System Configuration. Validate remaining Terminal numbers are sequential from the first.
Stratagy R3 I&M 11/99

SMDI Serial IntegrationSMDI Calling Party Identification
SM
DI S
erial Integ
ration
SMDI Calling Party IdentificationThe Strata DK telephone system only provides the Stratagy with incoming Calling Party ID via SMDI integration. Data messages or packets are sent into the system to provide information concerning the type of call and the calling party ID.
Some examples of the available applications are adding the Calling Party ID to the message header, playing a specific greeting and routing a call based on the telephone number received.
Calling Party ID in Message HeaderOne new application is playing the Calling Party ID in the header information of the message. To configure this option, in addition to making the required changes for SMDI integration in the Stratagy System Configuration, you must make sure the play_caller_id parameter is set to True.
Call Routing Based on Caller IDThe Stratagy can also play a specific greeting or route a call based on the telephone number received from the SMDI/Caller ID information.
Each port on the Stratagy system stores the %K token’s value individually so multiple ports can run this application simultaneously. The value of the %K token lasts for the duration of the call and is cleared when the Stratagy voice port goes idle. When Stratagy transfers the call to a Strata DK LCD telephone, the Caller ID information displays on the LCD.
Example Application
In this example, mailbox 900 answers incoming calls to the Stratagy system. The Caller ID information is temporarily stored as the %K token. Using the V token, Stratagy searches the CALLERID.TXT file for the telephone number saved as %K. If there is a match for %K, the number in the second column of the file (890 in this example) is stored as the variable %S2.
The final portion of the token string in mailbox 900 sends the call to mailbox %S2 to hear the correct greeting, route the call to a specific location (e.g., customer support), etc. If there is no match found for %K, the call follows the Done chain to mailbox 990 for normal call processing.
5. Validate that the number of the Called Extension (defined in the packet) is a valid User ID. If the User ID is less than seven digits long then the number is prefixed with zeros in the packet. If the User ID is less than seven digits long but the Called Extension defined in the packet is prefixed by numbers other than zero that information must be defined in the Switch Integration Patterns screen (see Page 3-21).
Stratagy R3 I&M 11/99 11-5

SMDI Serial IntegrationSMDI Calling Party Identification
11-6
The following procedures give you instructions on configuring this example for:
� Stratagy DK and Stratagy Flash
� Stratagy 6D, 24D and 24 Plus
➤ To configure this example for the Stratagy DK and Stratagy Flash
Note Stratagy Flash only supports the V token when used in conjunction with SMDI integration.
1. Using any text editor, create the DOS text file (CALLERID.TXT) on the Stratagy Admin PC.
The format should be:
9495833700,890
9495876798,890
where: 9495833700 and 9495876798 are the Caller ID phone numbers
890 is the GOTO mailbox
2. Save this file as C:\CALLERID.TXT.
3. From the Stratagy Admin Main Menu, press Alt+T to access the Tools menu.
4. Press 8. The Filecopy screen displays.
5. Enter PC in the Source System field, and CALLERID.TXT in the Copy From and Copy To fields.
6. Press Enter. Stratagy copies the file to the Stratagy Flash/DK’s C:\drive.
7. Press any key to continue.
8. Press Esc. Stratagy Admin’s Main Menu displays.
9. From the Main Menu, press Alt+U to access the Users Menu.
3233
3516
Stratagy R3 I&M 11/99

SMDI Serial IntegrationSMDI Calling Party Identification
SM
DI S
erial Integ
ration
10. From the Users Menu, create and save User ID mailbox 900. Enter the %K token string in the Extension field. Set the mailbox’s Do Not Disturb field to Off and configure the Done and RNA chains.
11. From the Users Menu, create and save the Caller ID greeting mailbox (890).
Set the Do Not Disturb (DND) field to On for this mailbox unless another token string is being used to run a subsequent application.
12. Press Esc. The Stratagy Admin Main Menu displays.
13. Press Alt+T. The Tools menu displays.
14. Press 6. The Stratagy System Configuration screen displays.
15. Modify the box_grt parameter for the appropriate number of ports in the Per Port Definitions portion of the Stratagy System Configuration.
The lines should look similar to this:
#- Per Port Definitions
set box_grt 900 1
set box_grt 900 2
set box_grt 900 3
set box_grt 900 4
16. Press ESC.
The example mailbox 900 looks like this:
Mailbox 900
Extension @KFV(“CALLERID.TXT”,1,%K,2,%S2)G(%S2)
@ Suppress normal process.
KF Suppresses DTMF gate.
V(“CALLERID.TXT”,1,%K,2,%S2)Searches field 1 of the callerid.txt for a value that matches %K. If a match is found, Stratagy stores the value in field 2 of the callerid.txt as %S2. If no match is found, the remaining values in the token string are ignored and Stratagy executes the Done chain(User ID 990).
G(%S2) Goes to mailbox number stored in %S2 (e.g., user ID 890).
Done Chain 990 Ensures the call is still handled in case of an error in the process.RNA Chain 990
DND Off Stratagy processes token string.
3241
Stratagy R3 I&M 11/99 11-7

SMDI Serial IntegrationSMDI Calling Party Identification
11-8
➤ To configure this example for the Stratagy 6D, 24D and 24 Plus
17. From the Stratagy System Config screen, press 1.
The changes are transmitted to Stratagy and Stratagy is shut down.
When the copy is complete, this status box displays:
18. Press any key to reboot. Incoming calls are now routed to User ID mailbox 900 where Stratagy searches for a Caller ID match.
1. Using any text editor, create a DOS text file (CALLERID.TXT) on Stratagy’s hard drive.
The format should be:
9495833700,890
9495876798,890
where: 9495833700 and 9495876798 are the Caller ID phone numbers
890 is the GOTO mailbox
2. Save the file as C:\CALLERID.TXT.
3. From the Main Menu, press Alt+U.
The Users Menu displays.
4. Using the Users Menu, create and save User ID mailbox 900. Enter the %K token string in the Extension field. Set the mailbox’s Do Not Disturb field to Off and configure the Done and RNA chains.
3254
The example mailbox 900 looks like this:
Mailbox 900
Extension @KFV(“CALLERID.TXT”,1,%K,2,%S2)G(%S2)
@ Suppress normal process.
KF Suppresses DTMF gate.
V(“CALLERID.TXT”,1,%K,2,%S2)Searches field 1 of the callerid.txt for a value that matches %K. If a match is found, Stratagy stores the value in field 2 of the callerid.txt as %S2. If no match is found, the remaining values in the token string are ignored and Stratagy executes the Done chain(User ID 990).
G(%S2) Goes to mailbox number stored in %S2 (e.g., user ID 890).
Done Chain 990 Ensures the call is still handled in case of an error in the process.RNA Chain 990
DND Off Stratagy processes token string.
Stratagy R3 I&M 11/99

SMDI Serial IntegrationSMDI Calling Party Identification
SM
DI S
erial Integ
ration
5. Using the Users Menu, create and save the Caller ID greeting mailbox (890).
Set the Do Not Disturb (DND) field to On for this mailbox unless another token string is being used to run a subsequent application.
6. Exit Stratagy. Important! To access the Stratagy Configuration Menu, you must exit Stratagy call processing first. Stratagy does not process calls while accessing the Stratagy Configuration Utility.
7. From the Stratagy Configuration Utility Menu, highlight Stratagy System Configuration and press Enter.
8. Modify the box_grt parameter for the appropriate number of ports in the Per Port Definitions portion of the Stratagy System Configuration screen.
The lines should look similar to this:
#- Per Port Definitions
set box_grt 900 1
set box_grt 900 2
set box_grt 900 3
set box_grt 900 4
9. Press Enter to save your changes.
10. Press Esc. The Stratagy Configuration Utility screen displays.
11. Press Esc again. Stratagy reboots and returns to the Main Menu for call processing or Stratagy programming.
Incoming calls are now routed to User ID mailbox 900 where Stratagy searches for a Caller ID match.
Stratagy R3 I&M 11/99 11-9

SMDI Serial IntegrationSMDI Calling Party Identification
11-10
Stratagy R3 I&M 11/99
AM
IS N
etwo
rking
AMIS Networking 12
Audio Messaging Interchange Specification (AMIS) is the analog networking protocol that enables Stratagy to pass voice messages to any remote voice mail system that supports the AMIS protocol.
This chapter discusses the following:
� AMIS mailboxes
� AMIS node
� System Identification Number
� Configuring Stratagy for AMIS
� Testing AMIS
� AMIS operation
� AmisNodeList
Note The AMIS analog networking specification does not support transmission of a fax message over the AMIS analog network.
AMIS MailboxesStratagy implements AMIS by using two specific mailboxes – Gateway and Proxy – that contain information and direction about a remote voice mail system or node. The node identifies itself to Stratagy by a local telephone number (i.e., System Identification Number) that is sent to the receiving voice mail system during the transmission process.
Remote mailboxes, whether represented by Proxy mailboxes or through Gateway mailboxes, can be members of distribution groups.
Gateway MailboxesEach system in the AMIS network must have a unique mailbox address called a node. The only requirements for a node number is that it be one~eight digits long and be unique. For example, the Stratagy system’s Gateway mailbox at the Dallas office might be node “40,” while the Stratagy at Los Angeles might be “33.”
To send a message to another Stratagy system user using a Gateway mailbox, you must enter the Stratagy system’s node number plus the addressee’s User ID mailbox number.
Stratagy R3 I&M 11/99 12-1

AMIS NetworkingAMIS Node
12-2
For example, when a user in the Dallas office (node 40) sends a message to mailbox 200 in Los Angeles (node 33), the destination address is: “33200.” Once the message is addressed and sent, the local Stratagy system (node 40) does the following:
1. Accesses its Gateway mailbox (node 40) and uses the information stored there to contact the remote voice mail system (node 33).
2. Provides some handshake signals requesting mailbox 200.
3. Audibly transmits the message.
The remote system (node 33) receives the message and stores it in mailbox 200.
An exception occurs if the 33200 destination address also exists on the local Stratagy system. The user must follow the node number with “*” (e.g., 33*200) when entering the destination. This flags the message as an AMIS message and the Stratagy system delivers the message to Gateway mailbox 33 at Los Angeles instead of Dallas mailbox 33200.
Proxy MailboxesThe Proxy mailbox represents a specific User ID mailbox on a remote node and resides on the local Stratagy system. A Stratagy user addresses a message to a Proxy Mailbox in the same manner as he/she would a local user. Once the message is addressed and sent, the Proxy mailbox initiates the AMIS transfer. This gives the appearance to the local user that the remote user has a mailbox on the local system.
For example, assume User ID mailbox 2300 is a mailbox on a voice mail system in Dallas. The same number also resides as a Proxy mailbox on the local Stratagy. When messages are left for Proxy mailbox 2300 on Stratagy, the system uses the information stored there to contact the Dallas voice mail system, provides some handshake signals requesting User ID mailbox 2300, then audibly transmits the message. The Dallas voice mail system would receive the message and store it in User mailbox 2300.
Important! It is not necessary for the remote mailbox number to match the Proxy mailbox number in Stratagy.
AMIS NodeAn AMIS node is a voice mail system in an AMIS network. Each node in the network is identified in two ways. First, there is a unique node number (the box number of the Gateway mailbox) that must be used as part of the message address when sending, forwarding or replying to a message. Second, the nodes use the System Identification Number, which is part of the AMIS protocol, to identify themselves to each other during AMIS connections.
System Identification NumberThe System Identification Number consists of a country code (the digit “1” in North America), area code, and seven-digit phone number. This number not only identifies the calling system, but can also be used by the administrator to configure the local system to enable message replies.
Stratagy R3 I&M 11/99

AMIS NetworkingConfiguring Stratagy for AMIS
AM
IS N
etwo
rking
Configuring Stratagy for AMISThere are three steps to configuring Stratagy to act as an AMIS node:
1. Set the Stratagy AMIS system parameters.
2. Create Gateway mailboxes for each remote system with which Stratagy communicates.
3. Create Proxy mailboxes for each remote user that wishes to have a local mailbox.
Step 1: Set AMIS ParametersFor AMIS to operate correctly, you must activate the AMIS configuration parameters in the Stratagy system and modify their settings. Table 12-1 lists the required parameters and their correct settings.
1. From the Stratagy Configuration Utility screen, press 2
...or use the arrow keys (↑↓) to highlight Stratagy System Configuration and press Enter.
The Stratagy System Configuration Screen is split into two areas: the left screen area lists the actual parameters and their values, the right screen area lists context-sensitive help for each parameter. See Table 12-1 for a list of the parameters, their definitions and default settings.
2. Using the arrow (↑↓) or Page Up and Page Down keys scroll to the AMIS configuration parameter section.
3. Modify the parameter using the line editor at the top of the screen.
For each parameter listed in Table 12-1, remove the starting #. Then set appropriately.
4. Press Enter to save your changes
...or Esc to exit without saving changes.
4073
Stratagy R3 I&M 11/99 12-3

AMIS NetworkingConfiguring Stratagy for AMIS
12-4
5. Press Esc. The Stratagy Configuration Utility screen displays.
Note We recommend that you back up the current database at this time by selecting the Stratagy Backup Utility. See Chapter 14 – Backup and Restore.
6. Press Esc again. Stratagy reboots and returns to the Main Menu for call processing or Stratagy programming.
Table 12-1 AMIS Parameters
Parameter Description
amis_diskfull
Percentage of the hard drive that must be free in order for Stratagy to accept new AMIS messages. If free space is less than this figure, Stratagy tells the calling AMIS system that the hard drive is full.
Default: 5 (To enable, remove the starting # and set the value.)
amis_enabled
Whether Stratagy processes incoming AMIS calls.
True: Stratagy processes incoming AMIS calls.False: AMIS calls told that this node is not accepting network calls.
Possible values: true, falseDefault: true (To enable, remove the starting # and set the value.)
amis_ltm
User ID to use for the AMIS Loopback mailbox. User ID mailbox other AMIS nodes can use for testing the network. Any AMIS message to this mailbox is sent back to the sender, if accessible from this Stratagy system.
Possible values: valid User ID. The single quotes are required.Default: ‘989’ (To enable, remove the starting # and set the value.)
amis_max_attempts
Special retry count that keeps track of how many times this system was called without a successful handshake after answer. If the count is exceeded, then the gateway is disabled.
Possible values: 1~5Default: 3 (To enable, remove the starting # and set the value.)
amis_max_node
Maximum number of remote nodes (Gateway and Proxy mailboxes) that can be in the network. If the actual number exceeds this value, some nodes are inaccessible.
Possible values: 1~256Default: 256 (To enable, remove the starting # and set the value.)
amis_rna
Enables the ring no answer time-out to be increased to enable slow answers from AMIS systems.
Possible values: 1~9Default: 3 (To enable, remove the starting # and set the value.)
area_codeArea code of the resident Stratagy system. Single quotes are required.
Default: ’ ’ (To enable, remove the starting # and set the value.)
country_code
Country code of the resident Stratagy system. Single quotes are required.
Default: ‘1’ (North America)(To enable, remove the starting # and set the value.)
Stratagy R3 I&M 11/99

AMIS NetworkingConfiguring Stratagy for AMIS
AM
IS N
etwo
rking
Step 2: Create and Program AMIS MailboxesMessages are forwarded to, or received from, the remote User ID mailboxes via the Gateway or Proxy mailboxes. The Gateway and Proxy mailboxes must be programmed for AMIS networking to operate properly and involves defining Users and Notify Menu fields. Stratagy processes the Notify record information, including the KN( ) token programmed in the Method field, to perform AMIS out-dialing and access the AMIS network.
➤ To create and program a Gateway mailbox
1. From the Users Menu, define the following Users Menu fields (see Chapter 6 – Users Menu).
2. From the Notify Menu, highlight the first available <Disabled> description line and press the spacebar to toggle the Notify Record Options Enabled field to YES. (See Chapter 8 – Notify Menu.)
3. Press ALT+T to select Templates.
4. Highlight the AMIS DELIVERY template and press Enter.
local_amis_node
User ID of the Gateway box that represents the local AMIS node. Messages addressed to this node are delivered directly to the real local box number instead of being shipped out on the network.
Possible values: valid User ID.Default: 0 (To enable, remove the starting # and set the value.)
phone_number
Local telephone number of the resident Stratagy system. Single quotes are required.
Default: ‘ ’ (To enable, remove the starting # and set the value.)
unknown_node_action
Whether Stratagy accepts messages from unknown AMIS nodes.
1: Refuses to accept messages.2: Delivers this message even though replies are impossible.
Possible values: 1, 2Default: 2 (To enable, remove the starting # and set the value.)
User ID Any valid User ID
Comment GATEWAY MAILBOX and any other identifying information.
Extension Play greeting that explains that this is a network mailbox then route the call to hang up or another menu.
Example @P(G1)H
Store Messages YES
Gateway Box YES
AmisSysNumber Telephone number remote node uses as identification. The format (including # signs): 1#area code#telephone number#.
Example 1#714#5551212#
Table 12-1 AMIS Parameters (continued)
Parameter Description
Stratagy R3 I&M 11/99 12-5

AMIS NetworkingConfiguring Stratagy for AMIS
12-6
5. Define the Notify Menu fields:
6. Press Alt+S to save the record.
7. Access the User ID mailbox via telephone and record Greeting 1: <explains that this is a network mailbox>.
➤ To create and program a Proxy mailbox
1. From the Users Menu, define the following Users Menu fields (see Chapter 6 – Users Menu).
2. From the Notify Menu, highlight the first available <Disabled> description line and press the spacebar to toggle the Notify Record Options Enabled field to YES. (See Chapter 8 – Notify Menu.)
3. Press ALT+T to select Templates.
4. Highlight the AMIS PROXY template and press Enter.
5. Define the following Notify Menu fields:
MTWTFSS Toggle between Y and N for days AMIS should attempt to call the remote node.
From Time for Stratagy to start attempting AMIS call outs.
To Time for Stratagy to stop attempting AMIS call outs.
Notify After Number of minutes after the message has been sent to the Gateway mailbox should Stratagy attempt to contact the remote node. If this is the only record in the Notify Menu, uses the default value 0. If other records appear in this Notify Menu, set Notify After to a different number of minutes for each record to avoid conflicts.
Continue Every Number of minutes between each retry attempt to contact the remote node.
Max Times Number of times Stratagy should attempt to contact the remote node.
Title AMIS DELIVERY. Comment or reminder that identifies the call out definition or destination.
Type NORMAL (standard) or URGENT (optional), as appropriate.
Method Program the KN( ) token inserting the line access code and the %V variable.
Example KN(“9,%V”). (For details see Chapter 9 – Token Programming.)
Variable Value Stratagy inserts in place of %V in the Method field. Enter the telephone number of the remote node. Programming Language Tokens.)
User ID Any valid User ID or the same number as the remote mailbox, providing there are no conflicts with existing User ID mailboxes on the local system.
Comment PROXY MAILBOX and any other identifying information.
Do Not Disturb ON
Store Messages YES
Gateway Box YES
AmisSysNumber Telephone number remote node uses as identification. The format (including # signs)1#area code#telephone number#.
Example 1#714#5551212#.
Stratagy R3 I&M 11/99

AMIS NetworkingTesting AMIS
AM
IS N
etwo
rking
6. Press Alt+S to save the record.
7. Have the owner of the mailbox record a personal greeting for the Proxy mailbox.
Testing AMISOne method of testing AMIS involves using the AMIS Loopback User ID (default 989). When enabled using the Stratagy system configuration parameter amis_ltm, this User ID can be used by other AMIS nodes for testing the network. Stratagy sends any AMIS message to this User ID back to the sender, assuming the sending system is accessible from the Stratagy system.
A line monitor can be used to analyze AMIS transmissions. However, to validate AMIS completely, an in-depth knowledge of AMIS Analog Protocol is required.
AMIS Operation
Note AMIS messages can only be sent from User ID mailboxes.
AMIS networking operation consists of the following steps:
➤ To send a message over the AMIS network
1. The user logs into his/her mailbox.
2. From the Main Menu, the user presses , for the Send Messages menu.
MTWTFSS Toggle between Y and N for days AMIS should attempt to call the remote node.
From Time for Stratagy to start attempting AMIS call outs.
To Time for Stratagy to stop attempting AMIS call outs.
Notify After Number of minutes after the message has been sent to the Gateway mailbox should Stratagy attempt to contact the remote node. If this is the only record in the Notify Menu, uses the default value 0. If other records appear in this Notify Menu, set Notify After to a different number of minutes for each record to avoid conflicts.
Continue Every Number of minutes between each retry attempt to contact the remote node.
Max Times Number of times Stratagy should attempt to contact the remote node.
Title AMIS PROXY. Comment or reminder that identifies the call out definition or destination.
Type NORMAL (standard) or URGENT (optional), as appropriate.
Method Program the KN( ) token inserting the line access code, the %V variable, and the number of the User ID mailbox on the remote node. If the number is the same as the Proxy mailbox on the local Stratagy, then use %U (replaces with current User ID number).
Example KN(“9,%V,%U”).
Variable Value Stratagy inserts in place of %V in the Method field. Type the telephone number of the remote node.
Stratagy R3 I&M 11/99 12-7

AMIS NetworkingAMIS Operation
12-8
3. The user specifies the destination address as one of the following:
� node + mailbox number – if the address is a unique combination of the Gateway mailbox and destination mailbox.
� node + ( + mailbox number – if the address is not a unique combination of the Gateway mailbox and destination mailbox.
� Proxy mailbox number – if addressing the message to a Proxy mailbox.
where:
NODE = up to eight digits
remote mailbox number = up to 16 digits
4. The user records the message and presses # to stop recording.
5. The user presses # again to send the message to the specified node.
Once the message has been sent, Stratagy dials the remote System Identification Number. The message is placed in the remote mailbox and the user is returned to the Main Menu. If the transmission fails, Stratagy retries up to nine times before returning the message back to the user for one of the following reasons:
� Remote node does not answer
� Remote node is busy
� Message is too long
� Node’s phone number is incorrect
� Mailbox number does not exist
� Mailbox not accepting messages
� Mailbox is full
� Protocol error
Private/Urgent Message HandlingBecause AMIS does not support Special Delivery Options, the Stratagy proprietary options such as “private” or “urgent” are striped off when the message is sent via AMIS. These messages at the receiving mailbox are handled as normal messages.
However by using the Notify record, Stratagy can use the “urgent” option to determine the timing of the transmission. For example, normal messages can be delivered after 5:00 p.m. and the urgent messages immediately.
NotificationEach remote node is represented by a Gateway mailbox in the local node. The node number is the mailbox’s User ID. When a message is addressed to a remote node, it is placed in the Gateway mailbox, with information in its header that identifies the remote box number, and the fact that it is an AMIS-deliverable message.
A notify task is started to deliver messages to the remote site. There can be several notification tasks for a Gateway mailbox. For each notification task, a maximum of nine messages can be transmitted. The number of messages that can be stored in the Gateway mailbox is set by the system maximum.
Stratagy R3 I&M 11/99

AMIS NetworkingAmisNodeList
AM
IS N
etwo
rking
If a notify task was started as the result of an urgent message being placed in the Gateway mailbox, it is only allowed to deliver the urgent message to the remote node. The urgent status is stripped from the message when it is sent.
AMIS Notification Templates
Two templates exist:
� AMIS DELIVERY – for Gateway mailboxes
� AMIS PROXY – for Proxy mailboxes
AMIS Tokens
The notification token program in a Gateway mailbox must use an “AMIS delivery” KN( ) token which is responsible for actually sending the message to the remote site.
Note For detailed information on the AMIS token or templates, see Steps 1 and 2 under “Configuring Stratagy for AMIS” on Page 12-3 .
AmisNodeListThis is a list of known nodes in the network. Each entry on the list contains the node’s User ID, a comment identifying the node and the AmisSystem Number (the node number plus the node’s System Identification Number).
The list displays the:
� Mailboxes that have the Gateway Box field set to Yes
� Mailbox number of AMIS mailboxes
� Comments of AMIS mailboxes
� AMIS system number
View AMIS Node User IDs
1. Press Alt+T.
2. Use the arrow keys (↑↓) to highlight AmisNodeList.
4064
Stratagy R3 I&M 11/99 12-9

AMIS NetworkingAmisNodeList
12-10
Access Specific User ID from AmisNodeList Screen
3. Press Enter. AMIS node User IDs list in numerical order. For field definitions, see the “Options Screen” on Page 6-10 for screen fields descriptions.
4. Press Esc. The Users Menu displays.
1. From the NodeList screen, use the arrow keys (↑↓) to highlight the User ID.
2. Press Enter. The Users Menu displays with this User ID’s information.
4670
Stratagy R3 I&M 11/99
Faxes
Faxes 13
Stratagy 24D and the Stratagy 24 Plus can be optionally configured with one or two external fax/modems. These can be used for fax messaging (Stratagy accepts a fax document in place of a voice message) or to provide documents to callers.
This chapter discusses installation, application, and operation of the fax feature on the Stratagy system. It covers:
� How fax operates – fax messaging, Fax on Demand and Fax Back.
� Fax Modems
� Fax Document Conflict
� Fax Installation – connecting fax/modems to the Stratagy system and configuring Stratagy for fax operation.
� Fax Programming – using the Token Programming Language to create custom fax applications, and the Fax Application Software package (which enables automatic fax token programming of User ID mailboxes).
How Fax OperatesMany different applications can be developed around Stratagy’s fax feature, which is available only on the Stratagy 24D and the Stratagy 24 Plus. Stratagy performs three types of fax procedures.
Fax MessagingUploads fax documents into Stratagy as messages for users. This process can also be used for basic uploading of documents for other applications.
Fax on Demand (one-call fax)Transmits one fax document to callers on the same transmission. The caller can select one fax document. Fax on Demand assumes that the caller is calling into Stratagy from a fax machine and transfers the call to one of its fax/modems for immediate transmission of the document.
Fax Back (two-call fax)Transmits documents to fax machines on a separate call. The caller selects the fax documents and defines the telephone number of the receiving fax machine. Fax Back assumes that the caller is not calling into Stratagy from a fax machine and queues the fax for transmission from one of its fax/modems to the caller’s fax machine.
Stratagy R3 I&M 11/99 13-1

FaxesFax/Modems
13-2
Stratagy uses external fax/modems to translate the fax transmission protocol that is used across the public network into serial data that Stratagy can process. If a document is to be transmitted into Stratagy (fax messaging), Stratagy transfers the line to the standard port of the host phone system that supports the fax/modem so uploading can begin. When a caller needs to have a fax transmitted to him, either Stratagy commands one of its fax/modems to generate a call to the remote fax machine (Fax Back) or transfers the call to one of the fax/modems for immediate transmission (Fax on Demand).
Fax/ModemsTo use Stratagy’s fax features, you must install the optional fax/modem (SG-FMOD).
Important! Stratagy requires specific fax communication protocols. Only fax/modems provided by Toshiba can assure proper operation. Other manufacturer’s fax/modems are not supported.
A maximum of two fax/modems may be used per Stratagy system. Prior to implementing the fax feature, discuss the application with the customer to determine if one or two fax/modems should be used.
The requirement for the number of modems depends upon the application. If the fax application will be used for documents such as sales information and price lists—which would generate moderate to heavy traffic—implementing both fax/modems is suggested. If the only fax traffic is fax messages to users—which might generate light traffic—one fax/modem may be sufficient.
Fax Document ConflictWhen performing fax applications, there is a possibility of a fax document transmission failure if a document with an identical file name is simultaneously being uploaded into Stratagy. This would occur in documents that are frequently in need of alteration, such as mortgage rates.
Stratagy, as well as most programs that rely on database files, cannot modify a file that is currently opened for another application. To circumvent this problem, users should not attempt to upload fax documents to file names that are currently in the process of being transmitted to callers.
It can be difficult for users to know if the document that needs to be altered is in the process of transmission. We, therefore, suggest the following application as one way of uploading new documents without causing a conflict.
Mailbox SetupWhen fax applications are created on Stratagy, a mailbox is required for either receipt or transmission. The following instructions are for the mailbox that contains the tokens responsible for transmitting the fax documents:
1. Program the mailbox so that it cannot store messages.
2. Log on to the mailbox via telephone.
3. Press & Manage the Mailbox options from the Main Menu.
4. If the fax application has a token to play a specific greeting(s), record a new greeting in one of the unused greeting bins. For example, if greetings 1 and 2 are being used for the fax application, re-record greeting 3.
Stratagy R3 I&M 11/99

FaxesFax Installation
Faxes
The greeting can say something like “I’m sorry we cannot fax this document at this time, please call back in a few minutes.”
Once this greeting is recorded, it becomes the selected greeting for the mailbox. This has no effect on the operation of the existing token programming for this mailbox.
Mailbox FunctionalityNow that the mailbox is set up, the following steps should be taken to upload a document to an existing file name.
1. Observe the fax/modem(s) to see if they are busy or idle.
2. Log on to the mailbox that has the token programming in its extension field which is responsible for document transmission.
3. Press & Manage the Mailbox options from the Main Menu, then , Change your User Options.
4. Enable Do Not Disturb for the mailbox. This blocks callers from further accessing the extension field of the mailbox (that contains the token programming for fax transmission), so that a new fax document upload can be performed.
5. If there is an idle fax/modem, upload the fax document using the method that has been created.
6. Once upload is complete, log on to the mailbox from Step 2. Disable DND. The mailbox now processes fax transmission normally.
There are other ways to build applications for uploading new documents without causing a conflict. This is just one method.
Fax InstallationFax messaging requires you connect one or two optional fax/modems, configure the fax parameters, and optionally install fax application software.
Step 1: Connect the Fax/ModemsFax/modems are connected to the Stratagy system through serial communication ports COM1 and COM2 on the back of the cabinet.
Important! The fax application only works on COM1 and COM2.
Both COM ports are 9-pin male connectors, and cable connection of fax/modems is withRS-232 standard 9-pin female-to-male cables. (See Figure 13-1 and 13-2.) Each fax/modem requires one standard 2500 telephone port from the host telephone system.
1. Install the fax/modem per the modem manufacturer’s instructions and recommendations.
2. Plug the modem cable from the fax/modem to Stratagy’s COM port.
3. Install a modular cable supplying dial tone from the supporting standard station port into the designated connection of the fax/modem.
Note Write down the extension numbers of the supporting telephone ports; they are required for Stratagy programming.
4. Turn on the fax/modem.
Stratagy R3 I&M 11/99 13-3

FaxesFax Installation
13-4
Figure 13-1 Connecting Fax/modems to the Stratagy 24D
Figure 13-2 Connecting Fax/modems to the Stratagy 24 Plus
3529
Modular Cables toStandard Station Ports
ModemCablesFax/modem #2 Fax/modem #1
COM1COM2
4190
COM2 COM1
ModemCables
Fax/modem #2 Fax/modem #1
Modular Cables toStandard Station Ports
Stratagy R3 I&M 11/99

FaxesFax Installation
Faxes
Step 2: Configure Stratagy for FaxOnce the modems are installed, the next step is to configure Stratagy to recognize the fax/modem’s existence. This is done using the Stratagy System Configuration option in the Stratagy Configuration Utility. This section lists the required parameters and the correct settings.
1. From the Main Menu, select Shutdown by pressing Alt+S.
Stratagy prompts: Password?
2. Type the password and press Enter.
Stratagy requests you reconfirm shutdown.
3. To shut down the system, type Y twice.
4. From the Stratagy Configuration Utility screen, press 2.
The Stratagy System Configuration screen displays.
5. From the Stratagy System Configuration screen, scroll to the Serial Port Definition section. Modify the listed parameters to their correct settings. Remove the starting # if it exists.
See Table 13-1 for a list of port parameters.
6. From the Stratagy System Configuration screen, scroll to the Fax Configuration section. Modify the listed parameters to their correct settings. Remove the starting # if it exists.
See Table 13-2 for a list of fax parameters.
If Stratagy software has been upgraded on an existing system, some listed settings may not appear on the screen. To add these settings requires editing the INSTALL.CFG file. (“JOVE File Editor” on Page 16-29.) Contact Toshiba Technical Support for assistance.
7. Press Enter. Your changes are saved.
8. Press Esc. The Stratagy Configuration Utility Menu displays.
9. Press Esc again. Just prior to Stratagy displaying “Press any key to continue,” the fax/modem’s send and receive LEDs flicker. This indicates that the fax/modems are being initialized.
The Main Menu screen displays.
407
5
Stratagy R3 I&M 11/99 13-5

FaxesFax Installation
13-6
10. Verify that the appropriate number of fax port(s) display in the Faxes field. The field should describe each installed modem as IDLE (e.g., Faxes: 1 IDLE).
If there is no display, the system does not recognize the fax/modem’s existence. Review the above configuration settings for accuracy (Steps 5 and 6).
Table 13-1 Fax Modem Parameters
Fax/modem #1 Settings Fax/modem #2 Settings
baud1 19200 baud2 19200
databits1 8 databits2 8
parity1 none parity2 none
serial_port1 1 serial_port2 2
stopbits1 1 stopbits2 1
Stratagy R3 I&M 11/99

FaxesFax Installation
Faxes
Table 13-2 Fax Parameters
Parameter Description
fax1
Station or extension number connected to the first fax/modem.
Example: If the first fax/modem is connected to extension 101, use the value ‘101’. The single quotes are required.
Default: ’’ (no station or extension number)
fax2
Station or extension number connected to the second fax/modem.
Example: If the second fax/modem is connected to extension 102, use the value ‘102’. The single quotes are required.
Default: ’’ (no station or extension number)
fax_answer
AT command that instructs the Class 2 fax/modem to answer the call. Double quotes are required.
Default: “H100”
fax_dl_init
Dial codes Stratagy dials when a user dials ', from the Play Messages Menu to send a fax message he has received to a fax machine. Generally, this is the code for accessing a public network line, i. e., $.
Example: dial code to access an outside line. The single quotes are required.
Default: ‘9,’ (dial $ and pause for 2 seconds.)
fax_fail_retry
Whether Stratagy resends a fax if it detects a failure during transmit.
0: no resend
1: resends starting from the first page
2: resends starting from the failure page
Possible values: 0, 1, 2Default: 0
fax_flow_control
Class 2 command to set the type of flow control for the fax/modem.
Example ‘&K3’ Zoom fax/modem
Default: ‘&K3’ The single quotes are required.
fax_id
Fax/modem ID or telephone number used for identification to other fax devices. Single quotes are required. 20 characters maximum.
Note Must be defined for proper fax operation.
Default: ‘ ’ (no identification)
fax_id_pad
Some modems ignore the first four characters of the fax_id. If this value is set to true, the fax_id will be padded with the string “1111”, so that all digits in fax_id will be used.
Possible values: true, falseDefault: false
Stratagy R3 I&M 11/99 13-7

FaxesFax Installation
13-8
fax_log
Sent fax file log. This log file contains information about each fax file Stratagy sends (does not include received faxes and fax messages). The log consists of one line per fax, and includes the name of the fax file and the telephone number to which it was sent.
Note The file’s rate of growth depends upon fax send traffic. Archive or delete as appropriate.
Possible values: valid DOS file name. The single quotes are required.Default: comment line (#set fax_log”)
To enable, remove the starting # and set the value.
fax_max_retries
Defines the maximum number of times, after the first, to retry sending a fax if it is unsuccessful. This is used only when sending the fax in two-call mode, e.g., the caller enters a fax telephone number that the fax modem calls and then sends the fax.
Possible values: 0~9Default: 1
fax_receive_reverse
Controls whether to reverse the fax databits on receive. Setting depends solely on the Class 2 fax/modem used.
True: Setting for most fax/modems.False: Setting for some fax/modems. If the faxes received are reverse (mirror
images) from the original, try setting this parameter to false.
Possible values: true, falseDefault: true
fax_receive_speed
Maximum speed for receiving faxes. Setting depends upon the type and speed of your computer. Normally a value of 3 works for 386 CPUs at 33 MHz or higher. If you experience data loss on your faxes, lower this baud rate setting.
‘0’: 2400‘1’: 4800‘3’: 9600
Possible values: ‘0’, ‘1’, ‘3’ The single quotes are required.Default: ‘3’
fax_requeue_interval
Number of minutes to wait between retries for fax_max_retries.
Possible values: 1~99 (minutes)Default: 5
fax_reset
Reset command to send to the fax/modem when DTR is dropped. Use ‘&D3’ for most fax/modems. Single quotes are required.
Default: ‘&D3’
fax_resolution
Resolution of faxes to be stored by Stratagy.
0: Normal resolution
1: Fine resolution
Possible values: 0, 1Default: 0
Table 13-2 Fax Parameters (continued)
Parameter Description
Stratagy R3 I&M 11/99

FaxesFax Installation
Faxes
fax_scan_time
Fax line scan time.
VR=normal VR=fine0: 0ms 0ms1: 5ms 5ms2: 10ms 5ms3: 10ms 10ms4: 20ms 10ms5: 20ms 20ms6: 40ms 20ms7: 40ms 40ms
Possible values: 0~7Default: 7
fax_send_reverse
Setting depends solely on the Class 2 fax/modem used.
True: Setting for most fax/modems.False: Setting for some fax/modems. If the faxes received are reverse (mirror
images) from the original, try setting this parameter to true.
Possible values: true, falseDefault: false
fax_send_speed
Maximum speed that Stratagy will use for sending faxes. Setting depends upon the type and speed of your computer. Normally a value of 3 works for 386 CPUs at 33 MHz or higher. If you experience data loss on your faxes, lower this baud rate setting.
‘0’: 2400‘1’: 4800‘3’: 9600
Possible values: ‘’, ‘0’, ‘1’, ‘3’ The single quotes are required.Default: ‘3’
fax_start_char
Whether the fax/modem sends a control start character.
True: Setting for most fax/modems, including Zoom™.False: Setting for some fax/modems.
Possible values: true, falseDefault: false
Table 13-2 Fax Parameters (continued)
Parameter Description
Stratagy R3 I&M 11/99 13-9

FaxesFax Installation
13-10
Step 3: (Optional) Install Fax Application Software
Note The Fax Application Software is a tool to quickly provide fax operation; it is not necessary to have this software to perform fax features with Stratagy.
Important! Do not use the Fax Application Software until the fax/modems are installed and configured correctly.
This software automatically designs User ID mailboxes with Token Programming to produce fax applications. Installing the Stratagy Fax Application Software creates User ID mailboxes for fax upload, Fax on Demand, and Fax Back on the Stratagy system hard drive.
This software does not provide any programming for configuring fax/modems on the Stratagy system. See “Connect the Fax/Modems” on Page 13-3 and “Configure Stratagy for Fax” on Page 13-5 for information about installing and configuring fax/modems.
This section contains installation instructions for the Fax Application Software and detailed descriptions of each mailbox it creates, including definitions of each token and a list of sample greetings.
Once you have installed the Fax Application Software and have recorded the greetings, Stratagy has dynamic fax applications that you can use as is or modify to your specifications.
The Fax Application Software contains three applications:
� Fax Upload – Accepts incoming fax documents and stores them as files on Stratagy’s hard drive. (This is a type of fax messaging.)
� Fax Back (two-call fax) – A caller calls into Stratagy, enters a document number and a fax machine’s telephone number. Stratagy transmits that document to the designated fax machine.
� Fax on Demand (one-call fax) – Immediately sends a fax document to the fax machine from which a caller is calling.
Prior to Installation
We recommend that you:
� Backup the Stratagy system database. See Chapter 14 – Backup and Restore for details.
� Make a copy of the Fax Application Software as a backup.
Install the Fax Application Software
1. Press Alt+S to shut down Stratagy call processing.
You are prompted for the system password.
2. Enter the system’s [Password] and type y.
Stratagy requests you reconfirm shutdown.
3. Type y again.
4. At the Stratagy Configuration Utility Menu, press the Ctrl+C keys simultaneously.
The system displays: Terminate batch job (Y/N)?
5. Type y. The C:\STRATAGY> prompt appears on the screen.
Stratagy R3 I&M 11/99
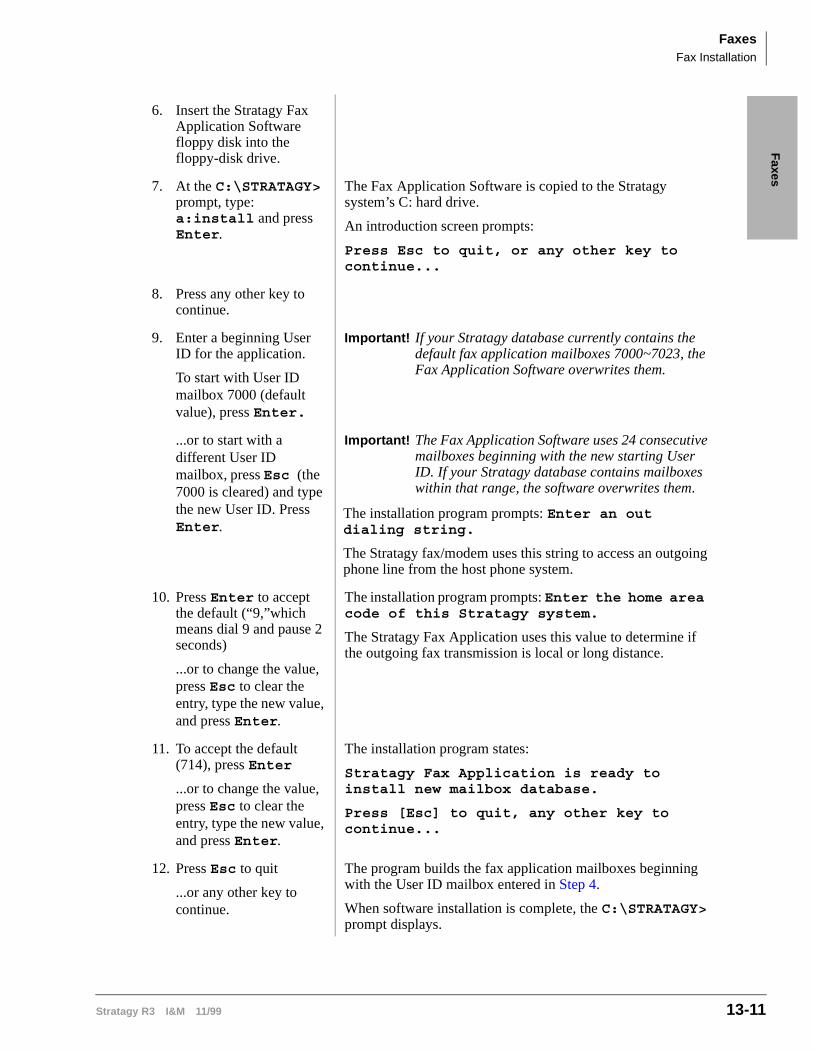
FaxesFax Installation
Faxes
6. Insert the Stratagy Fax Application Software floppy disk into the floppy-disk drive.
7. At the C:\STRATAGY> prompt, type: a:install and press Enter.
The Fax Application Software is copied to the Stratagy system’s C: hard drive.
An introduction screen prompts:
Press Esc to quit, or any other key to continue...
8. Press any other key to continue.
9. Enter a beginning User ID for the application.
To start with User ID mailbox 7000 (default value), press Enter.
Important! If your Stratagy database currently contains the default fax application mailboxes 7000~7023, the Fax Application Software overwrites them.
...or to start with a different User ID mailbox, press Esc (the 7000 is cleared) and type the new User ID. Press Enter.
Important! The Fax Application Software uses 24 consecutive mailboxes beginning with the new starting User ID. If your Stratagy database contains mailboxes within that range, the software overwrites them.
The installation program prompts: Enter an out dialing string.
The Stratagy fax/modem uses this string to access an outgoing phone line from the host phone system.
10. Press Enter to accept the default (“9,”which means dial 9 and pause 2 seconds)
...or to change the value, press Esc to clear the entry, type the new value, and press Enter.
The installation program prompts: Enter the home area code of this Stratagy system.
The Stratagy Fax Application uses this value to determine if the outgoing fax transmission is local or long distance.
11. To accept the default (714), press Enter
...or to change the value, press Esc to clear the entry, type the new value, and press Enter.
The installation program states:
Stratagy Fax Application is ready to install new mailbox database.
Press [Esc] to quit, any other key to continue...
12. Press Esc to quit
...or any other key to continue.
The program builds the fax application mailboxes beginning with the User ID mailbox entered in Step 4.
When software installation is complete, the C:\STRATAGY> prompt displays.
Stratagy R3 I&M 11/99 13-11

FaxesFax Installation
13-12
Fax Application Software User ID Mailboxes
This section lists the Fax Application Software User ID mailboxes in numerical order (starting with 7000) by application (Fax Upload, Fax Back, and Fax on Demand). Each User ID mailbox includes the tokens being used and an explanation of each token’s operation. In addition, for User ID mailboxes that require recorded greetings, it includes sample greetings. You may want to word a greeting in a different manner; we recommend that you retain the substance of the greeting.
Notes
� The Fax Application Software User ID mailbox numbers used below are based on the default value. If they were altered during installation of the software, use the altered User IDs instead.
� Some User ID mailboxes’ token programs are too large to reside in the Extension field. For these mailboxes, the Fax Application Software builds files on the Stratagy hard drive for the token programs then enters the { } token in the User ID mailbox Extension field that references the file.
Important! For the Fax Application Software User ID mailboxes you will be using, log on to the appropriate mailboxes and record the greetings. This is essential for proper operation of the Fax Application Software.
13. Type STRATAGY and press Enter
...or reboot the system.
The Main Menu displays.
Stratagy R3 I&M 11/99

FaxesFax Installation
Faxes
Fax Upload Mailboxes
User ID 7000: FaxUploadTop
User ID 7001: VerifyNoFax
Comment FaxUploadTop
Extension @=(%S9,”Yes”)P(G1)R(G2,%S3,20)P(G3)P(%S3)M(G4,3,10)G(999)
@ Suppress normal process.
=(%S9,R“Yes”) Forces users to start here by setting the %S9 variable to “Yes.” Following User IDs require this to be set or they are sent to error box.
P(G1) Plays greeting 1.
R(G2,%S3,20) Plays greeting 2. Receives digits and stores them in %S3. Waits 2 seconds for response.
P(G3) Plays greeting 3.
P(%S3) Plays digits stored in %S3.
M(G4,3,10) Plays greeting 4 and waits for menu choice.
G(999) If no menu choice is dialed, hangs up.
RNA Chain 999
Menu 1 7001
Menu 7 7000
Menu 9 999
Greeting 1 “Welcome to Fax Document Upload.”
Greeting 2 “Please enter a document number, then press #.”
Greeting 3 “You entered document number.”
Greeting 4 “If this is correct press 1, to start over press 7, to quit press 9.”
Comment VerifyNoFax
Extension @I(%S9,!,”Yes”,7022)V(“FAX/DOCLIST.TXT”,4,%S3,4,%S7)G(7003)
@ Suppress normal process.
I(%S9,!,“Yes”,7022) Verifies that call started at User ID 7000. If not, goes to User ID 7022.
V(“FAX/DOCLIST.TXT”,4,%S3,4,%S7)Finds document number (%S3) in a text file named DOCLIST.TXT, takes same field and puts in %S7. If not found, executes Done chain (7002).
G(7003) If document found, goes to User ID 7003 to confirm overwrite.
Done Chain 7002
RNA Chain 999
Stratagy R3 I&M 11/99 13-13

FaxesFax Installation
13-14
User ID 7002: AppendFaxList
User ID 7003: ConfirmReplace
User ID Mailbox 7004: StartUpload
Comment AppendFaxList
Extension @I(%S9,!,”Yes”,7022)¦(“/STRATAGY/FAX/DOCLIST.TXT”)G(7004)
@ Suppress normal process.
I(%S9,!,“Yes”,7022) Verifies that the call started at User ID 7000. If not, goes to User ID 7022.
¦(“/STRATAGY/FAX/DOCLIST.TXT”)Appends the text file doclist.txt with an additional listing.
G(7004) Goes to User ID 7004 for the start of the upload procedure.
Comment ConfirmReplace
Extension @I(%S9,!,”Yes”,7022)P(G1)P(%S7)P(G2)M(G3,5,10)
@ Suppress normal process.
I(%S9,!,“Yes”,7022) Verifies that call started at User ID 7000. If not goes to User ID 7022.
P(G1) Plays greeting 1.
P(%S7) Plays the document number assigned in User ID 7001.
P(G2) Plays greeting 2.
M(G3,5,10) Plays greeting 3 and waits for menu choice.
RNA Chain 999
Menu 1 7004
Menu 7 7000
Menu 9 999
Greeting 1 “Document number .”
Greeting 2 “ already exists.”
Greeting 3 “To replace it press 1, to start over press 7, to quit press 9.”
Comment StartUpload
Extension @I(%S9,!,”Yes”,7022)J(“FAX\\%S3.FAX”,””,”-P(G1)F-%FH”)G(999)
@ Suppress normal process.
I(%S9,!,“Yes”,7022) Verifies that the call the started at User ID 7000. If not, goes to User ID 7022.
J(“FAX\\%S3.FAX”,””,”-P(G1)F-%FH”)Prepares to receive fax document defined in %S3. Plays greeting 1. Performs a hookflash. Pauses (0.5 second). Dials fax/modem. Hangs up.
G(999) Goes to User ID 999, which hangs up.
Done Chain 999
RNA Chain 999
Greeting 1 “Press the start key on your fax machine when you hear the fax tone.”
Stratagy R3 I&M 11/99

FaxesFax Installation
Faxes
CAUTION! When creating applications using the J( ), T( ), and >( ) tokens, you must use the identical syntax for file identification. Otherwise, fax transmission or reception may fail.
Fax Back Mailboxes
User ID 7005: FaxDownloadTop
Note This mailbox can remain as a menu selection as defined below. However, with the G( ) token in place of the M( ) token, it can steer the caller to either the beginning of Fax on Demand (User ID 7016) or Fax Back (User ID 7006), narrowing the application to either one type or the other.
User ID 7006: MultiFaxTop
Comment FaxDownloadTop
Extension @=(%S9,”Yes”)M(G1,3,10)
@ Suppress normal process.
=(%S9,“Yes”) Forces users to start here by setting the %S9 variable to “Yes.” The following User IDs require this to be set or they are sent to error box.
M(G1,3,10) Plays greeting 1 and waits for menu choice.
RNA Chain 999
Menu 1 7016
Menu 2 7006
Menu 7 7005
Menu 9 999
Greeting 1 “Welcome to Document Fax Back. For immediate fax back press 1, for fax transmission of one or more documents to a remote facsimile machine press 2, to replay choices press 7, or press 9 to quit.”
Comment MultiFaxTop
Extension @{.\\FAX7006}
@ Suppress normal process.
{.\\FAX7006} Processes token text file FAX7006.
Token Text File FAX7006@I(%S9,!,”Yes”,7022)=(%S3,””)=(%S4,””)=(%S5,””)P(G1)G(7007)
@ Suppress normal process.
I(%S9,!,“Yes”,7022) Verifies that the call started at User ID 7005. If not, goes to User ID 7022.
=(%S3,””) Clears %S3 variable (first fax document).
=(%S4,””) Clears %S4 variable (second fax document).
=(%S5,””) Clears %S5 variable (third fax document).
P(G1) Plays greeting 1.
G(7007) Goes to User ID 7007 to start getting document numbers.
RNA Chain 999
Greeting 1 “To use this service you must know the telephone number of the facsimile machine that you wish to have a document transmitted to. You may request up to three documents.”
Stratagy R3 I&M 11/99 13-15

FaxesFax Installation
13-16
User ID 7007: GetDocumentNumber
Comment GetDocumentNumber
Extension @{.\\FAX7007}
@ Suppress normal process.
{.\\FAX7007} Processes token text file FAX7007.
Token Text File FAX7007@I(%S9,!,”Yes”,7022)=(%S5,%S4)=(%S4,%S3)R(G1,%S7,20)I(LEN[%S7],=,0,7009)P(G2)P(%S7)M(G3,3,10)
@ Suppress normal process.
I(%S9,!,“Yes”,7022) Verifies that the call started at User ID 7005. If not, goes to User ID 7022.
=(%S5,%S4) Moves 2nd document number to third.
=(%S4,%S3) Moves 1st document number to second.
R(G1,%S7,20) Plays greeting 1. Receives document number and stores it in %S7. Waits 2 seconds for response.
I(LEN[%S7],=,0,7009) If no digits entered, goes to User ID 7009.
P(G2) Plays greeting 2.
P(%S7) Plays document number stored in %S7.
M(G3,3,10) Plays greeting 3 and waits for menu choice.
RNA Chain 999
Menu 1 7008
Menu 2 7007
Menu 7 7006
Menu 9 999
Greeting 1 “Please enter a document number, then press #.”
Greeting 2 “The document number you entered was .”
Greeting 3 “If this is correct press 1, to enter a different document number press 2, to start over press 7, to quit press 9.”
Stratagy R3 I&M 11/99
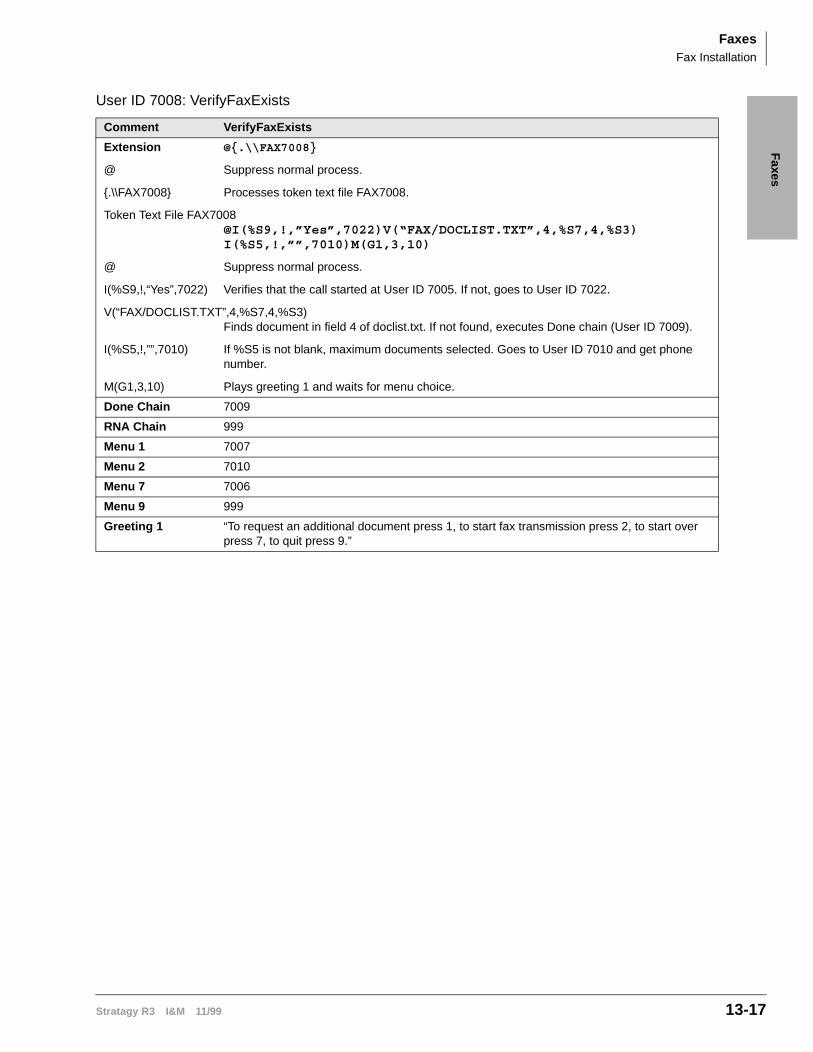
FaxesFax Installation
Faxes
User ID 7008: VerifyFaxExists
Comment VerifyFaxExists
Extension @{.\\FAX7008}
@ Suppress normal process.
{.\\FAX7008} Processes token text file FAX7008.
Token Text File FAX7008@I(%S9,!,”Yes”,7022)V(“FAX/DOCLIST.TXT”,4,%S7,4,%S3)I(%S5,!,””,7010)M(G1,3,10)
@ Suppress normal process.
I(%S9,!,“Yes”,7022) Verifies that the call started at User ID 7005. If not, goes to User ID 7022.
V(“FAX/DOCLIST.TXT”,4,%S7,4,%S3)Finds document in field 4 of doclist.txt. If not found, executes Done chain (User ID 7009).
I(%S5,!,””,7010) If %S5 is not blank, maximum documents selected. Goes to User ID 7010 and get phone number.
M(G1,3,10) Plays greeting 1 and waits for menu choice.
Done Chain 7009
RNA Chain 999
Menu 1 7007
Menu 2 7010
Menu 7 7006
Menu 9 999
Greeting 1 “To request an additional document press 1, to start fax transmission press 2, to start over press 7, to quit press 9.”
Stratagy R3 I&M 11/99 13-17

FaxesFax Installation
13-18
User ID 7009: FaxUnavailable
Comment FaxUnavailable
Extension @{.\\FAX7009}
@ Suppress normal process.
{.\\FAX7009} Processes token text file FAX7009.
Token Text File FAX7009@I(%S9,!,”Yes”,7022)P(G1)P(%S7)P(G2)=(%S3,%S4)=(%S4,%S5)=(%S5,””)M(G3,3,10)
@ Suppress normal process.
I(%S9,!,“Yes”,7022) Verifies that the call started at User ID 7005. If not, goes to User ID 7022.
P(G1) Plays greeting 1.
P(%S7) Plays document number stored in %S7.
P(G2) Plays greeting 2.
=(%S3,%S4) Moves document in %S4 back to %S3.
=(%S4,%S5) Moves document in %S5 back to %S4.
=(%S5,””) Clears document in %S5.
M(G3,3,10) Plays greeting 3 and waits for menu choice.
RNA Chain 999
Menu 1 7007
Menu 2 7010
Menu 7 7006
Menu 9 999
Greeting 1 “Document number ”
Greeting 2 “is not available.”
Greeting 3 “To enter another document number press 1, to start fax transmission press 2, to start over press 7, to quit press 9.”
Stratagy R3 I&M 11/99

FaxesFax Installation
Faxes
User ID 7010: GetPhoneNumber
User ID 7011: InvalidPhoneNumber
Comment GetPhoneNumber
Extension @{.\\FAX7010}
@ Suppress normal process.
{.\\FAX7010} Processes token text file FAX70010.
Token Text File FAX7010@I(%S9,!,”Yes”,7022)R(G1,%S1,20)R(G2,%S2,20)I(LEN[%S1],!,3,7011)I(LEN[%S2],!,7,7011)G(7012)
@ Suppress normal process.
I(%S9,!,“Yes”,7022) Verifies that the call started at User ID 7005. If not, goes to User ID 7022.
R(G1,%S1,20) Plays greeting 1. Receives digits and stores them in %S1. Waits 2 seconds for response.
R(G2,%S2,20) Plays greeting 2. Receives digits and stores them in %S2. Waits 2 seconds for response.
I(LEN[%S1],!,3,7011) If the area code in %S1 is not 3 digits long, goes to User ID 7011.
I(LEN[%S2],!,7,7011) If the telephone number in %S2 is not 7 digits long, goes to User ID 7011.
G(7012) Goes to User ID 7012.
Greeting 1 “Please enter your fax machine’s area code.”
Greeting 2 “Please enter your fax machine’s phone number.”
Comment InvalidPhoneNumber
Extension @I(%S9,!,”Yes”,7022)P(G1)P(%S1)P(%S2)P(G2)M(G3,3,10)
@ Suppress normal process.
I(%S9,!,“Yes”,7022) Verifies that the call started at User ID 7005. If not, goes to User ID 7022.
P(G1) Plays greeting 1.
P(%S1) Plays area code stored in %S1.
P(%S2) Plays telephone number stored in %S2.
P(G2) Plays greeting 2.
M(G3,3,10) Plays greeting 3 and waits for menu choice.
RNA Chain 999
Menu 1 7010
Menu 7 7006
Menu 9 999
Greeting 1 “The phone number that you entered”
Greeting 2 “is not valid.”
Greeting 3 “To enter a new phone number press 1, to start over press 7, to quit press 9.”
Stratagy R3 I&M 11/99 13-19

FaxesFax Installation
13-20
User ID 7012: ConfirmPhoneNumber
User ID 7013: IsAreaCodeLocal
Comment ConfirmPhoneNumber
Extension @I(%S9,!,”Yes”,7022)P(G1)P(%S1)P(%S2)M(G2,3,10)
@ Suppress normal process.
I(%S9,!,“Yes”,7022) Verifies that the call started at User ID 7005. If not, goes to User ID 7022.
P(G1) Plays greeting 1.
P(%S1) Plays area code stored in %S1.
P(%S2) Plays telephone number stored in %S2.
M(G2,3,10) Plays greeting 2 and waits for menu choice.
RNA Chain 999
Menu 1 7013
Menu 2 7010
Menu 7 7006
Menu 9 999
Greeting 1 “The fax phone number you entered was”
Greeting 2 “If this is correct press 1, to enter a new phone number press 2, to start over press 7, to quit press 9.”
Comment IsAreaCodeLocal
Extension @{.\\FAX7013}
@ Suppress normal process.
{.\\FAX7013} Processes token text file FAX7013.
Token Text File FAX7013@I(%S9,!,”Yes”,7022)?(“%S1”,”FAX/AREACODE.TXT”,7014)=(%S1,”1%S1”)G(7015)
@ Suppress normal process.
I(%S9,!,“Yes”,7022) Verifies that the call started at User ID 7005. If not, goes to User ID 7022.
?(“%S1”,”FAX/AREACODE.TXT”,7014)Checks text file AREACODE.TXT for area code stored in %S1. If found, area code is local and goes to User ID 7014.
=(%S1,”1%S1”) If not local, prefixes the area code stored in %S1 with the digit 1.
G(7015) Goes to User ID 7015.
Done Chain 7021
RNA Chain 999
Stratagy R3 I&M 11/99

FaxesFax Installation
Faxes
User ID 7014: LocalAreaCode
User ID 7015: StartTwoCallFax
CAUTION! When creating applications using the J( ), T( ), and >( ) tokens, you must use the identical syntax for file identification. Otherwise, fax transmission or reception may fail.
Comment LocalAreaCode
Extension @I(%S9,!,”Yes”,7022) =(%S1,””)G(7015)
@ Suppress normal process.
I(%S9,!,“Yes”,7022) Verifies that the call started at User ID 7005. If not, goes to User ID 7022.
=(%S1,””) Deletes the area code stored in %S1.
G(7015) Goes to User ID 7015.
RNA Chain 999
Comment StartTwoCallFax
Extension @{.\\FAX7015}
@ Suppress normal process.
{.\\FAX7015} Processes token text file FAX7015.
Token Text File FAX7015@I(%S9,!,”Yes”,7022)<(“9,%S1%S2”)>(“FAX\\%S3.FAX”)I(%S4,=,””,7023)>(“FAX\\%S4.FAX”)I(%S5,=,””,7023)>(“FAX\\%S5.FAX”)G(7023)
@ Suppress normal process.
I(%S9,!,“Yes”,7022) Verifies that the call started at User ID 7005. If not, goes to User ID 7022.
<(“9,%S1%S2”) Starts incremental fax: dials 9, pauses (2 seconds), dials the contents of %S1(1 + area code), dials telephone number in %S2.
>(“FAX\\%S3.FAX”) Sends the document number stored in %S3 appended by .FAX.
I(%S4,=,””,7023) If no next document in %S4, goes to User ID 7023.
>(“FAX\\%S4.FAX”) Sends the document number stored in %S4 appended by .FAX.
I(%S5,=,””,7023) If no next document in %S5, goes to User ID 7023.
>(“FAX\\%S5.FAX”) Sends the document number stored in %S5 appended by .FAX.
G(7023) Goes to User ID 7023.
RNA Chain 999
Stratagy R3 I&M 11/99 13-21

FaxesFax Installation
13-22
Fax On Demand Mailboxes
Note If your Fax Application needs to be Fax On Demand only, you may direct the caller from User ID Mailbox 7005 (see note on Page 13-15 for details).
User ID 7016: OneFaxTop
User ID 7017: OneFaxGetDocument
Comment OneFaxTop
Extension @I(%S9,!,”Yes”,7022)P(G1)G(7017)
@ Suppress normal process.
I(%S9,!,“Yes”,7022) Verifies that the call started at User ID 7005. If not, goes to User ID 7022.
P(G1) Plays greeting 1.
G(7017) Goes to User ID 7017.
RNA Chain 999
Greeting 1 “To use this service, you must be calling from a fax machine.”
Comment OneFaxGetDocument
Extension @{.\\FAX7017}
@ Suppress normal process.
{.\\FAX7017} Processes token text file FAX7017.
Token Text File FAX7017@I(%S9,!,”Yes”,7022)R(G1,%S3,20)I(LEN[%S3],=,0,7019)P(G2)P(%S3)M(G3,3,10)
@ Suppress normal process.
I(%S9,!,“Yes”,7022) Verifies that the call started at User ID 7005. If not, goes to User ID 7022.
R(G1,%S3,20) Plays greeting 1. Receives digits and stores them in %S3. Waits 2 seconds for response.
I(LEN[%S3],=,0,7019) If no digits in %S3, goes to User ID 7019.
P(G2) Plays greeting 2.
P(%S3) Plays document number entered in %S3.
M(G3,3,10) Plays greeting 3 and waits for menu choice.
RNA Chain 999
Menu 1 7018
Menu 2 7017
Menu 7 7016
Menu 9 999
Greeting 1 “Please enter a document number.”
Greeting 2 “The document number you entered was”
Greeting 3 “If this is correct press 1, to enter a different document number press 2, to start over press 7, to quit press 9.”
Stratagy R3 I&M 11/99

FaxesFax Installation
Faxes
User ID 7018: OneFaxVerify
User ID 7019: OneFaxUnavailable
Comment OneFaxVerify
Extension @I(%S9,!,”Yes”,7022)V(“FAX/DOCLIST.TXT”,4,%S3,4,%S7)G(7020)
@ Suppress normal process.
I(%S9,!,“Yes”,7022) Verifies that the call started at User ID 7005. If not, goes to User ID 7022.
V(“FAX/DOCLIST.TXT”,4,%S3,4,%S7)Finds document in field 4 of DOCLIST.TXT. If not found, executes Done chain (User ID 7019).
G(7020) Goes to User ID 7020.
Done Chain 7019
RNA Chain 999
Comment OneFaxUnavailable
Extension @I(%S9,!,”Yes”,7022)P(G1)P(%S3)P(G2)M(G3,3,10)
@ Suppress normal process.
I(%S9,!,“Yes”,7022) Verifies that the call started at User ID 7005. If not, goes to User ID 7022.
P(G1) Plays greeting 1.
P(%S3) Plays document number stored in %S3.
P(G2) Plays greeting 2.
M(G3,3,10) Plays greeting 3 and waits for menu choice.
RNA Chain 999
Menu 1 7017
Menu 7 7016
Menu 9 999
Greeting 1 “Document number”
Greeting 2 “is not available.”
Greeting 3 “To enter another document press 1, to start over press 7, to quit press 9.”
Stratagy R3 I&M 11/99 13-23

FaxesFax Installation
13-24
User ID 7020: StartOneCallFax
CAUTION! When creating applications using the J( ), T( ), and >( ) tokens, you must use the identical syntax for file identification. Otherwise, fax transmission or reception may fail.
User ID 7021: FaxError
User ID 7022: InvalidBoxDialed
Comment StartOneCallFax
Extension @{.\\FAX7020}
@ Suppress normal process.
{.\\FAX7020} Processes token text file FAX7020.
Token Text File FAX7020@I(%S9,!,”Yes”,7022)I(%S3,=,””,999)T(“FAX\\%S3.FAX”,””,”-P(G1)F-%FH”)G(999)
@ Suppress normal process.
I(%S9,!,“Yes”,7022) Verifies that the call started at User ID 7005. If not, goes to User ID 7022.
I(%S3,=,””,999)If no document number in %S3, goes to User ID 999 to hang up.
T(“FAX\\%S3.FAX”,””,”-P(G1)F-%FH”)Plays greeting 1. Transfers call to fax/modem extension and transmits document number stored in %S3 appended by .FAX.
G(999) Goes to User ID 999 to hang up.
Greeting 1 “Press the start key on your fax machine when you hear the fax tone.”
Comment FaxError
Extension @P(G1)G(999)
@ Suppress normal process.
P(G1) Plays greeting 1.
G(999) Goes to User ID 999 to hang up.
RNA Chain 999
Greeting 1 “Sorry, fax or configuration error. Please call later.”
Comment InvalidBoxDialed
Extension @P(G1)G(999)
@ Suppress normal process.
P(G1) Plays greeting 1.
G(999) Goes to User ID 999 to hang up.
Greeting 1 “Invalid access. You must start at the beginning of the application.”
Stratagy R3 I&M 11/99

FaxesFax Installation
Faxes
User ID 7023: TwoCallFaxBack
Step 4: (Optional) Customize Fax ApplicationsStratagy uses the Token Programming Language to generate fax applications. The four principal tokens are:
J( )token for fax receiving.
T( )token for single fax transmission.
<( )and >( ) tokens for multiple fax document transmission.
There are other tokens that can be used with the principal tokens in the fax process, and there may be certain applications that only require one of the principal tokens. For example, fax messaging into a user’s mailbox requires the J( ) token to receive the fax. No additional token programming is required to have the fax message sent to a fax machine.
Fax Messaging Example
➤ To prepare users’ mailboxes for fax messaging
1. Create a new User ID mailbox.
2. Define the Users record to contain:
3. Access the new User ID mailbox via telephone. Record:
Greeting 1: “Press the start key on your fax machine when you hear the tone.”
4. For User ID mailboxes of the users that desire fax mail, define their Users MenuGroup/Chains Screen to contain:
Comment TwoCallFaxBack
Extension @P(G1)G(999)
@ Suppress normal process.
P(G1) Plays greeting 1.
G(999) Goes to User ID 999 to hang up.
Greeting 1 “Thank you. The documents that you have selected will be faxed back to you momentarily.”
Extension @J(%P,””,”P(G1)F-%FH”)
@ Suppress normal process.
J Receives fax.
%P Previously accessed User ID.
”” Waits until a call rings into the fax port.
P(G1) Plays greeting 1.
F Performs a hookflash to put call on hold.
- Pauses (0.5 second).
%F Transfers call to an idle fax/modem.
H Hangs up (completes an unsupervised transfer).
Stratagy R3 I&M 11/99 13-25

FaxesFax Installation
13-26
Menu: Enter the new User ID as a menu selection. For example, if the new User ID is 750, define Menu 1 as 750.
5. Access each of their User ID mailboxes via telephone. Record:
Greeting 1: “Please leave a message or press (menu selection) to leave a fax message.” For this example, menu selection is 1.
A caller makes the selection and the system sends the caller to the new User ID. Stratagy, remembering the last User ID (%P), plays greeting 1. Stratagy transfers the call to an idle fax/modem (%F) for receipt, and hangs up (H). Stratagy then stores the fax as a message for the User ID mailbox. The user logs on to the User ID mailbox and, while listening to the fax message prompt, presses ') for Immediate Fax Retrieve (Fax on Demand) or ', for Send Fax to Fax Machine (Fax Back).
The J( ) token is also used for uploading documents into the Stratagy system. The above example would require the %P value to be replaced with a file name, or if new documents are constantly being uploaded, a variable token (%Sn) that can be defined in a previous User ID’s token programming.
Some fax applications require an ASCII list file or database. Fax documents can be filed by number, and that number can reside in a list file. When callers desire a document to be faxed to them, they enter a document number into the Stratagy. Stratagy scans the list file for the document number.
If the document number is found, the corresponding fax document can be transmitted immediately, or a phone number can be entered of a fax machine for alternate transmission.
If the document number is not found, then the call can be routed back to the start of the application for the document number to be re-entered or be re-routed for assistance. The tokens that assist the T( ) token in this application are:
R( )token to receive the document number from the caller.
V( )token to verify the entered document number exists in the file.
?( )token to verify if the entered phone number is a local number or has been restricted.
Just about any of the available tokens can be used in a fax application. The only qualifying element is what the application dictates and the programmer’s imagination.
Stratagy R3 I&M 11/99

Backu
p an
d R
estore
Backup and Restore 14
The Stratagy Configuration Utility provides the Stratagy 6D, 24D, and Stratagy 24 Plus systems with a convenient method to backup and restore the database and mailbox greetings and messages.
This chapter discusses:
� Backup Utility Menu Options
� Backing Up Stratagy
� Restoring Stratagy
� Reconfiguring the Stratagy Backup Utility
The Stratagy Backup Utility is used to back up and restore information between the Stratagy hard and floppy-disk drives. This utility works in conjunction with a program called Microsoft Backup by providing Microsoft Backup with information concerning the files that are to be backed up or restored.
Backup and Restore functions are available for a customer’s database, mailbox greetings, mailbox messages, or all three. They consist of:
� DatabaseAll mailbox settings and information, Stratagy system configuration settings, and all information concerning the selected telephone system’s integration information.
� Mailbox greetingsAll greetings that have been recorded for all programmed mailboxes (personal and company).
� Mailbox messagesAll messages that have been stored in all programmed mailboxes.
Backing up your Stratagy system regularly enables you to restore your system with minimal data loss if your computer system fails (hard drive failure, etc.). The data can also be used to restore your system to an earlier version of the database or greetings.
Note System changes and messages recorded since the last backup are lost.
Performing backup and restore varies by Stratagy system software:
� Stratagy Flash and Stratagy DK – Backup and restore functions are available using the Tool Utility on the Main menu. See the Stratagy Flash and the Stratagy DK Installation Guide for instructions.
� Stratagy 6D, Stratagy 24D, and Stratagy 24 Plus – Backup and restore functions are available using the Stratagy Configuration Utility.
Stratagy R3 I&M 11/99 14-1

Backup and Restore
Backup Utility Menu Options
14-2
Backup Utility Menu OptionsThe Backup Utility Main Menu consists of the following options (see Figure 14-1):
� Backup: Backs up a database, all the greetings, or all the messages. You can also back up all of them at one time.
� Restore: Restores a database, all the greetings, or all the messages. You can also restore all of them at one time.
� Compare: Not applicable to Stratagy.
� Configure: Reconfigures the screen.
� Quit: Returns you to the Stratagy Configuration Utility Menu.
The Backup Utility Menu uses a series of menus. For each menu, the current selections are surrounded by pointers (��). To select an option, press the highlighted letter or use the arrow keys to put pointers around the option and press Enter.
Figure 14-1 Navigating the Backup Utility Menus
StratagyConfigurationUtility Menu
BackupUtility
Database
Configure
Compare(not applicable)
Greetings
Messages
Quit
All
BackupMain Menu
BackupMain Menu
Backup
Restore
Configure Submenu
Backup Submenu
Select CatalogSubmenu
Video/MouseConfigurationSubmenu
Restore Submenu
2483
Stratagy R3 I&M 11/99

Backup and RestoreBackup
Backu
p an
d R
estore
BackupHow often you schedule backups depends upon your company’s needs. For some companies, monthly backups are appropriate; others require daily backups. In addition, we recommend that you perform backup whenever you are about to make changes to your system that you would not want to lose (e.g., configuration changes and User ID customizations).
We recommend:
For the database – you should schedule backups each time the Stratagy Configuration Utility is used to modify the configuration and integration settings and each time User IDs are customized—added, deleted, or modified.
For greetings – you should schedule backups each time you record special User ID mailbox greetings, IVR greetings, etc. and periodically to back up users’ greeting recordings.
Message – backups can be performed as appropriate. Some companies back up messages and others do not.
Since Stratagy is shutdown during backups, we recommend that you schedule them when Stratagy is least busy. With the System Announcement feature of the System Administrator User ID mailbox, you can let users know when the system will be shutdown for the next backup.
Important! Stratagy does not process calls while accessing the Stratagy Configuration Utility. Exiting the Stratagy Configuration Utility causes Stratagy to reboot with the new data, display the Main Menu, and resume call processing.
1. From the Main Menu, shut down Stratagy by pressing Alt+S. See “Access the Utility” on Page 3-4 for more information.
2. From the Stratagy Configuration Utility Menu, press Enter.
Note If the system alerts you that it has detected a change in the configuration and needs to be reconfigured, follow the procedures under “Reconfigure the Backup Utility” on Page 14-11. Then proceed with Step 4 below.
4075
4072
Stratagy R3 I&M 11/99 14-3

Backup and Restore
Backup
14-4
3. From the Stratagy Backup Utility Menu, use the arrow keys to highlight the data that needs to be backed up and press Enter
...or type the number of the selection.
4. From the Backup Main Menu, press Alt+B.
5. Verify that Setup File displays the desired backup set.
...or if incorrect, press Alt+P for a list.
Use the arrow keys to highlight the desired backup set, and press the spacebar to select. Press Enter.
The Backup Submenu displays.
4673
4082
4087
Stratagy R3 I&M 11/99
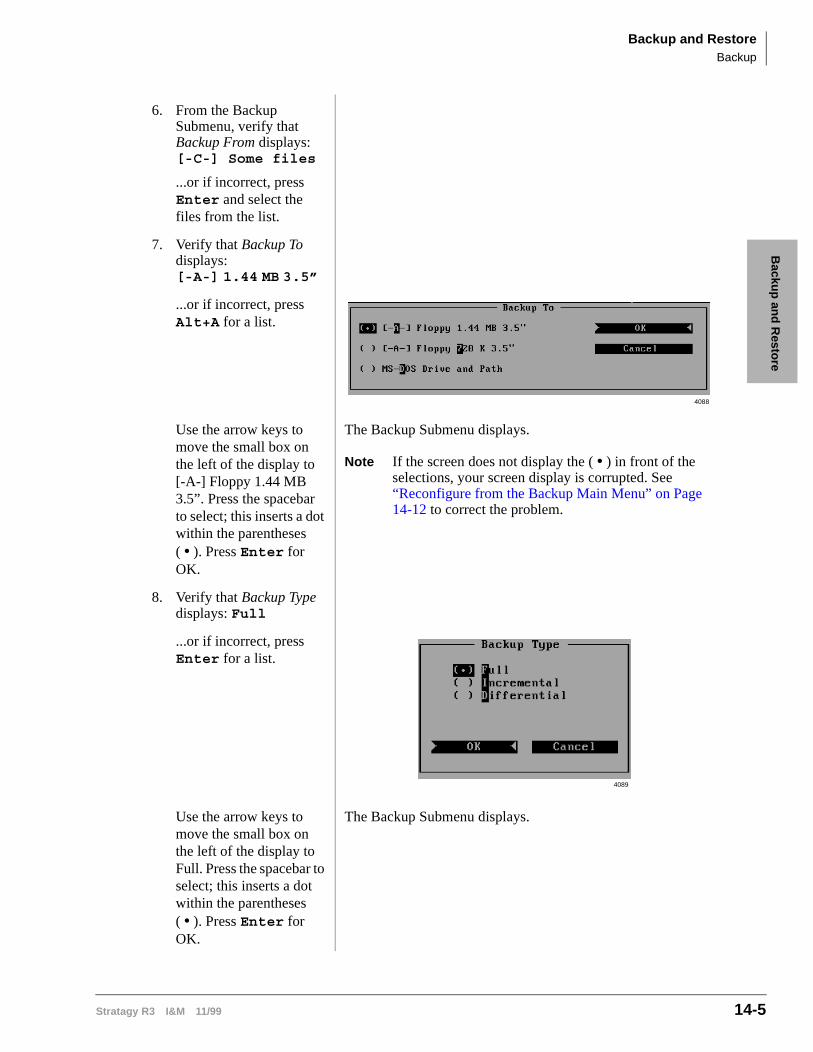
Backup and RestoreBackup
Backu
p an
d R
estore
6. From the Backup Submenu, verify that Backup From displays: [-C-] Some files
...or if incorrect, press Enter and select the files from the list.
7. Verify that Backup To displays:[-A-] 1.44 MB 3.5”
...or if incorrect, press Alt+A for a list.
Use the arrow keys to move the small box on the left of the display to[-A-] Floppy 1.44 MB 3.5”. Press the spacebar to select; this inserts a dot within the parentheses ( • ). Press Enter for OK.
The Backup Submenu displays.
Note If the screen does not display the ( • ) in front of the selections, your screen display is corrupted. See “Reconfigure from the Backup Main Menu” on Page 14-12 to correct the problem.
8. Verify that Backup Type displays: Full
...or if incorrect, press Enter for a list.
Use the arrow keys to move the small box on the left of the display to Full. Press the spacebar to select; this inserts a dot within the parentheses ( • ). Press Enter for OK.
The Backup Submenu displays.
4088
4089
Stratagy R3 I&M 11/99 14-5
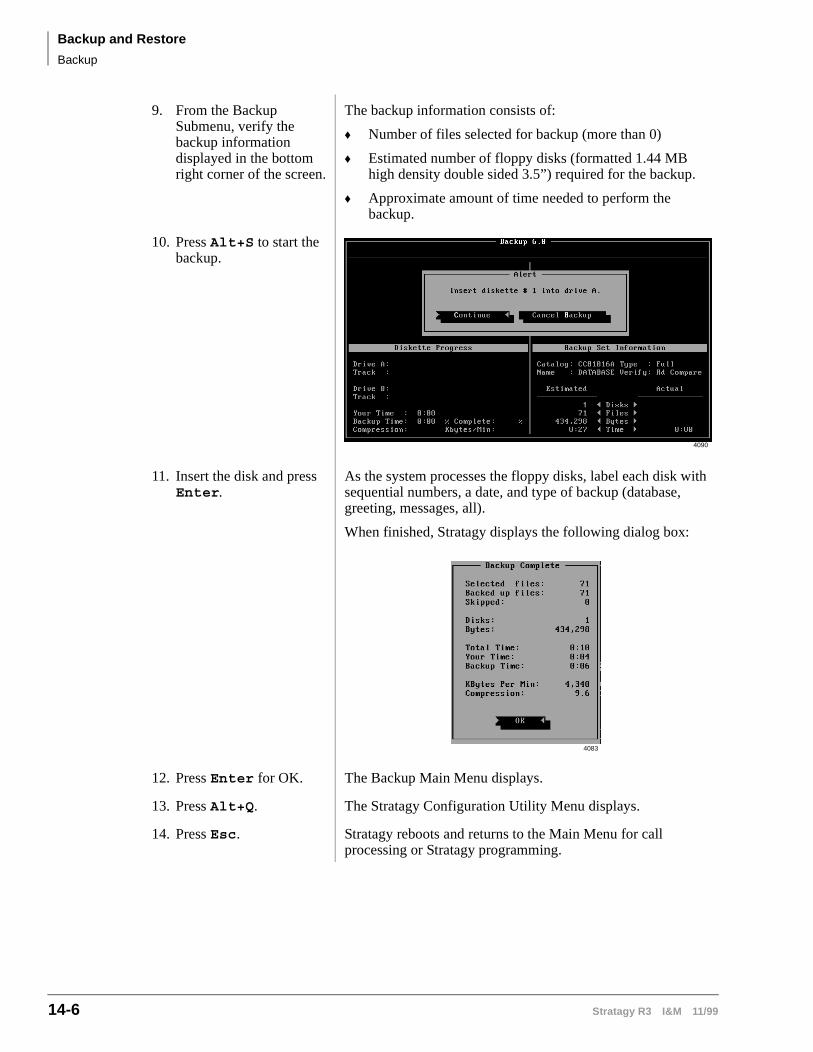
Backup and Restore
Backup
14-6
9. From the Backup Submenu, verify the backup information displayed in the bottom right corner of the screen.
The backup information consists of:
� Number of files selected for backup (more than 0)
� Estimated number of floppy disks (formatted 1.44 MB high density double sided 3.5”) required for the backup.
� Approximate amount of time needed to perform the backup.
10. Press Alt+S to start the backup.
11. Insert the disk and press Enter.
As the system processes the floppy disks, label each disk with sequential numbers, a date, and type of backup (database, greeting, messages, all).
When finished, Stratagy displays the following dialog box:
12. Press Enter for OK. The Backup Main Menu displays.
13. Press Alt+Q. The Stratagy Configuration Utility Menu displays.
14. Press Esc. Stratagy reboots and returns to the Main Menu for call processing or Stratagy programming.
4090
4083
Stratagy R3 I&M 11/99

Backup and RestoreRestore
Backu
p an
d R
estore
RestoreRestore selects data using a catalog file. When a backup is performed, the Backup Utility creates a catalog file and stores it on both the destination floppy-disk and hard drive of the Stratagy system. The catalog file name is date coded for identification.
Format CCymmddx
CC identifies the file as a catalog file
y last digit of the year the backup was performed
mm month the backup was performed
dd day the backup was performed
x which backup of the defined day. A indicates the first backup.
Example CC50712B indicates the second catalog file backed up on July 12, 1995.
1. From the Main Menu, shut down Stratagy by pressing Alt+S. See “Access the Utility” on Page 3-4 for more information.
2. From the Stratagy Configuration Utility Menu, press Enter.
3. From the Stratagy Backup Utility Menu, use the arrow keys to highlight the data that needs to be restored and press Enter
...or type the number of the selection.
Note If the system alerts you that it has detected a change in the configuration and needs to be reconfigured, follow the procedures under “Reconfigure the Backup Utility” on Page 14-11. Then proceed with Step 4 below.
4075
4072
4084
Stratagy R3 I&M 11/99 14-7

Backup and Restore
Restore
14-8
4. From the Backup Main Menu, press Alt+R.
The Backup Set Catalog field may display a catalog file that was previously backed up off your system. If several backups have been performed, the catalog file that displays may not be the one you want to restore. Therefore, ignore the catalog file under Backup Set Catalog and use the catalog file on the floppy disk.
5. From the Restore Submenu, press Alt+G.
6. From the Select Catalog screen, press Alt+R.
7. From the Retrieve Catalog screen, verify that the A: drive is selected under Retrieve Catalog From ([-A-] Floppy Drive)
...or if incorrect, press Alt+E for a list.
4675
4676
4677
4098
Stratagy R3 I&M 11/99

Backup and RestoreRestore
Backu
p an
d R
estore
Use the arrow keys to move the small box on the left of the display to [-A-] Floppy Drive. Press the spacebar to select; this inserts a dot within the parentheses ( • ). Press Enter for OK.
The Backup Submenu displays.
Note If you the screen does not display the ( • ) in front of the selections, your screen display is corrupted. See “Reconfigure from the Backup Main Menu” on Page 14-12 to correct the problem.
8. The last disk of each backup set contains the catalog. Restore the prompts for the last floppy disk of the backed up set and insert the disk into the floppy disk drive. Press Enter to continue.
The system checks the floppy-disk catalog file and the catalog files on the hard drive.
9. If Restore states the catalog file already exits on the hard drive, press Alt+O to Overwrite the catalog on the hard drive.
Restore retrieves the catalog file and places it on the hard drive.
10. Press Enter for OK. The Select Catalog Submenu displays.
11. From the Select Catalog Submenu, verify that the correct catalog file is highlighted under Files.
...or if incorrect, repeatSteps 5~9.
12. From the Select Catalog Submenu, press Alt+L to load the catalog file into Restore.
The Restore Submenu displays.
4091
4092
Stratagy R3 I&M 11/99 14-9

Backup and Restore
Restore
14-10
13. On the Restore submenu, verify that Backup Set Catalog displays the correct backup set.
...or if incorrect, follow the procedures under Steps 4~9.
14. Verify that Restore From displays: [-A-] 1.44 MB 3.5”
...or if incorrect, press Alt+E for a list.
Use the arrow keys to move the small box on the left of the display to [-A-] 1.44 MB 3.5”. Press the spacebar to select; this inserts a dot within the parentheses ( • ). Press Enter for OK.
The Restore Submenu displays.
15. Verify that Restore Files displays: [-C-] All files
...or if incorrect, press Alt+I. Press the spacebar to toggle to [-C-] All files.
16. Verify that Restore To displays: Original Locations
...or if incorrect, press Alt+R for a list.
Use the arrow keys to move the small box on the left of the display to Original Locations. Press the spacebar to select; this inserts a dot within the parentheses ( • ). Press Enter for OK.
The Restore Submenu displays.
4093
4094
Stratagy R3 I&M 11/99

Backup and RestoreReconfigure the Backup Utility
Backu
p an
d R
estore
Reconfigure the Backup UtilityYou will need to use the Backup Utility’s Configure option if the system alerts you that it needs to be reconfigured or when the screens appear distorted (the lines around the dialog boxes are not aligned).
The procedures differ depending upon whether you start reconfiguring from the Alert Screen or the Backup Main Menu.
17. Verify that the number of files selected for restore displays in the bottom right corner of the Restore Submenu (more than 0).
18. Press Alt+S to start the restore.
19. Insert the first floppy disk of the backup set into the floppy disk drive and press Enter. Replace with the remaining floppy disks as prompted.
When finished, Stratagy displays the following dialog box:
20. Press Enter for OK. The Backup Main Menu displays.
21. Press Alt+Q. The Stratagy Configuration Utility Menu displays.
22. Press Esc. Stratagy reboots and returns to the Main Menu for call processing or Stratagy programming.
4095
4085
Stratagy R3 I&M 11/99 14-11

Backup and Restore
Reconfigure the Backup Utility
14-12
Reconfigure from the Backup Main Menu
1. From the Main Menu, shut down Stratagy by pressing Alt+S. See “Access the Utility” on Page 3-4 for more information.
2. Press Enter.
3. From the Stratagy Backup Utility Menu, press Enter.
Note If the system alerts you that it has detected a change in the configuration and needs reconfiguration, follow the procedures under “Reconfigure from the Alert Screen” on Page 14-14.
4. From the Backup Main Menu, press Alt+N.
4075
4072
4086
4672
Stratagy R3 I&M 11/99

Backup and RestoreReconfigure the Backup Utility
Backu
p an
d R
estore
5. From the Configure screen, press Alt+V.
6. From the Video and Mouse Configuration screen, verify that Screen Colors displays:Black and White.
Note The screen display may be corrupted so that the parentheses and small dot cannot be distinguished. The following changes are designed to correct this.
...or if incorrect, press Alt+S for a list.
Use the arrow keys to move the small box to the left of the display to Black and White. Press the spacebar to select; this inserts a dot within the parentheses ( • ). Then press Enter for OK.
The Video and Mouse Configuration screen displays.
7. From the Video and Mouse Configuration Screen, verify that Graphical Display displays: Standard.
...or if incorrect, press Alt+G for a list.
4674
4096
4097
Stratagy R3 I&M 11/99 14-13

Backup and Restore
Reconfigure the Backup Utility
14-14
Reconfigure from the Alert Screen
Press Alt+S to select Standard. Then press Enter for OK.
The Video and Mouse Configuration screen displays.
8. From the Video and Mouse Configuration screen, use the arrow keys to highlight OK and press Enter.
9. At the Configure Screen, press Alt+S.
The configuration is saved and the Backup Main Menu displays.
1. If your backup utility screens need to be reconfigured, an Alert screen displays after you make a selection on the Stratagy Backup Utility screen.
2. From the Alert screen, press Enter
...or Alt+R.
3. From the Video Mouse screen, verify that the Screen Colors field displays:Black and White.
...or if incorrect, press Alt+S for a list.
4208
4674
4096
Stratagy R3 I&M 11/99

Backup and RestoreReconfigure the Backup Utility
Backu
p an
d R
estore
Use the arrow keys to move the small box to the left of the display to Black and White. Press the spacebar to select; this inserts a dot within the parentheses ( • ). Then press Enter for OK.
The Video and Mouse Configuration Screen displays.
4. From the Video Mouse screen, verify that the Graphical Display field displays: Standard
...or if incorrect, press Alt+G for a list.
Press Alt+S to select Standard. Then press Enter for OK.
The Video and Mouse Configuration screen displays.
5. From the Video and Mouse Configuration screen, use the arrow keys to highlight OK and press Enter.
6. From the Floppy Drive Change Line Test screen, press Enter to start the test.
7. Verify that Floppy Drive A displays: 3.5” 1.44 Mb High Density
4097
4209
4210
Stratagy R3 I&M 11/99 14-15
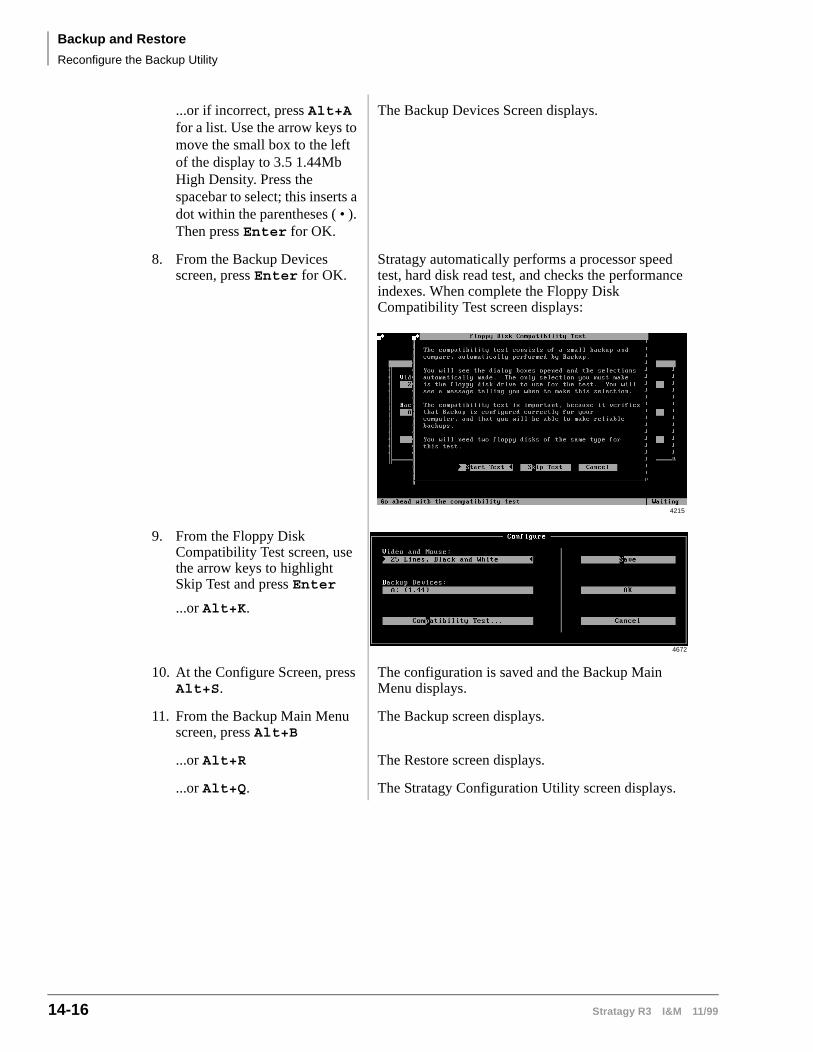
Backup and Restore
Reconfigure the Backup Utility
14-16
...or if incorrect, press Alt+A for a list. Use the arrow keys to move the small box to the left of the display to 3.5 1.44Mb High Density. Press the spacebar to select; this inserts a dot within the parentheses ( • ). Then press Enter for OK.
The Backup Devices Screen displays.
8. From the Backup Devices screen, press Enter for OK.
Stratagy automatically performs a processor speed test, hard disk read test, and checks the performance indexes. When complete the Floppy Disk Compatibility Test screen displays:
9. From the Floppy Disk Compatibility Test screen, use the arrow keys to highlight Skip Test and press Enter
...or Alt+K.
10. At the Configure Screen, press Alt+S.
The configuration is saved and the Backup Main Menu displays.
11. From the Backup Main Menu screen, press Alt+B
The Backup screen displays.
...or Alt+R The Restore screen displays.
...or Alt+Q. The Stratagy Configuration Utility screen displays.
4215
4672
Stratagy R3 I&M 11/99

System
Rep
orts
System Reports 15
Tracking the Stratagy system involves analyzing system operation and User ID activity. This chapter discusses:
� View system/user activity
� Listen to system activity
� Report types
� Report definitions
� Run, view, print a report
� Save report to floppy disk
� Automatic report generation
Note Stratagy is also equipped with a diagnostic tool called Trace which assists you in troubleshooting applications. See Chapter 17 – Troubleshooting for information.
View System/User ActivityYou can track system and user activity on the Stratagy system by viewing the Main and Users Menus, respectively.
Main Menu StatisticsThe Main Menu displays (Figure 15-1) the system activity statistics.
The menu provides:
� Port activity and CPU usage
� Number of defined User ID mailboxes
� Available hard drive space in time and percent of the hard drive
� Number of calls answered since the system started
� Notify activity
� Date and time system last started
4061
Figure 15-1 Main Menu
Stratagy R3 I&M 11/99 15-1

System ReportsListen to System Activity
15-2
� Next date and time of scheduled shutdown
� Fax port activity
See Chapter 2 – Access and Use Stratagy for details.
Users Menu StatisticsThe Users Menu (Info/Status Screen) displays (Figure 15-2) the User ID statistics.
In addition to the screen display, a report can also be generated based on the statistics shown. (“Report Definitions” on Page 15-3.) The menu provides:
� Date and time User ID was created
� Date and time User ID was last modified
� When date and time statistics were last reset
� Message activity
� Caller activity
� User activity
See Chapter 6 – Users Menu for details on the statistics.
Listen to System ActivityWhen logged on to the System Administrator User ID mailbox, you can select Review System Status. Stratagy plays (verbally) the status information:
� Percent of hard drive space remaining
� Number of ports in use
� System date and time
See Chapter 10 – Customization Examples for details.
Report TypesYou can generate a variety of reports that provide information about the Stratagy system and User ID mailboxes.
� Log information using the Stratagy Filecopy option to import a log file into a program on another PC (see “Log Information” on Page 15-3 for details)
� Users Menu information using the Stratagy Reports Menu
4063
Figure 15-2 Info/Status Screen
Stratagy R3 I&M 11/99

System ReportsReport Definitions
System
Rep
orts
Log InformationIf you need more system or User ID information, Stratagy provides the following logs.
� Message – Logs every received message and every User ID that checks for messages along with the DTMF entered. Includes date and time for each entry.
� Stratagy (System) – Logs startup, execution error, and shutdown information and system actions.
� User ID – Logs the date, time, and User ID number whenever a User ID is accessed via DTMF. Useful for creating a data file which can later be analyzed for call distributions and accesses by dates, days, and times.
� Fax – Logs information about each fax file Stratagy sends, including the name of the fax, telephone number to which it was sent, and date and time. One line per fax. It does not include received faxes and fax messages.
� Trace.out/Trace.old – Logs system activity while Stratagy is active.
� Ctask.log/Ctask.old – Logs debugging information to a file if the system encounters a fatal error caused by an invalid pointer.
See Chapter 17 – Troubleshooting and Chapter 3 – Configure Stratagy for instructions on activating and using these log files.
Users Menu InformationWith the Reports Menu, you can generate a variety of reports that provide information about the Stratagy system and User ID mailboxes.
Reports may be run for a specific User ID, a range of User IDs, or all active User IDs. When you run a report, Stratagy compiles information according to the report definition for the User ID mailboxes selected.
After running a report, you can view, print, or save the report to a file. Viewing and printing is restricted to 80 characters across; outputting to a file is not restricted.
Report DefinitionsDefining the contents of a report involves selecting the Report Definition Fields from the Reports Menu. This report definition can be saved for future reports you want defined using this format, and once saved, can be used to generate a report automatically at a specified time each day.
Once a report definition is created, you can run a report using the definition. Stratagy selects and sorts the report information according to the report definition (See “Run Report” on Page 15-5). After running a report, you can view, print, or save the report to a file.
Stratagy R3 I&M 11/99 15-3

System ReportsReport Definitions
15-4
Create Report Definitions
1. From the Main Menu, press Alt+R.
2. Type the password and press Enter. (The default password is Stratagy, with the first letter uppercase.)
The Reports screen displays (see Figure 15-4).
3. Number the Report Definition Fields in the column order you want them to appear on the report.
For example, if you want a report listing the User ID, Calls Last, and Messages Maximum from left to right, the values for these fields would be:
User ID: 1
Messages Maximum: 3
Calls Last: 2
4. Select Save by pressing Alt+S.
Note Only report definitions which you plan on using again should be saved.
5. Enter the name and press Enter.
Report names may be up to eight alphanumeric characters long (A~Z, 0~9) and are not case sensitive, e.g., report names LISTING, Listing, and listing all reference the same file.
The Reports Menu displays.
6. When you have finished with the Reports Menu, press Esc.
The Main Menu displays.
4216
Stratagy R3 I&M 11/99

System ReportsRun Report
System
Rep
orts
Load Exist Report Definition
Run ReportWhen you run a report, Stratagy compiles the report according to the report definition and User ID mailboxes you selected. The reports are compiled in columns, displaying each column’s title across the top of the page. User IDs are listed in increasing order. See Figure 15-3 for a sample report.
After running the report, Stratagy stores it in a temporary file on the hard drive. When the next report is run, the previous report file is overwritten.
Until another report is run, you can view, print, or save the report to a file on a floppy disk.
Note Stratagy Flash, Stratagy DK: Reports are run and saved on the Stratagy system but must be file copied to the remote PC using the Stratagy Admin software to view or print them.
1. From the Reports screen, press Alt+L.
2. Type the name of the report definition
...or press F2 to display a list of saved report definitions. Highlight the report name and press Enter.
3. Press Enter again. The Reports Menu displays the report definition selection.
1. From the Reports screen, create a report definition (see “Create Report Definitions” on Page 15-4)
...or load an existing definition (see “Load Exist Report Definition” on Page 15-5).
The Report screen with the definition displays.
2. Press Alt+R.
4070
4217
Stratagy R3 I&M 11/99 15-5

System ReportsView Report
15-6
Figure 15-3 Sample Report
View Report
3. Type the range of User IDs you want to include in the report or leave both fields blank to access all User IDs.
4. In the Reset Statistics When Done field, press Enter to accept the NO default
Stratagy does not reset the statistics.
...or type YES and press Enter.
Stratagy initializes the statistics for each User ID in the selected range to 0.
Important! If you reset the statistics, Stratagy cannot retrieve the old values after running the report.
The report starts running. While running, Stratagy displays the User ID currently being processed. When Stratagy finishes compiling the report, the Reports Menu displays.
1. From the Reports Menu, press Alt+V.
Note Viewing is restricted to 80 characters across. If your report is too wide for the screen, only the columns that fit display.
2. Use the arrow keys (↑↓) or Page Up and Page Down to view different parts of the report.
3. Press Esc to exit the report.
Page 1
User ID
200201202203204
200201202203204
081410
SmithHenryAdamsChanThomas
JoeJohnBillGeorgeSteve
ExtensionDirectoryName 1
DirectoryName 2
#Mesgs
Stratagy Report Mon Mar 29 18:02:51 1996
2493
Stratagy R3 I&M 11/99

System ReportsPrint Report
System
Rep
orts
Print ReportTo use the Print option, the Stratagy system Configuration parameter 1pt_port must define the printer port Stratagy should use. See Chapter 3 – Configure Stratagy.
➤ From the Reports Menu, press Alt+P to select Print.
Note Printing is restricted to 80 characters across.
Save Report to Floppy DiskBy saving the report to a floppy disk, you can read or import it to another PC that has a 1.44 MB floppy-disk drive. Since Stratagy creates reports in standard ASCII format, you can edit and import reports into programs such as word processors, spreadsheets, and databases.
Important! Do not output the report to a permanent file on Stratagy’s hard drive. Saving reports to the hard drive can lead to outdated files that are never deleted and an inefficient use of hard drive space that is needed for voice processing.
Automatic Report GenerationUsing a saved report definition, you can configure Stratagy to generate automatically a report at a specified time each day. See Chapter 3 – Configure Stratagy for detailed instructions on modifying parameters.
➤ To generate automatically a report using the Stratagy Configuration Utility
1. Set the auto_report parameter to active and specify the name of the report to be generated automatically. For example, if the name of the saved report definition is daily.rpt, the parameter is set auto_report ‘daily.rpt’.
2. Set the auto_report_time parameter to active and specify the time of day to generate the report each day. For example, if the time is 2:15 p.m., the parameter is set auto_report_time 1415.
1. Place a formatted standard IBM-compatible 3.5-inch 1.44 MB floppy disk in drive A:.
2. From the Reports Menu, press Alt+F to select File.
3. Enter the drive and file name. Valid entries are A:\filename.ext (any valid DOS file name). Press Enter.
For example: A:\report.txt
4218
Stratagy R3 I&M 11/99 15-7

System ReportsReport Menu Field Descriptions
15-8
Report Menu Field Descriptions
Figure 15-4 Reports Menu with Sample Data
Menu Bar Access Options (select)
Load Press Alt+L to load a previously saved report definition.
Save Press Alt+S to save current report definition.
RunPress Alt+R to compile a report using the report definition you just created or loaded and the User ID range selected.
View Press Alt+V to display the last report you ran.
Print Press Alt+P to print the last report you ran.
File Press Alt+F to output the last report you ran to a file.
Esc/Exit Press Esc to exit the Reports Menu and return to the Main Menu.
Report Definition Fields
(Select to create a report definition: See Chapter 6 – Users Menu for field definitions.)
3257
4069
ReportDefinition
Fields
Menu Bar
Stratagy R3 I&M 11/99
Main
tenan
ce and
U
pg
rades
Maintenance and Upgrades 16
This chapter provides information on steps you should take prior to installing or upgrading a Stratagy system. It also covers the following procedures:
� Hard drive maintenance
� Upgrading/Reloading of Stratagy system software
� Upgrading Stratagy Voice Ports
� Installing
� Screen savers
� Fax/modems
Prior to Installing/Upgrading1. We recommend that you back up your database prior to starting any installation or upgrading
procedure. (See Chapter 14 – Backup and Restore.)
2. Make sure the set of upgrade software you received is the correct version for your system. There is a different version of software for each of the configurations available.
3. Make a copy of any disks as a backup.
4. Make sure you have all the necessary parts and tools.
5. Since all of the procedures require Stratagy be out-of-service, coordinate with the customer a time for Stratagy to be taken off line.
6. Before removing and replacing components, you need to know:
� How to safely open a PC in order to install/remove cards in the computer.
� How to identify basic components of a PC: e.g., motherboard, video board, controller board, voice board, disk drives, power supply, cables.
Hard Drive MaintenanceStratagy automatically performs hard drive maintenance during scheduled shutdown (but not during normal shutdown). The default schedule is Tuesday at 1:30 a.m. The Shutdown field of the Main Menu displays the date and time of the next scheduled shutdown. See Chapter 3 – Configure Stratagy to set the Stratagy System Configuration shutdown parameter.
Stratagy R3 I&M 11/99 16-1

Maintenance and UpgradesHard Drive Maintenance
16-2
Important! If you do not want Stratagy to perform scheduled shutdown automatically, you must set the shutdown parameter for the day/time you want the scheduled shutdown to occur. After Stratagy performs the scheduled shutdown, re-comment out (place a # in front of) the parameter. We recommend performing scheduled shutdown at least weekly.
During scheduled shutdown, Stratagy uses the Norton’s Disk Doctor Utility to check the hard drive for lost files or anything unusual and automatically fixes any errors.
Using the Speed Disk Utility, Stratagy also optimizes the hard drive, reassembling each fragmented file into one piece and moving files closer together to reduce the distance between them. Unoptimized hard drives take longer to process files.
Note Chapter 17 – Troubleshooting for more information on Speed Disk and Disk Doctor.
Replace Stratagy 6D or Stratagy 24D Hard Drive 1. Shut down Stratagy by pressing Alt+S from the Main Menu. (See Chapter 2 – Access and
Use Stratagy for details.)
2. Enter the password (the default is Stratagy, with the first letter uppercase) and follow the system prompts. The Stratagy Configuration Utility displays.
See “System Shutdown” on Page 2-10 for more information.
3. Back up the database, greetings and messages, if the hard drive has the capability and information is not suspected of being corrupted (See Chapter 14 – Backup and Restore for details).
4. Shut off the system’s power and disconnect the power cable and all other cables from the back of the system.
5. Remove the screws located at the rear of the system securing the cover to the cabinet (Figures 16-2, 16-3 and 16-4 for details).
CAUTION! Electrostatic discharge can damage or destroy the components in a PC. Before continuing with this procedure, use an anti-static wrist strap to discharge any static electricity you may be carrying.
6. Remove the cover by pulling back slightly and then pulling the cover straight up.
7. Locate the existing hard drive and remove the ribbon and power cable from the rear of the hard drive.
8. Remove the retaining screws connecting the hard drive to the computer cabinet.
9. Remove the old hard drive and install the new hard drive in the cabinet.
10. Reconnect the power and ribbon cable. Make sure that the ribbon cable’s edge indicating pin 1 (usually a color different than the cable) is oriented to the pin 1 side of the connector on the hard drive.
11. Secure the hard drive to the cabinet with the retaining screws.
12. Replace the cover and secure it with the screws removed in Step 4. Reconnect the cables removed in Step 3.
13. Power up the system.
Stratagy R3 I&M 11/99

Maintenance and UpgradesHard Drive Maintenance
Main
tenan
ce and
U
pg
rades
14. Reload the Stratagy software and prompts (see “Upgrade/Reload Stratagy System Software” on Page 16-4).
15. Reboot the system. The Main Menu displays.
16. Restore the database, greetings and messages using the Stratagy Backup Utility (See Chapter 14 – Backup and Restore for details).
Replace Stratagy 24 Plus Hard Drive
Figure 16-1 Stratagy 24 Plus Hard Drive Replacement
Important! The Stratagy 24 Plus will not boot up if the hard drive bay is not installed and locked.
1. Shut down Stratagy by pressing Alt+S from the Main Menu. (See Chapter 2 – Access and Use Stratagy for details.)
2. Enter the password (the default is Stratagy, with the first letter uppercase) and follow the system prompts. The Stratagy Configuration Utility displays.
See “System Shutdown” on Page 2-10 for more information.
3. If the hard drive has the capability and information is not suspected of being corrupted, back up the database, greetings and messages (see Chapter 14 – Backup and Restore for details).
4. Shut off the system’s power and disconnect the power cable and all other cables from the back of the system.
5. Using the key provided unlock the hard drive unit (see Figure 16-1) and remove the unit from the PC by gently pulling forward on the handle.
6. Remove the top panel from the hard drive unit.
4056
Open
Stratagy R3 I&M 11/99 16-3

Maintenance and UpgradesUpgrade/Reload Stratagy System Software
16-4
7. Unfasten the four screws securing the hard drive to the walls of the unit and remove the power and HDD cables from the hard drive.
8. Insert the new drive into the unit and plug the power and HDD cables into the new drive.
9. Secure it with the screws removed in Step 7 and replace the top panel removed in Step 6.
10. Replace the hard drive back into the PC and lock the unit with the key provided.
11. Reconnect the cables removed in Step 4.
12. Power up the system.
13. Reload the Stratagy software and prompts (see “Upgrade/Reload Stratagy System Software” on Page 16-4).
14. Reboot the system. The Main Menu displays.
15. Restore the database, greetings and messages using the Stratagy Backup Utility (See Chapter 14 – Backup and Restore for details).
Upgrade/Reload Stratagy System SoftwareImportant! For upgrading Stratagy R2 systems, see “Upgrade Stratagy R2 Software/Hardware
to R3” on Page 16-25 for instructions.
Stratagy Flash and Stratagy DKSee “Upgrade Stratagy Software” in the Stratagy Flash Installation Guide and Stratagy DK Installation Guide for instructions.
Stratagy 6D and 24DImportant! This procedure requires Stratagy to be out-of-service.
To upgrade/reload Stratagy system software you need the correct version of software. Stratagy voice prompts may also be required during this procedure. Make sure these disks are available and are the proper version number.
Note The Stratagy software title format is: V = Version, 6 = Stratagy 6D feature level, 3 = Release 3 system software level, X = Version level. For example: V6.3X.
Install from A: Drive
This function is available from the Stratagy Configuration Utility menu. Use this function to re-install or upgrade Stratagy software from floppy disks using the Stratagy floppy-disk drive A:. It may also be necessary to re-install Stratagy System or Prompt software from floppy disks.
1. Shut down Stratagy by pressing Alt+S from the Main Menu.
See “System Shutdown” on Page 2-10 for a detailed procedure.
2. Backup the database, greetings, and/or messages, as required.
See Chapter 14 – Backup and Restore for details.
CAUTION! Everything not backed up may be lost during the procedure.
Stratagy R3 I&M 11/99

Maintenance and UpgradesUpgrade/Reload Stratagy System Software
Main
tenan
ce and
U
pg
rades
3. From the Stratagy Configuration Utility Menu, press 3.
Important! If the Stratagy Configuration Utility menu is not accessible, system software may be loaded from a DOS prompt by inserting Disk 1 and entering a:install.Go to Step 6 to continue.
The following message displays:
System about to reboot. Insure that no diskette is in the A: drive. Press any key to continue....
4. Insert the first floppy disk and press any key.
5. Press any key to continue
...or Esc to quit.
6. Press 1~3 to choose the Stratagy system.
7. Highlight Yes - Start configure voice ports and press Enter
...or No - Skip configure voice ports and press Enter.
Go to Step 12.
8. Type the number of ProLine/2V boards you have added.
9. Type the number of Dialog/4 boards you have added.
4180
4171
4172
4170
4257
4174
Stratagy R3 I&M 11/99 16-5

Maintenance and UpgradesUpgrade/Reload Stratagy System Software
16-6
10. Type the number of D/160SC-LS boards you have added.
Note These boards can only be installed in the Stratagy 24D.
11. Press any key to continue
The software gives you the choice of:
� Install Complete NEW System if your Stratagy has no database that you wish to retain and would like to start with a new database.
� Upgrade an Existing System if your Stratagy has data that you wish to retain.
� Screen Demonstration Only should never be used at any time.
...or Esc to quit.
Note If you have entered the wrong configuration, you must return to Step 3 and begin the process again.
12. Highlight your selection and press Enter.
The program checks the computer for proper components and conflicts and begins the installation.
13. Press any key except Esc to continue. Follow the system prompts. When complete, remove the floppy disk.
14. (Optional) If required, the system prompts you to reload the Voice Prompts. When finished, remove the floppy disk and store the disks in a safe place.
15. Press any key to reboot. If the software was loaded from the Stratagy Configuration Utility menu, the system restarts and the Main Menu displays.
If the software was loaded from the DOS prompt, the DOS prompt is displayed.
4175
4176
Stratagy R3 I&M 11/99

Maintenance and UpgradesAdd PC-based Stratagy Voice Boards
Main
tenan
ce and
U
pg
rades
Add PC-based Stratagy Voice BoardsThe Stratagy 6D and Stratagy 24D come standard with two or four voice ports built into the motherboard that connect to the telephone system. The Stratagy 24 Plus comes standard with a Dialog/4 (4 ports) voice board.
Voice port capacity can be expanded by installing additional Stratagy two- or four-port voice boards to any of the systems. A 16-port voice board is also available for use with the Stratagy 24D. A Toshiba D160SC-LS Adapter Cable is required to connect the D/160SC-LS voice board to the telephone systems analog ports.
The telephone system must be physically connected to each voice board using the board’s RJ11C or RJ14C type connectors. A voice board has one or two connectors with each connector supporting two ports.
Step 1: Install Stratagy Voice BoardsThis section discusses the installation of:
� ProLine/2V (2 ports) voice boards
� Dialog/4 (4 ports) voice boards
� D/160SC-LS (16 ports) voice boards
The following table shows the Stratagy systems, the number and type of voice boards shipped with the system from the factory, and the type and number of boards you can use in the system to expand it to its maximum capacity. See Figures 16-2~16-4 for illustrations of the voice board installations.
Table 16-1 Stratagy System Voice Boards
Stratagy System Factory Equipped Possible Configurations
6D
2-port Standard
Motherboard comes with 2 ports.Max. 6 ports/1 additional voice boardProLine/2V can be added to provide 4 ports.Dialog/4 can be added to provide 6 ports.
24D4 port Standard
Note Does not have an 18 port configuration.
Motherboard comes with 4 ports.
Max. 24 ports1/3 additional voice boards
Combinations of ProLine/2V, Dialog/4 and D/160SC-LS (16 ports)2 can provide up to 24 ports.
24 Plus
4 port Standard
Comes standard with a Dialog/4 (4 ports) voice board.
Max. 24 ports1/6 additional voice boards
Using Dialog/4 boards can provide up to 24 ports.
1 Systems configured for 24 ports must have one port reserved for outgoing channel notification.2 Only one D/160SC-LS can be installed in the Stratagy 24D. The Stratagy 6D and 24 Plus do not support the
D/160SC-LS board.
Stratagy R3 I&M 11/99 16-7

Maintenance and UpgradesAdd PC-based Stratagy Voice Boards
16-8
CAUTION! Computer boards are static-sensitive and can be damaged by touching or handling them. To prevent damage, wear an anti-static wrist strap whenever handling the voice board and keep the board in its anti-static container when it is not in use. Always handle the board by its edges or metal bracket.
Figure 16-2 Stratagy 6D Voice Board Installation
Tip of front plate mustslide into slot on case.Typical for all cards. Stratagy Voice Card
(Bottom slot)
PowerSupply
Floppy-disk drive
Cover
Hard drive
3929
Stratagy R3 I&M 11/99

Maintenance and UpgradesAdd PC-based Stratagy Voice Boards
Main
tenan
ce and
U
pg
rades
Figure 16-3 Stratagy 24D Voice Board Installation
4057
ProLine/2V orDialog/4 Voice Board(Bottom slot)
Power Supply
Floppy-disk drive
Cover
Hard drive
Power Supply
D/160SC-LS Voice Board
Tip of front plate mustslide into slot on case.Typical for all cards.
Stratagy R3 I&M 11/99 16-9

Maintenance and UpgradesAdd PC-based Stratagy Voice Boards
16-10
Figure 16-4 Stratagy 24 Plus Voice Board Installation
Cover
ProLine/2V orDialog/4 Voice Board
4199
11
0V
11
0V
Hard Drive
Single Board Computer
COM Card
Power Supply
Floppy Drive
Passive Backplane
Stratagy R3 I&M 11/99

Maintenance and UpgradesAdd PC-based Stratagy Voice Boards
Main
tenan
ce and
U
pg
rades
Install ProLine/2V
The ProLine/2V voice board can be added to the Stratagy 6D, Stratagy 24D or Stratagy 24 Plus to expand their port capacity. The ProLine/2V supports two single analog voice channels. RJ11C connectors and cables are used to access each channel.
CAUTION! Use only voice boards supplied by Toshiba. Other voice boards will cause your entire system to be non-operational.
Figure 16-5 ProLine/2V Part Diagram
CAUTION! Electrostatic discharge can damage or destroy the components in the server. Before starting this procedure, use an anti-static wrist strap to discharge any static electricity you may be carrying.
Part Function
J1 and J2RJ11 jacks for connection to the office telephone switch or public telephone network through CO telephone lines.
JP1 Jumper block to set hardware interrupt level (factory default is IRQ 5).
JP5 and JP6Jumper pins to set memory address segment (factory default is D000 – no jumper installed on pins labeled JP5 or JP6).
JP7Jumper pins to enable hardware interrupt circuitry for more than one board (factory default is one board – jumper installed on pins labeled JP7).
JP101 and JP201Jumper pins to lower ring detection threshold for use behind a telephone switch (factory default is normal detection – no jumpers installed on pins labeled JP101 and JP201).
SW1Microswitches to set the offset address (factory default is offset 0000 – microswitches 1, 2, and 3 set to “off”) and initial hook switch state (factory default is ring without answering – microswitch 4 set to Off).
3996
SW1JP1JP101
JP102
J1
J2
J3
J4
J5
JP7
J5 J6
1 2 3 4
JP7 SW1JP5 JP6
JP1
IRQ
2/9IR
Q 3
IRQ
4IR
Q 5
IRQ
7IR
Q 10
IRQ
11IR
Q 12
SW
1:4S
W 1:3
SW
1:2S
W 1:1
Stratagy R3 I&M 11/99 16-11
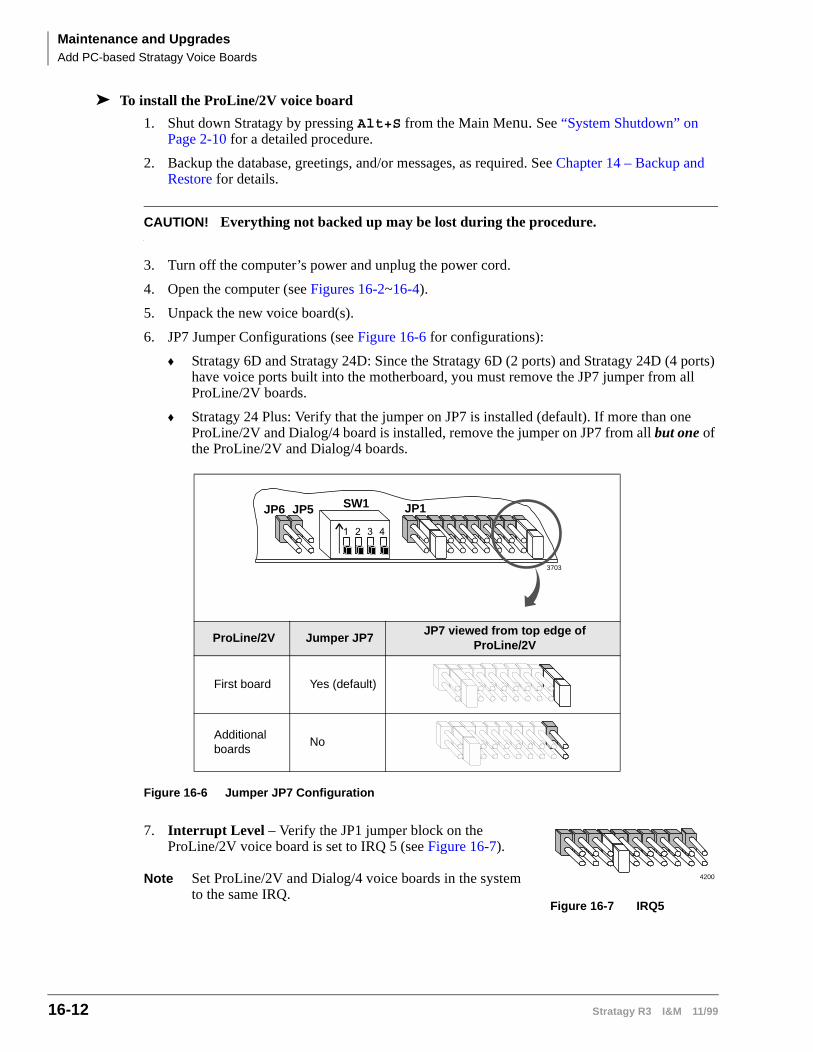
Maintenance and UpgradesAdd PC-based Stratagy Voice Boards
16-12
➤ To install the ProLine/2V voice board
1. Shut down Stratagy by pressing Alt+S from the Main Menu. See “System Shutdown” on Page 2-10 for a detailed procedure.
2. Backup the database, greetings, and/or messages, as required. See Chapter 14 – Backup and Restore for details.
CAUTION! Everything not backed up may be lost during the procedure.
3. Turn off the computer’s power and unplug the power cord.
4. Open the computer (see Figures 16-2~16-4).
5. Unpack the new voice board(s).
6. JP7 Jumper Configurations (see Figure 16-6 for configurations):
� Stratagy 6D and Stratagy 24D: Since the Stratagy 6D (2 ports) and Stratagy 24D (4 ports) have voice ports built into the motherboard, you must remove the JP7 jumper from all ProLine/2V boards.
� Stratagy 24 Plus: Verify that the jumper on JP7 is installed (default). If more than one ProLine/2V and Dialog/4 board is installed, remove the jumper on JP7 from all but one of the ProLine/2V and Dialog/4 boards.
Figure 16-6 Jumper JP7 Configuration
7. Interrupt Level – Verify the JP1 jumper block on the ProLine/2V voice board is set to IRQ 5 (see Figure 16-7).
Note Set ProLine/2V and Dialog/4 voice boards in the system to the same IRQ.
ProLine/2V Jumper JP7JP7 viewed from top edge of
ProLine/2V
First board Yes (default)
Additional boards
No
1 2 3 4
JP1SW1JP5JP6
3703
4200
Figure 16-7 IRQ5
Stratagy R3 I&M 11/99

Maintenance and UpgradesAdd PC-based Stratagy Voice Boards
Main
tenan
ce and
U
pg
rades
8. Base Memory Address – Verify that JP5 and JP6 jumpers are correctly set to the ProLine/2V’s default base memory address of D000H (hexadecimal).
Note The base memory address and the offset address in Step 8 set the board’s memory address in the system.
The setting is shown below
Figure 16-8 JP5 and JP6 Jumper Settings
Offset Address – Using the SW1 DIP switches 1, 2 and 3, set the offset address for the first ProLine/2V or Dialog/4 board at 0000.
The voice ports built into the Stratagy 6D and Stratagy 24D motherboards are set to the default offset address of 0000. Any additional boards must start at Offset Address 2000.
Important! Each board must have a unique offset address for the system to communicate with the board. Do NOT duplicate offset addresses.
The following table shows a list of offset address settings:
9. Hookswitch State – The initial hookswitch state is the signal presented to callers when they connect with the ProLine/2V before it has been started (the application support software has not yet been downloaded to the board and Stratagy is on) and therefore, cannot answer a call.
Memory segment
Jumper JP6
Jumper JP5
JP6 and JP5 viewed fromtop edge of ProLine/2V
D000 No No
Offset Address (hex)SW1: Switches
1 2 3
0000 (default) Off Off Off
2000 Off Off On
4000 Off On Off
6000 Off On On
8000 On Off Off
A000 On Off On
C000 On On Off
E000 On On On
1 2 3 4
JP6 JP5 SW1 JP1 JP7
Stratagy R3 I&M 11/99 16-13

Maintenance and UpgradesAdd PC-based Stratagy Voice Boards
16-14
Using the SW1 DIP switch 4 set the default hookswitch state for the ProLine/2V board(s). The settings are:
Notes
� You do not have to set all voice boards in the system to the same hookswitch state.
� When the firmware is downloaded, the hookswitch is set to on-hook and can only be changed by the application controlling the board.
10. (Optional) If the ProLine/2V has problems detecting rings, lower the ring detection threshold (JP101~JP201) on a channel-by-channel basis by installing the jumpers as follows:
Note A lower threshold may be too sensitive for network lines and cause false detection of rings.
11. Select an empty expansion slot. If more than one slot is available, use the first available slot. Remove the slot’s retaining screw and access coverplate.
12. Insert the board’s edge connector into the slot. Replace and tighten the retaining screw (see Figure 16-2).
13. Repeat this procedure for each ProLine/2V voice board you are installing.
14. When you are finished installing all the voice boards, reinstall the computer cover, plug in the power cord, and turn on the power.
Initial Hook Switch State
Set Microswitch
SW1:4Callers Hear
On-hook (default)
Ring no answer signal
Off-hook Busy signal
Lower Ring Detection Threshold
Voice Channel 1 (JP101)Voice Channel 2 (JP201)
Disabled (default)
Enabled
4103
4102
Stratagy R3 I&M 11/99

Maintenance and UpgradesAdd PC-based Stratagy Voice Boards
Main
tenan
ce and
U
pg
rades
Dialog/4 Voice Board
The Dialog/4 voice board (Figure 16-9) provides up to four voice ports and can be added to the Stratagy 6D, Stratagy 24D, and Stratagy 24 Plus to expand their port capacity. RJ14C connectors and cables are used to access the channels.
CAUTION! Use only voice boards supplied by Toshiba. Other voice boards will cause your entire system to be non-operational.
Figure 16-9 Dialog/4 Part Diagram
CAUTION! Electrostatic discharge can damage or destroy the components in the server. Before starting this procedure, use an anti-static wrist strap to discharge any static electricity you may be carrying.
Part Function
J1 and J2RJ14C jacks for connection to the office telephone switch or public telephone network through CO telephone lines.
JP1 Jumper block to set hardware interrupt level (factory default is IRQ 5).
JP5 and JP6Jumper pins to set memory address segment (factory default is D000 – no jumper installed on pins labeled JP5 or JP6).
JP7Jumper pins to enable hardware interrupt circuitry for more than one board (factory default is one board – jumper installed on pins labeled JP7).
JP101~JP401Jumper pins to lower ring detection threshold for use behind a telephone switch (factory default is normal detection – no jumpers installed on pins labeled JP101~JP401).
SW1DIP switches to set the offset address (factory default is offset 0000 – DIP switches 1, 2, and 3 set to “off”) and initial hook switch state (factory default is ring without answering – DIP switch 4 set to “off”).
J1
J2
3786
ON
1 2 3 4
SW1
SW1
JP5
JP6
JP101
JP201
JP301
JP401
JP7
JP1
J2
Stratagy R3 I&M 11/99 16-15

Maintenance and UpgradesAdd PC-based Stratagy Voice Boards
16-16
➤ To install the Dialog/4 voice board
1. Shut down Stratagy by pressing Alt+S from the Main Menu. See “System Shutdown” on Page 2-10 for a detailed procedure.
2. Backup the database, greetings, and/or messages, as required. See Chapter 14 – Backup and Restore for details.
CAUTION! Everything not backed up may be lost during the procedure.
3. Turn off the computer’s power and unplug the power cord.
4. Open the computer (see Figures 16-2~16-4).
5. Unpack the new voice board(s).
6. JP7 Jumper Configurations (see Figure 16-10 for configurations):
� Stratagy 6D and Stratagy 24D: Since the Stratagy 6D (2 ports) and Stratagy 24D (4 ports) have voice ports built into the motherboard, you must remove the JP7 jumper from all Dialog/4 boards.
� Stratagy 24 Plus: Verify that the jumper on JP7 is installed (default). If more than one ProLine/2V and Dialog/4 board is installed, remove the jumper on JP7 from all but one of the ProLine/2V and Dialog/4 boards.
Figure 16-10 Jumper JP7 Configuration
7. Interrupt Level – Verify the JP1 jumper block on the Dialog/4 voice board is set to IRQ 5 (see Figure 16-7).
Note Set all Dialog/4 and ProLine/2V voice boards in the system to the same IRQ level.
ProLine/2V Jumper JP7JP7 viewed from top edge of
ProLine/2V
First board Yes (default)
Additional boards
No
1 2 3 4
JP1SW1JP5JP6
3703
4200
Figure 16-11 IRQ5
Stratagy R3 I&M 11/99

Maintenance and UpgradesAdd PC-based Stratagy Voice Boards
Main
tenan
ce and
U
pg
rades
8. Base Memory Address – Verify that JP5 and JP6 jumpers are correctly set to the Dialog/4’s default base memory address of D000H (hexadecimal).
Note The base memory address and the offset address in Step 8 set the board’s memory address in the system.
The setting is shown below
Figure 16-12 JP5 and JP6 Jumper Settings
9. Offset Address – Using the SW1 DIP switches 1, 2 and 3, set the offset address for the first ProLine/2V or Dialog/4 board at 0000.
The voice ports built into the Stratagy 6D and Stratagy 24D motherboards are set to the default offset address of 0000. Any additional boards must start at Offset Address 2000.
Important! Each board must have a unique offset address for the system to communicate with the board. Do NOT duplicate offset addresses.
The following table shows a list of offset address settings:
Memory segment
Jumper JP6
Jumper JP5
JP6 and JP5 viewed fromtop edge of ProLine/2V
D000 No No
Offset Address (hex)SW1: Switches
1 2 3
0000 (default) Off Off Off
2000 Off Off On
4000 Off On Off
6000 Off On On
8000 On Off Off
A000 On Off On
C000 On On Off
E000 On On On
1 2 3 4
JP6 JP5 SW1 JP1 JP7
Stratagy R3 I&M 11/99 16-17

Maintenance and UpgradesAdd PC-based Stratagy Voice Boards
16-18
10. Hookswitch State – The initial hookswitch state is the signal presented to callers when they connect with the Dialog/4 before it has been started (the application support software has not yet been downloaded to the board and Stratagy is on) and therefore, cannot answer a call.
Using the SW1 DIP switch 4 set the default hookswitch state for the Dialog/4 board(s). The settings are:
Notes
� You do not have to set all the voice boards in the system to the same hookswitch state.
� When the firmware is downloaded, the hookswitch is set to on-hook and can only be changed by the application controlling the board.
11. (Optional) If the Dialog/4 has problems detecting rings, lower the ring detection threshold (JP101~JP401) on a channel-by-channel basis by installing the jumpers as follows:
Note A lower threshold may be too sensitive for network lines and cause false detection of rings.
12. Select an empty expansion slot. If more than one slot is available, use the first available slot. Remove the slot’s retaining screw and access coverplate.
13. Insert the board’s edge connector into the slot. Replace and tighten the retaining screw. See Figure 16-3.
14. Repeat this procedure for each Dialog/4 voice board you are installing.
15. When you are finished installing all the voice boards, reinstall the computer cover, plug in the power cord, and turn on the power.
Initial Hook Switch State
Set Microswitch
SW1:4Callers Hear
On-hook (default)
Ring no answer signal
Off-hook Busy signal
Lower Ring Detection Threshold
Voice Channel 1 (JP101)Voice Channel 2 (JP201)Voice Channel 3 (JP301)Voice Channel 4 (JP401)
Disabled (default)
Enabled
4103
4102
Stratagy R3 I&M 11/99

Maintenance and UpgradesAdd PC-based Stratagy Voice Boards
Main
tenan
ce and
U
pg
rades
D/160SC-LS Voice Board
The D/160SC-LS voice board (Figure 16-13) provides up to 16 voice ports and can be added to the Stratagy 24D to expand its port capacity. A D/160SC-LS adapter cable is used to access the channels. A LSI 1459 Adapter is required for direct CO connection.
Note Only one D/160SC-LS voice board can be installed in the Stratagy 24D. The Stratagy 6D and 24 Plus do not support the D/160SC-LS voice board.
CAUTION! Use only voice boards supplied by Toshiba. Other voice boards will cause your entire system to be non-operational.
Figure 16-13 D/160SC-LS Part Diagram
CAUTION! Electrostatic discharge can damage or destroy the components in the server. Before starting this procedure, use an anti-static wrist strap to discharge any static electricity you may be carrying.
Note The IRQ is set in the Dialogic software.
Part Function
P4 Connector for SCbus cable
XTERM Terminator socket for PEB
SW100 Switch to set the board ID number
SW4 Switch to set the hookswitch state
DB37 Connector to D/160SC-LS adapter cable
On-hookP4 XTERM SW100 Off-hookSW4
Side Viewof Bracket
DB37
3755
Stratagy R3 I&M 11/99 16-19

Maintenance and UpgradesAdd PC-based Stratagy Voice Boards
16-20
1. Shut down Stratagy by pressing Alt+S from the Main Menu. See “System Shutdown” on Page 2-10 for a detailed procedure.
2. Backup the database, greetings, and/or messages, as required. See Chapter 14 – Backup and Restore for details.
CAUTION! Everything not backed up may be lost during the procedure.
3. Turn off the computer’s power and unplug the power cord.
4. Open the computer (see Figures 16-2~16-4).
5. Unpack the new voice board.
6. Port Address – Set the board identification number to 0 using the rotary switch SW100 (see Figure 16-13).
7. Hookswitch State – Verify that the SW4 (see Figure 16-13) hookswitch is in the on-hook position. If the switch is not set to this position, the firmware for the board does not download properly.
8. Attach the PEB™ Terminator to the board’s XTERM Socket (Figure 16-14).
9. Open the computer. Select an empty expansion slot. If more than one slot is available, use the first available slot.
10. Remove the slot’s retaining screw and access coverplate.
11. Insert the board’s edge connector into the slot. Replace and tighten the retaining screw. See Figure 16-3.
12. Reinstall the computer cover, plug in the power cord, and turn on the power. Stratagy should automatically recognize the additional ports.
P5 SW1 SW2XTERMSocket
Network ModuleConfiguration
Resource ModuleConfiguration
3827
Figure 16-14 XTERM Socket
Stratagy R3 I&M 11/99

Maintenance and UpgradesAdd PC-based Stratagy Voice Boards
Main
tenan
ce and
U
pg
rades
Step 2: Connect Voice Board(s) to the Telephone LinesThe following instructions are for connecting the ProLine/2V, Dialog/4 and D/160SC-LS voice boards to the telephone lines.
ProLine/2V
➤ Connect each of the board jacks to a PBX or CO line using RJ11C connectors and cables. See Figure 16-15 for channel assignments.
Notes
� The ProLine/2V supports one channel per board jack.
� A standard telephone does not function when directly attached to the board jack.
Dialog/4
➤ Connect each of the board jacks to a PBX or CO line using RJ14C connectors and cables. See Figure 16-16 for channel assignments.
Notes
� The Dialog/4 supports two channels per board jack.
� A standard telephone does not function when directly attached to the board jack.
D/160SC-LS
The D/160SC-LS is connected to the PBX or CO lines using either the LSI 1459 Adapter or a D/160SC-LS Adapter Cable.
IN
OUT
VoiceChannel 1VoiceChannel 2
To PBX orCentral Office
To PBX orCentral Office
MIC
2
1
3715
Figure 16-15ProLine/2V Channel Assignments
1234
1234
1
2
3
4
Ring
Tip
Ring
Tip
ear Bracket Corresponding J1 and J2Channel assignments
J2
J1 Chan. 1 Chan. 2
1
2
3
4
Ring
Tip
Ring
Tip
Chan. 3 Chan. 4
3785
Figure 16-16Channel Assignments
Stratagy R3 I&M 11/99 16-21

Maintenance and UpgradesAdd PC-based Stratagy Voice Boards
16-22
Connect the D/160SC-LS Using an Adapter Cable and Punch-down Blocks
➤ Connect the D/160SC-LS voice board to a punch-down block using a prefabricated cable available from Toshiba (D/160SC-LS Adapter Cable) and an extension cable as shown in Figure 16-17. The D/160SC-LS Adapter Cable is four feet long and is designed expressly for the D/160SC-LS connection to the PBX and CO lines.
Figure 16-17 D/160SC-LS Adapter Cable to Terminated Cable/Block
Note For those who wish to purchase individual cabling/connectors/adapters in lieu of purchasing the Toshiba D/160SC-LS Adapter cable, we have provided the DB37 and RJ21X pinouts (Figure 16-18).
3946
Stratagy R3 I&M 11/99

Maintenance and UpgradesAdd PC-based Stratagy Voice Boards
Main
tenan
ce and
U
pg
rades
Figure 16-18 Cable Connector Pinouts
Connect the D/160SC-LS to the LSI 1459/RJ21X
Important! This procedure should be used when connecting the D/160SC-LS board to CO line(s). If you are connecting the board to a PBX, see “Connect the D/160SC-LS Using an Adapter Cable and Punch-down Blocks” below for instructions.
1. Connect the LSI 1459 adapter to the RJ21X jack with the cable packaged with the LSI 1459 adapter (Figure 16-19).
2. Connect the D/160SC-LS board to the LSI 1459 adapter with the D/160SC-LS adapter cable. Insert the 37-pin cable end into the DB-37 connector on the board bracket. Insert the 50-pin cable end into the connector on the RJ21X jack. See Figure 16-18 for connector pinout diagram.
3. Connect the LSI 1459 Adapter to a CO line using a RJ21X connector and cross connect.
Pin Number
Signal Signal
1 Tip 1
Ring 3 20 2 Tip 2
Ring 4 21 3 Tip 3
Ring 5 22 4 Tip 4
Ring 6 23 5 Tip 5
Ring 7 24 6 Tip 6
Ring 8 25 7 Tip 7
Ring 9 26 8 Tip 8
Ring 10 27 9 Tip 9
Ring 11 28 10 Tip 10
Ring 12 29 11 Tip 11
Ring 13 30 12 Tip 12
Ring 14 31 13 Tip 13
Ring 15 32 14 Tip 14
Ring 16 33 15 Tip 15
Unused 34 16 Tip 16
Unused 35 17 Unused
Unused 36 18 Ring 1
Ground 37 19 Ring 2
Pin Number
Signal Signal
Station 1 Ring 1 26 Station 1 Tip
Station 2 Ring 2 27 Station 2 Tip
Station 3 Ring 3 28 Station 3 Tip
Station 4 Ring 4 29 Station 4 Tip
Station 5 Ring 5 30 Station 5 Tip
Station 6 Ring 6 31 Station 6 Tip
Station 7 Ring 7 32 Station 7 Tip
Station 8 Ring 8 33 Station 8 Tip
Station 9 Ring 9 34 Station 91 Tip
Station 10 Ring 10 35 Station 10 Tip
Station 11 Ring 11 36 Station 11 Tip
Station 12 Ring 12 37 Station 12 Tip
Station 13 Ring 13 38 Station 13 Tip
Station 14 Ring 14 39 Station 14 Tip
Station 15 Ring 15 40 Station 15 Tip
Station 16 Ring 16 41 Station 16 Tip
Station 17 Ring 17 42 Station 17 Tip
Station 18 Ring 18 43 Station 18 Tip
Station 19 Ring 19 44 Station 19 Tip
Station 20 Ring 20 45 Station 20 Tip
Station 21 Ring 21 46 Station 21 Tip
Station 22 Ring 22 47 Station 22 Tip
Station 23 Ring 23 48 Station 23 Tip
Station 24 Ring 24 49 Station 24 Tip
25 50
DB37 Male Connector Pinout(D/160SC-LS End)
RJ21X Amphenol Female Connector Pinout
RJ21XLSI 1459Adapter
D/160SC-LS Board
D/160SC-LS Adapter Cable Cable packaged with LSI 1459 Adapter
4745
Figure 16-19 LSI 1459/Station Adapter Connection
Stratagy R3 I&M 11/99 16-23

Maintenance and UpgradesAdd PC-based Stratagy Voice Boards
16-24
Step 3: Configure Software for New Voice BoardsThis step uses the Add or Delete Voice Boards option on the Stratagy Configuration Utility.
1. From the Stratagy Configuration Utility Menu, press 7.
Stratagy displays:
Currently configured:
Product :Stratagy 6DDialog/4 :0ProLine/2V :0
Is this correct? (y/n)
2. Press y to accept the voice board configuration
The Stratagy Configuration Utility screen displays.
...or n to change it. Stratagy displays:
1. Stratagy 6D2. Stratagy 24D3. Other
What model are you configuring? 1
3. Enter the number of your selection.
Stratagy displays:
How many D/160ES-LS cards? 0
Note This selection displays only when you are configuring the Stratagy 24D.
4. Type the number of D/160ES–LS cards installed in the system
...or press Enter to accept the default number.
Stratagy displays:
How many Dialog/4 cards? 0
5. Type the number of Dialog/4 cards installed in the system
...or press Enter to accept the default number.
Stratagy displays:
How many ProLine/2V cards? 0
6. Type the number of ProLine/2V cards installed in the system
...or press Enter to accept the default number.
Stratagy displays the configuration you chose. The following is an example display:
You have chosen:
Product: Stratagy 24DD/160ES-LS: 1Dialog/4: 1ProLine/2V: 0
Is this correct? (y/n)
Stratagy R3 I&M 11/99

Maintenance and UpgradesUpgrade Stratagy R2 Software/Hardware to R3
Main
tenan
ce and
U
pg
rades
Upgrade Stratagy R2 Software/Hardware to R3The following Stratagy R2 products can be upgraded to Stratagy R3 software and hardware: Stratagy 4, 6, 6L, 12L, 16, 24, and Stratagy 24 Plus.
The number of voice ports and type of Dialogic boards supported are listed below:
Important!
� In order to perform this upgrade procedure, the Stratagy R2 product must be upgraded to R2.212 or later.
� User’s messages are deleted during this upgrade; however, all user’s list comments, user’s greetings, user’s busy greeting, user’s name recording, and user’s distribution lists are saved.
� Since the customer database is retained when upgrading from Stratagy R2, you must create the User ID mailboxes 982 and 983 required to support the “Shutdown using the Telephone Dial Pad” feature on Page 2-10.
Step 1: Install Voice Boards and R3 Software
7. Enter y to accept the configuration
Stratagy displays the message:
1 file(s) copiedSuccessfully modified voice card configuration.
Note If you have entered too many cards in the configuration, Stratagy displays the message: You have attempted to configure too many boards, please try again!Press any key to continue. The program displays the configuration you entered. Enter n and program takes you back to Step 3 to start the configuration process over.
...or n to reconfigure. The program takes you back to Step 3 to start the configuration process over.
8. Press any key to continue. The Stratagy Configuration Utility screen displays.
Stratagy System Dialogic Boards
Stratagy 4, 6, 6LMaximum 6 voice portsCombination of Dialog/4 and ProLine/2V boards.
Stratagy 12L, 16, 24, 24 Plus
Maximum 24 voice portsCombination of Dialog/4 and ProLine/2V boards
1. Shut down Stratagy by pressing Alt+S from the Main Menu.
See “System Shutdown” on Page 2-10 for a detailed procedure.
Stratagy R3 I&M 11/99 16-25

Maintenance and UpgradesUpgrade Stratagy R2 Software/Hardware to R3
16-26
2. Backup the database, greetings, and/or messages, as required.
See Chapter 14 – Backup and Restore for details.
CAUTION! Everything not backed up may be lost during the procedure.
3. Turn off the PC’s power and unplug the power cord.
4. Open the PC and remove all Rhetorex board(s).
5. Install the ProLine/2V and Dialog/4 boards.
See “Install ProLine/2V” on Page 16-11 and “Dialog/4 Voice Board” on Page 16-15 for detailed instructions.
6. For Stratagy 16, 24 and 24 Plus, change the IRQ on the existing COM4 board to 10.
7. Replace the PC cover and plug in the power cord.
8. Power on the PC.
9. During the startup, press F5 when the screen reads Starting MS-DOS...
This stops unnecessary programs from loading.
10. Insert the first installation disk into the floppy drive and at the C:\ prompt, type a: install. Press Enter.
11. Press any key to continue
...or Esc to quit.
12. Press 3.
4180
4171
4172
Stratagy R3 I&M 11/99

Maintenance and UpgradesUpgrade Stratagy R2 Software/Hardware to R3
Main
tenan
ce and
U
pg
rades
13. Highlight Yes - Start configure voice ports and press Enter
Note If you are upgrading from a Stratagy R2 to R3 software, you must configure the ports.
14. Type the number of ProLine/2V boards you have added.
15. Type the number of Dialog/4 boards you have added.
16. Press any key to continue.
Note If you have entered the wrong configuration, you must return to Step 3 and begin the process again.
17. Highlight Upgrade an Existing System and press Enter.
The program checks the computer for proper components and conflicts and begins the installation.
18. Press any key except Esc to continue. Follow the system prompts.
19. The system prompts you to reload the Voice Prompts. When finished, remove the floppy disk and store the disks in a safe place.
20. Press any key to reboot. If the software was loaded from the Stratagy Configuration Utility menu, the system restarts and the Main Menu displays.
If the software was loaded from the DOS prompt, the DOS prompt is displayed.
4170
4257
4174
4176
Stratagy R3 I&M 11/99 16-27

Maintenance and UpgradesInstallation
16-28
Step 2: Configure Software for New Voice BoardsSee “Configure Software for New Voice Boards” on Page 16-24 for detailed instructions.
Step 3: Add User ID Mailboxes 982 and 983These mailboxes support the “Shutdown using the Telephone Dial Pad” feature described on Page 2-10. They are not available in the software when upgrading an existing system and must be manually programmed. If they are not added, the Shutdown using the Telephone Dial Pad feature is not functional.
1. For User ID 982, define the Users record to contain:
2. For User ID 983, define the Users record to contain:
Installation
Screen SaversStratagy contains a screen saver program that automatically blanks the Main Menu after a specified number of minutes of inactivity (per the Stratagy System Configuration parameter tmo_blank). See Chapter 3 – Configure Stratagy.
An advertisement can be displayed on the monitor while the screen saver is activated. The advertisement constantly moves around the screen to prevent it from being “burnt” into the screen. This feature is enabled by using the set_advertisement parameter.
Fax/ModemsInstalling fax/modems in the Stratagy 24D and Stratagy 24 Plus involves selecting those that meet specific requirements, installing the hardware, and configuring Stratagy using the Stratagy Configuration Utility. See Chapter 3 – Configure Stratagy for details.
In addition, you need to customize Stratagy to send and receive faxes. See Chapter 13 – Faxes.
Extension @P(378,V)G(991)
@ Suppresses normal process.
P(378,V) Plays prompt in User ID 378 stating the security code entered is invalid.
G(991) Goes to User ID 991.
Extension @R(G1,%S1,30)KC(%U,%S1)KS(0)G(991)
@ Suppresses normal process.
R(G1,%S1,30) Plays greeting 1. Waits 3 (30/10) seconds for the caller to enter a security code. If no code entered, goes to box 991. If a code is entered, Stratagy reads the DTMF the caller entered into variable %S1.
KC(%U,%S1) Compares the security code in %S1 to the security code in %U (User ID 983 security code). If the security codes match, continues to next token. If security codes don’t match, goes to Done Chain.
KS(0) Stratagy shuts down immediately.
G(991) Goes to User ID 991.
Done Chain 982
Stratagy R3 I&M 11/99

Maintenance and UpgradesJOVE File Editor
Main
tenan
ce and
U
pg
rades
JOVE File Editor
Note This feature does not apply to the Stratagy DK and Stratagy Flash. These systems rely on the editing programs available on the remote PC.
Stratagy software contains a program called JOVE.EXE that enables the viewing and editing of text files. This program can be used to edit DOS system files such as autoexec.bat, report files or text files that Stratagy might create with Token Programming.
The JOVE.EXE file resides in the Stratagy directory on the hard drive. If JOVE is to be utilized in a different directory, then the DOS path must include Stratagy.
CAUTION! Always be extremely careful when editing files within Stratagy. All of Stratagy’s system files are precision formatted. Any character out-of-place could cause problems with the software. If you have any questions, contact Toshiba Technical Support for assistance.
Run JOVE Editor
1. From the Main Menu, select Shutdown by pressing Alt+S.
Stratagy prompts: Password?
2. Type the password and press Enter. (The default password is Stratagy with the first letter uppercase.)
Note We recommend that you change this password in the Stratagy System Configuration before exiting the Stratagy Configuration Utility.
Stratagy prompts:
Shutdown the entire system? [NY]
3. Type Y. Stratagy confirms:
Really SHUTDOWN the entire system? [NY]
4. Type Y again. Stratagy starts shutdown. If any ports are in use, Stratagy delays shutting down the system for 60 seconds. At that time, Stratagy completes shutdown, cutting off any callers or users that are still active.
When shutdown is complete, the menu displays.
4075
Stratagy R3 I&M 11/99 16-29

Maintenance and UpgradesJOVE File Editor
16-30
5. Press Ctrl+C to exit the Stratagy Configuration Utility menu.
Terminate batch job? (Y/N)?
6. Type Y.
7. At the C:\Stratagy> prompt, type cls.
The screen clears.
8. Type jove [filename]. Make sure that there is a space between JOVE and the filename to be edited.
As an example, to edit the install.cfg file in the Stratagy directory the entry would be:
C:\STRATAGY>jove install.cfg
The file is displayed with a bar at the bottom of the screen that looks like:
9. Navigate the file with the arrow (↑↓) and page up/down keys.
There are a number of command keys that can be used to manipulate files with JOVE. The commands in most cases are initiated by first holding down the Ctrl key on the keyboard and pressing a second key to complete the command. Where two letters are in a command, the entry is done sequentially not all at once. For example, you press Ctrl and the first letter and then Ctrl and the second letter.
In Table 16-20 is a list of commands and their use. The Ctrl key is symbolized by the ^ character in the list. If there is only one ^ character in the command, but two letters, the Ctrl key should not be held down for the second letter.
10. Exit the JOVE file editor. The DOS prompt displays.
11. Press the system’s RESET button.
-**-JOVE (C) install.cfg [install.cfg]--------c:/stratagy 17:11-----
Stratagy R3 I&M 11/99

Maintenance and UpgradesJOVE File Editor
Main
tenan
ce and
U
pg
rades
Table 16-20 JOVE File Commands
Definition of Command Command
To exit a file ^x^c
To save the file with the same file name ^x^s
To write the file with a different file name ^x^w
To edit a new file (current file is held in buffer) ^x^f
To delete the character beneath the cursor Delete
To delete the entire line ^k
To move to the beginning of the file Esc <
To move to the end of the file Esc >
To move text around, first delete the line using ^k, move cursor to new location, then ^y
To search for a file forwards for a string, enter the command and the string ^s
To search for a file backwards for a string, enter the command and the string ^r
To switch between edit buffers (previously loaded files are held in buffers) 4
To split the screen between two buffers ^x2
To switch between the two files on a split screen ^x0
To unsplit the screen ^x1
Stratagy R3 I&M 11/99 16-31

Maintenance and UpgradesJOVE File Editor
16-32
Stratagy R3 I&M 11/99
Trou
blesh
oo
ting
Troubleshooting 17
This chapter discusses procedures to identify and correct faults within the Stratagy Voice Processing system. Once faults are identified, it may be necessary to replace hardware components or make alterations, such as upgrades or configuration modifications, to the software of the system.
This chapter also covers the following diagnostic programs available in the Stratagy to assist in maintaining the integrity of the product:
� Stratagy Diagnostic Utilities – VMBEDIT, STRATAGY.LOG, MSG.LOG, TRACE.OUT
� Norton Utilities – Speed Disk, Disk Doctor
Determine ProblemResolving problems will be much easier if you consider the following:
� If you cannot start Stratagy, make sure that you have attached the power cord and that you have pressed the On/Off button.
� Check that all connecting cables are correctly and firmly attached. Loose cables can cause erroneous or intermittent signals. You may need to inspect the cables for loose wires and connectors for loose pins.
� If a problem occurs while Stratagy is functioning, document as much information concerning what is happening as possible (e.g., linecards, drives, keyboard and the video screen). Once the information is obtained, shut the system down to prevent any extensive file corruption.
� Remember to document what is happening. Write down what the system is doing and what actions you took, if any, immediately prior to and after the problem.
� Consider the simplest solution first. Ask yourself logical questions and consider the alternatives.
� Which part of the system is operating erratically? Voice boards? Disk drives? Keyboard? Video display? Each produces different symptoms.
� What appears in the video display? Do you see any messages or random characters?
� Do any of the indicator LEDs glow? Which ones? Do they stay on or do they blink?
� Do you hear any beeps? How many? Are they long or short? Is the computer making any unusual noises?
� Isolate the problem. Disconnect any peripheral equipment that may be connected to the COM or parallel ports.Temporarily remove the programming PC to see if it is causing the problem.
Stratagy R3 I&M 11/99 17-1

TroubleshootingInitial Power Up
17-2
You can connect a telephone port into a Stratagy voice port to verify operation when the Remote terminal is not connected.
� Make sure you are operating under the specified environmental conditions. These points serve as a guide. They are not definitive problem solving techniques. Some problems require the assistance of Toshiba Technical Support, but before you call, make sure of all the facts surrounding the problem.
Initial Power UpBefore beginning to do any detailed troubleshooting, take a moment and refer back to the installation section of this manual (see Chapter 1 – Installation) to make sure that all the appropriate steps have been taken for a proper installation.
Power up the system.
Table 17-1 Troubleshooting Tips
Problem Description Possible Explanation
No activity. No LEDs, no beeps, no display, no sound.
� No incoming power.
� Bad power cable (standard PC power cable)
� Bad power supply
� Bad power switch
Fan operational, but no LEDs glow, no beeps, no display.
� Loose connection in wiring from power supply to PC motherboard.
� Bad power supply wiring
� Bad power supply
� Bad motherboard connector
� Bad motherboard
� Other major hardware failure (Stratagy replacement recommended)
System seems to boot up. LEDs glow, system beeps, but no display.
Note Before considering part failure, take a moment and plug an analog port into Stratagy’s voice port to see if it answers a call.
� Unseated video controller card
� Bad video monitor.
� Bad video controller card.
� Bad motherboard connector for video controller card.
� Bad motherboard
� Other major hardware failure (Stratagy replacement recommended)
� Problem with Remote software
� Problem with Stratagy Admin software (Stratagy DK and Stratagy Flash)
� Bad cable from Remote PC to Stratagy
� Unseated COM port card
� Unseated video controller card
� Problem with COM port used for Remote Bad COM port card
� Bad video controller card
Stratagy R3 I&M 11/99

TroubleshootingStratagy Diagnostic Utilities
Trou
blesh
oo
ting
Stratagy Diagnostic UtilitiesStratagy software contains programs that can be used for diagnostics and periodic maintenance. These programs are:
� VMBEDIT – A program which examines the Stratagy mailbox database VMB.DAT for a variety of problems and provides solutions for database corruptions.
� STRATAGY.LOG – A log written to every time the Stratagy system properly shuts down and successfully boots up.
� MSG.LOG – A log of every message received and every mailbox that checks for messages, along with the DTMF entered.
� Trace – A program that records events such as digits dialed in, digits dialed out, mailbox access, port activity and more. The records are stored in SCREEN.SAV, TRACE.OUT, TRACE.OLD, CTASK.LOG and/or CTASK.OLD files.
� USERID.LOG – Logs the date, time, and User ID number whenever a User ID is accessed via DTMF. Useful for creating a data file which can later be analyzed for call distributions and accesses by dates, days, and times.
� FAX.LOG – Logs information about each fax file Stratagy sends, including the name of the fax, telephone number to which it was sent, and date and time. One line per fax. It does not include received faxes and fax messages.
All of these files are stored in the Stratagy directory and are best utilized in combination with each other. For example, if you are looking for a delayed message, enable MSG.LOG and start a trace. If you think you have a site with a power problem, viewing STRATAGY.LOG and TRACE.OUT would be the best course of action.
Stratagy begins to boot up with a display, but does not reach Stratagy Main menu screen.
Note failure on screen:
� CMOS failure
� Memory failureUnseated memory board(s)
Bad memory board
� Hard drive failureBad connection in cable between controller card and hard drive
Unseated controller card
Bad controller card
Bad hard drive
� Unseated controller card
� Bad controller card
System boots up to the Main menu, but does not answer.
� Wrong analog port being used.
� Bad analog port from phone system.
� Bad line cord.
� Unmodified full size linecard. Check for the letter ”M" on back panel.
� Bad linecard.
Table 17-1 Troubleshooting Tips (continued)
Problem Description Possible Explanation
Stratagy R3 I&M 11/99 17-3

TroubleshootingStratagy Diagnostic Utilities
17-4
View/Print Files➤ Since Stratagy creates log files in standard ASCII format (except Trace.out file), you can read,
edit, and import logs into programs such as text editors, word processors, spreadsheets, and databases. The JOVE File Editor can be used to edit logs. See Chapter 16 – Maintenance and Upgrades for details.
Use the Stratagy Main Menu’s Filecopy option (see “Filecopy” on Page 2-12) or the Stratagy Configuration Utility Archive MSG.LOG to A:Drive to output a log to floppy disk (see “Archive MSG.LOG to A:Drive (PC-based Stratagy Systems)” on Page 17-7).
Delete a Log File➤ You must shut down Stratagy and exit to the C:\Stratagy> prompt. Using the DOS delete
command, delete the file(s).
VMBEDITIf the Stratagy system develops problems that centralize around mailbox functionality, the software may be having difficulty with mailbox database corruption. Stratagy has a program called VMBEDIT for mailbox diagnostics.
The VMBEDIT program examines the Stratagy mailbox database (VMB.DAT) for a variety of problems and provides solutions for database corruption.
The main part of the program consists of a scan, during which each mailbox in the database is examined. Table 17-2 shows the steps of the scanning process, problems which might occur and possible solutions to those problems.
Before You Start
➤ Make a copy of VMB.DAT since VMBEDIT modifies the file.
Note VMB.D00, the database backup file automatically created and maintained by Stratagy during normal operation, is also modified by VMBEDIT and should not be considered a reliable backup.
Run VMBEDIT (Stratagy Flash, Stratagy DK)
Contact Toshiba Technical Support for assistance.
Run VMDEDIT (PC-based Stratagy Systems)
1. Shutdown Stratagy by pressing Alt+S. See “System Shutdown” on Page 2-10.
2. From the Stratagy Configuration Utility menu, press Ctrl+C.
Terminate Batch Job? (Y/N)?
3. Type y, press Enter. The C:\STRATAGY> prompt appears on the screen.
Stratagy R3 I&M 11/99

TroubleshootingStratagy Diagnostic Utilities
Trou
blesh
oo
ting
4. Type VMBEDIT and press Enter.
VMBEDIT opens the VMB.DAT file. The VMB.DAT file contains the mailbox database for Stratagy.
If this is not possible, the program says “Can’t open VMB.DAT,” and quits. It also must open VMB.D00, the mailbox database backup.
VMBEDIT scans each mailbox in the database.
If VMBEDIT is completed successfully, the C:\STRATAGY> prompt displays.
If VMBEDIT is not successful and mailbox problems continue to occur, contact Toshiba Technical Support for further assistance.
5. If the C:\STRATAGY> prompt displays, restart Stratagy by pressing the RESET button on the front of the cabinet.
Table 17-2 VMBEDIT Scanning Process
Steps Problem Description Possible Solution(s)
VMBEDIT begins the scanning process.
If VMBEDIT becomes lost within the VMB.DAT file, the following error messages are displayed:
Out of sync with vmb.dator
Out of sync with vmb.d00
Try running the program again.
If after re-running the program the message is consistent, there is no recovery, and the VMB.DAT file is beyond repair.
Try restoring the database from a recent back up. (See Chapter 14 – Backup and Restore.)
If there is no back up of the system, the mailbox database has to be completely rebuilt. This can be done by either performing a Toshiba Plug and Play from the Stratagy Configuration Utility menu (see Chapter 3 – Configure Stratagy) or reloading Stratagy system software as a complete new system.
The offset field of the mailbox is checked against the actual offset in the database file.
If the two don't match, it indicates that the file is corrupt and an error message similar to the following message appears:
Entry 4, box 354, offset 4096, has offset field=22.
You can fix the problem in one of three ways:
� Type f to force the offset field of the mailbox to the actual offset value. This should always be the first option tried.
� Type d to delete the mailbox.
Important! Only type t as a last resort.
� Type t to truncate the VMB.DAT file at this point, effectively deleting this and all subsequent boxes. Note that the t option is not visible in the prompt, but it functions correctly.
Stratagy R3 I&M 11/99 17-5

TroubleshootingStratagy Diagnostic Utilities
17-6
The initialization time of the mailbox is checked.
If it is the value -1, it means that this box was improperly initialized. An error message similar to the following message appears:
Entry 3, box 203, offset 3072, has inittime==NEVER
You can fix the problem in one of three ways:
� Type f to set the initialization time to zero.
� Type d to delete the box permanently.
Important! Only type t as a last resort.
� Type t to truncate the database file at this point, effectively deleting any remaining boxes in the database.
If the box number is less than zero, it is invalid. An error message similar to the following message appears:
Entry 3, box 203, offset 3072, negative box number 3.
You can fix the problem in one of three ways:
� Type f to change the box number to a positive value (you are prompted for the correct box number).
� Type d to delete the box permanently.
Important! Only type t as a last resort.
� Type t to truncate the database file at this point, effectively deleting any remaining boxes in the database.
If two mailboxes have the same box number, it is an error. The message looks like:
Duplicate box 203.
You are asked if you wish to correct record 1 or 2. There is no way to distinguish between them except by experimentation.
1. Choose record 1.
2. Repair the file and run Stratagy.
If the wrong box is modified:
1. Shut down.
2. Copy the VMB.D00 backup database file to VMB.DAT.
3. Run VMBEDIT again – this time choose record 2.
4. VMBEDIT asks whether you wish to change the box number or delete the duplicate.
� Type b (for change). If b is entered, the program asks you to enter a box number.
� Type d (for delete) the duplicate mailbox.
VMBEDIT may produce other error messages related to its inability to open or write to files.
Try running the program again.
Table 17-2 VMBEDIT Scanning Process (continued)
Steps Problem Description Possible Solution(s)
Stratagy R3 I&M 11/99

TroubleshootingStratagy Diagnostic Utilities
Trou
blesh
oo
ting
STRATAGY.LOGStratagy contains a file named STRATAGY.LOG which is written to every time the Stratagy system is properly shut down and successfully boots up. If a Stratagy system is turned off without a proper shutdown, there may be file corruption. A start-up without a shutdown preceding it in the STRATAGY.LOG is the first indication.
Some of the information contained in this file is how many channels (ports) the system started up with and the CKDB execution summary, which tells you basically that all of your messages have a home.
Note This file grows at a slow rate. Periodically archive or delete it once or twice a year, whenever you perform preventive maintenance.
Copy STRATAGY.LOG (Stratagy Flash, Stratagy DK)
See Stratagy Flash Installation Guide and the Stratagy DK Installation Guide for instructions.
Copy STRATAGY.LOG (PC-based Stratagy Systems)
➤ Using the Filecopy option from the Main Menu (see “Filecopy” on Page 2-12), copy the STRATAGY.LOG file to a floppy disk. You can view it using any common text editor.
MSG.LOGIf you need to check actions related to specific types of messaging, you can enable MSG.LOG in the System Configuration file. In this file, Stratagy logs every message received and every mailbox that checks for messages along with the DTMF entered.
Important! Since the MSG.LOG file continuously collects information, we recommend that you not enable the file unless you are looking for specific information. Otherwise, the file takes up space on the hard drive that could be used for message storage.
Enable MSG.LOG
Using the procedure in Chapter 3 – Configure Stratagy, enable the msg_log parameter by removing the # sign in the string, #set msg_log ‘MSG.LOG’. After rebooting, the Stratagy system starts logging the information to the MSG.LOG file.
Copy MSG.LOG (Stratagy Flash, Stratagy DK)
See Stratagy Flash Installation Guide and the Stratagy DK Installation Guide for instructions.
Archive MSG.LOG to A:Drive (PC-based Stratagy Systems)
Important! To use this option, a customer-supplied PKZIP.EXE program must be resident in the C:\STRATAGY directory. If PKZIP.EXE is not available, you must use the Filecopy feature to archive the log.
The Archive MSG.LOG to A:Drive option is available from the Stratagy Configuration Utility menu. It zips the current MSG.LOG file and copies the file to a floppy disk. If more than one disk is required, the function can copy across multiple floppy disks.
As part of the function, Stratagy changes the name of the copied MSG.LOG file to MSG.BKP. When the process is complete, message logging continues using a new MSG.LOG file.
Stratagy R3 I&M 11/99 17-7

TroubleshootingStratagy Diagnostic Utilities
17-8
➤ To archive MSG.LOG
TraceTrace is a diagnostic tool that is designed to assist you in troubleshooting Stratagy’s activity. When troubleshooting problems with Stratagy’s functionality, running the Trace program should always be one of your first options.
When Trace is enabled, it is automatically turned on when Stratagy loads up and logs data until Stratagy software is shut down. The trace information can be stored using several methods.
The SCREEN.SAV, TRACE.OUT, TRACE.OLD and CTASK.LOG files can be copied to a floppy disk and edited.
Note The SCREEN.SAV and TRACE.OLD functions are not available on the Stratagy Flash and Stratagy DK.
� TRACE.OUT
� Stratagy Flash and Stratagy DK— Enabled from the Shutdown, and Trace CURRENT Version option available from the Shutdown function (Stratagy Admin Main Menu). See the Stratagy Flash Installation Guide and Stratagy DK Installation Guide for detailed information on using trace diagnostics with the Stratagy Flash or Stratagy DK.
� Stratagy 6D, Stratagy 24D, and Stratagy 24 Plus — Enabled from commands entered from the DOS prompt.
Trace data is stored in a text file called TRACE.OUT.
1. From the Stratagy Configuration Utility Menu, press 8.
Stratagy displays a message telling you the size of the zip file, MSG.ZIP, to be copied and asks you to insert a floppy disk.
2. Insert the disk into the floppy drive and press any key to continue. If multiple disks are required, Stratagy prompts you to insert the next disk and press any key to continue.
When the process is complete, Stratagy displays the message:
Archive is donePress any key to continue...
3. Press any key. The Stratagy Configuration Utility screen displays.
The copied MSG.LOG file on the Stratagy PC’s hard drive is now MSG.BKP. The file remains on the hard drive until you remove it. When the archive function is performed again, the MSG.BKP file is overwritten if it has not been deleted.
407
5
Stratagy R3 I&M 11/99

TroubleshootingStratagy Diagnostic Utilities
Trou
blesh
oo
ting
� TRACE.OLD — Every time the Stratagy system restarts, the current TRACE.OUT file, which is used to monitor Stratagy’s system functions, is automatically saved by Stratagy as TRACE.OLD. This prevents the TRACE.OUT file from being overwritten which is essential to expediting the resolution of performance issues.
� SCREEN.SAV — Using the SCREEN.SAV feature, trace data can be viewed on the PC monitor. The feature must be enabled. See “TRACE.OUT, TRACE.OLD Files” on Page 17-9 for procedures on configuring and viewing this option. Trace data is stored in a file called SCREEN.SAV (default).
� CTASK.LOG — Stratagy automatically writes debugging information to a file called CTASK.LOG if the system encounters a fatal error caused by an invalid pointer.
� CTASK.OLD — Every time the Stratagy system restarts, the current CTASK.LOG file is automatically saved by Stratagy as CTASK.OLD. This prevents the CTASK.LOG file from being overwritten which is essential to expediting the resolution of performance issues.
TRACE.OUT, TRACE.OLD Files
Another way to log trace data is by way of a text file called TRACE.OUT. This file receives data whenever Stratagy is active.
This process does not require command codes to be entered from the Main Menu screen. Instead an entry is made at the DOS prompt that automatically turns on Trace when Stratagy loads up and logs data until Stratagy software is shut down.
Every time the Stratagy system restarts, the current TRACE.OUT file is saved as TRACE.OLD. This prevents the TRACE.OUT file from being overwritten which is essential to expediting the resolution of performance issues.
Enable TRACE.OUT (Stratagy Flash, Stratagy DK)
See the Stratagy Flash Installation Guide and Stratagy DK Installation Guide for procedures.
Enable TRACE.OUT (PC-based Stratagy Systems)
1. Shut down Stratagy. See “System Shutdown” on Page 2-10.
2. From the Stratagy Configuration Utility menu, press Ctrl+C.
Terminate Batch Job? (Y/N)?
3. Type y, press Enter. The C:\STRATAGY> prompt appears on the screen.
4. Type:
Stratagy /T /S1400
Stratagy restarts, displays the Main Menu and:
� Enables Trace (/T)
� Scrolls (/S) data after 1.4MB (1400KB) of information has been collected. At the scroll point, old data is then overwritten with new data.
Trace runs continuously until Stratagy is shut down. At that point, the Trace stops but data still resides in the text file TRACE.OUT.
When Trace is restarted the current TRACE.OUT file is automatically copied by Stratagy to a TRACE.OLD file.
Stratagy R3 I&M 11/99 17-9
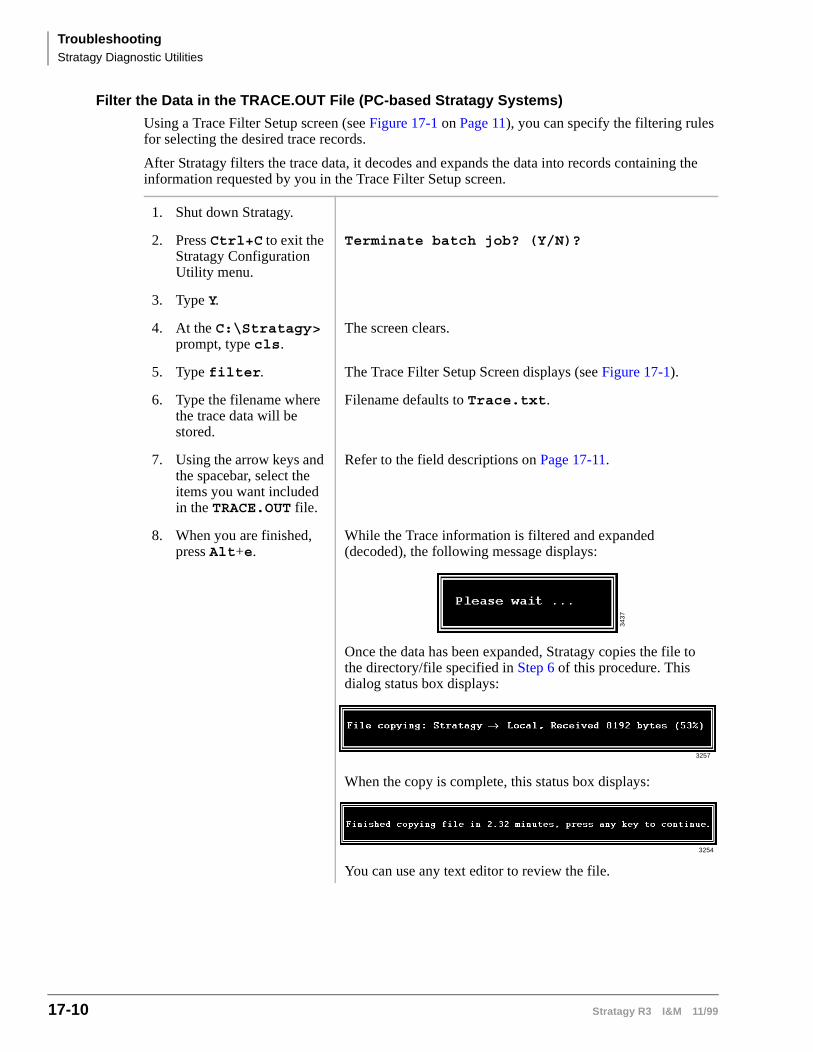
TroubleshootingStratagy Diagnostic Utilities
17-10
Filter the Data in the TRACE.OUT File (PC-based Stratagy Systems)
Using a Trace Filter Setup screen (see Figure 17-1 on Page 11), you can specify the filtering rules for selecting the desired trace records.
After Stratagy filters the trace data, it decodes and expands the data into records containing the information requested by you in the Trace Filter Setup screen.
1. Shut down Stratagy.
2. Press Ctrl+C to exit the Stratagy Configuration Utility menu.
Terminate batch job? (Y/N)?
3. Type Y.
4. At the C:\Stratagy> prompt, type cls.
The screen clears.
5. Type filter. The Trace Filter Setup Screen displays (see Figure 17-1).
6. Type the filename where the trace data will be stored.
Filename defaults to Trace.txt.
7. Using the arrow keys and the spacebar, select the items you want included in the TRACE.OUT file.
Refer to the field descriptions on Page 17-11.
8. When you are finished, press Alt+e.
While the Trace information is filtered and expanded (decoded), the following message displays:
Once the data has been expanded, Stratagy copies the file to the directory/file specified in Step 6 of this procedure. This dialog status box displays:
When the copy is complete, this status box displays:
You can use any text editor to review the file.
3437
3257
3254
Stratagy R3 I&M 11/99

TroubleshootingStratagy Diagnostic Utilities
Trou
blesh
oo
ting
Trace Filter Setup Screen
Figure 17-1 Trace Filter Setup Screen with System Defaults
Table 17-3 Trace Filter Setup Screen Fields
Categories Categories/classes of the traced records. Use the spacebar to toggle between Yes for inclusion of data or No for exclusion.
Detail
Detail system information.
Note Since this information is very detailed and complex, it is only useful for advanced technical personnel trying to debug the system.
Normal General system activities including digits dialed and boxes executed.
Call Activity Log ins, log outs, messages received, and messages retrieved.
Traffic Information concerning system load and possible problems caused by the load.
System Control flow between functions.
Error Abnormal conditions, faults, exceptions, etc.
Threads Program processes. Use the spacebar to toggle between Yes for inclusion of data or No for exclusion.
Main System messages and trace events relating to the overall system.
Interface Communication protocol between the Stratagy Flash and Stratagy Admin.
EventAnything that happens to the Stratagy Flash from outside the system (e.g., detects voice, dial tones, ringing, etc.).
Rover Actions that the Stratagy Flash takes (e.g., notifications and internal scheduling).
Watch Timers, system self-monitoring.
SMDI SMDI information.
Class2Fax Related fax messages.
ListServer Related messages delivery (using distribution list).
4204
Stratagy R3 I&M 11/99 17-11

TroubleshootingStratagy Diagnostic Utilities
17-12
Copy Trace Data Files (PC-based Stratagy Systems)
1. Using the DOS Copy command or the Filecopy selection from the Stratagy Main Menu screen, copy the file to the floppy-disk drive.
2. These files may be viewed using the JOVE editor (see “JOVE File Editor” on Page 16-29).
SCREEN.SAV
Note Not available on Stratagy Flash or Stratagy DK.
The SCREEN.SAV feature enables you to view Trace data information on the PC monitor.
To use the feature, you must first configure the screen_save parameter (Chapter 3 – Configure Stratagy) and enter a Trace enable code from the Main Menu screen (see “Enable TRACE.OUT (PC-based Stratagy Systems)” on Page 17-9). The Trace data is logged to a text file called SCREEN.SAV.
Important! If you enable trace and the screen_save parameter is not active, the screen displays the trace information but Stratagy does not log it to the SCREEN.SAV file.
Configure SCREEN.SAV
Parameters Limiting factors (date/time range, channel information, mailbox information).
Time From: Starting date and time for trace data. Enter in dd/mm/yy hh:mm:ss format.
Time To: Ending date and time for trace data. Enter in dd/mm/yy hh:mm:ss format.
Channels ListChannel numbers. When no numbers are entered, all channels are included in the output.
Mailboxes ListWhen this parameter is used, only mailbox activities (log in, log out, message delivery, pickup, message delete, etc.) are displayed in the trace output. This option is useful when only mailbox activities need to be monitored.
1. From the Stratagy Configuration Utility, press 2.
2. From the Stratagy System Configuration screen, highlight the parameter called set screen_save ‘SCREEN.SAV’ by using the arrow (↑↓) keys and press Enter.
The Stratagy System Configuration Screen displays.
Table 17-3 Trace Filter Setup Screen Fields (continued)
4075
Stratagy R3 I&M 11/99

TroubleshootingStratagy Diagnostic Utilities
Trou
blesh
oo
ting
View the Trace Data (SCREEN.SAV File)
CTASK.LOG/CTASK.OLD Files
Stratagy automatically writes debugging information to a file called CTASK.LOG if the system encounters a fatal error caused by an invalid pointer.
An invalid pointer error can occur when the Stratagy system tries to access information that has been stored in the system’s temporary memory but is no longer available (e.g. file corruption due to power failure or other system interruption). The purpose of this file is to assist in determining the reason the Stratagy system is unable to access the stored information.
These text files can be viewed using an available text editor on the remote PC (for Stratagy DK and Stratagy Flash) or the JOVE File Editor (for PC-based Stratagy systems).
3. (Optional) If the line begins with a #, it is a heading or a parameter that is “commented out” and has no effect. To enable the parameter, remove the starting #.
4. Modify the parameter using the line editor at the top of the screen.
The default name is ‘SCREEN.SAV’. The name can be changed to meet your needs. Entries must be valid DOS file names enclosed by single quotes.
Note Each time you perform a trace, the file is overwritten. If you are performing more than one trace, you may want to change the name for each trace.
5. Press Enter. Your changes are saved.
6. Press Esc. The Stratagy Configuration Utility Menu displays.
Note We recommend that you back up the current database at this time by selecting the Stratagy Backup Utility. See Chapter 14 – Backup and Restore.
7. Press Esc again. Stratagy reboots and the Main Menu displays.
1. From the Stratagy Main Menu press: Ctrl+Home + Alt+T.
The Trace Filter Setup screen (see Figure 17-1) displays.
2. Follow the instructions in “Filter the Data in the TRACE.OUT File (PC-based Stratagy Systems)” on Page 17-10 for using the screen. Press Alt+E.
Trace is enabled and the data appears on the screen.
3. When finished, press Esc twice.
Tracing is disabled, the text file is closed, and the Stratagy Main Menu displays.
Stratagy R3 I&M 11/99 17-13

TroubleshootingStratagy Diagnostic Utilities
17-14
Every time the Stratagy system restarts, the current CTASK.LOG file is automatically saved by Stratagy as CTASK.OLD. This prevents the CTASK.LOG file from being overwritten which is essential to expediting the resolution of performance issues.
USERID.LOGLogs the date, time, and User ID number whenever a User ID is accessed via DTMF. Useful for creating a data file which can later be analyzed for call distributions and accesses by dates, days, and times.
Enable USERID.LOG
Using the procedure in Chapter 3 – Configure Stratagy, enable the user_log parameter by removing the # sign in the string, #set user_log ‘USERID.LOG’. After rebooting, the Stratagy system starts logging the information to the USERID.LOG file.
Note When active, grows quickly. Archive or delete frequently.
Copy USERID.LOG (PC-based Stratagy Systems)
➤ Using the Filecopy option from the Main Menu (see “Filecopy” on Page 2-12), copy the USERID.LOG file to a floppy disk. You can view it using any common text editor.
FAX.LOGLogs information about each fax file Stratagy sends, including the name of the fax, telephone number to which it was sent, and date and time. One line per fax. It does not include received faxes and fax messages.
Enable FAX.LOG
Using the procedure in Chapter 3 – Configure Stratagy, enable the fax_log parameter by’FAX.LOG’. After rebooting, the Stratagy system starts logging the information to the FAX.LOG file.
Notes
� The filename does not default to FAX.LOG. You can enter any filename up to eight characters long with an extension up to three characters long.
� When active, the file’s rate of growth depends upon fax send traffic. Archive or delete as appropriate.
Copy FAX.LOG (PC-based Stratagy Systems)
➤ Using the Filecopy option from the Main Menu (see “Filecopy” on Page 2-12), copy the FAX.LOG file to a floppy disk. You can view it using any common text editor.
Stratagy R3 I&M 11/99

TroubleshootingNorton Utilities
Trou
blesh
oo
ting
Norton Utilities
Note Not available on Stratagy Flash and Stratagy DK.
Stratagy is pre-programmed to perform Symantec®’s Norton Utilities (Speed Disk and Disk Doctor) every Tuesday at 1:30 a.m. in the morning. The time and day are set in the Stratagy System Configuration screen, using the shutdown parameter. (See Chapter 3 – Configure Stratagy.)
These diagnostic programs focus on the hard drive of the system and can be performed manually, if desired. They are implemented from the DOS prompt level and require Stratagy software be shut down completely.
Speed DiskSpeed Disk analyzes the hard drive to determine if it is fragmented and then reorganizes the files to optimize disk performance. Fragmentation occurs when a file is broken into fragments and stored in different locations on the hard drive. Although it does not affect the validity of the information (files are still complete), it does take much longer for the computer to read and write the fragmented files.
Perform Speed Disk (PC-based Stratagy Systems)
1. Shutdown Stratagy by pressing Alt+S (see “System Shutdown” on Page -10).
2. At the Stratagy Configuration Utility menu, press Ctrl+C to terminate batch job and then type Y for yes.
The C:\STRATAGY> prompt appears.
3. Exit the Stratagy directory by typing CD\ and pressing Enter.
The root directory C:\> prompt displays.
4. Type cd norton and press Enter.
5. At the C:\NORTON> prompt, type speedisk and press Enter.
420
3
Stratagy R3 I&M 11/99 17-15

TroubleshootingNorton Utilities
17-16
6. Press spacebar to select the C: drive.
Speed Disk proceeds to check specific areas on the hard drive. If Speed Disk detects any errors on the drive it asks to correct them. The main errors that Speed Disk reports are crosslinked files and lost clusters.
If the drive is fragmented, the percentage of the drive that is currently not fragmented and a recommendation displays on the screen. Optimize is highlighted.
7. To accept the recommendation, press Enter
...or highlight another option and press Enter
...or press c to cancel.
Disk Doctor begins the optimization and condensing of the files. When the process is finished, the following screen displays.
8. Press Enter.
9. Press x to exit. The C:\norton> prompt displays.
4219
422
0
4221
Stratagy R3 I&M 11/99

TroubleshootingNorton Utilities
Trou
blesh
oo
ting
Disk DoctorThe Norton Disk Doctor Utility consists of two functions:
� Diagnose Disk – Diagnose Disk is a utility that detects, diagnoses, and repairs disk errors on uncompressed drives. Diagnose Disk can repair file system (e.g., crosslinks and lost clusters) and physical disk errors. Diagnose Disk keeps a log of its repairs and enables you to undo any of the changes it made.
This utility also enables you to perform a surface test of the hard drive and repair any problems if they exist.
� Surface Test – The Surface Test function only scans the disk for errors and does not repair them. You must use the Diagnose Disk function to make repairs.
This program takes about 15 minutes to run and is appropriate when you want to verify the disk is OK.
Run Diagnose Disk
1. Shutdown Stratagy by pressing Alt+S (see “System Shutdown” on Page -10).
2. At the Stratagy Configuration Utility menu, press Ctrl+C to terminate batch job and then type Y for yes.
The C:\STRATAGY> prompt appears.
3. Exit the Stratagy directory by typing CD\ and pressing Enter.
The root directory C:\> prompt displays.
4. Type cd Norton and press Enter.
5. At the C:\norton prompt, type ndd and press Enter.
420
5
Stratagy R3 I&M 11/99 17-17

TroubleshootingNorton Utilities
17-18
Fix Crosslinked Files
Crosslinked files are defined as files that claim the same area on the hard drive as segments for their individual file.
1. If crosslinked files are detected, Diagnose Disk asks to either “Fix It” or “Don't Fix It”. Select “Fix It” for all crosslinked files.
2. Diagnose Disk may ask to create an Undo disk because it is about to make changes on the hard drive and wants to give the opportunity to reverse what it is going to do. Since there is more than likely an error in file structure, this procedure can be skipped by selecting Skip Undo when prompted.
6. Press Enter or D to run Diagnose Disk function.
7. Press Enter to select the C: drive.
Disk Doctor begins to analyze the files on the hard drive. When it is complete, the Surface Scan screen displays.
8. Press S to skip test
...or Enter to perform test.
When completed a Summary of the Test Results displays:
9. Press D. The Norton Disk Doctor screen displays.
10. Press Q. The program is exited.
4206
422
2
4207
Stratagy R3 I&M 11/99

TroubleshootingNorton Utilities
Trou
blesh
oo
ting
Remove Lost Clusters
Lost clusters are areas on the hard drive that are not claimed by a file, or labeled by the operating system as free space.
➤ If lost clusters are detected Diagnose Disk asks to either “save” or “delete.” Since lost clusters are more than likely parts of corrupted files there is no reason to retain them. Select “delete” for all lost clusters.
Run Surface TestThe Surface Test function only scans the disk for errors and does not repair them. You must use the Diagnose Disk function to make repairs.
This program takes about 15 minutes to run and is appropriate when you want to verify the disk is OK.
1. Shutdown Stratagy by pressing Alt+S (see “System Shutdown” on Page -10).
2. At the Stratagy Configuration Utility menu, press Ctrl+C to terminate batch job and then type Y for yes.
The C:\STRATAGY> prompt appears.
3. Exit the Stratagy directory by typing CD\ and pressing Enter.
The root directory C:\> prompt displays.
4. Type cd Norton and press Enter.
5. Type ndd and press Enter.
4205
Stratagy R3 I&M 11/99 17-19

TroubleshootingNorton Utilities
17-20
6. Press Enter
...or S to run Surface Test function.
7. Press Enter to continue.
8. Highlight the C:\drive and press Enter.
If Disk Doctor identifies either corrupted data or a physical problem with the hard drive that it cannot correct, testing should be suspended and Toshiba Technical Support contacted for further guidance.
When Disk Doctor is complete, a display reports what Disk Doctor has found.
9. Press D. The Norton Disk Doctor screen displays.
10. Press Q. The program is exited.
4223
4224
4225
Stratagy R3 I&M 11/99

TroubleshootingAutomatic System Recovery
Trou
blesh
oo
ting
Automatic System RecoveryThis feature is controlled by two parameters in the Stratagy System Configuration file, restore_original and restore_config. The parameters default to TRUE and enable the Stratagy to create an Archive directory (c:\Stratagy\Archive).
The directory contains copies of the files used for system startup (i.e., Stratagy batch and configuration files, and mailbox database) and is divided into three subdirectories: Original, Good and Suspect.
When the Stratagy system software is first installed, a copy of the files are automatically stored in an Archive subdirectory named Original. Each time you restart the system successfully, the files automatically write to an Archive subdirectory named Good, thereby saving the most up-to-date database changes.
If an unsuccessful startup is detected by the program, the system copies the problem files to an Archive subdirectory named Suspect and restarts using the files in the Good subdirectory. The Suspect files can be used for debugging purposes.
To receive notification of the unsuccessful startup, a new error_box parameter enables you to designate an User ID Mailbox to receive the message. The Notify menu for the mailbox can be set for a new “Panic” notification type.
Stratagy R3 I&M 11/99 17-21

TroubleshootingAutomatic System Recovery
17-22
Stratagy R3 I&M 11/99
Ch
ecklists/Fo
rms
Checklists/Forms A
This appendix provides surveys, checklists and forms to assist you in the installation of the Stratagy systems.
Survey/Checklists
� Pre-installation Company Survey
� Stratagy Pre-installation Checklist
� Stratagy Installation Checklist
Forms
� Users Form
� Auto (Scheduling) Form
� Notify Form
� Greeting Scripts Form
Make copies as needed.
Stratagy R3 I&M 11/99 A-1

Checklists/FormsPre-installation Company Survey
A-2
Pre-installation Company Survey
Company
Number of employees
Number of employees using mailboxes
Number of locations
Telephone System (to which you will connect Stratagy)
Manufacturer, model, and software release
Voice mail integration capabilities
Types of Hunt Groups for single-line stations
Number of Central Office lines
Number of single line stations
Auto Attendant Information
Number of companies using the system
Whether it is the primary answering position and how many Central Office lines will be answered by Stratagy
Company greetings and instructions
Menus (sales, service, etc.)
Voice Mail Information
Number of employees requiring voice mailboxes
Message waiting lights
Notification requirements
Directory requirements
AMIS Information
Whether two or more voice messaging systems need to exchange messages
Fax/modem Information (Stratagy 24D and Stratagy 24 Plus only)
Number of fax/modems (0 ~ 2) fax traffic indicates
Stratagy R3 I&M 11/99

Checklists/FormsPre-installation Checklist
Ch
ecklists/Fo
rms
Pre-installation Checklist
Done ✔ Item
Know the Reference Documentation
(See Chapter 1 – Installation.)
❏ 1. Know Stratagy’s features.
❏ 2. Know Stratagy operation, customization, and administration.
❏ 3. Know Stratagy installation.
❏ 4. Know how to configure the voice mail system settings for your telephone system.
Conduct the Pre-installation Company Survey
(See “Pre-installation Company Survey” on Page A-2.)
❏ 1. Conduct the Pre-installation survey.
Determine Stratagy’s Configuration and Integration
(See Chapter 1 – Installation and Chapter 3 – Configure Stratagy.)
❏ 1. Define Stratagy system configuration options.
❏ 2. Define system integration options.
Customize User ID Mailboxes and Call Processing
❏ 1. Determine the company greeting.
❏ 2. Determine the caller instructions.
❏ 3. Obtain the busy-hold music (optional).
❏ 4. Determine the employee directory instructions.
❏ 5. Program the User IDs.
Select and Prepare the Hardware Sites
(See “Select the Hardware Site (PC-based Systems)” on Page 1-4.)
❏ 1. Stratagy system.
❏ 2. Remote or local system.
Stratagy R3 I&M 11/99 A-3

Checklists/FormsInstallation Checklist
A-4
Installation Checklist
Done ✔ Item
Install the Hardware
(See Chapter 1 – Installation, Chapter 2 – Access and Use Stratagy, Chapter 13 – Faxes.)
❏ 1. Inspect and unpack the system.
❏ 2. Install Stratagy voice boards (as appropriate).
❏ 3. Set up the Stratagy system PC hardware.
❏ 4. Power up Stratagy and verify Stratagy’s basic functions.
❏ 5. Configure your telephone system’s voice mail system settings individually (as appropriate).
❏ 6. Connect line cords from the voice boards to the telephone system.
❏ 7. Install the modem for remote maintenance.
❏ 8. Prepare (hardware and software) the remote or local system to access the Stratagy host system.
❏ 9. Access Stratagy directly, remotely, or locally.
❏ 10. Install fax/modems for fax applications (option for Stratagy 24D and Stratagy 24 Plus)
Configure Stratagy Using the Stratagy Configuration Utility
(See Chapter 3 – Configure Stratagy, Chapter 14 – Backup and Restore.)
❏ 1. Define Stratagy system configuration options.
❏ 2. Define Stratagy integration options.
For a Toshiba telephone system, selected the appropriate system.
For a non-Toshiba telephone system, define:
❏ Telephone system dial codes.
❏ Telephone system tone patterns.
❏ System integration options.
❏ 3. Back up Stratagy using the Stratagy Backup Utility.
Customize User ID Mailboxes and Call Processing
❏ 1. Record the company greeting.
❏ 2. Record the caller instructions.
❏ 3. Record the busy-hold music (optional).
❏ 4. Record the employee directory instructions.
❏ 5. Program the User ID mailboxes.
❏ 6. Back up Stratagy using the Stratagy Backup Utility.
Stratagy R3 I&M 11/99

Checklists/FormsUsers Form
Ch
ecklists/Fo
rms
Users Form
2436
User ID: Comment:
Extension:
Directory Name 1: Directory Name 2:
Security Code:
Group/Chains
Options
User ID Copy as needed
Basic Options:
Maximum Rings: (default is 4) Current Greeting:
Do Not Disturb: Lock: Busy Greeting: Max: sec
Screen Calls: Lock: ID Call ?: Busy Hold :
Store Messages: Max: sec Play Date/Time?: Slow Menu :
Copy Message To: Record Name?: Saved Msg Que :
Message Volume: Guests: Message Order : Caller Menu:
Message Pending:___ Alternate Rate: Use At Login :
Chains: Groups:
Chain Done: Group1:
Chain RNA : Group2:
Chain Busy: Group3:
Chain Delay: Group4:
Menus:
1: 2: 3:
4: 5: 6:
7: 8: 9:
0:
Amis Options: Gateway Box: AmisSysNumber:
Max: sec
Does this User ID also have:
Auto Form: Yes No
Notify Form: Yes No
Greeting Scripts Form: Yes No
Stratagy R3 I&M 11/99 A-5

Checklists/FormsAuto (Scheduling) Form
A-6
Auto (Scheduling) Form
Enabled
Extension: Rings: Do Not Disturb: Call Screening: Greeting #:
Change On:
And Every: month(s) day(s)
hour(s) minute(s)
Restrict To: M T W T F S S
Next Change:
At :
Enabled
Extension: Rings: Do Not Disturb: Call Screening: Greeting #:
Change On:
And Every: month(s) day(s)
hour(s) minute(s)
Restrict To: M T W T F S S
Next Change:
At :
Enabled
Extension: Rings: Do Not Disturb: Call Screening: Greeting #:
Change On:
And Every: month(s) day(s)
hour(s) minute(s)
Restrict To: M T W T F S S
Next Change:
At :
Enabled
Extension: Rings: Do Not Disturb: Call Screening: Greeting #:
Change On:
And Every: month(s) day(s)
hour(s) minute(s)
Restrict To: M T W T F S S
Next Change:
At :
Enabled
Extension: Rings: Do Not Disturb: Call Screening: Greeting #:
Change On:
And Every: month(s) day(s)
hour(s) minute(s)
Restrict To: M T W T F S S
Next Change:
At :
ser ID Copy as needed
2437
Stratagy R3 I&M 11/99
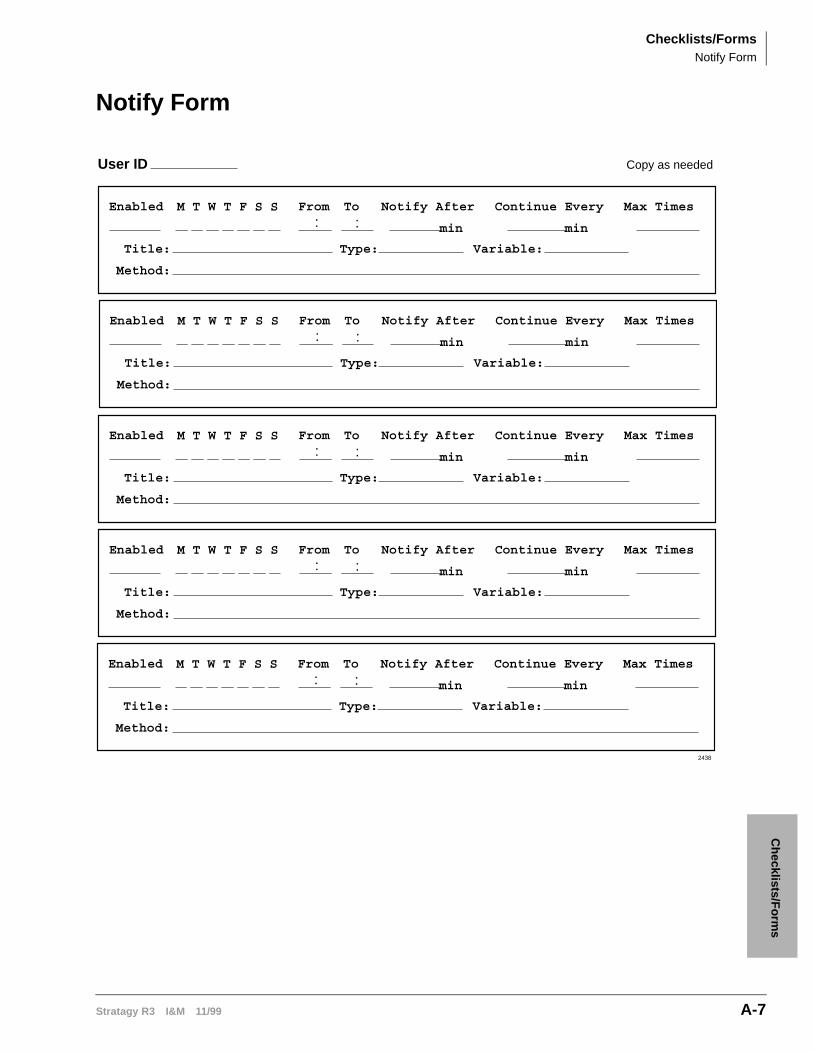
Checklists/FormsNotify Form
Ch
ecklists/Fo
rms
Notify Form
M T W T F S S
User ID
Enabled
Title:
Method:
Type: Variable:
Notify After
min
Continue Every
min
Max TimesFrom To: :
M T W T F S SEnabled
Title:
Method:
Type: Variable:
Notify After
min
Continue Every
min
Max TimesFrom To: :
M T W T F S SEnabled
Title:
Method:
Type: Variable:
Notify After
min
Continue Every
min
Max TimesFrom To: :
M T W T F S SEnabled
Title:
Method:
Type: Variable:
Notify After
min
Continue Every
min
Max TimesFrom To: :
M T W T F S SEnabled
Title:
Method:
Type: Variable:
Notify After
min
Continue Every
min
Max TimesFrom To: :
Copy as needed
2438
Stratagy R3 I&M 11/99 A-7

Checklists/FormsGreeting Scripts Form
A-8
Greeting Scripts Form
User ID
Greeting 1
Greeting 2
Greeting 3
Greeting 4
Greeting 5
Greeting 6
Greeting 7
Copy as needed
2439
Stratagy R3 I&M 11/99

Sp
ecial Greetin
g U
ser ID
Mailb
oxes
Special Greeting User ID Mailboxes B
Stratagy contains four special greeting User ID mailboxes:
� Initial Greeting Mailboxes
� Company GreetingThe salutation that lets the caller know which company he called. Default is User ID 990.
� Caller InstructionsGives the caller options for reaching departments or information. Default is User ID 991.
� Directory MailboxThe caller enters the first few letters of the name of the person he/she wants to contact. Stratagy plays the corresponding User ID’s name recording. Default is User ID 411.
� Operator Mailbox GreetingFor an after hours caller who is unable to direct his own call or does not know the extension of the person he/she wants to reach. Default is User ID 0.
When initially setting up the system, you need to define each of the special greeting mailboxes. This includes recording the greetings and customizing the User ID mailbox (e.g., using the Auto (Scheduling) Menu to schedule greetings).
You can modify these greetings and customizations as needed. This chapter discusses all four greetings and how to record them.
Use the forms in Appendix A – Checklists/Forms as an aid in defining each of the special greeting mailboxes. For detailed information about customization, see Chapter 6 – Users Menu, Chapter 7 – Auto (Scheduling) Menu, Chapter 8 – Notify Menu, and Chapter 10 – Customization Examples.
Record Mailbox Greetings
Note For more details on recording greetings, see the Stratagy User Guide.
1. Enter Stratagy’s extension.
Stratagy answers.
2. Press�( + the User ID mailbox number.
3. Enter your security code + #.
Stratagy R3 I&M 11/99 B-1

Special Greeting User ID MailboxesRecord Mailbox Greetings
B-2
4. From the Main menu, press &.
The Manage Mailbox menu plays.
5. Press ). The Change Your Greeting menu plays.
6. Enter the personal greeting number you want to change or add()~').
7. Press , to select Record Greeting option.
You are prompted to record your greeting. Speak slowly and clearly.
8. Press # when done.
9. (Optional) After recording, you can press:
) Review recording The complete greeting plays.
, Re-record
Press # when done.
The system prompts you to record at the beep.
& Append recording
Press�#�when done.
Appending a greeting enables you to add information to the end of your already recorded greeting. The system prompts you to record at the beep.
- Cancel recording The greeting is canceled. The system returns to the previous menu.
$ Save recording Stratagy tells you that greeting (number) has been recorded and returns to the previous menu. Again, you are given the option to review or record over the greeting you have just recorded.
10. Press $ to return to the previous menu.
You are given the option to record another greeting.
11. Press ) and select another greeting number ()~').
12. Repeat Step 7 on Page B-2.
Important! The last greeting selected or recorded is the greeting that callers hear as your User ID greeting.
13. To return to the Main Menu, press�$$$.
Stratagy plays the Main Menu options.
Stratagy R3 I&M 11/99

Special Greeting User ID MailboxesRecord Mailbox Greetings
Sp
ecial Greetin
g U
ser ID
Mailb
oxes
Initial Greeting MailboxesThe initial greeting mailboxes are the Company Greeting and Caller Instructions. Stratagy ships with these defined as User ID 990 and User ID 991, respectively.
You can schedule different initial greetings to play different times of the day or days of the week, or even a specific day of the year.
See Chapter 4 – How Stratagy Operates for details about how Stratagy processes incoming calls. If you need to change the initial greeting defaults for specific channel ports, use the Stratagy Configuration Utility (see Chapter 3 – Configure Stratagy.)
Company GreetingWhen a caller first reaches Stratagy, it plays the company greeting. Typically this salutation gives the caller the company name (for example, “Thank you for calling…”). Stratagy then plays the caller instructions.
You can record up to seven greetings that you can schedule to play as needed.
➤ To record the Company Greeting
1. Access Stratagy from your telephone using default User ID: 990 and Security Code: 990997.
2. Record the greeting (see “Record Mailbox Greetings” on Page B-1).
Note Change the security code as soon as possible.
➤ To customize the Company Greeting User ID mailbox
1. From the Main Menu, press Alt+U to access the Users Menu.
Note Company Greeting User ID mailbox 990 chains to Caller Instructions User ID mailbox 991.
2. Use the Auto Menu to schedule the greetings to play as needed.
For detailed information about customization, see Chapter 6 – Users Menu, Chapter 7 – Auto (Scheduling) Menu, Chapter 8 – Notify Menu, and Chapter 10 – Customization Examples.
Caller InstructionsBy default, Stratagy plays the caller instructions directly after the company greeting. In addition, Stratagy plays the caller instructions whenever it has nowhere else defined to continue processing.
Typically, caller instructions give the caller options for reaching departments or information. Providing this information is important to help process the call.
“To reach the person you are calling, enter their extension number. To reach the Operator, press 0 or stay on the line.”
You can record up to seven greetings (caller instructions) that you can schedule to play as needed.
➤ To record the Caller Instructions
1. Access Stratagy from your telephone using default User ID: 991 and Security Code: 991997.
Note Change the security code as soon as possible.
Stratagy R3 I&M 11/99 B-3

Special Greeting User ID MailboxesDirectory Mailbox
B-4
2. Record the caller instructions (see “Record Mailbox Greetings” on Page B-1).
➤ To customize the Caller Instructions User ID mailbox
1. From the Main Menu, press Alt+U to access the Users Menu.
2. Use the Auto Menu to schedule the greetings to play as needed.
For detailed information about customization, see Chapter 6 – Users Menu, Chapter 7 – Auto (Scheduling) Menu, Chapter 8 – Notify Menu, and Chapter 10 – Customization Examples.
Sample Initial GreetingsThe following sample greetings play as a result of chaining the Company Greeting User ID mailbox (990) to the Caller Instructions User ID mailbox (991).
Directory MailboxStratagy ships with User ID 411 predefined as the access box for the directory. The User ID and port number for the directory can be specified using the Stratagy system configuration parameter box_idx (Chapter 3 – Configure Stratagy).
When a caller uses the directory, he/she enters the first few letters of the name of the person he/she wants to contact. When Stratagy makes a match using the Users Menu Directory Name fields, it plays the User ID’s name recording.
Depending upon how the directory search feature is configured using the Stratagy system configuration parameter dir_play_uid (Chapter 3 – Configure Stratagy), Stratagy also plays the User ID digits. If a user has not recorded a name, Stratagy either does not play the entry or plays the User ID’s digits. Stratagy plays the first match to the caller. The caller can select this directory name (and/or User ID) or choose to hear the next match.
Example 1990 Thank you for calling (company name).991 To reach the person you are calling, enter his extension. For information about our company
products and services, press 1. For customer support, press 2. For sales, press 3. To access the employee directory, enter 411. To reach the Operator, press 0 or stay on the line.
Example 2990 Good afternoon. Thank you for calling (company name).991 If you know the extension of the person you are calling, you may enter it now. Otherwise, press
0 or stay on the line for Operator assistance.
Example 3990 Thank you for calling (company name).991 Sorry, our offices are closed. To leave a message in our Operator’s mailbox, press 0. Or call
during regular business hours – 8:00 to 5:00 Monday through Friday.
Example 4990 Thank you for calling (company name).991 Our offices are closed July 4th to celebrate Independence Day. Please call back during regular
business hours.
Stratagy R3 I&M 11/99

Special Greeting User ID MailboxesDirectory Mailbox
Sp
ecial Greetin
g U
ser ID
Mailb
oxes
How Stratagy Maintains the DirectoryStratagy automatically maintains the directory using:
� The names you create from the Users Menu Directory Name 1 and Directory Name 2 fields. To avoid having a User ID appear in the directory (default 411), leave these fields blank. Chapter 6 – Users Menu for details.
� Recordings made via telephone from Stratagy’s User mode. See the Stratagy User Guide for details.
For example, Mary would translate to 6279 for access after a caller enters 411, while Jo Ann translates to 56266. When Stratagy matches a directory name after accessing 411, it plays that User ID’s name recording. Therefore, it is important that users record their names, e.g., “Donna Smith.”
If a user has not recorded a name, Stratagy either does not play the entry (default) or plays the User ID’s digits. Stratagy plays the first match to the caller. The caller can select this directory name (and/or User ID) or choose to hear the next match.
Directory InstructionsThe recording you make should be consistent with your customization of User IDs.
Notes
� Since the letters Q and Z do not appear on the telephone dial pad, you need to provide special directions to the caller. Stratagy translates Q to 7 and Z to 9.
� Stratagy ignores spaces and punctuation in a name.
➤ To record the directory instructions
1. Access Stratagy from your telephone using default User ID: 411 and Security Code: 411997.
Note Change the security code as soon as possible.
2. Record the instructions (see “Record Mailbox Greetings” on Page B-1).
The following is a sample directory greeting.
“Please enter the first few letters of the first or last name of the person you are calling. For the letter Q, use 7; and for the letter Z, use 9.”
Stratagy ships with an initial directory recording:
“Enter the first few letters of the first or last name of the person you wish to reach.”
Stratagy R3 I&M 11/99 B-5

Special Greeting User ID MailboxesOperator Mailbox Greeting
B-6
Operator Mailbox GreetingThe default for the Operator or general mailbox is User ID mailbox 0. Stratagy provides the Operator User ID mailbox for after hour callers who are unable to direct their own calls (rotary dial telephone) or do not know the extension of the party they want to reach.
When a caller accesses the Operator User ID mailbox, Stratagy plays its greeting which advises the caller on how the call is handled. The caller can then leave a message in the mailbox (which the Operator usually forwards on the next business day).
The greeting should cover the following information:
� Inform the caller that he has reached the Operator mailbox
� Remind the caller to leave his/her own name
� Remind the caller to state who the message is for
� State that the message will be delivered to the proper person
You can record up to seven greetings that you can schedule to play as needed.
➤ To record the Operator Mailbox greeting
1. Access Stratagy from your telephone using default User ID: 0 and Security Code: 0997.
Note Change the security code as soon as possible.
2. Record the greeting (see “Record Mailbox Greetings” on Page B-1).
The following is a typical Operator User ID mailbox greeting:
“You have reached the Operator mailbox. Please leave a message at the tone. Your message will be forwarded on the next business morning.”
➤ To customize the Operator User ID mailbox greeting
1. From the Main Menu, press Alt+U to access the Users Menu.
2. Use the Auto Menu to schedule the greetings to play as needed.
For detailed information about customization, see Chapter 6 – Users Menu, Chapter 7 – Auto (Scheduling) Menu, Chapter 8 – Notify Menu, and Chapter 10 – Customization Examples.
Stratagy R3 I&M 11/99

Glo
ssary
Glossary
The following mnemonics identify the system’s hardware, operation, and features.
Term Definition
AMIS Audio Messaging Interchange Specification – Analog Networking Protocol that enables Stratagy to exchange messages with other vendor’s voice messaging systems.
AMIS Loopback Reserved User ID (User ID 989) that other AMIS nodes can use for testing the network.
� Auto Attendant: Stratagy’s automated attendant can solve various answering requirements.
� Answer company lines
� Available all of the time
� Provide callers with information (company address, directions, product specifications, service offerings, price information, etc.)
� Route callers to the extension, department, etc. they enter.
Auto (Scheduling) Menu Enables you to set up automatic changes for each User ID mailbox. You can set these changes to occur at a specified time, on certain days of the week, or on a specified date.
BPS Bits Per Second – Unit of measure that refers to the transmission speed (baud rate) of electronic signals. Used when describing modem operation.
Busy The user’s telephone is busy.
Call Screening Stratagy asks the caller to record his name before attempting to transfer to the user’s extension, enabling a user to accept, reject, transfer the call with announcement, or transfer the call without announcement.
Called Party The telephone user the caller reached. See “User.”
Caller Someone who calls into Stratagy. A caller can obtain information, leave a message for someone, or provide information.
Caller Instructions Reserved User ID (User ID 991) that gives the caller options for reaching departments or information.
Stratagy R3 I&M 11/99 GL-1

GlossaryChains
GL-2
Chains Tells Stratagy what to do when one of three conditions apply: Done (if caller remains on the line after leaving a message or listening to an announcement), RNA (Ring No Answer – there is no answer at the extension), or Busy (the extension is busy).
CO Central Office – Facility that houses switching equipment that provides telephone service (CO lines, Centrex lines, etc.) for the immediate geographical area.
Company Greeting Reserved User ID (User ID 990) that plays the salutation that lets the caller know which company he/she called.
Defaults Box Reserved User ID (User ID 997) that Stratagy uses for the default values when creating a new User ID.
Direct Access Method for accessing the Stratagy through its monitor and keyboard.
Direct Message Reserved User ID (User ID 998)that is the Direct Message User ID for all or specified ports. Useful for an Operator transferring directly to voice mail.
Disk Notification Notify user (usually System Administrator) when available hard drive space is low.
DID Direct Inward Dialing – Feature of PBX and Centrex telephone systems that enable callers to dial from the public network to a wanted extension without operator intervention.
Directory Directory User ID (User ID 411) for all or specified ports. The caller enters the first few letters of the person’s name he/she wants to contact. Stratagy plays the corresponding User ID’s name recording.
DK Digital Key.
Do Not Disturb(DND)
Stratagy transfers callers directly to a user’s User ID mailbox without ringing the user’s telephone.
DTMF Dual Tone Multi-frequency – Push-button tone dialing.
Fax Application Software
Software program that enables automatic programming of User ID mailboxes that perform fax operations. Contains three applications: Fax Upload, Fax Back, and Fax on Demand.
Fax Back (two-call fax)
Transmits fax documents to callers on a separate transmission. The caller can select the fax documents and the fax machine. Assumes that the caller is not calling from a fax machine; Stratagy queues the fax for later transmission from one of its fax/modems to the caller’s fax machine (telephone number defined by the caller).
Fax Messaging Uploads fax documents into Stratagy as messages for users. Fax messaging can also be used for basic uploading of documents for other applications.
Term Definition
Stratagy R3 I&M 11/99

GlossaryFax on Demand (one-call fax)
Glo
ssary
Fax on Demand(one-call fax)
Transmits fax documents to callers on the same transmission. The caller can select the fax documents. Assumes that the caller is calling from a fax machine; Stratagy transfers the call to one of its fax/modems for immediate transmission to the caller.
Fax Tone Detect Reserved User ID (User ID 994) that Stratagy “jumps” to when Stratagy detects a specific tone. Handles incoming faxes, detects connections from TDD machines for deaf communication, etc.
Fax Upload Accepts incoming fax documents and stores them as files on Stratagy’s hard drive. Type of fax messaging.
Fax/modem Device that transmits and receives fax messages. Also see modem.
FIFO First-In First-Out.
Future Delivery Reserved User ID (User ID 995) that stores all messages awaiting future delivery.
Groups Controls which User IDs a call can access. Each User ID mailbox user can be a member of up to four groups. To be able to access another User ID, the caller User ID must share at least one group number with the currently accessed User ID.
Guest Defaults Reserved User ID (User ID 996) that Stratagy uses for the default values when creating a new Guest User ID.
Guest User IDs Provides limited access to the Stratagy system for temporary and project-oriented employees, such as consultants and contractors. Guest users can only send messages to their Host User ID and other guests of their Host User ID.
Interactive Voice Response (IVR)
An application that prompts the user for input (using a custom prompt), waits for the user to enter a DTMF response, that is stored as a variable, and then uses that information to access a database to formulate a response. Databases may be on the hard drive of the Stratagy system, accessed remotely over a network, or accessed through the serial ports of the Stratagy system, possibly connecting to a mainframe or other data server.
Once a response has been determined from the database, the Stratagy system can be programmed to play this data back to the caller in a number of different ways: as a date, time, monetary value (in dollars and cents), or simply as a number. The value can be combined with other custom-recorded prompts, so that the system could, for example, respond to a caller with the message “Your order for six items will be shipped on July 17, 1999.” The number six and the date in this example would be provided by the database, while the phrases “Your order for” and “items will be shipped on” would be recordings that the System Administrator would make.
I/O Input/Output.
LIFO Last-In First-Out.
Term Definition
Stratagy R3 I&M 11/99 GL-3

GlossaryLocal Access
GL-4
Local Access Method for accessing the Stratagy system directly via a cable connecting the Stratagy system with a portable or desktop PC. Uses Stratagy Remote software.
Main Menu Core Stratagy menu. The administrative functions (e.g., report generation, system shutdown, and file copy) are available from the Main Menu. The Users Menu from which all User ID mailbox customization takes place is also a Main Menu option.
Menus Defines the destination a caller is sent when he/she presses one of ten possible single-digit menu options while listening to the greeting of the mailbox. Menus can accommodate an unlimited number of special applications.
Modem Modulator-Demodulator – Device used primarily for converting digital signals into quasi-analog signals for transmission, and reconverting upon reception. Used for accessing Stratagy remotely. Also see fax/modem.
Normal Notification Notifies user of new messages in his/her User ID mailbox by lighting the message light or calling a telephone number.
Notify Menu Menu that enables Stratagy to automatically perform notifications of new or urgent messages, disk low status, etc. Notification methods: normal, relay, pickup, disk, panic and urgent.
One-call Fax Fax on Demand.
Operator Reserved User ID (User ID 0) designed for an after hours caller who is unable to direct his/her own call or does not know the extension of the person he/she wants to reach.
PBX Private Branch Exchange – Industry-standard term which refers to a telephone switch, usually on-premises, which serves an individual company, and is connected to a public telephone exchange through the CO.
PC Personal Computer.
PCB Printed Circuit Board.
Pickup Notification Turns off a message waiting light after a user has retrieved messages from his/her User ID mailbox.
Port There are two types of ports: physical and logical. A physical port is an actual station circuit location; a logical port is the set of characteristics – features, station intercom number, etc. – assigned to the physical port. Logical ports are mobile; they can be moved from one physical port to another.
RAM Random Access Memory – Type of system memory that holds individual system configuration and features programming. RAM is read/write memory, and can easily be revised in programming.
Term Definition
Stratagy R3 I&M 11/99

GlossaryRelay Notification
Glo
ssary
Relay Notification Notifies user by relaying the caller’s telephone number to the user’s beeper display.
Remote Access Method for accessing the Stratagy system via modem from a PC located at this or another site. Uses Stratagy Remote software.
Reserved User IDs Special function User ID mailboxes. All except System Administrator (User ID 999) can be assigned to a different mailbox. These are:
� Operator (User ID 0)
� Employee Directory Instructions (User ID 411)
� System Shutdown 1&2 (User IDs 982/983)
� AMIS Loopback (User ID 989)
� Company Greeting (User ID 990)
� Caller Instructions (User ID 991)
� Soft Modem (User ID 993)
� Fax Tone Detect (User ID 994)
� Future Delivery (User ID 995)
� Guest Defaults (User ID 996)
� Defaults Box (User ID 997)
� Direct Message (User ID 998)
� System Administrator (User ID 999)
Ring No Answer (RNA) The user’s telephone rings but he does not answer.
ROM Read Only Memory – Type of system memory that holds static software that comprises the mechanics of the features’ functions.
SMDI Simplified Message Desk Interface – type of integration that uses an RS-232 serial link.
SMDR Station Message Detail Recording.
Soft Modem Reserved User ID (User ID 993) that enables the user to communicate with the Stratagy DK’s internal modem.
Term Definition
Stratagy R3 I&M 11/99 GL-5

GlossaryStratagy Configuration Utility
GL-6
Stratagy Configuration Utility
Utility that enables you to do the following.
� Backup and restore the Stratagy system.
� Define Stratagy System Configuration parameters.
� Install Stratagy software from the floppy-disk drive.
� Select a Toshiba telephone switch or plug and play integration.
� Define how Stratagy and other manufacturer’s telephone systems communicate together
� Add or delete voice cards.
� Archive Msg.Log to A:drive.
Stratagy does not process calls while accessing the Stratagy Configuration Utility.
Stratagy Voice Board Code
Stratagy voice boards are manufactured by Dialogic Corporation and are configured with a unique Stratagy code enabling them to work with a Stratagy system. Only Stratagy voice boards work in a Stratagy system. Other Dialogic voice boards are not configured with the unique Stratagy code.
System Administrator Reserved User ID (User ID 999) that enables the System Administrator to create system lists, record and delete system announcements, record the busy-hold music or message, manage User IDs, and review system status.
System Shutdown Reserved User IDs (User ID 982/983) that enable the System Administrator to shut down the system via the telephone dial pad.
Telephone Answering Stratagy provides telephone answering when a user is busy or unavailable.
Token Programming Language
Stratagy control structure that allows for more complex programming. Stratagy’s programming language gives versatility to obtain additional features, such as Fax on Demand, message waiting light control, and confirming digits entered by a caller. A series of tokens instruct Stratagy what actions to perform.
Trace Diagnostic tool designed to assist you in troubleshooting applications. It logs Stratagy call activity step-by-step (digits dialed in, digits dialed out, taking message, playing prompt, flashing, etc.).
Two-Call Fax Fax Back.
UPS Uninterruptible Power Supply.
Urgent Notification Notifies user of an urgent message in his/her User ID mailbox.
User A telephone user is someone who has access to one or more User IDs in the system by knowing their security codes. Once a user accesses his/her User ID, he/she can play back messages which have been left for him/her, delete those messages, send them to other User IDs, etc.
Term Definition
Stratagy R3 I&M 11/99

GlossaryUser ID/User ID Mailbox
Glo
ssary
User ID/User ID Mailbox
Unique Stratagy record that provides call processing control – records messages from callers, provides information to callers, or controls call flow.
Users Menu Consists of three screens (Info/Status, Options, Group/Chains) that enable you to define, delete, and list User ID mailboxes. Features to define include directory entries, do not disturb, call screening, greetings, and control structures such as chains, groups, and menus. Once you have defined and saved a User ID, you can customize it using the Auto and Notify Menus.
Voice Messaging Stratagy voice messaging enables users to create, send, receive, and save voice messages.
Term Definition
Stratagy R3 I&M 11/99 GL-7

GlossaryVoice Messaging
GL-8
Stratagy R3 I&M 11/99
Index
Ind
ex
Aabout this manual
conventions, xiiorganization, xirelated documents, xiii
accessing Stratagydirect, 2-2local, 2-3remote, 2-5
active_hold parameter, 3-27admin_port parameter, 3-42adpcm_hq parameter, 3-27, 5-4adpcm_nq parameter, 3-27, 5-4adpcm_pq parameter, 3-28, 5-4advertising parameter, 3-28, 5-4AMIS, 5-3
amisnodelist, 12-9configuration parameters, 3-42configuring Stratagy for AMIS, 12-3gateway mailbox, 12-1options, 6-15proxy mailbox, 12-2testing AMIS, 12-7user ID 989, 4-2
amis_diskfull parameter, 12-4amis_enabled parameter, 5-3, 12-4amis_ltm parameter, 12-4amis_max_attemp parameter, 12-4amis_max_node parameter, 12-4amis_rna parameter, 12-4archive MSG.LOG to A
drive, 17-7area_code parameter, 12-4area_office parameter, 3-28audiotex
schedule, 5-5auto(scheduling) menu, 7-1
access/exit, 7-1
customization examples, 10-23field descriptions, 7-5menu options, 7-2records
create, 7-3disable, 7-4how Stratagy uses, 7-1modify, 7-3options, 7-6
auto_report parameter, 3-28, 5-3auto_report_time parameter, 3-28, 5-3automatic scheduler, 5-2, 5-5automatic system recovery, 17-21
Bbackup utility
access, 14-3main menu, 14-4, 14-7, 14-12menus, 14-2reconfigure the backup utility, 14-11restore option, 14-7scheduling, 14-3use, 14-2
baud1 ~ 4 parameter, 3-40before you install, 1-1begin_rec_prompt parameter, 3-28box_grt parameter, 3-42, 5-2box_idx parameter, 3-29, 5-6box_snd parameter, 3-29boxlist, 6-6busy greetings, 5-6
Ccall blocking, 5-7call processing control, 4-3
chains, 4-3groups, 4-3menus, 4-3
Stratagy R3 I&M 11/99 IN-1

IndexD ~ D
IN-2
token programming language, 4-3call screening, 5-5, 7-8call transfer, 5-5caller confirmation prior to transferring, 5-1caller instructions, B-3
user ID 991, 4-2calling party identification, 5-5, 11-5cancel_busy_hold parameter, 3-29centrex, 3-42, 11-1chains, 4-3, 5-6, 6-16character codes, 3-25checklists, 1-5, A-1clock_sync parameter, 3-29cmt_maxlen parameter, 3-29, 5-6company greeting, 4-2, 5-2, B-3configuration, 1-4
AMIS, 12-1Stratagy, 3-1
configuration utilityadd or delete voice cards, 3-27, 16-24archive MSG.LOG to A
drive, 17-7backup utility option, 14-3exit, 3-4install from A drive, 3-6, 16-4menu, 3-3other switch integrations option, 3-9system configuration option, 3-5
system integration patterns, 3-21telephone system dial codes, 3-9telephone system tone patterns, 3-14
Toshiba plug and play option, 3-6Toshiba switch integration option, 3-8use, 3-4
connect the fax/modems, 13-3connect to your telephone system
modular and split blocks, 1-11RJ11 modular jacks, 1-11, 1-15RJ14 modular jacks, 1-11, 1-16
connect_tone parameter, 3-29console_slot_id parameter, 3-29copy
files, 2-12mailbox, 6-4messages, 6-12
country_code parameter, 12-4ctask.log file, 17-9ctask.old file, 17-9customization examples
auto menu, 10-23
emergency lists, 10-22extension change, 10-28holiday greetings, 10-11, 10-26-10-27log on after notification, 10-17message waiting light, 10-14notification to pager, 10-18, 10-20notify menu, 10-14order shipment information, 10-9switching/maintaining languages, 10-6system paging for ring no answer, 10-4system paging user for special callers, 10-3time of day greetings, 10-23transferring caller directly to mailbox, 10-13unsupervised conferencing, 10-29using a status user ID to check message
count, 10-2voice notification, 10-16
customizeuser ID forms, 1-5, A-1user ID mailboxes, 1-5
DD/160SC-LS voice board
connect to phone lines, 16-21hookswitch state, 16-20part diagram, 16-19port address, 16-20
databits1 ~ 4 parameter, 3-40date and time (see system date and time)daylight time, 2-13-2-14, 3-30db_locking parameter, 3-30defaults box
parameter, 3-30user ID 997, 4-2
defined tokens, 9-7delete
user ID mailbox, 6-5voice cards, 16-24
diagnostic programsctask.log, 17-9ctask.old, 17-9fax.log, 17-14MSG.LOG, 17-7speed disk, 16-2, 17-15Stratagy diagnostic utilities, 17-3STRATAGY.LOG, 17-7trace, 17-1userid.log, 17-14VMBEDIT, 17-4
Stratagy R3 I&M 11/99

IndexE ~ F
Ind
ex
dial codes, 3-9Dialog/4 voice board
base memory address, 16-17connect to phone lines, 16-21hookswitch state, 16-18interrupt level, 16-16offset address, 16-17part diagram, 16-15
did_dtmf parameter, 3-43did_mode parameter, 3-43dir_play_uid parameter, 3-30direct
accessing, 2-2message, 4-2transfer, 10-13
directory, 5-6how Stratagy maintains the directory, B-5instructions, B-5mailbox, B-4names, 6-8user ID 411, 4-2
disk doctor, 17-17disk space notification, 5-2diskwarn parameter, 3-31, 5-2distribution lists, 5-6do not disturb, 5-6, 6-11, 7-7dss_active parameter, 3-31dtmf_dly parameter, 3-31dtmf_gate parameter, 3-31, 5-1dtmf_on parameter, 3-31
Eemergency lists, 10-22error_box parameter, 3-31, 5-1exiting Stratagy (see system shutdown)extension change, 10-28extensions, 5-6
scheduled, 5-5shared, 5-9
Ffault finding, 17-1
trace, 17-1fax
configuration parameters, 3-42configure Stratagy for fax, 13-5connect the fax/modems, 13-3document conflict, 13-2fax application software, 13-10
fax back, 13-1, 13-10, 13-15fax messaging, 5-2, 13-1
example, 13-25fax on demand, 13-1, 13-10, 13-22fax tone detect, 3-33, 4-2, 5-2fax upload, 13-10, 13-13fax/modems
configure Stratagy for fax, 13-5connect, 13-3requirements, 13-2upgrading, 16-28
hardware installation, 13-3how fax operates, 13-1mailboxes
functionality, 13-3setup, 13-2
programming, 13-25status, 2-15token programming, 13-25
fax.log, 17-14fax_answer parameter, 13-7fax_dl_init parameter, 13-7fax_fail_retry parameter, 13-7fax_flow_control parameter, 13-7fax_id parameter, 13-7fax_id_pad parameter, 13-7fax_log parameter, 13-8fax_max_retries, 13-8fax_receive_reverse parameter, 13-8fax_receive_speed parameter, 13-8fax_requeue_interval parameter, 13-8fax_reset parameter, 13-8fax_resolution parameter, 13-8fax_scan_time parameter, 13-9fax_send_reverse parameter, 13-9fax_send_speed parameter, 13-9fax_start_char parameter, 13-9fax1 ~ 2 parameter, 13-7FIFO, 5-8, 6-14file editor, 16-29filecopy (see main menu)fixed length user ID parameters, 3-44fixed_len0 ~ 9 parameter, 3-44forms
auto (scheduling), A-6greeting scripts, A-8notify, A-7user ID customization, 1-5, A-1users, A-5
future delivery, 5-2
Stratagy R3 I&M 11/99 IN-3

IndexG ~ I
IN-4
parameter, 3-32user ID 995, 4-2, 5-2
future_delivery parameter, 5-2
Ggain_norm parameter, 3-32, 5-9gateway mailbox, 12-1greetings, 6-12, 7-8
busy, 5-6caller instructions, B-3company, 5-2, 5-5, B-3current, 6-13holiday, 10-11, 10-26-10-27initial greeting mailboxes, B-3operator mailbox greetings, B-6personal, 5-5-5-6port selectable, 5-2record mailbox greetings, B-1restart, 5-7time of day, 10-23
group partitions, 5-7group/chains screen, 6-16groups, 4-3, 6-18guest defaults
parameter, 3-32user ID 996, 4-2, 5-7
guest users, 5-7limit, 5-7
guest_defaults parameter, 5-7guest_max parameter, 3-32, 5-7guest_min parameter, 3-33, 5-7
Hhangup_supervision parameter, 3-33hard drive
maintenance, 16-1replacing, 16-2-16-3space, 1-4, 2-15
hardwareconnect to your telephone system, 1-10determine hardware sizing, 1-2hard drive
maintenance, 16-1replacing, 16-2-16-3space, 1-4
maintenance, 16-1modular and split blocks, 1-11ports, 1-2power requirements, 1-4
pre-installation, 1-2RJ11 modular jacks, 1-11RJ14 modular jacks, 1-11setting up system, 1-6site, 1-4site selection, 1-4
environmental considerations, 1-4sizing, 1-2unpack and inspect, 1-6verify basic functions, 1-12
help (see online help function)holiday greetings, 10-11, 10-26-10-27hot_box parameter, 3-33, 5-2
Iinfo/status screen, 6-20initial greeting mailboxes, B-3
caller instructions, B-3company greeting, B-3sample initial greeting, B-4
inspecting hardware (see hardware)install from A drive, 3-6, 16-4installation
before you install, 1-1checklists, 1-5, A-1configure Stratagy for fax, 13-5connect the fax/modems, 13-3fax, 13-3fax/modems, 16-28
requirements, 13-2pre-installation survey, 1-2screen savers, 16-28voice boards, 16-7
installer, 1-1integration, 1-4
centrex, 3-42, 11-1patterns, 3-21
additional, 3-26character codes, 3-25how Stratagy matches, 3-26masks, 3-26modifying, 3-23
SMDI, 11-1, 11-5strings, 3-25switch, 3-8-3-9
integration helper, 3-23Interactive Voice Response, 5-2
Stratagy R3 I&M 11/99

IndexJ ~ M
Ind
ex
JJOVE, 16-29
Kksu_time parameter, 3-33
Llanguages (switching/maintaining), 10-6lcoff parameter, 3-33lcvalid parameter, 3-33lcwait parameter, 3-34LIFO, 5-8, 6-14local access
before you start, 2-3preparing the system, 2-3
local_amis_node parameter, 12-5log information, 15-3
delete, 17-4types of logs
fax, 15-3message, 15-3Stratagy (system), 15-3user ID, 15-3
login_pound parameter, 3-34lognam parameter, 3-34lpt_port parameter, 3-34
Mmailboxes
AMIS gateway, 12-1AMIS proxy, 12-2customize, 4-4customizing, 1-5, 4-4directory, B-4fax back, 13-15fax on demand, 13-22fax upload, 13-13initial greeting mailboxes, B-3
caller instructions, B-3company greeting, B-3
operator mailbox greeting, B-6record mailbox greetings, B-1special greeting user ID mailboxes, B-1types, 4-3
control, 4-4information, 4-4user, 4-3
user ID, 4-3, 4-8, 6-1
main menuaccess, 2-12daylight time, 2-14exiting, 2-11field descriptions, 2-14filecopy, 2-12menu bar, 2-14, 8-6, 15-8options, 2-12shutdown, 2-10system date and time, 2-13system information, 2-15
maintenancehard drive, 16-1JOVE file editor, 16-29reloading system software, 16-4
masks, 3-26max_dl_inits parameter, 3-34max_prompt parameter, 3-34menu
auto(scheduling), 7-1backup utility, 14-2group/chains screen, 6-16main, 2-12notify, 8-1options screen, 6-10select catalog submenu, 14-8users, 6-1
messagealternate rate, 6-15busy, 6-13copy, 5-8, 6-12copy with delete, 5-8date/time, 5-8, 6-14delete continuous, 5-3length, 5-8new, 5-8notification, 5-9order, 6-14pause during playback/recording, 5-3pending, 5-8playback continuous, 5-3playback control, 5-3purging, 5-3queues, 5-8retrieval control, 5-8saved, 5-8speed control, 5-7statistics, 6-20store, 6-12
Stratagy R3 I&M 11/99 IN-5

IndexN ~ P
IN-6
urgent, 5-8volume, 5-9, 6-12
message pending, 6-13message waiting light
customization example, 10-14min_msg parameter, 3-34modular and split blocks, 1-11modular jacks
RJ11, 1-11RJ14, 1-11
MSG.LOG, 17-7archive to drive A, 17-7copy, 17-7enable, 17-7
msg_log parameter, 3-34msg_pending_threshold parameter, 3-34, 5-8multiple system languages, 5-3
Nn_msg_scan parameter, 3-35n_ochan parameter, 3-35, 5-4, 5-9n_rings parameter, 3-43nam_maxlen parameter, 3-35, 5-9name (and extension) control, 5-9networking (see AMIS)norton utilities, 17-15
disk doctor, 17-17speed disk, 17-15surface test, 17-19
notification, 10-18enable/disable, 8-7features, 8-8frequency, 8-7log on after, 10-17method, 8-9pager on urgent messages, 10-20type, 8-8
disk, 5-2panic, 5-1relay, 5-9urgent, 5-8
notify menu, 8-1access/exit, 8-2customization examples, 10-14field descriptions, 8-6menu options, 8-3records
create, 8-3create without using template, 8-3
disable, 8-5field values, 8-3modify, 8-4options, 8-7summary, 8-6
templates, 8-2, 8-6notify_restriction parameter, 3-35, 5-4
Oonline help function, 2-10
detailed help, 2-10help line, 2-10
operatormailbox greeting, B-6user ID 0, 4-2
options screen, 6-10other switch integrations, 3-9
add or delete voice cards, 3-27system integration patterns, 3-21telephone system dial codes, 3-9telephone system tone patterns, 3-14
Ppager, 10-18, 10-20paging
customization example, 10-3-10-4office, 5-9
parametersactive_hold, 3-27admin_port, 3-42adpcm_hq, 3-27, 5-4adpcm_nq, 3-27, 5-4adpcm_pq, 3-28, 5-4advertising, 3-28, 5-4amis_diskfull, 12-4amis_enabled, 5-3, 12-4amis_ltm, 12-4amis_max_attemp, 12-4amis_max_node, 12-4amis_rna, 12-4area_code, 12-4area_office, 3-28auto_report, 3-28, 5-3auto_report_time, 5-3baud1 ~ 4, 3-40begin_rec_prompt, 3-28box_grt, 3-42, 5-2box_idx, 3-29, 5-6box_snd, 3-29
Stratagy R3 I&M 11/99
IndexP ~ P
Ind
ex
cancel_busy_hold, 3-29clock_sync, 3-29cmt_maxlen, 3-29, 5-6connect_tone, 3-29console_slot_id, 3-29country_code, 12-4databits1 ~ 4, 3-40daylight_saving_time, 3-30db_locking, 3-30defaults_box, 3-30did_dtmf, 3-43did_mode, 3-43dir_play_uid, 3-30diskwarn, 3-31, 5-2dss_active, 3-31dtmf_dly, 3-31dtmf_gate, 3-31, 5-1dtmf_on, 3-31error_box, 3-31, 5-1fax_answer, 13-7fax_dl_init, 13-7fax_fail_retry, 13-7fax_flow_control, 13-7fax_id, 13-7fax_id_pad, 13-7fax_log, 13-8fax_max_retries, 13-8fax_receive_reverse, 13-8fax_receive_speed, 13-8fax_requeue_interval, 13-8fax_reset, 13-8fax_resolution, 13-8fax_scan_time, 13-9fax_send_reverse, 13-9fax_send_speed, 13-9fax_start_char, 13-9fax1 ~ 2, 13-7fixed_len0 ~ 9, 3-44future_delivery, 3-32, 5-2gain_norm, 3-32, 5-9guest_defaults, 3-32, 5-7guest_max, 3-32, 5-7guest_min, 3-33, 5-7hangup_supervision, 3-33hot_box, 3-33, 5-2ksu_time, 3-33lcoff, 3-33lcvalid, 3-33lcwait, 3-34local_amis_node, 12-5
login_pount, 3-34lognam, 3-34lpt_port, 3-34max_dl_inits, 3-34max_prompt, 3-34min_msg, 3-34msg_log, 3-34msg_pending_threshold, 3-34, 5-8n_msg_scan, 3-35n_ochan, 3-35, 5-4, 5-9n_rings, 3-43nam_maxlen, 3-35, 5-9notify_restriction, 3-35, 5-4parity1 ~ 4, 3-40partial_q_ok, 3-35password, 3-35pbx_type, 3-35per port definitions, 3-42phone_number, 12-5play_caller_id, 3-35, 5-5play_skip, 3-36, 5-3please_hold, 3-36prompt_file, 3-36, 5-3purge, 3-36, 5-3restore_config, 3-36, 5-1restore_original, 3-36, 5-1ring_mode, 3-43screen_save, 3-37security_max_length, 3-37, 5-10security_min_length, 3-37, 5-10serial port definitions, 3-40serial_port1 ~ 4, 3-41short_direct_send, 3-37shutdown, 3-37skip_name_announce, 3-37smdi_base_port, 11-2smdi_port, 11-2smdi_pretimeout, 11-2smdi_type, 11-2stopbits1 ~ 4, 3-42switch interface definition, 3-43t1_mode, 3-43tape_length, 3-38, 5-3timestamp_forwards, 3-38tmo_2digit_menu, 3-38tmo_blank, 3-38, 5-4tmo_dtmf, 3-38tmo_dtmf_login, 3-38tmo_hold, 3-38tmo_idle, 3-39
Stratagy R3 I&M 11/99 IN-7

IndexR ~ R
IN-8
tmo_menu, 3-39tmo_pickup, 3-39tmo_resume, 3-39, 5-3tmo_serial, 3-39tmo_silence, 3-39tmo_sound, 3-39trace_cap, 3-39unknown_node_action, 12-5use_pvc, 3-39user_log, 3-40
parity1 ~ 4 parameter, 3-40partial_q_ok parameter, 3-35password, 2-11-2-13password parameter, 3-35pbx_type parameter, 3-35pbxpert, 3-14
add new tone set, 3-15definitions/settings, 3-19enable new TSF, 3-19main menu functions, 3-14
per port definitions parameters, 3-42personal greetings, 5-6phone_number parameter, 12-5play_caller_id parameter, 3-35, 5-5play_skip parameter, 3-36, 5-3please_hold parameter, 3-36plug-and-play (see Toshiba plug and play)ports
activity statistics, 2-14number of, 1-2parameters, 3-40per port definitions, 3-42universal, 5-4
powerrequirements, 1-4
pre-installationchecklists, 1-5, A-1forms, 1-5survey, 1-2
programmable dial actions, 5-9programming
fax, 13-25tokens, 9-1
ProLine/2V voice boardbase memory address, 16-13connect to phone lines, 16-21hookswitch state, 16-13interrupt level, 16-12offset address, 16-13part diagram, 16-11
prompt_file parameter, 3-36, 5-3prompts, 5-7proxy mailbox, 12-2purge parameter, 3-36, 5-3
Rreconfigure the backup utility
from the alert screen, 14-14from the backup main menu, 14-12
recordmailbox greetings, B-1
reloadsystem software, 16-4
remote accessconfiguring the modem, 2-5connecting the modem, 2-5exiting, 2-8installing the modem, 2-5load the remote software, 2-6prior to installation, 2-5using, 2-7
replaced or variable tokens, 9-4replacing the hard drive, 16-2-16-3reports, 5-3, 15-1
automatic generation, 15-7definitions, 15-3listening to system activity, 15-2log information, 15-3menu options, 15-3print, 15-7run a report, 15-5save to floppy disk, 15-7types, 15-2view, 15-6
system activity, 15-1user activity, 15-1
restore, 14-1, 14-7restore_config parameter, 3-36, 5-1restore_original parameter, 3-36, 5-1ring duration, 5-9ring no answer
customization example, 10-4ring_mode parameter, 3-43RJ11 modular jacks, 1-11RJ14 modular jacks, 1-11
Stratagy R3 I&M 11/99

IndexS ~ S
Ind
ex
Ssampling rates, 5-4scheduling (see auto(scheduling) menus)screen advertisement, 5-4screen save
diagnostics, 17-12screen_save parameter, 3-37
screen saversinstallation, 16-28
security code, 5-10, 6-9security_max_length parameter, 3-37, 5-10security_min_length parameter, 3-37, 5-10serial_port1 ~ 4 parameter, 3-41setting up system
Stratagy 24 Plus, 1-9Stratagy 24D, 1-8Stratagy 6D, 1-7
short_direct_send parameter, 3-37shutdown (see system shutdown)shutdown parameter, 3-37single-digit menus, 5-10, 6-19singular tokens, 9-2site
environmental considerations, 1-4power requirements, 1-4
skip_name_announce parameter, 3-37SMDI
calling party identification, 5-5, 11-5serial integration, 11-1
connection, 11-3enabling, 11-2testing, 11-3validating the link, 11-4
smdi_base_port parameter, 11-2smdi_port parameter, 11-2smdi_pretimeout parameter, 11-2smdi_type parameter, 11-2
soft modemuser ID 993, 4-2
softwarereload, 16-4
special greeting user ID mailboxes, B-1directory mailbox, B-4operator mailbox greeting, B-6
speed disk, 17-15usage, 16-2
statisticsfaxes, 6-20main menu, 15-1
message, 6-20user’s, 6-20users menu, 15-2
stopbits1 ~ 4 parameter, 3-42STRATAGY.LOG, 17-7
copy, 17-7surface test, 17-19switch integration, 3-8
other, 3-9switch interface definition parameters, 3-43switching languages
customization example, 10-6system
accessing and using, 2-1activity
listening, 15-2view, 15-1
AMIS networking, 12-1backup, 14-1before you install, 1-1configuration, 1-4, 3-1configure Stratagy for fax, 13-5connect to your telephone system, 1-10date and time, 2-13diagnostic utilities, 17-3fax
installation, 13-3programming, 13-25
hardwaremaintenance, 16-1power requirements, 1-4site selection, 1-4
how Stratagy operates, 4-1how Stratagy processes user IDs, 4-5integration, 1-4log information, 15-3navigating, 2-9paging, 10-3-10-4pre-installation survey, 1-2reports, 15-1restore, 14-1setting up hardware, 1-6shutdown, 2-10, 2-14
via telephone set, 2-10-2-11, 5-4software
reloading, 16-4startup, 2-2statistics, 6-21system information, 2-15token programming, 9-1
Stratagy R3 I&M 11/99 IN-9

IndexT ~ T
IN-10
trace, 17-1troubleshooting, 17-1unpacking and inspecting hardwareuser IDs, 4-1using, 2-8verify basic functions, 1-12
system administrator, 1-1mailbox, 5-4user ID 999, 4-2, 5-2
system configuration option, 3-5modify parameters, 3-5
system integration patternsdefine fields, 3-21definitions and settings, 3-22modify, 3-23remove, 3-23
system-wide features, 5-1
Tt1_mode parameter, 3-43tape_length parameter, 3-38, 5-3telephone system dial codes
definition/settings, 3-12modify, 3-11
telephone system tone patterns, 3-14pbxpert, 3-14
templates, 8-2, 8-6timestamp_forwards parameter, 3-38tmo_2digit_menu parameter, 3-38tmo_blank parameter, 3-38, 5-4tmo_dtmf parameter, 3-38tmo_dtmf_login parameter, 3-38tmo_hold parameter, 3-38tmo_idle parameter, 3-39tmo_menu parameter, 3-39tmo_pickup parameter, 3-39tmo_resume parameter, 3-39, 5-3tmo_serial parameter, 3-39tmo_silence parameter, 3-39tmo_sound parameter, 3-39token programming language, 4-3, 5-4, 9-1
auto’s extension field, 9-1defined tokens, 9-7fax, 13-25notify’s method field, 9-1programming tokens, 9-2replaced or variable tokens, 9-4singular tokens, 9-2user’s extension field, 9-1
using, 9-1tokens
defined+( ) addition, 9-21<( ) starts incremental fax, 9-22=( ) equate, 9-21>( ) adds incremental fax, 9-23?( ) exists in file, 9-22[( ) read %S variables, 9-23]( ) write %S variable, 9-24^( ) change port volume, 9-24{ } input file, 9-24|( ) append variables, 9-23G( ) go to user ID, 9-7H( ) hang up process, 9-7I( ) if conditional, 9-7J( ) receive fax, 9-8KB( ) plays tone, 9-8KC( ) compare security code, 9-9KD( ) delete mailbox message, 9-9KF( ) suppresses DTMF-gate, 9-10KI( ) position of substring, 9-10KL( ) log in caller, 9-11KM( ) soft modem, 4-2, 9-11KN( ) access AMIS, 9-11KR( ) creates a recording, 9-11KT( ) forwards calls, 9-11KV( ) delete record, 9-12L( ) switch system language, 9-12M( ) audiotex menu, 9-13N( ) update record, 9-13-9-14O( ) timed on-hook, 9-14P( ) play, 9-15Q( ) question and answer, 9-16R( ) read DTMF from a caller, 9-16S( ) serial port access, 9-17T( ) transmit fax, 9-18-9-19V( ) search for value, 9-19W( ) wait for event, 9-20X( ) creates zero length file, 9-20Y( ) deletes file, 9-20Z( ) execute done chain, 9-20
replaced%A public network line access, 9-4%B1 ~ %B6 board serial number, 9-4%C replaces port number, 9-4%D hard drive space remaining, 9-4%E extension field, 9-4%F user ID’s directory name, 9-4%K value held in calling party ID, 9-5
Stratagy R3 I&M 11/99

IndexU ~ U
Ind
ex
%M number of messages, 9-5%N number of new messages, 9-5%P previously accessed user ID, 9-5%R relay page DTMF, 9-5%S0 ~ %S19 store value, 9-5%T connect time, 9-5%U user ID, 9-6%V variable, 9-6%W current day of week, 9-6%X transfer hold codes, 9-6%Y current date, 9-6%Z current time, 9-6LEN[ ] length, 9-6
singular- short pause, 9-3# plays DTMF tone, 9-2* plays DTMF tone, 9-2, long pause, 9-3@ suppress normal process, 9-2~ timed break recall, 9-30 ~ 9 plays DTMF tone, 9-2A ~ D plays DTMF tone, 9-2E earth recall, 9-3F hookflash, 9-3H go off hook, 9-3U return to transferring user ID, 9-3X remember event, 9-3Y forget event, 9-3Z test event, 9-3
tone patterns, 3-14Toshiba DK424, 11-1Toshiba plug and play, 3-6Toshiba switch integration, 3-8trace, 17-1
filter setup screen, 17-11screen save
configure, 17-12enable/disable, 17-13screen_save parameter, 3-37
trace filter setup screen, 17-11trace out
enable, 17-9trace.old file, 17-9
trace_cap parameter, 3-39troubleshooting, 17-1
crosslinked files, 17-18determining the problem, 17-1diagnostic programs
speed disk, 17-15initial power up, 17-2
lost clusters, 17-19Stratagy diagnostic utilities, 17-3
ctask.log, 17-9ctask.old, 17-9fax.log, 17-14MSG.LOG, 17-7STRATAGY.LOG, 17-7trace, 17-1userid.log, 17-14VMBEDIT, 17-4
Uunknown_node_action parameter, 12-5unpacking hardware (see hardware)unsupervised conferencing, 10-29upgrading
prior to upgrading, 16-1R2 to R3, 16-25software, 16-4
urgent messages, 5-8use_pvc parameter, 3-39user ID, 4-1, 4-5
0 operator, 4-2411 directory, 4-2982/983 System Shutdown, 4-2989 AMIS loopback, 4-2990 company greeting, 4-2, 5-2991 caller instructions, 4-2993 Stratagy DK soft modem, 4-2994 fax tone detect, 4-2, 5-2995 future delivery, 4-2, 5-2996 guest defaults, 4-2, 5-7997 defaults box, 4-2998 direct message, 4-2999 system administrator user ID, 4-2, 5-2customization examples, 10-1customization forms, 1-5, A-1features, 5-5fixed length parameters, 3-44how Stratagy processes, 4-5mailboxes, 4-3, 4-8, 6-2
copy, 6-4create, 6-2customize, 1-5delete, 6-5modify, 6-3
Stratagy R3 I&M 11/99 IN-11

IndexV ~ V
IN-12
typescontrol, 4-4information, 4-4user, 4-3
multiple, 10-2number defined, 2-15reserved, 4-2special greeting mailboxes, B-1status, 10-2
user statistics, 6-20user_log parameter, 3-40userid.log, 17-14users menu, 6-1
access, 6-1customization examples, 10-1directory names, 6-8examples, 10-1exit, 6-1field descriptions, 6-7group/chains screen, 6-16info/status screen, 6-20menu options, 6-2message statistics, 6-20options screen, 6-10security code, 6-9user ID mailbox
copy, 6-4create, 6-2delete, 6-5list
amisnodelist, 12-9boxlist, 6-6
modify, 6-3user statistics, 6-20
utilitiesbackup, 14-1configuration, 3-1ctask.log, 17-9ctask.old, 17-9disk doctor, 17-17fax.log, 17-14MSG.LOG, 17-7pbxpert, 3-14speed disk, 17-15STRATAGY.LOG, 17-7surface test, 17-19trace, 17-1userid.log, 17-14VMBEDIT, 17-4
Vview
system/user activity, 15-1VMBEDIT, 17-4voice boards
add or delete, 3-27install
D/160SC-LS, 16-19Dialog/4, 16-15ProLine/2V, 16-11
voice forms, 5-10voice notification
customization example, 10-16
Stratagy R3 I&M 11/99