Embed Size (px)
Citation preview

VocALign Project User Manual 1
VocALign® Project
Compatible with Apple® Macintosh® and Microsoft® Windows® systems
Macintosh User’s Manual(Windows users - please use the Help system in the Windows application)
Manual Version 2.9.1

VocALign Project User Manual 2
© Synchro Arts Limited 1995-2008
VocALign is a registered trademark of Synchro Arts Limited.Pro Tools and Digidesign are registered trademarks of Digidesign,
a Division of Avid Technology, Inc.
All other trademarks are the property of their respective holders.
Contact Information
Synchro Arts Limited13 Links RoadEpsom, SurreyKT17 3PP, UK
Tel: +44 1372 811934UK Tel: 01372 811934Fax: +44 1372 817976UK Fax: 01372 817976
Web: www.SynchroArts.comE-mail: [email protected]
Online Support at:www.SynchroArts.com/support
VocALign Project User Manual 3
End User License AgreementPLEASE READ THE FOLLOWING LEGAL AGREEMENT CAREFULLY PRIOR TO USING THE VOCALIGNSOFTWARE PROVIDED WITH THIS AGREEMENT. USE OF THE SOFTWARE CONSTITUTES YOURACCEPTANCE OF THE TERMS OF THIS LICENSE. IF YOU DO NOT AGREE TO THE TERMS OF THISLICENSE, PROMPTLY RETURN THE UNUSED SOFTWARE, MANUALS AND ACCOMPANYING MATERIALS TOTHE LOCATION FROM WHICH THEY WERE OBTAINED FOR A REFUND.
1. License. The application, demonstration and other software and audio accompanying this License, whether ondisc, in memory or on any other media (the "Software"), and the related documentation are licensed to you bySynchro Arts Limited. You may use the Software on a single computer, make one copy of the Software for backuppurposes only and physically transfer the Software from one computer to another provided that all copies of theSoftware are removed from the machine from which it is being transferred and the Software is only used on onecomputer at a time. You may also transfer all your license rights in the Software, the backup copy of the Software,the related documentation and a copy of this License to another party, provided the other party reads and agrees toaccept the terms and conditions of this License.
2. Copy and use restrictions. You are not allowed to distribute copies of the Software or the documentation. ThisSoftware is protected by the copyright laws that pertain to computer software. It is illegal to make copies of theSoftware, except for backups. It is illegal to give copies to another person, or to duplicate the Software by any othermeans, including electronic transmission. The Software contains trade secrets and in order to protect them you maynot decompile, reverse engineer, disassemble or otherwise reduce the software to human-perceivable form.
You may not modify, adapt, translate, rent, lease or create derivative works based upon the Software or any partthereof. You may not provide use of the Software in a network, time-sharing, or multiple user arrangement. You maynot electronically transmit the Software from one computer to another. You acknowledge that no title to theintellectual property in the Software is transferred to you and that title and full ownership rights to the Software a willremain the exclusive property of Synchro Arts Limited or its suppliers and licensors.
3. Termination. This License is effective until terminated. You may terminate this License at any time by destroyingall copies and recordings of the licensed software and documentation and giving a legally binding written assuranceto Synchro Arts that you have done so. This License will terminate immediately without notice from Synchro ArtsLimited if you fail to comply with any provision of this License. Upon termination you must destroy all copies andrecordings of the Software, related documentation and copies thereof and return to Synchro Arts the originals of theSoftware and documentation.
4. Limited Warranty. Synchro Arts Limited warrants that the original disc (if supplied) on which the Software isrecorded is free from defects in materials and workmanship, assuming normal use, for a period of ninety (90) daysfrom the date of purchase. If a defect occurs during this period, you may return your faulty disc to Synchro ArtsLimited along with a dated proof of purchase and Synchro Arts Limited will replace it free of charge. This limitedwarranty is void if failure of the Software has resulted from accident, abuse or misapplication. Any replacementSoftware will be warranted for the remainder of the original warranty period. This warranty gives you specific legalrights and you may also have other rights which vary by jurisdiction.
5. No Other Warranties. EXCEPT FOR THE EXPRESS WARRANTY OF THE ORIGINAL DISCS SET FORTHABOVE, SYNCHRO ARTS LIMITED GRANTS NO OTHER WARRANTIES, EXPRESS OR IMPLIED, BY STATUTEOR OTHERWISE, REGARDING THE DISCS AND RELATED MATERIALS, THEIR FITNESS FOR ANY PURPOSE,THEIR QUALITY, THEIR MERCHANTABILITY OR OTHERWISE.
THE LIABILITY OF SYNCHRO ARTS LIMITED UNDER THE WARRANTY SET FORTH ABOVE SHALL BELIMITED TO THE AMOUNT PAID BY THE CUSTOMER FOR THE PRODUCT. IN NO EVENT SHALL SYNCHROARTS LIMITED OR ITS AUTHORIZED DISTRIBUTORS BE LIABLE FOR ANY SPECIAL, CONSEQUENTIAL OROTHER DAMAGES OR BREACH OF WARRANTY.
6. Severability. In the event any provision of this Agreement is determined to be invalid or unenforceable, it shall beadjusted so as to best reflect the intent of the parties to the maximum extent possible, and the remainder of thisagreement shall be valid and enforceable to the maximum extent possible.
7. Entire Agreement. This Agreement is the entire understanding between the parties with respect to the subjectmatter hereof and replaces any previous discussion and/or agreement regarding such subject matter. No amendmentto or modification of this License will be binding unless in writing and signed by Synchro Arts Limited.
8. Governing Law. This Agreement shall be interpreted and enforced in accordance with English law and theEnglish courts shall have jurisdiction to determine any dispute.

VocALign Project User Manual 4
Table of Contents
A. END USER LICENSE AGREEMENT 3
B. IMPORTANT NOTES 6
C. INTRODUCTION TO VOCALIGN 8
D. APPLICATIONS 9
E. AUTHORIZATION 10Unlocking the Software 10Deactivation of your License 12
F. SETTING-UP VOCALIGN PROJECT 13Auto Filter: 13Auto Naming: 13Confirm File Name Option 15Changing the Colors of the Audio Waveforms 16Settings Folder 16
G. QUICK START GUIDE 17
H. OPERATIONAL GUIDE TO USING VOCALIGN 20Screen and Controls: 20Description of Controls: 20
Operation with Digital Performer 22Digital Performer Tutorial 22
Using VocALign with Sound Files 24Selecting an Audio File: 24Selecting Regions within Sound Files: 25
Operation with Pro Tools 3.2 - 5.0 26General Operational Features 26Hot-Key Control of VocALign and Process Descriptions 26Accessing Audio Waveforms: 27Auditioning 28Further Notes for VocALign Playback 28Trimming the Selected Audio 29Moving the Dub Display for Inspection 30Processing Signals with Different Lengths 30“Latching” 31Reverb tails 31
Foreign Dialogue Synchronization 32
VocALign Project User Manual 5
I. TIMEMODTM 34Overview of TimeMod 34TimeMod Setup 35Handles: 35
The TimeMod Window and Controls 36Using TimeMod 37Completing the Processing 37
J. TROUBLE-SHOOTING 38General Trouble Shooting 38Trouble Shooting for Digital Performer Users 38

VocALign Project User Manual 6
A. Important Notes
Pro Tools
VocALign Project 2.9 and later does not support Digidesign Pro Tools.
If you require support for Pro Tools 5.0 or later you need to use VocALignProject for Pro Tools.
For Pro Tool 5.0 and earlier, use the legacy version of VocALign Project 2.71which can either be found on your installer CD or athttp://www.synchroarts.com
This program is currently compatible with the following systems:
Apple Mac Systems:
For Stand-alone Operation:PowerPC 601 or betterMac OS 9.0 or higher and OS X10.3 or higher2 Megabytes of Free RAM
Supported File Formats:SDII and Wave at 44.1 KHz to192KHz.
Additional requirements forMOTU® Operation:Digital Performer® 3.0 or higherand Digital Performer® 4.0 orhigher software (But not 5.12, 5.13and higher is supported.)
Microsoft Windows Systems:
For Stand-alone Operation:Windows95/98/NT/2000/ME/XP/Vista
Supported File Formats:Wave and Broadcast wave files at44.1 KHz to 192 KHz.
For Operation via the WindowsClipboard:Syntrillium™ Cool Edit Pro™Sonic Foundry® Sound Forge®
For the latest compatibility list, please check: www.SynchroArts.com
Acknowledgements
VocALign is developed and sold under license from Wordfit Limited. VocALignwas written and developed by Jeff Bloom, John Ellwood, Tim Rogers and MakJukic at Synchro Arts Limited.

VocALign Project User Manual 7

VocALign Project User Manual 8
B. Introduction to VocALign
What is VocALign?VocALign is a process that lets audio editors make the timing of one audio signalmatch another automatically.
How does VocALign work?VocALign works by applying varying amounts of time stretching or compression toone signal (called the "dub") to make its energy peaks and troughs align in time witha “guide” signal. This alignment is fast and of the highest quality.
What can VocALign do for me?If you are a dialogue editor needing to lip-sync vocals, or a music editor needing totighten-up lead or backing vocals, instrumental tracks, or a number of otheralignment tasks, then VocALign is for you!
Consider the following examples:
Working without VocALign:A dubbing session, for film post production, or music production, begins with a guidetrack. Then the voice-over artist, singer, or musician will dub this as closely aspossible.Because humans are not machines, they will not be able to get exactly in time withthe guide. This is generally not acceptable for lip-syncing, nor for double-tracking ofvocals or instruments. Often, the next step is to loop-record the more tricky sectionsindividually, but this can break-up the natural flow of the line. Lastly, the editor willuse a digital audio editor to cut and nudge individual sections into time with the guide.The above process can take many hours for both the artist and the editor. Above all,the process sometimes creates a result that is inferior in quality.
Working with VocALign:The above process becomes a simple matter of getting the artist to concentrate oncreating a great performance, and not worry about the fact that it may drift in and outof exact sync with a previous performance. VocALign can then be used to adjust thetiming by automatically applying the required amount of varying time-stretching andcompression to allow the dub to take on the same timing as the guide.This saves studio time, saves artists time and improves the quality of your results.Most importantly, you allow your artists to produce their best performances, free fromthe rigidity normally associated with dubbing.

VocALign Project User Manual 9
C. Applications
VocALign was originally designed for Lip Syncing replacement dialogue forFilm and Video post-production but it has been adapted to work successfullyin all of the following applications:
• Syncing replacement dialogue in Post Production for Film and Video.
• Double-tracking vocal parts or instrumental parts
• Tightening backing singers with one another, or with the lead vocal
• Tightening backing instrumental tracks
• Synching a drum machine audio-output to a real drummer (or vice versa)
• Giving a dubbed vocal the timing of a “live” vocal performance,
• Changing the voice or even sex of a singer or actor’s performance.
• Replacing the vocals in a music video shoot with a production track,achieving perfect lip-sync.
• Foreign Language Dubbing

VocALign Project User Manual 10
D. Authorization
Once installed, VocALign will initially run in a time-limited trial mode. Onceyour trial period is over, you will need to purchase the VocALign software inorder to unlock it for its continued use on your computer. If you have alreadypurchased the software, you can unlock it at any time, ready for fullyfunctioning use.
Unlocking the SoftwareWhen you purchase software from Synchro Arts you will be supplied with aunique code called a Product Key. This Product Key is used to start theunlocking process on you computer.
You cannot use the same Product Key to unlock the software on morethan one computer.
To unlock the software you will need an Internet connection, either on thecomputer on which you wish to run VocALign, or via a remote computer.
When the trial periods end the program will display the following dialog
If you have already purchased VocALign select Unlock… if you which topurchase VocALign select Buy Now…
If you the select Unlock… the following dialog will be displayed

VocALign Project User Manual 11
Enter your Product Key. You Product key is an eleven digit string which willstart with “VP27”.
If your computer is attached to the Internet select Register. You will then betaken to a web page which will ask for your registration details. When you fillin this form, an email will be sent to the email address you supply. It may takeup to 1 hour for this email to arrive. If you do not receive the email within 1hour, contact Synchro Arts.
When you receive the email it will contain an authorization code. If you haveclosed VocALign you need to restart VocALign and then select Unlock todisplay this dialog again. You can then enter the authorization code into thelower edit field then select OK. If the authorization code is correct, VocALignwill then start. Once an authorization code has successfully authorizedVocALign, that authorization code cannot be used again. (Make sure that youdo not confuse letters with numbers in the authorization code.)
The Product key can be used to generate new authorization codes if thesoftware has been de-activated.
If you computer is not attached to the Internet you need to select SaveShortcut, and the following message will be displayed.

VocALign Project User Manual 12
Locate the file Unlock VocALign Project.htm on your desktop and move thefile to a computer with an Internet connection (The computer can be using anyoperating system which supports web browsing). Open the file in a webbrowser and select the Unlock VocALign Project link. A web page will thenbe displayed which will ask for you registration details – then follow theinstructions above.
If you do not have any Internet connections open the Unlock VocALignProject.htm file in a web browser (you do not need an Internet connection toopen the file) and follow the instructions in the file.
Deactivation of your LicenseYou can move your Product Key between computers by deactivating thelicense.
It is important that you deactivate your license before:• Removing the software from your computer.• Upgrading or re-installing your computer's operating system.
To deactivate the license you will need an Internet connection, either on thecomputer on which you wish to run VocALign, or via a remote computer.
If access to an Internet connection is not possible, please contact SynchroArts Limited during UK business hours: 1000-1800 GMT.
To start deactivation, select the “About VocALign…” menu then click“Deactivate…” and follow the on-screen instructions.
This will then allow you to use your Product Key to unlock the software onanother computer.
It is important to keep your Product Key safe as it may be needed if youupgrade your computer or wish to move the software to another computer.
Do not allow any one else to use your Product Key, as this will prevent youfrom using your software.

VocALign Project User Manual 13
E. Setting-up VocALign Project
It is highly advisable that you use the following instructions to set-upVocALign on your system before using it to process audio:
Auto Filter:
Click on the Options selection in theMain VocALign Menu.
Auto Filter should be switched ON by default already, showing a check mark next tothe option. This means that anytime you select or change a Guide or Dub region andswitch to VocALign, VocALign will automatically Filter (i.e. spectrally analyse) thenew signal.
If there is no checkmark, Auto Filter is OFF, and you will see a waveform whenVocALign runs instead of the spectral energy.
TIP: It is recommended that you leave Auto Filter ON.
Auto Naming:
Ensure a) VocALign is running in the foreground and b) the main VocALign window ispresent (not the TimeMod window).
Click on the Options selection in the Main VocALign Menu and from the drop downlist select the Edit Auto Name... Using this feature will automatically create a newname of each new VocALigned audio file. This saves considerable time and effortand avoids mistakes.
The user has control over:-• Where (i.e. in which disk and folder) the VocALigned audio is placed (the
Destination)• What Name VocALign automatically generates each time it Edits a signal.
In the Edit Auto Name window:Select the Destination for the VocALigned audio. This can be the any of thefollowing:-
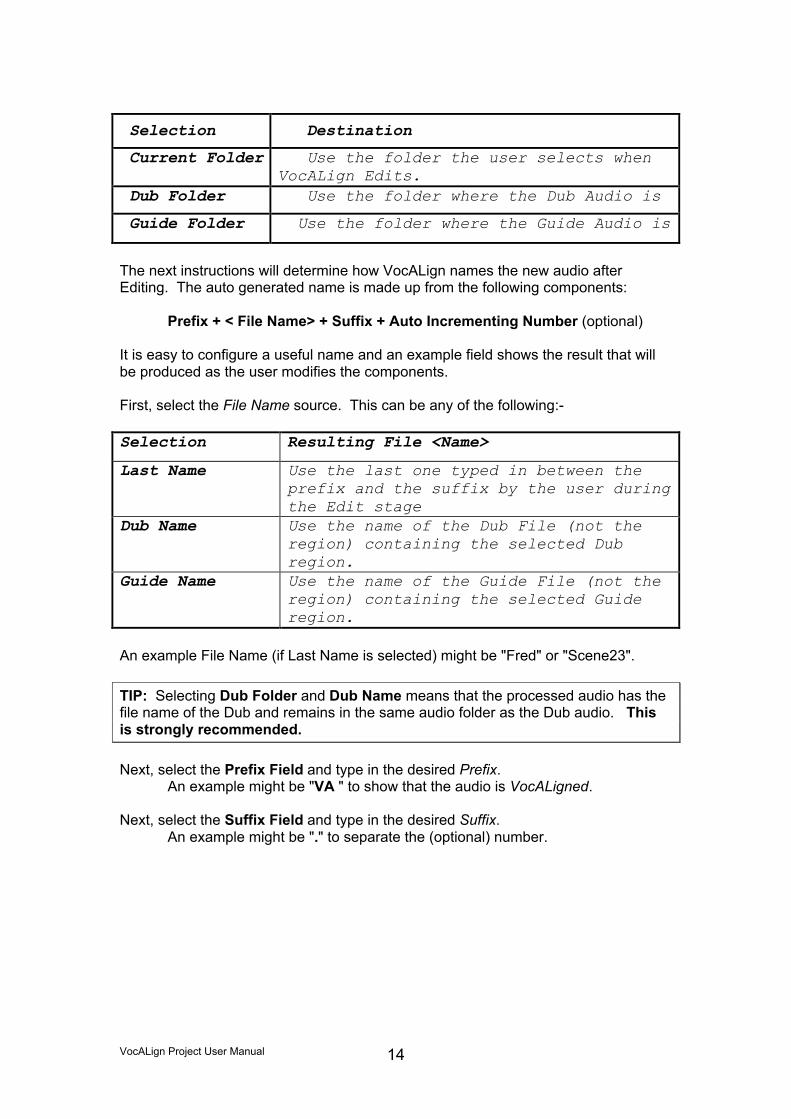
VocALign Project User Manual 14
Selection Destination
Current Folder Use the folder the user selects whenVocALign Edits.
Dub Folder Use the folder where the Dub Audio is
Guide Folder Use the folder where the Guide Audio is
The next instructions will determine how VocALign names the new audio afterEditing. The auto generated name is made up from the following components:
Prefix + < File Name> + Suffix + Auto Incrementing Number (optional)
It is easy to configure a useful name and an example field shows the result that willbe produced as the user modifies the components.
First, select the File Name source. This can be any of the following:-
Selection Resulting File <Name>
Last Name Use the last one typed in between theprefix and the suffix by the user duringthe Edit stage
Dub Name Use the name of the Dub File (not theregion) containing the selected Dubregion.
Guide Name Use the name of the Guide File (not theregion) containing the selected Guideregion.
An example File Name (if Last Name is selected) might be "Fred" or "Scene23".
TIP: Selecting Dub Folder and Dub Name means that the processed audio has thefile name of the Dub and remains in the same audio folder as the Dub audio. Thisis strongly recommended.
Next, select the Prefix Field and type in the desired Prefix.An example might be "VA " to show that the audio is VocALigned.
Next, select the Suffix Field and type in the desired Suffix.An example might be "." to separate the (optional) number.

VocALign Project User Manual 15
Confirm File Name Option
When VocALign automatically creates a file name during the editing stage of itsoperation, the user can optionally have VocALign show a dialog box with the newname before the file gets written. This feature can be used to ensure that the filenames, destination folders, and destination disks for the new audio are correct and, ifnot, the user can modify them.
If this box is not checked (i.e. selected), then VocALign will write the new file withoutany user confirmation or intervention unless a duplicate filename is encountered.This is recommended and makes operation quicker, but the user is responsible forensuring that the Auto Name options are set correctly:
Setting Result
Confirm File Name - ON Show naming dialog before editing (Default)
Confirm File Name - OFF Do not show naming dialog before editing
TIPS:
Confirm File Name - OFF is recommended for efficiency.
However, if there are file errors or problems saving files in the right location,put this option ON and observe what destination Disk and Folder VocALign isattempting to use.
Finally, if auto numberingis required, check theAppend Number boxand enter the desiredStarting Number in thebox.
An example of completedRecommended Settingsis shown below. (Notethat the Number field canbe set to any numberfrom which the userwishes to start theautomated count).
WARNING: The Destination Folder for the VocALign output audio must be on adrive accessible by your Digital Audio Editing System.
VocALign Project User Manual 16
Changing the Colors of the Audio Waveforms
Note: It is not recommended that you alter the waveform colours untilyou are familiar with the operation of VocALign.
Note also that if you have run previous versions of the VocALignApplication on your system, the previous color scheme will be displayed.
Ensure VocALign is running in the foreground. Select the Colors option in theOptions menu.
Select which of the waveforms' color to change. (Unselected refers to the audio notincluded in the region currently selected but which is adjacent to it. This is normallyGrey).
Selecting any of these will bring up a color selection control panel. The user can nowchoose a new color as required.
Settings Folder
The Settings Folder currently comprises six factory pre-sets used to control howflexible VocALign's Time Alignment is. Normally, this folder is automatically foundwhen VocALign is loaded, however, if a previous version has been run, or ifVocALign is moved, the following procedure should be carried out.
Ensure VocALign is running in the foreground. Click the VocALign Settings Selectorand Display drop-down menu at the bottom of the VocALign window.
Check that the drop down menu has several settings titles (e.g. "Normal Flexibility","Maximum Compression", etc.)
If this drop down menu only contains "<Default>", carry out the following procedure:1. Select the menu item "Settings Folder" from the VocALign Options
menu.2. Locate and set the directory at the top of the screen to point to the folder
labelled "VocALign Settings" in the VocALign Project Folder and thenclick the box with "Select VocALign Settings" or “Choose” at the bottomof this window.
3. Check again in the VocALign Application that the drop down SettingsMenu has several settings titles. If not, redo the previous steps in thissection.
VocALign Project User Manual 17
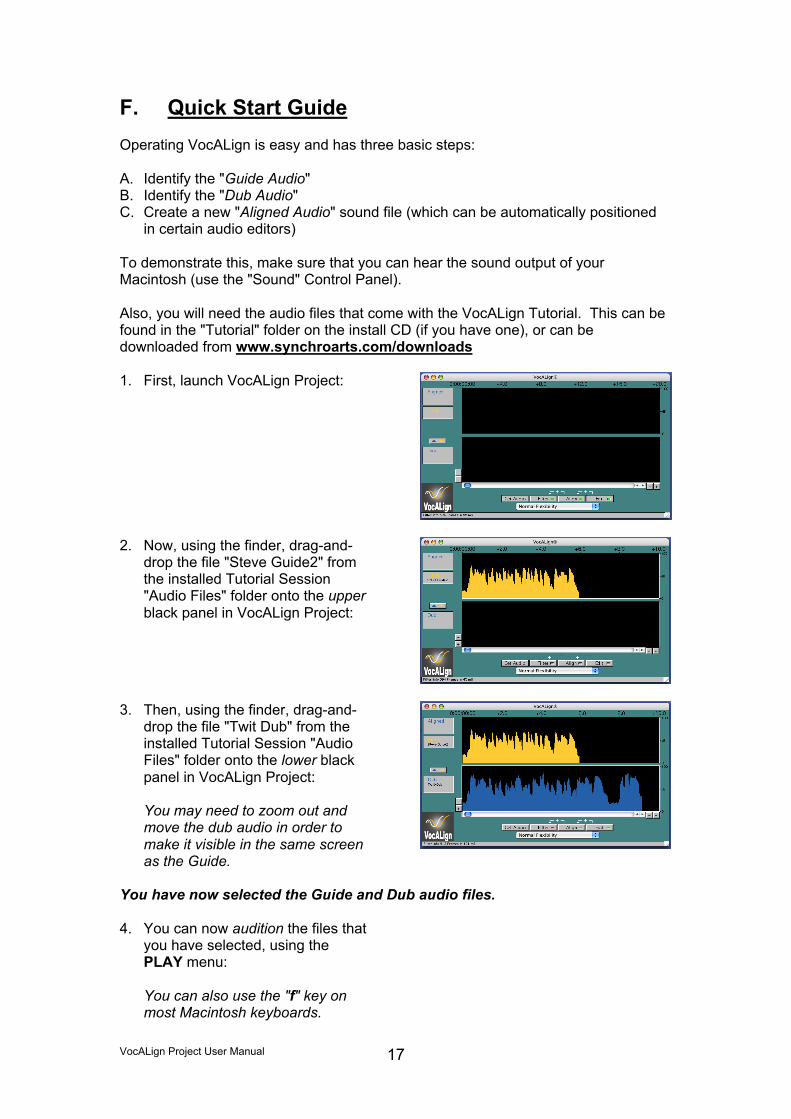
F. Quick Start GuideOperating VocALign is easy and has three basic steps:
A. Identify the "Guide Audio"B. Identify the "Dub Audio"C. Create a new "Aligned Audio" sound file (which can be automatically positioned
in certain audio editors)
To demonstrate this, make sure that you can hear the sound output of yourMacintosh (use the "Sound" Control Panel).
Also, you will need the audio files that come with the VocALign Tutorial. This can befound in the "Tutorial" folder on the install CD (if you have one), or can bedownloaded from www.synchroarts.com/downloads
1. First, launch VocALign Project:
2. Now, using the finder, drag-and-drop the file "Steve Guide2" fromthe installed Tutorial Session"Audio Files" folder onto the upperblack panel in VocALign Project:
3. Then, using the finder, drag-and-drop the file "Twit Dub" from theinstalled Tutorial Session "AudioFiles" folder onto the lower blackpanel in VocALign Project:
You may need to zoom out andmove the dub audio in order tomake it visible in the same screenas the Guide.
You have now selected the Guide and Dub audio files.
4. You can now audition the files thatyou have selected, using thePLAY menu:
You can also use the "f" key onmost Macintosh keyboards.
VocALign Project User Manual 18
5. Press the "Align" button.VocALign will now create anothertrack, the "Aligned" audio, which isthe Dub audio, modified so thatthat the peaks and troughs in theenergy match that of the Guide.The "Aligned" audio appears as ayellow trace above the Guidewaveform. Check that it followsthe shape of the Guide's energy:
6. You can now audition the Alignedand Guide files together, using thePLAY menu:
You can also use the "e" key onmost Macintosh keyboards.
7. Finally, to Edit the Aligned Audiointo a sound file, press the EDITbutton.
This creates a sound file on yourhard disk (normally in the samefolder as the Dub audio is located)In this case it is called "VA TwitDub.1":
Congratulations - You have successfully "VocALigned" your first audio track!

VocALign Project User Manual 19
Consult the information in the “Troubleshooting” chapter if the audio does notappear to be properly aligned.
The next chapter details how to get the most out of VocALign Project:

VocALign Project User Manual 20
G. Operational Guide to using VocALign
Screen and Controls:
Description of Controls:
1. Name Display Panels: Shows the name of the Guide, Dub and Aligned files.Clicking either "Guide" or "Dub" panels will open a dialog box to allow you toselect a specific "region" within the SDII file instead of the entire file itself.
2. Guide Energy: A profile of the energy of the Guide signal in time3. Dub Energy: A profile of the energy of the Dub signal in time4. Aligned Audio Trace: A representation of the energy of the new Aligned signal
in time5. Exchange Button: Swaps the captured Guide with the captured Dub in
VocALign.6. Graph vertical scale: Use to increase or decrease the scale of the graph.7. Get Audio Button: Click to load a sound file into VocALign.8. VocALign Settings: Control the way that VocALign aligns the audio:
• Maximum Compression: Tries to match the Guide by time compressing thealigned audio as much as possible
• Low Flexibility: Alignment is not very flexible, sound quality may be best.• Normal Flexibility: Standard VocALign settings, works best in most cases• High Flexibility: Alignment is as flexible as possible• Maximum Expansion: Tries to match the Guide by time-expanding the aligned
audio as much as possible9. Filter Button: Used to analyse the energy of the selected audio (not needed if
the Auto Filter Option is ON)

VocALign Project User Manual 21
10. Align Button: Click this to generate the Aligned audio trace.11. Edit Button: Creates the Aligned audio file.12. Graph Time Scale: Use to increase or decrease the time scale of the graph.
VocALign Project User Manual 22
Operation with Digital Performer
To use VocALign with MOTU's Digital Performer, the way that you capture the Guideand Dub is different to the method described in the Quick Start Guide (Chapter F).You also have a way of returning the Aligned audio straight back into DP.
Tip: You need Digital Performer version 3.0 or later to use the VocALign integration.
Digital Performer Tutorial
1. Make sure VocALign Project is running, then, in Digital Performer, open thefile "VocALign Tutorial DP" (which is in the "Tutorial" folder on your install CD,or available for download from our website: www.synchroarts.com).
2. Now, select thesound bite"Steve Guide 2":
3. Next, set this as "Guide"using the Audio >VocALign menu:
You have now identified the Guide file to VocALign.
4. Now, select thesound bite "TwitDub":
VocALign Project User Manual 23
5. Next, set this as "Dub" usingthe Audio > VocALign menu:
You have now identified the Dub file to VocALign.
6. Optionally, at this point, youcan switch to VocALign andadjust the selected files orVocALign's flexibility settings.
7. Finally, just select "Align andSpot Audio" from the Audio >VocALign menu.
8. This will replace theselected Dub with theAligned Audio:
In the illustration, thealigned audio file iscalled "Twit-Dub 7"
You have just VocALigned the audio from Digital Perfomer!

VocALign Project User Manual 24
Using VocALign with Sound Files
In addition to the "drag-and-drop" operation detailed in the Quick Start Guide(Chapter F), there are some additional features about using VocALign to directlyprocess Sound Files:
Selecting an Audio File:
In VocALign, there are four ways to select an audio file for the Guide or Dub:-
• Drag-and-Drop onto VocALign• Press the Get Audio button• Press the o shortcut keystroke• Select the Open option in the File Menu.
With Drag-and-Drop, you specify the file as either Guide or Dub by dropping it intothe appropriate panel in VocALign.For the other methods, you will need to locate the files you wish to open in a filebrowser, making sure that you select either Guide or Left Dub in the drop-down menuwhen you open each one.
Note that interleaved Stereo files can be used and processed correctly, but VocALigncannot replay them. Split Stereo files need to be opened as Left Dub and Right DubAppropriately.
Once opened, and if Auto Filter is on (Auto Filter is described in Chapter E), thefiles will be filtered and displayed on screen. Auto Filter is recommended, as youwill otherwise have to manually click filter for each signal:

VocALign Project User Manual 25
Selecting Regions within Sound Files:
The most common method of selecting audio within opened sound files is by openingREGION definitions within them. In this way, you can specify sections that you wantto VocALign as REGIONS in your Digital Audio Workstation, then open the files inVocALign, recalling the regions to process and process them highly efficiently.
Important: When using Regions, make sure that you EXPORT the region definitionsto the SDII or Wave file (normally region definitions are saved in the Digital AudioWorkstation)
Regions Tutorial:
Using the example audio from the Quick Start Guide, we will remove the "laughfrom the end of the aligned audio:
1. To select a region in the Guide,click on the Guide Name Panel.
A dialog box will appear allowingyou to select the desired Regionwithin the SDII file.
For this example select the regioncalled "selection".
2. Next, click on the Dub NamePanel.
A dialog box will appear allowingyou to select the desired Regionwithin the SDII file
For this example, select the regioncalled "No Laugh"
3. The Regions will now appearhighlighted in the Guide and Dubpanels:
4. The selected Regions can now beAligned normally:

VocALign Project User Manual 26
Operation with Pro Tools 3.2 - 5.0
This version of VocALign does not support Pro Tools. For Pro Tools 3.2 to 5.0 youmust use the earlier version of VocALign Project 2.7.2 which can be found on yourproduct CD or at http://www.synchroarts.com
General Operational Features
Hot-Key Control of VocALign and Process Descriptions
Once the user has captured the Guide and Dub audio and is satisfied with the startand end of each, any of the four on-screen Processing buttons can be pressed (or,alternatively, their "Hot-keys" equivalents:
Function[Hot-Key] Process and description
Filter
(no hot key)
Starts VocALign's analysis processing, in which both theGuide and Dub are filtered by a band pass filterbank. Usingthe VocALign View menu, any of the four filter bank bands'outputs (or the original audio) can be displayed.Note: Normally, Auto Filter is ON and the Filter step does notneed to be activated manually.
Align
Hot-key = a
Can be activated once the signals are filtered. This uses theSetting shown under the Align button. After Alignment, atrace of the same colour as the Dub will be shown in thesame Display window as the Guide, superimposed on theGuide.The user can visually inspect quickly how well the peaks ofthe Guide and Aligned Dub line-up. The Scale + and - keysas well as the Scroll Controls will assist in this process.
Edit
Hot-key = e
Can be activated once the Alignment has been carried out.This process automatically edits the Dub audio according tothe time alignment path that was created in the Align stepand writes a new audio file to the disk.Before writing the file, a window may appear requesting theuser confirm the Auto Naming selection, or the user canmanually enter a file name.The user must ensure that the directory path is correct.HOT TIP: Use Autonaming and Prefix the new name with"VA" to keep the “VocALigned” audio easily identifiable.

VocALign Project User Manual 27
Note that pressing keys with arrows and "+" symbols above them will activate theprocessing operations to the left of the keys, as indicated by the flow of the arrows. Acompleted operation will have a Red light and an uncompleted operation will have aGreen light as shown below where the filter operation is shown completed.
Thus, pressing Align instead of Filter will both run the Filter (if required) and theAlign functions.
If the Dub is stereo, then the user must use the drop down menu to assign and getthe Left Dub Audio and the Right Dub Audio files separately.
Accessing Audio Waveforms:
The user may view the audio waveform (instead of the waveform's energy) in theVocALign window by pressing d.

VocALign Project User Manual 28
Auditioning
In the VocALign Application, the selected Guide, Dub and Aligned signals can beplayed back separately or together with single keys.
Pressing the same key will restart playback or pressing one of the other keys willstop the current playback and start playback of the new selection:
One signal audition Two signal audition
g for Guide Audio f for Guide and Dub together
d for Dub Audio s for Dub and Aligned together
a for Aligned Audio e for Aligned and Guide together
[Space] - stops or repeats previous playback (toggle)
Tip: Use of the [e] or [a] keys will process and play the audio - providing avery efficient single key operation.
Further Notes for VocALign Playback
To make it easy to remember, the keys that play two signals are "between" the twokeys used to play the relevant individual signals.
Also, during Playback, a green arrow in the Signal Identification panels will showwhich signal and channels of signals are being played.
If the user presses any playback key that plays the Aligned signal (a, s, or e) beforean Aligned signal has been generated, a temporary signal will be produced andindicated by the name Audition.

VocALign Project User Manual 29
If the user is satisfied with the Audition signal, then if the Edit button is pressed, theAudition signal will be renamed with the appropriate name. It will not be regenerated.
If a stereo signal is played, both channels will be played when the signal is played byitself (e.g. [g], [d] or [a]) are pressed.
However, if a stereo signal is played with another signal, then only the channelselected in the Play menu will be fed to the output. The left channel is the default.
Trimming the Selected Audio
We will next reduce the length of the Dub being processed. You may wish to dothis to align only the beginning part of the dub and leave the following partunaligned.
1) First, move the cursor to the end of the Dub filtered as shown below.
2) Next, hold down the mouse button, and a dotted line should appear. While
holding down the mouse button, drag the line to the left and release it at the pointshown in the next picture. (This does not need to be exactly the same point).
3) The above picture indicates that the selected Dub region for processing is nowmuch shorter than the Guide selected region.
4) Click on Align and the following result should appear:

VocALign Project User Manual 30
The Selected Dub audio has been aligned to the corresponding section of theGuide.
5) It is useful to audition the Aligned audio.
6) The Aligned Audio File can now be created.
Moving the Dub Display for Inspection
Before or after Alignment takes place, if mouse pointer is placed over the Dub energydisplay and the mouse button clicked, an Open Hand Icon will appear:
By holding down the mouse button, the Hand Icon will appear "closed" andthe Dub audio or Filtered output display can be "dragged" back or forth tocheck the alignment visually. This has no effect on processing.
Processing Signals with Different Lengths
In general, it is common for either the Guide or Dub to be part of a much longer audioregion than the other is. In most cases, the Guide region is longer (being part of along transfer), while the Dub is a shorter section.
In the second example in the Demo Session, however, we have a Dub that is muchlonger than the Guide, and even contains extra audio at the end of the region that isnot in the Guide.
The Tutorial files Steve Guide2 and Twit-Dub should be opened in VocALign andplayed together to hear how the Dub is not only much slower and longer than theGuide but it has extra audio at the end.
Before processing, the user should try to determine which modulations in the Guidematch with modulation in the Dub.
Next, click on the Align button and the resulting aligned (orange) trace over the Guideshould appear as shown below:

VocALign Project User Manual 31
In this case, the Dub audio filter waveform is aligned up to the point where the Guideselected waveform (shown in blue) stops, and then the rest of the Dub filterwaveform is joined on but without any modification.
Audition the resulting Aligned Audio along with the Guide (press "e" on the Macintoshkeyboard) and note the amount of time compression required to align these twosignals and also note how the "laugh" at the end of the Aligned Dub is unedited.
“Latching”
To align just the start of the Dub with the Guide (and leave the rest of the Dubunprocessed), capture only 0.25 to 1.0 second of the Guide and capture the Dub asnormal.
Reverb tails
To stop the end of a Dub from being stretched to wrongly "fit" to a noisy orreverberant Guide, stop the captured end of the Guide 0.25 to 1.0 second before theGuide signal of interest ends and capture the Dub as normal.

VocALign Project User Manual 32
Foreign Dialogue Synchronization
Summary
This section discusses the problems that arise in foreign language dialoguereplacement (dubbing) and how and when VocALign can be used to assist thisprocess.
Overview
The quality of lip synch that can be achieved in Foreign Dialogue Replacement(often called Dubbing, Doublage, etc.) depends on many factors including:-
• The quality of the translation. • The accuracy of the timing of the new dialogue recording. • The ability of the editor to modify the new dialogue.
VocALign will attempt to align one set of audio modulations to another, nomatter what the audio signals are. Therefore, it can be used to align themodulations of recorded dialogue in one language to recorded dialogue inanother language.
Thus, when there is an audio Guide Track that is in good synch with the lipmovements in the picture, VocALign can generally be used to improve theaccuracy of the lip sync of the replacement foreign dialogue.
Sometimes, unfortunately, the Guide Track will not be in close sync with the picture.This can occur if the Guide Track is itself already badly dubbed or in a differentlanguage from the original location recording.
In this case, even if VocALign matches the new audio modulations to the Guide, theywill be out of sync, just as the Guide is. An experienced editor must align the audioby ear and eye in this case, and VocALign is not likely to be of much assistance.
Also, the Guide track used for dubbing can sometimes contain music and effects.This makes the job for VocALign harder, but not impossible, since it must "ignore" themusic and effects in the Guide Track and match only to the dialogue.
Lastly, the translation may demand that the two audio signals are vastly incompatibleand result could never be totally satisfactory. In this case, the best result sometimescomes from making the two audio signals start together and, if possible, endtogether. VocALign or the use of linear time compression or expansion products(such as Synchro Arts TimeModTM) can often help in this case, too.
Suggested Operations
Advice: Dialogue Editors should be very familiar with the use of VocALign ondialogue replacement in the same language before attempting to use it forforeign dialogue replacement.

VocALign Project User Manual 33
The following tips are suggestions and not rules, so the user should not onlytry these techniques, but also experiment further. Every line of dialogue islikely to need individual attention.
When to use VocALign
If the Guide Track dialogue is in sync with the picture, and the replacement foreigndialogue has been translated and recorded to achieve good lip sync, then VocALignshould be able to improve the quality of lip sync.
Break the dialogue into appropriate length sections.
The user must remember that VocALign is deliberately restricted to stretching a partof a signal by a factor of 2.0 (100% expansion) and compressing it by a factor of 1/2(50% compression). If VocALign is trying to expand or compress a gap in thespeech, and it has used up its allowance, it may try to expand or compress theneighbouring speech.
This means, for example, that if gaps in the new and replacement dialogue appear indifferent places or are of very different durations, after modifying the gap region,VocALign might also have to expand or compress the replacement speech signalnear the gap, to best align the modulations. This may lead to unwanted effects. Inthis case, the user should break the signal into sections that can be individuallytreated.
Sync up only the beginning of a line
To get only the beginning of a new line of dialogue to sync up with the Guide, use the"latching" technique described earlier. This means only selecting perhaps a secondat the start of the guide that VocALign will try to sync the dub start to, and the entirereplacement line for the dub.
Minimize the amount of VocALign's Time Compression and Expansion
If VocALign is making too many timing modifications and creating unnatural soundingspeech, try using the "Low Flexibility" setting.
To align only the start and end of the replacement audio
Use a Linear Time Compression/Expansion utility (such as the TimeMod™) to getthe new dialogue to the same length. Then use VocALign to adjust it.
VocALign Project User Manual 34
H. TimeModTM
Overview of TimeMod
TimeModTM is available as part of the Macintosh Version of VocALign Project and isdesigned to provide an easy to use, high-quality audio stretching and compressionutility.
TimeMod is a non-real time, time compression/expansion process with the followingfeatures:• The user can quickly specify the required changes by setting a new start
or end time code, duration, ratio or change in a simple TimeMod window.• TimeMod generates user-specified invisible "handles" which will be added
to both ends of the selected audio and processed with it, so crossfadesand extensions can be added later.
• Stereo is processed without phase shifts between the two output channels.• No pitch change is introduced.• It is a linear process (as opposed to VocALign which is non-linear) so that
the time modification is uniformly spread throughout the signal andmaintains rhythms accurately.
• The user can audition the input and output directly from the TimeModwindow.

VocALign Project User Manual 35
TimeMod Setup
It is highly advisable that you use the following instructions to set-up TimeModon your system before using it to process audio:
Handles:
TimeMod, however, allows the user to have additional audio before and after theselected region automatically included in the processing. These are commonlycalled "Handles".
These Handles are processed along with the selected audio, but remain "invisible"unless the user extends them.
To set the length of the handles, with the TimeMod window in the foreground:
5. Click on the Options selection in the VocALign Application's TimeModMenu.
6. Click on the Handles selection and a menu will appear with the defaultlength set to 0.25 seconds.
7. Set the handle length to the required amount (generally, between 0.002second and 2.00 seconds). When complete, click OK.
The use of handles is discussed in the operational description, later in this chapter
Note: The Handle Length, Frame Rate, and Auto Name settings can be reset atany time when running TimeMod.
This completes the setup of TimeMod.

VocALign Project User Manual 36
The TimeMod Window and Controls
1. Left File: Filename of the selected Left Audio file2. Right File: Filename of the selected Right Audio file3. Anchor: The buttons under this label select whether the original audio's
Start or Stop time fill be fixed.4. Ratio: This number equals (Current Duration/Original Duration). This is
initially 1.0000 and can go from 0.5 to 2.0. This field can be modifiedanytime.
5. Start Time: This initially is the selected region's start time. If the Anchor isset to Start Time, the Start Time cannot be modified.
6. Stop Time: This initially is the selected region's end time. If the Anchor isset to Stop Time, the Stop Time cannot be modified.
7. Duration: This initially is the selected region's "Length". This field can bemodified anytime but the new duration must be greater than 0.5 times orless that 2.0 times that of the original signal.
8. Get Audio: Click to open an audio file for processing9. Reset: Sets all input boxes to the default state10. Edit: Creates the Processed audio file(s)11. Change: This is the difference between the Current Duration and the
Original Duration. This is initially 00:00:00 and can go positive or negative.This field can be modified anytime.

VocALign Project User Manual 37
Using TimeMod
If the VocALign application is running and the TimeMod window is not in theforeground, the user can use the VocALign drop down File menu, select theTimeMod entry and the TimeMod window should appear in the foreground.
There are three ways to select the Left or Right Files:-• Press the Get Audio button• Press the o shortcut keystroke• Select the Open option in the File Menu.
Any of these actions should bring up a file selection window.
The user must select the relevant file as shown above. If the signal is mono, thenonly the Left Audio must be selected. Once selected, the Open button must bepressed.
If the signal is stereo, the Right Audio must be selected as well as the Left Audiousing the same procedures. Using the drop down menu and choosing the RightAudio option allows the user to select the Right Audio. Then the Right Audio filemust be selected as shown below after which the Open button should be pressed.
Completing the Processing
The user can audition the input using the [i] key, and then select the desiredTimeMod parameters. When these are set, pressing Edit will generate the newsignal which can be played with the [o] key.
Pressing the [o] key before pressing Edit will generate the audio and play it.

VocALign Project User Manual 38
I. Trouble-Shooting
Help and advice can also be found on the Synchro Arts website atwww.SynchroArts.com/support
Some commonly occurring problems are listed here:
General Trouble ShootingProblem:"VocALign stretches or compresses the audio too much at one or morepoints."Possible Reason:
The signal must be inspected for differences in gaps betweencorresponding "words" or the lengths of words themselves beingdifferent between the Guide and Dub by more than 1/2 or 2/1.Solution: If this is the case, work with smaller sections of the signals,because VocALign will not compress by more than 1/2 or stretch bymore than 2/1.
Problem:"VocALign produces an error saying that the files need to be greater than0.25s or less than 120s"Possible Reason:
VocALign can process files and regions that are between 0.25s and120s in length.Solution: Bounce your files down into shorter sections before loadingthem into VocALign.
Trouble Shooting for Digital Performer Users
Problem:"Digital Performer reports "Error Communicating with VocALign" when one ofthe VocALign menu options is selected."Possible Reason:
There is a warning or error message in VocALign.Solution: switch over to the VocALign Application and clear anywarning or error messages before switching back to performer toproceed.

VocALign Project User Manual 39