Embed Size (px)
Citation preview

EMC® VMAX® All Flash and VMAX3™
FamilySecurity Configuration Guide
REVISION 11

Copyright © 2002-2017 Dell Inc. or its subsidiaries. All rights reserved.
Published May 2017
Dell believes the information in this publication is accurate as of its publication date. The information is subject to change without notice.
THE INFORMATION IN THIS PUBLICATION IS PROVIDED “AS-IS.“ DELL MAKES NO REPRESENTATIONS OR WARRANTIES OF ANY KIND
WITH RESPECT TO THE INFORMATION IN THIS PUBLICATION, AND SPECIFICALLY DISCLAIMS IMPLIED WARRANTIES OF
MERCHANTABILITY OR FITNESS FOR A PARTICULAR PURPOSE. USE, COPYING, AND DISTRIBUTION OF ANY DELL SOFTWARE DESCRIBED
IN THIS PUBLICATION REQUIRES AN APPLICABLE SOFTWARE LICENSE.
Dell, EMC, and other trademarks are trademarks of Dell Inc. or its subsidiaries. Other trademarks may be the property of their respective owners.
Published in the USA.
EMC CorporationHopkinton, Massachusetts 01748-91031-508-435-1000 In North America 1-866-464-7381www.EMC.com
2 Security Configuration Guide

7
9
Preface 11Revision history...........................................................................................15
Overview 17System Overview........................................................................................ 18Points of access..........................................................................................18Security controls map................................................................................. 19
Physical Security 21Physical security controls...........................................................................22Port security...............................................................................................22
Solutions Enabler 23Solutions Enabler checklist.........................................................................24SYMAPI home and bin directory locations.................................................. 26Security controls map.................................................................................27Access control............................................................................................ 27
Host access IDs............................................................................. 28User-based access control............................................................ 29Client/server access IDs................................................................ 31
Solutions Enabler log files........................................................................... 31Port usage...................................................................................................31Client/server security settings................................................................... 32
Network encryption.......................................................................32Securing remote connections using TLS/SSL................................33Server host security...................................................................... 34Client host security........................................................................35Secure session configuration summary..........................................36
Certificate files........................................................................................... 37Managing backward compatibility of certificates...........................39
Server security considerations................................................................... 39Specifying nodes and addresses.................................................................40Concurrent connections..............................................................................41Control operations for IBM z/OS................................................................43File backup................................................................................................. 43
File protection............................................................................... 44Non-privileged user command use.................................................44
Lockbox......................................................................................................44Stable System Values (SSVs)........................................................45Lockbox passwords....................................................................... 45Password and SSV management................................................... 46
Daemon security settings........................................................................... 46Daemon identity on UNIX...............................................................47
Figures
Tables
Chapter 1
Chapter 2
Chapter 3
CONTENTS
Security Configuration Guide 3

Secure host directories..................................................................48Secure directory path....................................................................48Daemon connection authorization................................................. 49
SRM daemon connections..........................................................................49
Mainframe Enablers 51Overview of Mainframe Enablers................................................................52Security controls map................................................................................ 53EMCSAFI security interface....................................................................... 53Security-related configuration options....................................................... 53
Unisphere for VMAX 55Unisphere for VMAX checklist....................................................................56SYMAPI home and bin directory locations..................................................56Security controls map.................................................................................57Unisphere for VMAX access control........................................................... 57
User-based access control............................................................ 58symauth rules................................................................................ 59Individual and group roles.............................................................. 59User IDs.........................................................................................60
User authorization...................................................................................... 62Authorization for the Initial Setup User..........................................62Unisphere REST API......................................................................62Multiple authorization roles........................................................... 62
Lockbox......................................................................................................63Unisphere for VMAX and CA server certificates.........................................63Certificate revocation list for X.509 certificate-based authentication........ 63Port usage..................................................................................................64Link-and-launch security............................................................................ 64Unisphere data security..............................................................................65Security alert system................................................................................. 65Session timeout..........................................................................................65Root access requirements.......................................................................... 65
SMI-S Provider 67SMI-S checklist.......................................................................................... 68ECOM toolkit..............................................................................................68Security controls map................................................................................ 69User-based access control......................................................................... 69
User authorization......................................................................... 69User authentication....................................................................... 70Administrator user account............................................................ 71
Component access control......................................................................... 73Log files and settings..................................................................................73
Displaying log files......................................................................... 73Port usage.................................................................................................. 74Network encryption....................................................................................74
Group Replication.......................................................................... 74Enabling Global Mode.................................................................... 75
Enable authentication for SMI-S................................................................ 75Manage the Lockbox ................................................................................. 75
Create the CST Lockbox................................................................75Security alerts............................................................................................ 76
Chapter 4
Chapter 5
Chapter 6
CONTENTS
4 Security Configuration Guide

Container Applications 77Overview of container applications............................................................. 78Container application access IDs................................................................ 78
Client/server mode........................................................................78
Embedded NAS 81Embedded NAS.......................................................................................... 82Security controls map.................................................................................82
Embedded Management 85Embedded management............................................................................. 86Security controls map................................................................................ 86Virtual Machine ports................................................................................. 86
vApps 89vApp overview............................................................................................90vApp checklist............................................................................................ 90Security controls map................................................................................. 91Deployment settings and points of access..................................................92
Limiting access to management interfaces.................................... 92User authentication.................................................................................... 92
VASA Provider authentication....................................................... 93Default user accounts....................................................................93
Port usage..................................................................................................94Log files and settings..................................................................................95
Log file management..................................................................... 95SSL certificates..........................................................................................96Data security settings.................................................................................96Serviceability.............................................................................................. 97Alerts..........................................................................................................97Clam anti-virus........................................................................................... 97Upgrades.................................................................................................... 97
Snapshots 99TimeFinder SnapVX.................................................................................. 100Secure snaps............................................................................................ 100
Data at Rest Encryption 101Overview...................................................................................................102Key manager............................................................................................. 103Key protection.......................................................................................... 103
Chapter 7
Chapter 8
Chapter 9
Chapter 10
Chapter 11
Chapter 12
CONTENTS
Security Configuration Guide 5

CONTENTS
6 Security Configuration Guide

System components for VMAX All Flash and VMAX3 storage arrays.......................... 19Solutions Enabler components....................................................................................27Unisphere for VMAX components...............................................................................57SMI-S managed objects............................................................................................. 69Embedded NAS managed objects...............................................................................82eManagement managed objects................................................................................. 86vApp managed objects................................................................................................ 91
1234567
FIGURES
Security Configuration Guide 7

FIGURES
8 Security Configuration Guide

Typographical conventions used in this content.......................................................... 13Revision history...........................................................................................................15Solutions Enabler security configuration checklist......................................................24Session negotiation behavior...................................................................................... 34Host operating systems that support SSL.................................................................. 36Secure sessions summary...........................................................................................36Options that restrict storsrvd functionality................................................................ 40storsrvd daemon session control options and values...................................................42Unisphere for VMAX security configuration checklist.................................................56SMI-S security configuration checklist.......................................................................68Ports used by SMI-S...................................................................................................74vApp security configuration checklist.........................................................................90vApp default accounts................................................................................................94Network ports used in vApps......................................................................................94
1234567891011121314
TABLES
Security Configuration Guide 9

TABLES
10 Security Configuration Guide

Preface
As part of an effort to improve its product lines, EMC periodically releases revisions ofits software and hardware. Therefore, some functions described in this documentmight not be supported by all versions of the software or hardware currently in use.The product release notes provide the most up-to-date information on productfeatures.
Contact your EMC representative if a product does not function properly or does notfunction as described in this document.
Note
This document was accurate at publication time. New versions of this document mightbe released on EMC Online Support (https://support.emc.com). Check to ensure thatyou are using the latest version of this document.
PurposeThis guide helps you to securely deploy and maintain VMAX3 and VMAX All Flasharrays, including Solutions Enabler, Unisphere® for VMAX®, SMI-S, and vAppManager. This guide provides references to VNX® documentation to help you securelydeploy embedded NAS.
AudienceThis document is intended for security administrators and operators that need tounderstand and maintain VMAX3 and VMAX All Flash security.
Related documentationThe following EMC publications provide additional information related to managingsecurity for your software and storage system configuration. For a comprehensive listof documentation, see the EMC VMAX3 Family Product Guide for VMAX 100K, VMAX200K, VMAX 400K with HYPERMAX OS or the EMC VMAX All Flash Product Guide forVMAX 250F, 450F, 850F, 950F with HYPERMAX OS .
EMC VMAX All Flash Site Planning Guide for VMAX 250F, 450F, 850F, 950F withHYPERMAX OS
Provides planning information regarding the purchase and installation of a VMAX250F, 450F, 850F, 950F with HYPERMAX OS.
EMC VMAX3 Family Site Planning Guide for VMAX 100K, VMAX 200K, VMAX 400K withHYPERMAX OS
Provides planning information regarding the purchase and installation of a VMAX3Family 100K, 200K, 400K.
EMC Solutions Enabler, VSS Provider, and SMI-S Provider Release Notes
Describes new features and any known limitations.
EMC Solutions Enabler Installation and Configuration Guide
Provides host-specific installation instructions.
EMC Solutions Enabler CLI Reference Guide
Documents the SYMCLI commands, daemons, error codes and option fileparameters provided with the Solutions Enabler man pages.
Preface 11

EMC Solutions Enabler Array Controls and Management for HYPERMAX OS CLI UserGuide
Describes how to configure array control, management, and migration operationsusing SYMCLI commands for arrays running HYPERMAX OS.
EMC Solutions Enabler Array Controls and Management CLI User Guide
Describes how to configure array control, management, and migration operationsusing SYMCLI commands.
EMC Solutions Enabler SRDF Family CLI User Guide
Describes how to configure and manage SRDF environments using SYMCLIcommands.
SRDF Interfamily Connectivity Information
Defines the versions of HYPERMAX OS and Enginuity that can make up validSRDF replication and SRDF/Metro configurations, and can participate in Non-Disruptive Migration (NDM).
EMC Solutions Enabler TimeFinder SnapVX for HYPERMAX OS CLI User Guide
Describes how to configure and manage TimeFinder SnapVX environments usingSYMCLI commands.
EMC Solutions Enabler SRM CLI User Guide
Provides Storage Resource Management (SRM) information related to variousdata objects and data handling facilities.
EMC Common Object Manager (ECOM) Toolkit Deployment and Configuration Guide
Describes how to securely deploy the EMC Common Object Manager (ECOM).
EMC Unisphere for VMAX Release Notes
Describes new features and any known limitations for Unisphere for VMAX .
EMC Unisphere for VMAX Installation Guide
Provides installation instructions for Unisphere for VMAX.
EMC Unisphere for VMAX Online Help
Describes the Unisphere for VMAX concepts and functions.
EMC VMAX VASA Provider Release Notes
Describes new features and any known limitations for VASA Provider.
EMC vApp Manager for Unisphere for VMAX Online Help
Describes the vApp Manager for Unisphere for VMAX concepts and functions.
EMC vApp Manager for Solutions Enabler Online Help
Describes the vApp Manager for Solutions Enabler concepts and functions.
EMC vApp Manager for eManagement Online Help
Describes the vApp Manager for embedded Management concepts and functions.
EMC vApp Manager for VASA Provider Online Help
Describes the vApp Manager for VASA Provider concepts and functions.
EMC VMAX Embedded NAS Release Notes
Describes the new features and identify any known functionality restrictions andperformance issues that may exist in the current version.
Preface
12 Security Configuration Guide

EMC VMAX Embedded NAS Quick Start Guide
Describes how to configure eNAS on a VMAX3 or VMAX All Flash storage system.
EMC Unisphere for VNX Online Help
Describes how to configure embedded NAS.
EMC VNX Series Security Configuration Guide for VNX
Describes security settings and configuration for embedded NAS.
EMC VNX Series Command Line Interface Reference for File
Describes CLI commands to manage access control, certificates, LDAPconfiguration, and other security-related activities for embedded NAS.
EMC Mainframe Enablers Installation and Customization Guide
Describes how to install and configure Mainframe Enablers software.
EMC Mainframe Enablers Release Notes
Describes new features and any known limitations.
Special notice conventions used in this documentEMC uses the following conventions for special notices:
DANGER
Indicates a hazardous situation which, if not avoided, will result in death orserious injury.
WARNING
Indicates a hazardous situation which, if not avoided, could result in death orserious injury.
CAUTION
Indicates a hazardous situation which, if not avoided, could result in minor ormoderate injury.
NOTICE
Addresses practices not related to personal injury.
Note
Presents information that is important, but not hazard-related.
Typographical conventionsEMC uses the following type style conventions in this document:
Table 1 Typographical conventions used in this content
Bold Used for names of interface elements, such as names of windows,dialog boxes, buttons, fields, tab names, key names, and menu paths(what the user specifically selects or clicks)
Italic Used for full titles of publications referenced in text
Preface
13

Table 1 Typographical conventions used in this content (continued)
Monospace Used for:
l System code
l System output, such as an error message or script
l Pathnames, filenames, prompts, and syntax
l Commands and options
Monospace italic Used for variables
Monospace bold Used for user input
[ ] Square brackets enclose optional values
| Vertical bar indicates alternate selections - the bar means “or”
{ } Braces enclose content that the user must specify, such as x or y orz
... Ellipses indicate nonessential information omitted from the example
Where to get helpEMC support, product, and licensing information can be obtained as follows:
Product information
EMC technical support, documentation, release notes, software updates, orinformation about EMC products can be obtained on the https://support.emc.com site (registration required).
Technical support
To open a service request through the https://support.emc.com site, you musthave a valid support agreement. Contact your EMC sales representative fordetails about obtaining a valid support agreement or to answer any questionsabout your account.
Reporting security vulnerabilitiesEMC takes reports of potential vulnerabilities in our products very seriously. For thelatest on how to report a security issue to EMC, please see the EMC Product SecurityResponse Center at http://www.emc.com/products/security/product-security-response-center.htm.
Your commentsYour suggestions help us improve the accuracy, organization, and overall quality of thedocumentation. Send your comments and feedback to: [email protected]
Preface
14 Security Configuration Guide

Revision historyThe following table lists the revision history of this document.
Table 2 Revision history
Revision Description and/or change
11 Added new content on [email protected] section on replication and secure snaps.
10 Combined individual VMAX3 Family and VMAX All Flash Security ConfigurationGuides into a single guide to cover both product lines.Added new content for mainframe systems.
09 Updated all security controls maps.Removed procedural information from Solutions Enabler section. Proceduresnow reside in the EMC Solutions Enabler Array Controls and Management forHYPERMAX OS CLI User Guide and the EMC Solutions Enabler Installation andConfiguration Guide.
08 Added content on restricting vApp client access to a single domain.
07 New content describing VASA Provider.Changed/updated content:
l Solutions Enabler 8.2 network encryption supports OpenSSL 1.0.1q
06 Minor updates and fixed typos.
05 New content:
l Added “Configure Certificate Revocation List for X.509 Certificate-basedAuthentication”
l
Embedded NAS chapter renamed to Container applications. New contentadded on access IDs and embedded management.
Changed/updated content:
l Solutions Enabler 8.1 network encryption supports OpenSSL 1.0.1p
l “manager_server_cert commands syntax” updated to support certificateswith keysize of 3072
l “Resetting the host system SSVs” updated to clarify that SMAS servicemust be running to reset SSVs
04 New content describing Data at Rest Encryption (D@RE).Changed/updated content:
l Updated steps to manage Unisphere for VMAX certificates
l Updated steps to manage vApp persistent files
03 New content describing security procedures for SMI-S and an introduction toEmbedded NAS.
02 New title: EMC VMAX Family Security Configuration Guide.New content describing security procedures for vApp Manager.
Preface
Revision history 15

Table 2 Revision history (continued)
Revision Description and/or change
Updates for Solutions Enabler 8.0 and Unisphere for VMAX 1.6:
l Multiple authorization roles
l Managing the Lockbox
01 EMC Symmetrix Security Configuration Guide for Solutions Enabler 7.6 andUnisphere for VMAX 1.5.
Preface
16 Security Configuration Guide

CHAPTER 1
Overview
This chapter includes the following topics:
l System Overview................................................................................................18l Points of access................................................................................................. 18l Security controls map.........................................................................................19
Overview 17

System OverviewEMC storage arrays running HYPERMAX OS provide industry-leading, information-centric security to secure people, infrastructure and data. You can authenticate,authorize and audit activities across systems and devices.
Points of accessThere are two points of access to an array running HYPERMAX OS: Direct access tothe physical system or through array control management. You can manage an arraythrough host management or from embedded management (eManagement) directlyon the array.
The following points of access must be secured in a HYPERMAX OS system:
l Physical: Physical security encompasses limiting who has access to the datacenterand array hardware. It also includes monitoring port access under normal andservice operations.
l Host: Traditional host-based management allows you to manage multiple arraysfrom a single management interface. The host can be a physical server or a virtualmachine. Host management applications include:
n Solutions Enabler: Solutions Enabler provides a comprehensive command lineinterface, called SYMCLI, to manage your storage environment. SYMCLIcommands are invoked from the host, either interactively on the command line,or using scripts.
n Unisphere for VMAX: Unisphere provides a web-based application that allowsyou to quickly and easily provision, manage, and monitor arrays.
n SMI-S Provider: SMI-S Provider supports the SNIA Storage ManagementInitiative (SMI), an ANSI standard for storage management. This initiative hasdeveloped a standard management interface that resulted in a comprehensivespecification (SMI-Specification or SMI-S). SMI-S defines the open storagemanagement interface, to enable the interoperability of storage managementtechnologies from multiple vendors. These technologies are used to monitorand control storage resources in multivendor or SAN topologies.Solutions Enabler provides the interface between the SMI and the arrays. TheSolutions Enabler components required for SMI-S Provider operations areincluded as part of the SMI-S Provider installation.
n Mainframe Enabler: EMC Mainframe Enablers allow you to monitor and managean array running HYPERMAX OS.
l Embedded: Embedded applications are virtual machines that provide embeddedfunctionality on the array. Virtual hardware resources are used by the embeddedapplications, including:
n Virtual hardware needed to run the software and embedded application(processor, memory, PCI devices, virtual power management)
n Virtual FA ports (on the director where the container is installed)
n Access to necessary drives (boot, root, swap, persist, shared)
Two embedded applications are available: Embedded NAS (eNAS) and embeddedmanagement (eManagement). eNAS enables consolidated block and file storagewithout the expense and complexity of gateway hardware. eManagement embeds
Overview
18 Security Configuration Guide

management software (Solutions Enabler, Unisphere for VMAX and SMI-S) on thearray, enabling you to manage the array without software installed on a host.
Enbedded applications are installed at the factory. No additional securityprocedures are required.
Security controls mapFigure 1 System components for VMAX All Flash and VMAX3 storage arrays
Solutions Enabler Server
HYPERMAX OS
Storage Array
Solutions Enabler Server Host
vCenter
Server
FC, iSCSI, FICON
VMware ESXi
TLS
eNAS
eMGMT
MMCS
Service
Access
vApps
SSH
FC, iSCSI
ESRS Gateway
to EMC
Customer Data
EnvironmentFC, iSCSI
Customer
Management
Network
Unisphere
360 Host
HTTPS
Guest
AccessSymmetrix
Service
Credentials
(SSC)
Credentials
TLS
HTTPS,
other protocols
Symmetrix Access Control
eMGMT
Clients
TLS
Management
Hosts
Overview
Security controls map 19

Overview
20 Security Configuration Guide

CHAPTER 2
Physical Security
This chapter describes physical security controls that you should put in place toensure a secure environment. Topics include:
l Physical security controls.................................................................................. 22l Port security...................................................................................................... 22
Physical Security 21

Physical security controlsYou are responsible for providing a secure physical environment for an array runningHYPERMAX OS. A secure environment includes basic measures such as providingsufficient doors and locks, permitting only authorized and monitored physical accessto the system, providing a reliable power source, and following standard cabling bestpractices.
Port securityA storage array includes a number of physical ports. You should ensure that onlyauthorized personnel have access to the ports and that they are used for theirintended purpose.
Physical Security
22 Security Configuration Guide

CHAPTER 3
Solutions Enabler
Solutions Enabler provides a comprehensive command line interface (SYMCLI) tomanage your storage environment.
Solutions Enabler is available as a host-based component, as part of embeddedmanagement, or as a virtual application. This chapter addresses the host-basedcomponent.
SYMCLI commands are invoked from the host, either interactively on the commandline, or using scripts.
Solutions Enabler 8.0 or greater is required to discover storage arrays runningHYPERMAX OS.
This chapter contains the following topics:
l Solutions Enabler checklist................................................................................ 24l SYMAPI home and bin directory locations..........................................................26l Security controls map........................................................................................ 27l Access control....................................................................................................27l Solutions Enabler log files................................................................................... 31l Port usage.......................................................................................................... 31l Client/server security settings...........................................................................32l Certificate files...................................................................................................37l Server security considerations........................................................................... 39l Specifying nodes and addresses........................................................................ 40l Concurrent connections..................................................................................... 41l Control operations for IBM z/OS....................................................................... 43l File backup.........................................................................................................43l Lockbox............................................................................................................. 44l Daemon security settings...................................................................................46l SRM daemon connections................................................................................. 49
Solutions Enabler 23

Solutions Enabler checklistThe following checklist summarizes the security-related tasks you should perform toimprove the security of your deployment.
Table 3 Solutions Enabler security configuration checklist
Purpose of activity Task
Host-based access control
Restrict which hosts may access specificfunctionality.
Configure SYMAPI options.Use the symacl command to generate uniqueID for each management host.
Restrict actions hosts can execute. Configure SYMAPI options and use thesymacl command to enable use of Alternate
Access IDs.Define Access Control Groups, Pools, andHosts to control what actions managementhosts can execute.
Restrict which hosts and users may performmanagement operations.
Use access control or user authorization torestrict hosts.
Client/server security settings
Reduce local attachments between hosts andstorage arrays.
Use Solutions Enabler in client/server modeto a storsrvd running on a remote host
locally attached to the storage.
Protect access to Solutions Enabler resourcesthrough firewalls and NATs.
If a firewall or NAT router is used to protectnetwork resources, you may need to:
l Configure the network resources to allowaccess to specific ports.
l Modify related settings indaemon_options.
Certificate files
Require client authentication by the serverusing client certificates.
Set security_clt_secure_lvl=MUSTVERIFY inthe daemon_options file.
Strengthen your authentication by usingcustom certificates.
Replace SYMAPI-generated securitycertificates with more secure customer-supplied certificates.
On client hosts
Control ports used by the client-side eventdaemon (storevntd).
Modify the port on which the client-sidestorevntd listens.
Specify the host (HostName) and port(NNNN) on which the server daemon islistening.
For SYMCLI users, modify the netcnfg file
with the hostnames or IP addresses of yourservers.
On server hosts
Solutions Enabler
24 Security Configuration Guide

Table 3 Solutions Enabler security configuration checklist (continued)
Purpose of activity Task
Control the port used by the server daemon(storsrvd).
Modify the port on which storsrvd listens
(resolve port conflicts).
Control startup of the server daemon(storsrvd).
Use the stordaemon install command to
configure storsrvd be started automatically
at system boot.
Limit the set of client hosts from which theserver will accept connections.
Configure the following:
l <SYMAPI_HOME>/config/nethost file
l The following entries in the<SYMAPI_HOME>/config/daemon_options file:
n max_sessionsn max_sessions_per_hostn max_sessions_per_user
Restrict the functionality that the storsrvddaemon is allowed to perform on behalf ofremote client hosts.
Edit the following entries in the<SYMAPI_HOME>/config/options file:
l SYMAPI_ACC_ADMIN_VIA_SERVERl SYMAPI_ACC_DISPLAY_VIA_SERVERl SYMAPI_ALLOW_SCRIPTS_VIA_SERVE
Rl SYMAPI_CTRL_VIA_SERVER
Securing directories
Protect the SYMAPI directory and itscontents so that only appropriateadministrators have write access.
Protect the <SYMAPI_HOME>/configdirectory.
Protect the <SYMAPI_HOME>/db directory
to grant non-root users access.
Configure daemon_users to authorize non-root users to use daemons.Run SYMCLI commands as a non-root or non-Administrator user.
Limit write access privileges to the<SYMAPI_HOME>/db directory to authorized
users only.
Prevent unauthorized access to the Lockbox. Change the Lockbox password immediatelyafter installation to best protect its contents.
Limit which users have write privileges to theconfig directory.
Limit access to the <SYMAPI_HOME>/config directory to authorized users only.
All other users should have limited access(read-only or no access, if possible) to thisdirectory.
Minimize injection attacks and other issues. Use the daemon_optionssecure_directory_path to specify which
output directories daemons may write to.
Solutions Enabler
Solutions Enabler checklist 25

Table 3 Solutions Enabler security configuration checklist (continued)
Purpose of activity Task
Securing daemons
Reduce system exposure by using non-rootexecution of daemons.
Use the stordaemon setuser command to
establish a non-root user for daemons, anddirectory permissions.
Securing SRM operations
Limit access to SRM functionality. Limit permission to the SRM daemon.Edit the common daemon authorization file,daemon_users.
Limit security exposure by using a databaseaccount in SRM with minimal privileges.
Configure a minimally privileged account forSRM database access
Protect directories and files. Restrict access privileges for directories andfiles.
Start up and shut down the database servermanager instance.
Configure database startup options.
SYMAPI home and bin directory locationsThe Solutions Enabler <SYMAPI_HOME> and <SYMCLI_BIN> directories are found inthe following locations by default:
<SYMAPI_HOME>
l Windows: c:\Program Files\EMC\SYMAPI...l UNIX: /var/symapi/...l z/OS: /var/symapi/...Pathnames presented in this document use a UNIX-specific format: forward slashes(/) instead of the backslashes (\) typically used on Windows platforms.
<SYMCLI_BIN>
l Windows: C:\Program Files\EMC\SYMCLI\bin...l UNIX: /usr/storapi/bin...
Note
By default, the location of <SYMAPI_HOME> is the same for both z/OS and UNIX.The EMC Solutions Enabler Installation and Configuration Guide provides moreinformation about:
l Changing the location for <SYMAPI_HOME> on z/OS systems during installation.
l Open VMS file locations.
Solutions Enabler
26 Security Configuration Guide

Security controls mapFigure 2 Solutions Enabler components
Solutions Enabler Server
HYPERMAX OS
Storage Array
Solutions Enabler Server Host
FC, iSCSI, FICON
Solutions
Enabler Client
Management Hosts
Unisphere for
VMAX
SMI-S Provider
TLS
TLS
TLS
TLS
TLS
Access controlSolutions Enabler provides two mechanisms to control access to arrays: host-basedaccess and user-based access.
l The symacl command provides host-based access control that can restrict hostaccess to selected sets of devices across multiple arrays. Host-based accesscontrol limits the management operations a host can perform and provides highlygranular control over management operations. Functionality provided by thesymacl command is referred to as Symmetrix Access Control.
l The symauth command provides user-based authorization that assigns a user orgroup to a role. Roles limit the management operations users can perform on anarray.
Solutions Enabler
Security controls map 27

Note
When configuring Symmetrix Access Control, it is important to:
l Give access rights only to authorized hosts.
l Assign only the privileges users require to perform their tasks.
l Grant ADMIN rights to a very limited number of users (for example, assign ADMINrights to only known users and a select administrative group).
The EMC Solutions Enabler Array Controls and Management for HYPERMAX OS CLI UserGuide provides information on how to set up and perform host-based access controland user-based authorization with the symacl and symauth commands.
Host access IDsSymmetrix Access Control identifies individual management hosts using access IDswhich are stored in a Lockbox. The Lockbox is associated with a particular host whichprevents copying the Lockbox from one host to another. There are two differentmethods to generate the access IDs:
l Alternate access ID: The host's access ID can be generated at random or from auser-defined passphrase, then stored in a secure location on the local disk.Alternate access IDs are supported for all platforms. See Alternate access IDs onpage 28 for more information on alternate access IDs.
Note
It is strongly recommended that you use alternate access IDs on platforms wherethe hardware-based access ID is derived from a network interface MAC address.
l Hardware-based access ID (default): The host's access ID is derived fromhardware characteristics of that host:
n On x86_64 (64-bit Intel/AMD), and IA 64 platforms, a network interface MACaddress is used.
n On other platforms, characteristics of the host, such as a processor identifier,are used.
Note
When MAC addresses generate access IDs, the IDs may be unreliable or ineffectiveunder some circumstances, including clustering environments, virtual environments, orfollowing a hardware change. For added security on x86_64 (64-bit), IA64, andBS2000 hardware platforms, it is strongly recommended that you use alternate accessIDs instead of hardware-based access IDs.
Alternate access IDsAlternate access IDs are available for all platforms. When alternate access IDs areenabled, Solutions Enabler can:
l Randomly generate an access ID.
l Generate an access ID based on a user-chosen passphrase, where the passphraseis either:
n Entered on the command line in an option.
Solutions Enabler
28 Security Configuration Guide

n Entered in a file, whose name is specified in the command line.
You enable alternate access IDs with the SYMAPI_ALTERNATE_ACCESS_ID option inthe <SYMAPI_HOME>/config/options file.
Solutions Enabler securely stores the alternate access ID on the local disk in theLockbox file. The symacl man page provides more information on the symacl –unique command.
Note
Solutions Enabler access control changes must be made from an administrative hostwith ADMIN rights to the array and rights to make symacl changes.If you only have one such administrative host, and you change its alternate access ID,once that change is made, the host can no longer make access control changesbecause the new access ID is not yet in an access group.
It is recommended that you enable a second administrative host prior to attempting tochange a host’s alternate access ID.
User-based access controlUser authorization assigns individual users to roles to limit the management operationsthat users can perform. User-based controls are less granular than host-basedcontrols.
You can use the symauth command, Symmetrix Management Console (SMC), orUnisphere for VMAX to assign users to roles.
Solutions Enabler does not support an explicit authentication mechanism for users. Ituses the credentials that users supply when logging onto the local system, as providedby the operating system. SMC and Unisphere for VMAX pass the user’s authenticatedidentity to Solutions Enabler.
For information on the symauth command, see the EMC Solutions Enabler ArrayControls and Management for HYPERMAX OS CLI User Guide.
For information on managing Unisphere for VMAX user accounts, see the EMCUnisphere for VMAX Installation Guide.
User identificationInternally, Solutions Enabler represents a user identity as a string assembled from theuser’s name and authentication source. The possible encodings are:
H:HostName\UserName
A user authenticated by the local operating system.
D:DomainName\UserName
A user authenticated by a specific domain on Windows.
L:ServerName\UserName
A user authenticated by an LDAP server. (SMC orUnisphere for VMAX.)
C:HostName\UserName
A user authenticated by the private SMC or Unispherefor VMAX authentication service on some host.
M:Symmetrix ID\UserName
A user authenticated by a management guest hostrunning on the specified Symmetrix array.
Solutions Enabler uses these identities in a number of ways. A username is included inrecords written to the array’s secure audit log. This identifies the user that initiated
Solutions Enabler
User-based access control 29

the activity being logged. A user identity is the basis for optional user authorizationrules that restrict management access to arrays.
Support for all user groupsSolutions Enabler checks all groups a user belongs to. During rights checking, eachuser group is examined for a role mapping and the “or” of all rights granted to eachgroup.
The symauth show –username command displays all groups a user belongs to.
Authorization rules can be configured for an array that map either a user or groupname to a management role.
For both user and group authorization, the contained name can be fully qualified (suchas D:Corp\Jones and D:Corp\Sales) or unqualified (such as Jones and Sales).
The rights that are called out for any of these entries matching the user's identity aregranted to that user.
Authorization entries with an unqualified group name are only considered if there areno group entries with a fully qualified name matching the user.
The symauth man page provides more information on this topic.
Multiple authorization rolesIn Solutions Enabler 8.x, you can use the symauth command to assign up to fourauthorization roles. Each role is separated with a '+' character. For example:
StorageAdmin+Auditor+MonitorOutput of the symauth list command displays authorization roles ordered frommost powerful to least powerful. For example:
StorageAdmin+Auditor+PerfMonitor
Backward compatibility
Solutions Enabler versions 7.6 and earlier support only one role per user or group. Tomake later versions compatabile with versions 7.6 and earlier, you must create at leastone authorization rule that corresponds to the version 7.6 roles of Admin orSecurityAdmin. This ensures that older versions of Solutions Enabler can interpret atleast one rule.
When a user has multiple roles defined on an array running Solutions Enabler 8.x, olderversions of Solutions Enabler display only one (the highest assigned) role for that user.
Considerations when deleting or modifying rulesUsers on pre-8.x systems can modify the rules on systems running Solutions Enabler8.x, but the following cautions apply:
l Users on pre-8.x systems can see only one (the highest) role of a rule on a systemrunning Solutions Enabler 8.x, even if the 8.x rule contains multiple roles.
l If a user on a pre-8.x system deletes a rule on an 8.x system that contains multipleroles, the operation deletes the entire multiple role rule.
l If a user on a pre-8.x system modifies a rule on an 8.x system that containsmultiple roles, the modification replaces the multiple roles in the rule with thesingle role specified by the pre-8.x user.
Example: A rule on a system running Solutions Enabler 8.x contains bothStorageAdmin and Monitor roles.
In this case, a user on a pre-8.x system can see only the StorageAdmin role. If the usermodifies the rule to Auditor role, both the StorageAdmin and Monitor roles are
Solutions Enabler
30 Security Configuration Guide

removed even though the pre-8.x system sees only the StorageAdmin role in the rulebefore the modification.
Client/server access IDsAnyone with access to array management software can execute functions on any ofthe array’s devices. Many applications can issue management commands to anydevice in a deployment. Such shared systems may be vulnerable to a host accidentallyor intentionally tampering with another’s devices. To prevent this, you should set upand restrict host access to defined sets of devices across the arrays.
By default, client/server mode operations are executed on the server host using theaccess ID of the server. Access control checks are performed against the rulesestablished for the server host, regardless of which client host initiated theoperations.
You can use the access ID of the client host instead of the server host to perform thischeck. When this is enabled, access control rules must be established for, andchecked against, the client hosts from which the operations are issued.
To use the access ID of the client host, you must make changes in the<SYMAPI_HOME>/config/options file on the client and the server host. On theserver, the SYMAPI_USE_ACCESS_ID option controls the source of the access IDused for the client/server sessions. On the client, theSYMAPI_ALTERNATE_ACCESS_ID option must be enabled to use alternate accessIDs. Use the SYMAPI_CLIENT_SIDE_ACCESS_ID to control whether the client cansend its own access ID to the server. By default theSYMAPI_CLIENT_SIDE_ACCESS_ID option is disabled (the client does not send itsaccess ID to the server in client/server mode).
For more information on setting server or client host access ID, see the EMC SolutionsEnabler Array Controls and Management for HYPERMAX OS CLI User Guide.
Solutions Enabler log filesSolutions Enabler maintains three types of log files:
l Secure audit log – The secure audit log records configuration changes, securityalarms, service operations, and security-relevant actions on the array.
l SYMAPI log files – The SYMAPI log file records SYMAPI errors and othersignificant conditions. One log file is created per day using a date format. A newlog file is started everyday on the first write after 12:00 am.
l Daemon log files – The daemon log files record daemon errors and othersignificant conditions. Each deamon has two log files (.log0 and .log1). Loggingalternates between the two files, switching to the other file each time themaximum size specified by the daemon’s LOGFILE_SIZE parameter is reached.Each daemon writes to the .log0 file until its size exceeds that specified in theLOGFILE_SIZE option, at which point it switches to the .log1 file. It switches backto .log0 under the same conditions.
For more detail on log files, see the EMC Solutions Enabler Array Controls andManagement for HYPERMAX OS CLI User Guide.
Port usageThis section describes the ports Solutions Enabler uses to communicate betweenserver and client hosts.
Solutions Enabler
Client/server access IDs 31

If a firewall or network address translator is present, these ports must be open.Typically, this is a firewall between the Solutions Enabler client and the server hosts.
Server portsIn client/server mode, the Solutions Enabler server (storsrvd daemon) listens bydefault at TCP/IP port 2707 for client connections.
You can configure a port by adding an entry to <SYMAPI_HOME>/config/daemon_options file. If you change the default port at the server, you must modifythe <SYMAPI_HOME>/config/netcnfg configuration file at client hosts to reflectthe use of the non-default port.
To change the server port the server must be down. To use a different port, specify itin the daemon_options file, then restart the storsrvd daemon.
Event daemon portsWhen using the asynchronous events in client/server mode, the event daemon at theclient host listens at a TCP/IP port for events being forwarded from the eventdaemon at the server. By default, the client event daemon asks the operating systemto pick an unused port for it to use.
You can configure a specific port to use by adding an entry to the <SYMAPI_HOME>/config /daemon_options file on the client host. The event daemon uses thefollowing ports by default:
Port Description
Dynamically assigned1024 - 65535
In client/server mode, the event daemon(storevntd) on a client host listens on thisport for asynchronous events sent to it from aserver host. By default, this is picked atrandom by the client host event daemon.
514 Port the server listens on for events.
162 Port the application listens on for traps.
Client/server security settingsIn Solutions Enabler client/server mode, client host operations are automaticallyforwarded to the storsrvd daemon on a server host for execution.
By default, traffic transmitted between client and server hosts is encrypted usingTLS/SSL.
This section describes the mechanisms to operate these connections in a securemanner.
Network encryptionPlatforms where Solutions Enabler supports secure sessions default to securing allconnections using TLS/SSL.
v8.1 and higher uses OpenSSL with the OpenSSL FIPS Object Module 2.0 (NISTcertificate #1747). OpenSSL support is as follows:
l v8.4 - OpenSSL 1.0.2j
l v8.2 - OpenSSL 1.0.1q
Solutions Enabler
32 Security Configuration Guide

l v8.1 - OpenSSL 1.0.1p
FIPS mode is supported on the following platforms:
l Linux x86 platforms
l Windows x86 64 bit platforms
The version of TLS varies depending on the version of Solutions Enabler:
l v8.0.2 server and a client 7.6.2 or later - Client and server use TLS V1.2 withAdvanced Encryption Standard (AES) with 128-bit key, Galois Counter Mode(GCM), with Secure Hash Algorithm 1 (SHA-1).In v 8.0.2 SSLv2 and SSLv3 are disabled by both the client and server. Sessionsare secured using TLS v1.0 or TLS v1.2.
l v8.4 - TLSv1 and TLSv1.1 are disabled by both client and server. Sessions aresecured using TLSv1.2 only.v8.4 also disables all SHA1 ciphers. Only AES128 GCM with SHA256 ciphers areused.
Note
FIPS 140-2 mode is enabled by default.
Securing remote connections using TLS/SSLFor platforms that support secure SYMAPI client and server communications, thedefault/initial configuration is to negotiate only SECURE sessions. You can modify thesecurity level at which the client and server are operating.
Before modifying the security level, you should:
l Understand that the security level specifies the capability of the local side and thelocal side’s expectation of the remote side.
l Know whether the host is SSL-capable or SSL-incapable.
The possible security levels are:
l Level 3 (SECURE) — (Default) Indicates that only secure sessions will benegotiated between the client and server. This is the highest level of security, andit should only be used when there is no chance of an SSL-incapable clientattempting to connect with the server, or an SSL-capable client connecting to anSSL-incapable server.
l Level 2 (ANY) — Indicates that either secure or non-secure sessions will benegotiated between the client and server on SSL-capable platforms.
l Level 1 (NONSECURE) — Indicates that only non-secure sessions will benegotiated between the client and server. This level is intended as a last resort insituations where SSL cannot be used for some reason or is undesirable. In addition,this level can also be useful in matters of performance and availability.
The default security level is SECURE on platforms that support securecommunications and NONSECURE on platforms that do not support securecommunications. The following messages may be issued by the server if SSL-relatedproblems occur:
l ANR0141E through ANR0145E
l ANR0147E
l ANR0148E
l ANR0150E through ANR0153E
Solutions Enabler
Securing remote connections using TLS/SSL 33

l ANR0155E
The EMC Solutions Enabler Installation and Configuration Guide provides details aboutSYMAPI server daemon messages.
Session negotiation behavior
The following table details the type of session negotiated if a client and server are atthe same or different security levels (implied or configured).
Table 4 Session negotiation behavior
Client security level Server security level Negotiated session type
SECURE SECURE SECURE
ANY SECURE
NONSECURE Rejected
NONSECURE NONSECURE NONSECURE
ANY NONSECURE
SECURE Rejected
ANY ANY SECURE
SECURE SECURE
NONSECURE NONSECURE
Server host security
Note
It is strongly recommended to synchronize host times for the server and client hostsbefore generating and using OpenSSL certificates. Failure to synchronize host timescould result in difficulty in establishing secure connections.
You can configure server host security levels in two ways:
l Use the SYMAPI_SECURITY_LEVEL option in the <SYMAPI_HOME>/config/options file. This option specifies whether the server accepts only securesessions from clients.The default value for the SYMAPI_SECURITY_LEVEL option is SECURE. Theserver accepts only secure sessions from clients.
l Use the SECURITY_LEVEL parameter in the <SYMAPI_HOME>/config/daemon_options file. The default for the SECURITY_LEVEL parameter isSECURE.
If both the SYMAPI_SECURITY_LEVEL option in the options file andSECURITY_LEVEL parameter in the daemon_options file are set, and are set todifferent levels, then the setting on the SYMAPI_SECURITY_LEVEL option in theoptions file overrides the setting on the SECURITY_LEVEL parameter in thedaemon_options file.
Solutions Enabler
34 Security Configuration Guide

NOTICE
It is strongly recommended that you use secure sessions. Non-secure sessions are notrecommended, however, you can allow non-secure sessions from clients by modifyingthe SYMAPI_SECURITY_LEVEL or SECURITY_LEVEL options.
FIPS 140-2 encryptionTo set whether to operate in FIPS 140-2 mode for client/server communication, usethe SYMAPI_FIPS option in the <SYMAPI_HOME>/config/options file. When theSYMAPI_SECURITY_LEVEL option is set to SECURE, the SYMAPI_FIPS optionenables or disables FIPS 140-2 compliant encryption of Solutions Enabler client/serversessions on Linux and Windows platforms. The default value for the SYMAPI_FIPSoption is ENABLE.
For a full description of the SYMAPI_SECURITY_LEVEL and SYMAPI_FIPS options,see the EMC Solutions Enabler CLI Reference Guide.
Backward compatibility to pre-8.0 configuration files
Solutions Enabler 8.0 provides backward compatibility to 7.5 and earlier versions usingthe following logic to select the security level:
l Look for SYMAPI_SECURITY_LEVEL in the <SYMAPI_HOME>/config/optionsfile.
l If SYMAPI_SECURITY_LEVEL is specified in the <SYMAPI_HOME>/config/options file, use it.
l If the SYMAPI_SECURITY_LEVEL security level is not specified in the<SYMAPI_HOME>/config/options file, the server looks for storsrvd:security_levelin the <SYMAPI_HOME>/config/daemon_options file.
n If the storsrvd:security_level is not specified on the server, look forSYMAPI_SERVER_SECURITY_LEVEL.
– If the SYMAPI_SERVER_SECURITY_LEVEL is not specified, use thedefault for the platform: SECURE everywhere except OVMS, BS2000, orIBM i, which use NONSECURE.
– If the SYMAPI_SERVER_SECURITY_LEVEL is specified, use the specifiedvalue and post a message saying it was used instead of thestorsrvd:security_level.
n If the storsrvd:security_level is specified, use it.
Verifying client security certificates
By default, if a client has a subject certificate, a server requires the certificate andverifies it. This behavior is controlled by the SECURITY_CLT_SECURE_LVLparameter in the <SYMAPI_HOME>/config/daemon_options file.
The default value for the SECURITY_CLT_SECURE_LVL parameter is VERIFY.
For a full description of the SECURITY_CLT_SECURE_LVL parameter, see the EMCSolutions Enabler CLI Reference Guide.
Client host securityBy default, a Solutions Enabler client attempts to negotiate a secure session with theserver when both the server and client are capable of secure sessions. It is notrecommended that you disable secure communications, however, if you need to allownon-secure sessions between a client and server that cannot negotiate a secure
Solutions Enabler
Client host security 35

session, you can modify the SYMAPI_SECURITY_LEVEL option in the<SYMAPI_HOME>/config/options file to allow non-secure sessions.
netcnfg fileTo configure session security for specific server hosts, modify the <SYMAPI_HOME>/config/netcnfg file for the server in question. This file maps service names toserver hostnames (or IP addresses) and port numbers for Solutions Enabler SYMCLIcommands. If you do not specify a security level, SECURE is used for secure-capableplatforms, and NONSECURE is used for secure-incapable platforms, depending on theconfiguration of the server.
If both the SYMAPI_SECURITY_LEVEL option in the options file and the securitylevel in the netcnfg file are set, and are set to different levels, then the security levelin the netcnfg file takes precedence over the setting in the options file.
For more information on the security settings in the options and netcnfg files, seethe EMC Solutions Enabler CLI Reference Guide.
Secure session configuration summaryThe following table lists the host operating systems that support SSL.
Table 5 Host operating systems that support SSL
Operating systems that support SSL
AIX (64-bit)
HP-UX (64-bit)HP-UX Itanium (64-bit)
Linux Itanium (64-bit)Linux AMD (64-bit)
Solaris (64-bit)
Windows AMD (64-bit)
z/OS
Note
Solutions Enabler does not support SSL on iSeries, BS2000, or OpenVMS.
The following table provides a summary of the secure session settings. See the EMCSolutions Enabler CLI Reference Guide for more information.
Table 6 Secure sessions summary
Option name, possible values, andlocation
Description
storsrvd:security_clt_secure_lvl=MUSTVERIFY |VERIFY |NOVERIFY<SYMAPI_HOME>/config/daemon_options
On server hosts, controls how the servervalidates client certificates.
Solutions Enabler
36 Security Configuration Guide

Table 6 Secure sessions summary (continued)
Option name, possible values, andlocation
Description
Note
This option is not supported on z/OS hosts,where it defaults to NOVERIFY.
MUSTVERIFY: The server requires clients tosend a valid certificate.
VERIFY (default): The server verifies a client’scertificate, if one is sent.
NOVERIFY: The server does not verify clientcertificates.
storsrvd:security_level =SECURE |NONSECURE |ANY<SYMAPI_HOME>/config/daemon_options
On server hosts, controls whether serversestablish a secure session.SECURE (default): Secure sessions arealways used. All other connection types arerefused.
NONSECURE: Non-secure sessions are used;secure sessions are not used.
ANY: A secure session is established whensupported by the client; otherwise a non-secure session is used.
SYMAPI_SECURITY_LEVEL = SECURE | ANY| NONSECURE<SYMAPI_HOME>/config/options
Specifies whether the Solutions Enablerserver accepts only secure sessions fromclients. Applies to both server and client.
SECURE (default): Secure sessions arealways used. All other connection types arerefused.
NONSECURE: Non-secure sessions are used;secure sessions are not used.
ANY: A secure session is established whensupported by the client; otherwise a non-secure session is used.
Certificate filesSolutions Enabler uses OpenSSL to generate certificates for secure client-servercommunication. The client and server verify each other's identity based on theinformation contained in the certificates.
During installation, you have the option to install the certificate component. If youchoose to install the certificate component, a default set of certificates is generated.These certificates are signed by a self-signed root certificate.
Solutions Enabler uses a root certificate and key to generate subject certificates thatidentify client and server hosts. The root certificate is installed on the host. The
Solutions Enabler
Certificate files 37

installation process automatically generates a subject certificate for the host on whichthe install is executed.
The generated certificates can be replaced with certificates that you generate or thatare issued to you by a commercial certification authority.
Subject certificates are generated for both client and server hosts. The subjectcertificates represent the identity of the host without respect to whether the hostacts as a client or a server. A single set of certificates can be used in both the clientand server.
The client and server can be configured separately to use other sets of certificates. Bydefault, both the client and the server validate the certificate of the peer duringsecure session negotiation. The client always validates the server’s certificate; youcannot disable this validation when a secure session is negotiated.
The cert directory is located at:
l Windows: <SYMAPI_HOME>\config\certl UNIX and z/OS: <SYMAPI_HOME>/config/cert
Note
By default, the location of cert directory is the same for z/OS as UNIX. Thelocation for z/OS systems can be changed during installation.
The following certificate files enable a client to verify a server’s identity and a serverto verify a client’s identity:
l symapisrv_cert_v8.*.pem is the default version 8.* subject certificate filewhere 8.* is the Solutions Enabler version. It is created specifically for itsparticular host during installation. It is signed by the EMC Enterprise StorageAutomation root certificate symapisrv_trust_vn.n.pem. This file must be in thecert directory on the SYMAPI client and server for client/server security to work.
l symapisrv_trust_v8.*.pem is the EMC Enterprise Storage Automation Rootcertificate, where 8.* is the Solutions Enabler version. This file must be in the certdirectory on every client and server.
l symapisrv_key_v8.*.pem is the key file associated with the subjectcertificate, where 8.* is the Solutions Enabler version. It is created specifically forits particular host during installation. It is generated during the certificate creationprocess. This file must be in the cert directory on the SYMAPI client and server forclient/server security to work.
Solutions Enabler v8.0.x-8.3.x support backward compatibility with pre-v8.0. Forbackward compatibility with pre-v8.0 versions the following certificate files are alsocreated in the cert directory:
l symapisrv_cert.pem is the pre-V8.x subject certificate file. It is createdspecifically for its particular host during installation. It is signed by the EMC SPEApre-V8.x Root certificate. This file must be in the cert directory on the SYMAPIclient and server for pre-V8.x client/server security to work.
l symapisrv_trust.pem is the EMC SPEA pre-V8.x Root certificate used to signthe SYMAPI certificate file. This file must be in the cert directory on every clientand server for pre-V8.x client/server security to work.
l symapisrv_key.pem is the pre-V8.x key file associated with the subjectcertificate. It is created specifically for its particular host during installation. It isgenerated during the certificate creation process. This file must be in the certdirectory on the SYMAPI client and server for pre-V8.x client/server security towork.
Solutions Enabler
38 Security Configuration Guide

Note
Solutions Enabler v8.4 and higher does not support certificates generated prior toSolutions Enabler v8.0.
Managing backward compatibility of certificates
Note
This section applies to Solutions Enabler v8.0.x-8.3.x. Solutions Enabler v8.4 andhigher does not support certificates generated prior to Solutions Enabler v8.0.
Solutions Enabler 8.x is backward compatible with certificates generated by earlierversions, back to 7.4. For example:
l A Solutions Enabler 8.x server can verify a certificate generated by an olderversion.
l A Solutions Enabler 7.6 client can verify a server certificate generated with -sanand -mode V76 options.
l An older client (Solutions Enabler 7.5 or earlier), can verify a certificate generatedby a Solutions Enabler 8.x server if the certificate’s CN contains either:
n A Fully Qualified Domain Name (FQDN) - if the server host name can beresolved to a FQDN
n An IP address corresponding to the server - if the server host name cannot beresolved to a FQDN
In cluster configurations, if the Solutions Enabler 8.x server’s certificate does notcontain wildcards in the CN, the Solutions Enabler 7.5 client will not verify theserver if the server fails over and presents a different host ID than that present inthe CN.
If a Solutions Enabler 8.x server is running in a clustered environment, SolutionsEnabler 7.5 and older clients must have certificates for each host node of theserver cluster.
CAUTION
When generating certificates on Solutions Enabler 8.x servers, be careful not toadd non-DNS host names in the CN if Solutions Enabler 7.5 and older clients willconnect to the server.
Server security considerationsStarting up the serverThe storsrvd daemon does not run by default. You must explicitly start it before itcan accept connections from remote clients. You can configure the daemon to startautomatically whenever a server host starts.
The EMC Solutions Enabler Installation and Configuration Guide provides detailedinstructions on starting the Solutions Enabler server.
Restricting access to the serverThe <SYMAPI_HOME>/config/nethost file on a server host restricts the hosts andusers from which the storsrvd daemon accepts connections. If the nethost file isnot present, connections are accepted from all client hosts.
Solutions Enabler
Managing backward compatibility of certificates 39

Note
The server considers the contents of the nethost file before deciding whether it willnegotiate a SYMAPI session with the client. If the client host and user are not definedin the nethost file, a session will not be negotiated, regardless of the security level.
The EMC Solutions Enabler Installation and Configuration Guide describes thenethost file.
Restricting server functionalityYou can use settings in the <SYMAPI_HOME>/config/options file on a server hostto restrict the functionality that the storsrvd daemon is allowed to perform onbehalf of remote client hosts. Check to make sure all references to the options filehave a path name of <SYMAPI_HOME>/config/options. You can edit thefunctionality options in the options file while the server is running. The runningserver uses the new settings for all future sessions.
Since the settings are not specified in the <SYMAPI_HOME>/daemon_options file,they cannot be changed using the stordaemon setvar command.
The following table lists the options in the options file that restrict storsrvddaemon functionality:
Table 7 Options that restrict storsrvd functionality
Option name (in <SYMAPI_HOME>/config/options)
Description
SYMAPI_ACC_ADMIN_VIA_SERVER Enable/disable Symmetrix Access Controlchanges.Default is ENABLE.
SYMAPI_ACC_DISPLAY_VIA_SERVER Enable/disable Symmetrix Access Controlinformation displays.Default is ENABLE.a
SYMAPI_ALLOW_SCRIPTS_VIA_SERVER Enable/disable TimeFinder® pre-action andpost-action scripts.Default is DISABLE.
SYMAPI_CTRL_VIA_SERVER Enable/disable array control operations ingeneral. Default is DISABLE.a
a. When set to DISABLE, this class of functionality is not available through the server.
Specifying nodes and addressesA server can accept connections from IPv4 or IPv6 clients. The exact syntax isimportant If you specify the network address instead of the node name in thenethost file. If you incorrectly specify an address, connections from some clientsmay be denied.It is recommended to specify the node name (or the FQDN) since proper DNSconfiguration usually ensures that the name of the client host is consistent, regardlessof the network address.
If you must specify the address, keep these factors in mind:
Solutions Enabler
40 Security Configuration Guide

l The rules for specifying an IPv4 address are simple: Specify the complete addressin its dotted-decimal form, without leading zeros in each octet. For example:
172.23.191.20 user110.243.142.82 user1
l If you want to specify an IPv6 address, follow these shorthand rules (part of theIPv6 standard):
n Leading zeros in each quartet can be omitted.
n Contiguous sets of zeros can be replaced by two adjacent colons, but only oncein an address. If there are multiple non-adjacent sets of contiguous sets ofzeros, only one set of double colons can be used. The other set of zeros mustbe specified. For example:
3FFE:80C0:22C:18:250:88FF:FEAD:F92F
If you are uncertain about the address syntax, ask your network administratorto determine the exact syntax. For most UNIX and Linux hosts, the ifconfig–a command can be used to display the IPv6 address of a machine. In aMicrosoft Windows environment, use the ipconfig /all command todisplay the IPv6 address.
l If you have IPv4 client hosts that connect to IPv6-capable servers on AIX or Linux,the client network address appears as IPv4-mapped addresses. The server hostfile validation logic takes this into account and treats IPv4-mapped addresses asthough they are native IPv4 addresses. You can specify the regular IPv4 addressas described in the first point above.
l You may have to experiment to find the right address.
Concurrent connectionsThe maximum number of concurrent connections from client hosts is controlled by thestorsrvd:max_sessions parameter in the <SYMAPI_HOME>/config/daemon_options file. When a new session arrives that exceeds the threshold, it isrefused.
The default and maximum value is 100.
Concurrent sessions may be limited based on the source hostname or username of theclient:
l Limiting by source host is based on the IP address of the host where the clientsession originates. User name is not considered when counting concurrentconnections from hosts.
l Limiting by source user is based on the user identity format. Only two types ofuser identity formats are counted:
n The H: format identifies that the client user has been authenticated by the localoperating system. This format is used when the client comes from any UNIX orLinux type of host, or from a Windows host where the user has logged into thelocal system (not a Windows domain). In the host authentication case, the useris considered the same only when logging in from the same host with the sameuser name.
n The D: format is used when the client user has logged into a Windows domain.In this case, a user can log into the same domain from different hostcomputers. Such a user identity is considered the same, without respect to thesource host that initiates the session.
Solutions Enabler
Concurrent connections 41

Two configuration statements for storsrvd control session refusal from specificsources:
l storsrvd:max_sessions_per_host=value – This option specifies themaximum number of concurrent sessions from any specific host. If a new sessionfrom the source host exceeds the threshold for that host, the session is refused.
l storsrvd:max_sessions_per_user=value – This option specifies themaximum number of concurrent sessions from any specific user. If a new sessionfrom the same user exceeds the threshold for that user, the session is refused.
Table 8 on page 42 lists the storsrvd session control options and values.
Note
These options and values are only used by the storsrvd daemon and apply toSYMAPI remote sessions. There is no impact on the use of the stordaemon controlCLI or any other Solutions Enabler daemon.
Best practices for setting the storsrvd session control options:
l Set max_sessions_per_host and max_sessions_per_user to a value lessthan max_sessions. Specifically:
n Set max_sessions to the highest number of concurrent sessions you willtolerate without respect to the source host or user of the session.
n Set max_sessions_per_host and max_sessions_per_user to lowervalues, reflecting the maximum number of concurrent sessions from specificsources you will tolerate.
l Both max_sessions_per_host and max_sessions_per_user can be usedconcurrently to count sessions.
l It is possible to set either max_sessions_per_host andmax_sessions_per_user to 0, but doing so refuses all new connections. It isrecommended that if you want to refuse all sessions temporarily, setmax_sessions to 0. To resume accepting new sessions, change max_sessionsto a non-zero value.
Table 8 storsrvd daemon session control options and values
Option name Values Default Notes
max_sessions 0 – All new sessionsare refused.1 – 100 – Maximum(host and user)sessions allowed.
100 Default of 100 iscompatible withprevious releases.
max_sessions_per_host
0 – All new sessionsare refused.1 – 100 – Maximumnumber of sessionsallowed from aspecific host.
NOLIMIT -Disablescounting of sessionsfrom a specific host.
NOLIMIT NOLIMIT valueprovides backwardcompatibility.NOLIMIT is case-insensitive:
NOLIMIT = nolimit
Solutions Enabler
42 Security Configuration Guide

Table 8 storsrvd daemon session control options and values (continued)
Option name Values Default Notes
max_sessions_per_user
0 – All new sessionsare refused.1 – 100 – Maximumnumber of sessionsallowed from aspecific user.
NOLIMIT – Disablescounting of sessionsfrom a specific user.
NOLIMIT
Control operations for IBM z/OSBy default, a Solutions Enabler server running on any z/OS host allows configurationchanges when requested by a remote client. The EMC Solutions Enabler Installation andConfiguration Guide provides additional information.
NOTICE
If control operations are left enabled by default, remote Open Systems users (client/server mode) can make changes to the array configuration on your mainframe system.
File backupSolutions Enabler maintains important configuration data in a number of files. It isimportant that you back up and protect these files at all times. If lost, functionalitythat depends on the data in these files may be impacted.
Back up the following directories and their contents to preserve the Solutions Enablerconfiguration on a host:
l <SYMAPI_HOME>/configl <SYMAPI_HOME>/dbl <SYMAPI_HOME>/gnsIf you want to retain the logs for audit purposes, include the <SYMAPI_HOME>/logdirectory in your backups.
Other directories under <SYMAPI_HOME> contain less critical data that is recreatedby Solutions Enabler as needed.
The following table lists specific files you should regularly back up.
File location Description
<SYMAPI_HOME>/config/emcpwddb.dat This file stores connectivity information(including user names and passwords) used tointeract with CLARiiON storage arrays andVMware/Hyper-V Virtual InfrastructureServices.
Solutions Enabler
Control operations for IBM z/OS 43

File location Description
It is managed using the symcfgauthorization SYMCLI command.
The file is encrypted to protect its contentsand prevent tampering.
SYMAPI_HOME>/db/symapi_db.bin The Solutions Enabler database file containsarray topology information; arrays, devices,directors, and other information.
<SYMAPI_HOME>/config/lockboxp2 This file contains sensitive configurationinformation. The file is encrypted to protectits contents to prevent tampering.
<SYMAPI_HOME>/gns/storgnsd.db The Solutions Enabler groups database filecontains information about CG's, DG's andtheir contents.
File protectionSolutions Enabler stores its configuration files in the following directory:
<SYMAPI_HOME>/configProtect the files in the config directory by making sure only authorizedadministrators have write access. All other users should have no access or read-onlyaccess.
Non-privileged user command useFollowing an initial installation of Solutions Enabler, most SYMCLI commands can onlybe run as a root user on UNIX systems and by an administrator on Windows systems.To allow other users to execute these commands (for example, symcfg discover),you must grant them write access to the following directories and their contents:
<SYMAPI_HOME>/config<SYMAPI_HOME>/dbIn addition, non-root users on UNIX and non-administrators on Windows must beauthorized (using the stordaemon command) to manage daemons, and to usedaemons in the process of running SYMCLI commands. To authorize these users, addan entry for a specific user in the file <SYMAPI_HOME>/config/daemon_users.For example:
# Allow user 'jones' to make use of the storapid daemon:jones storapid# A ‘*’ character at the end of a name can be used# as a simple wildcard. The following allows user 'jones'# to make use of any of the Solutions Enabler daemons:jones stor*
LockboxSolutions Enabler uses a Lockbox to store and protect sensitive information. TheLockbox is associated with a particular host. This association prevents the Lockboxfrom being copied to a second host and used to obtain access.
Solutions Enabler
44 Security Configuration Guide

The Lockbox is created at installation. During installation, the installer is prompted toprovide a password for the Lockbox. If no password is provided at installation, adefault password: nodename@SELockbox1 is generated and stored in the Lockboxalong with Stable System values (SSVs, a fingerprint that uniquely identifies the hostsystem). The host_name is the same value as returned by the hostname command.
Stable System Values (SSVs)Stable System values (SSVs) validate access to the Lockbox. When data is written toor retrieved from the Lockbox, the SSVs in the Lockbox are compared against theSSVs generated from the host. If the SSVs match, the operation is permitted. If theSSVs do not match, the operation fails.
When Solutions Enabler is upgraded, product information in the existing Lockbox isautomatically copied into the Lockbox when the Lockbox is first accessed.
When any of the following occur, the host fingerprint may no longer match, and theSSVs inside of the Lockbox must be reset:
l The host is upgraded (either hardware or software)
l The Lockbox file is moved to another host
l User clones a virtual machine
NOTICE
To improve security, change the Lockbox password after resetting the SSVs.
Lockbox passwordsIf you create the Lockbox using the default password during installation, change thepassword immediately after installation to best protect the contents in the Lockbox.
For maximum security, select a password that is hard to guess. It is very important toremember the password.
WARNING
Loss of this password can lead to situations where the data stored in the Lockboxis unrecoverable.
Passwords must meet the following requirements:
l 8 - 256 characters in length
l Include at least one numeric character
l Include at least one uppercase and one lowercase character
l Include at least one of the following non-alphanumeric characters: ! @ # % &Lockbox passwords may include any character that can be typed in from USstandard keyboard.
l The new password must not be the same as the previous password.
Default Lockbox passwordWhen you install Solutions Enabler, you are asked whether you want to use the defaultpassword for the Lockbox. If you choose to use the default, the installation processestablishes the default Lockbox password in the following format:
nodename@SELockbox1
where: nodename is the hostname of the computer on which you are installing.
Solutions Enabler
Stable System Values (SSVs) 45

Operating systems have different methods of determining the node name:
l Unix: The installation program uses the hostname command to determine the nodename. Normally, the node name is set in the /etc/hosts file.
l Windows: The value of the COMPUTERNAME system environment variable,converted to lower case.
l z/OS: The gethostname() function is used to get the node name of the machine.
If the value of nodename is stored in upper case letters, it is converted to lower casefor the default password.
NOTICE
It is strongly recommended that you change the default password. If you allow theinstallation program to use the default password, note it for future use. You will needthe password if you need to reset the Lockbox Stable System values or generatecertificates for client/server operations.
Password and SSV managementSSVs are platform-dependent. Changes to hardware or software on a host mayrequire you to reset the SSVs stored in the Lockbox.
Lockbox administrative interactions include:
l Changing the password used to protect the Lockbox.
l Resetting the saved SSVs in the Lockbox after attributes on the host change,making the Lockbox inaccessible to user-initiated SYMAPI and SYMCLI calls.
Note
You must restart all Solutions Enabler daemons after changing or resetting theLockbox password.
Two symcfg commands allow administrative interactions with the Lockbox:
symcfg -lockbox [-password <Password>] reset -ssv setpw [-new_password <NewPassword>]
Note
Both commands require the existing password.
Daemon security settingsSolutions Enabler uses a number of helper daemon processes:
l storapid
l storevntd
l storgnsd
l storrdfd
l storsrmd
l storsrvd
l storstpd
Solutions Enabler
46 Security Configuration Guide

l storwatchd
Daemon identity on UNIXOn UNIX, daemons run as a root user by default.
Some daemons can be configured to run as an identity other than a root user. Thedaemons that may run as a non-root user are:
l storevntd
l storgnsd
l storrdfd
l storsrvd
l storstpd
l storwatchd (Unix only)
Note
The storapid (base) daemon must run as root.
You can configure daemon user identiy at the following times:
l During installation, in either the interactive or silent install process. Refer to theEMC Solutions Enabler Installation and Configuration Guide for how to choose non-root daemon execution during installation.
l Post-installation using the stordaemon command. For information on whichdaemons are affected by this option, refer to the stordaemon man page.
If you are running daemons as a non-root user:
l When configured to run as a non-root user, all daemons must run as the sameuser.
l stordaemon setuser sets the UNIX setuid bit on the daemon executables tothe named user.
l stordaemon setuser alters permission s of directories and files under /var/symapi such that the named user can create and delete, read, write the files itneeds during normal operation.
To configure all daemons to run under the bin user account:
stordaemon setuser all -user binAuthorized users are allowed to control daemons using the stordaemon command lineutility. For example, to start the SRM daemon:
stordaemon start storsrmdNon-root and non-administrative users must be defined in the daemon_users file toobtain authorization for using daemons and other daemon services.
For additional information, refer to:
l The stordaemon man page.
l <SYMAPI_HOME>/config/README.daemon_users file installed with SolutionsEnabler.
Solutions Enabler
Daemon identity on UNIX 47

Secure host directoriesThe Solutions Enabler daemons can run with root privileges for UNIX systems andsystem account file privileges for Windows systems.
These privileges are typically greater than the privileges granted to users making useof the daemon processes. This can present security vulnerabilities in situations wherea user through a CLI or some other application provides a pathname on which adaemon can operate, such as a backup file to be written to or read from.
To prevent these security vulnerabilities for the storsrvd daemon running as a rootuser, you can specify a list of secure directories in which the storsrvd daemon canread, write, and execute files. Existing mechanisms protect the Solutions Enablerdatabase and log file locations. Specify a list of secure directories for the storsrvddaemon to protect other operations, such as backups and restores.
Note
When daemons are running as non-root user, the secure_directory_path optionis ignored. In this case, the privileges of the non-root user are used when attemptingto write output files in specific directories.
Secure directory pathReview the following before specifying a secure_directory_path for thestorsrvd daemon running as a root user:
l The supplied pathname directories must exist when the daemon is started or thedaemon_options file is reloaded.Nonexistent paths are ignored.
All subdirectories below the specified directories are also treated as being secure.
l A total of 32 secure directory locations can be maintained.
l Once the storsrvd daemon has read the security_directory_pathstatement, directories specified cannot be removed without changing the value inthe daemon_options file and restarting the daemon.
l New directories can be added while the storsrvd daemon is running by editingthe daemon_options file and reloading it using the following command:stordaemon action storsrvd –cmd reload
l If the secure_directory_path option is not present, no security checks areperformed.
l The secure_directory_path option does not apply to the following pathnames:
n Path names provided in the options or daemon_options files.These files are assumed to be protected by an administrator.
An exception is the path named in the storstpd:dmn_root_locationoption:
If storstpd is running as root, and was started by a non-root user using thestordaemon command, storstpd validates that the path in thedmn_root_location option is also specified in thesecure_directory_path option.
n Path names accessed (read or written) by the SYMCLI itself.
Solutions Enabler
48 Security Configuration Guide

In client/server mode, these occur under the identity of the user and aresubject to standard access control checks against the user identity.
n Pathnames accessed by an API on the client host in client/server modebecause these occur under the identity of the user and are not a security risk.
Windows platformsOn Windows platforms, the secure directory path is a list of directories separated by asemicolon (;). Use the backward slash (\) when specifying each directory name.
To apply the secure_directory_path to the storsrvd daemon:
storsrvd:secure_directory_path = c:\Temp\dir1;c:\Users\SEUNIX platformsOn UNIX platforms, the secure directory path is a list of directories separated by asemicolon (;) or a colon (:). Use the forward slash (/) when specifying each directoryname.
To apply the secure_directory_path to the storsrvd daemon:
storsrvd:secure_directory_path = /tmp/dir1;/opt/dir2;/users/seListing secure directoriesTo display a list of secure directories in effect for the storsrvd daemon:stordaemon getvar storsrvd –name secure_directory_path
Daemon connection authorizationBy default, daemons only accept connection requests from users running with root oradministrator privileges.
For non-root users to use this feature, create a <SYMAPI_HOME>/config/daemon_users file (initially installed as README.daemon_users) with a list ofallowed usernames.
Privileged users are automatically authorized, and do not need to be added to the file.Solutions Enabler daemons make connections between one another. Daemon-to-daemon connections are automatically authenticated and authorized.
For more information on authorizing daemon connections, see the EMC SolutionsEnabler Installation and Configuration Guide.
SRM daemon connectionsAccess to SRM functionality is controlled by limiting permission to the SRM daemon.This access is controlled using the common daemon authorization file,<SYMAPI_HOME>/config/daemon_users.
Note
You should protect this file so that only privileged administrators can modify it.
Users meeting any of the following criteria are permitted to control and use the SRMdaemon:
l Authorized users: UNIX users with root access, and Windows users that are amembers of the Administrators group
l Users listed in the daemon_users file located on each host from which theyrequire access
Solutions Enabler
Daemon connection authorization 49

For any directories and files being accessed for SRM control and mapping operations,operating-system-level permission is required.
For more information on defining SRM operations available to users and settingoperating system level permissions, see the EMC Solutions Enabler SRM CLI UserGuide.
Solutions Enabler
50 Security Configuration Guide

CHAPTER 4
Mainframe Enablers
This chapter contains the following topics:
l Overview of Mainframe Enablers....................................................................... 52l Security controls map........................................................................................ 53l EMCSAFI security interface...............................................................................53l Security-related configuration options...............................................................53
Mainframe Enablers 51

Overview of Mainframe EnablersMainframe Enablers is the umbrella term for the suite of products installed in a z/OSenvironment to provide control and management of the storage array functionsdirectly on z/OS.
Mainframe Enablers provides a subset of the functionality provided by SolutionsEnabler. Existing devices can be managed, but (for example) device creation andmapping are out of scope for Mainframe Enablers.
Mainframe Enabler software commands can be executed via:
l Console commands
l Batch job
l Symmetrix API for z/OS (SymmAPI-MF)
l REXX API
l TSO ISPF panels
Symmetrix Control Facility (SCF) is a component of Mainframe Enablers that providesbaseline functionality and is a prerequisite for any software control on z/OS. SCFincludes SymmAPI-MF for use by EMC and ISV provided products.
Mainframe Enablers 8.0 or greater is required to manage arrays running HYPERMAXOS.
Mainframe Enablers
52 Security Configuration Guide

Security controls map
SCF address space
Address spaces and programs of
Mainframe Enablers components
HYPERMAX OS
Storage Array
z/OS Host
FICON
Platform security product
SymmAPI-MF calls
Batch jobs
Console commands
REXX API calls
TSO ISPF panels
EMCSAFI security interfaceMainframe Enablers use the EMCSAFI security interface to request authorizationwhen a command is executed or a function called. EMCSAFI interface uses RACF 1.9or higher, or an equivalent SAF-compliant security product. The EMCSAFI interface isenabled by default.
For a full description of EMCSAFI security controls, refer to the EMC MainframeEnablers Installation and Customization Guide.
Security-related configuration optionsConsider the following security-related configuration options:
l SCF initialization fileThe SCF (Symmetrix Control Facility) initialization file can control the storagearrays and devices under SCF management. Refer to the EMC MainframeEnablers ResourcePak Base for z/OS Product Guide for details.
l z/OS SYMAPI server control restrictions
Mainframe Enablers
Security controls map 53

The RIMLIB member #12CNTRL can limit the functionality provided to SYMAPIclients. Similar to access controls, features can be enabled or disabled to controlthe services provided by the z/OS SYMAPI server.
Mainframe Enablers
54 Security Configuration Guide

CHAPTER 5
Unisphere for VMAX
This chapter contains the following topics:
l Unisphere for VMAX checklist........................................................................... 56l SYMAPI home and bin directory locations..........................................................56l Security controls map........................................................................................ 57l Unisphere for VMAX access control...................................................................57l User authorization..............................................................................................62l Lockbox............................................................................................................. 63l Unisphere for VMAX and CA server certificates.................................................63l Certificate revocation list for X.509 certificate-based authentication................63l Port usage......................................................................................................... 64l Link-and-launch security....................................................................................64l Unisphere data security..................................................................................... 65l Security alert system......................................................................................... 65l Session timeout................................................................................................. 65l Root access requirements..................................................................................65
Unisphere for VMAX 55

Unisphere for VMAX checklistThe following checklist summarizes the security-related tasks you should perform toimprove the security of your deployment.
Table 9 Unisphere for VMAX security configuration checklist
Purpose of activity Task
Access control
Authenticate users with a user account storedon a LDAP-SSL (LDAPS) server.
Set up LDAP-SSL authentication.
User-based access control
Restrict the management operations userscan perform.
Assign users the minimum access theyrequire.
Protect sensitive information
Update the platform credentials after anupgrade.
Reset the hosts system Stable SystemValues.
Certificate files
Replace generated certificates withcustomer-supplied (trusted) certificates forsecure communications.
Replace pre-generated SSL certificates.
SYMAPI home and bin directory locationsThe Solutions Enabler <SYMAPI_HOME> and <SYMCLI_BIN> directories are found inthe following locations by default:
<SYMAPI_HOME>
l Windows: c:\Program Files\EMC\SYMAPI...l UNIX: /var/symapi/...l z/OS: /var/symapi/...Pathnames presented in this document use a UNIX-specific format: forward slashes(/) instead of the backslashes (\) typically used on Windows platforms.
<SYMCLI_BIN>
l Windows: C:\Program Files\EMC\SYMCLI\bin...l UNIX: /usr/storapi/bin...
Unisphere for VMAX
56 Security Configuration Guide

Note
By default, the location of <SYMAPI_HOME> is the same for both z/OS and UNIX.The EMC Solutions Enabler Installation and Configuration Guide provides moreinformation about:
l Changing the location for <SYMAPI_HOME> on z/OS systems during installation.
l Open VMS file locations.
Security controls mapFigure 3 Unisphere for VMAX components
Solutions Enabler Server
HYPERMAX OS
Storage Array
Solutions Enabler Server Host
FC, iSCSI, FICON
Solutions Enabler
Components
Symmetrix Access Control
Unisphere for VMAX Host
TLS
Unisphere for VMAX
Unisphere for VMAX
Clients
HTTPS, SSH/SCP,
LDAPS, TCP/UDP
Unisphere for VMAX access controlUnisphere for VMAX supports the following types of user authentication:
l Windows (local and domain-based): Users have a Windows account on theSymmetrix Management Application Server (SMAS) server. Users log in with aWindows domain username and password.
l LDAP: User accounts are stored on an LDAP server, which may be accessible overLDAPS (LDAP with TLS1.0, TLS 1.1 or TLS1.2 support). To use this method, a userwith Administrator or SecurityAdmin privileges must set up LDAP-SSLauthentication in Unisphere for VMAX.
Unisphere for VMAX
Security controls map 57

NOTICE
EMC strongly recommends using VPN solutions if the customer's LDAP serversare outside the DMZ, and in cases where the security of the network on whichUnisphere for VMAX is operating cannot be guaranteed.
l Local users: Users can have local Unisphere for VMAX accounts. Users log in withtheir Unisphere for VMAX username and password. Local user accounts are storedlocally on the SMAS server host and work in much the same way as the othermethods to validate user credentials. To use this method, a Unisphere for VMAXInitial Setup User, Administrator, or SecurityAdmin user must create a localUnisphere for VMAX user account.
The EMC Unisphere for VMAX Installation Guide and Unisphere for VMAX online helpinclude instructions on how to create users and configure LDAP authentication.
External EMC applications establish trust in Unisphere for VMAX using the sequencedescribed in Link-and-launch security on page 64.
User-based access controlUnisphere for VMAX uses roles and groups to restrict which management operations auser can perform on an array.
The steps to create and manage user accounts, including user authorization, aredescribed in the EMC Unisphere for VMAX Installation Guide and online help.
Default user account
The Initial Setup User is created during installation.
The Unisphere for VMAX installer software creates the Initial Setup User as atemporary local user. The Initial Setup User has an Administrator role, and is used toinstall and set up Unisphere for VMAX. Once a user with Administrator orSecurityAdmin privileges is assigned to an array, the Initial Setup User can no longeraccess or view the array from the Unisphere for VMAX console.
NOTICE
EMC recommends that you delete the Initial Setup User after configuring the array.
Instructions for creating the Initial Setup User are described in the EMC Unisphere forVMAX Installation Guide and online help.
User roles
Unisphere for VMAX includes the following user roles:
l None - Provides no permissions.
l Monitor - Performs read-only (passive) operations on an array excluding the abilityto read the audit log or access control definitions.
l StorageAdmin - Performs all management (active or control) operations on anarray in addition to all Monitor operations. This role does not allow users toperform security operations.
l Administrator - Performs all operations on an array, including security operationsin addition to all StorageAdmin and Monitor operations.
l SecurityAdmin - Performs security operations on an array in addition to all Monitoroperations.
Unisphere for VMAX
58 Security Configuration Guide

l Auditor - Grants the ability to view, but not modify, security settings for an array(including reading the audit log, symacl list, and symauth) in addition to all Monitoroperations. This is the minimum role required to view the audit log.
l Perf Monitor - Performs the same operations as a monitor, with the addition ofbeing able to set performance alerts and thresholds.
l Initial Setup User - Defined during installation, this temporary role providesadministrator-like permissions for the purpose of adding local users and roles toUnisphere.
For additional information on user roles and permissions and the Initial Setup User, seethe Unisphere for VMAX online help.
symauth rulesYou can use the symauth command, Symmetrix Management Console, or Unispherefor VMAX to create the symauth rules. The requirements vary depending on whichmethod you use to create the symauth rule:
l If you use only Unisphere for VMAX to create the symauth rule:
n After installation use Unisphere for VMAX to create at least one Administratoruser.
n You can use any username/password-credentialed authority to create theAdministrator user.
n This Administrator user ensures that you can use Unisphere for VMAX tocreate the symauth rules when arrays are added or removed.
l If you use the temporary Initial Setup User to create a symauth rule:
n After installation create at least one Administrator user on each array.
n When an array is added, use the Solutions Enabler CLI to create authorizationrules for at least one Administrator user on the new array.
Special characters in x.509 client certificatesSolutions Enabler does not support the following characters in the CommonName/userPrincipalName extracted from a client's X.509 certificate:
@ : ? ; | < > [ ] + = , * / \
These characters are stripped from the client's X.509 certificate. For example:
The userPrincipalName:
Is changed to Unisphere for VMAX username:
John.q.publicanysite.com
The symauth rule must use the stripped username.
Individual and group rolesUsers access an array or component directly through a role assignment or indirectlythrough membership in a user group that has a role assignment.
User groups enable administrators to assign roles to multiple users simultaneously.User groups are created on the SMAS server according to its operating system andassigned roles with Unisphere for VMAX.
If a user has two different role assignments (one as an individual and one as a memberof a group), the permissions assigned to the user will be combined.
Unisphere for VMAX
symauth rules 59

For example, if a user is assigned a Monitor role and a StorageAdmin role through agroup, the user will be granted Monitor and StorageAdmin rights.
User IDsThe following section describes the SYMAPI format to create users and roles.
Note
This format displays in the footer bar of the Unisphere for VMAX GUI, but not in theUser/Role list view or creation wizard.
Users and user groups are mapped to their respective roles by IDs. These IDs consistof a three-part string in the form:
Type:Domain\NameIn the event that a user is matched by more than one mapping, the user authorizationmechanism uses the more specific mapping:
l If an exact match (e.g., D:sales\putman) is found, that is used.
l If a partial match (e.g., D:*\putman) is found, that is used.
l If an unqualified match (e.g., putman) is found, that is used.
l Otherwise, the user is assigned a role of None.
Valid values for Type, Domain, and Name are as follows:
TypeType of security authority used to authenticate the user or group. Possible typesare:
LA user or group authenticated by LDAP. In this case, Domain specifies thefully qualified name of the domain controller on the LDAP server.
For example: L:danube.com\FinanceL:danube.com\Financeindicates that user group Finance will log in through domain controllerdanube.com.
Once configured, individual LDAP users and groups can log in to Unispherefor VMAX using a simple username, or simple group name, respectively. Forexample, Finance.
CA user or group authenticated by the SMAS server.
For example: C:Boston\Legal indicates that user group Legal will log inthrough Unisphere sever Boston.
HA user or group authenticated by logging into a local account on a Windowshost. In this case, Domain specifies the hostname.
For example: H:jupiter\mason indicates that user mason will log in onhost jupiter.
Unisphere for VMAX
60 Security Configuration Guide

DA user or group authenticated by a Windows domain. In this case, Domainspecifies either the simple domain name (for individual users) or the fullyqualified domain name (for groups).
For example: D:sales\putman indicates user putman will log in throughWindows domain sales.
Once configured, individual Windows domain users can log in to Unispherefor VMAX using a simple username. For example, putman.
Group Windows domain users can log in to Unisphere using either a simpledomain name\group name or a fully qualified domain name\group name.
VA user or group authenticated by a virtualization domain. In this case,Domain specifies the virtualization domain name.
DomainWithin role definitions, IDs can be either fully qualified (as above), partiallyqualified, or unqualified.
When the Domain portion of the ID string is an asterisk (*), the asterisk istreated as a wildcard, meaning any host or domain.
Note
When configuring group access, the Domain portion of the ID must be fullyqualified.
For example:
D:ENG\jonesFully qualified path with a domain and username (for individual domainusers).
D:ENG.xyz.com\ExampleGroupFully qualified domain name and group name (for domain groups).
D:*\jonesPartially qualified that matches username jones with any domain.
H:HOST\jonesFully qualified path with a hostname and username.
H:*\jonesPartially qualified that matches username jones within any host.
jonesUnqualified username that matches any jones in any domain on any host.
NameSpecifies the username relative to that authority. It cannot be longer than 32characters and spaces are allowed if delimited with quotes.
Usernames can be for individual users or user groups.
Unisphere for VMAX
User IDs 61

User authorizationUser authorization restricts the management operations users can perform on anarray.
By default, authorization is enforced within Unisphere for VMAX against therespective authorization rules database of a given array. This enforcement is doneregardless of the authorization control setting (Enabled/Disabled) for that array.SYMCLI uses this authorization control state to determine enforcement of rules.Unisphere for VMAX always behaves as if symauth is enabled (exception is the InitialSetup User).
A user with Administrator or SecurityAdmin privileges can map individual users orgroups of users to specific user roles. Roles determine what operations users canperform.
Authorization for the Initial Setup UserThe authorizations on an array determine the privileges the Initial Setup User has onthe array. The relationship between the Initial Setup User and authorizations is definedby:
l If authorization is enabled, authorization rules are always enforced. The InitialSetup User could be locked out if no authorization rule exists for the user.
l If authorization is disabled and there are no authorization rules on the array, theInitial Setup User is granted Admin privileges.
l If authorization is disabled and there are no Admin or SecurityAdmin authorizationrules on the array, the Initial Setup User is granted Admin privileges. All other rulesare enforced as defined.
l When authorization is disabled and Admin or SecurityAdmin authorization rules aredefined on the array, if the Initial Setup User does NOT have an authorization ruleexplicitly defined, the Initial Setup User will have NO permissions. All other rulesare enforced as defined.
Unisphere REST APIBefore you can use the Unisphere REST API, you must assign user authorization foreach storage array a user is permitted to access. Users can be assigned the followingroles:
l Monitor
l StorageAdmin
l Admiistrator
l SecurityAdmin
These user roles are valid for the currently available REST resource methods (GET,POST, and DELETE). When they become available, only Admin and StorageAdminroles are able to initiate PUT methods.
For information on how to assign user roles, see the EMC Unisphere for VMAXInstallation Guide and Unisphere for VMAX online help.
Multiple authorization rolesA user or group can be assigned up to four authorization roles.
Unisphere for VMAX
62 Security Configuration Guide

LockboxUnisphere for VMAX uses the Common Security Toolkit Standalone Lockbox to storeand protect sensitive information.
The Lockbox is first created during installation. During installation, you can use eitherthe default password, or a password you define.
WARNING
Loss of the user-defined password can lead to situations where the data stored inthe Lockbox is unrecoverable.
On every Unisphere for VMAX startup, the default password is derived from theStable System Values (SSVs) of the host's execution environment. The defaultpassword is not accessible to EMC or customer staff.
When the Unisphere for VMAX is upgraded, product information in the existingLockbox is automatically copied into the new Lockbox when the Lockbox is firstaccessed.
SSVs are host-dependent. Changes to hardware or software on a host may require anupdate of the SSVs. You must update the SSVs in the Lockbox whenever the hostSSVs no longer match the values in the Lockbox, including when the:
l Host upgrade reaches a certain threshold
l Lockbox file is moved to another host
The Lockbox includes a CLI utility to reset the host system SSVs.
Unisphere for VMAX and CA server certificatesAt installation, the installer generates and installs the self-signed server certificateused for HTTPS transport-level security.
You can replace this certificate with the one issued by a trusted third-party.
You need the keystore password to replace a certificate. The keystore password isgenerated during installation and is stored in the following file:
<SMAS installation>/jboss/domain/configuration/host.xmlwhere <SMAS installation> is the directory where SMAS is installed.
Open the file and search for keystore alias="tomcat" key-password=.
You must generate a new JKS key/trust store file with the server certificate alias“tomcat” and key/store password. The key/trust store must contain all CAcertificates needed for full certificate trust chain verification.
For information on how to replace, list and delete certificates, see the EMC Unispherefor VMAX Installation Guide.
Certificate revocation list for X.509 certificate-basedauthentication
For Unisphere for VMAX installations with X.509 certificate-based authenticationenabled, you may optionally configure a Certificate Revocation List (CRL) for greater
Unisphere for VMAX
Lockbox 63

PKI security. The CRL can be replaced periodically, based on the PKI securityrequirements set by your enterprise.
Port usageUnisphere for VMAX components use the following ports:
Component Port
https 8443
CLI CLI 9999 (bound to the localhost, and notremotely accessible)
Remoting 4447
postgresql 3324 (bound to the localhost, and notremotely accessible)
Link-and-launch securityLink-and-launch clients connect to Unisphere for VMAX using HTTPS. The client andUnisphere for VMAX are required to establish mutual trust. That is, the client sidetrusts that the server is authentic.
Note
Link-and-launch is unavailable if Unisphere for VMAX is installed with the X.509certificate-based client authentication option.
The link-and-launch client (acting as SSL client) must establish trust either:
l Explicitly, importing the Unisphere for VMAX self-signed certificate into theclient's trust store
l Implicitly, if the Unisphere for VMAX self-signed certificate (generated duringinstallation) is replaced with a certificate issued by a mutually-trusted CA (a CAtrusted by both Unisphere for VMAX and the link-and-launch client).
Trust with the client's launching application is established by explicit registration (byAdmin/SecurityAdmin) of the link-and-launch client's ID.
The client must provide a valid username of the Unisphere for VMAX user in whosecontext the link-and-launch is performed. Once trust is established, a one-timepassword (token) is issued to trusted link-and-launch clients. The tokens are thenexchanged as a means to provide single sign on into Unisphere for VMAX.
Note
Unisphere for VMAX supports link-and-launch only in the context of users with Admin,StorageAdmin, or Monitor roles.
When the transport is fully secured (by mutual trust establishment) and the user isvalidated (during initial registration connection), Unisphere for VMAX issues the clienta one-time password (OTP).
In the request that follows, the client exchanges the OTP for a launch token. Theexchange must take place within OTP's time-to-live of 10 minutes, otherwise theprocess (of OTP acquisition and OTP-to-token exchange) must be started over.
Unisphere for VMAX
64 Security Configuration Guide

The token is valid only for a single launch-and-link until the Unisphere for VMAX serverreboots.
Unisphere data securityYou can export and import some Unisphere for VMAX configuration settings toconveniently configure multiple installations.
Exported settings are protected with a customer-defined, one-time password.
The password must be communicated out-of-band as necessary.
Security alert systemUsers with Administrator or StorageAdmin privileges can configure Unisphere forVMAX to deliver alert notifications for SNMP, e-mail, and Syslog.
The steps to configure alerts, manage alert thresholds, and view alert-relatedinformation are described in the EMC Unisphere for VMAX Installation Guide and onlinehelp.
Session timeoutUnisphere for VMAX sessions time out after 8 hours of user inactivity.
The timeout interval is not configurable.
When timeouts occur, the user is logged out, but the user account is not locked.
Root access requirementsUnisphere for VMAX requires Root/Administrator access privileges for installation,deployment, and operations.
Unisphere for VMAX
Unisphere data security 65

Unisphere for VMAX
66 Security Configuration Guide

CHAPTER 6
SMI-S Provider
EMC SMI-S Provider supports the SNIA Storage Management Initiative (SMI), anANSI standard for storage management. Solutions Enabler provides the interfacebetween the SMI and arrays running HYPERMAX OS 5977 or higher.
This chapter contains the following topics:
l SMI-S checklist..................................................................................................68l ECOM toolkit..................................................................................................... 68l Security controls map........................................................................................ 69l User-based access control.................................................................................69l Component access control.................................................................................73l Log files and settings......................................................................................... 73l Port usage..........................................................................................................74l Network encryption........................................................................................... 74l Enable authentication for SMI-S........................................................................ 75l Manage the Lockbox ......................................................................................... 75l Security alerts....................................................................................................76
SMI-S Provider 67

SMI-S checklistThe following checklist summarizes the security-related tasks you should perform toimprove the security of your deployment.
Table 10 SMI-S security configuration checklist
Purpose of activity Task
User-based access control
Restrict user access to specific functionality. Configure user authentication, createcstadmin and cstuser accounts, and mapusers to roles.
Log files and settings
Administer SMI-S log files. Display SMI-S log files.
Securely deploy SMI-S
Enable authentication. Enable authentication for CIM and non-CIMrequests.
Create the Lockbox
Create a Lockbox to store and protectsensitive information.
Create the CST Lockbox.
ECOM toolkitSMI-S uses the EMC Common Object Manager (ECOM) Toolkit to implement securityat a variety of levels. ECOM uses SSL and TLS protocols to secure and protectnetwork requests, responses, and indication deliveries. Refer to the EMC CommonObject Manager (ECOM) Toolkit Deployment and Configuration Guide for informationabout:
l ECOM port security
l Securing ECOM communication
SMI-S Provider
68 Security Configuration Guide

Security controls mapFigure 4 SMI-S managed objects
SMI-S Client
Application
ECOM
SMI-S Provider
Solutions Enabler
HTTPS
CIM/XML
Request
HTTPS
CIM/XML
Response
HTTPS
CIM/XML
Indication/Alert
User-based access controlThis section describes user authorization, user authentication, and administrator useraccount.
User authorizationUser access control to the SMI provider is provided by the ECOM authorization andsecurity toolkit.
The ECOM login page can be accessed at https://{hostname}:5989/ecomconfig.
The default login credentials are
username: adminpassword: #1Password
SMI-S Provider
Security controls map 69

User authenticationECOM supports three types of authorities: LocalDirectory (default), LDAP, andOSLogin. These authorities grant the user access.
To authenticate, ECOM requires user information following one of these two formatsalong with the user password:
user information := [ authority '/' ] [ domain '\' ] < username >
or
user information := [ domain '\' ] < username > [ '@' authority ]
If the authority recognizes the user, the authentication succeeds and ECOM returns avalid security token.
Configure authentication
The default authority is LocalDirectory. LocalDirectory is if the authority information isnot informed by the user.
You can specify the Local Directory Authority as any substring from the LocalDirectory name as defined in Config.xml configuration file (default isLocalDirectoryTest). For example:
adminLocalDir/adminLocalDirectory/adminLocalDirectoryTest/adminadmin@LocalDiradmin@LocalDirectoryadmin@LocalDirectoryTest
LDAP servers can also be used as the authority to authenticate a user. For example:
PSO-AD-Authority/adminPSO-SunOneAuthority/lennonadmin@PSO-AD-Authoritylennon@PSO-SunOneAuthority
Windows users can also be authenticated by the OSLogin authority.
The string "OSLogin" is used as the authority name in order to authenticate OS users.
Both local and domain users can be authenticated:
l If no domain is specified, the user is treated as a "local user" (default).
l If the domain is explicitly specified, the user is treated as a "domain user".
Both the fully-qualified domain name (FQDN) and the domain name can be usedduring authentication. The user-supplied domain entry will be converted into theFQDN.
SMI-S Provider
70 Security Configuration Guide

For example:
OSLogin/AdministratorAdministrator@OSLoginOSLogin/CORP\mccartneyCORP\mccartney@OSLoginOSLogin/corp.localdomain\ringocorp.localdomain\ringo@OSLogin
Administrator user accountECOM requires a user account under LocalDirectory authority named administrator.
This section describes the commands to create the administrator role, create a user,and assign the user to the role.
Create a cstadmin role
Use the cstadmin create-role command to create a new role.
The syntax for the cstadmin create-role command:
cstadmin create-role <role> -app=<app> -cstdir=<directory> -description <description> -passphrase=<passphrase>
<role>
(mandatory) Name of the role to create.
-app=<app>
(optional) Name of the application bootstrap file.
-cstdir=<directory>
(optional) Path to the CST configuration directory.
-description<description>
(optional) Description for the role.
-threshold
(optional) - Sets the Lockbox SSV threshold.
-passphrase=<passphrase>
(optional) - Passphrase for the Lockbox.
For example:
$ cstadmin create-role administrator -cstdir=.Enter lockbox passphrase:Confirm passphrase:cstadmin: Role administrator created in role database RoleManagement.
Create a cstadmin user
Use the cstadmin create-user command to create a local directory user account.
The syntax for the cstadmin create-user command:
SMI-S Provider
Administrator user account 71

cstadmin create-user <account> -app=<app> -cstdir=<directory> -description <description> -passphrase=<passphrase> -password=<initial password>
<account>
(mandatory) - Name of the local directory account to create.
-app=<App>
(optional) - Name of the application bootstrap file.
-cstdir=<directory>
(optional) - Path to the CST configuration directory.
-description<description>
(optional) - Description for the user.
-passphrase=<passphrase>
(optional) - Passphrase for the Lockbox.
-password=<initial password>
(optional) - Initial password for the account.
For example:
$ cstadmin create-user lennon -cstdir=c:/cst/lockboxEnter new user's password:Confirm passphrase:Enter lockbox passphrasecstadmin: User lennon created with account manager LocalDirectoryTest.
Create a role mapping
Use the cstadmin add-rolemember command to add an identity to a role.
The syntax for the cstadmin add-rolemember command:
cstadmin add-rolemember <authority type> <authority type> <authority name> <account name> <role name> -app=<app> -cstdir=<directory> -group -passphrase=<passphrase>
<authority type>
Type of authority.
<authority name>
Name of authority.
<account name>
The account name to add.
<role name>
Role name to add.
SMI-S Provider
72 Security Configuration Guide

-app=<app>
(optional) - Name of the application bootstrap file.
-cstdir=<directory>
(optional) - Path to the CST configuration directory.
-passphrase=<passphrase>
(optional) Passphrase for the Lockbox.
For example:
$ cstadmin add-rolemember LocalDirectory LocalDirectoryTest lennonadministrator -cstdir=c:/cst/lockboxEnter lockbox passphrasecstadmin: Role administrator added to lennon from account managerLocalDirectoryTest.
Component access controlAccess control for SMI-provider components is provided by EMC Common ObjectManager (ECOM).
EMC Common Object Manager (ECOM) Toolkit Deployment and Configuration Guidedescribes the steps to complete this task.
Log files and settingsIf SecurityLoggingEnabled is set to true in the Security_settings.xmlconfiguration file (located at <ECOM_install_dir>/conf/), ECOM logs security-related information to the file securitylog.txt.
Whether security logging is enabled or not, security-related information is alwayslogged to the file cimomlog.txt.
cimomlog.txt and securitylog.txt are located at:
<ECOM_install_dir>/log/
Displaying log filesUse the ECOM web server to administer logs and security. The server can beaccessed from:
https://<ManagementIPAddress>:<port>/ecomconfigwhere <port> is a secure port as defined in Port_settings.xml.
EMC Common Object Manager (ECOM) Toolkit Deployment and Configuration Guidedescribes the steps to complete this task.
SMI-S Provider
Component access control 73
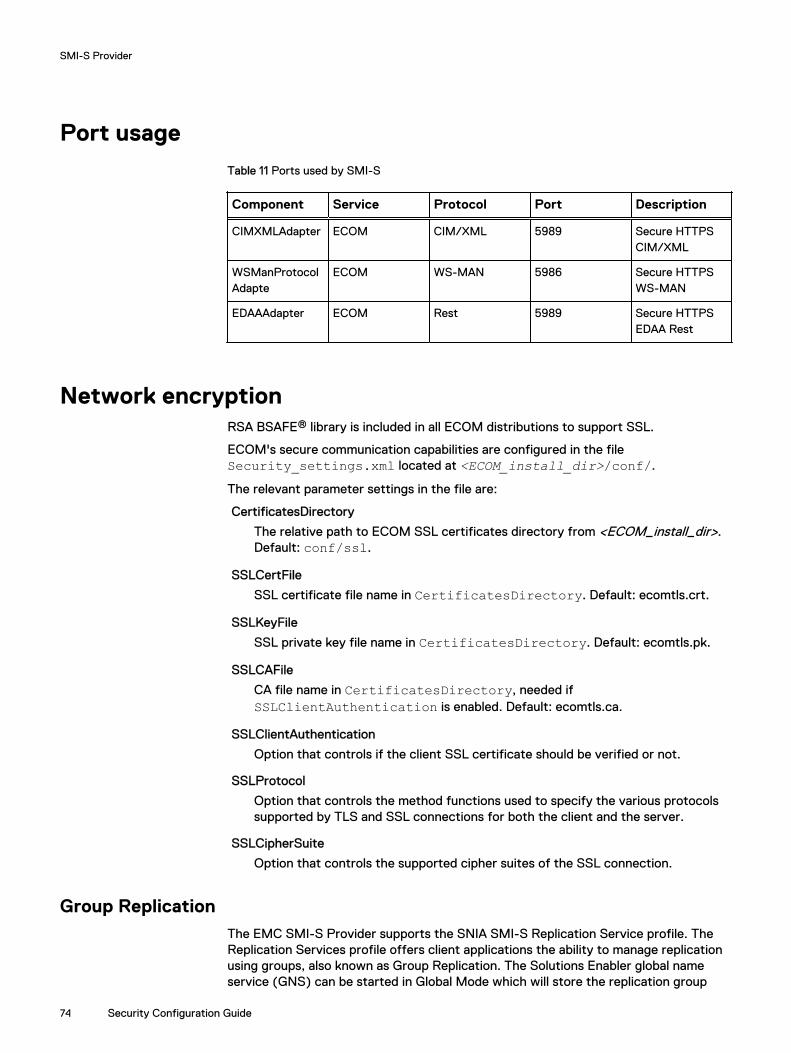
Port usage
Table 11 Ports used by SMI-S
Component Service Protocol Port Description
CIMXMLAdapter ECOM CIM/XML 5989 Secure HTTPSCIM/XML
WSManProtocolAdapte
ECOM WS-MAN 5986 Secure HTTPSWS-MAN
EDAAAdapter ECOM Rest 5989 Secure HTTPSEDAA Rest
Network encryptionRSA BSAFE® library is included in all ECOM distributions to support SSL.
ECOM's secure communication capabilities are configured in the fileSecurity_settings.xml located at <ECOM_install_dir>/conf/.
The relevant parameter settings in the file are:
CertificatesDirectory
The relative path to ECOM SSL certificates directory from <ECOM_install_dir>.Default: conf/ssl.
SSLCertFile
SSL certificate file name in CertificatesDirectory. Default: ecomtls.crt.
SSLKeyFile
SSL private key file name in CertificatesDirectory. Default: ecomtls.pk.
SSLCAFile
CA file name in CertificatesDirectory, needed ifSSLClientAuthentication is enabled. Default: ecomtls.ca.
SSLClientAuthentication
Option that controls if the client SSL certificate should be verified or not.
SSLProtocol
Option that controls the method functions used to specify the various protocolssupported by TLS and SSL connections for both the client and the server.
SSLCipherSuite
Option that controls the supported cipher suites of the SSL connection.
Group ReplicationThe EMC SMI-S Provider supports the SNIA SMI-S Replication Service profile. TheReplication Services profile offers client applications the ability to manage replicationusing groups, also known as Group Replication. The Solutions Enabler global nameservice (GNS) can be started in Global Mode which will store the replication group
SMI-S Provider
74 Security Configuration Guide

information into the HYPERMAX OS system. The advantage to storing replicationgroup information in the storage array is that it centralizes the group data and makesit accessible to different hosts/servers accessing the same system.
The default installation of Solutions Enabler with SMI-S has the default GNS in LocalMode. In this mode, the replication group information is stored on the host running theSolutions Enabler SMI-S service.
Enabling Global ModeBefore you begin
These steps must be completed before any replication group operations are initiated.
Procedure
1. Shut down ECOM service.
2. Shut down Solutions Enabler daemons.
3. In the SYMAPI/config/options file add or enable the SYMAPI_USE_GNS =ENABLE option.
4. Start ECOM service. ECOM service will automatically start the SolutionsEnabler daemons.
Enable authentication for SMI-STo enable authentication for:
l CIM requests - set the configuration parameterCIMRequest_AuthenticationEnabled to true.
l non CIM requests - set NonCIMRequest_AuthenticationEnabled.
Manage the LockboxSMI-S uses a Lockbox to store and protect sensitive information.
The Lockbox must be initialized with a user account created and mapped to theadministrator role.
The Lockbox must be located at <ECOM_install_dir>/conf/cst/.
Create the CST LockboxUse the cstadmin initialize command to create the Lockbox in the specifieddirectory.
The command creates a new Lockbox in the specified directory used to store keys,signed configuration files and signatures.
The syntax for the cstadmin initialize command:
cstadmin initialize <directory> -attended -overwrite -set-lockbox-policy -threshold -two-factor
<directory>
(mandatory) - Path to CST configuration directory. Contains CSTconfigurationfiles. The Lockbox will be created in this directory.
SMI-S Provider
Enabling Global Mode 75

-attended
(optional) - Attended Lockbox.
-overwrite
(optional) - Overwrites existing Lockbox.
-set-lockbox-policy
(optional) - Sets Lockbox passphrase policy.
-threshold
(optional) - Sets the Lockbox SSV threshold.
-two-factor
(optional) - Two factor Lockbox.
For example:
$ cstadmin initialize c:/cst/lockboxEnter lockbox passphrase:Confirm passphrase:cstadmin: Lockbox c:\cst\lockbox\csp.clb initialized.
Security alertsSMI Provider manages alerts as follows:
l SMI Provider registers to receive all Solutions Enabler storage-related events fromSolutions Enabler.
l SMI Provider converts the storage-related events to indication objects.
l The indication objects are sent to ECOM indication handler, which then deliversthe objects to listening client applications.
SMI-S Provider
76 Security Configuration Guide

CHAPTER 7
Container Applications
Application containers are virtual machines that provide embedded applications on thestorage array. This chapter contains the following topics:
l Overview of container applications.....................................................................78l Container application access IDs........................................................................ 78
Container Applications 77

Overview of container applicationsThe HYPERMAX OS converged operating system provides an open applicationplatform for running data services. HYPERMAX OS includes a light-weight hypervisorthat enables multiple operating environments to run as virtual machines on the storagearray.
Application containers are virtual machines that provide embedded applications on thestorage array. Each container virtualizes hardware resources required by theembedded application, including:
l Hardware needed to run the software and embedded application (processor,memory, PCI devices, power management)
l VM ports, to which LUNs are provisioned
l Access to necessary drives (boot, root, swap, persist, shared)
Embedded NAS (eNAS) is a data service offered as a container application. eNASenables consolidated block and file storage without the expense and complexity ofgateway hardware.
Embedded Management (eManagement) is a container application that allows you tomanage arrays running HYPERMAX OS without requiring a dedicated managementhost.
Container applications are installed at the factory. No additional security proceduresare required.
Container application access IDsThe access ID for a container application is a shared secret between Solutions Enablerand HYPERMAX OS. Solutions Enabler generates the access ID based on the type ofcontainer application during first boot.
When a container application issues a syscall, HYPERMAX OS validates the access ID,and associates the privilege check with the appropriate group.
Container application access IDs have the following characteristics:
l Traditional access IDs (generated using attributes of the hardware), are not validfor container applications.
l The shared secret is not visible through any interface.
l Customers cannot disable alternate access ID mode or change the access ID.
Client/server modeBy default, client/server mode operations use the access ID of the server. Accesscontrol checks are performed against the rules established for the server host.
Customers may prefer to apply client host privileges rather than those of the host.
To change the access control privileges to the client, perform the following:
l On the client host:Set the SYMAPI option SYMAPI_CLIENT_SIDE_ACCESS_ID to ENABLE
symcli -option set SYMAPI_USE_ACCESS_ID -value CLIENTThis tells SYMAPI to send the client access ID to the server.
Container Applications
78 Security Configuration Guide
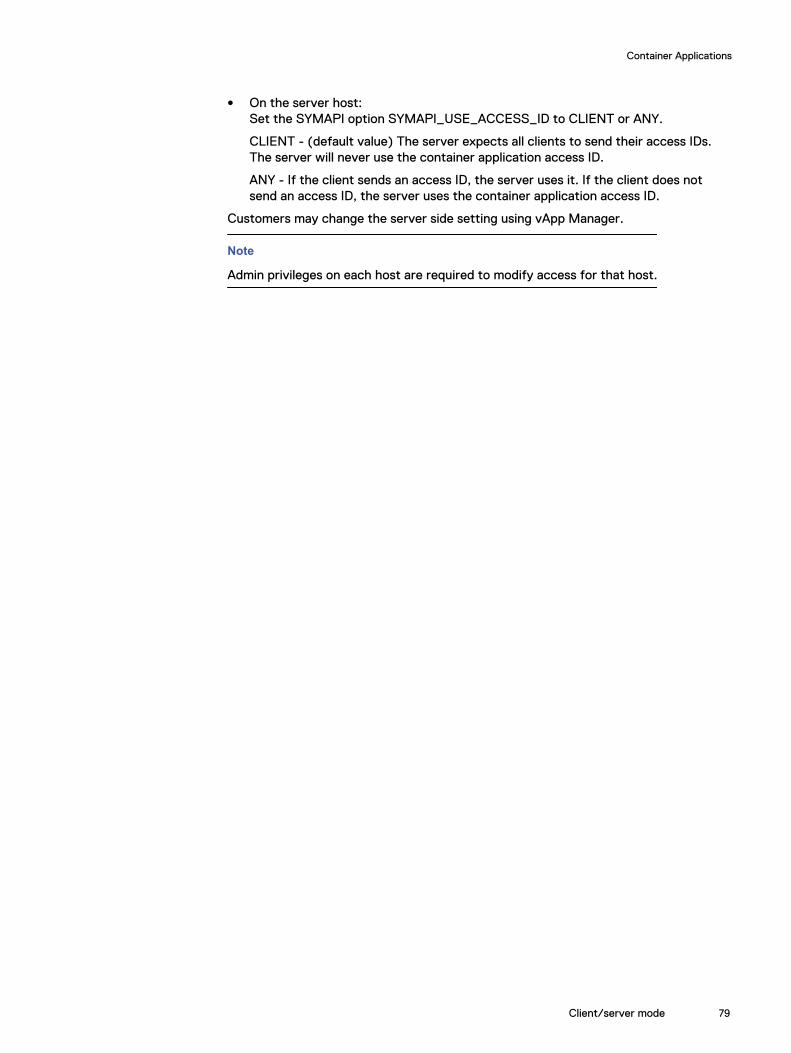
l On the server host:Set the SYMAPI option SYMAPI_USE_ACCESS_ID to CLIENT or ANY.
CLIENT - (default value) The server expects all clients to send their access IDs.The server will never use the container application access ID.
ANY - If the client sends an access ID, the server uses it. If the client does notsend an access ID, the server uses the container application access ID.
Customers may change the server side setting using vApp Manager.
Note
Admin privileges on each host are required to modify access for that host.
Container Applications
Client/server mode 79

Container Applications
80 Security Configuration Guide

CHAPTER 8
Embedded NAS
This chapter provides information on the security configuration required for embeddedNAS (eNAS), an embedded application available on storage arrays runningHYPERMAX OS. Topics include:
l Embedded NAS..................................................................................................82l Security controls map........................................................................................ 82
Embedded NAS 81

Embedded NASEmbedded NAS (eNAS) uses the lightweight hypervisor provided in HYPERMAX OSto create and run a set of virtual machines on storage array controllers. These virtualmachines host two major elements of eNAS: software data movers and controlstations. These virtual machines are distributed based on the mirrored pairarchitecture of the storage array to evenly consume resources for both performanceand capacity. All block and file resources are managed through the intuitive, easy touse Unisphere for VNX management interface.
eNAS extends the value of storage arrays running HYPERMAX OS to file storage byenabling customers to leverage vital enterprise features including SLO-basedprovisioning, Host I/O Limits, and FAST technologies for both block and file storage.
The eNAS guest runs in a virtual environment created by a “container”. Containersidentify the resources (memory, ports, and LUNs) used by their guest. When a guestis created, HYPERMAX OS assigns an internal IP address that is not exposed to thecustomer network. MAC Address filtering prevents unauthorized access betweenguests on the array's internal network.
Security controls mapFigure 5 Embedded NAS managed objects
HYPERMAX OS
Storage Array
MMCS Service Access
eNAS
Data Mover
Guest Access
Customer Management
Network
HTTPS,other protocols
Credentials
Control Station with EMC Unisphere (for VNX)
Director 1
Data MoverControl Station with EMC
Unisphere (for VNX)
Director 2
Unisphere for VMAX Link & Launch
(Host or eMGMT)
eNAS
HTTPS
HTTPS
Clients
NFS, CIFS
NFS, CIFS
Embedded NAS
82 Security Configuration Guide

The security features and tasks the eNAS guest running on the storage array runningHYPERMAX OS are the same as those for the VNX series.
l EMC VNX Series Security Configuration Guide for VNX provides information on thefollowing security-related topics:
n Access control
n Logging
n Communication security
n Data security settings
n Security maintenance
n Advanced management
l EMC VNX Series Command Line Interface Reference for File provides information theCLI commands to manage access control, certificates, LDAP configuration, andother security-related activities.
CAUTION
Customers are responsible for securing their eNAS/VNX deployment. Pre-configured settings may not be sufficiently secure for their needs. EMC VNXSeries Security Configuration Guide for VNX provides additional information.
Embedded NAS
Security controls map 83

Embedded NAS
84 Security Configuration Guide

CHAPTER 9
Embedded Management
This chapter provides information on the security configuration required for embeddedmanagement (eMgmt). eMgmt enables you to manage an array running HYPERMAXOS without software installed on a host. Topics include:
l Embedded management.....................................................................................86l Security controls map........................................................................................ 86l Virtual Machine ports.........................................................................................86
Embedded Management 85

Embedded managementEmbedded management (eManagement) embeds management software (SolutionsEnabler, SMI-S, Unisphere for VMAX) on the storage array, enabling customers tomanage the array without software installed on a host.
Note
eManagement manages a single storage array running HYPERMAX OS and any SRDFattached arrays. Customers with multiple storage arrays who want a single controlpane can use the traditional host-based management interfaces.
eManagement is enabled at the EMC factory.
Security controls mapFigure 6 eManagement managed objects
HYPERMAX OS
Storage Array
MMCS Service Access
eMGMT
Solutions Enabler (server)
SMI-SUnisphere for
VMAX
vApp Manager
Guest Access
Customer Management
Network
HTTPS,other protocols
Solutions Enabler
eMGMT Clients
Unisphere for VMAX
SMI-S Provider
TLS
TLS
TLS
Credentials
Note
MMCS service access and guest access to the array are distinct and separateoperations. Service users do not have access to any traffic on the guest interface.
Virtual Machine portsVirtual machine (VM) ports are associated with virtual machines to avoid contentionwith physical connectivity. VM ports are addressed as ports 32-63 per director FAemulation.
Embedded Management
86 Security Configuration Guide

LUNs are provisioned on VM ports using the same methods as provisioning physicalports.
A VM port can be mapped to one and only one VM.
A VM can be mapped to more than one port.
Embedded Management
Virtual Machine ports 87

Embedded Management
88 Security Configuration Guide

CHAPTER 10
vApps
This chapter contains the following topics:
l vApp overview................................................................................................... 90l vApp checklist....................................................................................................90l Security controls map.........................................................................................91l Deployment settings and points of access......................................................... 92l User authentication............................................................................................92l Port usage......................................................................................................... 94l Log files and settings......................................................................................... 95l SSL certificates................................................................................................. 96l Data security settings........................................................................................ 96l Serviceability......................................................................................................97l Alerts................................................................................................................. 97l Clam anti-virus................................................................................................... 97l Upgrades............................................................................................................97
vApps 89

vApp overviewEMC delivers virtual appliances (vApps) for:
l Unisphere for VMAX
l Solutions Enabler
l SMI-S
l VASA ProviderThe VASA Provider orchestrates the lifecycle of Virtual Volumes (VVols) and theirderivatives: snapshots, clones, and fast-clones. It also provides storage topology,capabilities and status information to the vCenter ™ and the ESXi hosts.
vApp checklistThe following checklist summarizes security-related tasks you should perform toimprove the security of your deployment.
Table 12 vApp security configuration checklist
Purpose of activity Task
User-based access control: Manage useraccounts
Manage user authentication
Log files and settings: Manage log files Download log files
Certificate files: Replace generatedcertificates with customer-supplied (trusted)certificates for secure communications
Replace pre-generated SSL certificates
Security settings: Perform anti-virus scans,download scan logs, and edit the anti-virusconfiguration file
Manage Clam anti-virus
vApps
90 Security Configuration Guide
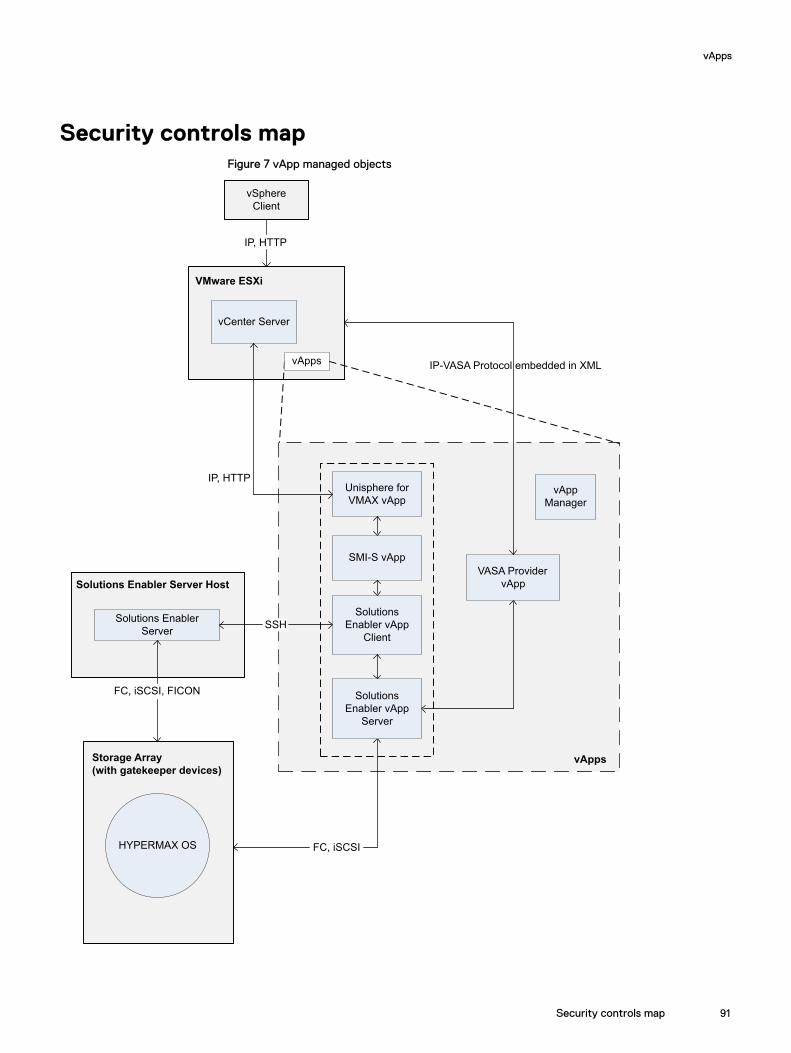
Security controls mapFigure 7 vApp managed objects
Solutions
Enabler vApp
Client
VASA Provider
vApp
Storage Array
(with gatekeeper devices)
HYPERMAX OS
vApp
Manager
SMI-S vApp
Unisphere for
VMAX vApp
vSphere
Client
IP, HTTP
vApps
FC, iSCSI
vApps
vCenter Server
IP-VASA Protocol embedded in XML
Solutions
Enabler vApp
Server
IP, HTTP
VMware ESXi
Solutions Enabler
Server
Solutions Enabler Server Host
SSH
FC, iSCSI, FICON
vApps
Security controls map 91

Deployment settings and points of accessEach vApp is installed from a single Open Virtualization Format (OVF) archive anddeployed in a standard ESXi appliance.
There are three points of access:
l vApp Manager
l SSH
l VM console
vApps are designed to be managed by the vApp Manager. There is no direct useraccess except when SSH is explicitly enabled for troubleshooting. No components canbe individually managed.
vApp ManagervApp Manager is a browser-based graphical user interface console contained withineach vApp that allows you to perform management and configuration tasks for thevApp. vApp manager is the sole management interface for accessing vApps and isaccessed via a secure https layer. For example:
https://hostname:5480
SSHYou can enable the SSH port for an SSH session to troubleshoot the appliance orstorage system. The default state of the SSH port is disabled.
You must log in to the vApp Manager to enable or disable the SSH port.Authentication is required for login.
CAUTION
Troubleshooting the appliance or storage system should only be done under thedirection of EMC Customer Support.
Virtual machine consoleYou can access the virtual machine console via the ESXi server. The followingactivities are supported through ESXi server access:
l Network configuration
l Upgrades
l Setting timezones
Limiting access to management interfacesYou can limit access to management interfaces from a defined list of hosts. In vAppManager, you can specify an IP/Host name to restrict the vApp client access to onlythat domain. Both the server and client components must be part of the samenetwork.
For information on how to change the domain name, see the vApp Manager onlinehelp.
User authenticationvApp Manager users can:
vApps
92 Security Configuration Guide

l Configure the Common Security Toolkit Lockbox
l Configure and update vApp options
l Retrieve log files
The vApp Manager provides two types of user authentication:
l Local directory authentication (username and password)
l Lightweight Directory Access Protocol (LDAP) authentication
LDAP allows for distributed directory information services over a network of hosts. Aclient must provide a set of parameters to configure LDAP, which then allowsconnection to the LDAP server, and secures communication between hosts on thenetwork.
You can add new local users or map existing LDAP users. New users are assigned oneof two roles:
l admin
l service
The default role is admin.
LDAP admin users can be either a "user" or "group" type. All users belonging to anLDAP group can perform all vApp Manager operations.
The vApp Manager contains online help that describes the steps to manage userauthentication, including:
l Configuring LDAP
l Changing the LDAP configuration
l Importing certificates
l Adding user accounts
l Removing user accounts
l Changing user passwords
VASA Provider authenticationAuthentication and authorization between vCenter and the VASA Provider is achievedby registering the VASA Provider in the vSphere Web Client for vCenter. Forinformation on registering the VASA Provider, see the EMC VMAX VASA ProviderRelease Notes. It is recommended that you change the default password for security.
After the VASA Provider is registered, certificates are the authorization mechanism.The certificate authorities can be owned by VMware Certificate Authority (VMCA),EMC or a third party.
Default user accountsvApp Manager has one or two default user accounts.
A default user account is created during installation. The default user account cannotbe removed.
vApp default user accounts are:
vApps
VASA Provider authentication 93

Table 13 vApp default accounts
vApp Username Password
Unisphere for VMAX seconfig seconfig
Solutions Enabler seconfig seconfig
VASA Provider vpconfig vpconfig
The first time you log in you will be prompted to change the password for the defaultuser account. You can subsequently change the password at any time.
A second default user account is created if you enable SSH. The default SSH useraccount for all vApps is:
username: cseadminpassword: cseadmin
You can change the password for the default SSH account at any time.
Port usagevApp Manager uses the ports listed in the following table. All other ports are blocked.
Table 14 Network ports used in vApps
Component Protocol Port Description
SSH TCP 22 SSH port. This portcan be enabled/disabled using vAppManager.Default: disabled.
Solutions Enabler TCP 2707 Standard EMCSolutions Enablerserver port for client-server communication.
vApp Manager TCP 5480 Port where the vAppJBoss web serverlistens for vAppmanager requests.Listening port foruploading certificatesand licenses toUnisphere for VMAXvApp Manager overHTTP.
SMI TCP 5988, 5989 Standard EMC SMIport.
VASA Provider TCP 5989 Standard EMC secureport. VASA Providerdoes not conflict withSMI-S port usage since
vApps
94 Security Configuration Guide

Table 14 Network ports used in vApps (continued)
Component Protocol Port Description
the vApps are installedin separate OVFpackages.
vApp for Unispherefor VMAX
TCP 8443 Standard EMCUnisphere for VMAXlistening port.
Log files and settingsYou can use the vApp Manager to download the following log files from the vApp:
l Daemon log files, including:
n storapid
n storgnsd
n storrdfd
n storevntd
n storsrmd
n storwatchd
n storstpd
n storsrvd
n ecom
n univmax
l Appliance (vApp Manager) log files
l First level log files and other diagnostic information obtained by the EMCGrabutility
The vApp Manager online help describes the steps to download log files.
VASA Provider Log FilesThe VASA Provider log files are located in /opt/emc/vvol/log.
The log files are:
l HTTP_trace.log
l VVolProvider-<date>.log cimomlog.txt
l udb.log
l vp.log
l securitylog.txt
Log file managementLogging levels, log file retention, and synchronization between the log files and theESX timer are not configurable.
Log file entries cannot be streamed to an external log service, such as syslog.
vApps
Log files and settings 95

If the disk space utilized by log files reaches 80% capacity, an alert is generated. Thisthreshold is not configurable.
SSL certificatesSSL certificates for the vApp Manager can not be modified.
You can use the vApp Manager to import an alternate (custom) SSL certificate for thestorsrvd daemon. The vApp Manager online help describes the steps to create andupdate SSL certificates.
The certificate is used when stordaemon command requests are made from aremote client. Certificates can be self-signed or CA-signed.
Importing an alternate certificate for the storsrvd daemon requires the followingfiles:
l Private key file
l Replacement certificate file
l Trust certificate file
These files must be in a .pem format. For example:
customer_key.pemThe common name (CN) of the certificate must include storsrvd followed by aspace, and the fully qualified name of the host where the certificate will be installed.For example:
storsrvd my.host.com
Data security settingsThe vApp Manager persistent data files include the following appliance configurationfiles:
l Daemon Option file
l Option file
l Network configuration file
l symapi.db file
l daemon specific files
To download the persistent files using vApp Manager, click the Download PersistentData button on the Appliance Data/Log tab.
Downloaded data files are saved to a .zip file (including a .gpg file) named:
product-name_export_persistenent_data_date_time.zipThe data is fully encrypted. The encryption key is not configurable and cannot bemodified.
Starting in Solutions Enabler 8.0.2, vApp Manager verifies that there is sufficientspace to create the .zip file. If there is not sufficient space, a message similar to thefollowing is displayed:
Insufficient space to compress persistent data. Please trycleaning up temporary files.You can click the CLEAR FILES button to create sufficient space to complete thecompression and download.
vApps
96 Security Configuration Guide

Note
In Unisphere for VMAX deployments, you need to stop and restart SMAS in order toclear the files. The steps to start and stop SMAS are described in the EMC Unispherefor VMAX Installation Guide.
ServiceabilityThere is no special login to vApp Manager for service personnel.
EMC Service Personnel may ask you to enable SSH access for troubleshooting thevApp. Ensure SSH is disabled except upon request from EMC.
Security patches and other updates are applied by upgrading the vApp installationimage from the virtual machine console.
AlertsvApp Manager has two pop-up alerts:
l Virus update alert - Displayed when an update for ClamAV is available. ClamAV isan anti-virus package that detects viruses, trojans, malware, and other maliciousthreats.
l Log file usage alert - Displayed when a log file reaches 80% of available capacity.
These alerts are display-only. They are not forwarded to an alert notification manager.
Clam anti-virusThe vApp Manager is packaged with Clam Anit-virus (ClamAV), an open source (GPL)anti-virus capability designed to detect viruses, trojans, malware, and other maliciousthreats on the appliance virtual machine. ClamAV supports on-demand scanning, anti-virus updates, access to scan log files, and editing the ClamAV configuration file.
Information on managing ClamAV is included in the vApp Manager online help.
UpgradesUpdates to vApp are installed using a full ISO upgrade.
Patching is not supported.
vApps
Serviceability 97

vApps
98 Security Configuration Guide

CHAPTER 11
Snapshots
TimeFinder SnapVX delivers point-in-time copies of volumes and snapshots of StorageGroups. Secure snaps provide added security by preventing accidental deletion ofsnapshot data.
This chapter contains the following topics:
l TimeFinder SnapVX.......................................................................................... 100l Secure snaps.................................................................................................... 100
Snapshots 99

TimeFinder SnapVXEMC TimeFinder SnapVX creates and manages point-in-time snapshots of critical datathat can be used for backups, decision support, and to refresh data warehouse, test,and development environments. SnapVX snapshots do not require target volumes.SnapVX snapshots share back-end allocations with the source volume and othersnapshots on the source volume.
TimeFinder SnapVX is supported on VMAX arrays running HYPERMAX OS 5977 andhigher, and snapshots are always consistent. Consistency across multiple arrays isachieved when source devices are in a composite group.
Secure snaps
Introduced with HYPERMAX OS 5977 Q2 2017 SR, secure snaps is an enhancement tothe current snapshot technology. Secure snaps prevent administrators or other high-level users from intentionally or unintentionally deleting snapshot data. In addition,Secure snaps are also immune to automatic failure resulting from running out ofStorage Recourse Pool (SRP) or Replication Data Pointer (RDP) space on the array.
When creating a secure snapshot, you assign it an expiration date/time either as adelta from the current date or as an absolute date. Once the expiration date passes,and if the snapshot has no links, HYPERMAX OS automatically deletes the snapshot.Prior to its expiration, Administrators can only extend the expiration date - theycannot shorten the date or delete the snapshot. If a secure snapshot expires, and ithas a volume linked to it, or an active restore session, the snapshot is not deleted;however, it is no longer considered secure.
Note
Secure snapshots may only be terminated after they expire or by customer-authorizedEMC support. Refer to Knowledgebase article 498316 for additional information.
Snapshots
100 Security Configuration Guide

CHAPTER 12
Data at Rest Encryption
This chapter contains the following topics:
l Overview.......................................................................................................... 102l Key manager.....................................................................................................103l Key protection.................................................................................................. 103
Data at Rest Encryption 101

OverviewData at Rest Encryption (D@RE) provides hardware-based, on-array, back-endencryption for VMAX storage arrays running HYPERMAX OS 5977.596.583 or higher.Back-end encryption protects your information from unauthorized access when drivesare removed from the system. D@RE provides encryption on the back end using SASI/O modules that incorporate AES-XTS data-at-rest encryption, designed to be FIPS140-2 Level 1 compliant. These modules encrypt and decrypt data as it is being writtento or read from a drive. Both HDDs and SSDs are protected and all configured drivesare encrypted, including both RAID groups and spares. In addition, all array Vaultcontents are encrypted.
D@RE can use either of the following methods for key management:
l D@RE can use its RSA® Embedded Key Manager
l You can configure D@RE to interface with an OASIS Key ManagementInteroperability Protocol (KMIP) compliant external key manager
D@RE keys are self-managed, and there is no need to replicate keys across volumesnapshots or remote sites. The key manager provides a separate, unique DEK for alldrives in the array including spare drives.
By securing data on enterprise storage, D@RE ensures that the potential exposure ofsensitive data on discarded, misplaced, or stolen media is reduced or eliminated. Aslong as the key used to encrypt the data is secured, encrypted data cannot be read. Inaddition to protecting against threats related to physical removal of media, this alsomeans that media can readily be repurposed by destroying the encryption key used forsecuring the data previously stored on that media.
D@RE is compatible with all VMAX3 and VMAX All Flash system features, allows forencryption of any supported logical drive types or volume emulations, and deliverspowerful encryption without performance degradation or disruption to existingapplications or infrastructure.
D@RE protects against unauthorized data access when drives are lost, failed orstolen. Features include:
l Secure replacement for failed drives that cannot be overwritten. Delete theapplicable keys, and the data on the failed drive is unreadable.
l Protection against stolen drives. When a drive is removed from the array, the keystays behind, making data on the drive unreadable.
l Faster drive sparing. The drive replacement script crypto-shreds data bydestroying the keys associated with the removed drive.
l Secure array retirement. Simply delete all copies of keys on the array, and allremaining data is unreadable.
l All configured drives are encrypted, including RAID groups and spares.
l PowerVault data is encrypted on Flash I/O modules (instead of drives).
l You can use the SYMCLI (symcfg list -v), Unisphere for VMAX (icon on the frontpanel), vApp Manager, and SMI-S to display whether D@RE is enabled on astorage array.
D@RE is a licensed feature. For new systems, D@RE is pre-configured and installed atthe factory. If you are using the embedded key manager, no user management ofD@RE’s security features are required or possible. If you are using an external keymanager, additional steps are required to connect to the key servers.
Data at Rest Encryption
102 Security Configuration Guide

Note
If you have an existing storage array running HYPERMAX OS without D@RE enabled,you must upgrade to enable D@RE. The upgrade is disruptive and requires re-installingthe array, and may involve a full data back up and restore. Before you upgrade, youmust plan how to manage any data already on the array. EMC Professional Servicesoffers services to help you upgrade to D@RE.
Key managerD@RE provides enterprise-level key management using by integrating with a KMIPcompliant external key manager. For a list of supported key managers, see E-Lab™
Interoperability Navigator (ELN) at https://elabnavigator.emc.com.
The key manager provides a separate, unique Data Encryption Key (DEK) for each diskin the array, including spare drives. As long as the key used to encrypt the data issecured, encrypted data cannot be read. When D@RE is enabled:
l The key manager generates a Key Encryption Key (KEK).
l When a RAID group or pool is configured, the key manager generates anencryption key (DEK) for each drive. Every drive has a unique key. When a drive isadded or replaced, a new DEK is generated. After drive replacement, the old key isdestroyed both in the array configuration and key manager.
DEKs and KEKs can only be used on the array where they are generated (embeddedkey manager) or requested from (KMIP compliant external key manager). DEKs areencrypted with a KEK and pushed from the Key Manager to the controller asnecessary during normal operations, such as when a new drive is added.
When data requiring encryption is replicated to another array, D@RE must be enabledat both the primary and secondary sites. Drives at the primary site have differentencryption keys to those at the secondary site.
The VMAX Audit Log records all key management events.
Key protectionThe local keystore file is encrypted with a 256-bit AES key derived from a randomly-generated password, and stored in the Common Security Toolkit (CST) Lockboxwhich leverages RSA’s BSAFE technology.
The Lockbox is protected using MMCS-specific stable system values of the primaryMMCS. These are the same SSVs that protect Symmetrix Secure Credentials.
Compromising the MMCS’s drive or copying Lockbox/keystore files off the arraycauses the SSV tests to fail.
Compromising the entire MMCS only gives an attacker access if they also successfullycompromise Symmetrix Service Credentials (SSC).
There are no backdoor keys or passwords to bypass D@RE security.
Data at Rest Encryption
Key manager 103

Data at Rest Encryption
104 Security Configuration Guide