Embed Size (px)
Citation preview

[© RPR Wyatt 2014. All rights reserved.]
RPRWYATT
November 14, 2014
[© RPR Wyatt 2014. All rights reserved.]

Table of Contents
1.0 Installation Guide ...................................................................................................... 9
1.1 Introduction ............................................................................................................... 9
1.1.1 Features .............................................................................................................. 9
1.1.2 Views................................................................................................................... 9
1.1.3 Support ............................................................................................................... 9
1.2 System Requirements ................................................................................................. 9
1.2.1 Hardware ............................................................................................................ 9
1.2.2 Operating System.............................................................................................. 10
1.2.3 IBM Notes Requirements (Notes/Domino Users) ............................................. 10
1.2.4 IBM Sametime Monitoring (optional) .............................................................. 10
1.2.5 Microsoft Exchange Requirements (Exchange Users) ..................................... 10
1.2.6 Microsoft Lync Requirements (optional) .......................................................... 10
1.3 Advisories ................................................................................................................ 10
1.3.1 Ports ................................................................................................................. 10
1.3.2 Firewalls ........................................................................................................... 10
1.3.3 Included components ........................................................................................ 11
1.4 Installations ............................................................................................................. 11
1.4.1 New Installations .............................................................................................. 11
1.4.2 Upgrade Installations ....................................................................................... 14
2.0 Manage and Maintain Common Features ............................................................... 17
2.1 Create and Manage Locations and Passwords ....................................................... 17
2.1.1 Create Server locations .................................................................................... 17
2.1.2 Edit Server Locations ....................................................................................... 17
2.1.3 Delete Sever Locations ..................................................................................... 17
2.1.4 Assign Server Locations ................................................................................... 18
2.1.5 Registering Notes Credentials .......................................................................... 18
2.1.6 Registering General Credentials ...................................................................... 19
2.1.7 Applying Server Credentials............................................................................. 20
2.2 Importing Servers .................................................................................................... 20
2.2.1 Import Domino Servers using Domino Directory ............................................ 20
2.2.2 Import Domino Servers using CSV File ........................................................... 23

2.2.3 Import Exchange Servers ................................................................................. 23
2.2.4 Import DAG Servers ......................................................................................... 25
2.3 Server Settings Editor .............................................................................................. 26
2.3.1 Server Attributes ............................................................................................... 26
2.3.2 Domino Server Tasks ........................................................................................ 27
2.3.3 Windows Services ............................................................................................. 28
2.3.4 Disk Settings ..................................................................................................... 29
2.3.5 Edit Server Locations ....................................................................................... 30
2.3.6 Edit Credentials ................................................................................................ 31
2.4 Alerts ....................................................................................................................... 32
2.4.1 Alert Settings .................................................................................................... 32
2.4.2 Event Type Alerting (trending alerts) ............................................................... 32
2.4.3 Alert Definitions ............................................................................................... 33
2.5 Monitor Misc. Items ................................................................................................ 35
2.5.1 Monitor Mobile Users ...................................................................................... 35
2.5.2 Monitor Network Devices ................................................................................. 36
2.5.3 Edit Network Devices ....................................................................................... 37
2.5.4 Monitor SNMP Devices .................................................................................... 37
2.5.5 Edit SNMP Devices .......................................................................................... 38
2.5.6 Monitor URL’s.................................................................................................. 38
2.5.7 Edit URLs ......................................................................................................... 39
2.5.8 Monitor Cloud Applications ............................................................................. 39
2.5.9 Edit Cloud Applications ................................................................................... 40
2.6 Monitoring Mail ...................................................................................................... 40
2.6.1 Monitor NotesMail Probes ............................................................................... 40
2.6.2 Edit NotesMail Probes ..................................................................................... 41
2.6.3 Monitor ExchangeMail Probes ........................................................................ 41
2.6.4 Edit ExchangeMail Probes ............................................................................... 42
2.6.5 Monitor Mail Services ...................................................................................... 42
2.6.6 Edit Mail Services............................................................................................. 43
2.7 General Preferences/Settings .................................................................................. 43
2.7.1 Licensing information ....................................................................................... 43
2.7.2 Setup Maintenance Windows ............................................................................ 44

2.7.3 Setup Business Hours ....................................................................................... 45
2.7.4 Assign Features ................................................................................................ 46
2.8 User Account Information ....................................................................................... 47
2.8.1 Create a New User ........................................................................................... 47
2.8.2 Edit a User ........................................................................................................ 48
2.8.3 Restrict User Server Access.............................................................................. 48
2.8.4 Grant User Server Access ................................................................................ 49
2.8.5 Restrict User Navigator (Menu) Access ........................................................... 49
2.8.6 Grant User Navigator (Menu) Access .............................................................. 50
2.8.7 Security Questions ............................................................................................ 50
2.8.8 Change Password ............................................................................................. 51
2.9 Manage & Maintain Server Configurations ........................................................... 52
2.9.1 Manually Add Servers ...................................................................................... 52
2.9.2 Edit Server Configurations ............................................................................... 52
2.9.3 Delete Servers ................................................................................................... 52
2.9.4 Enable or Disable a Server from Scanning ...................................................... 52
3.0 Manage and Maintain Microsoft Attributes ............................................................ 55
3.1 Microsoft Exchange ................................................................................................. 55
3.1.1 Apply Exchange Server Attributes .................................................................... 55
3.1.2 Monitor Windows Services ............................................................................... 55
3.1.3 Apply Advanced Settings .................................................................................. 56
3.1.4 Apply Disk Settings ........................................................................................... 57
3.1.5 Apply Database Settings ................................................................................... 58
3.2 Microsoft Lync ......................................................................................................... 59
3.2.1 Setup Lync Server* ........................................................................................... 59
3.2.2 Edit Lync Servers .............................................................................................. 59
3.2.3 Apply Server Attributes..................................................................................... 60
3.2.4 Apply Disk Settings ........................................................................................... 61
3.2.5 Apply Advanced Settings .................................................................................. 62
3.3 Microsoft Active Directory ...................................................................................... 63
3.3.1 Setup Active Directory Server .......................................................................... 63
3.3.2 Edit Active Directory Servers ........................................................................... 63
3.3.3 Apply Server Attributes..................................................................................... 64

3.3.4 Apply Disk Settings ........................................................................................... 65
3.3.5 Monitor Windows Services ............................................................................... 66
3.3.6 Apply Advanced Settings .................................................................................. 66
3.4 Microsoft Sharepoint ............................................................................................... 67
3.4.1 Setup Sharepoint Servers .................................................................................. 67
3.4.2 Edit Sharepoint Servers .................................................................................... 67
3.4.3 Apply Server Attributes..................................................................................... 69
3.4.4 Apply Disk Settings ........................................................................................... 70
3.4.5 Apply Advanced Settings .................................................................................. 71
3.5 Microsoft Windows .................................................................................................. 72
3.5.1 Setup Windows Virtual Machines or Server ..................................................... 72
3.5.2 Edit Windows Virtual Machines ....................................................................... 72
3.5.3 Apply Server Attributes..................................................................................... 73
3.5.4 Apply Disk Settings ........................................................................................... 74
3.5.5 Monitor Windows Services ............................................................................... 75
3.5.6 Apply Advanced Settings .................................................................................. 76
4.0 Manage and Maintain Domino Attributes .............................................................. 77
4.1 IBM Domino ............................................................................................................ 77
4.1.1 Apply Server Attributes..................................................................................... 77
4.1.2 Monitor Server Tasks ....................................................................................... 78
4.1.3 Apply Disk Settings ........................................................................................... 79
4.1.4 Apply Advanced Settings .................................................................................. 80
4.1.5 Clusters ............................................................................................................. 81
4.1.6 Notes Databases ............................................................................................... 83
4.1.7 Custom Statistics .............................................................................................. 83
4.1.8 Add Task Definitions ........................................................................................ 84
4.1.9 Logfile Scanning ............................................................................................... 85
4.2 IBM Sametime ......................................................................................................... 86
4.2.1 Setup Sametime Server* ................................................................................... 86
4.2.2 Edit Sametime Server ....................................................................................... 86
4.2.3 Setup Sametime Statistics ................................................................................. 88
5.0 User Guide (Coming Soon!) ....................................................................................... 91
6.0 Troubleshooting (Coming Soon!) ............................................................................... 92


Figure 1-1 .................................................................................................................................. 12 Figure 1-2 .................................................................................................................................. 13 Figure 1-3 .................................................................................................................................. 13 Figure 1-4 .................................................................................................................................. 14 Figure 1-5 .................................................................................................................................. 15 Figure 2-1 .................................................................................................................................. 17 Figure 2-2 .................................................................................................................................. 18 Figure 2-3 .................................................................................................................................. 19 Figure 2-4 .................................................................................................................................. 20 Figure 2-5 .................................................................................................................................. 20 Figure 2-6 .................................................................................................................................. 21 Figure 2-7 .................................................................................................................................. 22 Figure 2-8 .................................................................................................................................. 22 Figure 2-9 .................................................................................................................................. 23 Figure 2-10 ................................................................................................................................ 24 Figure 2-11 ................................................................................................................................ 25 Figure 2-12 ................................................................................................................................ 26 Figure 2-13 ................................................................................................................................ 27 Figure 2-14 ................................................................................................................................ 28 Figure 2-15 ................................................................................................................................ 29 Figure 2-16 ................................................................................................................................ 30 Figure 2-17 ................................................................................................................................ 31 Figure 2-18 ................................................................................................................................ 31 Figure 2-19 ................................................................................................................................ 32 Figure 2-20 ................................................................................................................................ 33 Figure 2-21 ................................................................................................................................ 34 Figure 2-22 ................................................................................................................................ 35 Figure 2-23 ................................................................................................................................ 36 Figure 2-24 ................................................................................................................................ 37 Figure 2-25 ................................................................................................................................ 38 Figure 2-26 ................................................................................................................................ 39 Figure 2-27 ................................................................................................................................ 40 Figure 2-28 ................................................................................................................................ 41 Figure 2-29 ................................................................................................................................ 42 Figure 2-30 ................................................................................................................................ 43 Figure 2-31 ................................................................................................................................ 44 Figure 2-32 ................................................................................................................................ 45 Figure 2-33 ................................................................................................................................ 46 Figure 2-34 ................................................................................................................................ 47 Figure 2-35 ................................................................................................................................ 48 Figure 2-36 ................................................................................................................................ 49 Figure 2-37 ................................................................................................................................ 50 Figure 2-38 ................................................................................................................................ 51 Figure 2-39 ................................................................................................................................ 51 Figure 2-40 ................................................................................................................................ 52 Figure 2-41 ................................................................................................................................ 53 Figure 2-42 ................................................................................................................................ 54 Figure 3-1 .................................................................................................................................. 55 Figure 3-2 .................................................................................................................................. 56 Figure 3-3 .................................................................................................................................. 57 Figure 3-4 .................................................................................................................................. 58 Figure 3-5 .................................................................................................................................. 58 Figure 3-6 .................................................................................................................................. 60

Figure 3-7 .................................................................................................................................. 60 Figure 3-8 .................................................................................................................................. 61 Figure 3-9 .................................................................................................................................. 62 Figure 3-10 ................................................................................................................................ 63 Figure 3-11 ................................................................................................................................ 64 Figure 3-12 ................................................................................................................................ 64 Figure 3-13 ................................................................................................................................ 65 Figure 3-14 ................................................................................................................................ 66 Figure 3-15 ................................................................................................................................ 66 Figure 3-16 ................................................................................................................................ 67 Figure 3-17 ................................................................................................................................ 68 Figure 3-18 ................................................................................................................................ 69 Figure 3-19 ................................................................................................................................ 70 Figure 3-20 ................................................................................................................................ 71 Figure 3-21 ................................................................................................................................ 71 Figure 3-22 ................................................................................................................................ 73 Figure 3-23 ................................................................................................................................ 73 Figure 3-24 ................................................................................................................................ 74 Figure 3-25 ................................................................................................................................ 75 Figure 3-26 ................................................................................................................................ 76 Figure 3-27 ................................................................................................................................ 77 Figure 4-1 .................................................................................................................................. 78 Figure 4-2 .................................................................................................................................. 79 Figure 4-3 .................................................................................................................................. 80 Figure 4-4 .................................................................................................................................. 81 Figure 4-5 .................................................................................................................................. 82 Figure 4-6 .................................................................................................................................. 82 Figure 4-7 .................................................................................................................................. 83 Figure 4-8 .................................................................................................................................. 84 Figure 4-9 .................................................................................................................................. 85 Figure 4-10 ................................................................................................................................ 86 Figure 4-11 ................................................................................................................................ 87 Figure 4-12 ................................................................................................................................ 88 Figure 4-13 ................................................................................................................................ 89

9 VitalSigns Installation, Administrator, and End User Guide
1.0 Installation Guide
1.1 Introduction
With VitalSigns Plus, you will have a monitoring tool that is not limited to a single workstation. With VitalSigns Plus, you can access the status of your environment from any Internet browser. The Administrator’s Guide is written for the System Administrator to use when maintaining and configuring VitalSigns. VitalSigns has two main views: The Configurator and the Dashboard. The Configurator is typically managed by the lead administrator and is the view where all the administrative functions and configurations are stored. From the Configurator, the administrator can select servers, select server tasks to monitor, set up alerts and mail probes, assign access for other users and much much more. The Dashboard is for everybody else in the organization. From the HelpDesk team to managers to power users they can all be kept up-to-date with the latest status and information in their IT environment all from the VitalSigns Dashboard.
1.1.1 Features
Use VitalSigns to monitoring the following:
Domino servers
Exchange servers
Server tasks
Notes databases
Clusters
DAG availability
Notes mail probes
Disk space
URL’s
Windows virtual machines
Sametime
Lync
BES
Traveler
Mobile devices
Plus much more!
1.1.2 Views
Detail views
1.1.3 Support
Please direct your support inquiries to [email protected] or call (602) 263-8788.
1.2 System Requirements
1.2.1 Hardware
4 GB RAM
75 GB of Free Disk Space
Disk Space = .25GB x # of Servers

10 VitalSigns Installation, Administrator, and End User Guide
2 core processor for up to 100 servers
4 core process for over 100 servers
1.2.2 Operating System
Windows 7 (32bit & 64bit)
Windows 2008 with SP2 (64bit)
Windows 2008 R2 (64bit)
1.2.3 IBM Notes Requirements (Notes/Domino Users)
Standard 8.5.1 (or above)
Single user setup (cannot be multiuser setup)
No Roaming
ID file with a known password and administrator rights
Confirm access to applicable servers with the use of connection documents within the Notes client
1.2.4 IBM Sametime Monitoring (optional)
2 dedicated user accounts created in Domino address book (no mail file required)
Explicitly list 1 user in stconfig.nsf as a Person with Reader (or higher) rights on the server to be monitored
User 1 must be a member of the SametimeMonitor role
1.2.5 Microsoft Exchange Requirements (Exchange Users)
Active Directory credentials
Member of Exchange Administrators group is ideal
Requires the right to run remote Powershell commands
1.2.6 Microsoft Lync Requirements (optional)
Dedicated VitalSigns workstation must be in same Domain as the Lync server
1.3 Advisories
1.3.1 Ports
If the dedicated VitalSigns workstation is outside of the domain, you must create inbound and outbound rules for the following ports:
Port 80 – HTTP
Port 1352 – Notes
Port 35 -SMTP
Port 43 - IMAP
1.3.2 Firewalls
Include firewall exceptions

11 VitalSigns Installation, Administrator, and End User Guide
1.3.3 Included components
For new VitalSigns Plus installations, the following components will be installed automatically with the prerequisites wizard onto the workstation. Please speak with your RPRWyatt representative for more information
Web Server (Application)
o IIS 6.0 or higher
Run-time Environment
o .NET Framework 3.5
AND
o .NET Framework 4.0
Java Runtime Environment
SQL Server Express *
1.4 Installations
1.4.1 New Installations
Install a new instance of VitalSigns. (Note: For Notes/Domino users, you must have the IBM Notes client installed and configured on the dedicated VitalSigns workstation before you install VitalSigns)
Step 1 (Figure 1-1, Figure 1-4)
Go to http://azphxdom5.rprwyatt.com/dlcentral.nsf/UNID/59234E?OpenDocument
Download the file that corresponds to your system (i.e. 32 bit, 64 bit, etc.)
Go to http://azphxdom5.rprwyatt.com/dlcentral.nsf/UNID/50356F?OpenDocument
Download the VitalSigns Plus Front End, VitalSigns Plus Services, and VitalSigns Plus SQL files (Note: These files must be placed and ran on the workstation VitalSigs is installed on)

12 VitalSigns Installation, Administrator, and End User Guide
Figure 1-1
Step 2 (Figure 1-2)
Open the folder where the files downloaded in the previous step are located
Run each file as administrator in the following order (listed by filename):
o VitalSignsUpgrade_Vx.x.x.exe
o Setup_VitalSigns_VS_Services_Vx.x.x.exe
o Setup_VitalSigns_VSPFE_Vx.x.x.exe
Follow the setup Wizard instructions (Note: If you do not use your own SQL server instance, please accept the default SQL credentials)

13 VitalSigns Installation, Administrator, and End User Guide
Figure 1-2
Step 3 (Figure 1-3)
On the VitalSigns workstation, go to the Windows Services and start the VitalSigns Master Service
The VitalSigns installation is now complete
Use the Administrators Guide below to get started using VitalSigns by setting up Locations (Section 2.2), Credentials (Section 2.3), and Servers (Section 2.4)
Figure 1-3

14 VitalSigns Installation, Administrator, and End User Guide
1.4.2 Upgrade Installations
Upgrade your existing VitalSigns Plus to the latest version
Step 1 (Figure 1-4)
Go to http://azphxdom5.rprwyatt.com/dlcentral.nsf/UNID/50356F?OpenDocument
Download the VitalSigns Plus Front End, VitalSigns Plus Services, and VitalSigns Plus SQL files (Note: These files must be placed and ran on the workstation VitalSigs is installed on)
Figure 1-4
Step 2 (Figure 1-3)
On the VitalSigns workstation, go to the Windows Services and stop the VitalSigns Master Service (Note: leave this window open, you will have to restart the service after the upgrade)
Step 3 (Figure 1-5)
On the VitalSigns workstation, open Internet Information Serivces (IIS) Manager (Start -> enter IIS in the search box)
Once open, in the left side navigation pane, expand the host name and Sites folder, then highlight VSWeb

15 VitalSigns Installation, Administrator, and End User Guide
In the navigation pane on the right side under Manage Web Site, click Stop (Note: leave this window open, you will have to restart the website after the upgrade)
Figure 1-5
Step 3 (Figure 1-2)
Open the folder where the files downloaded in the previous step are located
Run each file as administrator in the following order (listed by filename)
o VitalSignsUpgrade_Vx.x.x.exe
o Setup_VitalSigns_VS_Services_Vx.x.x.exe
o Setup_VitalSigns_VSPFE_Vx.x.x.exe
Follow the setup Wizard instructions (Note: If you do not use your own SQL server instance, please accept the default SQL credentials)
Step 4
Once the files complete, open Internet Information Serivces (IIS) Manager
In the navigation pane on the right side under Manage Web Site, click Start
Open the Windows Services and start the VitalSigns Master Service
The upgrade is complete and you can now access VitalSigns Plus

16 VitalSigns Installation, Administrator, and End User Guide

17 VitalSigns Installation, Administrator, and End User Guide
2.0 Manage and Maintain Common Features
2.1 Create and Manage Locations and Passwords
2.1.1 Create Server locations
Step 1 (Figure 2-1)
Go to Setup & Security -> Maintain Server Locations
Click the New button
Enter the Location information into the text box
Click the Update button to save the changes
Figure 2-1
2.1.2 Edit Server Locations
Step 1 (Figure 2-1)
Go to Setup & Security -> Maintain Server Locations
Click the Edit button next to the appropriate server
Edit the corresponding information
Click the Update button to save the changes
2.1.3 Delete Sever Locations
Step 1 (Figure 2-1)
Go to Setup & Security -> Maintain Server Locations
Click the Delete button next to the appropriate server

18 VitalSigns Installation, Administrator, and End User Guide
Click OK to accept the changes
2.1.4 Assign Server Locations
Step 1 (Figure 2-2)
Go to Servers & Devices -> Server Settings Editor
Select the Server Locations tab
Select the appropriate server(s)
Select the appropriate location
Click the Assign Location button to accept the changes
Figure 2-2
2.1.5 Registering Notes Credentials
Step 1 (Figure 2-3)
Go to Stored Passwords & Options -> IBM Domino Settings
Enter the appropriate paths that correspond to the Notes Directory, Notes ID file, and Notes.ini file (Note: If the Notes path, Notes ID, or Notes password changes, the changes must be reflected within VitalSigns under Stored Passwords & Options -> IBM Domino Settings)
Click Register Notes Password and enter the password
Click Save to apply the changes

19 VitalSigns Installation, Administrator, and End User Guide
Figure 2-3
2.1.6 Registering General Credentials
Step 1 (Figure 2-4)
Go to Stored Passwords & Options -> Server Credentials
Click the New button
Enter an alias (reference name) for the credentials
Enter the User ID
Enter the password associated with the ID
Click the Update button to save the credentials

20 VitalSigns Installation, Administrator, and End User Guide
Figure 2-4
2.1.7 Applying Server Credentials
Step 1 (Figure 2-5)
Go to Servers & Devices -> Server Setting Editor
Select the Credentials tab
Select the desired credentials from the drop down list (setup in section 2.1.6)
Select the server(s) to apply to the credentials selected in the previous step (Note: you must have servers already imported)
Click Assign Credentials
Figure 2-5
2.2 Importing Servers
With our import server wizard, you can easily import Domino, Exchange, and/or DAG servers with the simple click of a button.
2.2.1 Import Domino Servers using Domino Directory
Step 1 (Figure 2-6)

21 VitalSigns Installation, Administrator, and End User Guide
Go to Setup & Security -> Import Domino Servers
Click Load Servers
Select a Location to associate with the server(s)
Select the servers to import
Click Next
Figure 2-6
Step 2 (Figure 2-7)
Select the default scan settings to apply to the server(s) (Note: These settings will apply to all servers selected in the previous step)
Click Next

22 VitalSigns Installation, Administrator, and End User Guide
Figure 2-7
Step 3 (Figure 2-8)
Select the default server tasks you wish to monitor (Note: The selected server tasks will apply to all servers selected in the first step)
Click Next
Figure 2-8

23 VitalSigns Installation, Administrator, and End User Guide
Step 4
Select Import Additional Servers
OR
Click Done
2.2.2 Import Domino Servers using CSV File
Step 1 (Figure 2-9)
Go to Setup & Security -> Import Domino Servers
Click Load From CSV
Select the Location to associate with the server
Click Next
Figure 2-9
2.2.3 Import Exchange Servers
Step 1 (Figure 2-10)
Go to Setup & Security -> Import Exchange Servers
Enter the Exchange server address
Select the appropriate credentials from the drop down list (Note: These credentials can be setup in the VitalSigns Configurator under Stored Passwords & Options -> Server Credentials)
OR

24 VitalSigns Installation, Administrator, and End User Guide
Enter the user ID and password manually
Click Load Exchange Servers
Select a Location and servers to import
Click Next
Figure 2-10
Step 2 (Figure 2-11)
Select the default scan settings to apply to the server(s) (Note: These settings will apply to all servers selected in the previous step)
Click Next

25 VitalSigns Installation, Administrator, and End User Guide
Figure 2-11
Step 3
Select Import Additional Servers
OR
Click Done
2.2.4 Import DAG Servers
Step 1 (Figure 2-9)
Go to Setup & Security -> Import Exchange Servers
Enter the Exchange server address
Select the appropriate credentials from the drop down list (Note: These credentials can be setup in the VitalSigns Configurator under Stored Passwords & Options -> Server Credentials)
OR
Enter the user ID and password manually
Click Load DAG Servers
Step 2 (Figure 2-10)
Select the default scan settings to apply to the server(s) (Note: These settings will apply to all servers selected in the previous step)
Click Next

26 VitalSigns Installation, Administrator, and End User Guide
Figure 2-12
Step 3
Select Import Additional Servers
OR
Click Done
2.3 Server Settings Editor
2.3.1 Server Attributes
Step 1 (Figure 2-13)
Go to Servers & Devices -> Server Settings Editor
Select the Server Attributes tab
Select a server type from the drop down list
Select the checkbox to the left of the attribute name you want to change
Enter the appropriate value for the attribute
Select the servers/locations for which the attribute(s) will apply
Click Apply to save the changes

27 VitalSigns Installation, Administrator, and End User Guide
Figure 2-13
2.3.2 Domino Server Tasks
Step 1 (Figure 2-14)
Go to Servers & Devices -> Server Settings Editor
Select the Domino Server Tasks tab
Select the checkbox to the left of the task name you want monitored
Choose what actions you want to take if the task becomes unresponsive (Note: if you do not select an action, you will only receive an alert about the unresponsive task)
Select the servers/locations for which the tasks will apply
Click the Add Task(s) button to apply monitoring for the selected tasks
Alternatively, you can also select to remove tasks which will disable the monitoring of the task

28 VitalSigns Installation, Administrator, and End User Guide
Figure 2-14
2.3.3 Windows Services
Step 1 (Figure 2-15)
Go to Servers & Devices -> Server Settings Editor
Select the Windows Services tab
Select the checkbox to the left of the service name you want monitored
Select the servers/locations for which the service(s) will apply
Click the Add Service(s) button to apply monitoring for the selected services
Alternatively, you can also select to remove services which will disable the monitoring of the service

29 VitalSigns Installation, Administrator, and End User Guide
Figure 2-15
2.3.4 Disk Settings
Step 1 (Figure 3-4)
Go to Servers & Devices -> Server Settings Editor
Select the Disk Settings tab
Select the necessary Radio button for disk monitoring and set the appropriate values
o You can monitor all disks on the currently selected server by percentage
o You can monitor all disks on the currently selected server by gigabytes (GB)
o You can monitor specific disks on the currently selected server either by percentage or gigabytes (GB)
o You can select to not monitor disks on the currently selected server
Select the servers/locations for which the disk thresholds will apply
Click Apply Setting(s) to save the changes

30 VitalSigns Installation, Administrator, and End User Guide
Figure 2-16
2.3.5 Edit Server Locations
Step 1 (Figure 2-17)
Go to Servers & Devices -> Server Settings Editor
Select the Server Locations tab
Select the appropriate server(s)
Select the appropriate location to associate with the servers selected in the previous step
Click the Assign Location button to accept the changes

31 VitalSigns Installation, Administrator, and End User Guide
Figure 2-17
2.3.6 Edit Credentials
Step 1 (Figure 2-18)
Go to Servers & Devices -> Server Setting Editor
Select the Credentials tab
Select the desired credentials from the drop down list (setup in section 2.1.6)
Select the server(s) to apply to the credentials selected in the previous step
Click Assign Credentials to save the changes
Figure 2-18

32 VitalSigns Installation, Administrator, and End User Guide
2.4 Alerts
2.4.1 Alert Settings
Step 1 (Figure 2-19)
Go to Alerts -> Alert Settings
Select the SMTP Server and Advanced Alerting tab (if not already selected)
Under Primary SMTP Server, enter the Hostname, Port Number, User ID (in the form of a valid email) and Password (Notes: You must enter a valid email address (not password) located in the Directory even if your server does not require authentication)
Select the checkbox to the left of Requires Authentication if your SMTP server requires authentication
You can enter a second SMTP server (optional) for failover under Secondary SMTP Server
Click OK to save the changes
Figure 2-19
2.4.2 Event Type Alerting (trending alerts)
Step 1 (Figure 2-20)
Go to Alerts -> Alert Settings
Select the Event Type Alerting tab
Select the checkbox to the left of Alert about recurrences only
Enter a value for the number of recurrences (Note: this is the number of times the event must fail before VitalSigns alerts you of a problem)
Select the events/alerts for which you want to restrict alerts

33 VitalSigns Installation, Administrator, and End User Guide
Click OK to save the changes
Figure 2-20
2.4.3 Alert Definitions
Step 1 (Figure 2-21)
Go to Alerts -> Alert Definitions
In the Name textbox, enter a name to define the alert
Click the New button under the Name textbox
Select a Type from the drop down list
o Business Hours - Alerts will only be sent during the pre-defined business hours (Hours & Maintenance -> Business Hours)
o Off Hours - Alerts will only be sent during non-business hours
o Specific Hours - Alerts will only be sent during the selected days and hours
o All Hours - Alerts will be sent at all hours (commonly chosen)
Enter the email address for which the alert will be sent
o You can enter an individual or group email address
o You can only enter one email address per text box
Click the Update button to save the settings

34 VitalSigns Installation, Administrator, and End User Guide
Figure 2-21
Step 2 (Figure 2-22)
Expand the desired events and select the Events for which you will be alerted
Select the Servers the events will apply to
Click OK to save the settings

35 VitalSigns Installation, Administrator, and End User Guide
Figure 2-22
2.5 Monitor Misc. Items
2.5.1 Monitor Mobile Users
Step 1 (Figure 2-23)
Go to Servers & Devices -> Mobile Users
Under All Devices, right click on the user you wish to monitor
Select monitor device
The users/devices displayed under Critical Devices are the devices currently being monitored

36 VitalSigns Installation, Administrator, and End User Guide
Figure 2-23
2.5.2 Monitor Network Devices
Step 1 (Figure 2-24)
Go to Servers & Devices -> Network Devices
Click the New button
Enter the appropriate information into the text boxes
Click OK to save the changes

37 VitalSigns Installation, Administrator, and End User Guide
Figure 2-24
2.5.3 Edit Network Devices
Step 1 (Figure 2-24)
Go to Servers & Devices -> Network Devices
Click the Edit button
Edit the necessary information
Click OK to save the changes
2.5.4 Monitor SNMP Devices
Step 1 (Figure 2-25)
Go to Servers & Devices -> Network Devices
Click on the SNMP device tab
Click the New button
Enter the appropriate information into the text boxes
Click OK to save the changes

38 VitalSigns Installation, Administrator, and End User Guide
Figure 2-25
2.5.5 Edit SNMP Devices
Step 1 (Figure 2-25)
Go to Servers & Devices -> Network Devices
Click on the SNMP device tab
Click the Edit button
Edit the necessary information
Click OK to save the changes
2.5.6 Monitor URL’s
Step 1 (Figure 2-26)
Go to Servers & Devices -> URLs
Click the New button
Enter the appropriate information into the text boxes
Click OK to save the changes

39 VitalSigns Installation, Administrator, and End User Guide
Figure 2-26
2.5.7 Edit URLs
Step 1 (Figure 2-26)
Go to Servers & Devices -> URLs
Click the New button
Enter the appropriate information into the text boxes
Click OK to save the changes
2.5.8 Monitor Cloud Applications
Step 1 (Figure 2-27)
Go to Servers & Devices -> Cloud Applications
Click the New button
Enter the appropriate information into the text boxes
Click OK to save the changes
40 VitalSigns Installation, Administrator, and End User Guide
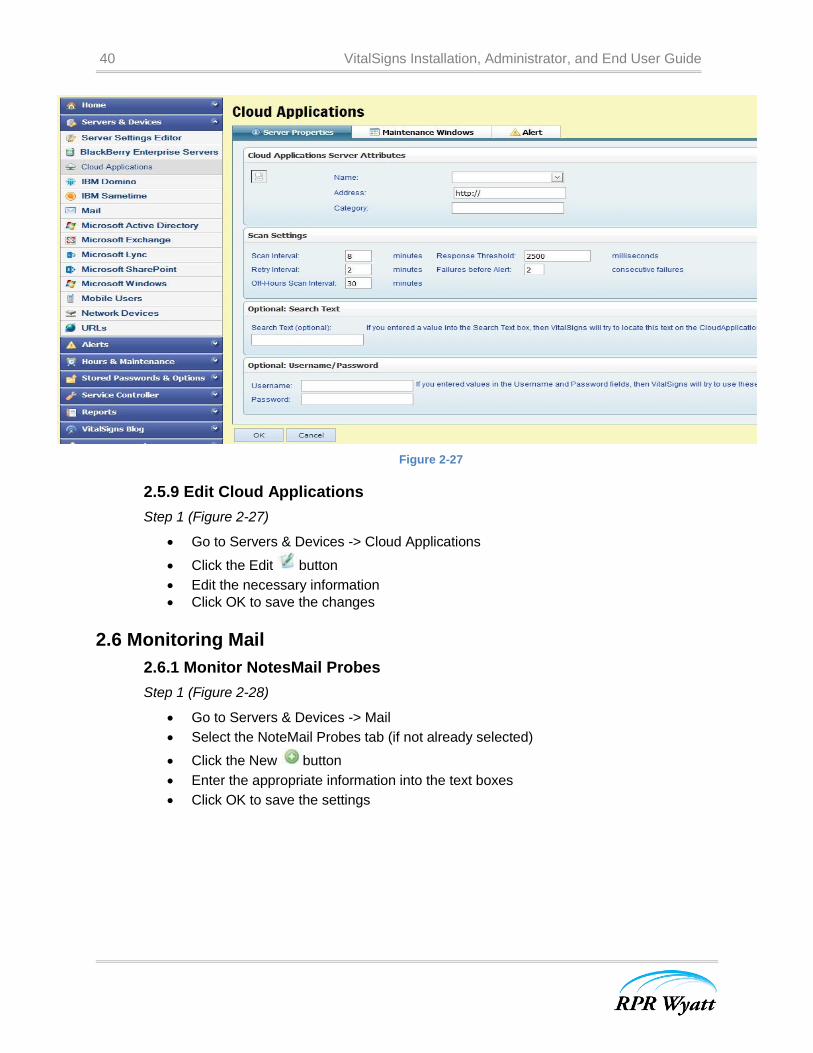
Figure 2-27
2.5.9 Edit Cloud Applications
Step 1 (Figure 2-27)
Go to Servers & Devices -> Cloud Applications
Click the Edit button
Edit the necessary information
Click OK to save the changes
2.6 Monitoring Mail
2.6.1 Monitor NotesMail Probes
Step 1 (Figure 2-28)
Go to Servers & Devices -> Mail
Select the NoteMail Probes tab (if not already selected)
Click the New button
Enter the appropriate information into the text boxes
Click OK to save the settings

41 VitalSigns Installation, Administrator, and End User Guide
Figure 2-28
2.6.2 Edit NotesMail Probes
Step 1 (Figure 2-28)
Go to Servers & Devices -> Mail
Select the NoteMail Probes tab (if not already selected)
Click the Edit button
Edit the necessary information
Click OK to save the settings
2.6.3 Monitor ExchangeMail Probes
Step 1 (Figure 2-29)
Go to Servers & Devices -> Mail
Select the ExchangeMail Probes tab
Click the New button
Enter the appropriate information into the text boxes
Click OK to save the settings

42 VitalSigns Installation, Administrator, and End User Guide
Figure 2-29
2.6.4 Edit ExchangeMail Probes
Step 1 (Figure 2-29)
Go to Servers & Devices -> Mail
Select the ExchangeMail Probes tab
Click the Edit button
Edit the necessary information
Click OK to save the settings
2.6.5 Monitor Mail Services
Step 1 (Figure 2-30)
Go to Servers & Devices -> Mail
Select the Mail Services tab
Click the New button
Enter the appropriate information into the text boxes
Click OK to save the settings

43 VitalSigns Installation, Administrator, and End User Guide
Figure 2-30
2.6.6 Edit Mail Services
Step 1 (Figure 2-30)
Go to Servers & Devices -> Mail
Select the Mail Services tab
Click the Edit button
Edit the necessary information
Click OK to save the settings
2.7 General Preferences/Settings
2.7.1 Licensing information
Step 1 (Figure 2-31)
Go to Stored Passwords & Options -> License Information
Click Enter License Code and paste the license code into the prompt box
Click OK to apply the license
Click Save to save the settings
You must restart the VitalSigns Master service to apply the licensing changes (Windows Services -> VitalSigns Master Service)

44 VitalSigns Installation, Administrator, and End User Guide
Figure 2-31
2.7.2 Setup Maintenance Windows
Step 1 (Figure 2-32)
Go To Hours & Maintenance -> Maintenance
Click the New button (if you are editing a maintenance window, click the Edit button next to the appropriate window name)
In the Name textbox, enter a name to define the Maintenance window
Select a Radio button for Duration Type
o Continue Until - Creates a maintenance window for a specific length of time
o Forever - Creates a maintenance window that does not expire (this field does not require you to specify an End Date)
Select a Start Date and Start Time
Select an End Date (Note: The End Date field does not apply to maintenance windows that have “Forever” selected as the Duration Type)
Select a Duration (the amount of time the server will not be scanned)
Select how often the Maintenance window should repeat (One time, Daily, Weekly, Monthly)
Select the specific servers in which the maintenance window will apply
Click Submit to save the settings

45 VitalSigns Installation, Administrator, and End User Guide
Figure 2-32
2.7.3 Setup Business Hours
Step 1 (Figure 2-33)
Go to Hours & Maintenance -> Business Hours
Select the hours that correspond to your hours of operation
Select the days of operation by clicking the checkbox to the left of the appropriate days
Click OK to save the settings

46 VitalSigns Installation, Administrator, and End User Guide
Figure 2-33
2.7.4 Assign Features
Step 1 (Figure 2-34)
Go to Setup & Security -> Assign Features
Click the Checkbox next to the feature you want to display/hide
Click Apply to save the changes
Within the VitalSigns Configurator, click the Home menu option to refresh the menu
The features will now be displayed/hidden under Servers & Device

47 VitalSigns Installation, Administrator, and End User Guide
Figure 2-34
2.8 User Account Information
2.8.1 Create a New User
Step 1 (Figure 2-35)
Go to Setup & Security -> Maintain Users
Enter the Login Name and Full Name for the new user
Enter an email address where the user credentials will be sent to
Select the options for the user
o Super Admin will give the user full admin access throughout VitalSigns
o Console command access will allow the user to send server console commands to the server
o Configurator access will allow the user to change server settings and preferences within VitalSigns (such as scan settings, disk thresholds, etc.)
Once the access option have been selected, click the Update to save the user
An email containing the credentials will be sent to the email addresses specified in the above step

48 VitalSigns Installation, Administrator, and End User Guide
Figure 2-35
2.8.2 Edit a User
Step 1 (Figure 2-35)
Go to Setup & Security -> Maintain Users
Click the Edit button next to the appropriate user
Edit the desired selections
Click Update button to save the changes
2.8.3 Restrict User Server Access
Step 1 (Figure 2-36)
Go to Setup & Security -> Assign Server Access
Select the user from the User Name drop down list
Select the Radio button for ‘Limit user to servers in the following Locations’
Highlight the location you wish to hide from the user
Click the Move --> button to restrict the location from the user
Under Specific Servers, you can select servers to hide from the user by selecting the servers and moving them to the appropriate category
Click Assign to save the changes

49 VitalSigns Installation, Administrator, and End User Guide
Figure 2-36
2.8.4 Grant User Server Access
Step 1 (Figure 2-36)
Go to Setup & Security -> Assign Server Access
Select the user from the User Name drop down list
Select ‘Allow user to administer servers in any Location’ to make all servers visible to the user
OR
Highlight the location you wish to make visible to the user
Click the Move button to grant the location to the user
Under specific servers, you can select specific servers to display to the by selecting the servers and moving them to the appropriate category
Click Assign to save the changes
2.8.5 Restrict User Navigator (Menu) Access
Step 1 (Figure 2-37)
Go to Setup & Security -> Assign Navigator Access
Select the user from the User Name drop down list
Select the menu items you wish to hide from the user
Click the Move -> button
Click Assign to save the changes

50 VitalSigns Installation, Administrator, and End User Guide
Figure 2-37
2.8.6 Grant User Navigator (Menu) Access
Step 1 (Figure 2-37)
Go to Setup & Security -> Assign Navigator Access
Select the user from the User Name drop down list
Select the menu items you wish to make visible to the user
Click the <- Move button
Click Assign to save the changes
2.8.7 Security Questions
Step 1 (Figure 2-38)
Go to My Account
Change the desired security questions and answers (Note: to change the security questions for a specific user, you must be logged in as that user)
Click Save to apply the changes
Optional
Click the Startup page drop down list to change the default start page
Enter a value (in seconds) to change the page refresh rate within VitalSigns

51 VitalSigns Installation, Administrator, and End User Guide
Figure 2-38
2.8.8 Change Password
Step 1 (Figure 2-39)
Go to My Account
Enter the current password
Enter the new password (Note: to change the password for a specific user, you must be logged in as that user)
Click Save to apply the changes
Figure 2-39

52 VitalSigns Installation, Administrator, and End User Guide
2.9 Manage & Maintain Server Configurations
2.9.1 Manually Add Servers
Step 1 (Figure 2-40)
Go to Setup & Security -> Maintain Servers
Click the New button
Enter the corresponding information
Click the Update button to save the changes (Note: You can also import servers using the import server wizard – see section 2.4)
Figure 2-40
2.9.2 Edit Server Configurations
Step 1 (Figure 2-40)
Go to Setup & Security -> Maintain Servers
Click the Edit button next to the appropriate server
Edit the corresponding information
Click the Update button to save the changes
2.9.3 Delete Servers
Step 1 (Figure 2-40)
Go to Setup & Security -> Maintain Servers
Click the Delete button next to the appropriate server
Click OK to accept the changes
2.9.4 Enable or Disable a Server from Scanning
Option 1 (Figure 2-41)
Go to Servers & Devices -> Server Settings Editor

53 VitalSigns Installation, Administrator, and End User Guide
Select the Server Type from the drop down list (Note: the values displayed under the Default Value column are NOT the current values associated with the server)
Select the checkbox to the left of Enable for Scan
Set the value to 0 (to disable scanning) OR set the value to 1 (to enable scanning)
Figure 2-41
Option 2 (Figure 2-42)
Go to Servers & Devices
Within the Server & Devices sub menu, select the server type you wish to enable or disable from scanning (i.e. IBM Domino, IBM Sametime, Microsoft Exchange, Sharepoint, etc.)
Once the correct category is open, click the Edit button next to the appropriate server
On the right hand side, select or deselect the checkbox to the left of Enable for Scanning
Click OK to save the changes

54 VitalSigns Installation, Administrator, and End User Guide
Figure 2-42

55 VitalSigns Installation, Administrator, and End User Guide
3.0 Manage and Maintain Microsoft Attributes
3.1 Microsoft Exchange
3.1.1 Apply Exchange Server Attributes
Step 1 (Figure 3-1)
Go to Setup & Security -> Microsoft Exchange
Click the Edit button next to the appropriate server
Click on the Server Attributes tab (if not already selected)
Within the Server Attributes tab, you can change the following information: (Note: the settings displayed are the current values for the selected server)
o Scan settings
o Failure thresholds
o Queue thresholds
After changing the desired attributes, Click Ok to save the changes (Note: unchanged values will remain the same)
Figure 3-1
3.1.2 Monitor Windows Services
Step 1 (Figure 3-2)
Go to Setup & Security -> Microsoft Exchange

56 VitalSigns Installation, Administrator, and End User Guide
Click the Edit button next to the appropriate server
Click on the Windows Services tab
Select the checkbox to the left of the services you want to monitor
Click OK to save the changes
Figure 3-2
3.1.3 Apply Advanced Settings
Step 1 (Figure 3-3)
Go to Setup & Security -> Microsoft Exchange
Click the Edit button next to the appropriate server
Select the Advanced tab
Within the Advanced Settings tab, you can change the following information:
o Increase or decrease the maximum Memory Usage threshold
o Increase or decrease the maximum CPU usage threshold
o Increase or decrease the threshold for the number of consecutive days the server has been running before queueing an alert
o Enable or disable specific CAS server tests
Click OK to save the changes

57 VitalSigns Installation, Administrator, and End User Guide
Figure 3-3
3.1.4 Apply Disk Settings
Step 1 (Figure 3-4)
Go to Setup & Security -> Microsoft Exchange
Click the Edit button next to the appropriate server
Select the Disk Settings tab
Select the necessary Radio button for disk monitoring and set the appropriate values
o You can monitor all disks on the currently selected server by percentage
o You can monitor all disks on the currently selected server by gigabytes (GB)
o You can monitor specific disks on the currently selected server either by percentage or gigabytes (GB)
o You can select to not monitor disks on the currently selected server
Click OK to save the changes
You can apply disk settings to multiple servers at one time using the Server Settings Editor

58 VitalSigns Installation, Administrator, and End User Guide
Figure 3-4
3.1.5 Apply Database Settings
Step 1 (Figure 3-5)
Go To Servers & Devices -> Microsoft Exchange
Click the Edit button next to the appropriate server
Select the Database Settings tab
Figure 3-5

59 VitalSigns Installation, Administrator, and End User Guide
3.2 Microsoft Lync
3.2.1 Setup Lync Server*
Step 1 (Figure 3-6)
Go to Setup & Security -> Maintain Servers
Click the New button
Enter the information associated with the Lync server
Click the Update button to save the server
The Lync server will now be listed in the Microsoft Lync category under Servers & Devices -> Microsoft Lync
Lync Requirements*
Dedicated VitalSigns workstation must be in same Domain as the Lync server
3.2.2 Edit Lync Servers
Option 1 (Figure 3-7)
To edit Lync properties, which includes scan settings and response thresholds, go to Servers & Devices -> Microsoft Lync
Click the Edit button to the left of the Lync server
Change the desired settings
Click OK to apply the changes
Option 2 (Figure 2-20)
To Edit Lync configurations, which includes the server location and IP address, go to Setup & Security -> Maintain Servers
Click the Edit button to the left of the Lync server
Change the desired settings
Click the Update button to save the changes

60 VitalSigns Installation, Administrator, and End User Guide
Figure 3-6
Figure 3-7
3.2.3 Apply Server Attributes
Step 1 (Figure 3-8)

61 VitalSigns Installation, Administrator, and End User Guide
Go to Servers & Devices -> Microsoft Lync
Click the Edit button next to the appropriate server
Click on the Server Attributes tab (if not already selected)
Within the Server Attributes tab, you can change the following information: (Note: the settings displayed are the current values for the selected server)
o Scan settings
o Failure thresholds
o Queue thresholds
Click OK to save the changes
Figure 3-8
3.2.4 Apply Disk Settings
Step 1 (Figure 3-9)
Go to Setup & Security -> Microsoft Lync
Click the Edit button next to the appropriate server
Select the Disk Settings tab
Select the necessary Radio button for disk monitoring and set the appropriate values
o You can monitor all disks on the currently selected server by percentage
o You can monitor all disks on the currently selected server by gigabytes (GB)
o You can monitor specific disks on the currently selected server either by percentage or gigabytes (GB)
o You can select to not monitor disks on the currently selected server
Click OK to save the changes

62 VitalSigns Installation, Administrator, and End User Guide
You can apply disk settings to multiple servers at one time using the Server Settings Editor
Figure 3-9
3.2.5 Apply Advanced Settings
Step 1 (Figure 3-10)
Go to Setup & Security -> Microsoft Lync
Click the Edit button next to the appropriate server
Select the Advanced tab
Within the Advanced Settings tab, you can change the following information:
o Increase or decrease the maximum Memory Usage threshold
o Increase or decrease the maximum CPU usage threshold
Click OK to save the changes

63 VitalSigns Installation, Administrator, and End User Guide
Figure 3-10
3.3 Microsoft Active Directory
3.3.1 Setup Active Directory Server
Step 1 (Figure 3-11)
Go to Setup & Security -> Maintain Servers
Click the New button
Enter the information associated with the Active Directory server
Click the Update button to save the server
The Active Directory server will now be listed in the Active Directory category under Servers & Devices -> Active Directory
3.3.2 Edit Active Directory Servers
Option 1 (Figure 3-11)
To edit Active Directory properties, which includes scan settings and response thresholds, go to Servers & Devices -> Active Directory
Click the Edit button to the left of the Active Directory server
Change the desired settings
Click OK to apply the changes
Option 2 (Figure 3-12)
To Edit Active Directory configurations, which includes the server location and IP address, go to Setup & Security -> Maintain Servers
Click the Edit button to the left of the Active Directory server
Change the desired settings
Click the Update button to save the changes

64 VitalSigns Installation, Administrator, and End User Guide
Figure 3-11
Figure 3-12
3.3.3 Apply Server Attributes
Step 1 (Figure 3-13)

65 VitalSigns Installation, Administrator, and End User Guide
Go to Servers & Devices -> Microsoft Active Directory
Click the Edit button next to the appropriate server
Click on the Server Attributes tab (if not already selected)
Within the Server Attributes tab, you can change the following information: (Note: the settings displayed are the current values for the selected server)
o Scan settings
o Failure thresholds
Click OK to save the changes
Figure 3-13
3.3.4 Apply Disk Settings
Step 1 (Figure 3-14)
Go to Setup & Security -> Microsoft Active Directory
Click the Edit button next to the appropriate server
Select the Disk Settings tab
Select the necessary Radio button for disk monitoring and set the appropriate values
o You can monitor all disks on the currently selected server by percentage
o You can monitor all disks on the currently selected server by gigabytes (GB)
o You can monitor specific disks on the currently selected server either by percentage or gigabytes (GB)
o You can select to not monitor disks on the currently selected server
Click OK to save the changes
You can apply disk settings to multiple servers at one time using the Server Settings Editor

66 VitalSigns Installation, Administrator, and End User Guide
Figure 3-14
3.3.5 Monitor Windows Services
Step 1 (Figure 3-15)
Go to Setup & Security -> Microsoft Active Directory
Click the Edit button next to the appropriate server
Click on the Windows Services tab
Select the checkbox to the left of the services you want to monitor
Click OK to save the changes
Figure 3-15
3.3.6 Apply Advanced Settings
Step 1 (Figure 3-16)

67 VitalSigns Installation, Administrator, and End User Guide
Go to Setup & Security -> Microsoft Active Directory
Click the Edit button next to the appropriate server
Select the Advanced tab
Within the Advanced Settings tab, you can change the following information:
o Increase or decrease the maximum Memory Usage threshold
o Increase or decrease the maximum CPU usage threshold
Click OK to save the changes
Figure 3-16
3.4 Microsoft Sharepoint
3.4.1 Setup Sharepoint Servers
Step 1 (Figure 3-17)
Go to Setup & Security -> Maintain Servers
Click the New button
Enter the information associated with the Sharepoint server
Click the Update button to save the server
The Sharepoint server will now be listed in the Sharepoint category under Servers & Devices -> Sharepoint
3.4.2 Edit Sharepoint Servers
Option 1 (Figure 3-17)
To edit Sharepoint properties, which includes scan settings and response thresholds, go to Servers & Devices -> Sharepoint
Click the Edit button to the left of the Sharepoint server
Change the desired settings

68 VitalSigns Installation, Administrator, and End User Guide
Click OK to apply the changes
Option 2 (Figure 3-18)
To Edit Sharepoint configurations, which includes the server location and IP address, go to Setup & Security -> Maintain Servers
Click the Edit button to the left of the Sharepoint server
Change the desired settings
Click the Update button to save the changes
Figure 3-17

69 VitalSigns Installation, Administrator, and End User Guide
Figure 3-18
3.4.3 Apply Server Attributes
Step 1 (Figure 3-19)
Go to Servers & Devices -> Microsoft SharePoint
Click the Edit button next to the appropriate server
Click on the Server Attributes tab (if not already selected)
Within the Server Attributes tab, you can change the following information: (Note: the settings displayed are the current values for the selected server)
o Scan settings
o Failure thresholds
Click OK to save the changes

70 VitalSigns Installation, Administrator, and End User Guide
Figure 3-19
3.4.4 Apply Disk Settings
Step 1 (Figure 3-20)
Go to Setup & Security -> Microsoft SharePoint
Click the Edit button next to the appropriate server
Select the Disk Settings tab
Select the necessary Radio button for disk monitoring and set the appropriate values
o You can monitor all disks on the currently selected server by percentage
o You can monitor all disks on the currently selected server by gigabytes (GB)
o You can monitor specific disks on the currently selected server either by percentage or gigabytes (GB)
o You can select to not monitor disks on the currently selected server
Click OK to save the changes
You can apply disk settings to multiple servers at one time using the Server Settings Editor

71 VitalSigns Installation, Administrator, and End User Guide
Figure 3-20
3.4.5 Apply Advanced Settings
Step 1 (Figure 3-21)
Go to Setup & Security -> Microsoft SharePoint
Click the Edit button next to the appropriate server
Select the Advanced tab
Within the Advanced Settings tab, you can change the following information:
o Increase or decrease the maximum Memory Usage threshold
o Increase or decrease the maximum CPU usage threshold
Click OK to save the changes
Figure 3-21

72 VitalSigns Installation, Administrator, and End User Guide
3.5 Microsoft Windows
3.5.1 Setup Windows Virtual Machines or Server
Step 1 (Figure 3-22)
Go to Setup & Security -> Maintain Servers
Click the New button
Enter the information associated with the virtual Windows machine or Windows server
Click the Update button to save the information
The Windows machine/server will now be listed in the Microsoft Windows category under Servers & Devices -> Microsoft Windows
3.5.2 Edit Windows Virtual Machines
Option 1 (Figure 3-23)
To edit Windows VM or server properties, which includes scan settings and response thresholds, go to Servers & Devices -> Microsoft Windows
Click the Edit button to the left of the Windows VM/server
Change the desired settings
Click OK to apply the changes
Option 2 (Figure 3-22)
To Edit Windows VM or server configurations, which includes the server location and IP address, go to Setup & Security -> Maintain Servers
Click the Edit button to the left of the Windows VM/server
Change the desired settings
Click the Update button to save the changes

73 VitalSigns Installation, Administrator, and End User Guide
Figure 3-22
Figure 3-23
3.5.3 Apply Server Attributes
Step 1 (Figure 3-24)

74 VitalSigns Installation, Administrator, and End User Guide
Go to Servers & Devices -> Microsoft Windows
Click the Edit button next to the appropriate server
Click on the Server Attributes tab (if not already selected)
Within the Server Attributes tab, you can change the following information: (Note: the settings displayed are the current values for the selected server)
o Scan settings
o Failure thresholds
Click OK to save the changes
Figure 3-24
3.5.4 Apply Disk Settings
Step 1 (Figure 3-25)
Go to Setup & Security -> Microsoft Windows
Click the Edit button next to the appropriate server
Select the Disk Settings tab
Select the necessary Radio button for disk monitoring and set the appropriate values
o You can monitor all disks on the currently selected server by percentage
o You can monitor all disks on the currently selected server by gigabytes (GB)
o You can monitor specific disks on the currently selected server either by percentage or gigabytes (GB)
o You can select to not monitor disks on the currently selected server
Click OK to save the changes
You can apply disk settings to multiple servers at one time using the Server Settings Editor

75 VitalSigns Installation, Administrator, and End User Guide
Figure 3-25
3.5.5 Monitor Windows Services
Step 1 (Figure 3-26)
Go to Setup & Security -> Microsoft Windows
Click the Edit button next to the appropriate server
Click on the Windows Services tab
Select the checkbox to the left of the services you want to monitor
Click OK to save the changes

76 VitalSigns Installation, Administrator, and End User Guide
Figure 3-26
3.5.6 Apply Advanced Settings
Step 1 (Figure 3-27)
Go to Setup & Security -> Microsoft Windows
Click the Edit button next to the appropriate server
Select the Advanced tab
Within the Advanced Settings tab, you can change the following information:
o Increase or decrease the maximum Memory Usage threshold
o Increase or decrease the maximum CPU usage threshold
Click OK to save the changes

77 VitalSigns Installation, Administrator, and End User Guide
Figure 3-27
4.0 Manage and Maintain Domino Attributes
4.1 IBM Domino
4.1.1 Apply Server Attributes
Step 1 (Figure 4-1)
Go to Setup & Security -> IBM Domino
Click the Edit button next to the appropriate server
Click on the Server Attributes tab (if not already selected)
Within the Server Attributes tab, you can change the following information: (Note: the settings displayed are the current values for the selected server)
o Scan settings
o Failure thresholds
o Pending, Dead, and Held Mail Thresholds
o Apply/change credentials the currently selected server uses
o Enable or disable SSL for the currently selected server
o Enable or disable the scanning of Notes Database information
After changing the desired attributes, Click Ok to save the changes (Note: unchanged values will remain the same)

78 VitalSigns Installation, Administrator, and End User Guide
Figure 4-1
4.1.2 Monitor Server Tasks
Step 1 (Figure 4-2)
Go to Setup & Security -> IBM Domino
Click the Edit button next to the appropriate server
Click on the Server Tasks tab
Click the New button (if you are editing a task, click the Edit button next to the appropriate task name)
Select the task name from the drop down list
Select the checkbox to the left of Enabled for Task Scanning
Select the checkbox next to the appropriate Action(s) to take if the task becomes unresponsive
o “If Task not loaded, send 'Load' command to server (i.e. try to start it)” will attempt to load the tasks 3 times before VitalSigns reports it as an issue
o “If Task is HUNG, or LOAD TASK fails, send 'Tell Server Restart' command, AS SOON AS POSSIBLE” will restart the server if the task cannot be started after 3 attempts
o “If Task is HUNG, or LOAD TASK fails, send 'Tell Server Restart' command, OFF PEAK HOURS ONLY” will restart the server if the task cannot be started after 3 attempts during non-business hours (can be configured under Hours & Maintenance -> Business Hours)
o “If Task is running, send 'Task exit' command (i.e prohibit this command)” will stop the task if it is found running
Click the Update button to save the changes

79 VitalSigns Installation, Administrator, and End User Guide
Figure 4-2
4.1.3 Apply Disk Settings
Step 1 (Figure 4-3)
Go to Setup & Security -> IBM Domino
Click the Edit button next to the appropriate server
Select the Disk Settings tab
Select the necessary Radio button for disk monitoring and set the appropriate values
o You can monitor all disks on the currently selected server by percentage
o You can monitor all disks on the currently selected server by gigabytes (GB)
o You can monitor specific disks on the currently selected server either by percentage or gigabytes (GB)
o You can select to not monitor disks on the currently selected server
Click OK to save the changes
You can apply disk settings to multiple servers at one time using the Server Settings Editor (Section 3.3.6)

80 VitalSigns Installation, Administrator, and End User Guide
Figure 4-3
4.1.4 Apply Advanced Settings
Step 1 (Figure 4-4)
Go to Setup & Security -> IBM Domino
Click the Edit button next to the appropriate server
Select the Advanced tab
Within the Advanced Settings tab, you can change the following information:
o Increase or decrease the maximum Memory Usage threshold
o Increase or decrease the CPU maximum CPU usage threshold
o Increase or decrease the threshold for the number of consecutive days the server has been running before queueing an alert
o Increase or decrease the Cluster Replication Delay threshold
Click OK to save the changes

81 VitalSigns Installation, Administrator, and End User Guide
Figure 4-4
4.1.5 Clusters
Step 1 (Figure 4-5)
Go to Severs & Devices -> IBM Domino
Select the Clusters tab
Click the New button
Click the Servers tab
Select the cluster servers from the Domino Server drop down list
Enter the database file mask for cluster analysis

82 VitalSigns Installation, Administrator, and End User Guide
Figure 4-5
Step 2 (Figure 4-6)
Select the Cluster Settings tab
Enter a name for the cluster into the Name text box
Select a category for the cluster
You can set the threshold to monitor the difference (in percentage) of the document count between two replicas (optional)
Click OK to save the changes
Figure 4-6

83 VitalSigns Installation, Administrator, and End User Guide
4.1.6 Notes Databases
Step 1 (Figure 4-7)
Got to Servers & Devices -> IBM Domino
Click on the Notes Databases tab
Click the New button
Enter the properties for the database
Select the type of event you wish to monitor against the Notes database
Click OK to save the changes
Figure 4-7
4.1.7 Custom Statistics
Step 1 (Figure 4-8)
Go to Servers & Devices -> IBM Domino
Click on the Custom Statistics tab
Click the New button
Select a server from the Domino Server drop down list
Select the statistic from the drop down list
Select the appropriate value for the statistic
Click the Current Value button to view the value of the statistic selected in the previous step (the VitalSigns user must have console comma access to use this feature)
(Note: you can view a list of all Domino statistics by issuing a ‘show stat’ command in the Domino server console)

84 VitalSigns Installation, Administrator, and End User Guide
You can select to issue a console command to the server to apply an action if the value set is not met (optional)
Click OK to save the changes
Figure 4-8
4.1.8 Add Task Definitions
Step 1 (Figure 4-9)
To add a task that is not already defined go to Servers & Devices -> IBM Domino
Select the Server Task Definitions tab
Click the New button
Enter the information associate with the task
You can enable Hang Detection and set a threshold to determine if a task becomes hung (optional)
Click OK to save the changes

85 VitalSigns Installation, Administrator, and End User Guide
Figure 4-9
4.1.9 Logfile Scanning
Step 1 (Figure 4-10)
Go to Servers & Devices -> IBM Domino
Select the Logfile Scanning tab
Click the New button
Enter a keyword to search for in the log file
Enter a keyword to exclude in the search of the log file
Click the Update button to save the changes

86 VitalSigns Installation, Administrator, and End User Guide
Figure 4-10
4.2 IBM Sametime
4.2.1 Setup Sametime Server*
Step 1 (Figure 4-11)
Go to Setup & Security -> Maintain Servers
Click the New button
Enter the information associated with the Sametime server
Click the Update button to save the server
The Sametime server will now be listed in the IBM Sametime category under Servers & Devices -> IBM Sametime
Sametime Requirements*
2 dedicated user accounts created in Domino address book (no mail file required)
Explicitly list 1 user in stconfig.nsf as a Person with Reader (or higher) rights on the server to be monitored
User 1 must be a member of the SametimeMonitor role
4.2.2 Edit Sametime Server
Option 1 (Figure 4-12)
To edit Sametime properties, which includes scan settings and response thresholds, go to Servers & Devices -> IBM Sametime
Click the Edit button to the left of the Sametime server
Change the desired settings
Click OK to apply the changes
Option 2 (Figure 4-11)

87 VitalSigns Installation, Administrator, and End User Guide
To Edit Sametime configurations, which includes the server location and IP address, go to Setup & Security -> Maintain Servers
Click the Edit button to the left of the Sametime server (Note: Under Maintain Servers, the Sametime server will appear twice, once as a Domino server and once as a Sametime server)
Change the desired settings
Click the Update button to save the changes
Figure 4-11

88 VitalSigns Installation, Administrator, and End User Guide
Figure 4-12
4.2.3 Setup Sametime Statistics
Step 1 (Figure 4-13)
Go to Stored Passwords & Options -> IBM Sametime Settings
Enter the first Sametime user name (Sametime User1/ACME) and password
Enter the second Sametime user name (Sametime User2/ACME) and password
Select the checkbox to the left of Collect extended Sametime statistics for detailed Sametime statistics (optional)
Enter the Sametime Servlet Port (if collecting extended Sametime statistics)
Click Apply to save the settings

89 VitalSigns Installation, Administrator, and End User Guide
Figure 4-13

90 VitalSigns Installation, Administrator, and End User Guide

91 VitalSigns Installation, Administrator, and End User Guide
5.0 User Guide (Coming Soon!)

92 VitalSigns Installation, Administrator, and End User Guide
6.0 Troubleshooting (Coming Soon!)