Embed Size (px)
Citation preview

Types of Errors
• Syntax errors
• Logic errors
• Run-time errors

Syntax Errors
• Equivalent to grammatical errors in English– For example: You green the computer.
• Does not make sense to use an adjective instead of a verb in the sentence above
• Likewise if the VB complier cannot understand a statement you have committed a syntax error

Syntax Error
• Results from mistyping a word or forming a bad expression in the code
• Examples:– 524+ + 62.55– If Number == 2 Number = 6– Label1.tuxt = “Hehe!”– Labelone.text = “Hoho!”

Syntax Errors
• Example Data Type Error:– Valid statement: label1.Top = 20– Syntax error: label1.Top = “hoho”
• VB can automatically catch syntax errors
• VB places a squiggly line under “hoho” to mark the error and a display box explains the error when the cursor is placed over the error

Syntax Errors
• Use the Option Strict On statement to catch the data type errors
• Insert at the beginning of the program
• Syntax error are easy to find and correct because the development systems finds them for you

Logic or Semantic Errors
• If you tell VB to do something that you did not intend of it to do
• Example:– You multiply two variables when you meant to
divide them– Results in an incorrect result but no error
message
• Logic errors are errors of meaning• Sometimes can be difficult to catch

Logic or Semantic Errors
• Sometimes can be difficult to catch
• Often need to step patiently through the execution of the program
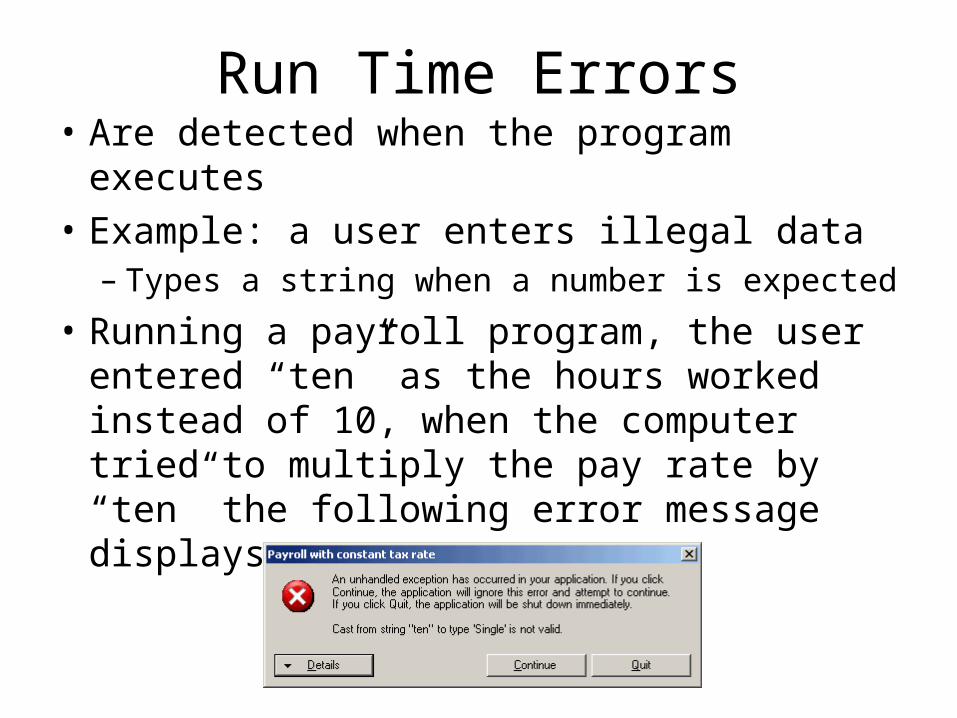
Run Time Errors• Are detected when the program executes
• Example: a user enters illegal data– Types a string when a number is expected
• Running a payroll program, the user entered “ten” as the hours worked instead of 10, when the computer tried to multiply the pay rate by “ten” the following error message displays

Errors
• The key to handling errors is to catch them and correct them in the early stages of the development
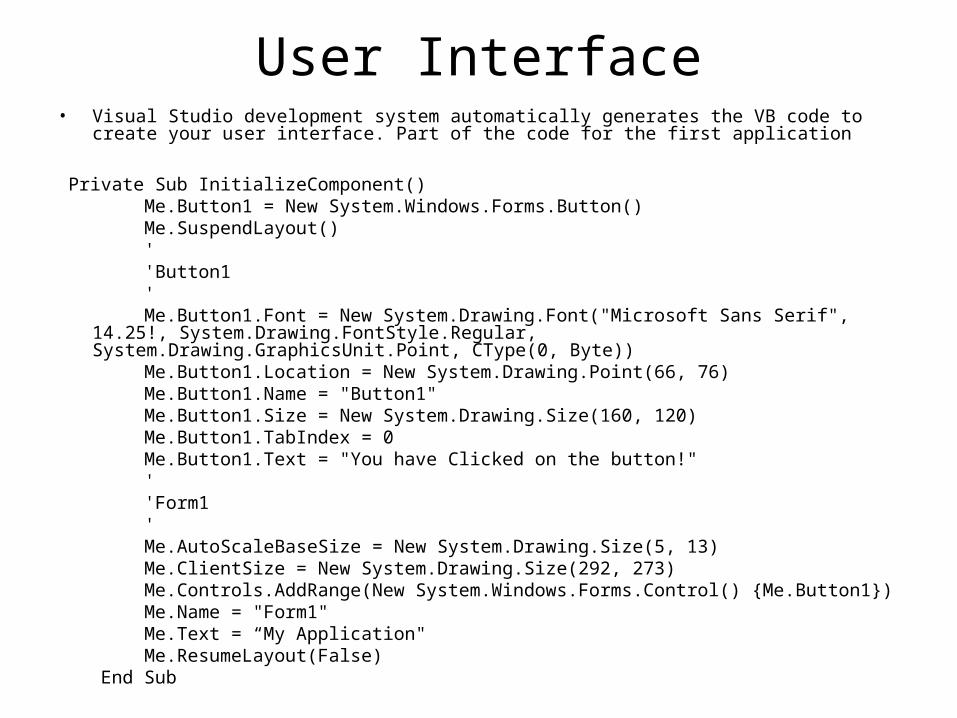
User Interface• Visual Studio development system automatically generates the VB code to create your user
interface. Part of the code for the first application
Private Sub InitializeComponent() Me.Button1 = New System.Windows.Forms.Button() Me.SuspendLayout() ' 'Button1 ' Me.Button1.Font = New System.Drawing.Font("Microsoft Sans Serif", 14.25!,
System.Drawing.FontStyle.Regular, System.Drawing.GraphicsUnit.Point, CType(0, Byte)) Me.Button1.Location = New System.Drawing.Point(66, 76) Me.Button1.Name = "Button1" Me.Button1.Size = New System.Drawing.Size(160, 120) Me.Button1.TabIndex = 0 Me.Button1.Text = "You have Clicked on the button!" ' 'Form1 ' Me.AutoScaleBaseSize = New System.Drawing.Size(5, 13) Me.ClientSize = New System.Drawing.Size(292, 273) Me.Controls.AddRange(New System.Windows.Forms.Control() {Me.Button1}) Me.Name = "Form1" Me.Text = “My Application" Me.ResumeLayout(False) End Sub

User Interface• When you write your program, you are
actually creating a new class, and when you run the program, VS.NET automatically creates an instance of that class and executes it. That new object is called Me, and it contains a Button called Button1. This automatically generated code assigns values to the properties of Button1 that I changed while creating the user interface. If you do not change the value of a property, it inherits a default value automatically.

User Interface (UI) Design
• UI is a very important factor in the design of an application
• UI is how the user interacts with the application• Designing a good user interface which is easy to
use and understand is crucial for a successful application
• A well designed user interface makes it easy and simple for the target audience to understand and use
• a poorly designed user interface will be hard to understand and use and can lead to distraction and frustration
Source: http://www.startvbdotnet.com/forms/design.aspx

User Interface (UI) Design
• Human Factors Goals– Provide an interface that is intuitive to the
users – Provide the user with the easiest interaction
possible – Help the users complete their tasks

UI Principles
• Simplicity
• Positioning of Controls
• Consistency
• Aesthetics
Source: http://www.startvbdotnet.com/forms/design.aspx

UI Principles - Simplicity
• The user interface should allow the user to complete all the required tasks by the program quickly and easily
• Not crowded with controls
• No flashy and/or unnecessary images
• Simple and complete = user friendly
Source: http://www.startvbdotnet.com/forms/design.aspx

UI Principles - Positioning of Controls
• Should reflect their importance
• Match the program flow (i.e., data entry form a submit button at the bottom)
Source: http://www.startvbdotnet.com/forms/design.aspx

UI Principles - Consistency
• Should consistent look through out the application
• Before developing an application, you need to plan and decide a consistent visual scheme for the application that will be followed throughout the application
• Using of particular fonts for special purposes, using of colors for headings, use of images, etc are all part of consistency
Source: http://www.startvbdotnet.com/forms/design.aspx

UI Principles - Aesthetics
• An application should project an inviting and pleasant user interface
• Color– Use of color is one way to make the user
interface attractive to the user. The color which you select for text and back-ground should be appealing. Care should be taken to avoid gaudy colors that are disturbing to the eye, for example, black text on a red back-ground.
Source: http://www.startvbdotnet.com/forms/design.aspx

UI Principles - Aesthetics
• Fonts– The fonts which you use for text should also
be selected with care. Simple, easy-to-read fonts like Verdana, Times New Roman should be used. Try to avoid bold, strikeout text in most parts of the application. Use of bold, italics and other formatting should be limited to important text or headings.
Source: http://www.startvbdotnet.com/forms/design.aspx

UI Principles - Aesthetics
• Images– Images add visual interest to the application.
Simple, plain images should be used wherever appropriate. Avoid using flashing images and images that are not necessary but are used only for show off
Source: http://www.startvbdotnet.com/forms/design.aspx
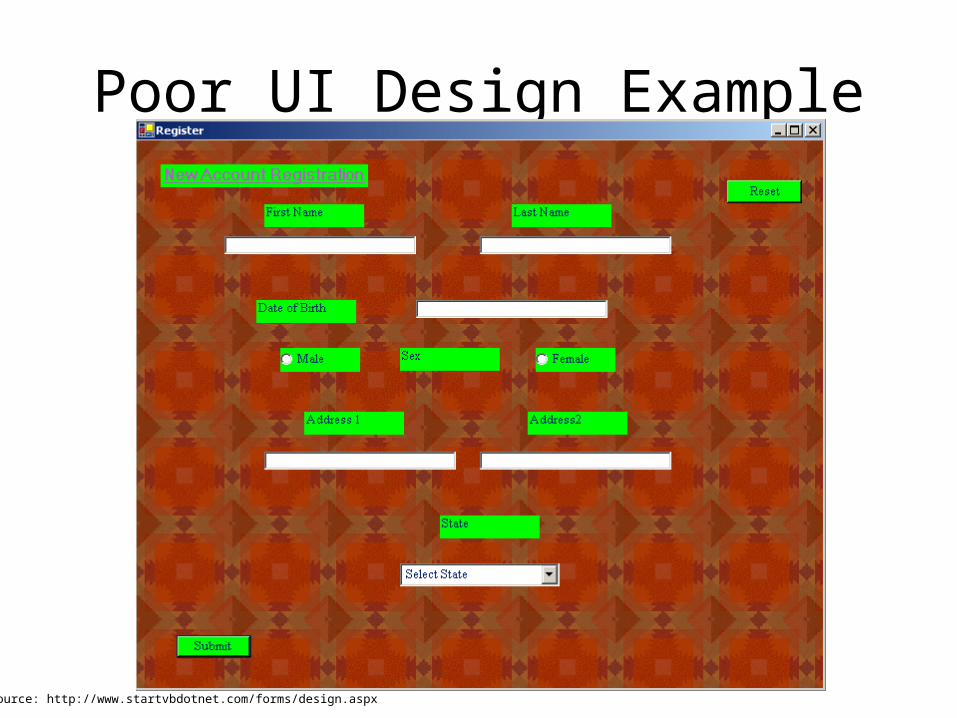
Poor UI Design Example
Source: http://www.startvbdotnet.com/forms/design.aspx
The Programming Process
• The Programming Process Consists of Several Steps, Which Include Design, Creation, Testing, and Debugging Activities

Step 1 of Developing an Application
• Clearly define what the program is to do• For example, the Wage Calculator program:
– Purpose: To calculate the user’s gross pay– Input: Number of hours worked, hourly pay rate– Process: Multiply number of hours worked by hourly
pay rate (result is the user’s gross pay)– Output: Display a message indicating the user’s gross
pay

Step 2 of Developing an Application
• Visualize the application running on the computer and design its user interface

Step 3 of Developing an Application
• Make a list of the controls neededType Name DescriptionTextBox txtHoursWorked Allows the user to enter the number of hours worked.TextBox txtPayRate Allows the user to enter the hourly pay rateLabel lblGrossPay Displays the gross pay, after the btnCalcGrossPay
button has been clickedButton btnCalcGrossPay When clicked, multiplies the number of hours worked
by the hourly pay rateButton btnClose When clicked, terminates the application
Label (default) Description for Number of Hours Worked TextBoxLabel (default) Description for Hourly Pay Rate TextBoxLabel (default) Description for Gross Pay Earned LabelForm (default) A form to hold these controls

Step 4 of Developing an Application
• Define values for each control's relevant properties:
Control Type Control Name TextForm (Default) "Wage Calculator"Label (Default) "Number of Hours Worked"Label (Default) "Hourly Pay Rate"Label (Default) "Gross Pay Earned"Label lblGrossPay "$0.00"TextBox txtHoursWorked ""TextBox txtPayRate ""Button btnCalcGrossPay "Calculate Gross Pay"Button btnClose "Close"

Step 5 of Developing an Application
• List the methods needed for each control:
Method DescriptionbtnCalcGrossPay_Click Multiplies hours worked by hourly pay rate
These values are entered into the txtHoursWorked and txtPayRate TextBoxes
Result is stored in lblGrossPay Text property
btnClose_Click Terminates the application

Step 6 of Developing an Application
• Create pseudocode or a flowchart of each method:– Pseudocode is an English-like description in
programming language terms
– A flowchart is a diagram that uses boxes and other symbols to represent each step
Store Hours Worked x Hourly Pay Rate in sngGrossPay.Store the value of sngGrossPay in lblGrossPay.Text.
Start End
Multiply hours worked by
hourly payrate. Store result in sngGrossPay.
Copy value in sngGrossPay
to lblGrossPay text property

Step 7 of Developing an Application
• Check the code for errors:– Read the flowchart and/or pseudocode– Step through each operation as though you are
the computer– Use a piece of paper to jot down the values of
variables and properties as they change– Verify that the expected results are achieved

Step 8 of Developing an Application
• Use Visual Basic to create the forms and other controls identified in step 3– This is the first use of Visual Basic, all of the
previous steps have just been on paper– In this step you develop the portion of the
application the user will see
Step 9 of Developing an Application
• Use Visual Basic to write the code for the event procedures and other methods created in step 6– This is the second step on the computer– In this step you develop the methods behind the
click event for each button– Unlike the form developed on step 8, this portion of
the application is invisible to the user
Step 10 of Developing an Application
• Attempt to run the application - find syntax errors– Correct any syntax errors found– Syntax errors are the incorrect use of an element
of the programming language– Repeat this step as many times as needed– All syntax errors must be removed before Visual
Basic will create a program that actually runs

Step 11 of Developing an Application
• Run the application using test data as input– Run the program with a variety of test data– Check the results to be sure that they are correct– Incorrect results are referred to as a runtime error– Correct any runtime errors found– Repeat this step as many times as necessary