Embed Size (px)
Citation preview

APPLICATIONSMANAGERUser's Guide
VISICORPTM
VisiCorp gratefully acknowledges the substantial contributions of Rosetta,Incorporated, for their prominent role in the development of the Visi Onconcept and family of products .
VisiCorp also recognizes Graphic Software Systems, Incorporated, for theirparticipation in the implementation of Visi On peripheral support .
Copyright © 1983 VisiCorpAll Rights Reserved .Printed in U.S .A.
Visi On Applications Manager Program Copyright © 1983 VisiCorpAll Rights Reserved .
IBM° is a registered trademark of International Business Machines CorporationMS TM is a trademark of Microsoft CorporationQume® is a registered trademark of Qume Corporation
Visi OnTM, Visi On CalcTM, Visi On Word TM, Visi On GraphTM, Visi OnQueryTM, Visi On Convert to CalcTM, Visi On Convert to Word TM, Visi OnConvert to GraphTM, VisiWord TM, VisiFileTM, and QuickStart TM are trademarksof VisiCorpTM
VisiCalc®, VisiCalc® Advanced Version, and VisiTrend/Plot© are registeredtrademarks of VisiCorp

Table of Contents

Table of Contents
Using this Guide
Taking the Visi OnTM Tutorial
2 Getting Help
Table of Contents v
After the Tutorial . . . xi
Getting Help xiii
Organization of this Guide xiii
When You're Looking at the Screen . . . xv
While You're Using the Programs . . .
xv
Overview of the Visi On TM System T-1
Using the Mouse T-3
Overview of the Visi On TM Tutorial T-4
Starting the Visi On TM Tutorial T-5
Stopping the Visi On TM Tutorial
T-7
1 Overview of the Visi On TM System
What is the Visi On TM Applications Manager?
1-1
How Do You Interact with the Visi On TM System?
1-5Selecting Menu Commands from the Keyboard
1-7
How to Start Using an Application Program
1-8
Overview: Visi OnTM Help
2-1
Getting Help on the Visi OnTM System and itsPrograms
2-3
Removing a Help Window 2-5
Displaying the Visi OnTM Table of Contents 2-7
Displaying an Overview Help Topic 2-9
Displaying a Cross-Referenced Help Topic 2-10
Displaying a Previous Help Topic
2-12
vi Table of Contents
3 Starting and Ending Your Work in a Window
4 Using Windows
Starting Your Work in a Window
3-1
Ending Your Work in a Program Window 3-3Ending Your Work after Creating a New File 3-7Ending Your Work after Revising a File
3-10
Ending Your Work in the Archives Window
3-12
Overview: Windows
4-1
Window Layout
4-1
Opening a Window 4-5Opening a Closed Window 4-5Returning a Full-Screen Window to Its Previous
Size and Location
4-7
Setting a Window Aside (Closing a Window)
4-9
Displaying the List of Closed Windows
4-11
Changing the Size and Location of a Window(Framing)
4-12
Expanding a Window to Full-Screen Size
4-15
5 Organizing and Updating Your Information
Overview: The Visi On TM Archives 5-2The Central Archives 5-2The Wastebasket 5-2Organizing Your Files 5-4Saving (Storing), Getting (Retrieving), and
Reorganizing Your Files
5-5Summary
5-13
Reorganizing and Updating Your Files from theArchives Window
5-13
Creating a Folder
5-14
Displaying Two Folders : The Source and theDestination Folders
5-16
Returning to One View of the Archives 5-17
Copying a File or a Folder 5-17
Moving a File or a Folder 5-19
Changing the Name of a File or a Folder 5-21
Removing a File or an Empty Folder 5-21
Getting a File out of the Wastebasket
5-22
Table of Contents V11
Storing InformationStoring Information on Your Floppy DisksProtect Your Files : Back Up Your DisksInititalizing a Floppy Disk for the ArchivesMounting a Floppy DiskUnmounting a Floppy Disk
5-235-245-255-265-285-30
6 Transferring InformationThe "TRANSFER" Command 6-1
The Source and the Destination of a Transfer 6-2
Types of Information You Can Transfer 6-2
Matching the Source and the Destination Types 6-3
Transferring Information between Visi OnTM ProgramWindows 6-7
Transferring Files and Folders between ArchivesWindows 6-13
Transferring Files and Folders between Folders 6-15Replacing a File with Another File 6-18
Transferring Information between a Visi On TM Systemand Another System 6-21
Transferring Information into the Visi OnSystem 6-22
Transferring Information out of the Visi OnSystem 6-24
7 PrintingPrinting Your Files 7-1
Printing on a Connected (Local) Printer 7-1Printing on a Remote Printer 7-1Printing on a Remote Printer Connected to a
Computer Not Running the Visi On System 7-2
Displaying the Print Queue 7-4
Changing the Status of Your Print Requests 7-5Stopping the Printer Temporarily 7-5Restarting the Printer 7-5Cancelling a Print Request 7-6
Responding to Print Messages 7-7
viii Table of Contents
8 Selecting Options
9 Visi OnTM Messages
Glossary
Index
Options Sheets 8-1
System Options 8-2
Displaying an Options Sheet 8-4Displaying the Visi On Services Options Sheet 8-5Displaying the Visi On Calc Recalculation
Options Sheet 8-6
Changing an Options Sheet 8-8Changing the Visi On Services Options Sheet 8-9Changing the Visi On Calc Recalculation
Options 8-10
Saving an Options Sheet 8-11
Restoring an Options Sheet 8-11
Setting an Options Sheet Aside 8-12

Using this Guide

Using this Guide
After the Tutorial . . . xi
Getting Help xiii
Organization of this Guide xiii
When You're Looking at the Screen . . . xv
While You're Using the Programs . . .
xv
Using this Guide
After the Tutorial . . .
Using this Guide Xi
This guide contains additional information for using theVisi OnTM Applications Manager as an operatingenvironment for the Visi On programs, such as theVisi On CalcTM, Visi On Word TM, Visi On GraphTM, orVisi On Query TM programs .For specific instructions on preparing your personalcomputer to use the Visi On system, see the Visi OnSetup Guide . After you have set up your equipment andinstalled the Visi On system, its programs, and theTutorial, follow the instructions in "Taking the Visi OnTutorial," which follows this chapter . It contains briefinstructions for completing the Tutorial.If you haven't taken the Visi On Tutorial, we suggestyou do it now so that you will be familiar with thesystem fundamentals that are covered in this guide .When you've finished the Visi On Tutorial, you can goon to take the QuickStart TM Course provided with eachVisi On program, or you can use this guide to exploremore of the Visi On system in depth .Figure 1 illustrates the relationships among the learningtools that are available to you .
Chapter 1 of this guide introduces you to the conceptsand terminology used in the Visi On environment andgives you some ideas about how the system and itsrelated programs can be used together . It provides ageneral overview to the system . We recommend that youread this chapter first, even if you are an experiencedcomputer user .After Chapter 1, each chapter of this guide describes theoperations that you use with the Visi On system . Forexample, Chapter 3 contains instructions for starting andending your work in a window, while Chapter 7describes the system's requirements for printing yourdocuments .You may find it helpful to review Chapter 5,"Organizing and Updating Your Information," beforeyou begin to store very many documents . This chapterintroduces you to the system of files and folders the
xii Using this Guide
Figure 1 . The Visi On learning tools that are available to you .
Getting Help
Getting Help
xiii
Visi On system environment uses to store theworksheets, tables, graphs, series, and documents youcreate with the individual Visi On programs .
In addition to the information in this guide, help isalways available as you learn to use the Visi On systemand its programs . At any time, you can request helpwithout affecting the information on your screen .
You simply select "HELP" from the Visi On menu at thebottom of the screen ; then point to and select the itemyou need more information about, such as a menucommand or a program window . The Visi On systemthen displays instructions that tell you what the item isand how you use it . It also supplies cross references toother "help" topics you may also want to read .
Organization of this GuideYou'll find instructions for taking the Visi On Tutorialbehind the TUTORIAL tab in this guide .
Behind the BASIC OPERATIONS tab are eight chaptersthat provide more detailed descriptions of theVisi On system .
CHAPTER 1 . OVERVIEW OF THE VISI ON TM SYSTEMintroduces the Visi On system and its basic concepts andfeatures . It describes the various features of the systemand briefly describes some types of applications for theVisi On environment and its programs .
CHAPTER 2 . GETTING HELP describes the Visi Onsystem's Help structure . It describes how you can useHelp most effectively while you are working with thesystem and its programs .
CHAPTER 3. STARTING AND ENDING YOURWORK IN A WINDOW describes the steps you take tostart and end work in a Visi On program window andthe Visi On Archives window .
xiv Using this Guide
CHAPTER 4 . USING WINDOWS describes how tointeract with the various Visi On programs through"windows" on your screen . It describes how to open,close, and resize windows and describes the basiccomponents of each window you'll create .
CHAPTER 5. ORGANIZING AND UPDATING YOURINFORMATION gives you an overview of the Visi Onstorage system, where all the documents you create arestored for later use . Even if you are an experiencedcomputer user, you should review the overview tobecome familiar with the meanings of various terms asthey are used in the Visi On system and its programs .
This chapter also provides step-by-step instructions forreorganizing and maintaining your files-cleaning upyour files by removing, moving, copying, or renamingfiles .
CHAPTER 6. TRANSFERRING INFORMATIONdescribes how to transfer information from one windowto another .
CHAPTER 7 . PRINTING gives you instructions forprinting the worksheets, documents, graphs, series, andtables you create with the various Visi On programs .
CHAPTER 8 . SELECTING OPTIONS describes in detailhow you can use options sheets to tailor the way theVisi On system works to your individual needs . Forexample, you can change the preset size of the windowsthat appear when you're using Visi On programs withthe system .
CHAPTER 9 . MESSAGES describes all the errormessages the Visi On system may give you . Eachmessage explains what could have caused the error anddetails what you can do to correct it .
In addition, a GLOSSARY defines all the terms used inthe Visi On environment . Each Visi On program alsoprovides you with these definitions, plus any specializedterms that the specific program uses .
An INDEX lists and cross references all major topics andterms used in this guide, providing a quick reference toany system function or command .
When You're Looking at the Screen . . . xv
When You're Looking at the Screen . . .Menu items, commands, and messages that you see onthe screen while you're using the Visi On ApplicationsManager appear in this guide in "quotation marks ."
Characters that you type at your keyboard-forexample, to enter data-are in boldface type .
While You're Using the Programs . . .Built-in prompts and messages guide you through mostof the operations . You may be asked to supplyinformation by typing it at the keyboard or by selectingan item with your pointer, for example .
The Visi On system is interactive so that you can workwith it in a natural way . After you've become used to it,you may need to refer to this guide only when you wantto learn about a feature you haven't used before .

APPLICATIONSMANAGER-

VISI ON'"


Tutorial

Taking the Visi OnTM Tutorial
Overview of the Visi On TM System T-1
Using the Mouse T-3
Overview of the Visi On TM Tutorial T-4
Starting the Visi OnTM Tutorial T-5
Stopping the Visi On TM Tutorial T-7
Overview of the Visi On TM System T- 1
If you haven't installed the Visi On TM Tutorial, do sonow by following the instructions in "Installing theVisi On Tutorial" in the Visi On Setup Guide .
This section includes :
•
An overview of the Visi On system .
•
A brief introduction to using the mouse .
•
An overview of the online (on the screen) Visi OnTutorial .
•
Step-by-step instructions for starting and stopping theTutorial .
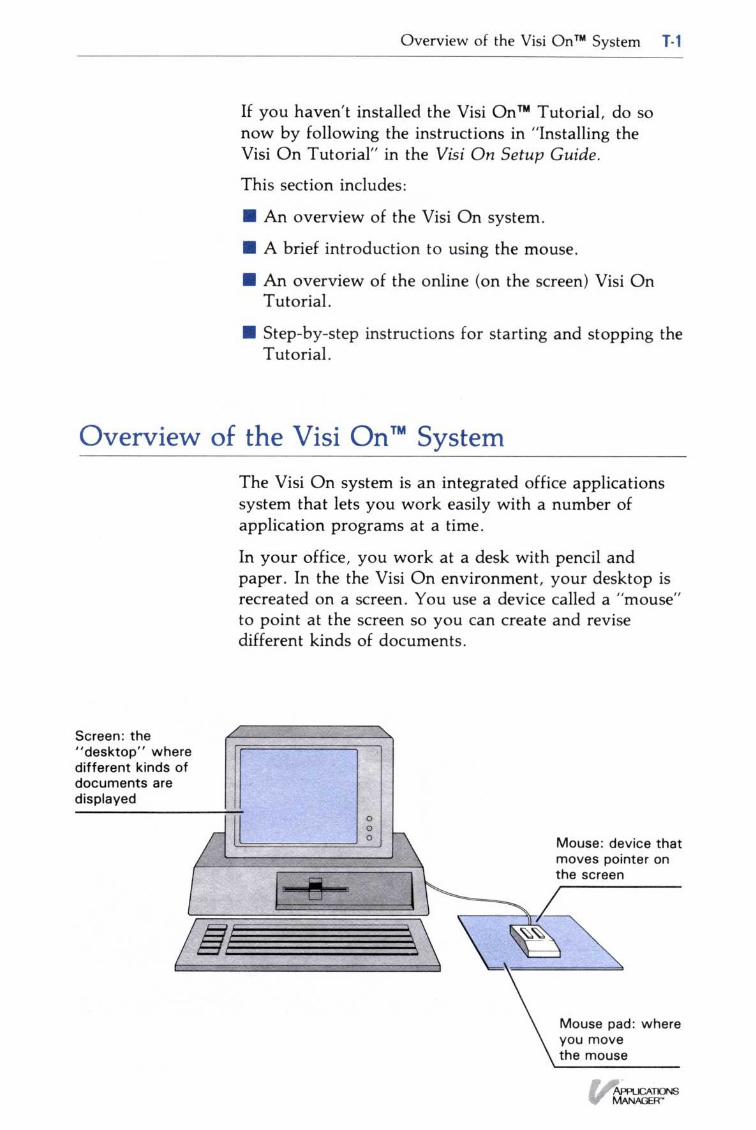
Overview of the Visi OnTM SystemThe Visi On system is an integrated office applicationssystem that lets you work easily with a number ofapplication programs at a time .
In your office, you work at a desk with pencil andpaper . In the the Visi On environment, your desktop isrecreated on a screen . You use a device called a "mouse"to point at the screen so you can create and revisedifferent kinds of documents .
T-2 Visi On TM Tutorial
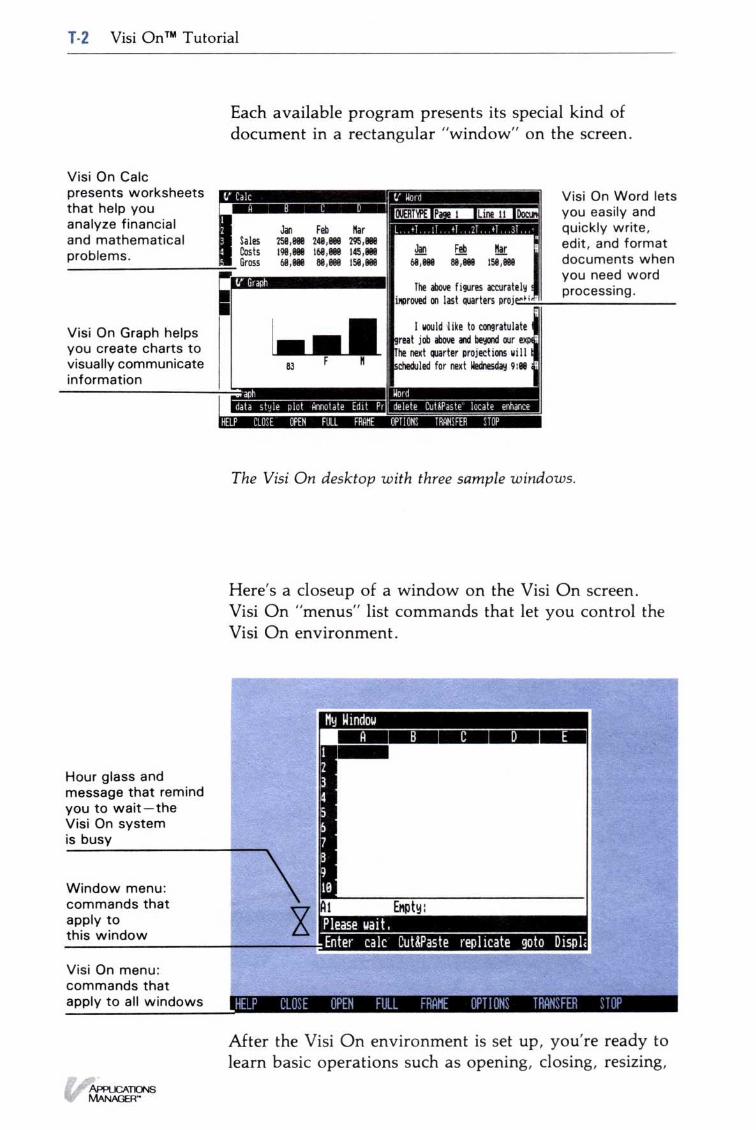
Each available program presents its special kind ofdocument in a rectangular "window" on the screen .
The Visi On desktop with three sample windows .
Here's a closeup of a window on the Visi On screen .Visi On "menus" list commands that let you control theVisi On environment .
After the Visi On environment is set up, you're ready tolearn basic operations such as opening, closing, resizing,

Using the Mouse
Using the Mouse T-3
and moving windows on the screen . The Visi OnTutorial (described in the following sections) teachesthese operations .
After you learn these standard operations, you canapply them to all Visi On programs. This makes learningto use additional Visi On programs much fasterand easier .
Each program has a separate QuickStart Course thatteaches you the basic program features . You shouldcomplete the Visi On Tutorial, however, before you takeone of the QuickStart Courses for a program .
Before you can start the Visi On Tutorial, you need toknow how to use the mouse . The mouse, along with thekeyboard, is how you communicate with and control theVisi On system . The mouse lets you point at items onthe Visi On screen, such as windows or commands .
Do this
1. Place your mouse in the center of its pad .
2 . Slide the mouse on the pad without pressing eithermouse button .
3 . Move the mouse in circles . Watch the pointer moveon the the screen in the same direction .
T-4 Visi On TM Tutorial
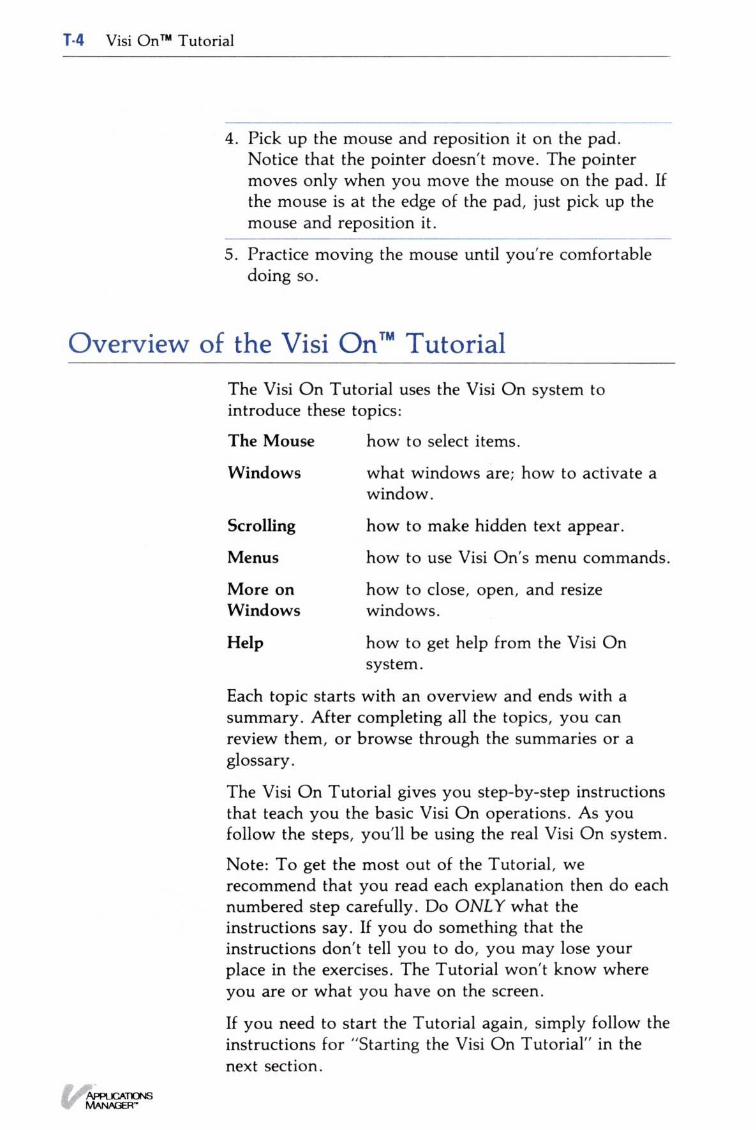
4 . Pick up the mouse and reposition it on the pad .Notice that the pointer doesn't move . The pointermoves only when you move the mouse on the pad . Ifthe mouse is at the edge of the pad, just pick up themouse and reposition it .
5 . Practice moving the mouse until you're comfortabledoing so .
Overview of the Visi On TM TutorialThe Visi On Tutorial uses the Visi On system tointroduce these topics :The Mouse
how to select items .
Windows
what windows are; how to activate awindow .
Scrolling
how to make hidden text appear .
Menus
how to use Visi On's menu commands .
More on
how to close, open, and resizeWindows
windows.
Help
how to get help from the Visi Onsystem .
Each topic starts with an overview and ends with asummary . After completing all the topics, you canreview them, or browse through the summaries or aglossary .
The Visi On Tutorial gives you step-by-step instructionsthat teach you the basic Visi On operations . As youfollow the steps, you'll be using the real Visi On system .
Note: To get the most out of the Tutorial, werecommend that you read each explanation then do eachnumbered step carefully . Do ONLY what theinstructions say . If you do something that theinstructions don't tell you to do, you may lose yourplace in the exercises . The Tutorial won't know whereyou are or what you have on the screen .
If you need to start the Tutorial again, simply follow theinstructions for "Starting the Visi On Tutorial" in thenext section .
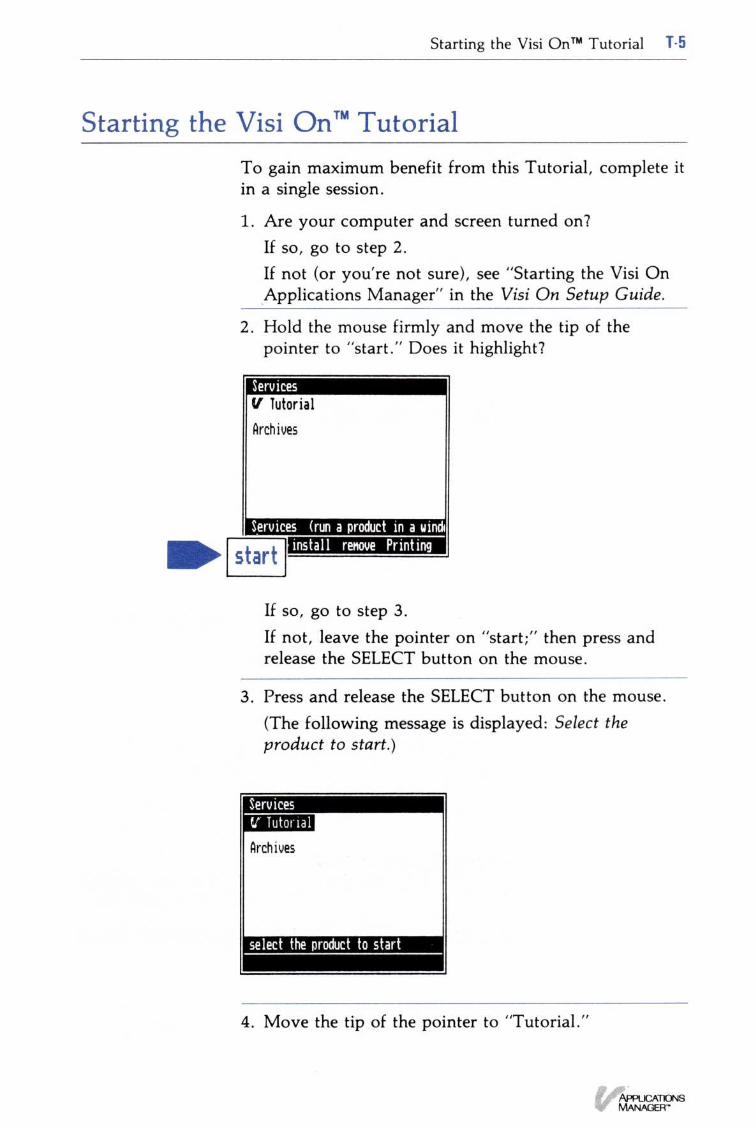
Starting the Visi On TM TutorialTo gain maximum benefit from this Tutorial, complete itin a single session .
1 . Are your computer and screen turned on?If so, go to step 2 .If not (or you're not sure), see "Starting the Visi OnApplications Manager" in the Visi On Setup Guide .
2 . Hold the mouse firmly and move the tip of thepointer to "start ." Does it highlight?
Starting the Visi On TM Tutorial T-5
If so, go to step 3 .If not, leave the pointer on "start ;" then press andrelease the SELECT button on the mouse .
3 . Press and release the SELECT button on the mouse .(The following message is displayed : Select theproduct to start .)
4 . Move the tip of the pointer to "Tutorial ."
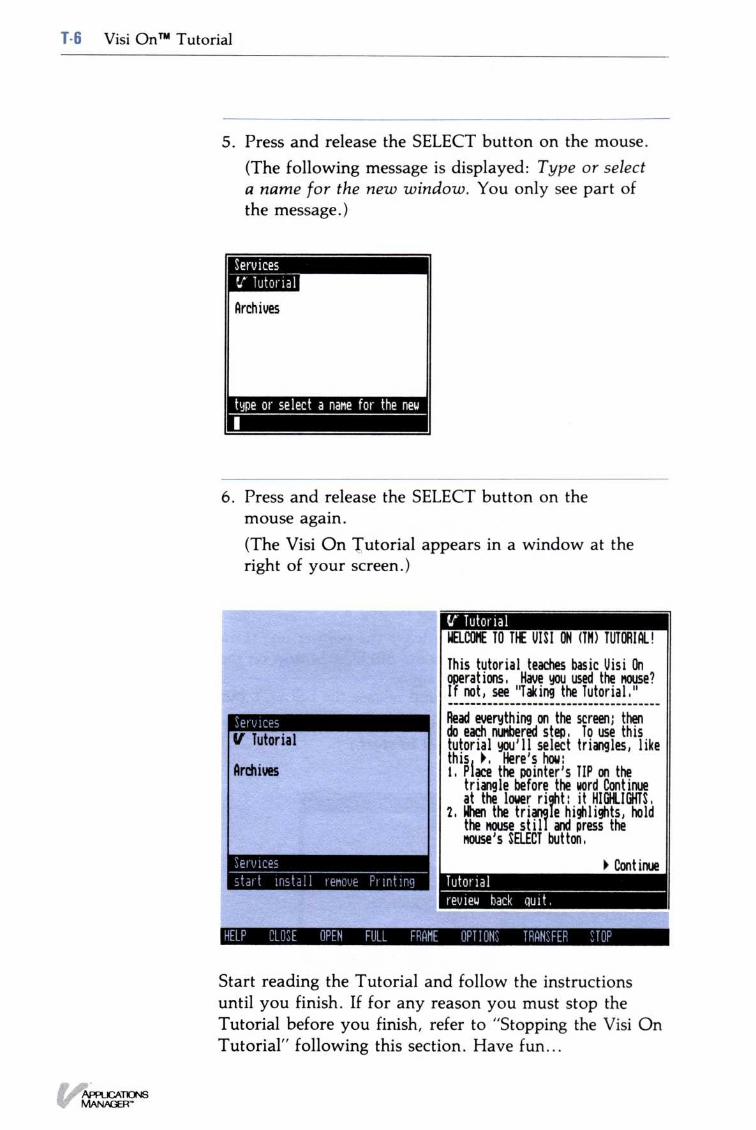
T-6 Visi OnTM' Tutorial
5. Press and release the SELECT button on the mouse .(The following message is displayed : Type or selecta name for the new window . You only see part ofthe message .)
6 . Press and release the SELECT button on themouse again .(The Visi On Tutorial appears in a window at theright of your screen .)
Start reading the Tutorial and follow the instructionsuntil you finish . If for any reason you must stop theTutorial before you finish, refer to "Stopping the Visi OnTutorial" following this section . Have fun . . .
Stopping the Visi On TM Tutorial
Stopping the Visi On TM Tutorial T-7
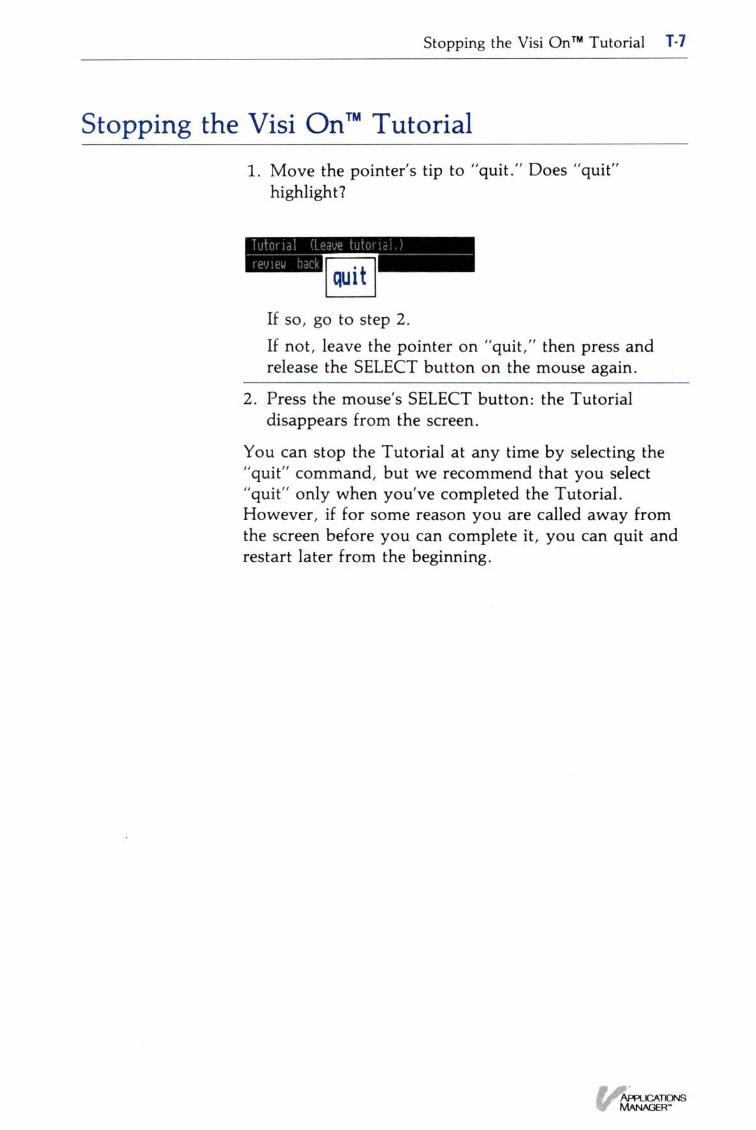
1 . Move the pointer's tip to "quit ." Does "quit"highlight?
If so, go to step 2 .If not, leave the pointer on "quit," then press andrelease the SELECT button on the mouse again .
2 . Press the mouse's SELECT button : the Tutorialdisappears from the screen .
You can stop the Tutorial at any time by selecting the"quit" command, but we recommend that you select"quit" only when you've completed the Tutorial .However, if for some reason you are called away fromthe screen before you can complete it, you can quit andrestart later from the beginning .


VISI ON'"


1 Overview of theVisi OnTM System

Chapter 1
Overview of the Visi On TM System
What is the Visi On TM Applications Manager? 1-1
How Do You Interact with the Visi On TM System? 1-5Selecting Menu Commands from the Keyboard 1-7
How to Start Using an Application Program 1-8
What is the Visi On TM Applications Manager? 1 -1
Before you read this guide, you should have read theVisi OnTM Setup Guide and completed the Visi OnTutorial .
This chapter introduces you to the basic features of theVisi OnTM Applications Manager and its integratedfamily of easy-to-use personal computer programs . TheVisi On system is a fast, easy, and professional aid tomanaging your business, whether you work in a small orlarge business arena . The system is effective in anydecision-making environment . Its well-researched designmaximizes computer power and minimizes learning time .
If you have used the Visi On Setup Guide and taken theVisi On Tutorial, you have become acquainted with theconcepts described in this chapter . You can skim thischapter quickly as a review, or you can go directly toany subject in this User's Guide that you would like tolearn more about . The chapters do not need to be readin order .
If, however, you are completely new to the Visi Onsystem, you should read this chapter to get a basicunderstanding of the Visi On system, how it is used, andwhat steps you should take to get the Visi On systemworking . After reading this overview, you should thengo to the Visi On Setup Guide to get the systemrunning; then take the Visi On Tutorial to learn thebasic system features in an online (on the screen)tutorial .
What Is the Visi On TM Applications Manager?The Visi On Applications Manager is an operatingenvironment that allows you to use different applicationprograms, such as word processing and spreadsheetprograms, simultaneously on one computer . The systemmultiplies what you can do with your personalcomputer. It makes switching from one task to anothereasy . It makes exchanging information from oneprogram to another fast . And with a pointing device todo many of the operations, it makes doing work on thepersonal computer as natural as pointing your finger atwhat you want done .
1-2 Overview of the Visi On TM System
Figure 1-1 . Overview o f the Visi On system
Let's take a look at the basic features of the Visi On system :
• How you interact with the system : you use a pointingdevice (called a mouse) that lets you do most tasks simplyby pointing .
∎
How the system lets you display what you want todo : you open windows (rectangular areas on thescreen) almost as you would open file folders fromyour office filing cabinet .
∎ How you interact with the program : you use the Visi Oncommands that are common to all programs and specificcommands for each application program .
8 How you do spreadsheet analyzing, word processing,graphing, and organizing information : you use the specificVisi On application program that is designed to do thespecialized task electronically .
Pointing (the first basic feature) is the natural way foryou to interact with the Visi On programs .
You operate the Visi On system using a "mouse"pointing device (see Figure 1-2) . As you move the
What is the Visi On" Applications Manager? 1 .3
Figure 1-2 . The pointing device lets you point at what you want to do and select it .This two-step process is called selecting .
pointing device on its pad, an arrow on the screenmoves in a corresponding direction . You point the screenarrow at what you want to do and press the "select"button on the mouse pointing device . It takes only ashort time to be able to select commands quickly . Datathat you want to put into a program is generally typedin at the keyboard.
Windows (another basic feature) are for viewing andworking with each program .
A window is an area of the computer screen that has anapplication program, such as a word processingprogram, in it . You can have many windows (see Figure1-3) on the screen at the same time, with a differentapplication program or the same application program ineach window . This makes it possible to see, work with,and develop your ideas in words, tables, graphs, andplanning sheets simultaneously .
But how do you actually interact with the program? Youuse commands (a third basic feature) .
1 .4 Overview of the Visi On TM System
Figure 1-3 . Visi On windows with different applicationprograms let you switch between tasks rapidly .
Commands are displayed at the bottom of the Visi Onscreen and at the bottom of each program window (seeFigure 1-4) . Each window has a group of commandsdesigned to do special tasks for that window . This groupof commands is the menu for that window and the lineon which the commands are displayed is the menu line .
The name of a command usually tells you what it does .To get detail, you simply point at any command, andthe Applications Manager highlights that command, anda special description of the command is displayed on theline above it . When you select a command, the programguides you with a message about what to do next ordisplays another menu from which you can selectadditional commands . Eight commands are alwayspresent at the bottom of the Visi On screen .
The last basic feature of the Visi On system is that it is afamily of application programs . An application programcarries out specialized tasks such as handling text,calculating, graphing, and accesssing information . Thesystem allows you to add a whole library of powerfulprograms, each sharing the distinguishing capabilities of
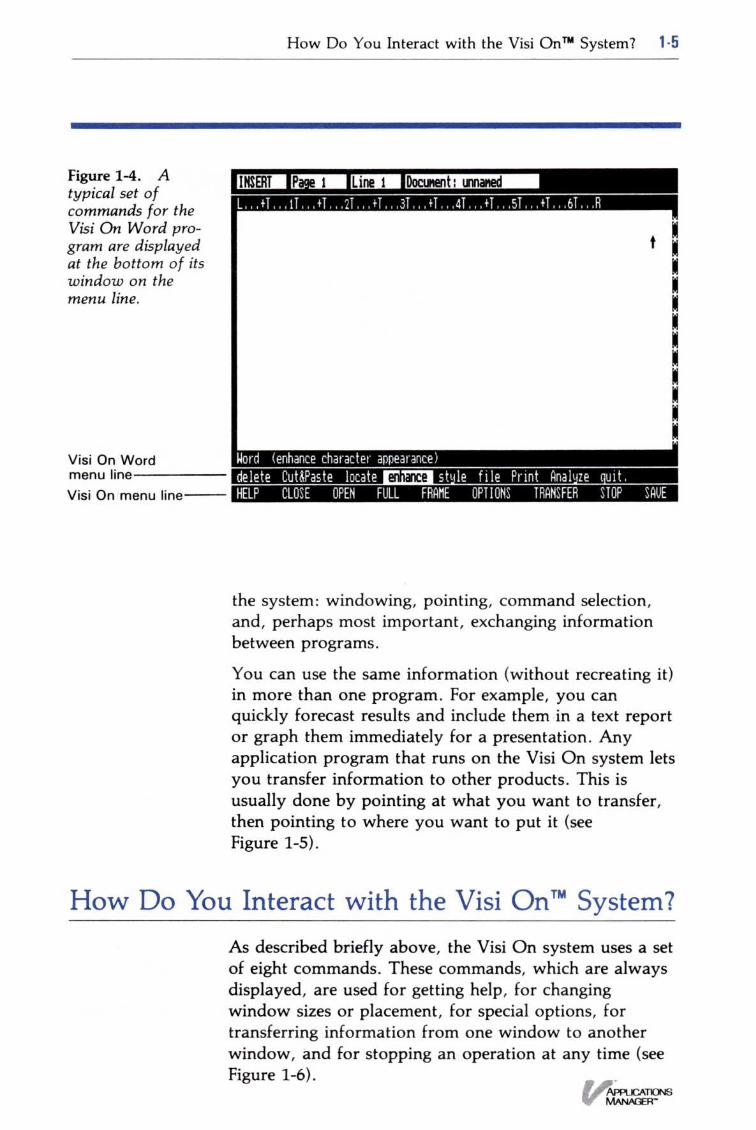
Figure 1-4 . Atypical set o fcommands for theVisi On Word pro-gram are displayedat the bottom o f itswindow on themenu line.
How Do You Interact with the Visi On TM System? 1-5
the system : windowing, pointing, command selection,and, perhaps most important, exchanging informationbetween programs .
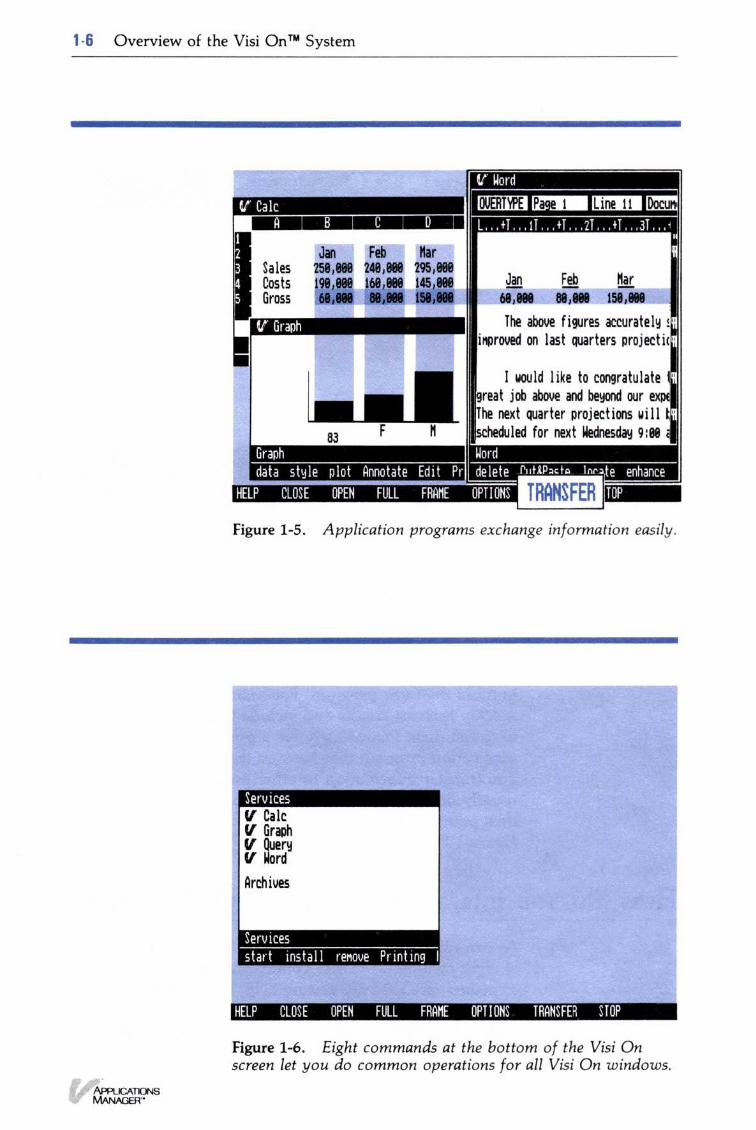
You can use the same information (without recreating it)in more than one program . For example, you canquickly forecast results and include them in a text reportor graph them immediately for a presentation . Anyapplication program that runs on the Visi On system letsyou transfer information to other products . This isusually done by pointing at what you want to transfer,then pointing to where you want to put it (seeFigure 1-5) .
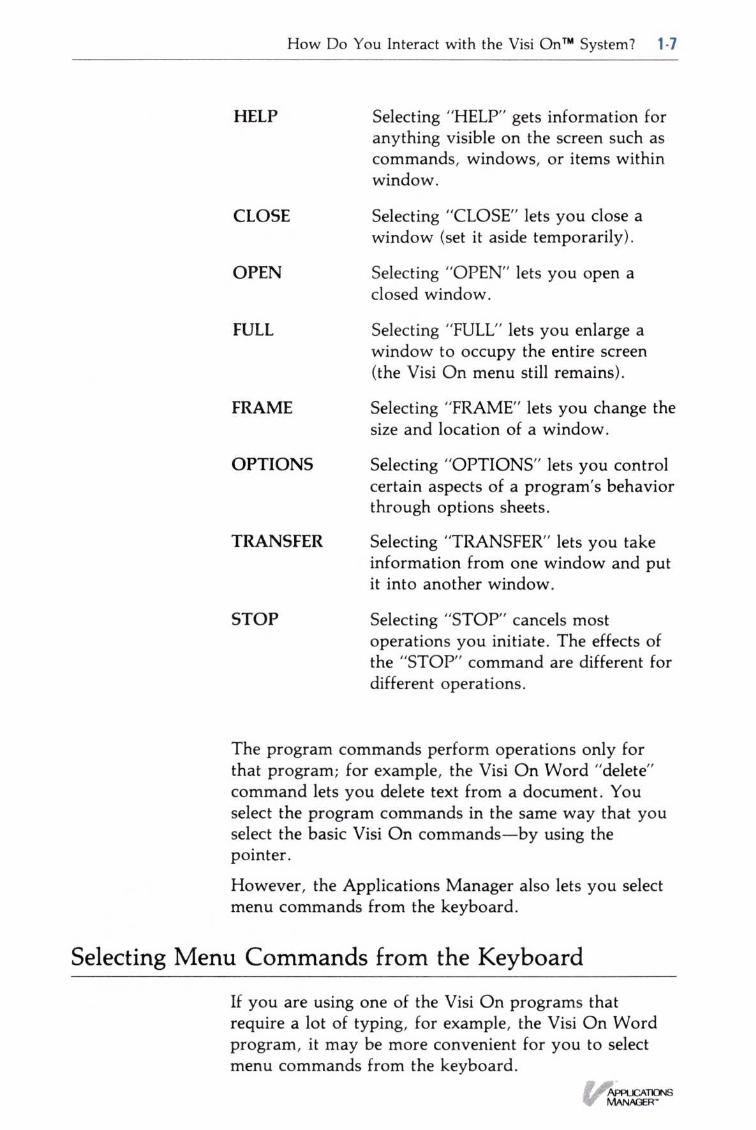
How Do You Interact with the Visi On TM System?As described briefly above, the Visi On system uses a setof eight commands . These commands, which are alwaysdisplayed, are used for getting help, for changingwindow sizes or placement, for special options, fortransferring information from one window to anotherwindow, and for stopping an operation at any time (seeFigure 1-6) .
1 .6 Overview of the Visi On TM System
Figure 1-5 . Application programs exchange information easily .
Figure 1-6 . Eight commands at the bottom of the Visi Onscreen let you do common operations for all Visi On windows .
How Do You Interact with the Visi On TM System? 1- 7
HELP Selecting "HELP" gets information foranything visible on the screen such ascommands, windows, or items withinwindow .
CLOSE
Selecting "CLOSE" lets you close awindow (set it aside temporarily) .
OPEN
Selecting "OPEN" lets you open aclosed window .
FULL Selecting "FULL" lets you enlarge awindow to occupy the entire screen(the Visi On menu still remains) .
FRAME
Selecting "FRAME" lets you change thesize and location of a window .
OPTIONS Selecting "OPTIONS" lets you controlcertain aspects of a program's behaviorthrough options sheets .
TRANSFER
Selecting "TRANSFER" lets you takeinformation from one window and putit into another window .
STOP
Selecting "STOP" cancels mostoperations you initiate . The effects ofthe "STOP" command are different fordifferent operations .
The program commands perform operations only forthat program ; for example, the Visi On Word "delete"command lets you delete text from a document . Youselect the program commands in the same way that youselect the basic Visi On commands-by using thepointer.
However, the Applications Manager also lets you selectmenu commands from the keyboard .
Selecting Menu Commands from the Keyboard
If you are using one of the Visi On programs thatrequire a lot of typing, for example, the Visi On Wordprogram, it may be more convenient for you to selectmenu commands from the keyboard .

1- 8 Overview of the Visi OnTM System
The Visi On Applications Manager provides an optionthat lets you do just that . This option is in the ServicesOptions Sheet (see Chapter 8 for a description) .
The way you select a menu command from thekeyboard, is to press the key marked (E S C) first; thentype the first letter of a lower case menu command .
How to Start Using an Application Program
Install Visi Onsystem andprogram .
To use the Visi On Word TM program or other applicationprograms, you must put it on your hard disk (install it)after you have installed the Visi On ApplicationsManager. You should become familiar with the basicVisi On commands by taking the Visi On Tutorial .Specific instructions for using each applications programare provided in that program's QuickStart Course Tm andUser's Guide .
The steps you take to start using an applicationsprogram are (see Figure 1-7) :
1 . Install (put on your hard disk) the Visi OnApplications Manager and the applications programyou want to use . You do this only one time . See theVisi On Setup Guide for instructions .
2 . Take the Visi On Tutorial ; then take the QuickStartCourse for the program you want to use . The Visi OnTutorial (the instructions and exercises are all on thecomputer screen) teaches you the way to use thepointing device and all of the basic Visi On
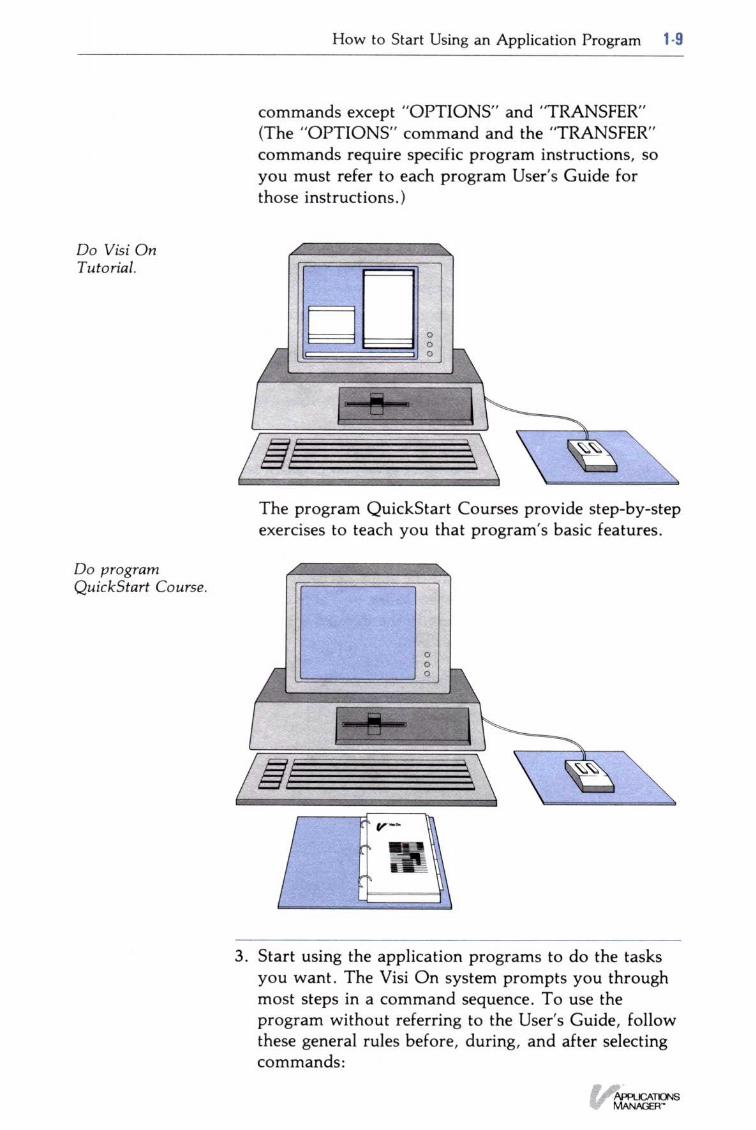
Do Visi OnTutorial .
Do programQuickStart Course .
How to Start Using an Application Program 1-9
commands except "OPTIONS" and "TRANSFER"(The "OPTIONS" command and the "TRANSFER"commands require specific program instructions, soyou must refer to each program User's Guide forthose instructions .)
The program QuickStart Courses provide step-by-stepexercises to teach you that program's basic features .
3 . Start using the application programs to do the tasksyou want . The Visi On system prompts you throughmost steps in a command sequence . To use theprogram without referring to the User's Guide, followthese general rules before, during, and after selectingcommands :
1- 1 0 Overview of the Visi On TM System
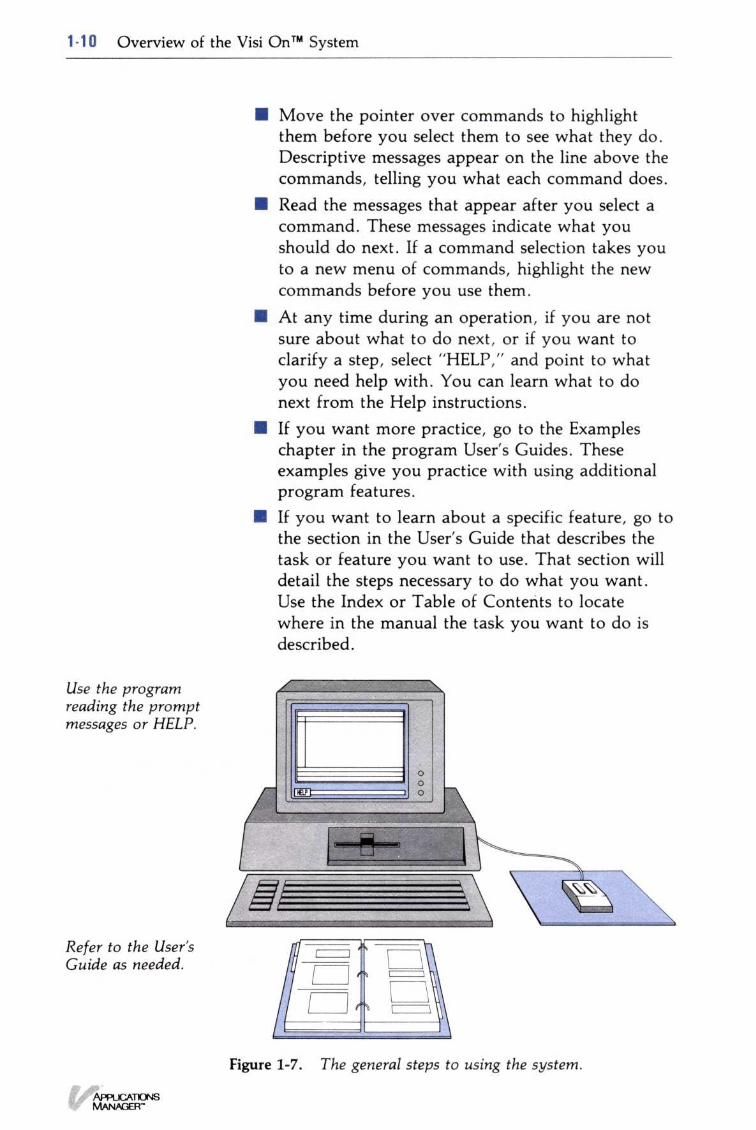
Use the programreading the promptmessages or HELP .
∎ Move the pointer over commands to highlightthem before you select them to see what they do .Descriptive messages appear on the line above thecommands, telling you what each command does .
•
Read the messages that appear after you select acommand. These messages indicate what youshould do next . If a command selection takes youto a new menu of commands, highlight the newcommands before you use them .
∎
At any time during an operation, if you are notsure about what to do next, or if you want toclarify a step, select "HELP," and point to whatyou need help with . You can learn what to donext from the Help instructions .
∎
If you want more practice, go to the Exampleschapter in the program User's Guides . Theseexamples give you practice with using additionalprogram features .
∎
If you want to learn about a specific feature, go tothe section in the User's Guide that describes thetask or feature you want to use . That section willdetail the steps necessary to do what you want .Use the Index or Table of Contents to locatewhere in the manual the task you want to do isdescribed .
Figure 1-7 . The general steps to using the system .
Refer to the User'sGuide as needed .

VISI ON'"


2 Getting Help
Chapter 2
Getting Help
Overview: Visi OnTM Help 2-1
Getting Help on the Visi On TM System and itsPrograms 2-3
Removing a Help Window 2-5
Displaying the Visi On TM Table of Contents 2-7
Displaying an Overview Help Topic 2-9
Displaying a Cross-Referenced Help Topic 2-10
Displaying a Previous Help Topic 2-12

Overview : Visi OnTM Help
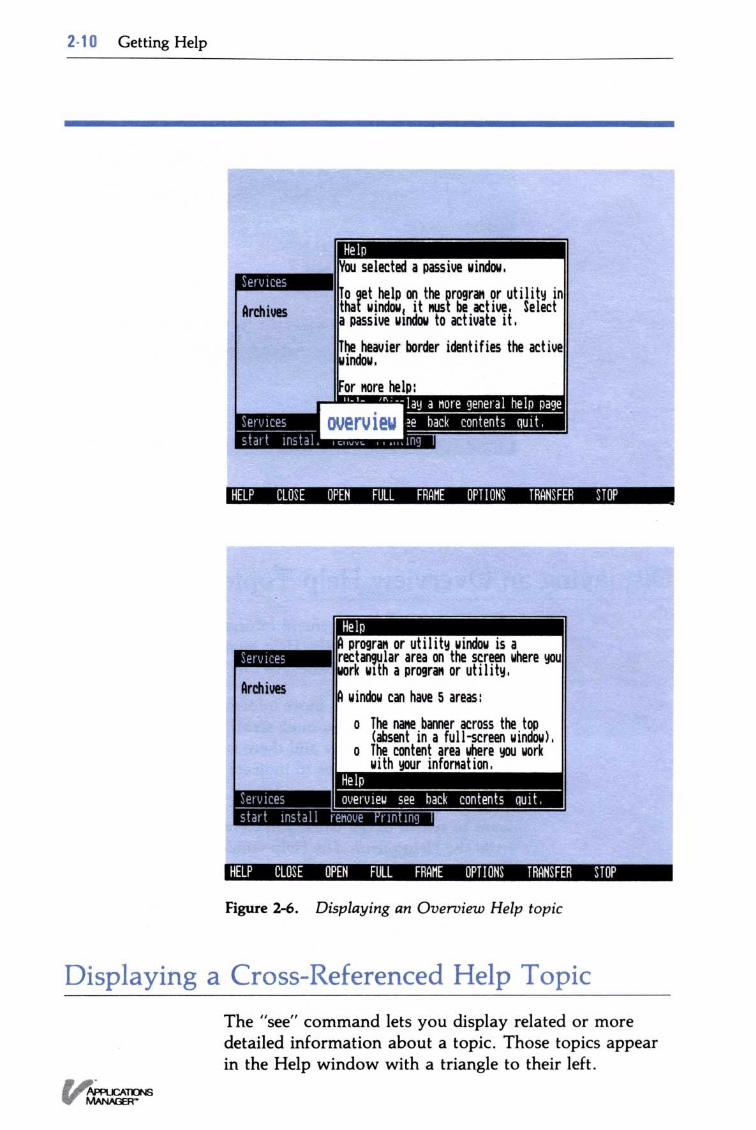
Overview: Visi On TM Help 2- 1
This chapter includes :
•
An overview on getting help in the Visi On TMenvironment .
∎
A description of a help window .
•
Step-by-step instructions for :
Whenever you're working with the Visi On system andits programs and you're not clear about what to do next,you can get help on anything visible on the screen, suchas menu commands, windows, and items within windows .
When you select "HELP" from the Visi On menu (seeFigure 2-1), the system prompts you to select what youneed help with .
When you select an item, information about the itemappears in a Help window in the middle of the screen .
Each Help window has the same components as otherVisi On windows (see Figure 2-2) .
Figure 2-1 . Selecting the "HELP" command from the Visi Onmenu gets you information about whatever you point to .
∎ Getting help on the Visi On system and itsprograms.
∎ Removing a help window .∎ Displaying the Visi On Table of Contents .∎ Displaying an overview help topic .∎ Displaying a cross-referenced help topic .∎ Displaying a previous help topic .
2-2 Getting Help
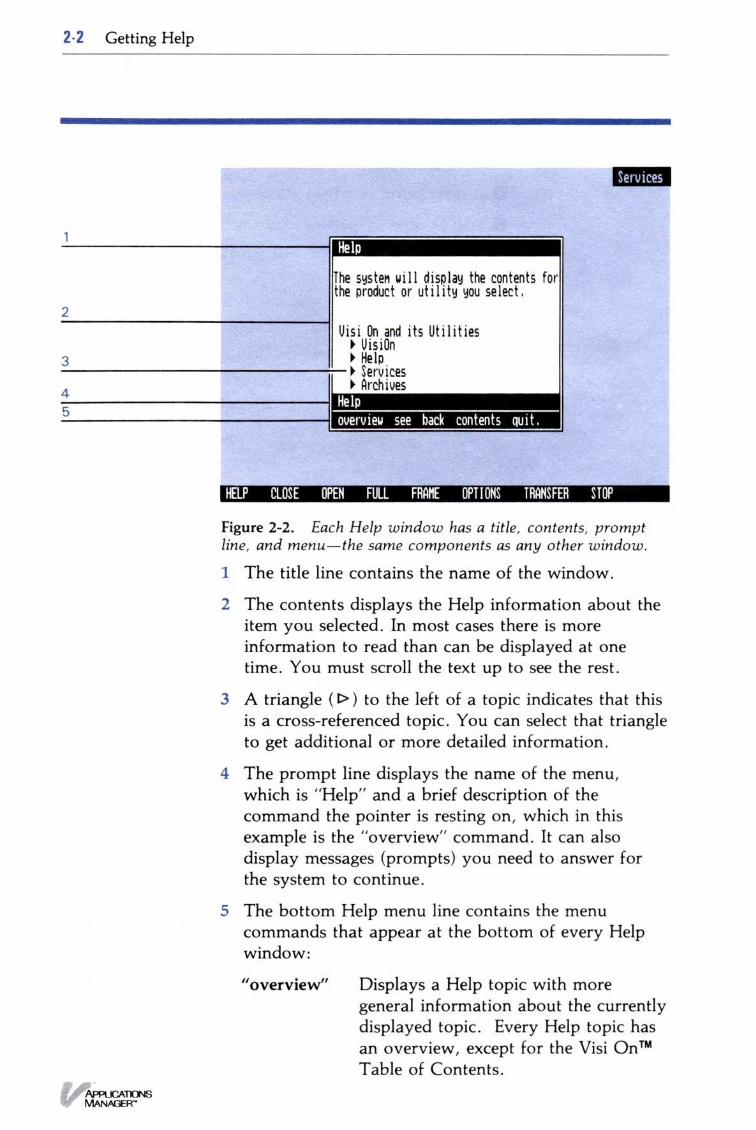
Figure 2-2 . Each Help window has a title, contents, promptline, and menu-the same components as any other window .
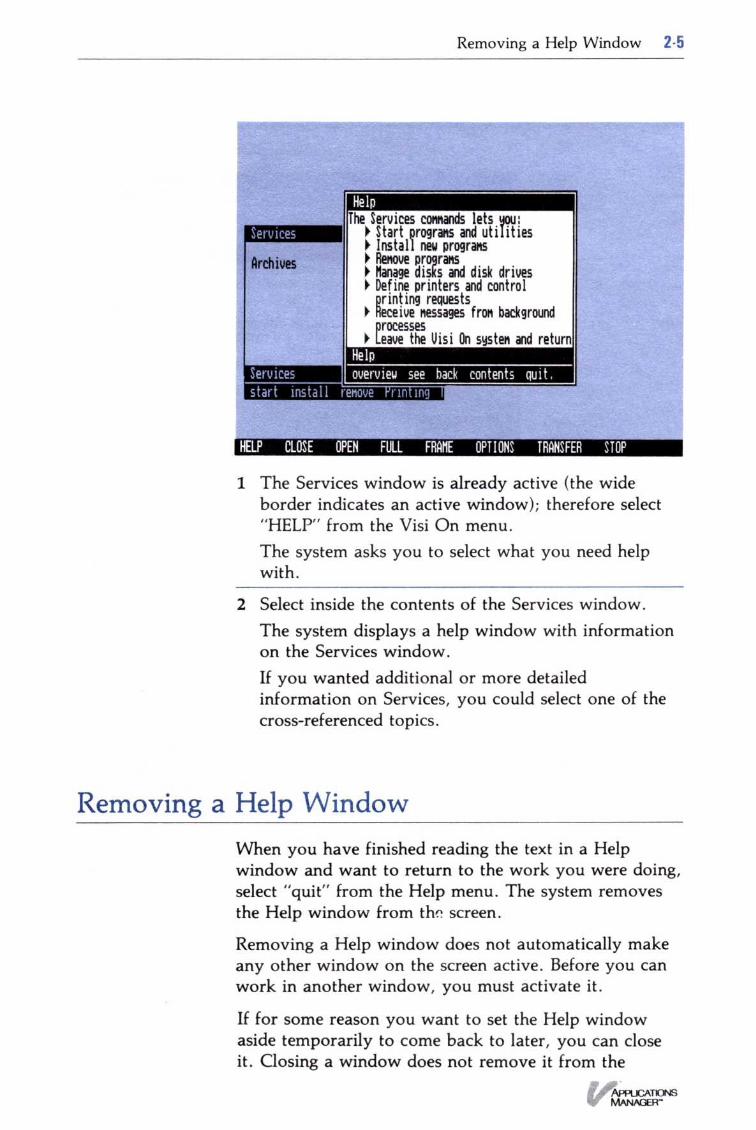
1 The title line contains the name of the window .
2 The contents displays the Help information about theitem you selected . In most cases there is moreinformation to read than can be displayed at onetime . You must scroll the text up to see the rest .
3 A triangle (>) to the left of a topic indicates that thisis a cross-referenced topic . You can select that triangleto get additional or more detailed information .
4 The prompt line displays the name of the menu,which is "Help" and a brief description of thecommand the pointer is resting on, which in thisexample is the "overview" command . It can alsodisplay messages (prompts) you need to answer forthe system to continue .
5 The bottom Help menu line contains the menucommands that appear at the bottom of every Helpwindow :
"overview"
Displays a Help topic with moregeneral information about the currentlydisplayed topic . Every Help topic hasan overview, except for the Visi On TMTable of Contents .
Getting Help on the Visi On TM System and its Programs 2-3
"see"
"back"
Displays the previously displayedHelp topic .
"contents"
Displays the Visi On Table ofContents . You can select the Table ofContents for any programs you haveinstalled or any of the utilities thatcome with the Visi On system .
"quit"
Displays related or more detailedinformation on a topic . When youselect this command, you are promptedto select a cross-referenced topic in theHelp window. You can also select thetriangle without selecting "see" first .
Removes the Help window from thescreen .
Getting Help on the Visi On TM Systemand its Programs
The "HELP" command in the Visi On menu displaysinformation about a command, a window, or an areathat you selected on the Visi On screen .
Use the "HELP" command whenever you are not clearabout what you should do next or when you wantinformation about a command or an item on the screen .
To request help
Do one of the following :If you want help on a window or an item in thewindow, make sure the window is active . Then select"HELP" from the Visi On menu .
∎ If you want help on a Visi On command, select"HELP" from the Visi OnTM menu.
The system asks you to select what you need helpwith .
Select the command, window, or item within thewindow for which you want help .The system opens a new Help window that displays aHelp topic for the item you selected .
2-4 Getting Help
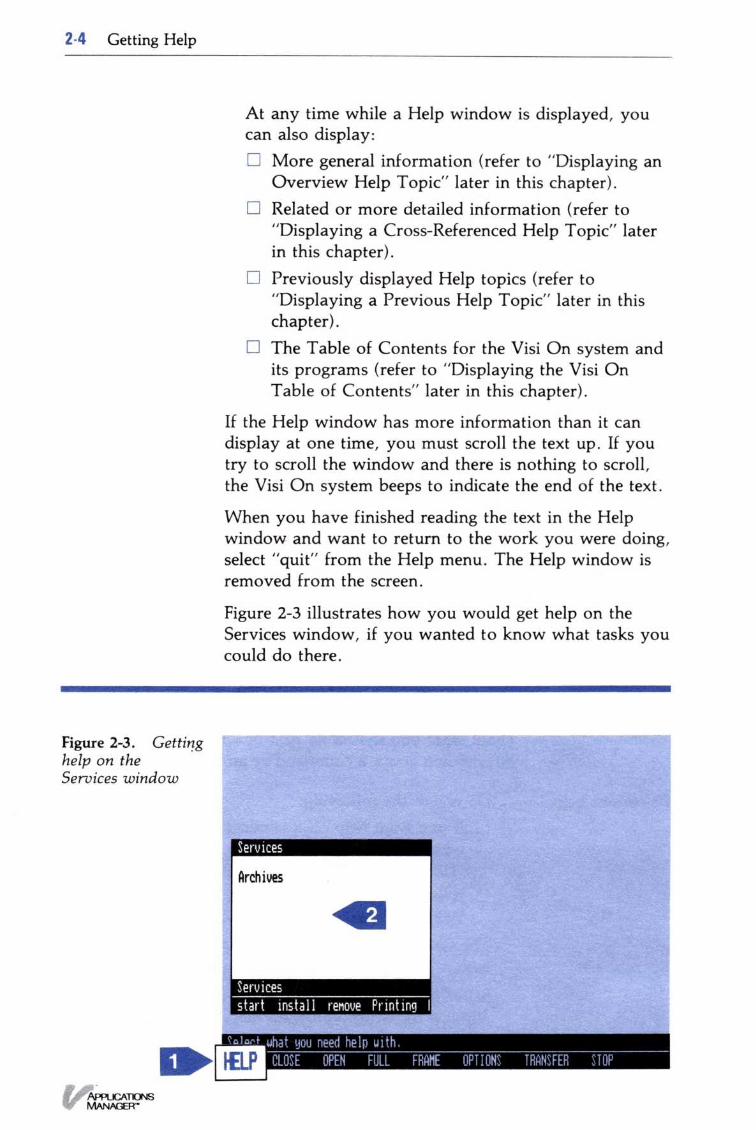
Figure 2-3 . Gettinghelp on theServices window
At any time while a Help window is displayed, youcan also display :∎ More general information (refer to "Displaying an
Overview Help Topic" later in this chapter) .∎ Related or more detailed information (refer to
"Displaying a Cross-Referenced Help Topic" laterin this chapter) .
∎ Previously displayed Help topics (refer to"Displaying a Previous Help Topic" later in thischapter) .
∎ The Table of Contents for the Visi On system andits programs (refer to "Displaying the Visi OnTable of Contents" later in this chapter) .
If the Help window has more information than it candisplay at one time, you must scroll the text up . If youtry to scroll the window and there is nothing to scroll,the Visi On system beeps to indicate the end of the text .
When you have finished reading the text in the Helpwindow and want to return to the work you were doing,select "quit" from the Help menu . The Help window isremoved from the screen .
Figure 2-3 illustrates how you would get help on theServices window, if you wanted to know what tasks youcould do there .
1 The Services window is already active (the wideborder indicates an active window) ; therefore select"HELP" from the Visi On menu .The system asks you to select what you need helpwith.
2 Select inside the contents of the Services window .The system displays a help window with informationon the Services window .If you wanted additional or more detailedinformation on Services, you could select one of thecross-referenced topics .
Removing a Help Window
Removing a Help Window 2 .5
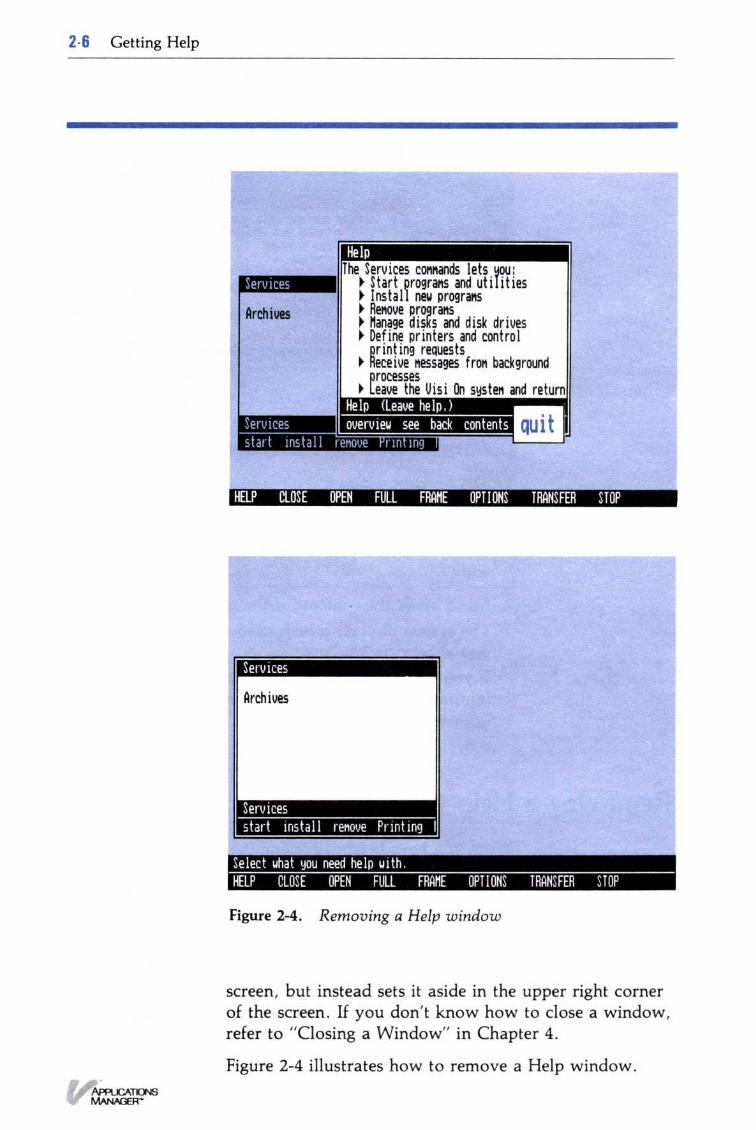
When you have finished reading the text in a Helpwindow and want to return to the work you were doing,select "quit" from the Help menu . The system removesthe Help window from the screen .
Removing a Help window does not automatically makeany other window on the screen active . Before you canwork in another window, you must activate it .
If for some reason you want to set the Help windowaside temporarily to come back to later, you can closeit. Closing a window does not remove it from the
2-6 Getting Help
Figure 2-4 . Removing a Help window
screen, but instead sets it aside in the upper right cornerof the screen . If you don't know how to close a window,refer to "Closing a Window" in Chapter 4 .
Figure 2-4 illustrates how to remove a Help window .
Displaying the Visi On TM Table of Contents 2 -7
Select "quit" from the help menu .
The system removes the help window from the screen .Notice that the Services window is not active . To workin that window, you would have to activate it first .
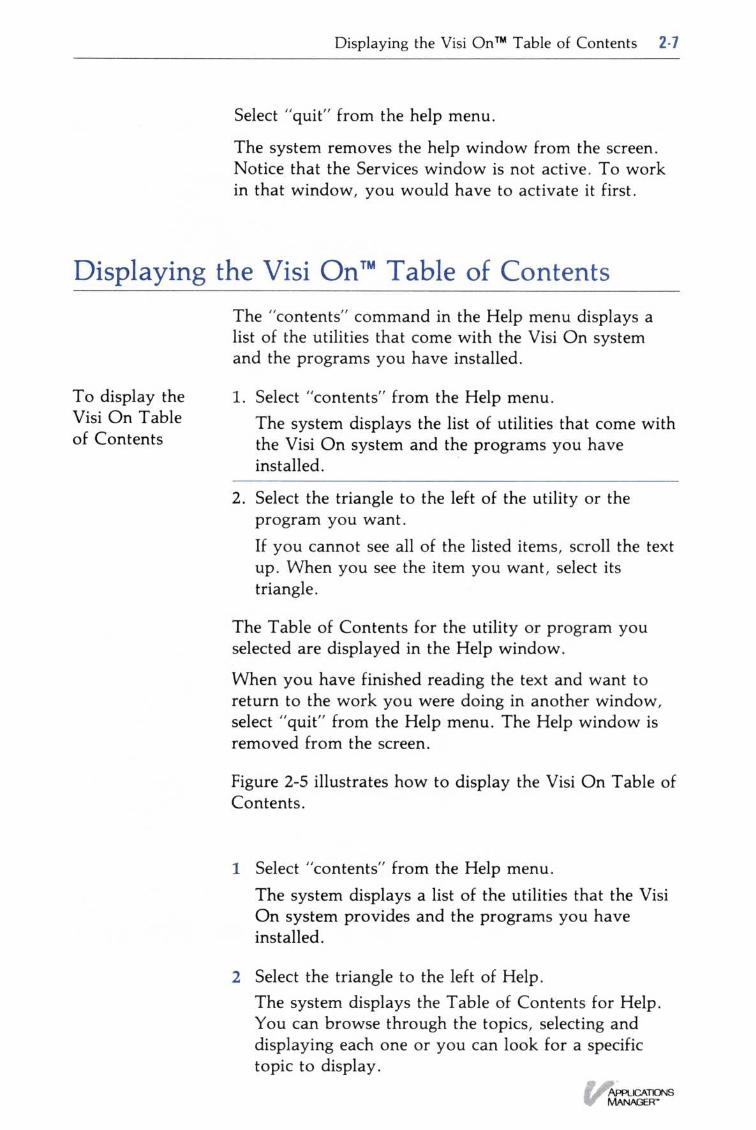
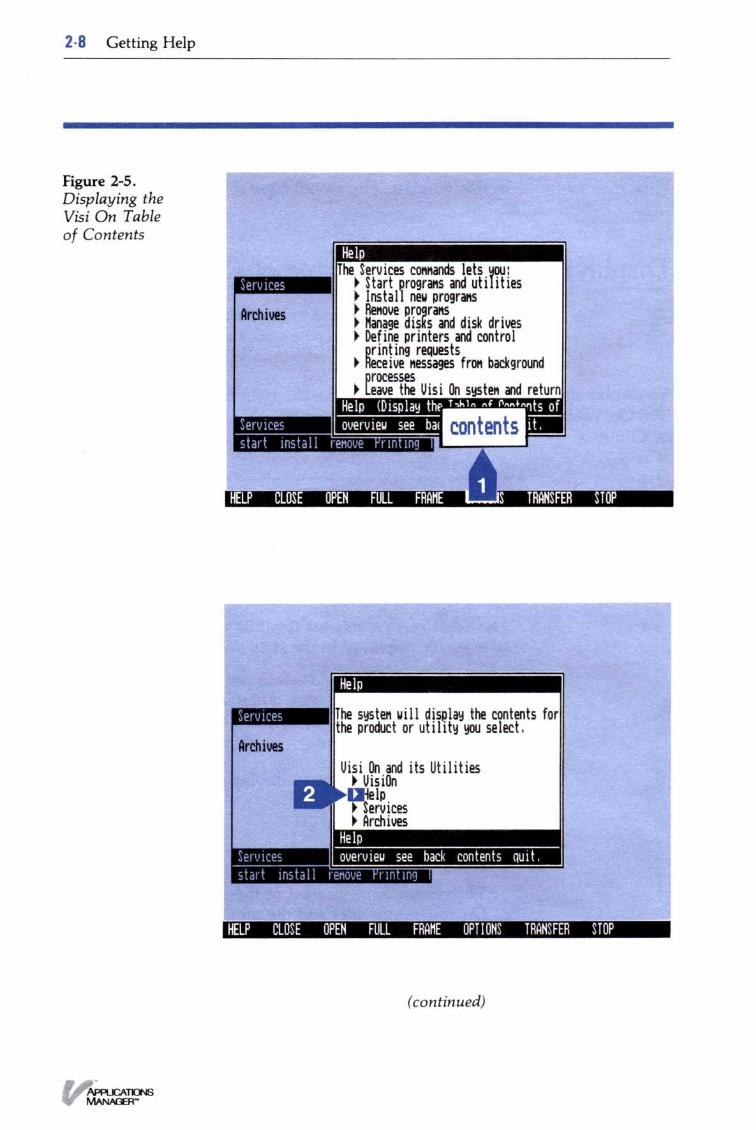
Displaying the Visi OnTM Table of ContentsThe "contents" command in the Help menu displays alist of the utilities that come with the Visi On systemand the programs you have installed .
To display the
1. Select "contents" from the Help menu .Visi On Tableof Contents
The system displays the list of utilities that come withthe Visi On system and the programs you haveinstalled .
2 . Select the triangle to the left of the utility or theprogram you want .If you cannot see all of the listed items, scroll the textup . When you see the item you want, select itstriangle .
The Table of Contents for the utility or program youselected are displayed in the Help window .
When you have finished reading the text and want toreturn to the work you were doing in another window,select "quit" from the Help menu . The Help window isremoved from the screen .
Figure 2-5 illustrates how to display the Visi On Table ofContents .
1 Select "contents" from the Help menu .The system displays a list of the utilities that the VisiOn system provides and the programs you haveinstalled .
2 Select the triangle to the left of Help .The system displays the Table of Contents for Help .You can browse through the topics, selecting anddisplaying each one or you can look for a specifictopic to display .
2- 8
Getting Help
Figure 2-5 .Displaying theVisi On Tableof Contents
(continued)
Displaying an Overview Help Topic
Displaying an Overview Help Topic 2-9
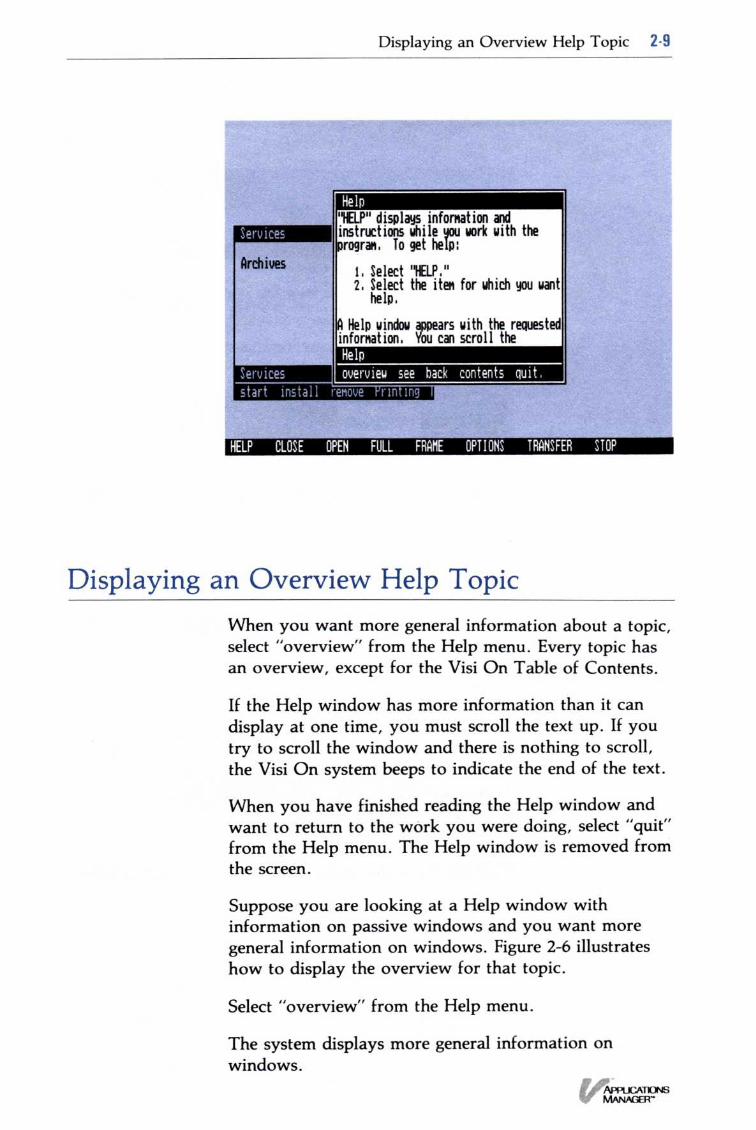
When you want more general information about a topic,select "overview" from the Help menu . Every topic hasan overview, except for the Visi On Table of Contents .
If the Help window has more information than it candisplay at one time, you must scroll the text up . If youtry to scroll the window and there is nothing to scroll,the Visi On system beeps to indicate the end of the text .
When you have finished reading the Help window andwant to return to the work you were doing, select "quit"from the Help menu . The Help window is removed fromthe screen .
Suppose you are looking at a Help window withinformation on passive windows and you want moregeneral information on windows . Figure 2-6 illustrateshow to display the overview for that topic .
Select "overview" from the Help menu .
The system displays more general information onwindows .
2. 1 0 Getting Help
Figure 2-6 . Displaying an Overview Help topic
Displaying a Cross-Referenced Help TopicThe "see" command lets you display related or moredetailed information about a topic . Those topics appearin the Help window with a triangle to their left .
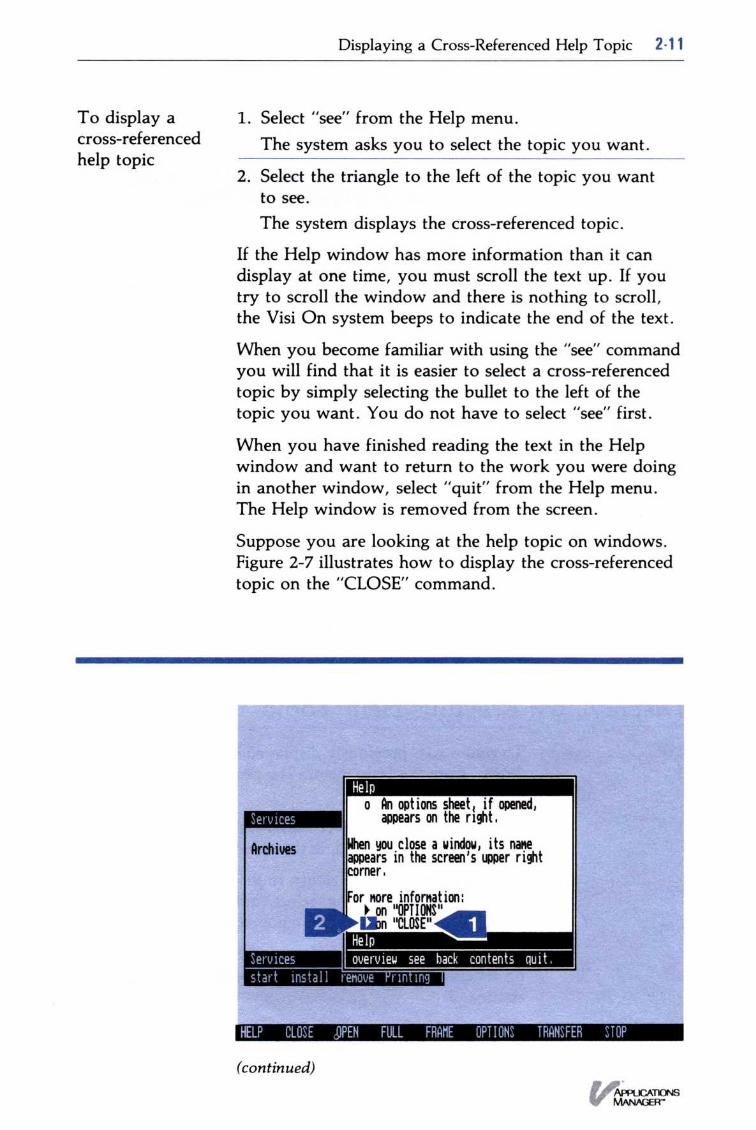
Displaying a Cross-Referenced Help Topic 2- 1 1
To display a
1. Select "see" from the Help menu .cross-referenced
The system asks you to select the topic you want .help topic
2 . Select the triangle to the left of the topic you wantto see .The system displays the cross-referenced topic .
If the Help window has more information than it candisplay at one time, you must scroll the text up . If youtry to scroll the window and there is nothing to scroll,the Visi On system beeps to indicate the end of the text .
When you become familiar with using the "see" commandyou will find that it is easier to select a cross-referencedtopic by simply selecting the bullet to the left of thetopic you want . You do not have to select "see" first .
When you have finished reading the text in the Helpwindow and want to return to the work you were doingin another window, select "quit" from the Help menu .The Help window is removed from the screen .
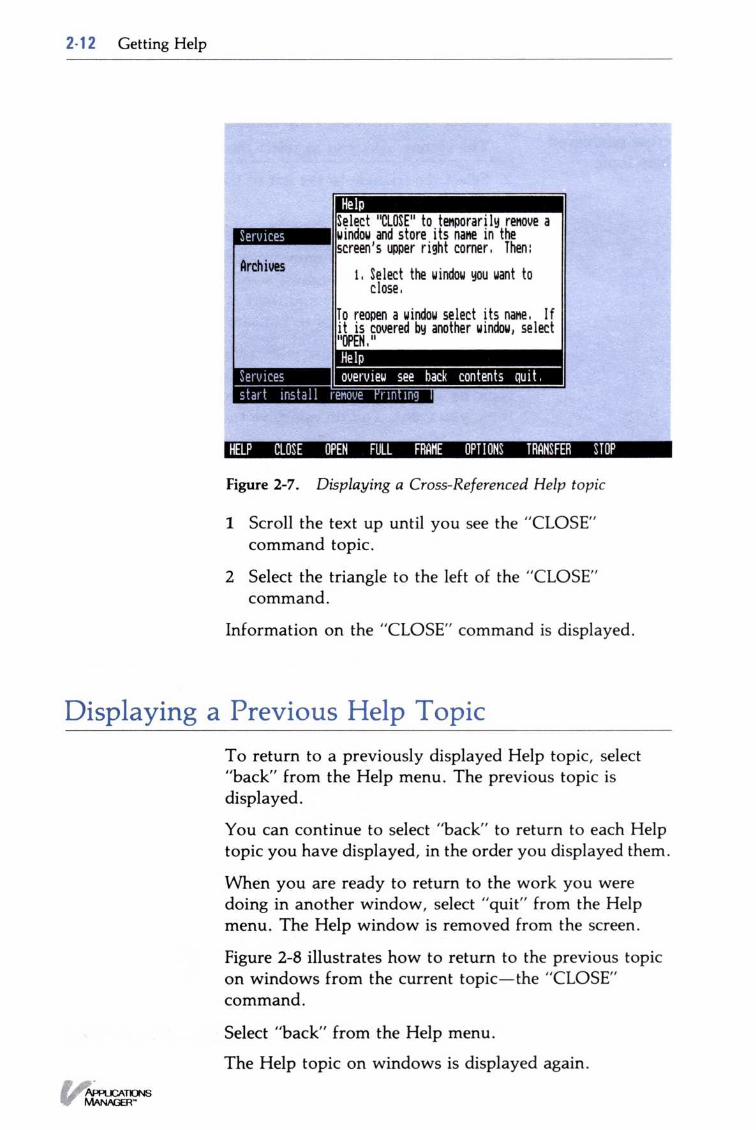
Suppose you are looking at the help topic on windows .Figure 2-7 illustrates how to display the cross-referencedtopic on the "CLOSE" command .
(continued)
2- 1 2 Getting Help
Figure 2-7 . Displaying a Cross-Referenced Help topic
1 Scroll the text up until you see the "CLOSE"command topic .
2 Select the triangle to the left of the "CLOSE"command.
Information on the "CLOSE" command is displayed .
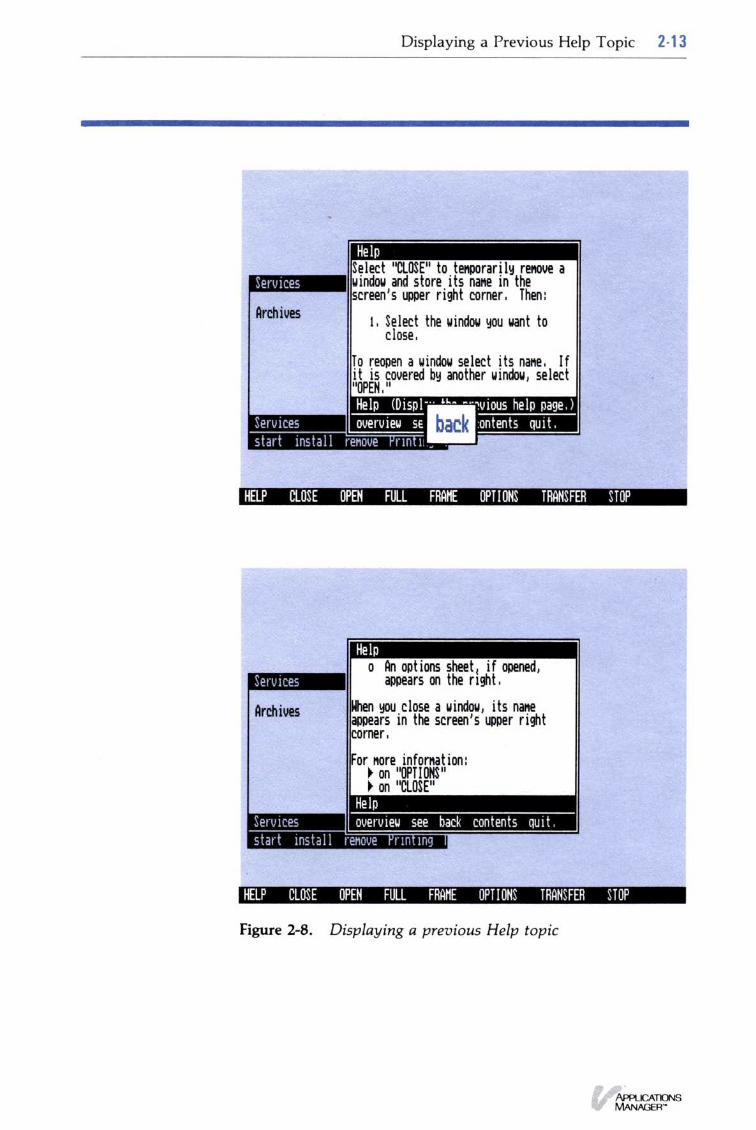
Displaying a Previous Help TopicTo return to a previously displayed Help topic, select"back" from the Help menu . The previous topic isdisplayed .
You can continue to select "back" to return to each Helptopic you have displayed, in the order you displayed them .
When you are ready to return to the work you weredoing in another window, select "quit" from the Helpmenu . The Help window is removed from the screen .
Figure 2-8 illustrates how to return to the previous topicon windows from the current topic-the "CLOSE"command .
Select "back" from the Help menu .
The Help topic on windows is displayed again .
Displaying a Previous Help Topic 2-13
Figure 2-8 . Displaying a previous Help topic


3 Starting andEnding Your Workin a Window
Chapter 3 Starting and Ending Your Work in a Window
Starting Your Work in a Window 3-1
Ending Your Work in a Program Window 3-3Ending Your Work after Creating a New File 3-7Ending Your Work after Revising a File 3-10
Ending Your Work in the Archives Window 3-12

Starting Your Work in a Window
To start workingin a window
Figure 3-1 . TheServices window isyour entry point intothe Visi On programsand the Archives . Ifthe Services windowis not already active(displaying a wideborder), then select it .
Starting Your Work in a Window 3- 1
This chapter includes step-by-step instructions for :
∎
Starting your work in a window
•
Ending your work in a program window
•
Ending your work in an Archives window
Before you can do any work with the Visi On TMprograms such as creating or updating a Visi On Calc TMworksheet, or do any "housekeeping" tasks in theVisi On Archives filing system such as removing,copying, or moving files, you must start the activitiesfrom the Services window on the Visi On screen (seeFigure 3-1) .
The Services window must be active before you can startan activity from it . You can tell if it is active : activewindows have wide borders (as Figure 3-1 shows) . If theServices window is not active, you simply select it .1 . Select "start" from the Services menu .
The system asks you to select the program to start .
3- 2 Starting and Ending Your Work in a Window
Figure 3-2 . Startingthe Visi On CalcProgram
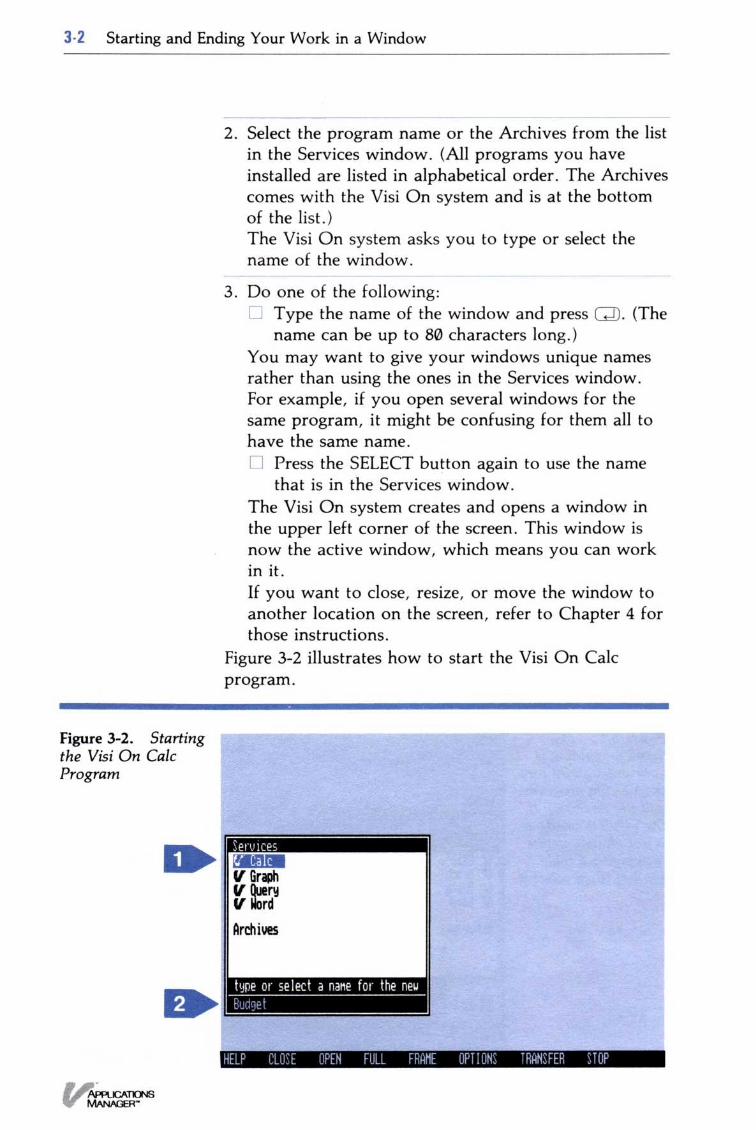
2 . Select the program name or the Archives from the listin the Services window . (All programs you haveinstalled are listed in alphabetical order . The Archivescomes with the Visi On system and is at the bottomof the list .)The Visi On system asks you to type or select thename of the window .
3 . Do one of the following :Type the name of the window and press (ENTER) . (Thename can be up to 80 characters long .)
You may want to give your windows unique namesrather than using the ones in the Services window .For example, if you open several windows for thesame program, it might be confusing for them all tohave the same name .
Press the SELECT button again to use the namethat is in the Services window .
The Visi On system creates and opens a window inthe upper left corner of the screen . This window isnow the active window, which means you can workin it .If you want to close, resize, or move the window toanother location on the screen, refer to Chapter 4 forthose instructions .
Figure 3-2 illustrates how to start the Visi On Calcprogram .
To end yourwork in aprogram window
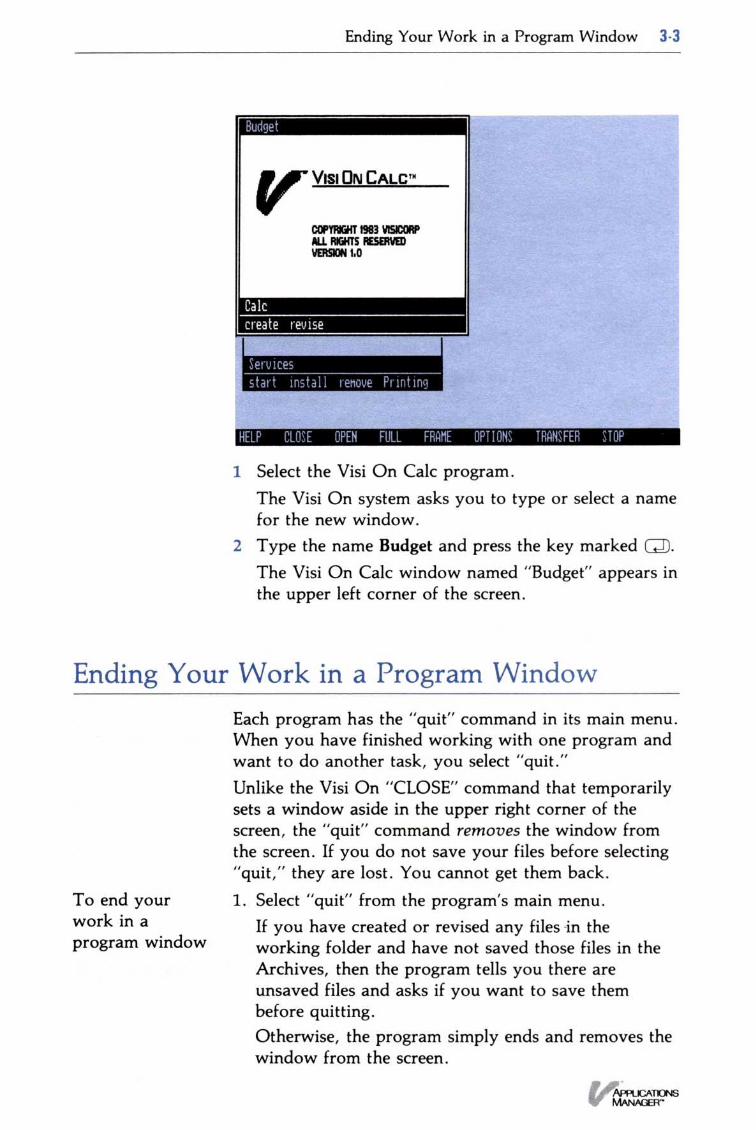
1 Select the Visi On Calc program .The Visi On system asks you to type or select a namefor the new window .
2 Type the name Budget and press the key marked (ENTER) .The Visi On Calc window named "Budget" appears inthe upper left corner of the screen .
Ending Your Work in a Program Window 3 -3
Ending Your Work in a Program WindowEach program has the "quit" command in its main menu .When you have finished working with one program andwant to do another task, you select "quit ."Unlike the Visi On "CLOSE" command that temporarilysets a window aside in the upper right corner of thescreen, the "quit" command removes the window fromthe screen. If you do not save your files before selecting"quit," they are lost . You cannot get them back .1 . Select "quit" from the program's main menu .
If you have created or revised any files -in theworking folder and have not saved those files in theArchives, then the program tells you there areunsaved files and asks if you want to save thembefore quitting .Otherwise, the program simply ends and removes thewindow from the screen .
3- 4 Starting and Ending Your Work in a Window
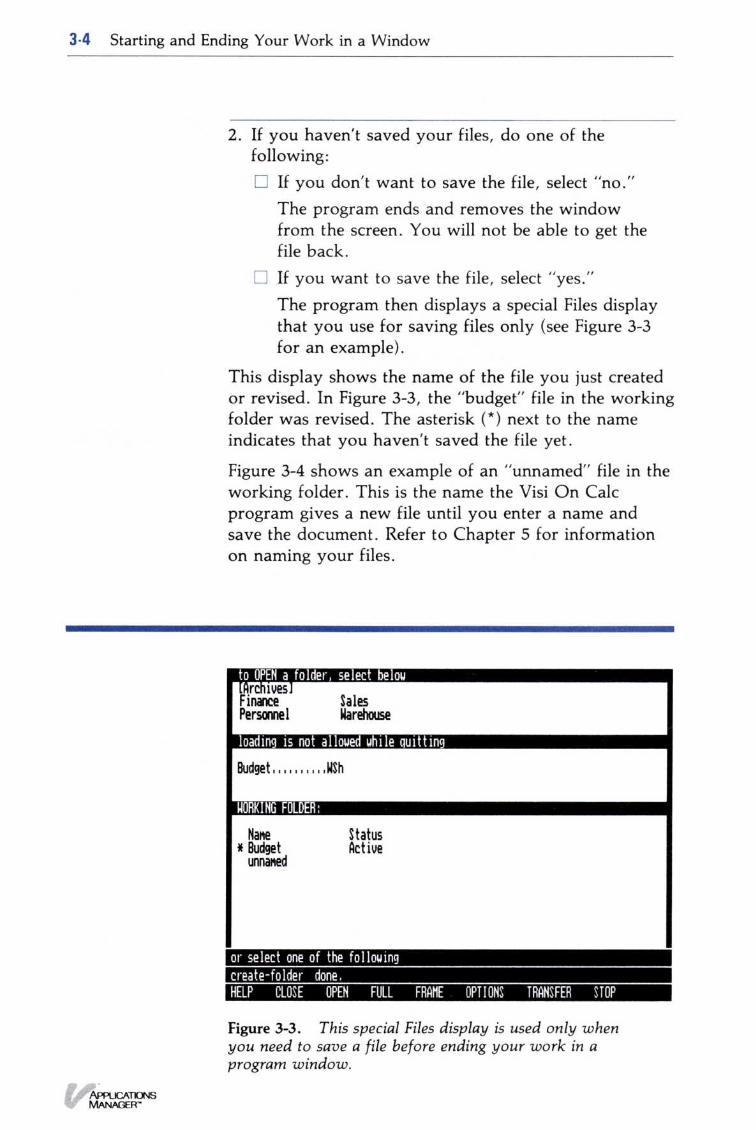
2 . If you haven't saved your files, do one of thefollowing :∎ If you don't want to save the file, select "no ."
The program ends and removes the windowfrom the screen . You will not be able to get thefile back .
∎ If you want to save the file, select "yes ."The program then displays a special Files displaythat you use for saving files only (see Figure 3-3for an example) .
This display shows the name of the file you just createdor revised . In Figure 3-3, the "budget" file in the workingfolder was revised . The asterisk (*) next to the nameindicates that you haven't saved the file yet .
Figure 3-4 shows an example of an "unnamed" file in theworking folder. This is the name the Visi On Calcprogram gives a new file until you enter a name andsave the document . Refer to Chapter 5 for informationon naming your files .
Figure 3-3 . This special Files display is used only whenyou need to save a file before ending your work in aprogram window .
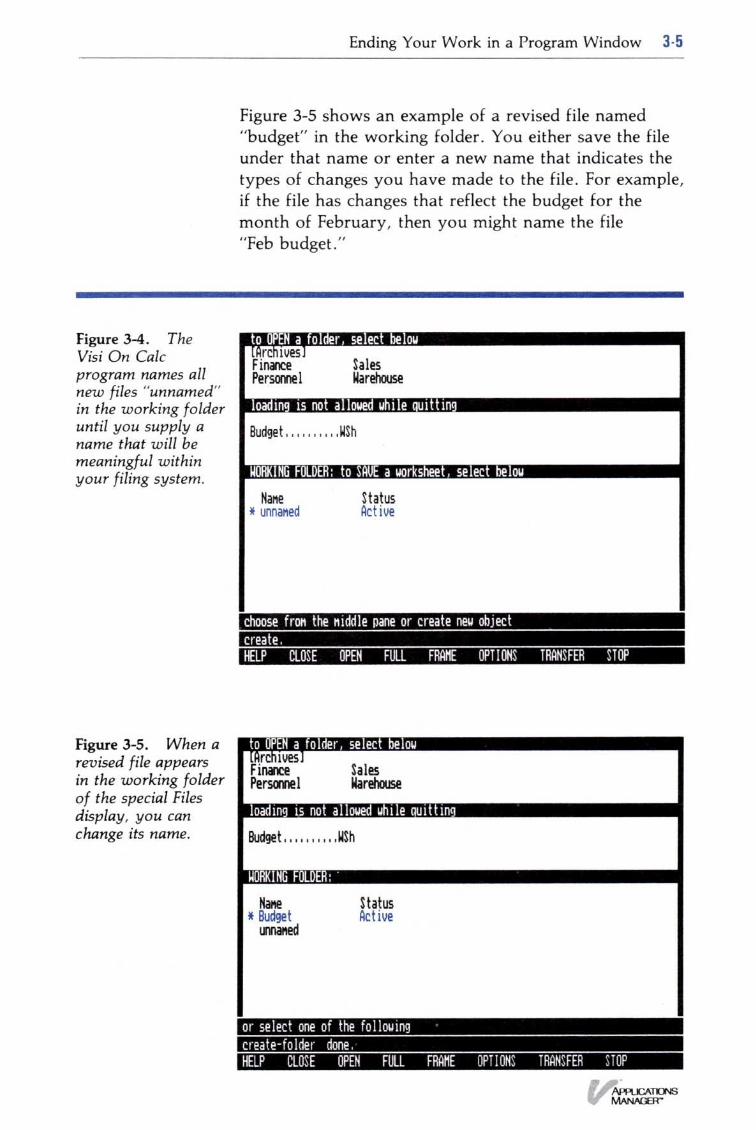
Figure 3-4 . TheVisi On Calcprogram names allnew files "unnamed"in the working folderuntil you supply aname that will bemeaningful withinyour filing system .
Figure 3-5 . When arevised file appearsin the working foldero f the special Filesdisplay, you canchange its name .
Ending Your Work in a Program Window 3 . 5
Figure 3-5 shows an example of a revised file named"budget" in the working folder . You either save the fileunder that name or enter a new name that indicates thetypes of changes you have made to the file . For example,if the file has changes that reflect the budget for themonth of February, then you might name the file"Feb budget ."
3 -6 Starting and Ending Your Work in a Window
3 . To save your file, you can do one of the following :To save your file in the current folder, simplyselect the file name from the working folder .The program asks you to select a file name fromthe middle part of the display or to create a newfile .To save your file in another folder, select thefolder you want from the top part of the Filesdisplay . If you can't see all the available folders,you can scroll this part .The program asks you to select a file name fromthe middle part of the display or to create a newfile .To save your file in a new folder, select "create-folder" from the Files display menu .The program asks you to enter a name for thenew folder .a . Type the name of the folder (it can be up to 12
characters long) and press ( ENTER).The program creates the folder ; its nameappears as the last name in the folder path atthe top of the window .For example, if you created a new folder called"Sales," the folder path would read :"[Archives] /Sales"
b . To save the document in this new folder, selectthe file name from the working folder .Repeat step 3 for each file that you want tosave .
4 . Then do one of the following :I To overwrite another file with the file you just
created or revised, select a file from the middlepart of the display .The program overwrites the file with the file youcreated or revised, and gives that file the name ofthe file you selected . For example, "*budget" inthe working folder overwrites "budget1" in themiddle part of the display (see Figure 3-6) .To create a new file, select "create" from the menuline .
Figure 3-6 . Whenyou select a file fromthe middle part o fthe display, thecreated or revisedfile overwrites thatfile and uses thatfile's name .
The program asks you to enter a name for the fileor use the preset name the program provides . Ifyou just created the file, the name is "unnamed ."If you revised a file, it is the revised file's name .a . To enter a name, type a name for the file (up to
12 characters long) and press (ENTER).The program gives the file the new name youentered .
b . To use the name the program provides, press(ENTER).
The program uses the name it provides .
5 . To end your work in a Files display and in a programwindow, select "done" from the menu .The program continues to let you know there areunsaved files until you save them all . Then theprogram ends and removes the window from thescreen .
Ending Your Work in a Program Window 3-7
Ending Your Work after Creating a New File
Suppose you want to end your work in a Visi On Calcprogram window and you have just created a newbudget for the Personnel department in your company .The following example illustrates the steps you wouldfollow .
3-8 Starting and Ending Your Work in a Window
1 Select "quit" from the Visi On Calc main menu .
The program asks if you want to save the file .
2 Select "yes ."
The special Files display for saving files appears . Itdisplays the folders in the central Archives folder,which is the current folder, in the top part and thenew budget file named "*unnamed" in the workingfolder at the bottom of the display .You want to save the new file in a folder called"Personnel ."
3 Select "Personnel" from the top part of the display .
Ending Your Work in a Program Window 3 -9
The Personnel folder becomes the current folder .Notice the folder path changes showing "Personnel"as the last name in the path .
The Personnel folder has a Visi On Calc worksheetnamed "Monthly bud" and some other Visi Onprogram files .
4 To save the "unnamed" worksheet in the Personnelfolder, select "unnamed" from the working folder .
The program asks you to select a file name from themiddle part of the display or to create a new file .
You want to create a new file, therefore, select"create ." The program asks you to enter a name forthe file .
3-10 Starting and Ending Your Work in a Window
5 Type budget and press the key marked (ENTER).
The program saves the budget file in the Personnelfolder .
6 To end your work in the Files display and remove theprogram window, select "done" from the menu .
Ending Your Work after Revising a File
Suppose you want to end your work in a Visi On Calcprogram window and you have just revised the budgetfor the Personnel department in your company . Thefollowing example illustrates the steps you would follow .
1 Select "quit" from the Visi On Calc main menu .The program asks if you want to save the file .
2 Select "yes ."
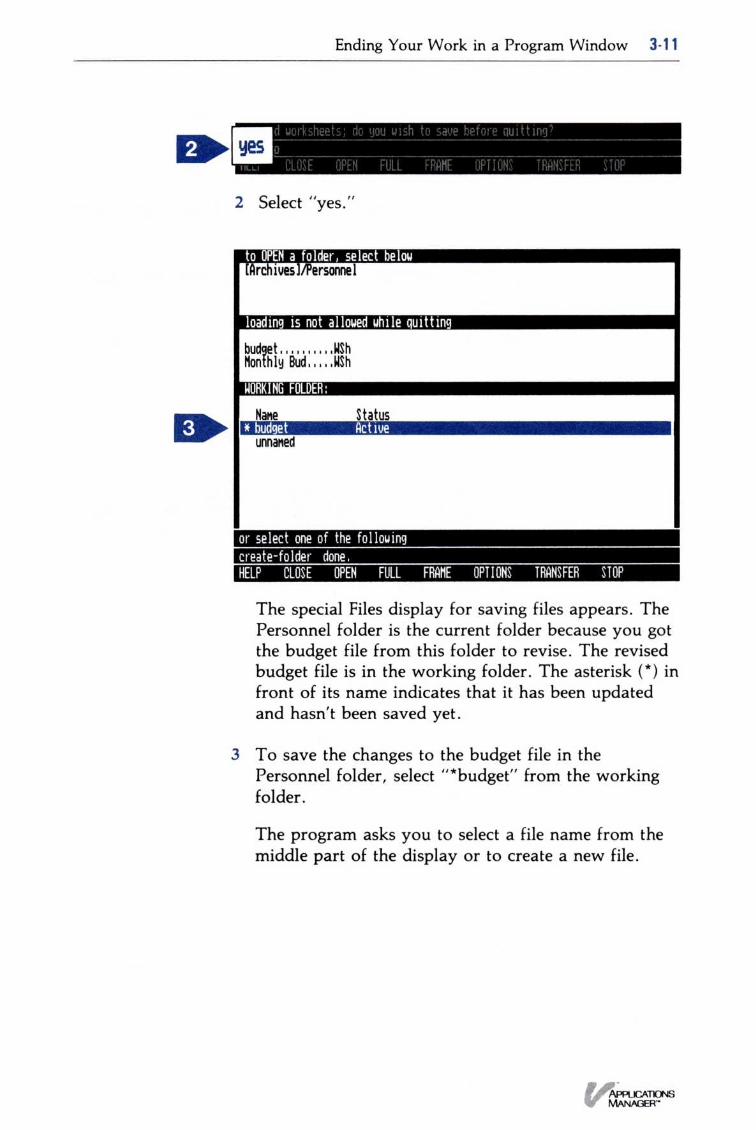
Ending Your Work in a Program Window 3 . 11
The special Files display for saving files appears . ThePersonnel folder is the current folder because you gotthe budget file from this folder to revise . The revisedbudget file is in the working folder . The asterisk (*) infront of its name indicates that it has been updatedand hasn't been saved yet .
3 To save the changes to the budget file in thePersonnel folder, select "*budget" from the workingfolder .
The program asks you to select a file name from themiddle part of the display or to create a new file .
3 . 12 Ending Your Work in the Archives Window
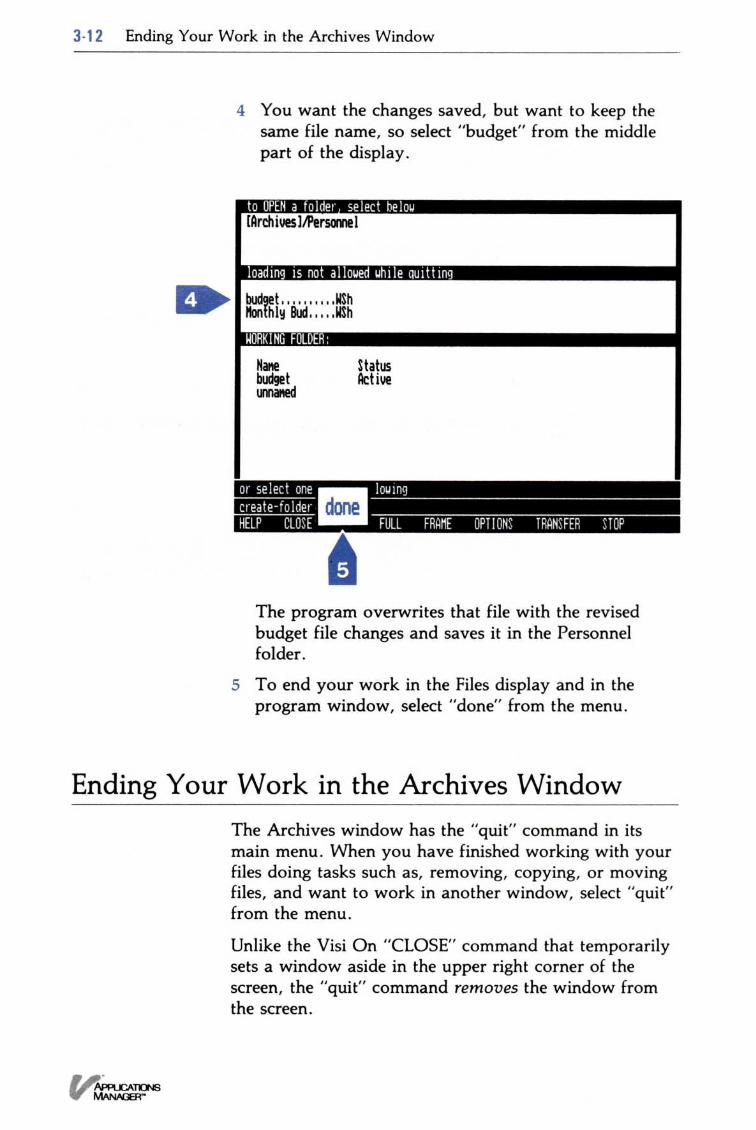
4 You want the changes saved, but want to keep thesame file name, so select "budget" from the middlepart of the display .
The program overwrites that file with the revisedbudget file changes and saves it in the Personnelfolder .
5 To end your work in the Files display and in theprogram window, select "done" from the menu .
Ending Your Work in the Archives WindowThe Archives window has the "quit" command in itsmain menu . When you have finished working with yourfiles doing tasks such as, removing, copying, or movingfiles, and want to work in another window, select "quit"from the menu .
Unlike the Visi On "CLOSE" command that temporarilysets a window aside in the upper right corner of thescreen, the "quit" command removes the window fromthe screen .

4 Using Windows
Chapter 4
Using Windows
Overview : Windows 4-1
Window Layout 4-1
Opening a Window 4-5Opening a Closed Window 4-5Returning a Full-Screen Window to Its Previous
Size and Location 4-7
Setting a Window Aside (Closing a Window) 4-9
Displaying the List of Closed Windows 4-11
Changing the Size and Location of a Window(Framing) 4-12
Expanding a Window to Full-Screen Size 4-15
Overview: Windows
Window Layout
Overview : Windows 4-1
This chapter includes :
•
An overview of windows and how they are used .
•
A description of a window's layout-the standardelements that are common to all windows .
•
Step-by-step instructions for :∎ Opening a window .∎ Setting a window aside (closing a window) .∎ Displaying the list of closed windows .∎ Changing the size and location of a window
(framing) .∎ Expanding a window to full-screen size .
The Visi On TM system allows you to work with theVisi On programs and the Visi On Archives filing systemin windows on the screen . Windows are rectangularareas that display part of a program or your files in theArchives .
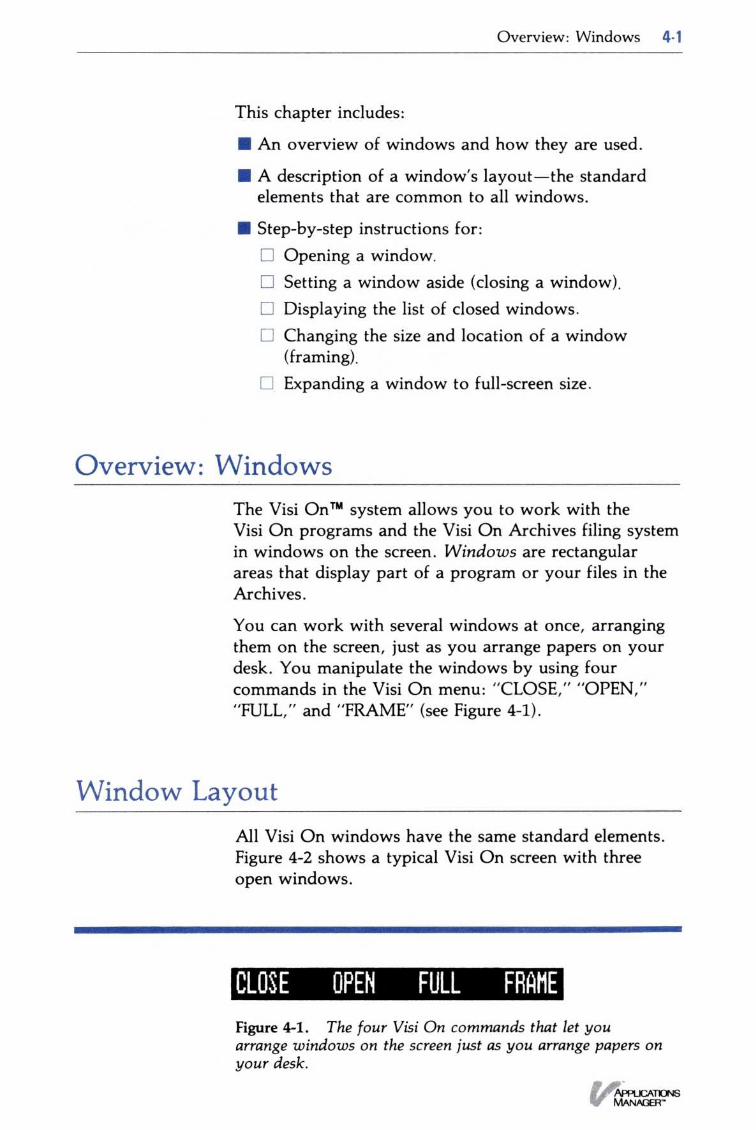
You can work with several windows at once, arrangingthem on the screen, just as you arrange papers on yourdesk. You manipulate the windows by using fourcommands in the Visi On menu : "CLOSE," "OPEN,""FULL," and "FRAME" (see Figure 4-1) .
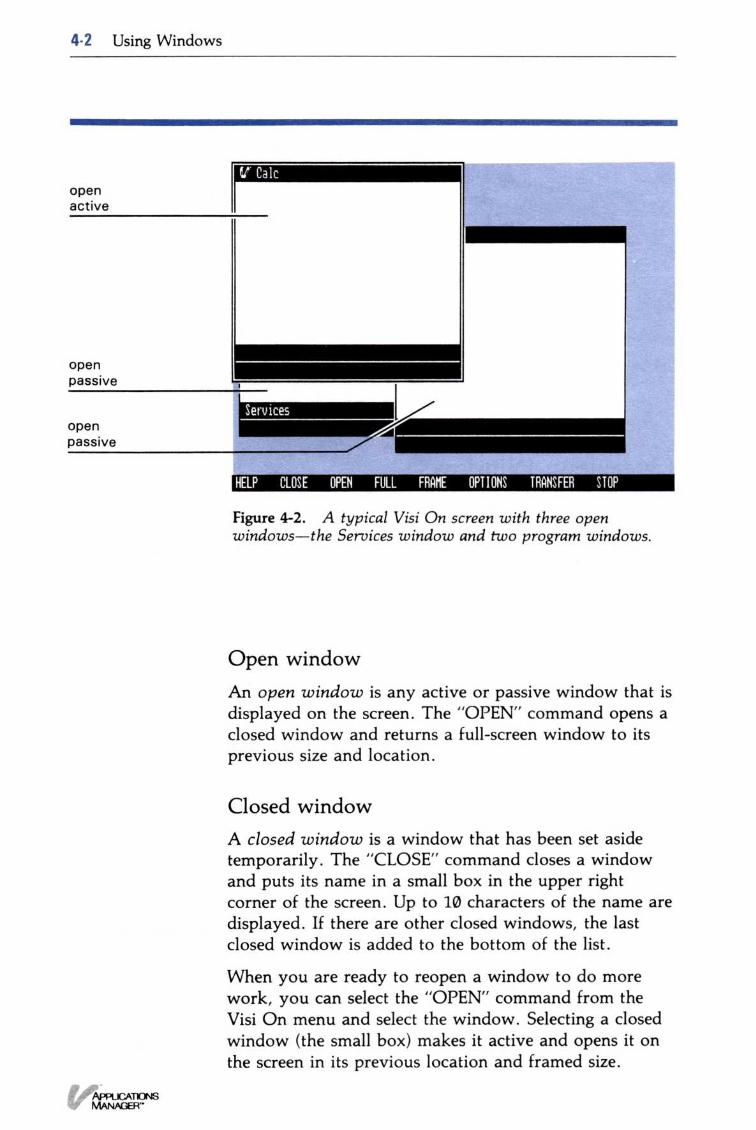
All Visi On windows have the same standard elements .Figure 4-2 shows a typical Visi On screen with threeopen windows .
Figure 4-1 . The four Visi On commands that let youarrange windows on the screen just as you arrange papers onyour desk.
4-2 Using Windows
Figure 4-2 . A typical Visi On screen with three openwindows-the Services window and two program windows .
Open windowAn open window is any active or passive window that isdisplayed on the screen . The "OPEN" command opens aclosed window and returns a full-screen window to itsprevious size and location .
Closed windowA closed window is a window that has been set asidetemporarily. The "CLOSE" command closes a windowand puts its name in a small box in the upper rightcorner of the screen . Up to 10 characters of the name aredisplayed . If there are other closed windows, the lastclosed window is added to the bottom of the list .
When you are ready to reopen a window to do morework, you can select the "OPEN" command from theVisi On menu and select the window . Selecting a closedwindow (the small box) makes it active and opens it onthe screen in its previous location and framed size .
Overview : Windows 4- 3
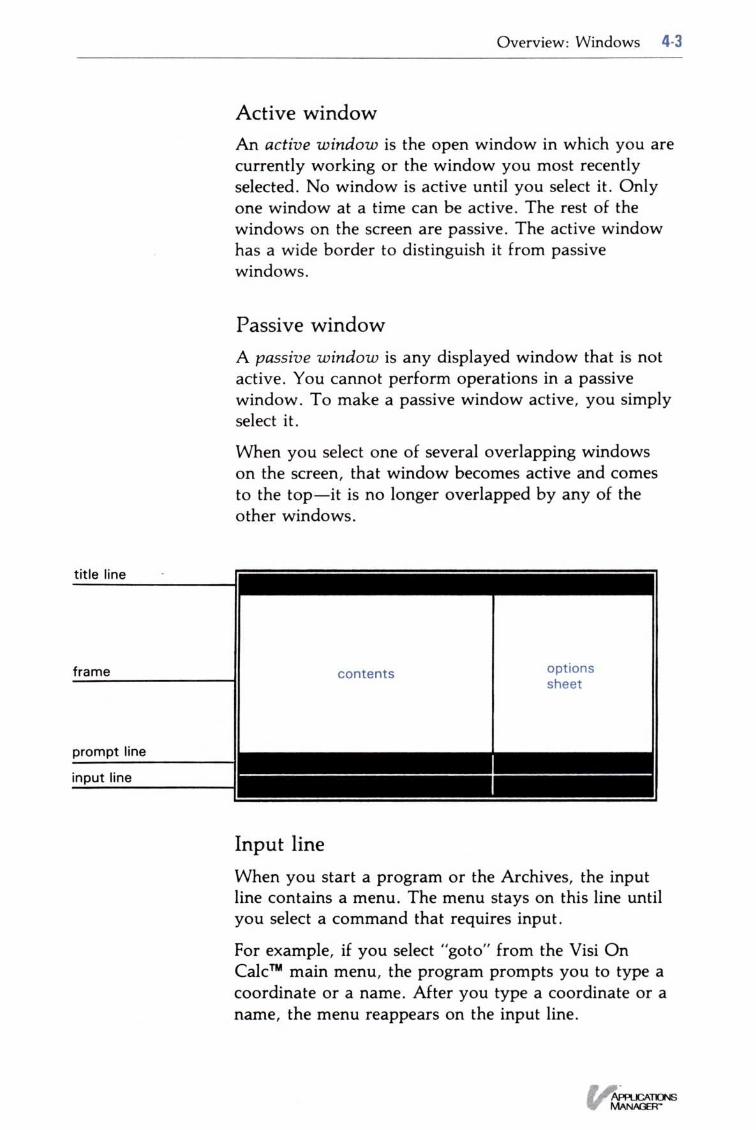
Active windowAn active window is the open window in which you arecurrently working or the window you most recentlyselected. No window is active until you select it . Onlyone window at a time can be active . The rest of thewindows on the screen are passive . The active windowhas a wide border to distinguish it from passivewindows .
Passive windowA passive window is any displayed window that is notactive. You cannot perform operations in a passivewindow . To make a passive window active, you simplyselect it .
When you select one of several overlapping windowson the screen, that window becomes active and comesto the top-it is no longer overlapped by any of theother windows .
Input lineWhen you start a program or the Archives, the inputline contains a menu . The menu stays on this line untilyou select a command that requires input .
For example, if you select "goto" from the Visi OnCalcTM main menu, the program prompts you to type acoordinate or a name. After you type a coordinate or aname, the menu reappears on the input line .
4-4 Using Windows
FrameEach window on the screen is bordered by a frame . Theinner frame line is white and the outer line is black . Theframe helps to separate overlapping windows . An activewindow is bordered by a wider frame to distinguish itfrom passive windows .
Title lineThe title line at the top of the window displays the nameof the window . This is the name you typed in or selectedwhen you started the program or the Archives from theServices window . The name can be up to 80 characterslong . The title line does not appear in a full-screenwindow .
ContentsThe contents pane, which occupies most of the window,displays a portion of the program's or the Archives'contents . You do your work in this part of the window .
Options sheetAn options sheet contains the option settings that let youchange certain characteristics of a program and the wayit operates .
You can display and change option settings by selectingthe "OPTIONS" command from the Visi On menu andthen selecting the window you want . The options sheetappears on the right side of the window . To set theoptions sheet aside when you've finished working withit, you select "done" from the Options menu .
For more information on options sheets, refer toChapter 8 .
Prompt lineThe prompt line displays the following information atthe appropriate times during your use of a program orthe Archives:
∎ The name of the program (or Archives) you areworking with .
Opening a Window
To open a closedwindow toresume workingin it
∎ The menu path (where you are in the menuhierarchy) . For example, if you are in the Visi OnWordTM "Cut&Paste" menu, this line shows"Word/Cut&Paste ."The menu path shows the menu names you selectedto get to the current menu . If you want to go backto a previous menu, you simply select that name inthe path .
•
A brief description of the highlighted command . (Acommand is highlighted as you move the pointeracross the menu and the menu path .)
•
Messages or questions you need to answer for theprogram to continue .When you select a command that requires moreinformation, a message or question appears onthe prompt line. After you respond, the menupath returns .
The "OPEN" command activates, opens, and redisplaysa closed window's contents on the Visi On screen .
Use the "OPEN" command to :
•
Open a closed window that you have set asidetemporarily to do other work .
•
Return a full-screen window to its previous size andlocation .
Opening a Closed Window
Opening a Window 4.5
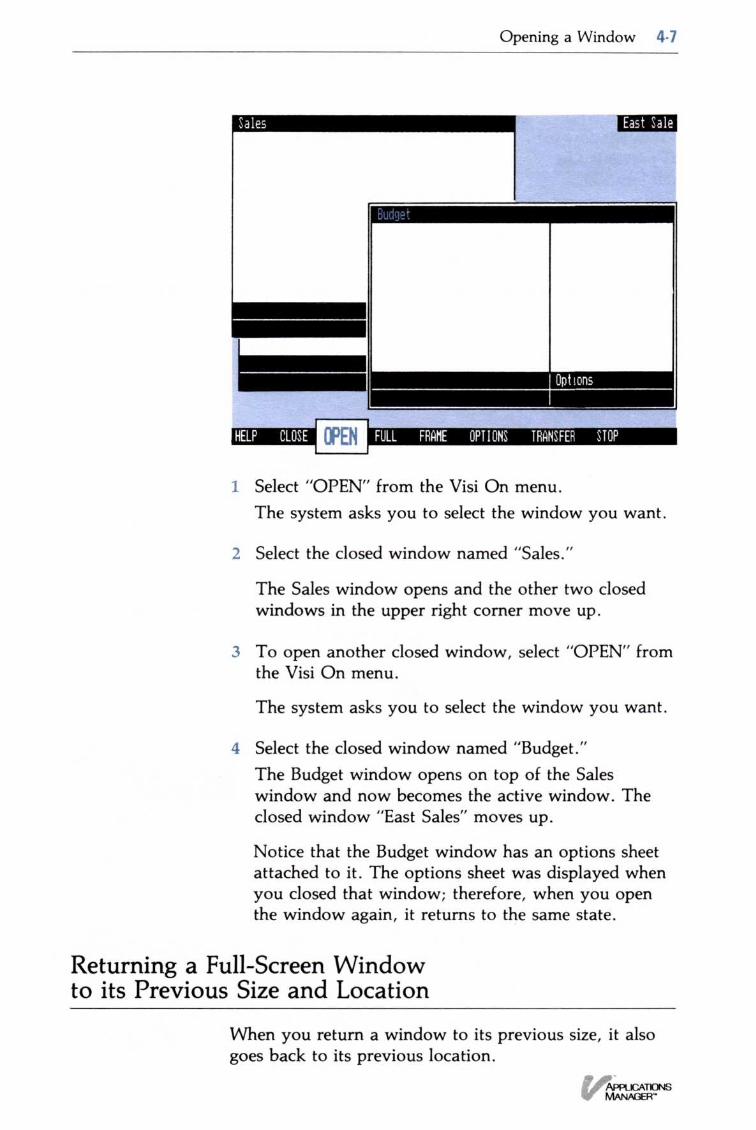
1 . Select "OPEN" from the Visi On menu .The Visi On system asks you to select a window .
2 . Select the window you want to open .The Visi On system activates the window and puts iton top of any overlapping windows on the screen .If you open a closed window that was full-screen sizewhen you closed it, the window returns to itsprevious location and framed size . It does not open tofull-screen size .
4-6 Using Windows
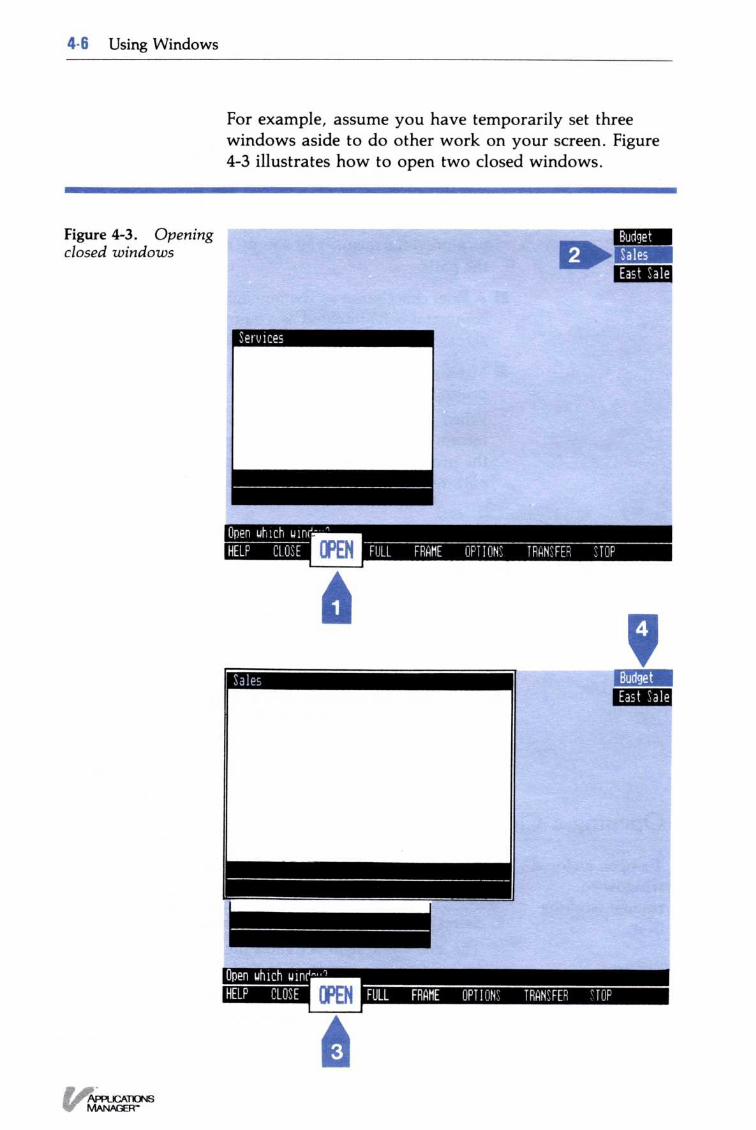
Figure 4-3 . Openingclosed windows
For example, assume you have temporarily set threewindows aside to do other work on your screen . Figure4-3 illustrates how to open two closed windows .
I
Returning a Full-Screen Windowto its Previous Size and Location
Opening a Window 4-7
1 Select "OPEN" from the Visi On menu .The system asks you to select the window you want .
2 Select the closed window named "Sales ."
The Sales window opens and the other two closedwindows in the upper right corner move up .
3 To open another closed window, select "OPEN" fromthe Visi On menu .
The system asks you to select the window you want .
4 Select the closed window named "Budget ."The Budget window opens on top of the Saleswindow and now becomes the active window . Theclosed window "East Sales" moves up .
Notice that the Budget window has an options sheetattached to it . The options sheet was displayed whenyou closed that window; therefore, when you openthe window again, it returns to the same state .
When you return a window to its previous size, it alsogoes back to its previous location .
4- 8
Using Windows
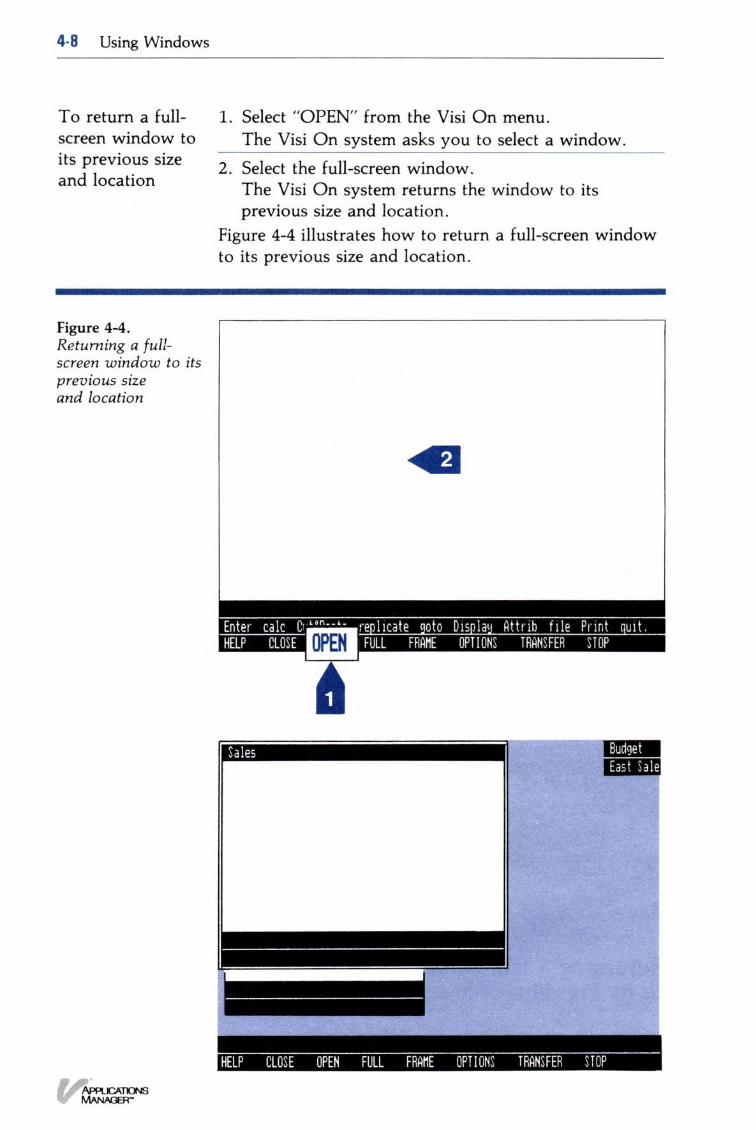
To return a full-
1. Select "OPEN" from the Visi On menu .screen window to
The Visi On system asks you to select a window .its previous size
2. Select the full-screen window .and location
The Visi On system returns the window to its
previous size and location .
Figure 4-4 illustrates how to return a full-screen windowto its previous size and location .
Figure 4-4 .Returning a full-screen window to itsprevious sizeand location
Setting a Window Aside (Closing a Window) 4.9
1 Select "OPEN" from the Visi On menu .The system asks you to select the window you want .
2 Select the full-screen window .The window returns to its previous size and location .
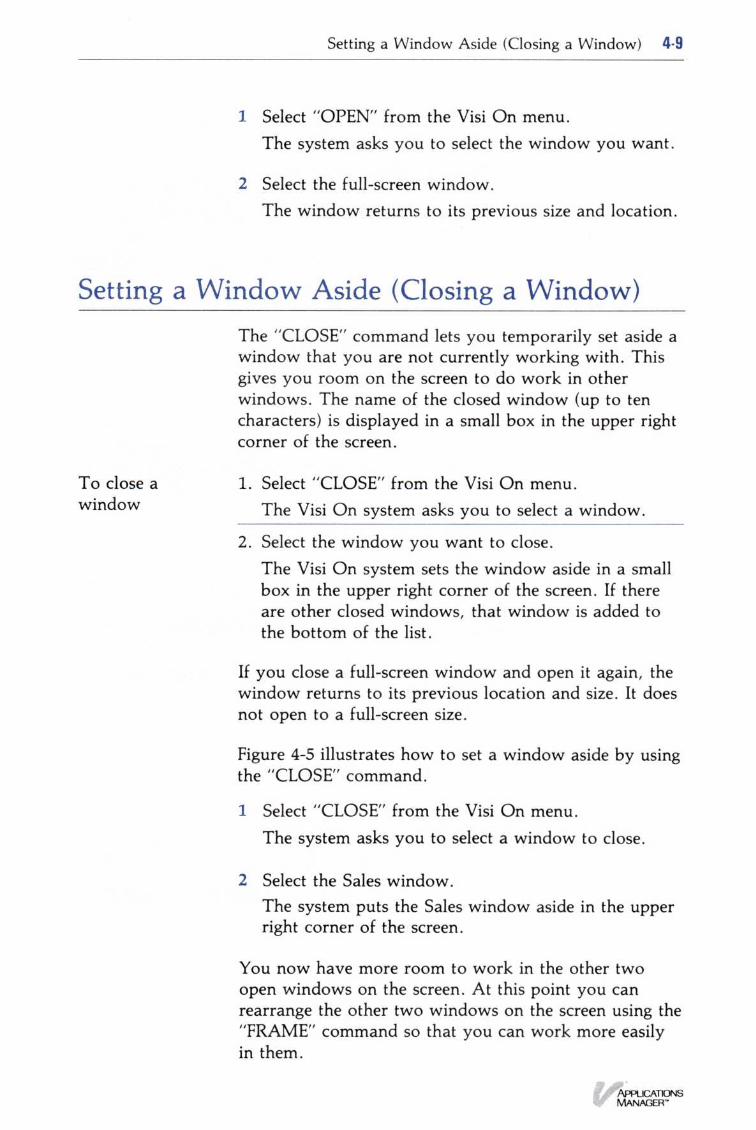
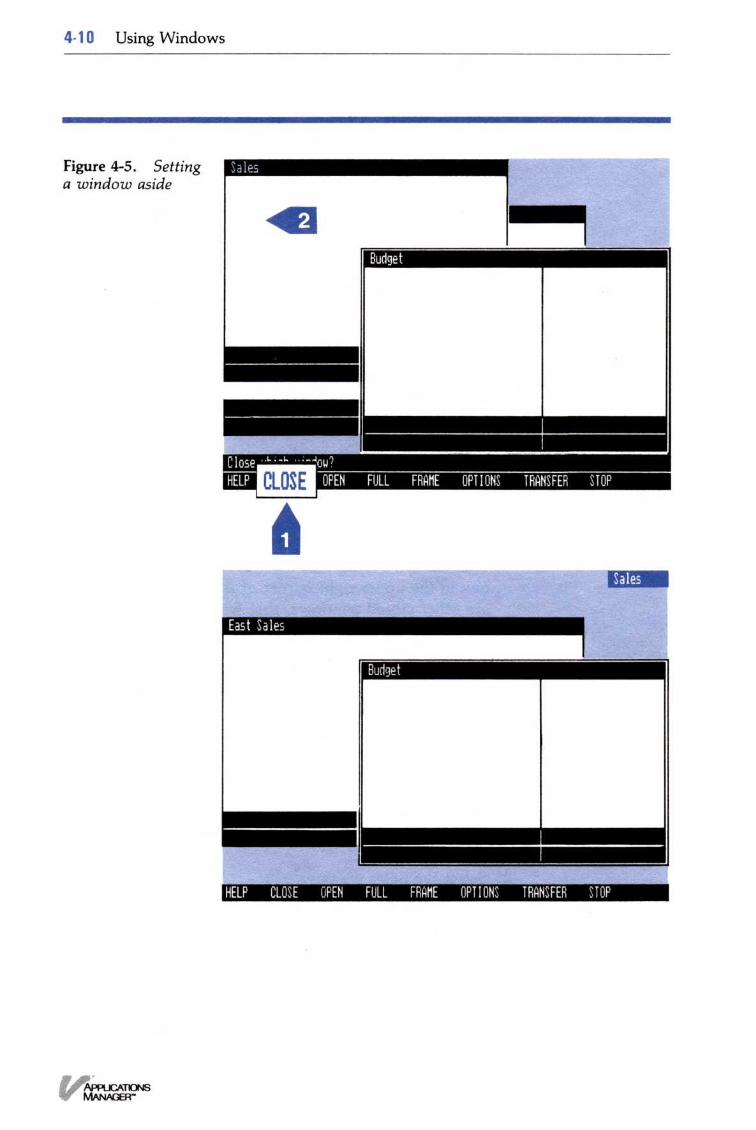
Setting a Window Aside (Closing a Window)The "CLOSE" command lets you temporarily set aside awindow that you are not currently working with . Thisgives you room on the screen to do work in otherwindows . The name of the closed window (up to tencharacters) is displayed in a small box in the upper rightcorner of the screen .
1 . Select "CLOSE" from the Visi On menu .To close awindow The Visi On system asks you to select a window .
2 . Select the window you want to close .The Visi On system sets the window aside in a smallbox in the upper right corner of the screen . If thereare other closed windows, that window is added tothe bottom of the list .
If you close a full-screen window and open it again, thewindow returns to its previous location and size . It doesnot open to a full-screen size .
Figure 4-5 illustrates how to set a window aside by usingthe "CLOSE" command .
1 Select "CLOSE" from the Visi On menu .The system asks you to select a window to close .
2 Select the Sales window .The system puts the Sales window aside in the upperright corner of the screen .
You now have more room to work in the other twoopen windows on the screen . At this point you canrearrange the other two windows on the screen using the"FRAME" command so that you can work more easilyin them .
4-10 Using Windows
Figure 4-5 . Settinga window aside
Displaying the List of Closed Windows 4.11
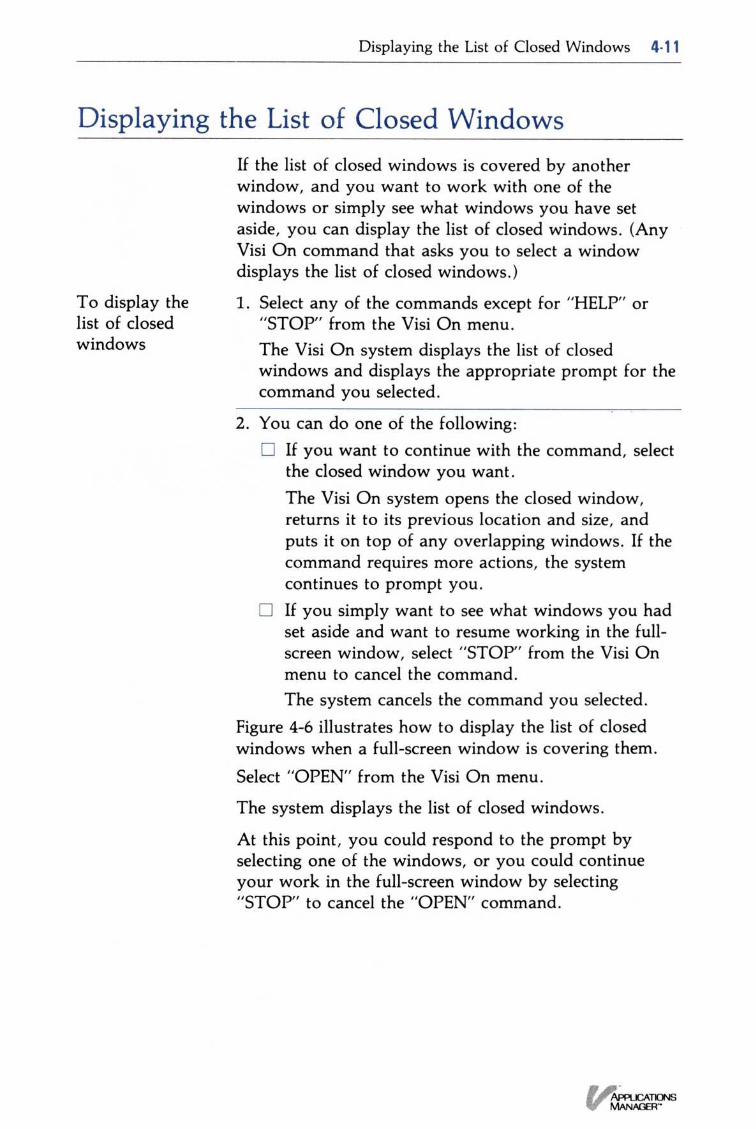
Displaying the List of Closed WindowsIf the list of closed windows is covered by anotherwindow, and you want to work with one of thewindows or simply see what windows you have setaside, you can display the list of closed windows. (AnyVisi On command that asks you to select a windowdisplays the list of closed windows .)
To display the
1. Select any of the commands except for "HELP" orlist of closed
"STOP" from the Visi On menu .windows
The Visi On system displays the list of closedwindows and displays the appropriate prompt for thecommand you selected .
2 . You can do one of the following :∎ If you want to continue with the command, select
the closed window you want .The Visi On system opens the closed window,returns it to its previous location and size, andputs it on top of any overlapping windows . If thecommand requires more actions, the systemcontinues to prompt you .If you simply want to see what windows you hadset aside and want to resume working in the full-screen window, select "STOP" from the Visi Onmenu to cancel the command .The system cancels the command you selected .
Figure 4-6 illustrates how to display the list of closedwindows when a full-screen window is covering them .Select "OPEN" from the Visi On menu .
The system displays the list of closed windows .
At this point, you could respond to the prompt byselecting one of the windows, or you could continueyour work in the full-screen window by selecting"STOP" to cancel the "OPEN" command .
4- 1 2 Using Windows
Figure 4-6 .Displaying a list ofclosed windows
Changing the Size and Locationof a Window (Framing)
To frame awindow
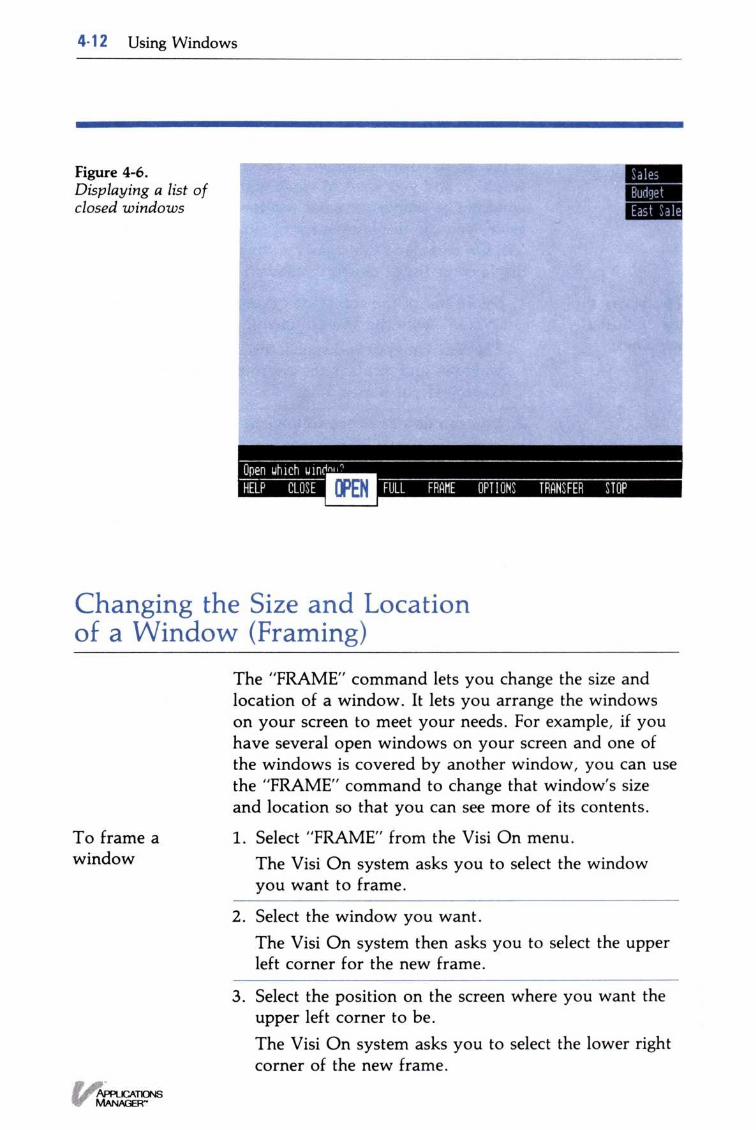
The "FRAME" command lets you change the size andlocation of a window . It lets you arrange the windowson your screen to meet your needs . For example, if youhave several open windows on your screen and one ofthe windows is covered by another window, you can usethe "FRAME" command to change that window's sizeand location so that you can see more of its contents .
1 . Select "FRAME" from the Visi On menu .The Visi On system asks you to select the windowyou want to frame .
2 . Select the window you want .The Visi On system then asks you to select the upperleft corner for the new frame .
3 . Select the position on the screen where you want theupper left corner to be .The Visi On system asks you to select the lower rightcorner of the new frame .
Figure 4-7 .Changing the sizeand location of awindow (framing)
Changing the Size and Location of a Window (Framing) 4- 1 3
4 . Select the position on the screen where you want thelower right corner to be .The window disappears from its previous locationand appears in the new framed window, on top ofany overlapping windows on the screen as the activewindow .Note that the minimum size that you can frame awindow varies with each program . Therefore, if youtry to make a window smaller than that programallows, the Visi On system automatically frames itaccording to that program's requirement .If the window has an attached options sheet, the newframe includes both the window and the options sheet .
Figure 4-7 illustrates how to change the size and locationof a window.
1 Select "FRAME" from the Visi On menu.The system asks you to select the window .
2 Select the Sales window .The system asks you to select the upper left corner ofthe new frame .
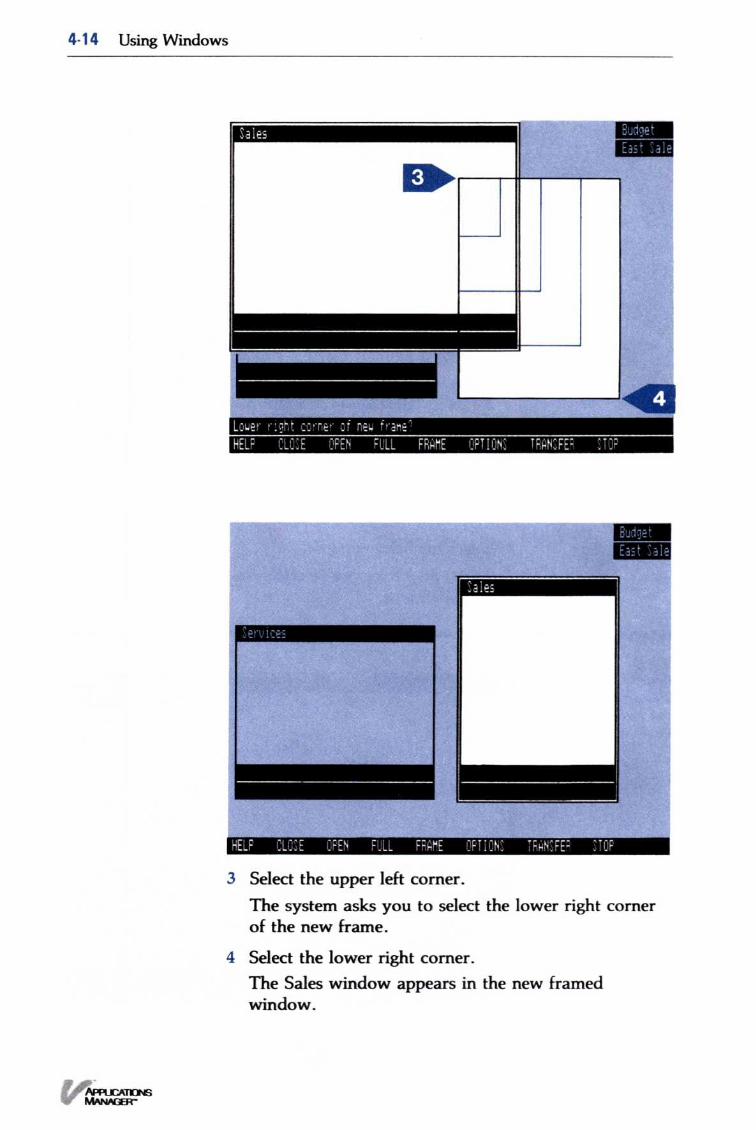
4. 1 4 Using Windows
3 Select the upper left corner .The system asks you to select the lower right cornerof the new frame .
4 Select the lower right corner .The Sales window appears in the new framedwindow.
Expanding a Window to Full-Screen Size 4- 1 5
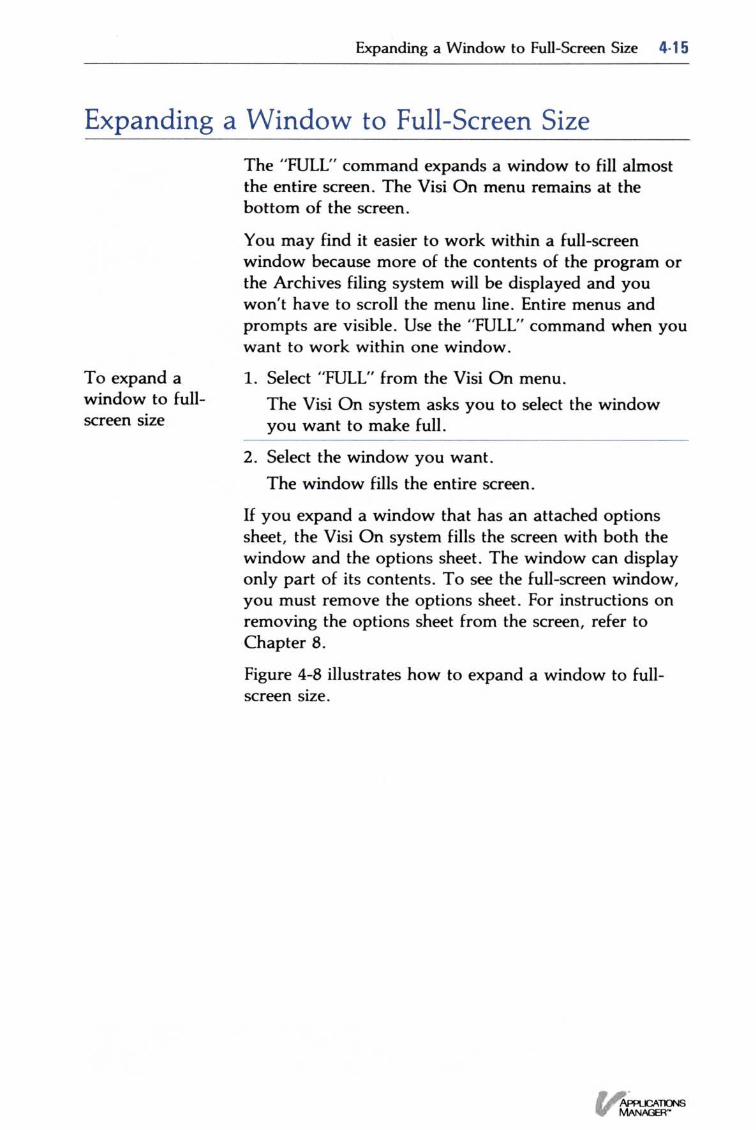
Expanding a Window to Full-Screen SizeThe "FULL" command expands a window to fill almostthe entire screen . The Visi On menu remains at thebottom of the screen .
You may find it easier to work within a full-screenwindow because more of the contents of the program orthe Archives filing system will be displayed and youwon't have to scroll the menu line . Entire menus andprompts are visible . Use the "FULL" command when youwant to work within one window .
1 . Select "FULL" from the Visi On menu .The Visi On system asks you to select the windowyou want to make full .
2 . Select the window you want .The window fills the entire screen .
If you expand a window that has an attached optionssheet, the Visi On system fills the screen with both thewindow and the options sheet . The window can displayonly part of its contents . To see the full-screen window,you must remove the options sheet . For instructions onremoving the options sheet from the screen, refer toChapter 8 .
Figure 4-8 illustrates how to expand a window to full-screen size .
To expand awindow to full-screen size
4- 1 6 Using Windows
Figure 4-8 .Expanding a windowto full-screen size
1 Select "FULL" from the Visi On menu .The system asks you select a window .
2 Select the Sales window .The Sales window fills the entire screen .

5 Organizing andUpdating YourInformation
Chapter 5
Organizing and Updating Your Information
Overview : The Visi On Archives 5-2The Central Archives 5-2The Wastebasket 5-2Organizing Your Files 5-4Saving (Storing), Getting (Retrieving), and
Reorganizing Your Files 5-5Summary 5-13
Reorganizing and Updating Your Files from theArchives Window 5-13
Creating a Folder 5-14
Displaying Two Folders : The Source and theDestination Folders 5-16
Returning to One View of the Archives 5-17
Copying a File or a Folder 5-17
Moving a File or a Folder 5-19
Changing the Name of a File or a Folder 5-21
Removing a File or an Empty Folder 5-21
Getting a File out of the Wastebasket 5-22
Storing Information 5-23Storing Information on Your Floppy Disks 5-24Protect Your Files : Back Up Your Disks 5-25Inititalizing a Floppy Disk for the Archives 5-26Mounting a Floppy Disk 5-28Unmounting a Floppy Disk 5-30
Organizing and Updating Your Information 5-1
This chapter is divided into three parts . This first partpresents an overview of the Visi On TM filing systemcalled the Archives . It introduces you to some basicconcepts about :
∎
Organizing your information into a system of filesand folders .
•
Storing (saving) and retrieving (getting) the files youcreate with the Visi On programs .
•
Periodically performing "housekeeping" activites onyour files and folders to reorganize them .
The second part of this chapter includes step-by-stepinstructions for reorganizing and updating your files andfolders from the Archives window .
The third part of this chapter includes :
∎
A description of how and where information is stored(on your hard disk and on floppy disks) .
∎
Guidelines for backing up your files .
If you will be storing some of your files on floppy diskssuch as files that you use infrequently or files thatcontain sensitive or confidential information, thosefloppy disks must be in the format that the Visi OnArchives can accept .
The "initialize" command from the Drives menu in theServices window is used to initialize your disks for theArchives . It writes some special information on the diskand puts all Visi On-related information in an MS-DOSdirectory called \visi_on . If you remove the directoryor any information in it, you cannot use the disk withthe Visi On system . You may also lose data on thefloppy disk .
For information on using the MS-DOS FORMATcommand, refer to "Preparing Your Floppy Disks" in theVisi On Setup Guide . For instructions on using the VisiOn "initialize" command, refer to "Initializing YourFloppy Disks for the Archives" later in this chapter .
If you are an experienced computer user, you may wantto scan the following overview . Make sure, however,that you become familiar with the meanings of variousterms (such as folder, file, and Files display) as they areused in the Visi On system and its programs .
5-2 Organizing and Updating Your Information
Overview: The Visi OnTM Archives
The Central Archives
The Visi On system provides a central filing systemcalled the Archives . The Archives stores information inmuch the same way as you store information in youroffice filing cabinet that contains files and folders . In theVisi On environment, a file is the data you create withthe Visi On programs-such as a worksheet, table,graph, series, or document . A folder is a collection offiles, usually related .
The procedures you follow to organize, store, retrieve,and periodically clean up your files in your officeenvironment apply to the Visi On environment as well .
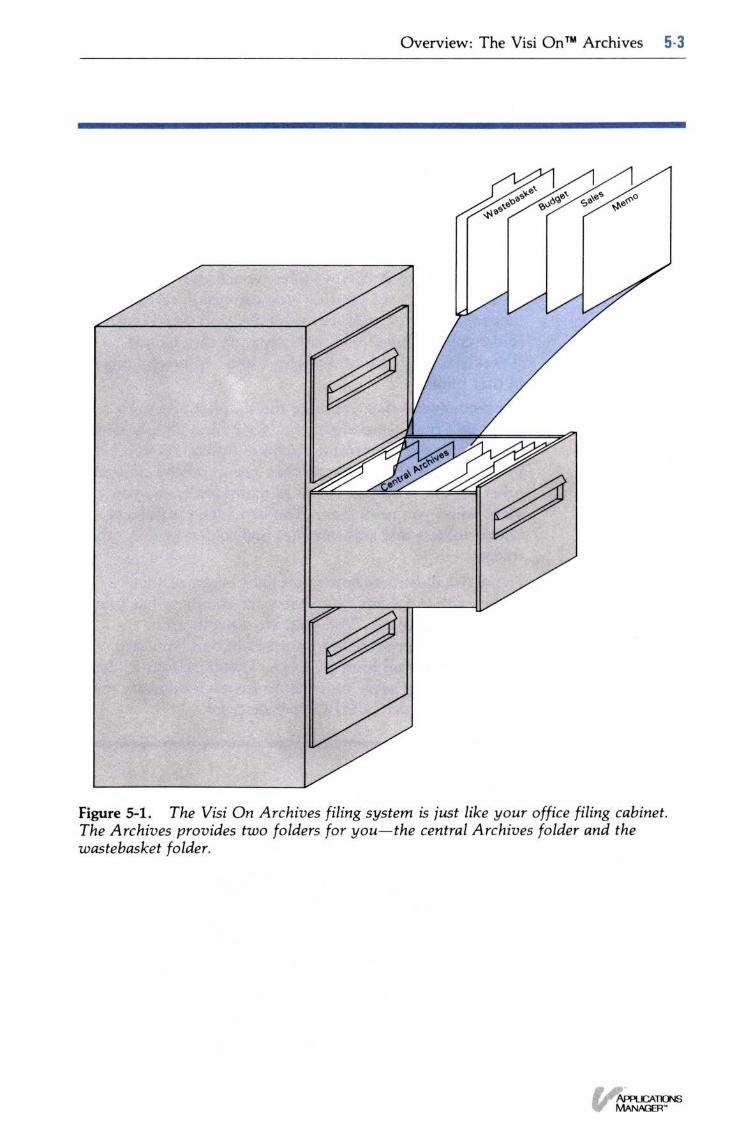
When you start using the Archives, you will notice thatthe Visi On system provides two folders for you (seeFigure 5-1) :
∎
The central Archives folder
•
The wastebasket folder
The central Archives folder lets you store all your filesin one folder . After you create a file and want to store(save) it for future use, you simply store it in this centralfolder . This is the easiest way to store your files . Whenyou start accumulating several files, you may decide togroup related files into other folders. You will learnmore about the central Archives folder in "OrganizingYour Files" later in this chapter .
The Wastebasket
When you remove a file from the Archives, it goes intothe wastebasket folder . This folder is created when youremove a file . If you remove a file by mistake, you canget it back by going to the Archives, opening thewastebasket folder, and either moving or copying the fileinto another folder .
The wastebasket keeps the file until you remove anotherfile-at which time, the Visi On system deletes the filethat was in the wastebasket and puts in the file you justremoved . Instructions for retrieving the file from thewastebasket folder are in "Getting a File out of theWastebasket" later in this chapter .
Overview: The Visi On TM Archives 5-3
Figure 5-1 . The Visi On Archives filing system is just like your office filing cabinet .The Archives provides two folders for you-the central Archives folder and thewastebasket folder.
5-4 Organizing and Updating Your Information
Organizing Your Files
Figure 5-2 . Filingfolders within foldersis a convenient wayto organize relatedfiles and folders .
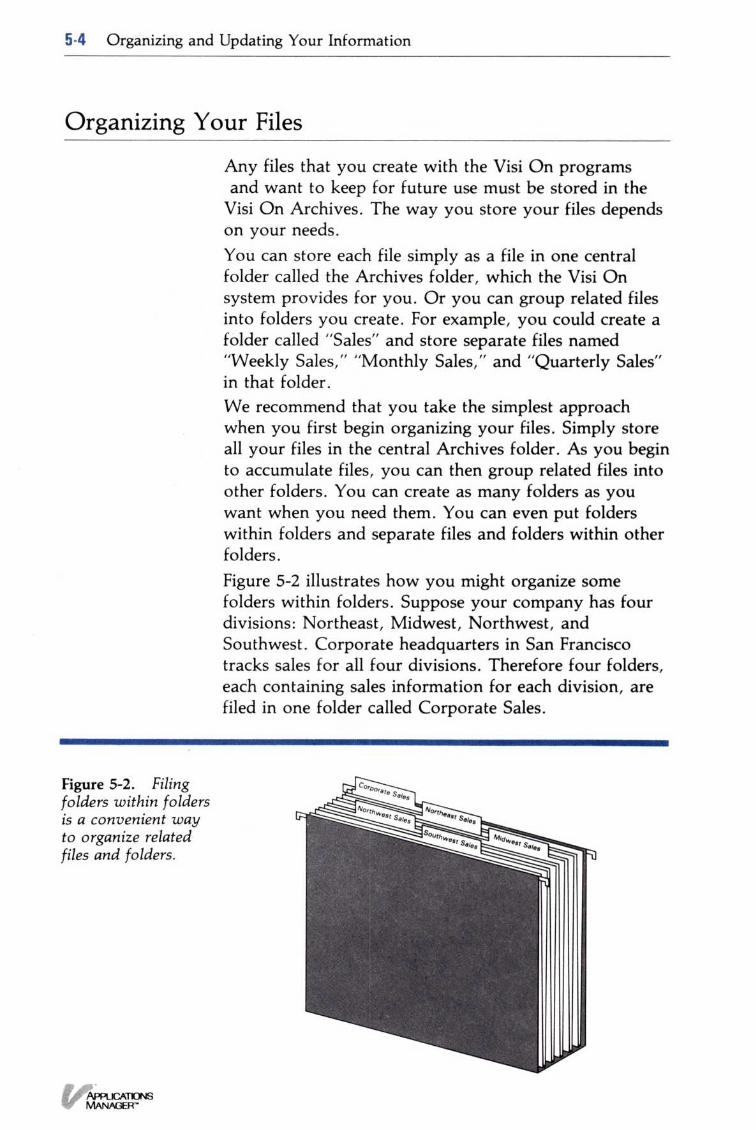
Any files that you create with the Visi On programsand want to keep for future use must be stored in theVisi On Archives . The way you store your files dependson your needs .You can store each file simply as a file in one centralfolder called the Archives folder, which the Visi Onsystem provides for you . Or you can group related filesinto folders you create . For example, you could create afolder called "Sales" and store separate files named"Weekly Sales," "Monthly Sales," and "Quarterly Sales"in that folder .We recommend that you take the simplest approachwhen you first begin organizing your files . Simply storeall your files in the central Archives folder . As you beginto accumulate files, you can then group related files intoother folders . You can create as many folders as youwant when you need them . You can even put folderswithin folders and separate files and folders within otherfolders .Figure 5-2 illustrates how you might organize somefolders within folders . Suppose your company has fourdivisions : Northeast, Midwest, Northwest, andSouthwest . Corporate headquarters in San Franciscotracks sales for all four divisions. Therefore four folders,each containing sales information for each division, arefiled in one folder called Corporate Sales .
Using the Visi On Archives can be as simple as storingall files in the central Archives folder or as complex ascreating a hierarchy of folders and files stored withinother folders . You decide what you need and thenorganize your files accordingly .
Saving (Storing), Getting (Retrieving),and Reorganizing Your Files
Overview : The Visi On TM Archives 5-5
Depending on the tasks you want to perform, you reachthe Archives in one of two ways :
•
Through one of the Visi On applications program'sFiles display to save and get files .
•
Through the Archives window itself to dohousekeeping tasks, such as removing, copying,moving, and renaming files .
Saving and getting filesA Files display appears each time you select "file" from aVisi On program's main menu . That command opens thepart of the Archives that stores that program's files(worksheets, documents, graphs, series, or tables) . Forexample, selecting "file" from the Visi On Word TM mainmenu opens the part of the Archives that shows yourword processing documents .
You select "file" when you want to permanently save(store) a file you have created or revised or when youwant to get (retrieve) a stored file into the programwindow (temporary storage) to work with .
When you get a file to work with, the program gets acopy of that file from permanent storage and puts it intemporary storage in your program window . If youmake changes to that copy and quit the program or turnyour computer off, your changes are lost. You cannotget them back . That's why after you create or update afile, you must use the Files display to save the file inpermanent storage .
All the Files displays are similar . What appears in eachof the displays depends on how you have organizedyour files .
5-6 Organizing and Updating Your Information
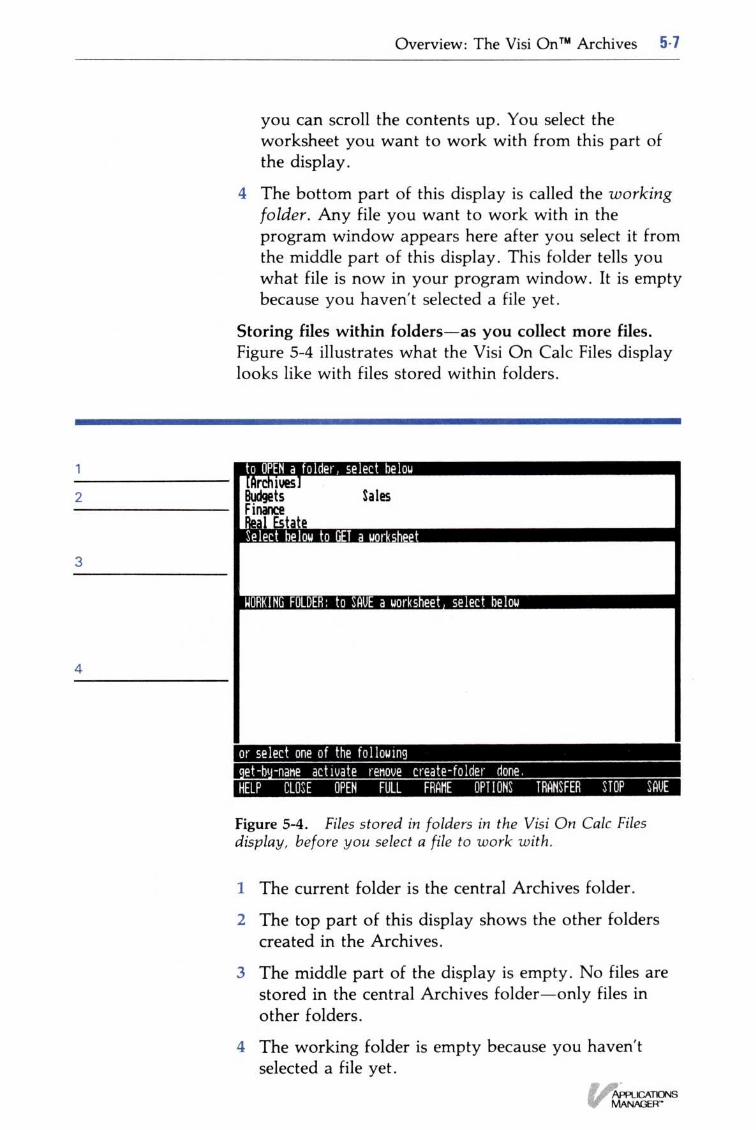
Figures 5-3, 5-4, and 5-6 illustrate how the Files displayfor the Visi On CalcTM program would look before youselect a file to work with in the program window. Theexamples illustrate three different ways of organizingyour Visi On Calc files .
For details on how each program's Files display worksand for instructions on getting and saving files, refer tothe individual program User's Guides .
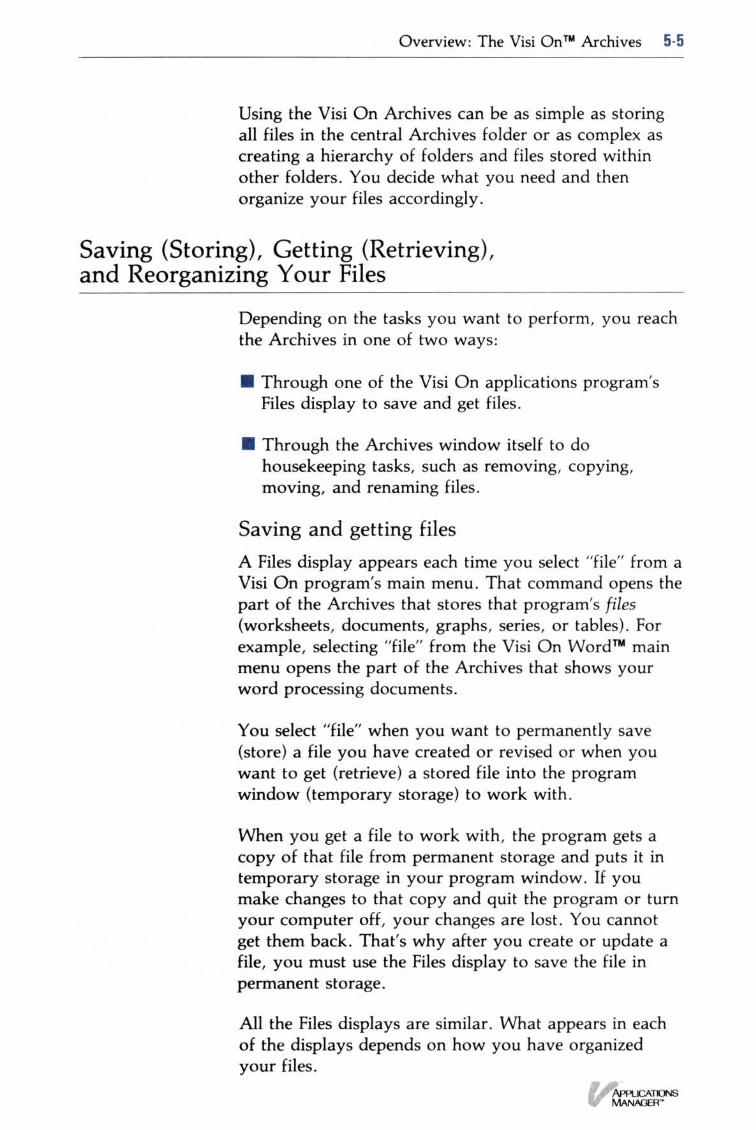
Storing files in the central Archives folder-the simplestway. Figure 5-3 illustrates the simplest filing approach . Itshows what the Visi On Calc Files display looks likewith all files stored in the central Archives folder .
1 The folder path line shows the Archives folder as thecurrent folder. The current folder is always the lastname in the path .
2 You have not created any other folders in theArchives ; therefore the top part of the display isempty .
3 The middle part of the display lists the names of theworksheets in the central Archives folder . If there areadditional worksheets that you can't see in this part,
Figure 5-3 . The Visi On Calc Files display before you select afile to work with. This display shows all files stored in thecentral Archives folder, which is the simplest and easiest wayto store your files .
Overview : The Visi OnTM Archives 5 -7
you can scroll the contents up. You select theworksheet you want to work with from this part ofthe display .
4 The bottom part of this display is called the workingfolder. Any file you want to work with in theprogram window appears here after you select it fromthe middle part of this display . This folder tells youwhat file is now in your program window . It is emptybecause you haven't selected a file yet .
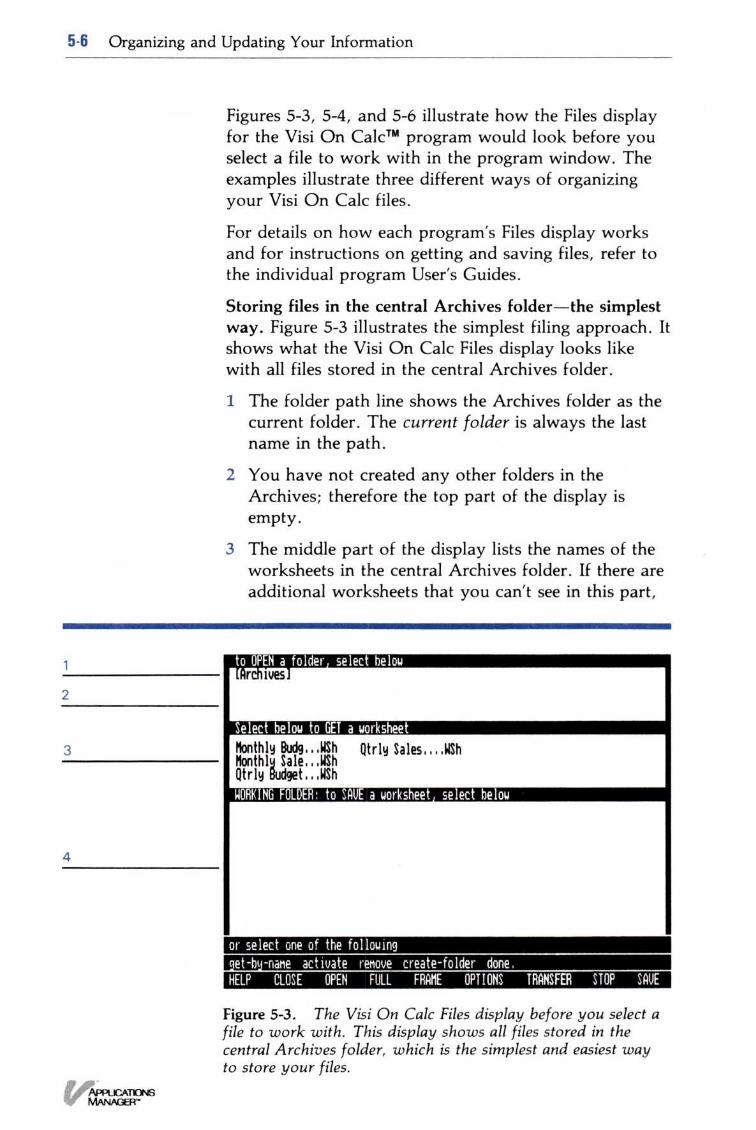
Storing files within folders-as you collect more files .Figure 5-4 illustrates what the Visi On Calc Files displaylooks like with files stored within folders .
Figure 5-4 . Files stored in folders in the Visi On Calc Filesdisplay, before you select a file to work with .
1 The current folder is the central Archives folder .
2 The top part of this display shows the other folderscreated in the Archives .
3 The middle part of the display is empty . No files arestored in the central Archives folder-only files inother folders .
4 The working folder is empty because you haven'tselected a file yet .
5 -8 Organizing and Updating Your Information
If you selected the Sales folder from the top part of thedisplay to see its contents, then "Sales" would be thecurrent folder (see Figure 5-5) and the files in the Salesfolder would be displayed in the middle part . If the Salesfolder contained folders as well as files, those folderswould be displayed in the top part of the display .
Figure 5-5. The Visi On Calc Files display shows the files inthe Sales folder, which is the current folder .
Storing files and folders within folders-as your needsincrease . Figure 5-6 illustrates what the Visi On CalcFiles display looks like with both files and files withinfolders stored in the Archives .
If you selected the Budgets folder from the top part ofthe display to see its contents, then "Budgets" would bethe current folder (see Figure 5-7) . You can see that theBudgets folder has folders within it as well as files . Itsfolders are displayed in the top part and its files in themiddle part of the display . This figure illustrates a morecomplex hierarchy of files and folders than any of thoseshown in the previous examples of Visi On Calc Filesdisplays .
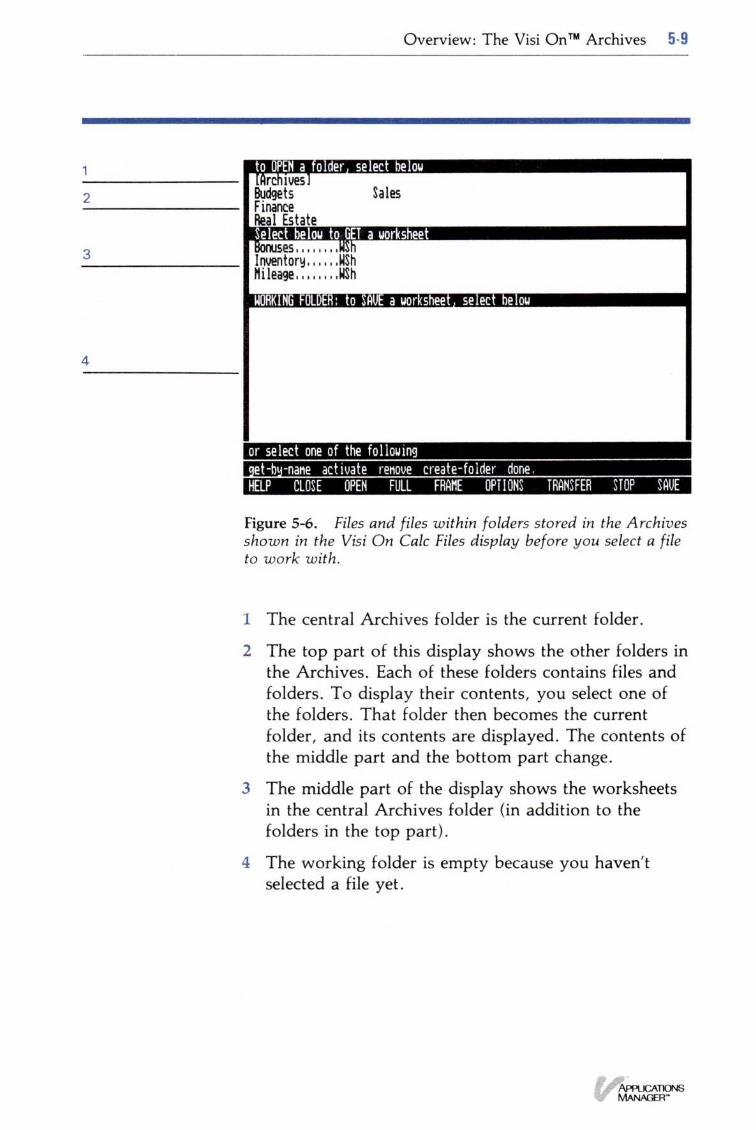
Overview: The Visi OnTM Archives 5- 9
Figure 5-6 . Files and files within folders stored in the Archivesshown in the Visi On Calc Files display before you select a fileto work with .
1 The central Archives folder is the current folder .
2 The top part of this display shows the other folders inthe Archives . Each of these folders contains files andfolders . To display their contents, you select one ofthe folders . That folder then becomes the currentfolder, and its contents are displayed . The contents ofthe middle part and the bottom part change .
3 The middle part of the display shows the worksheetsin the central Archives folder (in addition to thefolders in the top part) .
4 The working folder is empty because you haven'tselected a file yet .
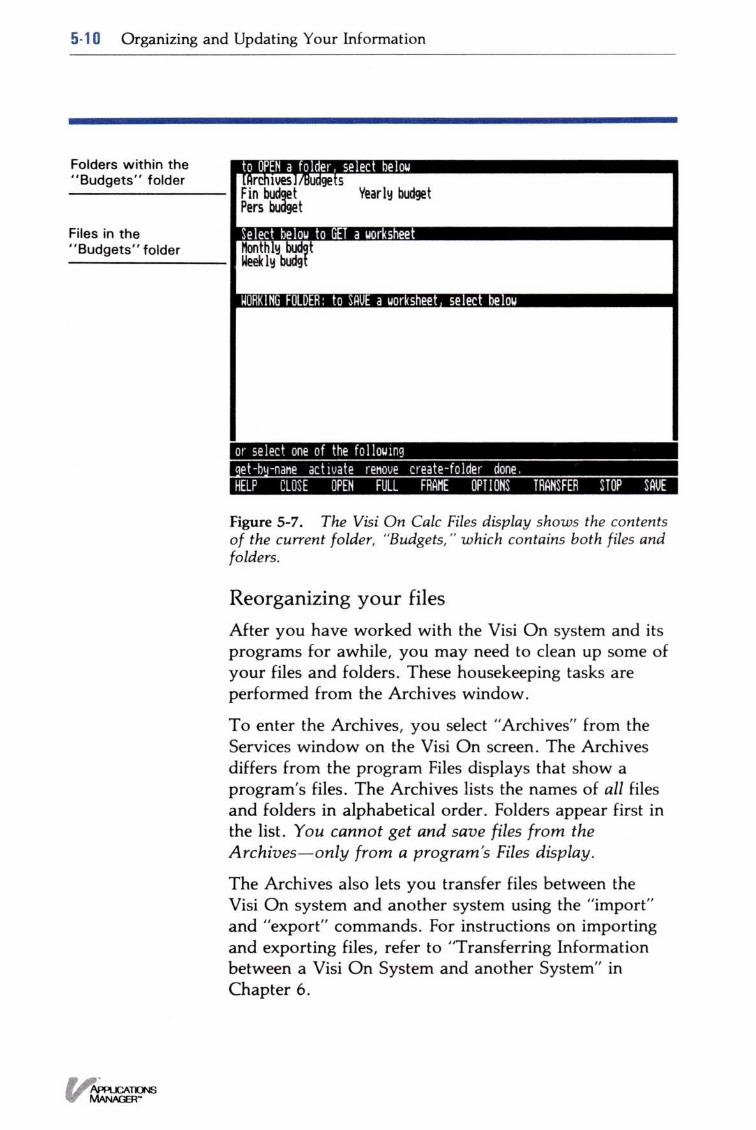
5- 1 0 Organizing and Updating Your Information
f
I
Figure 5-7 . The Visi On Calc Files display shows the contentsof the current folder, "Budgets," which contains both files andfolders .
Reorganizing your filesAfter you have worked with the Visi On system and itsprograms for awhile, you may need to clean up some ofyour files and folders . These housekeeping tasks areperformed from the Archives window .
To enter the Archives, you select "Archives" from theServices window on the Visi On screen . The Archivesdiffers from the program Files displays that show aprogram's files . The Archives lists the names of all filesand folders in alphabetical order . Folders appear first inthe list . You cannot get and save files from theArchives-only from a program's Files display .
The Archives also lets you transfer files between theVisi On system and another system using the "import"and "export" commands . For instructions on importingand exporting files, refer to "Transferring Informationbetween a Visi On System and another System" inChapter 6 .
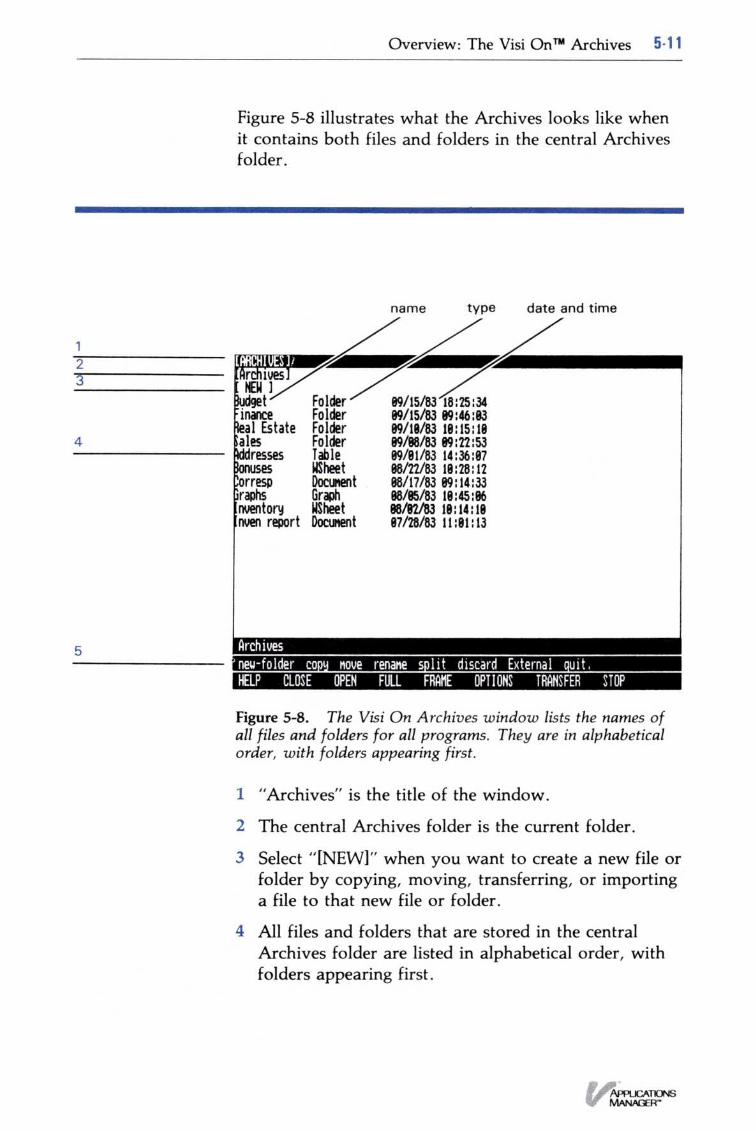
Overview: The Visi On TM Archives 5- 1 1
Figure 5-8 illustrates what the Archives looks like whenit contains both files and folders in the central Archivesfolder .
Figure 5-8 . The Visi On Archives window lists the names ofall files and folders for all programs . They are in alphabeticalorder, with folders appearing first .
1 "Archives" is the title of the window .
2 The central Archives folder is the current folder .
3 Select "[NEW]" when you want to create a new file orfolder by copying, moving, transferring, or importinga file to that new file or folder .
4 All files and folders that are stored in the centralArchives folder are listed in alphabetical order, withfolders appearing first .
5- 1 2 Organizing and Updating Your Information
Every file and folder has a :Name
Your files and folders can havenames that can be up to 12characters long (including anyprintable characters such ascommas, dashes, spaces,underscores, and upper- andlowercase letters) .
Type
The type is determined by theprogram that creates it and cannotbe changed :Program
Type
Visi On Calc
WsheetVisi On Query
TableVisi On Graph
Graph or SeriesVisi On Word
DocumentIf you create a folder, it is always aFolder, regardless of the programthat created it . If you import orexport a file, the type for that file isExternal .
Date/time This is the date and time the folderwas created or the file was createdor last updated . MS-DOS providesthe date and time for you, based onwhat you enter when you first startMS-DOS .
5 This line contains the menu commands you use toupdate your files and folders :new-folder
Creates a new folder within one ofthe displayed folders in theArchives window .
copy
Copies a file or folder into anotherfolder .
move
Moves a file or folder into anotherfolder .
rename
Gives a file or folder a new name .split
Splits the Archives window intotwo separate views of the Archives(two folders) so that you can copyor move files/folders from onefolder to another .
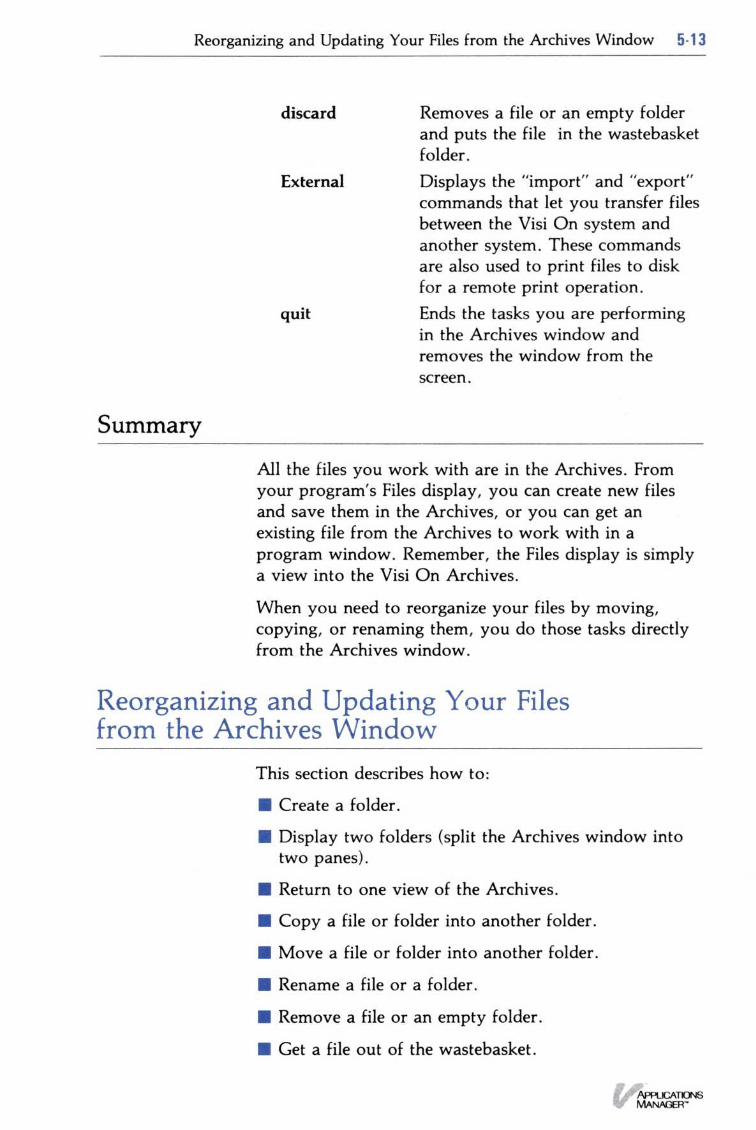
Summary
Reorganizing and Updating Your Files from the Archives Window 5- 1 3
discard
Removes a file or an empty folderand puts the file in the wastebasketfolder .
External
Displays the "import" and "export"commands that let you transfer filesbetween the Visi On system andanother system . These commandsare also used to print files to diskfor a remote print operation .
quit
Ends the tasks you are performingin the Archives window andremoves the window from thescreen .
All the files you work with are in the Archives . Fromyour program's Files display, you can create new filesand save them in the Archives, or you can get anexisting file from the Archives to work with in aprogram window . Remember, the Files display is simplya view into the Visi On Archives .
When you need to reorganize your files by moving,copying, or renaming them, you do those tasks directlyfrom the Archives window .
Reorganizing and Updating Your Filesfrom the Archives Window
This section describes how to:
∎
Create a folder .
•
Display two folders (split the Archives window intotwo panes) .
•
Return to one view of the Archives .
∎
Copy a file or folder into another folder .
•
Move a file or folder into another folder .
•
Rename a file or a folder .
•
Remove a file or an empty folder .
•
Get a file out of the wastebasket .
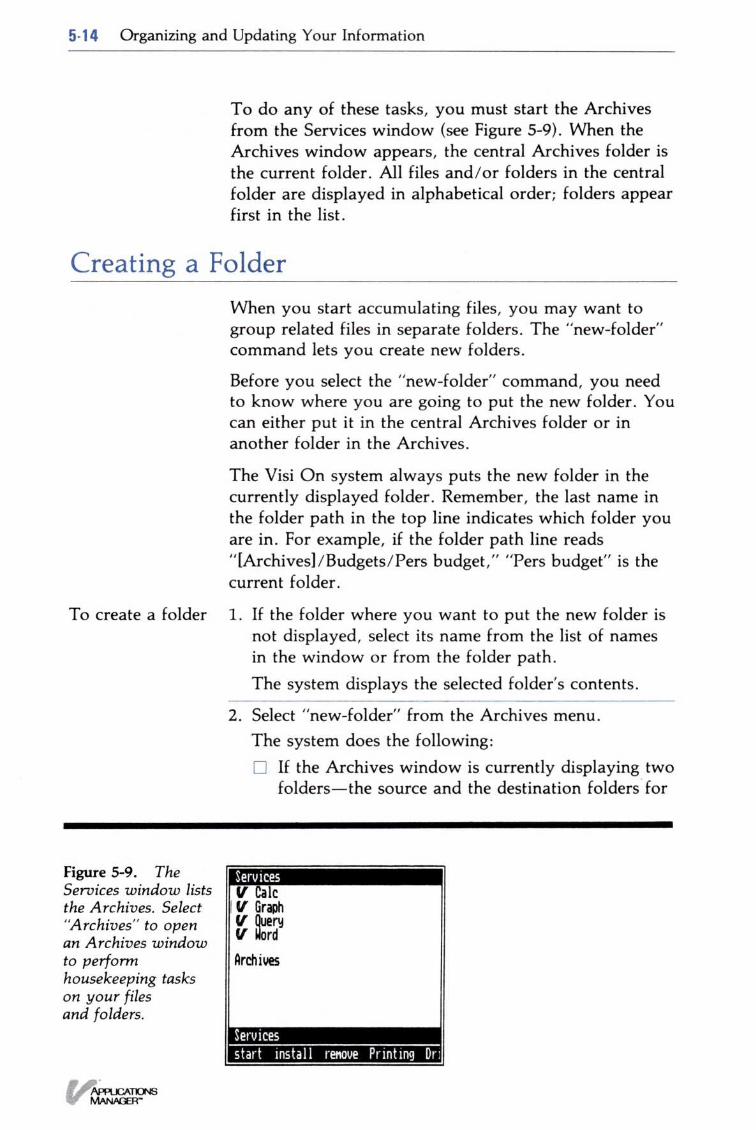
5- 1 4 Organizing and Updating Your Information
Creating a Folder
To create a folder
Figure 5-9 . TheServices window liststhe Archives. Select"Archives" to openan Archives windowto performhousekeeping taskson your filesand folders .
To do any of these tasks, you must start the Archivesfrom the Services window (see Figure 5-9) . When theArchives window appears, the central Archives folder isthe current folder . All files and/or folders in the centralfolder are displayed in alphabetical order ; folders appearfirst in the list .
When you start accumulating files, you may want togroup related files in separate folders . The "new-folder"command lets you create new folders .
Before you select the "new-folder" command, you needto know where you are going to put the new folder . Youcan either put it in the central Archives folder or inanother folder in the Archives .
The Visi On system always puts the new folder in thecurrently displayed folder . Remember, the last name inthe folder path in the top line indicates which folder youare in. For example, if the folder path line reads"[Archives]/Budgets/Pers budget," "Pers budget" is thecurrent folder .
1 . If the folder where you want to put the new folder isnot displayed, select its name from the list of namesin the window or from the folder path .The system displays the selected folder's contents .
2 . Select "new-folder" from the Archives menu .The system does the following :∎ If the Archives window is currently displaying two
folders-the source and the destination folders for
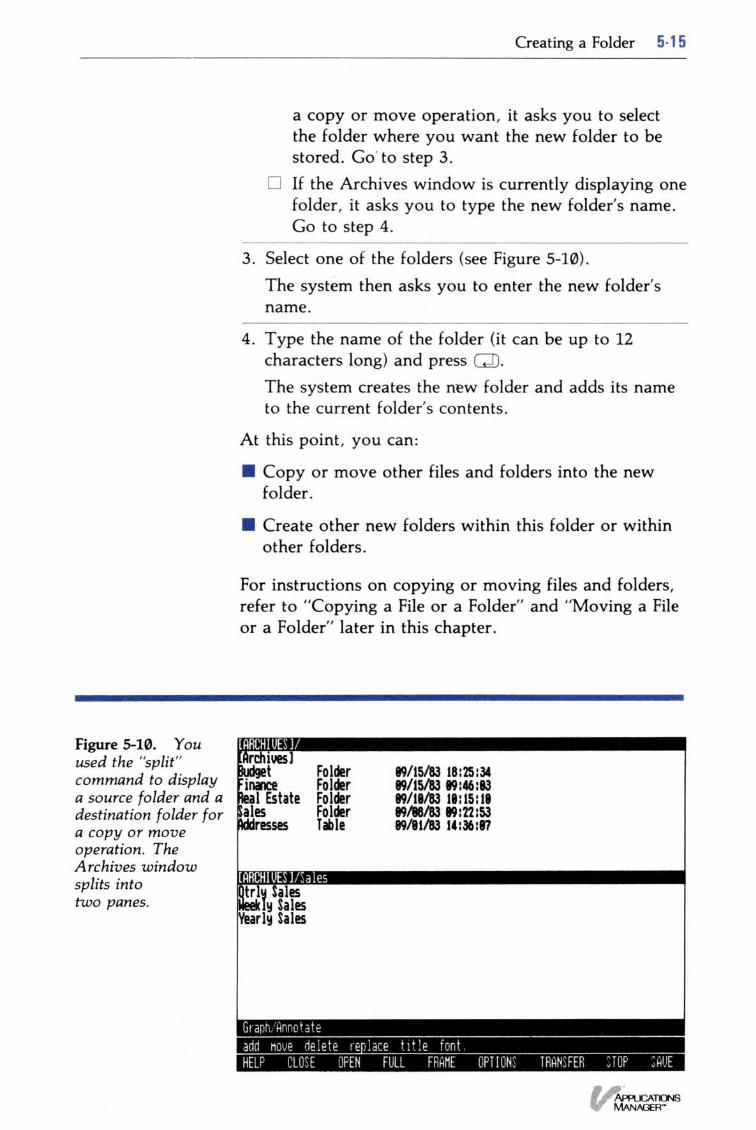
Figure 5-10 . Youused the "split"command to displaya source folder and adestination folder fora copy or moveoperation . TheArchives windowsplits intotwo panes .
Creating a Folder 5- 1 5
a copy or move operation, it asks you to selectthe folder where you want the new folder to bestored . Go' to step 3 .If the Archives window is currently displaying onefolder, it asks you to type the new folder's name .Go to step 4.
3 . Select one of the folders (see Figure 5-10) .The system then asks you to enter the new folder'sname .
4. Type the name of the folder (it can be up to 12characters long) and press (ENTER).The system creates the new folder and adds its nameto the current folder's contents .
At this point, you can :
∎
Copy or move other files and folders into the newfolder .
∎
Create other new folders within this folder or withinother folders .
For instructions on copying or moving files and folders,refer to "Copying a File or a Folder" and "Moving a Fileor a Folder" later in this chapter .
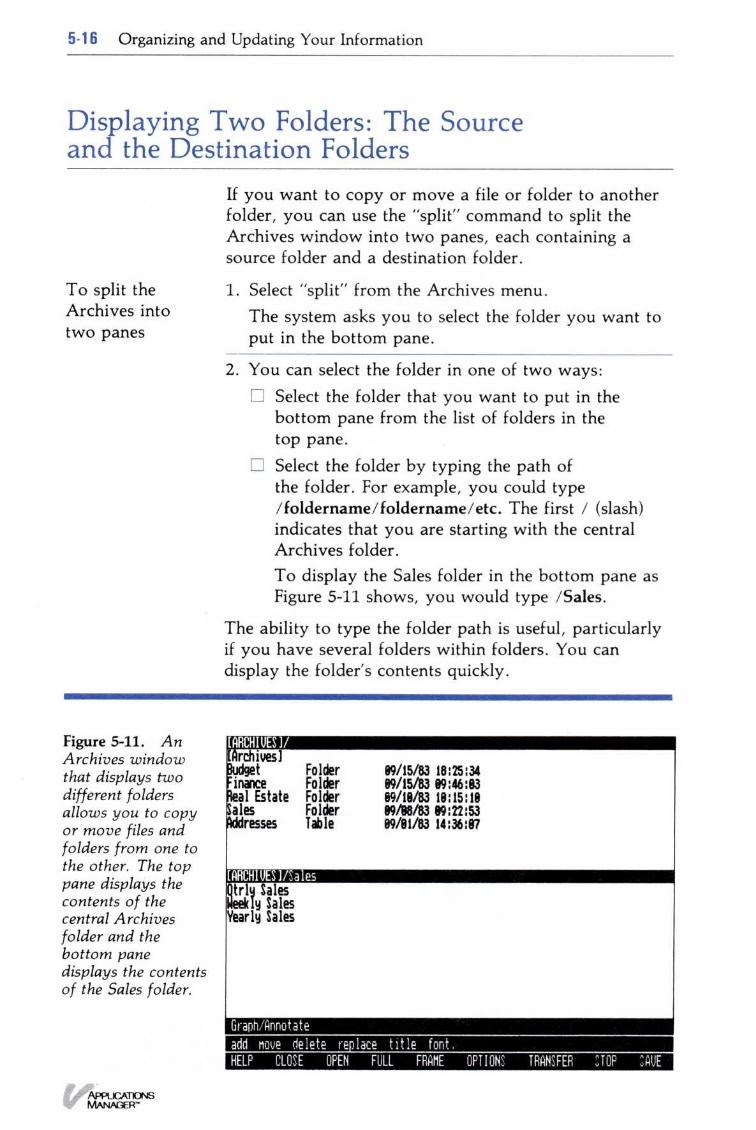
5-1 6 Organizing and Updating Your Information
Displaying Two Folders : The Sourceand the Destination Folders
To split theArchives intotwo panes
Figure 5-11 . AnArchives windowthat displays twodifferent foldersallows you to copyor move files andfolders from one tothe other. The toppane displays thecontents o f thecentral Archivesfolder and thebottom panedisplays the contentso f the Sales folder .
If you want to copy or move a file or folder to anotherfolder, you can use the "split" command to split theArchives window into two panes, each containing asource folder and a destination folder .
1 . Select "split" from the Archives menu .The system asks you to select the folder you want toput in the bottom pane .
2 . You can select the folder in one of two ways:Select the folder that you want to put in thebottom pane from the list of folders in thetop pane .
∎ Select the folder by typing the path ofthe folder. For example, you could type/foldername/foldername/etc . The first / (slash)indicates that you are starting with the centralArchives folder .To display the Sales folder in the bottom pane asFigure 5-11 shows, you would type /Sales .
The ability to type the folder path is useful, particularlyif you have several folders within folders . You candisplay the folder's contents quickly .
Copying a File or a Folder 5 . 1 7
The system splits the window into two panes (seeFigure 5-11) .
Now you can copy or move your files and folders fromone folder to another .
When you have finished with those operations, to returnto one folder again, refer to "Returning to One View ofthe Archives" following this section .
Returning to One View of the ArchivesIf you have used the "split" command and have copiedor moved a file(s) and folder(s) from one folder toanother, then to return to one view (folder), use the"split" command again .
To return to
1. Select "split" from the Archives menu .one view
The system asks you which pane you want to returnto .
2 . Select the top or bottom pane .The system returns to one view and displays thecontents of the one you selected .
Copying a File or a FolderThe "copy" command in the Archives menu lets you :
∎ Replace a file or folder .For example, if you distribute a monthly sales report,you have to update that report with the currentmonth's sales information . You could use the "copy"command to replace the file named "Monthly Sale"with the current month's sales that are in a file named"Feb Sales ."
∎ Copy a file or folder into a new folder .You may want to have copies of certain files (orfolders) in more than one folder . For example, if youhave a "Sales" folder and a "Yearly Sales" folder, youmay want copies of the files from the "Sales" folder inthe the "Yearly Sales" folder . You can use the "copy"command to make those copies .
5-1 8 Organizing and Updating Your Information
Before you begin, you may want to use the "split"command to display the contents of both the source andthe destination folders .
For instructions on using the "split" command, refer to"Displaying Two Folders : The Source and theDestination Folders" earlier in this chapter .
1 . Select "copy" from the Archives menu .The system asks you to select the source file or folderto be copied .
2 . You can do one of the following :If you are displaying two folders (you used the"split" command), select the source file or folderfrom the displayed list of files/folders in the topor bottom pane .
∎ Select the file/folder you want to copy (source)from the list of files/folders that are displayed .
∎ Select the source folder by typing its folder path,for example, /foldername/foldername/etc .
The ability to type the folder path is useful,particularly if you have several folders within folders .You can display the folder's contents quickly .The system asks you to select the destination for thefile or folder to be copied .
3 . You can do one of the following :If you are displaying two folders, select a file orempty folder from either pane .
The system replaces the selected file or folder, and ifit is a file, puts the replaced file in the "wastebasket"folder, and gives the source file or folder the samename as the destination file or folder (for example,the file "Feb Sales" becomes the destination file"Monthly Sales") .For instructions on retrieving a file from the"wastebasket," see "Getting a File Out of theWastebasket" later in this chapter .
Select "[NEW]" from either pane if the window issplit, or select "[NEW]" from the top of thewindow if you didn't split the window .
The system asks you to type the name of the newdestination file or folder .
To copy a fileor folder
Moving a File or Folder
Moving a File or Folder 5- 1 9
- Type the name of the new file or folder (it canbe up to 12 characters long) and press (ENTER).
- Press (ENTER) to use the same name as the source fileor folder .If the name you type already exists for a file orfolder in the destination folder, the systemprompts you for another name .
The system puts a copy of the file or folder into thedestination folder and adds the new file or folder tothe list of displayed files/folders .
At this point you can continue copying files/folders, oryou can do other housekeeping tasks such as moving,renaming, or removing files .
The "move" command in the Archives menu lets you :
•
Replace a file or folder.
•
Move a file or folder to a new folder .
Before you begin, you may want to use the "split"command to display the contents of both the source andthe destination folders .
For instructions on using the "split" command, refer to"Displaying Two Folders : The Source and theDestination Folders" earlier in this chapter .
To move a file
1. Select "move" from the Archives menu .or folder
The system asks you to select the source file or folderto be moved.
2 . You can do one of the following :If you are displaying two folders (you used the"split" command), select the source file or folderfrom the displayed list of files/folders in the topor bottom pane .
∎ Select the file/folder you want to move (source)from the list of files/folders that are displayed .
∎ Select the source folder by typing its folder path,for example, /foldername/foldername/ etc .
5- 20 Organizing and Updating Your Information
The ability to type the folder path is useful,particularly if you have several folders within folders .You can display the folder's contents quickly .
The system asks you to select the destination for thefile or folder to be moved .
3 . You can do one of the following :
∎ If you are displaying two folders, select a file orempty folder from either pane .
The system replaces the selected file or folder, and ifit is a file, puts the replaced file in the "wastebasket"folder, and gives the source file or folder the samename as the destination file or folder (for example,the file "Feb Sales" becomes the destination file"Monthly Sales") . The source file/folder disappearsfrom the folder in which it was previously contained .
For instructions on retrieving a file from the"wastebasket," see "Getting a File Out of theWastebasket" later in this chapter .
∎ Select "[NEW]" from either pane if the window issplit, or select "[NEW]" from the top of thewindow if you didn't split the window .
The system asks you to type the name of the newdestination file or folder .
- Type the name of the new folder (it can be upto 12 characters long) and press (ENTER).
- Press (ENTER) to use the same name as the source fileor folder .
If the name you type already exists for a file orfolder in the destination folder, the systemprompts you for another name .
The system moves the file or folder into thedestination folder and adds the new folder to thelist of displayed files/folders . The sourcefile/folder disappears from the folder in which itwas previously contained .
At this point you can continue moving files or foldersinto other folders, or you can do other housekeepingtasks such as copying, renaming, or removing files .
Removing a File or an Empty Folder 5-2 1
Changing the Name of a File or a FolderTo change the name of a file or folder use the "rename"command in the Archives menu .
To change a file's 1 . Select "rename" from the Archives menu .name or a
The system asks you to select the file or folder youfolder's name
want to rename .
2 . Select a file or folder from the current folder'sdisplayed list .The system asks you to type the new name of thenew folder .
3 . Type the new name for the file or folder (it can be upto 12 characters long) and press (ENTER)If the name already exists in the folder, the systemprompts you for another name . When you enter aunique name, the system changes the name to the oneyou typed .
At this point you can continue renaming files or folders,you can do other "housekeeping" tasks such as copying,moving, or removing files .
Removing a File or an Empty FolderThe "discard" command in the Archives menu lets youget rid of (remove) old files and empty folders . Use thiscommand periodically to clean out the Archives to makeroom for new files and folders .
To remove a file
1 . Select "discard" from the Archives menu .(or an empty
The system asks you to select the file or empty folderfolder)
you want removed . You cannot remove a folder thatcontains files or other folders .
2 . Select the name of the file (or empty folder) you wantto remove from the list in the current folder .The system removes the file from the folder and putsit in the wastebasket folder under the same name . Ifyou remove a file by mistake, you can retrieve itfrom the wastebasket .
5-2 2 Organizing and Updating Your Information
For instructions on retrieving a file from thewastebasket, refer to "Getting a File out of theWastebasket" later in this chapter .
If you want to free up disk space, you should use the"discard" command to remove your file from thewastebasket folder, which causes the file to bepermanently removed . You cannot get it back .
At this point you can continue removing files or emptyfolders, or you can do other "housekeeping" tasks suchas copying, moving, or renaming files .
Getting a File out of the WastebasketYou can delete files from the Visi On Archives by :
•
Selecting "remove" from one of the program Filesdisplays .
∎
Selecting "replace" from a program Files display tooverwrite a file with another file.
∎
Selecting "copy" or "move" from the Archives menuto replace a file with another file .
•
Selecting "TRANSFER" from the Visi On menu toreplace a file with another file .
•
Selecting "discard" from the Archives menu .
In each of these cases, the Visi On system removes thefile from the current folder and puts it in thewastebasket folder the system provides for you . Thesystem creates that folder when you remove a file, if itdoesn't already exist .
The file stays in the wastebasket until you removeanother file. The wastebasket always keeps the lastremoved file . When another file is removed, the file inthe wastebasket is permanently deleted from theArchives .
Before you begin, you may want to use the "split"command to display the contents of the wastebasketfolder and the destination folder .
Storing Information
Storing Information 5 .2 3
If you remove a file by mistake and want to retrieve itfrom the wastebasket folder :
1 . If Archives isn't your current folder, select it from thefolder path . Scroll the Archives until you see thewastebasket folder; then select it .The system displays the wastebasket's contents andthe folder path line changes to read :[Archives] /wastebasket
2 . Select the "copy" or "move" command from theArchives menu. Then follow the instructions in"Copying a File or Folder" or "Moving a File orFolder" earlier in this chapter .The system either moves or copies the file into thedestination folder .
This section:
•
Describes how and where information is stored
•
Provides guidelines for backing up your disks
∎
Includes step-by-step instructions for :∎ Initializing your floppy disks for the Archives∎ Mounting your floppy disks∎ Unmounting your floppy disks
When you work with the Visi On system and itsprograms, you store the programs themselves-as wellas the files you create with them-on your hard disk oron floppy disks .
Hard disks and floppy disks have a flat magnetic surfaceon which information is recorded . Disks hold a largeamount of information . Hard disks hold moreinformation than floppy disks .
Before you can copy information for the first time onthe hard disk or the floppy disks, you must prepare thehard disk and floppy disks using the MS-DOS FORMATcommand so that they can accept information from theVisi On system and its programs .
5.2 4 Organizing and Updating Your Information
Before you can use your floppy disks in the Visi Onsystem, you must initialize them for the Visi OnArchives using the "initialize" command from the Drivesmenu in the Services window .
For information on using the MS-DOS FORMATcommand, refer to "Preparing Your Floppy Disks" inthe Visi On Setup Guide. For instructions on using theVisi On "initialize" command, refer to "Initializing YourFloppy Disks for the Archives" later in this chapter .
Storing Information on Your Floppy Disks
You will store most of the information you work with onyour hard disk . However, you may find it convenient tokeep some of your documents on floppy disks, such as :
•
Confidential or sensitive information, such as salaryor personnel-related information .
•
Information you use infrequently, such as quarterlyor yearly data .
•
Information you may want to give to another personwith a Visi On system .
Whenever you need to use the information, you use the"mount" command to mount the floppy disk . The filesfrom the disk appear in the Archives just like other filesyou created in the system .
You load the file you need from the program's Filesdisplay just as you do other files in the Archives . Thefiles and folders that are on the disk appear in thecentral Archives folder in a folder whose name is thename you entered when you initialized the volume .When you've finished working with the file or files, yousave them on the floppy disk, and then remove it usingthe "unmount" command from the Drives menu in theServices window .
Make sure you store your floppy disks in a safe place soyou can use them the next time you need theinformation .
Protect Your Files : Back up Your Disks
Storing Information 5 . 2 5
Paper documents are fragile . You can misplace them,drop them on the floor, or accidentally throw themaway . Disk files, while subject to different hazards, arealso fragile . Anything from a computer malfunction to apiece of dust to a fingerprint can destroy a file or anentire floppy disk . A computer malfunction or a powerfailure can cause you to lose information stored on yourhard disk .
Protect yourself by making copies of your informationon floppy disks that you can store in a safe place . Thebackup procedure you follow depends on the volume ofwork you do, how often you update your documents,and how critical your information is .
Here are some general guidelines you may want tofollow :
•
After you install the Visi On system and theprograms, make backup copies of the floppy disks sothat if anything goes wrong and the disks aredamaged during the system's use, you'll have abackup .
∎
If it would take you a lot of time to reconstruct a fileif you lost it, make a backup copy of it on a floppydisk every time you update it .
•
If you work with a number of documents each day,make a backup copy of those documents at the end ofeach day .
•
Periodically, you should back up your entire harddisk onto floppy disks .
To make backup copies of the hard disk and the floppydisks, refer to the MS-DOS BACKUP command in theIBM Disk Operating System manual .
To restore your information from backup copies, referto the MS-DOS RESTORE command in the IBM DiskOperating System manual.
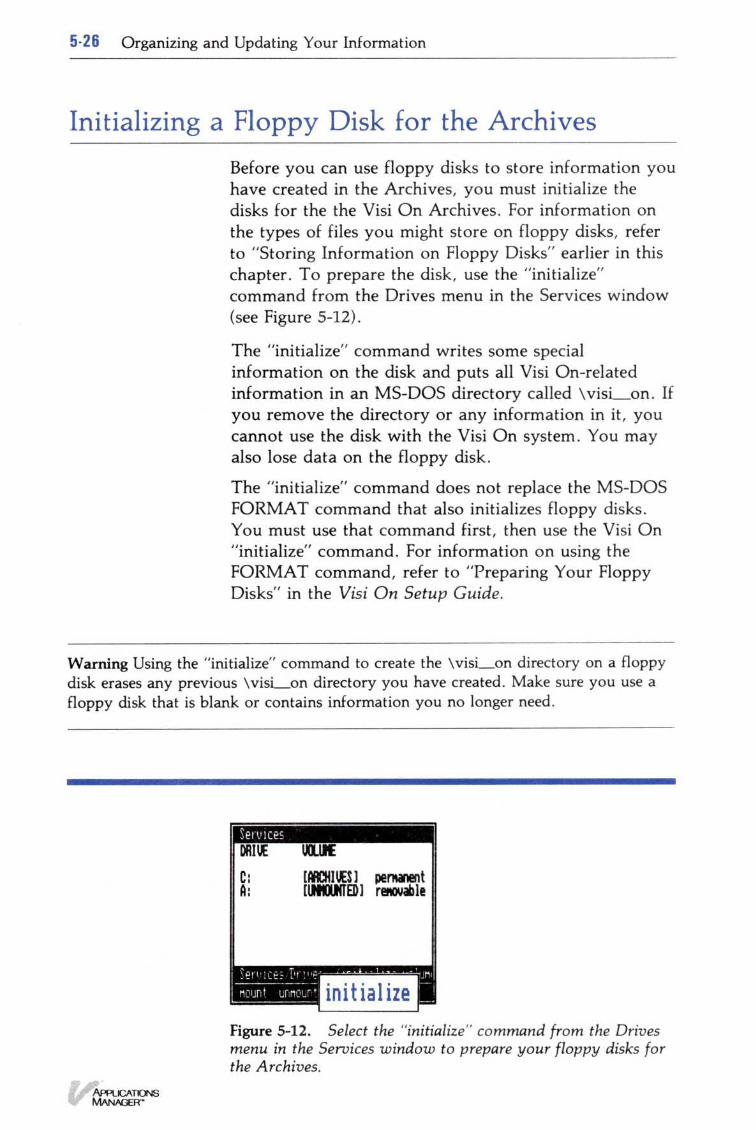
5-2 6 Organizing and Updating Your Information
Initializing a Floppy Disk for the ArchivesBefore you can use floppy disks to store information youhave created in the Archives, you must initialize thedisks for the the Visi On Archives . For information onthe types of files you might store on floppy disks, referto "Storing Information on Floppy Disks" earlier in thischapter . To prepare the disk, use the "initialize"command from the Drives menu in the Services window(see Figure 5-12) .
The "initialize" command writes some specialinformation on the disk and puts all Visi On-relatedinformation in an MS-DOS directory called \visi_on . Ifyou remove the directory or any information in it, youcannot use the disk with the Visi On system . You mayalso lose data on the floppy disk .
The "initialize" command does not replace the MS-DOSFORMAT command that also initializes floppy disks .You must use that command first, then use the Visi On"initialize" command. For information on using theFORMAT command, refer to "Preparing Your FloppyDisks" in the Visi On Setup Guide .
Warning Using the "initialize" command to create the \visi_on directory on a floppydisk erases any previous \visi_on directory you have created . Make sure you use afloppy disk that is blank or contains information you no longer need .
Figure 5-12 . Select the "initialize" command from the Drivesmenu in the Services window to prepare your floppy disks forthe Archives .
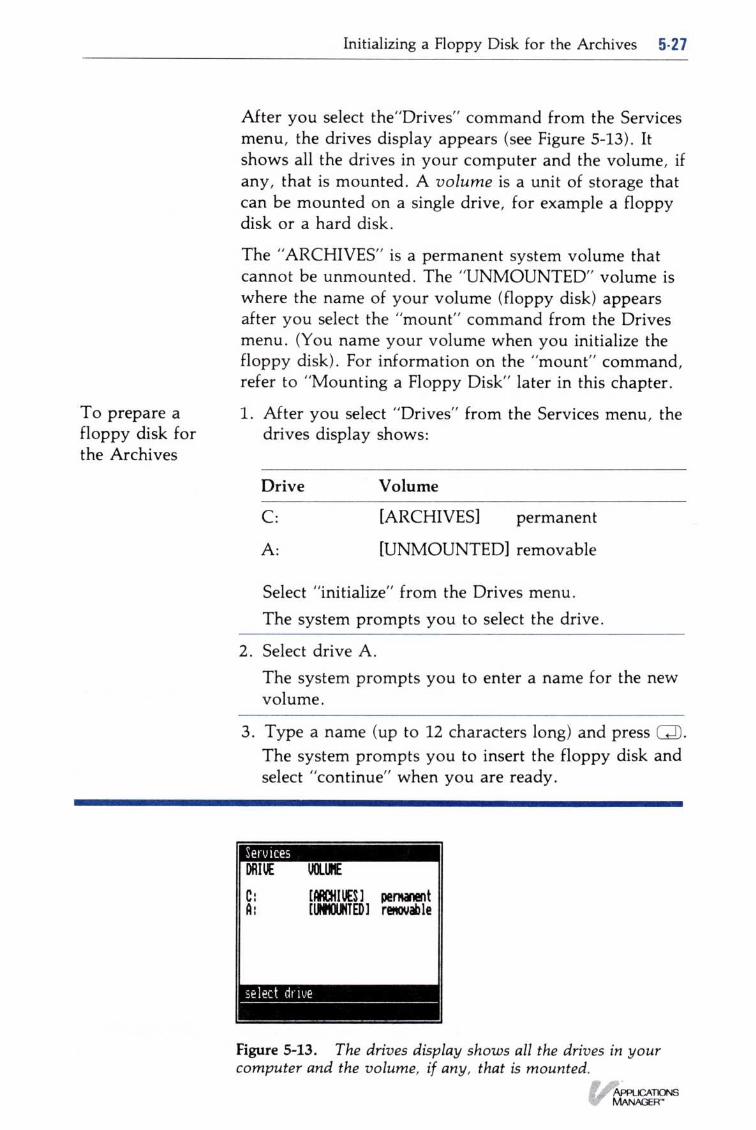
Initializing a Floppy Disk for the Archives 5 .27
After you select the"Drives" command from the Servicesmenu, the drives display appears (see Figure 5-13) . Itshows all the drives in your computer and the volume, ifany, that is mounted . A volume is a unit of storage thatcan be mounted on a single drive, for example a floppydisk or a hard disk .
The "ARCHIVES" is a permanent system volume thatcannot be unmounted . The "UNMOUNTED" volume iswhere the name of your volume (floppy disk) appearsafter you select the "mount" command from the Drivesmenu . (You name your volume when you initialize thefloppy disk) . For information on the "mount" command,refer to "Mounting a Floppy Disk" later in this chapter .
To prepare a
1. After you select "Drives" from the Services menu, thefloppy disk for
drives display shows :the Archives
Select "initialize" from the Drives menu .The system prompts you to select the drive .
2 . Select drive A .The system prompts you to enter a name for the newvolume .
3 . Type a name (up to 12 characters long) and press (ENTER) .The system prompts you to insert the floppy disk andselect "continue" when you are ready .
Figure 5-13 . The drives display shows all the drives in yourcomputer and the volume, if any, that is mounted .
Drive Volume
C : [ARCHIVES] permanent
A: [UNMOUNTED] removable
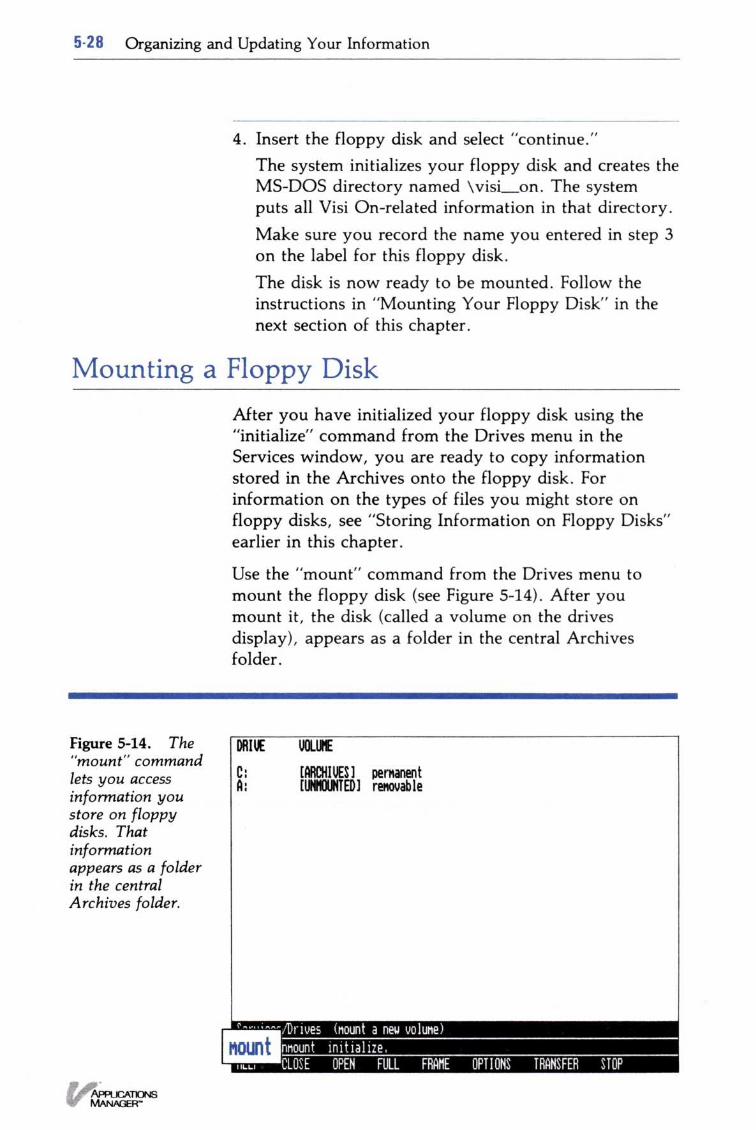
5-2 8 Organizing and Updating Your Information
Mounting a Floppy Disk
Figure 5-14 . The"mount" commandlets you accessinformation youstore on floppydisks. Thatinformationappears as a folderin the centralArchives folder .
4 . Insert the floppy disk and select "continue ."The system initializes your floppy disk and creates theMS-DOS directory named \visi_on . The systemputs all Visi On-related information in that directory .Make sure you record the name you entered in step 3on the label for this floppy disk .The disk is now ready to be mounted . Follow theinstructions in "Mounting Your Floppy Disk" in thenext section of this chapter .
After you have initialized your floppy disk using the"initialize" command from the Drives menu in theServices window, you are ready to copy informationstored in the Archives onto the floppy disk . Forinformation on the types of files you might store onfloppy disks, see "Storing Information on Floppy Disks"earlier in this chapter .
Use the "mount" command from the Drives menu tomount the floppy disk (see Figure 5-14) . After youmount it, the disk (called a volume on the drivesdisplay), appears as a folder in the central Archivesfolder .
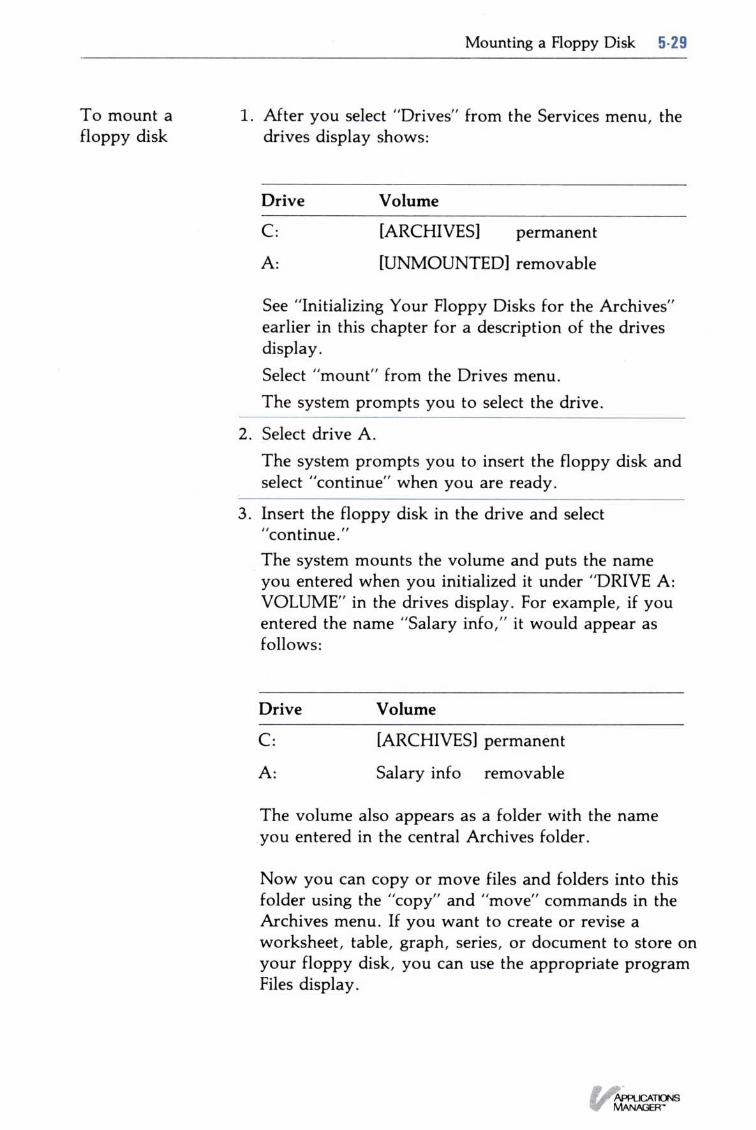
To mount a
1. After you select "Drives" from the Services menu, thefloppy disk
drives display shows :
See "Initializing Your Floppy Disks for the Archives"earlier in this chapter for a description of the drivesdisplay .Select "mount" from the Drives menu .The system prompts you to select the drive .
2 . Select drive A .The system prompts you to insert the floppy disk andselect "continue" when you are ready .
3 . Insert the floppy disk in the drive and select"continue ."The system mounts the volume and puts the nameyou entered when you initialized it under "DRIVE A:VOLUME" in the drives display . For example, if youentered the name "Salary info," it would appear asfollows :
Drive
Volume
C :
[ARCHIVES] permanent
A:
Salary info removable
The volume also appears as a folder with the nameyou entered in the central Archives folder .
Now you can copy or move files and folders into thisfolder using the "copy" and "move" commands in theArchives menu . If you want to create or revise aworksheet, table, graph, series, or document to store onyour floppy disk, you can use the appropriate programFiles display .
Mounting a Floppy Disk 5-29
Drive Volume
C : [ARCHIVES] permanent
A: [UNMOUNTED] removable
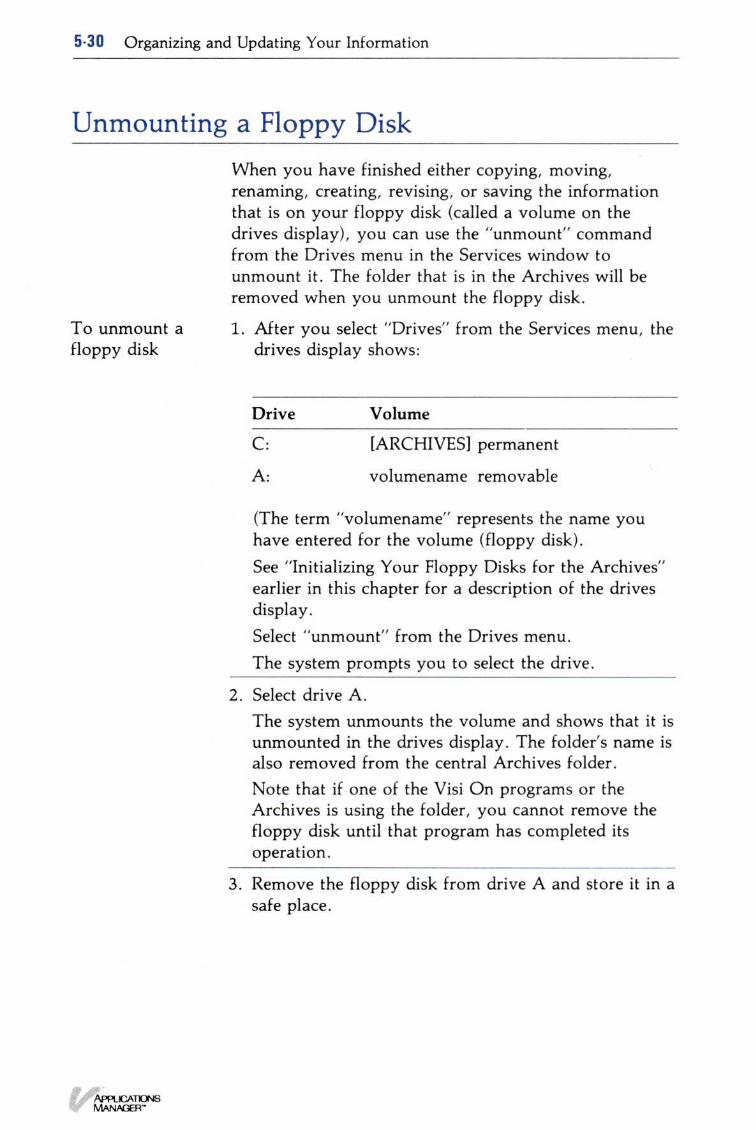
5 . 3 0 Organizing and Updating Your Information
Unmounting a Floppy DiskWhen you have finished either copying, moving,renaming, creating, revising, or saving the informationthat is on your floppy disk (called a volume on thedrives display), you can use the "unmount" commandfrom the Drives menu in the Services window tounmount it . The folder that is in the Archives will beremoved when you unmount the floppy disk .
To unmount a
1. After you select "Drives" from the Services menu, thefloppy disk
drives display shows :
Drive
Volume
C :
[ARCHIVES] permanent
A:
volumename removable
(The term "volumename" represents the name youhave entered for the volume (floppy disk) .See "Initializing Your Floppy Disks for the Archives"earlier in this chapter for a description of the drivesdisplay .Select "unmount" from the Drives menu .The system prompts you to select the drive .
2 . Select drive A .The system unmounts the volume and shows that it isunmounted in the drives display . The folder's name isalso removed from the central Archives folder .Note that if one of the Visi On programs or theArchives is using the folder, you cannot remove thefloppy disk until that program has completed itsoperation .
3 . Remove the floppy disk from drive A and store it in asafe place .

6 TransferringInformation
Chapter 6
Transferring Information
The "TRANSFER" Command 6-1
The Source and the Destination of a Transfer 6-2
Types of Information You Can Transfer 6-2
Matching the Source and the Destination Types 6-3
Transferring Information between Visi OnTM ProgramWindows 6-7
Transferring Files and Folders between ArchivesWindows 6-13
Transferring Files and Folders between Folders 6-15Replacing a File with Another File 6-18
Transferring Information between a Visi On TM Systemand Another System 6-21
Transferring Information into the Visi OnSystem 6-22
Transferring Information out of the Visi OnSystem 6-24
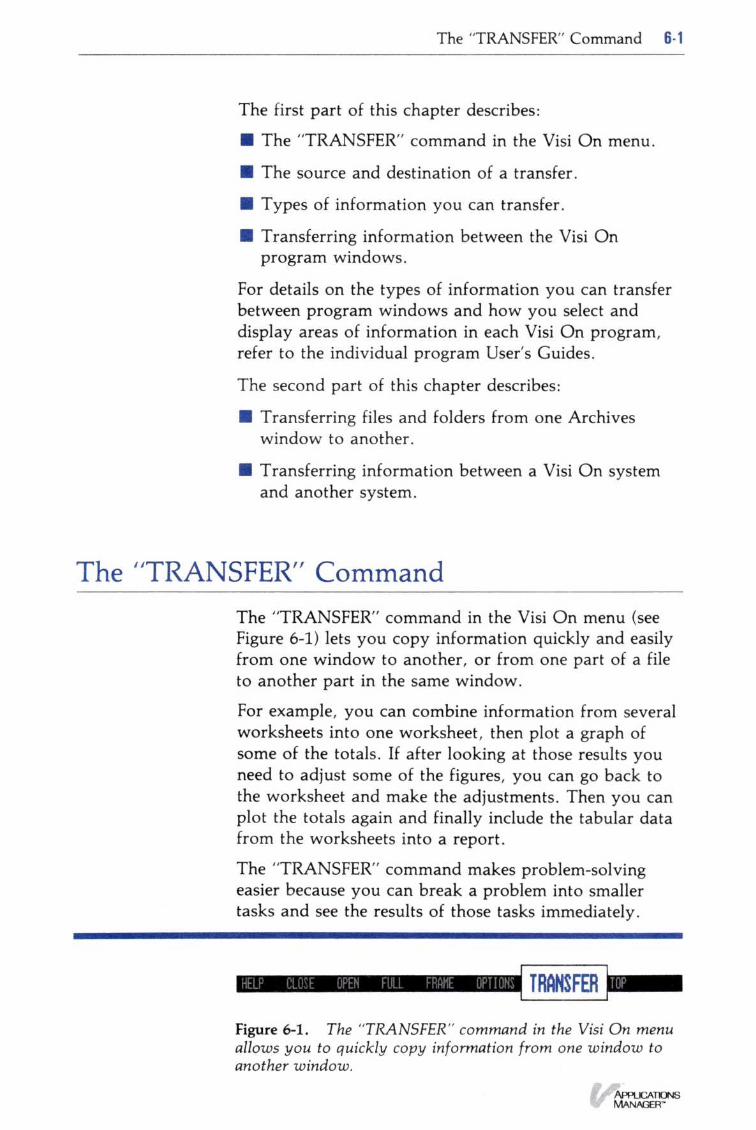
The "TRANSFER" Command 6 .1
The first part of this chapter describes :
∎
The "TRANSFER" command in the Visi On menu .
•
The source and destination of a transfer .
∎
Types of information you can transfer .
•
Transferring information between the Visi Onprogram windows .
For details on the types of information you can transferbetween program windows and how you select anddisplay areas of information in each Visi On program,refer to the individual program User's Guides .
The second part of this chapter describes :
•
Transferring files and folders from one Archiveswindow to another .
•
Transferring information between a Visi On systemand another system .
The "TRANSFER" CommandThe "TRANSFER" command in the Visi On menu (seeFigure 6-1) lets you copy information quickly and easilyfrom one window to another, or from one part of a fileto another part in the same window .
For example, you can combine information from severalworksheets into one worksheet, then plot a graph ofsome of the totals . If after looking at those results youneed to adjust some of the figures, you can go back tothe worksheet and make the adjustments . Then you canplot the totals again and finally include the tabular datafrom the worksheets into a report .
The "TRANSFER" command makes problem-solvingeasier because you can break a problem into smallertasks and see the results of those tasks immediately .
Figure 6-1 . The "TRANSFER" command in the Visi On menuallows you to quickly copy information from one window toanother window .
6- 2 Transferring Information
The Source and the Destination of a TransferThe transfer operation consists of : (1) defining thesource, the area or part of the data that you want totransfer; and (2) defining the destination, the place orlocation where you want the information transferred .
The source and destination are usually in different filesand different windows, but they can be within the samefile and even within the same window .
For example, if you want to transfer information fromone part of a file to another part of the same file, thenyou only need one window .
Figure 6-2 shows information transferred from onewindow to another .
Types of Information You Can TransferThere are two categories of transfer types in the Visi Onenvironment : general and program-specific . The type ofinformation that you can transfer in the Visi Onenvironment depends on how the source and destinationprograms interpret the selections you make .
For example, the Visi On Calc TM program can transfer anentire worksheet or parts of a worksheet . If you transferinformation from one worksheet to anotherworksheet-a program-specific type, you can transferthe entire worksheet (or parts of it) with all its displaycharacteristics (attributes), labels, and numbers to theirfull precision or you can transfer formulas only .
You can also transfer the entire worksheet, or parts of it,from a Visi On Calc worksheet to another Visi Onprogram's file-a general type ; but, the transferredinformation will not include attributes or formulas,because the destination program cannot accept thatinformation .
Some Visi On programs, however, can use the valuesfrom the numbers in the worksheet . For example, theVisi On Graph program creates a series from thenumbers, and then plots the series . Other Visi Onprograms, such as the Visi On WordTM program, treateverything as text .

Matching the Source and the Destination Types 6-3
Figure 6-2 . Transferring information from one window toanother allows you to break a problem into smaller tasks .
Matching the Source and the Destination TypesWhen you select the source in a file, the Visi On systemchecks the source program to determine the types ofinformation that it can transfer .
6-4 Transferring Information
When you select the destination, the system checks thedestination program to determine the types ofinformation that it can accept .
If the destination can accept one or more of the typesthat the source can transfer, then the Visi On systemchooses the one most preferred by the source program .
Figure 6-3 summarizes the types of information that eachVisi On program can transfer (source) and accept(destination) . Each column in Figure 6-3 has a type, suchas "Rectangle" or "Text ." Some types of informationrequire further explanation ; those include a circlednumber . Refer to the number below the table for thedescription .
For more details on the types of information you cantransfer between windows and how you select anddisplay areas of information in each Visi On program,refer to the individual program User's Guides .
Figure 6-3 . Types of information that can be transferred between the Visi On programs
Matching the Source and the Destination Types 6 . 5
1 You can transfer all or part of a worksheet withattributes, labels, and numeric values, if those aredisplayed . The Visi On system copies this informationto another Visi On Calc worksheet .You can transfer all or part of a worksheet withformulas only, if formulas are displayed . The systemcopies the formulas into another Visi On Calcworksheet .
2 You can transfer any rectangular area of a worksheetthat consists of text and numeric values . The Visi Onsystem copies the information into cells in a Visi OnQuery table. If you transfer labels and numbers tocells that contain formulas, the Visi On Queryprogram uses the labels and numbers in calculations .
3 You can transfer any rectangular area of a worksheetthat consists of individual labels and values . Thesystem copies the information to the Visi On Graphwindow as series in the working folder . A single rowor column becomes a single series ; a rectanglebecomes multiple series, one from each row .Then the Visi On Graph program converts items thatlook like numbers to numeric values, and other itemsto zero . If the first item in each series does not looklike a number, it is used as the series name. Theprogram then plots the series .
4 You can transfer the same information as 3, exceptthe Visi On Graph program adds the values to thedisplay of series numbers in the edit table, not theworking folder, and doesn't plot it . If the values are asingle row or column, they may be inserted into anexisting series .
5 You can transfer a rectangular area of the worksheetas lines of text . The system copies the worksheet textinto the Visi On Word document . The text appears inthe document just as it appears in the Visi On Calcwindow . The Visi On Word program treats thenumbers as text . The numbers are not suitable forcalculations .
6 You can transfer a rectangular area of the worksheetas lines of text . The system copies the cells from aVisi On Query table to another Visi On Query table .The Visi On Query program treats the numbers astext . The numbers are not suitable for calculations .
6-6 Transferring Information
7 You can transfer any rectangular area of text andnumbers. The system copies the information to theVisi On Graph window as a series in the workingfolder . A single row or column becomes a singleseries; a rectangle becomes multiple series, one fromeach row .Then the Visi On Graph program converts items thatlook like numbers to numeric values, and other itemsto zero . If the first item in each series does not looklike a number, it is used as the series name . Theprogram then plots the series .
8 You can transfer the same information as 7, exceptthe Visi On Graph program adds the values to thedisplay of series numbers in the edit table, not theworking folder, and doesn't plot it . If the values are asingle row or column they may be inserted into anexisting series .
9 You can transfer a rectangular area of text andnumbers that are not suitable for calculations . Thesystem copies the text to the Visi On Worddocument . The text appears in the document just as itappears in the Visi On Query window . The Visi OnWord program treats the numbers as text .
10 You can transfer a rectangular area that consists ofone or more numbers. The Visi On system copies thenumbers into the worksheet, placing each columnfrom the Visi On Graph program into a row in theworksheet .
11 You can transfer a rectangular area of one or morenumbers. The Visi On system copies the series intoconsecutive cells in the table . Each column in thesource rectangle becomes a row in the destination . Ifyou transfer numbers to cells that contain formulas,the Visi On Query program uses the numbers incalculations .
12 You can transfer a rectangular area of numbers . Thesystem copies the numbers as text to the Visi OnWord document . Each column of numbers becomes asingle line of text .
13 You can transfer text and numbers . The systemcopies the Visi On Word information into a column(the destination point) in the worksheet and theVisi On Calc program converts any numbers to
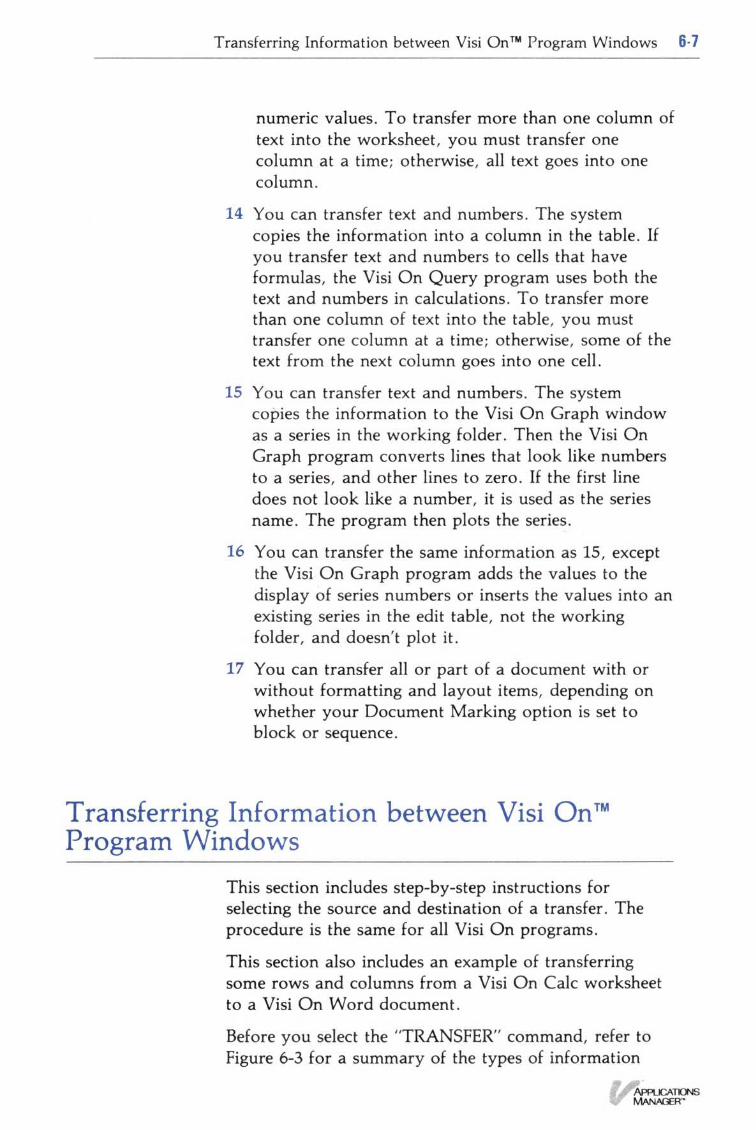
Transferring Information between Visi On TM Program Windows 6-7
numeric values . To transfer more than one column oftext into the worksheet, you must transfer onecolumn at a time ; otherwise, all text goes into onecolumn .
14 You can transfer text and numbers . The systemcopies the information into a column in the table . Ifyou transfer text and numbers to cells that haveformulas, the Visi On Query program uses both thetext and numbers in calculations . To transfer morethan one column of text into the table, you musttransfer one column at a time ; otherwise, some of thetext from the next column goes into one cell .
15 You can transfer text and numbers . The systemcopies the information to the Visi On Graph windowas a series in the working folder . Then the Visi OnGraph program converts lines that look like numbersto a series, and other lines to zero . If the first linedoes not look like a number, it is used as the seriesname . The program then plots the series .
16 You can transfer the same information as 15, exceptthe Visi On Graph program adds the values to thedisplay of series numbers or inserts the values into anexisting series in the edit table, not the workingfolder, and doesn't plot it .
17 You can transfer all or part of a document with orwithout formatting and layout items, depending onwhether your Document Marking option is set toblock or sequence .
Transferring Information between Visi On"'Program Windows
This section includes step-by-step instructions forselecting the source and destination of a transfer . Theprocedure is the same for all Visi On programs .
This section also includes an example of transferringsome rows and columns from a Visi On Calc worksheetto a Visi On Word document .
Before you select the "TRANSFER" command, refer toFigure 6-3 for a summary of the types of information
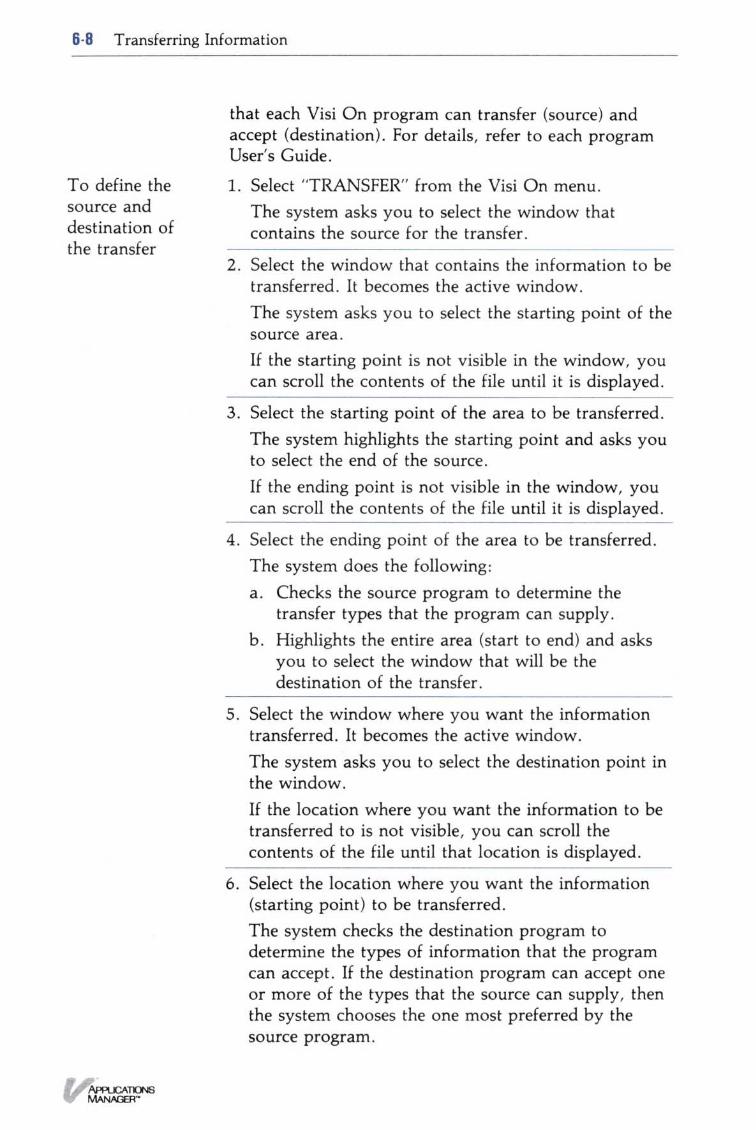
6 .8 Transferring Information
that each Visi On program can transfer (source) andaccept (destination) . For details, refer to each programUser's Guide .
To define the
1. Select "TRANSFER" from the Visi On menu .source and
The system asks you to select the window thatdestination of
contains the source for the transfer .the transfer
2 . Select the window that contains the information to betransferred . It becomes the active window .The system asks you to select the starting point of thesource area .If the starting point is not visible in the window, youcan scroll the contents of the file until it is displayed .
3 . Select the starting point of the area to be transferred .The system highlights the starting point and asks youto select the end of the source .If the ending point is not visible in the window, youcan scroll the contents of the file until it is displayed .
4 . Select the ending point of the area to be transferred .The system does the following :a . Checks the source program to determine the
transfer types that the program can supply .b . Highlights the entire area (start to end) and asks
you to select the window that will be thedestination of the transfer.
5 . Select the window where you want the informationtransferred . It becomes the active window .The system asks you to select the destination point inthe window .If the location where you want the information to betransferred to is not visible, you can scroll thecontents of the file until that location is displayed .
6 . Select the location where you want the information(starting point) to be transferred .The system checks the destination program todetermine the types of information that the programcan accept . If the destination program can accept oneor more of the types that the source can supply, thenthe system chooses the one most preferred by thesource program .
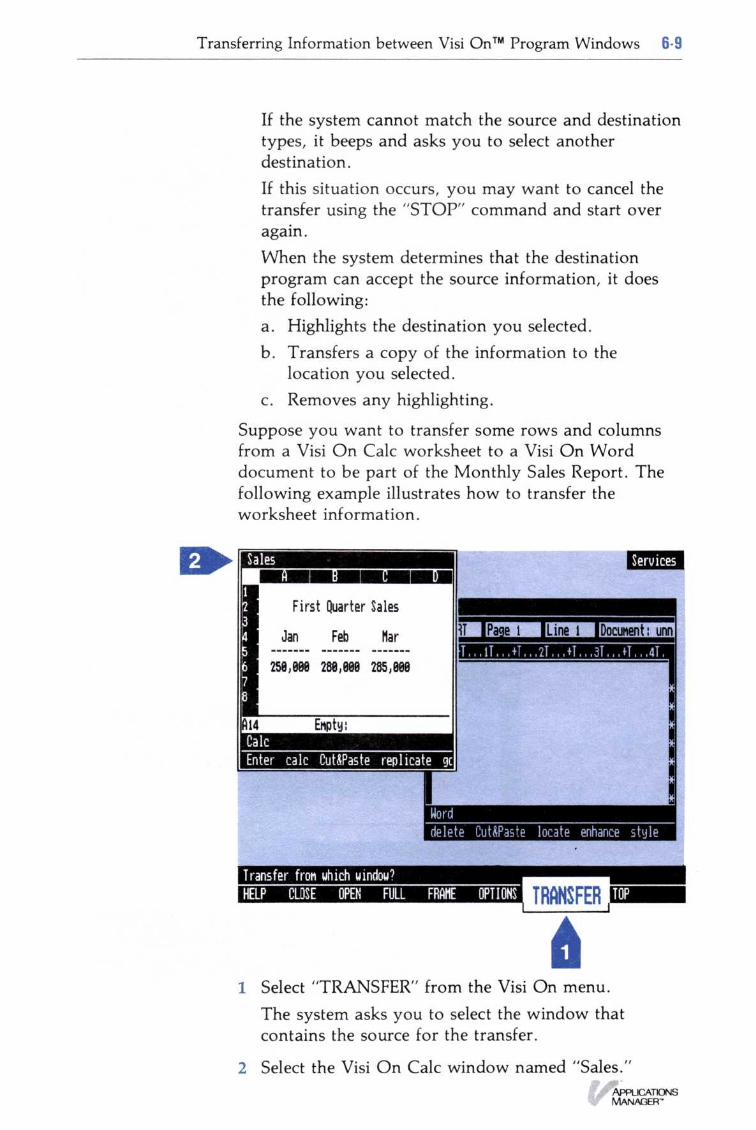
Transferring Information between Visi On TM Program Windows 6-9
If the system cannot match the source and destinationtypes, it beeps and asks you to select anotherdestination .If this situation occurs, you may want to cancel thetransfer using the "STOP" command and start overagain .When the system determines that the destinationprogram can accept the source information, it doesthe following :a . Highlights the destination you selected .b . Transfers a copy of the information to the
location you selected .c . Removes any highlighting .
Suppose you want to transfer some rows and columnsfrom a Visi On Calc worksheet to a Visi On Worddocument to be part of the Monthly Sales Report . Thefollowing example illustrates how to transfer theworksheet information .
1 Select "TRANSFER" from the Visi On menu .The system asks you to select the window thatcontains the source for the transfer .
2 Select the Visi On Calc window named "Sales ."
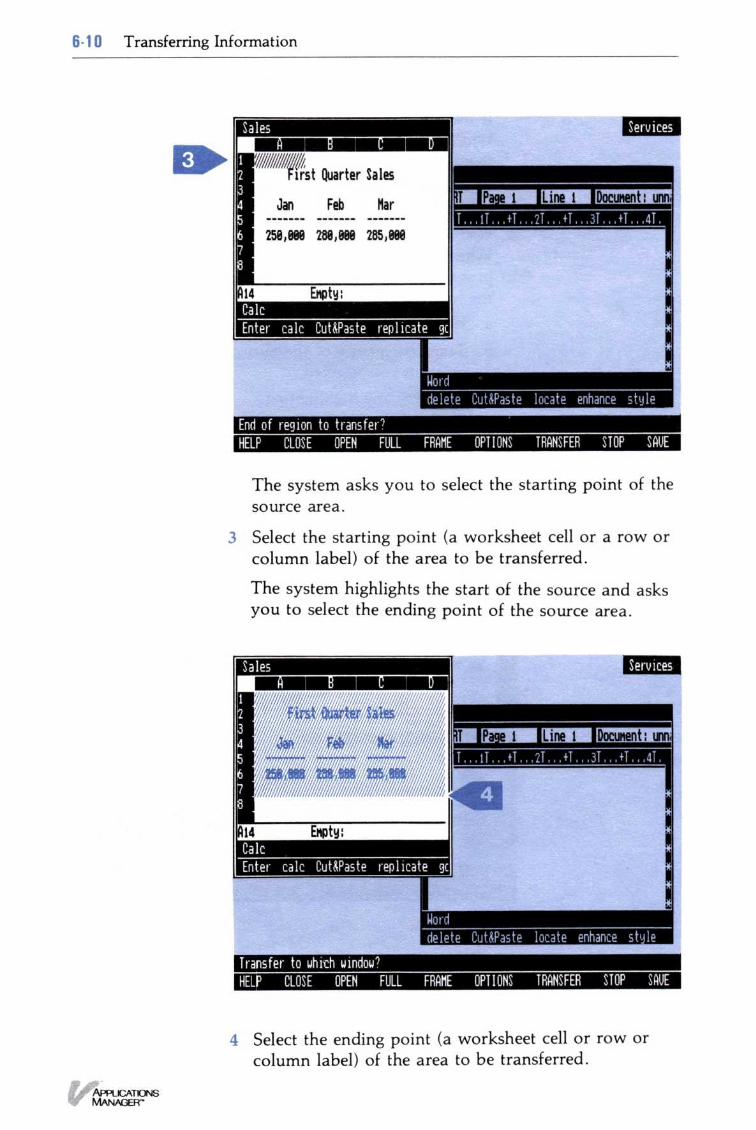
6 . 1 0 Transferring Information
The system asks you to select the starting point of thesource area .
3 Select the starting point (a worksheet cell or a row orcolumn label) of the area to be transferred .
The system highlights the start of the source and asksyou to select the ending point of the source area .
4 Select the ending point (a worksheet cell or row orcolumn label) of the area to be transferred .
Transferring Information between Visi On TM Program Windows 6- 1 1
The system checks the Visi On Calc program todetermine the types of information it can supply .The Visi On Calc program can transfer :∎ First, all or part of a worksheet with attributes,
labels, and numbers, if that is what is currentlydisplayed .
∎ Second, all or part of a worksheet with formulasonly, if formulas are currently displayed .Third, any rectangular area of a worksheetconsisting of individual labels and values (noattributes or formulas) .
∎ Fourth, a text image of all or part of a worksheetconsisting of lines of text that are no longersuitable for calculations .
The system then highlights the entire rectangular areaof cells from start to end .
The system asks you to select the window that will bethe destination of the transfer .
5 Select the Visi On Word window .
The destination window becomes the active window,and the system asks you to select the destinationpoint in the window .
6- 1 2 Transferring Information
6 Select the location where you want the information tobe copied .The system checks the Visi On Word program todetermine the types of information that it can accept .The Visi On Word program can accept :∎ First, all or part of a Visi On Word document
with or without its formatting and layout items .[H' Second, text and numbers that are not used for
calculations .
Transferring Files and Folders between Archives Windows 6- 1 3
The system checks to see if there is a matchbetween the types of information the Visi On Calcprogram can supply and the types the Visi OnWord program can accept . The Visi On Calcprogram can transfer a rectangular area of theworksheet as lines of text including numbers thatare no longer suitable for calculating and theVisi On Word program can accept it .
7 The system copies the worksheet rows and columnsand inserts it into the Visi On Word file beginning atthe location you selected .The information looks just like the worksheetinformation in the Visi On Calc "Sales" window,except that it does not contain the worksheetattributes and the numbers are no longer suitable forcalculating .
Transferring Files and Foldersbetween Archives Windows
This section includes step-by-step instructions fortransferring a single file or folder or several files andfolders from one Archives folder to another .
This operation is similar to the one the "copy" commandin the Archives menu performs, but the "copy"command only lets you copy one file or folder at a time .The "TRANSFER" command, however, lets you transferseveral files and/or folders to another folder in theArchives all at one time . It also lets you copy betweenfolders displayed in different windows, whereas you canuse the "copy" command within one window only .
To transfer a
1. Make sure the folder that has the files/folders yousingle file/folder
want to transfer is displayed in an Archives windowor several
and the destination folder is displayed in an Archivesfiles/folders
window, then select "TRANSFER" from the Visi Onmenu .The system asks you to select the window thatcontains the source for the transfer.
2 . Select the window that contains the information to betransferred . It becomes the active window .

6-1 4 Transferring Information
The system asks you to select the starting point of thesource area .If the single file/folder or several files/folders youwant to transfer are not visible in the window, youcan scroll the contents of the Archives until they aredisplayed .
3 . Select anywhere in the line that contains the singlefile/folder or the first file/folder you want to transfer .The system highlights the selected line and asks youto select the end of the source .If you want to transfer more than one file/folder andthe last one is not visible in the window, you canscroll the contents of the Archives until it isdisplayed .
4. Do one of the following :∎ To transfer one file/folder only, select anywhere
in the same line as before .∎ To transfer several files/folders, select anywhere
in the line that contains the last file/folder to betransferred .
The system highlights the single file/folder or severalfiles/folders, and asks you to select the window thatwill be the destination of the transfer .
5 . Select the destination window ; it becomes the activewindow.The system asks you to select the destination point inthe window .
6 . Do one of the following :∎ To add a copy of a single file/folder or several
files/folders, select "[NEW] ."∎ To replace a file in the destination folder with
another file, select the existing file in thedestination folder .If the file you want to replace is not visible, youcan scroll the contents of the window until it isdisplayed .Note that the source must be a single file or folderand that you can only replace a file with a file (forexample, replace a worksheet with anotherworksheet or replace a series with a worksheet) .You cannot replace a file with a folder or replacea folder with a file .
Transferring Files and Folders between Archives Windows 6 . 1 5
The system does one of the following :If you selected "[NEW]," it transfers a copy of thesingle file/folder or several files/folders to thefolder .If there is a file/folder with the same name ornames in the destination folder, the system adds anumber to the end of the name (for example,budget becomes budget0) .The next time you start the Archives and displaythis folder, the files and folders in it will be inalphabetical order .
is If you selected an existing destination file/folder tobe replaced with the source file/folder, the systemoverwrites the file/folder, puts the file in thewastebasket folder, and gives the source file/folderthe same name as the destination (for example, thesource file Feb Sales becomes the destination filenamed "Monthly Sales") .
Transferring Files and Folders between FoldersSuppose you have several files and a folder in yourBudget folder that you would like to make copies of andalso put in your Sales folder . The following exampleillustrates how to transfer copies of those files and folderto the Sales folder .
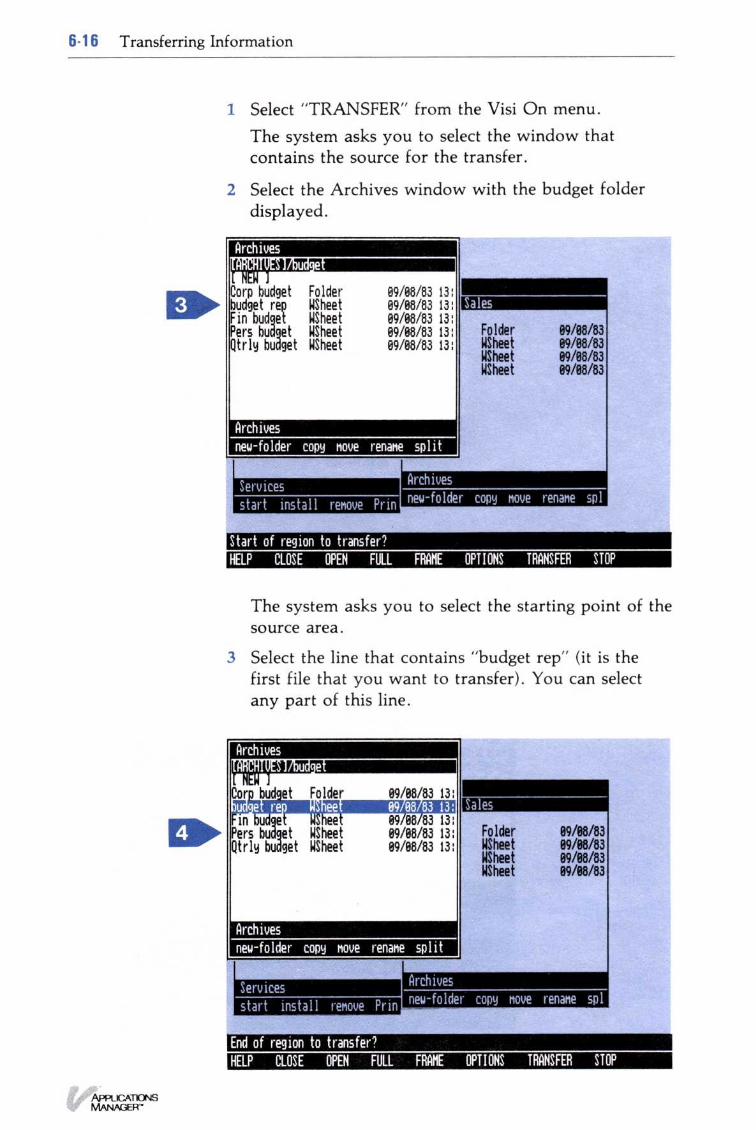
6- 1 6 Transferring Information
1. Select "TRANSFER" from the Visi On menu .The system asks you to select the window thatcontains the source for the transfer .
2 Select the Archives window with the budget folderdisplayed .
The system asks you to select the starting point of thesource area .
3 Select the line that contains "budget rep" (it is thefirst file that you want to transfer) . You can selectany part of this line .
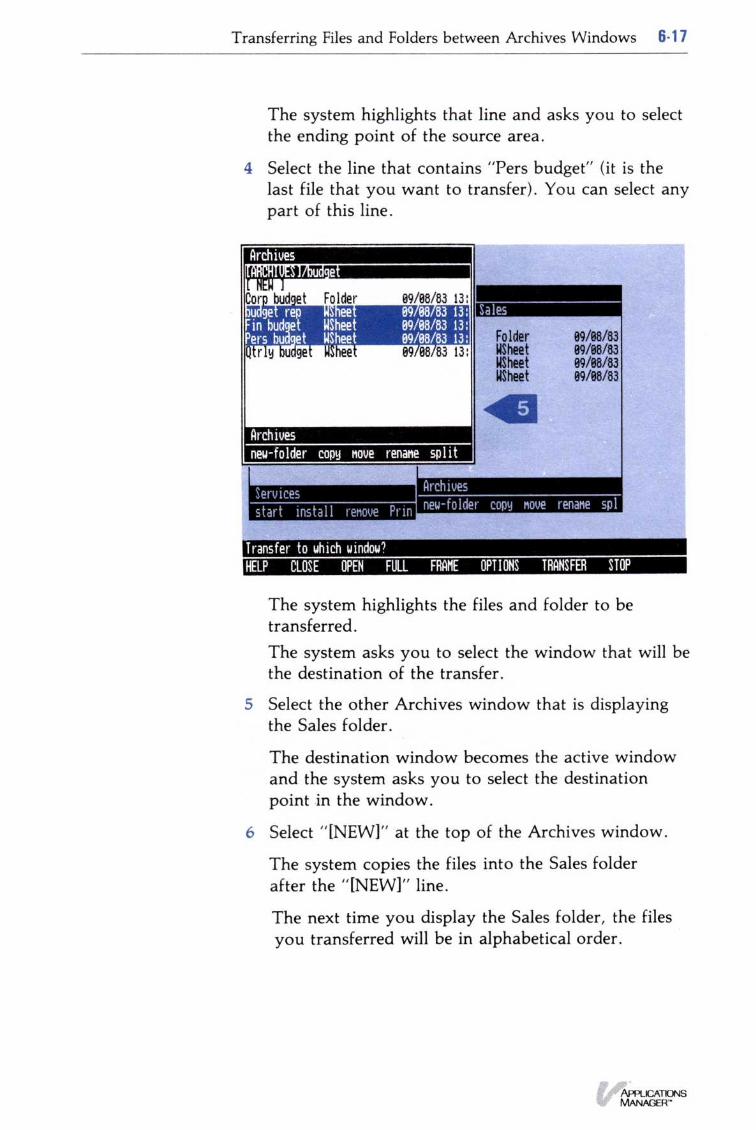
Transferring Files and Folders between Archives Windows 6 . 1 7
The system highlights that line and asks you to selectthe ending point of the source area .
4 Select the line that contains "Pers budget" (it is thelast file that you want to transfer) . You can select anypart of this line .
The system highlights the files and folder to betransferred .The system asks you to select the window that will bethe destination of the transfer .
5 Select the other Archives window that is displayingthe Sales folder .
The destination window becomes the active windowand the system asks you to select the destinationpoint in the window .
6 Select "[NEW]" at the top of the Archives window .
The system copies the files into the Sales folderafter the "[NEW]" line .
The next time you display the Sales folder, the filesyou transferred will be in alphabetical order .
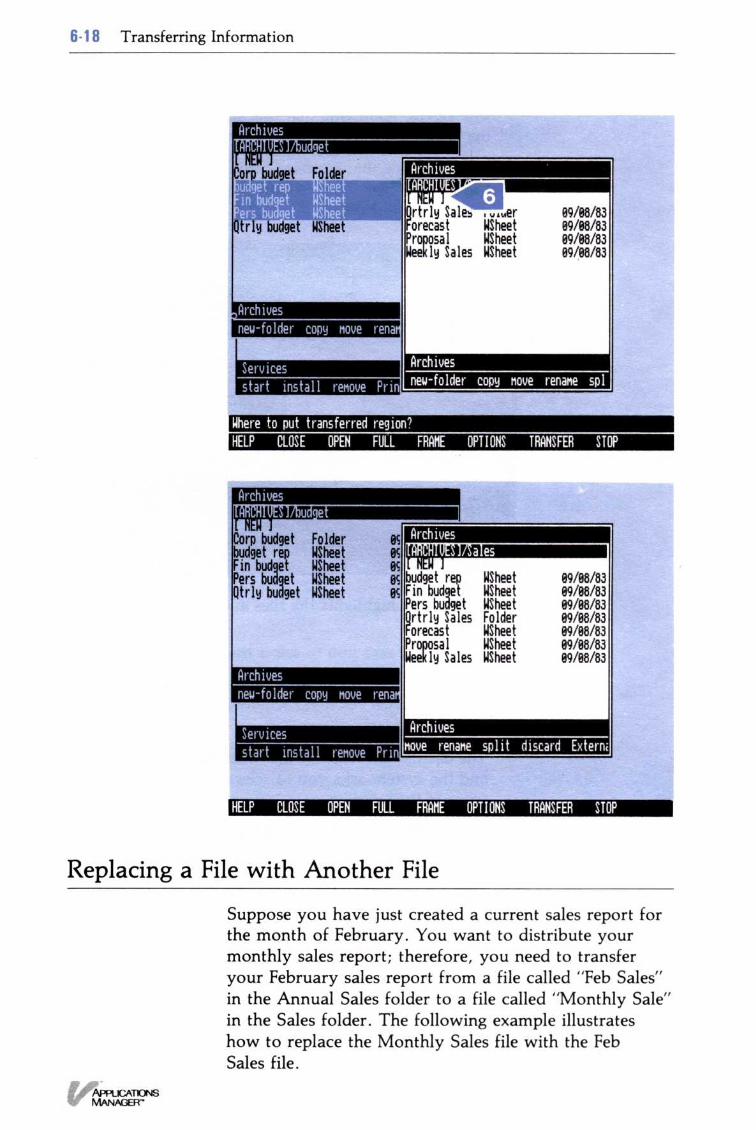
6- 1 8 Transferring Information
Replacing a File with Another File
Suppose you have just created a current sales report forthe month of February . You want to distribute yourmonthly sales report ; therefore, you need to transferyour February sales report from a file called "Feb Sales"in the Annual Sales folder to a file called "Monthly Sale"in the Sales folder . The following example illustrateshow to replace the Monthly Sales file with the FebSales file .

Transferring Files and Folders between Archives Windows 6- 1 9
1 Select "TRANSFER" from the Visi On menu .The system asks you to select the window thatcontains the source for the transfer.
2 Select the Archives window with the Annual Salesfolder displayed .
The system asks you to select the starting point of thesource area .
3 Select the line that contains "Feb Sales ." You canselect any part of this line .
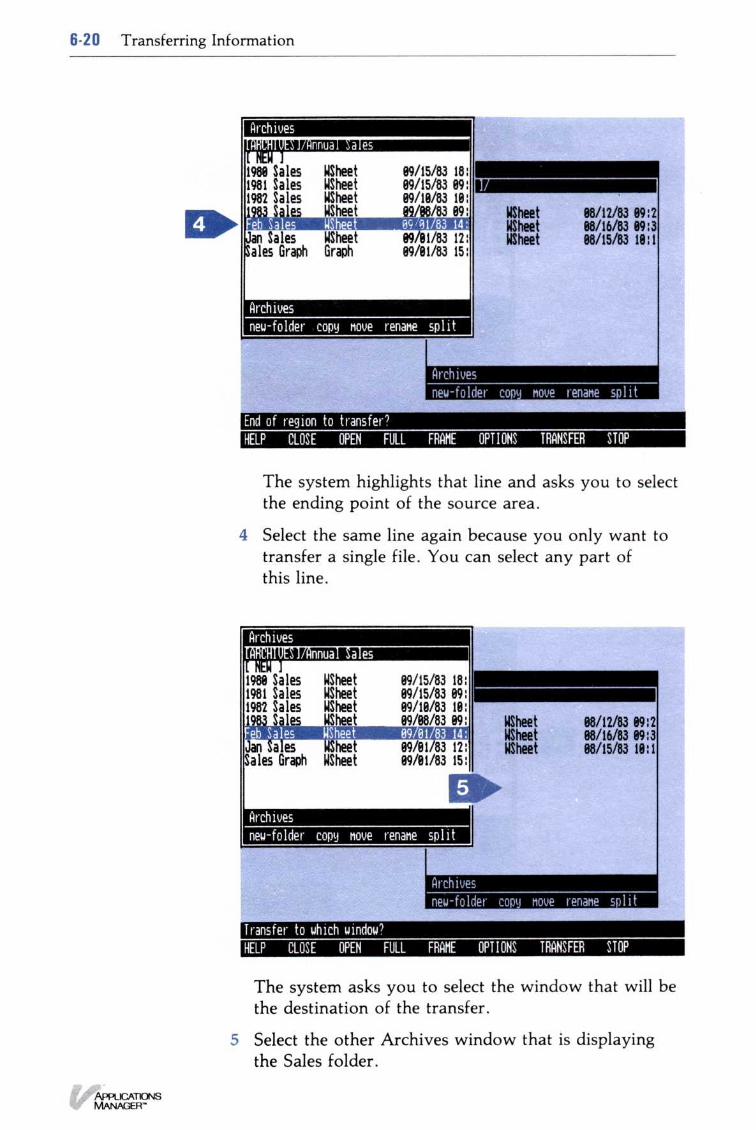
6-2 0 Transferring Information
The system highlights that line and asks you to selectthe ending point of the source area .
4 Select the same line again because you only want totransfer a single file . You can select any part ofthis line .
The system asks you to select the window that will bethe destination of the transfer .
Select the other Archives window that is displayingthe Sales folder .
Transferring Information between a Visi On TM System and Another System 6-2 1
The destination window becomes the active windowand the system asks you to select the destinationpoint in the window .
6 Select the line that contains "Monthly Sale ." That lineis highlighted .The system overwrites the Monthly Sale file with theFeb Sales file, puts the Monthly Sale file in thewastebasket folder, and gives the Feb Sales source filethe same name as the destination . The file "Feb Sales"becomes the destination file named "Monthly Sale ."
Transferring Informationbetween a Visi On TM Systemand Another System
This section includes step-by-step instructions for :
∎
Transferring information from another system to theVisi On system, and ultimately to a Visi On program .
∎
Transferring information from the Visi On programto another system .
This type of transfer is called an "external transfer," inwhich either the source or the destination is listed as anExternal file in the Visi On Archives .
6-2 2 Transferring Information
These operations use the "import" and "export"commands in the Archives External menu and the"TRANSFER" command in the Visi On menu .
Transferring Information into the Visi On System
You can create MS-DOS files on another system andthen use those files within the Visi On environment .However, they must be in the Visi On transfer format .Independent software vendors will be providingprograms that create MS-DOS files in that format .
After those files are created, the "import" command inthe Archives External menu lets you copy the MS-DOSfile into the Archives . From the Archives, the"TRANSFER" command in the Visi On menu lets youthen transfer the file into one of the Visi On programs .
To transfer the 1 . Start the Archives from the Services window . Forfile to a Visi On instructions on starting the Archives, refer toprogram Chapter 3 .
2 . Select "External" from the Archives menu .
3 . If the file is on a floppy disk, insert the floppy disk .
4 . Select "import" from the "External" menu .
5 .
The system asks you to type the name of the MS-DOS file .
Type the name of the file including the drive and
6 .
optionally a directory name, for example,a: \dirname\filename . For information on MS-DOSfile names, see Chapter 2 in the IBM Disk OperatingSystem manual .Then press the key marked (ENTER) .The Visi On system asks you to select thedestination for the "imported" file .
Make sure the folder where you want the file copiedis displayed . Then do one of the following :L∎ To add the new file to the folder, select "[NEW] ."
To replace an existing file with the new file,select the file you want to replace .
Note that you cannot replace a folder ; you mustreplace a file with a file .
Transferring Information between a Visi On TM System and Another System 6-2 3
The system does one of the following :If you selected "[NEW]," the system asks you totype a name for the new file or to press the keymarked (ENTER) to use the same name .Type a new name (up to 12 characters long) andpress (ENTER) .If you enter a name that already exists, thesystem prompts you to enter another name .The system copies the new file to the displayedfolder and gives it the External file type .If you selected an existing file to be replaced withthe new file, the system overwrites the file, putsit in the wastebasket folder, gives the source filethe same name as the destination, and gives it anExternal file type .
7 . Before you transfer the External file to thedestination program, make sure you have started theprogram and the window is displaying the file whereyou want the new file transferred, then select"TRANSFER" from the Visi On menu .The system asks you to select the source window forthe transfer .
8 . Select the Archives window displaying the Externalfile .The system asks you to select the starting point forthe source .
9 . Select the line that contains the "External" file fromthe Archives window .The system asks you to select the ending point .
10. Select the same line .The system asks you to select the window where theExternal file will be transferred .
11 . Select the program window where you want theExternal file transferred .The system asks you to select the destination point .
12 . Select the location in the program file (such as a VisiOn CalcTM worksheet, Visi On Graph TM graph orseries, Visi On Query TM table, or Visi on Word TM
document) where you want the External filetransferred .
6-2 4 Transferring Information
The system checks the destination program todetermine the types of information that it canaccept . If the destination program can accept thetype in the selected External source file, then thesystem accepts it .If the system cannot match the source anddestination types, it beeps and asks you to selectanother destination point .
If this situation occurs, you may want to cancel thetransfer operation by selecting "STOP" from theVisi On menu and start over again .
When the system determines that the destinationprogram can accept the source file, it transfers acopy of the External file to the location you selected .
Depending on the destination of the transfer, thesystem either overwrites what is in the destinationwith the transferred information or inserts theinformation beginning at the location you select .
Transferring Information Out of the Visi On System
The "TRANSFER" command in the Visi On menu andthe "export" command in the Archives External menulets you transfer a copy of a Visi On file to anothersystem .
1 . Make sure you have started the Visi On programand are displaying the file you want to transfer, thenselect "TRANSFER" from the Visi On menu .The system asks you to select the window thatcontains the source for the transfer .
2 . Select the window that contains the information tobe transferred . It becomes the active window .The system asks you to select the starting point ofthe source area .If the starting point is not visible in the window,you can scroll the contents of the file until it isdisplayed .
3 . Select the starting point of the area to be transferred .The system highlights the starting point and asksyou to select the end of the source .
To transfer thatfile to anothersystem
Transferring Information between a Visi On TM System and Another System 6. 25
If the ending point is not visible in the window, youcan scroll the contents of the file until it is displayed .
4. Select the ending point of the area to be transferred .The system does the following :a. Checks the source program to determine the
transfer types that the program can supply .b . Highlights the entire area (start to end), and asks
you to select the window that will be thedestination of the transfer .
5 . Select the Archives window where you want theinformation transferred . It becomes the activewindow .The system asks you to select the destination pointin the window .
6 . Select "[NEW] ."The Archives can accept all general types (notprogram-specific) of information from the Visi Onprograms, so the system chooses the first type thatthe source program can supply .The system creates a new file named "TRANSFER"of the type External and stores the information fromthe source file in the format of its transfer type (suchas a rectangular area of text and numbers) .
7. To copy this file to an MS-DOS file, select"External" from the Archives menu .
8 . Select "export ."The system asks you to select the file to betransferred to another system .
9 . Select the External file you want to "export"(transfer out) .The system asks you to type the name of thedestination file .
10. If the file will be on a floppy disk, insert thefloppy disk.
11 . Type the name you want the destination file to haveas an MS-DOS file, including the drive andoptionally the directory name. For example, typea: \dirname\filename . For information on MS-DOS

6- 26 Transferring Information
file names, see Chapter 2 in the IBM Disk OperatingSystem manual .Then press the key marked (ENTER) .The system creates an MS-DOS file on theappropriate disk .

Printing7
Chapter 7
Printing
Printing Your Files 7-1Printing on a Connected (Local) Printer 7-1Printing on a Remote Printer 7-1Printing on a Remote Printer Connected to a
Computer Not Running the Visi On System 7-2
Displaying the Print Queue 7-4
Changing the Status of Your Print Requests 7-5Stopping the Printer Temporarily 7-5Restarting the Printer 7-5Cancelling a Print Request 7-6
Responding to Print Messages 7-7
Printing Your Files
Printing Your Files 7-1
Before you can print your files, you must connect yourprinters or plotters and let the Visi On TM system knowthe name of the device, its model, and to whichconnector the device is connected . Refer to "Setting upYour Computer Equipment" and "Installing Your Printeror Plotter" in the Visi On Setup Guide .
This chapter includes step-by-step instructions for :
•
Printing your files .
•
Displaying the print queue .
∎
Changing the status of print requests :∎
Stopping a printer temporarily .∎ Restarting a printer .∎
Cancelling a print request .
•
Responding to Print Messages
You can print your files on :
∎
A connected (local) printer or plotter .
•
A remote printer or plotter connected to a computerthat has the Visi On system and its programs installedand running .
∎
A remote printer that does not have the Visi Onsystem and its programs installed .
Printing on a Connected (Local) Printer
To print a file on a connected printer (this is called localprinting), you use the "print" command in each Visi Onapplication program's main menu . Refer to theindividual program User's Guides for instructions onlocal printing .
Printing on a Remote PrinterIf you want to print some of your Visi On files and yourcomputer does not have a printer connected to it, youcan print those files from another Visi On system thathas a printer connected to it .
7-2 Printing
To print the files
1. Initialize and mount a floppy disk in the system thaton another
has the files you want to print . Follow the instruc-Visi On system
tions in "Initializing a Floppy Disk for the Archives"and "Mounting a Floppy Disk" in Chapter 5 .The mounted floppy disk appears as a folder in thecentral Archives folder . The name of the folder is thename you entered when you initialized the floppydisk .
2 . Copy or move the file you want to print into thisfolder using the "copy" or "move" commands in theArchives menu. Refer to Chapter 5 for thoseinstructions .Copying or moving the file into the folder copies ormoves the file onto the floppy disk as well .
3 . Unmount the floppy disk following the instructions in"Unmounting a Floppy Disk" in Chapter 5 .
4 . Take the floppy disk and put it in a disk drive of thecomputer that has the printer/plotter attached .
5 . Mount the floppy disk according to the instructions in"Mounting a Floppy Disk" in Chapter 5 .Again the file on the floppy disk appears in a folderin the central Archives folder .
6 . Start the program window you want to print from .
7. Select "file" from the program's main menu .The program's Files display appears .
8 . Load (get) the file from the folder in the Archives andput it in your working folder on the Files display .Then select "done" from the Files display menu .The file appears in the program window .
9 . Select "print" from the main menu and follow theinstructions in the individual User's Guides forprinting files .
Printing on a Remote Printer Connected to aComputer Not Running the Visi On TM System
When you want to print a file on a printer that is atanother location and is not connected to a computer that
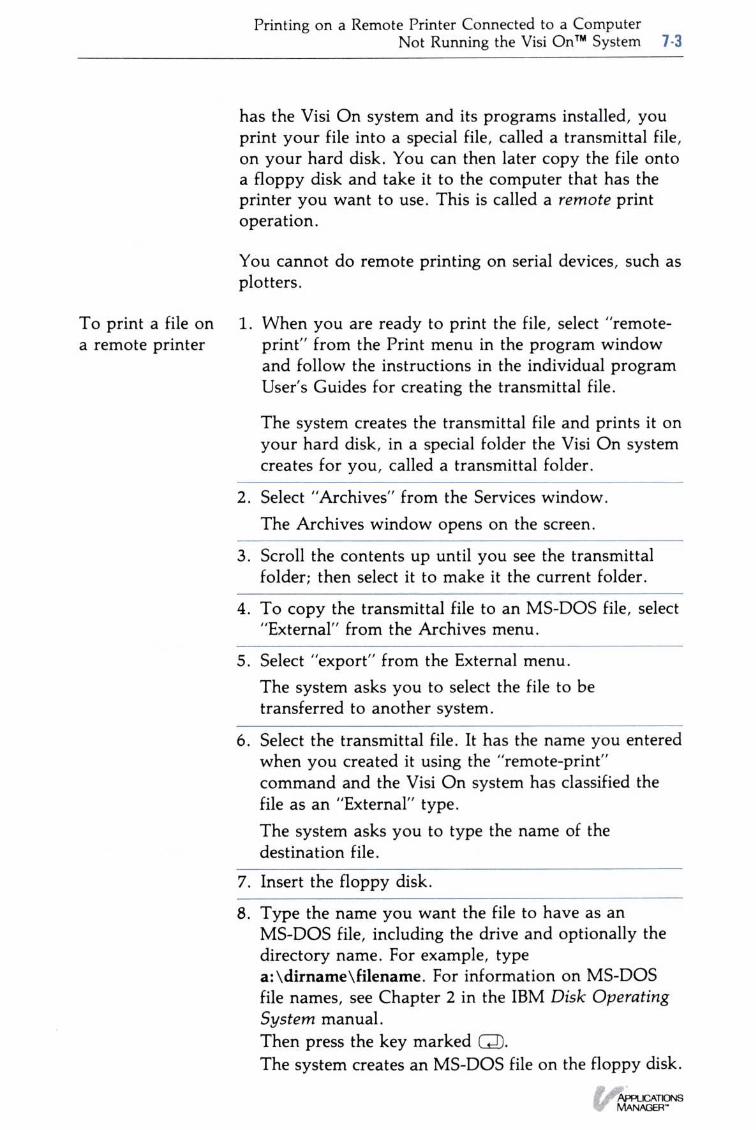
Printing on a Remote Printer Connected to a ComputerNot Running the Visi OnTM System 7-3
has the Visi On system and its programs installed, youprint your file into a special file, called a transmittal file,on your hard disk . You can then later copy the file ontoa floppy disk and take it to the computer that has theprinter you want to use . This is called a remote printoperation .
You cannot do remote printing on serial devices, such asplotters .
1 . When you are ready to print the file, select "remote-print" from the Print menu in the program windowand follow the instructions in the individual programUser's Guides for creating the transmittal file .
The system creates the transmittal file and prints it onyour hard disk, in a special folder the Visi On systemcreates for you, called a transmittal folder .
2 . Select "Archives" from the Services window .The Archives window opens on the screen .
3 . Scroll the contents up until you see the transmittalfolder ; then select it to make it the current folder .
4 . To copy the transmittal file to an MS-DOS file, select"External" from the Archives menu .
5 . Select "export" from the External menu .The system asks you to select the file to betransferred to another system .
6 . Select the transmittal file . It has the name you enteredwhen you created it using the "remote-print"command and the Visi On system has classified thefile as an "External" type .The system asks you to type the name of thedestination file .
7. Insert the floppy disk .
8 . Type the name you want the file to have as anMS-DOS file, including the drive and optionally thedirectory name . For example, typea: \dirname\filename . For information on MS-DOSfile names, see Chapter 2 in the IBM Disk OperatingSystem manual .Then press the key marked (ENTER) .The system creates an MS-DOS file on the floppy disk .
To print a file ona remote printer
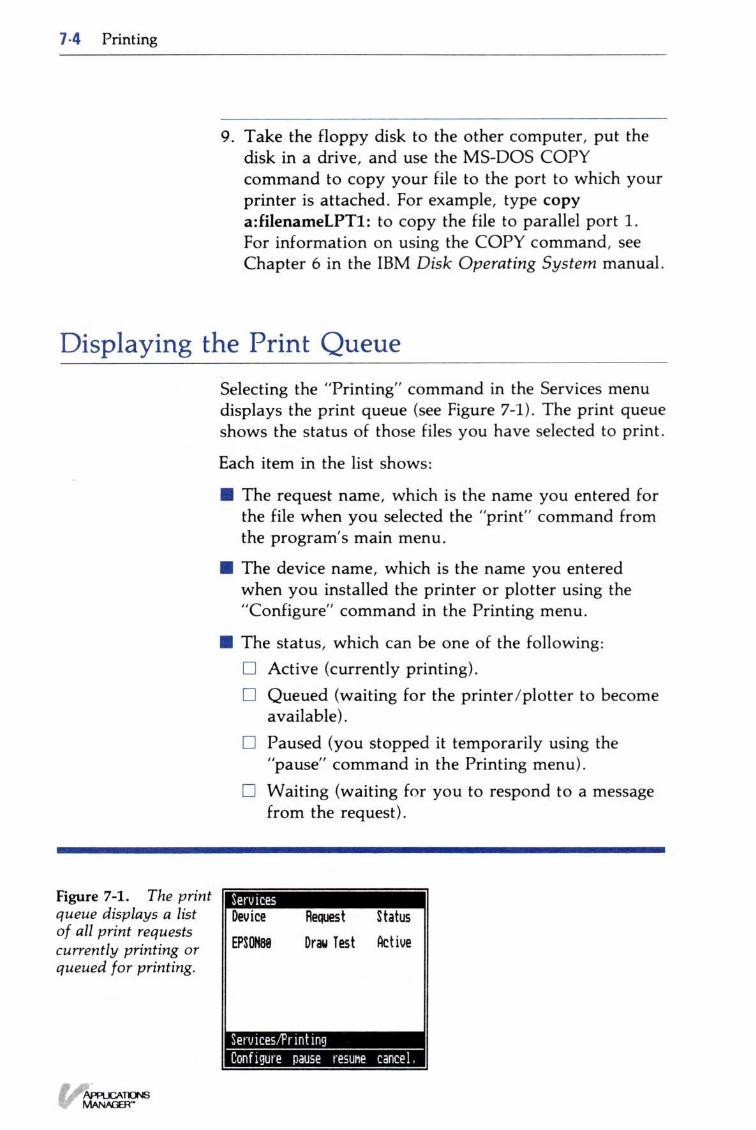
7 .4 Printing
Figure 7-1 . The printqueue displays a listof all print requestscurrently printing orqueued for printing .
9 . Take the floppy disk to the other computer, put thedisk in a drive, and use the MS-DOS COPYcommand to copy your file to the port to which yourprinter is attached . For example, type copya :filenameLPT1 : to copy the file to parallel port 1 .For information on using the COPY command, seeChapter 6 in the IBM Disk Operating System manual .
Displaying the Print QueueSelecting the "Printing" command in the Services menudisplays the print queue (see Figure 7-1) . The print queueshows the status of those files you have selected to print .
Each item in the list shows :
• The request name, which is the name you entered forthe file when you selected the "print" command fromthe program's main menu .
•
The device name, which is the name you enteredwhen you installed the printer or plotter using the"Configure" command in the Printing menu .
•
The status, which can be one of the following :∎ Active (currently printing) .∎ Queued (waiting for the printer/plotter to become
available) .∎ Paused (you stopped it temporarily using the
"pause" command in the Printing menu) .∎ Waiting (waiting for you to respond to a message
from the request) .
Changing the Status of Your Print Requests
To stopthe printertemporarily
Restarting the Printer
printing
Changing the Status of Your Print Requests 7- 5
If you want to change the status of any print request,you can use three Printing menu commands :
"pause"
Temporarily stops a printer .
"resume"
Restarts a printer .
"cancel'
Cancels a print request .
Stopping the Printer TemporarilyThe "pause" command from the Printing menu in theServices window lets you temporarily stop active orqueued print requests from sending output to a printeror a plotter .
1 . Select "Printing" from the Services menu .The print queue is displayed .
2 . Select "pause" from the Printing menu .The system asks you to select a print request from theprint queue display .
3 . Select the print request you want to stop temporarily .The system does the following :∎ If the request is active (currently printing), the
system stops the printing temporarily .∎ If the request is queued (waiting for the printer or
plotter to become available), the system keepsfrom sending output to the device when thatrequest reaches the top of the queue .
You cannot stop a request that is waiting for you torespond to a message . For instructions on respondingto a message, refer to "Responding to Print Messages"later in this chapter .
The "resume" command from the Printing menu in theServices window lets you restart a printer or a plotterthat was temporarily stopped by the "pause" command .
To resume
1. Select "Printing" from the Services menu .The print queue is displayed .
7 .6 Printing
Cancelling a Print Request
print request
2 . Select "resume" from the Printing menu .The system asks you to select a print request from theprint queue display .
3 . Select the print request you want to resume printing .The system continues sending output to the printer orthe plotter .
You cannot select a request that is waiting for you torespond to a message. For instructions on respondingto a message, refer to "Responding to Print Messages"later in this chapter .
The "cancel" command from the Printing menu in theServices window lets you cancel (stop permanently) anyprint request .
To cancel a
1. Select "Printing" from the Services menu .The print queue is displayed .
2 . Select "cancel" from the Printing menu .The system asks you to select a print request from theprint queue display .
3 . Select the print request you want to cancel .The system asks you to confirm the cancellation .
∎ Select "yes" to cancel the request .∎ Select "no" if you do not want to cancel the
request .
If you selected "yes," the system cancels the requestand removes it from the queue . The request cannot beresumed or restarted except by selecting "print" fromthe program's main menu .
You cannot select a request that is waiting for you torespond to a message . For instructions on respondingto a message, refer to "Responding to Print Messages"later in this chapter .
If you selected a request that was currently printing,the system stops it .

Responding to Print Messages
To read andrespond to yourmessages
Responding to Print Messages 7-7
When you print a file, the Visi On applications programsends the job to the Visi On system . This allows you tobegin working on the same or another file withoutwaiting until the file has finished printing .
When you print several files from your programs, theVisi On system puts each of your printing jobs in aqueue, and prints them in order .
The Visi On system displays any messages about yourprinting in the Services window as each job is printed .Because you may have continued your work on a file,the system blinks the Visi On menu at the bottom of thescreen to let you know there is a message that needsyour response .
1 . Activate the Services window by selecting it .
2 . Select "messages" from the Services menu .The system displays the message in the Serviceswindow .
3 . Respond to the message; depending on the message,the menu commands can vary . Typically there aretwo choices : "resume" and "cancel ."Select "resume" to resume printing, or if something iswrong that you cannot correct at this time, select"cancel" to stop the printing .Depending on your response, the system eitherrestarts or stops printing .If there are any other messages that are in the queue,the system displays the next message .


8
Selecting Options
Chapter 8
Selecting Options
Options Sheets 8-1
System Options 8-2
Displaying an Options Sheet 8-4Displaying the Visi On Services Options Sheet 8-5Displaying the Visi On Calc Recalculation
Options Sheet 8-6
Changing an Options Sheet 8-8Changing the Visi On Services Options Sheet 8-9Changing the Visi On Calc Recalculation
Options 8-10
Saving an Options Sheet 8-11
Restoring an Options Sheet 8-11
Setting an Options Sheet Aside 8-12
Options Sheets
Options Sheets 8-1
In this chapter you will learn how to use the specialoptions sheets that the Visi OnTM system provides to give
you more flexibility in using the system and itsprograms .
The second part of this chapter provides step-by-stepinstructions for :
•
Displaying an options sheet
•
Changing an options sheet
•
Saving an options sheet
∎
Restoring an options sheet
•
Setting an options sheet aside
The Visi On system and its programs are designed towork in certain ways . However, you can control theway certain operations are performed by tailoring themto fit your particular business needs . You change theseoperations through options sheets, which are displayedwhen you select the "OPTIONS" command in theVisi On menu (see Figure 8-1) .
When you install the Visi On system and the programs,each of the options is preset for you . These option
settings are used by the system and the programs until
you change them . The format of the options sheets andthe procedure for changing them are the same for allVisi On programs .
Figure 8-1. Selecting the "OPTIONS" command from theVisi On menu allows you to specify how you want eachVisi On program to operate to suit your needs .
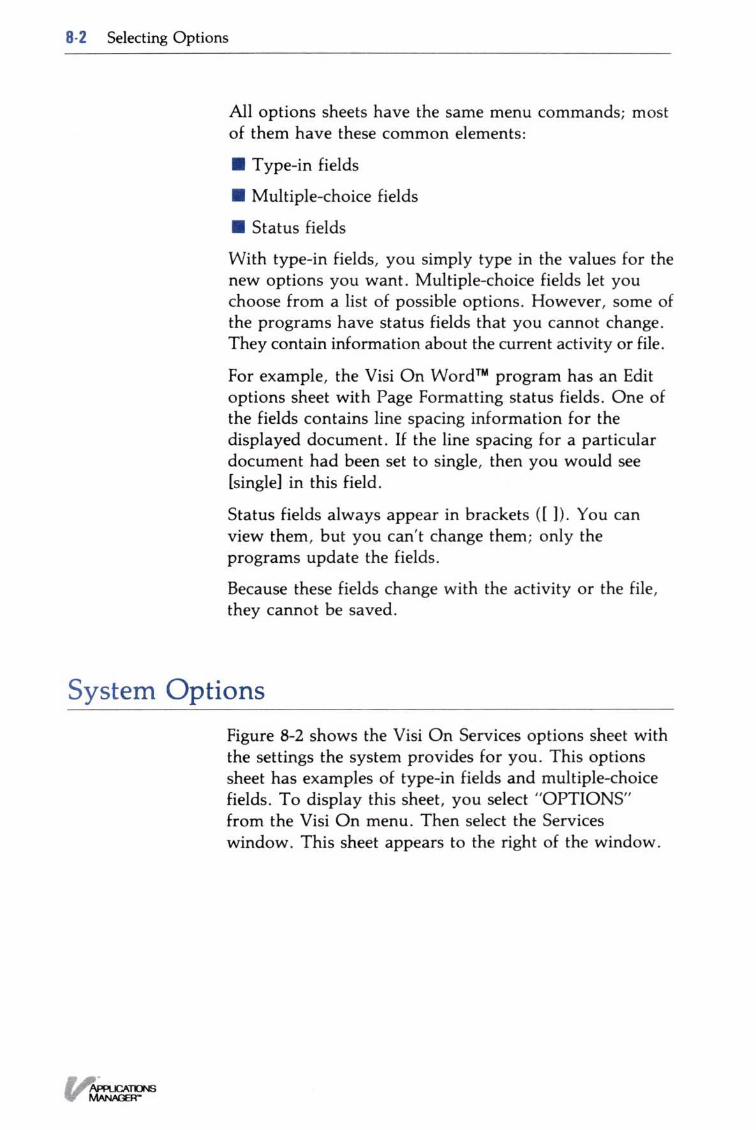
8-2
Selecting Options
System Options
All options sheets have the same menu commands ; mostof them have these common elements :
•
Type-in fields
•
Multiple-choice fields
•
Status fields
With type-in fields, you simply type in the values for thenew options you want . Multiple-choice fields let youchoose from a list of possible options . However, some ofthe programs have status fields that you cannot change .They contain information about the current activity or file .
For example, the Visi On Word TM program has an Editoptions sheet with Page Formatting status fields . One ofthe fields contains line spacing information for thedisplayed document . If the line spacing for a particulardocument had been set to single, then you would see
[single] in this field .
Status fields always appear in brackets ([ 1) . You canview them, but you can't change them; only the
programs update the fields .
Because these fields change with the activity or the file,they cannot be saved .
Figure 8-2 shows the Visi On Services options sheet with
the settings the system provides for you . This options
sheet has examples of type-in fields and multiple-choicefields . To display this sheet, you select "OPTIONS"from the Visi On menu . Then select the Serviceswindow . This sheet appears to the right of the window .
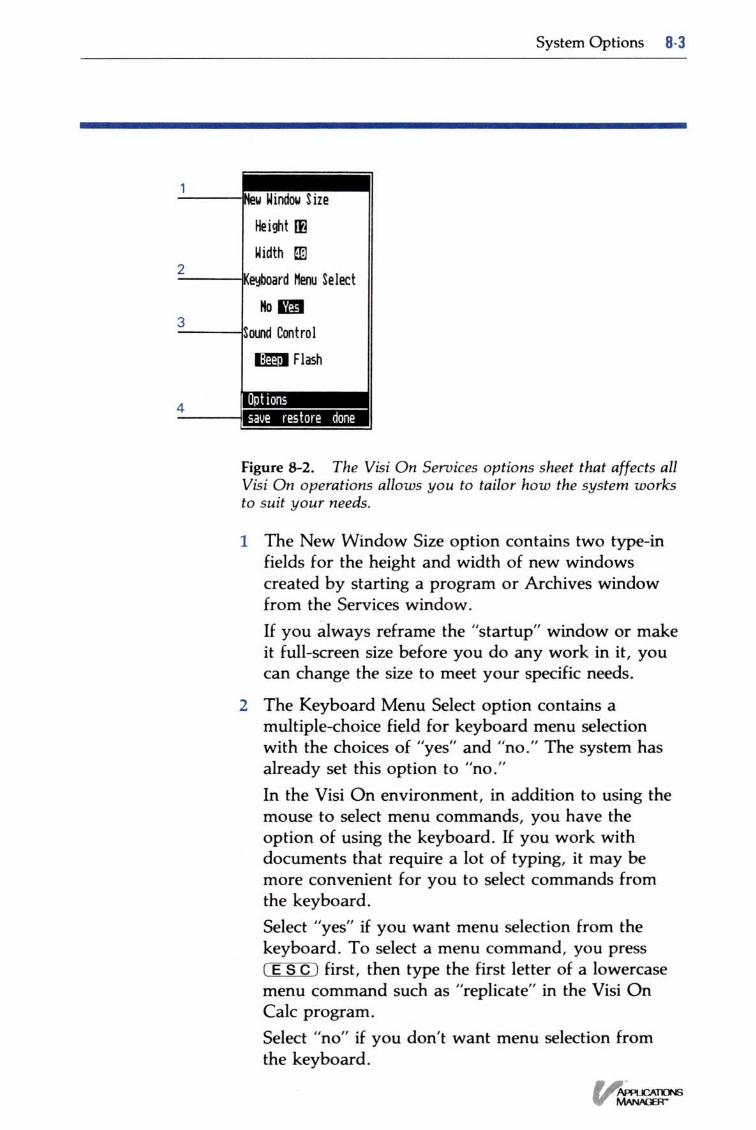
System Options 8-3
Figure 8-2 . The Visi On Services options sheet that affects allVisi On operations allows you to tailor how the system worksto suit your needs .
1 The New Window Size option contains two type-infields for the height and width of new windowscreated by starting a program or Archives windowfrom the Services window .If you always reframe the "startup" window or makeit full-screen size before you do any work in it, youcan change the size to meet your specific needs .
2 The Keyboard Menu Select option contains amultiple-choice field for keyboard menu selectionwith the choices of "yes" and "no ." The system hasalready set this option to "no ."In the Visi On environment, in addition to using themouse to select menu commands, you have theoption of using the keyboard . If you work withdocuments that require a lot of typing, it may bemore convenient for you to select commands fromthe keyboard.Select "yes" if you want menu selection from thekeyboard . To select a menu command, you press(E S C) first, then type the first letter of a lowercasemenu command such as "replicate" in the Visi OnCalc program .Select "no" if you don't want menu selection fromthe keyboard .

8-4 Selecting Options
Displaying an Options Sheet
3 The Sound Control option contains a multiple-choicefield with the choices of "beep" and "flash ." The"beep" option has initially been set . Select "beep" ifyou want the system to beep to give you feedback onactions you take such as selecting a commandcorrectly or incorrectly . Select "flash" if you want thesystem to flash the cursor instead : once for correctaction and three times for incorrect action .
4 The Options sheet menu line contains the menucommands you use with all options sheets :
"save"
Stores this options sheet and alloptions sheets in the program .
"restore"
Resets the option settings of thisoptions sheet to the last saved settings .
To reset the options to the values theyhad originally when the programs wereinstalled, refer to Chapter 1 in theindividual User's Guides .
"done"
Removes the options sheet from thewindow.
The Visi On system has one options sheet called theServices options sheet . Each Visi On program hasoptions sheets associated with the menus in its menuhierarchy . The "OPTIONS" command lets you displayand change the settings in the options sheet . If anoptions sheet is displayed and you select another menucommand, an options sheet for that menu appears .
Some of the Visi On programs display options sheetsautomatically when you select certain commands. Youdon't have to select "OPTIONS" for those to appear .
For examples of each program's options sheets and theoriginal settings the programs provide, refer to Chapter 1in the individual program User's Guides .
This section includes step-by-step instructions fordisplaying an options sheet for the Visi On Serviceswindow or for one of the programs ; the procedure is thesame for displaying all options sheets .

(continued)
Displaying an Options Sheet 8.5
This section also includes specific examples of displayingthe Services options sheet and displaying the Visi OnCalcTM options sheet .
To display an
1. Make sure you are displaying the program menu youoptions sheet
want before you select "OPTIONS" from the Visi Onmenu, so that the appropriate options sheet displays .Then select "OPTIONS ."The Visi On system asks you to select the window forwhich you want options displayed .
2. Select the Services window or a program window .The system displays the Services options sheet, on theright of the Services window or an options sheet forthe menu that was displayed, on the right of theprogram window .
To change the displayed options, refer to "Changing anOptions Sheet" later in this chapter .
Displaying the Visi On Services Options Sheet
Suppose you want to change the size of your programand Archives windows . To change the window size youmust display the Services options sheet . Figure 8-3illustrates how to display it .
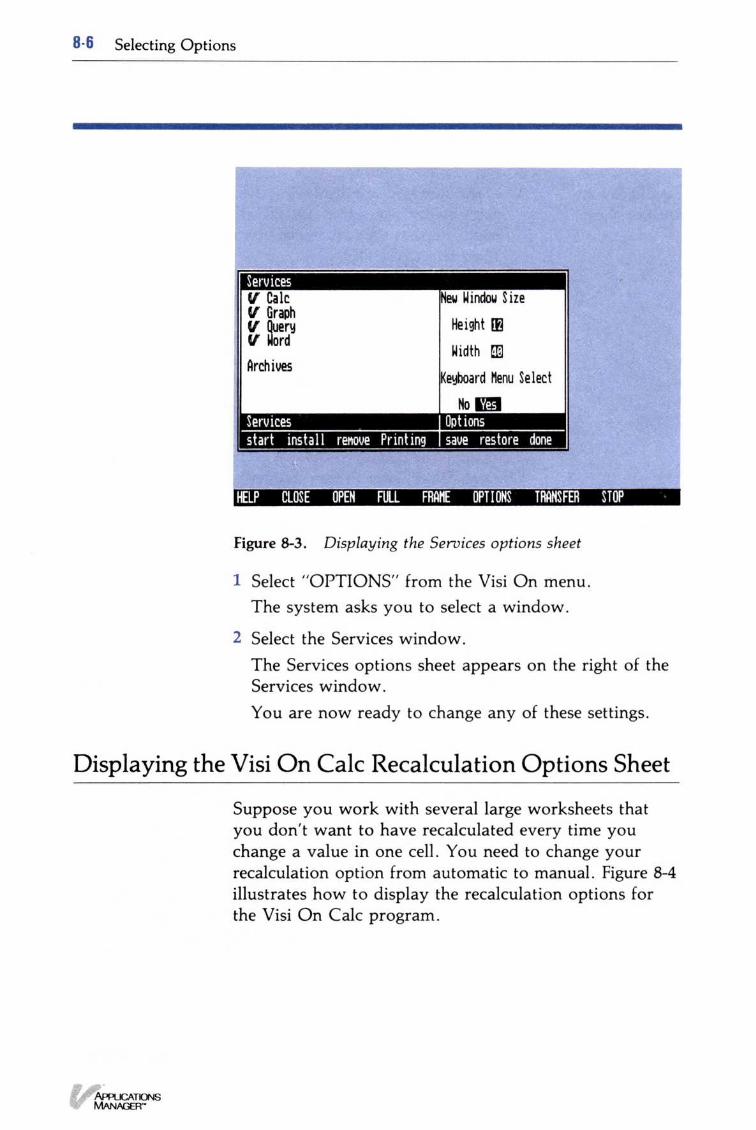
8. 6 Selecting Options
Figure 8-3 . Displaying the Services options sheet
1 Select "OPTIONS" from the Visi On menu .The system asks you to select a window .
2 Select the Services window .The Services options sheet appears on the right of theServices window .You are now ready to change any of these settings .
Displaying the Visi On Calc Recalculation Options Sheet
Suppose you work with several large worksheets thatyou don't want to have recalculated every time youchange a value in one cell . You need to change yourrecalculation option from automatic to manual . Figure 8-4illustrates how to display the recalculation options forthe Visi On Calc program .
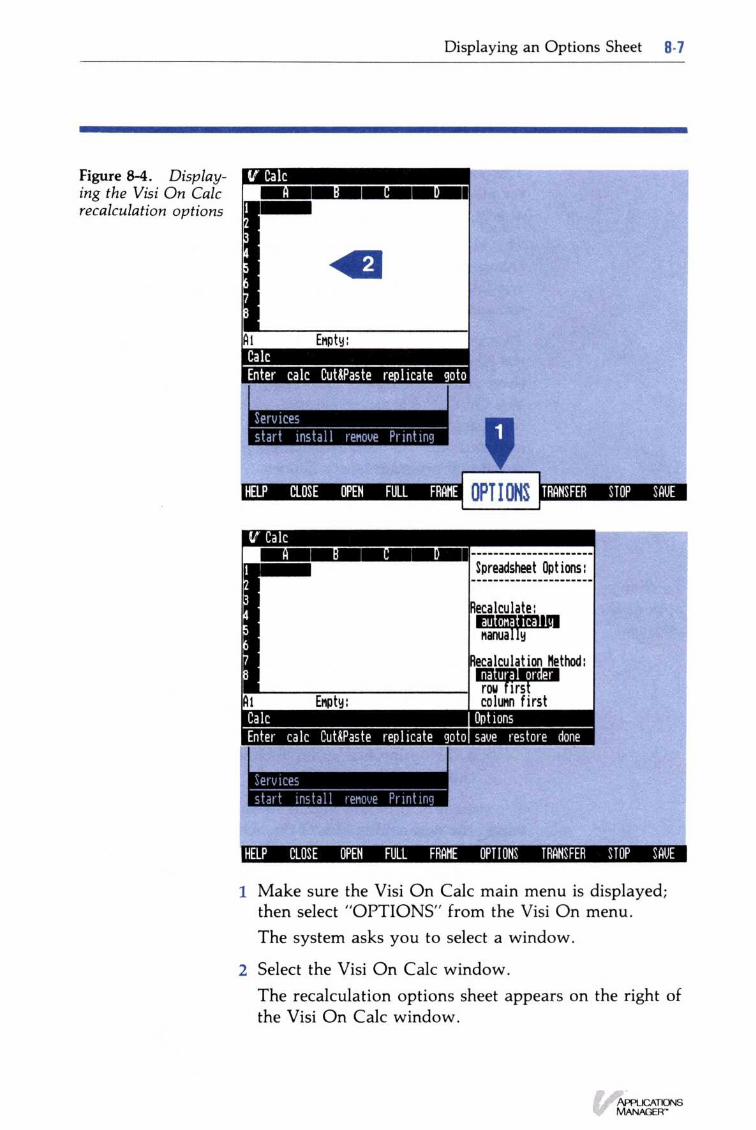
Figure 8-4 . Display-ing the Visi On Calcrecalculation options
Displaying an Options Sheet 8- 7
1 Make sure the Visi On Calc main menu is displayed ;then select "OPTIONS" from the Visi On menu .The system asks you to select a window .
2 Select the Visi On Calc window .
The recalculation options sheet appears on the right ofthe Visi On Calc window .
8 .8 Selecting Options
Changing an Options Sheet
To changeoptions sheetsettings
The Visi On system and its programs provide settingsfor all the options sheets . You can change those optionsat any time to meet your business needs .
This section includes step-by-step instructions forchanging an options sheet for the Visi On Serviceswindow or for one of the programs ; the procedure is thesame for changing all options sheets .
This section also includes specific examples of changingthe New Window Size option on the Services optionssheet and changing the recalculation option on theVisi On Calc Recalculation options sheet . Instructionsfor changing other options sheets in the programs areincluded with the task instructions in each of theindividual program User's Guides .
If the options sheet you want to change isn't displayed,follow the steps in "Displaying an Options Sheet" earlierin this chapter .
1 . Move the pointer to the option you want to change .
2 . Do one of the following :∎ If the option is a type-in field, select the field first ;
a blinking cursor appears at the first position inthe field . If the field is already filled in, delete thetext by pressing (D EL) or E N D and then typethe new value and press (ENTER)
∎ If the option is a multiple-choice field, select thechoice you want .
The system or program highlights the option's newvalue; the new setting affects the activity or fileimmediately . Depending on the type of option, you maysee the contents of the window actually change rightaway . For example, if you changed the "Column Width"option in the Visi On Calc program from 9 to 12, youwould see the columns in the displayed worksheetchange from 9 to 12 characters immediately .
These options settings are saved with the file when yousave it from the program's Files display . You do nothave to select the "save" command in the options menuunless you want these new options to be used the next
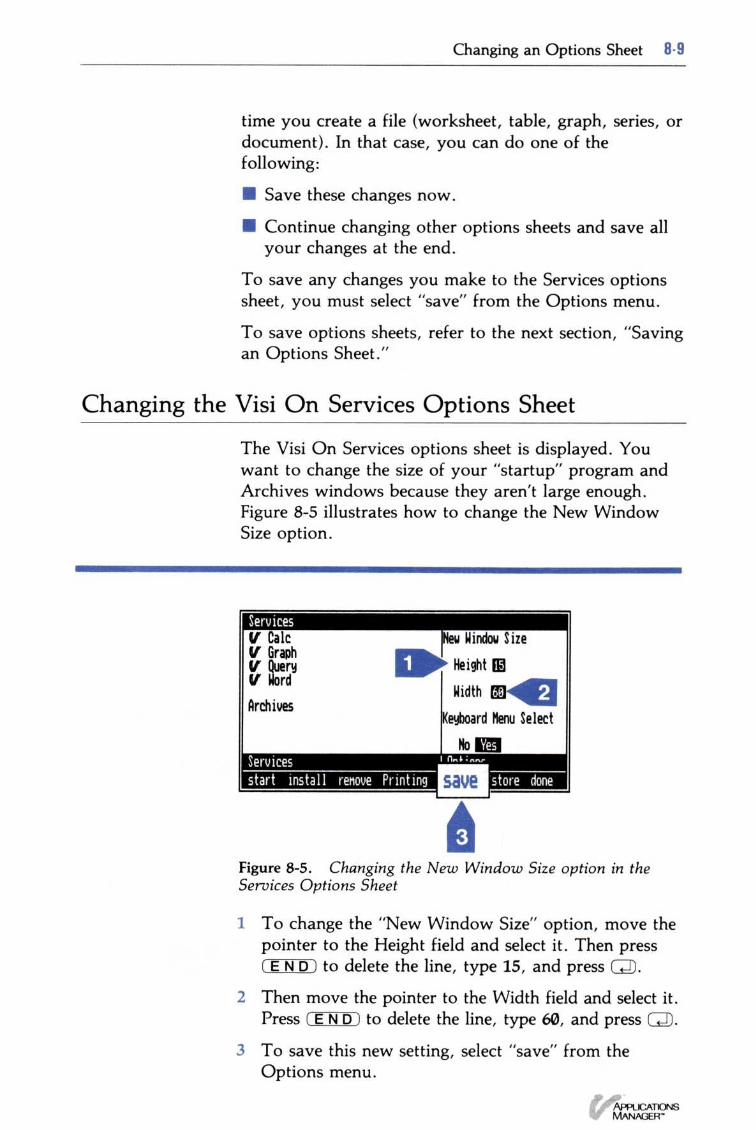
Changing an Options Sheet 8-9
time you create a file (worksheet, table, graph, series, ordocument) . In that case, you can do one of thefollowing :
•
Save these changes now .
•
Continue changing other options sheets and save allyour changes at the end .
To save any changes you make to the Services optionssheet, you must select "save" from the Options menu .
To save options sheets, refer to the next section, "Savingan Options Sheet ."
Changing the Visi On Services Options Sheet
The Visi On Services options sheet is displayed . Youwant to change the size of your "startup" program andArchives windows because they aren't large enough .Figure 8-5 illustrates how to change the New WindowSize option .
Figure 8-5 . Changing the New Window Size option in theServices Options Sheet
1 To change the "New Window Size" option, move thepointer to the Height field and select it . Then press(E N D) to delete the line, type 15, and press (ENTER).
2 Then move the pointer to the Width field and select it .Press (E N D) to delete the line, type 60, and press (ENTER) ).
3 To save this new setting, select "save" from theOptions menu .
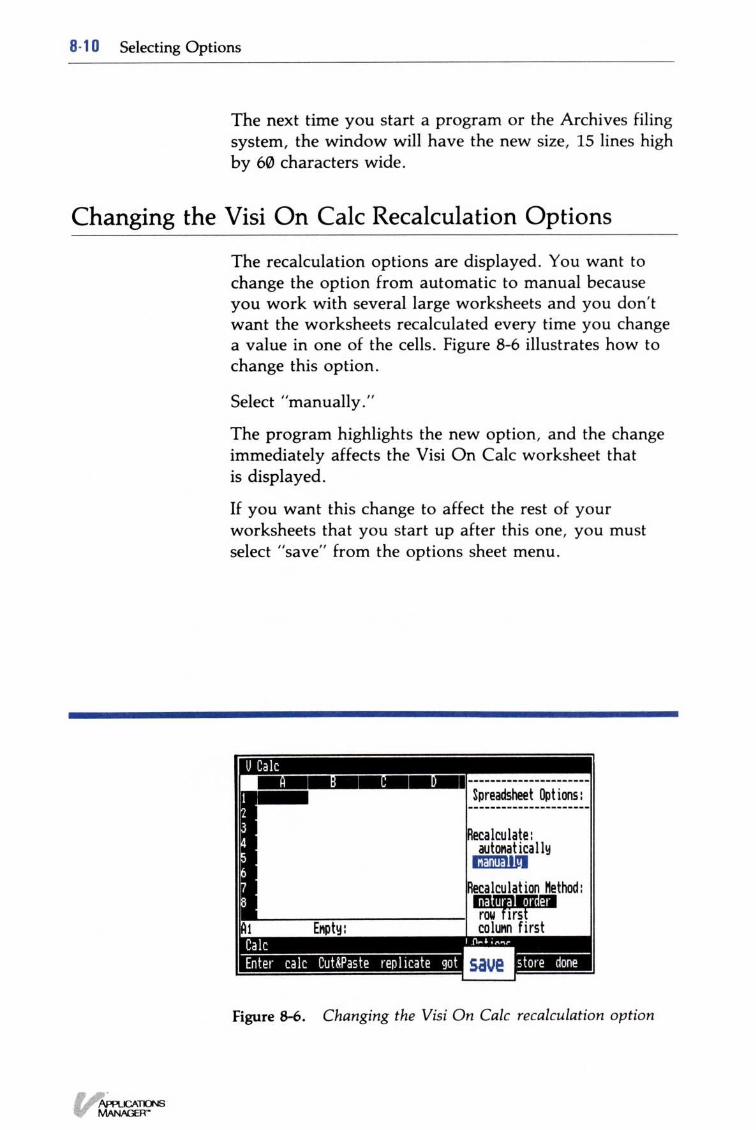
8 .10 Selecting Options
The next time you start a program or the Archives filingsystem, the window will have the new size, 15 lines highby 60 characters wide .
Changing the Visi On Calc Recalculation Options
The recalculation options are displayed . You want tochange the option from automatic to manual becauseyou work with several large worksheets and you don'twant the worksheets recalculated every time you changea value in one of the cells. Figure 8-6 illustrates how tochange this option .
Select "manually ."
The program highlights the new option, and the changeimmediately affects the Visi On Calc worksheet thatis displayed .
If you want this change to affect the rest of yourworksheets that you start up after this one, you mustselect "save" from the options sheet menu .
Figure 8-6 . Changing the Visi On Calc recalculation option
Saving an Options Sheet
Restoring an Options Sheet 8 . 11
If you want your new options sheet settings to be usedthe next time you create a file, you should do one of thefollowing :
•
Save the changes for each options sheet as youmake them .
∎
Continue changing other options sheets and save allyour changes at one time .
To save any changes you make to the Services optionssheet, you must must select the "save" command fromthe Options menu.
The "save" command stores the settings for all optionssheets for the program at one time . (For the Visi Onsystem there is only one options sheet you can save-theServices options sheet .)
Any activities that you have already started in otherwindows before you save the new option settings aren'taffected . Any new activity of the same program that youstart after you save these settings uses the new savedsettings .
Select "save" from the options sheet menu .The system saves the Visi On Services options sheet orthe program saves all the options sheets for the program .
Restoring an Options SheetThe "restore" command resets the option settings of thecurrently displayed options sheet to the last saved optionsheet or sheets .
If you want to change the options to the values they hadoriginally when each program was installed, refer toChapter 1 in the individual program User's Guides . Forthe Visi On system Services options sheet settings, seeFigure 8-2 in the beginning of this chapter . Thosesections show the options sheets with their originalsettings .
To save anoptions sheet
B- 1 2 Selecting Options
To restore an
Select "restore" from the options sheet menu .options sheet
sheet aside
The system resets the Visi On Services options sheet orthe program resets all the options sheets for the programto the last saved options sheet or sheets .
Setting an Options Sheet AsideAfter you have displayed, changed, saved, and/orrestored your options sheet and are ready to resumeworking with a file or the Services window, select the"done" command in the options sheet menu to removethe options sheet from the screen .
You don't have to remove the options sheet . You cancontinue to work with the sheet still displayed . The"done" command simply sets the options sheet aside sothat you have more space on the screen to do otherwork . You can always display the options sheet again .
If you're working with options sheets that affect a file'sappearance, those options are saved with the documentwhen you save the document from the Files display .
To set an options Select "done" from the options sheet menu .The system or program removes the options sheet fromthe screen .
Let's assume you've changed the New Window Sizeoption on the Services Options Sheet and saved it . Thus,you're ready to resume work . Figure 8-7 illustrates how toset your options sheet aside . (Remember, you can alwaysdisplay it again by selecting the "OPTIONS" command .)
Select "done" from the options sheet menu to set theoptions sheet aside and to resume work in otherwindows on the screen .
The options sheet is removed from the screen .
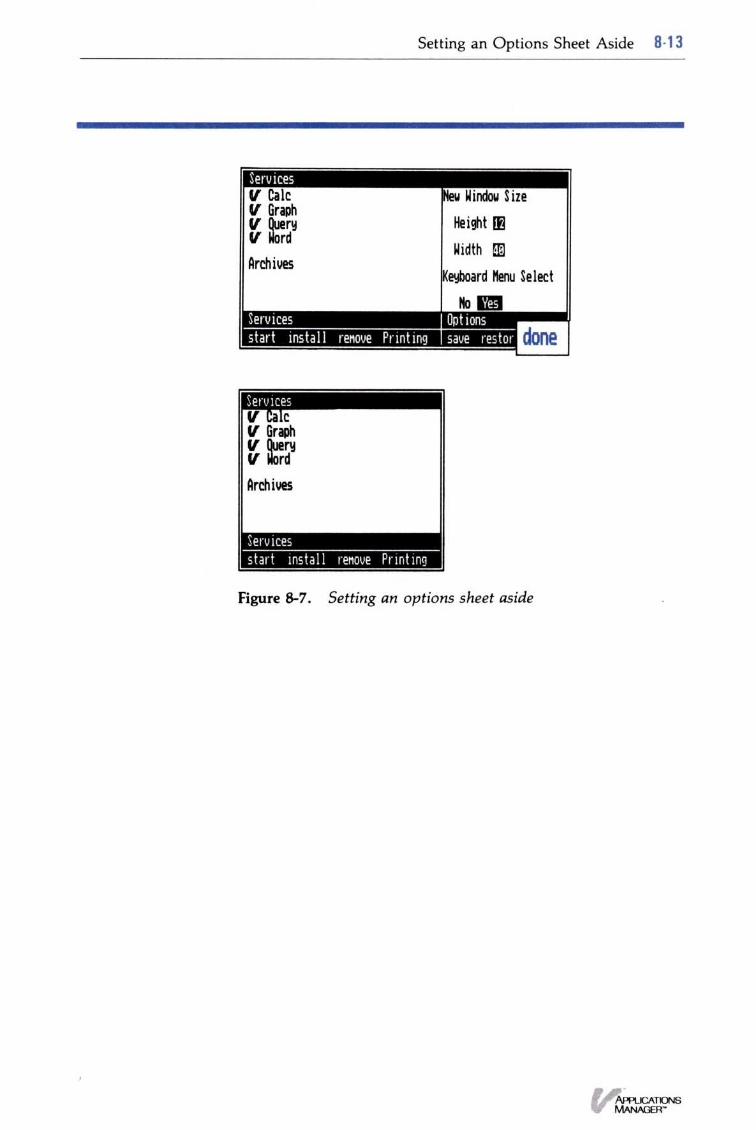
Figure 8-7 . Setting an options sheet aside
Setting an Options Sheet Aside 8. 13


VISI ON'"


9 Visi OnTM Messages

Messages
Messages 9-1
This chapter contains Visi On TM system messages. Themessages are arranged in numeric order and eachmessage has an explanation and recommended action foryou to follow . For a listing and an explanation of theVisi On program messages, see the individual programUser's Guides .
(164) Cannot continue until disk < disk > is placed indrive < drive >The disk, identified in the message, that theprogram expected to find is not in the identifieddrive . Either replace the disk or select unmount tonotify the program that the disk was removed .
(165) Cannot complete disk operation-check disk anddriveThe current disk operation cannot be completed .Check the disk and the disk drive . If you cannotfind a problem, you may have a disk drivemalfunction .
(166) You must unmount the current disk firstYou attempted to mount a disk on a disk drivethat already has a disk mounted . Either mount thedisk on different disk drive or unmount thecurrently mounted disk .
(167) The disk you mounted is not a Visi On diskThe disk you mounted is not in the Visi On diskformat . To use this disk you must initialize it .Initializing a disk erases any information on thedisk .
(168) There is no disk on the selected driveNo disk is mounted on the drive you selected . Youmay have selected the wrong drive . Select"unmount" again and select the correct drive .
(169) Cannot unmount that disk-file or folder in useYou attempted to unmount a disk on which a fileor a folder is in use . You cannot unmount a diskunless all files and folders are not being used .
9 . 2 Visi OnTM Messages
(170) Cannot unmount the system diskYou attempted to unmount the system disk, whichcannot be unmounted .
(171) Cannot initialize the system diskYou attempted to initialize the system disk, whichis not allowed . Such an action would destroy yourcopy of the program .
(174) Cannot complete operation because a file or folderis in useThe current operation cannot be completedbecause its completion would change a file or afolder-that is currently in use .
(175) That name already exists in this folder-enteranotherYou entered a name for a file or folder thatalready exists in the current folder . Duplicatenames are not allowed in a folder . Enter a namethat is unique for this folder .
(176) Folder is not empty-cannot discard or replaceYou attempted to discard or replace a folder thatis not empty . You must move or destroy allfolders and files in a folder before you can removeor replace it .
(177) There is no file or folder with that nameThere is no file or folder with the name youentered . You may have misspelled the name .Check the name and enter a valid name .
(178) Cannot proceed-destination folder is within thesource folderYou attempted to copy or move a folder to adestination folder that is in the source folder . Thedestination folder cannot be in the source folder .
(180) You must select a folder, not a fileYou selected the "split" command and thenselected a file . With this command you must selecta folder. Select again .
(181) There is no folder with that nameThere is no folder with the name you entered . Youmay have misspelled the name . Check the nameand enter a valid name .
Messages 9 .3
(182) Cannot export a folder-select a file nameYou selected the "export" command and then afolder name. You must select a file name, not afolder name. Select again .
(183) Cannot find file < file name >You entered a file name that the system cannotfind . You may have typed the wrong name . Checkthe file name and reenter .
(184) Cannot remove program-it is in useThe program you selected to remove is in use . Youmust quit the windows containing this programbefore you can remove it .
(185) There are no print requests to suspendYou issued a "pause" command but there are noprint requests to suspend .
(186) There are no print requests to resumeYou issued a "resume" command but there are nosuspended print requests to reactivate .
(187) There are no print requests to cancelYou issued a "cancel" command, but there are noprint requests to cancel .
(188) That request is not suspended-select a suspendedrequestYou issued a "resume" command for a printrequest that was not suspended . Select a requestwith a status of "Suspended ."
(189) That connector is already in useYou attempted to install a device to a computerconnector that is already in use with anotherdevice. Select another connector or remove thecurrent device from that connector .
(190) That device name is already in useYou entered a device name that is already in usefor another device . All device names must beunique. Enter another name .
(191) There are no devices to removeYou selected the "remove" command but there arenot devices to remove from use . You may haveselected the wrong command .
9 .4 Visi OnTM Messages
(192) Cannot remove-device is in useYou selected the "remove" command but thedevice you selected is in use . Either cancel therequests to that device or wait until they havecompleted to remove the device .
(193) There are no installed devices to modifyYou selected the "modify" command but there areno installed devices to be modified . You may haveselected the wrong command .
(194) Cannot modify-device is in useYou selected the "modify" command but thedevice you selected to modify is in use . Eithercancel the requests to that device or wait untilthey are completed to modify the device .
(195) There is no room for a Help window-pressSELECTYou selected the "HELP" command but there is noroom for a Help window. You must remove awindow with the "quit" command before anotherwindow can be created .
(196) Not enough disk space to install theVisi On systemInstallation failed-restart the systemYou attempted to install the Visi On system on ahard disk that does not have enough free space forthe system . You must erase enough files to makeroom for the system or use a different hard disk .When you have enough space, restart theinstallation from the beginning .
(198) Neither drive A nor B is a floppy disk driveInstallation failed-restart the systemYou attempted to install the Visi On system on acomputer where neither drive A or B are floppydisk drives . Drive A or B must be a floppy diskdrive .
(199) There is no floppy disk drive on this computerInstallation failed-restart the systemYou attempted to install the Visi On system on acomputer without a floppy disk drive . A floppydisk drive is required .
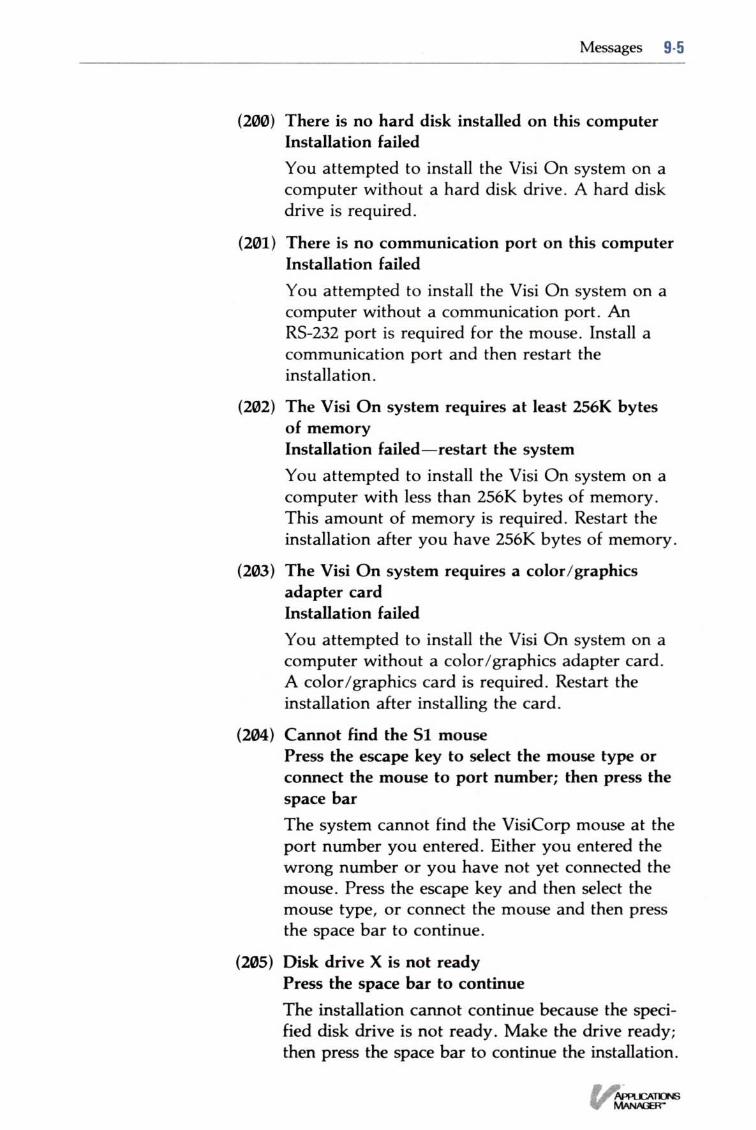
Messages 9-5
(200) There is no hard disk installed on this computerInstallation failedYou attempted to install the Visi On system on acomputer without a hard disk drive . A hard diskdrive is required .
(201) There is no communication port on this computerInstallation failedYou attempted to install the Visi On system on acomputer without a communication port . AnRS-232 port is required for the mouse. Install acommunication port and then restart theinstallation .
(202) The Visi On system requires at least 256K bytesof memoryInstallation failed-restart the systemYou attempted to install the Visi On system on acomputer with less than 256K bytes of memory .This amount of memory is required . Restart theinstallation after you have 256K bytes of memory .
(203) The Visi On system requires a color/graphicsadapter cardInstallation failedYou attempted to install the Visi On system on acomputer without a color/graphics adapter card .A color/graphics card is required . Restart theinstallation after installing the card .
(204) Cannot find the S1 mousePress the escape key to select the mouse type orconnect the mouse to port number ; then press thespace barThe system cannot find the VisiCorp mouse at theport number you entered . Either you entered thewrong number or you have not yet connected themouse . Press the escape key and then select themouse type, or connect the mouse and then pressthe space bar to continue .
(205) Disk drive X is not readyPress the space bar to continueThe installation cannot continue because the speci-fied disk drive is not ready . Make the drive ready;then press the space bar to continue the installation .
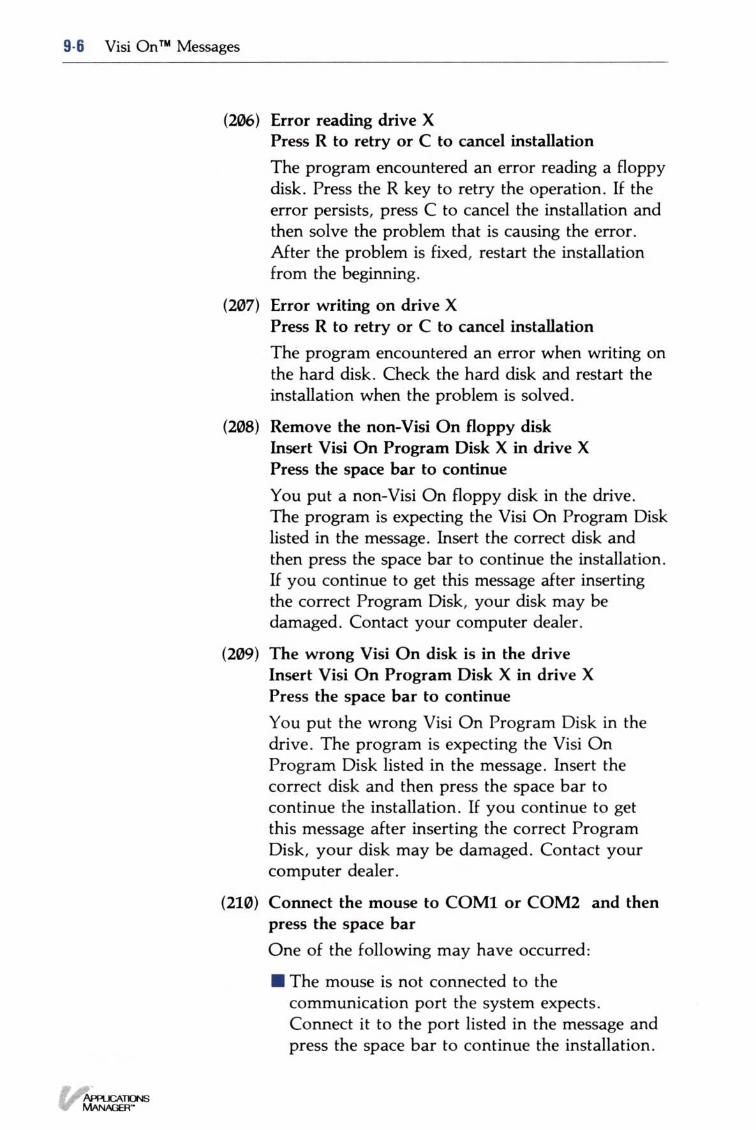
9-6 Visi OnTM Messages
(206) Error reading drive XPress R to retry or C to cancel installationThe program encountered an error reading a floppydisk . Press the R key to retry the operation. If theerror persists, press C to cancel the installation andthen solve the problem that is causing the error .After the problem is fixed, restart the installationfrom the beginning .
(207) Error writing on drive XPress R to retry or C to cancel installationThe program encountered an error when writing onthe hard disk . Check the hard disk and restart theinstallation when the problem is solved .
(208) Remove the non-Visi On floppy diskInsert Visi On Program Disk X in drive XPress the space bar to continueYou put a non-Visi On floppy disk in the drive .The program is expecting the Visi On Program Disklisted in the message . Insert the correct disk andthen press the space bar to continue the installation .If you continue to get this message after insertingthe correct Program Disk, your disk may bedamaged . Contact your computer dealer .
(209) The wrong Visi On disk is in the driveInsert Visi On Program Disk X in drive XPress the space bar to continueYou put the wrong Visi On Program Disk in thedrive . The program is expecting the Visi OnProgram Disk listed in the message . Insert thecorrect disk and then press the space bar tocontinue the installation . If you continue to getthis message after inserting the correct ProgramDisk, your disk may be damaged . Contact yourcomputer dealer .
(210) Connect the mouse to COM1 or COM2 and thenpress the space barOne of the following may have occurred :
∎ The mouse is not connected to thecommunication port the system expects .Connect it to the port listed in the message andpress the space bar to continue the installation .

Messages 9-7
•
The mouse is connected to the correctcommunication port, but the mouse power plugis not plugged into a power socket . Put themouse power plug into the power socket . Youwill have to calibrate the mouse when you startthe Visi On Applications Manager .
•
The mouse is damaged . Call your dealer orcomputer repair technician .
(211) The wrong mouse is being used-restart thesystemYou are not using the correct S1 mouse that youinstalled originally . Restart the installation fromthe beginning and enter the correct code for yourmouse .
(212) Visi On Program Disk 1 must be in drive APut Visi On Program Disk 1 in drive A and pressthe space barYour system was installed with an M1 mouse .When using an M1 mouse you must put your VisiOn Program Disk 1 (Key Disk) in drive A. Pressthe space bar after putting the disk in the drive .
(213) The wrong Visi On disk is being used-restart thesystemYou put the wrong Visi On disk in the drive tostart the system . The serial number on the diskdoes not match the serial number of the installedsystem . Put the correct disk in the drive andrestart the system .
(215) Cannot unmount the disk on drive X cannot installThe disk on the disk drive listed in the messagecannot be unmounted . Make a drive available andrestart the installation .
(216) Remove volume X and insert Program Disk 1then select continueRemove the disk listed in the message from thedrive and put the Program Disk 1 in that drive .Restart the installation .
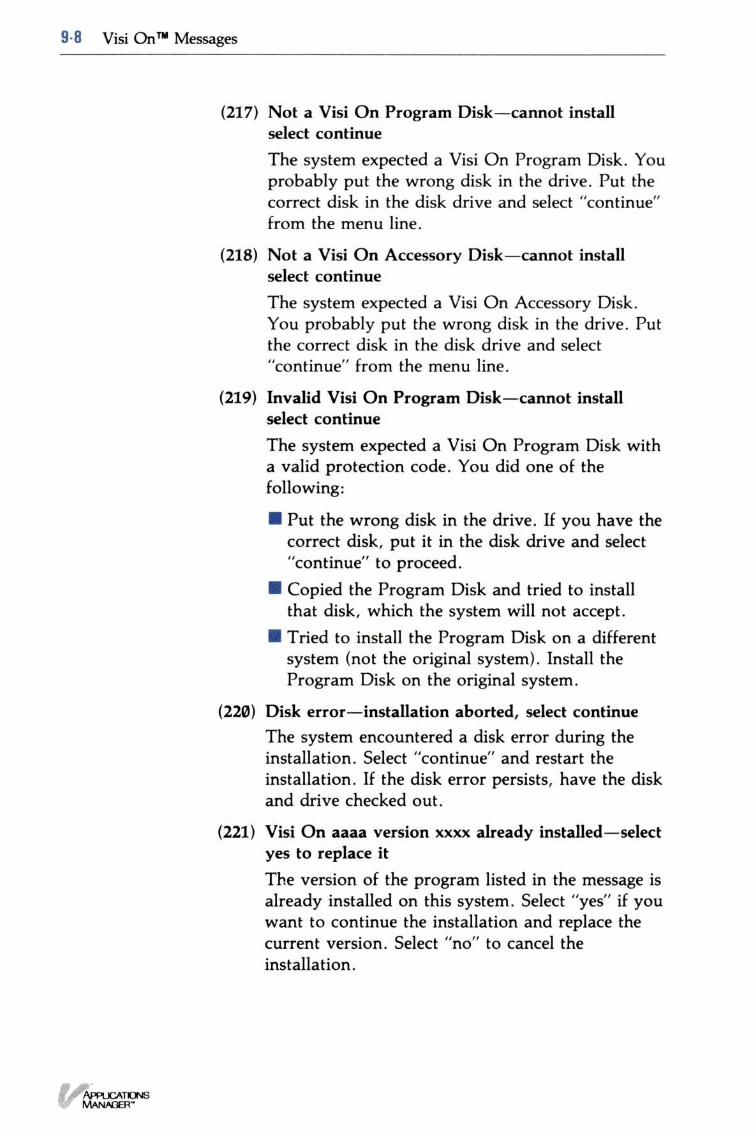
9- 8 Visi OnTM Messages
(217) Not a Visi On Program Disk-cannot installselect continueThe system expected a Visi On Program Disk . Youprobably put the wrong disk in the drive . Put thecorrect disk in the disk drive and select "continue"from the menu line .
(218) Not a Visi On Accessory Disk-cannot installselect continueThe system expected a Visi On Accessory Disk .You probably put the wrong disk in the drive . Putthe correct disk in the disk drive and select"continue" from the menu line .
(219) Invalid Visi On Program Disk-cannot installselect continueThe system expected a Visi On Program Disk witha valid protection code . You did one of thefollowing :
•
Put the wrong disk in the drive . If you have thecorrect disk, put it in the disk drive and select"continue" to proceed .
•
Copied the Program Disk and tried to installthat disk, which the system will not accept .
•
Tried to install the Program Disk on a differentsystem (not the original system) . Install theProgram Disk on the original system .
(220) Disk error-installation aborted, select continueThe system encountered a disk error during theinstallation . Select "continue" and restart theinstallation . If the disk error persists, have the diskand drive checked out .
(221) Visi On aaaa version xxxx already installed-selectyes to replace itThe version of the program listed in the message isalready installed on this system . Select "yes" if youwant to continue the installation and replace thecurrent version . Select "no" to cancel theinstallation .
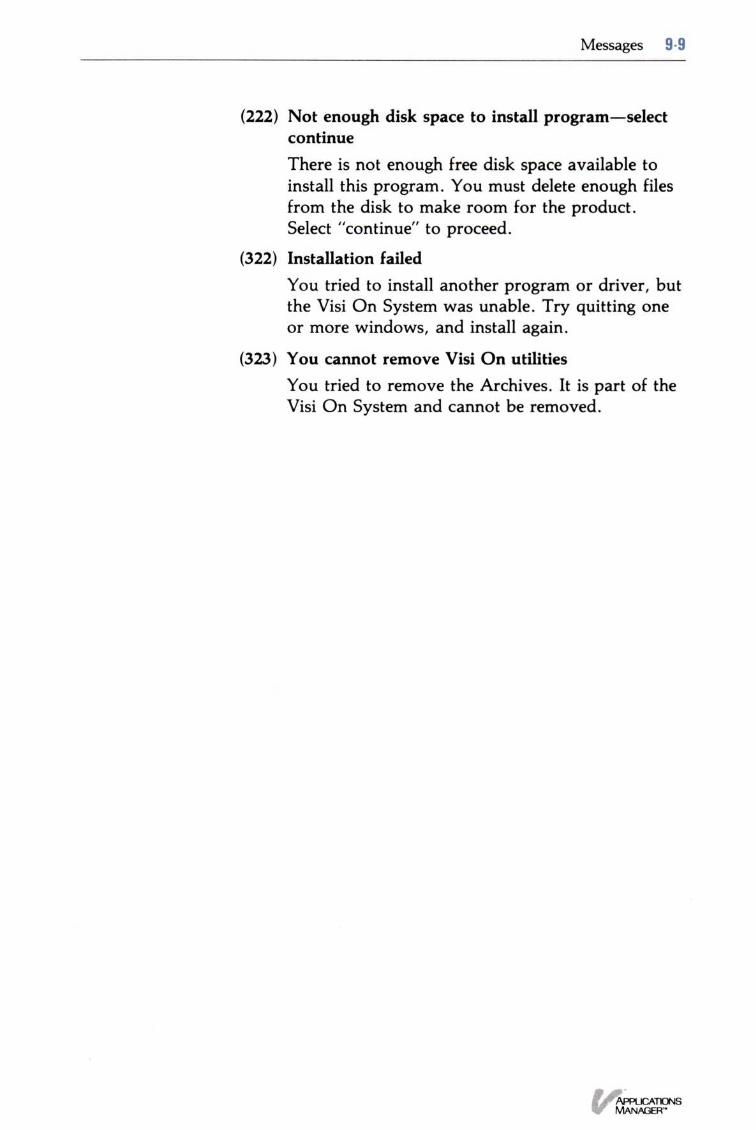
Messages 9 -9
(222) Not enough disk space to install program-selectcontinueThere is not enough free disk space available toinstall this program. You must delete enough filesfrom the disk to make room for the product .Select "continue" to proceed .
(322) Installation failedYou tried to install another program or driver, butthe Visi On System was unable . Try quitting oneor more windows, and install again .
(323) You cannot remove Visi On utilitiesYou tried to remove the Archives . It is part of theVisi On System and cannot be removed .


VISI ON'"


Glossary

Glossary
This glossary includes definitions of terms that are usedin the Visi On TM environment . For definitions of termsused with each of the Visi On programs, refer to the"Glossary" in the individual program User's Guides .
A
Glossary G- 1
activate To select a passive window, making it activeso you can work in that window .
active window The window in which you are currentlyworking or the window you most recently selected . Onlyone window at a time can be active ; sometimes none areactive . The active window has a wider border around it .
Archives The storage system of the Visi OnApplications Manager and its programs . All files youcreate are stored in the Visi On Archives . Eachprogram's Files display allows you to get (retrieve) andsave (store) files from and into the Archives .
Archives folder The central folder in the Archives thatthe Visi On system provides for you . All files that youcreate and save are stored in this folder unless you createother folders in the Archives .
"back" The Visi On Help command that returns you tothe last Help topic you looked at .
B
back up To create a copy of a disk or file that you canuse if the original is damaged or lost .
C
"cancel" The Printing command in the Services windowthat lets you remove a printing request from the list ofqueued requests .
chart See graph .
"CLOSE" The Visi On command that lets youtemporarily set aside a program window that you arenot currently working with . The name of the closedwindow is displayed in a small box in the upper rightcorner of the screen .
G-2 Glossary
closed window One that has been closed (temporarilyset aside) with the Visi On "CLOSE" command . Thenames of closed windows are displayed in the screen'supper right corner .
command A menu item you can select that causes theVisi On system or its programs to take action or initiatean operation . For example, selecting the Visi On"TRANSFER" command initiates the transfer operationand selecting the Visi On Word TM Cut&Paste commanddisplays the Cut&Paste menu .
"Configure" The Printing command in the Serviceswindow that has additional commands that allow you toinstall and remove printers and modify the printer'sname or connector .
"contents" The Visi On Help command that displaysthe Visi On Table of Contents .
contents pane The middle portion of a window. Thetitle of the window is above the contents and the promptline and menu are below it .
"copy" The Archives command that lets you copy afile or folder to another folder .
cross-referenced topics A topic in the Visi On Helpnetwork that provides additional information about asubject . You display a cross-referenced topic by selectingthe "see" command and the triangle next to it . Or youcan simply select the triangle .
current file The file you are currently working with . Inthe Visi On Calc program, it is referred to as aworksheet; in the Visi On Query program, it is a table ;in the Visi On Graph program, it is a graph or series(you can work with as many as 12 series at one time) ; inthe Visi On Word program, it is a document .
current folder The folder you have selected to workwith from the Archives window or from a program Filesdisplay . It is the last name in the folder path . Forexample, if the folder path reads "[Archives]/Sales,"Sales is the current folder . The current folder cancontain other folders and files . Also see Files display .
cursor A highlight that identifies a location within aprogram window . In a Visi On Calc worksheet, thecursor is a rectangular area that highlights (identifies) a
worksheet cell . In a Visi On Word document, the cursoris a small rectangle that identifies a character location .
D
default A fallback value that the Visi On system, itsprograms, or you yourself set .
destination In the transfer operation, the place orlocation you select where the information from anotherwindow is copied. In the Archives copy and moveoperations, the folder where a file or folder is copied ormoved .
"discard" The Archives menu command that removes afile or empty folder and puts it in the wastebasket folderin the Archives . You can retrieve the file from thewastebasket if you inadvertently removed the file . Alsosee wastebasket folder .
disk See floppy disk, hard disk .
"done" The options sheet menu command that removesan options sheet from the screen .
document In the Visi On Word TM program, the type offile you create, save, and print .
"Drives" The Visi On command in the Serviceswindow that displays the Drives menu, which hascommands that let you manage your disk drivesand disks .
E
Glossary G-3
enter To type information on the screen . You end linesof text by pressing the (ENTER) key on your keyboard .
"exit" The Services command that lets you leave theVisi On system . It returns you to the host operatingsystem .
"export" The Archives command that lets you transfera copy of a Visi On file to another system .
external transfer To transfer information between theVisi On system and another system .
G .4 Glossary
F
file A collection of information (worksheet, table,graph, series, or document) created and saved in the theVisi On Archives .
Files display The display provided by each Visi Onprogram that allows you to access that program's files inthe Visi On Archives .
fixed disk See hard disk .
floppy disk A flexible magnetic surface that can storedata or programs outside your computer's memory .Floppy disks are removable from your computer system .
folder A collection of files stored in the Visi OnArchives. Folders can -contain other folders as well asfiles . Also see current folder, working folder .
folder path The sequence of folders you selected fromthe Archives to reach the folder that is currentlydisplayed . You can return to a previous folder byselecting its name from the path line at the top of thewindow .
"FRAME" A Visi On command that allows you tochange the size and location of a window .
frame The border around each window on the screen .
"FULL" A Visi On command that expands a window tothe full screen (maximum) size . The Visi On menuremains at the bottom of the screen .
G
get To transfer information from storage into thecomputer's memory, where it can be worked with .
graph In the Visi On GraphTM program, a type of fileyou can create, store, and print . Also called "chart ."
H
hard disk A large-capacity magnetic storage device thatis used to store data and programs outside yourcomputer's memory, although its enclosure may beattached to your computer .

header pane The line at the top of a program windowthat displays the name of the window .
"HELP" A Visi On menu command that displaysinformation about whatever you select after you select"HELP ."
hourglass pointer The shape the pointer assumes whena time-consuming operation is in progress . This is adirect, graphic way of saying "Please wait ." You cannotcontinue while the hourglass pointer is displayed .
I
Glossary G- 5
"import" The Archives command that lets you copy anMS-DOS TM data file into the Visi On Archives .
"initialize" The Drives command in the Serviceswindow that you use to format a disk for the Visi OnArchives .
initializing Preparing your disks to receive data .
input line The highlighted line at the bottom of aprogram window where you can enter and edit data .
"install" In the Visi On Services window, the commandthat loads each of the Visi On programs and the Tutorialinto your hard disk . In the Services Printing menu, theConfigure command that lets you install a new printer inthe system .
M
memory The part of a computer that temporarily holdsinformation and programs . Also see Storage .
menu The line of commands at the bottom of thescreen and at the bottom of each window . Also seecommand .
menu command See command .
menu path The sequence of menus you selected toreach the menu that is currently displayed . You canreturn to a previous menu by selecting its name from thepath line .
"messages" The Services command that lets you viewand respond to messages that occur during printing .
G- 6 Glossary
"modify" The Configure command from the ServicesPrinting menu that lets you change a printer's orplotter's name or connector .
"move" The Archives command that moves a file orfolder into another folder .
"mount" The Drives command in the Services windowthat lets you put a disk on a drive you select so that thefile or files you want to work with are accessible in theVisi On Archives . For example, you may storeconfidential or sensitive information such as salary dataon a floppy disk . When you want to work with that file,you mount the disk ; then remove it later so that no oneelse has access to that information .
mouse The pointing device that you use to move thepointer on the screen to items that you want to selectsuch as windows or menu commands . You also use themouse to scroll information that is hidden in a window .
N"new-folder" The Archives command that lets youcreate a new folder within one of the displayed folders inthe Archives .
O"OPEN" The Visi On command that redisplays aclosed window . It also returns a full-screen window toits previous framed size .
open window Any window that is displayed on thescreen . An open window can be active or passive .
option An item appearing in an options sheet that letsyou change certain characteristics of the Visi On systemand its programs and the way they operate .
"OPTIONS" The Visi On command that lets youdisplay and change the Visi On Services options sheetand a program's option sheets .
options sheet The display containing the options forthe current mend, which appears after you select"OPTIONS" from the Visi On menu and then select awindow .
Glossary G-7
"overview" The Visi On Help command that displaysgeneral information about the current Help topic .
P
pane A part of a Visi On window . The major part of awindow is the contents pane; the menu pane is acrossthe bottom; the header pane is at the top .
passive window Any window that is not the activewindow.
path The sequence of menus you selected to reach themenu that is currently displayed or the sequence offolders you selected from the Archives to reach thefolder that is currently displayed . You can return to aprevious menu or folder by selecting its name from thepath line .
"pause" The Printing command in the Services windowthat allows you to temporarily stop a printing requestfrom sending output to a printer .
pointer An arrow on the Visi On screen that followsthe movement of the mouse and identifies an area suchas a window, a command, or an item in a list, forselection or scrolling . An upward-pointing arrow is thenormal pointer. When the SCROLL button is pressed,the cross-shaped scroll pointer is displayed . When atime-consuming command is selected, the pointerchanges to an hourglass figure until the operation iscompleted .
"Printing" The Printing menu in the Services windowthat has commands that monitor and control theprogress of printing requests and commands that you useto install, remove, or modify printers .
prompt A message you receive on the prompt lineasking you for further information or action .
prompt line The highlighted line at the bottom of aprogram window that displays the name of the programor utility you are working with, the menu path (whereyou are in the menu hierarchy), a brief description of thehighlighted command (when you rest the pointer on thecommand), or messages or questions you need to answerfor the program to continue .

G-8 Glossary
Qquit To leave a program and remove the window sothat you can do another task .
R
"remove" In the Services menu, the command that letsyou remove an installed Visi On program or the Visi OnTutorial . In the Services Printing menu, the Configurecommand that lets you remove a printer from theVisi On system .
"rename" The Archives command that lets you changethe name of a file or a folder .
"restore" The options sheet menu command that resetsthe options sheet settings to the last options sheet yousaved.
"resume" The Printing command in the Serviceswindow that allows you to resume a printing requestthat you previously stopped using the pause command .
S
save To permanently store information for laterretrieval from the Visi On Archives . Also see file .
"save" The options sheet menu command that saves alloptions sheet settings at one time .
screen The display portion of your video monitor .
scroll To move the contents of an area so that you canview hidden information . You can scroll right, left, up,or down . Scrolling is activated by pointing to an area,pressing the SCROLL button on the mouse, and thenmoving the pointer .
scroll pointer The four-pointed indicator that appearson the screen when the SCROLL button is pressed .
scrolling speeds The rate at which you scroll awindow. There are three scrolling speeds : reading speed,scan speed, and fast speed . The distance you move thepointer determines the scrolling speed .
"see" The Visi On Help command that lets you select across-referenced triangle for more information on a topic .
Glossary G-9
select The process of moving the pointer to an item onthe screen and pressing the SELECT button on themouse.
series In the Visi On Graph program, a type of file thatyou create, save, and print .
Services window The window on the Visi On screenthat allows you to install and start programs and usevarious system utilities . Also see utility .
source In the transfer operation, the area or part of thefile that you select to transfer to another window. Thesource area has a starting and ending point . In theArchives copy or move operations, the file or folder thatyou select to be copied or moved to another folder .
"split" The Archives command that lets you split theArchives window into two separate views (two folders)so that you can copy or move files/folders from onefolder to another .
spreadsheet See worksheet .
"start" A command in the Services window that letsyou activate a program, utility, or the Visi On Tutorialwindow so you can work with that activity .
status fields Program settings that appear in certainoptions sheets and program windows . Each programupdates its own status fields ; you cannot change them .
"STOP" The Visi On command that cancels mostoperations you initiate . The effects of the "STOP"command are different for different operations .
storage A place where information is kept permanentlyfor later use . The Visi On system uses disk storage ."Memory" refers to where information is kepttemporarily within the computer. Also see Archives .
T
table In the Visi On QueryTM program, the type of fileyou create, save, and print .
title line The top line of a window, showing its name .
"TRANSFER" The Visi On command that lets youtransfer information from one window to another .
G- 1 0 Glossary
transfer type The type of information that eachVisi On program can transfer and accept .
transmittal file A file that contains printer commandsfor a remote print operation . After you create this file,the program puts it in the transmittal folder in theArchives where it stays until you are ready to print it ona printer at another location . Also see transmittal folder .
transmittal folder A folder in the Archives where thetransmittal file is kept until you are ready to print thefile on a printer at another location .
U"unmount" The Drives command in the Serviceswindow that you use to remove a disk so that the file orfiles are no longer accessible in the Visi On Archives .For example, you may store confidential or sensitiveinformation such as salary data on a floppy disk . Youremove the disk after you have worked with the file sothat no one else has access to that information .
utility A Visi On system function that allows you toperform various system tasks, such as starting aprogram . Utilities are activated through the Serviceswindow on the Visi On screen .
VVisi On program Any programs that run under theVisi On system, for example, the Visi On Calc, Visi OnQuery, Visi On Graph, or Visi On Word program .
Wwastebasket folder The temporary storage area wherethe last file you discarded is kept . If you inadvertentlyremoved this file, you can retrieve it from this folder .
window A rectangular area on your screen in which aVisi On program or utility appears . Every window hasfive parts : a name on the top line, a contents area, amenu on the bottom line, an information line above themenu, and an options sheet that is opened with theVisi On "OPTIONS" command .
Glossary G- 1 1
working folder The folder in the Files display thatcontains the files you selected to work with . It cancontain several files . Depending on the program, youcan work with one file or several files at a time . Also seeFiles display .
worksheet In the Visi On Calc program, the type of filethat you create, store, and print . Sometimes called"spreadsheet ."


Index

IndexA
Active, print queue status, 7-4Active window, description of, 4-3Adding files See CreatingAfter the Tutorial . . . iApplications Manager, Visi On,
See Visi On ApplicationsManager
Application programsdefined, 1-4exchanging information between,
1-5general rules for, 1-7illustrated, 1-4, 1-5, 1-6preparation for using, 1-7Archivescentral folderdescription, 5-2illustration of storing all files in,
5-6recommendations for organizing
your files in, 5-4changing the name of files and
folders, 5-21copying files and folders,
instructions for, 5-17description of, 5-2deleting files and empty folders
from, 5-21description of folders in, 5-2displaying folders in, 5-6 to 5-10entering, 5-10Files display, examples of, 5-6 to
5-10finding additional files in, 5-7housekeeping tasks in, 5-10initializing floppy disks for, 5-26menu commands, 5-12 to 5-13moving files from, instructions
for, 5-19organizing files, recommendations
for, 5-4organizing folders in, 5-4recommendations for organizing
your files, 5-4
removing empty folders from,5-21
removing files from, 5-21renaming files in, 5-21reorganizing files in, 5-13replacing a file or folder, 5-17saving files inwhen quitting a program, 3-3,
3-8from a program Files display,
5-7splitting into two viewsexample, 5-16instructions for, 5-16 to 5-17
storing files/folders in, 5-4 to 5-10transferring files/folders withinexamplesreplacing a file with anotherfile, 6-18
transferring files/foldersbetween folders, 6-15
instructions for, 6-13wastebasket folderdescription, 5-2getting files out of, 5-22
window, description of, 5-11 to5-13
Arranging windows on the screen,4-1
B
"back" command, Helpdescription, 2-12example, 2-12instructions for using, 2-12
Backup copies of disks, 5-25Begin printing again, 7-5Begin work in a window, See
Starting a program, 3-1
C
"cancel" command, Printing, 7-6Cancelling a command, 1-7Cancelling a print request, 7-6
Index
1-1
1- 2 Index
Central Archives folderdescription, 5-2storing files in, example of, 5-6storing files within folders in,
example of, 5-7storing files and folders within
folders in, example of, 5-9Changingfiles, 3-10locations of windows, 4-12names of files/folders, 5-21options setting, See Options
settingsoptions sheets, 8-8 to 8-10recalculation options, Visi On
Calc, 8-10sizes of windows,example, 4-13instructions for, 4-12option for, 8-3
Changing the size and location of awindow (framing)
example, 4-13instructions for, 4-12
Changing the size of your"startup" window
description of the option, 8-2examples, 8-5, 8-6"CLOSE"description, 4-9used to close an open window,
4-9used to display a list of closed
windows, 4-11Closed windowsdescription, 4-2displaying list of, 4-10Closing a windowdescription, 4-9example, 4-9 to 4-10instructions for, 4-9Command(s)Archives menu, overview of,
5-12 to 5-13Visi On menu, overview, 1-5 to
1-7"CLOSE," 4-9Configure menu, See Visi On
Setup GuideDrives menu
"initialize" command, 5-26"mount" command, 5-28"unmount" command, 5-30
for options sheets, 8-4for updating files/folders,
overview of, 5-12 to 5-13for windows, overview, 1-4 to
1-6"FRAME," 4-12"FULL," 4-15Help menu, overview of, 2-2 to
2-3"HELP," 2-1overview illustrations, 1-5, 1-6"OPEN," 4-5Options menu, overview of, 8-4"OPTIONS," 8-1Printing menu, 7-1 to 7-2program, 1-5selecting from the keyboard,instructions for, 1-7option for, 8-3Services menuConfigure menu, See Visi On
Setup GuideDrives menu, 5-26 to 5-30"exit" command, See Visi On
Setup Guide"install" command, See
Visi On Setup Guide"messages" command, 7-7Printing menu, 7-1"remove" command, See Visi On
Setup Guide"start" command, 3-1"TRANSFER" 6-1"contents" command, Helpdescription, 2-7example, 2-7, 2-8instructions for using, 2-7
Configure menu, Printing, See VisiOn Setup Guide
Contents, window, description of,4-4
Conventions used in this guide, iv,v
Copies of backup disks, making,5-25
"copy" command, Archives, 5-17Copying

files/folders to a new folder, 5-17files/folders to replace
file/folders, 5-17files/folders to other file/folders,
5-17Creatingfiles, 3-7 See also Visi On Calc,
Visi On Graph, Visi OnQuery, or Visi On WordUser's Guides
folders, instructions for, 5-14Cross-referenced Help topics, 2-10Current folderdescription, 5-6examples, 5-6, 5-8
D
Date and time, entering, 5-12Defaultscentral Archives folder, 5-2file names, 3-7options settings, See preset
optionswastebasket folder, 5-2window names, 3-2
Definingdestination of transfersdescription, 6-2instructions for, 6-7
sources of transfersdescription, 6-2instructions for, 6-7
Deleting files, 5-21Destination filescopying to, 5-18transferring to, 6-24
Destination folders, copying to,5-16, 5-18
Destinations of transfers, SeeTransfer, information
Destination programs fortransferring information, 6-4to 6-7
Device name, print queue, 7-4"discard" command, Archives,
5-21Disk storage, 5-23Disks
Index
1-3
backup copies of, 5-25floppycare and handling, See Visi On
Setup Guideexamples of information you can
store on, 5-14initializing for the Archives, 5-26storing information on, 5-24mounting, 5-28unmounting, 5-30
hard, 5-25Displayingcovered closed windows, 4-11closed windows,instructions, 4-11example, 4-11
cross-referenced Help topics,example, 2-11instructions for displaying, 2-10
destination folders, 5-16files from Files display, 5-8foldersexamples of, 5-8 to 5-10instructions for, 5-14
lists of closed windows, 4-11options sheetsdescription, 8-4examplesdisplaying the Visi On Servicesoptions sheet, 8-5
displaying the Visi On Calcrecalculation options, 8-6 to8-7
instructions for, 8-5overview Help topicsexample, 2-9, 2-10instructions for displaying, 2-9
previous Help topicsexample, 2-12instructions for displaying, 2-12
print queue, 7-4recalculation options sheets, 8-6source folders, 5-16Table of Contents for Helpexample, 2-7, 2-8instructions for displaying, 2-7
Displaying a list of closed windowsexample, 4-11instructions for, 4-11
1 -4 Index
Displaying the print queue, 7-4Documentation, Visi On, examples
of, iiDocument transfer type,
description of, 6-4, 6-7Documents, Visi On Word, See
Files"done" command, Optionsdescription, 8-12example, 8-13instructions for using, 8-12
DOS files, See MS-DOS filesDrives displaydescription, 5-27example, 5-27
Drives menu, Services, 5-26
E
Empty folders, 5-21Endingpoints of transfers, defining, 6-2,
6-6Tutorial, Visi On, T-7Visi On system, See Visi On
Setup Guidework in Files display, 3-4work in windowsexamplesafter creating a new file, 3-7after revising a file, 3-10
instructions forArchives, 3-12Help, 2-5programs, 3-4Tutorial, T-7
options sheets, 8-12Ending a programusing the "CLOSE" command, 4-9using the "quit" command, 3-4
Ending the Archives, 3-12Ending Your Work after Creating a
New File, 3-7Ending Your Work after Revising a
File, 3-10Ending Your Work in a Program
Window, 3-4Ending Your Work in the
Archives, 3-12Enlarging a window, See
Expanding windows to full-screen size, 4-15
Entering the Archives, 5-10Exchanging information between
applications programs,overview of, 1-4
"exit" command, Services, See VisiOn Setup Guide
ExitingArchives window, 3-12Help windows, 2-5program windows, 3-4Visi On system, See Visi On
Setup GuideTutorial, Visi On, T-7
Expanding windows to full-screensize
example, 4-15instructions for, 4-15
"export" command, Externaldescription, 5-13used to transfer a file out of the
Visi On system, 6-24used to print a file on a remote
printer, 7-3Exporting files, 6-24, 7-3"External" menu, Archives, 5-13External files, 6-24, 7-3External transfer, 6-21
F
Fieldsmultiple-choicedescription, 8-2 to 8-3example of selecting 8-10
status, description, 8-2type-indescription, 8-2 to 8-3example of changing, 8-9
File types, description of, 5-12Fileschanging names of, 5-21copying, instructions for, 5-17creating, 3-7, See also Visi On
Calc, Visi On Graph, Visi OnQuery, or Visi On WordUser's Guide
description of, 5-2deleting, 5-21
destinationcopying to, 5-18transferring to, 6-8, 6-21
displaying in central Archivesfolder, 5-6
exporting, 6-24, 7-3external, 6-21 to 6-26, 7-3importing to new folders, 6-22in central Archives, 5-5 to 5-10maintainingdescription, 5-10instructions for, 5-13
moving, instructions for, 5-19MS-DOS files, creatingto transfer into the Visi On
system, 6-22to transfer out of the Visi On
system, 6-24naming, 5-12organizing, 5-4overwriting, 3-6 to 3-11, 6-18printing, 7-1 to 7-2protecting, 5-25removing, instructions for, 5-21renaming, instructions for, 5-21reorganizing, 5-13replacingby copying, 5-17by transferring, 6-18
retrievingfrom the wastebasket folder,
5-22to work with, 5-5
revised, 3-5 to 3-6, 3-10 to 3-11savingwhen quitting, 3-4 to 3-6when selecting the "file"command, 5-5
source, 5-18storing, 5-4 to 5-10transferringexample, 6-15instructions for, 6-13
types, description of, 5-12unnamed, 3-5, 3-7 to 3-8updating, 5-10
Files displaydisplaying files from, 5-6ending work in, 3-4 to 3-12examples
Index 1- 5
with all files in the centralArchives folder, 5-6
with files in folders, 5-7with files and files within
folders, 5-9folder path line in, 5-6getting files from, 5-5loading files from, 5-5reaching Archives through, 5-5retrieving files from, 5-5saving files when quitting, 3-4 to
3-9saving files when selecting the
"file" command, 5-5showing files stored within
folders, 5-6 to 5-7storing files, 5-5unnamed files in, example of, 3-5
Filing system, See ArchivesFilling a window, See Expanding a
window to full-screen size,4-15
Findingadditional files in central
Archives, 5-4current folders in folder paths,
5-12instructions for using applications
programs, 1-8new folders, 5-14
Floppy diskscare and handling, See Visi On
Setup Guideinitializing for the Archives, 5-26making backup copies, 5-25storing information on, 5-24used for remote printing, 7-1
Folder paths, 3-6, 5-14Folder(s)central Archives, 5-2changing the name of, 5-21copying to a new folder, 5-17copying to an existing folder, 5-17creating 5-14current, description of, 5-4defined, 5-2destination, 5-16, 5-18displaying, 5-6 to 5-10empty, 5-21moving into new folders, 5-19
1-6 Index
naming, 3-6organizing by hierarchy, 5-5path, 5-14removing empty, 5-21selecting from Archives, 5-7source, 5-16, 5-18storing files/folders within, 5-5 to
5-10transferringexample, 6-15instructions for, 6-13
transmittal, 7-2updating, 5-10wastebasket, description of, 5-2working, description of, 5-7Full-screen windowsexample, 4-8returning to previous size and
location, 4-7"FRAME"description, 4-12used to change the size and
location of a window, 4-12used to display a list of closed
windows, 4-11Frame, window, 4-3Framing a windowexample, 4-13instructions for, 4-12
"FULL"description, 4-15used to expand a window to full-
screen size, 4-15used to display a list of closed
windows, 4-11
G
Getting files, 5-5Getting Help, 2-1Getting Help on the Visi On
System and its Programs, 2-3Graphs, See FilesGrouping related files in separate
folders, 5-14
H
Hard disks, 5-25
"HELP"description, 2-1used to get Help on an item, 2-3
Helpdescription of window, 2-2displaying a cross-referenced Help
topicexample, 2-11instructions for, 2-10
displaying a previous Help topicexample, 2-12, 2-13instructions for, 2-12
displaying an overview Help topicexample, 2-9, 2-10instructions for, 2-9
displaying the Table of Contentsfor Help
example, 2-7, 2-8instructions for, 2-7
menu commands, description of,2-2, 2-3
requesting helpexample, 2-4, 2-5instructions for, 2-3
removing a Help windowexample, 2-6instructions for, 2-5
scrolling a Help window, 2-4triangle, selecting a, 2-2when to get, 2-3
Help topicscross-referenced, 2-10overview, 2-9previous, 2-12
Help window, description ofmenu commands, overview of,
2-2, 2-3prompt line, 2-2title line, 2-2triangle, 2-2
Hierarchy, organizing files/foldersof, 5-5
Hourglass pointer, T-2Housekeeping tasks, description of,
5-5How Do You Interact with the
Visi On System? 1-5How to Start Using an Application
Program, 1-8
"import" command, Externaldescription, 5-13used to transfer files into the
Visi On system, 6-22Importing files to new folders, 6-22Informationmatching sources and destination
of transfers of, 6-3 to 6-4program-specific, 6-3restoring from backup copies of
disks, 5-25source programs, 6-4storing, 5-23transfers, See Transfers,
informationtransferringbetween applications programs,
overview of 1-5between program windows, 6-7from Visi On to another system,
6-24from one window to another,
example of, 6-3into the Visi On system, 6-22within the same window, 6-2types that can be transferred, 6-4
to 6-7"initialize" command, Drives, 5-26Initializing floppy disks for the
Archives, 5-26Input line, window, 4-3"install" commandConfigure, See Visi On Setup
GuideServices, See Visi On Setup Guide
Installing Visi On applications, 1-9
K
Keyboard, description of, SeeVisi On Setup Guide
Keyboard Menu Select option,Services, 8-3
Keyboard menu selection,instructions for, 1-7
L
Layout of windows, 4-1Leavinga program, 3-4a Help window, 2-5Archives, 3-12options sheets, 8-12Tutorial, Visi On, T-7Visi On system, See Visi On
Setup Guidework in windowsprogram, 3-4Archives, 3-12
Loading files, See Getting filesLocal printing, 7-1
M
Index
I-7
Maintaining files, See Reorganizingfiles
Making backup copies of disks,5-25
Manipulating windows, 4-1Matching sources and destinations
of information, 6-3 to 6-4Menu(s)defined, 1-4commandsArchives menu, 5-12 to 5-13Configure menu, See Visi On
Setup GuideDrives menu, 5-26 to 5-30Files display menu, Visi On
Calc, 5-6Help menu, 2-2, 2-3Options menu, 8-4Printing menu, 7-1 to 7-2Visi On menu, 1-7Services menuConfigure menu, See Visi OnSetup Guide
Drives menu, 5-26 to 5-30"exit" command, See Visi OnSetup Guide
"install" command, See Visi OnSetup Guide
"messages" command, 7-7
I
1- 8 Index
Printing menu, 7-1"remove" command, SeeVisi On Setup Guide
"start" command, 3-1paths, defined, 4-5previous, returning to, 4-5
Menu paths, description of, 4-5"messages" command, Services, 7-7MessagesVisi On, 9-1print, responding to, 7-7"modify" command, Configure,
See Visi On Setup Guidemodifying files, See Revising files"mount" command, Drives, 5-28Mousecalibrating, See Visi On Setup
Guidemoving, T-3Tutorial, using in the, T-3overview description, 1-2repositioning on the pad, 1-4troubleshooting, See Visi On
Setup Guide"move" command, Archives, 5-19Moving files and foldersto new folders, 5-19to replace files/folders, 5-19
MS-DOS files, creatingto transfer into the Visi On
system, 6-22to transfer out of the Visi On
system, 6-24Multiple-choice fields, options
sheetdescription, 8-2 to 8-3example of selecting, 8-10
N
Names of files, changing, 5-21Namingconventions, 5-12new fileswhen quitting, 3-7when saving a file, 5-12
new folderswhen quitting, 3-6from the Archives, 5-12
"new folder" command, Archives,5-14
New Window Size option, Servicesdescription 8-2example of changing, 8-9
0"OPEN"description, 4-5used to open a closed window,
4-5used to return a full-screen
window to its previous sizeand location, 4-7
used to display a list of closedwindows, 4-11
Open window, description of, 4-2Opening a windowexamplesopening a closed window, 4-6using "OPEN" to return a full-
screen window to its previoussize and location, 4-8
instructions for, 4-5options, system, 8-2options, Visi On ServicesKeyboard Menu Select, 8-3New Window Size, 8-3Sound Control, 8-4"OPTIONS"description, 8-1used to display an options sheet,
8-4used to display a list of closed
windows, 4-11Options settingschangingexamples, 8-9 to 8-10instructions for, 8-8
displaying, 8-4preset, 8-1restoring, 8-11saving, 8-11setting aside, 8-12
Options sheet(s)changingexamples
changing the Services optionssheet, 8-9
changing the Visi On Calcrecalculation options, 8-10
instructions for, 8-8commands for, 8-4description of, 8-1 to 8-2displayingexamplesdisplaying the Services optionssheet, 8-5
displaying the Visi On Calcrecalculation options, 8-6
instructions for, 8-4illustratedoverview of layout, 4-3example of Services options
sheet, 8-3example of Visi On Calc
recalculation options sheet,8-7
overview, 4-4recalculation options, example of,
8-7removing from screen, 8-12restoring, 8-11saving, 8-11Servicesdescription, 8-3 to 8-4layout, 8-3
setting asideexample, 8-13instructions for, 8-12
windows, 4-3 to 4-4Organizing files/folders by
hierarchy, 5-5"overview" command, Helpdescription, 2-9instructions for using, 2-9, 2-10
Overview of the Visi On System,the Tutorial, T-1
Overview : Visi On Help, 2-1Overview : Windows, 4-1Overview Help topics, 2-9 to 2-10Overwriting one file with anotherwhen quitting, 3-6 to 3-11by transferring, 6-18
P
Index
1-9
Passive windowsdescription, 4-4example of getting help on, 2-9,
2-10pause" command, Printing, 7-5Paused, print queue status, 7-4Permanent storage, See Archives
and Disk storagePlotters, See printersPointing device, 1-1 to 1-2Pointer, moving the, T-3 to T-4Preset options settings, 8-1Previous Help topics, 2-12 to 2-13Print queuechanging the status of print
requests, 7-5description, 7-4displaying, 7-4illustration, 7-4
Print messages, responding to, 7-7Print requestscancelling, 7-6restarting, 7-5stopping temporarily, 7-5
Printing menu, Services"cancel" command, 7-6"Configure" command, See
Visi On Setup Guide"pause" command, 7-5"resume" command, 7-5
Printersconfiguring, See Visi On Setup
Guideinstalling, See Visi On Setup
Guiderestarting, 7-5setting up, See Visi On Setup
Guidestopping, 7-5
Printingcancelling a print request, 7-6changing the status of print
requests, 7-5files (worksheets, tables, graphs,
series, or documents)
1 . 1 0 Index
on a local printer, 7-1on a remote printer on another
Visi On system, 7-2on a remote printer on a
computer without the Visi Onsystem, 7-2, 7-4
messages, responding to print, 7-7print queue, displaying, 7-4status, print request, 7-4restarting the printer, 7-4stopping the printer temporarily,
7-5Printing your files, 7-1Programapplications, See Application
programscommands, overview of 1-4windowsending work in, 3-3starting work in, 3-1
Program-specific information, 6-3Prompt line, window, 4-4,Protecting files using backup disks,
5-25Purging files and folders, See
Removing
Q
Queue, print, description of, 7-4Queued, print queue status, 7-4QuickStart course,
recommendations for taking1-8 to 1-9
overview description, 1-9"quit" commandArchives window, used in, 3-12Help window, used in, 2-5program window, used in, 3-4Tutorial window, used in, T-7
Quittingoptions sheets, 8-12Tutorial, Visi On, T-7Visi On system, See Visi On
Setup Guidework in Files display, 3-4work in windowsexamplesafter creating a new file, 3-7after revising a file, 3-10
R
instructions forArchives, 3-12Help, 2-5programs, 3-4Tutorial, T-7
Rearranging windows on thescreen, 4-1
Recalculation options sheet,Visi On Calc, 8-6, 8-10
Recovering information, 5-25Rectangle transfer type, description
of, 6-4 to 6-7Remote printing, 7-1 to 7-2"remove" commandConfigure, See Visi On Setup
GuideServices, See Visi On Setup GuideRemovingArchives windows, 3-12empty folders from Archives,
5-21files from Archives, 5-21files from wastebasket, 5-22Help window, 2-5options sheets from screens, 8-12program windows, 3-4"rename" command, Archives,
5-21Renamingfiles, 5-21folders, 5-21program windows, 3-2
Reopening windows, 4-2Reorganizing filesdescription of, 5-10instructions for, 5-13
Replacing a file with another fileusing the "copy" command, 5-17using the "TRANSFER"
command, 6-18Request name, print queue, 7-4Requesting help, 2-3Resizing windows, See Framing a
window, 4-12Responding to print messages, 7-7Restarting the printer, instructions
for, 7-5
"restore" command, Optionsdescription, 8-11instructions for using, 8-11
Restoring information from backupcopies of disks, 5-25
Restoring options sheets, 8-11"resume" command, Printing, 7-5Resume printing, 7-5Retrieving files, See Getting filesReturningto one view of the Archives, 5-17to previous menus, 4-5windows to previous sizes and
locations, 4-7 to 4-9Returning a full-screen window to
its previous size and location,4-7
Revised filessaving when quitting, instructions
for, 3-5 to 3-6examples of saving, 3-10 to 3-11
S
"save" command, Optionsdescription, 8-11instructions for using, 8-11
Savingfileswhen quittinginstructions for, 3-4 to 3-6examples of, 3-7, 3-10,
when selecting the "file"command, 5-5
options settings, 8-11options sheets, 8-11revised files, 3-5 to 3-6Scrolling, Help window, 2-4"see" command, Helpdescription, 2-10instructions for using, 2-10 to
2-12Selectingcommands, Visi On, 1-2 to 1-3,
1-6 to 1-7commands from the keyboard,
1-7destinations of transfers, See
Transfers, informationending points of source areas, See
Index
1 . 1 1
Transfers, informationfolders from Archives, 5-7mouse, with the, 1-3program commands, 1-6sources of transfers, See
Transfers, informationstarting points of source areas,
See Transfers, informationSeries, See FilesSeries transfer type, description of,
6-4Services options sheets, See
Options sheetsServices window, See Window(s)Setting aside a window (closing a
window)example, 4-9, 4-10instructions for, 4-9
Setting options sheets asidedescription, 8-12example, 8-13instructions for, 8-12
Setting, options, See Optionssettings
Sizing windows, See Framing awindow, 4-12
Sound Control option, Services,8-4
Source(s)folders, 5-16, 5-18files, 5-18programs for transferring
information, 6-4 to 6-7of information transfer, See
Transfers, information"split" command, Archives, 5-16,
5-17Splitting Archives into two panes,
5-16"start" command, Services, 3-1StartingArchives, 3-1points of source areas of
information, See Transfers,information
printer, 7-5programs, 3-1Visi On system, See Visi On
Setup GuideVisi On system, overview of, 1-1
1-1 2 Index
Visi On Tutorial, T-5work in windows, 3-1 to 3-3
Starting a printer again, 7-5Startup window, changing the size
of 8-3Status, print queue, 7-4Status fields, options sheet, 8-2"STOP" command, Visi On, 1-7StoppingArchives, 3-12operating (STOP command), 1-7printers, 7-5programs, 3-4Visi On system, See Visi On
Setup GuideVisi On Tutorial, T-7
Stopping the printer temporarily,7-5
Storagepermanent, See Archives and
Disk Storagetemporary, See Files display and
Working folderStoringfiles in the Archiveswhen quitting a programexamples, 3-7, 3-10instructions for, 3-3
when selecting the "file"command, 5-5
files/folders within folders, 5-4 to5-11
information on disks, 5-23System options, 8-2
T
Table of Contents, Help, 2-7Tables, See FilesTailoring the Visi On system and
its programs, 8-1Temporary storage, See Files
display and Working folderTerminating, See QuittingText transfer type, description of,
6-4 to 6-7Time, entering date and, 5-12Title line, window, 4-3
Transfer types, description of, 6-4to 6-7
"TRANSFER"description, 6-1used to transfer information
between windows, example of,6-3
used to display a list of closedwindows, 4-11
Transfers, information, See alsoInformation, transferring
defining sources and destinationsof, 6-2
external, 6-21matching sources and destinations
of, 6-3 to 6-4selecting ending points of source
areas of, examples of, 6-8, 6-9selecting destinations of, 6-8 to
6-9, 6-11 to 6-13selecting sources of, 6-8, 6-10selecting starting points of source
areas of, examples of, 6-8 to6-11
types of, 6-4, 6-11 to 6-12Transferringbetween applications programs,
overview of 1-5between program windows, 6-7filesexamplestransferring files and foldersbetween folders, 6-15
replacing a file with anotherfile, 6-18
instructions for, 6-13foldersexample, 6-15instructions for, 6-13
from Visi On to another system,instructions for, 6-24
from one window to another,example of, 6-3
into the Visi On system,instructions for, 6-22
within the same window, 6-2types that can be transferred, 6-4
to 6-7Transmittal folders, 7-2Triangle, description of, 2-2
Tutorial, Visi OnexamplesVisi On desktop, T-2Visi On screen, T-2
how to use the Tutorial, T-4overviewTutorial, T-4Visi On system, T-1
starting the Tutorial, instructionsfor, T-5
stopping the Tutorial, instructionsfor, T-7
using the mouseexample, T-3instructions for, T-3, T-4
Type-in fields, options sheetdescription, 8-2 to 8-3example of changing, 8-9
U
"unmount" command, Drives, 5-30Unnamed filesdescription of, 3-4saving, 3-7 to 3-8
Updating See Reorganizing files
V
Visi OnApplications Manager, overview
of, 1-1 to 1-7Calc Files display, 5-3 to 5-7commands, 1-7overview description, 1-1pointing device, 1-2printing on a computer, 7-1 to 7-2selecting with the mouse, 1-2selecting menu commands from
the keyboard, 1-7system, starting, See Visi On
Setup GuideTable of Contents, Help, 2-7Tutorial, Taking the, T-1
Visi On Tutorial, See Tutorial,Visi On, T-1
Volume, description of, 5-27
W
Index
1- 1 3
Waiting, print queue status, 7-4Wastebasket folder, defined, 5-1What is the Visi On Applications
Manager? 1-1When You're Looking at the
Screen . . . ivWhile You're Using the
Programs. . . vWindow(s)active, described, 4-3Archives, See Archives windowsarranging on the screen, 4-10 to
4-12changing the location of, 4-12changing the size ofusing the "FRAME" command,
4-12using the New Window Size
option, 8-9closeddescription, 4-2opening, 4-5
closing, 4-9commandsoverview, 1-3 to 1-6,instructions for using, overview,
4-1contents pane, 4-3 to 4-4defined,overview, 1-1 to 1-2,detailed description, 4-1, 4-4ending work in, 3-4, 3-12expanding a window to full-
screen size, 4-15frame, 4-3framing, 4-12full-screen, expanding to, 4-15Help, 2-1input line, 4-3layout of, 4-1 to 4-5manipulating, 4-1open, 4-2opening, 4-5options sheet, 4-4passive, 4-3 to 4-4programending work in, 3-4starting work in, 3-1
1- 1 4 Index
prompt line, 4-3removinga Help window, 2-5a program window, 3-4an Archives window, 3-12an options sheet, 8-12
reopening, 4-2returning folders to one in
Archives, 5-15returning a full-screen window to
its previous size, 4-7Servicesexample of getting help on, 2-4,
2-5
starting programs and theArchives from, 3-1 to 3-2
options sheet, 8-3setting aside, 4-9splitting into two, 5-12 to 5-16starting work in, 3-1 to 3-3startup, changing the size of 8-3,
8-9Window layout, 4-1Working folder, description of, 5-7Worksheet transfer type,
description, 6-4 to 6-7Worksheets, See Files


Visi OnTM Applications Manager
IBM° Personal Computer69910-2210 10/83
Reader's CritiqueVisiCorp's Publications Department wants to provide documentsthat meet the needs of all our product users . Your feedback helps usproduce better manuals .
Please tell us how you rate this manual in the following areas :
Your computer experience : ∎ 2 yrs or less ∎ 2-5 yrs ∎ 5 yrs +Did you use the manual to learn the program? ∎ Yes ∎ NoI read ∎ 25% ∎ 50 % ∎ 75 % ∎ 100 % of this manual .
Please specify, by page, any errors you found in this manual .
Please tell us for what application(s) you are using this program .
What one thing could we do to improve this manual for you?
Name TitleCompanyAddressCity StateZipPhone : (Office)(Home)
Excellent(v)
Good(v)
Average(v)
Fair(v)
Poor(v)
Completeness of information .Clarity of information .Organization of manual .Appearance of manual .Quantity of examples .Usefulness of examples .Quantity of photographs andillustrations .Appropriateness of photographsand illustrations .Degree to which this manual meetsyour expectations and needs .Appropriateness of the manual levelto a person of your experience .Overall manual .


2895 Zanker RoadSan Jose, CA 95134Phone: 408/946-9000
IBM° Personal ComputerVisi OnTM Applications Manage
69910-2210 10/83
Important InformationPlease note the following changes to the Visi On TM Applications ManagerSetup Guide and the Visi On Applications Manager User's Guide .
Changes to the Visi On Applications ManagerSetup Guide
Page
Change13
The last sentence in step 3 should read :"The MS-DOS prompt appears on the screen : C > if youtyped c : ; D > if you typed d : ; and so forth ."
18
Figure 9 shows the Visi On Calc, Visi On Graph,Visi On Query, and Visi On Word program names inthe Services window . Those names will appear after youinstall each of the programs .
32
The description of parity should read :" . . .the printer contains an even or odd number of1 bits ."
Additional tips and techniques for using the mouseHere are some additional tips and techniques for calibrating and usingthe mouse :
•
If you have an M1 mouse, you must calibrate it the first time you use itafter it is connected . Then every time you start the ApplicationsManager, move the mouse until the pointer moves on the screen .
•
If you are already using the mouse on your computer, you will not beasked to calibrate the mouse after you install the Visi On ApplicationsManager . The only time you'll be asked is the first time you use themouse or any time the power to the mouse has been turned off or themouse is unplugged .
•
If you are asked to calibrate the mouse, follow these steps :1 . Slowly move the mouse in large circles in a clockwise direction on the
pad . Have patience; you may have to move the mouse in eight ormore circles before it calibrates . The number of circles required canvary from mouse to mouse .
2. If the mouse still doesn't calibrate (the pointer doesn't move or itmoves erratically on the screen), unplug the mouse from thepower socket .
3 . Plug the mouse back into the power socket, and repeat step 1 .
69910-8910
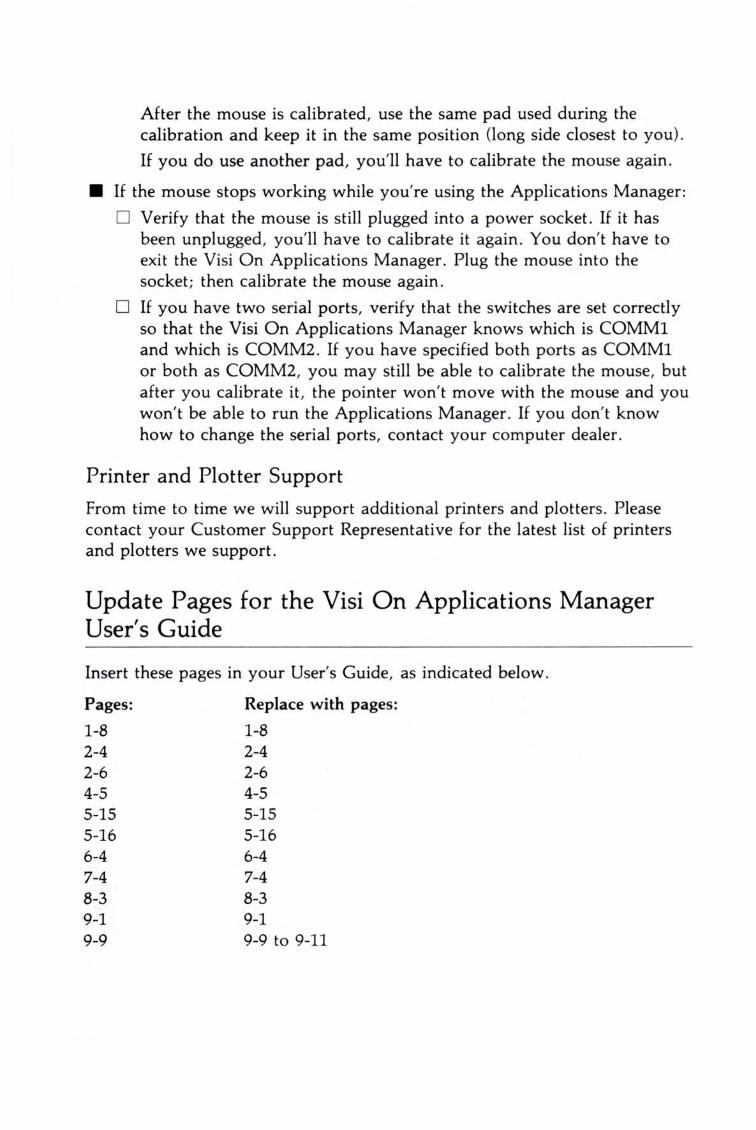
After the mouse is calibrated, use the same pad used during thecalibration and keep it in the same position (long side closest to you) .If you do use another pad, you'll have to calibrate the mouse again .
∎ If the mouse stops working while you're using the Applications Manager :∎ Verify that the mouse is still plugged into a power socket . If it has
been unplugged, you'll have to calibrate it again . You don't have toexit the Visi On Applications Manager . Plug the mouse into thesocket; then calibrate the mouse again .
∎ If you have two serial ports, verify that the switches are set correctlyso that the Visi On Applications Manager knows which is COMM1and which is COMM2 . If you have specified both ports as COMM1or both as COMM2, you may still be able to calibrate the mouse, butafter you calibrate it, the pointer won't move with the mouse and youwon't be able to run the Applications Manager . If you don't knowhow to change the serial ports, contact your computer dealer .
Printer and Plotter SupportFrom time to time we will support additional printers and plotters . Pleasecontact your Customer Support Representative for the latest list of printersand plotters we support .
Update Pages for the Visi On Applications ManagerUser's Guide
Insert these pages in your User's Guide, as indicated below .
Pages: Replace with pages:1-8 1-82-4 2-42-6 2-64-5 4-55-15 5-155-16 5-166-4 6-47-4 7-48-3 8-39-1 9-19-9 9-9 to 9-11
How Do You Interact with the Visi OnTM System? 1-i
The program commands perform operations only forthat program ; for example, the Visi On Word "delete"command lets you delete text from a document . Youselect the program commands in the same way that youselect the basic Visi On commands-by using thepointer .
However, the Applications Manager also lets you selectmenu commands from the keyboard.
Selecting Menu Commands from the Keyboard
If you are using one of the Visi On programs thatrequire a lot of typing, for example, the Visi On Wordprogram, it may be more convenient for you to selectmenu commands from the keyboard .
HELP Selecting "HELP" gets information foranything visible on the screen such ascommands, windows, or items withinwindow.
CLOSE
Selecting "CLOSE" lets you close awindow (set it aside temporarily) .
OPEN
Selecting "OPEN" lets you open aclosed window .
FULL Selecting "FULL" lets you enlarge awindow to occupy the entire screen(the Visi On menu still remains) .
FRAME
Selecting "FRAME" lets you change thesize and location of a window .
OPTIONS Selecting "OPTIONS" lets you controlcertain aspects of a program's behaviorthrough options sheets .
TRANSFER
Selecting "TRANSFER" lets you takeinformation from one window and putit into another window .
STOP
Selecting "STOP" cancels mostoperations you initiate . The effects ofthe "STOP" command are different fordifferent operations .

1-8 Overview of the Visi On TM System
The Visi On Applications Manager provides an optionthat lets you do just that . This option is in the ServicesOptions Sheet (see Chapter 8 for a description) .
The way you select a menu command from thekeyboard, is to press the key marked (E SC) first ; thentype the first letter of the menu command you want touse . If the first letter of the command is an uppercaseletter you must press and hold the (S H IF T) key whileyou type the first letter of the command .
How to Start Using an Application ProgramTo use the Visi On Word TM program or other applicationprograms, you must put it on your hard disk (install it)after you have installed the Visi On ApplicationsManager . You should become familiar with the basicVisi On commands by taking the Visi On Tutorial .Specific instructions for using each application programare provided in that program's QuickStart Course Tm andUser's Guide .
The steps you take to start using an applicationprogram are (see Figure 1-7) :
1 . Install (put on your hard disk) the Visi OnApplications Manager and the application programyou want to use . You do this only one time . See theVisi On Setup Guide for instructions .
2 . Take the Visi On Tutorial ; then take the QuickStartCourse for the program you want to use . The Visi OnTutorial (the instructions and exercises are all on thecomputer screen) teaches you the way to use thepointing device and all of the basic Visi On
Install Visi Onsystem andprogram.
Getting Help on the Visi On TM System and its Programs 2-3
"see"
Displays related or more detailedinformation on a topic . When youselect this command, you are promptedto select a cross-referenced topic in theHelp window. You can also select thetriangle without selecting "see" first .
"back"
Displays the previously displayedHelp topic .
"contents"
Displays the Visi On Table ofContents. You can select the Table ofContents for any programs you haveinstalled or any of the utilities thatcome with the Visi On system .
"quit"
Removes the Help window from thescreen .
Getting Help on the Visi OnTM Systemand its Programs
The "HELP" command in the Visi On menu displaysinformation about a command, a window, or an areathat you selected on the Visi On screen .
Use the "HELP" command whenever you are not clearabout what you should do next or when you wantinformation about a command or an item on the screen .
To request help
1 . Do one of the following :∎ If you want help on a window or an item in the
window, make sure the window is active . Then select"HELP" from the Visi On menu .If you want help on a Visi On command, select"HELP" from the Visi On TM menu .
The system asks you to select what you need helpwith .
2 . Select the command, window, or item within thewindow for which you want help .The system opens a new Help window that displays aHelp topic for the item you selected .
2 -4 Getting Help
Figure 2-3 . Gettinghelp on theServices window
At any time while a Help window is displayed, youcan also display :
More general information (refer to "Displaying anOverview Help Topic" later in this chapter) .Related or more detailed information (refer to"Displaying a Cross-Referenced Help Topic" laterin this chapter) .Previously displayed Help topics (refer to"Displaying a Previous Help Topic" later in thischapter) .The Table of Contents for the Visi On system andits programs (refer to "Displaying the Visi OnTable of Contents" later in this chapter) .
If the Help window has more information than it candisplay at one time, you must scroll the text up . If youtry to scroll the window and there is nothing to scroll,the Visi On system beeps to indicate the end of the text .
When you have finished reading the text in the Helpwindow and want to return to the work you were doing,select "quit" from the Help menu . The Help window isremoved from the screen .
Figure 2-3 illustrates how you would get help on theServices window, if you wanted to know what tasks youcould do there .
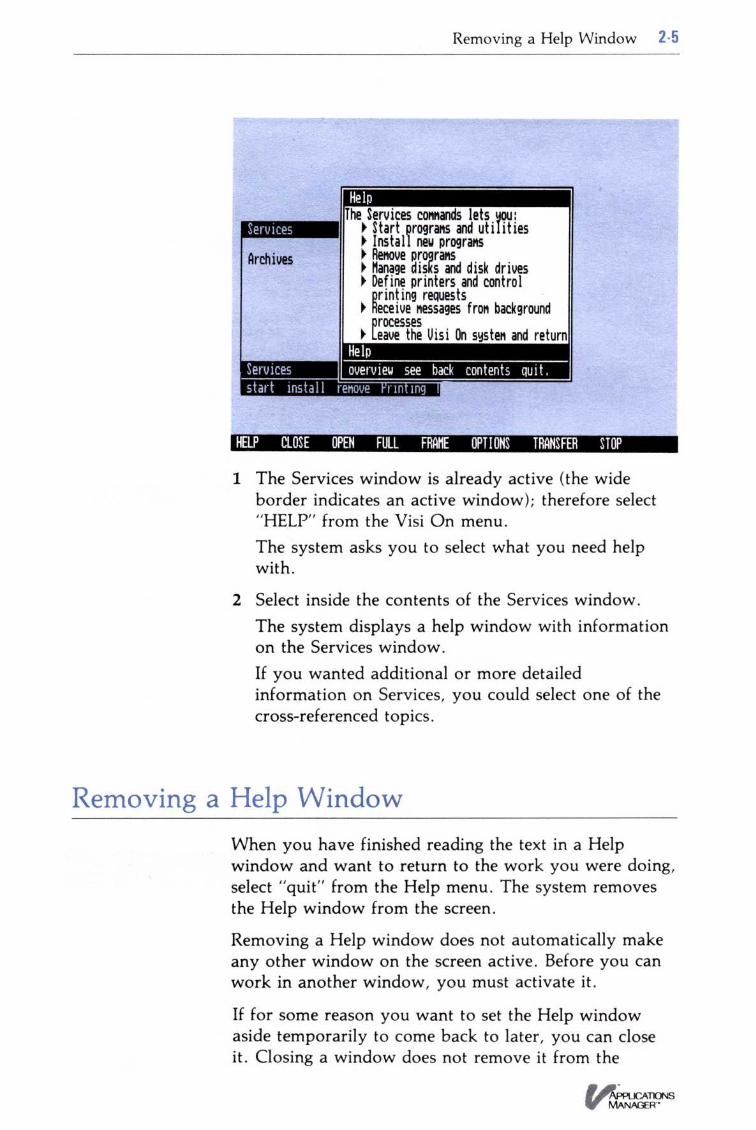
Removing a Help Window 2 -5
1 The Services window is already active (the wideborder indicates an active window) ; therefore select"HELP" from the Visi On menu .The system asks you to select what you need helpwith .
2 Select inside the contents of the Services window .The system displays a help window with informationon the Services window .If you wanted additional or more detailedinformation on Services, you could select one of thecross-referenced topics .
Removing a Help WindowWhen you have finished reading the text in a Helpwindow and want to return to the work you were doing,select "quit" from the Help menu . The system removesthe Help window from the screen .
Removing a Help window does not automatically makeany other window on the screen active . Before you canwork in another window, you must activate it .
If for some reason you want to set the Help windowaside temporarily to come back to later, you can closeit . Closing a window does not remove it from the
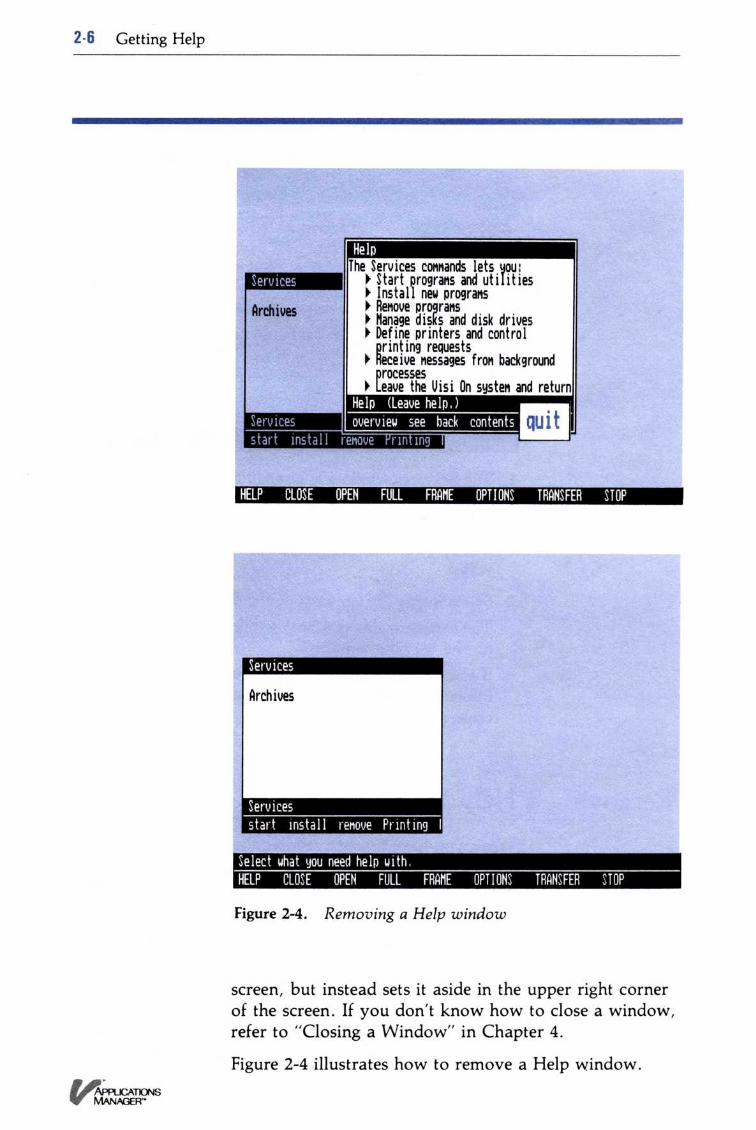
2-6 Getting Help
Figure 2-4 . Removing a Help window
screen, but instead sets it aside in the upper right cornerof the screen . If you don't know how to close a window,refer to "Closing a Window" in Chapter 4 .
Figure 2-4 illustrates how to remove a Help window .
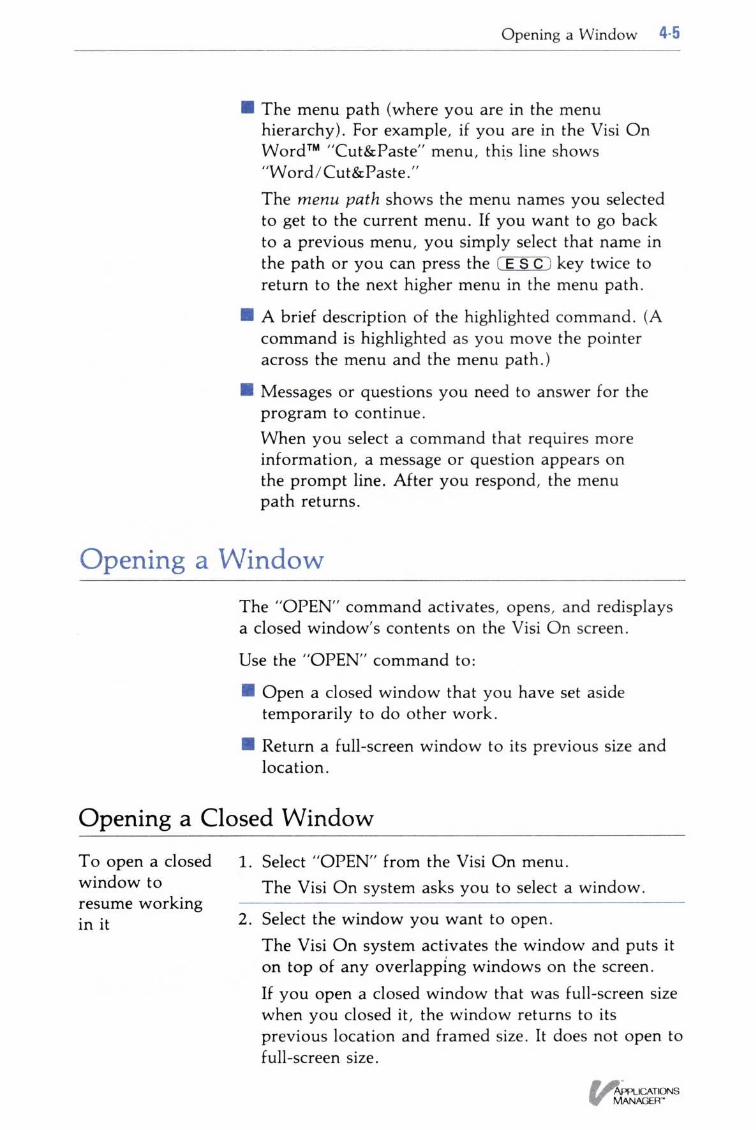
Opening a Window
To open a closedwindow toresume workingin it
∎ The menu path (where you are in the menuhierarchy) . For example, if you are in the Visi OnWord TM "Cut&Paste" menu, this line shows"Word/ Cut&Paste ."The menu path shows the menu names you selectedto get to the current menu . If you want to go backto a previous menu, you simply select that name inthe path or you can press the (E S C ) key twice toreturn to the next higher menu in the menu path .
•
A brief description of the highlighted command . (Acommand is highlighted as you move the pointeracross the menu and the menu path .)
∎
Messages or questions you need to answer for theprogram to continue .When you select a command that requires moreinformation, a message or question appears onthe prompt line . After you respond, the menupath returns .
The "OPEN" command activates, opens, and redisplaysa closed window's contents on the Visi On screen .
Use the "OPEN" command to :
∎
Open a closed window that you have set asidetemporarily to do other work .
∎
Return a full-screen window to its previous size andlocation .
Opening a Closed Window
Opening a Window 4-5
1 . Select "OPEN" from the Visi On menu .The Visi On system asks you to select a window .
2 . Select the window you want to open .The Visi On system activates the window and puts iton top of any overlapping windows on the screen .If you open a closed window that was full-screen sizewhen you closed it, the window returns to itsprevious location and framed size . It does not open tofull-screen size .
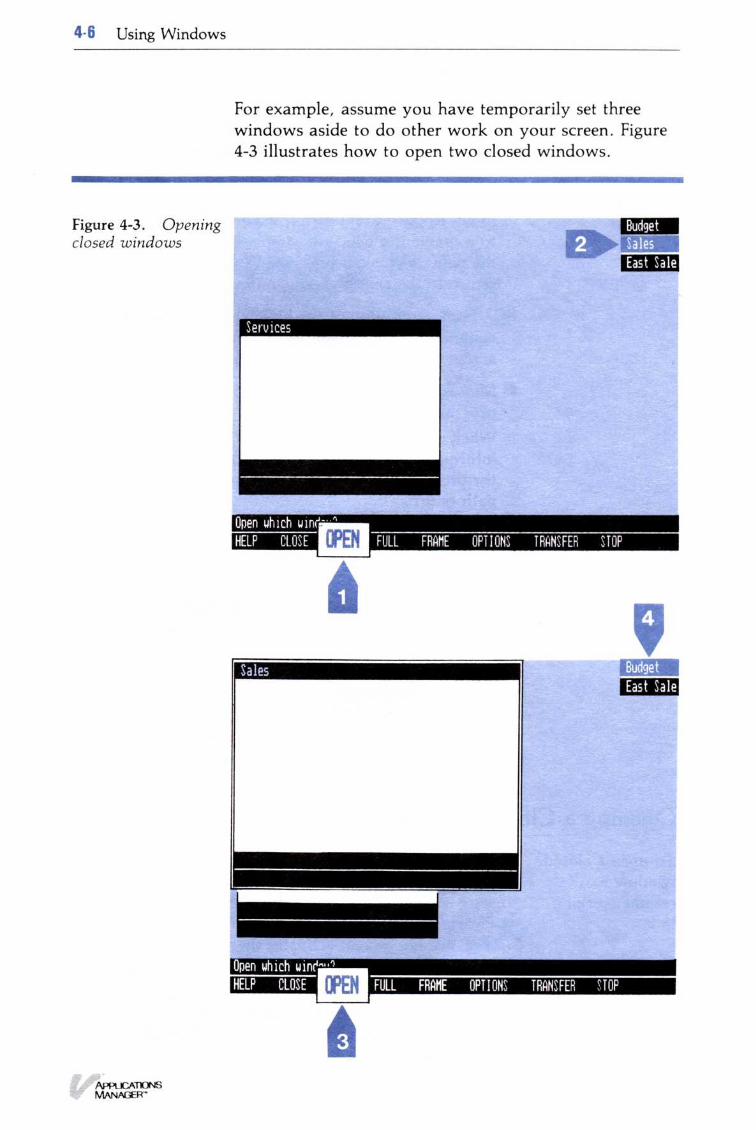
4. 6 Using Windows
Figure 4-3 . Openingclosed windows
For example, assume you have temporarily set threewindows aside to do other work on your screen . Figure4-3 illustrates how to open two closed windows .
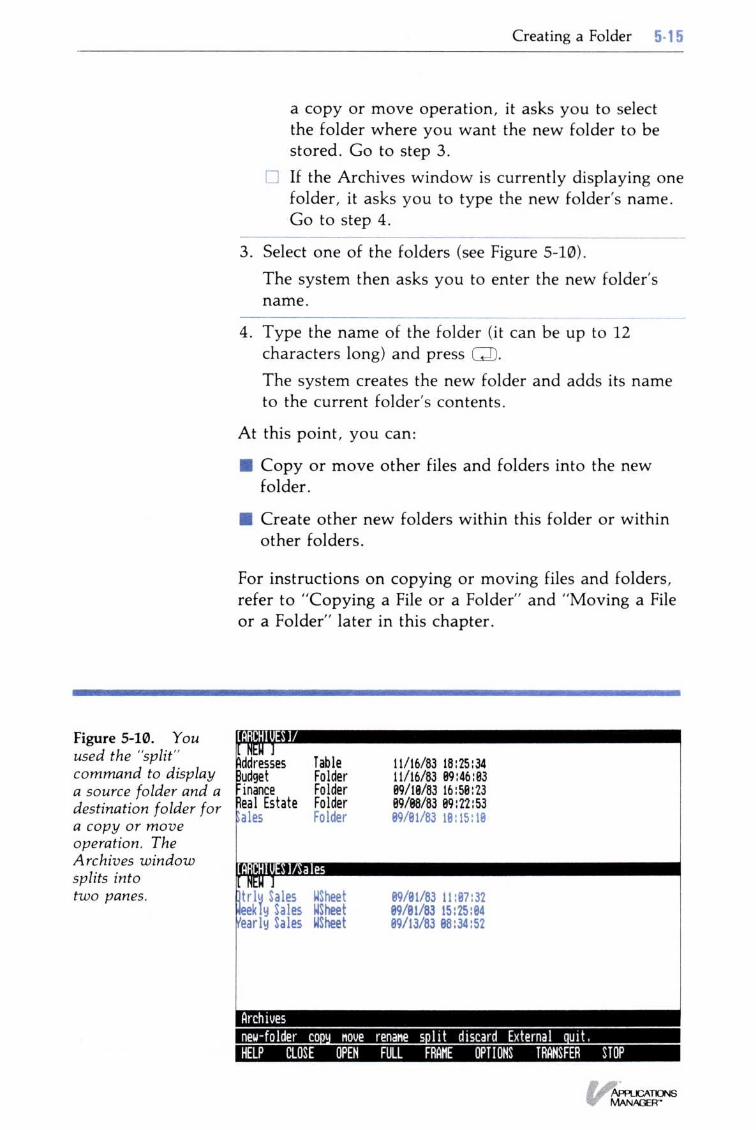
Figure 5-10 . Youused the "split"command to displaya source folder and adestination folder fora copy or moveoperation. TheArchives windowsplits intotwo panes .
a copy or move operation, it asks you to selectthe folder where you want the new folder to bestored . Go to step 3 .
If the Archives window is currently displaying onefolder, it asks you to type the new folder's name .Go to step 4 .
3 . Select one of the folders (see Figure 5-10) .
The system then asks you to enter the new folder'sname .
4 . Type the name of the folder (it can be up to 12characters long) and press (ENTER).
The system creates the new folder and adds its nameto the current folder's contents .
At this point, you can :
Copy or move other files and folders into the newfolder .
∎ Create other new folders within this folder or withinother folders.
For instructions on copying or moving files and folders,refer to "Copying a File or a Folder" and "Moving a Fileor a Folder" later in this chapter .
Creating a Folder
`- 15
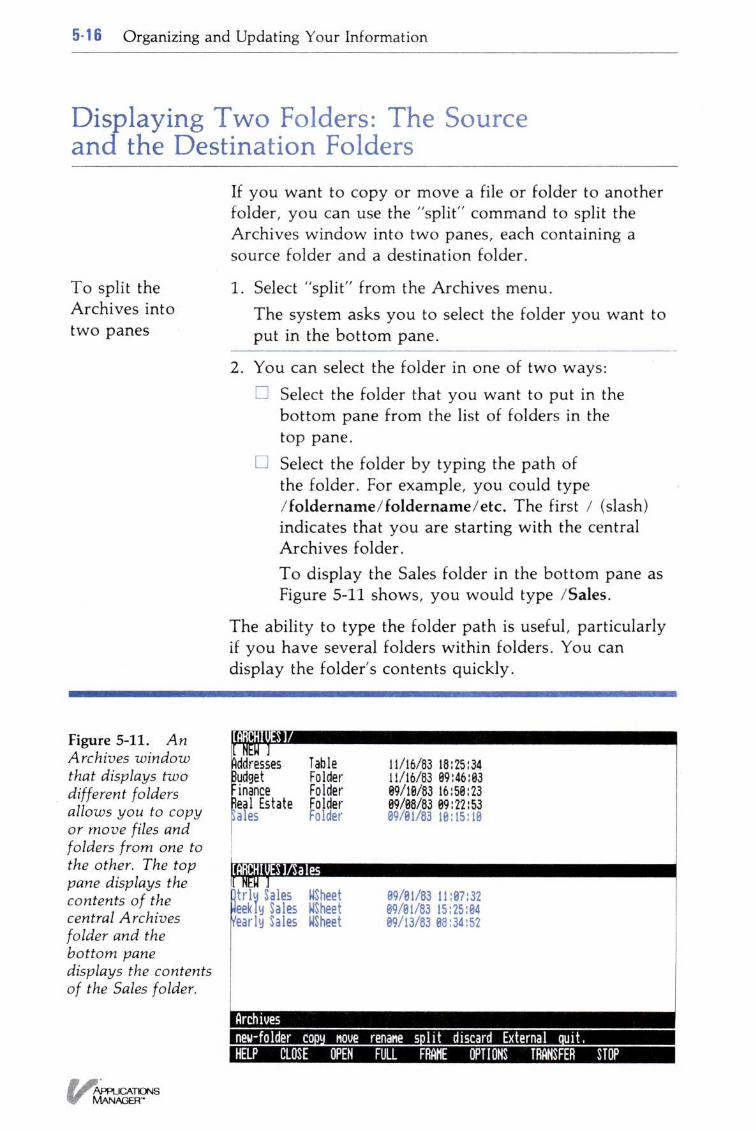
5- 1 6 Organizing and Updating Your Information
Displaying Two Folders : The Sourceand the Destination Folders
To split theArchives intotwo panes
Figure 5-11 . AnArchives windowthat displays twodifferent foldersallows you to copyor move files andfolders from one tothe other. The toppane displays thecontents of thecentral Archivesfolder and thebottom panedisplays the contentsof the Sales folder .
If you want to copy or move a file or folder to anotherfolder, you can use the "split" command to split theArchives window into two panes, each containing asource folder and a destination folder .
1 . Select "split" from the Archives menu .The system asks you to select the folder you want toput in the bottom pane .
2 . You can select the folder in one of two ways :Select the folder that you want to put in thebottom pane from the list of folders in thetop pane .Select the folder by typing the path ofthe folder . For example, you could type/foldername/foldername/ etc . The first / (slash)indicates that you are starting with the centralArchives folder .To display the Sales folder in the bottom pane asFigure 5-11 shows, you would type /Sales .
The ability to type the folder path is useful, particularlyif you have several folders within folders . You candisplay the folder's contents quickly .
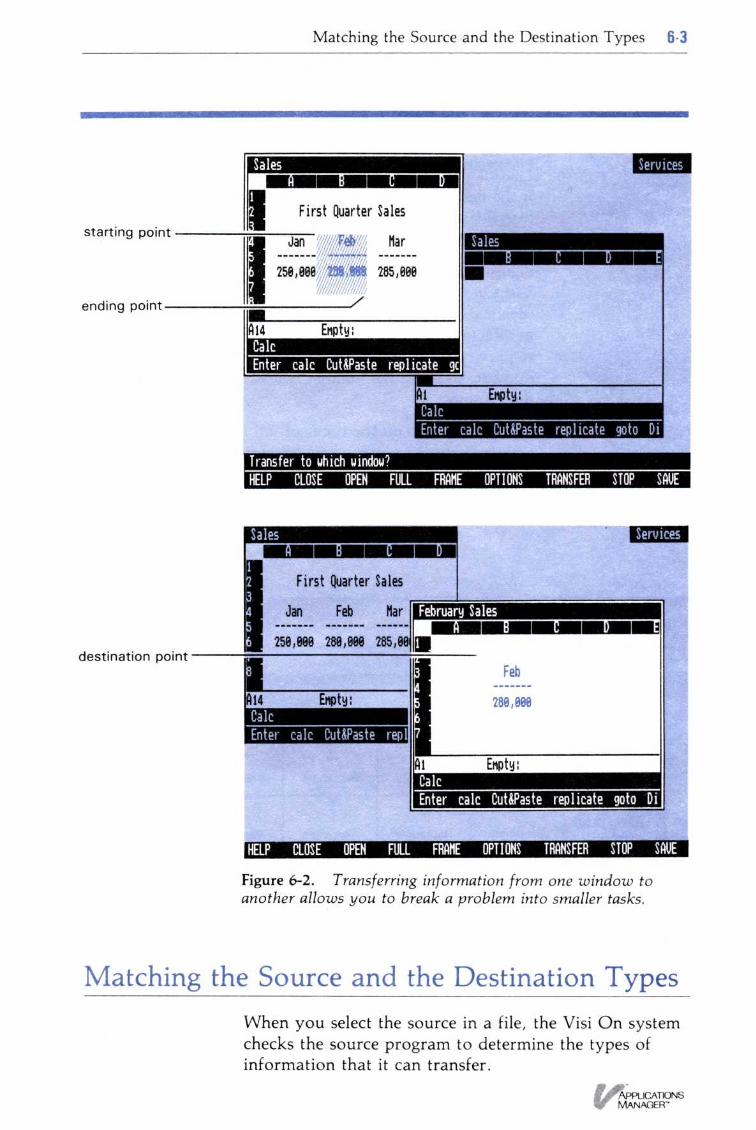
Matching the Source and the Destination Types 6-3
Figure 6-2 . Transferring information from one window toanother allows you to break a problem into smaller tasks .
Matching the Source and the Destination TypesWhen you select the source in a file, the Visi On systemchecks the source program to determine the types ofinformation that it can transfer .
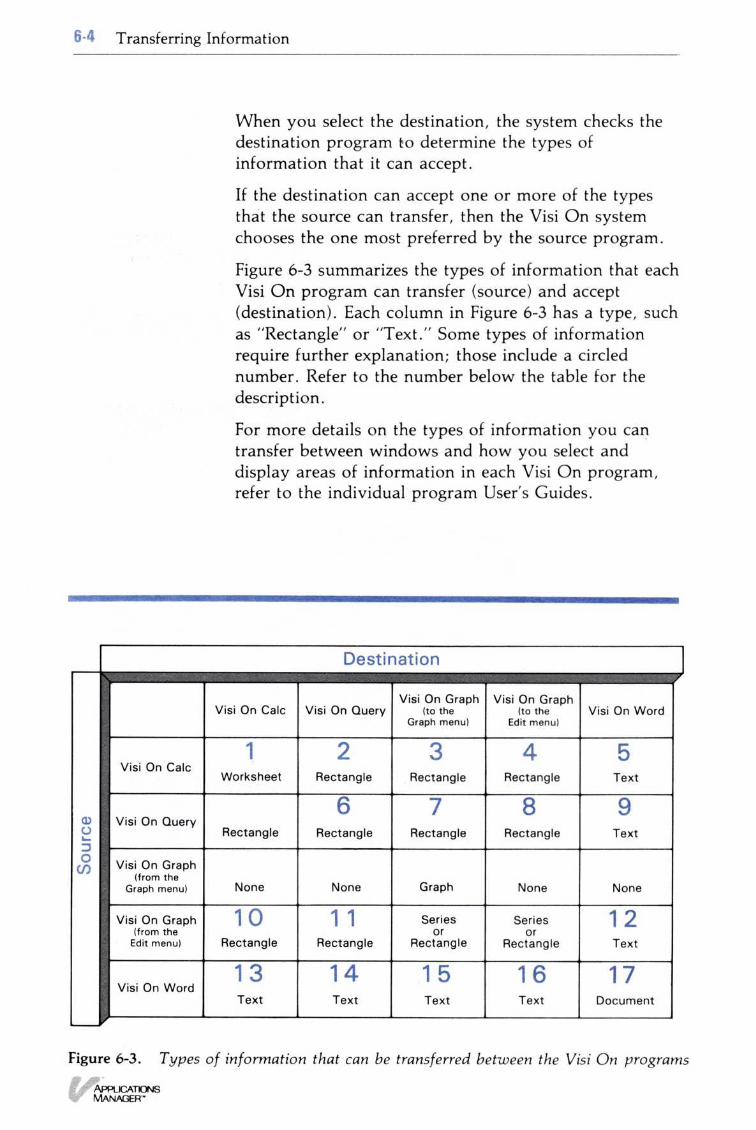
6-4 Transferring Information
Figure 6-3 . Types of information that can be transferred between the Visi On programs
APPLICATIONSMANAGER"
When you select the destination, the system checks thedestination program to determine the types ofinformation that it can accept .
If the destination can accept one or more of the typesthat the source can transfer, then the Visi On systemchooses the one most preferred by the source program .
Figure 6-3 summarizes the types of information that eachVisi On program can transfer (source) and accept(destination) . Each column in Figure 6-3 has a type, suchas "Rectangle" or "Text ." Some types of informationrequire further explanation ; those include a circlednumber . Refer to the number below the table for thedescription .
For more details on the types of information you cantransfer between windows and how you select anddisplay areas of information in each Visi On program,refer to the individual program User's Guides .
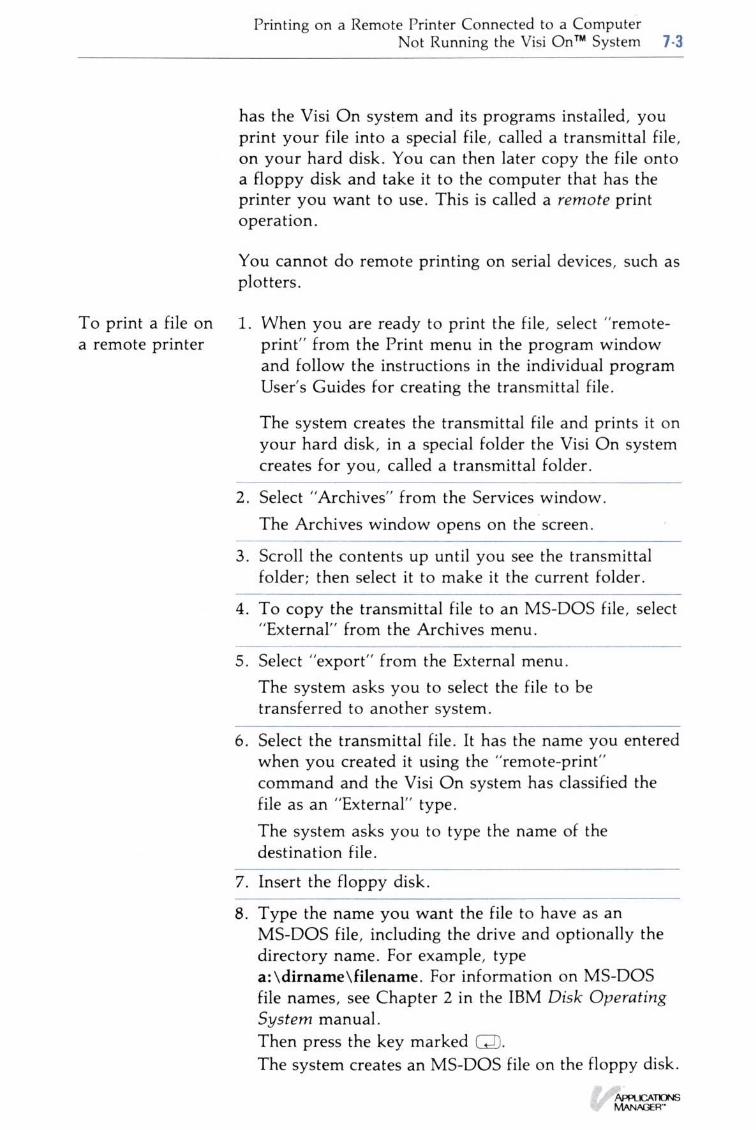
Printing on a Remote Printer Connected to a ComputerNot Running the Visi On TM System 7-3
has the Visi On system and its programs installed, youprint your file into a special file, called a transmittal file,on your hard disk . You can then later copy the file ontoa floppy disk and take it to the computer that has theprinter you want to use . This is called a remote printoperation .
You cannot do remote printing on serial devices, such asplotters .
To print a file on
1 . When you are ready to print the file, select "remote-a remote printer
print" from the Print menu in the program windowand follow the instructions in the individual programUser's Guides for creating the transmittal file .
The system creates the transmittal file and prints it onyour hard disk, in a special folder the Visi On systemcreates for you, called a transmittal folder .
2 . Select "Archives" from the Services window .The Archives window opens on the screen .
3 . Scroll the contents up until you see the transmittalfolder; then select it to make it the current folder .
4 . To copy the transmittal file to an MS-DOS file, select"External" from the Archives menu .
5 . Select "export" from the External menu .The system asks you to select the file to betransferred to another system .
6 . Select the transmittal file . It has the name you enteredwhen you created it using the "remote-print"command and the Visi On system has classified thefile as an "External" type .The system asks you to type the name of thedestination file .
7 . Insert the floppy disk .
8 . Type the name you want the file to have as anMS-DOS file, including the drive and optionally thedirectory name . For example, typea: \dirname\filename . For information on MS-DOSfile names, see Chapter 2 in the IBM Disk OperatingSystem manual .Then press the key marked(ENTER) .The system creates an MS-DOS file on the floppy disk .
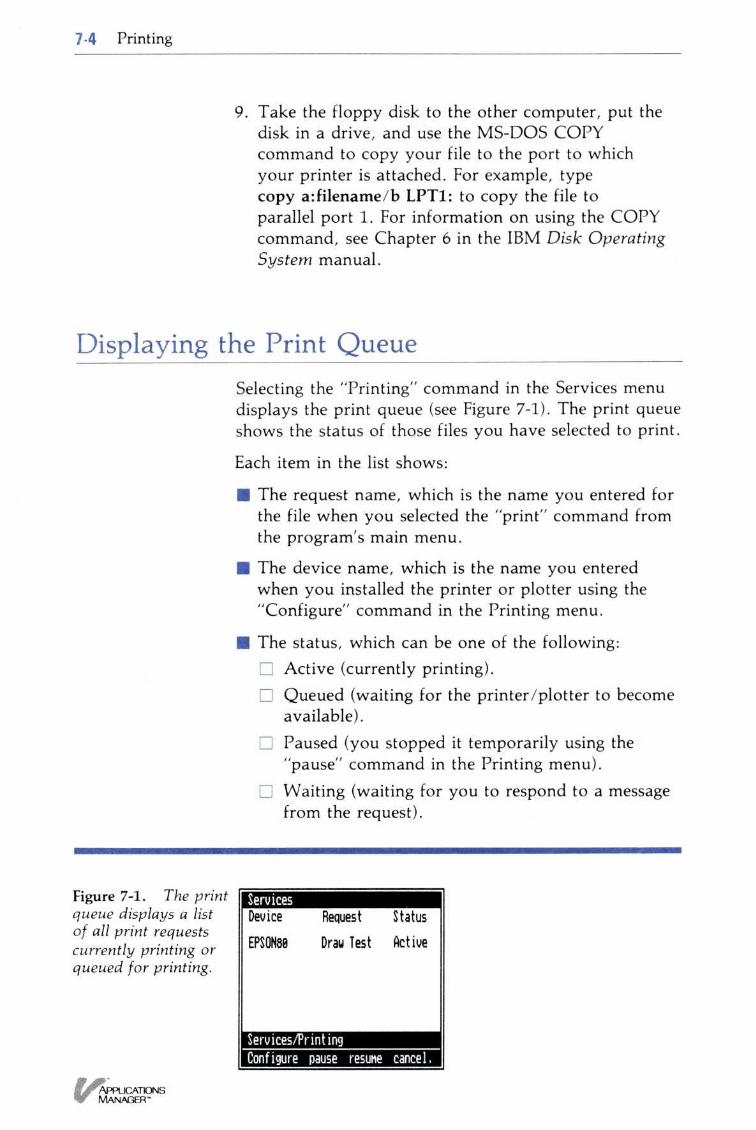
7-4 Printing
9 . Take the floppy disk to the other computer, put thedisk in a drive, and use the MS-DOS COPYcommand to copy your file to the port to whichyour printer is attached . For example, typecopy a :filename/b LPT1 : to copy the file toparallel port 1 . For information on using the COPYcommand, see Chapter 6 in the IBM Disk OperatingSystem manual .
Displaying the Print Queue
Figure 7-1 . The printqueue displays a listof all print requestscurrently printing orqueued for printing .
Selecting the "Printing" command in the Services menudisplays the print queue (see Figure 7-1) . The print queueshows the status of those files you have selected to print .
Each item in the list shows:
∎ The request name, which is the name you entered forthe file when you selected the "print" command fromthe program's main menu .
•
The device name, which is the name you enteredwhen you installed the printer or plotter using the"Configure" command in the Printing menu .
∎
The status, which can be one of the following :∎
Active (currently printing) .∎
Queued (waiting for the printer/plotter to becomeavailable) .
_; Paused (you stopped it temporarily using the"pause" command in the Printing menu) .Waiting (waiting for you to respond to a messagefrom the request) .
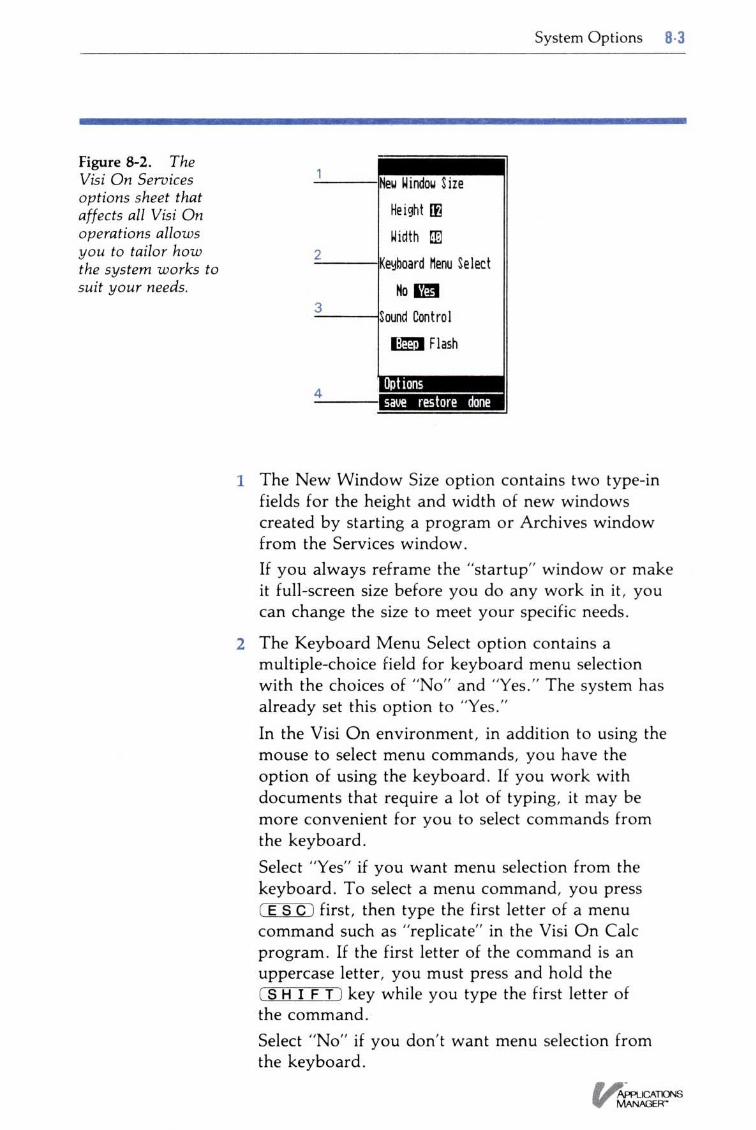
Figure 8-2 . TheVisi On Servicesoptions sheet thataffects all Visi Onoperations allowsyou to tailor howthe system works tosuit your needs .
System Options 8- 3
1 The New Window Size option contains two type-infields for the height and width of new windowscreated by starting a program or Archives windowfrom the Services window .If you always reframe the "startup" window or makeit full-screen size before you do any work in it, youcan change the size to meet your specific needs .
2 The Keyboard Menu Select option contains amultiple-choice field for keyboard menu selectionwith the choices of "No" and "Yes ." The system hasalready set this option to "Yes ."In the Visi On environment, in addition to using themouse to select menu commands, you have theoption of using the keyboard . If you work withdocuments that require a lot of typing, it may bemore convenient for you to select commands fromthe keyboard .Select "Yes" if you want menu selection from thekeyboard . To select a menu command, you press(ES C) first, then type the first letter of a menucommand such as "replicate" in the Visi On Calcprogram . If the first letter of the command is anuppercase letter, you must press and hold the(S H I FT) key while you type the first letter ofthe command .Select "No" if you don't want menu selection fromthe keyboard .

8.4 Selecting Options
Displaying an Options Sheet
3 The Sound Control option contains a multiple-choicefield with the choices of "beep" and "flash ." The"beep" option has initially been set . Select "beep" ifyou want the system to beep to give you feedback onactions you take such as selecting a commandcorrectly or incorrectly . Select "flash" if you want thesystem to flash the cursor instead : once for correctaction and three times for incorrect action .
4 The Options sheet menu line contains the menucommands you use with all options sheets :
"save"
Stores this options sheet and alloptions sheets in the program .
"restore"
Resets the option settings of thisoptions sheet to the last saved settings .
To reset the options to the values theyhad originally when the programs wereinstalled, refer to Chapter 1 in theindividual User's Guides .
"done"
Removes the options sheet from thewindow .
The Visi On system has one options sheet called theServices options sheet . Each Visi On program hasoptions sheets associated with the menus in its menuhierarchy . The "OPTIONS" command lets you displayand change the settings in the options sheet . If anoptions sheet is displayed and you select another menucommand, an options sheet for that menu appears .
Some of the Visi On programs display options sheetsautomatically when you select certain commands . Youdon't have to select "OPTIONS" for those to appear .
For examples of each program's options sheets and theoriginal settings the programs provide, refer to Chapter 1in the individual program User's Guides .
This section includes step-by-step instructions fordisplaying an options sheet for the Visi On Serviceswindow or for one of the programs ; the procedure is thesame for displaying all options sheets .
Messages
Messages 9 -1
This chapter contains Visi On TM system messages. Themessages are arranged in numeric order and eachmessage has an explanation and recommended action foryou to follow . For a listing and an explanation of theVisi On program messages, see the individual programUser's Guides .
(164) Place disk back into driveA mounted disk the program expected to find isnot in the drive . Either replace the disk or select"unmount" to notify the program that the diskwas removed .
(165) Cannot complete disk operation-check disk anddriveThe current disk operation cannot be completed .Check the disk and the disk drive . If you cannotfind a problem, you may have a disk drivemalfunction .
(166) You must unmount the current disk firstYou attempted to mount a disk on a disk drivethat already has a disk mounted . Either mount thedisk on different disk drive or unmount thecurrently mounted disk .
(167) The disk you mounted is not a Visi On diskThe disk you mounted is not in the Visi On diskformat . To use this disk you must initialize it .Initializing a disk erases any information on thedisk .
(168) There is no disk on the selected driveNo disk is mounted on the drive you selected . Youmay have selected the wrong drive . Select"unmount" again and select the correct drive .
(169) Cannot unmount that disk-file or folder in useYou attempted to unmount a disk on which a fileor a folder is in use . You cannot unmount a diskunless all files and folders are not being used .

9-2 Visi On TM Messages
(170) Cannot unmount the system diskYou attempted to unmount the system disk, whichcannot be unmounted.
(171) Cannot initialize the system diskYou attempted to initialize the system disk, whichis not allowed . Such an action would destroy yourcopy of the program .
(174) Cannot complete operation because a file or folderis in useThe current operation cannot be completedbecause its completion would change a file or afolder that is currently in use .
(175) That name already exists in this folder-enteranother
You entered a name for a file or folder thatalready exists in the current folder . Duplicatenames are not allowed in a folder . Enter a namethat is unique for this folder .
(176) Folder is not empty-cannot discard or replaceYou attempted to discard or replace a folder thatis not empty . You must move or destroy allfolders and files in a folder before you can removeor replace it .
(177) There is no file or folder with that nameThere is no file or folder with the name youentered . You may have misspelled the name .Check the name and enter a valid name .
(178) Cannot proceed-destination folder is within thesource folderYou attempted to copy or move a folder to adestination folder that is in the source folder . Thedestination folder cannot be in the source folder .
(180) You must select a folder, not a fileYou selected the "split" command and thenselected a file . With this command you must selecta folder. Select again .
(181) There is no folder with that nameThere is no folder with the name you entered . Youmay have misspelled the name . Check the nameand enter a valid name .
Messages 9.9
(222) Not enough disk space to install program-selectcontinue
There is not enough free disk space available toinstall this program . You must delete enough filesfrom the disk to make room for the product .Select "continue" to proceed .
(322) Installation failed
You tried to install another program or driver, butthe Visi On System was unable . Try quitting oneor more windows, and install again .
(323) You cannot remove Visi On utilities
You tried to remove the Archives . It is part of theVisi On System and cannot be removed .
(324) Invalid Visi On Accessory Disk-cannot install
The system expected a Visi On Accessory Diskwith a valid protection code . You did one ofthe following :
Put the wrong disk in the drive . If you havethe correct disk, put it in the disk drive andselect "continue" to proceed .
Copied the Accessory Disk and tried to installfrom that disk, which the system willnot accept .
(350) A Visi On system is already installed . Proceedingwill remove installed products. Press C to cancelinstallation or P to proceed
You are attempting to install a Visi On system ona disk that already contains a system . If youproceed with this installation, all currentlyinstalled programs will be removed . You will haveto install them again after the system installation iscompleted . Your Archives files will not be affectedby this installation .
(352) A name in the path, other than the last, is nota folder
You entered a path name that contains a file namewhere the program expects a folder name . Onlythe last name in a path name can be a file name,all other names must be folder names . Enter thecorrect path name .
9 . 1 0 Messages
(353) That is a volume folder-cannot do this operationYou selected a volume folder name as the target ofan operation that cannot be performed on avolume folder . For example, if you selected"rename," you must reinitialize the volume tochange the name, you cannot do it with anArchives command .
(354) That is the wastebasket-cannot do this operationYou selected the wastebasket folder as the target ofan operation that cannot be performed on thewastebasket folder . For example, if you selected"move," you cannot move a file into thewastebasket, only deleted (discarded) files go intothe wastebasket folder .
(355) Cannot proceed, a program is using that folderYou cannot perform that operation on this folderbecause another program is using it . The otherprogram must finish before you can proceed withthe current operation .
(356) Cannot copy or move a folder into itselfYou attempted to "copy" or "move" a folder intoitself or into a folder that is contained in thesubject folder . You must select a target folderthat is not contained in the folder being copiedor moved .
(357) Cannot mount a volume with an existing nameYou attempted to mount a volume that has thesame name as another file, folder, or volumefolder . You must either change the name of thevolume being mounted or change the folder nameor file name .
Visi OnTM Failure Messages
This section contains Visi On system failure messages .The messages are arranged in numeric order and eachmessage has an explanation and recommended action foryou to follow . A failure message is issued when asituation, usually involving the disk or memory, isencountered that prevents the system from proceeding .Take the required action and restart the system .
Messages
9 . 1 1
(1000) Cannot start Visi On-a file is missingor damagedYou cannot start the system because a requiredfile is missing or has been damaged . You mustreinstall the Visi On system and then yourVisi On application programs .
(1117) Not enough memory-cannot proceedThe computer does not contain enough memoryto proceed with the operation you requested . Youhave probably initiated a combination ofprocesses that require more memory than isavailable . When you restart the system, startonly those operations that are necessary . If youremoved memory since you installed the system,you must replace it . If maintenance wasperformed, the internal switches may be setincorrectly . Make sure you have the amount ofmemory that you had when you installed theVisi On system . When the memory is correct,restart the system .
(1122) Cannot write to hard diskThe program was unable to update a required fileon disk . All of the installed programs are lost .You must reinstall the Visi On system and thenthe application programs before you can proceed .