Embed Size (px)
Citation preview

Virtual HSpot Quick Start Guide HSpot 8.0
(Herschel Legacy Version)
HERSCHEL-HSC-DOC-2187
Version 1.1
26/10/2017
Mark Kidger

Contents 1. Why should I still use HSpot?............................................................................................................... 4
2. What is Virtual HSpot? ......................................................................................................................... 4
3. Validity of this version of HSpot .......................................................................................................... 4
3.1 What is Virtual HSpot? ................................................................................................................. 4
3.2 Caveats .......................................................................................................................................... 4
3.3 Problems with access to external catalogues ................................................................................ 5
3.4 System requirements ..................................................................................................................... 5
3.5 A note on the screenshots presented here ..................................................................................... 6
4. Downloading the VM ........................................................................................................................... 6
4.1 Installing VirtualBox .................................................................................................................... 6
4.2 Installing on Linux ........................................................................................................................ 7
5. Virtual HSpot Installation ..................................................................................................................... 8
6. Launching HSpot ................................................................................................................................ 11
7. Sharing folders between your local disk and Virtual HSpot ............................................................... 12
7.1 Defining a shared folder .............................................................................................................. 12
6.2 Enabling drag and drop and cut and paste of text ....................................................................... 15
8. Getting started with HSpot .................................................................................................................. 16
8.1 To Read in a list of AORs ........................................................................................................... 18
8.2 To Retrieve a Proposal ................................................................................................................ 19
8.3 Look for what Herschel observations were executed around a particular position in the sky .... 20
8.4 Look at how an AOR was executed ............................................................................................ 21
8.5 Look at what catalogued sources fall within a field of view ....................................................... 22
8.6 Look at the sky background for an observation .......................................................................... 25
9. Non-functioning options ..................................................................................................................... 27
9.1 Options that no longer operate at all ................................................................................................. 27
9.2 Options that may fail due to Firewall issues ..................................................................................... 27
9.3 An alternative method of name resolution to NAIF ID .................................................................... 27
10. Shutting down your session ............................................................................................................ 28
11. Further Reading about HSpot ......................................................................................................... 28
12. Caveats and Advanced Configuration ............................................................................................. 28

13. Credits and acknowledgements ....................................................................................................... 28
13.1 HSpot Development and Maintenance.................................................................................... 28
13.2 Virtual HSpot Development .................................................................................................... 29
14. Conclusions ..................................................................................................................................... 29

1. Why should I still use HSpot? HSpot was Herschel uplink software, used to prepare observations and to submit them to the database for execution. As Herschel ran out of helium cryogen on April 29th 2013, obviously this database is now frozen and there is no need to prepare any more observations. However, HSpot has many useful functionalities of which the following are just a few: it can be used to retrieve proposals and their observations; it can be used to examine how an observation was executed; it can be used to examine the sky background in the region of a particular observation and it can be used to overlay numerous catalogues onto executed observations to see what catalogued sources were in the Field-of-View of an observation.
2. What is Virtual HSpot? Virtual HSpot, or HSpot 8.0, is a version of HSpot packaged with a virtual machine (VM), allowing it to run on any host system that has the VM installed. It takes a version of HSpot that runs well on an old operating system and makes it compatible with much more recent operating systems. In other words, a user can run Virtual HSpot on a Windows 10 machine even though the classic HSpot will not install on any version later than Windows 7. Similarly, Virtual HSpot will install and run correctly on the most recent Mac and Linux versions despite the fact that classic HSpot will not.
3. Validity of this version of HSpot
3.1 What is Virtual HSpot? Virtual HSpot is the Herschel Observation Planning Tool (HSpot) packaged as an OVA Virtual Machine (VM) image. The guest OS is Debian Linux with the LXDE desktop: this combination was selected as it was known to work well with HSpot. To reduce the size of the download, the Linux package has been heavily stripped-down, hence a minimum of applications are installed. It assumed that other applications will be run on the host operating system.
The latest version of Virtual HSpot is HSpot 8.0.1: this is the only recommended version to use.
3.2 Caveats First and foremost: there are some external HSpot functionalities – accesses to catalogues outside ESA and NASA - that worked during flight Operations but which may fail in the future if links, or the access to them change, servers fail and are replaced and everything just gets older. Even during flight operations with a dedicated software team, maintaining the access to all these external catalogues was not easy. It is impossible to futureproof HSpot against such failures. Hence, this version of HSpot is offered “as is” and, although it received some maintenance in 2017 for this HSpot build to fix a few, minor issues, it has had very little maintenance since 2013.This version has been futureproofed as far as we are able to do it, but there is a likelihood of a slow, but progressive deterioration in functionality.

Many things are effectively “hard-wired” into HSpot via the Spot Core that is used by Spitzer, as SPOT, the Spitzer tool for proposal handling. The SPOT software was supplied to ESA, by IPAC, under a NASA-ESA agreement and the Spot Core of HSpot maintained by NASA. This Spot Core composes about 80% of the total code in HSpot (HSpot contains ≈180 000 lines of java code). The Spot Core version that was used to generate the HSpot 7.0 that forms the basis of this build, was issued back in late 2013 and, obviously, is now quite old and missing the latest updates.
In a post-Operations environment, with very limited resources, maintaining HSpot operational, preparing new builds and new installers that include the many small patches in the Spot Core that have been released to fix issues that have arisen and updating HSpot to work on new operating systems, is simply beyond the resources available to HSC, hence the decision to supply this virtualised version of HSpot (HSpot 8.0) that is platform independent and which does include some small, but significant additional patches to preserve basic functionality, hence this version is formally 8.0.1 to distinguish it from a previous, experimental build without the patches.
However: the difficulties of maintaining the functionality of software that has so many external dependencies have been graphically illustrated by two issues that have occurred in Autumn 2017 while we still have had a small amount of resources available for software maintenance. Independently and nearly simultaneously, a server at ESAC used for identification of credentials moved to a new URL and a new port number and the JPL server that provides ephemerides for Solar System Objects upgraded to TLS 1.2 for authentication. The former “broke” proposal retrieval with HSpot, the latter undid the patch applied in HSpot 8.0.1 to fix name resolution for Solar System Objects after the previous move of JPL from HTTP to HTTPS had led it to fail: HSpot uses Java 6, which does not support TLS 1.2. While the former issue is under our control and can be fixed – although it is a significant effort – the latter could only be fixed by upgrading HSpot to Java 8, which would be an impossible task given the minimal resources now available to us and would have been and enormous challenge even with the full resources available to us in Flight Operations. We will do everything in our power though to maintain operational the minimum suite of functionalities described in this manual.
3.3 Problems with access to external catalogues HSpot needs to be able to open particular ports to be able to access external catalogues for retrieving images or to plot overlays. An inability to access a catalogue such as Skyview or NED may indicate simply that you are working behind a firewall that refuses access to a particular port. Try accessing the same catalogue from home and see if the error repeats: if it does, the access protocol for the catalogue has been changed since the HSpot build was made and the link is definitively broken.
3.4 System requirements HSpot is not memory hungry. However, you must have enough space on your hard disk to install both the Virtual Image and the software that runs it. Even with the Linux installation stripped-down to a minimum, the OVA file takes up 1GB. Hence the minimum requirement is:
• 4GB of RAM. • 6GB of disk space.

3.5 A note on the screenshots presented here Most of the screenshots presented here are from Windows, save when there is an important difference with Linux: this is to ensure consistency of image style. It is possible that there will be some small differences between what you see on your own screen and the screenshots presented here.
4. Downloading the VM The VM and full instructions are available at the following link:
http://archives.esac.esa.int/hsa/legacy/software/hspot_vm/
It is strongly advised that you read the information on this page carefully BEFORE installing.
4.1 Installing VirtualBox Before doing anything else, you should install VirtualBox. Go to:
https://www.virtualbox.org/
This link will list the operating systems compatible with VirtualBox. You should see a screen like this:
Click on the download link and select the appropriate version for your platform from the list offered:

For windows and Mac you should see a pop-up like the following appear:
Click on Run to install.
4.2 Installing on Linux As for HSpot, Linux installation of VirtualBox is quite different to Windows or Mac. For Linux you have to select the version that matches your Linux kernel architecture. VirtualBox will present you with options for different platforms. Note that some Linux platforms are not supported:
Click on the appropriate installer to download it. A pop-up like the one below will appear, asking you what you want to do with the file. Click on OK to continue with installation.
You will then be asked to confirm installation, as below. Check that you have the correct version and click on Install:
You will require Administrator privileges on your PC to do this.
5. Virtual HSpot Installation Once you have VirtualBox installed, you can install the HSpot Virtual Machine. You download the HSpot Virtual Appliance by clicking the link to the virtualised image in the download page:
HSPOT-8.0.1_1.ova

When you completed download, double-click on the file in your Downloads folder:
The double-click will open VirtualBox automatically to make the import of the virtual image. If this is the first time that you have imported a virtual image into VirtualBox, it will open with the following welcome screen:
VirtualBox will present its current settings. If you want to change one – for example, you were to decide that you need to assign more memory (this should NOT be necessary in reality in HSpot) – click on that cell and put in the desired value:

Put in the new value. If you make a mistake, you have a panic button that undoes your changes: click on “Restore Defaults” to return to the initial settings.
When you are satisfied that your values are correct, click on Import. The virtual image will be read into VirtualBox. This may take a couple of minutes.
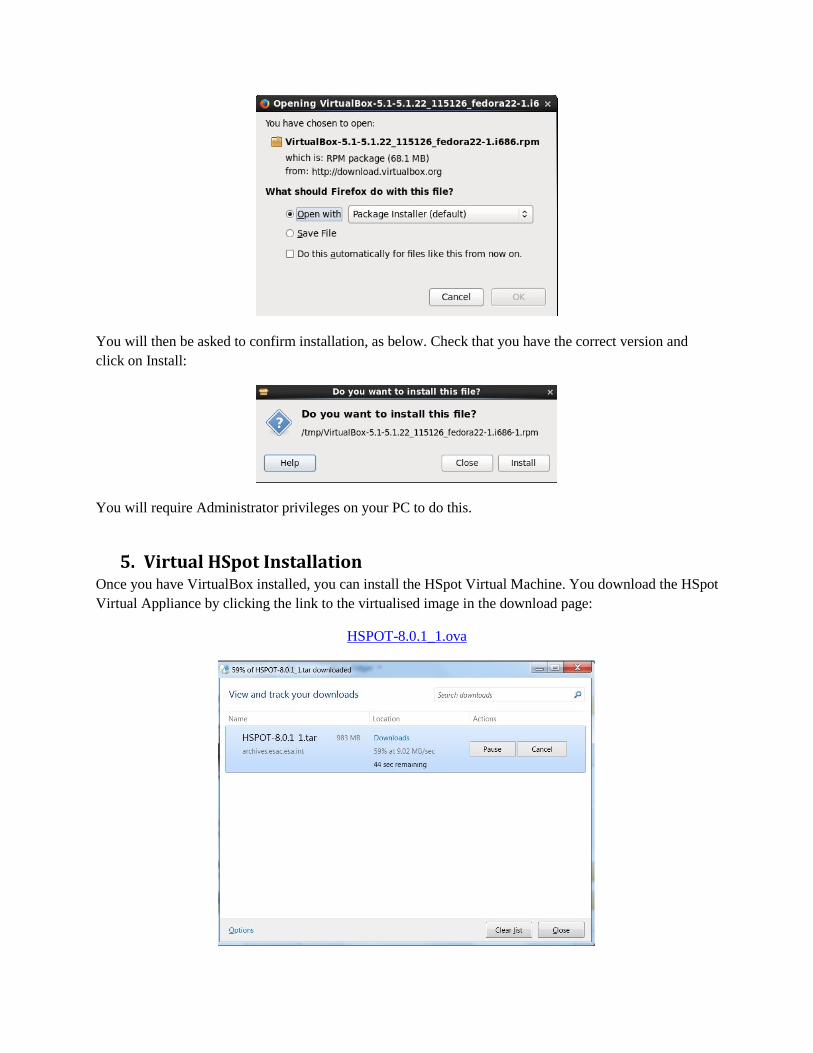
When import is complete you will see the following screen:
Your HSpot image will appear in the top left in its initial, powered off state. You are now ready to run virtual HSpot 8.0.1.
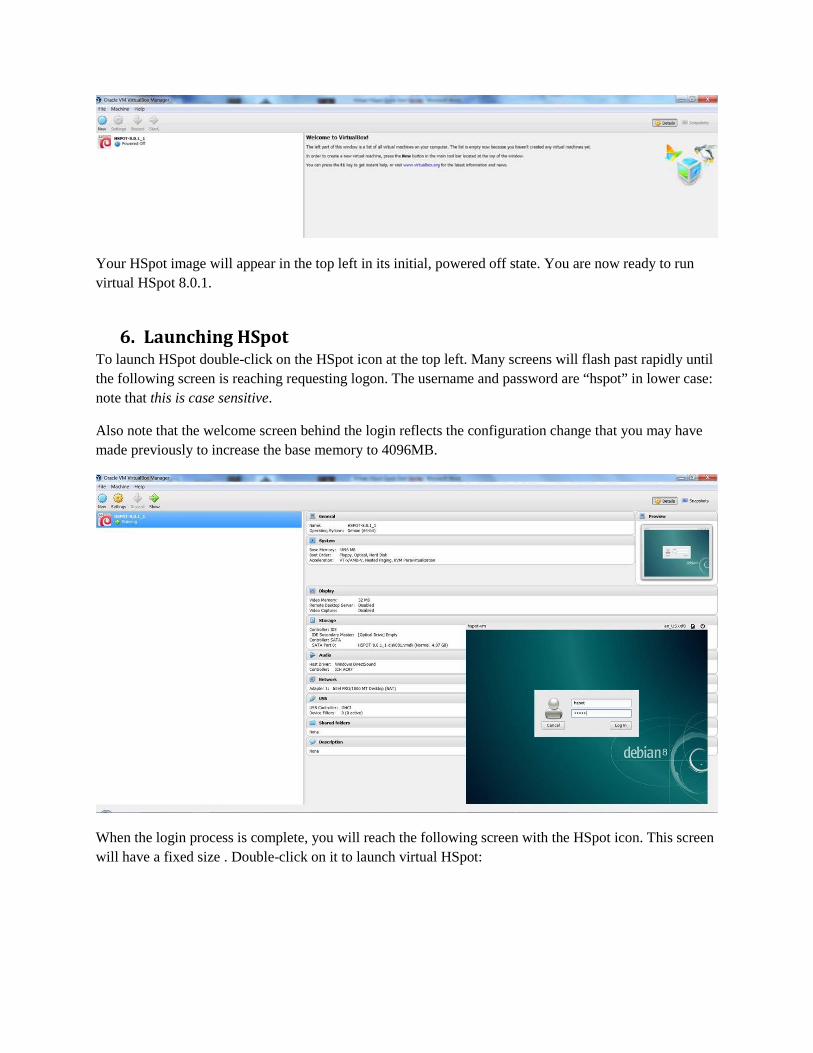
6. Launching HSpot To launch HSpot double-click on the HSpot icon at the top left. Many screens will flash past rapidly until the following screen is reaching requesting logon. The username and password are “hspot” in lower case: note that this is case sensitive.
Also note that the welcome screen behind the login reflects the configuration change that you may have made previously to increase the base memory to 4096MB.
When the login process is complete, you will reach the following screen with the HSpot icon. This screen will have a fixed size . Double-click on it to launch virtual HSpot:

7. Sharing folders between your local disk and Virtual HSpot There is one fundamental difference between the standard HSpot and the Virtual HSpot. Standard HSpot can see any internal or external directory or unit on your computer. In contrast, Virtual HSpot is a world within your computer, equivalent to having a private area of the disk for a separate user. Virtual HSpot can access the Internet, but it cannot see local directories on your computer unless you specifically give it access by previously sharing the folder or, alternatively, by specifically enabling cut and paste operations between your computer and the VM. These are the two simplest options for users to transfer files and data between their local disk and the VM. These options are described below.
One important item to note is that our version of Virtual HSpot has disabled access to USB2 and USB3. During testing we found significant issues on some OS/platform combinations when USB2/3 access was enabled, due to the requirement to install the VirtualBox extension package first and the additional steps and issues that it implied for users. Unless you have an old USB1 memory stick, USB access is effectively disabled.
7.1 Defining a shared folder This is a simple option that allows the VM to access any file within a particular folder. When you have opened the VM, click on Shared Folders before powering-up HSpot. A pop-up will appear, as shown
below. Click on the green symbol:

This will open your File Manager to allow you to navigate through your directory structure and to select a directory, as shown below. When you have the correct directory, click on “Select Folder”:
The VM will confirm the directory structure and the folder. Select the “Auto-mount” option to mount this directory so the VM will have access to it every time that it opens. You can also protect the contents of the folder from being overwritten by making it “read-only”. Click on “OK” to select.

If you have HSpot powered-up when you do this (not recommended) you should see a third option in the pop-up “Make-permanent”. Unless you tick this box the VM will forget your changes as soon as you exit your session.
As shown below, the VM will confirm your choice and activate two additional control buttons at the right
under the button. The middle button allows you to modify the selected folder (e.g. change it for another). The bottom button allows the shared folder to be deleted. You can add as many additional shared folders as you wish. When you have completed the process, click on “OK” to confirm your choice(s).
Within the VM, the shared folder will appear with the prefix “sf_” (for “shared folder”). So, in this case, my folder “29P” will be found in the VM as “sf_29P”.
The VM will show the number of shared folders that you have defined. You can now power-up HSpot and start to use them:
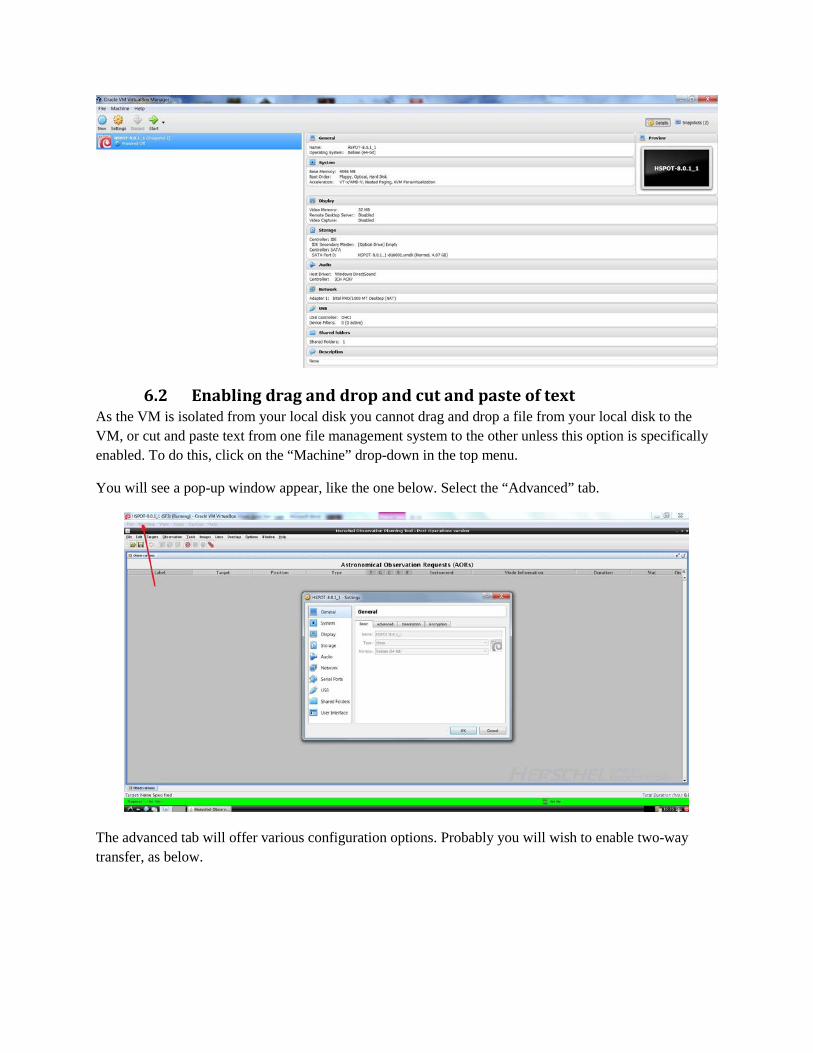
6.2 Enabling drag and drop and cut and paste of text As the VM is isolated from your local disk you cannot drag and drop a file from your local disk to the VM, or cut and paste text from one file management system to the other unless this option is specifically enabled. To do this, click on the “Machine” drop-down in the top menu.
You will see a pop-up window appear, like the one below. Select the “Advanced” tab.
The advanced tab will offer various configuration options. Probably you will wish to enable two-way transfer, as below.
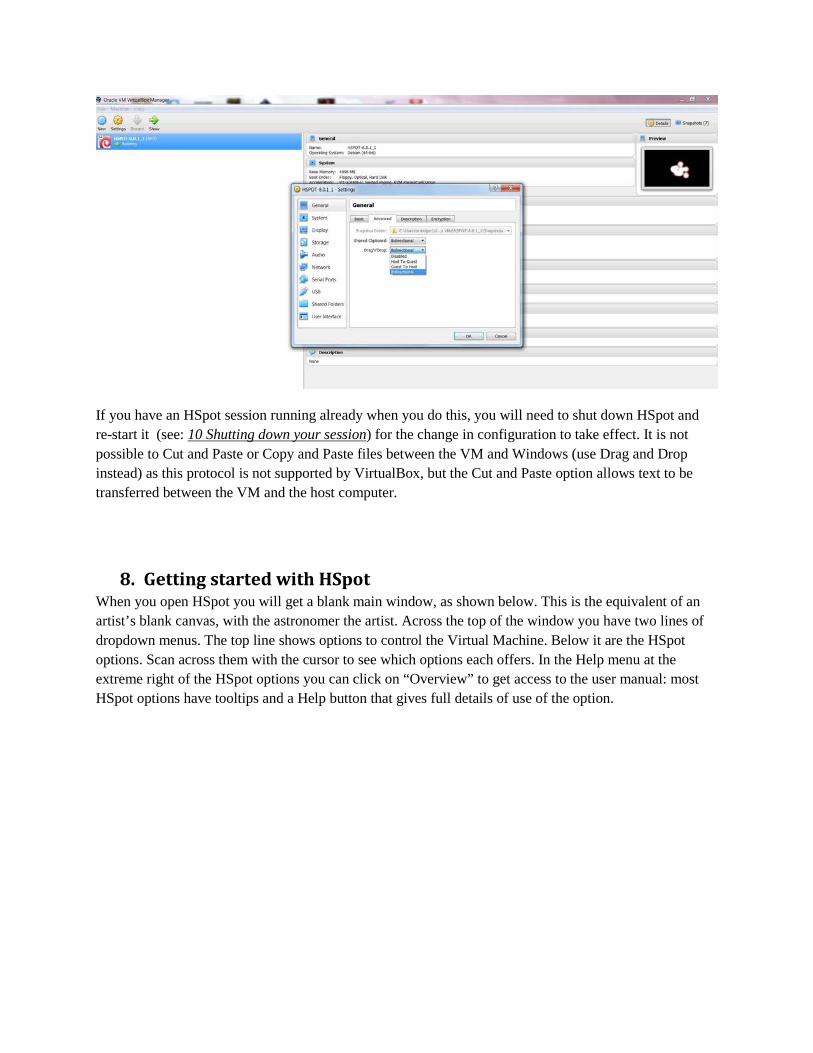
If you have an HSpot session running already when you do this, you will need to shut down HSpot and re-start it (see: 10 Shutting down your session) for the change in configuration to take effect. It is not possible to Cut and Paste or Copy and Paste files between the VM and Windows (use Drag and Drop instead) as this protocol is not supported by VirtualBox, but the Cut and Paste option allows text to be transferred between the VM and the host computer.
8. Getting started with HSpot When you open HSpot you will get a blank main window, as shown below. This is the equivalent of an artist’s blank canvas, with the astronomer the artist. Across the top of the window you have two lines of dropdown menus. The top line shows options to control the Virtual Machine. Below it are the HSpot options. Scan across them with the cursor to see which options each offers. In the Help menu at the extreme right of the HSpot options you can click on “Overview” to get access to the user manual: most HSpot options have tooltips and a Help button that gives full details of use of the option.

Most of the HSpot Menu options that you can see below are now of limited value. For example, you are not going to be able to prepare new observations or proposals, although there is nothing to stop you doing this to learn how different observing strategies would have worked on a particular object.
The most likely things that you are going to want to do with HSpot are:
1. Read in a set of executed AORs (Herschel observations). 2. Retrieve a proposal. 3. Look for what observations were executed in a particular area of sky.

4. Look at how an observation was executed. 5. Look at what catalogued sources fall within the field of a particular observation. 6. Look at the sky background in the area of an observation.
Let’s look at how to do each of these in turn.
8.1 To Read in a list of AORs To do this you must have an AOR file (*.aor extension) on your local disk. For it to be visible to Virtual HSpot, the folder must be a shared folder that you have previously defined to be visible to VirtualBox (see: 6.1 Defining a shared folder).
An AOR is Astronomical Observation Request: an XML file with instructions that told the observatory how to execute a requested observation. This was received at the Herschel Science Centre and later converted into the detailed commanding that was uplinked to the spacecraft.
• Click on the File option • Select Read AOR(s) and Target(s) • Select the directory and AOR file to read in. HSpot will show you a preview of the first 15
observations so that you can check that it is the correct file before loading. • To find the shared directory:
o Go back to your root directory “\” in the Read AOR(s) and Target(s) directory listing.
o Select the “media” directory.
o Select the directory “sf_YourName”

• You can load more than one AOR file if you wish. HSpot will store and display all the AORs
If the list of AORs is large and only those with a certain instrument or sub-instrument interest you, you can select, delete (and restore) AORs using the options in the Edit menu.
Click on the icon and HSpot will automatically generate a list of unique targets from the AOR file that can be saved to disk. The preview window, target list and main window with loaded AORs are shown below. Each column in the main window and in the target list is sortable by clicking on the header.
For fixed targets the main table and the target list will give the coordinates defined for the centre of the AOR. For moving targets, the NAIF ID will be shown. To understand the meaning of other columns, check the HSpot User Guide.
8.2 To Retrieve a Proposal Several methods are available giving different results according to your access rights to a proposal.

Summarising: all users have limited access to all proposals, but only the Principle Investigator [PI] of a proposal, people to whom he or she has given specific access rights, and a small number of people with special access privileges at HSC can access all information for any given proposal.
To load a proposal you must have previously deleted, using the Edit menu, any AORs that you had loaded previously. The most useful options for proposal retrieval are:
• To view an accepted proposal – you must know the exact proposal name. Select the File dropdown menu and, within it, Retrieve Accepted Proposal. Give the proposal name: e.g. KPOT_tmegeath_2. This will show you the proposal abstract and give you the option to load the AORs, but not the science case. Any user can access any accepted proposal in this way.
This option is interesting because you can see the status of each of the AORs. In the “Stat” column to the right of the AOR table you will see “scheduled” if the observation was executed successfully, “failed” if execution failed for any reason, “rejected” if the Time Allocation Committee (TAC) did not approve a particular AOR for execution, “released” if the AOR was made available to the mission planners, but could not be scheduled before End of Helium (EoH) and, occasionally, “accepted” if an observation had been approved by the TAC, but had not been released yet to the mission planners for scheduling by EoH.
• To load a proposal that you submitted, or to which you were given access rights by the PI of the proposal, select the Tools menu and click on the Proposal Submission Tool option, which opens a new window. Select the Submit menu within the tool and Retrieve Submitted Proposal from HSC. You will be asked to enter your username and password as a registered Herschel user and offered a dropdown menu with a list of proposals to which you have access rights. Click on the desired proposal to load the AORs and to see the proposal as submitted (this does NOT retrieve the science case).
• To retrieve the science case for a proposal that you submitted, or for which you have been given access rights, follow the same steps as the previous option but, in the Submit dropdown, select Retrieve Proposal Documentation. Again, you must submit your credentials and will only be allowed to access proposals for which you have access rights. Select the parts of the proposal that you wish to retrieve: the core, is the science case; the cover, is the cover sheet with the proposal summary; the AOR summary is a summary table of AORs. The program will return a PDF that you must save to disk. It will NOT retrieve the AORs.
8.3 Look for what Herschel observations were executed around a particular position in the sky
While Calls for Proposals were still active HSpot offered a simple option to check to see what proposed observations lay around a particular target position. The idea was to allow users to check for potential duplicating observations before submitting a proposal and to overlay them on the astronomer’s own draft AORs. This could be done from the Overlays drop-down menu. This option no longer functions.
As an alternative, we direct observers to ESA Sky.

8.4 Look at how an AOR was executed A particularly useful functionality of HSpot is that it allows a user to see how an observation was executed using a simple animation. As an example, we take the pair of AORs for field 297_0 from KPOT_smolinar_1.
When you have retrieved and marked the AORs to display you must display the field of view and superimpose the AOR on it. HSpot offers a wide range of image catalogues such as DSS, 2MASS and IRAS, as well as SkyView and NED.
Choose a field image to display. This should be at least as large as the AOR that you want to plot. Note that DSS images are limited to 15x15 arcminute field, 2MASS to 500x500 arcseconds and IRAS to 5 degrees (sometimes you can get around these size limitations to a degree by using the SkyView catalogue which, often, offers somewhat larger fields).
• For the 2°x2° tiles of the Galactic Plane in KPOT_smolinar_1, we need a field of at least 3.5° diameter as Parallel Mode observations map a much larger area than the 2x2° overlap between PACS and SPIRE, so the IRAS 60 micron images are best suited for this.
Go to the Images dropdown in the top menu and pick “ISSA/IRIS image”.
Select the IRAS : IRIS 60 micron image.
Select the field of view – in this case 4 degrees is a decent compromise between the resolution and the observation size, so I define 4 degrees.
Select the zoom level – this is a case of trial and error: on my laptop for a 4 degree IRAS field 4x zoom is about right to see the full image.
Click on “OK”.
• For a moving target, HSpot will query you about the date and time of the observation as it needs to calculate a position for that moment in time to display the observation correctly. For a fixed target you will receive the same query at the next stage. Put in the date and (for Solar System objects) the mid-time of the exposure and click on OK. HSpot will plot the field of view with the track of the target marked on it. A cross marks the position of the object at the exact mid-time of the integration.
• Now you also want to overlay the AOR(s). Select the AOR(s) to plot from your AOR table by clicking on them. If you have scan and cross-scan of a field you may wish to plot both to see the zone of overlap.
• In the “Overlays” dropdown in the top menu, select “AORs on images…”. If you have a moving target HSpot will ask you to confirm that the target is plotted. Click on “Yes”.
For a fixed target the position did not change with time, but the field orientation did and hence the orientation of the AOR on the sky background, did – if you know the exact date of execution you should enter it, if not, click on a Full Visibility window and HSpot will select the mid-time of that window as default, which is usually quite close to reality, although you will notice that,

with two viewing windows each year the AORs, when displayed, will tilt in opposite directions when displayed on the image background.
The AOR will be displayed, as below with a set of control for each AOR at the right. Click on the icon for one of the AORs and you will get the view that we show below, with a table of individual positions of the detectors as it scans. Note that the field of view of PACS (red) and SPIRE (green) are plotted separately as they cover different fields of view so, for scan and cross-scan, we will have four overlays of individual maps, with only the central 2x2° area covered by all four maps.
You will see that the pop-up that is displayed lists the field centres for each of the positions of the arrays and has two buttons marked “Animation” and “Animation w/ Trail”. Press the former and HSpot will animate the observation, scan position by scan position, repeating the sequence of positions for as many repetitions as was defined in the observation (this is particularly informative in the case of Parallel Mode). If you select “Animation w/ Trail”, HSpot will show how the observation is built up.
8.5 Look at what catalogued sources fall within a field of view Sometimes it is particularly useful when looking at some Herschel data to know what catalogued sources lie in your field of view. You can pick a target from your target list, display an image of the field, overlay the Herschel observation and then ask HSpot to mark sources in that field from a range of source catalogues including 2MASS, IRAS and AKARI. You can also query the data for these sources to obtain positions and fluxes.
Here is an example of how it might be used. I have retrieved an AOR from the proposal TOO_mkidger_5, a PACS scan map along the track of Comet C/2010 X1 (Elenin). Are there any bright 60 micron sources

that I might expect to detect in the background of this moving target that would contaminate my observation?
When you have retrieved your AOR, display the field of view and superimpose the AOR on it. HSpot offers a wide range of image catalogues such as DSS, 2MASS and IRAS, as well as SkyView and NED.
• Choose a field image to display. This should be at least as large as the AOR that you want to plot. Here, we pick a 2 degree IRAS 60 micron field as most appropriate.
Go to the Images dropdown in the top menu and pick “ISSA/IRIS image”.
Select the IRAS : IRIS 60 micron image.
Select the field of view – in this case 2 degrees is a decent compromise between the resolution and the observation size, so I define 2 degrees.
Select the zoom level – this is a case of trial and error: on my laptop for a 2 degree IRAS field 8x zoom is about right (you have a zoom button on the left side-bar to zoom in further, if required).
Click on “OK”.
• For a moving target HSpot will query you about the date and time of the observation as, logically, HSpot needs to calculate a position for that moment in time to display the observation correctly (for a fixed target the position would not change with time, but the field orientation and hence the orientation of the AOR on the sky, will, so the date when an observation was executed is still important even for fixed targets). In this case, I know that my observation started at 19 October 2011, 03:54:09UT and had duration 11092s, so I need to plot the position of the comet at the mid-time of the observation – 1h 32m 26s – later. In other words, at 05:26:35UT.
Put in this date and time and click on OK. HSpot will plot the field of view with the track of the comet marked on it. A cross marks the position of the comet at the exact mid-time of the integration.
• Now you also want to overlay the AOR(s). Select the AOR(s) to plot from your AOR table by clicking on it/them. If you have scan and cross-scan of a field you may wish to plot both to see the zone of overlap.
• In the “Overlays” dropdown in the top menu, select “AORs on images…”. HSpot will ask you to confirm that the target is plotted. Click on “Yes”. The AOR will be displayed, as below.

• Finally, you want to display the known sources in the field of view. In the top menu click on “Overlays” to see the options [Note: several of these catalogues are not under our control and may fail without warning for their own inscrutable reasons if their configuration has been changed at source since this version of HSpot was built]. Suppose we wish to know what AKARI sources lie in our field of view. Click on “Cataloges from AKARI”. A pop-up will appear asking you to define the search parameters (instrument, search radius). For AKARI we can choose FIS or IRC. Click on “OK” and HSpot will calculate what sources (if any) are in the field of view that has been chosen and will overlay them on the plot. You may find (as in this case) that there is no coverage of this field with the chosen catalogue, so you may wish to try another, such as the IRAS Faint Source Catalogue instead. Click on the icon that appears on the right of the window underneath the plotted catalogue and you will get a listing of sources.

The table allows you to toggle on and off source names and to configure the symbol used to mark sources. By expanding the table you see the name of the source in the catalogue, its coordinates, flux and quality information in each band, etc.
8.6 Look at the sky background for an observation In contrast to SPIRE, for which the background in images is cross-calibrated with Planck and good to about ±10%, a disadvantage of PACS maps produced by Herschel pipeline data is that they are subjected normally to high-pass filtering, so the background is normalised to zero. In other words, unless specifically required, large-scale background structure is (quite deliberately) filtered out in PACS maps. This also means that PACS pipeline products can, confusingly, show negative fluxes at some points in the observed field.
HSpot allows you have a look at the sky background around a map at 60 and 100μm in an AOR footprint and even to estimate it. There are several simple ways that you can do this. There is also a background estimator that will give a global estimate of average background between 55 and 672μm.
1. First and simplest – follow the instructions above to plot a background image from IRAS at 60 or 100μm (corresponding closely to the PACS “blue” and “green” channels) and overlay the AOR of interest on it. Move the cursor around the area covered by the AOR. At the top of the screen, just below the top menu, you will see that HSpot displays the flux (in MJy/steradian) on the pixel marked by the cursor, as well as the absolute and relative coordinates of the position.
2. Slightly more sophisticated – With the same IRAS background image displayed. Click on the icon on the left sidebar. This enables the cursor to define a profile across the image. Left click on the image where you want to start the slice across the image and, keeping the mouse pressed, draw out the line and release it where you want the slice to end. HSpot will draw a profile of

calibrated flux along the line that is defined. You can save both the tabulated data and the plot of the profile.
3. More sophisticated – HSpot can perform basic aperture photometry on either a background image (or, for that matter, a reduced Herschel observation that you have read into HSpot and displayed).
Click on the icon on the left-hand sidebar. Click on the image where you want to centre the aperture and draw out the cursor. HSpot will draw a configurable circular aperture on the image and, on releasing the cursor, will draw the aperture and present a pop-up with a summary of photometry, as shown below.
To calculate an average background estimate between 55 and 672μm:
Click on the target of interest in the target list for a proposal that you have already read in, or enter the target name manually using either the bullseye icon in the top menu or the “Targets” drop-down menu. In the “Targets” pop-up dialogue you will see a option to calculate the background. Click on this. A “Background Dialogue” pop-up will open. Give the wavelength of interest and click on “Estimate”. The target visibility pop-up will open: give the date and time that the observation was made. The background estimator will return an estimate of average background values in this area of the sky, as shown below:

9. Non-functioning options
9.1 Options that no longer operate at all There are a few options that we know have failed in HSpot 7.0.0, such as name resolution to NAIF ID (fixed here, in HSpot 8.0.1 and, later, broken again). In the Overlays menu, we know that the HEASARC option fails for reasons that we do not really understand, however, this is an external catalogue that is outside our control.
9.2 Options that may fail due to Firewall issues There are also options that only fail from behind firewalls because they require a particular port to open that the firewall will not permit: access to NED catalogues is a case in point – I can access this option from home, but not from my office. You should check that any such failures that you find are not due simply to a firewall blocking access.
9.3 An alternative method of name resolution to NAIF ID
HSpot will work happily with any Solar System Object that was observed by Herschel. You will be able to plot the track of the object on an AOR or a sky background image, but will no longer be able to look up NAIF IDs for new objects (a very handy functionality in HSpot). However, to return the NAIF ID for any named Solar System Object, enter the following line in a browser:
https://ssd.jpl.nasa.gov/x/smb_spk.cgi?OPTION=Look+up&OBJECT=xxxxx
Just replace the name "xxxxx" (e.g. Ceres) with the solar system object that you wish to identify (name - if named, number, or provisional designation).

10. Shutting down your session To shut down your session safely, click on the shutdown button in the bottom right corner of your screen, as shown below and select “Shutdown” in the pop-up. Other options, such as closing the VM window directly or selecting Powerdown without closing your session are like hitting the power switch on your computer without doing a controlled shutdown first: it will shut down the VM, but may corrupt your disk in doing so.
11. Further Reading about HSpot There is a detailed user manual for HSpot with complete information on all aspects of HSpot.
12. Caveats and Advanced Configuration If you want to look at known issues, or at advanced configuration, or wish to enable USB2/3 access you should look at the excellent summary of useful advice and warnings compiled by Jon Brumfitt towards the bottom of the VM installation page.
If you want detailed information on VirtualBox itself and on the configuration of VirtualBox, you should consult the VirtualBox Manual.
13. Credits and acknowledgements
13.1 HSpot Development and Maintenance HSpot has been a development that has been largely based on the SPOT tool created by the Spitzer Science Center for observation planning and proposals for NASA's Spitzer Space Telescope. We are extremely grateful to the original SPOT developers.
The work of adapting Spot for Herschel's needs was largely the development work of one person, Andrew Bonfield, at ESTEC. Andrew's contribution to HSpot was vital over the years of initial development of HSpot. From June 2007 to May 2008 the work of maintaining HSpot was taken over by Kevin Phipps, who then handed over to the HSC Software Maintenance Team until the end of Operations, in particular, the HSpot custodians Rafael Andres and Antonio Villacorta, assisted by Fran Vallejo and Jon Brumfitt. Some additional work during post-Operations to patch the Legacy version of

HSpot was carried out by Jon Brumfitt.
13.2 Virtual HSpot Development The initial version of Virtual HSpot (HSpot 8.0.0) was developed by Paolo Pesciullesci at HSC. The job of taking Virtual HSpot from being a development version to being the reality of a user release has been undertaken by Jon Brumfitt at HSC.
14. Conclusions The Use-Cases described above illustrate some of the ways that an astronomer with Herschel data may still find HSpot useful as a starting point for analysis. More sophisticated software is, of course, available but HSpot remains a simple, user-friendly way of familiarising yourself with Herschel observations and how they were executed.