Embed Size (px)
Citation preview


i
Table of Contents
i
Table of Contents
Table of Contents
Introduction 1
Foreword ......................................................................................................... 1
Legal Notices................................................................................................... 1
Document Conventions ................................................................................... 2
What Virtual CD NMS can do for you.............................................................. 2
New Features in Version 9 .............................................................................. 3
Virtual CD NMS Licensing............................................................................... 4
System Requirements ..................................................................................... 5
Technical Support............................................................................................ 6
Installation and Configuration of the Network Management Server 7
Notes on Installation........................................................................................ 7
Update............................................................................................................. 7
Installing the Virtual CD NMS Service............................................................. 9
Installing Virtual CD NMS Administration ....................................................... 13
Configuring Virtual CD Clients ........................................................................ 17
Distributing Virtual CD to Client Stations......................................................... 18
Remarks on Installation................................................................................... 22
Virtual CD FS .................................................................................................. 22
Virtual CD TS .................................................................................................. 23
Working with Virtual CD NMS 25
Working with Virtual CD NMS ........................................................................ 25
Before you continue... ..................................................................................... 26
Objects and Their Properties........................................................................... 27
Registered Virtual CDs.................................................................................... 28
Central Administration ..................................................................................... 29
Location is “Central”! ....................................................................................... 31
Global Functions ............................................................................................. 33
Print Function .................................................................................................. 33
Management of Virtual CD License Codes .................................................... 34
Logbook........................................................................................................... 39
Monitoring Virtual CD Drive Activity................................................................. 40
Logging Virtual CD Usage Data ...................................................................... 42
Station Groups ................................................................................................ 43

ii
Virtual CD v9 Manual
1
Scripts ............................................................................................................. 45
Profiles ............................................................................................................ 46Profile Editor 46Virtual CD Basic Profile 48Profile Settings 49Creating a User Profile 60How to get the most out of profiles 62Basic rules for using profiles 66
License Management ...................................................................................... 67License Control for Virtual CDs 67Defining the Number of Licenses for a Virtual CD 67Analysis of License Control 69Special Case: Virtual CD FS 70
Virtual CD Clients ............................................................................................ 72Virtual CD Clients 72Changing the Virtual CD Settings on NMS Client Stations 73Special Case: Client Station not Connected to Virtual CD NMS 73
Glossary 75
Index 79

ii
Virtual CD v9 Manual
1
Introduction
Introduction
ForewordThank you for choosing Virtual CD Network Management Server, or “Virtual CD NMS” for short. Virtual CD NMS is a powerful tool for centralized administration of the Virtual CD clients in your network. With Virtual CD NMS you can assign licenses to individual virtual CDs, to ensure that only the permitted number of instances can be used at any one time. Other features let you analyze usage data to optimize this licensing. Functions such as locking and releasing both virtual and physical drives give you selective control over the use of CDs, which is especially important in schools, for example.This documentation gives you a detailed description of how Virtual CD NMS works, and how you can work with it. The documentation is divided into the following sections:
Introduction: Provides an overview and general information.
Installation and Configuration of the Network Management Server: Describes the installation and basic configuration of all Virtual CD NMS components.
Working with Virtual CD NMS: Takes a closer look at how the program works and describes advanced settings for all Virtual CD NMS features.
Legal NoticesIf you use Virtual CD with CDs or DVDs that are under license, then creating multiple virtual images from a given CD/DVD or using mul-tiple instances of a given virtual CD simultaneously on more than one computer may constitute a breach of the software licensing agreement you entered into with the manufacturer of the CD/DVD in question. Make sure to check the licensing agreements you have with the CD/DVD manufacturer(s) for detailed information.
Copyrights on the software, the Virtual CD trademark and all corresponding documentation are owned by H+H Software GmbH. Microsoft and Windows are registered in the US as trademarks of Microsoft Corporation. The names of prod-ucts mentioned in this manual are used for identification purposes and may be trademarks of their manufacturers.

Virtual CD v9 Manual
2 3
Document ConventionsFor added clarity in these texts, this documentation uses the following conven-tions: Texts quoted from the program (buttons, menu items, dialog texts, etc.) are in bold type.Information that is particularly important is marked by one of the symbols shown below. The information in these notes is essential for trouble-free operation of the software.
Notes or procedures that are especially important are marked by the „exclamation point“ symbol you see here.
Tips and tricks for simplifying procedures are marked by the „light-bulb“ symbol shown here.
In some cases, step-by-step examples are given of certain tasks or configuration procedures. These steps are marked as follows:
Step 1
Step 2
What Virtual CD NMS can do for youVirtual CD Network Management Server – or Virtual CD NMS, for short – gives you an extensive array of features for centralized control of Virtual CD program functions on the client stations in your network. These features include:
Centralized management: The central Administration program shows you at a glance who has inserted which virtual or physical CDs in which CD drives. It also lets you insert and eject virtual CDs.
License control for registered virtual CDs: The license control function ensures that each virtual CD can be used only in the number of instances you specify.
Assigning profiles: You can assign binding profiles to users, stations and user/station groups. For example, you can specify which virtual CD drives are available for particular clients under Virtual CD TS.
Usage data: Virtual CD NMS can keep track of who uses which virtual CDs when, and for how long. You can switch this feature on and off as desired.

Virtual CD v9 Manual
2 3
Monitoring virtual CD drive activity: The data throughput monitor shows you the amount of data currently being read by a particular virtual CD drive on a selected client station. This feature lets you check CD drives for activity.
Distributing Virtual CD software to client machines: You can use the Virtual CD NMS Client Distributor to install Virtual CD on clients in the network.
Automatic distribution of Virtual CD licenses to Virtual CD clients: Virtual CD NMS can distribute Virtual CD program licenses to clients.
Group control of Virtual CD clients: You can have actions executed on the basis of user or station group membership.
Direct access to the main Virtual CD programs: Important Virtual CD programs can be opened by clicking on a link in the NMS Administration sidebar.
Microsoft Windows Vista: The latest versions of Virtual CD and Virtual CD NMS provide unlimited support for the new Windows Vista operating system from Mi-crosoft.
New Features in Version 9This section lists the new features available and the differences between the latest Virtual CD Network Management Server, v9, and the previous version. Your suggestions have played an important role in our development of the new features in Virtual CD NMS. The result is an optimized administration tool for man-aging Virtual CD clients in the network.
Revised User InterfaceThe user interface has been extensively revised. Links to Virtual CD programs have been integrated in the Tasks sidebar, simplifying access to important pro-gram functions. New interface designs have been added to enable „Vista-capable“ display options.
Administration of Virtual and Physical DrivesNot only virtual drives, but also the physical drives available to your clients can be locked to prevent access, and released as needed. In a school environment, for example, you may wish to use these functions to block users from installing programs that are on CDs.
Integration of Virtual CD v6, v7 and v9 FS and Virtual CD v6, v7 and v9 TS Server SoftwareVirtual CD NMS can be used in conjunction with Virtual CD v6, v7 and v9 File Server editions and Virtual CD v6, v7 and v9 Terminal Server editions. You can use Virtual CD NMS to assign licenses to virtual CDs stored on the file server. Further-more, v9 program versions can retrieve their license codes from NMS.
On-line Version Update CheckVirtual CD NMS can help you stay up to date by checking automatically at speci-fied intervals, or on your command, for newer VCD program versions so you can download program updates as soon as they become available.
Introduction

Virtual CD v9 Manual
4 5
Creating Station and User GroupsThis new feature lets you group your stations and your users for streamlined man-agement. For example, you can group the stations that belong to a particular de-partment in your company or that require access to a certain set of virtual CDs.
Expanded Administration Controls for Virtual CD Program LicensesYou can distribute Virtual CD licenses for client stations on the basis of user name, station, or user/station group membership. You can also let NMS distribute license codes to Virtual CD v9 FS and TS. Server license codes in use now have a sepa-rate window in NMS Administration.
Using Scripts You can have Virtual CD NMS run scripts on client stations when clients log in; for example, to distribute important information to your users.
Assigning Profiles Virtual CD NMS lets you create and assign binding profiles for users, user groups, stations, and station groups. For example, you might make a profile called „Guest“ that permits users to run the Virtual CD Management program, but not to create new virtual CDs or to burn Smart Virtual CDs. The latest NMS version also has a large number of new settings options available for configuring profiles. For exam-ple, you can activate or deactivate the availability of individual Virtual CD programs on client stations.
Logbook FunctionVirtual CD NMS has its own event log. You can define whether or not errors, warning and/or messages concerning actions executed are logged. The logbook is useful for troubleshooting in the event of difficulties; for example, if a particular virtual CD cannot be inserted.
Print FunctionsYou can print or save a variety of user data and logbook entries. For example, you can print the details on existing user profiles. This can be useful for keeping track of your user profiles.
Client DistributorThe Client Distributor is an all-new software deployment tool in Virtual CD NMS that lets you install Virtual CD on your client machines while working from a single centralized point.
Virtual CD NMS LicensingVirtual CD NMS is licensed on a per-server basis. In other words, you can install one Virtual CD NMS server in your network for each NMS license code you pur-chase. This licensing applies specifically to the VCD NMS service. The license code you purchase must be entered during installation of the service. If you do not have a license at the time of installation, the installation problem is halted.

Virtual CD v9 Manual
4 5
To enter a different license code at a later date, select NMS Licensing... from the Help menu in NMS Administration.
Unlike the previous versions, Virtual CD NMS v9 does not have a „demo“ operating mode. Rather, the Virtual CD NMS program comes in two different versions: one is a full version, and the other is a test version with limited functionality. The test version cannot be upgraded to a full version through the addition of a license code.
Any number of clients can log on to a single Virtual CD NMS instal-lation.
Virtual CD program licenses for Virtual CD clients must be acquired separately; they are not included in the Virtual CD NMS package.
System RequirementsThe following system specifications are required for running Virtual CD NMS.
For the Virtual CD NMS service:
Windows 2000 Server, or
Windows 2003 Server
For Virtual CD NMS Administration:
Windows 2000 Professional, or
Windows XP Professional, or
Windows Vista Professional
At least 256 MB RAM
The latest Service Pack available for the operating system used
Microsoft Internet Explorer version 6 or later.
Display resolution: 1024 x 768 or higher.
Virtual CD installation on the client station (NOT included with the Virtual CD NMS software)
Introduction

Virtual CD v9 Manual
6 7
Virtual CD NMS v9 supports all of the following versions and editions:
Virtual CD v5, build 5.0.4 and later
Virtual CD v6
Virtual CD v6 FS
Virtual CD v6 TS
Virtual CD v7
Virtual CD v7 FS
Virtual CD v7 TS
Virtual CD v8
Virtual CD v9
Virtual CD v9 FS
Virtual CD v9 TS
Virtual CD Network Management Server is made for use with Virtual CD program versions 5.0.4 and later. We recommend using the lat-est Virtual CD version available, however (currently v9), to ensure that you can benefit from the full array of functions offered by Virtual CD NMS. This is particularly important when running Virtual CD NMS on Windows Vista. We cannot guarantee that pre-v9 versions will perform correctly in Windows Vista.
Technical SupportIf you have any problems with Virtual CD, please check the manual, the on-line Help and our continuously updated Web pages at www.virtualcd-online.com for information.
Virtual CD Online: http://www.virtualcd-online.com/
Knowledge Base: http://www.virtualcd-online.com/kbase
Support Forum: http://www.virtualcd-online.com/support
You opinion is important to us, as are your questions, suggestions and criticism. Please use the Virtual CD forum to let us know what you think.

Virtual CD v9 Manual
6 7
Installation and Configuration of the Net-work Management Server
Notes on InstallationBecause Virtual CD NMS is a client/server application, there are two compo-nents to install: Virtual CD NMS service and Virtual CD NMS Administration.
To install VCD NMS, place the installation CD in a CD drive and wait a moment for Windows to detect it and run the Setup program. If the autoplay function is switched off in the computer, or if you are installing from a downloaded file, run the EXE file to start installation. Installation of a Virtual CD program on the client computers is required. See “Sys-tem Requirements” for a list of compatible versions. You can install Virtual CD on clients after installing NMS, using the Virtual CD NMS Client Distributor. In the client installations, you need to enter the name of the server running the Virtual CD NMS service and the port used for communication and specify whether the client machine will obtain its Virtual CD user license from Virtual CD NMS or has its own license number stored locally.
Installation and configuration must be carried out in the following order:
1. Installation of the Virtual CD NMS service
2. Installation of the Virtual CD NMS Administration program
3. Configuration of Virtual CD clients
UpdateThe procedure to follow to upgrade an earlier version of Virtual CD NMS depends on whether you have NMS v7 or the Virtual CD OPS program (v6).
Installing NMS v9 over NMS v7
Install Virtual CD NMS v9. While setting up NMS system components, the installa-tion program detects your NMS v7.
A window opens prompting you to specify whether existing data shall be used with the new version. The Virtual CD NMS v7 service is automatically set to “manual”
Installation and Configuration of the Network Management Server

Virtual CD v9 Manual
8 9
and deactivated. NMS v9 runs automatically and is ready to operate with your VCD clients.
After installation you can delete the old database directory share to prevent confu-sion.
Share the Virtual CD NMS v9 data directory.
The first time you run the Administration program following this update, you are prompted to configure the connection data for use with the Virtual CD NMS v9 server.
All stations that had connected to Virtual CD NMS v7 now automatically connect to Virtual CD NMS v9, provided the same port was specified in the v9 installation as was used with v7.
If you have any problems using the new version in your VCD system, deinstall Virtual CD NMS v7. Versions 7 and 9 are not compatible. This means, among other things, that NMS v7 CD Administration cannot run in conjunction with the NMS v9 server.
Installing NMS v9 over Virtual CD OPS
There are two ways to upgrade OPS to NMS v9. The first and easier of the two methods is to deinstall Virtual CD OPS and then install Virtual CD NMS on the same server. In this case, the following conditions apply:
The Virtual CD license code that you entered for OPS is automatically transferred to Virtual CD NMS Administration.
Virtual CD v9 Manual
8 9
If the same server and port are used, your Virtual CD clients will connect to Virtual CD NMS automatically.
Statistical data compiled with Virtual CD OPS cannot be transferred to Virtual CD NMS.
As in the case of a new installation, you need to enter the server name and port in the Administration program, specify the virtual CDs to be made available to clients, and share the Data directory. For details on sharing a directory, please see „Install-ing the Virtual CD NMS Service“ and „Installing Virtual CD NMS Administration“ in this manual.
Once the above configurations are completed, save the settings and restart Virtual CD NMS Administration.
The second method is to leave the Virtual CD OPS installation unchanged and install Virtual CD NMS on a different server. The advantage of this method is that you can keep the statistics data collected with VCD OPS. The disadvantage is that you have to configure all of the Virtual CD clients that will communicate with Virtual CD NMS.In this case, you can gradually migrate your system from OPS to NMS.
Installing the Virtual CD NMS ServiceInstallation and configuration of the Virtual CD NMS Service are described step by step in the following:
Choose the server on which you wish to install the Virtual CD NMS service and then run the installation program on that server.
Installation and Configuration of the Network Management Server
Virtual CD v9 Manual
10 11
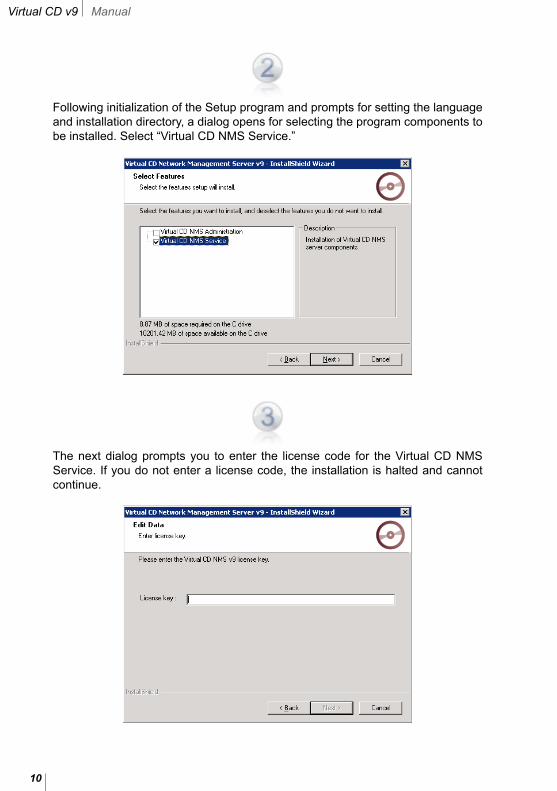
Following initialization of the Setup program and prompts for setting the language and installation directory, a dialog opens for selecting the program components to be installed. Select “Virtual CD NMS Service.”
The next dialog prompts you to enter the license code for the Virtual CD NMS Service. If you do not enter a license code, the installation is halted and cannot continue.
Virtual CD v9 Manual
10 11
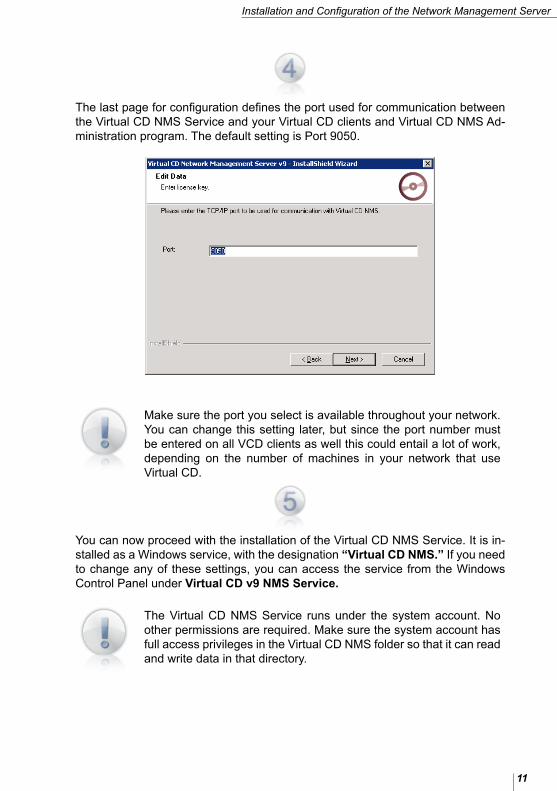
The last page for configuration defines the port used for communication between the Virtual CD NMS Service and your Virtual CD clients and Virtual CD NMS Ad-ministration program. The default setting is Port 9050.
Make sure the port you select is available throughout your network. You can change this setting later, but since the port number must be entered on all VCD clients as well this could entail a lot of work, depending on the number of machines in your network that use Virtual CD.
You can now proceed with the installation of the Virtual CD NMS Service. It is in-stalled as a Windows service, with the designation “Virtual CD NMS.” If you need to change any of these settings, you can access the service from the Windows Control Panel under Virtual CD v9 NMS Service.
The Virtual CD NMS Service runs under the system account. No other permissions are required. Make sure the system account has full access privileges in the Virtual CD NMS folder so that it can read and write data in that directory.
Installation and Configuration of the Network Management Server
Virtual CD v9 Manual
12 13
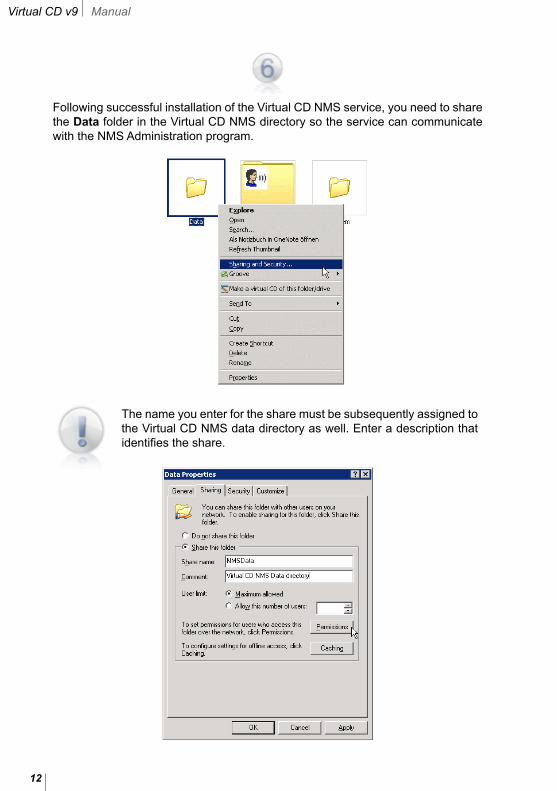
Following successful installation of the Virtual CD NMS service, you need to share the Data folder in the Virtual CD NMS directory so the service can communicate with the NMS Administration program.
The name you enter for the share must be subsequently assigned to the Virtual CD NMS data directory as well. Enter a description that identifies the share.

Virtual CD v9 Manual
12 13
Virtual CD NMS Administration reads data directly in this directory. For this reason, network users that will be working with the NMS Administration program must have “read” privileges in this shared directory.
Write privileges are required in the Data directory for editing or deleting scripts, and creating or editing profiles in Virtual CD NMS Administration.
Installing Virtual CD NMS Administration Following successful installation of the Virtual CD NMS Service, the next step is to install and configure the Virtual CD NMS Administration program. This procedure is described step by step in the following:
Select the workstation on which you wish to install Virtual CD NMS Administration. If desired, you can install this program on the same server that runs the Virtual CD NMS Service.If you use the same server for installation, we recommend using the same direc-tory as well. You also have the option of installing Virtual CD NMS Administration on any workstation, independent of the Virtual CD NMS Service.
You can install Virtual CD NMS Administration on as many machines as you wish, but it can only run in one instance per Virtual CD NMS service. If Virtual CD NMS Administration is already running when you try to start it, a message window opens to inform you of this fact; no second instance is opened.
Installation and Configuration of the Network Management Server

Virtual CD v9 Manual
14 15
Following initialization of the Setup program and prompts for setting the language and installation directory, a dialog opens for selecting the program components to be installed. Select “Virtual CD NMS Administration.”
If you are installing Virtual CD NMS Administration and the Virtual CD NMS Service on the same server, you can do so simultaneously by selecting both components here.
Once Virtual CD NMS Administration has been installed, open the program to configure its settings. A startup wizard opens and prompts input of the required data. The subsequent window lets you enter data for the administration program properties.
Virtual CD v9 Manual
14 15
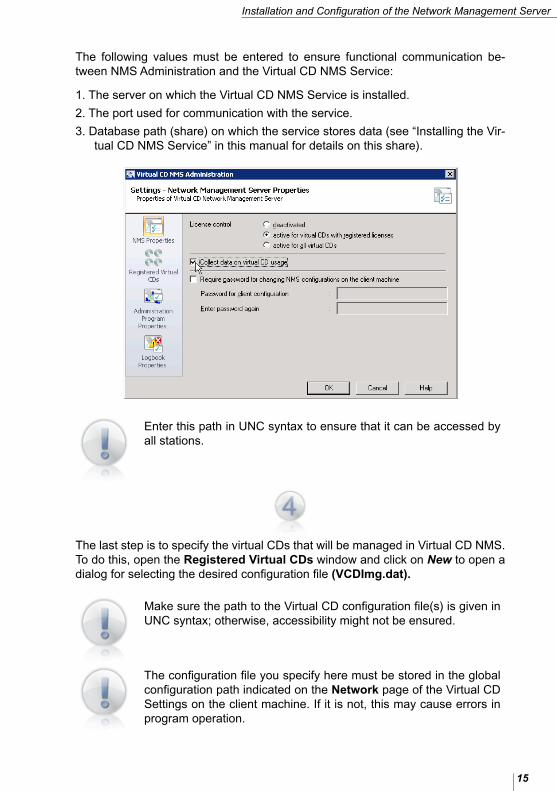
The following values must be entered to ensure functional communication be-tween NMS Administration and the Virtual CD NMS Service:
1. The server on which the Virtual CD NMS Service is installed.
2. The port used for communication with the service.
3. Database path (share) on which the service stores data (see “Installing the Vir-tual CD NMS Service” in this manual for details on this share).
Enter this path in UNC syntax to ensure that it can be accessed by all stations.
The last step is to specify the virtual CDs that will be managed in Virtual CD NMS. To do this, open the Registered Virtual CDs window and click on New to open a dialog for selecting the desired configuration file (VCDImg.dat).
Make sure the path to the Virtual CD configuration file(s) is given in UNC syntax; otherwise, accessibility might not be ensured.
The configuration file you specify here must be stored in the global configuration path indicated on the Network page of the Virtual CD Settings on the client machine. If it is not, this may cause errors in program operation.
Installation and Configuration of the Network Management Server
Virtual CD v9 Manual
16 17
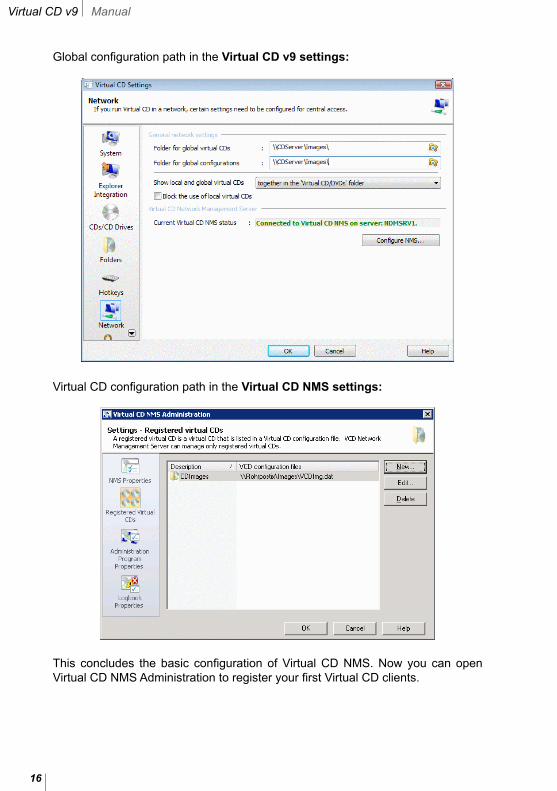
Global configuration path in the Virtual CD v9 settings:
Virtual CD configuration path in the Virtual CD NMS settings:
This concludes the basic configuration of Virtual CD NMS. Now you can open Virtual CD NMS Administration to register your first Virtual CD clients.

Virtual CD v9 Manual
16 17
Configuring Virtual CD Clients Once you have installed and configured the Virtual CD NMS components, you need to configure certain Virtual CD settings on your client stations for communi-cation with Virtual CD NMS.
Prerequisite for this step is the previous installation and network integration of Virtual CD on the client machines. For detailed infor-mation on the configuration of your Virtual CD program, consult the Virtual CD documentation. If Virtual CD has not yet been installed on your client machines, this can be done quickly and easily us-ing the Virtual CD NMS Client Distributor. (For details on the Client Distributor, please see „Distributing Virtual CD to Client Stations“ in this manual.)
To register a Virtual CD client in Virtual CD NMS, begin by opening Virtual CD Settings on the client station, either from the View menu or the Quick Start button in the system tray. Open the Network page of the settings and click on Configure NMS... in the „Virtual CD Network Management Server“ section.
Installation and Configuration of the Network Management Server

Virtual CD v9 Manual
18 19
In the dialog that opens, select the setting: „Virtual CD uses a Virtual CD Network Management Server.“ This activates the subsequent input fields. Enter the server and port for communication with the Virtual CD NMS Service.
Distributing Virtual CD to Client StationsAdvanced configuration of the Network Management Server cannot be carried out before Virtual CD software has been installed and configured on the network clients. Starting with v9, Virtual CD NMS offers a tool for deploying Virtual CD on clients quickly and easily from a central location in your network. This new tool is called Virtual CD Client Distributor. The following provides a detailed description of the procedure for deploying Virtual CD with the Client Distributor. In our example, all of the client stations are within a single domain.
Before a Client Setup can be used for distribution, it must be created in the Virtual CD program. Prerequisite for this is that you have at least one installation of Virtual CD, in addition to your Virtual CD NMS program.
The Client Distributor can deploy only version 9 setups. The current version of the Client Distribution program supports installation only of Virtual CD. Virtual CD TS and FS cannot be distributed.
To carry out the deployment, you have to have administrator rights on the stations on which you wish to install Virtual CD.
Virtual CD v9 Manual
18 19
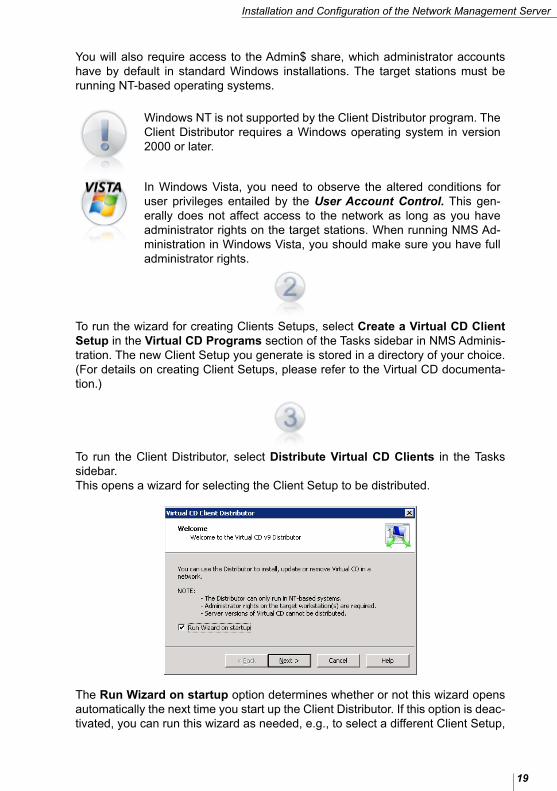
You will also require access to the Admin$ share, which administrator accounts have by default in standard Windows installations. The target stations must be running NT-based operating systems.
Windows NT is not supported by the Client Distributor program. The Client Distributor requires a Windows operating system in version 2000 or later.
In Windows Vista, you need to observe the altered conditions for user privileges entailed by the User Account Control. This gen-erally does not affect access to the network as long as you have administrator rights on the target stations. When running NMS Ad-ministration in Windows Vista, you should make sure you have full administrator rights.
To run the wizard for creating Clients Setups, select Create a Virtual CD Client Setup in the Virtual CD Programs section of the Tasks sidebar in NMS Adminis-tration. The new Client Setup you generate is stored in a directory of your choice. (For details on creating Client Setups, please refer to the Virtual CD documenta-tion.)
To run the Client Distributor, select Distribute Virtual CD Clients in the Tasks sidebar.This opens a wizard for selecting the Client Setup to be distributed.
The Run Wizard on startup option determines whether or not this wizard opens automatically the next time you start up the Client Distributor. If this option is deac-tivated, you can run this wizard as needed, e.g., to select a different Client Setup,
Installation and Configuration of the Network Management Server

Virtual CD v9 Manual
20 21
by choosing Select a Virtual CD Client Setup... in the File menu. Select Next to open a dialog that lets you browse for the desired path.
Enter the path to the Client Setup that you wish to distribute and click OK to con-firm.
If you do not specify a Setup, the main window will still open when you click OK. You can check the Virtual CD versions running on your client stations, but you cannot deploy the software until you run the wizard again and select a Client Setup.
The main window shows all groups and stations in the network.
Client Distributor lets you check your stations before deploying the software, to find out which versions of Virtual CD they are running. A “green monitor” icon indicates that the station has been checked and is ready for installation with the Client Setup.

Virtual CD v9 Manual
20 21
A red monitor indicates that the program was unable to check the version on the station. In such cases, we recommend checking the log file for details on the failed operation, including date, time, error message and error analysis.
You can also check an entire workgroup or domain by selecting it in the main window of the Client Distributor program and selecting Check from the Edit menu, the toolbar or the shortcut menu.
Once a station has been checked marked as ready for installation, you can select the Install... menu item to begin installation. The Client Distribution program cop-ies the required files to the workstation and then starts a service that processes the installation automatically. Once the installation is completed, Virtual CD is ready for use on the workstation.
The Client Distributor can also be used to deinstall Virtual CD on your network workstations. To do this, select Uninstall.
Similar to installation, the deinstallation process is supported only for Virtual CD v9. The Client Distributor can neither install nor dein-stall earlier versions.
Following deinstallation of Virtual CD, the workstation has to be restarted. This is indicated in the main window of the Client Distributor by a yellow monitor icon.
The Client Distributor also has an update function that you can use to make sure each workstation has the latest release of the Virtual CD version it runs. If the ver-sion installed by the Client Setup is a later release than that on a workstation, the Client Distributor can update that installation.
The update function is available for use only with Virtual CD v9.
Whenever an updated release of v9 becomes available, you can make a new Cli-ent Setup to update your v9 clients. Please keep in mind, however, that the update function merely updates the installation; it does not take any modification of set-tings into account. If you have modified settings in the Virtual CD setup, you need to perform a complete installation rather than an update.
Installation and Configuration of the Network Management Server

Virtual CD v9 Manual
22 23
Remarks on InstallationOnce you have completed the basic configuration steps and registered at least one Virtual CD client, your Virtual CD NMS Administration window should look something like this:
We recommend double-checking the settings for server and port before you configure the client stations; if a mistake is made and must be corrected on every single station, this could amount to a lot of extra work. For example, if you configure 50 clients to work with Virtual CD NMS and then change the name of the NMS server, you have to enter the new name on every one of the 50 stations to en-able communication between the clients and Virtual CD NMS.
Virtual CD FSVirtual CD FS versions 6, 7 and 9 can be integrated in your Virtual CD NMS v9 system.
The advantages of using the two programs together include:
• Expanded licensing functions for all virtual CDs
• Management of server licenses (v9 only)
• Centralized administration
Notes on Installing Virtual CD FSWhen you install Virtual CD FS, you have to enter a license code for it even though you will be using it in conjunction with Virtual CD NMS, possibly with the automatic
Virtual CD v9 Manual
22 23
licensing feature active. The Virtual CD FS service that makes virtual CD drives available requires a locally stored license code. Version 9 of Virtual CD FS can re-trieve a license code from NMS. This option can be configured during installation.
The setup program will not continue until a local Virtual CD FS li-cense code has been entered. Starting with Version 9, Virtual CD FS no longer has a demo mode. A separate test version of the program is available for testing purposes. It is not possible to activate the full range of functions by entering a license code in a test version.
For details on the installation and configuration of Virtual CD FS, please refer to the Virtual CD FS documentation.
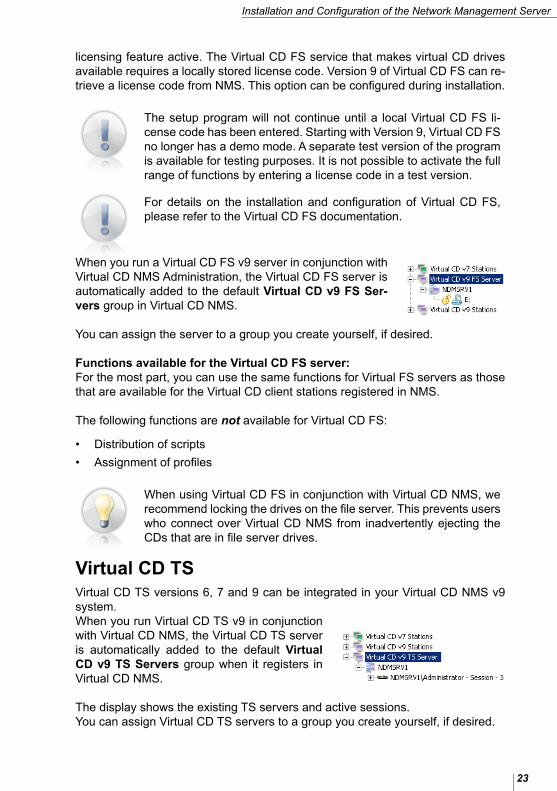
When you run a Virtual CD FS v9 server in conjunction with Virtual CD NMS Administration, the Virtual CD FS server is automatically added to the default Virtual CD v9 FS Ser-vers group in Virtual CD NMS.
You can assign the server to a group you create yourself, if desired.
Functions available for the Virtual CD FS server:For the most part, you can use the same functions for Virtual FS servers as those that are available for the Virtual CD client stations registered in NMS.
The following functions are not available for Virtual CD FS:
• Distribution of scripts
• Assignment of profiles
When using Virtual CD FS in conjunction with Virtual CD NMS, we recommend locking the drives on the file server. This prevents users who connect over Virtual CD NMS from inadvertently ejecting the CDs that are in file server drives.
Virtual CD TSVirtual CD TS versions 6, 7 and 9 can be integrated in your Virtual CD NMS v9 system. When you run Virtual CD TS v9 in conjunction with Virtual CD NMS, the Virtual CD TS server is automatically added to the default Virtual CD v9 TS Servers group when it registers in Virtual CD NMS. The display shows the existing TS servers and active sessions. You can assign Virtual CD TS servers to a group you create yourself, if desired.
Installation and Configuration of the Network Management Server

Virtual CD v9 Manual
24 25
The advantages of using Virtual CD NMS and Virtual CD TS together include:
• Centralized administration.
• Central management of TS server licenses using NMS.
• The functions available for NMS client stations are also available for clients in Virtual CD TS sessions.
• Every client station that logs on in a terminal server session is automatically assigned a profile.
If you add a Virtual CD TS installation without changing any other settings, clients that log on in terminal server sessions are assigned the Virtual CD basic profile. However, we recommend creating a separate profile for TS clients. In addition to configuring security settings and other features in the profile, you can also specify virtual drives for TS clients. The drives are mapped when a session is opened. For more information about profiles, please see “Working with Profiles” in this manual.
Assigning licenses for Virtual CD TS clients:You can assign licenses codes for Virtual CD TS using Virtual CD NMS. Each ter-minal server session takes up one license, starting when a virtual CD is inserted during the session.
For details on the installation and configuration of Virtual CD TS, please refer to the Virtual CD TS documentation.

Virtual CD v9 Manual
24 25
Working with Virtual CD NMS
Working with Virtual CD NMS Virtual CD NMS is a client/server application that lets you control a variety of features on your Virtual CD client stations. With Virtual CD NMS, all Virtual CD clients are registered centrally on the Virtual CD Network Management Server, enabling management of virtual and physical CD drives, inserted virtual CDs, and other functions on the client machine using the Virtual CD NMS Administration program.
As illustrated above, all Virtual CD clients communicate with the Virtual CD NMS Service directly over TCP/IP, so that direct data access is not necessary. The Vir-tual CD NMS Administration program also accesses the Virtual CD NMS Service over TCP/IP. To enable the optimum data access speed, Virtual CD NMS Man-
Working with Virtual CD NMS

Virtual CD v9 Manual
26 27
agement reads some of the data directly from the databases written by Virtual CD NMS Service. For this reason, the folder created for the databases must be shared once the Virtual CD NMS Service is installed. When you install the Virtual CD NMS Administration program, the name of this share must be entered in the administration program properties (see “Installing Virtual CD NMS Administration” in this manual for details).
Virtual CD NMS Administration can be installed on as many ma-chines as you like, but only one instance can run per Virtual CD NMS Service. If Virtual CD NMS Administration is already running when you try to start it, a message window opens to tell you which station the program is running on. Only after that instance has been closed can the program be started again on another machine.
The main tasks performed with Virtual CD NMS are accessible from the Virtual CD NMS Administration window:
• Central Management
• License Control for Virtual CDs
• Logging Data on Virtual CD Usage
• Activity Check for Virtual CD Drives
• Activity Check for Physical CD Drives
• Distributing Virtual CD Software to Client Stations
• Automatic Distribution of Virtual CD License Codes
• Creating and Assigning Profiles for Users/Stations
• Logbook Function
To understand how Virtual CD and Virtual CD NMS work together, it is important to keep in mind which tasks are performed by each of these two programs.
• Virtual CD manages your virtual CDs
• Virtual CD NMS manages the Virtual CD clients in the network
Before you continue...Before you go any further with the description of Virtual CD NMS functions, we would like to emphasize a few elementary aspects of the program that are essen-tial for the most effective possible use of Virtual CD NMS.
New settings must be saved: Changes in configuration settings that affect the Virtual CD NMS program or certain parameters for usage of virtual CDs (e.g., for license control) are not effective until you explicitly save them.
Your configuration data is not sent to the server – i.e., to the Virtual CD NMS service – until you select the command to save changes.
Virtual CD v9 Manual
26 27
Changes affecting a virtual CD are not effective until the next time that virtu-al CD is inserted: Changes that affect virtual CDs (e.g., in license control settings) are not applied until the next time the virtual CD in question is inserted. Virtual CDs that are in virtual drives (whether actively in use or not) when the changes are made are not affected.
If a given virtual CD is in a drive when you change settings that apply to it, the new settings are not effective for that CD until it has been ejected and then inserted again.
Objects and Their PropertiesAn “object” is an element of the Virtual CD NMS Administration program which you can manipulate by activating certain functions. Virtual CD NMS Administration recognizes the following objects:
• Virtual CDs
• Virtual CD drives
• Physical CD drives
• Users (these are passive objects; i.e., no functions can be applied)
• Stations
• Groups
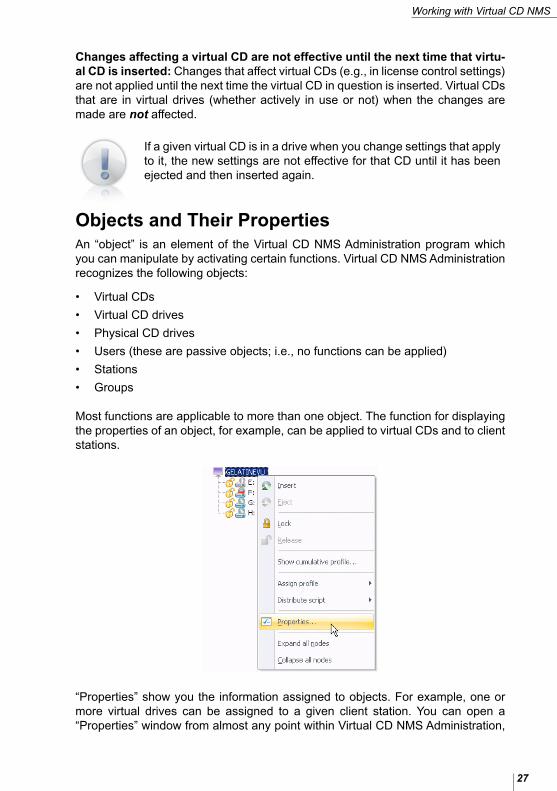
Most functions are applicable to more than one object. The function for displaying the properties of an object, for example, can be applied to virtual CDs and to client stations.
“Properties” show you the information assigned to objects. For example, one or more virtual drives can be assigned to a given client station. You can open a “Properties” window from almost any point within Virtual CD NMS Administration,
Working with Virtual CD NMS

Virtual CD v9 Manual
28 29
for fast access to key information about an object. The example below shows the properties of a virtual CD client station, which can include network parameters, the physical and virtual drives available on that station, and the virtual CDs currently inserted in drives on that station.
Registered Virtual CDsTo perform operations and routines on virtual CDs, the program must be able to identify the virtual CDs unambiguously, by some unique characteristic. The Virtual CD system identifies virtual CDs by their full name; in other words, by the file name of the virtual CD and its entire path (drive designation and folder names).Which CDs are “registered” in your Virtual CD NMS system is configured under Registered Virtual CDs in your Virtual CD NMS Settings. Virtual CDs are reg-istered by listing them in virtual CD configuration files (called VCDImg.dat). You can specify one or more configuration files in this dialog to register them in your NMS system.Configuration files are stored in the folder specified for this purpose on the Net-work page of the Virtual CD Settings under Global configuration path (see „Configuring Virtual CD Clients“ in this manual for details). These configuration files list the virtual CDs that are registered in your Virtual CD system and are available globally (e.g., over the network). Any time you add or re-move virtual CDs the corresponding DAT file is changed accordingly, which means changes are automatically reflected in the Virtual CD NMS system.Virtual CD NMS can insert only virtual CDs that are registered. Functions for as-signment of licenses and identification of usage data can also be applied only to registered virtual CDs.
If you move a virtual CD from one folder to another on your hard drive, the path name will change and Virtual CD NMS will no longer recognize that CD as being registered. Settings in VCD NMS relat-ing to the virtual CD, such as licensing, will be reset and have to be configured again.
Virtual CD v9 Manual
28 29
Central AdministrationVirtual CD NMS Administration offers central access to all administrative func-tions. Similar to the Virtual CD CD Management program, it is made up of three windows. In NMS, these are the administration window, the tasks window and the sidebar(„Tasks sidebar“). You can change the positions of these windows as desired. A configuration of windows in this program is referred to as a „layout,“ and individual layouts can be stored and loaded using the Layout command in the Window menu. You can choose from a number of specific views for the administra-tion window, such as the scripts overview or license codes window.The Tasks sidebar gives you quick access to central functions such as license management, usage analysis, profile administration and software distribution. The sidebar also contains commands for working with virtual CDs and virtual drives, for actions such as locking drives or inserting virtual CDs. The Virtual CD Programs section contains links to Virtual CD programs such as CD Management and the Image Wizard. You can also open the NMS Settings program from the sidebar.The Tasks window shows your NMS environment. Depending on which task is selected in the sidebar, this window lets you manage either virtual drives and vir-tual CDs or licenses for virtual CDs, or shows the license evaluation, usage evalu-ation or your registered stations. With the default window configuration, the Tasks window shows your CDs and CD drives. This view includes functions for controlling virtual and physical CD drives as well as the use of virtual CDs. Virtual and physical drives are shown on two dif-ferent display pages; click on the corresponding tab for the desired view. Physical drives that are designated for use with virtual CDs are listed under Virtual drives. In Virtual CD v9 and later, virtual drives and virtual burners are distinguished by different icons, as in the Virtual CD program.
The following commands are available for control of virtual CD drives:
Insert: Insert a virtual CD.
Eject: Eject a Virtual CD.
Lock: Lock a virtual CD drive.
Release: Release a locked virtual CD drive.
Data throughput: View the data throughput rate of the selected drive.
Show properties: The command in the sidebar lets you view properties of the virtual CD in the drive, or of the entire workstation.
Your virtual CDs must be registered in your VCD NMS system before the above commands can be applied.
When you use VCD NMS to insert a CD that is password-protected, the password is prompted centrally and must be entered in Virtual CD NMS before the NMS Administration program can insert the vir-tual CD. This means you can provide access to this CD for users on client stations without giving users the password.
Working with Virtual CD NMS

Virtual CD v9 Manual
30 31
You can prevent all usage of virtual CDs on a given station by using VCD NMS to lock that station‘s virtual CD drive(s). Once a virtual CD drive is locked, no virtual CDs can be inserted in that drive on that client station. You can, however, insert and eject CDs in that drive using VCD NMS Administration. When you release a CD drive that had been locked, the drive is once again available for use on that station. The „padlock“ symbol displayed next to a drive letter indicates the current status („locked“ or „unlocked“) of the virtual drive.
In Virtual CD NMS, it may occur that a drive can still be used on a given client station even though it has been locked in NMS. If this happens, please check whether the central network mode was active and set to „normal“ when the drive was locked. (For details on this topic, please see article #1236, „A drive can be used even though it has been locked by Virtual CD OPS“ in the Virtual CD knowledge base.)
The following functions can be applied to physical drives:
Eject: Eject a physical CD.
Lock: Lock a physical CD drive.
Release: Release a locked physical CD drive.
Data throughput: View the data throughput rate of the selected drive.
Show properties: The command in the sidebar lets you view properties of the CD in the drive, or of a registered station.
The Eject function makes it possible to eject a physical CD from a physical drive on a Virtual CD client station. You can also “lock” a physical drive on a Virtual CD client station. When the Lock setting is active, a physical CD can still be inserted in the physical drive but it is immediately ejected again. This means, of course, that no programs can be run or installed from physical CDs in that drive. When you release a physical CD drive that had been locked, the drive is once again available for use on that station. The „padlock“ symbol displayed next to a drive letter indicates the current status („locked“ or „unlocked“) of the drive.
As mentioned above, the Tasks window can be configured in accordance with your preferences.
Virtual CD v9 Manual
30 31
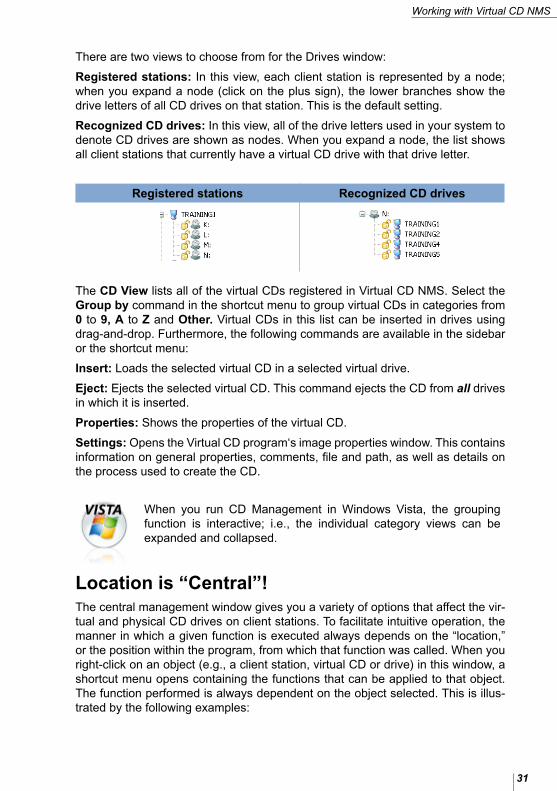
There are two views to choose from for the Drives window:
Registered stations: In this view, each client station is represented by a node; when you expand a node (click on the plus sign), the lower branches show the drive letters of all CD drives on that station. This is the default setting.
Recognized CD drives: In this view, all of the drive letters used in your system to denote CD drives are shown as nodes. When you expand a node, the list shows all client stations that currently have a virtual CD drive with that drive letter.
Registered stations Recognized CD drives
The CD View lists all of the virtual CDs registered in Virtual CD NMS. Select the Group by command in the shortcut menu to group virtual CDs in categories from 0 to 9, A to Z and Other. Virtual CDs in this list can be inserted in drives using drag-and-drop. Furthermore, the following commands are available in the sidebar or the shortcut menu:
Insert: Loads the selected virtual CD in a selected virtual drive.
Eject: Ejects the selected virtual CD. This command ejects the CD from all drives in which it is inserted.
Properties: Shows the properties of the virtual CD.
Settings: Opens the Virtual CD program‘s image properties window. This contains information on general properties, comments, file and path, as well as details on the process used to create the CD.
When you run CD Management in Windows Vista, the grouping function is interactive; i.e., the individual category views can be expanded and collapsed.
Location is “Central”!The central management window gives you a variety of options that affect the vir-tual and physical CD drives on client stations. To facilitate intuitive operation, the manner in which a given function is executed always depends on the “location,” or the position within the program, from which that function was called. When you right-click on an object (e.g., a client station, virtual CD or drive) in this window, a shortcut menu opens containing the functions that can be applied to that object. The function performed is always dependent on the object selected. This is illus-trated by the following examples:
Working with Virtual CD NMS
Virtual CD v9 Manual
32 33
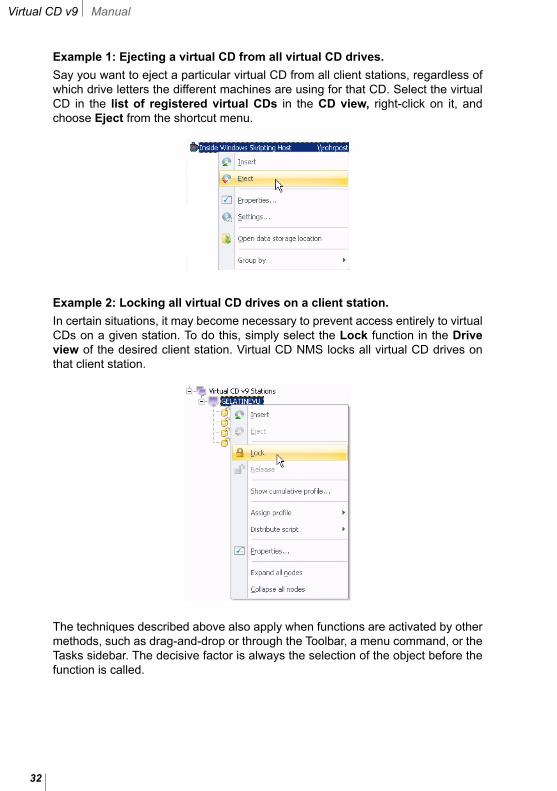
Example 1: Ejecting a virtual CD from all virtual CD drives.
Say you want to eject a particular virtual CD from all client stations, regardless of which drive letters the different machines are using for that CD. Select the virtual CD in the list of registered virtual CDs in the CD view, right-click on it, and choose Eject from the shortcut menu.
Example 2: Locking all virtual CD drives on a client station.
In certain situations, it may become necessary to prevent access entirely to virtual CDs on a given station. To do this, simply select the Lock function in the Drive view of the desired client station. Virtual CD NMS locks all virtual CD drives on that client station.
The techniques described above also apply when functions are activated by other methods, such as drag-and-drop or through the Toolbar, a menu command, or the Tasks sidebar. The decisive factor is always the selection of the object before the function is called.
Virtual CD v9 Manual
32 33
Global FunctionsIn addition to the functions that can be applied to individual objects, there are a number of functions that can be applied “globally,” to all virtual or physical CD drives on all registered client stations. To help make sure these functions are not activated inadvertently, they can be accessed only through the Edit menu. These global functions include the following (note that they are applied to virtual and physical drives separately):
Eject all CDs: Ejects all virtual or all physical CDs.
Lock all drives: Locks all virtual or all physical drives.
Release all drives: Releases all virtual or physical drives that had been locked.
These functions can be used to create a uniform operating state on all client sta-tions in the network, which can be useful in a teaching or training situation, for example. One way to use these functions, for example, would be to first lock all drives and then eject all virtual CDs. Then you can permit access to a particular selection of virtual CDs for the group with whom you are currently working.
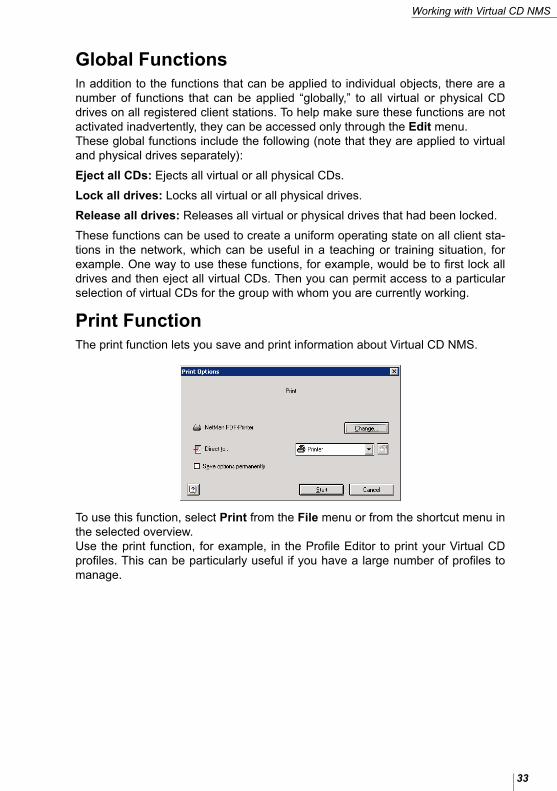
Print FunctionThe print function lets you save and print information about Virtual CD NMS.
To use this function, select Print from the File menu or from the shortcut menu in the selected overview. Use the print function, for example, in the Profile Editor to print your Virtual CD profiles. This can be particularly useful if you have a large number of profiles to manage.
Working with Virtual CD NMS

Virtual CD v9 Manual
34 35
Management of Virtual CD License Codes A central component of Virtual CD NMS is the management of license codes for Virtual CD client stations and Virtual CD servers. Virtual CD NMS can distribute licenses to stations, stations groups, users, and user groups. Server licenses can be deployed explicitly on servers in the network.
Virtual CD NMS can distribute license codes for Virtual CD versions 5 through 9. For users, user groups and station groups, licenses can be assigned only to Virtual CD products in version 6 and later.
To distribute license codes, configure VCD NMS as follows:
Run the Virtual CD NMS Administration program and enter the Virtual CD license codes that you wish to distribute to client stations. To enter the license codes, right-click in the Virtual CD license code overview in VCD NMS Administration to open the shortcut menu. (New license codes can be entered directly in the Virtual CD server license codes window.) Select New license code for: and then choose the Virtual CD version to which the new license code applies.
In our example, Virtual CD v9 is selected.

Virtual CD v9 Manual
34 35
Your Virtual CD client stations must now be configured to retrieve their license codes from Virtual CD NMS. To do this, run the Virtual CD Settings program on the client station, open the Network page and click on „Configure NMS...“ to open the Virtual CD Network Management Server Configuration window. Activate the Virtual CD licensed by the Virtual CD Network Management Server specified above option.
Once these steps have been completed, the client stations in your network that log on to Virtual CD NMS draw their licenses from VCD NMS on startup, and release the license when the station is logged out again. This saves you the trouble of entering license codes on each workstation separately.
At runtime, Virtual CD NMS will distribute Virtual CD licenses to each station that logs on until the number of licenses purchased are all in use. If another client attempts to log on and requests a license when none is available, an error message is shown. If no licenses are available, Virtual CD cannot run on additional stations.
To see which stations are using license codes from Virtual CD NMS, open the Registered stations view.When you use the automatic license distribution feature in Virtual CD NMS, we recommend the following procedure:
1. Configure all client stations as described under Step 3 above.
2. Do not enter any license codes locally on client stations.
3. Mobile computing devices such as laptops should not be included in the auto-matic licensing scheme, since they would not be able to run Virtual CD when they are not connected to the network. Rather, enter license codes locally on laptops, notebooks and the like. Locally entered codes cannot be distributed by Virtual CD NMS.
Once a license code has been entered in Virtual CD NMS for distri-bution, that code cannot be used locally (i.e., assigned explicitly on a particular machine).
Working with Virtual CD NMS
Virtual CD v9 Manual
36 37
Virtual CD Server License Codes
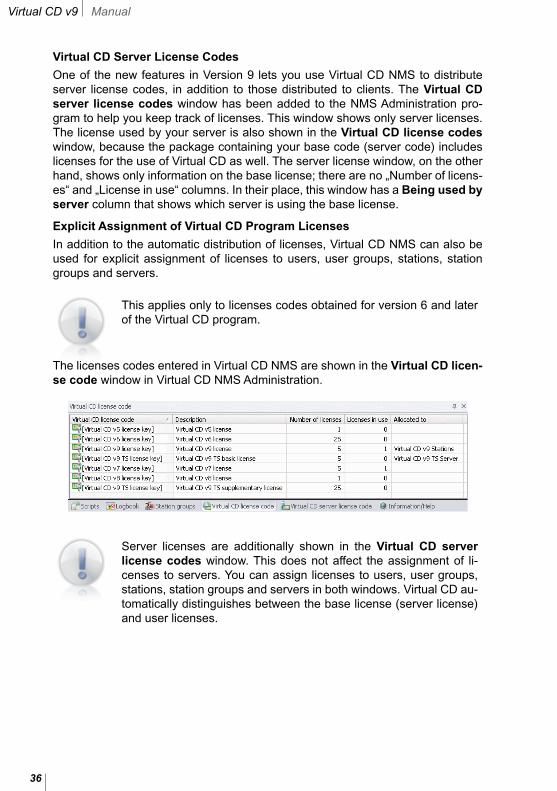
One of the new features in Version 9 lets you use Virtual CD NMS to distribute server license codes, in addition to those distributed to clients. The Virtual CD server license codes window has been added to the NMS Administration pro-gram to help you keep track of licenses. This window shows only server licenses. The license used by your server is also shown in the Virtual CD license codes window, because the package containing your base code (server code) includes licenses for the use of Virtual CD as well. The server license window, on the other hand, shows only information on the base license; there are no „Number of licens-es“ and „License in use“ columns. In their place, this window has a Being used by server column that shows which server is using the base license.
Explicit Assignment of Virtual CD Program Licenses
In addition to the automatic distribution of licenses, Virtual CD NMS can also be used for explicit assignment of licenses to users, user groups, stations, station groups and servers.
This applies only to licenses codes obtained for version 6 and later of the Virtual CD program.
The licenses codes entered in Virtual CD NMS are shown in the Virtual CD licen-se code window in Virtual CD NMS Administration.
Server licenses are additionally shown in the Virtual CD server license codes window. This does not affect the assignment of li-censes to servers. You can assign licenses to users, user groups, stations, station groups and servers in both windows. Virtual CD au-tomatically distinguishes between the base license (server license) and user licenses.

Virtual CD v9 Manual
36 37
The procedure for assigning licenses explicitly is demonstrated in the following, with a 5-user license code and Virtual CD v9 clients:
Double-click on the license code in the Virtual CD license codes window to open the Assign VCD License Code dialog.
None of the 5 licenses enabled by this code have been assigned up to now.
Working with Virtual CD NMS

Virtual CD v9 Manual
38 39
To assign licenses to individual stations, open the Stations/Groups page and select the Show stations option.
In our example, we select the “Student_1” through “Student_4” stations and click on OK to confirm. These stations are now shown in the Virtual CD license code window, under Users/Stations.

Virtual CD v9 Manual
38 39
The next time the “Details: Licenses” view is opened, these stations will be dis-played there as well.
Because these licenses have been assigned explicitly to these stations, the li-censes are not released for use by other stations when these stations log out!
LogbookIf you have any difficulties with Virtual CD NMS, it is a good idea to check the log-book for an indication of the cause.
System events shown here are divided into 3 categories:
Information: Shows uncritical system events that took place as expected.
Warning: These are semi-critical events; i.e., they were unexpected, but do not directly interfere with the proper functioning of the system.
Error: These are critical system events that interfere with or prevent proper func-tioning of the system.
Working with Virtual CD NMS

Virtual CD v9 Manual
40 41
If a given function was not carried out correctly, logbook entries can help locate the source of the error. For example if a station attempts to connect to NMS when no licenses are available, this fact is recorded in the logbook. This problem can be located and eliminated on the server, precluding the need for troubleshooting on the client machine.Which events are shown here is configured on the Logbook Properties page of the NMS Settings.
Monitoring Virtual CD Drive ActivityIf you are having a problem with a virtual CD, you can open the Data Throughput Monitor to determine whether the drive it is inserted in is actually being accessed. To open the data throughput monitor, right-click on a virtual drive (in which a vir-tual CD is inserted) in the Management of virtual CDs window, and select Data throughput... from the shortcut menu.
Virtual CD v9 Manual
40 41
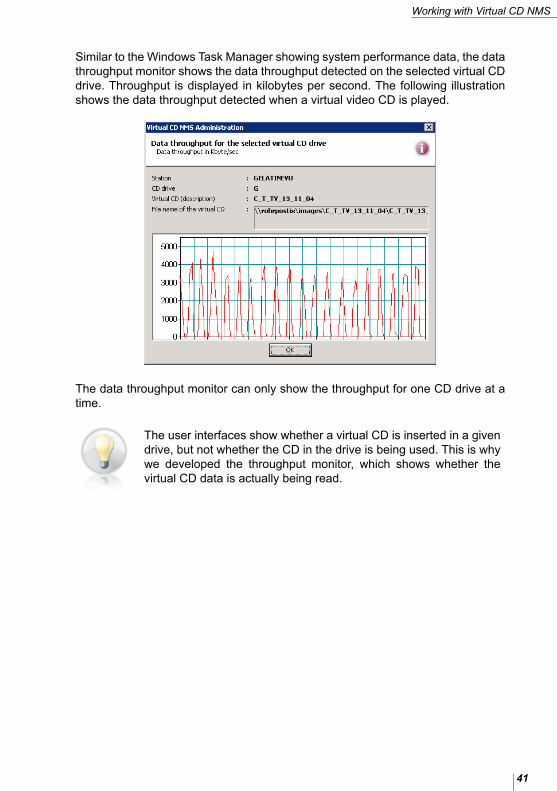
Similar to the Windows Task Manager showing system performance data, the data throughput monitor shows the data throughput detected on the selected virtual CD drive. Throughput is displayed in kilobytes per second. The following illustration shows the data throughput detected when a virtual video CD is played.
The data throughput monitor can only show the throughput for one CD drive at a time.
The user interfaces show whether a virtual CD is inserted in a given drive, but not whether the CD in the drive is being used. This is why we developed the throughput monitor, which shows whether the virtual CD data is actually being read.
Working with Virtual CD NMS
Virtual CD v9 Manual
42 43
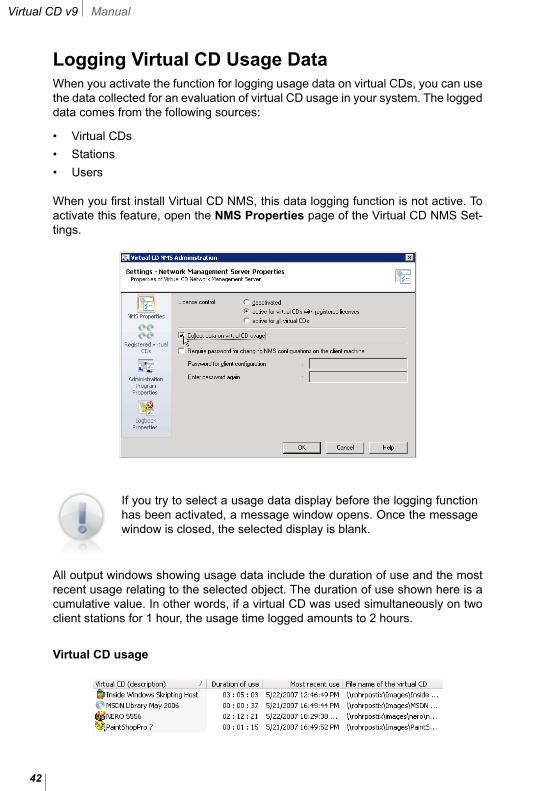
Logging Virtual CD Usage DataWhen you activate the function for logging usage data on virtual CDs, you can use the data collected for an evaluation of virtual CD usage in your system. The logged data comes from the following sources:
• Virtual CDs
• Stations
• Users
When you first install Virtual CD NMS, this data logging function is not active. To activate this feature, open the NMS Properties page of the Virtual CD NMS Set-tings.
If you try to select a usage data display before the logging function has been activated, a message window opens. Once the message window is closed, the selected display is blank.
All output windows showing usage data include the duration of use and the most recent usage relating to the selected object. The duration of use shown here is a cumulative value. In other words, if a virtual CD was used simultaneously on two client stations for 1 hour, the usage time logged amounts to 2 hours.
Virtual CD usage

Virtual CD v9 Manual
42 43
Usage by station
Usage by user
The usage data that is logged relates to inserted virtual CDs. If a client station logs on to Virtual CD NMS but does not insert any virtual CDs, no usage data is collected for that station. Neither the workstation nor the user logged in on that station are included in the display of usage data.
Select Delete data records from the Edit menu to delete all entries from the us-age database. When data logging continues, all values begin again at zero.
Station GroupsTo facilitate management of the client stations logged on to Virtual CD NMS, it can be very useful to group stations that have certain similarities. For example, you can put together all of the stations that are used in a particular department of your company, or all the stations that use Virtual CD, in groups. All existing groups are shown in the Station Groups window in Virtual CD NMS Administration.
Eleven groups are created during installation of Virtual CD; these are referred to as base station groups.
Virtual CD v5 Stations Virtual CD v7 FS StationsVirtual CD v6 Stations Virtual CD v8 StationsVirtual CD v6 TS Stations Virtual CD v9 StationsVirtual CD v6 FS Stations Virtual CD v9 TS StationsVirtual CD v7 Stations Virtual CD v9 FS StationsVirtual CD v7 TS Stations
Virtual CD clients are automatically added to one of these groups the first time they log on to Virtual CD NMS. These pre-defined groups cannot be deleted. You can, however, assign the stations in them to any other group, as desired.
Working with Virtual CD NMS
Virtual CD v9 Manual
44 45
Groups are displayed in the Administration view only if at least one member of the group is logged on to Virtual CD NMS. This applies to the base groups as well as user-defined groups.
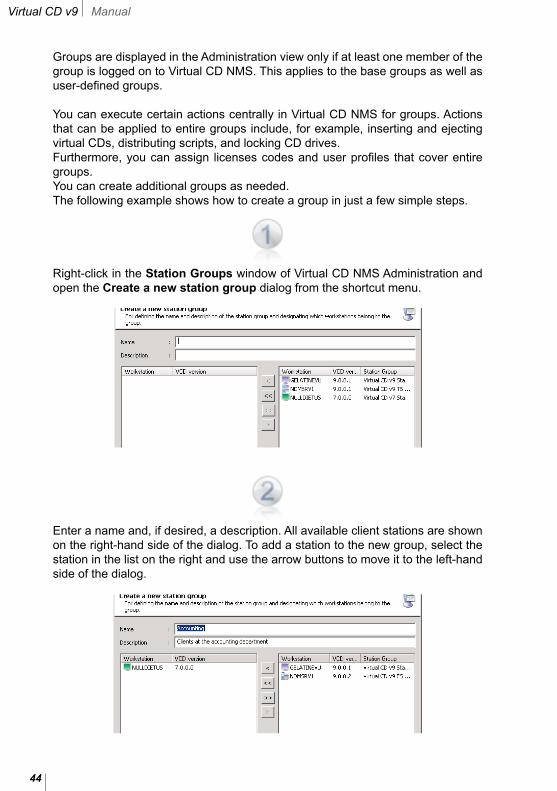
You can execute certain actions centrally in Virtual CD NMS for groups. Actions that can be applied to entire groups include, for example, inserting and ejecting virtual CDs, distributing scripts, and locking CD drives. Furthermore, you can assign licenses codes and user profiles that cover entire groups.You can create additional groups as needed. The following example shows how to create a group in just a few simple steps.
Right-click in the Station Groups window of Virtual CD NMS Administration and open the Create a new station group dialog from the shortcut menu.
Enter a name and, if desired, a description. All available client stations are shown on the right-hand side of the dialog. To add a station to the new group, select the station in the list on the right and use the arrow buttons to move it to the left-hand side of the dialog.

Virtual CD v9 Manual
44 45
The new group is displayed in the Station Groups window:
and in the Management of Virtual CDs: Registered stations view:
You can now execute actions for these groups, such as inserting and ejecting virtual CDs or assigning a profile.
Each station can belong to only one group.
ScriptsIn addition to assigning profiles and grouping stations, Virtual CD NMS also offers function controls implemented by scripts. In the Virtual CD NMS Administration program, you can assign scripts during run time for individual client stations or station groups.For example, you can have a script insert multiple virtual CDs in virtual CDs drives on client stations. With the Virtual CD Script Generator, you can create scripts quickly and easily with just a few mouse clicks. Alternatively, you can write scripts with a Visual Basic program. For details on scripts that insert or eject virtual CDs, please refer to the Virtual CD API documentation. For a link to this documentation, open the Virtual CD folder in your Windows Start menu.
To use a script with Virtual CD NMS, the script must be located in the Virtual CD NMS\Data\Scripts directory.
Working with Virtual CD NMS

Virtual CD v9 Manual
46 47
The scripts in this directory are listed in the Scripts overview in the VCD NMS Administration program.
Right-click on a script to assign it to a station or a station group.
The benefits of scripts can be seen, for example, when using Virtual CD NMS in a teaching or training environment: you can create a script that inserts the same virtual CD(s) on all client stations at once. This saves time and trouble, and all participants are quickly and easily provided with same resources.
Profiles
Profile EditorIn a network with a large number of Virtual CD client stations, it may be useful to define settings that are applied to certain clients or groups of clients; for example, to specify which functions may be used and which security settings are active. You can do this by creating and assigning profiles. Profiles define the “conditions of use” for stations logged on to Virtual CD NMS.
Virtual CD v9 Manual
46 47
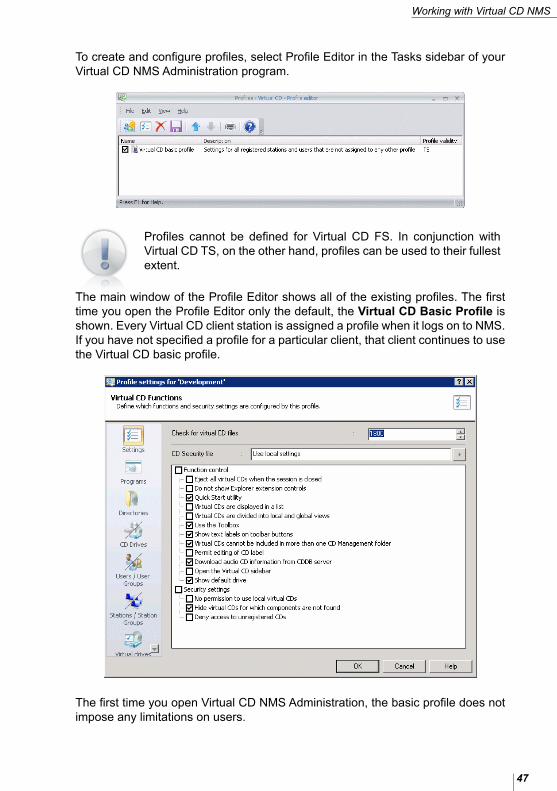
To create and configure profiles, select Profile Editor in the Tasks sidebar of your Virtual CD NMS Administration program.
Profiles cannot be defined for Virtual CD FS. In conjunction with Virtual CD TS, on the other hand, profiles can be used to their fullest extent.
The main window of the Profile Editor shows all of the existing profiles. The first time you open the Profile Editor only the default, the Virtual CD Basic Profile is shown. Every Virtual CD client station is assigned a profile when it logs on to NMS. If you have not specified a profile for a particular client, that client continues to use the Virtual CD basic profile.
The first time you open Virtual CD NMS Administration, the basic profile does not impose any limitations on users.
Working with Virtual CD NMS

Virtual CD v9 Manual
48 49
When change you a profile, the new settings are active only after:
• the changes have been saved, and
• a new session is opened.
It is a good idea to back up your profile data regularly so that you always have a recent version available in case of emergencies. Profile definitions are stored in Profile.vcd in your Virtual CD NMS data directory.
Types of Profile
The Profile Editor recognizes two types of profile:
The Virtual CD basic profile: This profile comes with your VCD NMS installation and cannot be deleted. It is applied to all users for whom you have not designated a specific profile.
User profiles: You can assign these to station groups. Every client station must be assigned a profile so that user settings can be loaded. If no user profile is speci-fied, the settings defined in the „basic profile“ are applied.
Validity of profile
„Profile validity“ is either „Local,“ „TS“ or both. A local profile is applicable only to stations that are registered locally; a TS profile applies for stations that register in NMS during a terminal server session. To define the validity of a profile, right click on it and choose the desired range from the shortcut menu. The following options are available:
Local and TS: The profile applies for both local stations and stations in terminal server sessions.
Local: This profile is assigned only to users that register locally; i.e., not in a ter-minal server session.
TS: This profile is assigned only to users in terminal server sessions.
Whether a station is registered locally or in a terminal server session can be an important difference for certain administrative decisions. For example, you might want to give local users broader permissions, allowing them capabilities such as creating virtual CDs or locking drives, while preventing users in terminal server sessions from using these features.
Virtual CD Basic ProfileThe basic profile lets you define the configuration status for all client stations that log on to Virtual CD NMS and for whom no other profile is explicitly designated. You can use the basic profile, for example, to deny Virtual CD access for unknown client stations or to restrict them to a specified set of functions.
Virtual CD v9 Manual
48 49
The basic profile differs from your customized profiles in the following respects:
1. It is not applied simultaneously with any other profile. More than one custom-ized profile can be assigned, but the basic profile cannot be assigned simulta-neously.
2. It is applied by default; i.e., to any client station for whom no other profile has been allocated.
3. It cannot be assigned to users or user groups.
4. It cannot be deleted or deactivated.
Directly following installation, the basic profile permits access to all functions in Virtual CD.
If you want all stations that log on the Virtual CD NMS to use the same configuration settings, we recommend configuring the basic profile for this purpose.
Profile SettingsProfile settings define which options in Virtual CD will be available on client sta-tions. To open the Profile Settings window and edit profile settings, select Edit profile... from the Edit menu, click on the corresponding toolbar button, or double-click on a profile.
The title bar of the Profile Settings window shows the name of the profile opened for editing. You can check the title bar to make sure you are editing the desired profile.
The Profile Editor in Virtual CD v9 is quite different from earlier ver-sions. A great many new settings options have been added, and care was taken to ensure downward compatibility. Some of the settings that you have used in earlier versions, however, may have different functions now, and some may not have been included in the new version. Changes, additions and deletions are all indicated in the following descriptions. Furthermore, the differences between v9 and the earlier versions are listed in table form at the end of this chapter.
The Profile Settings are divided into the following pages:
The Settings page lets you define which Virtual CD functions are available on the client stations.
Programs determines which Virtual CD programs can be executed on the client.
The Directories page defines the paths used by Virtual CD for its folders.
Working with Virtual CD NMS

Virtual CD v9 Manual
50 51
CD Drives enables management of virtual (and, in some cases, physical) drives on the client.
The Users/User Groups page lets you assign users and user groups to the active profile.
The Stations/Station Groups page lets you assign stations and station groups to the active profile.
Select Virtual drives to define whether a client drive is a virtual drive or a virtual burner.
For the basic profile, you can edit settings only on the Settings, Programs, Directories and CD Drives pages. Because the basic profile is automatically used by any station for which no other profile is designated, you cannot explicitly assign any users, stations or groups to this profile.
If your profile settings do not have the desired results, be sure to check the cumulative profile for the station. If the station is assigned to more than one profile and the others have different settings, your settings might have no effect. To open the cumulative profile, right-click on the station in the NMS CD Management and select Show cumulative profile... from the shortcut menu.
The options available on the Profile Settings dialog pages are listed in the follow-ing:
Settings
Check for virtual CD filesDefines the intervals (in seconds) at which the program checks for virtual CDs registered in the system.
CD Security fileDefines which security file is used. You can load the local settings for use in NMS, specify a particular file or reset security settings to the default values.
Function controlFunction control defines the Virtual CD user interface in the client and determines which Virtual CD functions are available. Function control is new in Virtual CD v9. The following options are available here:
Eject all virtual CDs when a session is ended: When the session is closed, all virtual CDs in that session are ejected.
Do not show Explorer extension controls: The Virtual CD Explorer extension is deactivated. The Explorer extension adds Virtual CD controls and functions to shortcut menus opened in the Windows Explorer.
Quick Start utility: The Virtual CD Quick Start utility is available in the Windows taskbar.

Virtual CD v9 Manual
50 51
Virtual CDs are displayed in a list: CDs are shown in a „CD overview“ in the CD Management program.
Virtual CDs are divided into local and global views: Virtual CDs displayed in the CD Management program are divided into global and local views.
Use the Toolbox: The Virtual CD Toolbox is activated. The user can override this option by selecting the desired configuration in the Settings program.
Show text labels on toolbar buttons: Activates the popup texts that explain the function of a button when the mouse hovers on that button.
Virtual CDs cannot be included in more than one CD Management folder: Prevents duplicates from being stored in a single folder.
Download audio CD information from CDDB server: Track titles and artist infor-mation are downloaded from the Internet. If CDDB Internet access has not been configured, a dialog opens prompting this configuration.
Open the Virtual CD sidebar: The Virtual CD sidebar is loaded automatically when the Virtual CD program is opened.
Show default drive: The default drive designated for a virtual CD is shown in the Quick Start menu when that CD is listed.
Security settings
Defines security policies for working with virtual CDs:
No permission to use local virtual CDs: You can prevent access to local virtual CDs; in this case, only virtual CDs that are available over the global configuration path can be accessed.
Hide CDs for which files are not found: If there are any virtual CDs that are classified as „not found“ when Virtual CD starts up, those CDs are not shown if this option is selected.
Deny access to unregistered CDs: CDs that are not specified in the Virtual CD NMS configuration file cannot be used.
Programs
On the Programs page you can specify which Virtual CD programs can be used on the stations that are assigned to the profile. You can deactivate programs that you do not want to allow users to execute. Deactivated programs are not available to users, or not on the station in question. For example, if you deactivate the Toolbox, the CD Management program (rather than the Toolbox) opens when the profile member double-clicks the desktop short-cut. In earlier Virtual CD versions, programs could not be activated or deactivated individually. This feature is fully operational only on clients running Virtual CD v9. For client machines running earlier Virtual CD versions, deactivating an individ-ual item (program) within a given group has the effect of deactivating that entire group.
Working with Virtual CD NMS

Virtual CD v9 Manual
52 53
The programs are grouped according to function. You can grant or deny permis-sion to run the following programs:
Administration: Activates access to administrative tools. You can grant or deny permission to run each of the programs under „Administration“ individually:
• Administration
• CD properties
• Drive properties
CD search
Catalog search
Toolbox
Quick Start utility
Command line program
Creating Virtual CDs: The programs under „Create virtual CDs“ have to do with making virtual CDs. You can grant or deny permission to run each of these pro-grams individually:
• Editor
• Image Converter
• Quick Copy Editor
• Copy Template Editor
• Collection Wizard (available only with the Virtual CD FS Edition)
• Copy Wizard
• Image Wizard
Smart Virtual CD Burner
1:1 Copy Wizard
Eraser Wizard
Blank Media Wizard
Change settings: This section defines whether users can edit settings in Virtual CD. You can grant or deny access to the following configuration dialogs individu-ally:
• Settings
• CD Security Editor
Administrative programs: This section defines whether users can run adminis-trative programs. You can grant or deny access to these programs individually:
• Script Generator
• License Monitor
• Profile Editor
• Drive Editor

Virtual CD v9 Manual
52 53
Explorer extension
Diagnostics
Create a Client Setup
Comparison Wizard
Job Editor
Virtual CD sidebar
Internal functions: Permission to change folders: When this option is active, the user can change the working directories specified for the local Virtual CD in-stallation.
The first time you run Virtual CD NMS Administration, all function control elements and all programs are activated in the basic profile.
For a detailed description of program options, please refer to the Help program.
Working with Virtual CD NMS

Virtual CD v9 Manual
54 55
v9v8
*v7
*v6
Ad
min
istr
atio
n
Yes
Yes
Yes
Yes
A
dmin
istr
atio
nY
esD
eact
ivat
ion
of th
e en
tire
‚Adm
inis
trat
ion‘
gro
upD
eact
ivat
ion
of th
e en
tire
‚Adm
inis
trat
ion‘
gro
upD
eact
ivat
ion
of th
e en
tire
‚Adm
inis
trat
ion‘
gro
up
C
D p
rope
rtie
sY
esD
eact
ivat
ion
of th
e en
tire
‚Adm
inis
trat
ion‘
gro
upD
eact
ivat
ion
of th
e en
tire
‚Adm
inis
trat
ion‘
gro
upD
eact
ivat
ion
of th
e en
tire
‚Adm
inis
trat
ion‘
gro
up
D
rive
prop
ertie
sY
esD
eact
ivat
ion
of th
e en
tire
‚Adm
inis
trat
ion‘
gro
upD
eact
ivat
ion
of th
e en
tire
‚Adm
inis
trat
ion‘
gro
upD
eact
ivat
ion
of th
e en
tire
‚Adm
inis
trat
ion‘
gro
up
CD
ser
ch
Yes
No
No
No
Cat
alo
g s
earc
h
Yes
No
No
No
Too
lbo
x
Yes
Yes
Yes
Yes
Qu
ick
Sta
rt u
tilit
y
Yes
Yes
Yes
Yes
Co
mm
and
lin
e p
ro-
gra
m
Yes
Yes
Yes
Yes
Cre
ate
virt
ual
CD
s
Yes
Yes
Yes
Yes
E
dito
rY
esD
eact
ivat
ion
of th
e en
tire
‚Cre
ate
virt
ual C
Ds‘
gro
upD
eact
ivat
ion
of th
e en
tire
‚Cre
ate
virt
ual C
Ds‘
gro
upD
eact
ivat
ion
of th
e en
tire
‚Cre
ate
virt
ual C
Ds‘
gro
up
Im
age
Con
vert
erY
esD
eact
ivat
ion
of th
e en
tire
‚Cre
ate
virt
ual C
Ds‘
gro
upD
eact
ivat
ion
of th
e en
tire
‚Cre
ate
virt
ual C
Ds‘
gro
upD
eact
ivat
ion
of th
e en
tire
‚Cre
ate
virt
ual C
Ds‘
gro
up
Q
uick
Cop
y E
dito
rY
esD
eact
ivat
ion
of th
e en
tire
‚Cre
ate
virt
ual C
Ds‘
gro
upD
eact
ivat
ion
of th
e en
tire
‚Cre
ate
virt
ual C
Ds‘
gro
upD
eact
ivat
ion
of th
e en
tire
‚Cre
ate
virt
ual C
Ds‘
gro
up
C
opy
Tem
plat
e E
dito
rY
esD
eact
ivat
ion
of th
e en
tire
‚Cre
ate
virt
ual C
Ds‘
gro
upD
eact
ivat
ion
of th
e en
tire
‚Cre
ate
virt
ual C
Ds‘
gro
upD
eact
ivat
ion
of th
e en
tire
‚Cre
ate
virt
ual C
Ds‘
gro
up

Virtual CD v9 Manual
54 55
C
olle
ctio
n W
izar
dY
esD
eact
ivat
ion
of th
e en
tire
‚Cre
ate
virt
ual C
Ds‘
gro
upD
eact
ivat
ion
of th
e en
tire
‚Cre
ate
virt
ual C
Ds‘
gro
upD
eact
ivat
ion
of th
e en
tire
‚Cre
ate
virt
ual C
Ds‘
gro
up
C
opy
Wiz
ard
Yes
Dea
ctiv
atio
n of
the
entir
e ‚C
reat
e vi
rtua
l CD
s‘ g
roup
Dea
ctiv
atio
n of
the
entir
e ‚C
reat
e vi
rtua
l CD
s‘ g
roup
Dea
ctiv
atio
n of
the
entir
e ‚C
reat
e vi
rtua
l CD
s‘ g
roup
Im
age
Wiz
ard
Yes
Dea
ctiv
atio
n of
the
entir
e ‚C
reat
e vi
rtua
l CD
s‘ g
roup
Dea
ctiv
atio
n of
the
entir
e ‚C
reat
e vi
rtua
l CD
s‘ g
roup
Dea
ctiv
atio
n of
the
entir
e ‚C
reat
e vi
rtua
l CD
s‘ g
roup
Sm
art
Vir
tual
CD
B
urn
er
Yes
Yes
Yes
Yes
1-to
-1 C
op
y W
izar
d
Yes
No
No
No
Era
ser
Wiz
ard
Y
esN
oN
oN
o
Bla
nk
Med
ia W
izar
d
Yes
No
t in
clu
ded
No
t in
clu
ded
No
t in
clu
ded
Ch
ang
e se
ttin
gs
Y
esY
esY
esY
es
S
ettin
gsY
es; t
his
setti
ng a
lso
de-
activ
ates
cre
atio
n of
Clie
nt
Set
ups
Dea
ctiv
atio
n of
the
entir
e ‚C
hang
e se
tting
s‘ g
roup
Dea
ctiv
atio
n of
the
entir
e ‚C
hang
e se
tting
s‘ g
roup
Dea
ctiv
atio
n of
the
entir
e ‚C
hang
e se
tting
s‘ g
roup
S
ecur
ity E
dito
rY
esD
eact
ivat
ion
of th
e en
tire
‚Cha
nge
setti
ngs‘
gro
upD
eact
ivat
ion
of th
e en
tire
‚Cha
nge
setti
ngs‘
gro
upD
eact
ivat
ion
of th
e en
tire
‚Cha
nge
setti
ngs‘
gro
up
Ad
min
istr
ativ
e p
ro-
gra
ms
Y
esY
esY
es
S
crip
t Gen
erat
orY
esD
eact
ivat
ion
of th
e en
tire
‚Adm
inis
trat
ive
prog
ram
s‘
grou
p
Dea
ctiv
atio
n of
the
entir
e ‚A
dmin
istr
ativ
e pr
ogra
ms‘
gr
oup
Dea
ctiv
atio
n of
the
entir
e ‚A
dmin
istr
ativ
e pr
ogra
ms‘
gr
oup
Li
cens
e M
onito
rY
esD
eact
ivat
ion
of th
e en
tire
‚Adm
inis
trat
ive
prog
ram
s‘
grou
p
Dea
ctiv
atio
n of
the
entir
e ‚A
dmin
istr
ativ
e pr
ogra
ms‘
gr
oup
Dea
ctiv
atio
n of
the
entir
e ‚A
dmin
istr
ativ
e pr
ogra
ms‘
gr
oup
Working with Virtual CD NMS
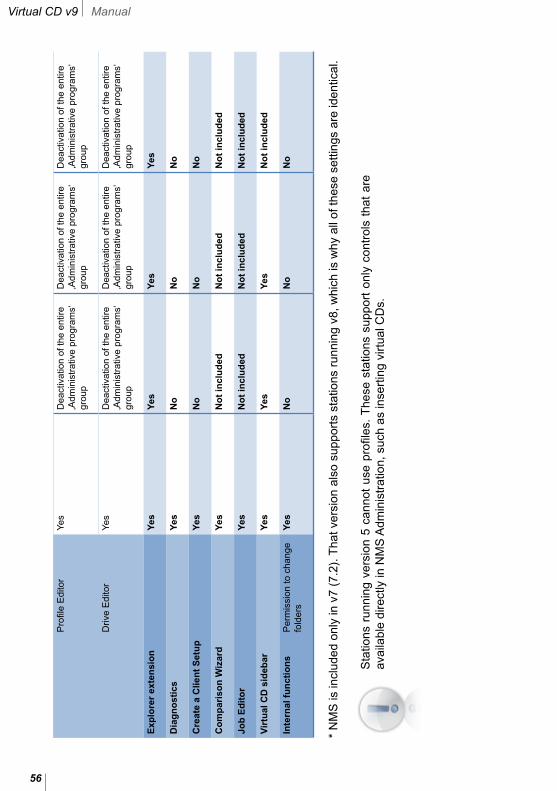
Virtual CD v9 Manual
56 57
P
rofil
e E
dito
rY
esD
eact
ivat
ion
of th
e en
tire
‚Adm
inis
trat
ive
prog
ram
s‘
grou
p
Dea
ctiv
atio
n of
the
entir
e ‚A
dmin
istr
ativ
e pr
ogra
ms‘
gr
oup
Dea
ctiv
atio
n of
the
entir
e ‚A
dmin
istr
ativ
e pr
ogra
ms‘
gr
oup
D
rive
Edi
tor
Yes
Dea
ctiv
atio
n of
the
entir
e ‚A
dmin
istr
ativ
e pr
ogra
ms‘
gr
oup
Dea
ctiv
atio
n of
the
entir
e ‚A
dmin
istr
ativ
e pr
ogra
ms‘
gr
oup
Dea
ctiv
atio
n of
the
entir
e ‚A
dmin
istr
ativ
e pr
ogra
ms‘
gr
oup
Exp
lore
r ex
ten
sio
n
Yes
Yes
Yes
Yes
Dia
gn
ost
ics
Y
esN
oN
oN
o
Cre
ate
a C
lien
t S
etu
p
Yes
No
No
No
Co
mp
aris
on
Wiz
ard
Y
esN
ot
incl
ud
edN
ot
incl
ud
edN
ot
incl
ud
ed
Job
Ed
ito
r
Yes
No
t in
clu
ded
No
t in
clu
ded
No
t in
clu
ded
Vir
tual
CD
sid
ebar
Y
esY
esY
esN
ot
incl
ud
ed
Inte
rnal
fu
nct
ion
sP
erm
issi
on to
cha
nge
fold
ers
Yes
No
No
No
* N
MS
is in
clud
ed o
nly
in v
7 (7
.2).
Tha
t ver
sion
als
o su
ppor
ts s
tatio
ns r
unni
ng v
8, w
hich
is w
hy a
ll of
thes
e se
tting
s ar
e id
entic
al.
Sta
tions
run
ning
ver
sion
5 c
anno
t us
e pr
ofile
s. T
hese
sta
tions
sup
port
onl
y co
ntro
ls t
hat
are
avai
labl
e di
rect
ly in
NM
S A
dmin
istr
atio
n, s
uch
as in
sert
ing
virt
ual C
Ds.

Virtual CD v9 Manual
56 57
Directories
On the Directories page, you can choose from the following options to define program folders:
•Use the program path defined in the local settings (Use local settings)
•Use the path in which Virtual CD is installed (Use the installation path)
•Specify the path yourself (Select the path)
With the default settings, the path defined in the local settings is used.
Not all of the directories that you can define for v9 can also be de-fined for earlier versions of Virtual CD. Settings defined in profiles that cannot be defined for a given program version are ignored by that program. The table below shows the settings to which this ap-plies.
v9 v8 v7 v6
Global configuration path Yes Yes Yes Yes
Global folder for virtual CDs Yes Cannot be defined Cannot be defined Cannot be defined
Local folder for configura-tion files (“... for virtual CDs”)
Yes Cannot be defined Cannot be defined Cannot be defined
Local folder for new virtual CDs
Yes Cannot be defined Cannot be defined Cannot be defined
Folder for copy templates Yes Yes Yes Yes
Folder for Quick Copy files Yes Yes Yes Yes
Folder for scripts Yes Yes Yes Yes
Folder for CDDB databases Yes Yes Yes Yes
Folder for catalog files Yes Yes Yes Yes
Folder for tempoary files Yes Yes Yes Cannot be defined
Folder for VCD Editor project files
Yes Cannot be defined Cannot be defined Cannot be defined
Folder for layout files Yes Cannot be defined Cannot be defined Cannot be defined
Folder for log files Yes Cannot be defined Cannot be defined Cannot be defined
CD Drives
On the CD Drives page, you can designate settings for CD drives to be configured by the profile. For example, you can specify that CD drives are locked by default for members of this profile, or you can have a particular virtual CD inserted.
Working with Virtual CD NMS
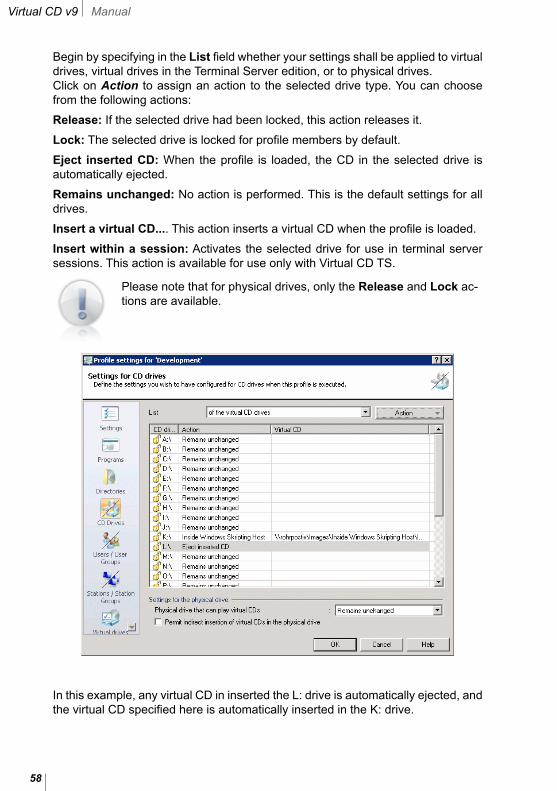
Virtual CD v9 Manual
58 59
Begin by specifying in the List field whether your settings shall be applied to virtual drives, virtual drives in the Terminal Server edition, or to physical drives.Click on Action to assign an action to the selected drive type. You can choose from the following actions:
Release: If the selected drive had been locked, this action releases it.
Lock: The selected drive is locked for profile members by default.
Eject inserted CD: When the profile is loaded, the CD in the selected drive is automatically ejected.
Remains unchanged: No action is performed. This is the default settings for all drives.
Insert a virtual CD.... This action inserts a virtual CD when the profile is loaded.
Insert within a session: Activates the selected drive for use in terminal server sessions. This action is available for use only with Virtual CD TS.
Please note that for physical drives, only the Release and Lock ac-tions are available.
In this example, any virtual CD in inserted the L: drive is automatically ejected, and the virtual CD specified here is automatically inserted in the K: drive.
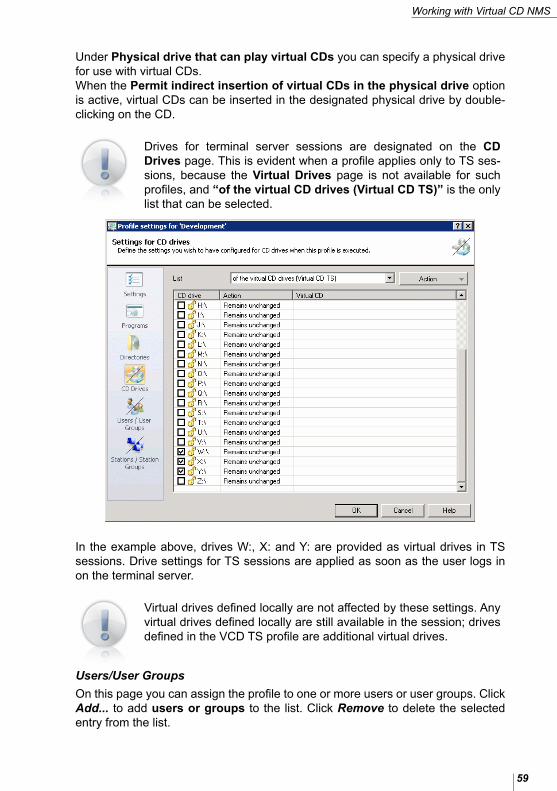
Virtual CD v9 Manual
58 59
Under Physical drive that can play virtual CDs you can specify a physical drive for use with virtual CDs.When the Permit indirect insertion of virtual CDs in the physical drive option is active, virtual CDs can be inserted in the designated physical drive by double-clicking on the CD.
Drives for terminal server sessions are designated on the CD Drives page. This is evident when a profile applies only to TS ses-sions, because the Virtual Drives page is not available for such profiles, and “of the virtual CD drives (Virtual CD TS)” is the only list that can be selected.
In the example above, drives W:, X: and Y: are provided as virtual drives in TS sessions. Drive settings for TS sessions are applied as soon as the user logs in on the terminal server.
Virtual drives defined locally are not affected by these settings. Any virtual drives defined locally are still available in the session; drives defined in the VCD TS profile are additional virtual drives.
Users/User Groups
On this page you can assign the profile to one or more users or user groups. Click Add... to add users or groups to the list. Click Remove to delete the selected entry from the list.
Working with Virtual CD NMS

Virtual CD v9 Manual
60 61
Stations/Station Groups
On this page you can assign the profile to one or more stations or station groups. Click Add... to add users or groups to the list. Click Remove to delete the selected entry from the list.
Virtual Drives
On the Virtual Drives page you can define the functionality of virtual drives. Spe-cifically, you can define whether or not a given virtual drive is a virtual burner.
Altered settings are not applied to the client station until the client has been restarted. If drive settings defined in a profile conflict with local drive settings, the local settings are overwritten.
You can use the Virtual CD NMS script distribution feature to apply modified drive settings. To do this, create a script that restarts the computer and store it in the Virtual CD script folder. Then locate the script in the NMS Administration program and use drag-and-drop to run it on the desired station.
Creating a User ProfileIn the following example, a profile is created for “Virtual CD Administration.” This profile will be assigned to the client stations used for managing the virtual CDs that are available over the network. For this example, a station group called “CD Administration” has already been created in the administration window.
Run the Profile Editor and select Add profile from the Edit menu.
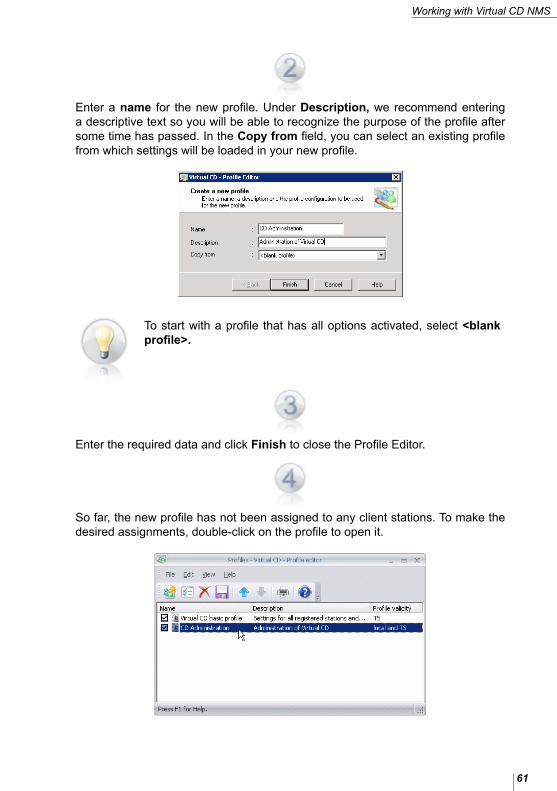
Virtual CD v9 Manual
60 61
Enter a name for the new profile. Under Description, we recommend entering a descriptive text so you will be able to recognize the purpose of the profile after some time has passed. In the Copy from field, you can select an existing profile from which settings will be loaded in your new profile.
To start with a profile that has all options activated, select <blank profile>.
Enter the required data and click Finish to close the Profile Editor.
So far, the new profile has not been assigned to any client stations. To make the desired assignments, double-click on the profile to open it.
Working with Virtual CD NMS
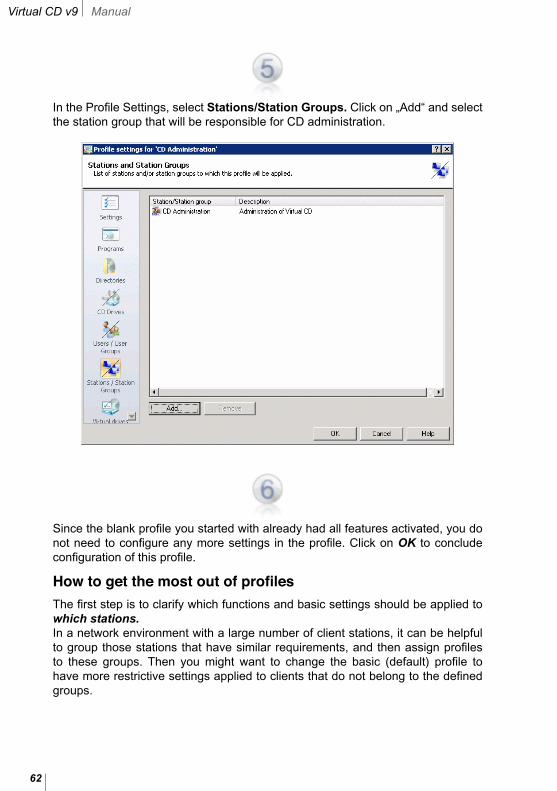
Virtual CD v9 Manual
62 63
In the Profile Settings, select Stations/Station Groups. Click on „Add“ and select the station group that will be responsible for CD administration.
Since the blank profile you started with already had all features activated, you do not need to configure any more settings in the profile. Click on OK to conclude configuration of this profile.
How to get the most out of profilesThe first step is to clarify which functions and basic settings should be applied to which stations. In a network environment with a large number of client stations, it can be helpful to group those stations that have similar requirements, and then assign profiles to these groups. Then you might want to change the basic (default) profile to have more restrictive settings applied to clients that do not belong to the defined groups.
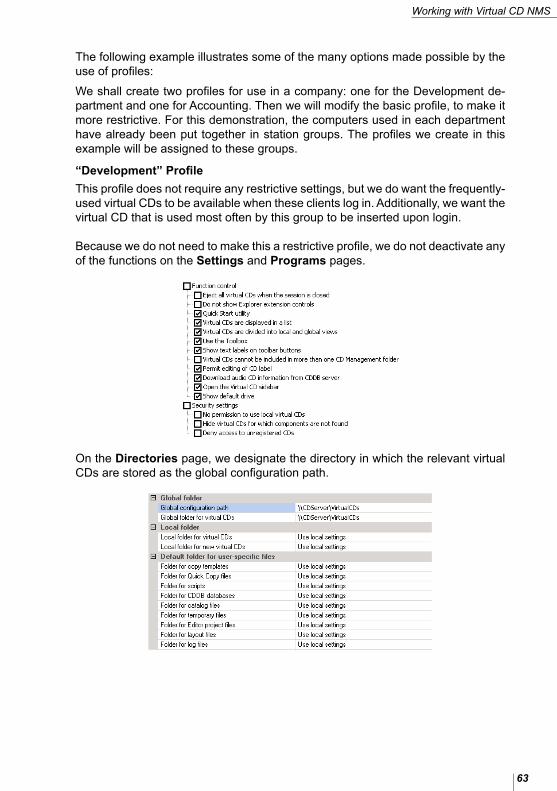
Virtual CD v9 Manual
62 63
The following example illustrates some of the many options made possible by the use of profiles:
We shall create two profiles for use in a company: one for the Development de-partment and one for Accounting. Then we will modify the basic profile, to make it more restrictive. For this demonstration, the computers used in each department have already been put together in station groups. The profiles we create in this example will be assigned to these groups.
“Development” Profile
This profile does not require any restrictive settings, but we do want the frequently-used virtual CDs to be available when these clients log in. Additionally, we want the virtual CD that is used most often by this group to be inserted upon login.
Because we do not need to make this a restrictive profile, we do not deactivate any of the functions on the Settings and Programs pages.
On the Directories page, we designate the directory in which the relevant virtual CDs are stored as the global configuration path.
Working with Virtual CD NMS

Virtual CD v9 Manual
64 65
On the CD Drives page, a virtual drive that exists on all stations in the group is specified for insertion of a particular virtual CD when a client in this group logs in.
Selecting a virtual CD drive that exists on all stations will help keep your management tasks as uncomplicated as possible.
On the Stations/Station Groups page of the Profile Settings, this profile is now assigned to the group called Development.
„Accounting“ Profile
This profile will be somewhat more restrictive than the „Development“ profile. It will permit users to work with the CD Management program, but not to create virtual CDs or burn Smart Virtual CDs.
On the Programs page, we deactivate the entire Create virtual CDs section of options, as well as the Burn Smart virtual CDs option.
On the Directories page, we designate the directory in which the relevant virtual CDs are stored as the global configuration path.
To ensure that users can access only those virtual CDs that are stored in the glo-bal configuration path, access to other virtual CDs is prohibited by configurations on the Settings page. To do this, we select No permission to use local virtual CDs and Hide virtual CDs for which components are not found under Securi-ty settings. Local use of physical CDs, on the other hand, remains unrestricted.
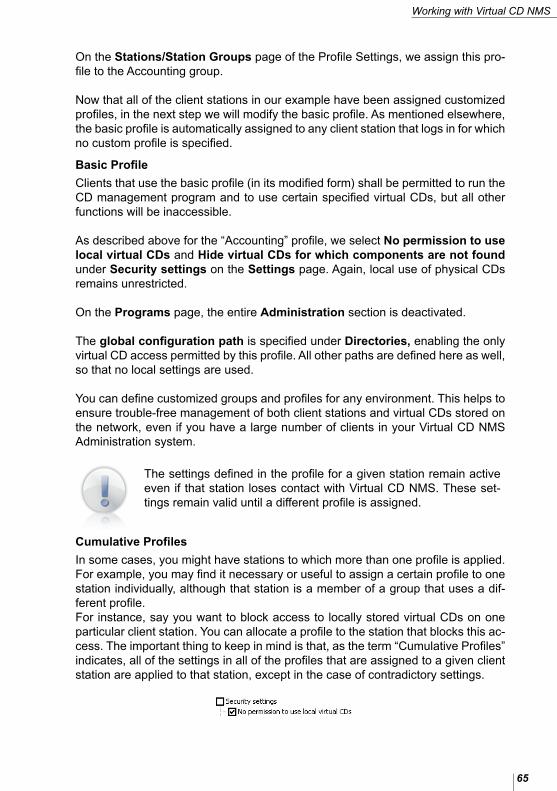
Virtual CD v9 Manual
64 65
On the Stations/Station Groups page of the Profile Settings, we assign this pro-file to the Accounting group.
Now that all of the client stations in our example have been assigned customized profiles, in the next step we will modify the basic profile. As mentioned elsewhere, the basic profile is automatically assigned to any client station that logs in for which no custom profile is specified.
Basic Profile
Clients that use the basic profile (in its modified form) shall be permitted to run the CD management program and to use certain specified virtual CDs, but all other functions will be inaccessible.
As described above for the “Accounting” profile, we select No permission to use local virtual CDs and Hide virtual CDs for which components are not found under Security settings on the Settings page. Again, local use of physical CDs remains unrestricted.
On the Programs page, the entire Administration section is deactivated.
The global configuration path is specified under Directories, enabling the only virtual CD access permitted by this profile. All other paths are defined here as well, so that no local settings are used.
You can define customized groups and profiles for any environment. This helps to ensure trouble-free management of both client stations and virtual CDs stored on the network, even if you have a large number of clients in your Virtual CD NMS Administration system.
The settings defined in the profile for a given station remain active even if that station loses contact with Virtual CD NMS. These set-tings remain valid until a different profile is assigned.
Cumulative Profiles
In some cases, you might have stations to which more than one profile is applied. For example, you may find it necessary or useful to assign a certain profile to one station individually, although that station is a member of a group that uses a dif-ferent profile. For instance, say you want to block access to locally stored virtual CDs on one particular client station. You can allocate a profile to the station that blocks this ac-cess. The important thing to keep in mind is that, as the term “Cumulative Profiles” indicates, all of the settings in all of the profiles that are assigned to a given client station are applied to that station, except in the case of contradictory settings.
Working with Virtual CD NMS

Virtual CD v9 Manual
66 67
If a given option is set to “No” or deactivated in one profile and “Yes” (activated) in another, the “Yes” setting is applied. Even if other profiles assigned to the same station have a “No” setting for the particular option, a single “Yes” setting takes precedence.
If you want to view profile settings for a client station that has more than one profile assigned to it, you need to look at the cumulative profile; i.e., the sum of all profiles applied to that station. To view the cumulative profile, right-click on the station in the Virtual CD NMS Administration window and select Show cumulative profile... from the shortcut menu.This opens a profile window showing all of the settings active for the selected sta-tion.
Opening the cumulative profile of a station is a good way to check which settings are actually applied to that station. If the allocation of a profile did not have the results you expected, checking the cumulative profile can help you detect and eliminate conflicting set-tings.
Basic rules for using profilesThe Virtual CD NMS Profile Editor makes it easy to manage your profiles. Still, there are a couple of points that you need to keep in mind to make sure your profile specifications have the desired effects:
First save, then test: Do not forget to save your changes before you test a profile. New settings are not applied until the profile has been saved.No login = no change: When you modify a profile, the new settings are not effec-tive until the next time the affected clients log in on Virtual CD NMS.Activate your profiles: In the list of profiles shown in your Profile Editor, the profiles can be activated and deactivated. Remember: only activated profiles are processed at login.
If you find that Virtual CD does not behave as expected on a given client, even thought you saved the desired profile settings and the client logged in afterwards, check whether there are multiple profiles assigned; the cumulative effect of con-flicting settings may produce unexpected results. To keep things as simple as possible, remember the old saying:
Less is MoreMake this your motto, and create only as many profiles as you really need.
Use the „Print“ function in the Virtual CD NMS Profile Editor to print hard copies of your profiles. This makes it easier to keep track of your settings.

Virtual CD v9 Manual
66 67
License Management
License Control for Virtual CDsWhen virtual CDs are distributed in a network, it can be difficult to make sure that software manufacturers’ licensing agreements are observed. Virtual CD NMS is equipped with special tools to help you control usage and protect your legal se-curity.Before you can use the licensing tools in Virtual CD NMS, you need to select one of the following options on the NMS Properties page of the VCD NMS Settings.
Setting 1: License control is deactivated
This is the default setting, active when you first install Virtual CD NMS. This set-ting is fine if you do not need to use the Virtual CD NMS license control functions. Properties of this setting:
1. License control is not applied.
2. Users can insert any virtual CDs.
Setting 2: License control is active for virtual CDs with registered licenses
This settings allows flexible handling of license settings, because it enables li-cense control for virtual CDs as required while also letting you permit unlimited use of virtual CDs that are not subject to licensing restrictions. Properties of this setting:
1. License control is applied for all virtual CDs for which you have defined a number of licenses.
2. The virtual CDs for which no number of licenses has been defined can run in any number of instances.
3. Virtual CDs that are not registered in Virtual CD NMS (for example, CDs that exist only on one client workstation) can be used without restriction.
Setting 3: License control is active for all virtual CDs
This is the most restrictive setting, and gives you complete control of virtual CD us-age for all client stations registered in Virtual CD NMS. Properties of this setting:
1. License control is applied for all virtual CDs for which you have defined a number of licenses.
2. Virtual CDs for which no number of licenses has been defined cannot be in-serted.
3. Virtual CDs that are not registered in Virtual CD NMS (for example, CDs that exist only on one client workstation) cannot be inserted.
Defining the Number of Licenses for a Virtual CDTo activate the Virtual CD NMS license control function for a given virtual CD, you need to define a number of licenses for that CD. Licenses are assigned in the Li-censes for virtual CDs window, which is opened by selecting Show licenses for virtual CDs in the sidebar. This view shows the number of licenses assigned to
Working with Virtual CD NMS
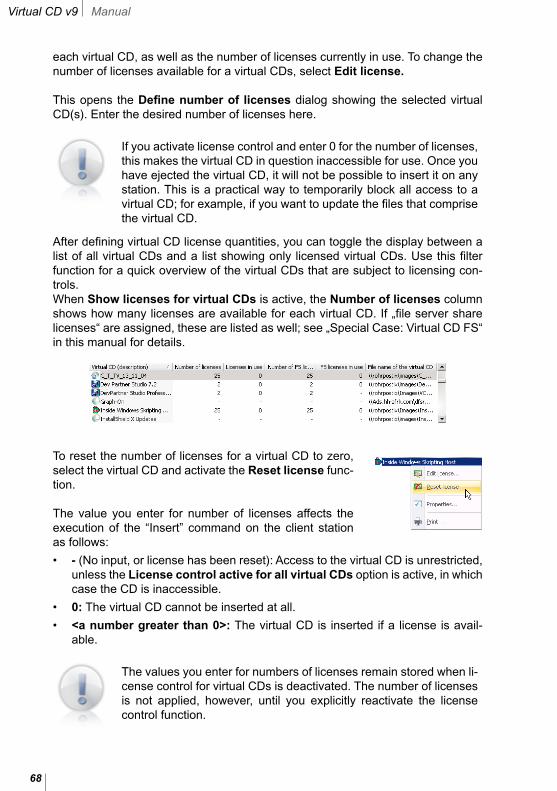
Virtual CD v9 Manual
68 69
each virtual CD, as well as the number of licenses currently in use. To change the number of licenses available for a virtual CDs, select Edit license.
This opens the Define number of licenses dialog showing the selected virtual CD(s). Enter the desired number of licenses here.
If you activate license control and enter 0 for the number of licenses, this makes the virtual CD in question inaccessible for use. Once you have ejected the virtual CD, it will not be possible to insert it on any station. This is a practical way to temporarily block all access to a virtual CD; for example, if you want to update the files that comprise the virtual CD.
After defining virtual CD license quantities, you can toggle the display between a list of all virtual CDs and a list showing only licensed virtual CDs. Use this filter function for a quick overview of the virtual CDs that are subject to licensing con-trols.When Show licenses for virtual CDs is active, the Number of licenses column shows how many licenses are available for each virtual CD. If „file server share licenses“ are assigned, these are listed as well; see „Special Case: Virtual CD FS“ in this manual for details.
To reset the number of licenses for a virtual CD to zero, select the virtual CD and activate the Reset license func-tion. The value you enter for number of licenses affects the execution of the “Insert” command on the client station as follows:
• - (No input, or license has been reset): Access to the virtual CD is unrestricted, unless the License control active for all virtual CDs option is active, in which case the CD is inaccessible.
• 0: The virtual CD cannot be inserted at all.
• <a number greater than 0>: The virtual CD is inserted if a license is avail-able.
The values you enter for numbers of licenses remain stored when li-cense control for virtual CDs is deactivated. The number of licenses is not applied, however, until you explicitly reactivate the license control function.

Virtual CD v9 Manual
68 69
Analysis of License ControlOver a period of time, the Virtual CD NMS license control function can accumulate a quantity of detailed data relating to the number of times the “Insert” command failed due to a lack of available licenses.This data is shown in the Evaluation of licenses view. For every virtual CD that has a defined number of licenses, the Denials of access column shows the number of times the CD was requested but could not be inserted because all licenses were in use.To view details on failed access attempts for a given virtual CD, right-click on the CD in this list and select Details... from the shortcut menu. The detailed view shows which workstations and users made the access attempts, as well as the time that access was denied.
This information can help you decide whether you have enough licenses for the CDs in your network. If the number of access failures is high, then the number of licenses might need to be increased.
The number of licenses should correspond to the actual program licensing.
The number given for denials of access is reset to 0 when:
• the number of licenses for the virtual CD is changed, or
• the licensing for a virtual CD is reset.
Working with Virtual CD NMS
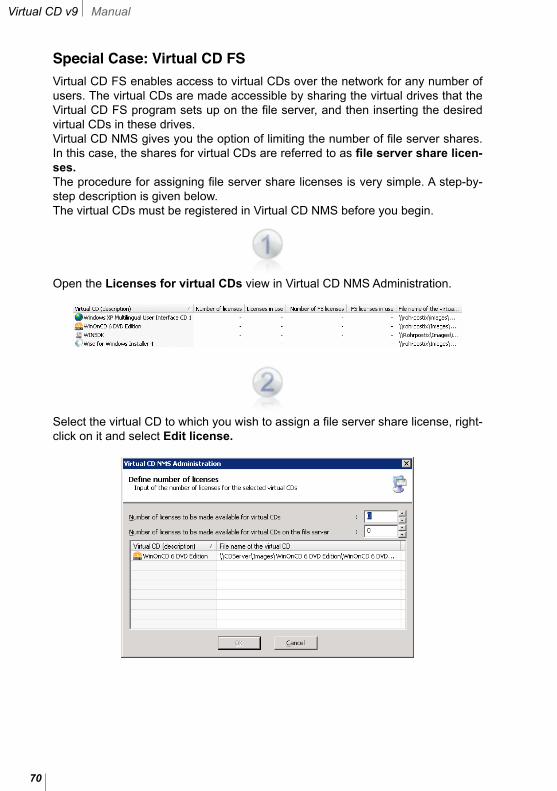
Virtual CD v9 Manual
70 71
Special Case: Virtual CD FSVirtual CD FS enables access to virtual CDs over the network for any number of users. The virtual CDs are made accessible by sharing the virtual drives that the Virtual CD FS program sets up on the file server, and then inserting the desired virtual CDs in these drives.Virtual CD NMS gives you the option of limiting the number of file server shares. In this case, the shares for virtual CDs are referred to as file server share licen-ses. The procedure for assigning file server share licenses is very simple. A step-by-step description is given below.The virtual CDs must be registered in Virtual CD NMS before you begin.
Open the Licenses for virtual CDs view in Virtual CD NMS Administration.
Select the virtual CD to which you wish to assign a file server share license, right-click on it and select Edit license.

Virtual CD v9 Manual
70 71
Enter the desired number of licenses under Number of licenses to be made available for virtual CDs on the file server. In the example shown here, the number is 20.
When this input is confirmed, you are prompted to save changes. To do this, click on Save.
You can deactivate this prompt by selecting Do not show this mes-sage again.
The number of licenses for the file server share is now displayed in the Licenses for virtual CDs view.
The FS share licenses in use column shows how many of these licenses are currently in use.
Working with Virtual CD NMS
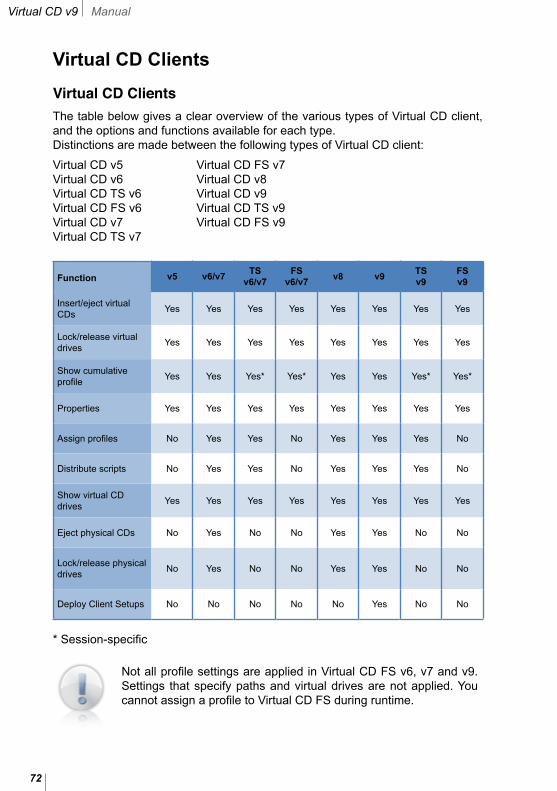
Virtual CD v9 Manual
72 73
Virtual CD Clients
Virtual CD ClientsThe table below gives a clear overview of the various types of Virtual CD client, and the options and functions available for each type.Distinctions are made between the following types of Virtual CD client:
Virtual CD v5 Virtual CD FS v7Virtual CD v6 Virtual CD v8Virtual CD TS v6 Virtual CD v9Virtual CD FS v6 Virtual CD TS v9Virtual CD v7 Virtual CD FS v9Virtual CD TS v7
Function v5 v6/v7TS
v6/v7FS
v6/v7v8 v9
TSv9
FSv9
Insert/eject virtual CDs
Yes Yes Yes Yes Yes Yes Yes Yes
Lock/release virtual drives
Yes Yes Yes Yes Yes Yes Yes Yes
Show cumulative profile
Yes Yes Yes* Yes* Yes Yes Yes* Yes*
Properties Yes Yes Yes Yes Yes Yes Yes Yes
Assign profiles No Yes Yes No Yes Yes Yes No
Distribute scripts No Yes Yes No Yes Yes Yes No
Show virtual CD drives
Yes Yes Yes Yes Yes Yes Yes Yes
Eject physical CDs No Yes No No Yes Yes No No
Lock/release physical drives
No Yes No No Yes Yes No No
Deploy Client Setups No No No No No Yes No No
* Session-specific
Not all profile settings are applied in Virtual CD FS v6, v7 and v9. Settings that specify paths and virtual drives are not applied. You cannot assign a profile to Virtual CD FS during runtime.
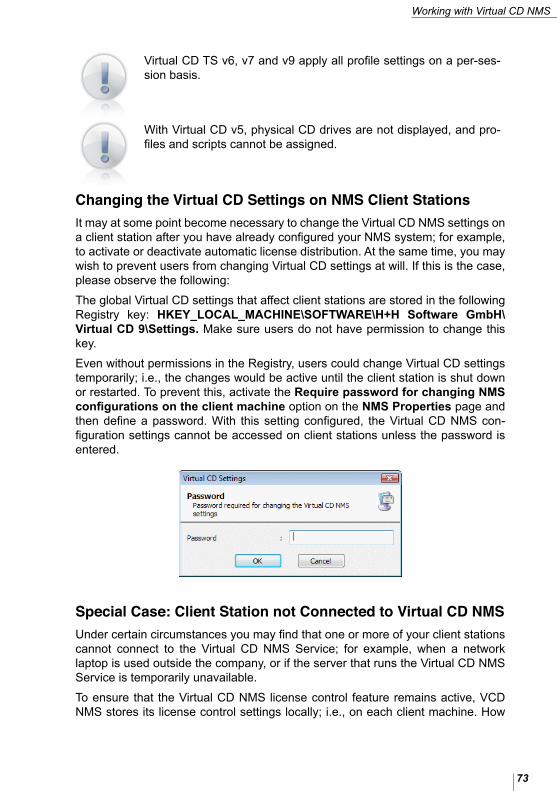
Virtual CD v9 Manual
72 73
Virtual CD TS v6, v7 and v9 apply all profile settings on a per-ses-sion basis.
With Virtual CD v5, physical CD drives are not displayed, and pro-files and scripts cannot be assigned.
Changing the Virtual CD Settings on NMS Client StationsIt may at some point become necessary to change the Virtual CD NMS settings on a client station after you have already configured your NMS system; for example, to activate or deactivate automatic license distribution. At the same time, you may wish to prevent users from changing Virtual CD settings at will. If this is the case, please observe the following:
The global Virtual CD settings that affect client stations are stored in the following Registry key: HKEY_LOCAL_MACHINE\SOFTWARE\H+H Software GmbH\Virtual CD 9\Settings. Make sure users do not have permission to change this key.
Even without permissions in the Registry, users could change Virtual CD settings temporarily; i.e., the changes would be active until the client station is shut down or restarted. To prevent this, activate the Require password for changing NMS configurations on the client machine option on the NMS Properties page and then define a password. With this setting configured, the Virtual CD NMS con-figuration settings cannot be accessed on client stations unless the password is entered.
Special Case: Client Station not Connected to Virtual CD NMSUnder certain circumstances you may find that one or more of your client stations cannot connect to the Virtual CD NMS Service; for example, when a network laptop is used outside the company, or if the server that runs the Virtual CD NMS Service is temporarily unavailable.
To ensure that the Virtual CD NMS license control feature remains active, VCD NMS stores its license control settings locally; i.e., on each client machine. How
Working with Virtual CD NMS

Virtual CD v9 Manual
74 75
the program operates in such cases depends on the following license control settings on the NMS Properties page:
License control is deactivated: Any virtual CD can be used.
License control is active for virtual CDs with registered licenses: Locally stored CDs are accessible; CDs stored on the network are not accessible.
License control is active for all virtual CDs: No virtual CDs can be used.
Regardless of the license control settings, Virtual CD cannot run on a client station that is not connected to the Virtual CD NMS Service unless the station in question has its own license for the Virtual CD program.
Virtual CD v9 Manual
74 75
Glossary
B
Basic group: There are eleven groups defined in Virtual CD NMS Administration that cannot be deleted. These eleven groups are: Virtual v6 TS Server, Virtual CD v6 FS Server, Virtual CD v7 TS Server, Virtual CD v7 FS Server, Virtual CD v9 TS Server, Virtual CD v9 FS Server, and station groups Virtual CD versions 5 through 9. The first time a client station logs on, it is automatically assigned to the corresponding group.
Basic profile: This profile is applied to all users for whom you have not designated a specific profile. There is only one instance of this profile, and it cannot be deleted.
C
CDDB: CDDB is a free database service offered at FreeDB.org. You (or your Virtual CD program) can request data (artist, track titles, etc.) pertain-ing to music from this service over the Internet.
Client Distributor: This is a component of Virtual CD NMS that en-ables installation of Virtual CD on client stations from a central NMS location, using --> Client Setups.
Client Setup: This is a Setup program that you configure, for installing Virtual CD on your network stations.
Configuration file: The configuration file (vcdimg.dat) lists all virtual CDs published in the program, with their paths.
F
Functions: The actions and operations that can be per-formed on objects in Virtual CD NMS are referred to as functions. Locking a drive, for ex-ample, and inserting virtual CDs are functions.
Glossary

Virtual CD v9 Manual
76 77
G
Global configuration path: If you designate a directory for this path, you can distribute access to virtual CDs over the network. This adds a “global view” to each workstation display of CDs.
L
Logbook: You can define whether or not errors, warning and/or messages concerning actions executed are logged.
O
Objects: Objects in Virtual CD NMS are elements in the Administration view on which functions can be carried out; these include, for example, drives and station groups.
P
Profile: Profiles are used to configure the settings (such as virtual CD drives, program functions, etc.) that are active when a particular user logs in on Vir-tual CD NMS.
Profile file: Data defining the profiles is stored in the profile file, called ‘Profile.vcd,’ in the Virtual CD NMS data directory.
Properties: Dialogs for viewing object properties can be opened from almost any window in Virtual CD NMS. This permits fast access to detailed infor-mation on a selected object.
S
Station groups: Client stations can be grouped for easier man-agement. You can assign profiles or licenses to groups.

Virtual CD v9 Manual
76 77
U
User profile: Data processed at login (such as user privi-leges and other settings) defining which data the particular user is allowed to access over the network, and how the data is accessed. If a spe-cific user profile is assigned to a given user, the “basic profile” is not applied for that user.
V
Virtual CD client: Virtual CD client are stations in the network on which Virtual CD is installed and that are linked to the Network Management Server.
Virtual CD NMS Administration: Virtual CD NMS Administration is the program used for administration of Virtual CD clients in the network.
Virtual CD NMS Service: This is the server component of Virtual CD NMS. The Virtual CD NMS Service regulates commu-nication between Virtual CD client stations and Virtual CD NMS Administration.
Glossary

Virtual CD v9 Manual
78 79

Virtual CD v9 Manual
78 79
Index
A
Activity monitor 2Administration 2, 29
Administration window 29
Administrative functions 29
Central administration 29
Data throughput 29
Information window 29
License Codes 34
Lock 29
Management of Virtual CD License Codes 34
Password prompt 29
Properties 29
Recognized CD drives 29
Release 29
Sidebar 29
Virtual CD NMS Administration 29
Virtual CD programs 29
Administrative functions 29Analysis of License Control 69API documentation 45
B
Base station groups 43Basic profile 23, 48
C
CD Security File 49Central Administration 29Checking activity of virtual CD drives 40Checking a virtual CD 40Client Distributor program 18Configuration file 13Configuration files 28Configuring Virtual CD Clients 28Configuring Virtual CD clients 17Creating a User Profile 60Cumulative profiles 62
Index

Virtual CD v9 Manual
80 81
D
Database path 13Data sources 42Data throughput 40Data throughput monitor 2Defining the Number of Licenses for a Virtual CD 67Denial of access 69Deploying Virtual CD in the network 18Distributing Virtual CD to client stations 18
F
File server share licenses 70Function 27Function controls 46
G
Global configuration path 13, 28Global Functions 33
H
How to get the most out of profiles 62How Virtual CD NMS Works 25
I
Information window 29Installing the Virtual CD NMS service 9Installing Virtual CD NMS Administration 13
L
Legal notices 1Licenses in use 23License agreements 1License Control for Virtual CDs 67, 73License control for virtual CDs 2License violations 69Lock 29Logbook 39Logging virtual CD usage data 42
M
Monitoring Virtual CD Drive Activity 40
Virtual CD v9 Manual
80 81
N
Notes on Installation 7
O
Objects 27
P
Password prompt 29Print Function 33Profiles 2, 46, 62
Basic profile 46
CD Security File 49
Function controls 49
Profile Editor 46
Profile settings 49
Security settings 46, 49
User profiles 46
Virtual CD basic profile 46
Properties 27
R
Recognized CD drives 29Registered virtual CDs 28Release 29
S
Security settings 46Software distribution 2Special Case
Virtual CD FS 70
Station Groups 43System requirements 5
T
Troubleshooting 40
U
Update 7Usage data 2
Data sources 42
Index

Virtual CD v9 Manual
82
Duration of use 42
Logging virtual CD usage data 42
User profiles 46
V
Violation of licensing controls 69Virtual CD basic profile 48Virtual CD Clients 72Virtual CD Client Setup distribution 18Virtual CD FS 22Virtual CD NMS with Virtual CD FS 22Virtual CD TS 23Virtual drive activity monitor 2