Embed Size (px)
Citation preview
Vigilant PlateSearch 7.0User Guide
*MN007783A01*MN007783A01-AC
OCTOBER 2021© 2021 Motorola Solutions, Inc. All rights reserved
Legal and SupportIntellectual Property and Regulatory Notices
CopyrightsThe Motorola Solutions products described in this document may include copyrighted MotorolaSolutions computer programs. Laws in the United States and other countries preserve for MotorolaSolutions certain exclusive rights for copyrighted computer programs. Accordingly, any copyrightedMotorola Solutions computer programs contained in the Motorola Solutions products described in thisdocument may not be copied or reproduced in any manner without the express written permission ofMotorola Solutions.
No part of this document may be reproduced, transmitted, stored in a retrieval system, or translatedinto any language or computer language, in any form or by any means, without the prior writtenpermission of Motorola Solutions, Inc.
TrademarksMOTOROLA, MOTO, MOTOROLA SOLUTIONS, and the Stylized M Logo are trademarks orregistered trademarks of Motorola Trademark Holdings, LLC and are used under license. All othertrademarks are the property of their respective owners.
License RightsThe purchase of Motorola Solutions products shall not be deemed to grant either directly or byimplication, estoppel or otherwise, any license under the copyrights, patents or patent applicationsof Motorola Solutions, except for the normal non-exclusive, royalty-free license to use that arises byoperation of law in the sale of a product.
Open Source ContentThis product may contain Open Source software used under license. Refer to the product installationmedia for full Open Source Legal Notices and Attribution content.
European Union (EU) and United Kingdom (UK) Waste of Electrical andElectronic Equipment (WEEE) Directive
The European Union's WEEE directive and the UK's WEEE regulation require that products sold into EU countries and the UK must have the crossed-out wheelie bin label on the product (or the package in some cases). As defined by the WEEE directive, this crossed-out wheelie bin label means that customers and end-users in EU and UK countries should not dispose of electronic and electrical equipment or accessories in household waste.
Customers or end-users in EU and UK countries should contact their local equipment supplier representative or service centre for information about the waste collection system in their country.
DisclaimerPlease note that certain features, facilities, and capabilities described in this document may not be applicable to or licensed for use on a specific system, or may be dependent upon the characteristics of a specific mobile subscriber unit or configuration of certain parameters. Please refer to your Motorola Solutions contact for further information.
© 2021 Motorola Solutions, Inc. All Rights Reserved
MN007783A01-ACLegal and Support
2
Contact UsFor inquiries, see https://www.motorolasolutions.com/en_us/support.html > License Plate Recognition (Vigilant) or contact our 24 hours support staff at:
• Tel: 925-398-2079
• Fax: 925-398-2113
• Email: [email protected]
Read Me First
Notations Used in This ManualThroughout the text in this publication, you notice the use of Warning, Caution, and Notice. Thesenotations are used to emphasize that safety hazards exist, and the care that must be taken orobserved.
WARNING: An operational procedure, practice, or condition, and so on, which may result ininjury or death if not carefully observed.
CAUTION: An operational procedure, practice, or condition, and so on, which may result indamage to the equipment if not carefully observed.
NOTE: An operational procedure, practice, or condition, and so on, which is essential toemphasize.
Special NotationsThe following special notations are used throughout the text to highlight certain information or items:
Table 1: Special Notations
Example Description
Menu key or Camera button Bold words indicate a name of a key, button, orsoft menu item.
The display shows Settings Applied. Typewriter words indicate the MMI strings ormessages displayed.
<required ID> The courier, bold, italic, and angle brackets indi-cate user input.
Setup→Settings→All Settings Bold words with the arrow in between indicatethe navigation structure in the menu items.
MN007783A01-ACLegal and Support
3
ContentsLegal and Support.......................................................................................................2
Intellectual Property and Regulatory Notices.................................................................................2
Contact Us..................................................................................................................................... 3
Read Me First................................................................................................................................ 3
List of Figures..............................................................................................................8List of Tables............................................................................................................. 12Chapter 1: Logging In to Law Enforcement Archival Reporting Network
(LEARN)................................................................................................................. 13Chapter 2: Profile Management............................................................................. 14
2.1 Editing User Information........................................................................................................ 14
2.2 Configuring Alert Management.............................................................................................. 15
2.2.1 Setting Filter Alerts...................................................................................................16
2.2.2 Drawing Geographic Zoning.................................................................................... 17
2.3 Managing Favorite Icons....................................................................................................... 18
2.4 Agency Manager Profile........................................................................................................ 19
2.4.1 Editing Agency Manager Profile...............................................................................19
2.4.2 Creating a User Account..........................................................................................21
2.5 Viewing Agency Managers.................................................................................................... 21
Chapter 3: License Plate Query............................................................................. 223.1 Performing Quick Search.......................................................................................................22
3.1.1 Adjusting More Options............................................................................................23
3.1.2 Altering Individual Data Sources..............................................................................25
3.1.3 Managing Search Results........................................................................................26
3.1.3.1 Customizing View.......................................................................................28
3.1.3.2 Detection Record Detail............................................................................. 29
3.1.3.3 Tools.......................................................................................................... 30
3.1.3.4 Comparing Scanned Vehicle Images.........................................................33
3.1.4 Saving Searches......................................................................................................34
3.1.5 Location................................................................................................................... 35
3.1.5.1 Creating Map..............................................................................................35
3.1.5.2 Viewing and Editing Map............................................................................36
3.1.6 Reports.................................................................................................................... 37
3.1.7 Associate Analysis................................................................................................... 38
Chapter 4: Agency Management........................................................................... 394.1 My Agency............................................................................................................................. 39
MN007783A01-ACContents
4
4.1.1 Managing Agency.................................................................................................... 39
4.1.2 Creating Agency...................................................................................................... 40
4.2 Mobile Camera Systems........................................................................................................42
4.2.1 Viewing Mobile LPR System Profiles.......................................................................42
4.2.2 Adding New Mobile LPR System............................................................................. 43
4.2.3 Editing Mobile Systems Configuration..................................................................... 44
4.2.3.1 Adjusting the Alert Condition Matrix........................................................... 46
4.2.3.2 Configuring the Alert Control......................................................................47
4.2.3.3 Priority Notification (Audio) Settings ..........................................................47
4.2.3.4 Camera...................................................................................................... 49
4.2.3.5 Database....................................................................................................51
4.2.4 Deleting the Mobile LPR System ............................................................................ 52
4.2.5 Utilizing Reset Hotlist/Whitelist................................................................................ 52
4.3 Fixed Camera Systems......................................................................................................... 52
4.3.1 Viewing Fixed Camera Systems.............................................................................. 52
4.3.2 Configuring New CarDetector Fixed System........................................................... 53
4.3.3 Editing CarDetector Fixed System Configuration.................................................... 54
4.3.3.1 Editing the Basic Tab................................................................................. 54
4.3.3.2 Editing the Communication Tab................................................................. 55
4.3.3.3 Alerts Tab Configuration............................................................................ 56
4.3.3.4 Editing the Alarms Tab...............................................................................56
4.3.3.5 Editing the Admin Alarms Tab....................................................................57
4.3.3.6 Editing Camera Tab................................................................................... 58
4.4 Resetting Hot List.................................................................................................................. 59
4.5 Configuring a Connection File............................................................................................... 59
4.6 Upgrade to VUS.....................................................................................................................60
4.7 Standalone Camera Systems................................................................................................ 61
4.7.1 Viewing Standalone Cameras..................................................................................61
4.7.2 Adding New Standalone Camera.............................................................................61
4.7.3 Editing Standalone Cameras................................................................................... 62
4.8 Camera Systems Grouping................................................................................................... 64
4.8.1 Grouping Mobile Camera Systems.......................................................................... 65
4.8.2 Grouping Fixed Camera Systems............................................................................65
4.8.3 Grouping Standalone Camera Systems.................................................................. 67
Chapter 5: User Management................................................................................ 685.1 Adding New User...................................................................................................................68
5.2 Configuring User Management..............................................................................................69
5.3 Searching and Modifying Users.............................................................................................73
5.4 Configuring User Profiles.......................................................................................................74
MN007783A01-ACContents
5

5.5 Confirming New Users...........................................................................................................74
Chapter 6: Hot List Management........................................................................... 766.1 Adding Hot Plate....................................................................................................................76
6.1.1 Configuring More Options........................................................................................ 77
6.2 Creating Manual Hot List....................................................................................................... 78
6.3 Selecting Hot List Template...................................................................................................79
6.4 Creating Auto Hot List............................................................................................................81
6.5 Configuring TX-TCIC and TX-NCIC Hot List Automation...................................................... 82
6.6 Creating Hot List for Texas Agency Managers...................................................................... 85
6.7 Viewing Hot List Templates................................................................................................... 86
6.8 Creating Hot List Template.................................................................................................... 86
6.9 Duplicating Hot List Template................................................................................................89
6.10 Editing Hot List Template.....................................................................................................89
6.11 Importing and Exporting Hot List Template......................................................................... 89
6.12 Deleting Hot List Templates.................................................................................................89
6.13 Searching Records.............................................................................................................. 89
6.13.1 Outputting Search Records Report........................................................................92
6.14 Searching Files.................................................................................................................... 92
6.14.1 Outputting Search Files Report..............................................................................94
Chapter 7: Whitelist Management..........................................................................957.1 Adding White Plate................................................................................................................ 95
7.2 Creating Manual Whitelists.................................................................................................... 96
7.3 Selecting a Whitelist Template.............................................................................................. 97
7.4 Creating a Parking Enforcement Whitelist............................................................................. 99
7.5 Viewing Whitelist Templates................................................................................................101
7.6 Creating Whitelist Templates...............................................................................................101
7.7 Searching Whitelist Records................................................................................................103
7.8 Adding Whitelist Locations...................................................................................................106
7.8.1 Digital Chalking in Multiple Schedules................................................................... 107
Chapter 8: Data Sharing....................................................................................... 1098.1 Accessing Detection Sharing...............................................................................................111
8.2 Accessing Hot List Sharing..................................................................................................115
Chapter 9: Mapping Tools.................................................................................... 1199.1 Stakeout...............................................................................................................................119
9.1.1 Performing Stakeout Search..................................................................................120
9.2 Mapping Alert Service..........................................................................................................121
9.2.1 Using the Mapping Alert Service............................................................................122
9.2.2 Adjusting Search with Data Fields......................................................................... 122
9.2.3 Generating Reports................................................................................................124
MN007783A01-ACContents
6
9.3 Density Map.........................................................................................................................124
9.3.1 Performing Density Map Search............................................................................ 125
9.3.2 Generating Reports................................................................................................126
Chapter 10: Locate Analysis................................................................................ 12710.1 Performing Locate Analysis Search...................................................................................127
10.2 Search Results.................................................................................................................. 128
10.3 Reports.............................................................................................................................. 129
Chapter 11: Dashboard.........................................................................................13011.1 Adjusting Dashboard View.................................................................................................130
11.2 Adjusting Filtering View..................................................................................................... 132
11.3 Dashboard Statistics..........................................................................................................133
11.3.1 Pie Charts............................................................................................................ 133
11.3.2 Bar Graphs...........................................................................................................135
11.3.3 Data View.............................................................................................................136
11.3.3.1 Generating Data View Reports.............................................................. 136
11.3.3.2 Scheduling Reports................................................................................137
11.4 Viewing Client Status.........................................................................................................138
Chapter 12: Auditing.............................................................................................13912.1 Auditing All Transactions................................................................................................... 139
12.2 Querying Viewed Records................................................................................................. 141
12.3 Tracking Logins................................................................................................................. 142
Chapter 13: Other Functions................................................................................14413.1 Viewing Agency Manager Contact Information..................................................................144
13.2 Viewing Downloadable Software....................................................................................... 144
MN007783A01-ACContents
7

List of FiguresFigure 1: LEARN Login Screen ............................................................................................................. 13
Figure 2: User Information .....................................................................................................................15
Figure 3: Alert Management .................................................................................................................. 16
Figure 4: Filter Alerts ............................................................................................................................. 17
Figure 5: Filter Alerts Configuration .......................................................................................................17
Figure 6: Geographic Zoning .................................................................................................................18
Figure 7: Draw Geographic Zoning ....................................................................................................... 18
Figure 8: Manager Information .............................................................................................................. 20
Figure 9: Quick Plate Search .................................................................................................................22
Figure 10: Hot List Hits .......................................................................................................................... 24
Figure 11: Ignore Out-of-State Alerts .................................................................................................... 24
Figure 12: Search Result If Unique License Plate Per Day Option Is Not Selected ..............................24
Figure 13: Search Result If Unique License Plate Per Day Option Is Selected .................................... 24
Figure 14: Data Source Filters Page ..................................................................................................... 25
Figure 15: Search Results ..................................................................................................................... 27
Figure 16: Customize Display ................................................................................................................28
Figure 17: Detection Record Detail ....................................................................................................... 29
Figure 18: Location Vehicles ................................................................................................................. 30
Figure 19: Associated Vehicles ............................................................................................................. 31
Figure 20: Probe Vehicle Info ................................................................................................................ 31
Figure 21: Convoy Analysis ...................................................................................................................31
Figure 22: Locate Analysis .................................................................................................................... 32
Figure 23: Zoom the Scanned Images .................................................................................................. 33
Figure 24: Compare the Scanned Images .............................................................................................33
Figure 25: Open Editing Tools ...............................................................................................................34
Figure 26: Search by Location ...............................................................................................................35
Figure 27: Create Map ...........................................................................................................................36
Figure 28: Output Reports ..................................................................................................................... 37
Figure 29: Associate Analysis ............................................................................................................... 38
Figure 30: Agency Management ........................................................................................................... 40
Figure 31: Agency Manager List ............................................................................................................41
Figure 32: Create Agency Manager ...................................................................................................... 42
Figure 33: Mobile Camera System Profiles ........................................................................................... 43
Figure 34: Viewing Mobile System Profiles ........................................................................................... 43
Figure 35: Edit Mobile System ...............................................................................................................45
Figure 36: Alert Condition Matrix ........................................................................................................... 46
MN007783A01-ACList of Figures
8
Figure 37: Alert Control ......................................................................................................................... 47
Figure 38: Priority Notification (Audio) ...................................................................................................48
Figure 39: Cameras Tab ........................................................................................................................49
Figure 40: Mobile Camera System Database ........................................................................................51
Figure 41: Fixed Camera Systems ........................................................................................................ 52
Figure 42: Add New CDFS Server Name ..............................................................................................53
Figure 43: New System Basic Tab ........................................................................................................ 54
Figure 44: New System Communication Tab ........................................................................................ 55
Figure 45: New System Alerts Tab ........................................................................................................56
Figure 46: New System Alarms Tab - Alert Settings ............................................................................. 56
Figure 47: New System Administrative Alert Settings Tab .................................................................... 57
Figure 48: New System Cameras Tab - Edit Camera ........................................................................... 58
Figure 49: New System Cameras Tab - Location ..................................................................................59
Figure 50: Upgrade to VUS ................................................................................................................... 60
Figure 51: CarDetector Updates - Distribute ......................................................................................... 60
Figure 52: Standalone Cameras ............................................................................................................61
Figure 53: Add New Standalone Camera ..............................................................................................62
Figure 54: Edit Standalone Camera ...................................................................................................... 63
Figure 55: Grouping Camera Systems .................................................................................................. 64
Figure 56: Grouping Mobile Camera Systems ...................................................................................... 65
Figure 57: Grouping Fixed Camera Systems ........................................................................................ 66
Figure 58: Grouping Standalone Camera Systems ...............................................................................67
Figure 59: User Information ...................................................................................................................68
Figure 60: User Options ........................................................................................................................ 69
Figure 61: Product Subscriptions .......................................................................................................... 69
Figure 62: Expiration Period and Date .................................................................................................. 69
Figure 63: User Profile ...........................................................................................................................70
Figure 64: LPR System Use .................................................................................................................. 70
Figure 65: Console Access ....................................................................................................................71
Figure 66: User Permission ................................................................................................................... 71
Figure 67: Setup Alert Management ......................................................................................................72
Figure 68: Search and Modify User .......................................................................................................73
Figure 69: View User Profile ..................................................................................................................74
Figure 70: New Users Confirmation ...................................................................................................... 75
Figure 71: Add Hot Plate ....................................................................................................................... 76
Figure 72: More Options ........................................................................................................................77
Figure 73: Upload a Hot List File ........................................................................................................... 78
Figure 74: Select a Template - Delimiter ............................................................................................... 79
Figure 75: Select a Template - Field Width ........................................................................................... 80
MN007783A01-ACList of Figures
9
Figure 76: Select Hot List Fields ............................................................................................................80
Figure 77: Auto Hot List Connection ......................................................................................................81
Figure 78: Designate Hot List Details .................................................................................................... 81
Figure 79: Specify Hot List Details ........................................................................................................ 83
Figure 80: Configure Hot List Connection ............................................................................................. 83
Figure 81: Select Hot List Template ...................................................................................................... 84
Figure 82: Schedule Confirmation ......................................................................................................... 84
Figure 83: TX-TCIC Service State .........................................................................................................84
Figure 84: TX-TCIC and TX-NCIC Service State .................................................................................. 85
Figure 85: Automated Hot List Set Up ...................................................................................................85
Figure 86: Viewing Templates ............................................................................................................... 86
Figure 87: Assign Hot List Name and Description .................................................................................86
Figure 88: Designate File Headers and Separators .............................................................................. 87
Figure 89: Choose the Delimiter Type ...................................................................................................87
Figure 90: Choose the Field Lengths .................................................................................................... 88
Figure 91: Select Hot List Fields ............................................................................................................88
Figure 92: Hot List Search Records ...................................................................................................... 90
Figure 93: Hot List Search Records ...................................................................................................... 91
Figure 94: Search Records Customize Report ......................................................................................91
Figure 95: Hot List Search Records Details .......................................................................................... 92
Figure 96: Searching for Hot List Files .................................................................................................. 93
Figure 97: Hot List Search Files ............................................................................................................ 94
Figure 98: Add White Plate ....................................................................................................................95
Figure 99: Upload Whitelist File .............................................................................................................96
Figure 100: Select a Template - Delimiter ............................................................................................. 98
Figure 101: Select a Template - Field Length ....................................................................................... 98
Figure 102: Select White List Fields ...................................................................................................... 99
Figure 103: Auto Whitelist Connection .................................................................................................. 99
Figure 104: Assign Whitelist Name and Description ........................................................................... 100
Figure 105: Assign Whitelist Name and Description ........................................................................... 101
Figure 106: Choose the Delimiter ........................................................................................................102
Figure 107: Choose the Field Lengths ................................................................................................ 102
Figure 108: Select Whitelist Fields ...................................................................................................... 103
Figure 109: Whitelist Search Records ................................................................................................. 104
Figure 110: Whitelist Search Records ................................................................................................. 105
Figure 111: Whitelist Search Records Details ..................................................................................... 105
Figure 112: Whitelist Locations ........................................................................................................... 106
Figure 113: Digital Chalking Alert Rule Set ......................................................................................... 107
Figure 114: Fixed Camera Options Rule Set .......................................................................................107
MN007783A01-ACList of Figures
10
Figure 115: Digital Chalking Alert Example ......................................................................................... 108
Figure 116: Data Sharing .................................................................................................................... 109
Figure 117: Data Sharing Map ............................................................................................................ 110
Figure 118: Data Sharing Update ........................................................................................................111
Figure 119: Detection Sharing Interface ..............................................................................................112
Figure 120: Share With List ................................................................................................................. 114
Figure 121: LEARN Data Sharing List .................................................................................................114
Figure 122: Accept Shares .................................................................................................................. 115
Figure 123: Hot List Sharing Interface .................................................................................................116
Figure 124: Share With List ................................................................................................................. 117
Figure 125: LEARN Data Sharing List .................................................................................................118
Figure 126: Accept Shares .................................................................................................................. 118
Figure 127: Stakeout ........................................................................................................................... 119
Figure 128: Stakeout Search ...............................................................................................................120
Figure 129: Stakeout Search Offline ................................................................................................... 121
Figure 130: Mapping Alert Service ...................................................................................................... 121
Figure 131: MAS Data Fields .............................................................................................................. 123
Figure 132: Filmstrip Tool ....................................................................................................................123
Figure 133: Density Map ..................................................................................................................... 124
Figure 134: Locate Analysis Search ....................................................................................................127
Figure 135: Activity Search ..................................................................................................................131
Figure 136: Filters ................................................................................................................................132
Figure 137: Pie Chart .......................................................................................................................... 134
Figure 138: Bar Graph .........................................................................................................................136
Figure 139: Data Configurator ............................................................................................................. 137
Figure 140: Schedule Reports .............................................................................................................138
Figure 141: Auditing Output Report .....................................................................................................139
Figure 142: Track All Transactions ......................................................................................................140
Figure 143: Output Report Data .......................................................................................................... 140
Figure 144: Query Viewed Records .................................................................................................... 141
Figure 145: Login Tracking ..................................................................................................................142
Figure 146: Agency Manager Contact List .......................................................................................... 144
Figure 147: Software Download Utility ................................................................................................ 145
MN007783A01-ACList of Figures
11
List of TablesTable 1: Special Notations .......................................................................................................................3
Table 2: Wildcard Symbol Description ...................................................................................................23
Table 3: Data Source Filters Options .................................................................................................... 23
Table 4: Colors of Film Strip Tool .......................................................................................................... 27
Table 5: Detection Record Detail Description ........................................................................................29
Table 6: Locate Analysis Field Description ............................................................................................32
Table 7: Type of Output Reports ........................................................................................................... 37
Table 8: Associate Analysis Information Description .............................................................................38
Table 9: New Mobile System Fields Description ................................................................................... 44
Table 10: Mobile System Profiles .......................................................................................................... 45
Table 11: Alert Conditions Description .................................................................................................. 46
Table 12: Alert Control Options ............................................................................................................. 47
Table 13: Camera Profile Configuration ................................................................................................ 49
Table 14: Database Configuration .........................................................................................................51
Table 15: Detection Sharing (External Server) Options ...................................................................... 112
Table 16: Stakeout Map Interface ....................................................................................................... 119
Table 17: MAS Configuration .............................................................................................................. 122
Table 18: MAP Search Options ........................................................................................................... 123
Table 19: Density Map Search Options ...............................................................................................125
Table 20: Required Information for Plate Search ................................................................................ 127
Table 21: Required Information for VIN Search .................................................................................. 127
Table 22: Sets of Locations ................................................................................................................. 128
Table 23: Locator Score Color Indication ............................................................................................ 129
Table 24: Pie Charts for Detections Type ............................................................................................133
Table 25: Pie Charts for Hits Type ...................................................................................................... 133
Table 26: Bar Charts for Detections Type ........................................................................................... 135
Table 27: Bar Charts for Hits Type ...................................................................................................... 135
MN007783A01-ACList of Tables
12

Chapter 1
Logging In to Law EnforcementArchival Reporting Network (LEARN)Prerequisites:To review the terms and conditions before logging in, click Vigilant Solutions termsand conditions*.
NOTE: Agencies must first configure their domains for self-registration before the user will beable to select their corresponding agency. Only users of approved government domains cansubmit self-registration requests to LEARN services.
Procedure:1 To log in, enter your <username ID>→<password>→Sign In.
Figure 1: LEARN Login Screen
NOTE: A direct link to Contact Support is provided in case you are having problemswith the login attempt.
2 On the multifactor authentication screen, enter the passcode sent to your email.
MN007783A01-ACLogging In to Law Enforcement Archival Reporting Network (LEARN)
13
Chapter 2
Profile Management2.1Editing User Information
NOTE: If you are an agency manager, you can also access the feature through AgencyManagement.
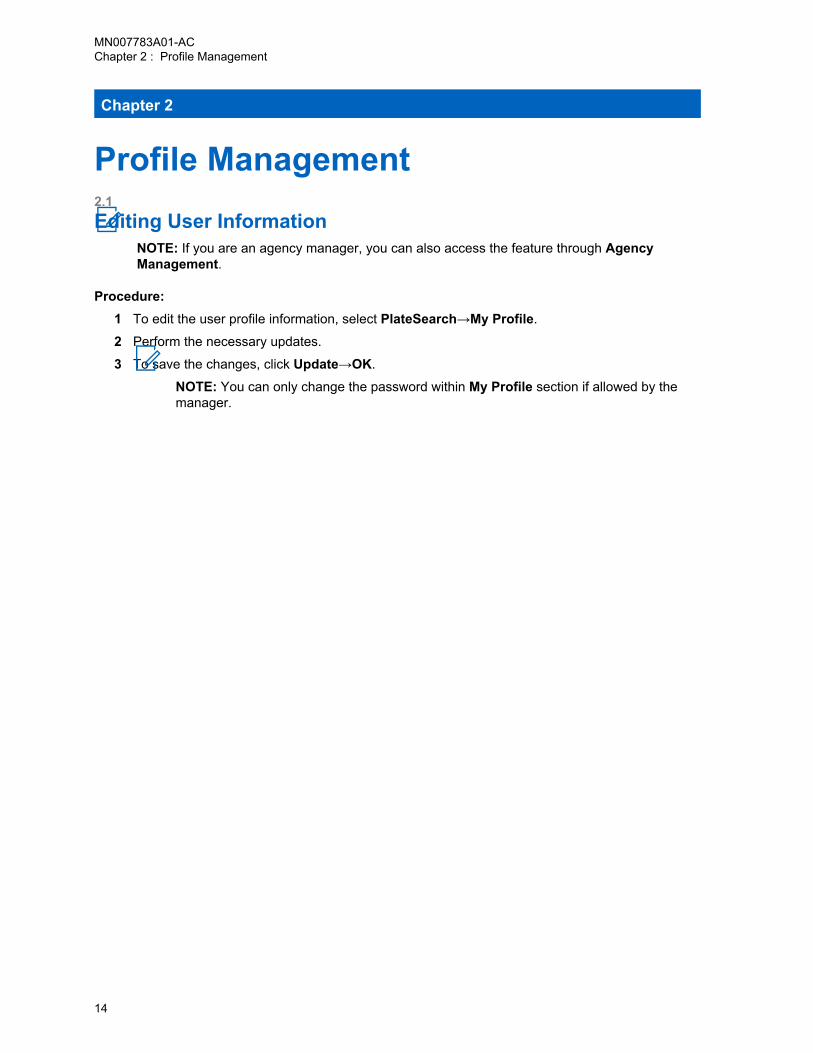
Procedure:1 To edit the user profile information, select PlateSearch→My Profile.
2 Perform the necessary updates.
3 To save the changes, click Update→OK.
NOTE: You can only change the password within My Profile section if allowed by themanager.
MN007783A01-ACChapter 2 : Profile Management
14
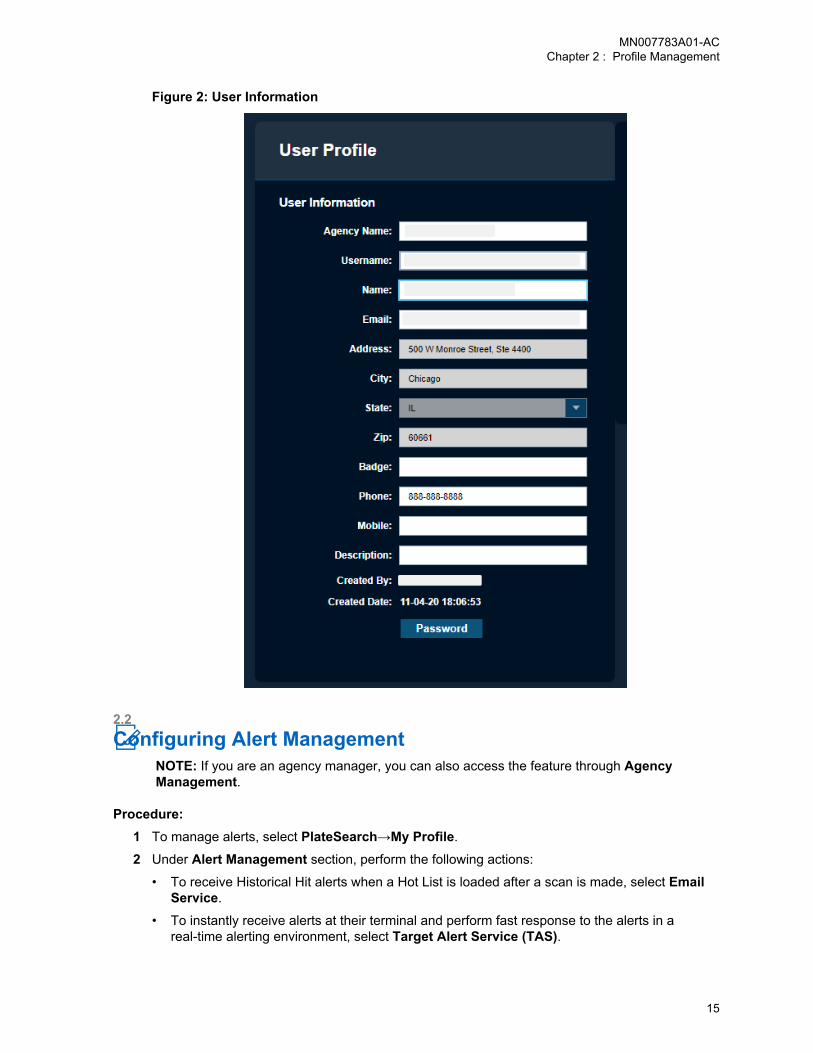
Figure 2: User Information
2.2Configuring Alert Management
NOTE: If you are an agency manager, you can also access the feature through AgencyManagement.
Procedure:1 To manage alerts, select PlateSearch→My Profile.
2 Under Alert Management section, perform the following actions:
• To receive Historical Hit alerts when a Hot List is loaded after a scan is made, select EmailService.
• To instantly receive alerts at their terminal and perform fast response to the alerts in areal-time alerting environment, select Target Alert Service (TAS).
MN007783A01-ACChapter 2 : Profile Management
15
• To enable Mobile Companion on smartphone devices when bridged with a LEARN account,select Mobile Companion (MC).
• To allow the consumption of NVLS Contributed Data within the CarDetector Mobile, selectMobile Hit Hunter (MHH).
Figure 3: Alert Management
2.2.1Setting Filter AlertsProcedure:
1 Perform the following actions:
• To enable alerting on the secondary OCR reads from the ALPR system, select AllowSecondary Plate Matching.
NOTE: When selected, you will see an increase of False Positives and inaccuratereads (default is unselected).
1 Applicable for the CarDetector Mobile System.
MN007783A01-ACChapter 2 : Profile Management
16
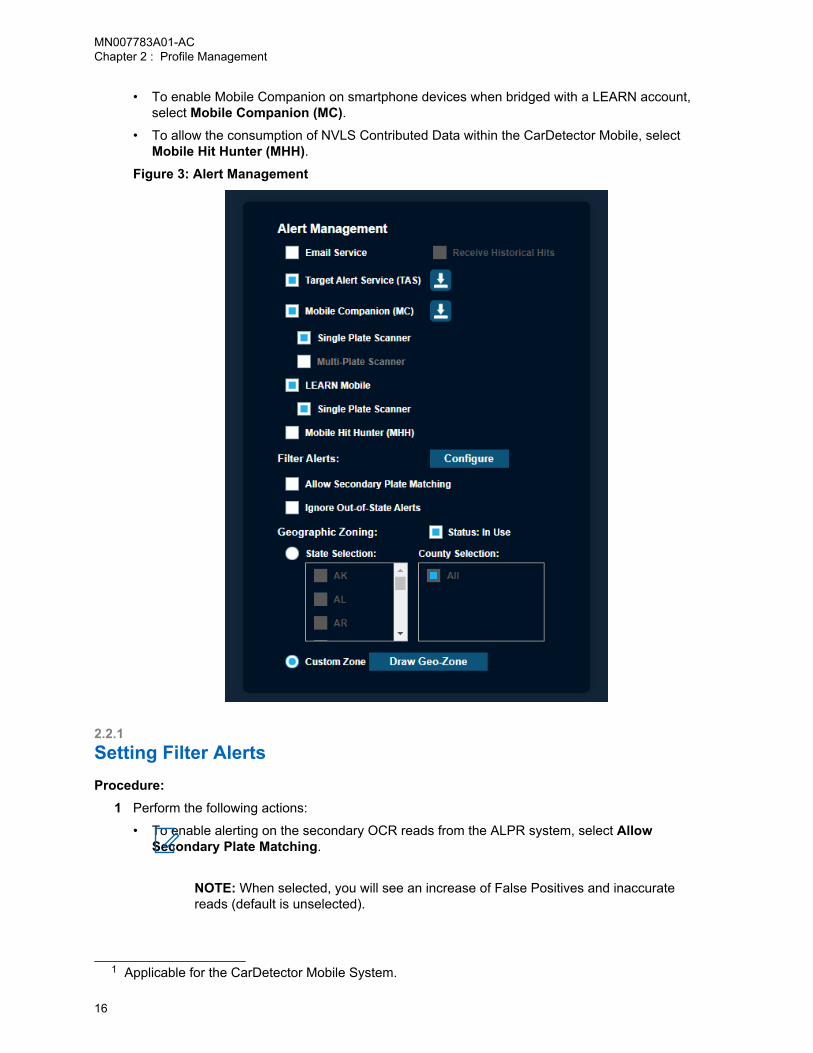
• To filter out Out-of-State alerts, select Ignore Out of State Alerts.
NOTE: For CarDetector Fixed units that does not have GPS readings, disable thisoption.
• To not receive any incorrect hit alert, select Ignore Incorrect Hits.
Figure 4: Filter Alerts
2 Select the required settings.
Figure 5: Filter Alerts Configuration
NOTE: Default for new sources, alerts, agencies, systems, and users are alwaysselected.
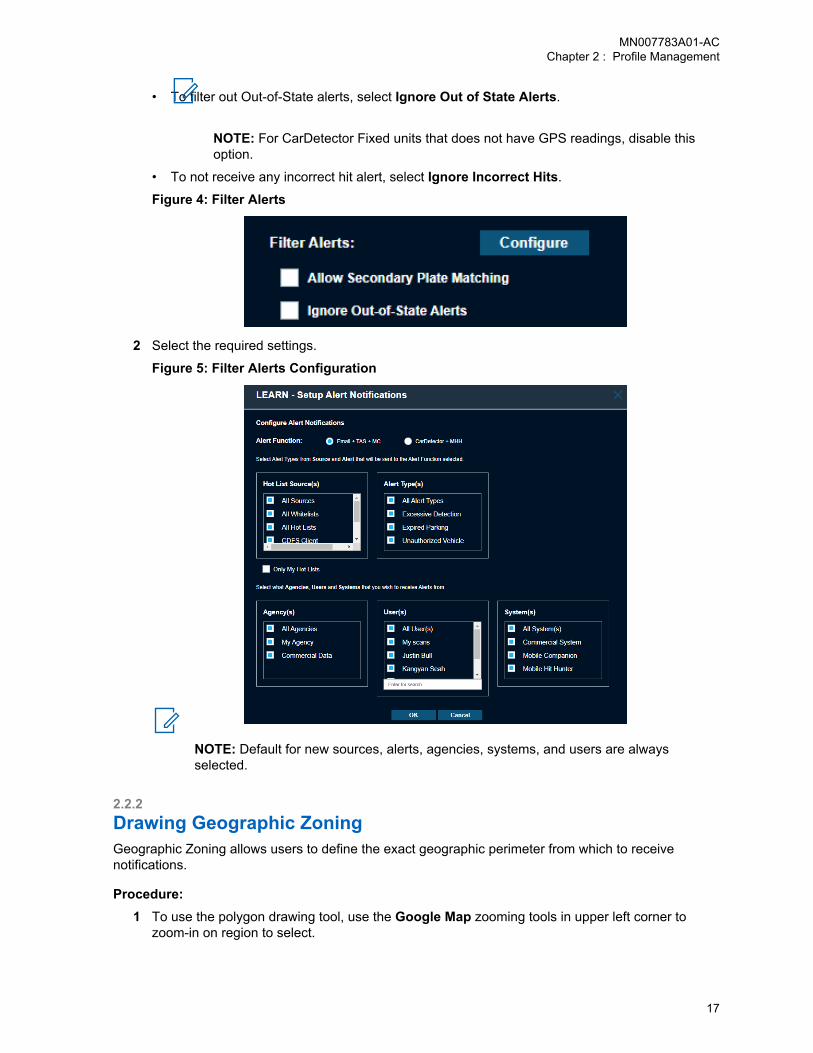
2.2.2Drawing Geographic ZoningGeographic Zoning allows users to define the exact geographic perimeter from which to receivenotifications.
Procedure:1 To use the polygon drawing tool, use the Google Map zooming tools in upper left corner to
zoom-in on region to select.
MN007783A01-ACChapter 2 : Profile Management
17
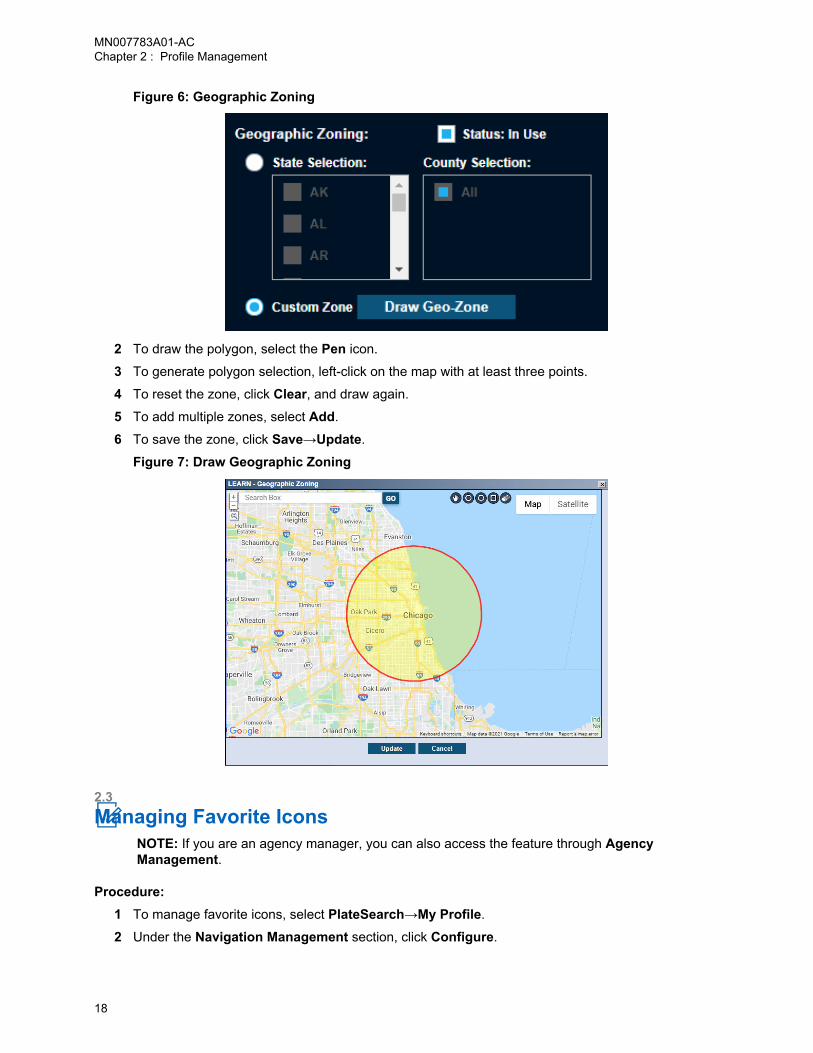
Figure 6: Geographic Zoning
2 To draw the polygon, select the Pen icon.
3 To generate polygon selection, left-click on the map with at least three points.
4 To reset the zone, click Clear, and draw again.
5 To add multiple zones, select Add.
6 To save the zone, click Save→Update.
Figure 7: Draw Geographic Zoning
2.3Managing Favorite Icons
NOTE: If you are an agency manager, you can also access the feature through AgencyManagement.
Procedure:1 To manage favorite icons, select PlateSearch→My Profile.
2 Under the Navigation Management section, click Configure.
MN007783A01-ACChapter 2 : Profile Management
18
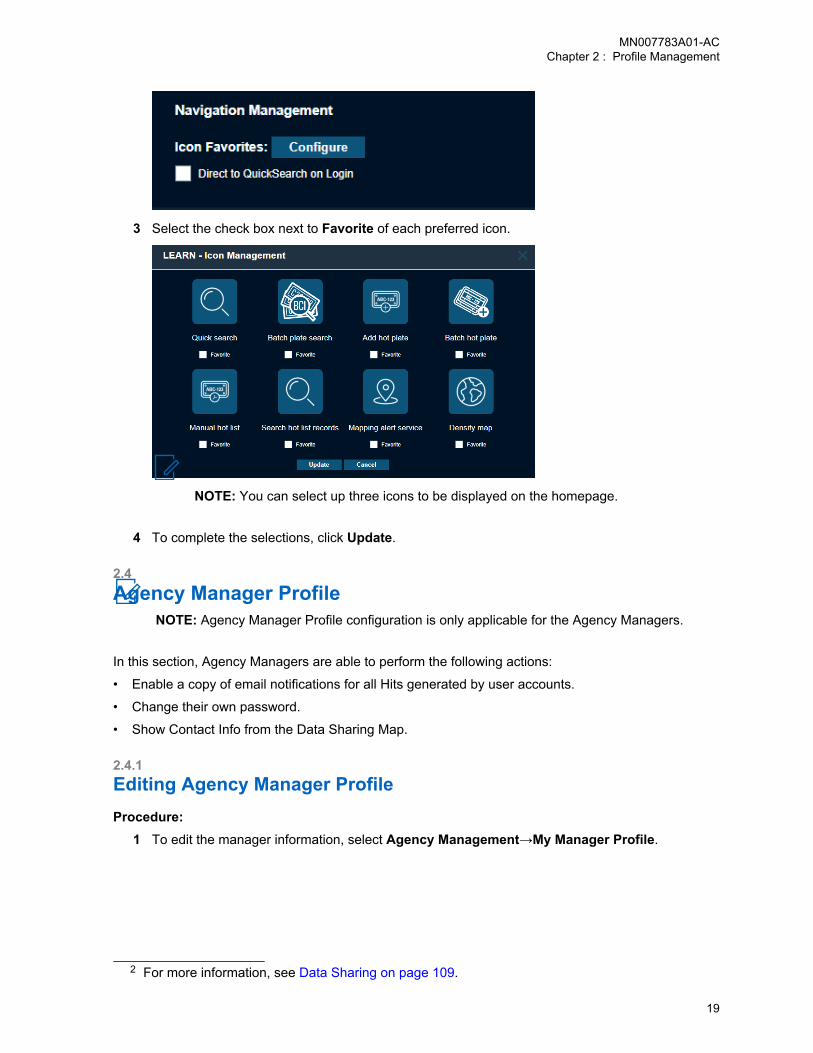
3 Select the check box next to Favorite of each preferred icon.
NOTE: You can select up three icons to be displayed on the homepage.
4 To complete the selections, click Update.
2.4Agency Manager Profile
NOTE: Agency Manager Profile configuration is only applicable for the Agency Managers.
In this section, Agency Managers are able to perform the following actions:
• Enable a copy of email notifications for all Hits generated by user accounts.
• Change their own password.
• Show Contact Info from the Data Sharing Map.
2.4.1Editing Agency Manager ProfileProcedure:
1 To edit the manager information, select Agency Management→My Manager Profile.
2 For more information, see Data Sharing on page 109.
MN007783A01-ACChapter 2 : Profile Management
19
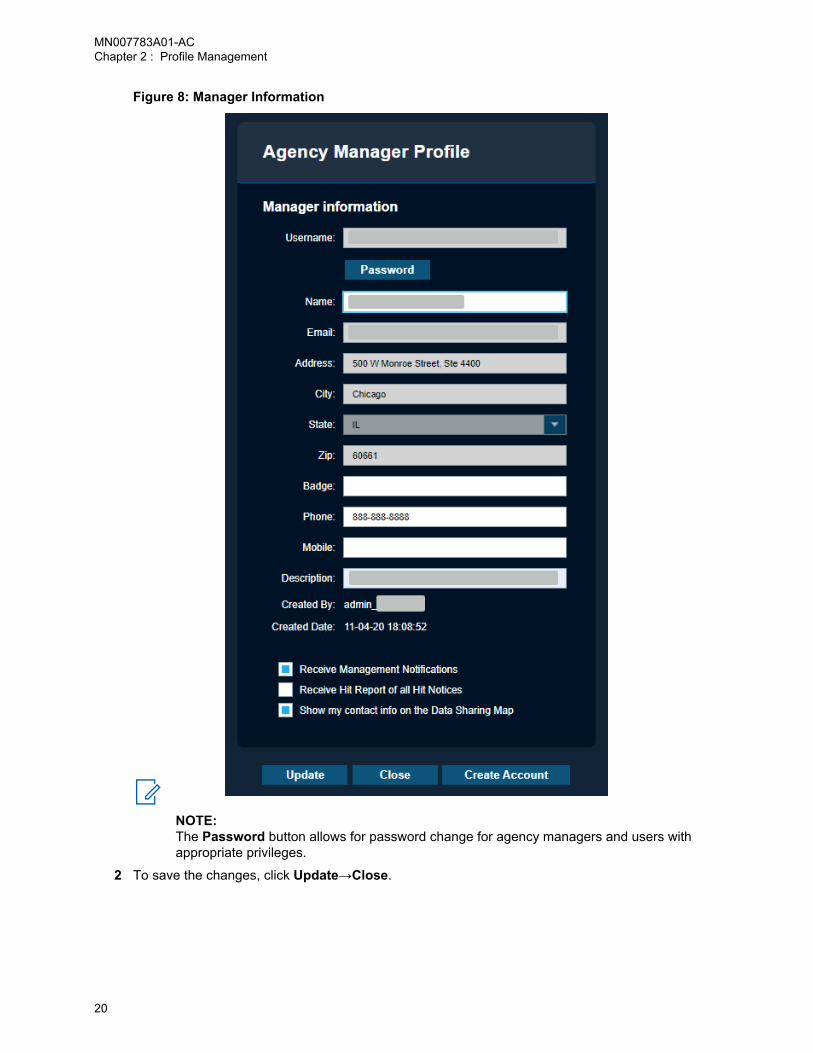
Figure 8: Manager Information
NOTE:The Password button allows for password change for agency managers and users withappropriate privileges.
2 To save the changes, click Update→Close.
MN007783A01-ACChapter 2 : Profile Management
20
2.4.2Creating a User AccountProcedure:
1 To create a new user account in the agency, select Agency Management→My ManagerProfile→Create Account.The account is created based on the contact information from the agency manager account.
2 Type in the <Username> and <Password> for the new user.
2.5Viewing Agency ManagersProcedure:
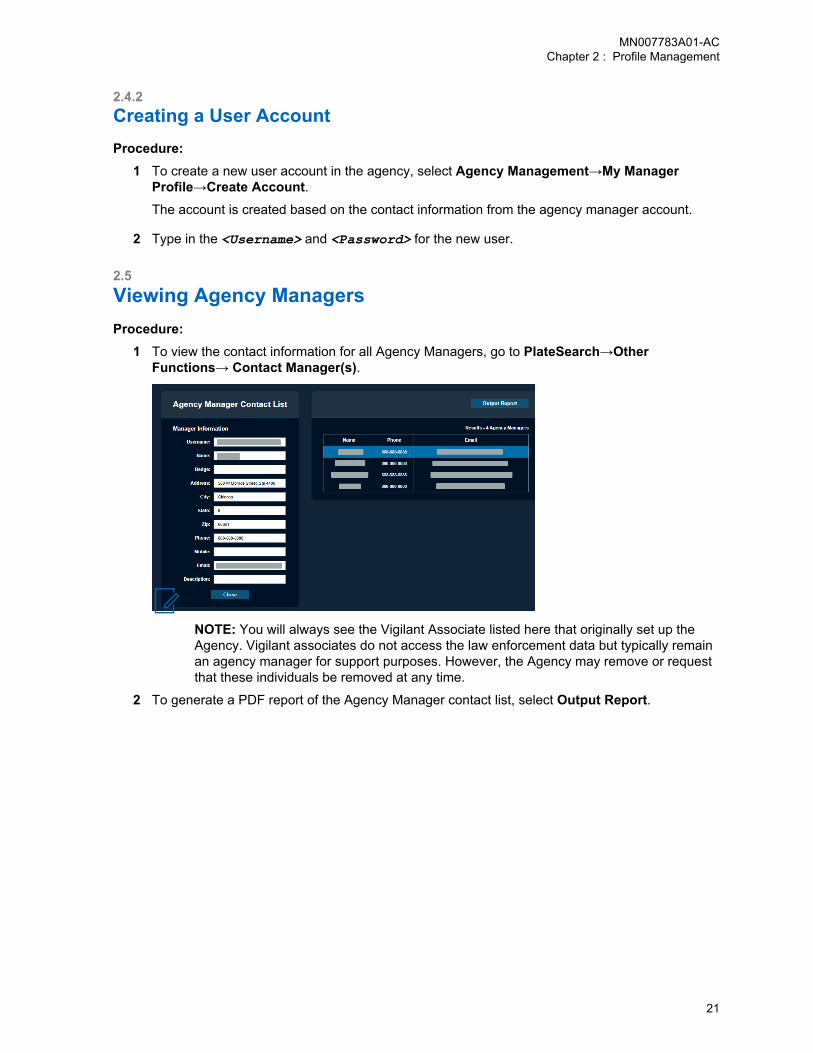
1 To view the contact information for all Agency Managers, go to PlateSearch→OtherFunctions→ Contact Manager(s).
NOTE: You will always see the Vigilant Associate listed here that originally set up theAgency. Vigilant associates do not access the law enforcement data but typically remainan agency manager for support purposes. However, the Agency may remove or requestthat these individuals be removed at any time.
2 To generate a PDF report of the Agency Manager contact list, select Output Report.
MN007783A01-ACChapter 2 : Profile Management
21
Chapter 3
License Plate Query3.1Performing Quick SearchProcedure:
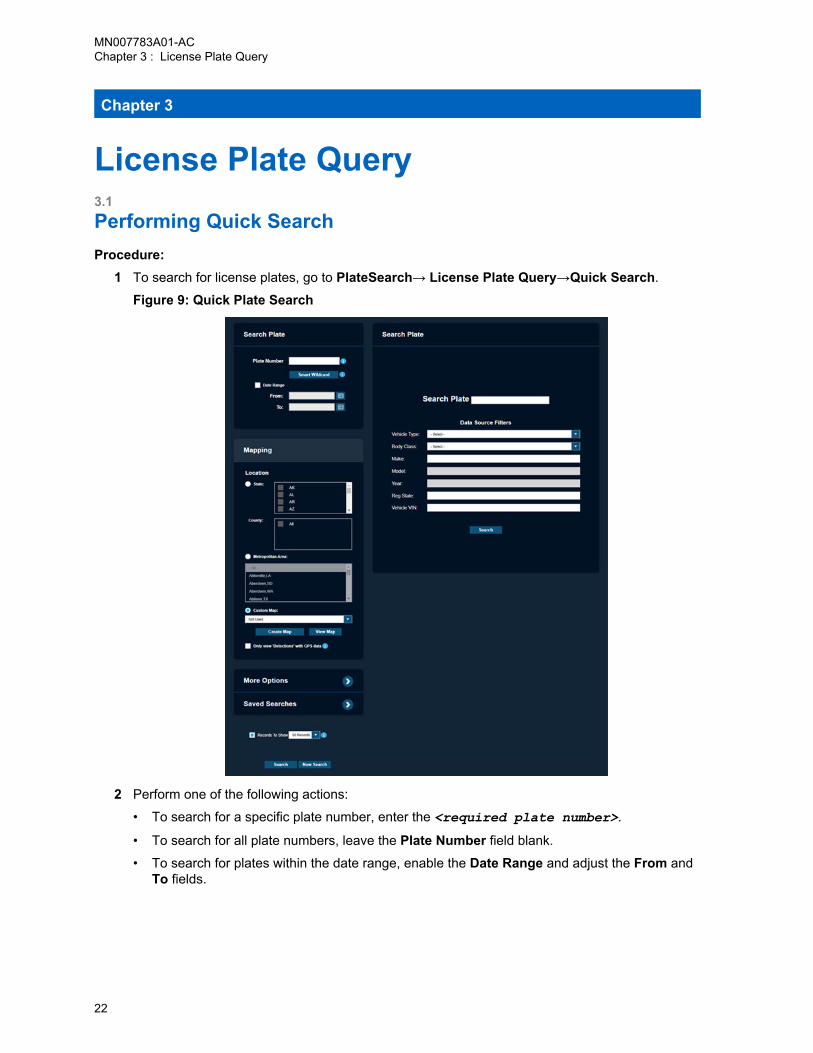
1 To search for license plates, go to PlateSearch→ License Plate Query→Quick Search.
Figure 9: Quick Plate Search
2 Perform one of the following actions:
• To search for a specific plate number, enter the <required plate number>.
• To search for all plate numbers, leave the Plate Number field blank.
• To search for plates within the date range, enable the Date Range and adjust the From andTo fields.
MN007783A01-ACChapter 3 : License Plate Query
22
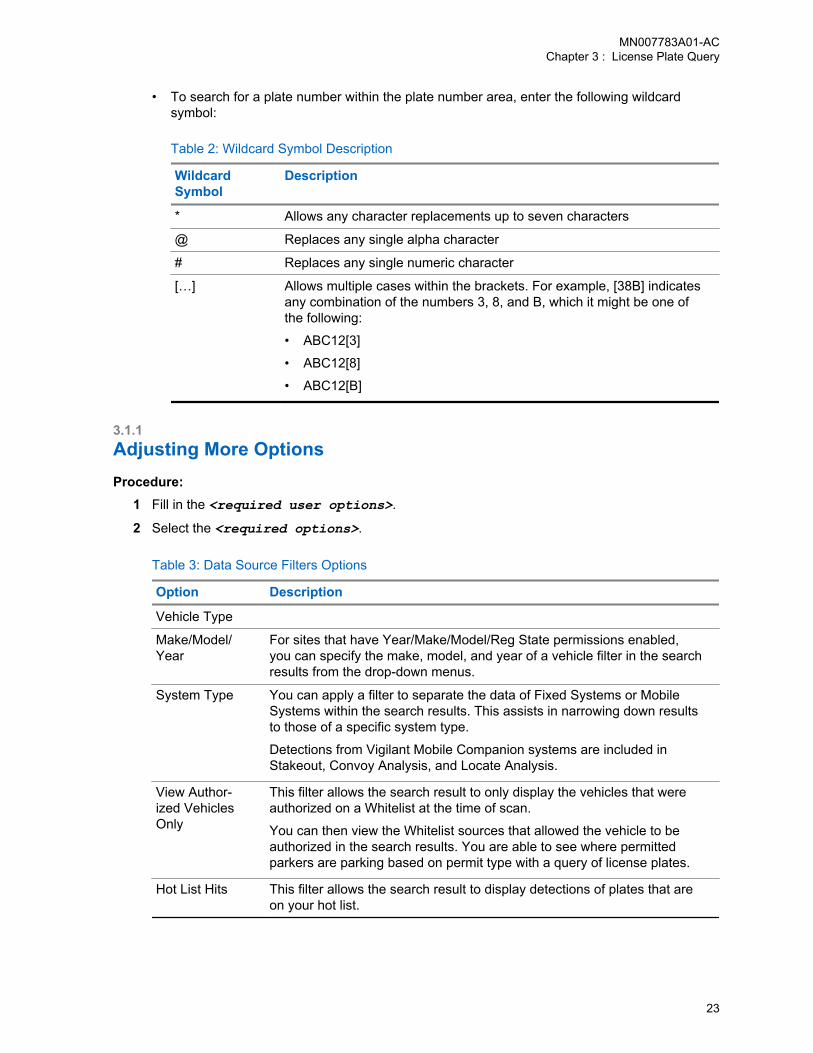
• To search for a plate number within the plate number area, enter the following wildcardsymbol:
Table 2: Wildcard Symbol Description
WildcardSymbol
Description
* Allows any character replacements up to seven characters
@ Replaces any single alpha character
# Replaces any single numeric character
[…] Allows multiple cases within the brackets. For example, [38B] indicatesany combination of the numbers 3, 8, and B, which it might be one ofthe following:
• ABC12[3]
• ABC12[8]
• ABC12[B]
3.1.1Adjusting More OptionsProcedure:
1 Fill in the <required user options>.
2 Select the <required options>.
Table 3: Data Source Filters Options
Option Description
Vehicle Type
Make/Model/Year
For sites that have Year/Make/Model/Reg State permissions enabled,you can specify the make, model, and year of a vehicle filter in the searchresults from the drop-down menus.
System Type You can apply a filter to separate the data of Fixed Systems or MobileSystems within the search results. This assists in narrowing down resultsto those of a specific system type.
Detections from Vigilant Mobile Companion systems are included inStakeout, Convoy Analysis, and Locate Analysis.
View Author-ized VehiclesOnly
This filter allows the search result to only display the vehicles that wereauthorized on a Whitelist at the time of scan.
You can then view the Whitelist sources that allowed the vehicle to beauthorized in the search results. You are able to see where permittedparkers are parking based on permit type with a query of license plates.
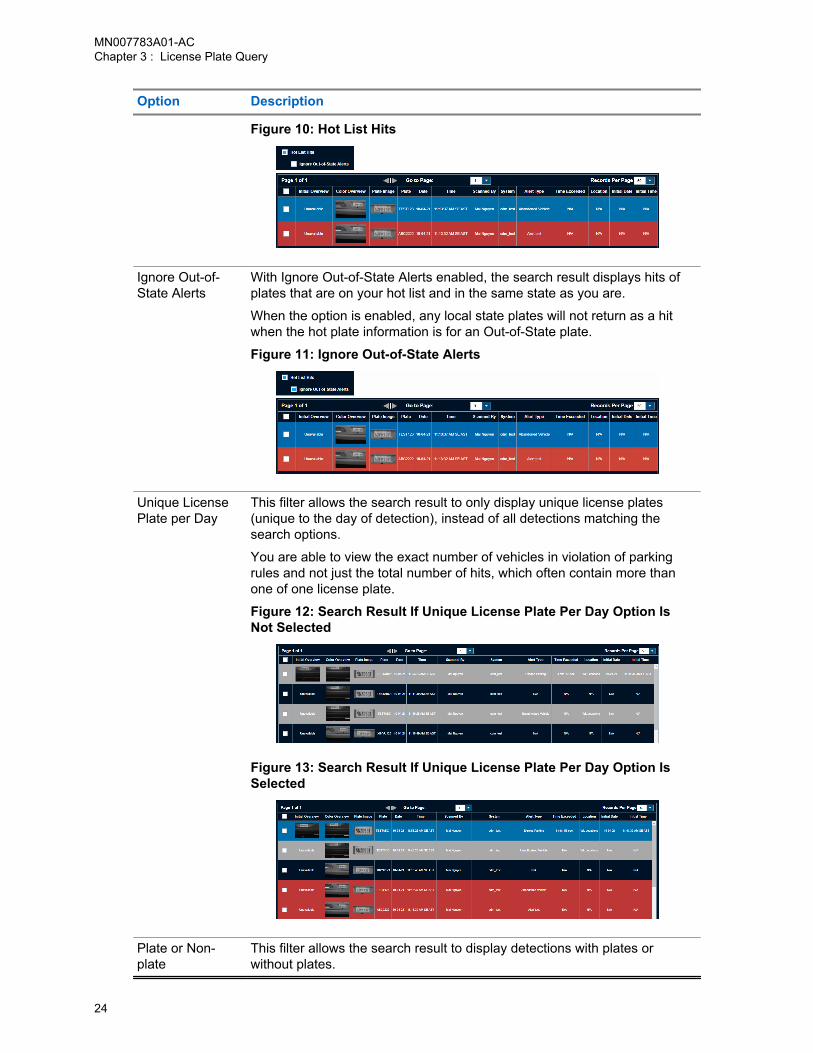
Hot List Hits This filter allows the search result to display detections of plates that areon your hot list.
MN007783A01-ACChapter 3 : License Plate Query
23
Option Description
Figure 10: Hot List Hits
Ignore Out-of-State Alerts
With Ignore Out-of-State Alerts enabled, the search result displays hits ofplates that are on your hot list and in the same state as you are.
When the option is enabled, any local state plates will not return as a hitwhen the hot plate information is for an Out-of-State plate.
Figure 11: Ignore Out-of-State Alerts
Unique LicensePlate per Day
This filter allows the search result to only display unique license plates(unique to the day of detection), instead of all detections matching thesearch options.
You are able to view the exact number of vehicles in violation of parkingrules and not just the total number of hits, which often contain more thanone of one license plate.
Figure 12: Search Result If Unique License Plate Per Day Option IsNot Selected
Figure 13: Search Result If Unique License Plate Per Day Option IsSelected
Plate or Non-plate
This filter allows the search result to display detections with plates orwithout plates.
MN007783A01-ACChapter 3 : License Plate Query
24
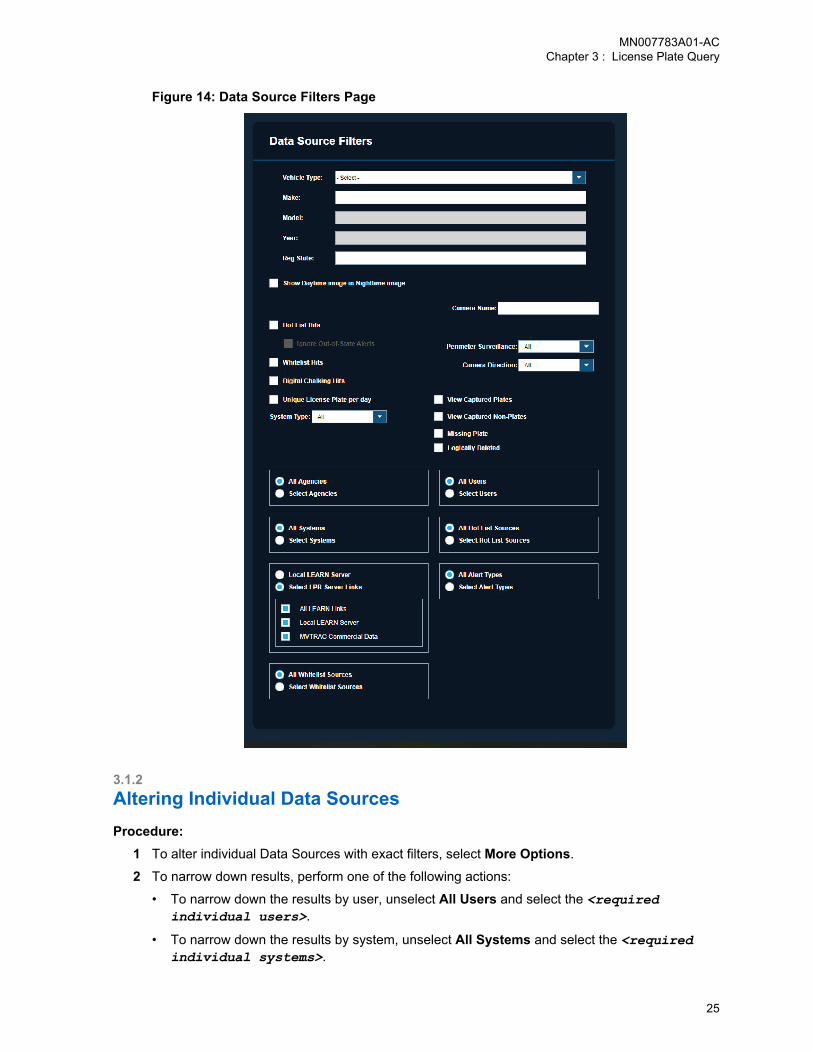
Figure 14: Data Source Filters Page
3.1.2Altering Individual Data SourcesProcedure:
1 To alter individual Data Sources with exact filters, select More Options.
2 To narrow down results, perform one of the following actions:
• To narrow down the results by user, unselect All Users and select the <requiredindividual users>.
• To narrow down the results by system, unselect All Systems and select the <requiredindividual systems>.
MN007783A01-ACChapter 3 : License Plate Query
25
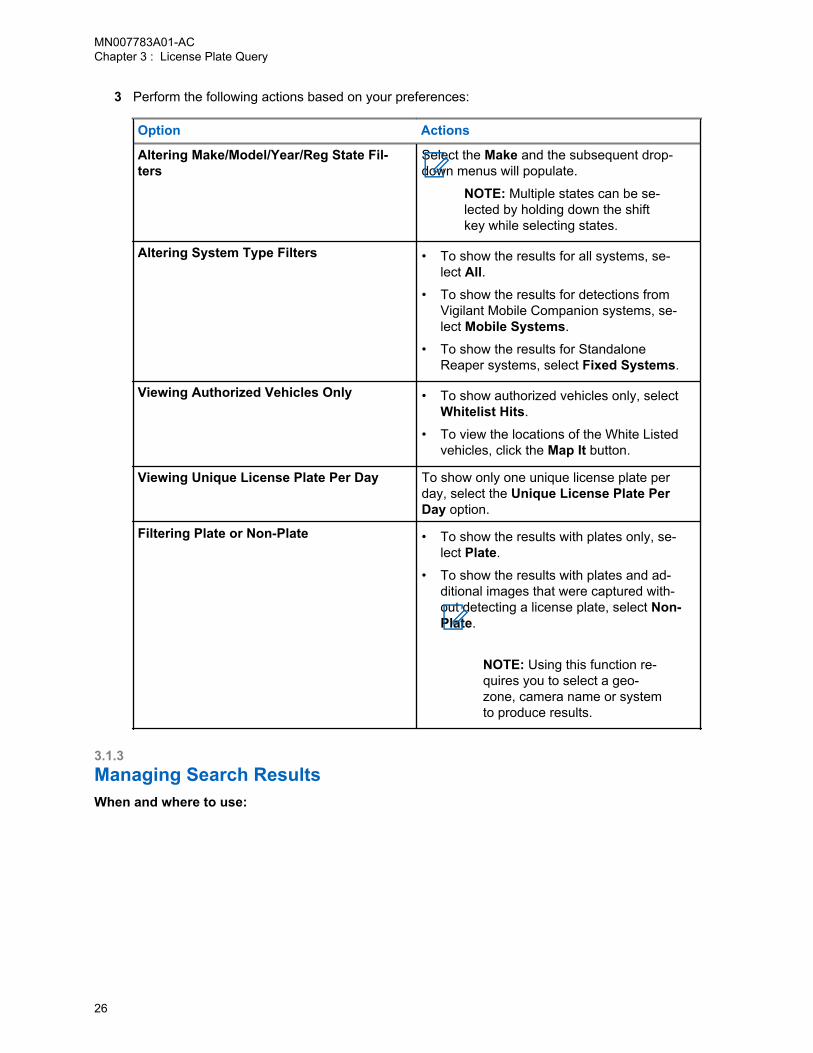
3 Perform the following actions based on your preferences:
Option Actions
Altering Make/Model/Year/Reg State Fil-ters
Select the Make and the subsequent drop-down menus will populate.
NOTE: Multiple states can be se-lected by holding down the shiftkey while selecting states.
Altering System Type Filters • To show the results for all systems, se-lect All.
• To show the results for detections fromVigilant Mobile Companion systems, se-lect Mobile Systems.
• To show the results for StandaloneReaper systems, select Fixed Systems.
Viewing Authorized Vehicles Only • To show authorized vehicles only, selectWhitelist Hits.
• To view the locations of the White Listedvehicles, click the Map It button.
Viewing Unique License Plate Per Day To show only one unique license plate perday, select the Unique License Plate PerDay option.
Filtering Plate or Non-Plate • To show the results with plates only, se-lect Plate.
• To show the results with plates and ad-ditional images that were captured with-out detecting a license plate, select Non-Plate.
NOTE: Using this function re-quires you to select a geo-zone, camera name or systemto produce results.
3.1.3Managing Search ResultsWhen and where to use:
MN007783A01-ACChapter 3 : License Plate Query
26
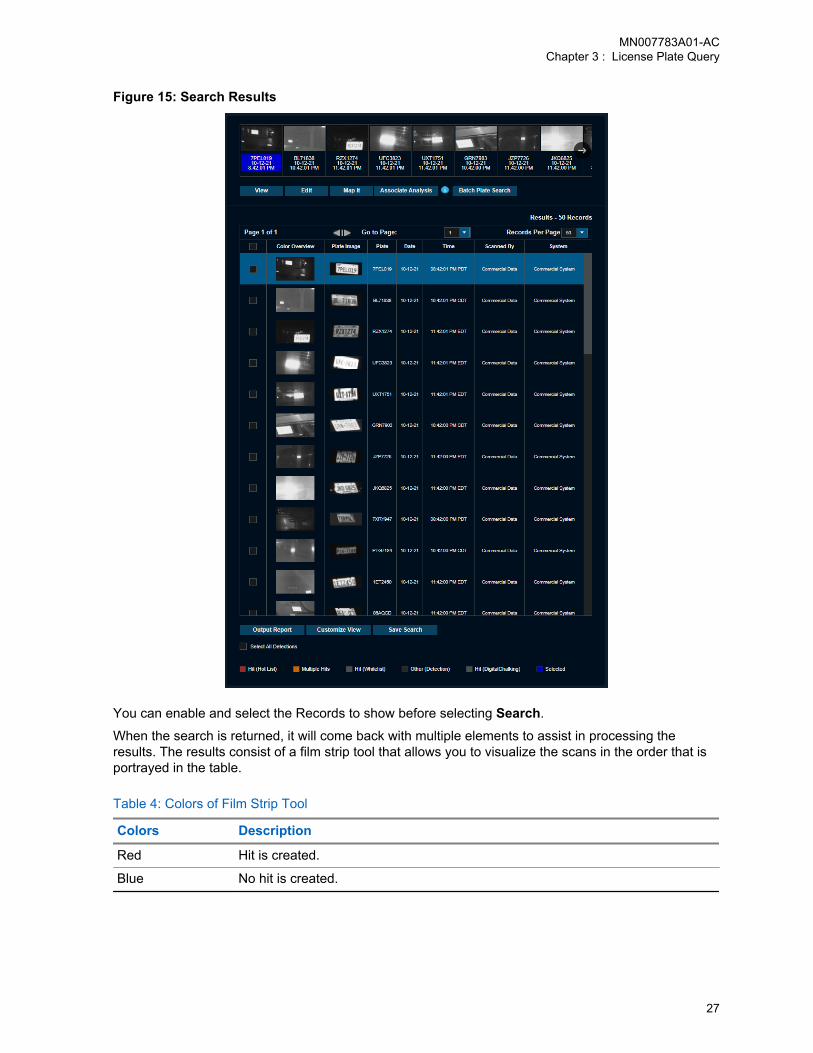
Figure 15: Search Results
You can enable and select the Records to show before selecting Search.
When the search is returned, it will come back with multiple elements to assist in processing theresults. The results consist of a film strip tool that allows you to visualize the scans in the order that isportrayed in the table.
Table 4: Colors of Film Strip Tool
Colors Description
Red Hit is created.
Blue No hit is created.
MN007783A01-ACChapter 3 : License Plate Query
27
Colors Description
Bright Red orBright Blue
Record is currently highlighted.
Procedure:1 Perform one of the following actions:
• To view a detailed record information, highlight a selected record and select View. For moredetails, see Detection Record Detail on page 29.
• To display the location of the detection, select Map It→Show Address.
• To generate the detailed report of the results, select Output Report.• To enter a comment for the record, select Add Comment.• To delete individual license plate detections, select the plate detection and select Delete.
NOTE: Shared detections from other Agencies cannot be deleted.
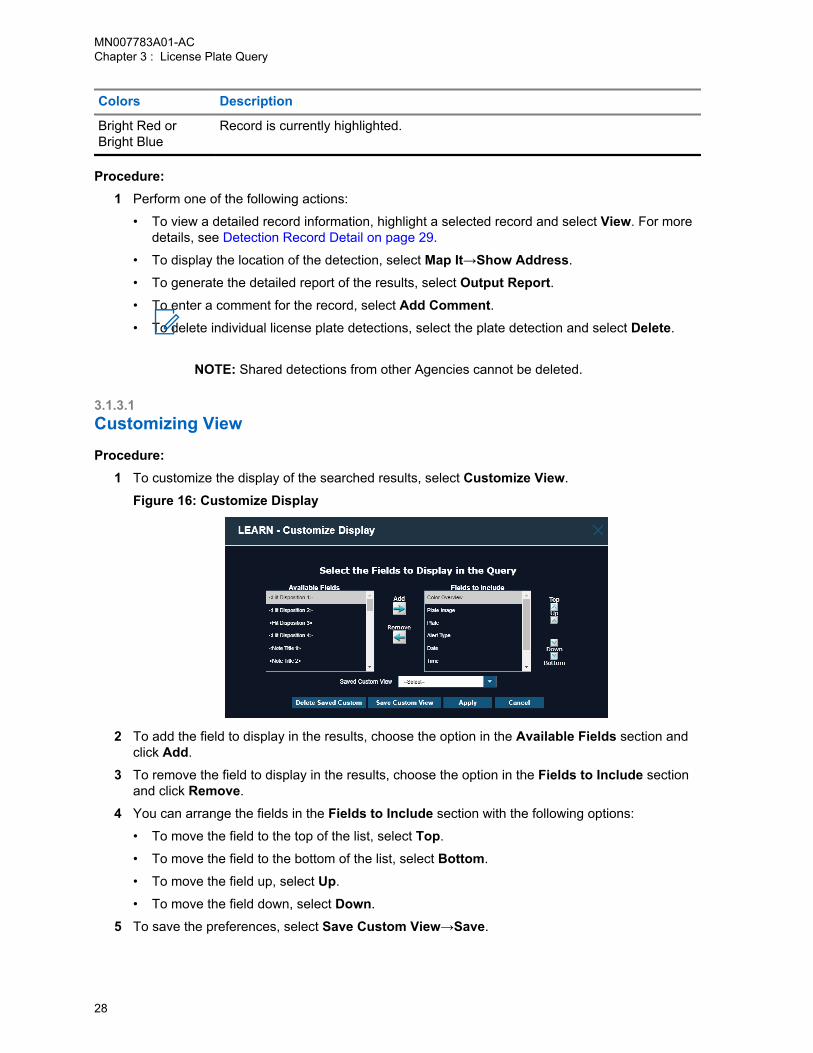
3.1.3.1Customizing View
Procedure:1 To customize the display of the searched results, select Customize View.
Figure 16: Customize Display
2 To add the field to display in the results, choose the option in the Available Fields section andclick Add.
3 To remove the field to display in the results, choose the option in the Fields to Include sectionand click Remove.
4 You can arrange the fields in the Fields to Include section with the following options:
• To move the field to the top of the list, select Top.
• To move the field to the bottom of the list, select Bottom.
• To move the field up, select Up.
• To move the field down, select Down.
5 To save the preferences, select Save Custom View→Save.
MN007783A01-ACChapter 3 : License Plate Query
28

6 Select Apply.
QuickSearch results window is updated with the selected information that you have chosen toview.
3.1.3.2Detection Record DetailFigure 17: Detection Record Detail
Detection Record Detail includes the following information:
Table 5: Detection Record Detail Description
Number Name Description
1 Location Vehicles Displays the path the ALPR vehicle used to col-lect data at a specific location of a target plate(visit).
2 Associated Vehicles Displays vehicles that have been scanned atthe same location within a short period of timeon two or more occasions and at two or morelocations; where the locations are separate by alarge distance.
3 Vehicle Comparison Displays the target vehicle image and allowusers to upload a probe image to compare/con-trast with and output in a single report with anno-tations.
4 Convoy Analysis Displays vehicles that have passed by samefixed camera location within a short period oftime on multiple occasions.
5 Locate Analysis Uses algorithms to determine the commonalityof the plates and group them together by loca-tion.
MN007783A01-ACChapter 3 : License Plate Query
29
Number Name Description
6 Vehicle Overview Displays vehicle overview images that havebeen previously scanned. From these images,the user can select up to 8 images to display a360 perspective of the target vehicle
7 Vehicle Info Displays information about the detected vehicle,and the date and time which it was captured.
8 Camera Info Displays information about the camera that cap-tured the detection and the GPS location of thecamera.
9 Scanned By Displays information about the Agency that man-ages this detection.
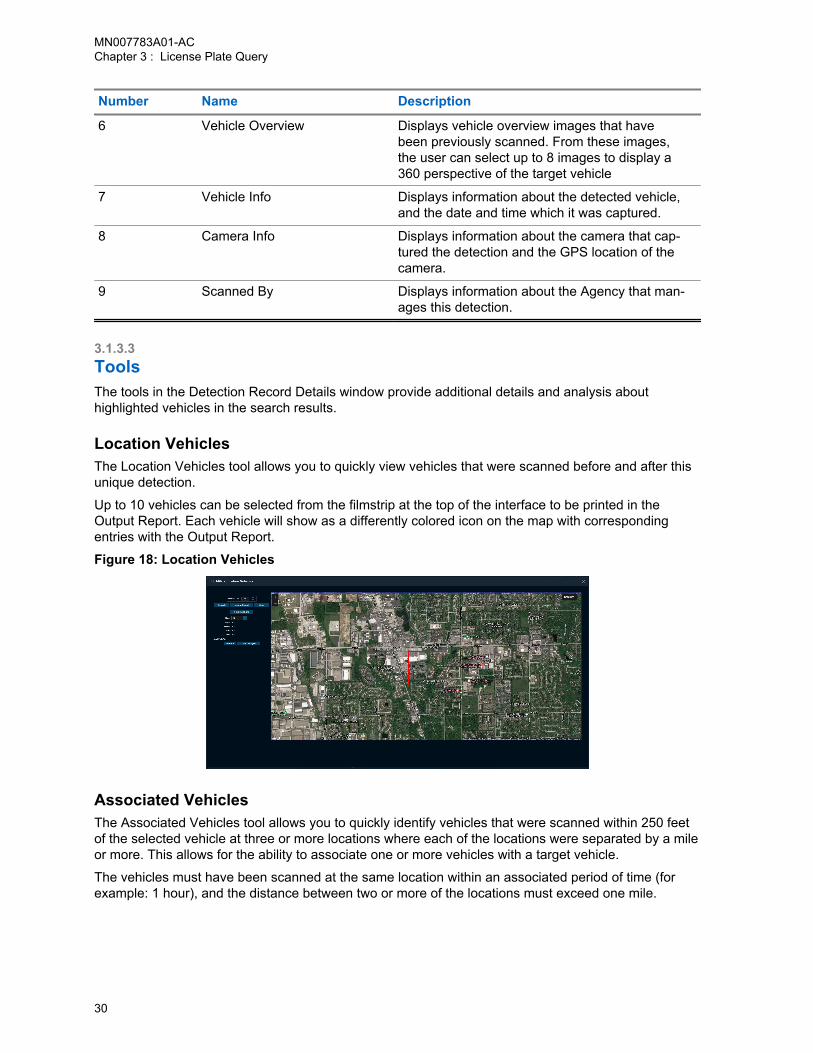
3.1.3.3ToolsThe tools in the Detection Record Details window provide additional details and analysis abouthighlighted vehicles in the search results.
Location VehiclesThe Location Vehicles tool allows you to quickly view vehicles that were scanned before and after thisunique detection.
Up to 10 vehicles can be selected from the filmstrip at the top of the interface to be printed in theOutput Report. Each vehicle will show as a differently colored icon on the map with correspondingentries with the Output Report.
Figure 18: Location Vehicles
Associated VehiclesThe Associated Vehicles tool allows you to quickly identify vehicles that were scanned within 250 feetof the selected vehicle at three or more locations where each of the locations were separated by a mileor more. This allows for the ability to associate one or more vehicles with a target vehicle.
The vehicles must have been scanned at the same location within an associated period of time (forexample: 1 hour), and the distance between two or more of the locations must exceed one mile.
MN007783A01-ACChapter 3 : License Plate Query
30
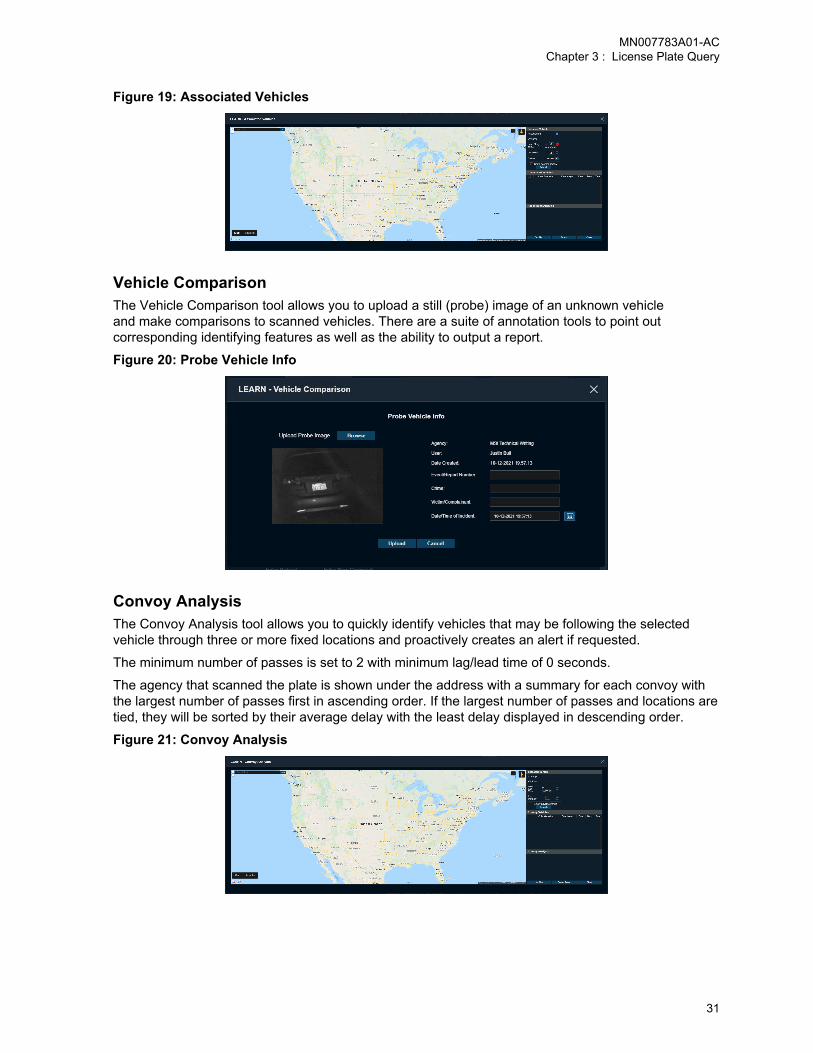
Figure 19: Associated Vehicles
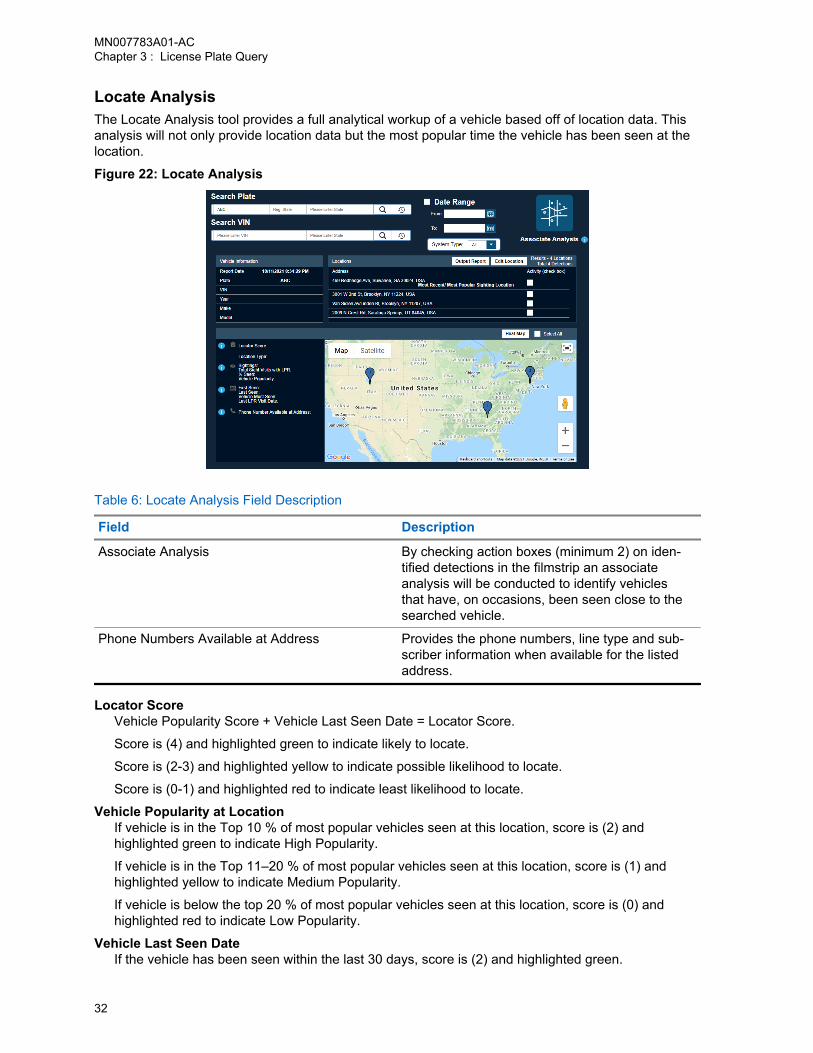
Vehicle ComparisonThe Vehicle Comparison tool allows you to upload a still (probe) image of an unknown vehicleand make comparisons to scanned vehicles. There are a suite of annotation tools to point outcorresponding identifying features as well as the ability to output a report.
Figure 20: Probe Vehicle Info
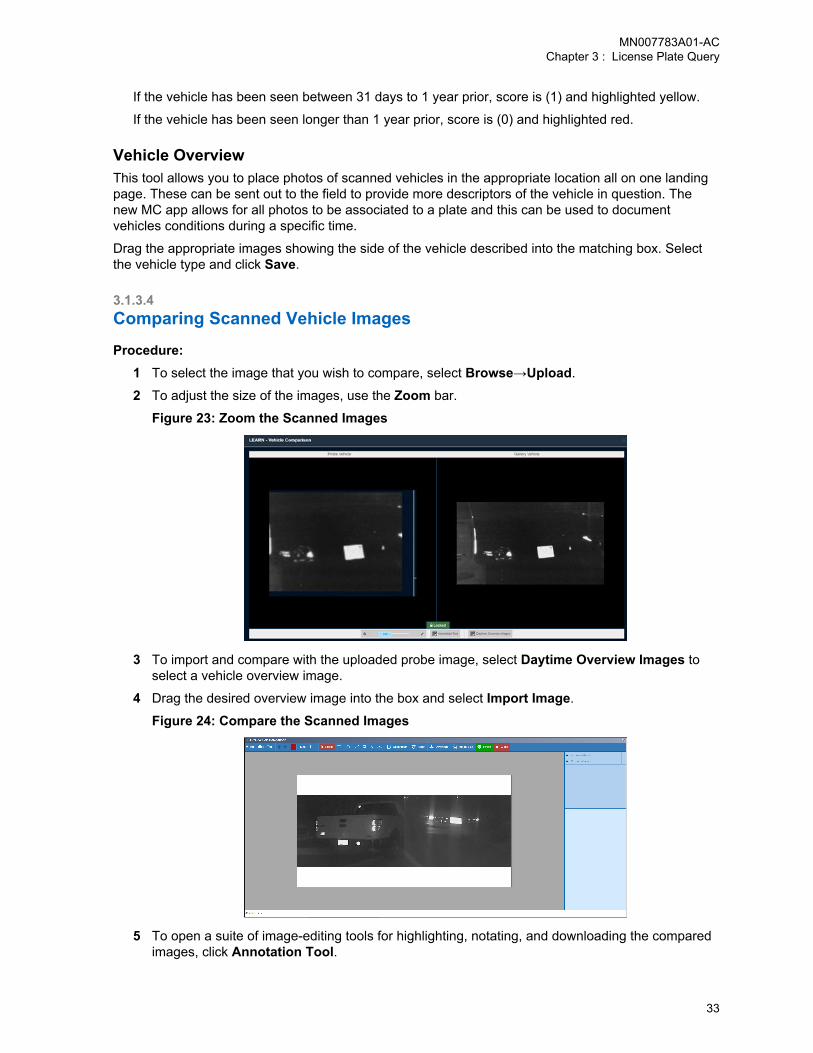
Convoy AnalysisThe Convoy Analysis tool allows you to quickly identify vehicles that may be following the selectedvehicle through three or more fixed locations and proactively creates an alert if requested.
The minimum number of passes is set to 2 with minimum lag/lead time of 0 seconds.
The agency that scanned the plate is shown under the address with a summary for each convoy withthe largest number of passes first in ascending order. If the largest number of passes and locations aretied, they will be sorted by their average delay with the least delay displayed in descending order.
Figure 21: Convoy Analysis
MN007783A01-ACChapter 3 : License Plate Query
31
Locate AnalysisThe Locate Analysis tool provides a full analytical workup of a vehicle based off of location data. Thisanalysis will not only provide location data but the most popular time the vehicle has been seen at thelocation.
Figure 22: Locate Analysis
Table 6: Locate Analysis Field Description
Field Description
Associate Analysis By checking action boxes (minimum 2) on iden-tified detections in the filmstrip an associateanalysis will be conducted to identify vehiclesthat have, on occasions, been seen close to thesearched vehicle.
Phone Numbers Available at Address Provides the phone numbers, line type and sub-scriber information when available for the listedaddress.
Locator ScoreVehicle Popularity Score + Vehicle Last Seen Date = Locator Score.
Score is (4) and highlighted green to indicate likely to locate.
Score is (2-3) and highlighted yellow to indicate possible likelihood to locate.
Score is (0-1) and highlighted red to indicate least likelihood to locate.
Vehicle Popularity at LocationIf vehicle is in the Top 10 % of most popular vehicles seen at this location, score is (2) andhighlighted green to indicate High Popularity.
If vehicle is in the Top 11–20 % of most popular vehicles seen at this location, score is (1) andhighlighted yellow to indicate Medium Popularity.
If vehicle is below the top 20 % of most popular vehicles seen at this location, score is (0) andhighlighted red to indicate Low Popularity.
Vehicle Last Seen DateIf the vehicle has been seen within the last 30 days, score is (2) and highlighted green.
MN007783A01-ACChapter 3 : License Plate Query
32
If the vehicle has been seen between 31 days to 1 year prior, score is (1) and highlighted yellow.
If the vehicle has been seen longer than 1 year prior, score is (0) and highlighted red.
Vehicle OverviewThis tool allows you to place photos of scanned vehicles in the appropriate location all on one landingpage. These can be sent out to the field to provide more descriptors of the vehicle in question. Thenew MC app allows for all photos to be associated to a plate and this can be used to documentvehicles conditions during a specific time.
Drag the appropriate images showing the side of the vehicle described into the matching box. Selectthe vehicle type and click Save.
3.1.3.4Comparing Scanned Vehicle Images
Procedure:1 To select the image that you wish to compare, select Browse→Upload.
2 To adjust the size of the images, use the Zoom bar.
Figure 23: Zoom the Scanned Images
3 To import and compare with the uploaded probe image, select Daytime Overview Images toselect a vehicle overview image.
4 Drag the desired overview image into the box and select Import Image.
Figure 24: Compare the Scanned Images
5 To open a suite of image-editing tools for highlighting, notating, and downloading the comparedimages, click Annotation Tool.
MN007783A01-ACChapter 3 : License Plate Query
33
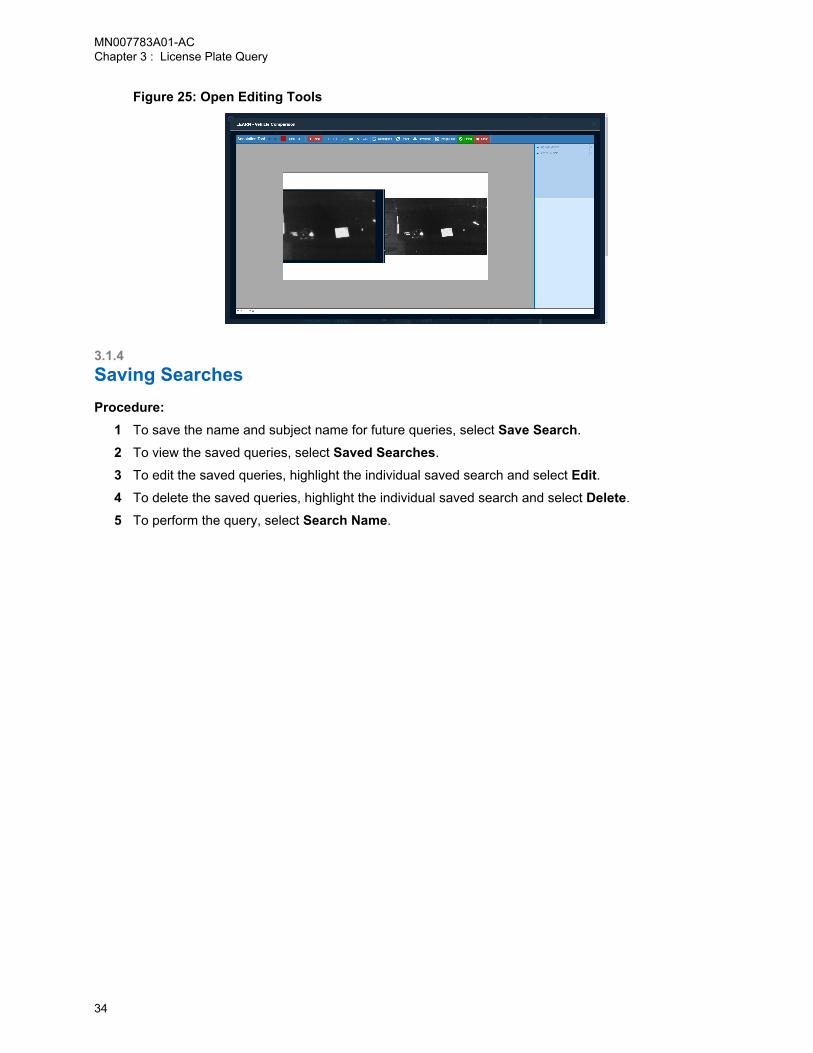
Figure 25: Open Editing Tools
3.1.4Saving SearchesProcedure:
1 To save the name and subject name for future queries, select Save Search.
2 To view the saved queries, select Saved Searches.
3 To edit the saved queries, highlight the individual saved search and select Edit.4 To delete the saved queries, highlight the individual saved search and select Delete.
5 To perform the query, select Search Name.
MN007783A01-ACChapter 3 : License Plate Query
34
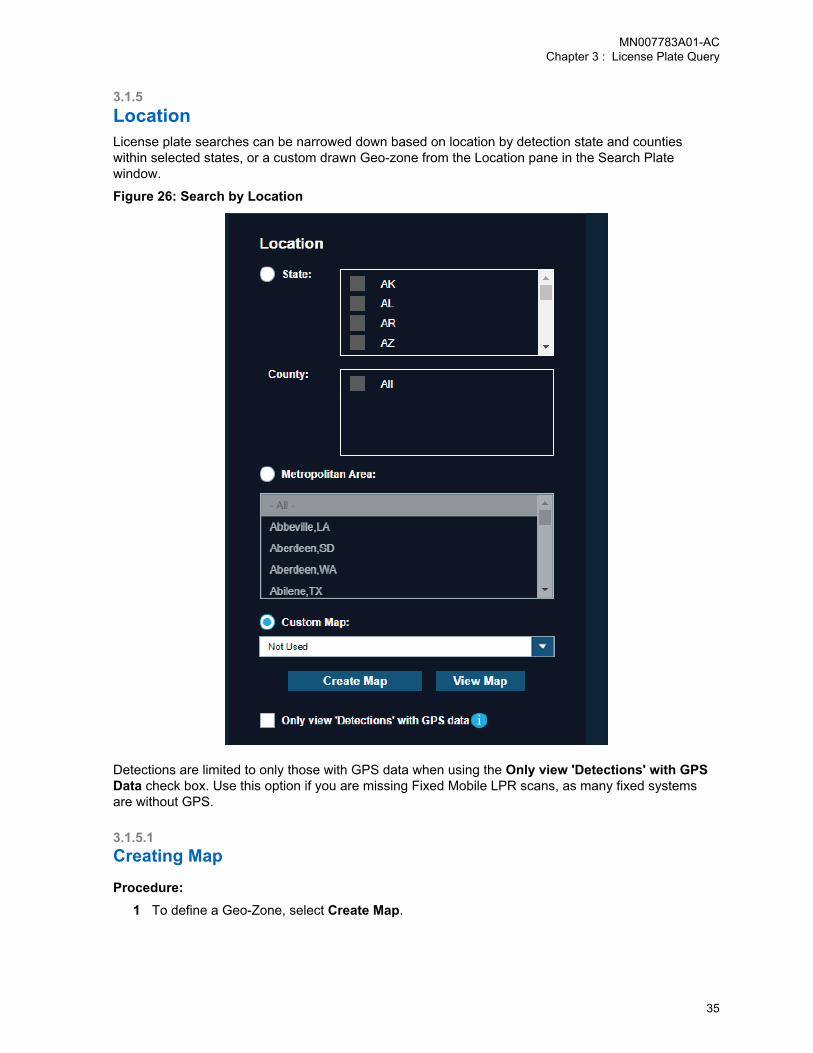
3.1.5LocationLicense plate searches can be narrowed down based on location by detection state and countieswithin selected states, or a custom drawn Geo-zone from the Location pane in the Search Platewindow.
Figure 26: Search by Location
Detections are limited to only those with GPS data when using the Only view 'Detections' with GPSData check box. Use this option if you are missing Fixed Mobile LPR scans, as many fixed systemsare without GPS.
3.1.5.1Creating Map
Procedure:1 To define a Geo-Zone, select Create Map.
MN007783A01-ACChapter 3 : License Plate Query
35
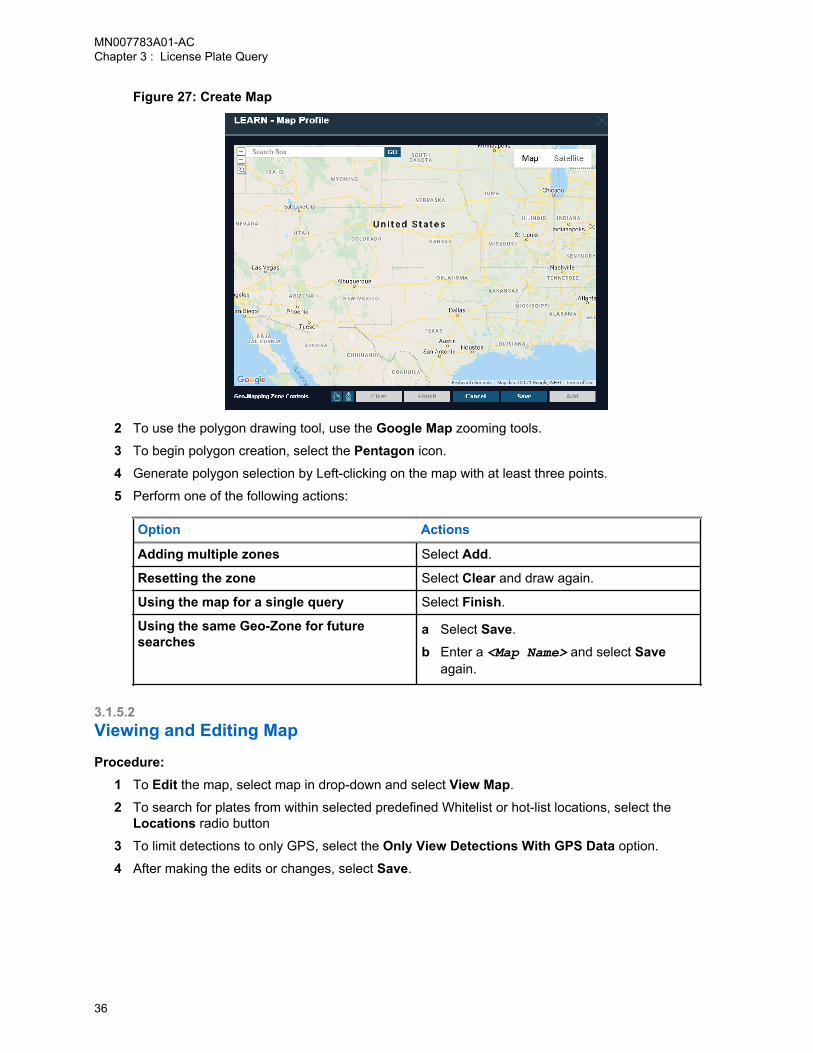
Figure 27: Create Map
2 To use the polygon drawing tool, use the Google Map zooming tools.
3 To begin polygon creation, select the Pentagon icon.
4 Generate polygon selection by Left-clicking on the map with at least three points.
5 Perform one of the following actions:
Option Actions
Adding multiple zones Select Add.
Resetting the zone Select Clear and draw again.
Using the map for a single query Select Finish.
Using the same Geo-Zone for futuresearches
a Select Save.
b Enter a <Map Name> and select Saveagain.
3.1.5.2Viewing and Editing Map
Procedure:1 To Edit the map, select map in drop-down and select View Map.
2 To search for plates from within selected predefined Whitelist or hot-list locations, select theLocations radio button
3 To limit detections to only GPS, select the Only View Detections With GPS Data option.
4 After making the edits or changes, select Save.
MN007783A01-ACChapter 3 : License Plate Query
36
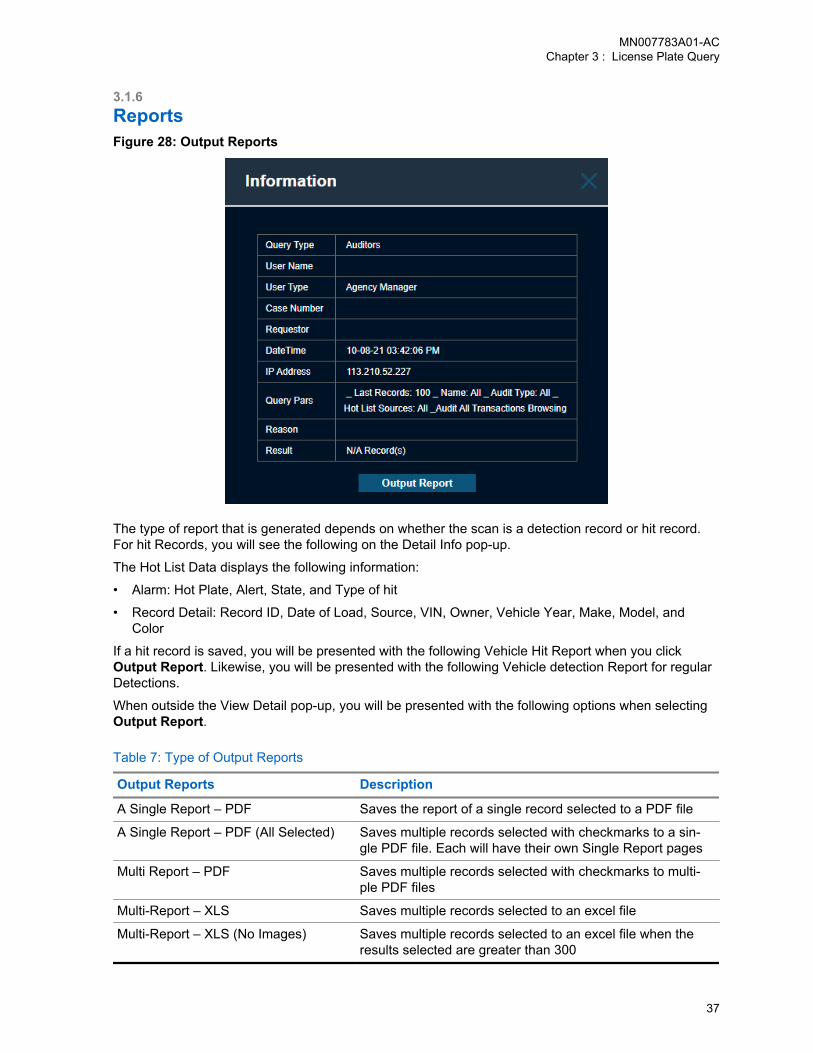
3.1.6ReportsFigure 28: Output Reports
The type of report that is generated depends on whether the scan is a detection record or hit record.For hit Records, you will see the following on the Detail Info pop-up.
The Hot List Data displays the following information:
• Alarm: Hot Plate, Alert, State, and Type of hit
• Record Detail: Record ID, Date of Load, Source, VIN, Owner, Vehicle Year, Make, Model, andColor
If a hit record is saved, you will be presented with the following Vehicle Hit Report when you clickOutput Report. Likewise, you will be presented with the following Vehicle detection Report for regularDetections.
When outside the View Detail pop-up, you will be presented with the following options when selectingOutput Report.
Table 7: Type of Output Reports
Output Reports Description
A Single Report – PDF Saves the report of a single record selected to a PDF file
A Single Report – PDF (All Selected) Saves multiple records selected with checkmarks to a sin-gle PDF file. Each will have their own Single Report pages
Multi Report – PDF Saves multiple records selected with checkmarks to multi-ple PDF files
Multi-Report – XLS Saves multiple records selected to an excel file
Multi-Report – XLS (No Images) Saves multiple records selected to an excel file when theresults selected are greater than 300
MN007783A01-ACChapter 3 : License Plate Query
37

3.1.7Associate AnalysisFigure 29: Associate Analysis
This feature allows you to select multiple detections of a known plate to determine if there are otherlicense plate commonly seen near the known plate. When selecting plates of interest and then clickingon Associate Analysis, you will be presented with the Analyze with Stakeout pop-up box that allowsyou to alter their desired selections.
The following information is displayed:
Table 8: Associate Analysis Information Description
Information Description
Plate Record # As seen in the main table and will be presentedwith the Plate read.
Time From and Time To Control how far before and after the scan tolook for an Associate plate. By default, thetimes are 12 hours before and 12 hours afterthe time of the detection.
Infrared Plate and Color Overview Scan Each scan will have a separate location even ifthey overlap.
Map A map will be presented with the ability to hov-er over the images and map for a large view.When you click on the map, you will be present-ed with closest address at the bottom of map tohelp determine if this is the desired location.
Location Type An indicator to the location of the scan can beone of the following: Residential, Retail Area orPublic Place, or Mixed Residential.
NOTE: You can wish to remove plates that appear in the same location repeatedly as this willlikely generate an associate list of vehicles owned by neighbors, coworkers, and so on.
MN007783A01-ACChapter 3 : License Plate Query
38
Chapter 4
Agency ManagementNOTE: This section is only applicable to Agency Managers.
4.1My AgencyAs an agency manager, you are allowed to view, add, create, or remove other agency managers fortheir agency.
Within My Agency, you can set a geographic zone area by drawing an agency-limiting zone using apolygon drawing tool. This zone prevents the view of any detections/hits outside of the zone to theagency users. This is not required if no geographic restrictions are desired.
4.1.1Managing AgencyProcedure:
1 To manage the agency, go to Agency Management →My Agency.
2 To enable Multi-Factor Authentication, check Enable Multi-Factor Authentication for Login.
NOTE: Agency Manager has the option to enable multifactor login for their users withoutneeding to contact Vigilant support. Agency Manager is allowed to do normal user levelactions without the Multi-Factor Authentication. If the Agency managers try to access theagency management page, they would have to authenticate before accessing. This is notapplicable to the Vigilant LEARN Australia server.
3 If required, set the number of days to retain the agency Detection data or Hit data.
MN007783A01-ACAgency Management
39

Figure 30: Agency Management
NOTE: Data retention should be set as per the agency policy and/or local legislation. Ifthere is no such information and if indefinite retention is not desired, a best practice is 5years (1825 days) to cover statutes of limitations for most Part I Major Crimes. Even if anagency shares to NVLS (see Detection Information Sharing), the data still belongs to theagency and is still governed by the agency Data Retention Policy.
4 To set the geographic zoning, select Default Zone→Draw Geo-zone.
NOTE: For more information, see Drawing Geographic Zoning on page 17.
4.1.2Creating AgencyProcedure:
1 To create an agency, select Create.
MN007783A01-ACChapter 4 : Agency Management
40
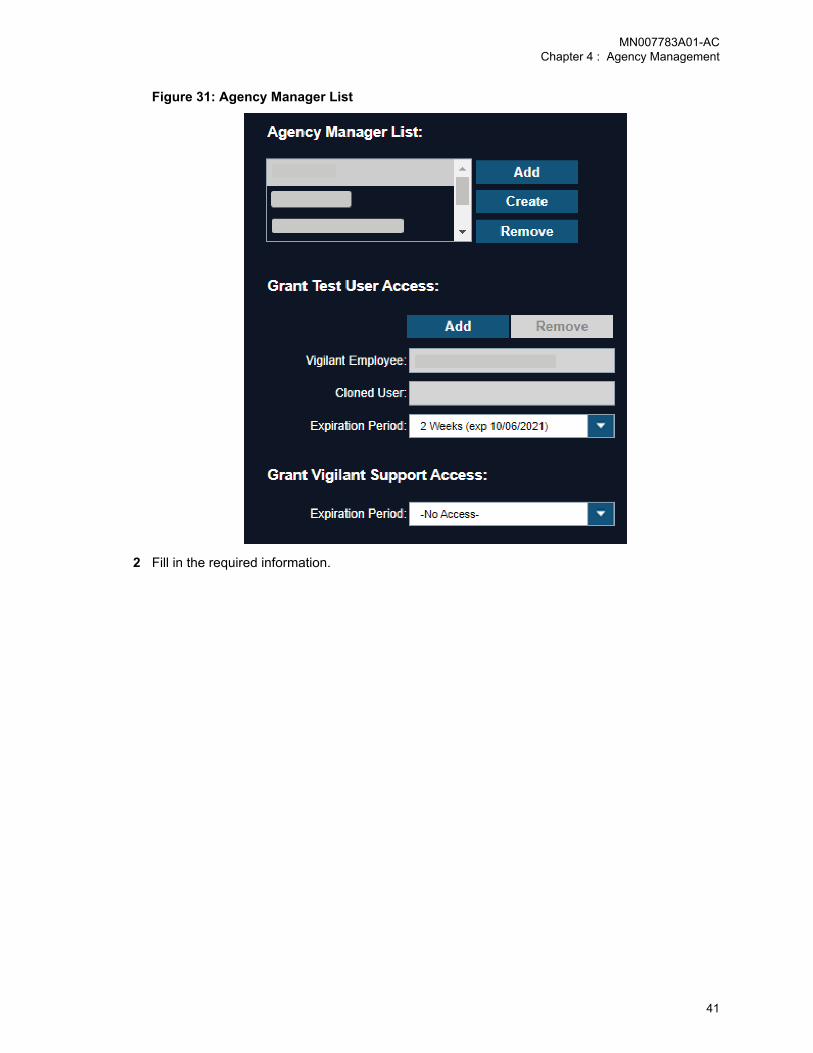
Figure 31: Agency Manager List
2 Fill in the required information.
MN007783A01-ACChapter 4 : Agency Management
41
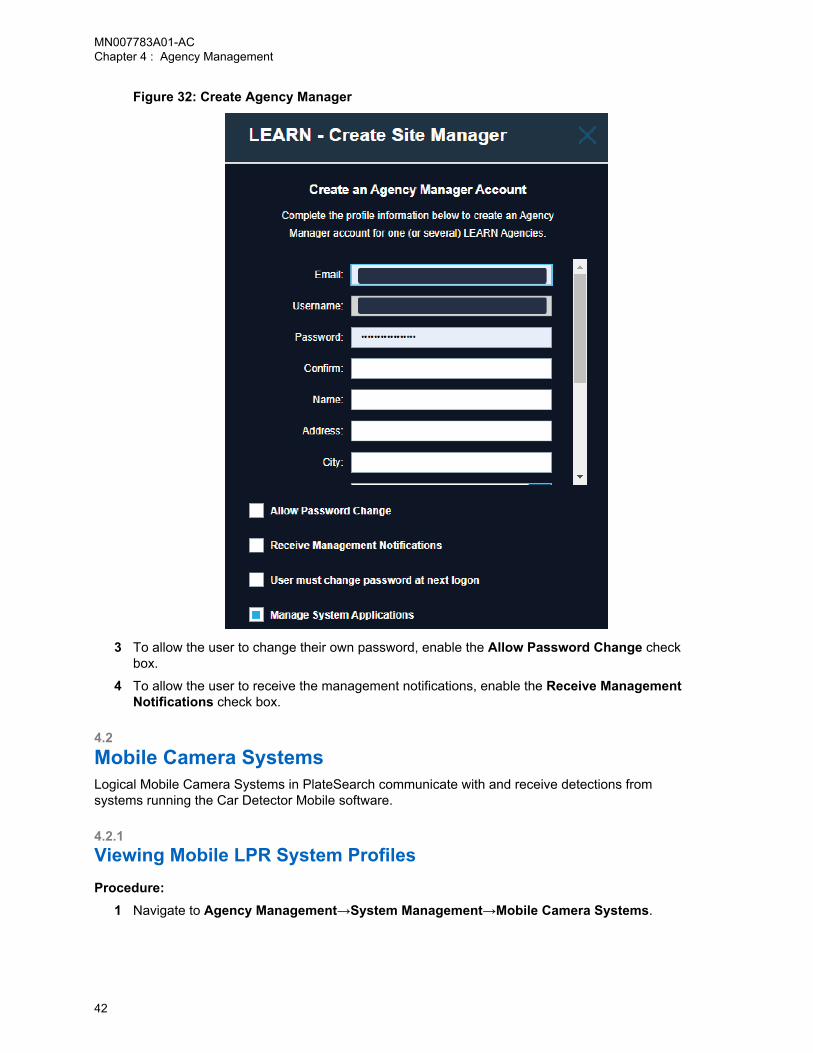
Figure 32: Create Agency Manager
3 To allow the user to change their own password, enable the Allow Password Change checkbox.
4 To allow the user to receive the management notifications, enable the Receive ManagementNotifications check box.
4.2Mobile Camera SystemsLogical Mobile Camera Systems in PlateSearch communicate with and receive detections fromsystems running the Car Detector Mobile software.
4.2.1Viewing Mobile LPR System ProfilesProcedure:
1 Navigate to Agency Management→System Management→Mobile Camera Systems.
MN007783A01-ACChapter 4 : Agency Management
42
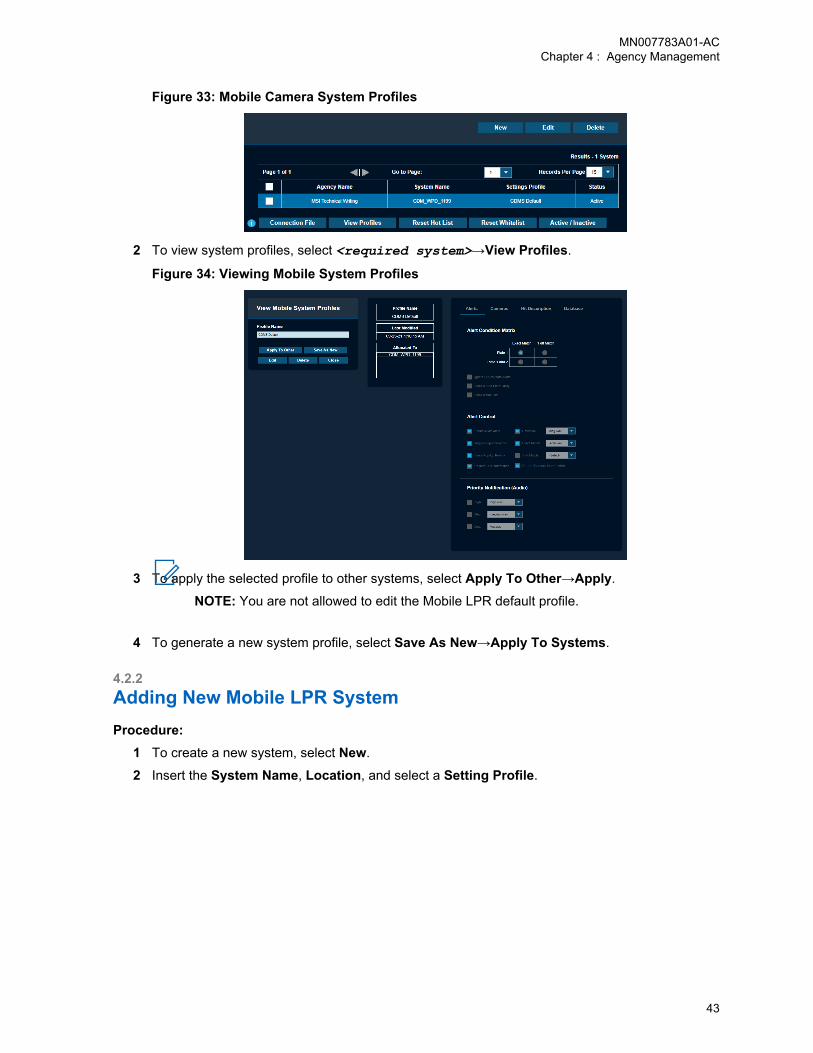
Figure 33: Mobile Camera System Profiles
2 To view system profiles, select <required system>→View Profiles.
Figure 34: Viewing Mobile System Profiles
3 To apply the selected profile to other systems, select Apply To Other→Apply.
NOTE: You are not allowed to edit the Mobile LPR default profile.
4 To generate a new system profile, select Save As New→Apply To Systems.
4.2.2Adding New Mobile LPR SystemProcedure:
1 To create a new system, select New.
2 Insert the System Name, Location, and select a Setting Profile.
MN007783A01-ACChapter 4 : Agency Management
43
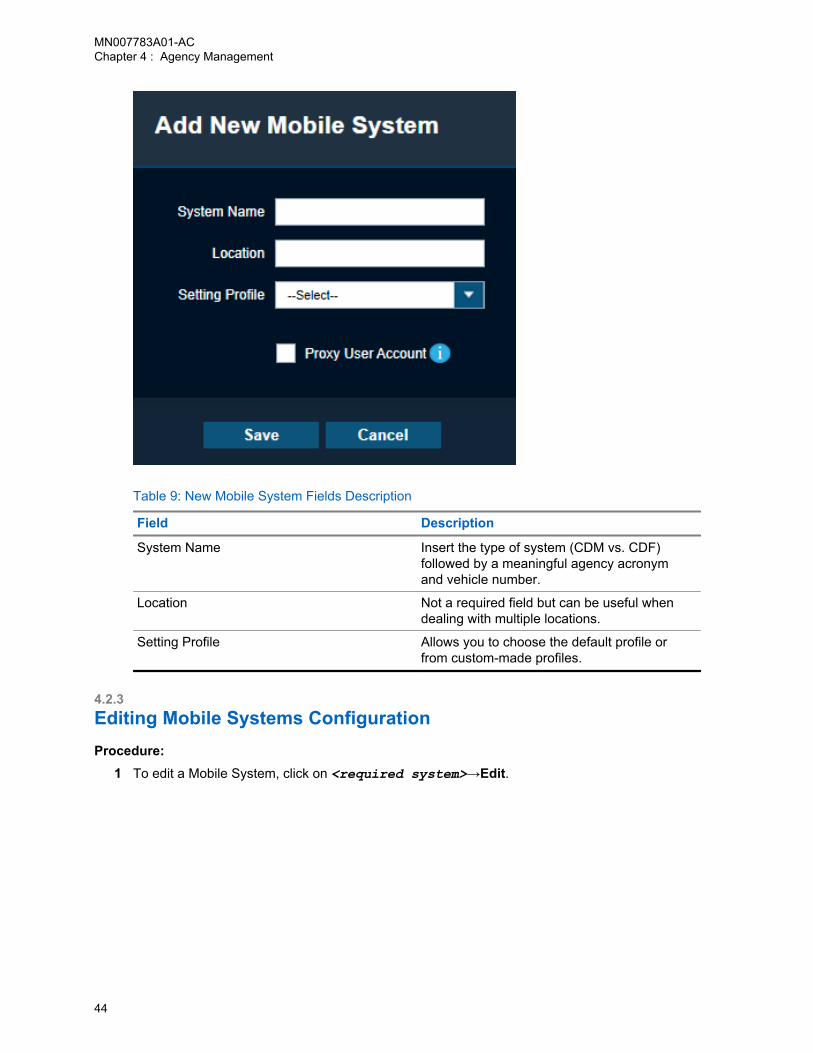
Table 9: New Mobile System Fields Description
Field Description
System Name Insert the type of system (CDM vs. CDF)followed by a meaningful agency acronymand vehicle number.
Location Not a required field but can be useful whendealing with multiple locations.
Setting Profile Allows you to choose the default profile orfrom custom-made profiles.
4.2.3Editing Mobile Systems ConfigurationProcedure:
1 To edit a Mobile System, click on <required system>→Edit.
MN007783A01-ACChapter 4 : Agency Management
44
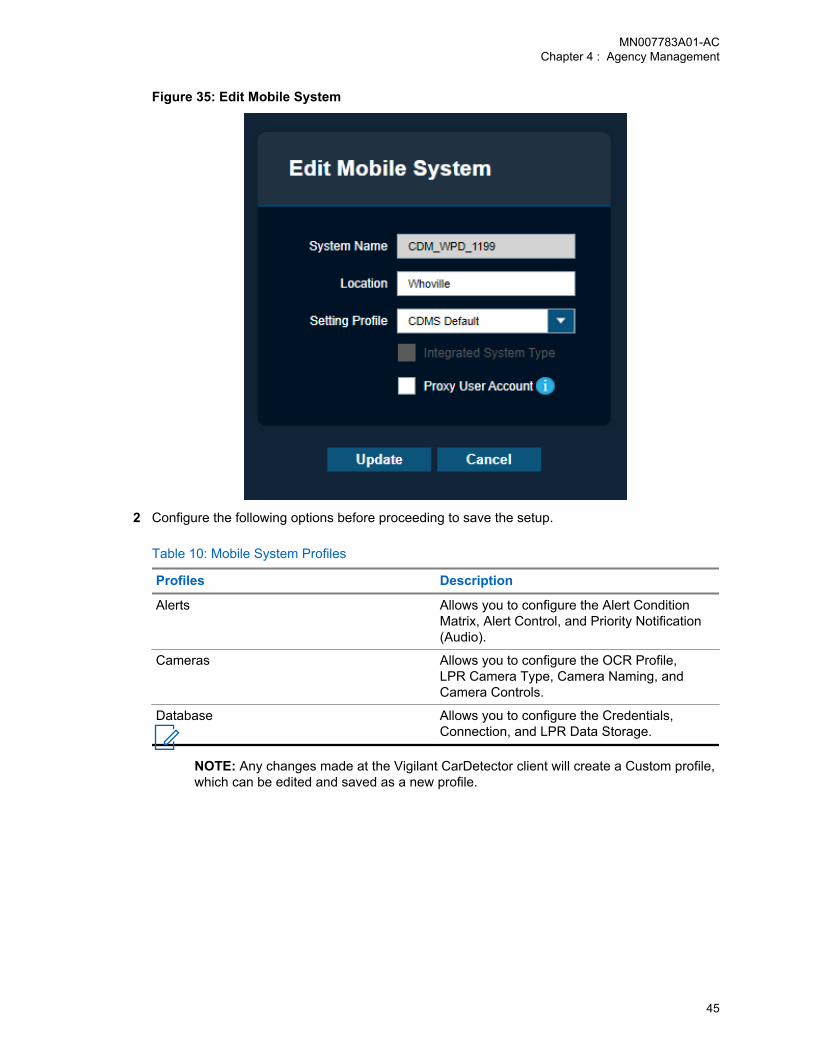
Figure 35: Edit Mobile System
2 Configure the following options before proceeding to save the setup.
Table 10: Mobile System Profiles
Profiles Description
Alerts Allows you to configure the Alert ConditionMatrix, Alert Control, and Priority Notification(Audio).
Cameras Allows you to configure the OCR Profile,LPR Camera Type, Camera Naming, andCamera Controls.
Database Allows you to configure the Credentials,Connection, and LPR Data Storage.
NOTE: Any changes made at the Vigilant CarDetector client will create a Custom profile,which can be edited and saved as a new profile.
MN007783A01-ACChapter 4 : Agency Management
45

4.2.3.1Adjusting the Alert Condition MatrixFigure 36: Alert Condition Matrix
Procedure:1 Choose the following condition according to your preference:
Table 11: Alert Conditions Description
Alert Conditions Description
Plate 1 Alerts you when there is a match (detection = hot-plate) on thefirst attempted Optical Character Recognition (OCR). For cap-tured images, the system can have multiple scans for characterrecognition.
Plate 1 And 2 Allows multiple OCR attempts on the same capture to increasethe chance of a match, If there are misreads associated withsimilar characters like 8 vs B, O vs Q.
NOTE: Recommend putting PLATE 1 as default inmost situations to prevent the increase rate of false-positive matches. Unless the Hot List is small or theplates are harder to read OCR.
Exact Match Alerts you when there is an exact match between the detectionand hot plate record.
1 Off Match Alerts you when there is one character off. For example, a plateis scanned with A8C123, and the hot-plate is ABC123.
NOTE: Recommend using Exact Match as default formost situations.
2 To lock the Mobile LPR System from allowing you to add plates from the client, select DisableAdd Plate Utility.
3 To only be alerted if a hot plate has a correct State ID associated with the location of thecapture, select Ignore Out-of-state Alerts.
MN007783A01-ACChapter 4 : Agency Management
46
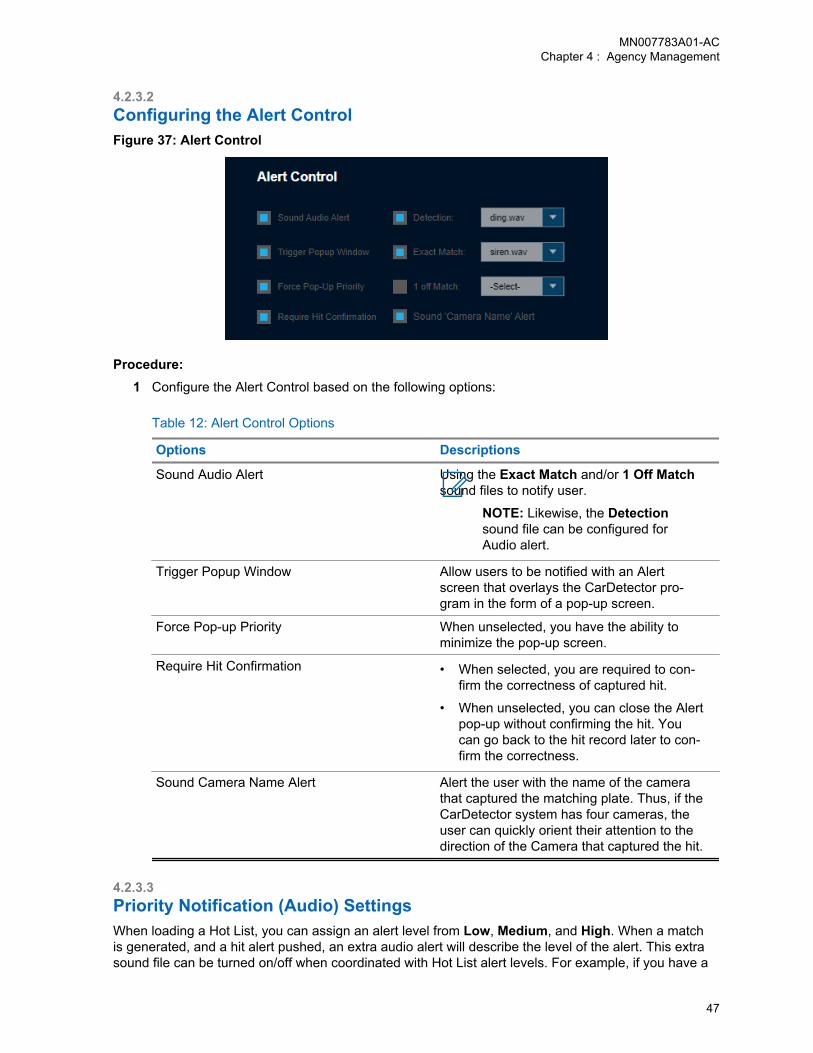
4.2.3.2Configuring the Alert ControlFigure 37: Alert Control
Procedure:1 Configure the Alert Control based on the following options:
Table 12: Alert Control Options
Options Descriptions
Sound Audio Alert Using the Exact Match and/or 1 Off Matchsound files to notify user.
NOTE: Likewise, the Detectionsound file can be configured forAudio alert.
Trigger Popup Window Allow users to be notified with an Alertscreen that overlays the CarDetector pro-gram in the form of a pop-up screen.
Force Pop-up Priority When unselected, you have the ability tominimize the pop-up screen.
Require Hit Confirmation • When selected, you are required to con-firm the correctness of captured hit.
• When unselected, you can close the Alertpop-up without confirming the hit. Youcan go back to the hit record later to con-firm the correctness.
Sound Camera Name Alert Alert the user with the name of the camerathat captured the matching plate. Thus, if theCarDetector system has four cameras, theuser can quickly orient their attention to thedirection of the Camera that captured the hit.
4.2.3.3Priority Notification (Audio) Settings When loading a Hot List, you can assign an alert level from Low, Medium, and High. When a matchis generated, and a hit alert pushed, an extra audio alert will describe the level of the alert. This extrasound file can be turned on/off when coordinated with Hot List alert levels. For example, if you have a
MN007783A01-ACChapter 4 : Agency Management
47

Hot List with low priority, perhaps no audio alert is needed. However, if you had a Hot List with highlevel, you would desire an extra audio alert in the audio notice.
Figure 38: Priority Notification (Audio)
MN007783A01-ACChapter 4 : Agency Management
48
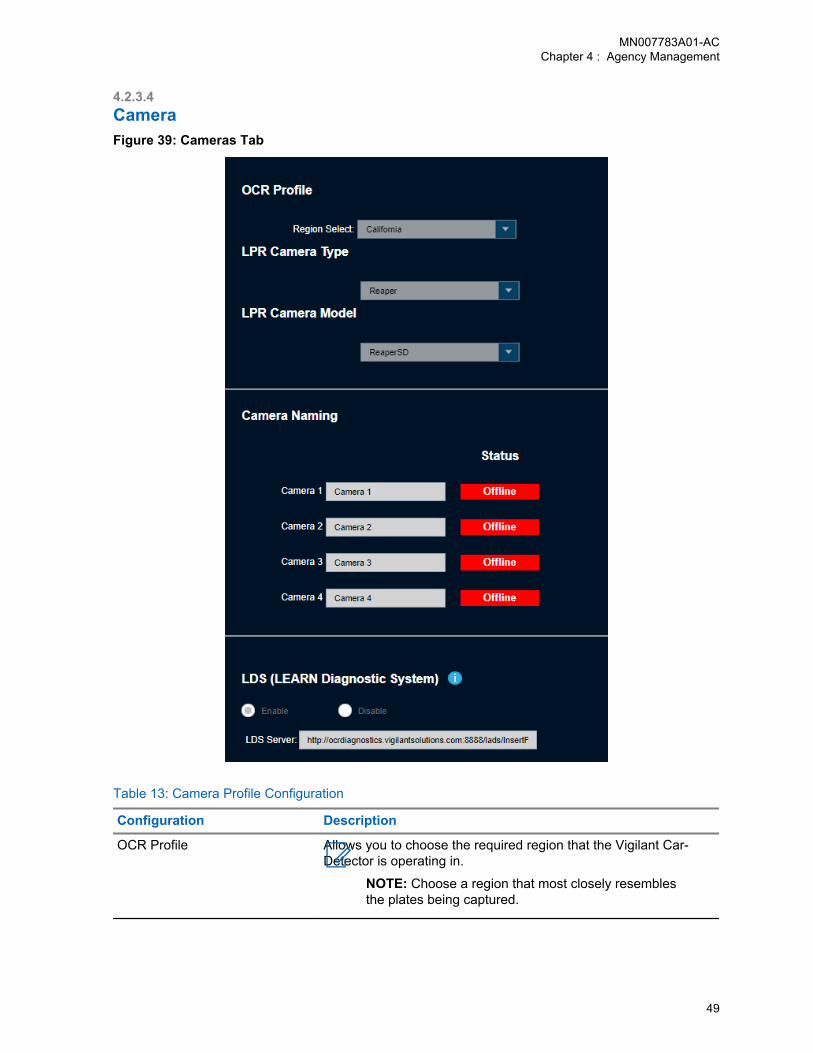
4.2.3.4CameraFigure 39: Cameras Tab
Table 13: Camera Profile Configuration
Configuration Description
OCR Profile Allows you to choose the required region that the Vigilant Car-Detector is operating in.
NOTE: Choose a region that most closely resemblesthe plates being captured.
MN007783A01-ACChapter 4 : Agency Management
49
Configuration Description
LPR Camera Type Allows you to choose the types of LPR camera that is currentlyusing.
NOTE: Choosing the correct type of camera allows foroptimum capture rates as the algorithms are designedaround the video collected on the different hardware.
Camera Naming Allows you to control specific names based on the camera ori-entation. In most scenarios, the camera orientation will not beknown until configured in the vehicle.
Camera Controls This configuration is based on your LPR camera type and willallow you to control hardware settings when connected throughRS232 or RS485 cable.
MN007783A01-ACChapter 4 : Agency Management
50
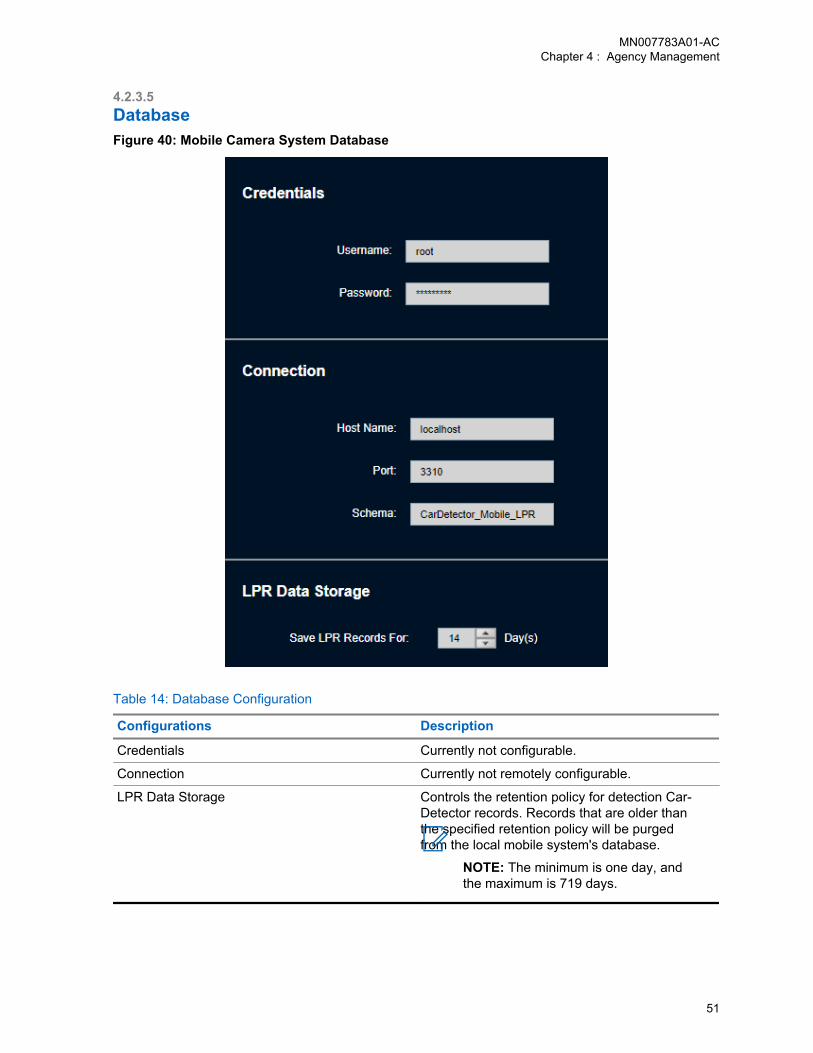
4.2.3.5DatabaseFigure 40: Mobile Camera System Database
Table 14: Database Configuration
Configurations Description
Credentials Currently not configurable.
Connection Currently not remotely configurable.
LPR Data Storage Controls the retention policy for detection Car-Detector records. Records that are older thanthe specified retention policy will be purgedfrom the local mobile system's database.
NOTE: The minimum is one day, andthe maximum is 719 days.
MN007783A01-ACChapter 4 : Agency Management
51
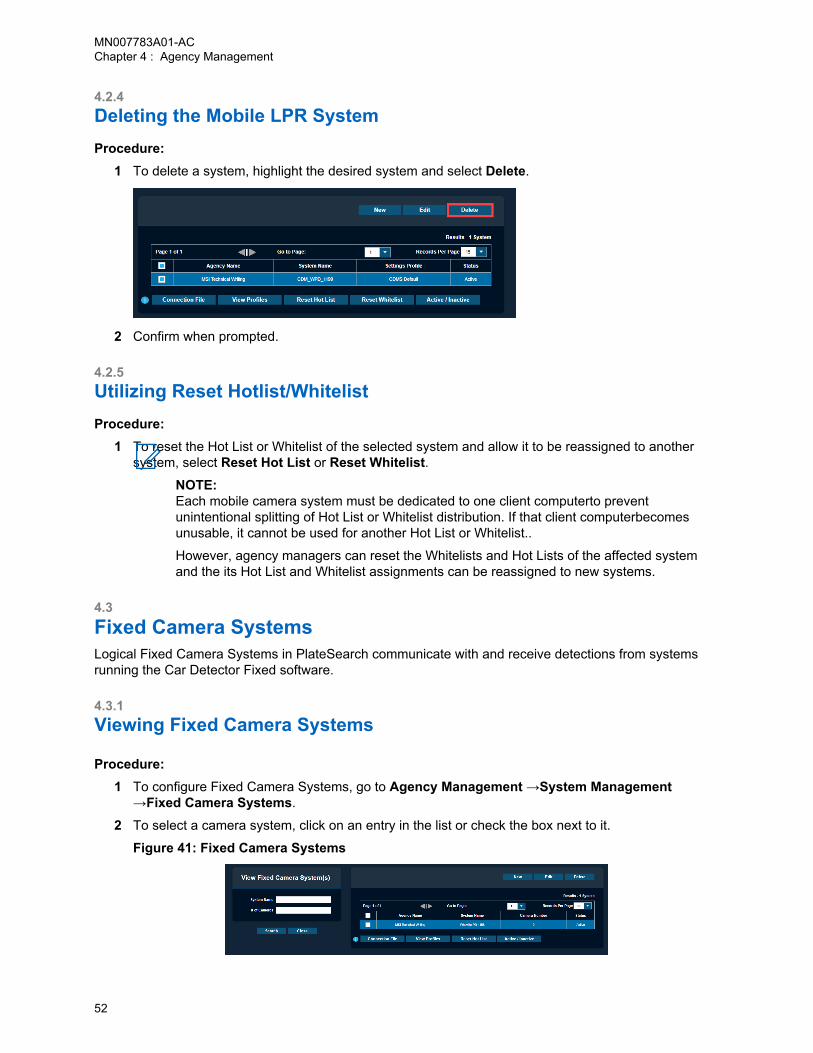
4.2.4Deleting the Mobile LPR System Procedure:
1 To delete a system, highlight the desired system and select Delete.
2 Confirm when prompted.
4.2.5Utilizing Reset Hotlist/WhitelistProcedure:
1 To reset the Hot List or Whitelist of the selected system and allow it to be reassigned to anothersystem, select Reset Hot List or Reset Whitelist.
NOTE:Each mobile camera system must be dedicated to one client computerto preventunintentional splitting of Hot List or Whitelist distribution. If that client computerbecomesunusable, it cannot be used for another Hot List or Whitelist..
However, agency managers can reset the Whitelists and Hot Lists of the affected systemand the its Hot List and Whitelist assignments can be reassigned to new systems.
4.3Fixed Camera SystemsLogical Fixed Camera Systems in PlateSearch communicate with and receive detections from systemsrunning the Car Detector Fixed software.
4.3.1Viewing Fixed Camera Systems
Procedure:1 To configure Fixed Camera Systems, go to Agency Management →System Management
→Fixed Camera Systems.
2 To select a camera system, click on an entry in the list or check the box next to it.
Figure 41: Fixed Camera Systems
MN007783A01-ACChapter 4 : Agency Management
52
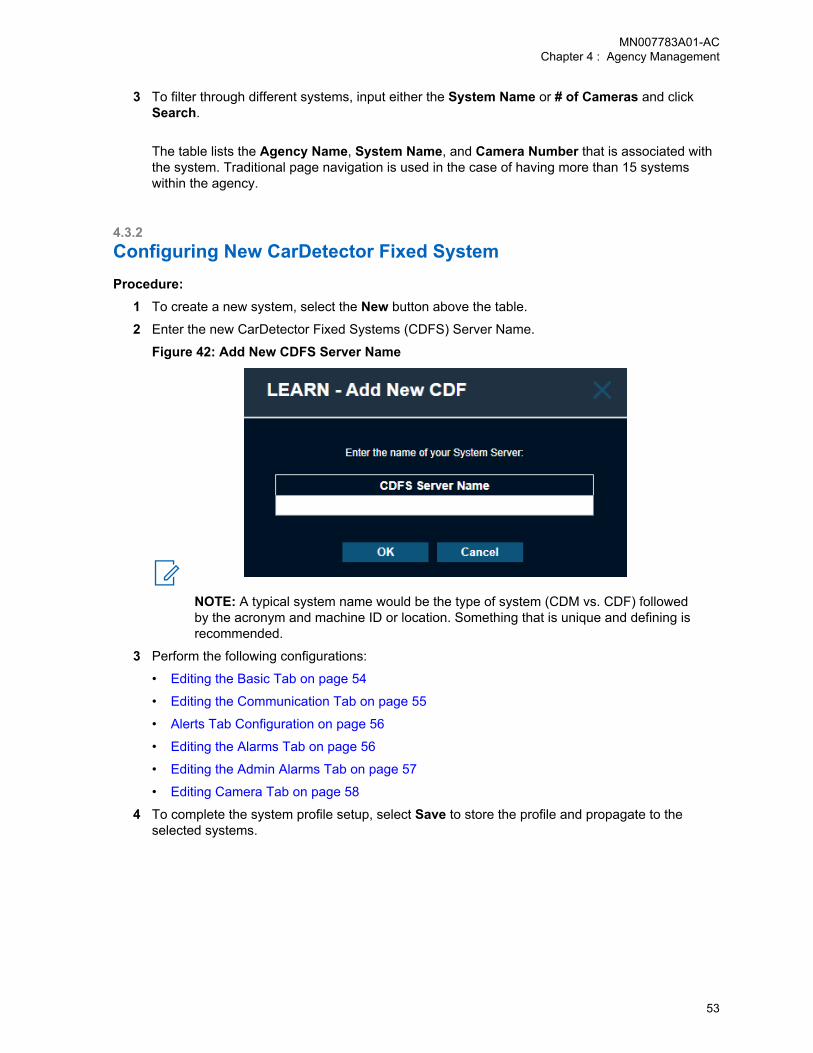
3 To filter through different systems, input either the System Name or # of Cameras and clickSearch.
The table lists the Agency Name, System Name, and Camera Number that is associated withthe system. Traditional page navigation is used in the case of having more than 15 systemswithin the agency.
4.3.2Configuring New CarDetector Fixed SystemProcedure:
1 To create a new system, select the New button above the table.
2 Enter the new CarDetector Fixed Systems (CDFS) Server Name.
Figure 42: Add New CDFS Server Name
NOTE: A typical system name would be the type of system (CDM vs. CDF) followedby the acronym and machine ID or location. Something that is unique and defining isrecommended.
3 Perform the following configurations:
• Editing the Basic Tab on page 54
• Editing the Communication Tab on page 55
• Alerts Tab Configuration on page 56
• Editing the Alarms Tab on page 56
• Editing the Admin Alarms Tab on page 57
• Editing Camera Tab on page 58
4 To complete the system profile setup, select Save to store the profile and propagate to theselected systems.
MN007783A01-ACChapter 4 : Agency Management
53
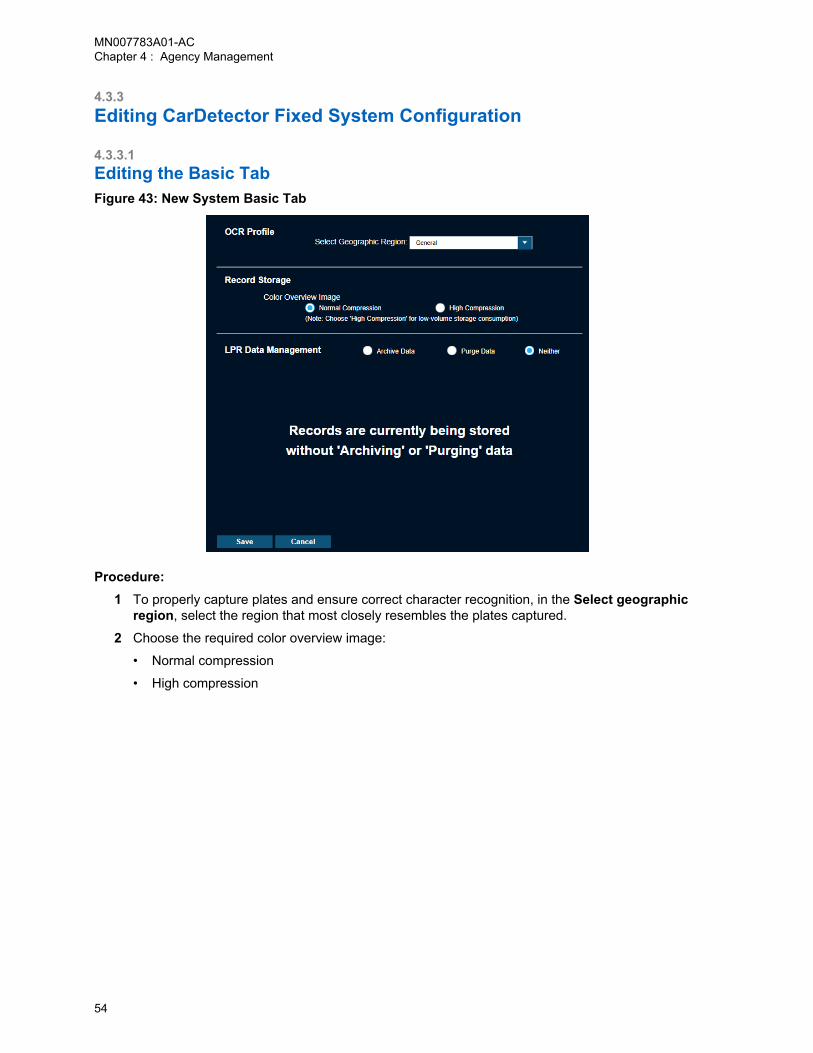
4.3.3Editing CarDetector Fixed System Configuration
4.3.3.1Editing the Basic TabFigure 43: New System Basic Tab
Procedure:1 To properly capture plates and ensure correct character recognition, in the Select geographic
region, select the region that most closely resembles the plates captured.
2 Choose the required color overview image:
• Normal compression
• High compression
MN007783A01-ACChapter 4 : Agency Management
54
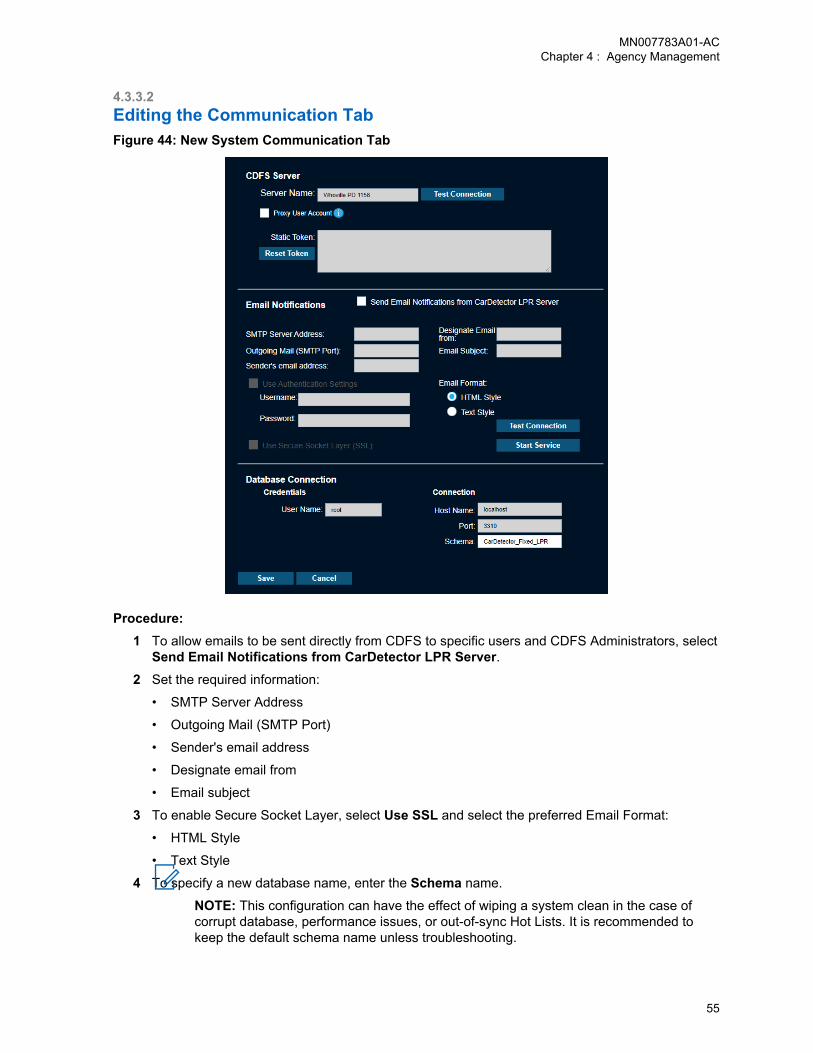
4.3.3.2Editing the Communication TabFigure 44: New System Communication Tab
Procedure:1 To allow emails to be sent directly from CDFS to specific users and CDFS Administrators, select
Send Email Notifications from CarDetector LPR Server.2 Set the required information:
• SMTP Server Address
• Outgoing Mail (SMTP Port)
• Sender's email address
• Designate email from
• Email subject
3 To enable Secure Socket Layer, select Use SSL and select the preferred Email Format:
• HTML Style
• Text Style
4 To specify a new database name, enter the Schema name.
NOTE: This configuration can have the effect of wiping a system clean in the case ofcorrupt database, performance issues, or out-of-sync Hot Lists. It is recommended tokeep the default schema name unless troubleshooting.
MN007783A01-ACChapter 4 : Agency Management
55
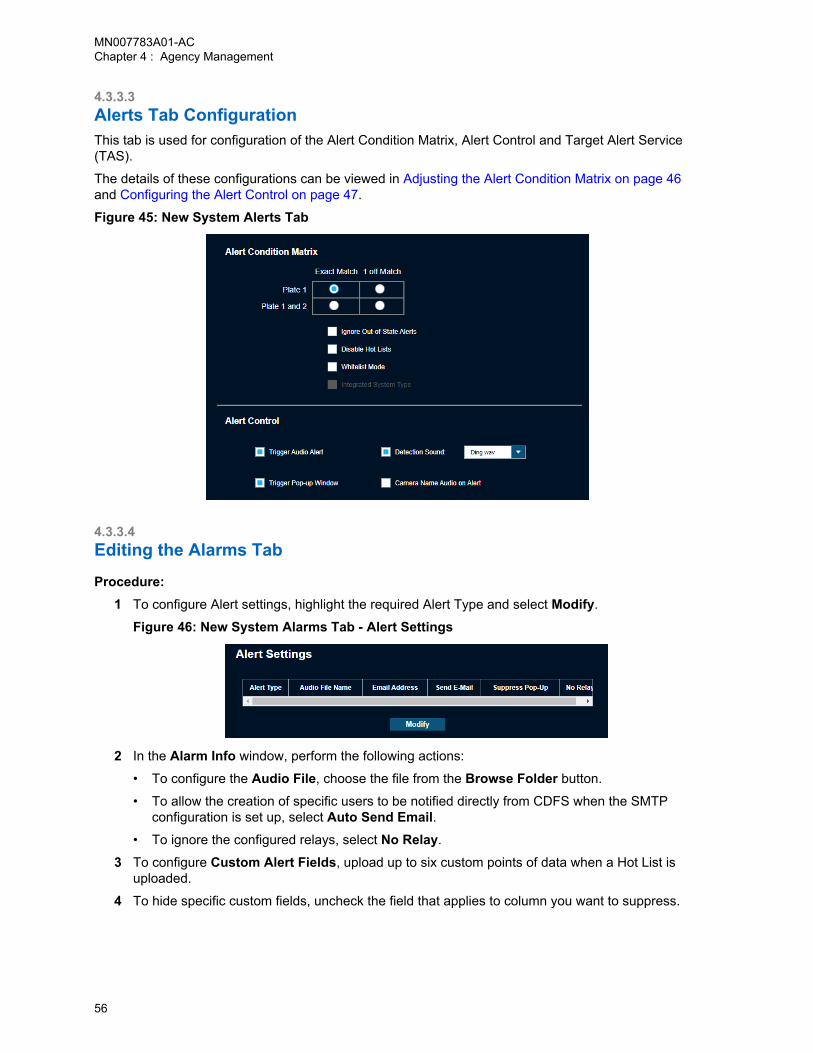
4.3.3.3Alerts Tab ConfigurationThis tab is used for configuration of the Alert Condition Matrix, Alert Control and Target Alert Service(TAS).
The details of these configurations can be viewed in Adjusting the Alert Condition Matrix on page 46and Configuring the Alert Control on page 47.
Figure 45: New System Alerts Tab
4.3.3.4Editing the Alarms Tab
Procedure:1 To configure Alert settings, highlight the required Alert Type and select Modify.
Figure 46: New System Alarms Tab - Alert Settings
2 In the Alarm Info window, perform the following actions:
• To configure the Audio File, choose the file from the Browse Folder button.
• To allow the creation of specific users to be notified directly from CDFS when the SMTPconfiguration is set up, select Auto Send Email.
• To ignore the configured relays, select No Relay.
3 To configure Custom Alert Fields, upload up to six custom points of data when a Hot List isuploaded.
4 To hide specific custom fields, uncheck the field that applies to column you want to suppress.
MN007783A01-ACChapter 4 : Agency Management
56
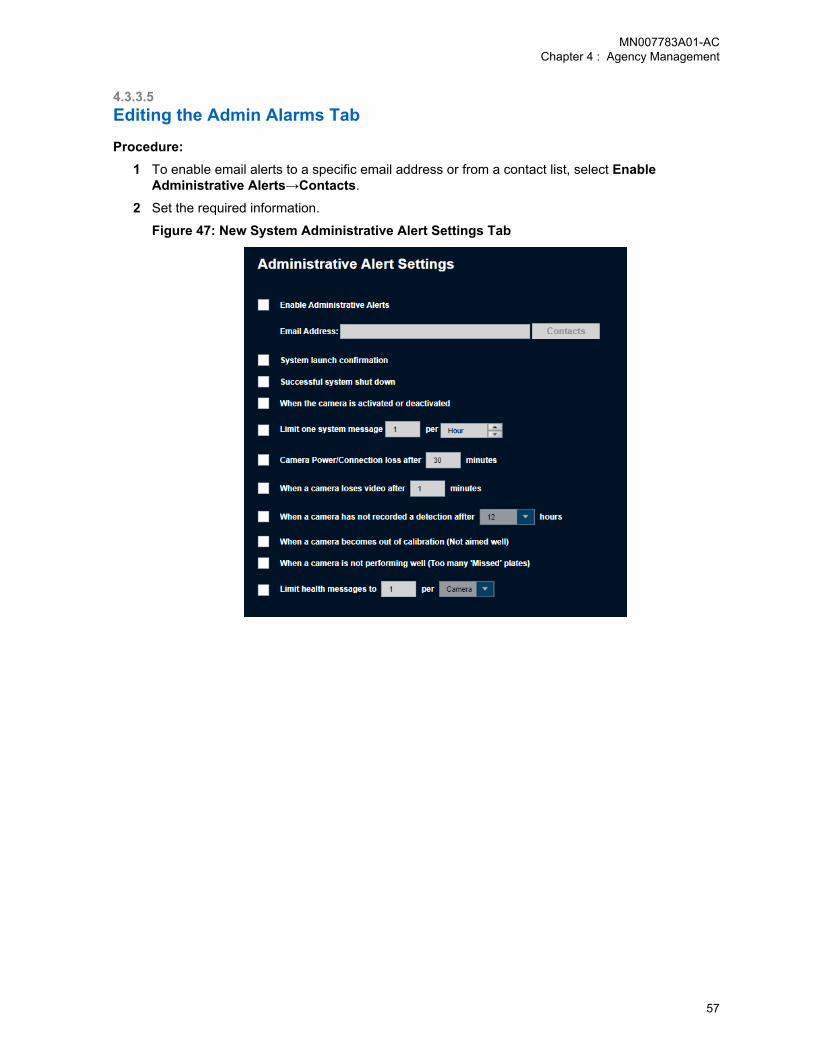
4.3.3.5Editing the Admin Alarms Tab
Procedure:1 To enable email alerts to a specific email address or from a contact list, select Enable
Administrative Alerts→Contacts.
2 Set the required information.
Figure 47: New System Administrative Alert Settings Tab
MN007783A01-ACChapter 4 : Agency Management
57

4.3.3.6Editing Camera TabFigure 48: New System Cameras Tab - Edit Camera
Procedure:1 Perform one of the following actions:
• To activate a camera, highlight the desired inactive camera and click Active.
• To deactivate a camera, highlight the desired active camera and click Deactivate.
2 To edit a camera information, select the camera group from the drop-down menu.
3 Select the camera type and camera models.
4 To controls when to activate and deactivate the camera, enable Schedule and set the desiredday and time.
5 To configure the Camera Location, perform one of the following actions:
• Select Location icon and input the GPS coordinates.
• Select Location icon and pin to the exact location.
• Input the address in the Address section.
MN007783A01-ACChapter 4 : Agency Management
58

Figure 49: New System Cameras Tab - Location
4.4Resetting Hot ListProcedure:
To reset a Hot List remotely, select the required systems and click Reset Hot List.
Resetting the Hot List for the checked fixed systems clears out the Hot List at the client and sends acurrent Hot List in packages to the LPR software.
4.5Configuring a Connection FileThe connection file button is only applicable for Mobile and Fixed Camera systems. Connection filesautomatically configure Car Detector software to communicate with PlateSearch.
Procedure:1 To allow for file creation of the encrypted System.ini file, perform the following actions to link the
system to the CarDetector client:
MN007783A01-ACChapter 4 : Agency Management
59
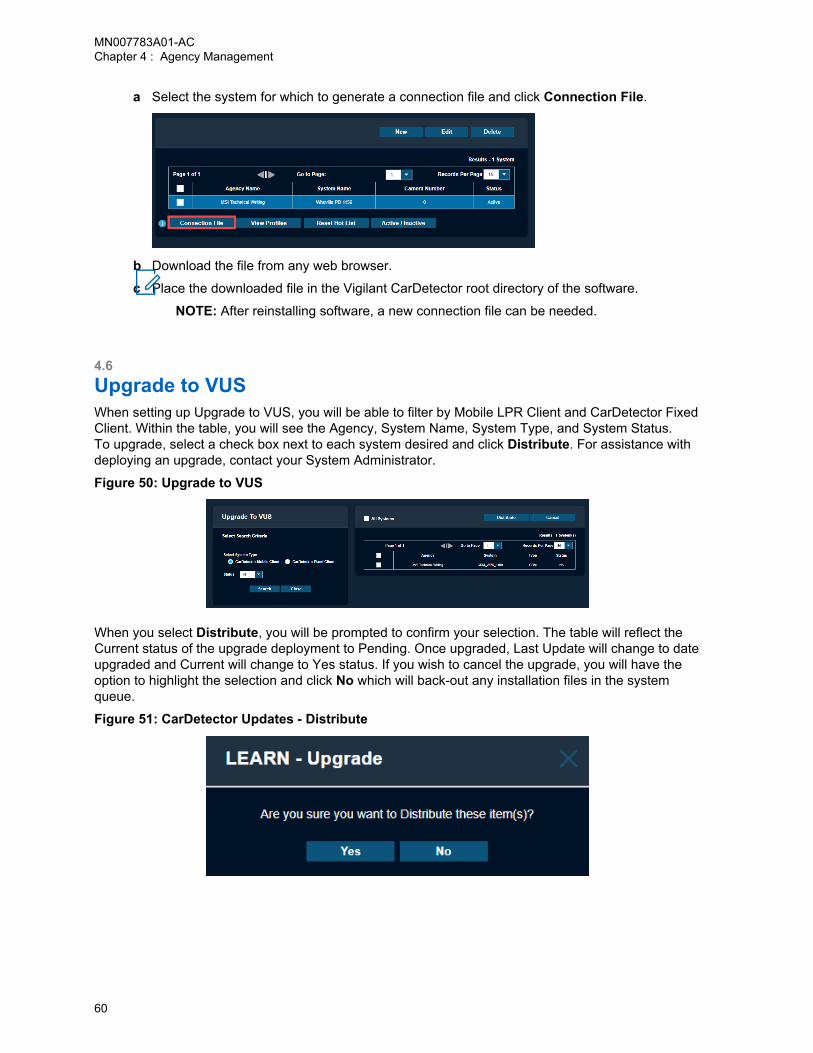
a Select the system for which to generate a connection file and click Connection File.
b Download the file from any web browser.
c Place the downloaded file in the Vigilant CarDetector root directory of the software.
NOTE: After reinstalling software, a new connection file can be needed.
4.6Upgrade to VUSWhen setting up Upgrade to VUS, you will be able to filter by Mobile LPR Client and CarDetector FixedClient. Within the table, you will see the Agency, System Name, System Type, and System Status.To upgrade, select a check box next to each system desired and click Distribute. For assistance withdeploying an upgrade, contact your System Administrator.
Figure 50: Upgrade to VUS
When you select Distribute, you will be prompted to confirm your selection. The table will reflect theCurrent status of the upgrade deployment to Pending. Once upgraded, Last Update will change to dateupgraded and Current will change to Yes status. If you wish to cancel the upgrade, you will have theoption to highlight the selection and click No which will back-out any installation files in the systemqueue.
Figure 51: CarDetector Updates - Distribute
MN007783A01-ACChapter 4 : Agency Management
60
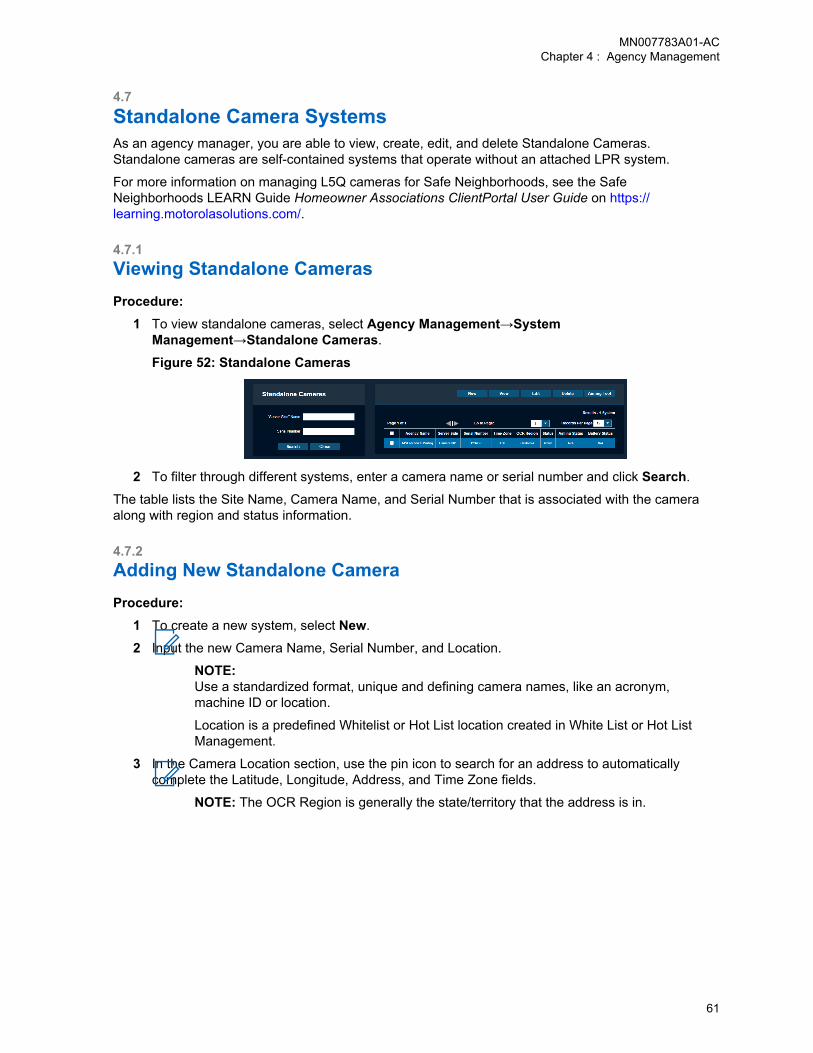
4.7Standalone Camera SystemsAs an agency manager, you are able to view, create, edit, and delete Standalone Cameras.Standalone cameras are self-contained systems that operate without an attached LPR system.
For more information on managing L5Q cameras for Safe Neighborhoods, see the SafeNeighborhoods LEARN Guide Homeowner Associations ClientPortal User Guide on https://learning.motorolasolutions.com/.
4.7.1Viewing Standalone CamerasProcedure:
1 To view standalone cameras, select Agency Management→SystemManagement→Standalone Cameras.
Figure 52: Standalone Cameras
2 To filter through different systems, enter a camera name or serial number and click Search.
The table lists the Site Name, Camera Name, and Serial Number that is associated with the cameraalong with region and status information.
4.7.2Adding New Standalone CameraProcedure:
1 To create a new system, select New.
2 Input the new Camera Name, Serial Number, and Location.
NOTE:Use a standardized format, unique and defining camera names, like an acronym,machine ID or location.
Location is a predefined Whitelist or Hot List location created in White List or Hot ListManagement.
3 In the Camera Location section, use the pin icon to search for an address to automaticallycomplete the Latitude, Longitude, Address, and Time Zone fields.
NOTE: The OCR Region is generally the state/territory that the address is in.
MN007783A01-ACChapter 4 : Agency Management
61
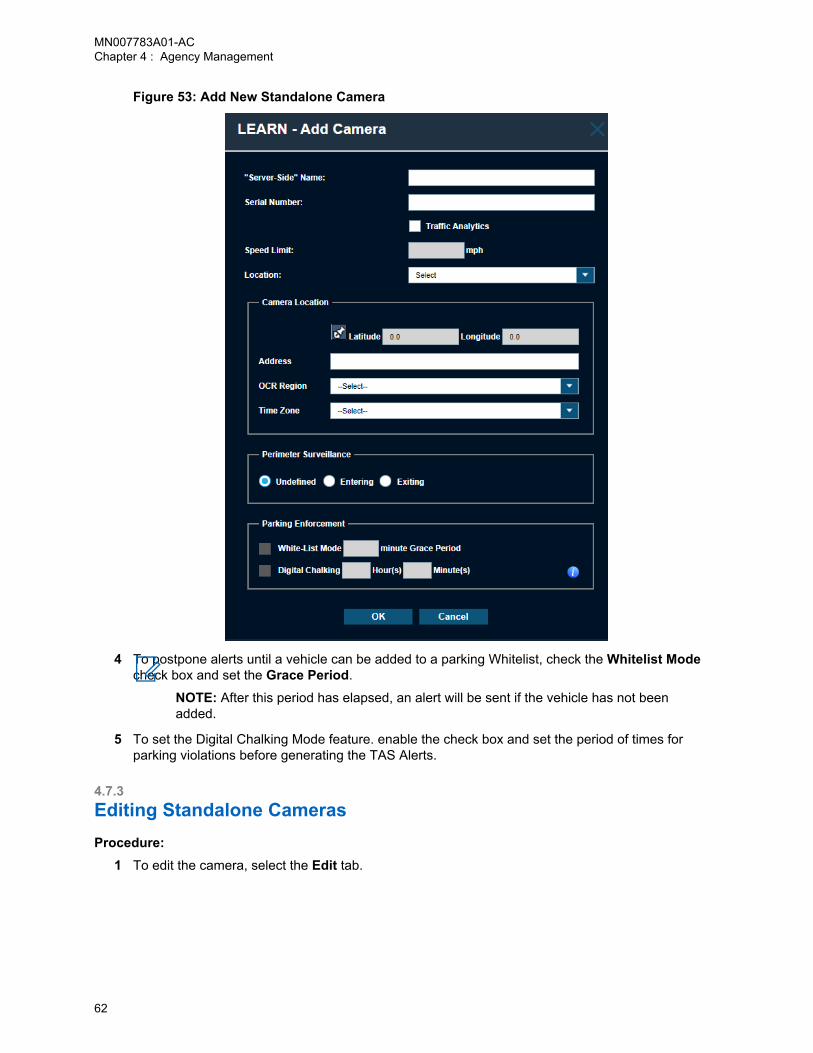
Figure 53: Add New Standalone Camera
4 To postpone alerts until a vehicle can be added to a parking Whitelist, check the Whitelist Modecheck box and set the Grace Period.
NOTE: After this period has elapsed, an alert will be sent if the vehicle has not beenadded.
5 To set the Digital Chalking Mode feature. enable the check box and set the period of times forparking violations before generating the TAS Alerts.
4.7.3Editing Standalone CamerasProcedure:
1 To edit the camera, select the Edit tab.
MN007783A01-ACChapter 4 : Agency Management
62
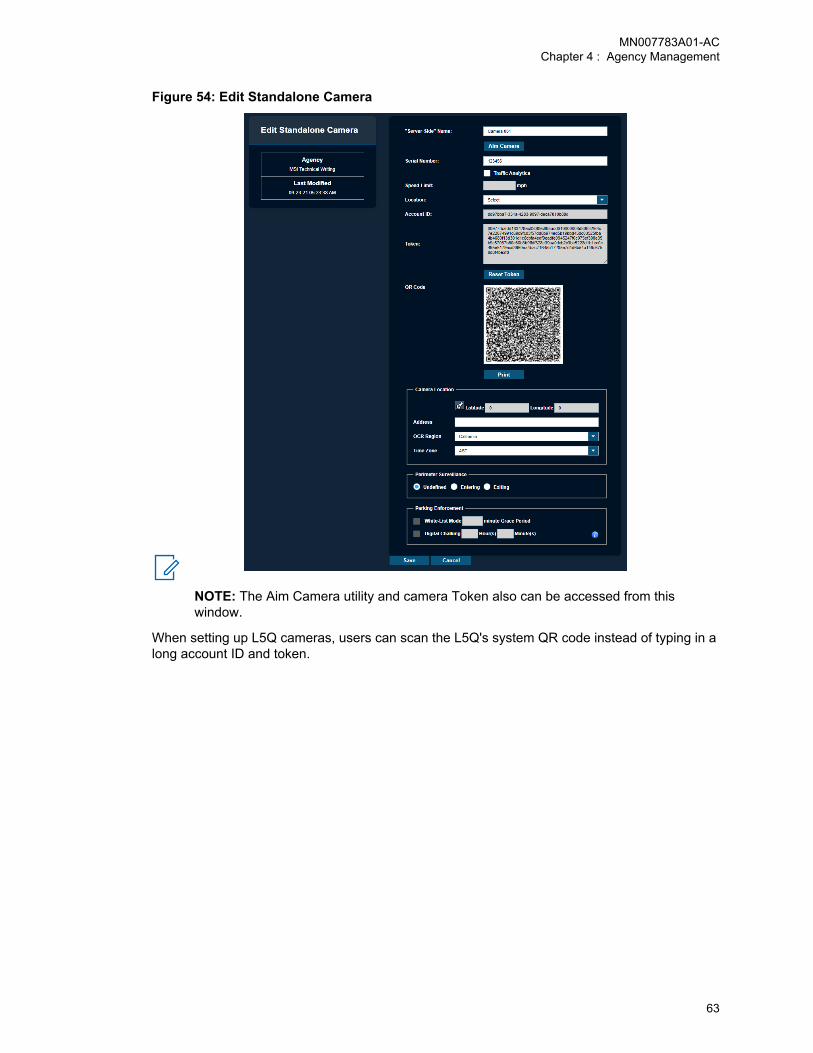
Figure 54: Edit Standalone Camera
NOTE: The Aim Camera utility and camera Token also can be accessed from thiswindow.
When setting up L5Q cameras, users can scan the L5Q's system QR code instead of typing in along account ID and token.
MN007783A01-ACChapter 4 : Agency Management
63
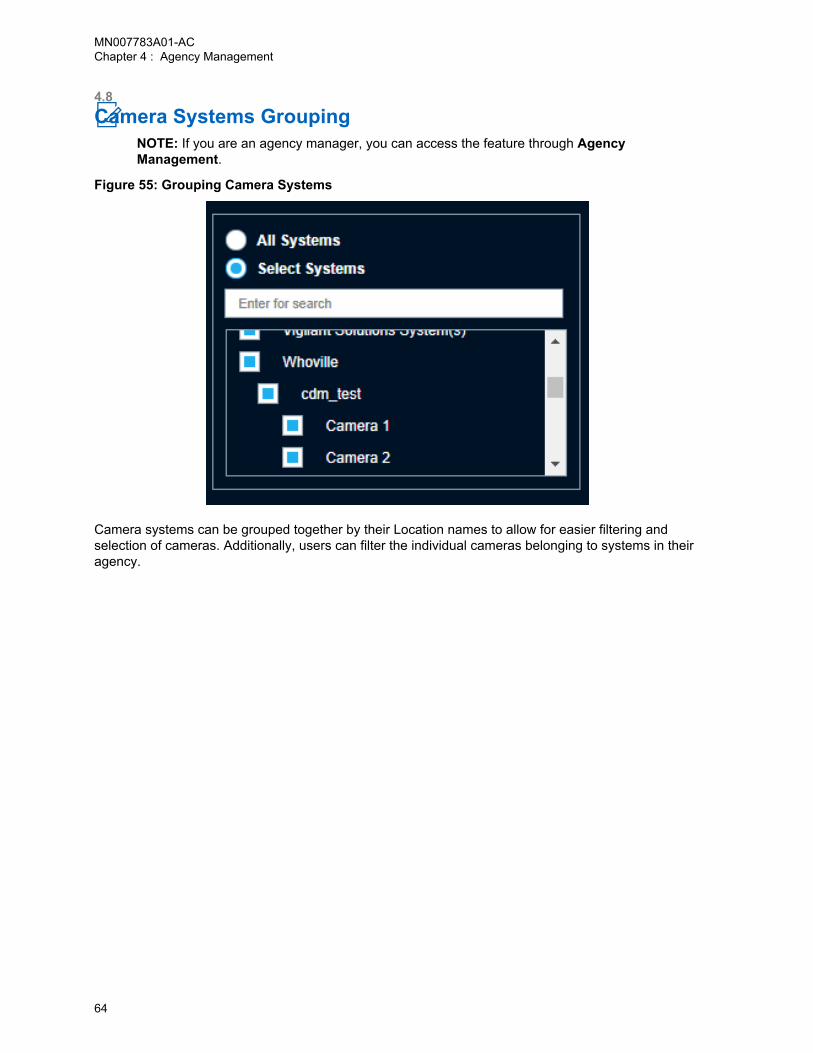
4.8Camera Systems Grouping
NOTE: If you are an agency manager, you can access the feature through AgencyManagement.
Figure 55: Grouping Camera Systems
Camera systems can be grouped together by their Location names to allow for easier filtering andselection of cameras. Additionally, users can filter the individual cameras belonging to systems in theiragency.
MN007783A01-ACChapter 4 : Agency Management
64
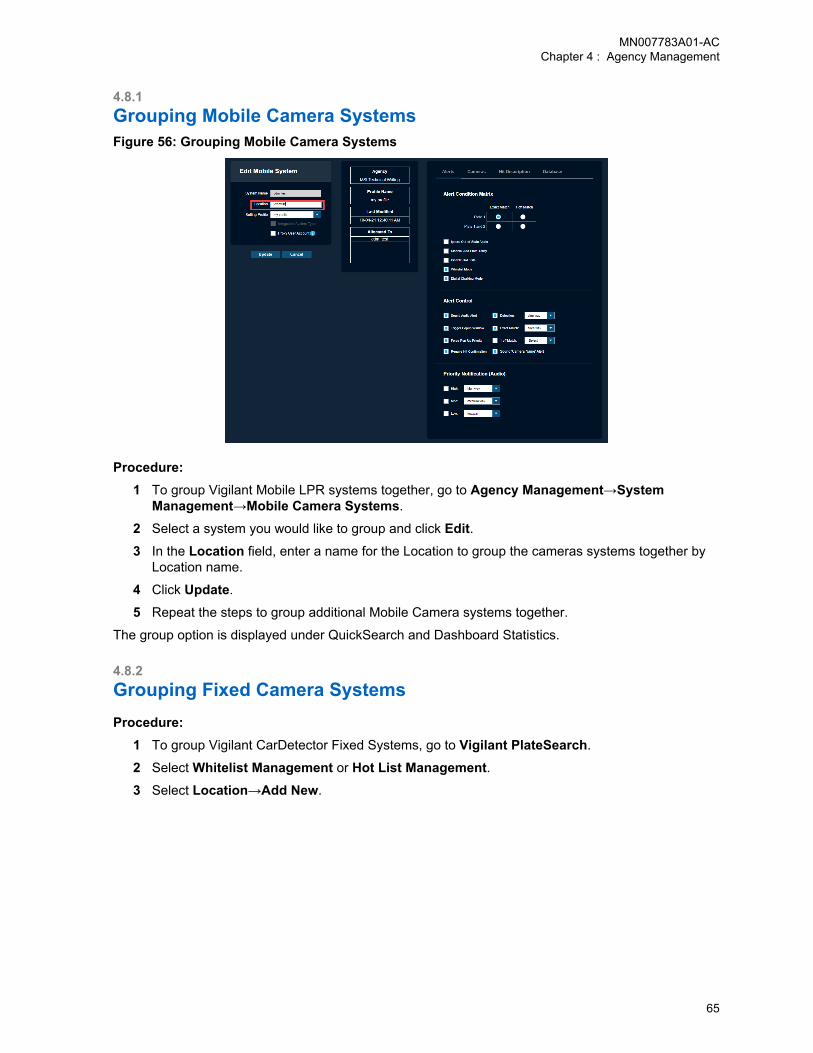
4.8.1Grouping Mobile Camera SystemsFigure 56: Grouping Mobile Camera Systems
Procedure:1 To group Vigilant Mobile LPR systems together, go to Agency Management→System
Management→Mobile Camera Systems.
2 Select a system you would like to group and click Edit.3 In the Location field, enter a name for the Location to group the cameras systems together by
Location name.
4 Click Update.
5 Repeat the steps to group additional Mobile Camera systems together.
The group option is displayed under QuickSearch and Dashboard Statistics.
4.8.2Grouping Fixed Camera SystemsProcedure:
1 To group Vigilant CarDetector Fixed Systems, go to Vigilant PlateSearch.
2 Select Whitelist Management or Hot List Management.3 Select Location→Add New.
MN007783A01-ACChapter 4 : Agency Management
65
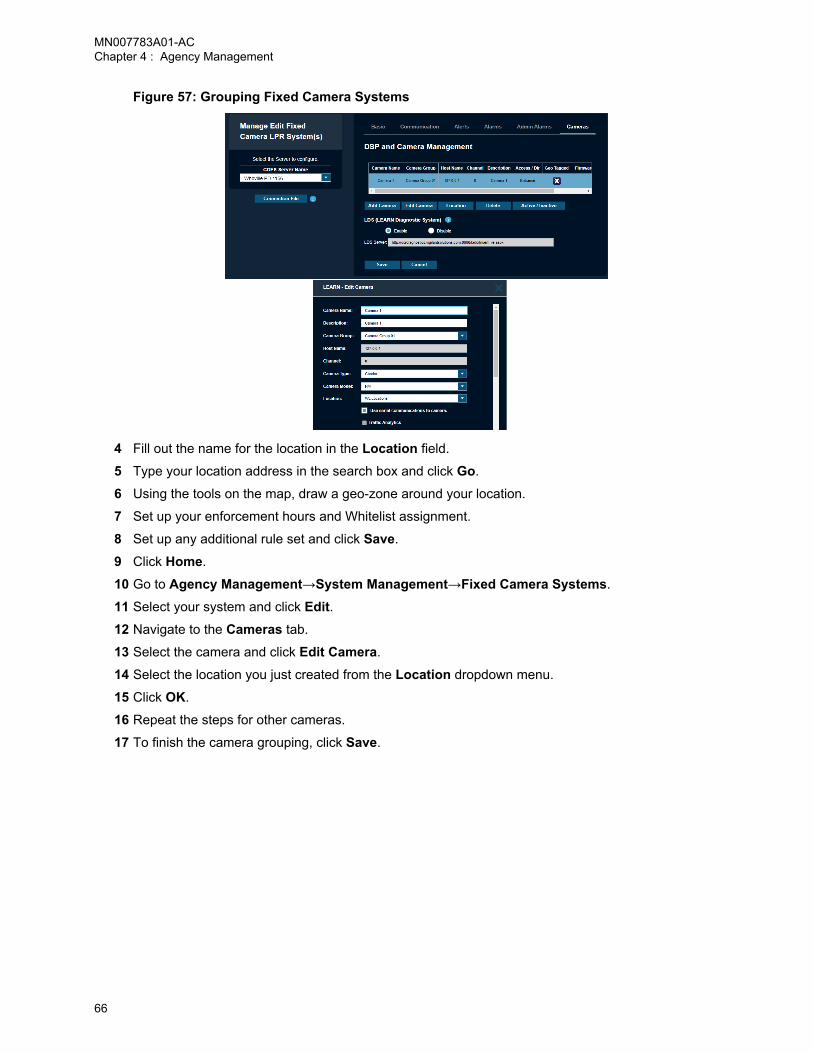
Figure 57: Grouping Fixed Camera Systems
4 Fill out the name for the location in the Location field.
5 Type your location address in the search box and click Go.
6 Using the tools on the map, draw a geo-zone around your location.
7 Set up your enforcement hours and Whitelist assignment.
8 Set up any additional rule set and click Save.
9 Click Home.
10 Go to Agency Management→System Management→Fixed Camera Systems.
11 Select your system and click Edit.12 Navigate to the Cameras tab.
13 Select the camera and click Edit Camera.
14 Select the location you just created from the Location dropdown menu.
15 Click OK.
16 Repeat the steps for other cameras.
17 To finish the camera grouping, click Save.
MN007783A01-ACChapter 4 : Agency Management
66
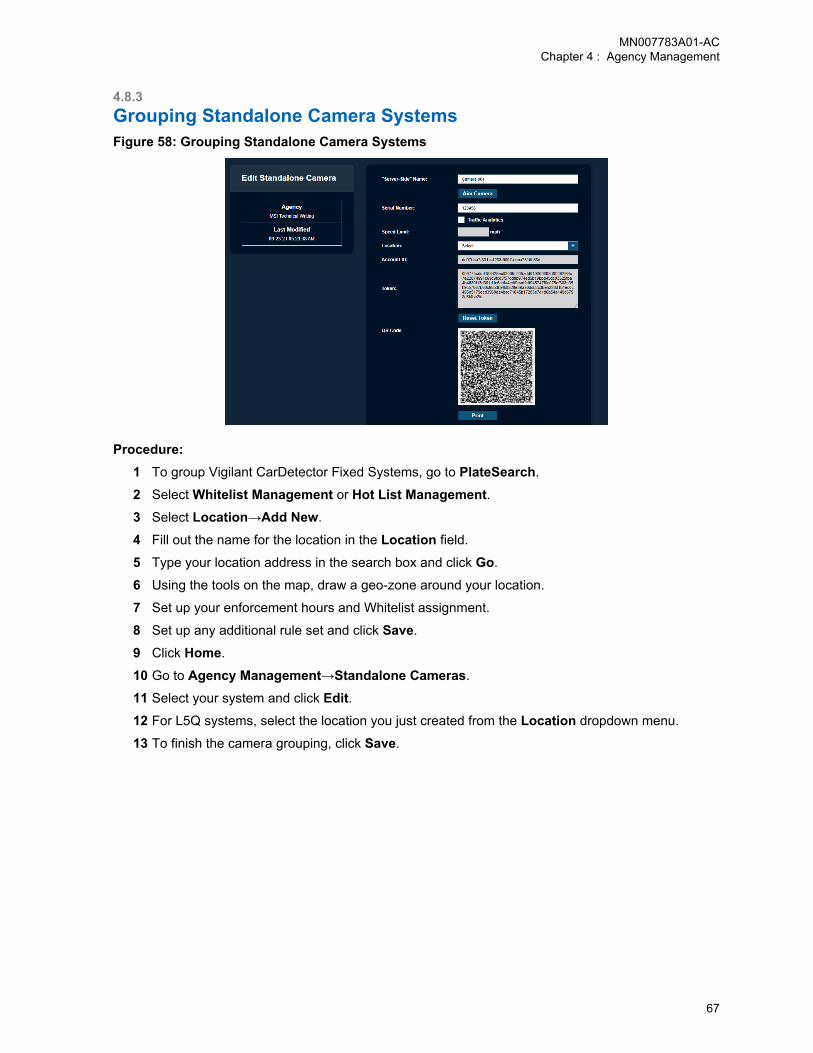
4.8.3Grouping Standalone Camera SystemsFigure 58: Grouping Standalone Camera Systems
Procedure:1 To group Vigilant CarDetector Fixed Systems, go to PlateSearch.
2 Select Whitelist Management or Hot List Management.3 Select Location→Add New.
4 Fill out the name for the location in the Location field.
5 Type your location address in the search box and click Go.
6 Using the tools on the map, draw a geo-zone around your location.
7 Set up your enforcement hours and Whitelist assignment.
8 Set up any additional rule set and click Save.
9 Click Home.
10 Go to Agency Management→Standalone Cameras.
11 Select your system and click Edit.12 For L5Q systems, select the location you just created from the Location dropdown menu.
13 To finish the camera grouping, click Save.
MN007783A01-ACChapter 4 : Agency Management
67
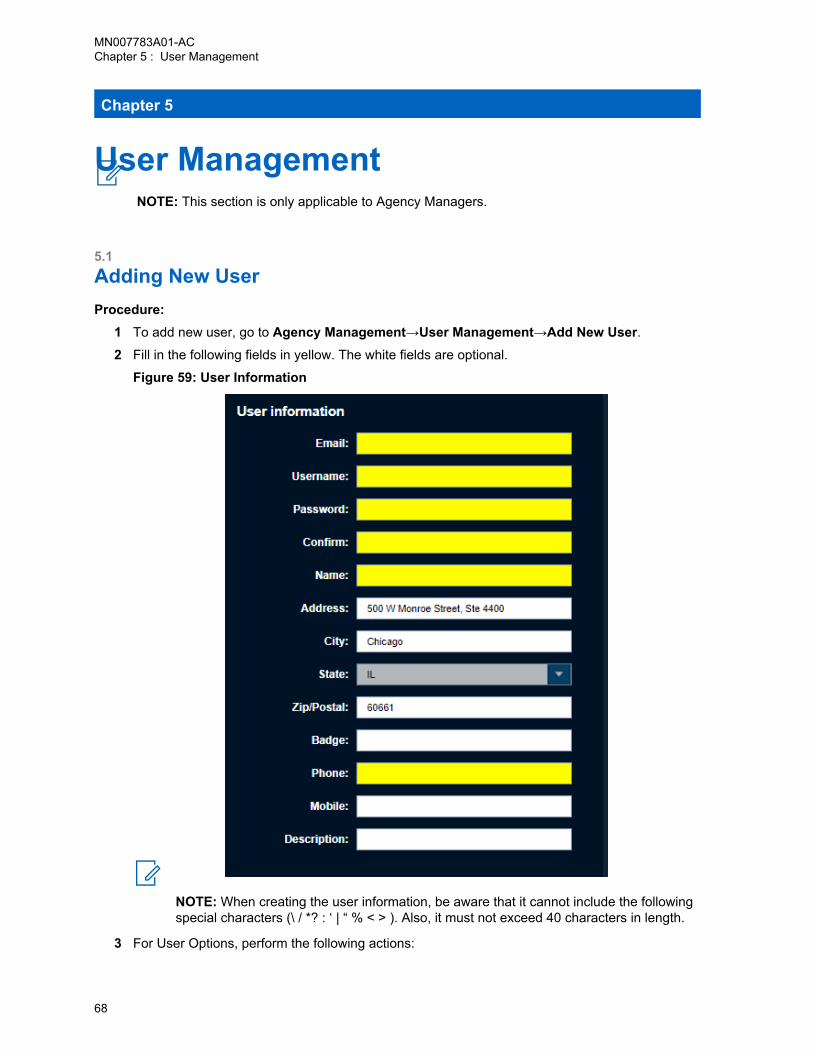
Chapter 5
User ManagementNOTE: This section is only applicable to Agency Managers.
5.1Adding New UserProcedure:
1 To add new user, go to Agency Management→User Management→Add New User.2 Fill in the following fields in yellow. The white fields are optional.
Figure 59: User Information
NOTE: When creating the user information, be aware that it cannot include the followingspecial characters (\ / *? : ‘ | “ % < > ). Also, it must not exceed 40 characters in length.
3 For User Options, perform the following actions:
MN007783A01-ACChapter 5 : User Management
68

• To prepopulate the user address with the agency address, enable the Use Existing AgencyAddress option.
• To allow the right for the user to change their password under the My Profile section, enablethe Allow Password Change option.
• To force the user to require a new strict password at the next login, enable the User mustchange password at next logon option.
Figure 60: User Options
4 For agency managers, to assign product subscriptions that are allocated to the agency, selectthe check box of the options.
Figure 61: Product Subscriptions
5 To set the expiration period, enter the number of days.
6 To set the mandated expiration date, select the check box and determine the date.
Figure 62: Expiration Period and Date
5.2Configuring User ManagementProcedure:
1 To set user permissions, select the required User Profile.
MN007783A01-ACChapter 5 : User Management
69
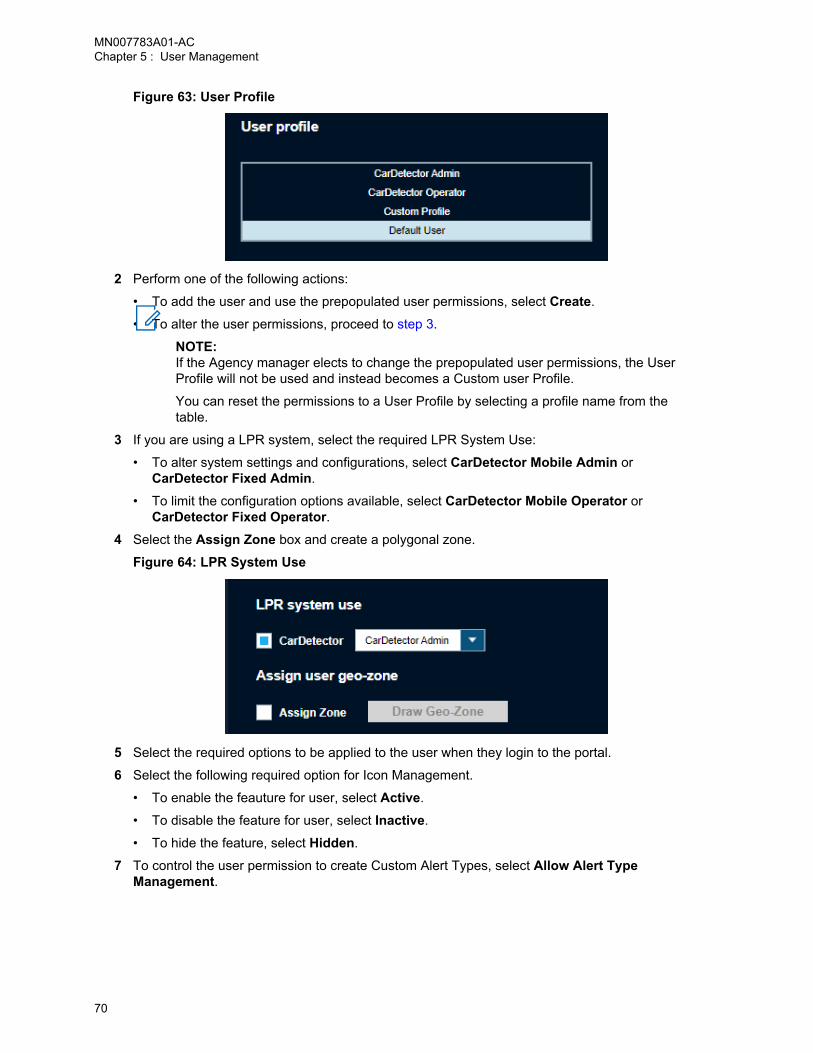
Figure 63: User Profile
2 Perform one of the following actions:
• To add the user and use the prepopulated user permissions, select Create.
• To alter the user permissions, proceed to step 3.
NOTE:If the Agency manager elects to change the prepopulated user permissions, the UserProfile will not be used and instead becomes a Custom user Profile.
You can reset the permissions to a User Profile by selecting a profile name from thetable.
3 If you are using a LPR system, select the required LPR System Use:
• To alter system settings and configurations, select CarDetector Mobile Admin orCarDetector Fixed Admin.
• To limit the configuration options available, select CarDetector Mobile Operator orCarDetector Fixed Operator.
4 Select the Assign Zone box and create a polygonal zone.
Figure 64: LPR System Use
5 Select the required options to be applied to the user when they login to the portal.
6 Select the following required option for Icon Management.
• To enable the feauture for user, select Active.
• To disable the feature for user, select Inactive.
• To hide the feature, select Hidden.
7 To control the user permission to create Custom Alert Types, select Allow Alert TypeManagement.
MN007783A01-ACChapter 5 : User Management
70
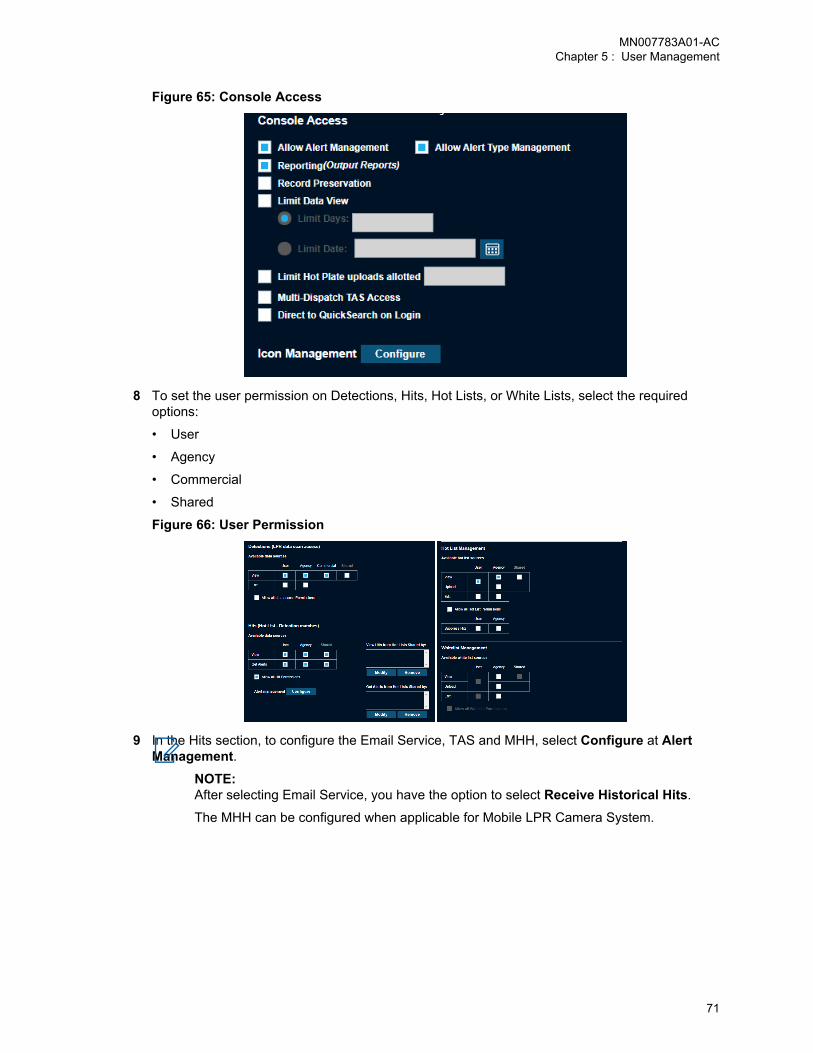
Figure 65: Console Access
8 To set the user permission on Detections, Hits, Hot Lists, or White Lists, select the requiredoptions:
• User
• Agency
• Commercial
• Shared
Figure 66: User Permission
9 In the Hits section, to configure the Email Service, TAS and MHH, select Configure at AlertManagement.
NOTE:After selecting Email Service, you have the option to select Receive Historical Hits.
The MHH can be configured when applicable for Mobile LPR Camera System.
MN007783A01-ACChapter 5 : User Management
71
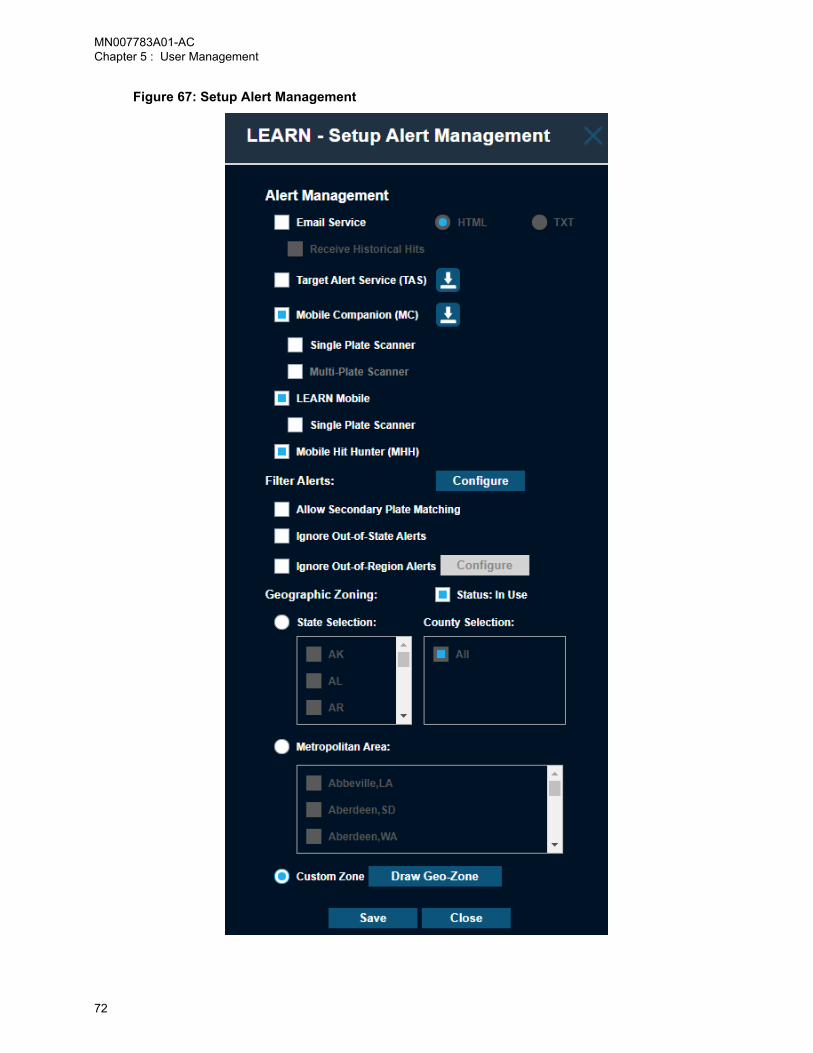
Figure 67: Setup Alert Management
MN007783A01-ACChapter 5 : User Management
72
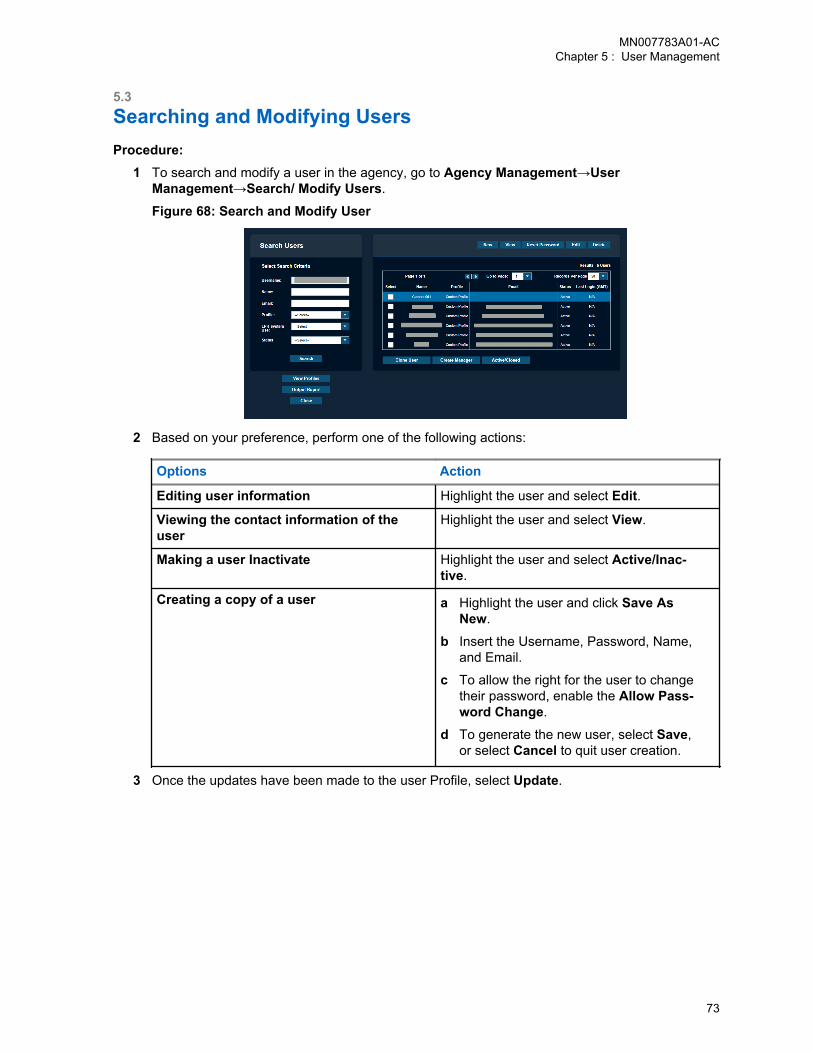
5.3Searching and Modifying UsersProcedure:
1 To search and modify a user in the agency, go to Agency Management→UserManagement→Search/ Modify Users.
Figure 68: Search and Modify User
2 Based on your preference, perform one of the following actions:
Options Action
Editing user information Highlight the user and select Edit.
Viewing the contact information of theuser
Highlight the user and select View.
Making a user Inactivate Highlight the user and select Active/Inac-tive.
Creating a copy of a user a Highlight the user and click Save AsNew.
b Insert the Username, Password, Name,and Email.
c To allow the right for the user to changetheir password, enable the Allow Pass-word Change.
d To generate the new user, select Save,or select Cancel to quit user creation.
3 Once the updates have been made to the user Profile, select Update.
MN007783A01-ACChapter 5 : User Management
73
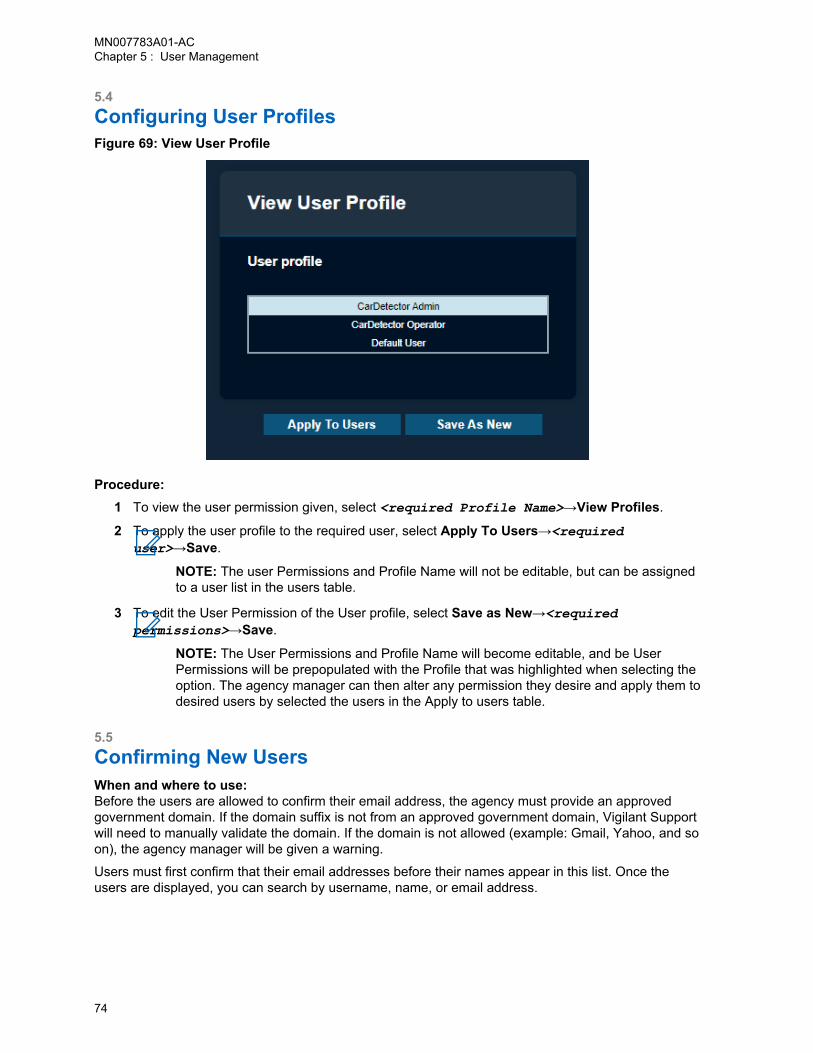
5.4Configuring User ProfilesFigure 69: View User Profile
Procedure:1 To view the user permission given, select <required Profile Name>→View Profiles.
2 To apply the user profile to the required user, select Apply To Users→<requireduser>→Save.
NOTE: The user Permissions and Profile Name will not be editable, but can be assignedto a user list in the users table.
3 To edit the User Permission of the User profile, select Save as New→<requiredpermissions>→Save.
NOTE: The User Permissions and Profile Name will become editable, and be UserPermissions will be prepopulated with the Profile that was highlighted when selecting theoption. The agency manager can then alter any permission they desire and apply them todesired users by selected the users in the Apply to users table.
5.5Confirming New UsersWhen and where to use:Before the users are allowed to confirm their email address, the agency must provide an approvedgovernment domain. If the domain suffix is not from an approved government domain, Vigilant Supportwill need to manually validate the domain. If the domain is not allowed (example: Gmail, Yahoo, and soon), the agency manager will be given a warning.
Users must first confirm that their email addresses before their names appear in this list. Once theusers are displayed, you can search by username, name, or email address.
MN007783A01-ACChapter 5 : User Management
74
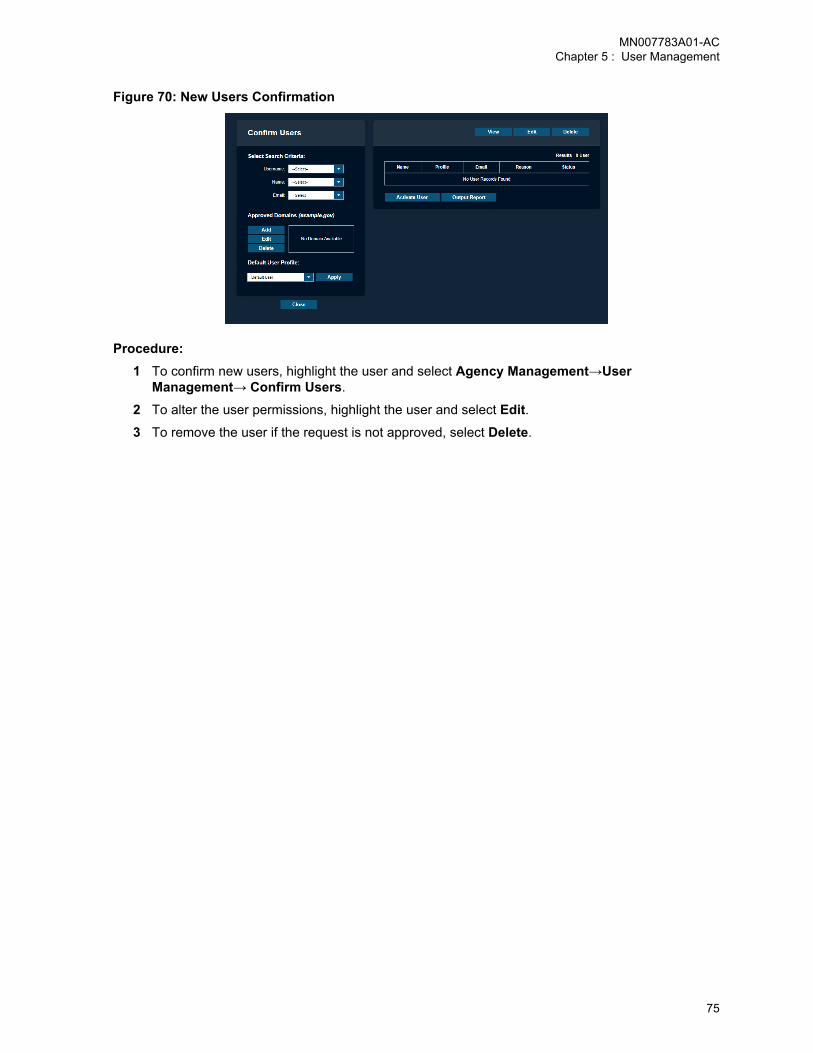
Figure 70: New Users Confirmation
Procedure:1 To confirm new users, highlight the user and select Agency Management→User
Management→ Confirm Users.
2 To alter the user permissions, highlight the user and select Edit.3 To remove the user if the request is not approved, select Delete.
MN007783A01-ACChapter 5 : User Management
75
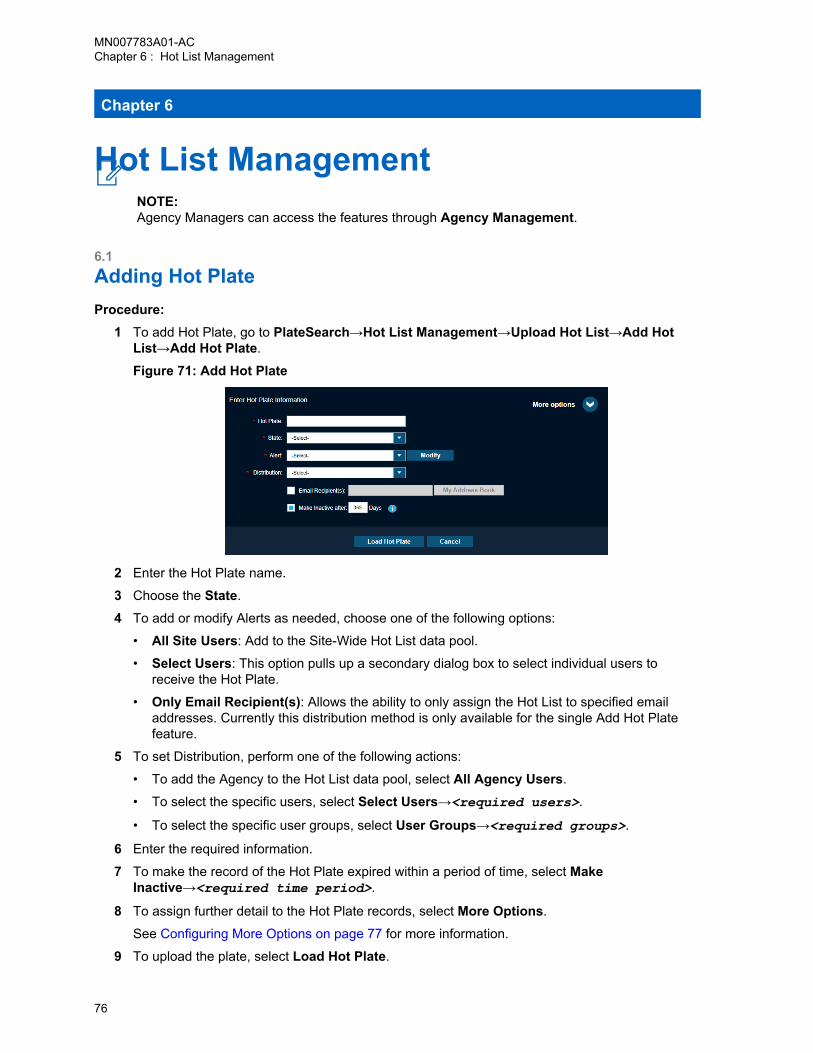
Chapter 6
Hot List ManagementNOTE:Agency Managers can access the features through Agency Management.
6.1Adding Hot PlateProcedure:
1 To add Hot Plate, go to PlateSearch→Hot List Management→Upload Hot List→Add HotList→Add Hot Plate.
Figure 71: Add Hot Plate
2 Enter the Hot Plate name.
3 Choose the State.
4 To add or modify Alerts as needed, choose one of the following options:
• All Site Users: Add to the Site-Wide Hot List data pool.
• Select Users: This option pulls up a secondary dialog box to select individual users toreceive the Hot Plate.
• Only Email Recipient(s): Allows the ability to only assign the Hot List to specified emailaddresses. Currently this distribution method is only available for the single Add Hot Platefeature.
5 To set Distribution, perform one of the following actions:
• To add the Agency to the Hot List data pool, select All Agency Users.
• To select the specific users, select Select Users→<required users>.
• To select the specific user groups, select User Groups→<required groups>.
6 Enter the required information.
7 To make the record of the Hot Plate expired within a period of time, select MakeInactive→<required time period>.
8 To assign further detail to the Hot Plate records, select More Options.
See Configuring More Options on page 77 for more information.
9 To upload the plate, select Load Hot Plate.
MN007783A01-ACChapter 6 : Hot List Management
76
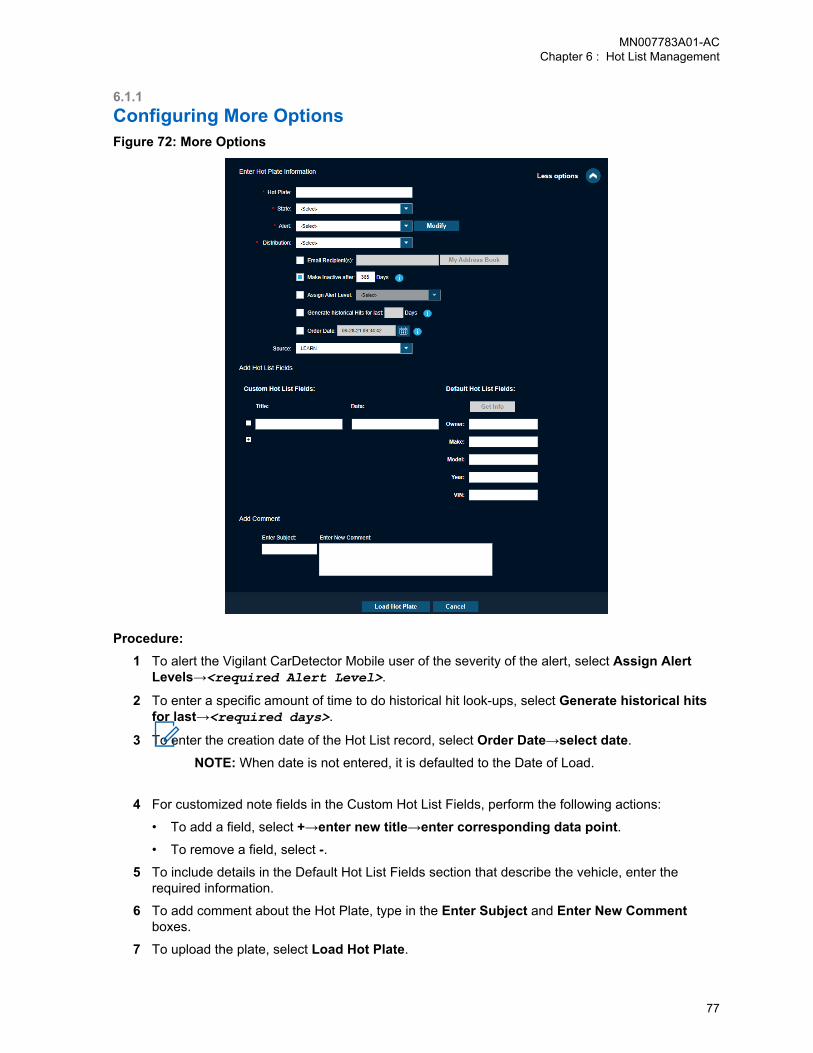
6.1.1Configuring More OptionsFigure 72: More Options
Procedure:1 To alert the Vigilant CarDetector Mobile user of the severity of the alert, select Assign Alert
Levels→<required Alert Level>.
2 To enter a specific amount of time to do historical hit look-ups, select Generate historical hitsfor last→<required days>.
3 To enter the creation date of the Hot List record, select Order Date→select date.
NOTE: When date is not entered, it is defaulted to the Date of Load.
4 For customized note fields in the Custom Hot List Fields, perform the following actions:
• To add a field, select +→enter new title→enter corresponding data point.• To remove a field, select -.
5 To include details in the Default Hot List Fields section that describe the vehicle, enter therequired information.
6 To add comment about the Hot Plate, type in the Enter Subject and Enter New Commentboxes.
7 To upload the plate, select Load Hot Plate.
MN007783A01-ACChapter 6 : Hot List Management
77
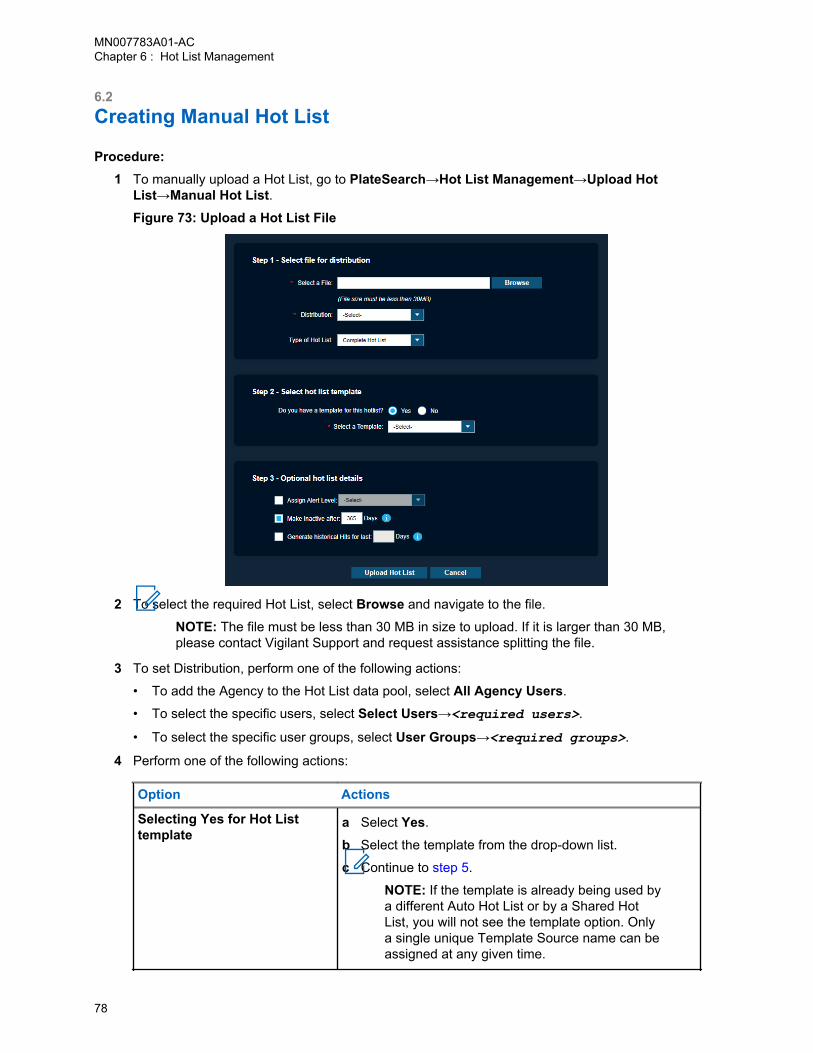
6.2Creating Manual Hot List
Procedure:1 To manually upload a Hot List, go to PlateSearch→Hot List Management→Upload Hot
List→Manual Hot List.Figure 73: Upload a Hot List File
2 To select the required Hot List, select Browse and navigate to the file.
NOTE: The file must be less than 30 MB in size to upload. If it is larger than 30 MB,please contact Vigilant Support and request assistance splitting the file.
3 To set Distribution, perform one of the following actions:
• To add the Agency to the Hot List data pool, select All Agency Users.
• To select the specific users, select Select Users→<required users>.
• To select the specific user groups, select User Groups→<required groups>.
4 Perform one of the following actions:
Option Actions
Selecting Yes for Hot Listtemplate
a Select Yes.
b Select the template from the drop-down list.
c Continue to step 5.
NOTE: If the template is already being used bya different Auto Hot List or by a Shared HotList, you will not see the template option. Onlya single unique Template Source name can beassigned at any given time.
MN007783A01-ACChapter 6 : Hot List Management
78
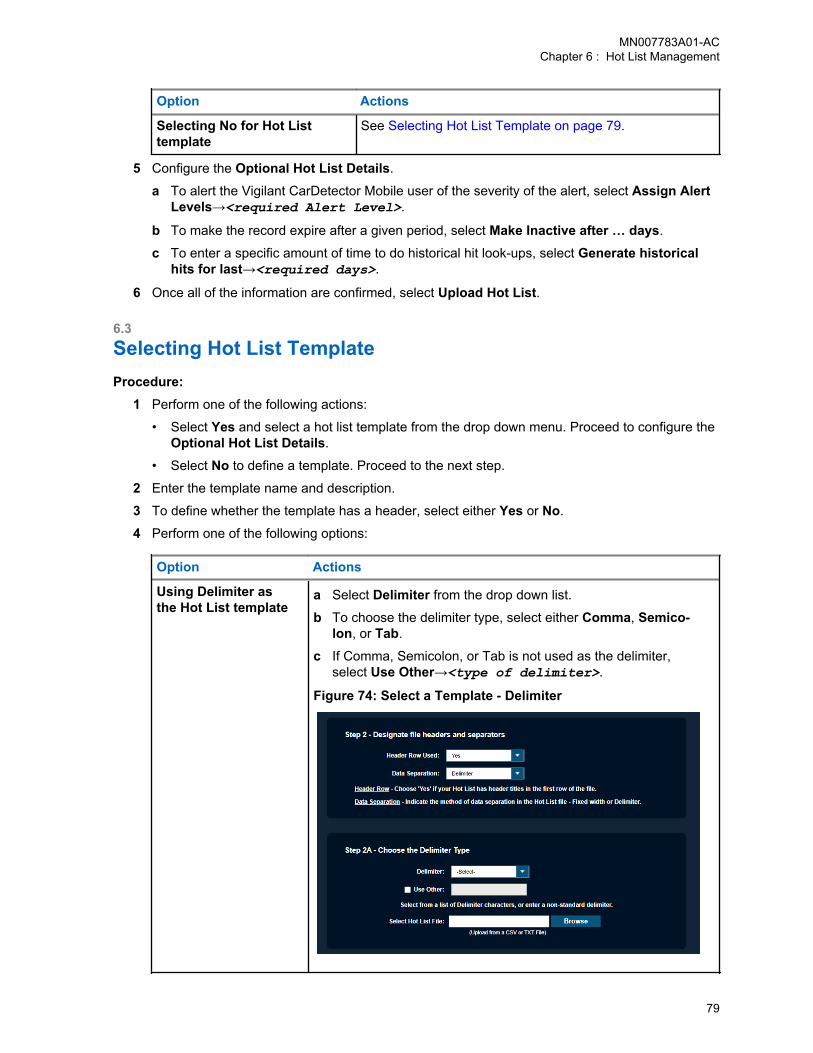
Option Actions
Selecting No for Hot Listtemplate
See Selecting Hot List Template on page 79.
5 Configure the Optional Hot List Details.
a To alert the Vigilant CarDetector Mobile user of the severity of the alert, select Assign AlertLevels→<required Alert Level>.
b To make the record expire after a given period, select Make Inactive after … days.
c To enter a specific amount of time to do historical hit look-ups, select Generate historicalhits for last→<required days>.
6 Once all of the information are confirmed, select Upload Hot List.
6.3Selecting Hot List TemplateProcedure:
1 Perform one of the following actions:
• Select Yes and select a hot list template from the drop down menu. Proceed to configure theOptional Hot List Details.
• Select No to define a template. Proceed to the next step.
2 Enter the template name and description.
3 To define whether the template has a header, select either Yes or No.
4 Perform one of the following options:
Option Actions
Using Delimiter asthe Hot List template
a Select Delimiter from the drop down list.
b To choose the delimiter type, select either Comma, Semico-lon, or Tab.
c If Comma, Semicolon, or Tab is not used as the delimiter,select Use Other→<type of delimiter>.
Figure 74: Select a Template - Delimiter
MN007783A01-ACChapter 6 : Hot List Management
79
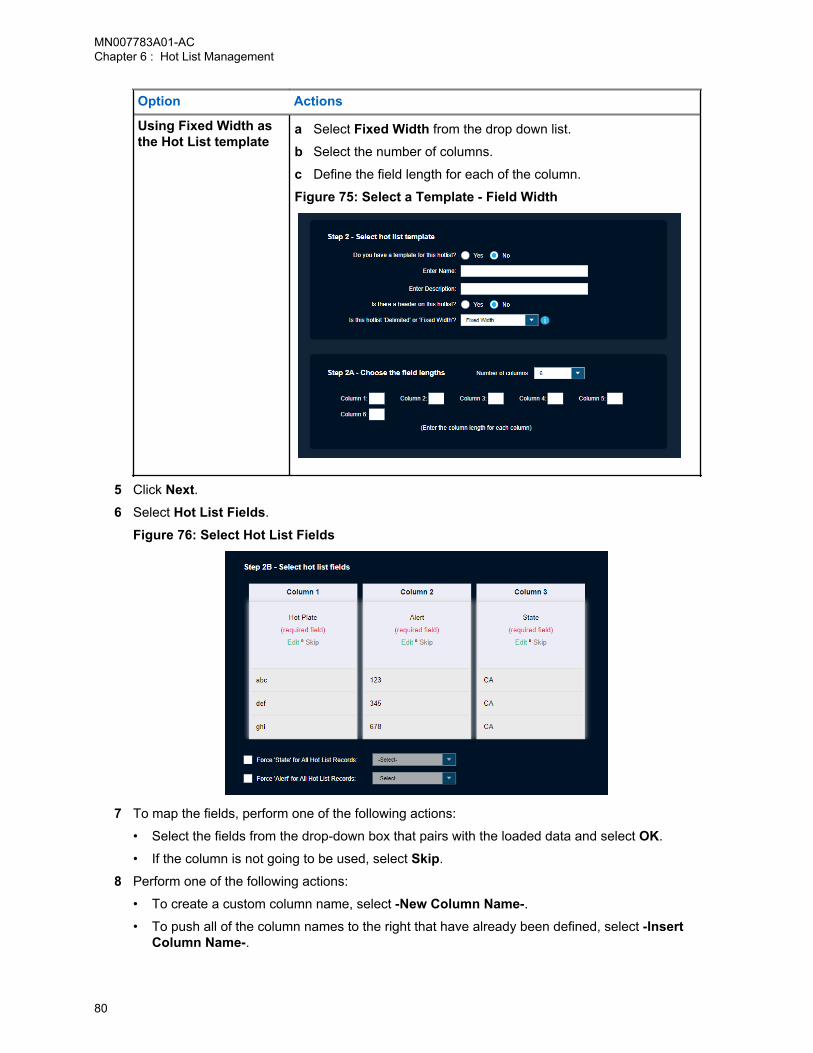
Option Actions
Using Fixed Width asthe Hot List template
a Select Fixed Width from the drop down list.
b Select the number of columns.
c Define the field length for each of the column.
Figure 75: Select a Template - Field Width
5 Click Next.6 Select Hot List Fields.
Figure 76: Select Hot List Fields
7 To map the fields, perform one of the following actions:
• Select the fields from the drop-down box that pairs with the loaded data and select OK.
• If the column is not going to be used, select Skip.
8 Perform one of the following actions:
• To create a custom column name, select -New Column Name-.• To push all of the column names to the right that have already been defined, select -Insert
Column Name-.
MN007783A01-ACChapter 6 : Hot List Management
80
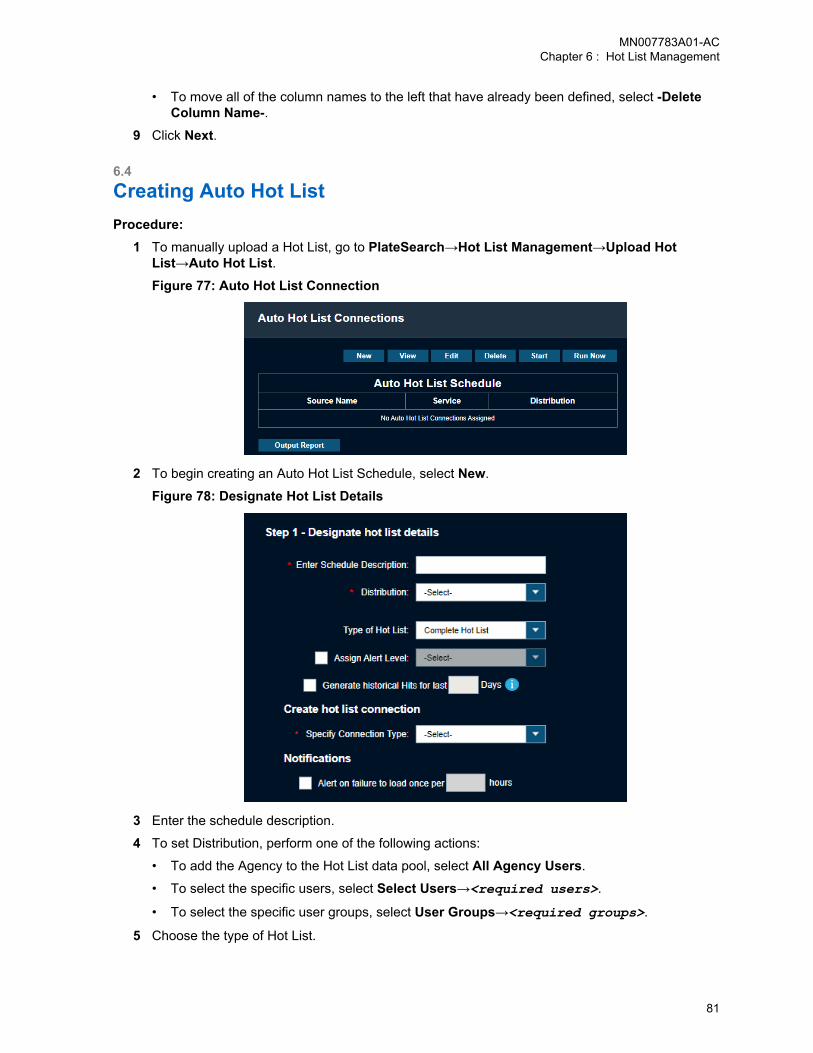
• To move all of the column names to the left that have already been defined, select -DeleteColumn Name-.
9 Click Next.
6.4Creating Auto Hot ListProcedure:
1 To manually upload a Hot List, go to PlateSearch→Hot List Management→Upload HotList→Auto Hot List.Figure 77: Auto Hot List Connection
2 To begin creating an Auto Hot List Schedule, select New.
Figure 78: Designate Hot List Details
3 Enter the schedule description.
4 To set Distribution, perform one of the following actions:
• To add the Agency to the Hot List data pool, select All Agency Users.
• To select the specific users, select Select Users→<required users>.
• To select the specific user groups, select User Groups→<required groups>.
5 Choose the type of Hot List.
MN007783A01-ACChapter 6 : Hot List Management
81
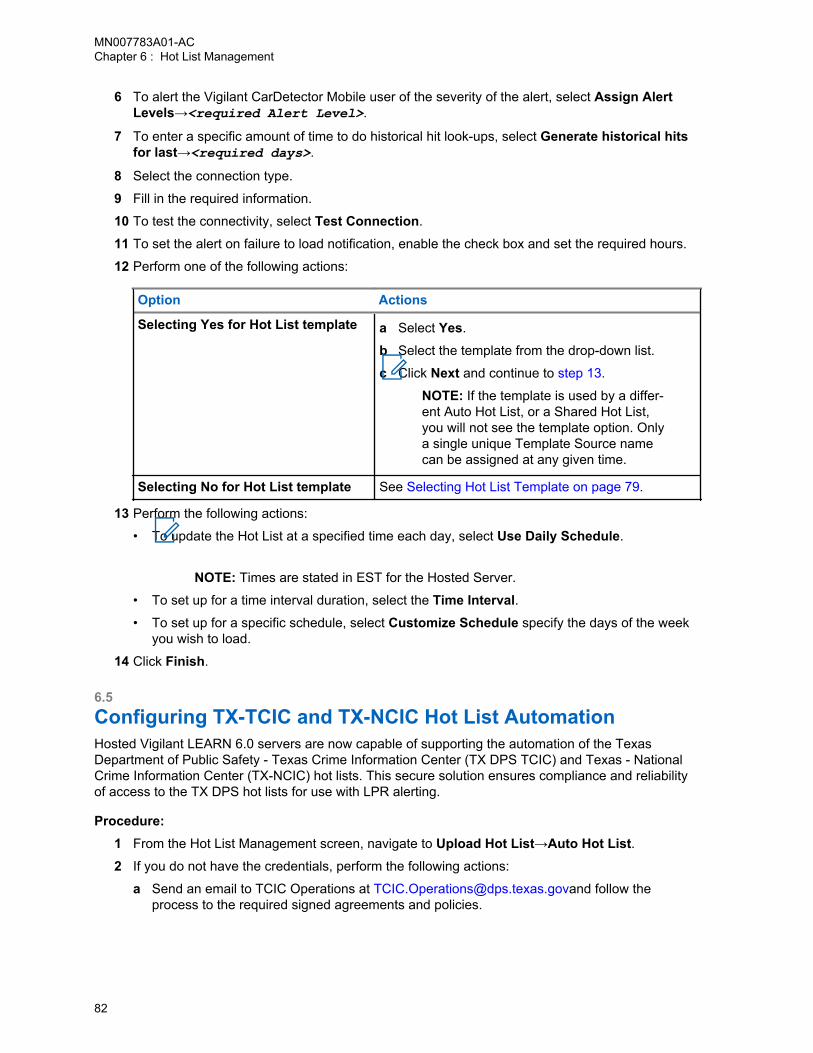
6 To alert the Vigilant CarDetector Mobile user of the severity of the alert, select Assign AlertLevels→<required Alert Level>.
7 To enter a specific amount of time to do historical hit look-ups, select Generate historical hitsfor last→<required days>.
8 Select the connection type.
9 Fill in the required information.
10 To test the connectivity, select Test Connection.
11 To set the alert on failure to load notification, enable the check box and set the required hours.
12 Perform one of the following actions:
Option Actions
Selecting Yes for Hot List template a Select Yes.
b Select the template from the drop-down list.
c Click Next and continue to step 13.
NOTE: If the template is used by a differ-ent Auto Hot List, or a Shared Hot List,you will not see the template option. Onlya single unique Template Source namecan be assigned at any given time.
Selecting No for Hot List template See Selecting Hot List Template on page 79.
13 Perform the following actions:
• To update the Hot List at a specified time each day, select Use Daily Schedule.
NOTE: Times are stated in EST for the Hosted Server.
• To set up for a time interval duration, select the Time Interval.• To set up for a specific schedule, select Customize Schedule specify the days of the week
you wish to load.
14 Click Finish.
6.5Configuring TX-TCIC and TX-NCIC Hot List AutomationHosted Vigilant LEARN 6.0 servers are now capable of supporting the automation of the TexasDepartment of Public Safety - Texas Crime Information Center (TX DPS TCIC) and Texas - NationalCrime Information Center (TX-NCIC) hot lists. This secure solution ensures compliance and reliabilityof access to the TX DPS hot lists for use with LPR alerting.
Procedure:1 From the Hot List Management screen, navigate to Upload Hot List→Auto Hot List.2 If you do not have the credentials, perform the following actions:
a Send an email to TCIC Operations at [email protected] follow theprocess to the required signed agreements and policies.
MN007783A01-ACChapter 6 : Hot List Management
82
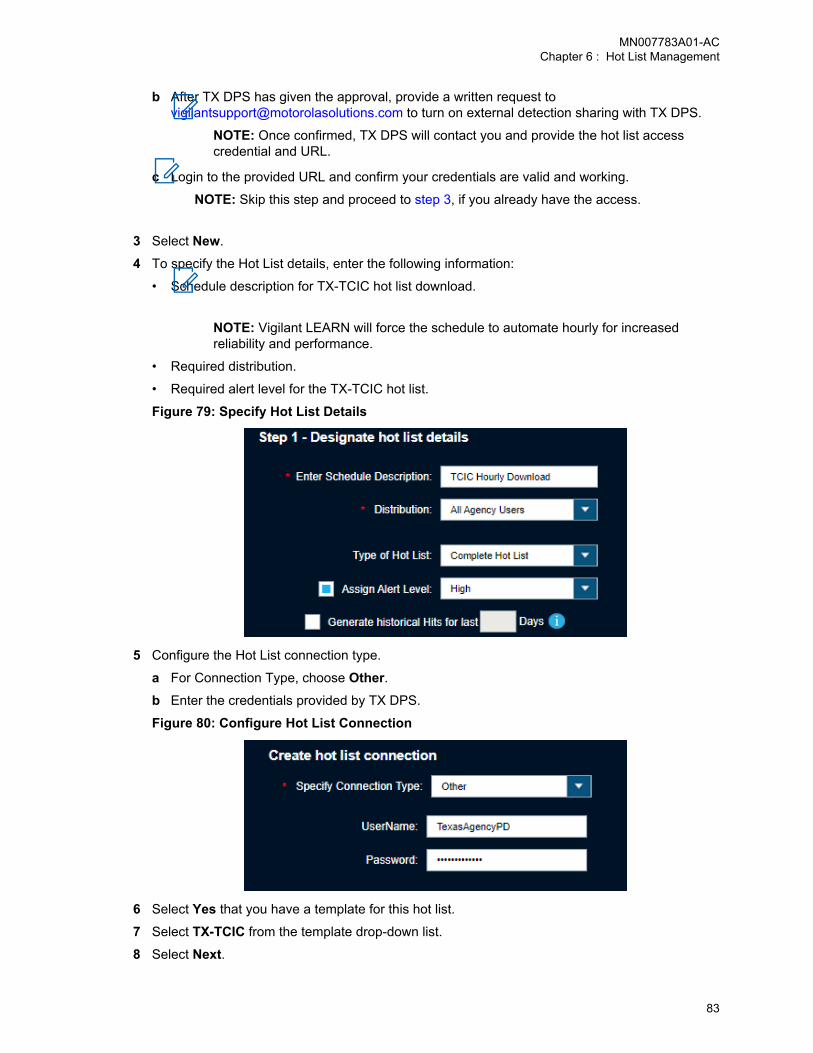
b After TX DPS has given the approval, provide a written request [email protected] to turn on external detection sharing with TX DPS.
NOTE: Once confirmed, TX DPS will contact you and provide the hot list accesscredential and URL.
c Login to the provided URL and confirm your credentials are valid and working.
NOTE: Skip this step and proceed to step 3, if you already have the access.
3 Select New.
4 To specify the Hot List details, enter the following information:
• Schedule description for TX-TCIC hot list download.
NOTE: Vigilant LEARN will force the schedule to automate hourly for increasedreliability and performance.
• Required distribution.
• Required alert level for the TX-TCIC hot list.
Figure 79: Specify Hot List Details
5 Configure the Hot List connection type.
a For Connection Type, choose Other.b Enter the credentials provided by TX DPS.
Figure 80: Configure Hot List Connection
6 Select Yes that you have a template for this hot list.
7 Select TX-TCIC from the template drop-down list.
8 Select Next.
MN007783A01-ACChapter 6 : Hot List Management
83
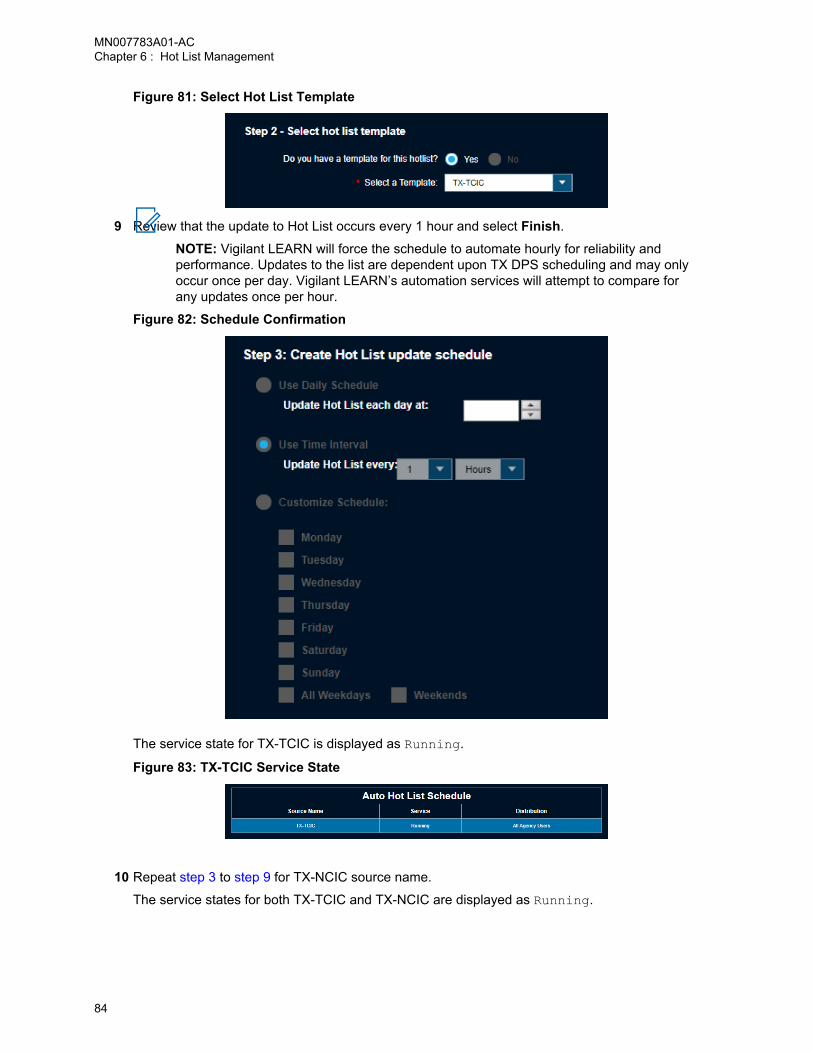
Figure 81: Select Hot List Template
9 Review that the update to Hot List occurs every 1 hour and select Finish.
NOTE: Vigilant LEARN will force the schedule to automate hourly for reliability andperformance. Updates to the list are dependent upon TX DPS scheduling and may onlyoccur once per day. Vigilant LEARN’s automation services will attempt to compare forany updates once per hour.
Figure 82: Schedule Confirmation
The service state for TX-TCIC is displayed as Running.
Figure 83: TX-TCIC Service State
10 Repeat step 3 to step 9 for TX-NCIC source name.
The service states for both TX-TCIC and TX-NCIC are displayed as Running.
MN007783A01-ACChapter 6 : Hot List Management
84

Figure 84: TX-TCIC and TX-NCIC Service State
11 Wait for an hour to see the next load to clients and agency for user assignment.
NOTE: You may configure Management Notices on your My Manager Profile to bealerted from email on the next load.
6.6Creating Hot List for Texas Agency ManagersThe Automated Hot List Set Up page complies with Texas Department of Public Safety (DPS) policiesfor TX-TCIC and TX-NCIC Hot List distribution.
NOTE: This feature is not applicable for the Vigilant LEARN Australia server.
Figure 85: Automated Hot List Set Up
Procedure:1 Enter the description of the auto job. For example, TX-TCIC.
2 For Distribution, select All Agency Users.
3 For Connection Type, select Other.4 Enter the credentials of your agency for TX DPS.
5 For Template, select TX-TCIC.
6 Click Next.7 To update the hot list, select Schedule.
8 Click Finish.
MN007783A01-ACChapter 6 : Hot List Management
85
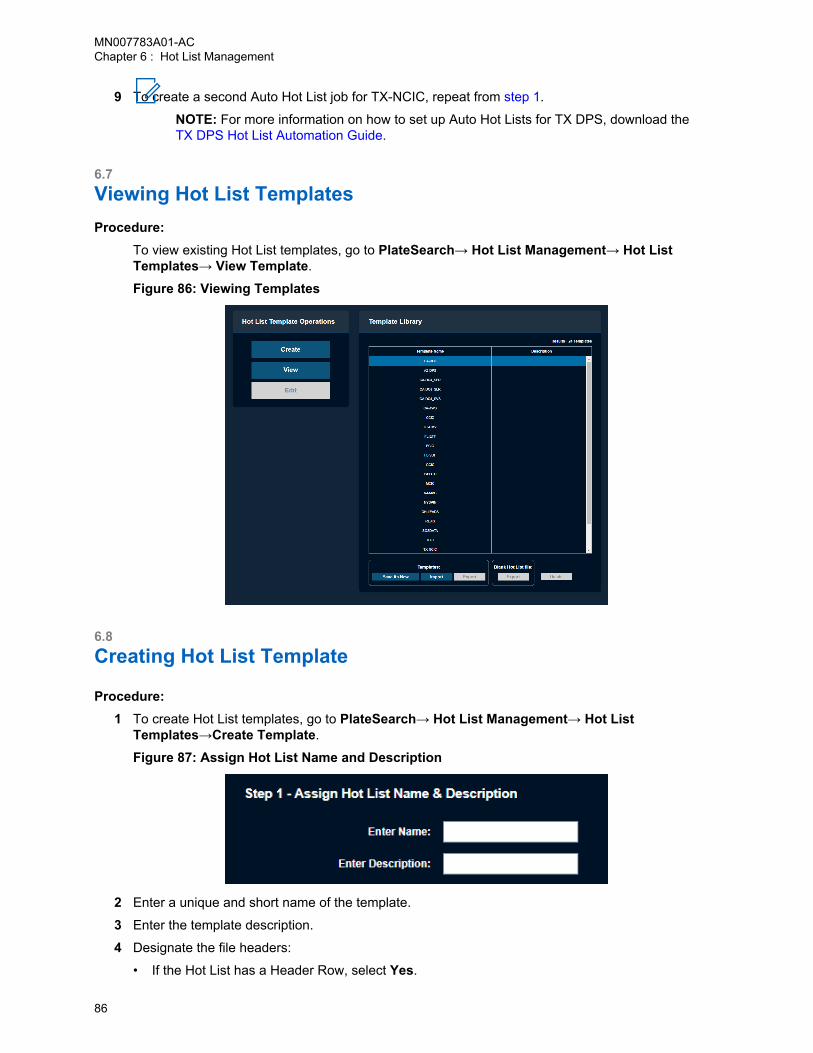
9 To create a second Auto Hot List job for TX-NCIC, repeat from step 1.
NOTE: For more information on how to set up Auto Hot Lists for TX DPS, download theTX DPS Hot List Automation Guide.
6.7Viewing Hot List TemplatesProcedure:
To view existing Hot List templates, go to PlateSearch→ Hot List Management→ Hot ListTemplates→ View Template.
Figure 86: Viewing Templates
6.8Creating Hot List Template
Procedure:1 To create Hot List templates, go to PlateSearch→ Hot List Management→ Hot List
Templates→Create Template.
Figure 87: Assign Hot List Name and Description
2 Enter a unique and short name of the template.
3 Enter the template description.
4 Designate the file headers:
• If the Hot List has a Header Row, select Yes.
MN007783A01-ACChapter 6 : Hot List Management
86
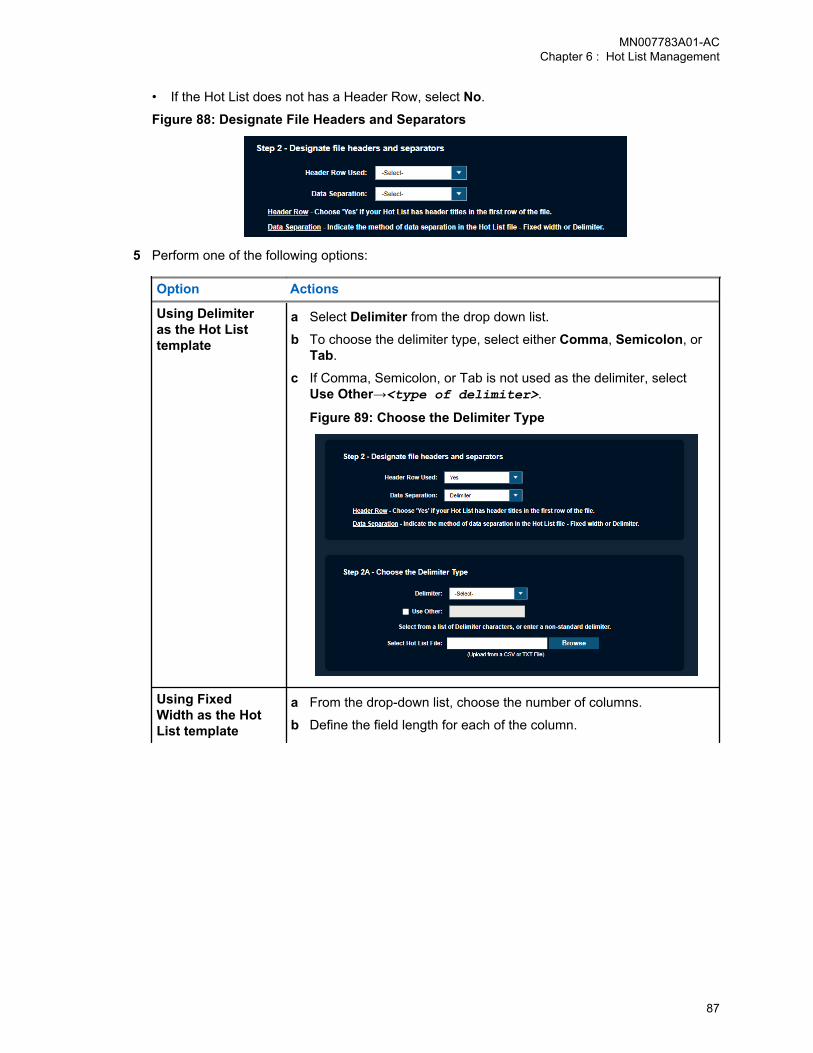
• If the Hot List does not has a Header Row, select No.
Figure 88: Designate File Headers and Separators
5 Perform one of the following options:
Option Actions
Using Delimiteras the Hot Listtemplate
a Select Delimiter from the drop down list.
b To choose the delimiter type, select either Comma, Semicolon, orTab.
c If Comma, Semicolon, or Tab is not used as the delimiter, selectUse Other→<type of delimiter>.
Figure 89: Choose the Delimiter Type
Using FixedWidth as the HotList template
a From the drop-down list, choose the number of columns.
b Define the field length for each of the column.
MN007783A01-ACChapter 6 : Hot List Management
87
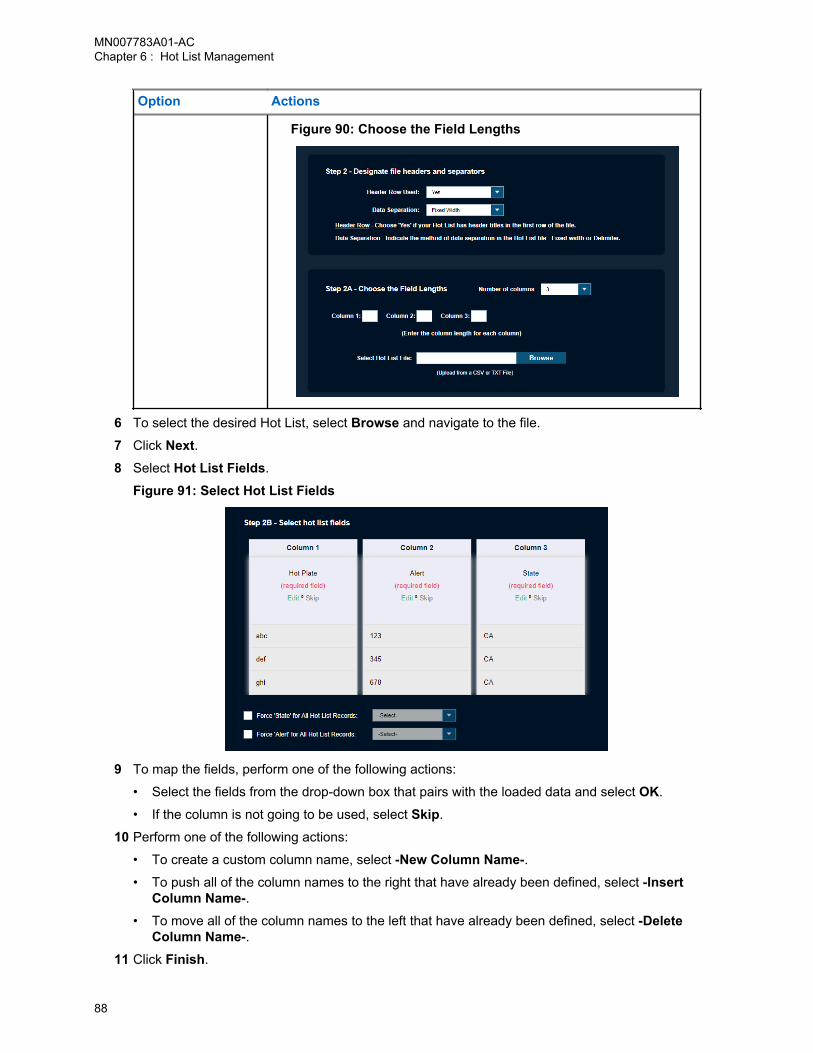
Option Actions
Figure 90: Choose the Field Lengths
6 To select the desired Hot List, select Browse and navigate to the file.
7 Click Next.8 Select Hot List Fields.
Figure 91: Select Hot List Fields
9 To map the fields, perform one of the following actions:
• Select the fields from the drop-down box that pairs with the loaded data and select OK.
• If the column is not going to be used, select Skip.
10 Perform one of the following actions:
• To create a custom column name, select -New Column Name-.• To push all of the column names to the right that have already been defined, select -Insert
Column Name-.• To move all of the column names to the left that have already been defined, select -Delete
Column Name-.11 Click Finish.
MN007783A01-ACChapter 6 : Hot List Management
88
6.9Duplicating Hot List TemplateProcedure:
1 To generate a template from an existing default template, go to PlateSearch→ Hot ListManagement→ Hot List Templates→ View Template.
2 Highlight one of the default templates and select Save As New.
3 Perform one of the following actions:
• To create new template, enter a new template Name, Description, and Source.
• To clone the template, enter a new template Name.
6.10Editing Hot List TemplateProcedure:
1 To edit a Hot List Template, navigate to PlateSearch→ Hot List Management→Hot ListTemplates→Edit template.
2 Highlight the desired template and select Edit.
6.11Importing and Exporting Hot List TemplateProcedure:
1 Highlight the required template.
2 To import and export templates from different sites, select Import and Export under Templates.
NOTE: This feature allows you to share the templates with a local site that uses anidentical custom template.
3 To export a blank Hot List template, select Export under Blank Hot List file.
6.12Deleting Hot List TemplatesProcedure:
1 To remove a template, highlight the required templates and select Delete.
NOTE: You are not allowed to delete the default templates in the Template Library.
6.13Searching RecordsProcedure:
1 To search for Hot List records, go to PlateSearch→Hot List Management→Search Records.
MN007783A01-ACChapter 6 : Hot List Management
89
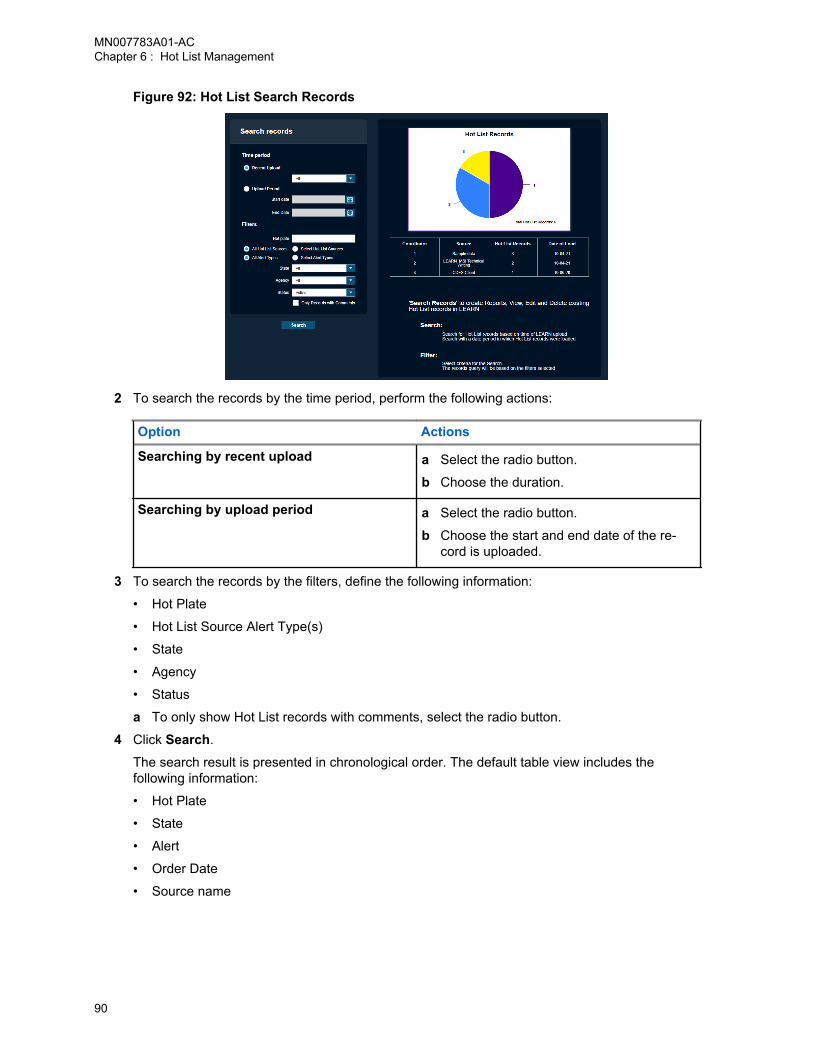
Figure 92: Hot List Search Records
2 To search the records by the time period, perform the following actions:
Option Actions
Searching by recent upload a Select the radio button.
b Choose the duration.
Searching by upload period a Select the radio button.
b Choose the start and end date of the re-cord is uploaded.
3 To search the records by the filters, define the following information:
• Hot Plate
• Hot List Source Alert Type(s)
• State
• Agency
• Status
a To only show Hot List records with comments, select the radio button.
4 Click Search.
The search result is presented in chronological order. The default table view includes thefollowing information:
• Hot Plate
• State
• Alert
• Order Date
• Source name
MN007783A01-ACChapter 6 : Hot List Management
90
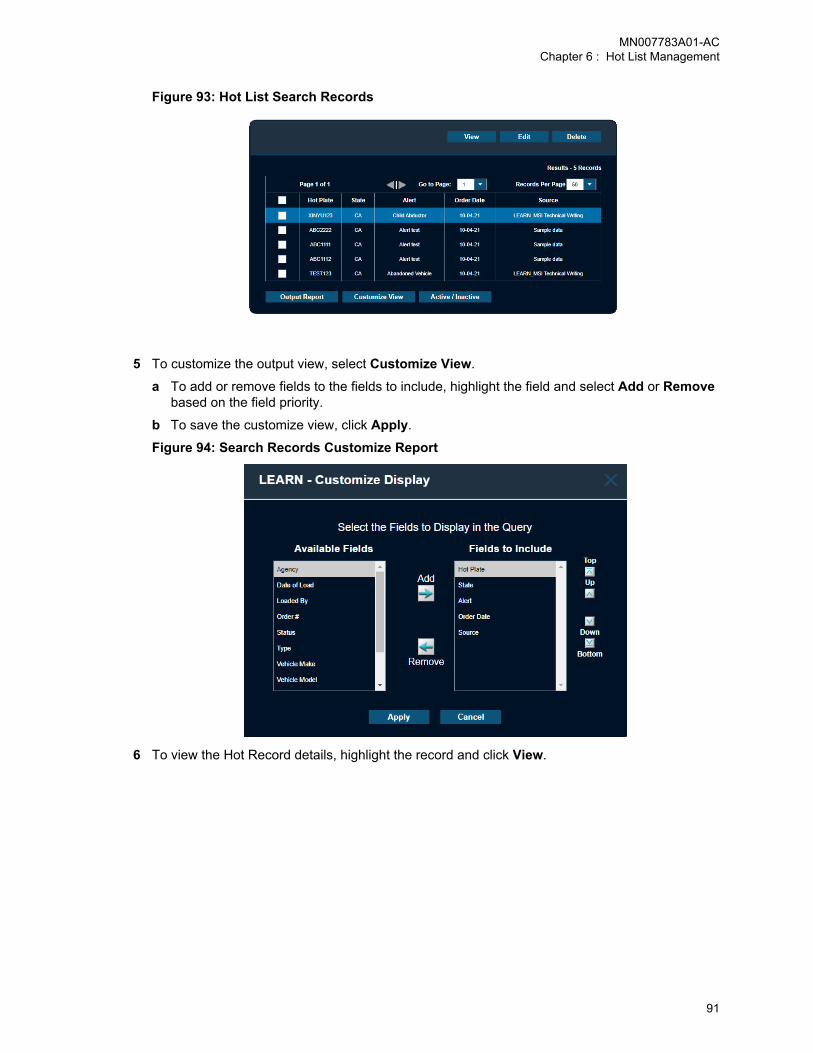
Figure 93: Hot List Search Records
5 To customize the output view, select Customize View.
a To add or remove fields to the fields to include, highlight the field and select Add or Removebased on the field priority.
b To save the customize view, click Apply.
Figure 94: Search Records Customize Report
6 To view the Hot Record details, highlight the record and click View.
MN007783A01-ACChapter 6 : Hot List Management
91
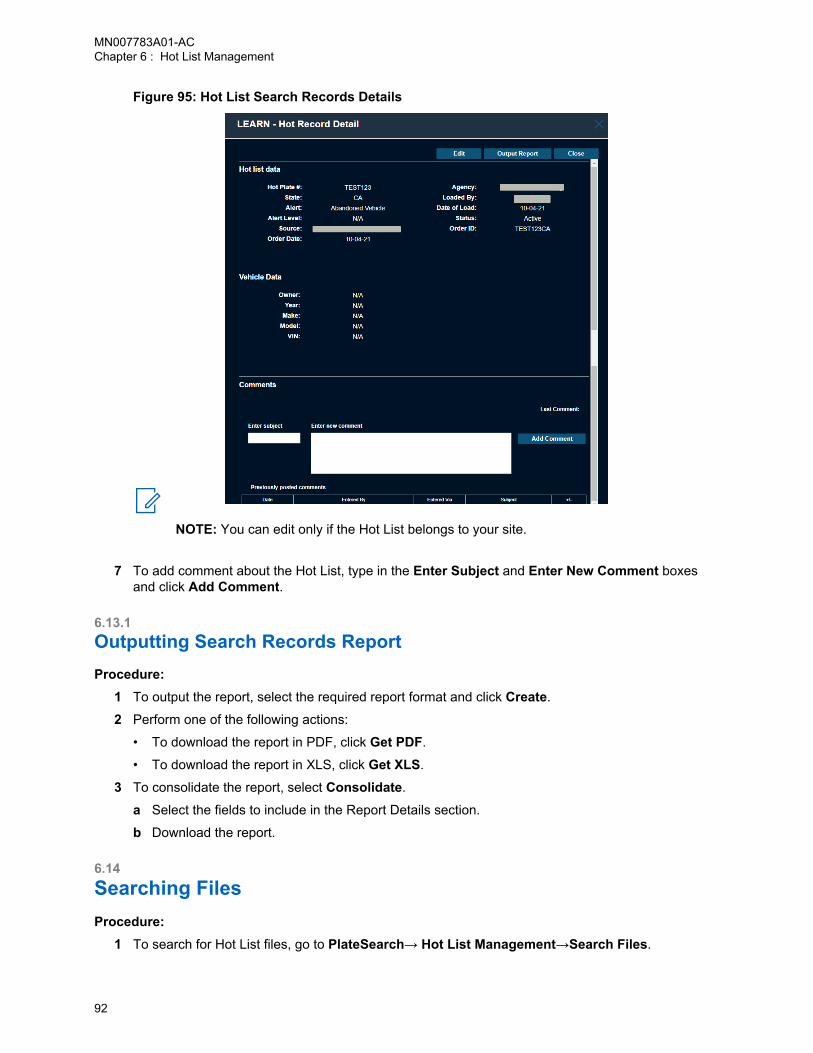
Figure 95: Hot List Search Records Details
NOTE: You can edit only if the Hot List belongs to your site.
7 To add comment about the Hot List, type in the Enter Subject and Enter New Comment boxesand click Add Comment.
6.13.1Outputting Search Records ReportProcedure:
1 To output the report, select the required report format and click Create.
2 Perform one of the following actions:
• To download the report in PDF, click Get PDF.
• To download the report in XLS, click Get XLS.
3 To consolidate the report, select Consolidate.
a Select the fields to include in the Report Details section.
b Download the report.
6.14Searching FilesProcedure:
1 To search for Hot List files, go to PlateSearch→ Hot List Management→Search Files.
MN007783A01-ACChapter 6 : Hot List Management
92

Figure 96: Searching for Hot List Files
2 To search the files by the time period, perform the following actions:
Option Actions
Searching by recent upload a Select the radio button.
b Choose the duration.
Searching by upload period a Select the radio button.
b Choose the start and end date of the fileis uploaded.
Searching by file name Enter the file name.
3 To search the records by the filters, select the required information.
4 Click Search.
The search result is presented in chronological order. The default table view includes thefollowing information:
• File Name
• Date of Load
• Source
• Records
• Status
MN007783A01-ACChapter 6 : Hot List Management
93
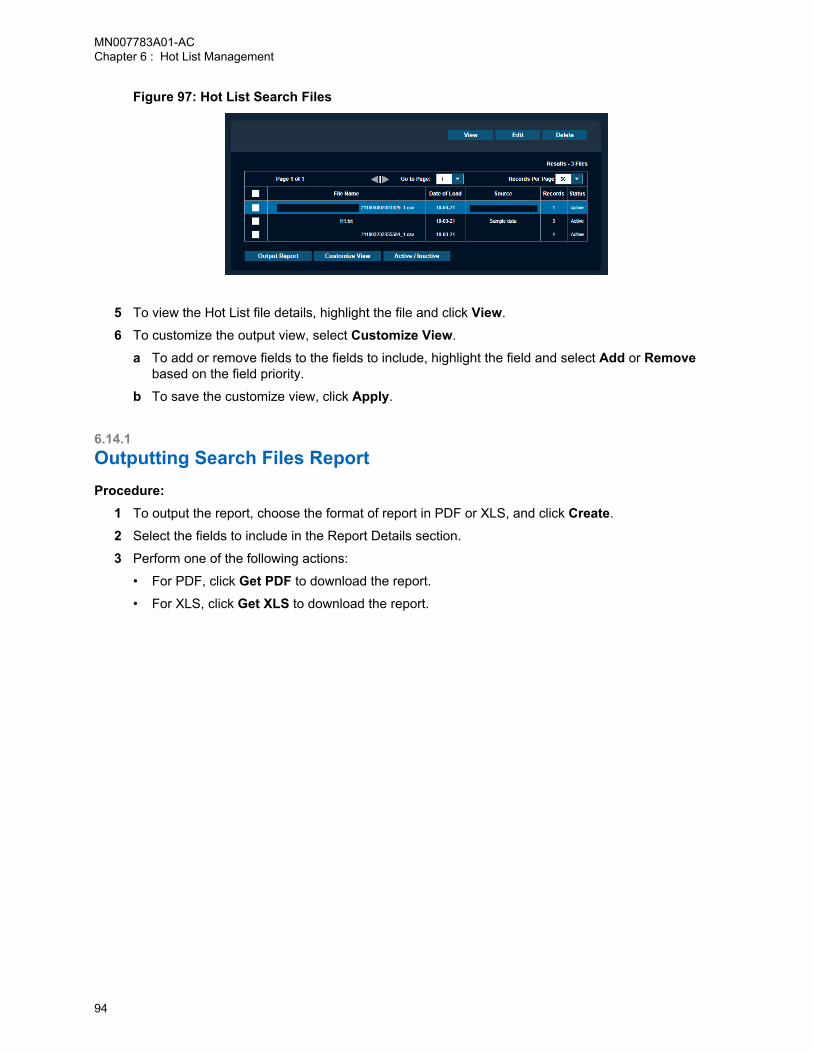
Figure 97: Hot List Search Files
5 To view the Hot List file details, highlight the file and click View.
6 To customize the output view, select Customize View.
a To add or remove fields to the fields to include, highlight the field and select Add or Removebased on the field priority.
b To save the customize view, click Apply.
6.14.1Outputting Search Files ReportProcedure:
1 To output the report, choose the format of report in PDF or XLS, and click Create.
2 Select the fields to include in the Report Details section.
3 Perform one of the following actions:
• For PDF, click Get PDF to download the report.
• For XLS, click Get XLS to download the report.
MN007783A01-ACChapter 6 : Hot List Management
94
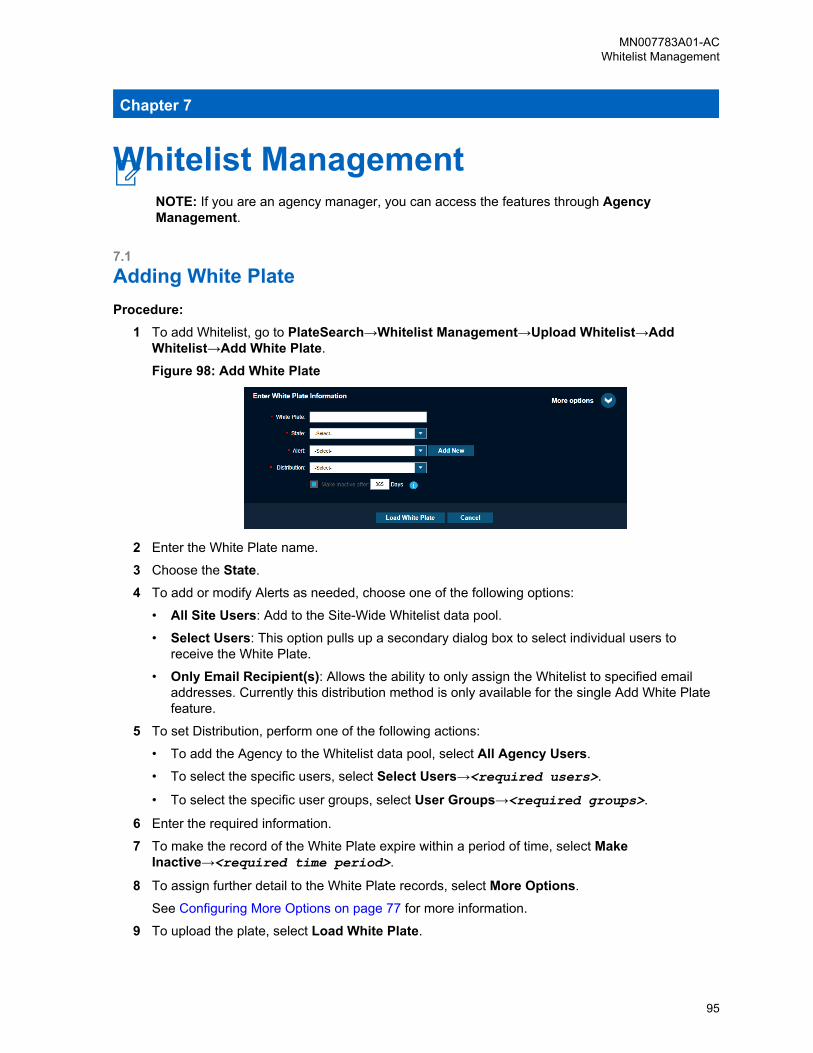
Chapter 7
Whitelist ManagementNOTE: If you are an agency manager, you can access the features through AgencyManagement.
7.1Adding White PlateProcedure:
1 To add Whitelist, go to PlateSearch→Whitelist Management→Upload Whitelist→AddWhitelist→Add White Plate.
Figure 98: Add White Plate
2 Enter the White Plate name.
3 Choose the State.
4 To add or modify Alerts as needed, choose one of the following options:
• All Site Users: Add to the Site-Wide Whitelist data pool.
• Select Users: This option pulls up a secondary dialog box to select individual users toreceive the White Plate.
• Only Email Recipient(s): Allows the ability to only assign the Whitelist to specified emailaddresses. Currently this distribution method is only available for the single Add White Platefeature.
5 To set Distribution, perform one of the following actions:
• To add the Agency to the Whitelist data pool, select All Agency Users.
• To select the specific users, select Select Users→<required users>.
• To select the specific user groups, select User Groups→<required groups>.
6 Enter the required information.
7 To make the record of the White Plate expire within a period of time, select MakeInactive→<required time period>.
8 To assign further detail to the White Plate records, select More Options.
See Configuring More Options on page 77 for more information.
9 To upload the plate, select Load White Plate.
MN007783A01-ACWhitelist Management
95
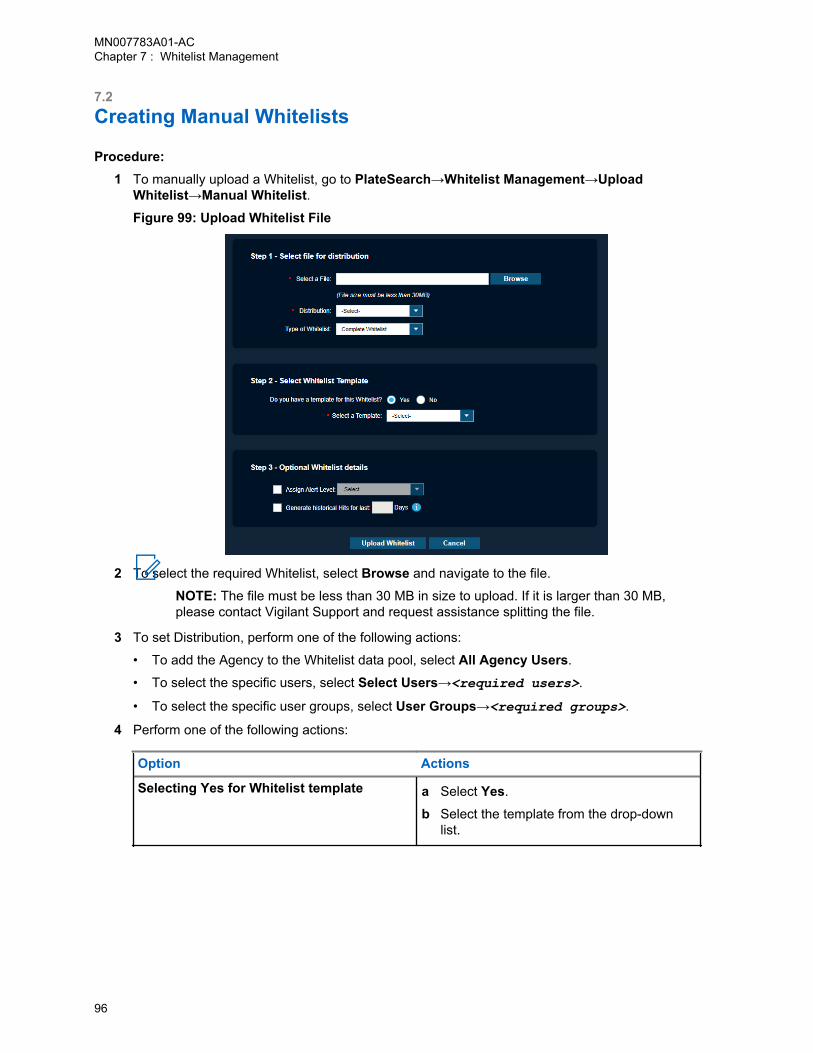
7.2Creating Manual Whitelists
Procedure:1 To manually upload a Whitelist, go to PlateSearch→Whitelist Management→Upload
Whitelist→Manual Whitelist.Figure 99: Upload Whitelist File
2 To select the required Whitelist, select Browse and navigate to the file.
NOTE: The file must be less than 30 MB in size to upload. If it is larger than 30 MB,please contact Vigilant Support and request assistance splitting the file.
3 To set Distribution, perform one of the following actions:
• To add the Agency to the Whitelist data pool, select All Agency Users.
• To select the specific users, select Select Users→<required users>.
• To select the specific user groups, select User Groups→<required groups>.
4 Perform one of the following actions:
Option Actions
Selecting Yes for Whitelist template a Select Yes.
b Select the template from the drop-downlist.
MN007783A01-ACChapter 7 : Whitelist Management
96
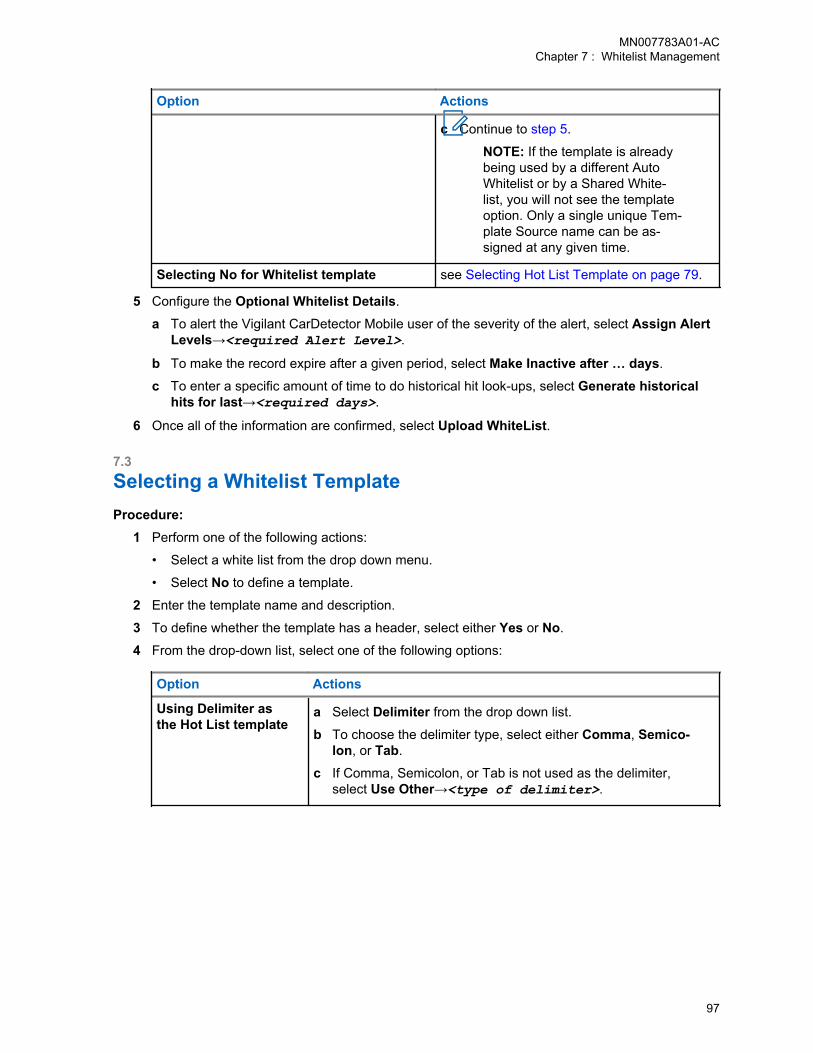
Option Actions
c Continue to step 5.
NOTE: If the template is alreadybeing used by a different AutoWhitelist or by a Shared White-list, you will not see the templateoption. Only a single unique Tem-plate Source name can be as-signed at any given time.
Selecting No for Whitelist template see Selecting Hot List Template on page 79.
5 Configure the Optional Whitelist Details.
a To alert the Vigilant CarDetector Mobile user of the severity of the alert, select Assign AlertLevels→<required Alert Level>.
b To make the record expire after a given period, select Make Inactive after … days.
c To enter a specific amount of time to do historical hit look-ups, select Generate historicalhits for last→<required days>.
6 Once all of the information are confirmed, select Upload WhiteList.
7.3Selecting a Whitelist TemplateProcedure:
1 Perform one of the following actions:
• Select a white list from the drop down menu.
• Select No to define a template.
2 Enter the template name and description.
3 To define whether the template has a header, select either Yes or No.
4 From the drop-down list, select one of the following options:
Option Actions
Using Delimiter asthe Hot List template
a Select Delimiter from the drop down list.
b To choose the delimiter type, select either Comma, Semico-lon, or Tab.
c If Comma, Semicolon, or Tab is not used as the delimiter,select Use Other→<type of delimiter>.
MN007783A01-ACChapter 7 : Whitelist Management
97
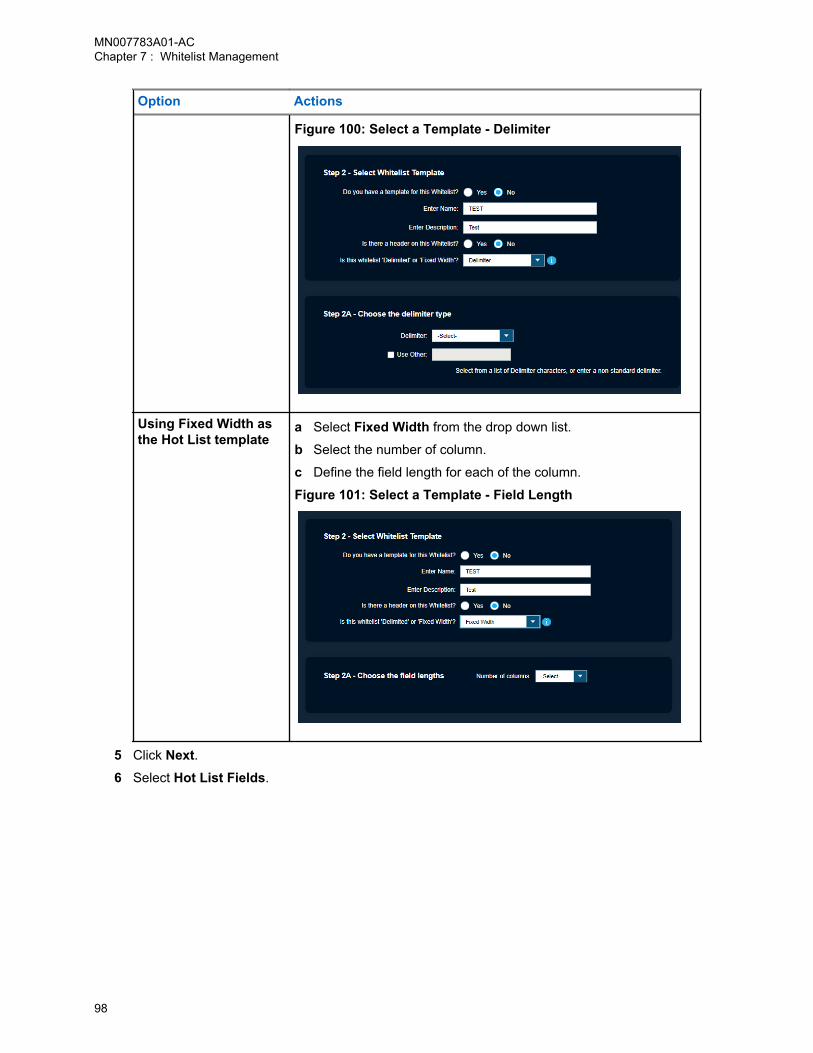
Option Actions
Figure 100: Select a Template - Delimiter
Using Fixed Width asthe Hot List template
a Select Fixed Width from the drop down list.
b Select the number of column.
c Define the field length for each of the column.
Figure 101: Select a Template - Field Length
5 Click Next.6 Select Hot List Fields.
MN007783A01-ACChapter 7 : Whitelist Management
98
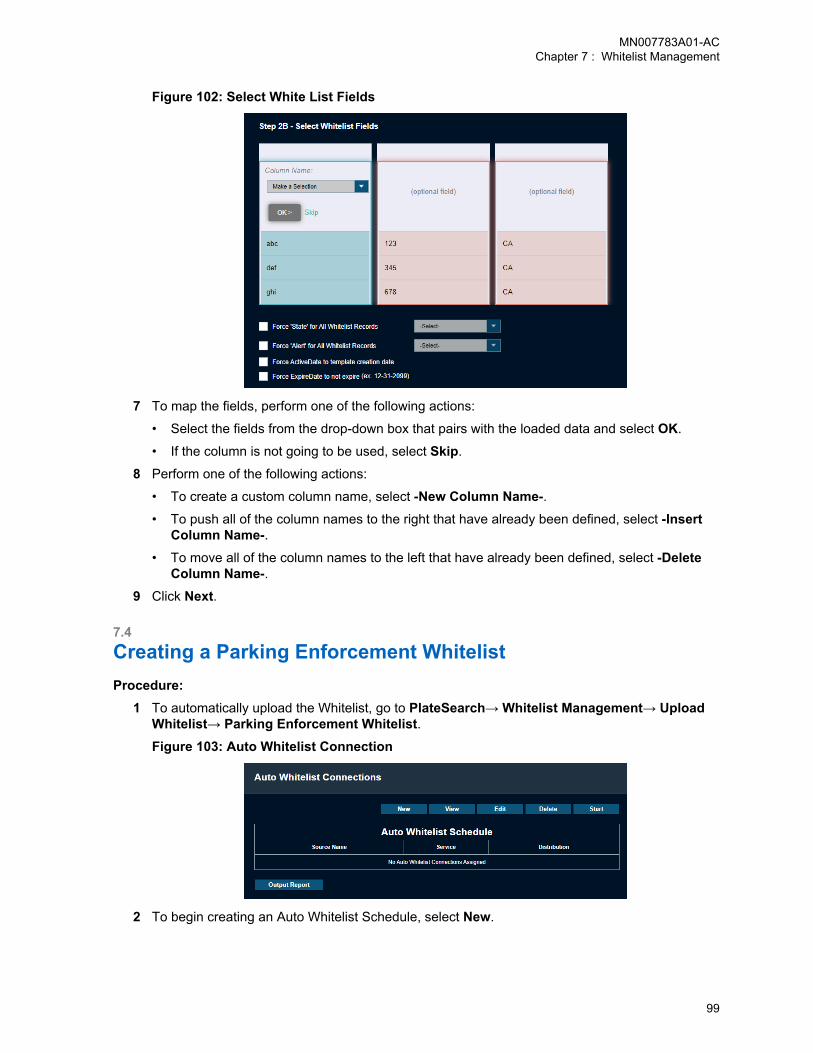
Figure 102: Select White List Fields
7 To map the fields, perform one of the following actions:
• Select the fields from the drop-down box that pairs with the loaded data and select OK.
• If the column is not going to be used, select Skip.
8 Perform one of the following actions:
• To create a custom column name, select -New Column Name-.• To push all of the column names to the right that have already been defined, select -Insert
Column Name-.• To move all of the column names to the left that have already been defined, select -Delete
Column Name-.9 Click Next.
7.4Creating a Parking Enforcement WhitelistProcedure:
1 To automatically upload the Whitelist, go to PlateSearch→ Whitelist Management→ UploadWhitelist→ Parking Enforcement Whitelist.Figure 103: Auto Whitelist Connection
2 To begin creating an Auto Whitelist Schedule, select New.
MN007783A01-ACChapter 7 : Whitelist Management
99

Figure 104: Assign Whitelist Name and Description
3 Enter the schedule description.
4 To set Distribution, perform one of the following actions:
• To add the Agency to the Whitelist data pool, select All Agency Users.
• To select the specific users, select Select Users→<required users>.
• To select the specific user groups, select User Groups→<required groups>.
5 Choose the type of Whitelist.
6 To alert the Vigilant CarDetector Mobile user of the severity of the alert, select Assign AlertLevels→<required Alert Level>.
7 To enter a specific amount of time to do historical hit look-ups, select Generate historical hitsfor last→<required days>.
8 Select the connection type.
9 Fill in the required information.
10 To test the connectivity, select Test Connection.
11 To set the alert on failure to load notification, enable the check box and set the required hours.
12 Perform one of the following actions:
Option Actions
Selecting Yes for Whitelist template perform the following actions:
a Select Yes.
b Select the template from the drop-downlist.
MN007783A01-ACChapter 7 : Whitelist Management
100

Option Actions
c Click Next and continue to step Step 13.
NOTE: If the template is usedby a different Auto Whitelist, ora Shared Whitelist, you will notsee the template option. Only asingle unique Template Sourcename can be assigned at any giv-en time.
Selecting No for Whitelist template see Selecting Hot List Template on page 79.
13 Perform the following actions:
• To update the Whitelist at a specified time each day, select Use Daily Schedule.
NOTE: Times are stated in EST for the Hosted Server.
• To set up for a time interval duration, select the Time Interval.• To set up for a specific schedule, select Customize Schedule specify the days of the week
you wish to load.
14 Click Finish.
7.5Viewing Whitelist TemplatesProcedure:
To view the Whitelist templates, go to PlateSearch→ Whitelist Management→ WhitelistTemplates→ View Template.
7.6Creating Whitelist Templates
Procedure:1 To create Whitelist templates, go to PlateSearch→ Whitelist Management→ Whitelist
Templates→Create Template.
Figure 105: Assign Whitelist Name and Description
MN007783A01-ACChapter 7 : Whitelist Management
101
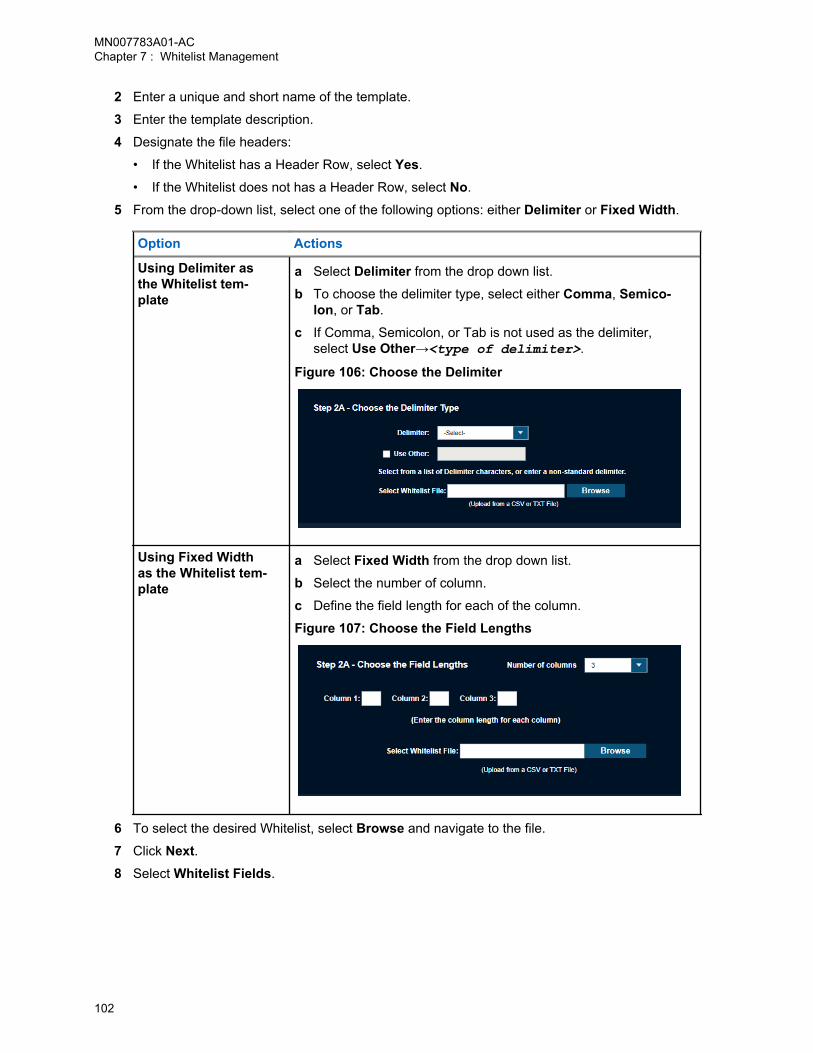
2 Enter a unique and short name of the template.
3 Enter the template description.
4 Designate the file headers:
• If the Whitelist has a Header Row, select Yes.
• If the Whitelist does not has a Header Row, select No.
5 From the drop-down list, select one of the following options: either Delimiter or Fixed Width.
Option Actions
Using Delimiter asthe Whitelist tem-plate
a Select Delimiter from the drop down list.
b To choose the delimiter type, select either Comma, Semico-lon, or Tab.
c If Comma, Semicolon, or Tab is not used as the delimiter,select Use Other→<type of delimiter>.
Figure 106: Choose the Delimiter
Using Fixed Widthas the Whitelist tem-plate
a Select Fixed Width from the drop down list.
b Select the number of column.
c Define the field length for each of the column.
Figure 107: Choose the Field Lengths
6 To select the desired Whitelist, select Browse and navigate to the file.
7 Click Next.8 Select Whitelist Fields.
MN007783A01-ACChapter 7 : Whitelist Management
102
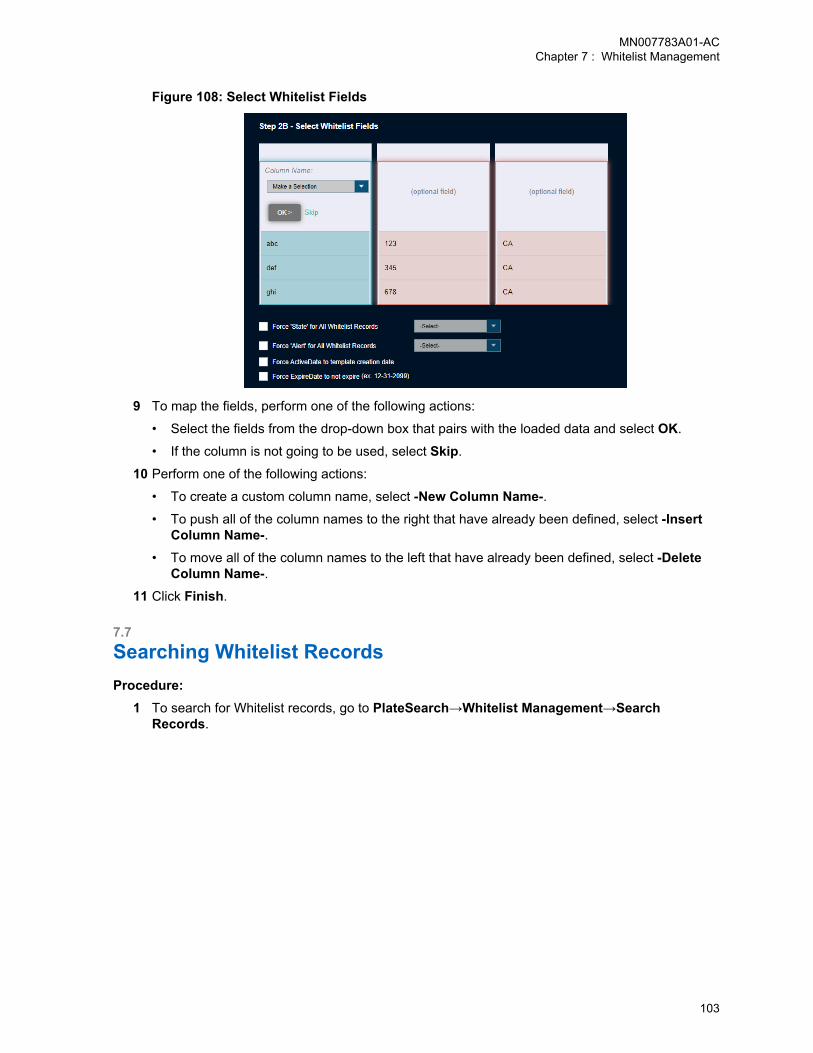
Figure 108: Select Whitelist Fields
9 To map the fields, perform one of the following actions:
• Select the fields from the drop-down box that pairs with the loaded data and select OK.
• If the column is not going to be used, select Skip.
10 Perform one of the following actions:
• To create a custom column name, select -New Column Name-.• To push all of the column names to the right that have already been defined, select -Insert
Column Name-.• To move all of the column names to the left that have already been defined, select -Delete
Column Name-.11 Click Finish.
7.7Searching Whitelist RecordsProcedure:
1 To search for Whitelist records, go to PlateSearch→Whitelist Management→SearchRecords.
MN007783A01-ACChapter 7 : Whitelist Management
103
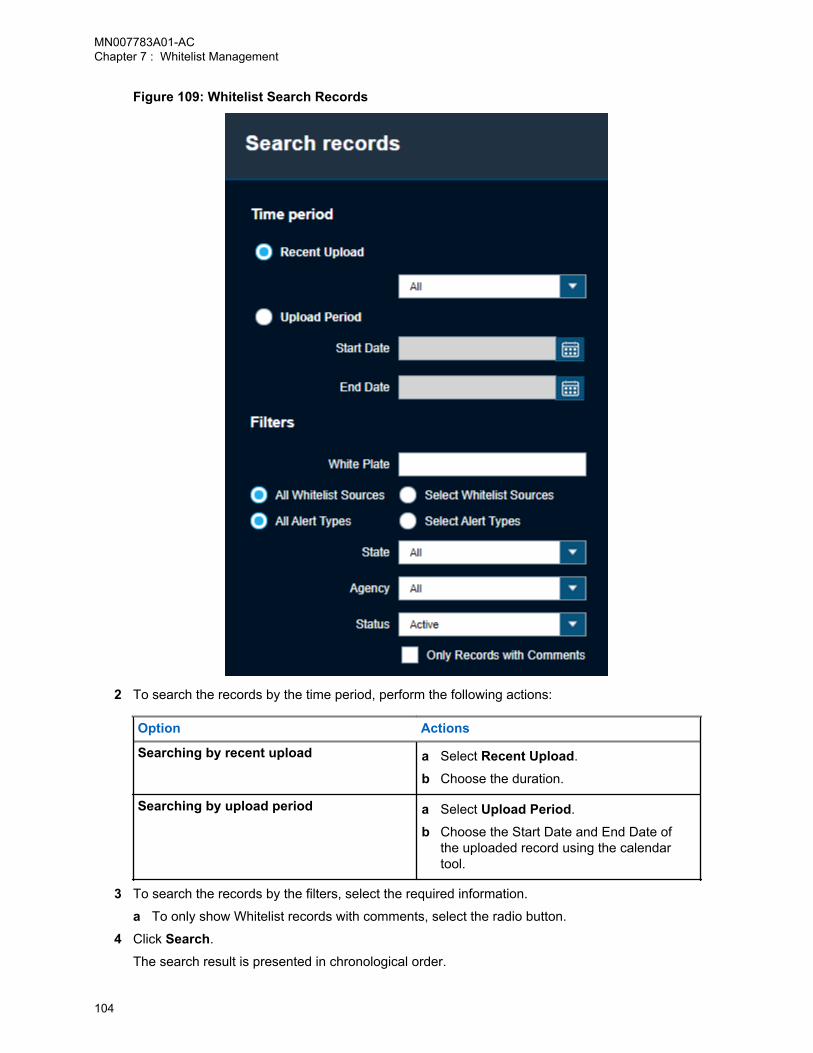
Figure 109: Whitelist Search Records
2 To search the records by the time period, perform the following actions:
Option Actions
Searching by recent upload a Select Recent Upload.
b Choose the duration.
Searching by upload period a Select Upload Period.
b Choose the Start Date and End Date ofthe uploaded record using the calendartool.
3 To search the records by the filters, select the required information.
a To only show Whitelist records with comments, select the radio button.
4 Click Search.
The search result is presented in chronological order.
MN007783A01-ACChapter 7 : Whitelist Management
104

If the Whitelist is shared with your site, an "(S)" is indicated beside the source name.
Figure 110: Whitelist Search Records
5 To view the Whitelist record details, highlight the record and click View.
In the CDM Status detail, the Status field shows when the Whitelist plate record is ready to bedownloaded to Car Detector Mobile systems.
Figure 111: Whitelist Search Records Details
6 To comment on a Whitelist record, type in the Enter Subject and Enter New Comment boxesand click Add Comment.
7 To generate an output report of a Whitelist record, click Output Report from the record details.
MN007783A01-ACChapter 7 : Whitelist Management
105
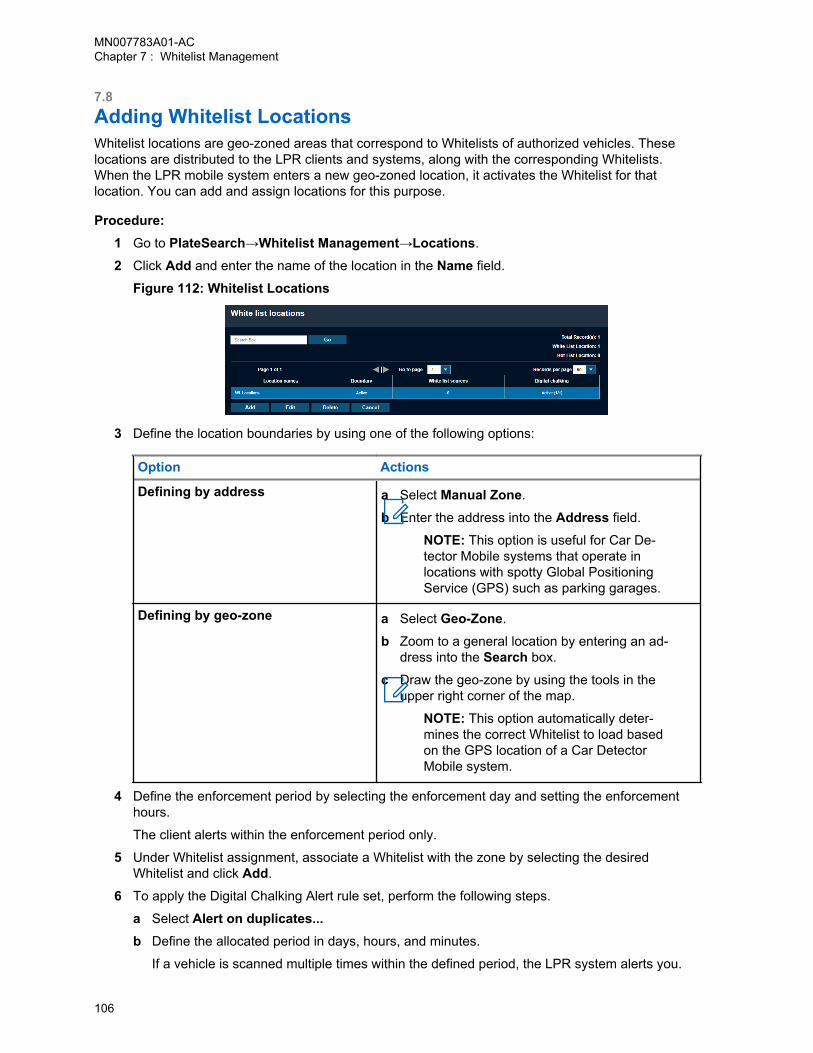
7.8Adding Whitelist LocationsWhitelist locations are geo-zoned areas that correspond to Whitelists of authorized vehicles. Theselocations are distributed to the LPR clients and systems, along with the corresponding Whitelists.When the LPR mobile system enters a new geo-zoned location, it activates the Whitelist for thatlocation. You can add and assign locations for this purpose.
Procedure:1 Go to PlateSearch→Whitelist Management→Locations.
2 Click Add and enter the name of the location in the Name field.
Figure 112: Whitelist Locations
3 Define the location boundaries by using one of the following options:
Option Actions
Defining by address a Select Manual Zone.
b Enter the address into the Address field.
NOTE: This option is useful for Car De-tector Mobile systems that operate inlocations with spotty Global PositioningService (GPS) such as parking garages.
Defining by geo-zone a Select Geo-Zone.
b Zoom to a general location by entering an ad-dress into the Search box.
c Draw the geo-zone by using the tools in theupper right corner of the map.
NOTE: This option automatically deter-mines the correct Whitelist to load basedon the GPS location of a Car DetectorMobile system.
4 Define the enforcement period by selecting the enforcement day and setting the enforcementhours.
The client alerts within the enforcement period only.
5 Under Whitelist assignment, associate a Whitelist with the zone by selecting the desiredWhitelist and click Add.
6 To apply the Digital Chalking Alert rule set, perform the following steps.
a Select Alert on duplicates...b Define the allocated period in days, hours, and minutes.
If a vehicle is scanned multiple times within the defined period, the LPR system alerts you.
MN007783A01-ACChapter 7 : Whitelist Management
106
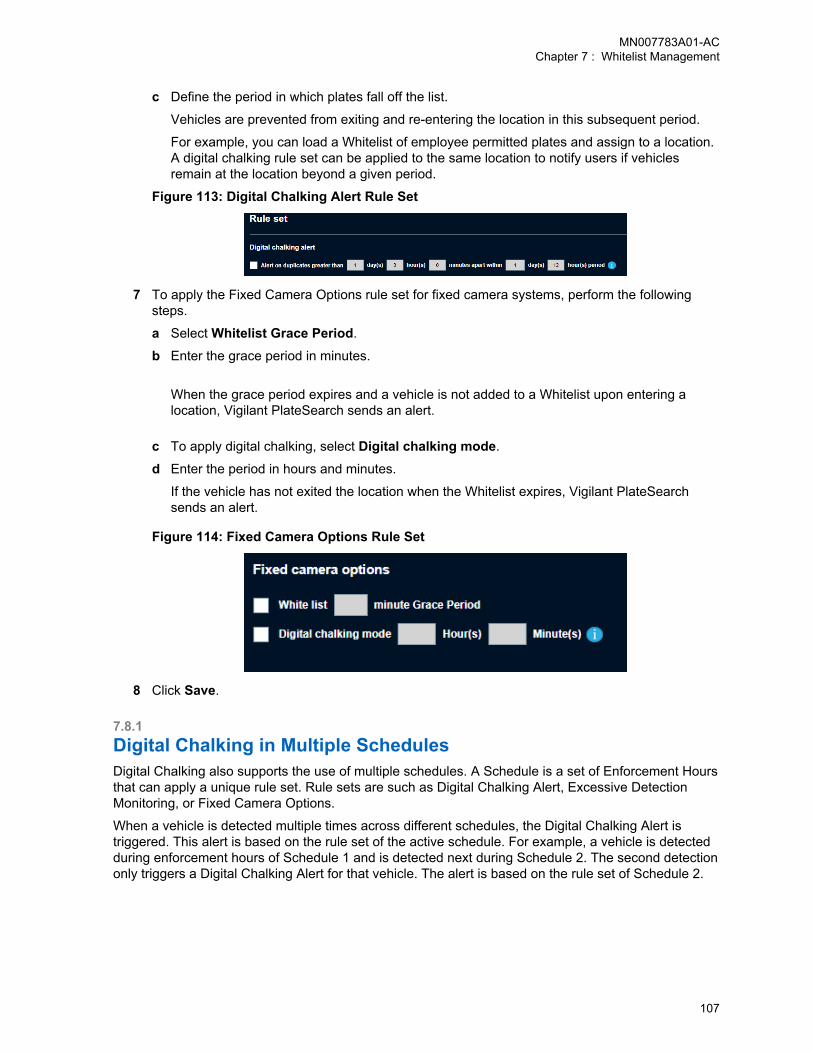
c Define the period in which plates fall off the list.
Vehicles are prevented from exiting and re-entering the location in this subsequent period.
For example, you can load a Whitelist of employee permitted plates and assign to a location.A digital chalking rule set can be applied to the same location to notify users if vehiclesremain at the location beyond a given period.
Figure 113: Digital Chalking Alert Rule Set
7 To apply the Fixed Camera Options rule set for fixed camera systems, perform the followingsteps.
a Select Whitelist Grace Period.
b Enter the grace period in minutes.
When the grace period expires and a vehicle is not added to a Whitelist upon entering alocation, Vigilant PlateSearch sends an alert.
c To apply digital chalking, select Digital chalking mode.
d Enter the period in hours and minutes.
If the vehicle has not exited the location when the Whitelist expires, Vigilant PlateSearchsends an alert.
Figure 114: Fixed Camera Options Rule Set
8 Click Save.
7.8.1Digital Chalking in Multiple SchedulesDigital Chalking also supports the use of multiple schedules. A Schedule is a set of Enforcement Hoursthat can apply a unique rule set. Rule sets are such as Digital Chalking Alert, Excessive DetectionMonitoring, or Fixed Camera Options.
When a vehicle is detected multiple times across different schedules, the Digital Chalking Alert istriggered. This alert is based on the rule set of the active schedule. For example, a vehicle is detectedduring enforcement hours of Schedule 1 and is detected next during Schedule 2. The second detectiononly triggers a Digital Chalking Alert for that vehicle. The alert is based on the rule set of Schedule 2.
MN007783A01-ACChapter 7 : Whitelist Management
107
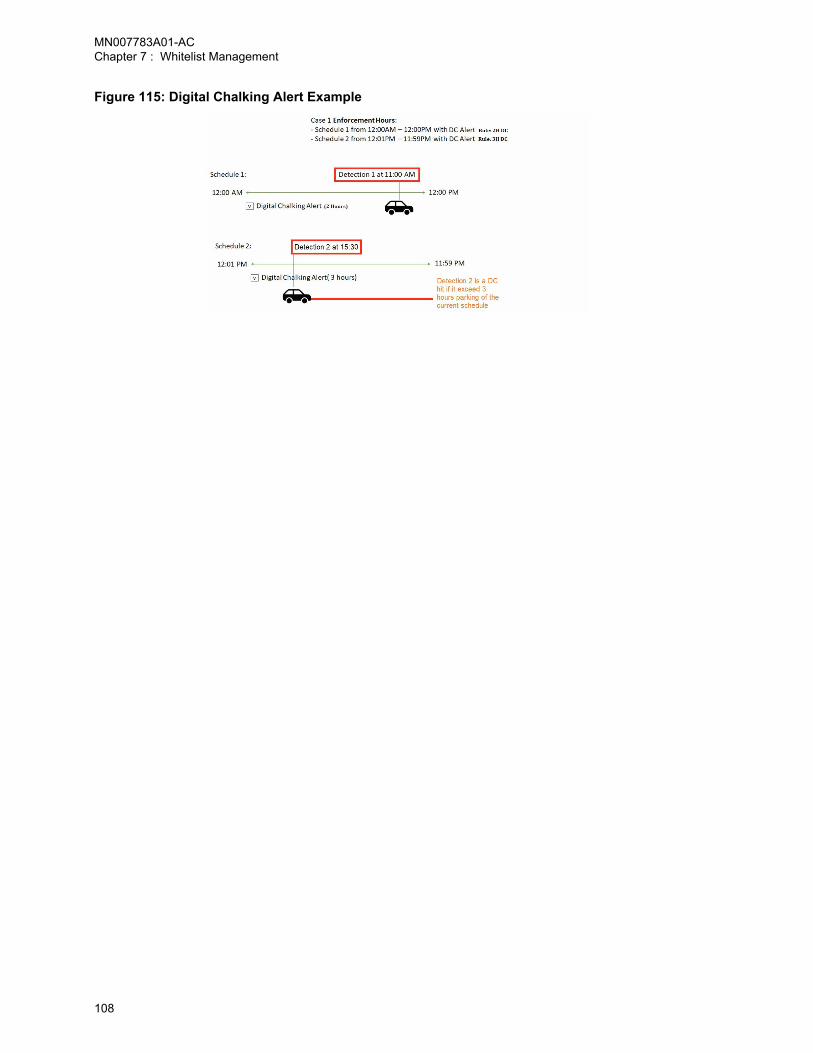
Figure 115: Digital Chalking Alert Example
MN007783A01-ACChapter 7 : Whitelist Management
108
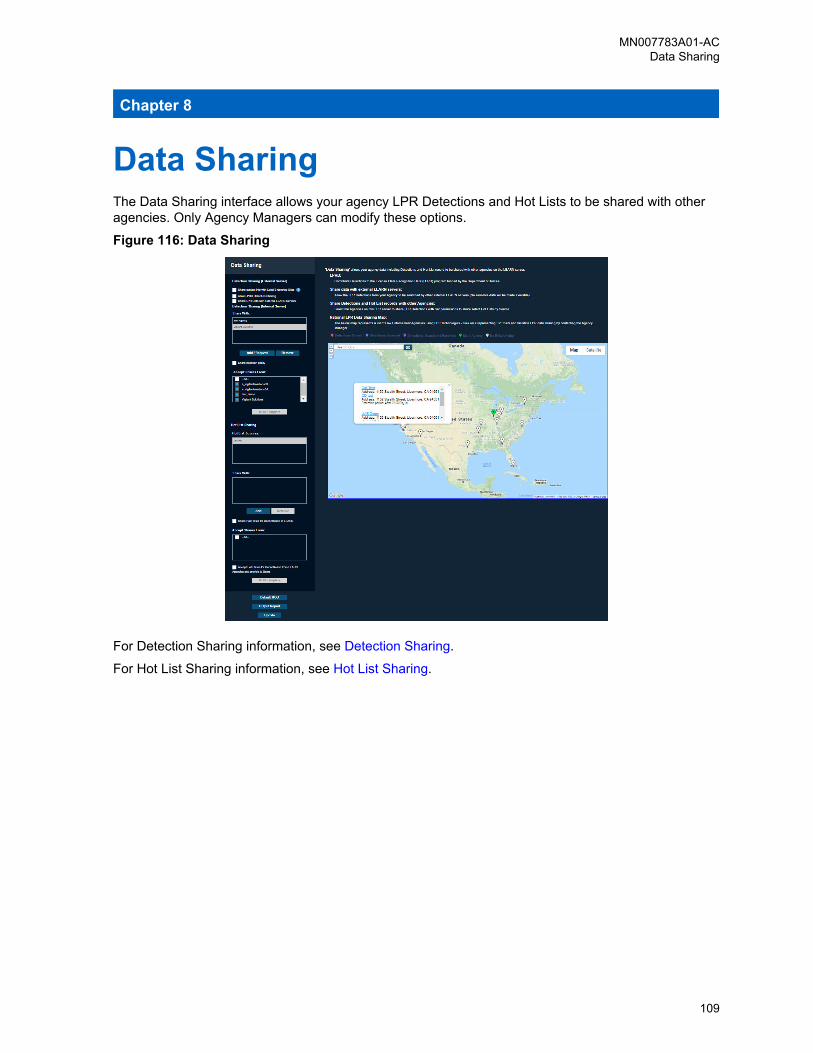
Chapter 8
Data SharingThe Data Sharing interface allows your agency LPR Detections and Hot Lists to be shared with otheragencies. Only Agency Managers can modify these options.
Figure 116: Data Sharing
For Detection Sharing information, see Detection Sharing.
For Hot List Sharing information, see Hot List Sharing.
MN007783A01-ACData Sharing
109
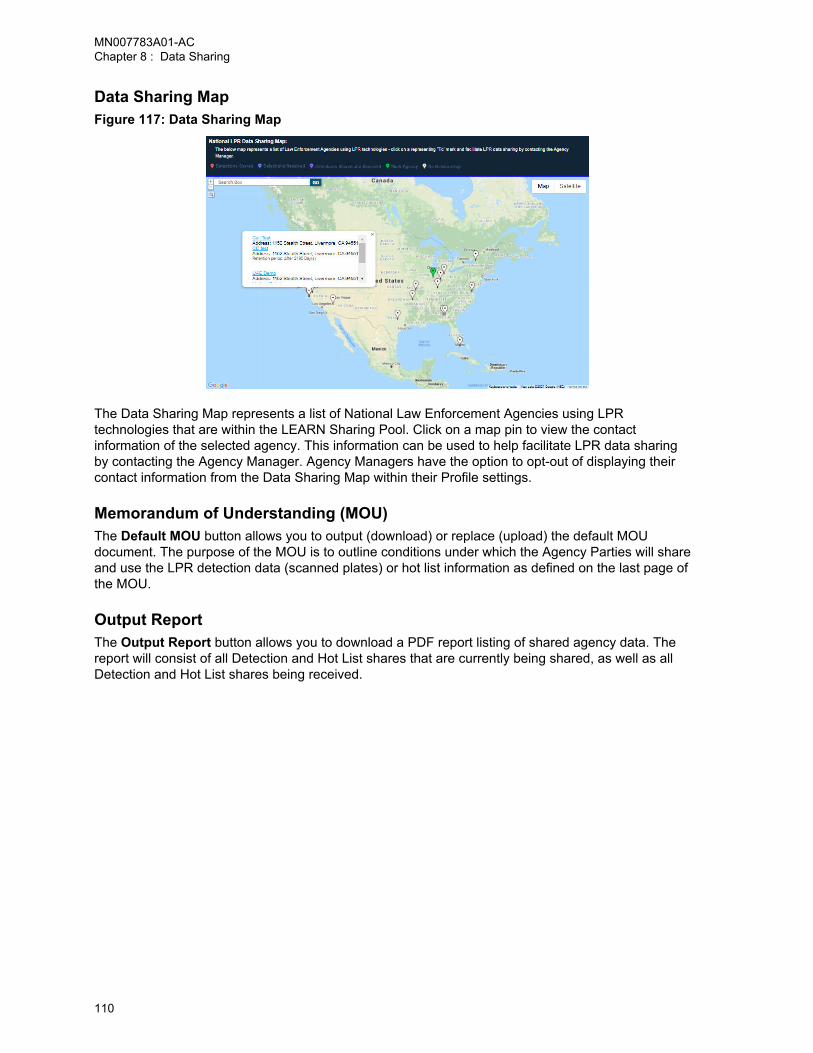
Data Sharing MapFigure 117: Data Sharing Map
The Data Sharing Map represents a list of National Law Enforcement Agencies using LPRtechnologies that are within the LEARN Sharing Pool. Click on a map pin to view the contactinformation of the selected agency. This information can be used to help facilitate LPR data sharingby contacting the Agency Manager. Agency Managers have the option to opt-out of displaying theircontact information from the Data Sharing Map within their Profile settings.
Memorandum of Understanding (MOU)The Default MOU button allows you to output (download) or replace (upload) the default MOUdocument. The purpose of the MOU is to outline conditions under which the Agency Parties will shareand use the LPR detection data (scanned plates) or hot list information as defined on the last page ofthe MOU.
Output ReportThe Output Report button allows you to download a PDF report listing of shared agency data. Thereport will consist of all Detection and Hot List shares that are currently being shared, as well as allDetection and Hot List shares being received.
MN007783A01-ACChapter 8 : Data Sharing
110
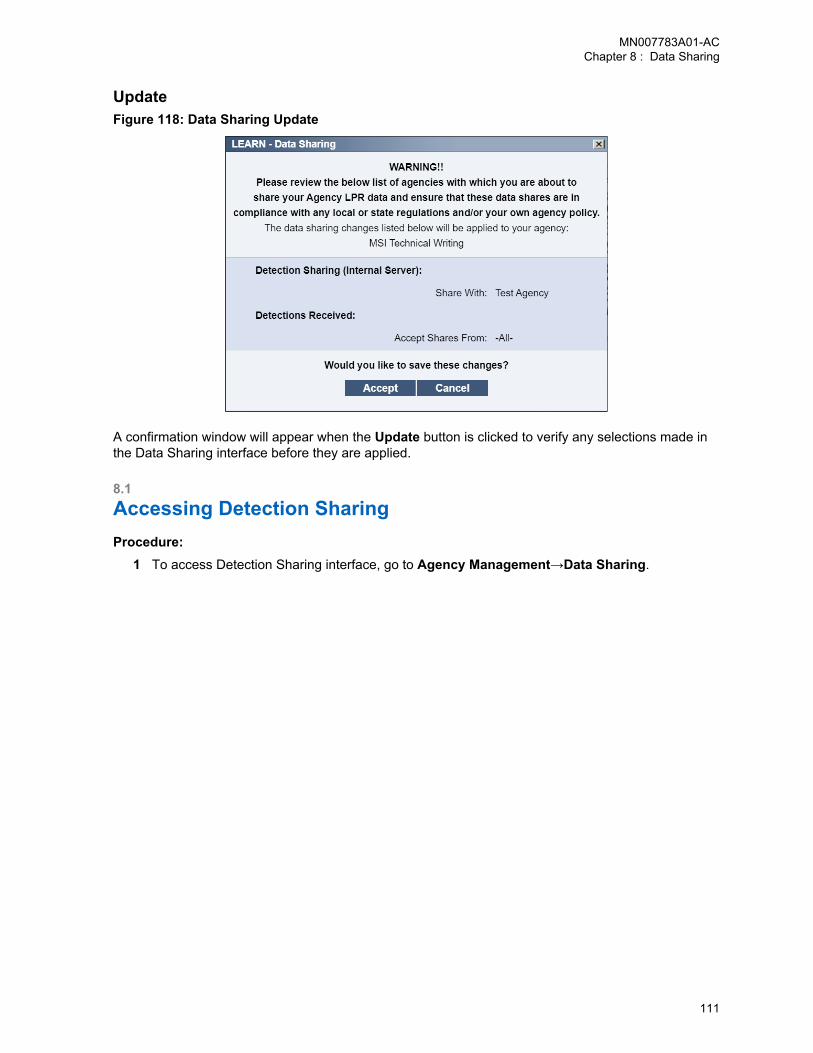
UpdateFigure 118: Data Sharing Update
A confirmation window will appear when the Update button is clicked to verify any selections made inthe Data Sharing interface before they are applied.
8.1Accessing Detection SharingProcedure:
1 To access Detection Sharing interface, go to Agency Management→Data Sharing.
MN007783A01-ACChapter 8 : Data Sharing
111
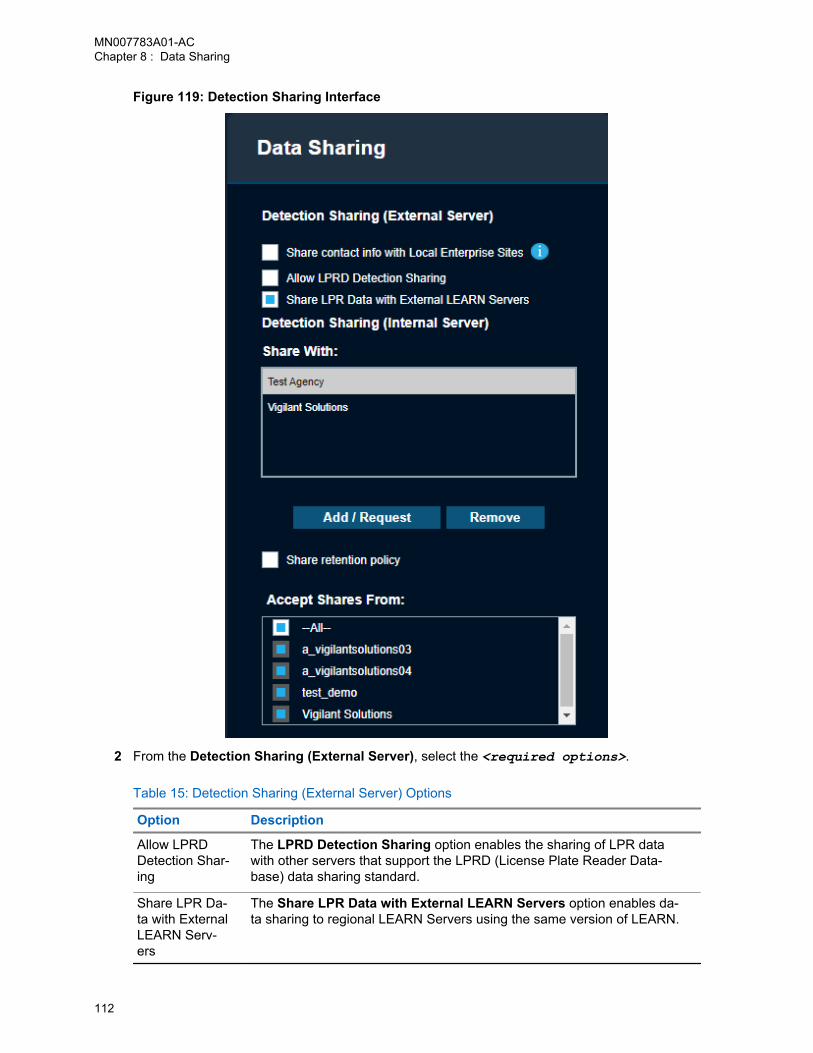
Figure 119: Detection Sharing Interface
2 From the Detection Sharing (External Server), select the <required options>.
Table 15: Detection Sharing (External Server) Options
Option Description
Allow LPRDDetection Shar-ing
The LPRD Detection Sharing option enables the sharing of LPR datawith other servers that support the LPRD (License Plate Reader Data-base) data sharing standard.
Share LPR Da-ta with ExternalLEARN Serv-ers
The Share LPR Data with External LEARN Servers option enables da-ta sharing to regional LEARN Servers using the same version of LEARN.
MN007783A01-ACChapter 8 : Data Sharing
112
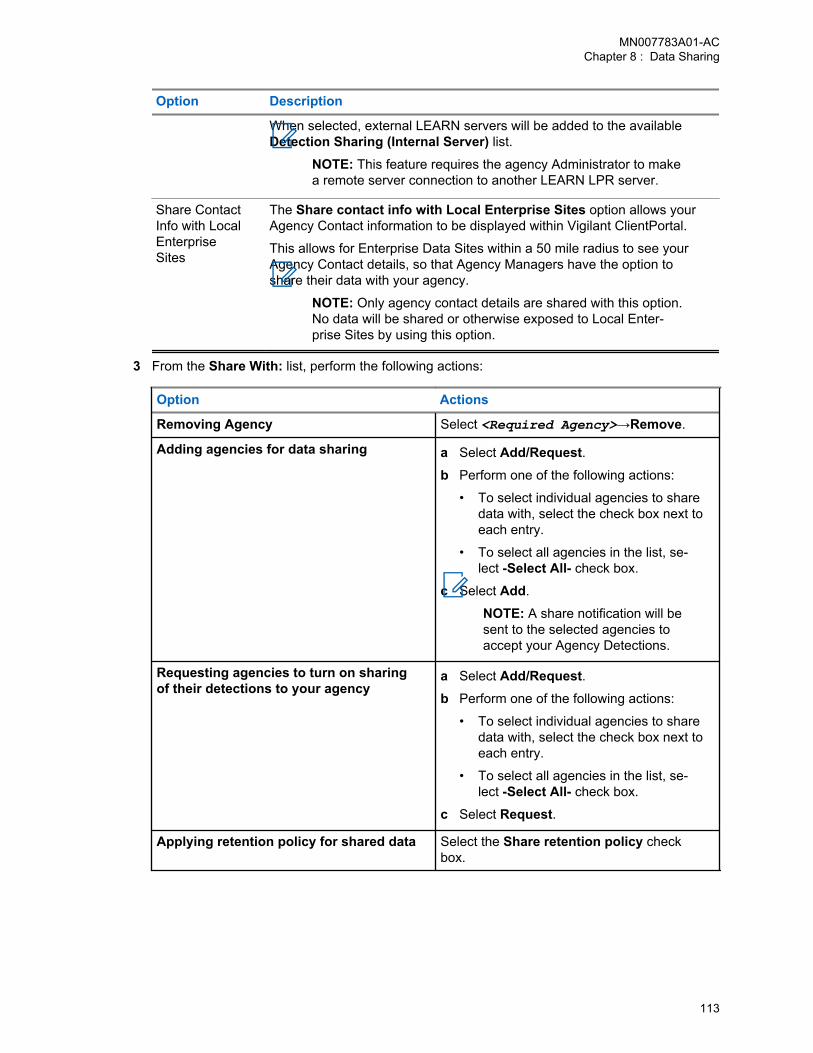
Option Description
When selected, external LEARN servers will be added to the availableDetection Sharing (Internal Server) list.
NOTE: This feature requires the agency Administrator to makea remote server connection to another LEARN LPR server.
Share ContactInfo with LocalEnterpriseSites
The Share contact info with Local Enterprise Sites option allows yourAgency Contact information to be displayed within Vigilant ClientPortal.
This allows for Enterprise Data Sites within a 50 mile radius to see yourAgency Contact details, so that Agency Managers have the option toshare their data with your agency.
NOTE: Only agency contact details are shared with this option.No data will be shared or otherwise exposed to Local Enter-prise Sites by using this option.
3 From the Share With: list, perform the following actions:
Option Actions
Removing Agency Select <Required Agency>→Remove.
Adding agencies for data sharing a Select Add/Request.b Perform one of the following actions:
• To select individual agencies to sharedata with, select the check box next toeach entry.
• To select all agencies in the list, se-lect -Select All- check box.
c Select Add.
NOTE: A share notification will besent to the selected agencies toaccept your Agency Detections.
Requesting agencies to turn on sharingof their detections to your agency
a Select Add/Request.b Perform one of the following actions:
• To select individual agencies to sharedata with, select the check box next toeach entry.
• To select all agencies in the list, se-lect -Select All- check box.
c Select Request.
Applying retention policy for shared data Select the Share retention policy checkbox.
MN007783A01-ACChapter 8 : Data Sharing
113
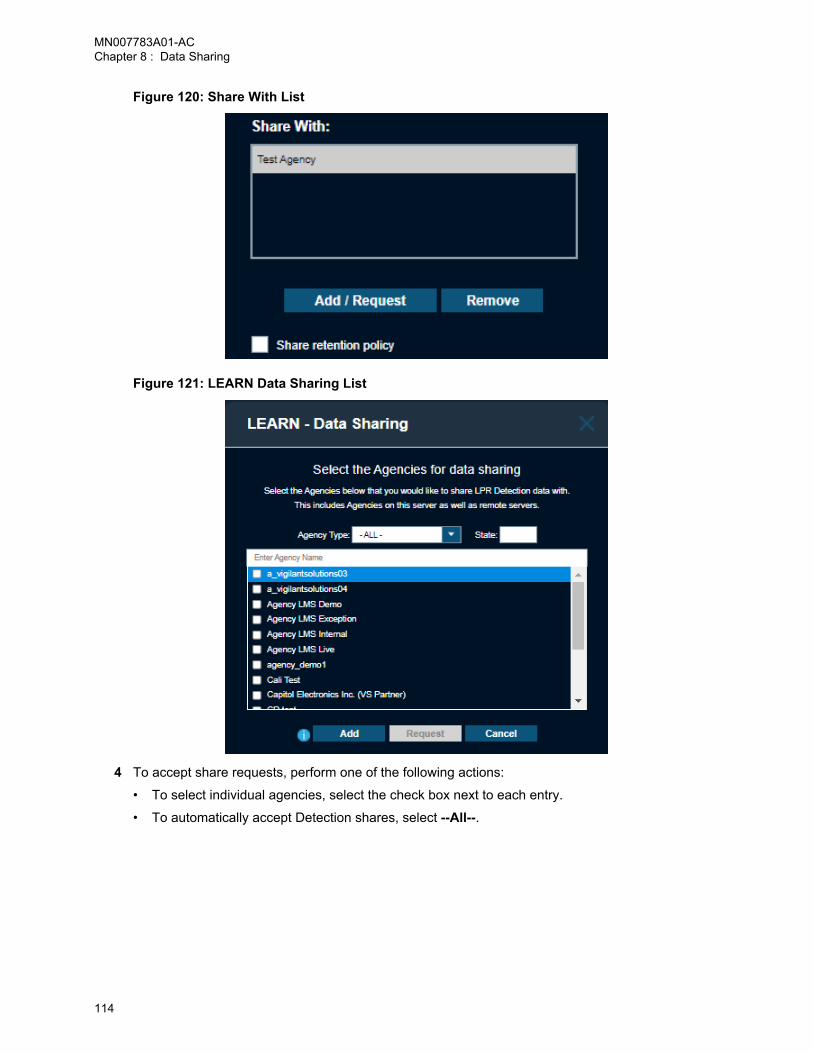
Figure 120: Share With List
Figure 121: LEARN Data Sharing List
4 To accept share requests, perform one of the following actions:
• To select individual agencies, select the check box next to each entry.
• To automatically accept Detection shares, select --All--.
MN007783A01-ACChapter 8 : Data Sharing
114
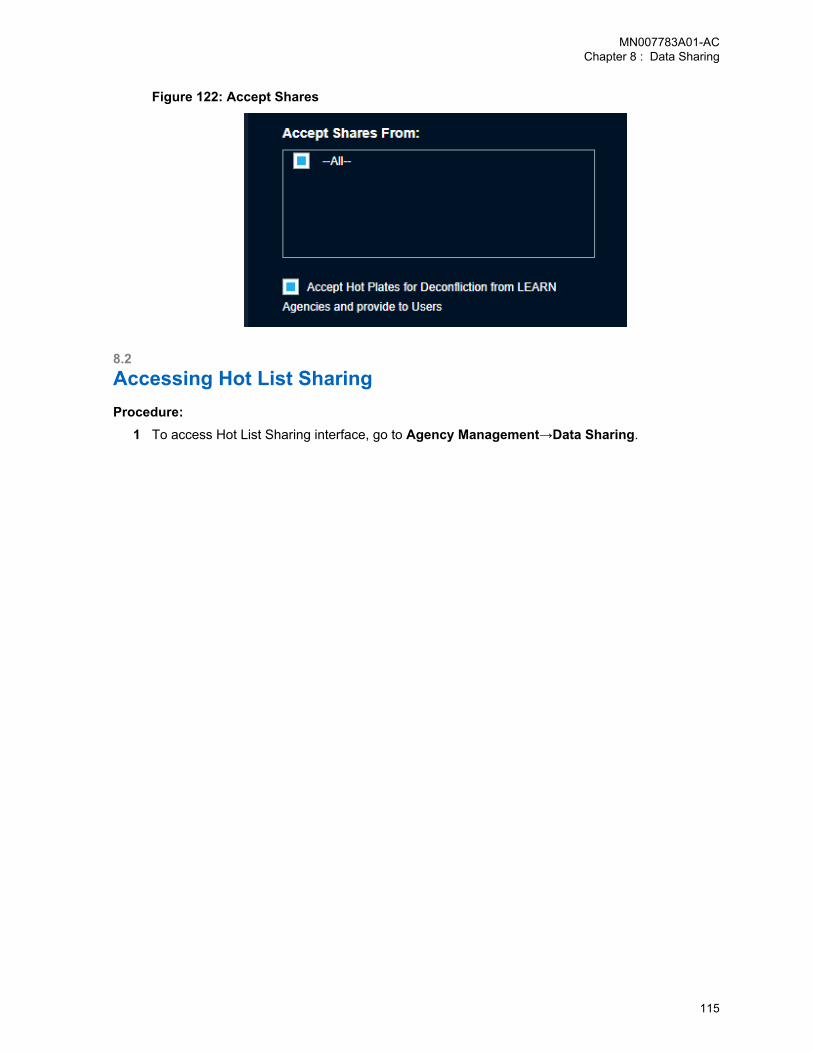
Figure 122: Accept Shares
8.2Accessing Hot List SharingProcedure:
1 To access Hot List Sharing interface, go to Agency Management→Data Sharing.
MN007783A01-ACChapter 8 : Data Sharing
115
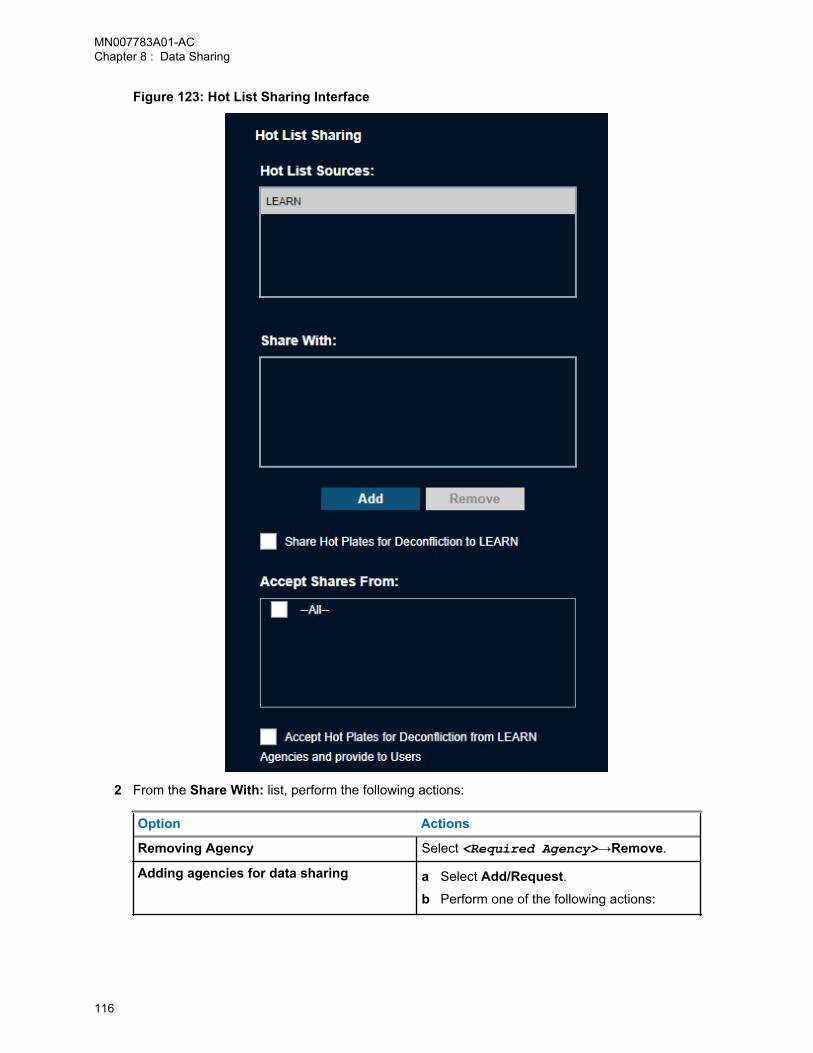
Figure 123: Hot List Sharing Interface
2 From the Share With: list, perform the following actions:
Option Actions
Removing Agency Select <Required Agency>→Remove.
Adding agencies for data sharing a Select Add/Request.b Perform one of the following actions:
MN007783A01-ACChapter 8 : Data Sharing
116
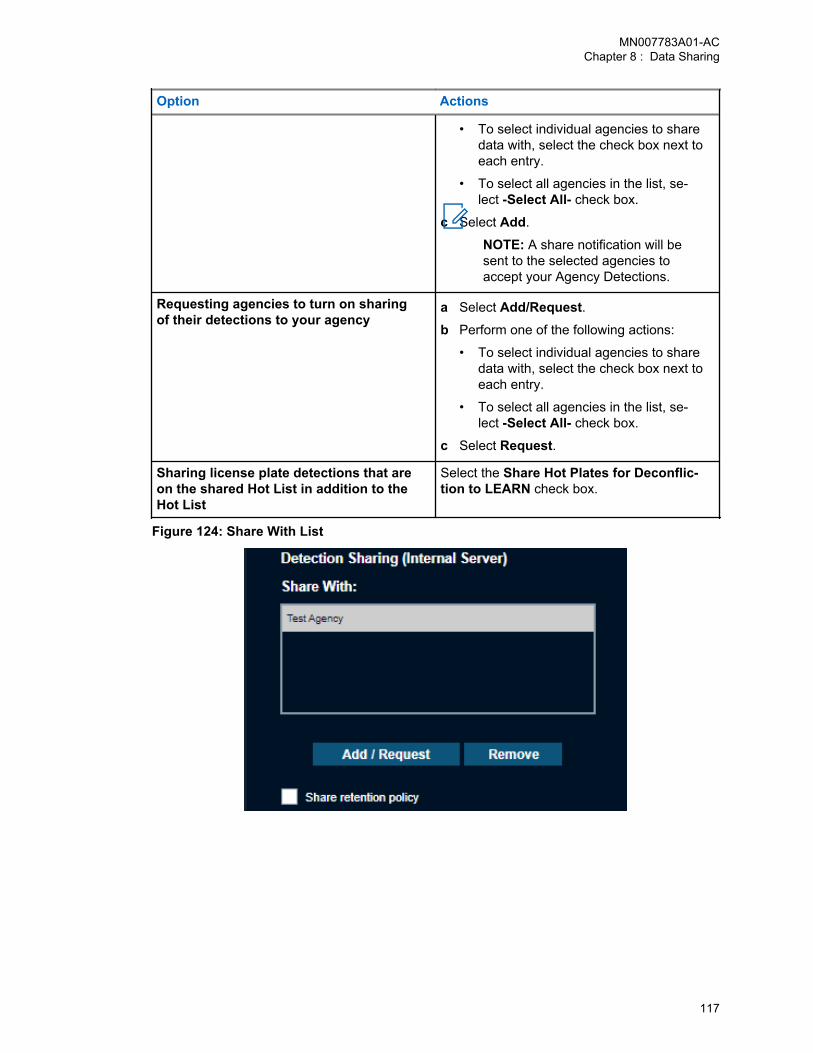
Option Actions
• To select individual agencies to sharedata with, select the check box next toeach entry.
• To select all agencies in the list, se-lect -Select All- check box.
c Select Add.
NOTE: A share notification will besent to the selected agencies toaccept your Agency Detections.
Requesting agencies to turn on sharingof their detections to your agency
a Select Add/Request.b Perform one of the following actions:
• To select individual agencies to sharedata with, select the check box next toeach entry.
• To select all agencies in the list, se-lect -Select All- check box.
c Select Request.
Sharing license plate detections that areon the shared Hot List in addition to theHot List
Select the Share Hot Plates for Deconflic-tion to LEARN check box.
Figure 124: Share With List
MN007783A01-ACChapter 8 : Data Sharing
117
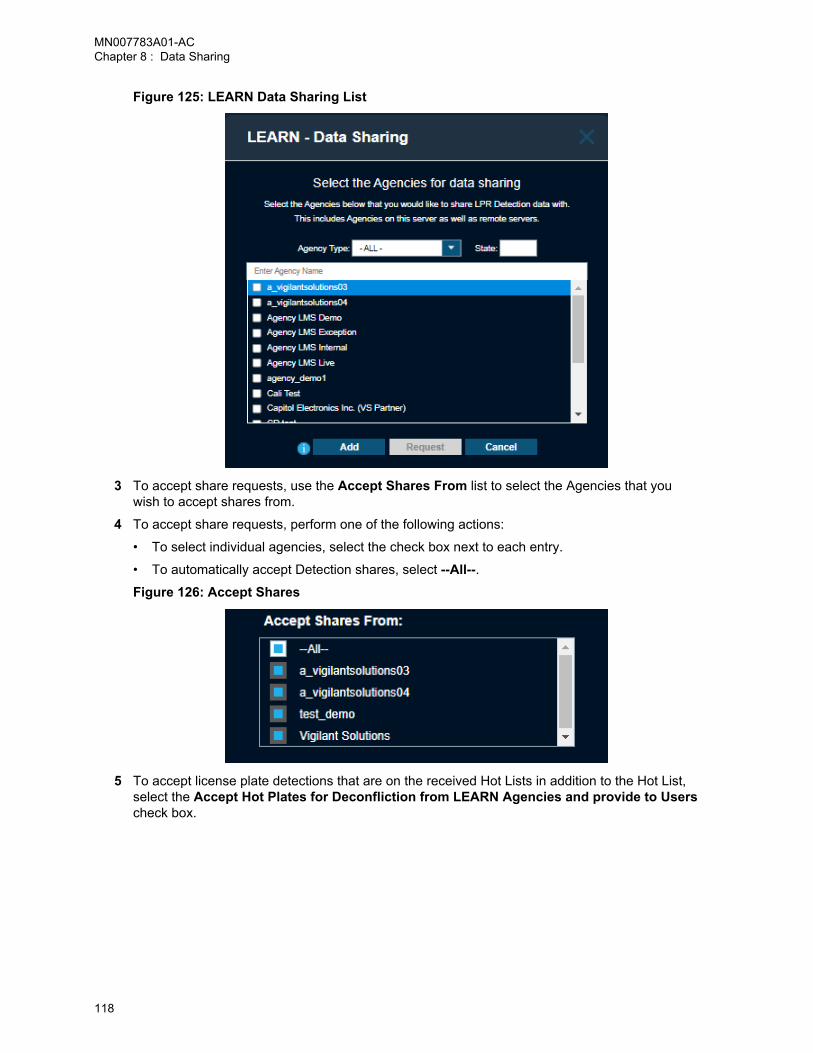
Figure 125: LEARN Data Sharing List
3 To accept share requests, use the Accept Shares From list to select the Agencies that youwish to accept shares from.
4 To accept share requests, perform one of the following actions:
• To select individual agencies, select the check box next to each entry.
• To automatically accept Detection shares, select --All--.Figure 126: Accept Shares
5 To accept license plate detections that are on the received Hot Lists in addition to the Hot List,select the Accept Hot Plates for Deconfliction from LEARN Agencies and provide to Userscheck box.
MN007783A01-ACChapter 8 : Data Sharing
118
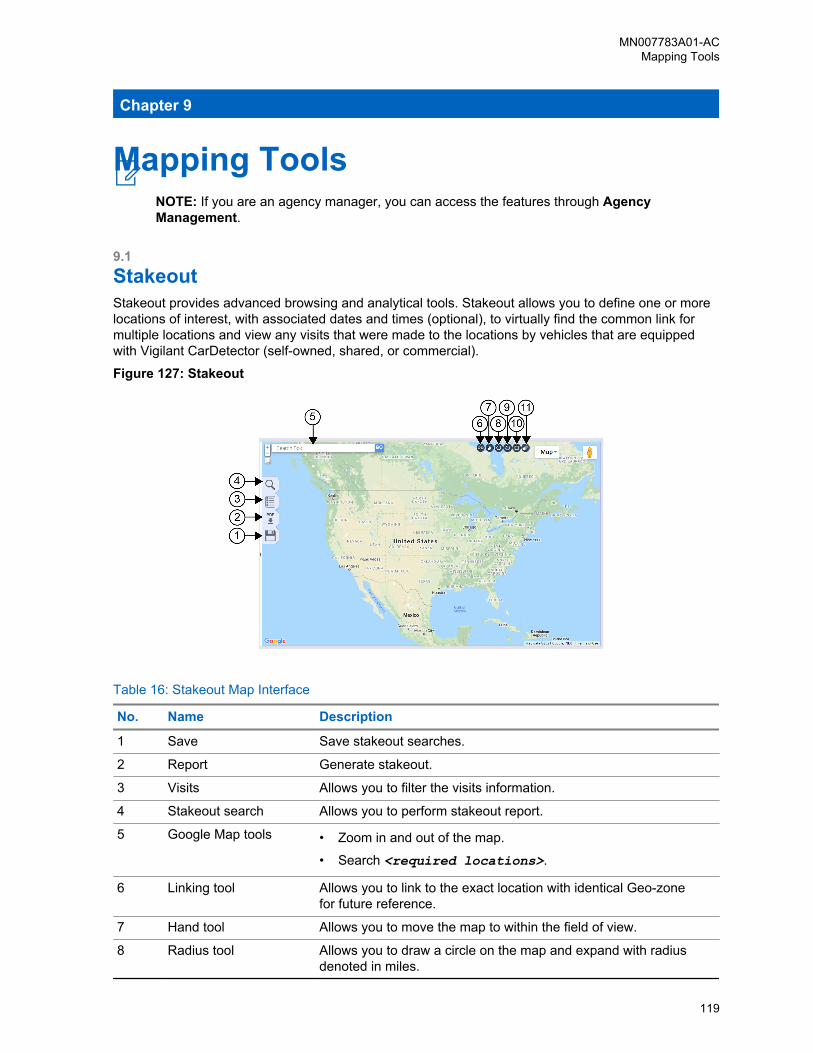
Chapter 9
Mapping ToolsNOTE: If you are an agency manager, you can access the features through AgencyManagement.
9.1StakeoutStakeout provides advanced browsing and analytical tools. Stakeout allows you to define one or morelocations of interest, with associated dates and times (optional), to virtually find the common link formultiple locations and view any visits that were made to the locations by vehicles that are equippedwith Vigilant CarDetector (self-owned, shared, or commercial).
Figure 127: Stakeout
Table 16: Stakeout Map Interface
No. Name Description
1 Save Save stakeout searches.
2 Report Generate stakeout.
3 Visits Allows you to filter the visits information.
4 Stakeout search Allows you to perform stakeout report.
5 Google Map tools • Zoom in and out of the map.
• Search <required locations>.
6 Linking tool Allows you to link to the exact location with identical Geo-zonefor future reference.
7 Hand tool Allows you to move the map to within the field of view.
8 Radius tool Allows you to draw a circle on the map and expand with radiusdenoted in miles.
MN007783A01-ACMapping Tools
119
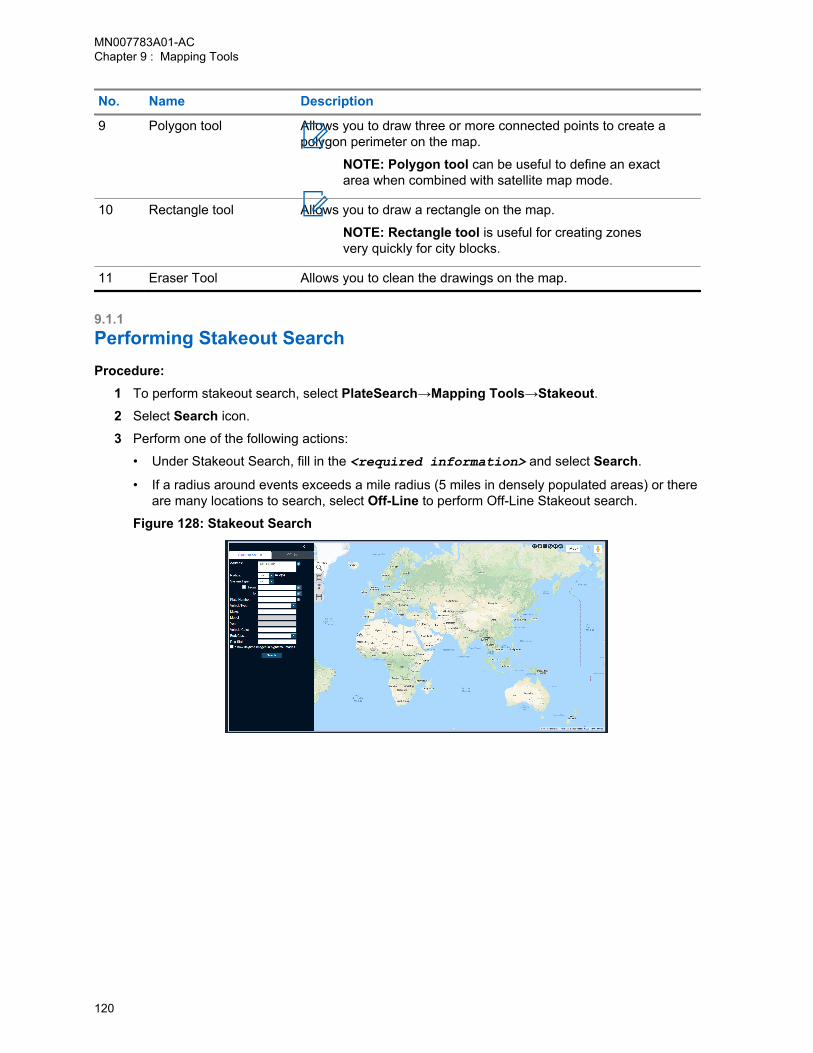
No. Name Description
9 Polygon tool Allows you to draw three or more connected points to create apolygon perimeter on the map.
NOTE: Polygon tool can be useful to define an exactarea when combined with satellite map mode.
10 Rectangle tool Allows you to draw a rectangle on the map.
NOTE: Rectangle tool is useful for creating zonesvery quickly for city blocks.
11 Eraser Tool Allows you to clean the drawings on the map.
9.1.1Performing Stakeout SearchProcedure:
1 To perform stakeout search, select PlateSearch→Mapping Tools→Stakeout.2 Select Search icon.
3 Perform one of the following actions:
• Under Stakeout Search, fill in the <required information> and select Search.
• If a radius around events exceeds a mile radius (5 miles in densely populated areas) or thereare many locations to search, select Off-Line to perform Off-Line Stakeout search.
Figure 128: Stakeout Search
MN007783A01-ACChapter 9 : Mapping Tools
120
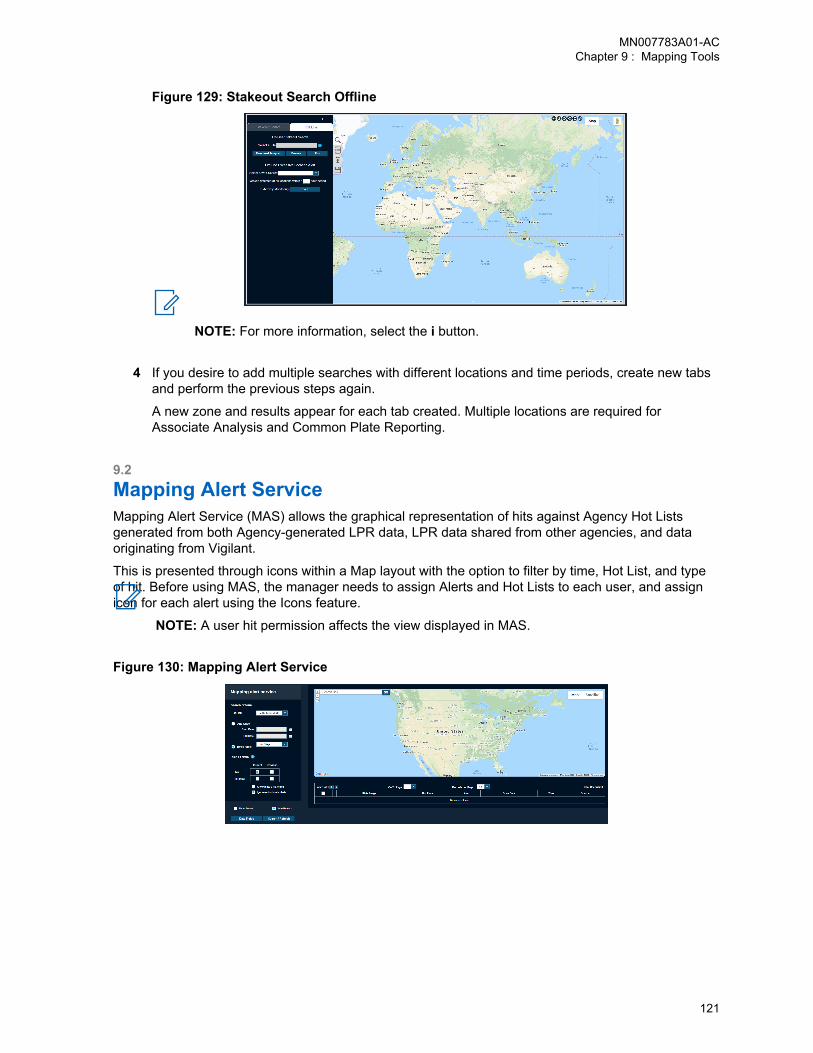
Figure 129: Stakeout Search Offline
NOTE: For more information, select the i button.
4 If you desire to add multiple searches with different locations and time periods, create new tabsand perform the previous steps again.
A new zone and results appear for each tab created. Multiple locations are required forAssociate Analysis and Common Plate Reporting.
9.2Mapping Alert ServiceMapping Alert Service (MAS) allows the graphical representation of hits against Agency Hot Listsgenerated from both Agency-generated LPR data, LPR data shared from other agencies, and dataoriginating from Vigilant.
This is presented through icons within a Map layout with the option to filter by time, Hot List, and typeof hit. Before using MAS, the manager needs to assign Alerts and Hot Lists to each user, and assignicon for each alert using the Icons feature.
NOTE: A user hit permission affects the view displayed in MAS.
Figure 130: Mapping Alert Service
MN007783A01-ACChapter 9 : Mapping Tools
121
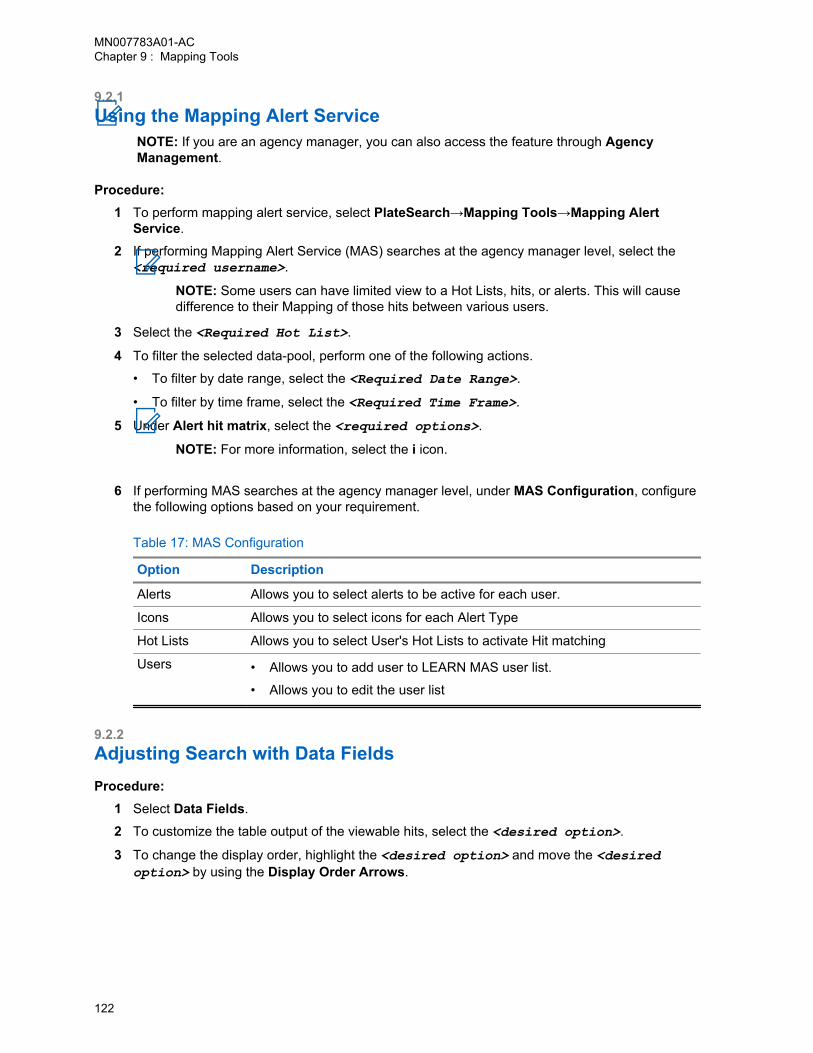
9.2.1Using the Mapping Alert Service
NOTE: If you are an agency manager, you can also access the feature through AgencyManagement.
Procedure:1 To perform mapping alert service, select PlateSearch→Mapping Tools→Mapping Alert
Service.
2 If performing Mapping Alert Service (MAS) searches at the agency manager level, select the<required username>.
NOTE: Some users can have limited view to a Hot Lists, hits, or alerts. This will causedifference to their Mapping of those hits between various users.
3 Select the <Required Hot List>.
4 To filter the selected data-pool, perform one of the following actions.
• To filter by date range, select the <Required Date Range>.
• To filter by time frame, select the <Required Time Frame>.
5 Under Alert hit matrix, select the <required options>.
NOTE: For more information, select the i icon.
6 If performing MAS searches at the agency manager level, under MAS Configuration, configurethe following options based on your requirement.
Table 17: MAS Configuration
Option Description
Alerts Allows you to select alerts to be active for each user.
Icons Allows you to select icons for each Alert Type
Hot Lists Allows you to select User's Hot Lists to activate Hit matching
Users • Allows you to add user to LEARN MAS user list.
• Allows you to edit the user list
9.2.2Adjusting Search with Data FieldsProcedure:
1 Select Data Fields.
2 To customize the table output of the viewable hits, select the <desired option>.
3 To change the display order, highlight the <desired option> and move the <desiredoption> by using the Display Order Arrows.
MN007783A01-ACChapter 9 : Mapping Tools
122

Figure 131: MAS Data Fields
4 Select Update.
5 Adjust the other available options according to your requirements.
Table 18: MAP Search Options
Option Description
Show Zone Allows you to turn on and off geo-zoned map.
If applicable, it will show the User zone, Agency zone, and Private Datazone.
Where the maps overlap, there will be the viewable hits for the selectedusers.
Auto-refresh Automatically update the hits and events as you navigate the map usingthe Google Navigational tools.
6 To turn on or off the geo-zoned, select Show Zones(s).7 After all desired Mapping Alert Service (MAS) settings have been configured, select Search/
Refresh.
The search result shows the Filmstrip Tool .Figure 132: Filmstrip Tool
You can navigate the Filmstrip Tool using Left and Right Arrows.
There is the option for a drop-down option to jump to a specific plate.
MN007783A01-ACChapter 9 : Mapping Tools
123
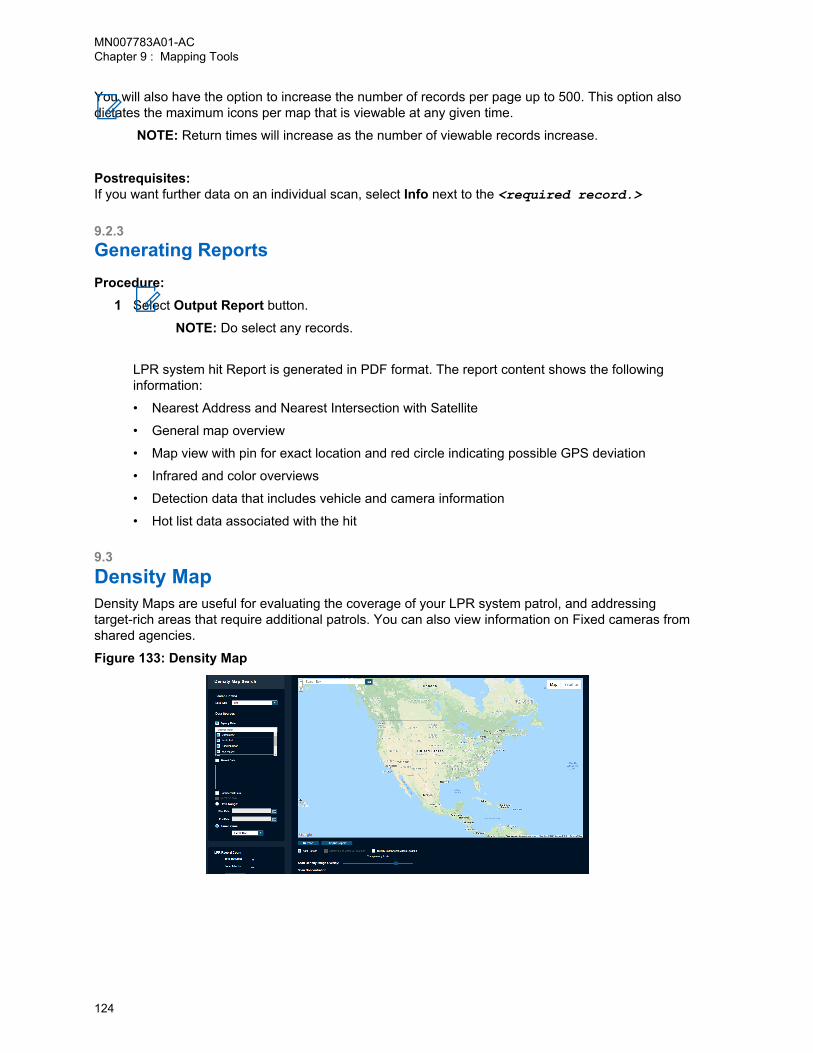
You will also have the option to increase the number of records per page up to 500. This option alsodictates the maximum icons per map that is viewable at any given time.
NOTE: Return times will increase as the number of viewable records increase.
Postrequisites:If you want further data on an individual scan, select Info next to the <required record.>
9.2.3Generating ReportsProcedure:
1 Select Output Report button.
NOTE: Do select any records.
LPR system hit Report is generated in PDF format. The report content shows the followinginformation:
• Nearest Address and Nearest Intersection with Satellite
• General map overview
• Map view with pin for exact location and red circle indicating possible GPS deviation
• Infrared and color overviews
• Detection data that includes vehicle and camera information
• Hot list data associated with the hit
9.3Density MapDensity Maps are useful for evaluating the coverage of your LPR system patrol, and addressingtarget-rich areas that require additional patrols. You can also view information on Fixed cameras fromshared agencies.
Figure 133: Density Map
MN007783A01-ACChapter 9 : Mapping Tools
124
9.3.1Performing Density Map Search
NOTE: If you are an agency manager, you can also access the feature through AgencyManagement.
Procedure:1 To perform density map search, select PlateSearch→Mapping Tools→Density Map.
2 If Density Map search is performed at the Agency Manager level, select the <required datatype>.
3 Select the <required Data Sources>.
4 To filter the selected data-pool, perform one of the following actions.
• To filter by date range, select the <Required Date Range>.
• To filter by time frame, select the <Required Time Frame>.
5 To view last known location of mobile systems, select Display Last Known Mobile Location.
6 To perform Density Map search, select Refresh.
The Density Map is presented in a normalized view.
Your Density Map of hits or detections shows the following color dots:
• If the density of the scan is the lowest at the area, green dots appear.
• If the density of the scan is the average at the area, yellow dots appear.
• If the density of the scan is higher than average at the area, orange dots appear.
• If the density of the scan is the highest at the area, red dots appear.
7 If you need to adjust the density map search, adjust the available options according to yourrequirements.
Table 19: Density Map Search Options
Option Description
Show Zone Allows you to turn on and off geo-zoned map.
If applicable, it will show the User zone, Agency zone, and Private Datazone.
Where the maps overlap, there will be the viewable hits for the selectedContributor.
Zone Allows you to access Geo-Mapping Zone Controls.
Auto-refresh Automatically update the hits and events as you navigate the map usingthe Google Navigational tools.
LPR RecordCount
Display the number of total records and whether a zone is selected alongwith various statistics about the selected zone.
TransparencyScale
Allows you to adjust image overly transparency.
Normalize Allows you to change the Scan Concentration from Normalized to user-defined.
MN007783A01-ACChapter 9 : Mapping Tools
125
Option Description
Thus, you can make up your own density requirements.
8 Once satisfied with the adjustments, select Refresh.
9.3.2Generating ReportsProcedure:
Select Output Report button→Get PDF.
Report is saved in PDF format. The report content shows the following information:
• Agency
• Data Source
• Time Frame
• Data Type
• Contributor
• Total Records
• Density Map Overlay in normalized scan concentration view
MN007783A01-ACChapter 9 : Mapping Tools
126
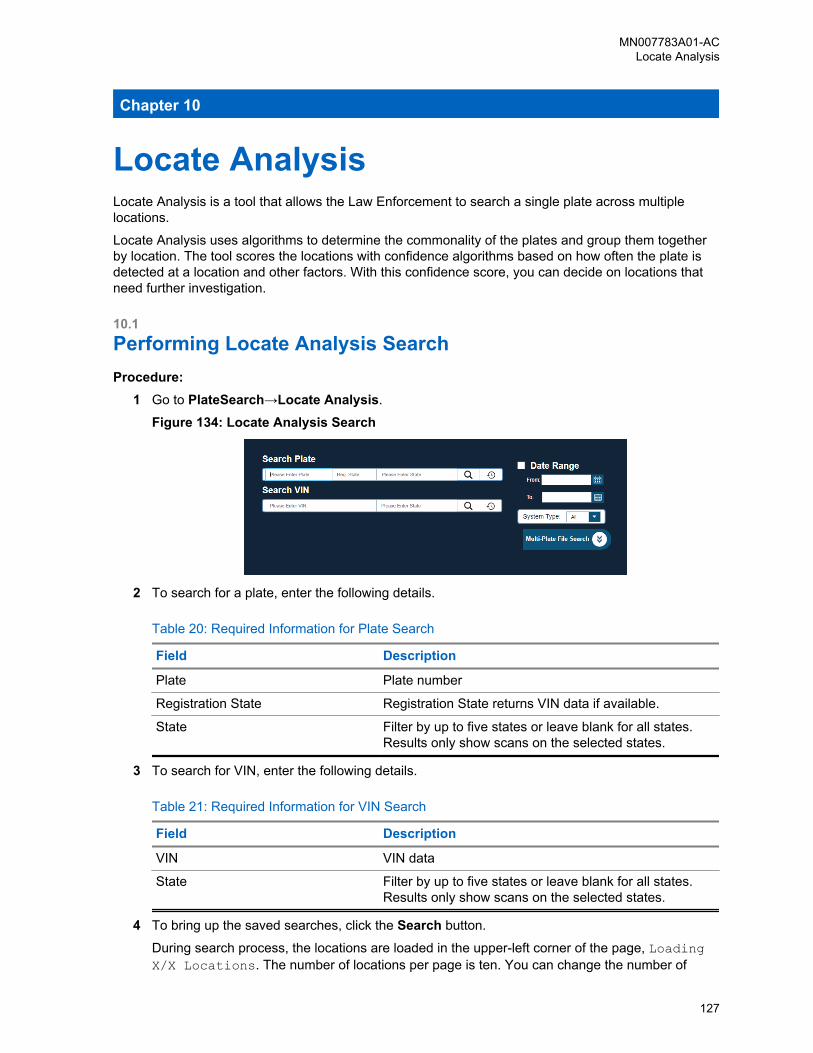
Chapter 10
Locate AnalysisLocate Analysis is a tool that allows the Law Enforcement to search a single plate across multiplelocations.
Locate Analysis uses algorithms to determine the commonality of the plates and group them togetherby location. The tool scores the locations with confidence algorithms based on how often the plate isdetected at a location and other factors. With this confidence score, you can decide on locations thatneed further investigation.
10.1Performing Locate Analysis SearchProcedure:
1 Go to PlateSearch→Locate Analysis.
Figure 134: Locate Analysis Search
2 To search for a plate, enter the following details.
Table 20: Required Information for Plate Search
Field Description
Plate Plate number
Registration State Registration State returns VIN data if available.
State Filter by up to five states or leave blank for all states.Results only show scans on the selected states.
3 To search for VIN, enter the following details.
Table 21: Required Information for VIN Search
Field Description
VIN VIN data
State Filter by up to five states or leave blank for all states.Results only show scans on the selected states.
4 To bring up the saved searches, click the Search button.
During search process, the locations are loaded in the upper-left corner of the page, LoadingX/X Locations. The number of locations per page is ten. You can change the number of
MN007783A01-ACLocate Analysis
127
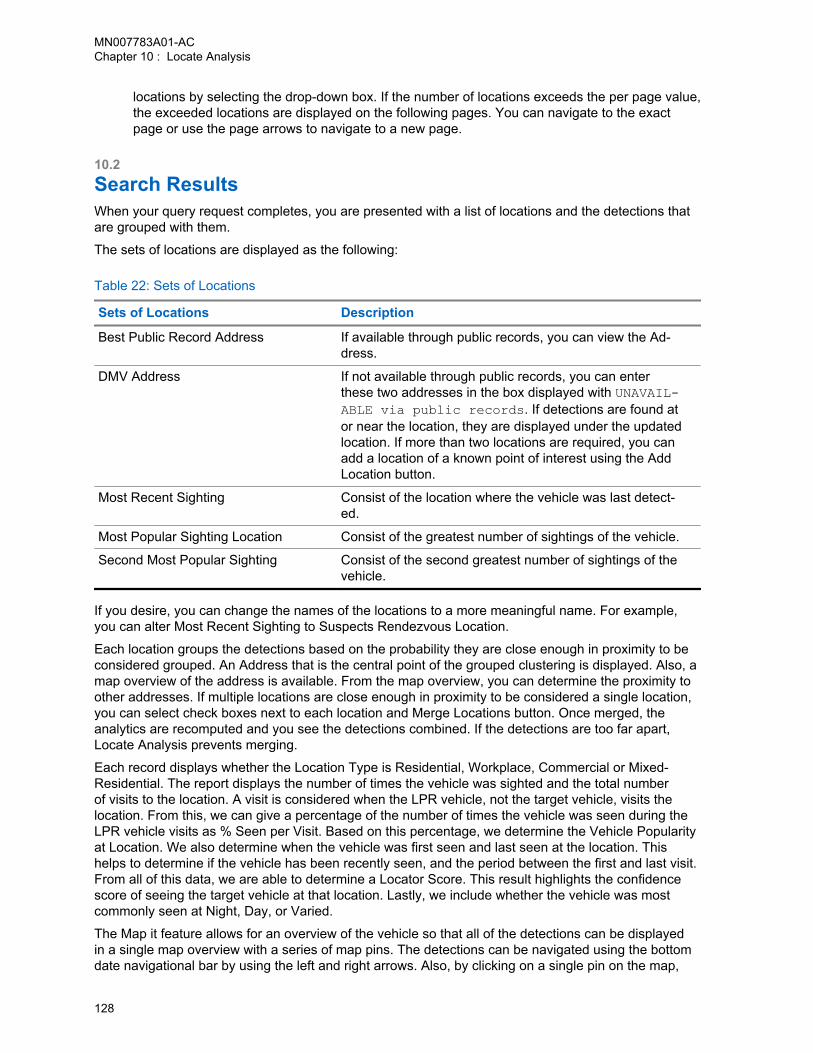
locations by selecting the drop-down box. If the number of locations exceeds the per page value,the exceeded locations are displayed on the following pages. You can navigate to the exactpage or use the page arrows to navigate to a new page.
10.2Search ResultsWhen your query request completes, you are presented with a list of locations and the detections thatare grouped with them.
The sets of locations are displayed as the following:
Table 22: Sets of Locations
Sets of Locations Description
Best Public Record Address If available through public records, you can view the Ad-dress.
DMV Address If not available through public records, you can enterthese two addresses in the box displayed with UNAVAIL-ABLE via public records. If detections are found ator near the location, they are displayed under the updatedlocation. If more than two locations are required, you canadd a location of a known point of interest using the AddLocation button.
Most Recent Sighting Consist of the location where the vehicle was last detect-ed.
Most Popular Sighting Location Consist of the greatest number of sightings of the vehicle.
Second Most Popular Sighting Consist of the second greatest number of sightings of thevehicle.
If you desire, you can change the names of the locations to a more meaningful name. For example,you can alter Most Recent Sighting to Suspects Rendezvous Location.
Each location groups the detections based on the probability they are close enough in proximity to beconsidered grouped. An Address that is the central point of the grouped clustering is displayed. Also, amap overview of the address is available. From the map overview, you can determine the proximity toother addresses. If multiple locations are close enough in proximity to be considered a single location,you can select check boxes next to each location and Merge Locations button. Once merged, theanalytics are recomputed and you see the detections combined. If the detections are too far apart,Locate Analysis prevents merging.
Each record displays whether the Location Type is Residential, Workplace, Commercial or Mixed-Residential. The report displays the number of times the vehicle was sighted and the total numberof visits to the location. A visit is considered when the LPR vehicle, not the target vehicle, visits thelocation. From this, we can give a percentage of the number of times the vehicle was seen during theLPR vehicle visits as % Seen per Visit. Based on this percentage, we determine the Vehicle Popularityat Location. We also determine when the vehicle was first seen and last seen at the location. Thishelps to determine if the vehicle has been recently seen, and the period between the first and last visit.From all of this data, we are able to determine a Locator Score. This result highlights the confidencescore of seeing the target vehicle at that location. Lastly, we include whether the vehicle was mostcommonly seen at Night, Day, or Varied.
The Map it feature allows for an overview of the vehicle so that all of the detections can be displayedin a single map overview with a series of map pins. The detections can be navigated using the bottomdate navigational bar by using the left and right arrows. Also, by clicking on a single pin on the map,
MN007783A01-ACChapter 10 : Locate Analysis
128
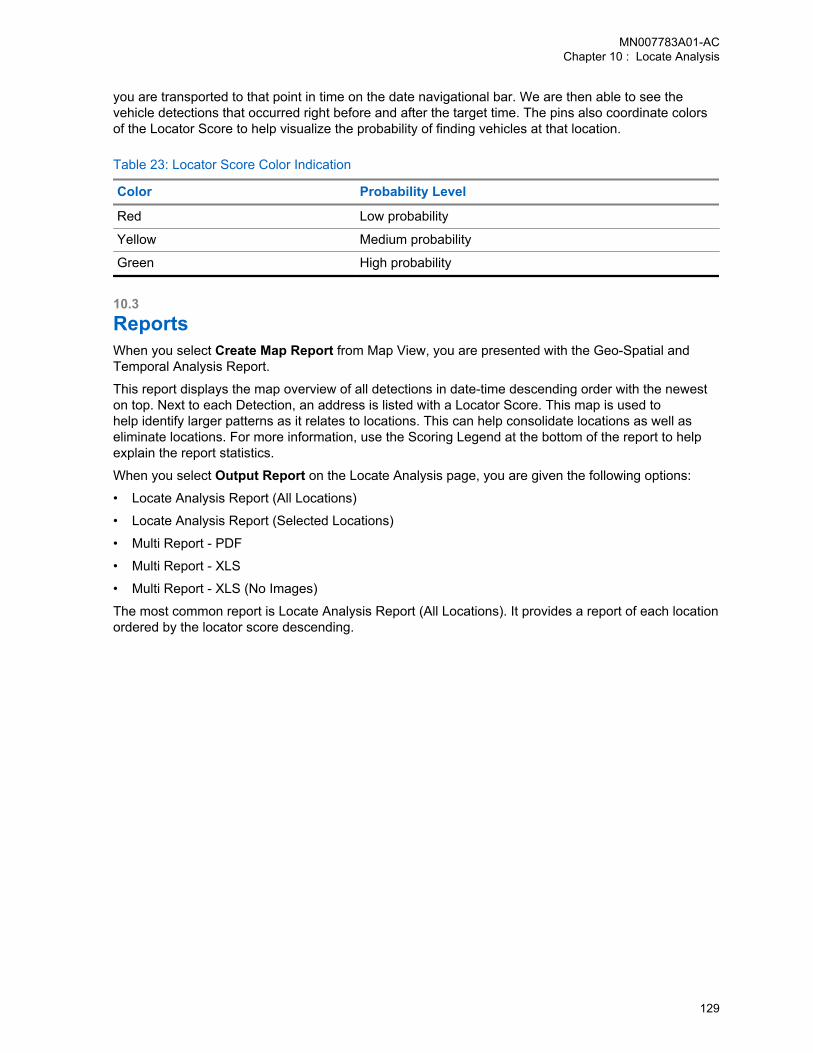
you are transported to that point in time on the date navigational bar. We are then able to see thevehicle detections that occurred right before and after the target time. The pins also coordinate colorsof the Locator Score to help visualize the probability of finding vehicles at that location.
Table 23: Locator Score Color Indication
Color Probability Level
Red Low probability
Yellow Medium probability
Green High probability
10.3ReportsWhen you select Create Map Report from Map View, you are presented with the Geo-Spatial andTemporal Analysis Report.
This report displays the map overview of all detections in date-time descending order with the neweston top. Next to each Detection, an address is listed with a Locator Score. This map is used tohelp identify larger patterns as it relates to locations. This can help consolidate locations as well aseliminate locations. For more information, use the Scoring Legend at the bottom of the report to helpexplain the report statistics.
When you select Output Report on the Locate Analysis page, you are given the following options:
• Locate Analysis Report (All Locations)
• Locate Analysis Report (Selected Locations)
• Multi Report - PDF
• Multi Report - XLS
• Multi Report - XLS (No Images)
The most common report is Locate Analysis Report (All Locations). It provides a report of each locationordered by the locator score descending.
MN007783A01-ACChapter 10 : Locate Analysis
129
Chapter 11
DashboardDashboard statistics are used to give managers and users a comprehensive reporting location forvolumes-generated using client software.
Dashboard statistics are presented in a quick to setup graphical environment that can be split intoPie Charts, Bar Graphs, or Spreadsheet tables. Statistics are calculated nightly and are accurate towithin 24 hours. When analyzing statistics using Dashboards, notice the ability to filter and tweak thesearches to recover volumes to suit nearly any situation. The Scheduled Reports feature allows forreports to be generated at specific intervals and emailed to desired recipients automatically.
11.1Adjusting Dashboard View
NOTE: If you are an agency manager, you can also access the feature through AgencyManagement.
When selecting Dashboard view, you must consider the duration and whether the duration must bebased on an interval or a period.
Procedure:1 To view Dashboard, go to PlateSearch→Dashboard.
MN007783A01-ACChapter 11 : Dashboard
130
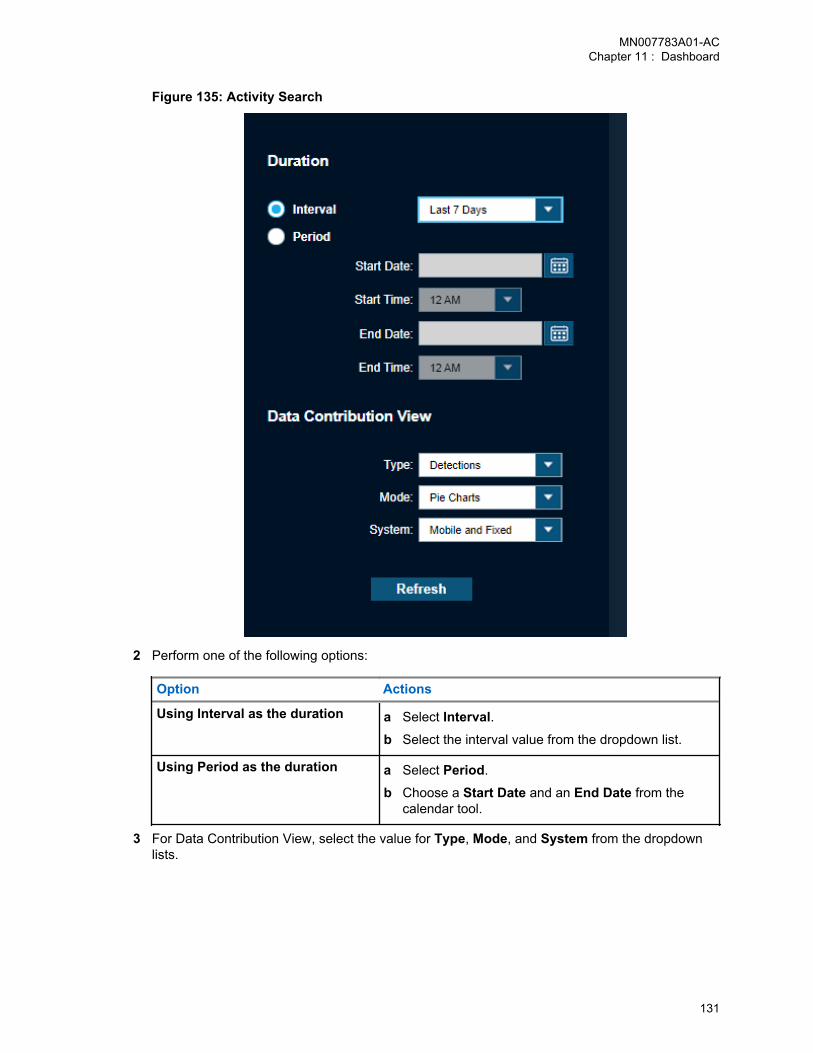
Figure 135: Activity Search
2 Perform one of the following options:
Option Actions
Using Interval as the duration a Select Interval.b Select the interval value from the dropdown list.
Using Period as the duration a Select Period.
b Choose a Start Date and an End Date from thecalendar tool.
3 For Data Contribution View, select the value for Type, Mode, and System from the dropdownlists.
MN007783A01-ACChapter 11 : Dashboard
131
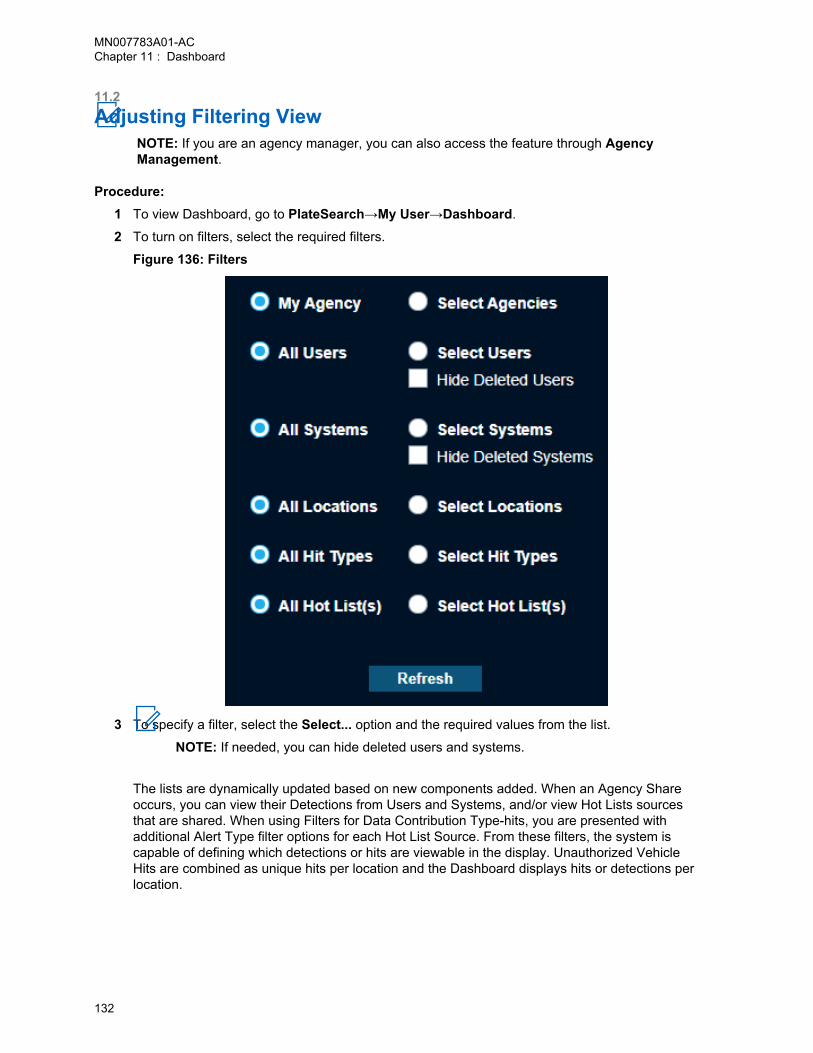
11.2Adjusting Filtering View
NOTE: If you are an agency manager, you can also access the feature through AgencyManagement.
Procedure:1 To view Dashboard, go to PlateSearch→My User→Dashboard.
2 To turn on filters, select the required filters.
Figure 136: Filters
3 To specify a filter, select the Select... option and the required values from the list.
NOTE: If needed, you can hide deleted users and systems.
The lists are dynamically updated based on new components added. When an Agency Shareoccurs, you can view their Detections from Users and Systems, and/or view Hot Lists sourcesthat are shared. When using Filters for Data Contribution Type-hits, you are presented withadditional Alert Type filter options for each Hot List Source. From these filters, the system iscapable of defining which detections or hits are viewable in the display. Unauthorized VehicleHits are combined as unique hits per location and the Dashboard displays hits or detections perlocation.
MN007783A01-ACChapter 11 : Dashboard
132
11.3Dashboard StatisticsThe Dashboard Statistics page contains three statistics views: Pie Charts, Bar Graphs, and Data View.
11.3.1Pie ChartsWhen viewing Dashboard Statistics using Pie Charts mode for type Detections, the following data willbe presented:
Table 24: Pie Charts for Detections Type
Type of Data Description
Agency Displays detection ratios from each Agency that are currentlywithin the agency managers data pool and within the chosenDuration.
Hot List Displays the Hot List ratios of all available Hot Lists within themanagers data pool. This will include shared hot lists.
User Displays detection ratios for each user selected from each agencyavailable.
System Displays detection ratios for each system selected from eachagency available.
Accuracy Displays the ratio of Correct, Incorrect, and Not Scored hits.
Hit Ratio Displays the ratio of detections against hits.
When viewing Dashboard Statistics using Pie Charts mode for type Hits, the following data will bepresented:
Table 25: Pie Charts for Hits Type
Type of Data Description
Agency Displays hits ratios from each Agency that are currently within theagency managers data pool and within the chosen Duration.
Hot List Displays the Hot List ratios of all available Hot Lists within themanagers data pool. This will include shared hot lists.
User Displays hits ratios for each user selected from each agencyavailable.
Hits by Source Displays the ratio of hits for each Hot List Source.
Hit Ratio Displays the ratio of detections against hits.
Alert Types by Source Displays the ratio of hits for each Alert Type within the Hot List.Each Hot List Source available, will be listed with Alert Type ra-tios.
When displaying the Pie Chart, you can hover over each piece and view the corresponding statisticsin a bubble overview. For some pie statistics, they will be batched together if the ratio is too small todistinguish a ratio. In this case, you will see the first and last key separated by hyphen. By clicking onthe magnifying glass, you will be presented with a Dashboards Detail view. This allows for a detailed
MN007783A01-ACChapter 11 : Dashboard
133
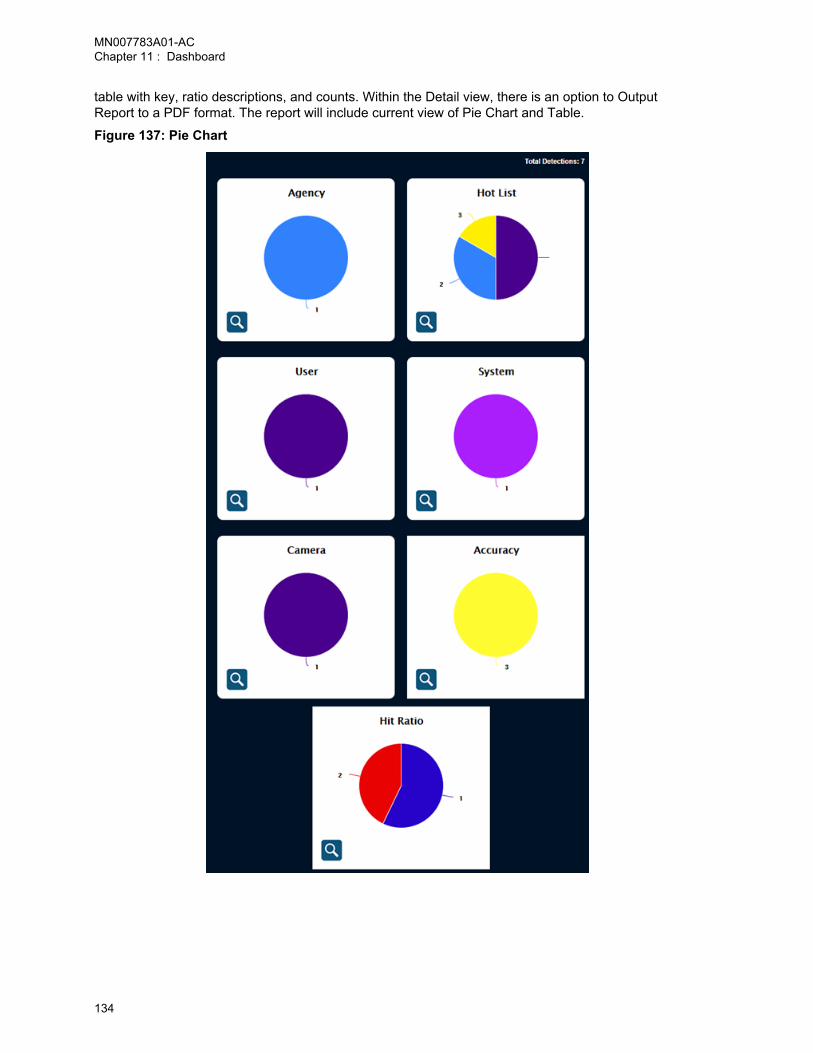
table with key, ratio descriptions, and counts. Within the Detail view, there is an option to OutputReport to a PDF format. The report will include current view of Pie Chart and Table.
Figure 137: Pie Chart
MN007783A01-ACChapter 11 : Dashboard
134
11.3.2Bar GraphsWhen viewing Dashboard Statistics using Bar Charts mode for type Detections, the following data willbe presented:
Table 26: Bar Charts for Detections Type
Type of Data Description
Agency Displays detection ratios from each Agency that are currentlywithin the agency managers data pool and within the chosenDuration.
Hot List Displays the Hot List ratios of all available Hot Lists within themanagers data pool. This will include shared hot lists.
User Displays detection ratios for each user selected from each agencyavailable.
System Displays detection ratios for each system selected from eachagency available.
When viewing Dashboard Statistics using Bar Charts mode for type Hits, the following data will bepresented:
Table 27: Bar Charts for Hits Type
Type of Data Description
Agency Displays hits ratios from each Agency that are currently within theagency managers data pool and within the chosen Duration.
Hot List Displays the Hot List ratios of all available Hot Lists within themanagers data pool. This will include shared hot lists.
User Displays hits ratios for each user selected from each agencyavailable.
Hits by Source Displays the ratio of hits for each Hot List Source.
Hit Ratio Displays the ratio of detections against hits.
Alert Types by Source Displays the ratio of hits for each Alert Type within the Hot List.Each Hot List Source available, will be listed with Alert Type ra-tios.
When displaying the Bar Graph, you can hover over each bar and view the corresponding statistics ina bubble overview. For some bar statistics, they will be batched together if the amounts are too smallto distinguish between the other elements. In this case, you will see the first and last key separated byhyphen. By clicking on the magnifying glass, you will be presented with a Dashboards Detail view. Thisallows for a detailed table with key element descriptions and counts. Within the Detail view, there is anoption to Output Report to a PDF format. The report will include current view of Bar Graph and Table.
MN007783A01-ACChapter 11 : Dashboard
135
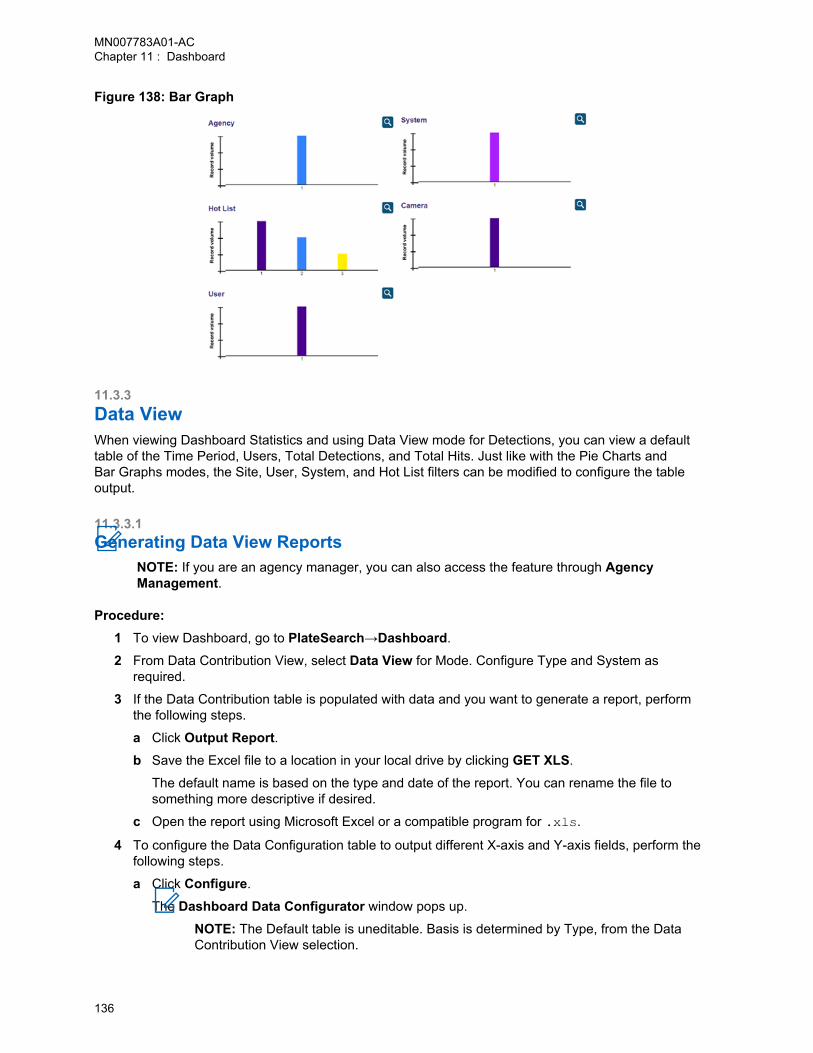
Figure 138: Bar Graph
11.3.3Data ViewWhen viewing Dashboard Statistics and using Data View mode for Detections, you can view a defaulttable of the Time Period, Users, Total Detections, and Total Hits. Just like with the Pie Charts andBar Graphs modes, the Site, User, System, and Hot List filters can be modified to configure the tableoutput.
11.3.3.1Generating Data View Reports
NOTE: If you are an agency manager, you can also access the feature through AgencyManagement.
Procedure:1 To view Dashboard, go to PlateSearch→Dashboard.
2 From Data Contribution View, select Data View for Mode. Configure Type and System asrequired.
3 If the Data Contribution table is populated with data and you want to generate a report, performthe following steps.
a Click Output Report.b Save the Excel file to a location in your local drive by clicking GET XLS.
The default name is based on the type and date of the report. You can rename the file tosomething more descriptive if desired.
c Open the report using Microsoft Excel or a compatible program for .xls.
4 To configure the Data Configuration table to output different X-axis and Y-axis fields, perform thefollowing steps.
a Click Configure.
The Dashboard Data Configurator window pops up.
NOTE: The Default table is uneditable. Basis is determined by Type, from the DataContribution View selection.
MN007783A01-ACChapter 11 : Dashboard
136
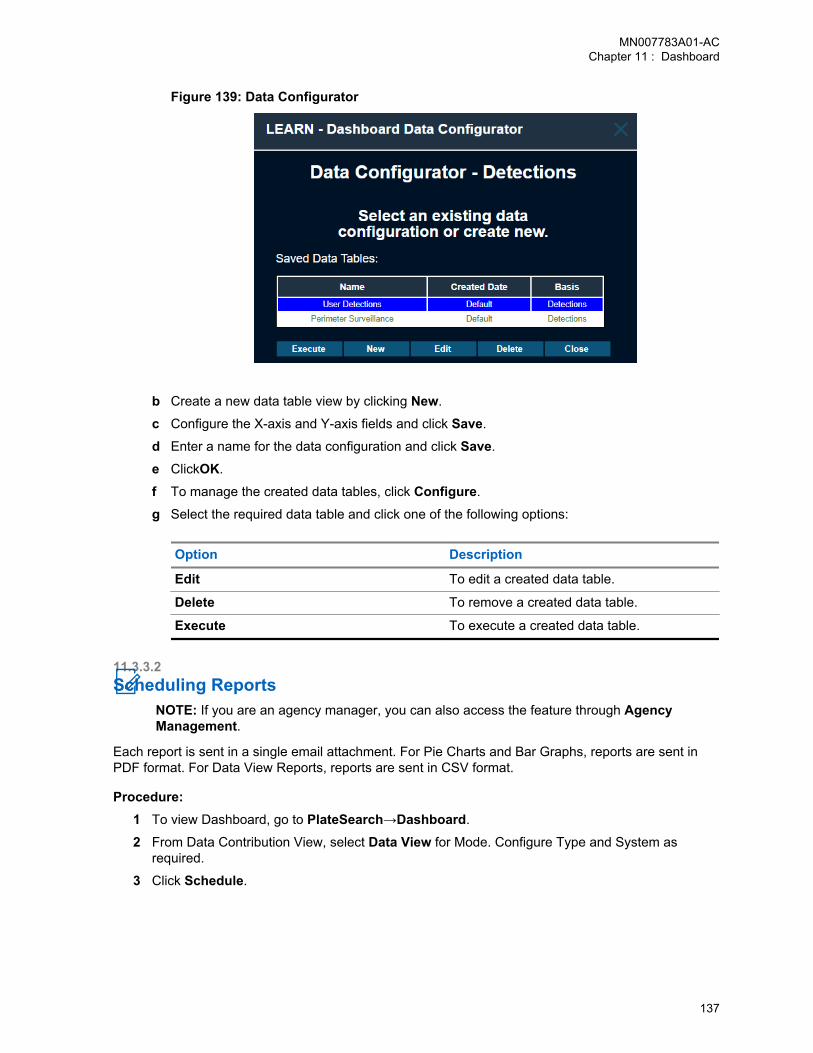
Figure 139: Data Configurator
b Create a new data table view by clicking New.
c Configure the X-axis and Y-axis fields and click Save.
d Enter a name for the data configuration and click Save.
e ClickOK.
f To manage the created data tables, click Configure.
g Select the required data table and click one of the following options:
Option Description
Edit To edit a created data table.
Delete To remove a created data table.
Execute To execute a created data table.
11.3.3.2Scheduling Reports
NOTE: If you are an agency manager, you can also access the feature through AgencyManagement.
Each report is sent in a single email attachment. For Pie Charts and Bar Graphs, reports are sent inPDF format. For Data View Reports, reports are sent in CSV format.
Procedure:1 To view Dashboard, go to PlateSearch→Dashboard.
2 From Data Contribution View, select Data View for Mode. Configure Type and System asrequired.
3 Click Schedule.
MN007783A01-ACChapter 11 : Dashboard
137
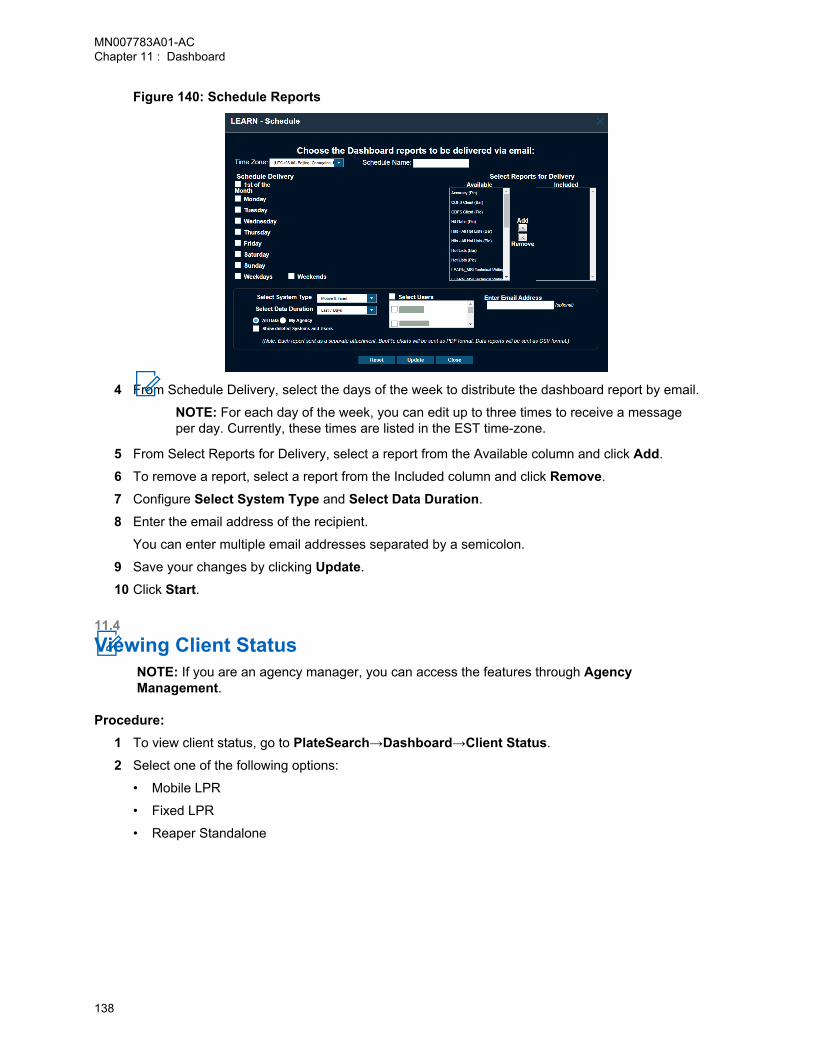
Figure 140: Schedule Reports
4 From Schedule Delivery, select the days of the week to distribute the dashboard report by email.
NOTE: For each day of the week, you can edit up to three times to receive a messageper day. Currently, these times are listed in the EST time-zone.
5 From Select Reports for Delivery, select a report from the Available column and click Add.
6 To remove a report, select a report from the Included column and click Remove.
7 Configure Select System Type and Select Data Duration.
8 Enter the email address of the recipient.
You can enter multiple email addresses separated by a semicolon.
9 Save your changes by clicking Update.
10 Click Start.
11.4Viewing Client Status
NOTE: If you are an agency manager, you can access the features through AgencyManagement.
Procedure:1 To view client status, go to PlateSearch→Dashboard→Client Status.
2 Select one of the following options:
• Mobile LPR
• Fixed LPR
• Reaper Standalone
MN007783A01-ACChapter 11 : Dashboard
138

Chapter 12
AuditingNOTE: This section is only applicable for the agency managers.
You can print single queries from the Auditing page or check the box next to each record desired inthe table and select Output Report. When you receive a Print Preview, you will be presented with thedefault options for Crystal Reports. This includes page navigation, Export, Print, and Show/Hide GroupTree. When selecting Export, you have the option to export to a specific format. The formats includeRPT, PDF, MS Word, MS Excel, or RTF. You also have the option to save all or specific pages. Theoutput report contains detailed audits for any changes to a user account, user profiles and permissiongroups. Audits also show changes to product subscription access, permissions, alert management,and alert filters for hot lists and alert types. Audits also show additional information from Vigilant Fixedand Mobile LPR.
Figure 141: Auditing Output Report
12.1Auditing All TransactionsProcedure:
1 To view audits for queried records, select Agency Management→Auditing→Audit AllTransactions.
3 Crystal Reports is a software developed by the software company SAP that automates reportgeneration from a dataset: https://www.crystalreports.com/
MN007783A01-ACAuditing
139
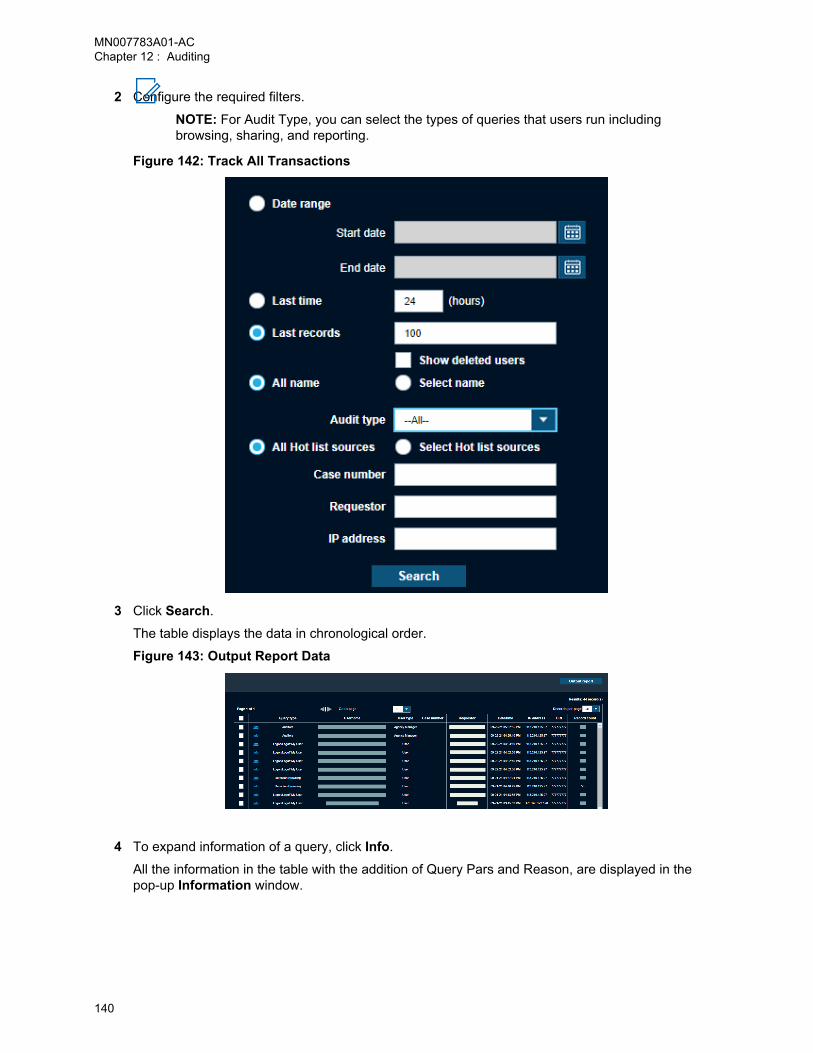
2 Configure the required filters.
NOTE: For Audit Type, you can select the types of queries that users run includingbrowsing, sharing, and reporting.
Figure 142: Track All Transactions
3 Click Search.
The table displays the data in chronological order.
Figure 143: Output Report Data
4 To expand information of a query, click Info.
All the information in the table with the addition of Query Pars and Reason, are displayed in thepop-up Information window.
MN007783A01-ACChapter 12 : Auditing
140
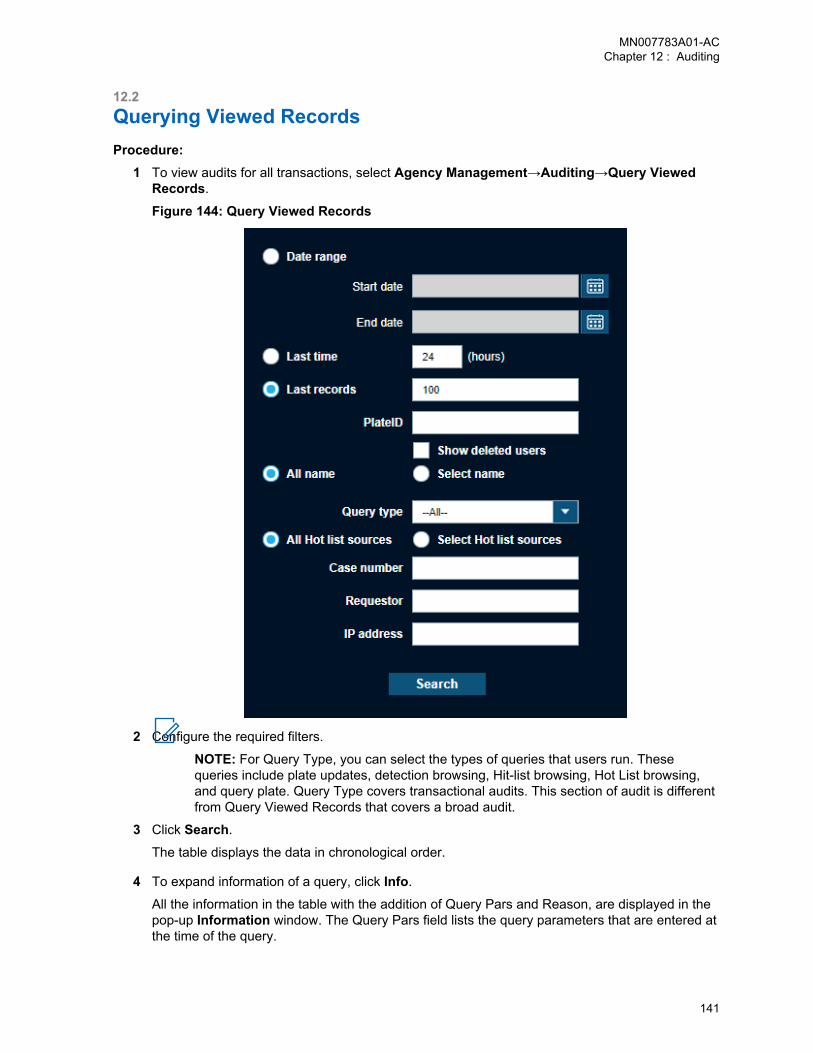
12.2Querying Viewed RecordsProcedure:
1 To view audits for all transactions, select Agency Management→Auditing→Query ViewedRecords.
Figure 144: Query Viewed Records
2 Configure the required filters.
NOTE: For Query Type, you can select the types of queries that users run. Thesequeries include plate updates, detection browsing, Hit-list browsing, Hot List browsing,and query plate. Query Type covers transactional audits. This section of audit is differentfrom Query Viewed Records that covers a broad audit.
3 Click Search.
The table displays the data in chronological order.
4 To expand information of a query, click Info.
All the information in the table with the addition of Query Pars and Reason, are displayed in thepop-up Information window. The Query Pars field lists the query parameters that are entered atthe time of the query.
MN007783A01-ACChapter 12 : Auditing
141
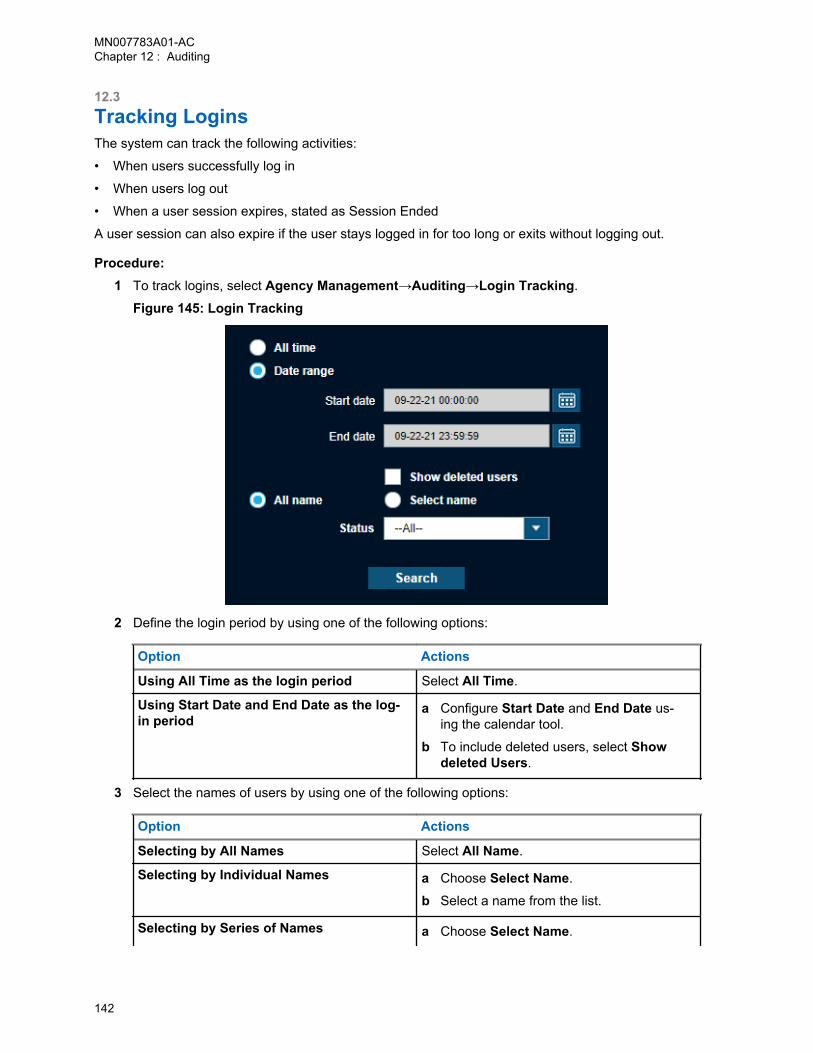
12.3Tracking LoginsThe system can track the following activities:
• When users successfully log in
• When users log out
• When a user session expires, stated as Session Ended
A user session can also expire if the user stays logged in for too long or exits without logging out.
Procedure:1 To track logins, select Agency Management→Auditing→Login Tracking.
Figure 145: Login Tracking
2 Define the login period by using one of the following options:
Option Actions
Using All Time as the login period Select All Time.
Using Start Date and End Date as the log-in period
a Configure Start Date and End Date us-ing the calendar tool.
b To include deleted users, select Showdeleted Users.
3 Select the names of users by using one of the following options:
Option Actions
Selecting by All Names Select All Name.
Selecting by Individual Names a Choose Select Name.
b Select a name from the list.
Selecting by Series of Names a Choose Select Name.
MN007783A01-ACChapter 12 : Auditing
142
Option Actions
b Hold down the Ctrl key and select multi-ple names from the list.
4 Define the login status by configuring Status.
5 Click Search.
The table displays the following data:
• Username
• Status
• Date/Time
• Source IP Address
MN007783A01-ACChapter 12 : Auditing
143

Chapter 13
Other FunctionsThis section provides information on other miscellaneous functions that are available in the application.
NOTE: If you are an agency manager, you can access the features through AgencyManagement.
13.1Viewing Agency Manager Contact InformationThis section provides detailed information about the Agency Manager Contact List.
Procedure:1 To view Agency Manager contact information, go to PlateSearch→Other Functions→ Contact
Manager(s).Figure 146: Agency Manager Contact List
2 To create a report of each manager in PDF format, click Output Report.
13.2Viewing Downloadable SoftwareVarious builds of Car Detector can be downloaded from PlateSearch.
Procedure:1 To view the downloadable software, go to PlateSearch→Other Functions→Software
Downloads.
The system supports the following softwares:
• Vigilant Mobile LPR
• Vigilant Fixed LPR
• Target Alert Service
MN007783A01-ACChapter 13 : Other Functions
144
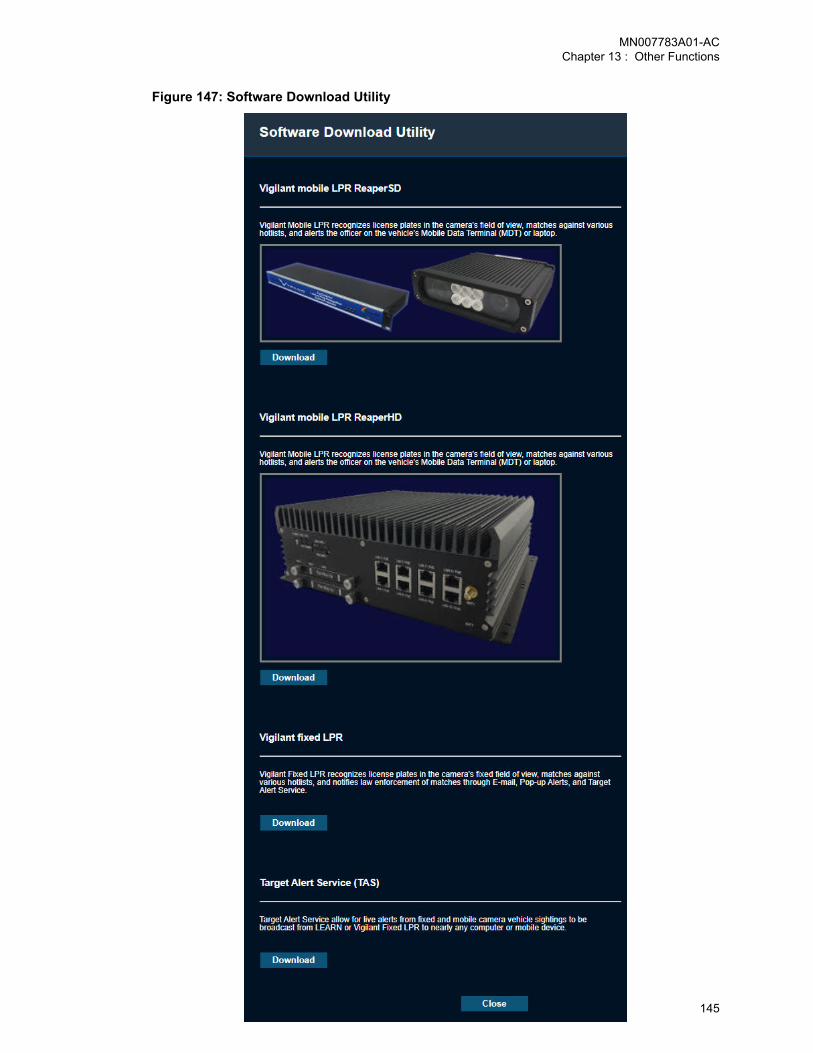
Figure 147: Software Download Utility
MN007783A01-ACChapter 13 : Other Functions
145

2 To download the desired software, click Download.
3 Save the installer file when prompted.
4 To start the installation, unzip and run the Setup.exe for each individual package.
MN007783A01-ACChapter 13 : Other Functions
146