Embed Size (px)
Citation preview
User Guide for Review/Submit Prepared Requests
Office of Disability Determinations
October 2015
Electronic Records Express (ERE): Review/Submit Prepared Requests
Instructions for Review/Submit Prepared Requests
This function allows CE providers to review and submit requests prepared by administrative staff.
The Review/Submit Prepared Requests link displays on the Electronic Records Express Home page when the CE provider registers to use this function.
Start by logging into Electronic Records Express using your username and password. Select the link, Review/Submit Prepared Requests under the Evidence Functions heading.
Electronic Records Express Home—Review/Submit Prepared Requests
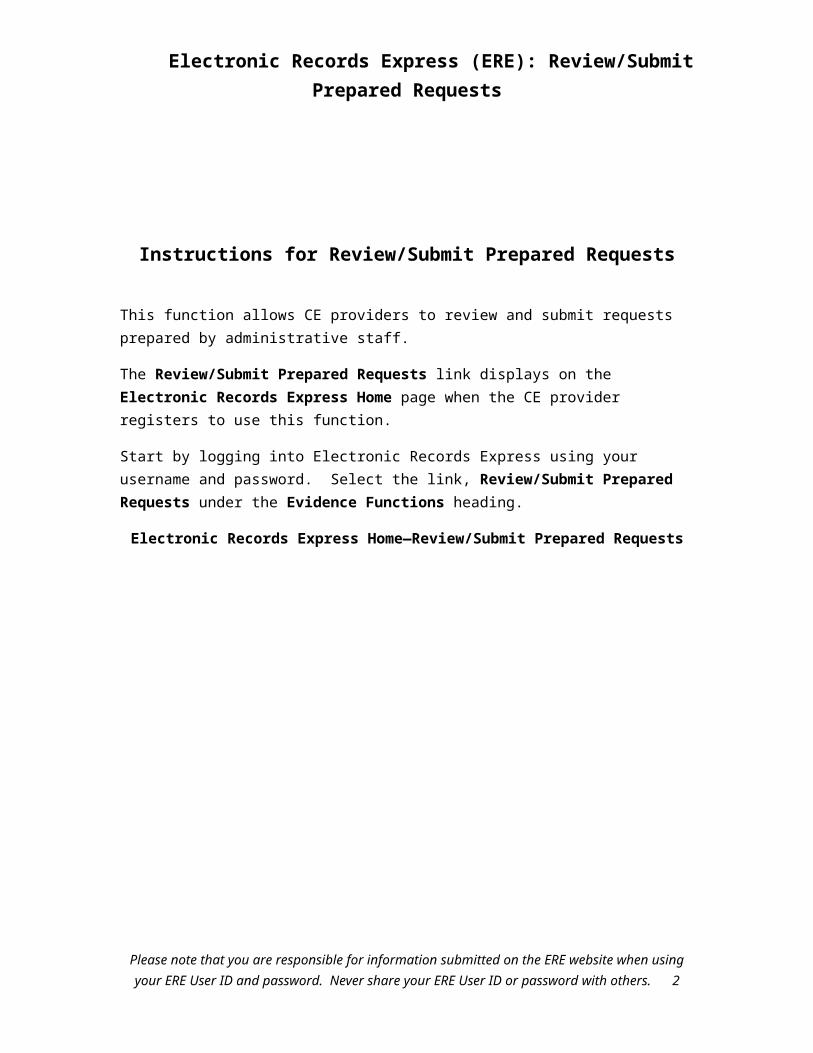
You will see the page shown below after selecting the Review/Submit Prepared Requests link. This page shows all requests prepared for you by your staff. None of the prepared requests can be submitted to the DDS until you review and submit each one.
Please note that you are responsible for information submitted on the ERE website when using your ERE User ID and password. Never share your ERE User ID or password with others. 2

Electronic Records Express (ERE): Review/Submit Prepared Requests
Review/Submit Prepared Requests
Review/Submit Prepared Requests You may select the header of each column to sort the displayed information by that
column in ascending or descending order. After sorting a column, a small arrow appears adjacent to that column header.
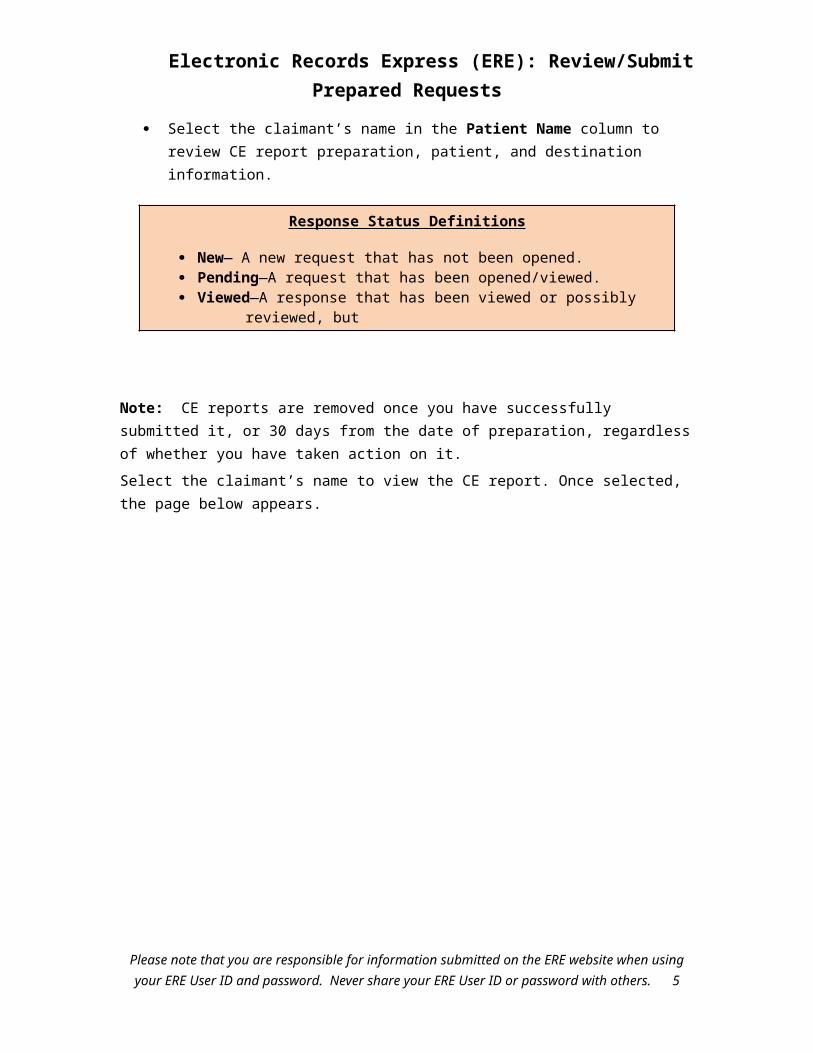
Select the claimant’s name in the Patient Name column to review CE report preparation, patient, and destination information.
Note: CE reports are removed once you have successfully submitted it, or 30 days from the date of preparation, regardless of whether you have taken action on it.Select the claimant’s name to view the CE report. Once selected, the page below appears.
Please note that you are responsible for information submitted on the ERE website when using your ERE User ID and password. Never share your ERE User ID or password with others. 3
Response Status Definitions
New— A new request that has not been opened. Pending—A request that has been opened/viewed. Viewed—A response that has been viewed or possibly reviewed, but has not yet been submitted to the requesting office.
Electronic Records Express (ERE): Review/Submit Prepared Requests
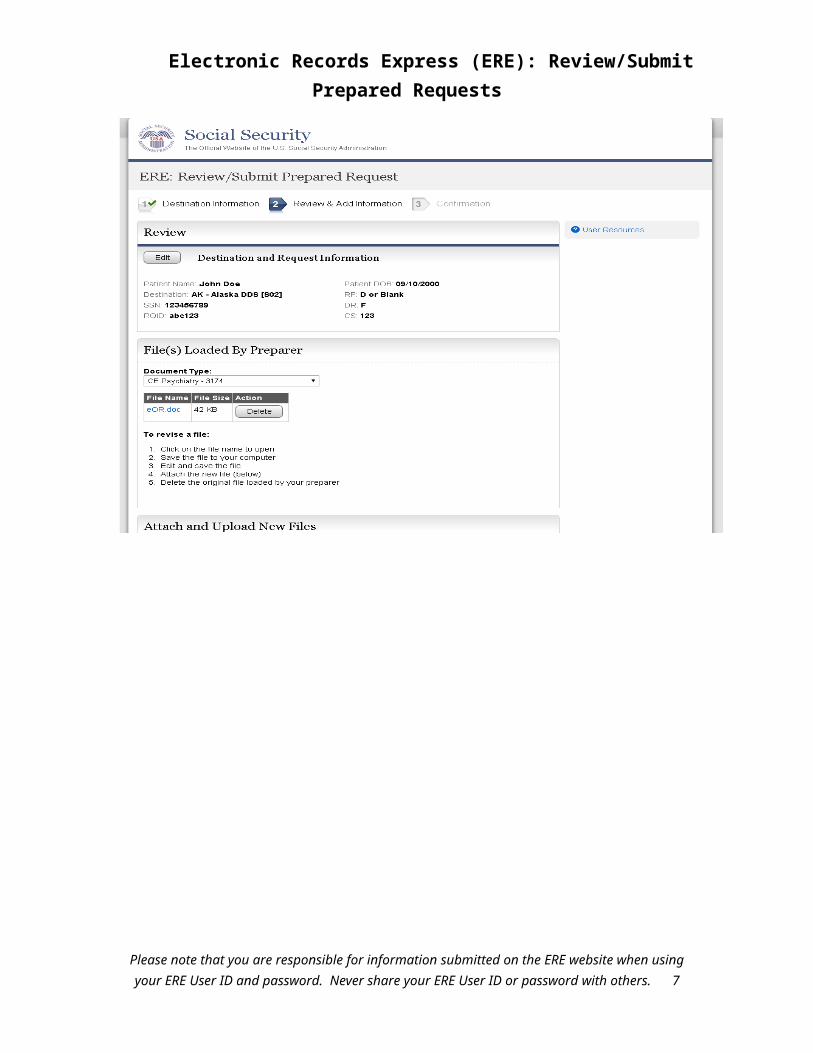
Review Desintation Information (Step 1 of 3)
Please note that you are responsible for information submitted on the ERE website when using your ERE User ID and password. Never share your ERE User ID or password with others. 4
Electronic Records Express (ERE): Review/Submit Prepared Requests
Please note that you are responsible for information submitted on the ERE website when using your ERE User ID and password. Never share your ERE User ID or password with others. 5

Electronic Records Express (ERE): Review/Submit Prepared Requests
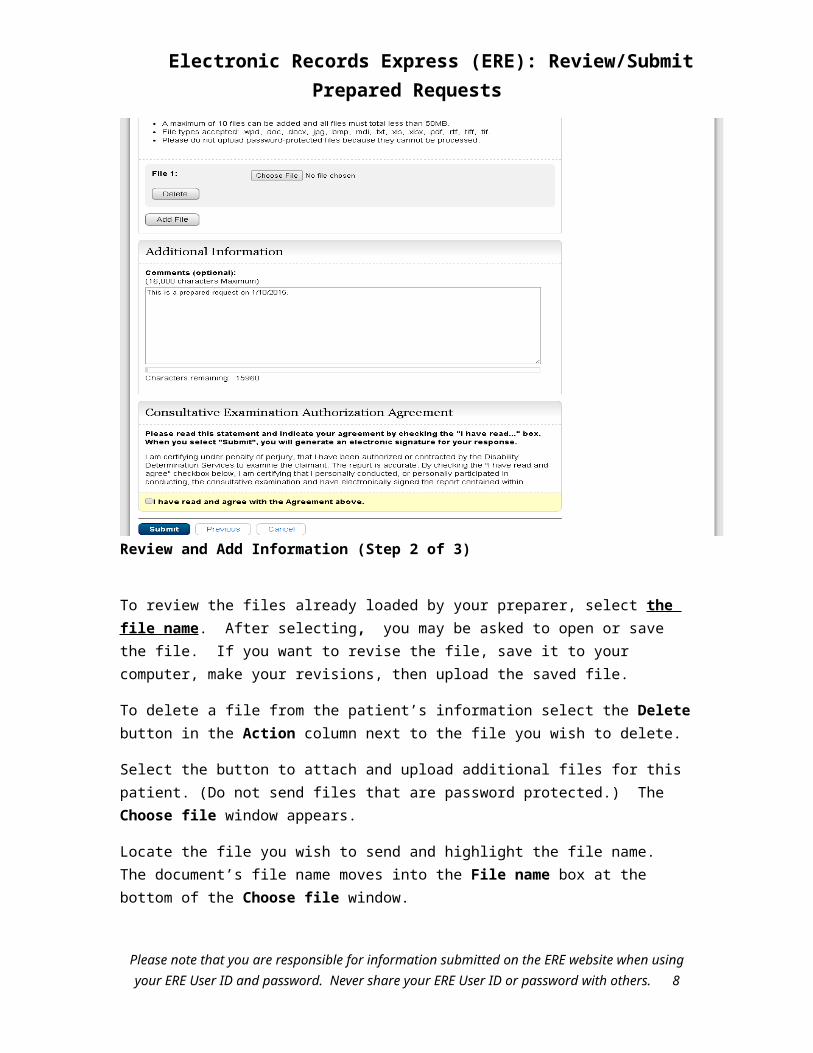
Review and Add Information (Step 2 of 3)
To review the files already loaded by your preparer, select the file name. After selecting, you may be asked to open or save the file. If you want to revise the file, save it to your computer, make your revisions, then upload the saved file.
To delete a file from the patient’s information select the Delete button in the Action column next to the file you wish to delete.
Select the button to attach and upload additional files for this patient. (Do not send files that are password protected.) The Choose file window appears.
Locate the file you wish to send and highlight the file name. The document’s file name moves into the File name box at the bottom of the Choose file window.
Select the Open button. The Choose file window closes and the file name displays. If you have chosen the incorrect file, select the Delete button to clear the field.
Select the Add File button to send additional files. Only files for the SSN in Step 1 can be sent with this transaction.
Please note that you are responsible for information submitted on the ERE website when using your ERE User ID and password. Never share your ERE User ID or password with others. 6
Electronic Records Express (ERE): Review/Submit Prepared Requests
Type Comments, if needed. The Comment field is where you can provide additional information. Type-in and/or cut-and-paste your text (up to 16,000 characters, approximately three letter size pages) directly into the box provided. The remaining character count shows beneath the box.
The next step is your “Electronic Signature”. This allows you to certify that the claimant has been examined, a report has been prepared, and the report is accurate. Read the certification statement located at the bottom of the screen and indicate your understanding by checking the box beside, “I have read and agree with the agreement above.” By checking the box, you affirm your intent to sign the report. This process eliminates the need for you to physically sign and send the paper report to the DDS..
Select the Submit button to forward this information to the selected DDS.
Please note that you are responsible for information submitted on the ERE website when using your ERE User ID and password. Never share your ERE User ID or password with others. 7
Note: A maximum of 10 files may be sent for one individual by selecting the Add A File button and repeating the previous steps.
SSA’s Electronic Records Express website accepts the following file formats: .wpd, .doc, .docx, .jpg, .bmp, .mdi, .txt, .rtf, .xls, xlsx, .pdf, .tiff, .tif.
Do not upload documents containing macros (i.e., a set of instructions or scripts that automates tasks). They may cause system problems, which will require you to re-submit your documents without macros.
Electronic Records Express (ERE): Review/Submit Prepared Requests
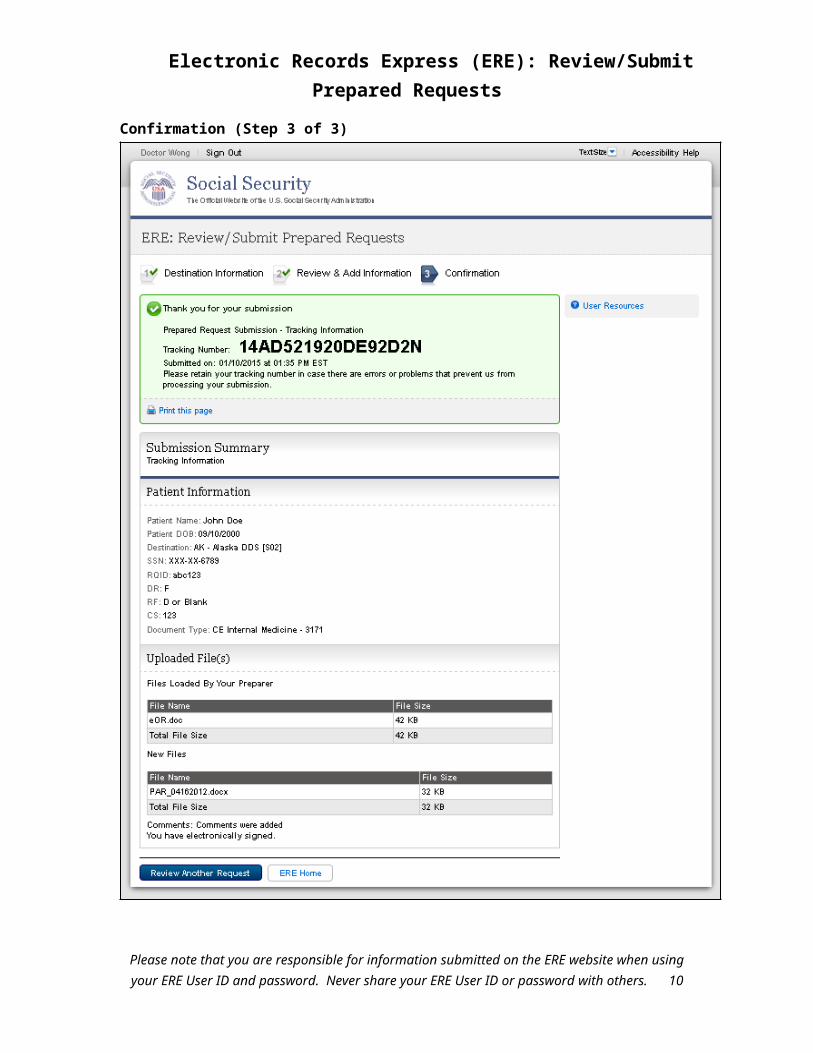
Confirmation (Step 3 of 3)
Please note that you are responsible for information submitted on the ERE website when using your ERE User ID and password. Never share your ERE User ID or password with others. 8
Electronic Records Express (ERE): Review/Submit Prepared Requests
Confirmation
After your submission uploads, Electronic Records Express provides a Confirmation page. This page provides a tracking number for you to keep and use if you want to check on the status of your submission. The Confirmation page indicates the specific files that you transmitted.
If you do not receive the Confirmation page, please resubmit the materials.
If you continue to have transmitting problems, contact the Electronic Records Express Website Help Desk at [email protected] or 1-866-691-3061.
If you have additional requests to review, select the Review Another Request button.
Select ERE Home to return to the Home page.
NOTE: We strongly recommended that you print or take a screenshot of the Confirmation page for your documentation. To do this, simply select Print this page located at the bottom of the green box. This print link works the same as if you selected File and Print from your browser’s menu. You cannot bookmark and save a Confirmation page, and you will not be able to retrieve it later once you exit the webpage.
Please note that you are responsible for information submitted on the ERE website when using your ERE User ID and password. Never share your ERE User ID or password with others. 9
Electronic Records Express (ERE): Review/Submit Prepared Requests
Access Keys
This application contains access keys to improve navigation and provide information. You will find a list of these keys in the table below:
Button/Link Access KeySubmit pUser Resources u
Other keyboard commands, hotkeys or access keys will vary based upon browser and the version of the browser that you are using. A list of these commands can be found in the Help section of your browser. The Help feature can be located on the Menu bar of your browser or by using the F1 function key on the keyboard. Any assistive devices that you may be using will also have a list of these shortcut keys in their Help section.
Note: To use these keys select the “Alt” or “Ctrl” button on your keyboard and the access key simultaneously.
Please note that you are responsible for information submitted on the ERE website when using your ERE User ID and password. Never share your ERE User ID or password with others. 10

Electronic Records Express (ERE): Review/Submit Prepared Requests
How to Get Important Information about Electronic Records Express Website Availability
You may subscribe to receive ERE website availability notifications through the GovDelivery services on the Social Security Administration’s Electronic Records Express internet website: Social Security Online: Electronic Records Express. Please see the following website for GovDelivery FAQs: https://subscriberhelp.govdelivery.com/hc/en-us
To subscribe to the ERE website availability notification, follow these instructions:
Click “Sign Up for Email/Text ERE System Notifications” on the Electronic Records Express Home Page,
Type your email address and select Submit Confirm your email address Select “Send updates immediately by email.” Choose an optional password Select Submit
You will receive a “Success” confirmation. Select Close to exit.
**Once you have subscribed, you will receive a Subscription Acknowledgement e-mail with instructions on how to update your user profile**
Please note that you are responsible for information submitted on the ERE website when using your ERE User ID and password. Never share your ERE User ID or password with others. 11