Embed Size (px)
Citation preview

Veterans Personal Finance System (VPFS)
User Guide Version 1.1.3
April, 2011
U.S. Department of Veterans Affairs Health Systems Design & Development

ii VPFS User Guide v1.1.3 December 20, 2010
Document Approval Signatures
Title: Project Manager Signed: [signature on file]
Typed: Rich LeBlanc
Date:
Title: SQA Manager Signed: [signature on file]
Typed: Kerry Zallar
Date:
History of Revisions
The following table contains a history of revisions for the User‟s Manual.
Version Section Changed
Description of Change Effective Date
Contacts
1.0 Initial release of VPFS User Guide 10/20/06
1.0 Figures 6.4 and 7.3
Sections 8.2.8, 8.2.11 and other
Updated Figure 7.4
Updates screen captures. Deleted list item: access privileges for Patient Fund Supervisor.
Other updates as listed in CQ 712
01/18/07 Monika Gill
1.1.1 Figure 2-5, page 18
Figure F-8, Appendix F, page 104
Appendix B Glossary
Updated figures:
“Change Institution” and “Cancel” buttons are now located under the institution list.
New field “Transaction Date” added to the fiscal transaction summary report.
VPFS is defined as Veterans Personal Finance System instead of Veterans Personal Funds System.
06/05/2008 Ram Gade
1.1.2 Section 2.1
Modified EVS to EPS.
New VPFS KAAJEE login screen
Added a note about Access/Verify code.
These changes are associated with the VPFS patch release 1.1.2
06/23/2009 Ram Gade

VPFS Users Manual
iii
1.1.3 Page 38 ,
Page 42
Page 17
Updated transaction date field information.
Updated „About Screen‟ page
Footer version changed to 1.1.3
These changes are associated with the VPFS patch release 1.1.3
06/28/2010
12/20/2010
Sowjanya (Ram) Gade

About This Document
December 20, 2010 VPFS User Guide v1.1.3 1
Table of Contents
About This Document ................................................................................................................................................. 6
Purpose ................................................................................................................................................................... 6
Audience ................................................................................................................................................................. 6
Conventions Used in this Document ...................................................................................................................... 6
Additional Resources.............................................................................................................................................. 6
Business Process Notes .......................................................................................................................................... 7
1. Overview of VPFS .................................................................................................................................................. 8
1.1 What is VPFS? .............................................................................................................................................. 8
1.2 System Requirements .................................................................................................................................... 8
1.3 User Roles and Access to Functions .............................................................................................................. 9
1.4 User Roles and Access to Reports ............................................................................................................... 10
1.5 Electronic Signature (E-signature) .............................................................................................................. 11
1.6 Automatic Timeout ...................................................................................................................................... 11
1.7 Section 508 Accessibility ............................................................................................................................ 11
2. Getting Started ..................................................................................................................................................... 14
2.1 Accessing VPFS .......................................................................................................................................... 14
2.2 Graphic Version Screen Components .......................................................................................................... 16
2.2.1 Popup Windows .............................................................................................................................. 16
2.2.2 Left Panel ........................................................................................................................................ 17
2.2.3 Top Menu Bar ................................................................................................................................. 19
2.2.4 Banner ............................................................................................................................................. 19
2.2.5 Tabs ................................................................................................................................................. 20
2.2.6 Work Area ....................................................................................................................................... 20
2.2.7 Bottom Button Bar .......................................................................................................................... 21
2.2.8 Fields ............................................................................................................................................... 21
2.2.9 Selection Table ................................................................................................................................ 22
2.2.10 Calendar Control ............................................................................................................................. 23
2.3 Shortcut Keys .............................................................................................................................................. 24
2.3.1 Menu Options .................................................................................................................................. 24
2.3.2 Buttons and Tabs ............................................................................................................................. 24
2.3.3 Selection Tables .............................................................................................................................. 25
2.4 Text Version Components ........................................................................................................................... 25
3. Selecting Patients ................................................................................................................................................. 27
3.1 Top Menu Bar Options ................................................................................................................................ 27
3.2 Searching For a Patient ................................................................................................................................ 28
3.3 Filtering the List of Patients ........................................................................................................................ 28
3.4 Verify Balances ........................................................................................................................................... 29
3.5 Viewing / Printing Patient Cards for Multiple Patients ............................................................................... 29
4. Registering a Patient ............................................................................................................................................ 31
5. Transferring a Patient ......................................................................................................................................... 35

About This Document
2 VPFS User Guide v1.1.3 December 20, 2010
5.1 Requesting a Transfer .................................................................................................................................. 35
5.1.1 To Make a Transfer Request ........................................................................................................... 35
5.1.2 To Cancel a Transfer Request: ........................................................................................................ 35
5.2 Authorizing a Transfer ................................................................................................................................ 36
5.2.1 To Authorize a Transfer: ................................................................................................................. 36
5.2.2 To Deny a Transfer: ........................................................................................................................ 36
6. Posting Multiple Transactions ............................................................................................................................ 37
7. Working with the Patient Account ..................................................................................................................... 41
7.1 Account Tab ................................................................................................................................................ 41
7.1.1 Post a Transaction ........................................................................................................................... 42
7.1.2 Verify Balances ............................................................................................................................... 44
7.1.3 Transfer Patient ............................................................................................................................... 44
7.1.4 Overriding Limits ............................................................................................................................ 44
7.2 Patient Tab ................................................................................................................................................... 46
7.2.1 View / Edit Patient Information ...................................................................................................... 46
7.2.2 Show Patient Detail ......................................................................................................................... 49
7.2.3 Show Information Display .............................................................................................................. 50
7.2.4 Show Patient Card ........................................................................................................................... 51
7.3 Guardians Tab ............................................................................................................................................. 53
7.4 Transactions Tab ......................................................................................................................................... 54
7.4.1 Editing a Deferral Date ................................................................................................................... 54
7.4.2 Showing the Transaction Display ................................................................................................... 55
7.4.3 Exporting Transactions ................................................................................................................... 55
7.4.4 Showing the Master Transaction Display ....................................................................................... 55
7.5 Suspense Tab ............................................................................................................................................... 56
7.5.1 Filter the List of Suspense Items ..................................................................................................... 57
7.5.2 Edit a Suspense Item ....................................................................................................................... 57
7.5.3 Add a Single Suspense Item ............................................................................................................ 58
7.5.4 Add a Recurring Suspense Item ...................................................................................................... 58
7.5.5 Cancel a Suspense Item ................................................................................................................... 58
7.5.6 Cancel a Recurring Suspense Item .................................................................................................. 59
7.5.7 Cancel all Transactions on a Specified Date ................................................................................... 59
7.6 Log Tab ....................................................................................................................................................... 59
8. Editing Dropdown Lists (Administration) ......................................................................................................... 62
8.1 Administration Menu ................................................................................................................................... 62
8.2 Working with Administration Pages ........................................................................................................... 63
8.2.1 Editing the List of Form Types ....................................................................................................... 64
8.2.2 Editing the List of Payee Types ...................................................................................................... 65
8.2.3 Editing the List of Remarks ............................................................................................................ 66
8.2.4 Editing the List of Income Source Types ........................................................................................ 67
8.2.5 Editing the List of Reference Types ................................................................................................ 68
8.2.6 Editing the List of Institutions......................................................................................................... 69
8.2.7 Editing the List of Patient Types ..................................................................................................... 70
8.2.8 Editing the List of Award Frequencies ........................................................................................... 71

About This Document
December 20, 2010 VPFS User Guide v1.1.3 3
8.2.9 Editing the List of Patient Statuses ................................................................................................. 72
8.2.10 Editing the List of Help Text .......................................................................................................... 73
8.2.11 Editing the List of Payment Types .................................................................................................. 74
8.2.12 Editing System Parameters ............................................................................................................. 75
8.2.13 Editing User Account ...................................................................................................................... 76
9. Viewing / Printing Reports .................................................................................................................................. 78
9.1 Run a Report ................................................................................................................................................ 78
9.2 Print a Report ............................................................................................................................................... 79
9.3 Export a Report............................................................................................................................................ 79
10. Selecting Suspense Items ..................................................................................................................................... 81
Appendix A. 508 Standards ................................................................................................................................ 82
508 Standards ....................................................................................................................................................... 82
Paragraph (a) ........................................................................................................................................................ 82
Paragraph (b) ........................................................................................................................................................ 82
Paragraph (c) ........................................................................................................................................................ 82
Paragraph (d) ........................................................................................................................................................ 83
Paragraph (e) ........................................................................................................................................................ 83
Paragraph (f) ......................................................................................................................................................... 83
Paragraph (g) ........................................................................................................................................................ 83
Paragraph (h) ........................................................................................................................................................ 83
Paragraph (i) ......................................................................................................................................................... 83
Paragraph (j) ......................................................................................................................................................... 84
Paragraph (k) ........................................................................................................................................................ 84
Paragraph (l) ......................................................................................................................................................... 85
Paragraph (m) ....................................................................................................................................................... 85
Paragraph (n) ........................................................................................................................................................ 85
Paragraph (o) ........................................................................................................................................................ 86
Paragraph (p) ........................................................................................................................................................ 86
Assistive Technology ........................................................................................................................................... 86
Appendix B. Glossary ......................................................................................................................................... 87
Appendix C. Acronyms and Abbreviations ....................................................................................................... 89
Appendix D. Frequently Asked Questions ........................................................................................................ 90
Appendix E. VPFS User Roles and Functions .................................................................................................. 92
Basic Official User ............................................................................................................................................... 94
Basic Patient Funds Clerk .................................................................................................................................... 95
Lead Patient Funds Clerk ..................................................................................................................................... 96
Patient Funds Clerk Supervisor ............................................................................................................................ 97
Fiscal Management ............................................................................................................................................... 98
VPFS System Administrator ................................................................................................................................ 99
VPFS Security Administrator ............................................................................................................................... 99

About This Document
4 VPFS User Guide v1.1.3 December 20, 2010
Appendix F. Report Samples ........................................................................................................................... 100
Account Balances ............................................................................................................................................... 100
Activity Audit Listing......................................................................................................................................... 100
Date Variance Report ......................................................................................................................................... 101
Deceased Patient with a Balance ........................................................................................................................ 101
Discharged Patient with a Balance ..................................................................................................................... 102
Dormant Account Listing ................................................................................................................................... 102
Fiscal Audit Report............................................................................................................................................. 103
Fiscal Transaction Summary Report .................................................................................................................. 104
Inactive Withdrawal Listing ............................................................................................................................... 105
Indigent Patient Listing ...................................................................................................................................... 105
Min and Max Restrictions .................................................................................................................................. 105
Negative Balance Report .................................................................................................................................... 106
Overdue Restriction Search ................................................................................................................................ 107
Patient Listing ..................................................................................................................................................... 107
Patient Summary ................................................................................................................................................ 108
Productivity Report ............................................................................................................................................ 109
Station Balances ................................................................................................................................................. 109
Transaction Listing ............................................................................................................................................. 110
List of Figures
Figure 1-1. Select Patient Page (graphic version) ........................................................................................................ 12 Figure 1-2. Select Patient Page (text version) .............................................................................................................. 12 Figure 2-1. VPFS Login Page ...................................................................................................................................... 14 Figure 2-2. VPFS Welcome Page ................................................................................................................................ 15 Figure 2-3. Elements of VPFS Screen (graphic version) ............................................................................................. 16 Figure 2-4. About Window .......................................................................................................................................... 17 Figure 2-5. Change Institution page ............................................................................................................................ 18 Figure 2-6. Sample Banner .......................................................................................................................................... 19 Figure 2-7. Tabs ........................................................................................................................................................... 20 Figure 2-8. Sample Work Area (Account Page) .......................................................................................................... 20 Figure 2-9. Example of Required Field ....................................................................................................................... 22 Figure 2-10. Sample Selection Table ........................................................................................................................... 22 Figure 2-11. Sample Calendar Control ........................................................................................................................ 24 Figure 2-12. Elements of VPFS Screen (text version) ................................................................................................. 25 Figure 3-1. Select Patient Page .................................................................................................................................... 27 Figure 3-2. Balance Verification Window ................................................................................................................... 29 Figure 3-3. Patient Funds Patient Account Card ......................................................................................................... 30 Figure 4-1. Register Patient Page with Partially Displayed Patient Lookup Window ................................................. 32 Figure 4-2. Register Patient Page with Patient Lookup Window ................................................................................ 32 Figure 4-3. Patient Lookup with Available List .......................................................................................................... 33 Figure 4-4. Patient Lookup with Selected Filter .......................................................................................................... 33 Figure 6-1. Patient List Confirmation Window ........................................................................................................... 37 Figure 6-2. Post Multiple Transactions – Common Information Page ........................................................................ 37 Figure 6-3. Post Multiple Transactions: Select Patients Page ..................................................................................... 38 Figure 6-4. Post Multiple Transactions – Individual Information Page ....................................................................... 39 Figure 6-5. Post Multiple Transactions - Individual Information Confirmation Page ................................................. 40 Figure 7-1. Account Tab .............................................................................................................................................. 41 Figure 7-2. Account Page ............................................................................................................................................ 41 Figure 7-3. Post Transaction Page ............................................................................................................................... 42

About This Document
December 20, 2010 VPFS User Guide v1.1.3 5
Figure 7-4. Post Transaction Confirmation Page ......................................................................................................... 43 Figure 7-5. Balance Verification Window ................................................................................................................... 44 Figure 7-6. Patient Page ............................................................................................................................................... 46 Figure 7-7. Select Provider Page ................................................................................................................................. 48 Figure 7-8. Select Provider Page with Providers ......................................................................................................... 49 Figure 7-9. Patient Detail Window .............................................................................................................................. 50 Figure 7-10. Patient Funds Information Display Window ........................................................................................... 51 Figure 7-11. Patient Funds Patient Account Card ....................................................................................................... 52 Figure 7-12. Guardians Page ....................................................................................................................................... 53 Figure 7-13. Transactions Page ................................................................................................................................... 54 Figure 7-14. Patient Funds Master Transaction Display.............................................................................................. 56 Figure 7-15. Suspense Page ......................................................................................................................................... 57 Figure 7-16. Log Page ................................................................................................................................................. 60 Figure 8-1. Administration Menu ................................................................................................................................ 62 Figure 8-2. Sample Administration Page ..................................................................................................................... 63 Figure 8-3. Maintain Form Types page ....................................................................................................................... 64 Figure 8-4. Maintain Payee Types Page ...................................................................................................................... 65 Figure 8-5. Maintain Remarks Page ............................................................................................................................ 66 Figure 8-6. Maintain Income Source Types Page ........................................................................................................ 67 Figure 8-7. Maintain Reference Types Page................................................................................................................ 68 Figure 8-8. Maintain Institutions Page ........................................................................................................................ 69 Figure 8-9. Maintain Patient Types Page ..................................................................................................................... 70 Figure 8-10. Maintain Award Frequencies Page ......................................................................................................... 71 Figure 8-11. Maintain Patient Statuses ........................................................................................................................ 72 Figure 8-12. Maintain Help Text Page ........................................................................................................................ 73 Figure 8-13. Maintain Payment Types Page ................................................................................................................ 74 Figure 8-14. Maintain System Parameters Page .......................................................................................................... 75 Figure 8-15. Maintain User Account Page .................................................................................................................. 76 Figure 9-1. Run Reports Page ...................................................................................................................................... 78 Figure 9-2. File Download Window ............................................................................................................................ 79 Figure 10-1. Select Suspense Page .............................................................................................................................. 81 Figure F-1. Account Balances ................................................................................................................................... 100 Figure F-2 Activity Audit Listing Report .................................................................................................................. 101 Figure F-3. Date Variance Report.............................................................................................................................. 101 Figure F-4. Deceased Patient with a Balance ............................................................................................................ 102 Figure F-5. Discharged Patient with a Balance ......................................................................................................... 102 Figure F-6. Dormant Account Listing ....................................................................................................................... 103 Figure F-7. Fiscal Audit Report ................................................................................................................................. 104 Figure F-8. Fiscal Transaction Summary Report ....................................................................................................... 104 Figure F-9. Inactive Withdrawal Listing ................................................................................................................... 105 Figure F-10. Indigent Patient Listing ......................................................................................................................... 105 Figure F-11. Min and Max Restrictions..................................................................................................................... 106 Figure F-12. Negative Balance Report ...................................................................................................................... 106 Figure F-13. Overdue Restriction Search .................................................................................................................. 107 Figure F-14. Patient Listing ....................................................................................................................................... 108 Figure F-15. Patient Summary Report ....................................................................................................................... 108 Figure F-16. Productivity Report ............................................................................................................................... 109 Figure F -17 Station Balances Report ........................................................................................................................ 110 Figure F-18. Transaction Listing ............................................................................................................................... 111

About This Document
6 VPFS User Guide v1.1.3 December 20, 2010
About This Document
Purpose
The purpose of this manual is to provide a step-by-step guide to using the VPFS application to manage
patient funds.
Audience
The audience for this document consists of staff members at the VistA site who use VPFS to manage
patient accounts, including all of the following:
Basic Official Users
Patient Funds Clerk (PFC)
Lead PFC
PFC Supervisor
Fiscal Management
VPFS System Administrator
VPFS Security Administrator
Conventions Used in this Document
Format Indicates…
bold A control that you click, such as a button, icon, or link, or a field label.
Example: Click Search.
Shortcut key combinations A key combination that you press to perform a specific action or to move the cursor to a specific location on the page. Press and hold the first key then press the second key.
Example: Alt + S to save.
Additional Resources
Additional VPFS documentation is available in the HealtheVet section of the VistA Documentation
Library (VDL) website: http://www.va.gov/vdl/default.asp

About This Document
December 20, 2010 VPFS User Guide v1.1.3 7
Business Process Notes
A copy of the Business Process Notes table is provided at the end of each chapter. Use this page to jot
down notes about the changes to business processes that will be required due to the differences between
PFOP and VPFS.
Business Process Notes:

1. Overview of VPFS
8 VPFS User Guide v1.1.3 December 20, 2010
1. Overview of VPFS
1.1 What is VPFS?
Veterans Personal Finance System (VPFS) is the mini-banking system used by the Veterans Health
Administration (VHA) to manage the accounts of VHA patients in the VHA hospital system. VPFS
replaces the Personal Funds of Patients (PFOP) system that was used previously. VPFS looks different
from PFOP because it is a web-based application; however, its design and functionality are modeled after
PFOP. You can perform all of the functions in VPFS that were available in PFOP, with the exception of a
few functions that are no longer needed because of the new built-in security controls.
One of the major changes is that VPFS is a centralized system. With PFOP, each site used a stand-alone
copy of the software and there were differences between local versions, such as data structures, business
rules, etc. With VPFS, all sites access the same centralized application using a web browser over the
VHA secure Intranet. VPFS stores all data for all sites in one centralized database. Access to the data in
the database is controlled by security software that limits access according to your VistA site and user
role.
1.2 System Requirements
To use the VFPS application:
JavaScript must be enabled on the PC
You must have access to the VHA Intranet via one of the following browsers:
o Microsoft Internet Explorer version 6.0 or higher with SP2, or
o Netscape 7.1 or higher
Standard 28-bit encrypted security (SSL) must be implemented
You must have an authorizing user account including:
o Defined user role
o Security-approved Access and Verify code pair

1. Overview of VPFS
December 20, 2010 VPFS User Guide v1.1.3 9
1.3 User Roles and Access to Functions
As in Personal Funds of Patients (PFOP), the level of access to data and functions in VPFS varies
depending on job function. However, VPFS user roles are more strictly defined. Your administrator will
work with you to determine the most appropriate level of access for your job function. Table 1-1 lists
typical access assignments based on user role.
Table 1-1. User Roles and Access to Functions
User Role Read-Only Data Entry Description
Basic Official Users
X View selected patient and account information
No reporting privileges
Basic PFC X
Search for patients
Register patients
Request patient transfer
Edit patient information
Post transactions
Lead PFC X
Search for patients
Register patients
Request patient transfer
Authorize patient transfer
Edit patient information
Post transactions
Override account restrictions
Override deferral date restrictions
PFC Supervisor X
Search for patients
Register patients
Request patient transfer
Authorize patient transfer
Edit patient information
Post transactions
Override account restrictions
Override deferral date restrictions
Request application changes through Administration area
Fiscal Management Users
X View selected patient and account information
No reporting privileges
VPFS System Administrator
X
Implement authorized changes to common reference data
No patient record access
VPFS Security Administrator
X View selected patient and account information for purposes of data security
PFC = Patient Funds Clerk

1. Overview of VPFS
10 VPFS User Guide v1.1.3 December 20, 2010
1.4 User Roles and Access to Reports
Table 1-2 lists the reports that are available through VPFS and indicates which users have the ability to
produce each type of report.
Table 1-2. User Roles and Access to Reports
Report Basic PFC Lead PFC PFC Super Fiscal
Management Enterprise
User
Patient Card Output Options
Print Selected Cards X X X
Print All Cards X X X
Transaction Display X X X
Information Display X X X
Master Transaction Review
X X X
Standard Reports
Activity Audit Listing X X X X X
Dormant Account Listing
X X X X X
Deceased Patient with a Balance
X X X
Discharged Patient with a Balance
X X X
Inactive Withdrawal Listing
X X X
Indigent Patient Listing
X X X X X
Overdue Restriction Search
X X X X X
Patient Summary Report
X X X X X
Min and Max Restrictions
X X X X X
Patient Listing X X X X X
Account Balances X X X X X
Transaction Listing X X X X X
Fiscal Audit Report X X X X X
Fiscal Transaction Summary Report
X X X X X
Date Variance Report X X X X X
Negative Balance Report
X X X

1. Overview of VPFS
December 20, 2010 VPFS User Guide v1.1.3 11
Productivity Report X
1.5 Electronic Signature (E-signature)
To ensure security and provide audit information, all VPFS users with authority to post transactions, such
as PFCs, lead PFCs, and PFC supervisors, must have an electronic signature code, or e-signature. Your e-
signature is a secondary level of authentication and carries the same legal responsibilities as your written
signature. It works in addition to your password to identify you. You must enter your e-signature when
you confirm the transactions that you enter.
Once you create your e-signature, do not share it with anyone. For your protection, your e-signature will
be encrypted and will be unknown to anyone else, including computer programmers maintaining VPFS. If
you forget your e-signature, it must be reset by a system administrator.
1.6 Automatic Timeout
If your session is inactive for a predetermined length of time (typically 15 to 25 minutes) the system logs
you out automatically and entries that you have not saved will be lost. A warning message appears 5
minutes before the timeout occurs. To continue working after the warning message appears:
Enter and/or save entries on the current page.
Navigate to a different page.
If an automatic timeout occurs, you can log back in. The page where you were when the timeout occurred
is redisplayed.
Note: This security feature is equivalent to Automatic Interactive-session Time-out in PFOP.
1.7 Section 508 Accessibility
Section 508 is a federal law that requires software developers to provide equivalent web page access to
users with visual impairment. The text version of VPFS provides this access with all of the functionality
of the graphic version. The text version of VPFS is also helpful for users accessing VPFS via hand-held
devices.
Following is a brief list of features of the text version of VPFS:
Graphics that convey meaning in the graphic version are substituted with text.
Navigation is via keyboard instead of mouse.
Common assistive devices, such as screen readers, text enlargement, and alternate input devices
are supported.
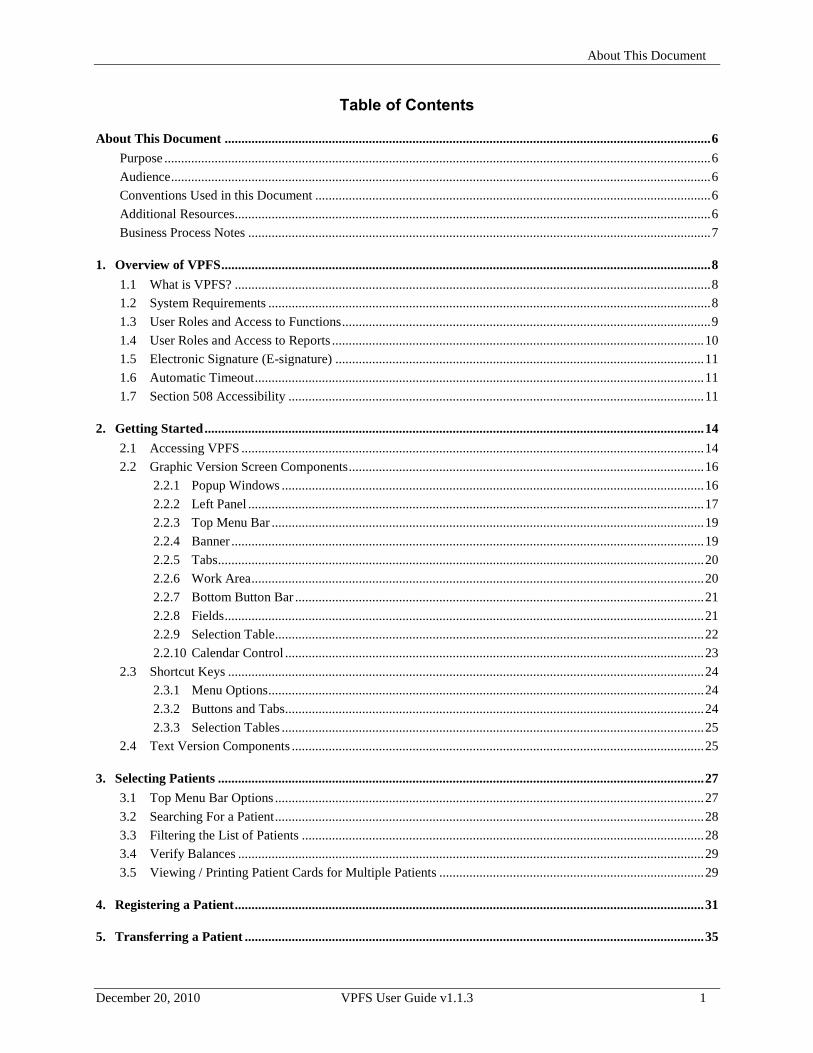
For details about how VPFS meets specific requirements of Section 508, see Appendix A.
Figure 1-1 and Figure 1-2 show samples of the graphic and text versions of the Select Patient page in
VPFS.
1. Overview of VPFS
12 VPFS User Guide v1.1.3 December 20, 2010
Figure 1-1. Select Patient Page (graphic version)
Figure 1-2. Select Patient Page (text version)

1. Overview of VPFS
December 20, 2010 VPFS User Guide v1.1.3 13
Business Process Notes:

2. Getting Started
14 VPFS User Guide v1.1.3 December 20, 2010
2. Getting Started
2.1 Accessing VPFS
Your VPFS log in grants you access based on the following:
Your affiliation with a VHA institution, or site, which determines the patient records that you are
allowed to access.
Your role at the VHA site, which determines the VPFS functions that you are allowed to perform.
To access VPFS:
1. Contact Enterprise Product Support (EPS) for a current URL to the VPFS application.
2. Open a web browser and enter the URL from EPS.
The VPFS Login page opens.
Figure 2-1. VPFS Login Page
3. Enter your VPFS login information:
a. Enter access code: Enter your VPFS access code.
b. Enter verify code: Enter your VPFS verify code.
Note: The access code and verify code can also be entered in the Access Code text box
separated by a semicolon. These are the same codes used for VistA login also.
4. Institution: Select your site from the dropdown list of institutions.

2. Getting Started
December 20, 2010 VPFS User Guide v1.1.3 15
5. Click Login or hit Enter key.
The VPFS Welcome page opens.
Figure 2-2. VPFS Welcome Page
6. Click any of the links on the VPFS Welcome page.
To start the VPFS graphic version, click Start VPFS.
To start the VPFS text version, click Start VPFS (text-only). For more information about
this section 508 compliant version of VPFS, see Appendix A.
To open the Department of Veterans Affairs home page, click VHA Links.
To open the Users Guide for VPFS, click Users Guide.
To open the Getting Started in VPFS document, click Getting Started.
To open the PFOP Supervisor User Manual, click VHA Docs.
2. Getting Started
16 VPFS User Guide v1.1.3 December 20, 2010
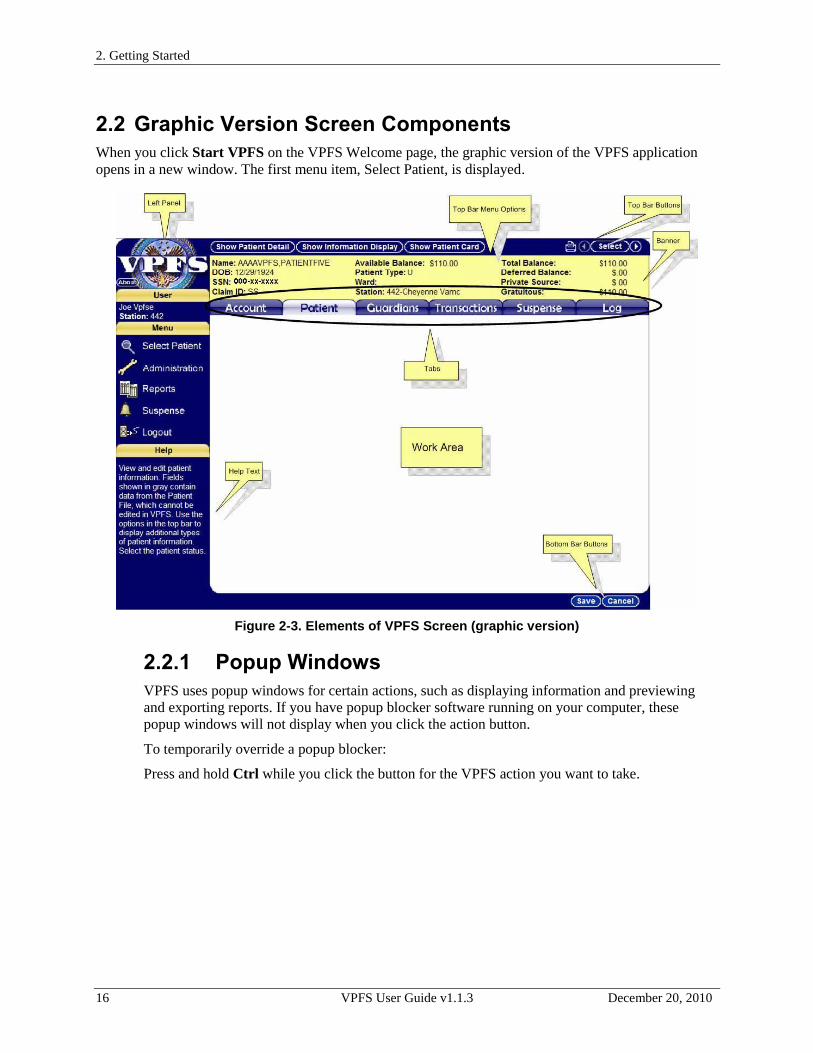
2.2 Graphic Version Screen Components
When you click Start VPFS on the VPFS Welcome page, the graphic version of the VPFS application
opens in a new window. The first menu item, Select Patient, is displayed.
Figure 2-3. Elements of VPFS Screen (graphic version)
2.2.1 Popup Windows
VPFS uses popup windows for certain actions, such as displaying information and previewing
and exporting reports. If you have popup blocker software running on your computer, these
popup windows will not display when you click the action button.
To temporarily override a popup blocker:
Press and hold Ctrl while you click the button for the VPFS action you want to take.

2. Getting Started
December 20, 2010 VPFS User Guide v1.1.3 17
2.2.2 Left Panel
The left panel provides user information and a menu of links to the different areas of VPFS:
About: To view system and user information, click the About button.
Figure 2-4. About Window
o Software Versions: Software version numbers for the VPFS application, the database,
the browser, and JavaScript.
o Screen Resolution: Your current screen resolution setting.
Note: If your resolution is less than 800/600 you will not be able to see the entire VPFS
Web page.
o User information: The name of the user who is currently logged in and the roles
associated with the user.
Note: The sample window shows all possible roles.
User: Displays the name and station number of the current VPFS user. If you are
authorized to access multiple sites, the change institution button appears to the right of your
user name and station ID.
a. Click the change institution button .
The Change Institution page opens.

2. Getting Started
18 VPFS User Guide v1.1.3 December 20, 2010
Figure 2-5. Change Institution page
b. Click the down arrow and select the institution from the dropdown list.
c. Click Change Institution.
The Select Patient page opens with the list of patients for the institution you selected.
The station ID displayed in the left panel changes.
Menu: Provides links to the different areas of VPFS and the link to log out of VPFS.
o Select Patient: Access this area to locate the patient you want to work with. From
Select Patient you can also register patients and post multiple transactions.
o Administration: Access this area to edit the values that appear in dropdown lists.
Options on this menu require certain user roles. Only the options for which you have
access appear in the menu. PFC supervisors can make certain local changes. System
administrators make global changes that affect all sites. If you do not have access to
these menu options, request changes through your PFC supervisor or system
administrator.
o Reports: Access this area to view, print, and export reports.
o Suspense: Access this area to view, access, and cancel suspense records.
o Logout: Click to log out of VPFS.
Caution: Clicking the “X” close box on the window will not log you out! Be sure to
click the Logout menu option to securely exit the application.
Help: Displays help text related to the current page or field.

2. Getting Started
December 20, 2010 VPFS User Guide v1.1.3 19
2.2.3 Top Menu Bar
Menu Options: Menu options for tasks that are available from the page appear across the top
menu bar.
Buttons: Buttons appear in the right-hand corner of the top menu bar for tasks that are
available from the page. The following buttons are available on numerous pages:
Button Description Action
Print Preview Click this button to view the current page in your browser window. Once displayed, you can print the page using the browser‟s print function.
Previous Move to the previous item in the list.
Select Select the current item.
Next Move to the next item in the list.
2.2.4 Banner
If a patient is selected, the banner displays information about the current account.
Figure 2-6. Sample Banner
Name: Patient's last name, first name, middle initial
DOB: Patient's date of birth. If the patient is deceased, the patient's date of death (DOD) is
shown also.
SSN: Patient's Social Security Number
Claim ID: Medical claim number
Available Balance: Amount that is currently available for withdrawal
Patient Type: U=unrestricted; R=restricted; L=limited unrestricted; U=unrestricted;
X=unknown
Ward: Ward where the patient is registered
Station: Station where the patient is registered
Total Balance: Total balance in the patient's account
Deferred Balance: Deferred balance in the patient's account
Private Source: Amount of balance from private source
Gratuitous: Amount of balance from gratuitous source

2. Getting Started
20 VPFS User Guide v1.1.3 December 20, 2010
2.2.5 Tabs
When a patient account is selected, the following tabs appear across the top of the work area.
Click a tab to access information and tasks related to the current patient account.
Figure 2-7. Tabs
Account: View account information for the current patient. From here you can click Post
Transaction to post a transaction or click Verify Balance to verify the patient‟s balances.
Patient: View and edit patient income information and add or remove income sources.
Guardians: View guardian information. You can designate the VA guardian as director
payee and enter the name and / or title of the VA guardian.
Transactions: View transaction history for the selected patient. Use the fields at the top of
the page to filter the list of transactions.
Suspense: View descriptions of suspense items in the patient‟s records.
Log: View descriptions of specific activities on the patient account.
2.2.6 Work Area
The work area is the main part of the VPFS web page. This part of the page changes when you
move from one menu item or tab to another or when the system responds to a request. The
following example is of the work area for the Account tab.
Figure 2-8. Sample Work Area (Account Page)

2. Getting Started
December 20, 2010 VPFS User Guide v1.1.3 21
2.2.7 Bottom Button Bar
Buttons appear in the right-hand side of the bottom button bar to allow you perform actions, such
as saving or canceling your entries or moving to the next page in a process:
Button Description Action
Save Save your entries.
Cancel Clear any unsaved entries.
Next Move to the next page in the process.
Confirm Transaction Move to the page where you confirm the transaction.
Cancel Transaction Cancel the transaction.
2.2.8 Fields
Different types of fields are used for entering data in different ways as listed in the following
table.
Type of Field Description How to Use
Text Field Type data in the field.
Dropdown List 1. Click the down arrow on the right to open a dropdown list of valid entries.
2. Select an entry from the list.
Combo Box Provides both text field and dropdown list options:
Click the right arrow on the right to open a list of valid entries and select your entry from the list,
OR
type data in the field.
2.2.8.1 Required Fields
Required fields are marked with an asterisk (*). If you leave a required field blank and attempt to
save your entries or to continue to the next page in a process, an error window will display the
name of the field that requires data.

2. Getting Started
22 VPFS User Guide v1.1.3 December 20, 2010
Figure 2-9. Example of Required Field
2.2.9 Selection Table
Figure 2-10. Sample Selection Table

2. Getting Started
December 20, 2010 VPFS User Guide v1.1.3 23
The results of search and filter entries are displayed in a selection table.
2.2.9.1 Sorting the Records in the List
You can sort the list of records by clicking on any column heading. The sort order toggles
between ascending and descending order.
Ascending Order: The first time you click on the column heading, all of the records in the
selection table are sorted in ascending order by that column. The up arrow symbol ▲ appears
to the right of the column heading to indicate that the current sort is in ascending order by
that column.
Descending Order: The next time you click on the column heading, all of the records in the
selection table are sorted in descending order by that column. The down arrow symbol ▼
appears to the right of the column heading to indicate that the current sort is in descending
order by that column.
2.2.9.2 Suspense Column
The header for the 5th column is the suspense icon . If a suspense item (reminder) is associated
with the patient account, a suspense icon appears in the row for the patient. To view all suspense
items for the patient, click the patient name to open the patient account tabs and then click the
Suspense tab.
2.2.9.3 Moving Through the List of Records
Up to 100 records can be displayed on a page in the selection table. Use the following features to
move through the list of records.
Scroll Bar: Use the scroll bar on the right to scroll through the current page of records.
Page arrows: If more than one page of records exists, use the arrows and page numbers to
move through the pages.
Go to the first page of records.
Go to the previous page of records.
Go to the specific page for the number you click.
Go to the next page of records.
Go to the last page of records.
2.2.10 Calendar Control
Use the calendar control to select the date for a field from a calendar.
To use the calendar control:
1. Click the calendar icon to the right of the date field.
The calendar control opens to today's date, or to the last date you selected.

2. Getting Started
24 VPFS User Guide v1.1.3 December 20, 2010
Figure 2-11. Sample Calendar Control
2. Navigate to the month and year that you want using the dropdown lists or by clicking the
previous month ( ) and next month ( ) arrows.
3. Click the date that you want to enter in the current field.
The calendar closes. The date is inserted in the field.
2.3 Shortcut Keys
The following shortcut keys are designed for use with both the graphic and the text versions of VPFS.
Press and hold the Alt key, then press the associated key. This places the cursor on the control, such as an
icon or button. Once the control is selected, press Enter to activate it.
2.3.1 Menu Options
Select Patient Alt+E
Administration Alt+D
Reports Alt+O
Suspense Alt+U
Logout Alt+G
Top menu bar options. Cycle through: Register, Post Multiple Transaction Show Patient Card, View Selected Patient.
Alt+M
2.3.2 Buttons and Tabs
Save Alt+S
Cancel Alt+C
Add Alt+A
Remove Alt+R
Next Alt+N
(Back) Alt+B
Print page Alt+P
Search and Filter buttons.
Cycle through: Search, Clear, Filter, Reset
Alt+F
Cycle through Tabs when tabs are present. Alt+T

2. Getting Started
December 20, 2010 VPFS User Guide v1.1.3 25
2.3.3 Selection Tables
Column headings: Place the cursor on a heading in the selection table. Each time you press Alt+H the cursor moves to the next heading. Cycles through headings from left to right.
Alt+H
Last Selection: Return the cursor to the most recently selected row in the selection table.
Alt+L
Next Row: Place the cursor on the next row in the selection table.
>
Previous Row: Place the cursor on the previous row in the selection table
<
Page Number: Place the cursor on the page number in the page navigation at the top of the selection table.
Alt + (1-5)
2.4 Text Version Components
When you click Start VPFS (text-only) on the VPFS Welcome page, the text version of the VPFS
applications opens in a new window. The first menu item, Select Patient, is displayed.
Figure 2-12. Elements of VPFS Screen (text version)

2. Getting Started
26 VPFS User Guide v1.1.3 December 20, 2010
The same components that are present in the graphic version are available in the text version, but are
arranged differently:
Actions: Any buttons that appear in the top menu bar or bottom button bar of the graphic version
are listed under the heading Actions in the text version in the lower left corner of the page.
Menu: Left panel menu items are listed under the heading Menu in the lower left corner of the
page.
User: User identification information is listed under the heading User in the lower left corner of
the page.
Help Text: Help text for the current page or field is displayed automatically in the left panel.
Business Process Notes:

3. Selecting Patients
December 20, 2010 VPFS User Guide v1.1.3 27
3. Selecting Patients
3.1 Top Menu Bar Options Register: Register a patient from the Patient File into VPFS using the Patient Service Lookup
Facility (PSL). See Chapter 4 Registering a Patient.
Post Multiple Transactions: Post similar transactions to multiple patients. See Chapter 6 Posting
Multiple Transactions.
Verify Balances: Verify whether the total balance for all the patients in the current list is correct.
Show Patient Card: Select a patient, and then click this option to view the patient account card
for the selected patient.
View Selected Patient: Select a patient, and then click this option to open the tabs that you use to
manage the patient account.
To select patients:
1. Click Select Patient from the menu in the left panel.
The Select Patient page opens. All patients registered in VPFS at your site are listed in the
selection table in alphabetical order by patient last name.
Figure 3-1. Select Patient Page
Several features are available to make it easier for you to zero in on the patient or group of patients that
you want to select. You can search through the list, filter the list, or search and filter the list by entering a
combination of search and filter criteria. Once you display the list that you want, you can move through
the list using the scroll bar, page numbers, and arrows.

3. Selecting Patients
28 VPFS User Guide v1.1.3 December 20, 2010
3.2 Searching For a Patient
To search for a patient who is already registered in VPFS:
1. Search Type: Select the type of data to search on, Patient Code, Last Name, or SSN.
2. Search Range: Select the range for the search type you entered, Begins with, Contains, Ends
with, or Equals.
3. Search Text: Enter the text to search for in the search type and range you entered.
For example: To find a patient whose last name begins with Cla, enter Search Type: Last
Name, Search Range: Begins with, and Search text: Cla.
4. Click Search.
The list of patients that matches the search criteria you entered is displayed. To clear your
entries and return to the complete list of patients, click Clear.
3.3 Filtering the List of Patients
You can use any of the filter fields alone or in combination with other filter fields. You can also use filter
fields in combination with search fields. To clear your filter entries and start over, click Reset.
To filter the list to include a specific group of patients:
1. Enter criteria in any of the filter fields. Leave the default of All for any filter fields that you
do not want to use:
a. Patient Type: Select the type of patient to include in the list, R-Restricted, L-Limited
Unrestricted, U-Unrestricted, X-Unknown, Unknown>30 days, or leave All.
b. In/Out Patient: Select In-patient, Out-patient, or leave All.
c. Guardian: Select Both, VA, Civil, None, or leave All.
d. Ward: Select a ward from the list, or leave All.
e. Special: Select Deceased, Director Payee, Discharged, or leave All.
f. Balance: This filter field works in combination with the Amount filter field. Select the
symbol that expresses the relationship with the balance amount. Select All, equals (=),
greater than (>), greater than or equal to (>=), less than (<), less than or equal to (<=), or
leave All.
g. Amount: This filter field works in combination with the symbol you entered in the
Balance filter field. Enter the balance amount to be compared to the symbol you selected.
h. Account Status: Select the account status: Active, Inactive, or leave All.
i. Patient Status: Select the patient status: A-Adjudged Incompetent, R-Rated
Incompetent, C-Competent, N-Not Rated, X-Unknown, O-Other, or leave All.
For example: To include all in-patients for a specific ward, select In-patient from the
In/Out Patient list and select the ward number from the Ward list, leaving all other filter
fields set to All.
2. Click Filter.
The list of patient accounts that match the filter criteria, and search criteria if entered, is
displayed.

3. Selecting Patients
December 20, 2010 VPFS User Guide v1.1.3 29
3.4 Verify Balances
This function displays a message that indicates whether the total balance for all the patients in the
current list is correct. It does not correct the balance.
To verify the account balance for the current list of patients:
3. Search and / or filter the list to include the patients whose accounts you want to include in the
balance check.
4. Click Verify Balances.
A window displays a message indicating whether the balances are correct.
Figure 3-2. Balance Verification Window
5. Read the message and click OK.
If the message indicates a discrepancy, be sure to notify the appropriate fiscal authority.
Unlike the legacy system PFOP, a discrepancy in VPFS indicates an error that needs to be
corrected.
3.5 Viewing / Printing Patient Cards for Multiple Patients
To view / print patient cards for multiple patients:
1. Complete the steps in Section 3.2 and 3.3 to display the list of patients who's Patient Cards
you want to view and/or print.
2. Click the Show Patient Card option in the top menu bar.
The Patient Funds Patient Account Card window opens.
3. Selecting Patients
30 VPFS User Guide v1.1.3 December 20, 2010
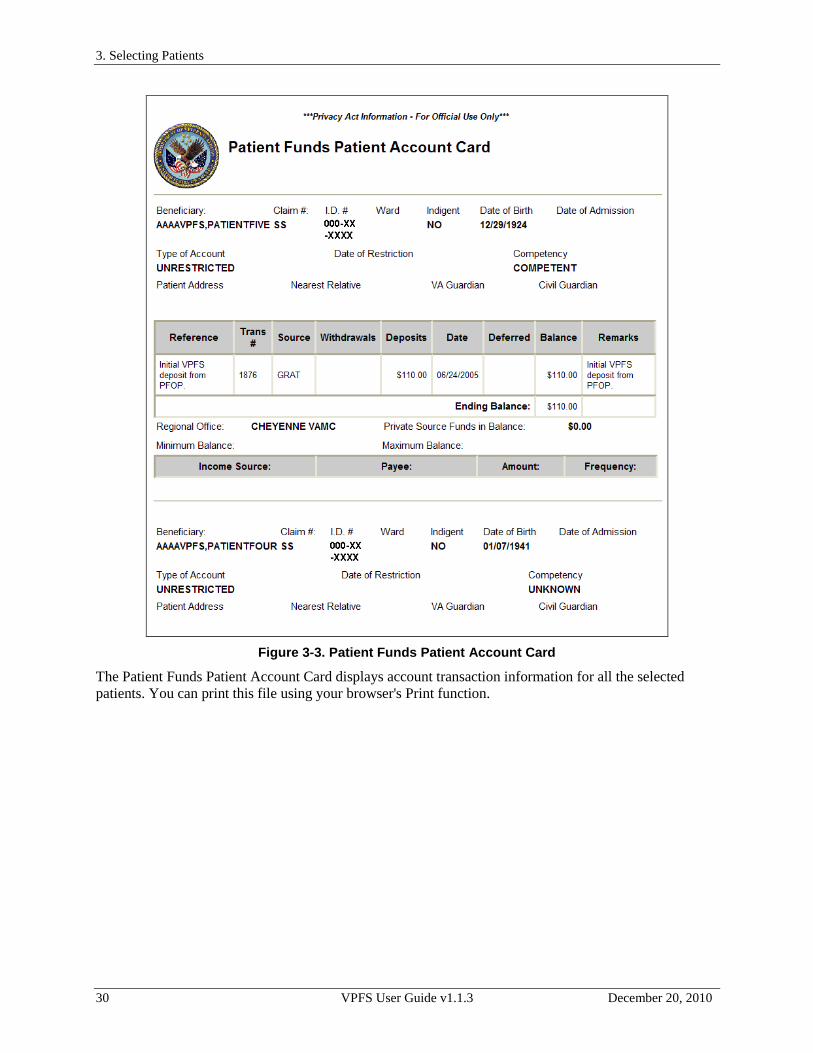
Figure 3-3. Patient Funds Patient Account Card
The Patient Funds Patient Account Card displays account transaction information for all the selected
patients. You can print this file using your browser's Print function.

4. Registering a Patient
December 20, 2010 VPFS User Guide v1.1.3 31
4. Registering a Patient You can register any patient in VPFS as long as the patient record already exists in the VistA Patient File.
The record would be in the Patient File if:
The patient was previously registered in PFOP.
The patient is registered at the hospital or institution (site).
Notes: In PFOP, patients may have multiple accounts at different institutions. In VPFS, patients can only
have a single patient account. This account can be transferred to another site if the patient moves.
If the patient you are attempting to register has already been registered in VPFS at another
institution, you will not be able to register them, however you will be able to request a transfer of
that patient to your site. See Transferring a Patient for more information.
Sensitive Records: The Patient Service Lookup facility (PSL) limits access to sensitive patient
information based on the nature of the information and on the authorization level of the user.
Before you are granted access to a sensitive patient record an alert will be displayed. If you
choose to access the sensitive record, a bulletin will be sent to the Information Security Officer
for the facility and an entry created in the Security Log file.
To register a patient:
1. Click Select Patient in the left panel.
The Select Patient page opens.
2. Click the Register option in the top menu bar of the Select Patient page.
The Register Patient page opens with the Patient Lookup fields. This page provides an
interface to PSL and allows you to search for patients in the Patient File.
Note: The PSL window may not be fully visible when it is initially displayed. You may
need to scroll right or expand the VPFS window to see the Search button on the right
side of the page. See Figure 4-1. Register Patient Page with Partially Displayed
Patient Lookup Window.
Note: For complete information about using PSL, click Help in the upper right-hand corner
of the Patient Lookup window.

4. Registering a Patient
32 VPFS User Guide v1.1.3 December 20, 2010
Figure 4-1. Register Patient Page with Partially Displayed Patient Lookup Window
Figure 4-2. Register Patient Page with Patient Lookup Window
3. If you want to limit the list, select one of the filters in the Limit Patient Selection By:
section. The list for the filter that you selected appears in the Available box.

4. Registering a Patient
December 20, 2010 VPFS User Guide v1.1.3 33
Figure 4-3. Patient Lookup with Available List
4. Select one or more items from the list in the Available box. (Hold down the Ctrl key to
select multiple items.)
5. Click > to move the selected items to the Selected list.
Figure 4-4. Patient Lookup with Selected Filter
6. Enter any of the following search criteria in the Select Patient field.
Note: An asterisk (*) can be used as a wildcard to search for all patients if you selected a
filter in Limit Patient Selection By. An asterisk is not a valid entry in the Select
Patient field otherwise.
Last name: Enter all or the first few characters of the patient‟s last name. Must be at least
4 characters with no asterisk. For example: smit to search for all patients with the last
name Smith.
Last name,first name: Enter all or part of the patient's last and first name, separated by a
comma. For example: smit,j or sm,jo to search for Joe Smith. Must be at least 4
characters with no asterisk.
SSN: Enter the complete Social Security Number (do not include dashes „-‟ or spaces).
Patient Code: Enter the first letter of the patient‟s last name followed by the last four
digits in their SSN. For example, for a patient with the name of Joe Patient, SSN: 000-00-
0001, you would type P0001 in the Select Patient field.

4. Registering a Patient
34 VPFS User Guide v1.1.3 December 20, 2010
7. Click Search.
The list of patients that match the search criteria you entered is displayed. To clear your
entries and return to the complete list of patients, click Clear Search. If more than one page
of matches was found, use the Next link at the bottom of the page to go to the next page of
results.
8. Select the patient from the list.
Any alerts associated with the patient record are displayed, one at a time. Refer to the PSL
User Manual, Appendix B for more information about individual alerts.
9. Read and click Continue to accept each alert.
If the patient is not already registered in VPFS, the Register Patient Confirmation page
displays the demographic information for the patient. Continue with the next step.
If the patient is already registered in VPFS at a different site, the Transfer Patient page
displays information about the patient you are attempting to register and the patient
already registered. You can request a transfer of the patient to your site. See Transferring
a Patient and Requesting a Transfer for more information.
If the patient is already registered in VPFS at the current site, an error message appears,
click Cancel to cancel the registration and return to the Register Patient page.
10. Review the demographic information to verify that this is the patient you want to register.
11. Click Register Patient.
The Select Patient page opens.

5. Transferring a Patient
December 20, 2010 VPFS User Guide v1.1.3 35
5. Transferring a Patient Transferring a patient occurs in two stages:
1. A patient transfer is requested by the site wanting the patient account transferred to them.
2. The transfer is authorized (or denied) by the site that currently owns the patient account.
5.1 Requesting a Transfer
When you attempt to register a patient that has already been registered at another site, you will be given
the option to request the transfer of that patient's account to your site. After you request a transfer of a
patient, you need to contact the Patient Funds department at the current site to have them authorize the
transfer (see section - Authorizing a Transfer.) Once they have authorized the transfer, the patient account
will be transferred to your site and they will no longer be able to access that account.
You can select View Patient to go directly to that patient account or go back to the Select Patient page and
search for the patient there. If the patient account has not been transferred yet, you will get a message
stating that you are not authorized to view the patient.
To cancel a transfer requested by your site, click Cancel Request from the Request Transfer page.
5.1.1 To Make a Transfer Request
Use the Register Patient function to try to register the patient in VPFS (go through the normal
Register Patient process.) If the patient has already been registered at another site, the Request
Transfer page will be displayed. Click Request Transfer to submit a request to transfer the
patient to your site.
Note: You will be notified if the patient has a pending transfer request. There can be only one
pending transfer request for a given patient account at a time. If another site has requested
the transfer of the patient, you will need to wait until that request has been completed
before you can request another transfer.
Once you have requested a transfer of the patient, you need to contact the current site to have
them authorize the transfer. In order to transfer a patient account, all available funds must be
withdrawn (the available balance must be $.00 (zero)) from that account at the current site and
transferred to your site via TDA to be re-deposited. If the patient has outstanding deferred
transactions, additional TDAs may be required to transfer those funds once they clear. Suspense
items will be created for any outstanding deferred transactions to remind you to check their status
with the current site.
5.1.2 To Cancel a Transfer Request:
If the Request Transfer page is still displayed, you cancel a pending transfer request by simply
clicking the Cancel Request button. You will then return to the Register Patient page.
If the Request Transfer page is no longer displayed, try to register the patient again using the
Register Patient function. This will display the Request Transfer page, where you can click the
Cancel Request button.

5. Transferring a Patient
36 VPFS User Guide v1.1.3 December 20, 2010
5.2 Authorizing a Transfer
When you select a patient that has a pending transfer request, the Transfer Patient button will be displayed
on the Account page. Only Lead PFCs and PFC Supervisors have the ability to authorize or deny a patient
transfer request.
Clicking the Transfer Patient button displays the Transfer Patient page. This page displays information
about the patient, as well as the name and station of the requestor. (Only one transfer request can be
pending for a patient at a time.) Before a patient can be transferred, their available balance must be $.00
(zero), so you may need to post a withdrawal transaction prior to authorizing a transfer. These funds
would then be sent to the requesting station via TDA to be re-deposited in the account once the transfer
has been completed. If there are any outstanding deferred transactions for the account, those amounts
would need to be sent to the requesting station once they clear.
5.2.1 To Authorize a Transfer:
From the Transfer Patient page, click on Authorize Transfer. The patient will be transferred
immediately, and you will no longer have access to that patient account. The Select Patient page
will be displayed.
5.2.2 To Deny a Transfer:
From the Transfer Patient page, click on Deny Transfer. The transfer request will be cancelled
and you will retain control of that patient account. The Account page will be displayed.
Note: If you plan to deny a transfer for any reason, you should contact the person who
requested the transfer and explain why the request will be denied. VPFS does not notify
the requestor that a transfer request has been authorized or denied.

6. Posting Multiple Transactions
December 20, 2010 VPFS User Guide v1.1.3 37
6. Posting Multiple Transactions When you are processing single transactions for different accounts, you will often find yourself
repeatedly entering the same preliminary information (e.g., Form, Reference, Remarks, etc.). To save
time and avoid duplicated effort, VPFS (like PFOP) allows you to process a series of transactions in one
session, using the Post Multiple Transactions option.
To post multiple transactions:
1. Click Select Patient in the left panel.
The Select Patient page opens.
2. Use the search and filter features to search and select the list of patients to whom you want to
post transactions. (See Chapter 3 Selecting Patients for assistance.)
3. Click the Post Multiple Transaction option in the top menu bar.
A window opens asking if the current list of patients is the one you want.
Figure 6-1. Patient List Confirmation Window
4. Verify that the list of patients is correct and click OK.
The Post Multiple Transactions – Common Information page opens.
Figure 6-2. Post Multiple Transactions – Common Information Page

6. Posting Multiple Transactions
38 VPFS User Guide v1.1.3 December 20, 2010
5. Enter common transaction information. Be sure to enter data in all required fields (marked
with *).
a. Transaction Type: Select the Deposit or Withdrawal radio button.
b. Reference: Select or type reference text associated with this transaction.
c. Form: Select the VA form to use for the transaction.
d. Transaction Date: Enter the date for the transaction.
e. Source: Select the income source.
f. Payment Type: Select the payment type.
g. Remarks and Comments: Select a remark from the list, if applicable. Type a
comment related to the remark you selected, if applicable. Click Add to add the
remark and comment to the Remarks list. You can add additional remarks and
comments by repeating this process.
6. Click Next to continue with the next post multiple transactions page.
The Post Multiple Transactions: Select Patients page opens.
Figure 6-3. Post Multiple Transactions: Select Patients Page
7. Select the checkbox for each patient to include in this set of transactions. To select all patients
in the list, click the checkbox at the top of the Select column.
8. Click Next to continue with the next post multiple transactions page.
The Post Multiple Transactions – Individual Information page opens.

6. Posting Multiple Transactions
December 20, 2010 VPFS User Guide v1.1.3 39
Figure 6-4. Post Multiple Transactions – Individual Information Page
Note: The entry fields that appear on this page are based on your entries on the first Post
Multiple Transactions page.
9. Enter transaction information for the current patient:
Amount: Enter the amount for the transaction.
Count in Restricted Balance: (Appears only if you are posting a withdrawal and
withdrawals are restricted for this patient.) Select the checkbox if the transaction amount
is to apply to the patient's restricted balance.
Deferral Date: (Appears only if you are posting a deposit made by check.) Enter a
deferral date to allow time for the check to clear.
10. Click Confirm Transaction.
The Post Multiple Transactions – Individual Information confirmation page opens.

6. Posting Multiple Transactions
40 VPFS User Guide v1.1.3 December 20, 2010
Figure 6-5. Post Multiple Transactions - Individual Information Confirmation Page
11. Review the transaction information to make sure it is correct.
If correct, continue with the next step.
If not correct, click Edit Transaction to return to the previous page and edit the
information.
12. Enter your electronic signature code.
13. Click OK.
The system verifies your electronic signature and posts the transaction. One of the following
occurs:
If additional patient accounts remain for this multiple transaction, the Post Multiple
Transactions: Enter transaction page opens for the next patient in the list. Repeat steps 9
through 13 to enter the transaction information for the current patient.
If all transactions have been posted for this multiple transaction, the Select Patient page
opens.

7. Working with the Patient Account
December 20, 2010 VPFS User Guide v1.1.3 41
7. Working with the Patient Account To work with an individual patient account:
1. Search for the patient, as described in Chapter 3 Selecting Patients.
2. To access the patient record:
Double-click on the patient's name (or anywhere on the row for the patient),
OR
Click View Selected Patient in the top menu bar.
The patient record tabs open. The sample below shows all possible tabs. The tabs that appear depend
on the user roles assigned to the Access / Verify code pair that you used to log in to VPFS. To access
a specific type of information in the patient record, click a tab.
Figure 7-1. Account Tab
7.1 Account Tab
When you click the Account tab, or when you first access the patient record tabs, account information for
the current patient is displayed on the Account page.
Figure 7-2. Account Page
From the Account page you can:
View the account balance and related information, including monthly and weekly authorized
withdrawal amounts (for restricted patients), total balance, deferred balance, and amount
available for withdrawal.

7. Working with the Patient Account
42 VPFS User Guide v1.1.3 December 20, 2010
Post a transaction.
Verify the patient's balances.
Transfer a patient to another institution.
7.1.1 Post a Transaction
To post a transaction for the current patient:
1. Select Post Transaction.
The Post Transaction page opens. Transaction information from the Account page appears at
the top of the page.
Figure 7-3. Post Transaction Page
2. Enter transaction detail:
a. Transaction Type: Select the Deposit or Withdrawal radio button.
b. Reference: Enter reference text associated with this transaction.
c. Amount: Enter the amount for the transaction.
d. Form: Select the VA form.
e. Transaction Date: Enter the date for the transaction.
f. Source: Select the income source.
g. Type: Select the payment type.

7. Working with the Patient Account
December 20, 2010 VPFS User Guide v1.1.3 43
h. Count in Restricted Balance: (Appears only if you are posting a withdrawal and
withdrawals are restricted for this patient.) Select the checkbox if the transaction
amount is to apply to the patient's restricted balance.
i. Deferral Date: (Appears only if you are posting a deposit and you selected Source:
Private Source and Type: Check.) Enter a deferral date to allow time for the check to
clear. The deferral date cannot be more than 30 days past the transaction date.
j. Remarks and Comments: Select a remark from the list, if applicable. Type a
comment related to the remark you selected, if applicable. Click Add to add the
remark and comment to the Remarks list. You can add additional remarks and
comments by repeating this process.
3. Click Confirm Transaction.
Note: Override warnings may be displayed at this point. Your options will vary depending on
your authorizations. See Section 7.1.4, below, for more information.
Override Gratuitous Balance: If you select Gratuitous as the source of funds and
attempt to withdraw an amount that exceeds the available balance in the Gratuitous
category, the system will display a warning message. If you continue with the transaction,
the transaction will first use all available gratuitous funds and take the remainder from the
Private Source funds.
The Post Transaction confirmation page opens.
Figure 7-4. Post Transaction Confirmation Page
4. Review the transaction information to make sure it is correct.

7. Working with the Patient Account
44 VPFS User Guide v1.1.3 December 20, 2010
If correct, continue with the next step.
If not correct, click Edit Transaction to return to the previous page and edit the
information.
5. Enter your electronic signature code.
6. Click OK.
The system verifies your electronic signature, posts the transaction, and reopens the Account
tab for the current patient.
7.1.2 Verify Balances
This function displays a message that indicates whether the total balance for the current patient is
correct. It does not correct the balance.
To verify the account balance for the current patient:
1. Select Verify Balance.
A window displays a message indicating whether the balances are correct.
Figure 7-5. Balance Verification Window
2. Read the message and click OK.
If the message indicates a discrepancy, be sure to notify the appropriate fiscal authority.
Unlike the legacy system PFOP, a discrepancy in VPFS indicates an error that needs to be
corrected.
7.1.3 Transfer Patient
The Transfer Patient button will appear for any patient with a pending transfer request for users
with the Lead PFC or PFC Supervisor roles. When the user clicks this button, the Transfer Patient
page displays the user and institution requesting the transfer, and instructions on how to authorize
or deny the transfer. See Transferring a Patient for more information.
7.1.4 Overriding Limits
The transaction you are posting may exceed the total balance, the available balance (the actual
balance of funds available, not counting deferred amounts), or it may exceed the weekly or
monthly limit placed on a restricted account.
If you do not have authorization to override these conditions, the system will inform you of this.
If you do have access to override available balances or limits placed on restricted accounts, the
system will warn you that the transaction exceeds a limit, and will ask you to verify that you want
to proceed. If you do, the system will process the transaction, and will send an automatic email
message to the appropriate group that tracks events overriding limits in VPFS. The system will
also log it into the Patient Event Log, where you can view the entry by selecting the Log Tab.

7. Working with the Patient Account
December 20, 2010 VPFS User Guide v1.1.3 45
The generated email message includes the transaction ID and station number for the transaction
that caused the override. It also contains a link that will display a report with detailed information
about the specified transaction in your browser window. If you are not currently logged into
VPFS, you will be prompted to log in before the system will display the report. Be sure to log in
using the station specified in the email message.
Note: The following are not menu items or options to be selected; rather, they are conditions
that may be automatically generated during the course of a transaction and require an
action from the user, such as a validation or a confirmation, to continue. You must be
explicitly authorized to override these limits by holding the appropriate security keys.
Overdraw Account: If you attempt to withdraw an amount that exceeds the total balance in
the patient account, the system will display a warning message and you will be required to
take personal responsibility for the transaction.
Override Deferral: If you attempt to withdraw an amount that exceeds the balance available
for withdrawal (i.e., the total balance minus the amount in deferred items), the system will
display a warning message and you will be required to take personal responsibility for the
transaction.
Override Weekly/Monthly Restriction: If you attempt to override a weekly or monthly
restriction placed on an account, the system will display a warning message.

7. Working with the Patient Account
46 VPFS User Guide v1.1.3 December 20, 2010
7.2 Patient Tab
When you click the Patient tab, patient information for the current patient is displayed on the Patient
page.
Figure 7-6. Patient Page
From the Patient page you can:
View / edit patient information.
Note: Information that is shown in gray text comes from Patient Services Demographics and cannot
be edited via VPFS.
Show Patient Detail.
Show Information Display.
Show Patient Card.
7.2.1 View / Edit Patient Information
For certain fields, such as currency amounts, the system checks the validity of your entry. You
will be required to correct any errors before saving the data or proceeding onto the next
transaction.
Note: Your user role determines whether you can view and edit General and Special Remarks.
1. Patient Status: Select the patient status.
2. Patient Type: Select the patient type.

7. Working with the Patient Account
December 20, 2010 VPFS User Guide v1.1.3 47
3. Special Remarks: Enter special remarks, if applicable. Maximum of 2000 characters. These
remarks can be viewed only by individuals with user roles Basic PFC, Lead PFC, and PFC
supervisor.
4. General Remarks: Enter general remarks, if applicable. Maximum of 2000 characters. These
remarks can be viewed by individuals with any user role.
5. Indigent: Select the checkbox if the patient is indigent.
6. Minimum Balance: Enter the minimum balance.
7. Maximum Balance: Enter the maximum balance.
8. Out patient / In patient: Select the appropriate radio button.
9. Weekly Amount: Enter the weekly amount (Sunday to Saturday) that can be withdrawn.
10. Monthly Amount: Enter the monthly amount that can be withdrawn.
11. Date Restricted: If you selected Patient Type R – Restricted or L – Limited Restricted, you
must enter the date when the account was restricted. Otherwise, leave this field blank.
12. Physician: If you selected Patient Type R – Restricted, or L – Limited Restricted, you must
select the physician, or other healthcare provider, who placed the restriction on the account.
To search for the provider, click Select Provider. The Select Provider page opens.
Note: When you select a provider, your changes to the patient are saved.
The following four fields work together. The information that you enter will be concatenated and
inserted in the unlabeled text box when you click Add. This set of fields is optional; however, the
Income Source, Payee, and Amount fields are required before you can click Add.
13. Income Source: Click the arrow to select the income source from the list, or type the income
source.
14. Payee: Click the arrow to select the payee from the list, or type the payee.
15. Amount: Enter the amount.
16. Frequency: Select the frequency. Optional.
17. Station: Both Lead PFCs and PFC Supervisors can transfer a patient to another station. This
list will only show stations that are included in the user‟s allowed divisions list (the
DIVISION multiple) in VistA. This is to allow PFCs to move patients between stations
within their division that they have access to.
Note: To transfer the patient's account to another station you must first post a withdrawal to
zero out the patient's account at the current station, then assign the patient to a
different station and deposit the funds at the new station. The station number cannot
be changed if the patient has a pending transfer request. Additionally, text will be
displayed on the screen that the patient has a transfer request pending.
18. Click Add to concatenate and insert the data in the set of fields into the unlabeled text box.
To insert additional sets of data, repeat steps 13-17.
19. Click Save.
Your entries are saved and the page is refreshed.

7. Working with the Patient Account
48 VPFS User Guide v1.1.3 December 20, 2010
7.2.1.1 Select Provider
To search for and select the name of the physician or other healthcare provider who set the
restriction on the patient account:
1. Click the Select Provider button.
The Select Provider lookup window opens.
Figure 7-7. Select Provider Page
2. Search for the provider by entering complete or partial information in the Last Name and / or
First Name fields.
3. Click Search.
The list of provider names that match the search criteria you entered is displayed.

7. Working with the Patient Account
December 20, 2010 VPFS User Guide v1.1.3 49
Figure 7-8. Select Provider Page with Providers
4. Select the provider from the list.
The Patient tab for the current patient reopens. The provider's name appears in the Physician
field.
7.2.2 Show Patient Detail
To view detail for the current patient, click Show Patient Detail on the top menu bar. Patient
detail information is stored in the VistA system and is refreshed each time you select the patient
in VPFS.

7. Working with the Patient Account
50 VPFS User Guide v1.1.3 December 20, 2010
Figure 7-9. Patient Detail Window
7.2.3 Show Information Display
To view the Patient Funds Information Display for the current patient, click Show Information
Display on the top menu bar. The Show Information Display window opens.

7. Working with the Patient Account
December 20, 2010 VPFS User Guide v1.1.3 51
Figure 7-10. Patient Funds Information Display Window
The Patient Funds Information Display provides patient account and demographic information.
You can print this display using your browser's Print function.
7.2.4 Show Patient Card
To view the Patient Funds Patient Account Card for the current patient, click Show Patient Card
on the top menu bar. The Patient Funds Patient Account Card window opens.
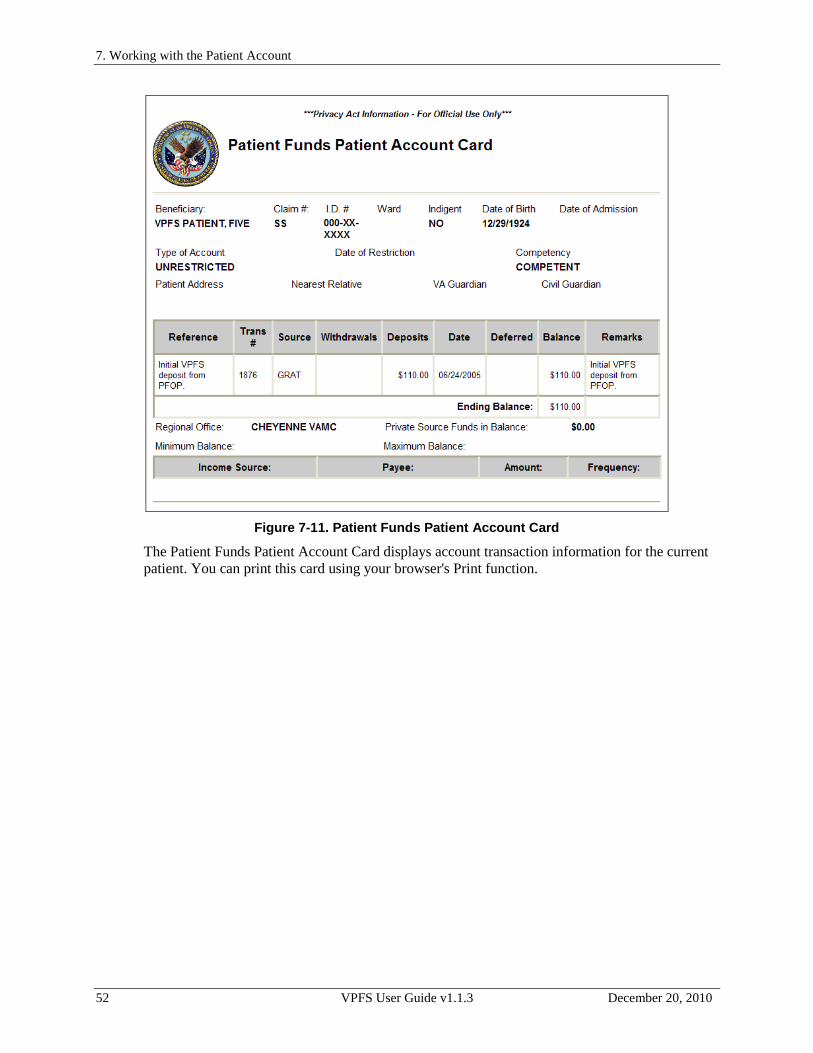
7. Working with the Patient Account
52 VPFS User Guide v1.1.3 December 20, 2010
Figure 7-11. Patient Funds Patient Account Card
The Patient Funds Patient Account Card displays account transaction information for the current
patient. You can print this card using your browser's Print function.

7. Working with the Patient Account
December 20, 2010 VPFS User Guide v1.1.3 53
7.3 Guardians Tab
When you click the Guardians tab, guardian information for the current patient is displayed on the
Guardians page.
Figure 7-12. Guardians Page
Guardian information comes from Patient Services Demographics (PSD) and cannot be edited through
VPFS. View only data is shown in gray text. Following are the only items that you can change in VPFS:
Director Payee: Select the checkbox if the VA guardian is the director payee.
Title Name: Enter the title and / or name of the VA guardian.

7. Working with the Patient Account
54 VPFS User Guide v1.1.3 December 20, 2010
7.4 Transactions Tab
When you click the Transactions tab, transaction history for the current patient is displayed on the
Transactions page.
Figure 7-13. Transactions Page
Transactions are sorted by date, in descending order by default. If additional information about the
transaction is available, click the info icon to view the information.
From the Transactions page you can perform the following tasks:
Edit Deferral Date: Edit the deferral date.
Transaction Display: Display the Transaction Display.
Export Transactions: Export transaction detail to an Excel spreadsheet.
Master Transaction: Display the Master Transaction Display report.
7.4.1 Editing a Deferral Date
Edit the deferral date if the deferral date that was entered originally is incorrect or if management
determines that the deferral date is inappropriate. This function is available only to Lead PFCs or
PFC Supervisors. The deferral date cannot be more than 30 days past the transaction date.

7. Working with the Patient Account
December 20, 2010 VPFS User Guide v1.1.3 55
7.4.2 Showing the Transaction Display
To view the Patient Funds Transaction Display for the selected transaction, click Transaction
Display on the top menu bar. The Patient Funds Transaction Display window opens. To print this
display, use the Print function on your browser.
7.4.3 Exporting Transactions
To export the list of transactions to an Excel spreadsheet on your computer:
1. Click Export.
The list is displayed in a Microsoft Excel file.
2. Save the Excel file to your computer.
7.4.4 Showing the Master Transaction Display
To view the Patient Funds Master Transaction Display of all transactions for the current patient,
click Master Transaction Display on the top menu bar. The Patient Funds Master Transaction
Display window opens. To print this display, use the Print function on your browser.

7. Working with the Patient Account
56 VPFS User Guide v1.1.3 December 20, 2010
Figure 7-14. Patient Funds Master Transaction Display
7.5 Suspense Tab
When you click the Suspense tab, information about suspense items for the current patient is displayed on
the Suspense page. A suspense item is a reminder of a deferred action, such as to make sure a patient's
monthly check has cleared the bank before allowing a withdrawal, a reminder to pay a patient's monthly
rent and utilities, or any other patient account issue to be resolved at a future date.

7. Working with the Patient Account
December 20, 2010 VPFS User Guide v1.1.3 57
Figure 7-15. Suspense Page
From the Suspense tab you can perform the following tasks:
Filter the list of suspense items to a specific range of dates.
Edit an existing suspense item.
Add Suspense: Enter a new suspense item.
Cancel This Item: Cancel an existing suspense item.
Cancel Recurring Items: Cancel all occurrences of a recurring suspense item.
Cancel This Date: Cancel all suspense items on the current account for a specified date.
7.5.1 Filter the List of Suspense Items
You can filter the list of suspense items by date:
To filter the list of suspense items:
1. From: Enter the first date to include in the date range (MM/DD/YYYY).
2. To: Enter the last date to include in the date range (MM/DD/YYYY).
3. Click Filter.
Only the suspense items within the specified date range appear in the list.
7.5.2 Edit a Suspense Item
To edit an existing suspense item:
1. Select the suspense item from the selection table.
The Edit Suspense fields open in the bottom section of the page.

7. Working with the Patient Account
58 VPFS User Guide v1.1.3 December 20, 2010
2. Edit information in the Edit Suspense fields, as needed. See sections 7.5.3 and 7.5.4 for field
descriptions.
3. Click Save.
Your entries are saved.
7.5.3 Add a Single Suspense Item
To add a suspense item to trigger a single reminder:
1. Click Add Suspense in the top menu bar.
The Add Suspense fields open in the bottom section of the page.
2. Enter information in the Add Suspense fields.
a. Item ID: Enter a unique name for the suspense item.
b. Assigned To: Enter the name of the person responsible for the suspense item.
c. Recurring Item: Leave the checkbox empty.
d. Suspense Date: Enter the date for the suspense item. This date can be up to one year
in the future.
3. Click Save.
Your entries are saved.
7.5.4 Add a Recurring Suspense Item
You can schedule recurring suspense items for a specified number of weeks or months. For
example: You could schedule a recurring reminder to pay for a patient's haircut once every 6
weeks, or a recurring reminder to pay the patient's rent once every month.
To schedule a recurring suspense item to trigger multiple reminders:
1. Click Add Suspense in the top menu bar.
The Add Suspense fields open in the bottom section of the page.
2. Enter information in the Add Suspense fields.
a. Recurring Item: Select the checkbox.
The Recurring Item fields open.
b. Description: Enter the description for the recurring suspense item.
c. Complete the Recurring Item fields.
i. Recurring every: Enter the number for the frequency and select either months or
weeks.
ii. Starting on: Enter the date for the first occurrence.
iii. Number of Occurrences, or Ending by: Enter the number of occurrences or the
ending date.
Note: Suspense items will not be created for recurrences beyond one year in the future.
7.5.5 Cancel a Suspense Item
To cancel a suspense item:
1. Select the suspense item from the list.

7. Working with the Patient Account
December 20, 2010 VPFS User Guide v1.1.3 59
2. Click Cancel This Item.
A confirmation window opens.
3. Click OK to confirm that you want to cancel.
The item is removed from the list.
7.5.6 Cancel a Recurring Suspense Item
To cancel all occurrences of a recurring suspense item:
1. Select any occurrence of the item.
2. Click Cancel Recurring Items.
A confirmation window opens.
3. Click OK to confirm that you want to cancel.
All occurrences of the item are removed from the list.
7.5.7 Cancel all Transactions on a Specified Date
To cancel a suspense item:
1. Select the suspense item from the list.
2. Click Cancel This Date.
A confirmation window opens.
3. Click OK to confirm that you want to cancel.
All items occurring on this date are removed from the list.
7.6 Log Tab
When you click the Log tab, the Log tab displays descriptions of significant events in the patient's
account.

7. Working with the Patient Account
60 VPFS User Guide v1.1.3 December 20, 2010
Figure 7-16. Log Page
Following are all of the possible events that may appear on the Log tab.
Register patient
Deactivate patient
Activate patient
Override deferral
Override weekly / monthly restrictions
Override availability / total balance
Change patient status (competent / incompetent)
Change patient type (restricted, etc.)
Business Process Notes:

7. Working with the Patient Account
December 20, 2010 VPFS User Guide v1.1.3 61

8. Editing Dropdown Lists (Administration)
62 VPFS User Guide v1.1.3 December 20, 2010
8. Editing Dropdown Lists (Administration) Many of the fields on VPFS pages provide dropdown lists of valid values for the user to select their entry.
Except for the list of Institutions, which cannot be edited through VPFS, system administrators maintain
these lists at the national level. Local Patient Funds Clerk Supervisors can make limited changes to the
lists that appear at their site, such as changing the order in which items are listed, or adding items that are
used by their site only.
8.1 Administration Menu
When you click Administration in the menu in the left panel, the Administration menu opens.
Figure 8-1. Administration Menu
This sample shows all possible Administration Menu items. The items that appear are based on the user
roles assigned to the Access / Verify code pair that you used to log in to VPFS.

8. Editing Dropdown Lists (Administration)
December 20, 2010 VPFS User Guide v1.1.3 63
8.2 Working with Administration Pages
The Maintain Form Types page is typical of the administration pages that you access from the
Administration menu.
Figure 8-2. Sample Administration Page
The following components are present on Administration pages:
Selection Table: Use the selection table to select the item to edit.
o If a checkmark appears in the Not Editable column, changes are not allowed for the item.
Edit Area: Use the fields in the edit area to make the change. Any value that appears in gray text,
is a value that cannot be changed.
o Order Number: Select the number for the sequence for the item to appear in dropdown lists.
Buttons: Use the buttons at the bottom of the page to complete your change request.
o Add: Click to open the edit fields to enter values for a new item that you want added to a
dropdown list.
o Remove: Click to remove the selected item from a dropdown list.
o Return to Administration Menu: Click to exit the page and return to the Administration
menu.
o Save: Click to save your changes.
o Cancel: Click to cancel your changes.

8. Editing Dropdown Lists (Administration)
64 VPFS User Guide v1.1.3 December 20, 2010
8.2.1 Editing the List of Form Types
When you click Maintain Form Types on the Administration menu, the Maintain Form Types
page displays the list of values for the dropdown list of forms.
Roles with access to this function are:
Patient Funds Clerk Supervisors: Make local changes that apply to their own sites only.
System Administrators: Make national changes that apply to all sites.
Figure 8-3. Maintain Form Types page
These fields are not editable. You can, however, change the sequence in which the item will
appear in dropdown lists by changing the Order Number.
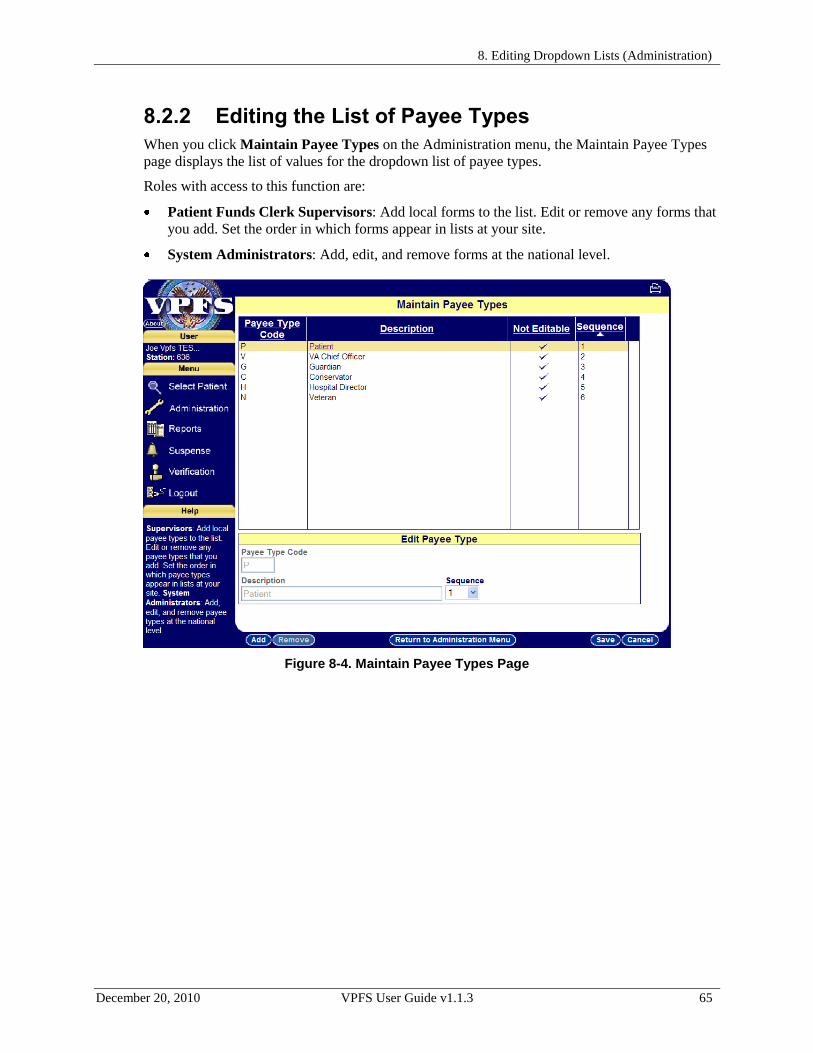
8. Editing Dropdown Lists (Administration)
December 20, 2010 VPFS User Guide v1.1.3 65
8.2.2 Editing the List of Payee Types
When you click Maintain Payee Types on the Administration menu, the Maintain Payee Types
page displays the list of values for the dropdown list of payee types.
Roles with access to this function are:
Patient Funds Clerk Supervisors: Add local forms to the list. Edit or remove any forms that
you add. Set the order in which forms appear in lists at your site.
System Administrators: Add, edit, and remove forms at the national level.
Figure 8-4. Maintain Payee Types Page

8. Editing Dropdown Lists (Administration)
66 VPFS User Guide v1.1.3 December 20, 2010
8.2.3 Editing the List of Remarks
When you click Maintain Remarks on the Administration menu, the Maintain Remarks page
displays the list of values for the dropdown list of remarks.
Roles with access to this function are:
Patient Funds Clerk Supervisors: Add local remarks to the list. Edit or remove any remarks
that you add. Set the order in which remarks appear in lists at your site.
System Administrators: Add, edit, and remove remarks at the national level.
Figure 8-5. Maintain Remarks Page
These fields are not editable. You can, however, change the sequence in which the item will
appear in dropdown lists by changing the Order Number.
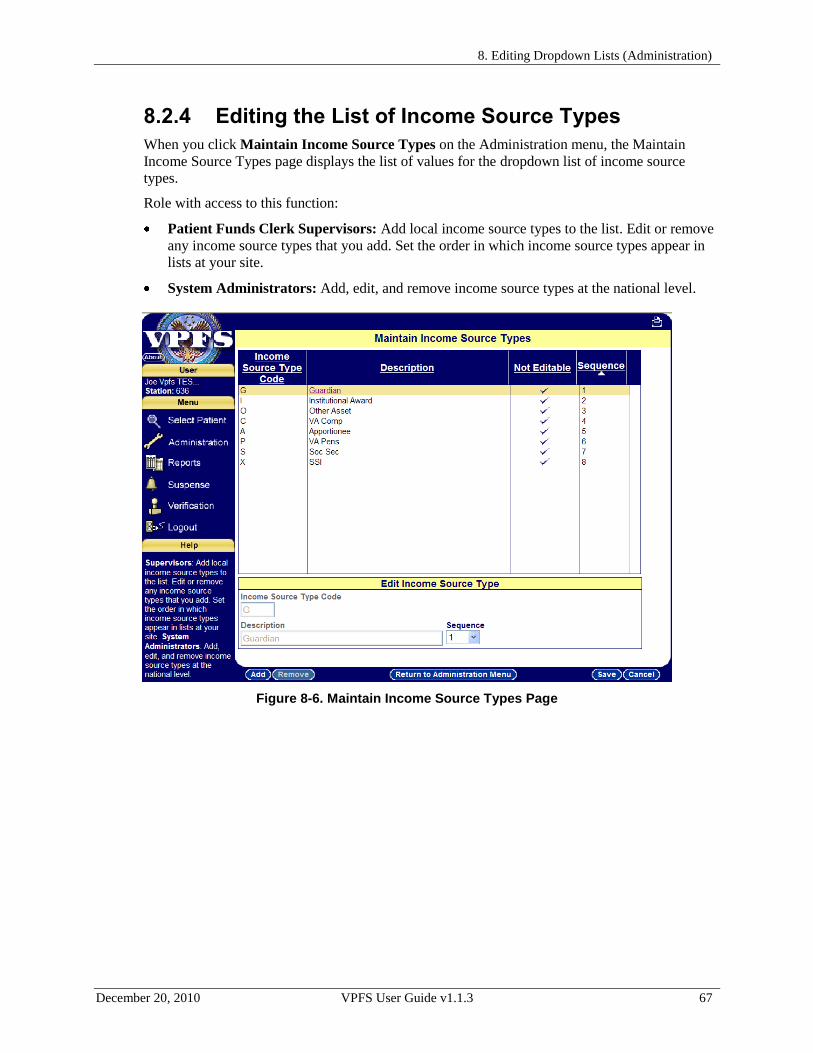
8. Editing Dropdown Lists (Administration)
December 20, 2010 VPFS User Guide v1.1.3 67
8.2.4 Editing the List of Income Source Types
When you click Maintain Income Source Types on the Administration menu, the Maintain
Income Source Types page displays the list of values for the dropdown list of income source
types.
Role with access to this function:
Patient Funds Clerk Supervisors: Add local income source types to the list. Edit or remove
any income source types that you add. Set the order in which income source types appear in
lists at your site.
System Administrators: Add, edit, and remove income source types at the national level.
Figure 8-6. Maintain Income Source Types Page

8. Editing Dropdown Lists (Administration)
68 VPFS User Guide v1.1.3 December 20, 2010
8.2.5 Editing the List of Reference Types
When you click Maintain Reference Types on the Administration menu, the Maintain Reference
Types page displays the list of values for the dropdown list of references used for posting
transactions.
Roles with access to this function are:
Patient Funds Clerk Supervisors: Add local reference types to the list. Edit or remove any
reference types that you add. Set the order in which reference types appear in lists at your
site.
System Administrators: Add, edit, and remove reference types at the national level.
Figure 8-7. Maintain Reference Types Page
These fields are not editable. You can, however, change the sequence in which the item will
appear in dropdown lists by changing the Order Number.

8. Editing Dropdown Lists (Administration)
December 20, 2010 VPFS User Guide v1.1.3 69
8.2.6 Editing the List of Institutions
When you click Maintain Institutions on the Administration menu, the Maintain Institutions
page displays the list of values for the dropdown list of institutions. The list of institutions is
supplied by the Department of Veteran Affairs (VA) and cannot be changed through VPFS. The
only fields on this page that can be changed are e-mail fields.
Roles with access to this function are:
Patient Funds Clerk Supervisors: Select your institution and edit the list of recipients and
the text for email notifications of overrides, deferral date changes, and overdraws at your site.
Use SMTP format for email addresses.
Note: Multiple email addresses can be entered in the Email Lists fields by separating each
address with a comma (“,”). Be sure to validate each address as VPFS cannot notify you
in the case where a message is undeliverable.
Figure 8-8. Maintain Institutions Page

8. Editing Dropdown Lists (Administration)
70 VPFS User Guide v1.1.3 December 20, 2010
8.2.7 Editing the List of Patient Types
When you click Maintain Patient Types on the Administration menu, the Maintain Patient
Types page displays the list of values for the dropdown list of patient types.
Role with access to this function:
System Administrators: Add, edit, and remove patient types.
Figure 8-9. Maintain Patient Types Page
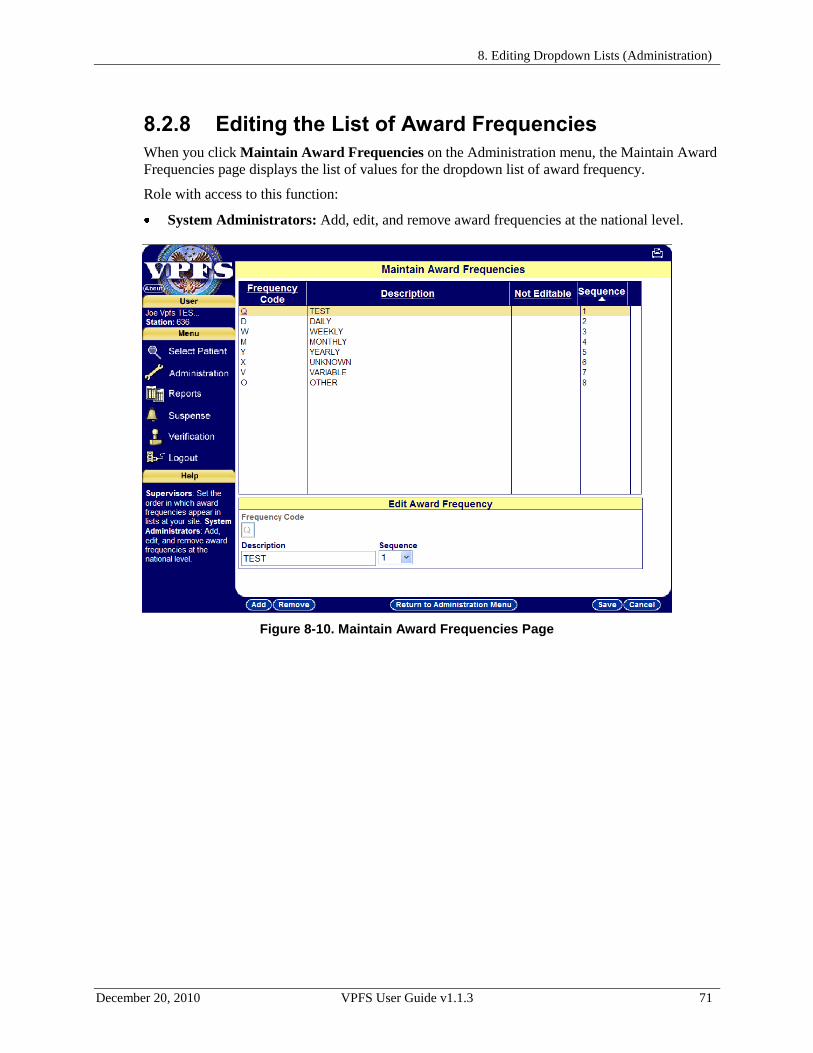
8. Editing Dropdown Lists (Administration)
December 20, 2010 VPFS User Guide v1.1.3 71
8.2.8 Editing the List of Award Frequencies
When you click Maintain Award Frequencies on the Administration menu, the Maintain Award
Frequencies page displays the list of values for the dropdown list of award frequency.
Role with access to this function:
System Administrators: Add, edit, and remove award frequencies at the national level.
Figure 8-10. Maintain Award Frequencies Page

8. Editing Dropdown Lists (Administration)
72 VPFS User Guide v1.1.3 December 20, 2010
8.2.9 Editing the List of Patient Statuses
When you click Maintain Patient Statuses on the Administration menu, the Maintain Patient
Statuses page displays the list of values for the dropdown list of patient status types.
Role with access to this function:
System Administrators: Make national changes that apply to all sites.
Figure 8-11. Maintain Patient Statuses

8. Editing Dropdown Lists (Administration)
December 20, 2010 VPFS User Guide v1.1.3 73
8.2.10 Editing the List of Help Text
When you click Maintain Help Text on the Administration menu, the Maintain Help Text page
displays the help text that appears in the left panel of each page.
Role with access to this function:
System Administrators: Add, edit, and remove the page level and field level help text that is
displayed in the left margin. Click the arrow to the left of a page name to open the list of
fields on the page and edit field level help text.
The blue editing area is approximately the same size as the area where the help text will be
displayed in the left panel. The help text areas are not scrollable, so be aware how much text you
enter or some of it may not be visible. The help text for each page or field can be a maximum of
500 characters.
Tip: To open the list of fields on a page and edit field level help text, click the arrow to the left
of the page name.
Figure 8-12. Maintain Help Text Page

8. Editing Dropdown Lists (Administration)
74 VPFS User Guide v1.1.3 December 20, 2010
8.2.11 Editing the List of Payment Types
When you click Maintain Payment Types on the Administration menu, the Maintain Payment
Types page displays the list of values for the dropdown list of payment types.
Role with access to this function:
System Administrators: Add, edit, and remove payment types at the national level.
Figure 8-13. Maintain Payment Types Page

8. Editing Dropdown Lists (Administration)
December 20, 2010 VPFS User Guide v1.1.3 75
8.2.12 Editing System Parameters
When you click Maintain System Parameters on the Administration menu, the Maintain
System Parameters page displays the list of system parameters.
Important: Changing system parameter values could have a negative impact on VPFS
functionality. Make sure that you understand the potential results before you make
any changes.
Role with access to this function:
System Administrators: Add, edit, and remove system parameters at the national level.
Figure 8-14. Maintain System Parameters Page

8. Editing Dropdown Lists (Administration)
76 VPFS User Guide v1.1.3 December 20, 2010
8.2.13 Editing User Account
Roles with access to this function:
All PFC users (Basic, Lead, Super): Change their personal e-signature code.
To access the Maintain User Account page to edit your user account:
If you are a Basic or Lead PFC, click Administration in the left panel.
If you are a PFC Super, click Administration in the left panel, then click Maintain User
Account from the Administration menu.
Figure 8-15. Maintain User Account Page

8. Editing Dropdown Lists (Administration)
December 20, 2010 VPFS User Guide v1.1.3 77
Business Process Notes:
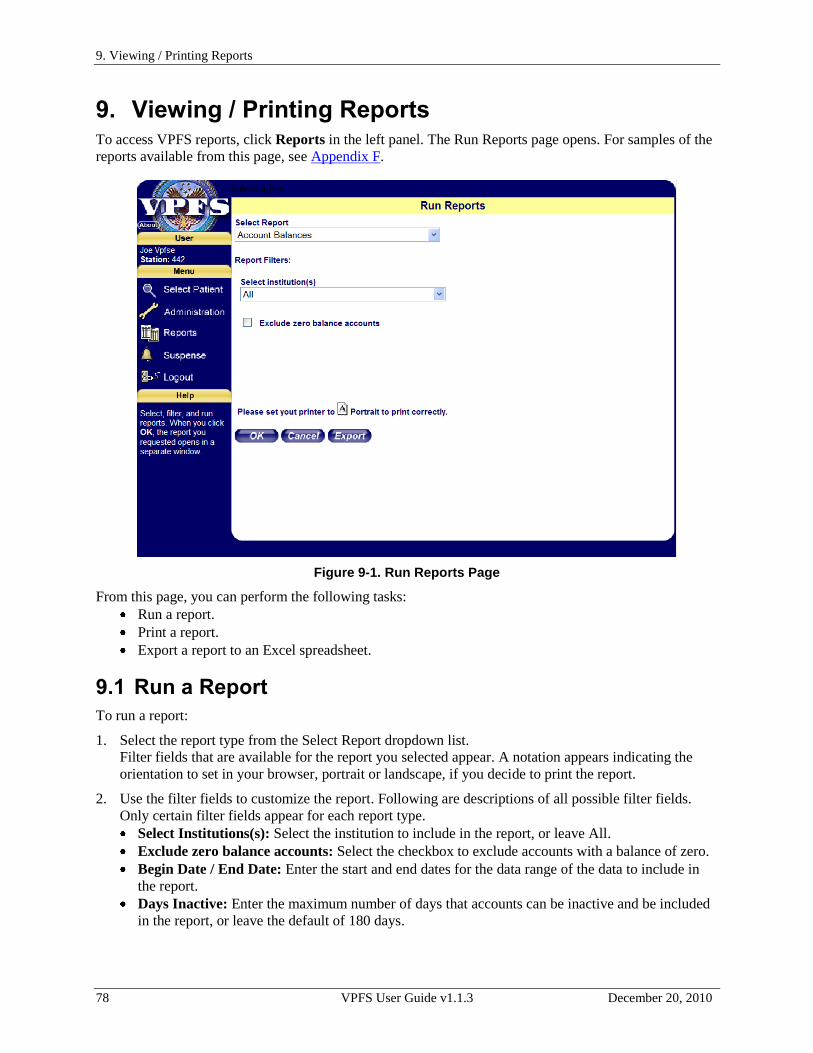
9. Viewing / Printing Reports
78 VPFS User Guide v1.1.3 December 20, 2010
9. Viewing / Printing Reports To access VPFS reports, click Reports in the left panel. The Run Reports page opens. For samples of the
reports available from this page, see Appendix F.
Figure 9-1. Run Reports Page
From this page, you can perform the following tasks:
Run a report.
Print a report.
Export a report to an Excel spreadsheet.
9.1 Run a Report
To run a report:
1. Select the report type from the Select Report dropdown list.
Filter fields that are available for the report you selected appear. A notation appears indicating the
orientation to set in your browser, portrait or landscape, if you decide to print the report.
2. Use the filter fields to customize the report. Following are descriptions of all possible filter fields.
Only certain filter fields appear for each report type.
Select Institutions(s): Select the institution to include in the report, or leave All.
Exclude zero balance accounts: Select the checkbox to exclude accounts with a balance of zero.
Begin Date / End Date: Enter the start and end dates for the data range of the data to include in
the report.
Days Inactive: Enter the maximum number of days that accounts can be inactive and be included
in the report, or leave the default of 180 days.

9. Viewing / Printing Reports
December 20, 2010 VPFS User Guide v1.1.3 79
3. Click OK.
The requested report appears in a separate window. If no data is available, the statement No Data
Available appears.
Note: If popup windows are blocked on your computer, press and hold Ctrl while you click OK.
9.2 Print a Report
To print the displayed report:
1. Use your browser's Print function to set the orientation to portrait or landscape, based on the notation
on the Run Reports page for the report you are printing.
2. Once you have set the appropriate orientation for the report, use your browser's print function to print
it. The example below lists the procedure you would use with Internet Explorer and most HP printers.
Your procedure may differ depending on the browser and printer you are using.
Example:
1. Select File > Print…
2. Click Preferences.
3. Select the Basics tab.
4. Select the appropriate orientation radio button.
5. Click Print.
9.3 Export a Report
To export the selected report to an Excel spreadsheet on your computer:
1. Click Export.
The File download window opens
Note: If popup windows are blocked on your computer, press and hold Ctrl while you click
Export.
Figure 9-2. File Download Window
2. Save the report as an Excel file to your computer.

9. Viewing / Printing Reports
80 VPFS User Guide v1.1.3 December 20, 2010
Business Process Notes:

10. Selecting Suspense Items
December 20, 2010 VPFS User Guide v1.1.3 81
10. Selecting Suspense Items The Suspense menu option in the left panel allows you to select suspense items for all patient accounts at
your site (or at multiple sites for multi-site institutions. A suspense item is a reminder of a deferred action,
such as to make sure a patient's monthly check has cleared the bank before allowing a withdrawal, a
reminder to pay a patient's monthly rent and utilities, or any other patient account issue to be resolved at
in the future.
For more information about working with suspense items, see section 7.5.
To select suspense items for patients at the site or sites to which you have access:
1. Click Suspense in the left panel.
The Select Suspense page displays the list of suspense items on patient records at your site(s).
Figure 10-1. Select Suspense Page
From the Select Suspense page you can perform the following tasks:
Filter the list of suspense items to a specific range of dates.
Cancel Suspense: Cancel an existing suspense item.
View Selected Suspense: Open the Suspense tab for a suspense item.
Cancel Recurring Items: Cancel all occurrences of a recurring suspense item.

Appendix A. 508 Standards
December 20, 2010 VPFS User Guide v1.1.3 82
Appendix A. 508 Standards
This appendix describes the approach used by the VPFS team to ensure that the VPFS application
complies with 508 requirements to provide individuals with visual impairment equivalent access to the
application web pages. The paragraphs that are quoted in this appendix come from Electronic and
Information Technology Accessibility Standards Final Rule (Federal Register 21 December 2000, 36
CFR Part 1194).
508 Standards
Paragraph (a)
“A text equivalent for every non-text
element shall be provided (e.g., via “alt”
“longdesc” or in element content).”
This requirement is met in VPFS mostly through the design
of the framework used by individual pages. Alternate text
was added to all graphical buttons, identifying the object, its
state (e.g., whether disabled or not), and what it does, in a
clear and concise manner. Images that serve as graphic
elements or placeholders that do not convey any meaning,
do not need to be given alternate text. However, testing
programs (such as Bobby) that look for section 508
compliance may flag such images as problems when they
are not problems. To avoid this, we added blank alternate
tags to these images.
Paragraph (b)
“Equivalent alternative for any
multimedia presentation shall be
synchronized with the presentation.”
No multimedia presentations will be used.
Paragraph (c)
“Web pages shall be designed so that all
information conveyed with color is also
available without color, for example form
context or markup.”
The tabs at the top of each page and the buttons on each
page convey information by their color. For instance, the
current tab may be highlighted in blue and a button that is
disabled may appear gray.
In order to be compliant with this paragraph, text was added
to explain the state of a button. In the case of a tab, the
alternate text for the tab would say, “Currently in the X
section” or alternate text for a button might identify its state.

Appendix A. 508 Standards
August 18, 2011 VPFS User Guide v1.1.3 83
Paragraph (d)
“Documents shall be organized so they
are readable without requiring an
associated style sheet.”
Style sheets are used to display the text in a particular style,
color and font size. This can present a problem if the style
sheet does not allow the user to increase or decrease the font
size. A separate style sheet is provided for the text only
version of the application, which specifies the font sizes in
relative measurements. Using relative measurements allows
the fonts to change based on the user‟s preferences.
Paragraph (e)
“Redundant text links shall be provided
for each active region of a server side
image map.”
Server side image maps will not be used.
Paragraph (f)
“Client-side image maps shall be provided
instead of server-side image maps except
where the regions cannot be defined with
an available geometric shape.”
Client side image maps will not be used.
Paragraph (g)
“Row and column headers shall be
identified for data tables.”
The application uses tables for both page formatting and
data presentation. For the tables that present data, row and
column headers are clearly identified for screen reader
accessibility.
Paragraph (h)
“Markup shall be used to associate data
cells and header cells for data tables that
have two or more logical levels of row or
column headers.”
Text is provided to distinguish between data and header cell
contents, and to associate content with the appropriate
headers.
Paragraph (i)
“Frames shall be titled with text that
facilitates frame identification and
navigation.”
Frames technology will not be used.

Appendix A. 508 Standards
84 VPFS User Guide v1.1.3 December 20, 2010
Paragraph (j)
“Pages shall be designed to avoid causing
the screen to flicker with frequency
greater than 2 Hz and lower than 55 Hz.”
Screen flicker is kept to a minimum and falls within the
accepted range.
Paragraph (k)
“A text-only page, with equivalent
information or functionality, shall be
provided to make a Web site comply with
the provisions of this part, when
compliance cannot be accomplished in
any other way. The content of the text-
only page shall be updated whenever the
primary page changes.”
After exploring the options to ensure that VPFS is in
compliance with 508 the emerging consensus was to create
an alternative text only view of the site, as part of the same
application. The rationale for this step is as follows:
A text only view allows us to change the order in which
information is displayed. For users using assistive
technologies this would make the content and navigation
much clearer and easier to understand.
Many critical elements of the site may not be easily
modified to create a “one site fits all” solution. The help
text and index most notably are significant barriers to
assistive technology.
Creating a text only view gives all visitors the option of
using a simplified version of the site. This is
advantageous for users who have a slow Internet
connection or are using other devices to access the Web,
such as palmtop computers.
The implementation of this text only view can be added
to the existing application without resorting to creating a
completely separate independent application. Designing
key framework elements appropriately can result in the
complete conversion of the output as it is rendered. This
method has many advantages.
o The maintenance of two different sites is not
necessary. Most site elements can be reused.
o Users of the text only and graphical views of the
application will always have the same content.
This eliminates the chance that the text only
view would not be updated as frequently as the
graphical site. Changes to one also take place in
the other.

Appendix A. 508 Standards
August 18, 2011 VPFS User Guide v1.1.3 85
Paragraph (l)
“When pages utilize scripting languages
to display content, or to create interface
elements the information provided by the
script shall be identified with functional
text that can be read by assistive
technology.”
The site uses scripting extensively for form validation and
navigation. Most of this scripting does not write content to
the browser and does not affect content. However, several
issues remain:
The margin text that runs in the left panel of the page
uses a script to update the content of that area depending
on what field the user‟s cursor is currently in. This
updated information is not available to a user of an
assistive technology. To address this problem, VPFS
displays the margin text for the user in a dialog box if
the user presses a keyboard shortcut.
Another issue associated with scripting and accessibility
concerns the way buttons work. The user takes an action
by clicking on a button, which in turn triggers a script to
run and execute a particular action. If the user cannot
use the mouse to click on the button, the action cannot
take place. To address this problem, buttons are
programmed to trigger actions if the user hits a key on
the keyboard while focus is on a button.
Paragraph (m)
“When a Web page requires that an
applet, plug-in or other application be
present on the client system to interpret
page content, the page must provide a link
to a plug-in or applet that complies with
§1194.21(a) through (l).”
The site will not require any applet or plug-in to display site
content.
Paragraph (n)
“When electronic forms are designed to
be completed on-line, the form shall allow
people using assistive technology to
access the information, field elements, and
functionality required for completion and
submission of the form, including all
direction and cues.”
All form fields identify their content to the screen reader. In
addition, the forms are designed in such a way as to
maximize usability in terms of direct access to information,
field elements, and functionality (equivalent to that of the
graphical view), including directions, context-sensitive help,
etc.

Appendix A. 508 Standards
86 VPFS User Guide v1.1.3 December 20, 2010
Paragraph (o)
“A method shall be provided that permits
users to skip repetitive navigation links.”
VPFS navigational links may appear in the left margin as
well as across the page top and bottom.
To address this issue, links were added to the top of the page
taking the user to the main areas within the page. One link
goes to the main content. Another links to the navigational
elements.
In addition to the accessibility links, the text only view of
the site reorganizes the content of the page. Repetitive links
and content fall to the bottom of the screen, while the main
content of the page remains near the top. Also keyboard
shortcuts were added to make jumping between sections of
the page easier.
Paragraph (p)
“When a timed response is required, the
user shall be alerted and given sufficient
time to indicate more time is required.”
The site does not have a timed response per prompt.
However, in compliance with security requirements, the site
has a timeout so that if the user does not take an appropriate
action in the form within a given amount of time the session
is terminated. The site gives warnings that this is going to
take place, which gives a user ample opportunity to take the
appropriate action to keep the session from timing out. The
users cannot change the time set for the timeout, as this is
determined by VHA security policy. However, by acting on
the timeout warnings, the user can extend/reset the 20-
minute timeout period.
Assistive Technology
There are many products available to assist persons with disabilities, such as speech or refreshable Braille
screen readers, programs that can enlarge portions of the screen, or hardware alternatives to keyboards
and mice. It is beyond the scope of this document to reference all the different assistive technologies that
are available and how VPFS would work with each. Below are the major categories of assistive devices
and what will be done in VPFS to support each.
Screen readers: Alternate text will be given to all visual information, including graphical buttons and
form controls. A text only view of VPFS that is optimized for use with a screen reader will be
available for anyone to use.
Screen magnification and text enlargement: The text only view will allow the text to be increased
to any size that is comfortable to the user. The graphical view will also be resizable to accommodate
different screen sizes and resolutions.
Alternative input devices: All elements will be designed to allow manipulation without the need for
a pointing device. In addition keyboard shortcuts will be provided to make navigation inside a page
easier.
Assuming the assistive technologies are following industry standards, VPFS will work with assistive
technologies.

Appendix B. Glossary
August 18, 2011 VPFS User Guide v1.1.3 87
Appendix B. Glossary
The terms and definitions in this glossary are taken from the Patient Funds (Integrated System) Technical
Manual for Site Manager, Version 3.0, February 1989, with some additions.
Fiduciary A legal entity or individual who is appointed by a court of
competent jurisdiction or by the administrator and who receives
VA benefits reserved for the eligible person‟s use and advantage.
Gratuitous Funds With the exception of insurance, all funds that are derived from
VA benefits and that are deposited in the account of a VA patient
rated as Incompetent. Although the VA cannot purchase U.S.
savings bonds with gratuitous funds, the patient or the patient‟s
representative can. When these bonds are redeemed, the proceeds
(principal) are considered gratuitous funds
Guardian A person or corporation who, following the decree of a court of
competent jurisdiction, protects the person or property, or both, of
a minor or mentally incompetent VA beneficiary.
Incompetent VA or court decreed classification assigned to patients who,
because of mental or physical incapacity, are unable to manage
their own affairs.
Institutional Award An award of disability compensation, pension, or emergency
officers‟ retirement pay to the Director of a VA healthcare
facility, or to another Federal, State, or private contract facility,
on behalf of a veteran rated incompetent by the VA, or adjudged
incompetent by court decree, or rated incompetent by both.
Nongratuitous Funds All funds in patients‟ accounts except those described as
gratuitous. Interest on U.S. savings bonds purchased from
gratuitous funds is also considered nongratutious.
Patients Individuals receiving hospitalization, nursing home care, and
domiciliary care under VA auspices. Also individuals whose
funds are managed by the VA following their release from
authorized medical care.
PFOP Personal Funds of Patients: The integrated computer system used
by Veterans Health Administration to manage the patient funds at
VA healthcare facilities. This integrated system is being
reengineered to the centralized system VPFS.

Appendix B. Glossary
88 VPFS User Guide v1.1.3 December 20, 2010
Restricted Accounts Patient accounts managed by the facility Director, who serves as
trustee. Deposited in this type of account are personal funds that
belong to the following types of patients:
All patients adjudged incompetent by a court.
All patients whom the VA rates as Incompetent or whom the
Director considers incapable of administering their funds
For purposes of administration, psychiatric patients whose
funds should be controlled because of their ward assignment
or because an in-competency rating is pending. For temporary
periods, Directors may designate certain “restricted” accounts
as “unrestricted” and may authorize the patient concerned to
use the account, within prudent limits, as an unrestricted
account if such use will aid the patient‟s therapeutic progress
or will help to determine whether the patient has the ability to
handle the funds.
Review Panel Three-member board that determines patient‟s competency and
reviews appeals about patient competency. Panel includes:
The Director (except where the Director appoints a team to
determine the patient‟s competency) or Assistant Director
The Chief of Staff
A mental health professional
Members of the treatment team for the patient being evaluated are
prohibited from serving on the review panel.
Status Account Status: active, inactive
Patient Status: incompetent, indigent, deceased
Unrestricted Accounts Accounts of patients capable of handling personal funds that are
deposited for safekeeping: such accounts are not subject to the
trusteeship of the Director; the funds in such accounts are
available for return to the patients on demand.
VPFS Veterans Personal Finance System: The HealtheVet Vista
centralized version of the mini-banking system used by the
Veterans Health Administration (VHA) to manage the accounts
of patients in the VHA hospital system. Replace PFOP.

Appendix C. Acronyms and Abbreviations
August 18, 2011 VPFS User Guide v1.1.3 89
Appendix C. Acronyms and Abbreviations
TERM DEFINITION
CFR Code of Federal Regulations
CI Configuration Item
E-signature Electronic Signature
IE Internet Explorer
IIG Impact Innovations Group
IPF Integrated Patient Funds
LLC Limited Liability Corporation
KAAJEE Kernel Authentication and Authorization for J2EE
M, MUMPS Massachusetts Universal Multi Programming System
OI Office of Information
OID Oracle Internet Directory
PDF Adobe file (*.pdf format)
PFC Patient Funds Clerk
PFOP Personal Funds of Patients
PSD Patient Service Demographics
PSL Patient Service Lookup
QA Quality Assurance
QCI Quality Control Inspector
SD&D System Design & Development
SDD System Design Document
SSL Secure Socket Layer
SOW Statement of Work
SQA Software Quality Assurance
SSN Social Security Number
TBD To Be Determined
VA Department of Veterans Affairs
VHA Veterans Health Administration
VistA Veterans Information Systems Technology Architecture
VPFS Veterans Personal Finance System

Appendix D. Frequently Asked Questions
90 VPFS User Guide v1.1.3 December 20, 2010
Appendix D. Frequently Asked Questions
QUESTION ANSWER
What is the purpose of VPFS? VPFS is the current mini-banking system used by the VHA to manage the accounts of VHA patients in the VHA hospital system.
What is the history of VPFS? VPFS is the reengineered version of PFOP. VPFS looks different from PFOP because it is a web-based Windows application; however, its design and functionality are modeled after PFOP.
Who will be using VPFS? Official users, patient funds clerks, systems and security administrators, and Fiscal management.
How does VPFS work? You will be able to perform all of the functions in VPFS that you are used to in PFOP, with the exception of a few functions that are no longer needed due to new built-in security controls.
How can I access VPFS In order to use the VFPS application, you will need access to the VHA Intranet via Internet Explorer (IE) versions 6 SP1, 6, or 5.5 SP2; or via Netscape version 7.1, 7.02 or 7.01.
How is information kept secure?
In addition to the standard 128-bit encrypted security (SSL) available through IE and Netscape, all authorized users are required to maintain a password and e-signature code. Without the proper authorization, password, and e-signature, no one can access VPFS.
Will my e-signature be the same as the password?
No. Because the e-signature is a secondary level of security, it is important that it be different than your password.
What if I don‟t know how to use Windows?
There are many Windows tutorials available, commercially and free on the Internet, to introduce you to the operating system.
Appendix D. Frequently Asked Questions
August 18, 2011 VPFS User Guide v1.1.3 91
QUESTION ANSWER
What if I‟m disabled and can‟t read the screen?
You can use the “text-only” option (on the Intro page), which will display all of the page contents in text form, and you can use an assistive screen reader with this version.
In general, the requirement of 508 compliance is that the disabled user (visually disabled or otherwise) should have an experience with the application that is functionally equivalent to that of the non-disabled user. This means that, for each element of the graphics-based presentation, there is a text-based equivalent that can be read by the user or by an assistive device. Further, it is important to make the text-based pages as usable as those of the graphics-based pages, e.g., by providing ways for the user to navigate directly to desired locations. The VPFS approach to 508 compliance is based on a design whereby the user specifies a preference for the text or the graphics version; for each page, the application then determines which version is to be rendered to the browser. This way there is only one Website, and an equivalent experience is ensured.
Can I bookmark the system pages?
You can bookmark the introduction page, but you must go through the logon process each time you access the system.

Appendix E. VPFS User Roles and Functions
92 VPFS User Guide v1.1.3 December 20, 2010
Appendix E. VPFS User Roles and Functions
The following breakout itemizes all the functions in the VPFS System.
Select Patient
Search and Filter
View All Patients (per Institution)
Select Patient, go to Account page for
patient record
Register Patient
Verify Balances
Post Multiple Transactions
Account
View Account Balance
Post Transaction
o Override Restriction
o Override Deferral Date
Verify Balance
Transfer Patient
Patient
Edit Patient Information
o Edit Special Remarks
View Patient Information
o View Special Remarks
Guardian
Add/Edit Guardian Information
View Guardian Information
Transactions
Search and Filter
View Transaction History
Edit Deferral Date
Suspense
Add Item
Cancel Item
Cancel Items for Date
Review Suspense Items per Patient
(Select Suspense)
Log
View Patient Log
Administration
Perform Maintenance
o Award Frequency
o Forms (national list)
o Forms (site-specific list)
o Patient Status
o Patient Type
o Payment Type
o Payee Type (national list)
o Payee Type (site-specific list)
o Income Source Type (national list)
o Income Source Type (site-specific
list)
o Remarks (national list)
o Remarks (site-specific list)
o Margin/Page Help
o Reference Type (national list)
o Reference Type (site-specific list)
o Institution (Note: PFC Super can
only view/edit their own
institutions)
o Maintain System Parameters
o Maintain User Account
Reports
Patient Card Output Options
o Print Selected Cards
o Print All Cards
o Transaction Display
o Information Display
o Master Transaction Review
Standard Reports
o Activity Audit Listing
o Dormant Account Listing
o Deceased Patient with a Balance
o Discharged Patient with a Balance
o Inactive Withdrawal Listing
o Indigent Patient Listing
o Overdue Restriction Search
o Patient Summary Report
o Min and Max Restrictions
o Patient Listing
o Account Balances
o Transaction Listing
o Fiscal Audit Report
o Fiscal Transaction Summary Report
o Date Variance Report
o Negative Balance Report
o Productivity Report

Appendix E. VPFS User Roles and Functions
August 18, 2011 VPFS User Guide v1.1.3 93
Select Suspense
Search and Filter
View Suspense Records across Patients
Select Suspense Item, go to Suspense
page for patient record
Cancel Suspense Item
Logout

Appendix E. VPFS User Roles and Functions
August 18, 2011 VPFS User Guide v1.1.3 94
Basic Official User
The Basic Official User is a user who requires access to patient records, but does not need privileges to
post transactions. Most similar to the existing PFOP Ward Clerk, this user only needs to review patient
data.
Basic Official Users have read-only access to the following selected pages of VPFS.
Select Patient
Search and Filter
View All Patients (per Institution)
Select Patient, go to Account page for patient record
Account
View Account Balance
Patient
View Patient Information
Guardian
View Guardian Information
Logout

Appendix E. VPFS User Roles and Functions
August 18, 2011 VPFS User Guide v1.1.3 95
Basic Patient Funds Clerk
The Basic Patient Funds Clerk (PFC) requires access to patient records to post transactions and print
reports. Basic PFCs have the ability to view all of the following pages in the Patient Account module, and
to edit most information (as in PFOP).
Select Patient
Search and Filter
View All Patients (per Institution)
Select Patient, go to Account page
for patient record
Register Patient
Post Multiple Transactions
Account
View Account Balance
Post Transaction
Patient
Edit Patient Information
o Edit Special Remarks
View Patient Information
o View Special Remarks
Guardian
Add/Edit Guardian Information
View Guardian Information
Transactions
Search and Filter
View Transaction History
Suspense
Add Item
Cancel Item
Cancel Items for Date
Review Suspense Items per Patient
(Select Suspense)
Log
View Patient Log
Administration
Maintain User Account
Reports
Patient Card Output Options
o Print Selected Cards
o Print All Cards
o Transaction Display
o Information Display
o Master Transaction Review
Standard Reports
o Activity Audit Listing
o Dormant Account Listing
o Deceased Patient with a Balance
o Discharged Patient with a
Balance
o Inactive Withdrawal Listing
o Indigent Patient Listing
o Overdue Restriction Search
o Patient Summary Report
o Min and Max Restrictions
o Patient Listing
o Account Balances
o Transaction Listing
o Fiscal Audit Report
o Fiscal Transaction Summary
Report
o Date Variance Report
Select Suspense
Search and Filter
View Suspense Records across
Patients
Select Suspense Item, go to Suspense
page for patient record
Cancel Suspense Item
Logout

Appendix E. VPFS User Roles and Functions
96 VPFS User Guide v1.1.3 December 20, 2010
Lead Patient Funds Clerk
Lead PFCs have the ability to view all pages and perform all functions in the Patient Account Module, as
follows.
Select Patient
Search and Filter
View All Patients (per Institution)
Select Patient, go to Account page
for patient record
Register Patient
Verify Balances
Post Multiple Transactions
Account
View Account Balance
Post Transaction
Verify Balance
Transfer Patient
Patient
Edit Patient Information
Edit Special Remarks
View Patient Information
View Special Remarks
Guardian
Add/Edit Guardian Information
View Guardian Information
Transactions
Search and Filter
View Transaction History
Edit Deferral Date
Suspense
Add Item
Cancel Item
Cancel Items for Date
Review Suspense Items per Patient
(Select Suspense)
Log
View Patient Log
Administration
Maintain User Account
Reports
Patient Card Output Options
o Print Selected Cards
o Print All Cards
o Transaction Display
o Information Display
o Master Transaction Review
Standard Reports
o Activity Audit Listing
o Dormant Account Listing
o Deceased Patient with a Balance
o Discharged Patient with a
Balance
o Inactive Withdrawal Listing
o Indigent Patient Listing
o Overdue Restriction Search
o Patient Summary Report
o Min and Max Restrictions
o Patient Listing
o Account Balances
o Transaction Listing
o Fiscal Audit Report
o Fiscal Transaction Summary
Report
o Date Variance Report
Select Suspense
Search and Filter
View Suspense Records across
Patients
Select Suspense Item, go to Suspense
page for patient record
Cancel Suspense Item
Logout

Appendix E. VPFS User Roles and Functions
December 20, 2010 VPFS User Guide v1.1.3 97
Patient Funds Clerk Supervisor
The PFC Supervisor has the ability to view all pages and perform all functions in the Patient Account
Module, as follows:
Select Patient
Search and Filter
View All Patients (per Institution)
Select Patient, go to Account page for
patient record
Register Patient
Verify Balances
Post Multiple Transactions
Account
View Account Balance
Post Transaction
Verify Balance
Transfer Patient
Patient
Edit Patient Information
Edit Special Remarks
View Patient Information
View Special Remarks
Guardian
Add/Edit Guardian Information
View Guardian Information
Transactions
Search and Filter
View Transaction History
Edit Deferral Date
Suspense
Add Item
Cancel Item
Cancel Items for Date
Review Suspense Items per Patient
(Select Suspense)
Log
View Patient Log
Administration
Perform Maintenance
o Forms (site-specific list)
o Payee Type (site-specific list)
o Income Source Type (site-specific
list)
o Remarks (site-specific list)
o Reference Type (site-specific list)
o Institution (Note: PFC Super can
only view/edit their own
institutions)
o Maintain User Account
Reports
Patient Card Output Options
o Print Selected Cards
o Print All Cards
o Transaction Display
o Information Display
o Master Transaction Review
Standard Reports
o Activity Audit Listing
o Dormant Account Listing
o Deceased Patient with a Balance
o Discharged Patient with a Balance
o Inactive Withdrawal Listing
o Indigent Patient Listing
o Overdue Restriction Search
o Patient Summary Report
o Min and Max Restrictions
o Patient Listing
o Account Balances
o Transaction Listing
o Fiscal Audit Report
o Fiscal Transaction Summary Report
o Date Variance Report
o Negative Balance Report
o Productivity Report
Select Suspense
Search and Filter
View Suspense Records across Patients
Select Suspense Item, go to Suspense
page for patient record
Cancel Suspense Item
Logout

Appendix E. VPFS User Roles and Functions
98 VPFS User Guide v1.1.3 December 20, 2010
Fiscal Management
The function of Fiscal Management is to perform audits to verify that patient accounts are being properly
maintained and reconciled. To this end, Fiscal Management users access VPFS on a read-only basis.
They cannot create, modify, or delete patient or account information.
Select Patient
Search and Filter
View All Patients (per Institution)
Select Patient, go to Account page
for patient record
Verify Balances
Account
View Account Balance
Verify Balance
Patient
View Patient Information
Guardian
View Guardian Information
Transactions
Search and Filter
View Transaction History
Suspense
Review Suspense Items per Patient
(Select Suspense)
Reports
Standard Reports
o Activity Audit Listing
o Dormant Account Listing
o Indigent Patient Listing
o Overdue Restriction Search
o Patient Summary Report
o Min and Max Restrictions
o Patient Listing
o Account Balances
o Transaction Listing
o Fiscal Audit Report
o Fiscal Transaction Summary Report
o Date Variance Report
o Negative Balance Report
Select Suspense
Search and Filter
View Suspense Records across Patients
Select Suspense Item, go to Suspense
page for patient record
Logout
Appendix E. VPFS User Roles and Functions
December 20, 2010 VPFS User Guide v1.1.3 99
VPFS System Administrator
The VPFS System Administrator implements authorized changes to the common reference data of VPFS,
as follows:
Administration
Perform Maintenance
o Award Frequency
o Forms (national list)
o Patient Status
o Patient Type
o Payment Type
o Payee Type (national list)
o Income Source Type (national list)
o Remarks (national list)
o Margin/Page Help
o Reference Type (national list)
o Institution
o Maintain System Parameters
Logout
VPFS Security Administrator
The VPFS Security Administrator is responsible for ensuring that data access is properly enforced in
VPFS (i.e., that users see and operate on only the data and functions for which they have security access
privileges). The VPFS Security Administrator has read-only privileges to the following areas of VPFS:
Select Patient
Search and Filter
View All Patients (per Institution)
Select Patient, go to Account page for patient record
Account
View Account Balance
Patient
View Patient Information
Guardian
View Guardian Information
Transactions
Search and Filter
View Transaction History
Log
View Patient Log

Appendix F. Report Samples
100 VPFS User Guide v1.1.3 December 20, 2010
Appendix F. Report Samples
Account Balances
This option provides a report that shows the grand total of the balances in the Patient Funds system. This
report is used by Fiscal to reconcile the general ledger.
Portrait: Select portrait page orientation when printing this report.
Figure F-1. Account Balances
Activity Audit Listing
This report provides a printout of all Patient Funds transactions for a selected date range. The information
is sorted in the following order:
Transaction date:
Type of transaction (deposit or withdrawal)
Type of currency (cash, check, or “other”)
Type of VA form
Subtotals are calculated for each transaction type, type of currency, and VA form.
Landscape: Select landscape page orientation when printing this report.

Appendix F. Report Samples
December 20, 2010 VPFS User Guide v1.1.3 101
Figure F-2 Activity Audit Listing Report
Date Variance Report
Portrait: Select portrait page orientation when printing this report.
Figure F-3. Date Variance Report
Deceased Patient with a Balance
Portrait: Select portrait page orientation when printing this report.

Appendix F. Report Samples
102 VPFS User Guide v1.1.3 December 20, 2010
Figure F-4. Deceased Patient with a Balance
Discharged Patient with a Balance
Portrait: Select portrait page orientation when printing this report.
Figure F-5. Discharged Patient with a Balance
Dormant Account Listing
This option searches the accounts and prints a list of all accounts that have had no activity for the period
of time you specify at the prompt.
Portrait: Select portrait page orientation when printing this report.

Appendix F. Report Samples
December 20, 2010 VPFS User Guide v1.1.3 103
Figure F-6. Dormant Account Listing
Fiscal Audit Report
This report provides a printout of all Patient Funds transactions for a selected date range. The information
is sorted in the following order:
1. Transaction date
2. Type of transaction (deposit or withdrawal)
3. Type of currency (cash, check, or “other”)
4. Type of VA form
Subtotals are calculated for each transaction type, type of currency, and VA form.
Landscape: Select landscape page orientation when printing this report.

Appendix F. Report Samples
104 VPFS User Guide v1.1.3 December 20, 2010
Figure F-7. Fiscal Audit Report
Fiscal Transaction Summary Report
The Fiscal Transaction Summary Report lists all of the transactions entered into the system for a date or
range of dates specified by the user. It differs from the transaction summary used by the Patient Fund
Clerks in that it sorts by the date of the transaction, rather than the date the transaction was entered. This
allows for predating entries for the previous month on the first day of the following month.
Landscape: Select landscape page orientation when printing this report.
Figure F-8. Fiscal Transaction Summary Report

Appendix F. Report Samples
December 20, 2010 VPFS User Guide v1.1.3 105
Inactive Withdrawal Listing
Portrait: Select portrait page orientation when printing this report.
Figure F-9. Inactive Withdrawal Listing
Indigent Patient Listing
This report displays all patients that have been marked as “Indigent” in the Patient Status field.
Portrait: Select portrait page orientation when printing this report.
Figure F-10. Indigent Patient Listing
Min and Max Restrictions
This option generates a report of all accounts on which the balance is outside of the range(s) specified in
the minimum and maximum balance fields in the Patient Info tab.
Landscape: Select landscape page orientation when printing this report.

Appendix F. Report Samples
106 VPFS User Guide v1.1.3 December 20, 2010
Figure F-11. Min and Max Restrictions
Negative Balance Report
This option prints a list of all accounts with a negative balance in the stored balance, monthly restriction
balance, or weekly restriction balance.
Landscape: Select landscape page orientation when printing this report.
Figure F-12. Negative Balance Report
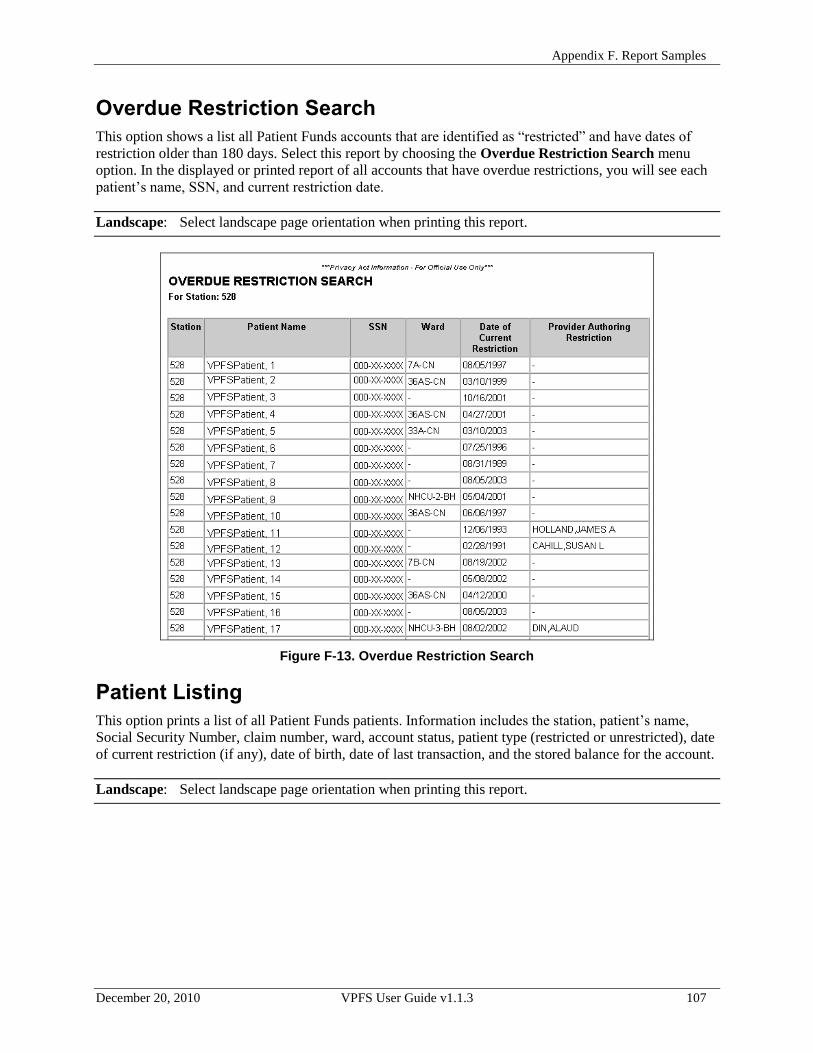
Appendix F. Report Samples
December 20, 2010 VPFS User Guide v1.1.3 107
Overdue Restriction Search
This option shows a list all Patient Funds accounts that are identified as “restricted” and have dates of
restriction older than 180 days. Select this report by choosing the Overdue Restriction Search menu
option. In the displayed or printed report of all accounts that have overdue restrictions, you will see each
patient‟s name, SSN, and current restriction date.
Landscape: Select landscape page orientation when printing this report.
Figure F-13. Overdue Restriction Search
Patient Listing
This option prints a list of all Patient Funds patients. Information includes the station, patient‟s name,
Social Security Number, claim number, ward, account status, patient type (restricted or unrestricted), date
of current restriction (if any), date of birth, date of last transaction, and the stored balance for the account.
Landscape: Select landscape page orientation when printing this report.

Appendix F. Report Samples
108 VPFS User Guide v1.1.3 December 20, 2010
Figure F-14. Patient Listing
Patient Summary
The Patient Summary Report is used to produce a list of all your active Patient Funds accounts.
Landscape: Select landscape page orientation when printing this report.
Figure F-15. Patient Summary Report

Appendix F. Report Samples
December 20, 2010 VPFS User Guide v1.1.3 109
Productivity Report
This report indicates the number of transactions that each system user posted for a range of dates. The
total number of transactions posted appears at the end of the report. Unlike the other VPFS reports, which
are patient oriented, the Productivity Report provides information about the workload. Only PFC
supervisors have access to this report.
Portrait: Select portrait page orientation when printing this report.
Figure F-16. Productivity Report
Station Balances
This option provides a report that shows the grand total of all the balances in the Patient Funds system for
the Division you have logged in against. In addition this report has subtotaling for any Child institutions
the user is authorized to access. This report is used to reconcile the general ledger.
The user has the option to run the report for a single institution or all institutions that a user is authorized
to access.
Portrait: Select portrait page orientation when printing this report.

Appendix F. Report Samples
110 VPFS User Guide v1.1.3 December 20, 2010
Figure F -17 Station Balances Report
Transaction Listing
This option produces a report of all the Patient Funds transactions entered into your system for a selected
date range. Transactions are grouped by the date the transaction was entered. The report includes the
station name, transaction ID, patient name, the reference code, transaction date and dollar amount, the
type of transaction (deposit or withdrawal), and the User ID of the Patient Funds Clerk who processed the
transaction.
Landscape: Select landscape page orientation when printing this report.

Appendix F. Report Samples
December 20, 2010 VPFS User Guide v1.1.3 111
Figure F-18. Transaction Listing