Embed Size (px)
Citation preview
ClinicalExpress®
Operator’s Guide
version 6.1 for general radiography
and mammography
P/N 18318-001 Rev. F Page 2 of 47
© Copyright by VIDAR Systems Corporation. All rights reserved.
No part of this publication may be reproduced, stored in a retrieval system, or transmitted, in any
form or by any means, electronic, mechanical, photocopying, recording or otherwise, without the
prior written permission of VIDAR Systems Corporation.
VIDAR and ClinicalExpress are registered trademarks of VIDAR Systems Corporation.
VIDAR® will provide support as per the terms and conditions set forth in the license
agreement. Other terms and conditions may have been presented by VIDAR resellers. If these terms differ from those offered by VIDAR, it is the responsibility of the reseller, not VIDAR to fulfill these obligations. Further, support will only be given in the following situations:
Installation and modifications are made by qualified personnel.
The equipment is used in accordance with the instructions in this manual.
No other software or hardware other than those sanctioned by VIDAR or distributed by VIDAR with ClinicalExpress are used on the ClinicalExpress workstation.
365 Herndon Parkway Herndon, VA 20170 U.S.A.
Sales: +1.800.471.SCAN or +1.800.471.7226 Email: [email protected]
Phone: +1.703.471.7070 Fax: +1.703.471.7665 Internet: www.filmdigitizer.com
Technical Support: +1.703.471.7070 or +1.800.471.7226 E-mail: [email protected]
Authorized representative in Europe
Emergo Europe Molenstraat 15 2513 BH, The Hague The Netherlands
Email: [email protected]
P/N 18318-001 Rev. F Page 3 of 47
Contents
Intended Use .................................................................................................................. 4
About this manual ......................................................................................................... 5 Conventions used in this manual ........................................................................ 5
About ClinicalExpress® ................................................................................................ 6 Options ........................................................................................................... 6
System overview ................................................................................................. 7 General Radiography Mode ........................................................................... 7 Mammography Mode ..................................................................................... 8
What you can do with ClinicalExpress ................................................................ 9 New features in ClinicalExpress 6.1 ................................................................... 9
Using ClinicalExpress® ............................................................................................... 10 Introduction ....................................................................................................... 10 Starting the ClinicalExpress program ............................................................... 11 Main window ..................................................................................................... 12
General Radiography Mode ......................................................................... 12 Mammography Mode ................................................................................... 13 Telling ClinicalExpress what you want to do ............................................... 14
A. Identify the patient, study and series. .......................................................... 15 Getting started ............................................................................................. 15 Enter new patient data manually ................................................................. 16 Open an existing patient record from Acquired Studies .............................. 17 Import existing patient data using Modality Work List ................................. 20 Enter new study information ........................................................................ 22 Enter new series information ....................................................................... 22 Manage patient data .................................................................................... 23
B. Set image characteristics, then digitize. ...................................................... 24 Working with images in General Radiography Mode .................................. 25 Working with images in Mammography Mode ............................................. 26
C. Set display characteristics, and modify images. .......................................... 27 Change Window and Level values .............................................................. 27 Changing your view of an image ................................................................. 29 Transform an image ..................................................................................... 30 Redact .......................................................................................................... 30 Segment an image (General Radiography Mode only) ............................... 33
D. Select a target, then send the composite. ................................................... 40 Working with retained studies ........................................................................... 41 Media import and export ................................................................................... 43 Scanning documents ........................................................................................ 44
Appendix ...................................................................................................................... 45 Preparing to digitize .......................................................................................... 46
Index ............................................................................................................................. 47
P/N 18318-001 Rev. F Page 4 of 47
Intended Use
ClinicalExpress is intended for forwarding a DICOM image from a medical
image digitizer to either DICOM print class provider or a storage class provider.
The target population is user’s wishing to use a medical film digitizer to scan
analog or transmissive films to a DICOM workstation using a traditional
teleradiology approach and users wishing to make duplications of film prints
using digital technology in DICOM and postscript protocols.
About this manual
P/N 18318-001 Rev. F Page 5 of 47
About this manual
This manual provides step-by-step instructions for using ClinicalExpress®. The
manual is organized around these topics:
About ClinicalExpress describes ClinicalExpress as part of a typical DICOM
radiography or mammography system.
Using ClinicalExpress shows how to digitize films, transmit images and
create copies.
Conventions used in this manual
Special keys you press on the keyboard are shown using SMALL CAPITALS. For
example, when you read the word ENTER in the text, press the corresponding
key on your keyboard.
Menu names and menu commands appear in block letters. For example, the
File menu contains the Open command. In this manual, commands are
expressed in a shorthand notation. For instance, File > Exit means select the
Exit command in the File menu.
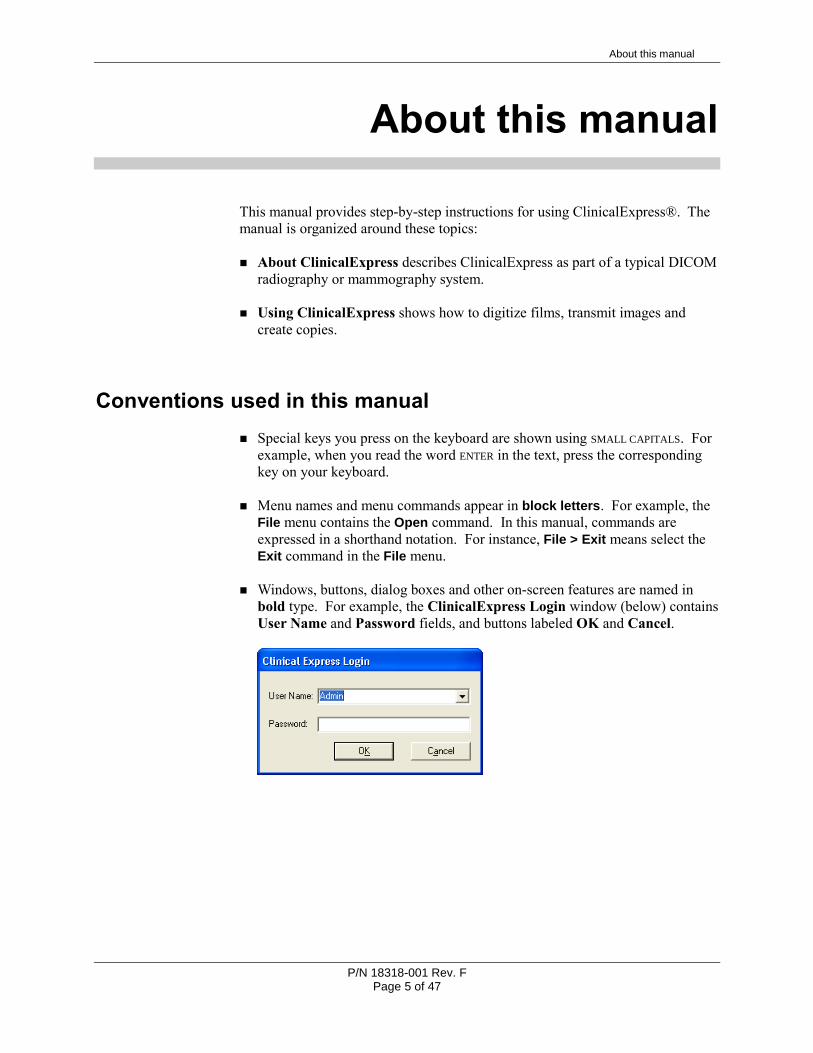
Windows, buttons, dialog boxes and other on-screen features are named in
bold type. For example, the ClinicalExpress Login window (below) contains
User Name and Password fields, and buttons labeled OK and Cancel.
P/N 18318-001 Rev. E Page 6 of 47
About ClinicalExpress®
ClinicalExpress 6.1 is a Windows-based program that digitizes films and
transmits film images. The program incorporates General Radiography and
Mammography modes, and can be purchased for General Radiography only, for
Mammography only, or for both modes.
Digitizing. Using a VIDAR film digitizer for input, ClinicalExpress displays
film images and associates them with a patient and study. The program provides
a set of controls for examining an image for quality control and adjusting its
characteristics.
Indications for use. General radiology images digitized using ClinicalExpress
meet or exceed the ACR and DICOM standards for use of secondary capture
images for consultation, review and final interpretation.
Mammography images digitized using ClinicalExpress as DICOM MG are to be
used as reference or comparison only, and not for primary diagnosis.
Options
These options can be purchased separately:
Modality Work List. This option enables imaging modalities to download work
list information about scheduled procedures and related data, present this
information to the modality operator, and assure that DICOM images contain
consistent descriptive data. Instructions for using the Modality Work List in
ClinicalExpress are provided in this manual. Integration details are provided in
the DICOM Conformance Statement.
PDI. This option includes the DICOM Media Import/Export (for reading and
writing DICOM CDs), Flat Bed Paper Scanning and Patient Query (for searching
patient information on storage devices).
About ClinicalExpress
P/N 18318-001 Rev. F Page 7 of 47
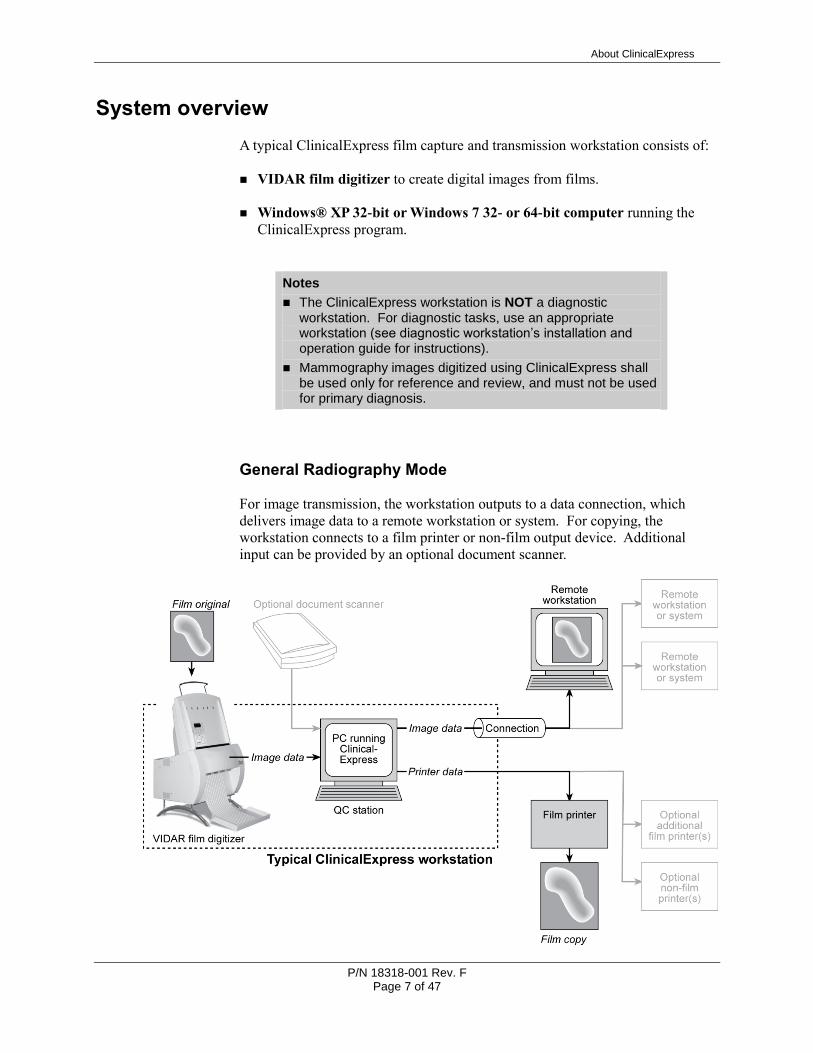
System overview
A typical ClinicalExpress film capture and transmission workstation consists of:
VIDAR film digitizer to create digital images from films.
Windows® XP 32-bit or Windows 7 32- or 64-bit computer running the
ClinicalExpress program.
Notes
The ClinicalExpress workstation is NOT a diagnostic workstation. For diagnostic tasks, use an appropriate workstation (see diagnostic workstation’s installation and operation guide for instructions).
Mammography images digitized using ClinicalExpress shall be used only for reference and review, and must not be used for primary diagnosis.
General Radiography Mode
For image transmission, the workstation outputs to a data connection, which
delivers image data to a remote workstation or system. For copying, the
workstation connects to a film printer or non-film output device. Additional
input can be provided by an optional document scanner.
About ClinicalExpress
P/N 18318-001 Rev. F Page 8 of 47
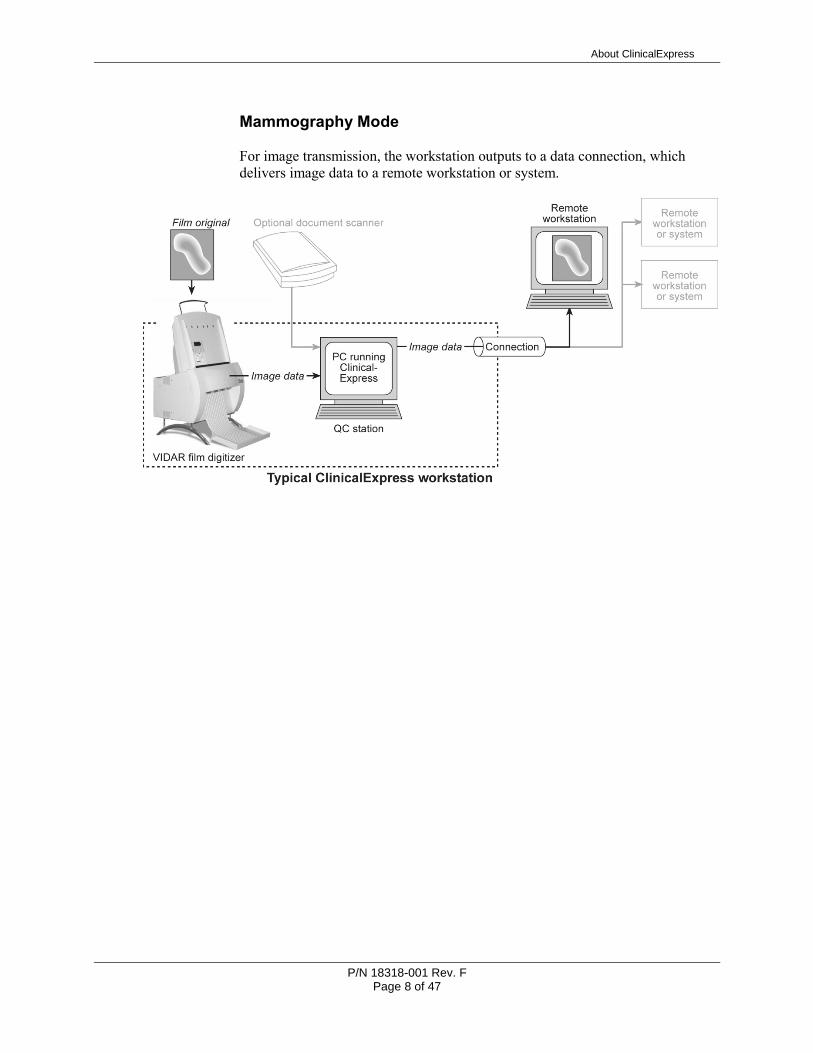
Mammography Mode
For image transmission, the workstation outputs to a data connection, which
delivers image data to a remote workstation or system.
About ClinicalExpress
P/N 18318-001 Rev. F Page 9 of 47
What you can do with ClinicalExpress
ClinicalExpress 6.1 is your primary point of control for film capture,
transmission and copying. With the program, you can:
Digitize
Designate a patient and study, or create a new patient record and/or study.
Using the Modality Work List option (available separately) to pull in
patient information from an external source (instead of typing patient data).
Set basic digitizing parameters: bit depth and resolution.
Digitize one or more films.
Perform quality check on the image created from the film before sending or
copying it.
Manipulate the image: set window and level, rotate, flip, invert tonal
values, split images, magnify a region of interest, zoom and redact
sensitive information.
Transmit
Select a remote workstation or system (the “target”).
Send digitized images to the selected target.
Digitize and send in one operation.
Copy (General Radiography Mode only)
Select a printer (if multiple printers are connected to the system).
Set the number of copies to be made from each film original.
Initiate printing.
Combine multiple images on one film.
Digitize and print in one operation.
Import from, and export to, DICOM standard CDs.
ClinicalExpress is licensed on a feature/function basis. All licenses include the
digitizing function as well as DICOM Send (sending to DICOM Service Class
Providers, workstations/PACS) and Copy (printing to DICOM printers and /or
Postscript devices). Additionally, you can purchase licenses for:
Modality Work List.
PDI. CD burning from DICOM viewer to Media Export, Media
Import/Export, Patient Query and Paper Document Scanner.
New features in ClinicalExpress 6.1
New date format options.
DICOM mammography Derived/Primary tag support for compatibility with
GE sites.
Mammography tag date acquisition support for compatibility with Siemens
sites.
P/N 18318-001 Rev. E Page 10 of 47
Using ClinicalExpress®
Contact VIDAR Technical Support if you have any questions about using ClinicalExpress software, or if you need the latest operation manual:
Phone: +1.800.471.SCAN (+1.800.471.7226)
+1.703.471.7070 outside the U.S.
E-mail: [email protected]
Introduction
This chapter provides detailed instructions for using ClinicalExpress. Sections
within the chapter cover:
Starting the program.
The ClinicalExpress main window.
Digitizing films, a multi-step process that includes:
Identifying the patient, study and series.
Setting image characteristics and digitizing films.
Setting display characteristics, and modifying images.
Selecting a target, then sending or copying images.
Working with retained studies.
Importing and exporting media.
Using ClinicalExpress
P/N 18318-001 Rev. F Page 11 of 47
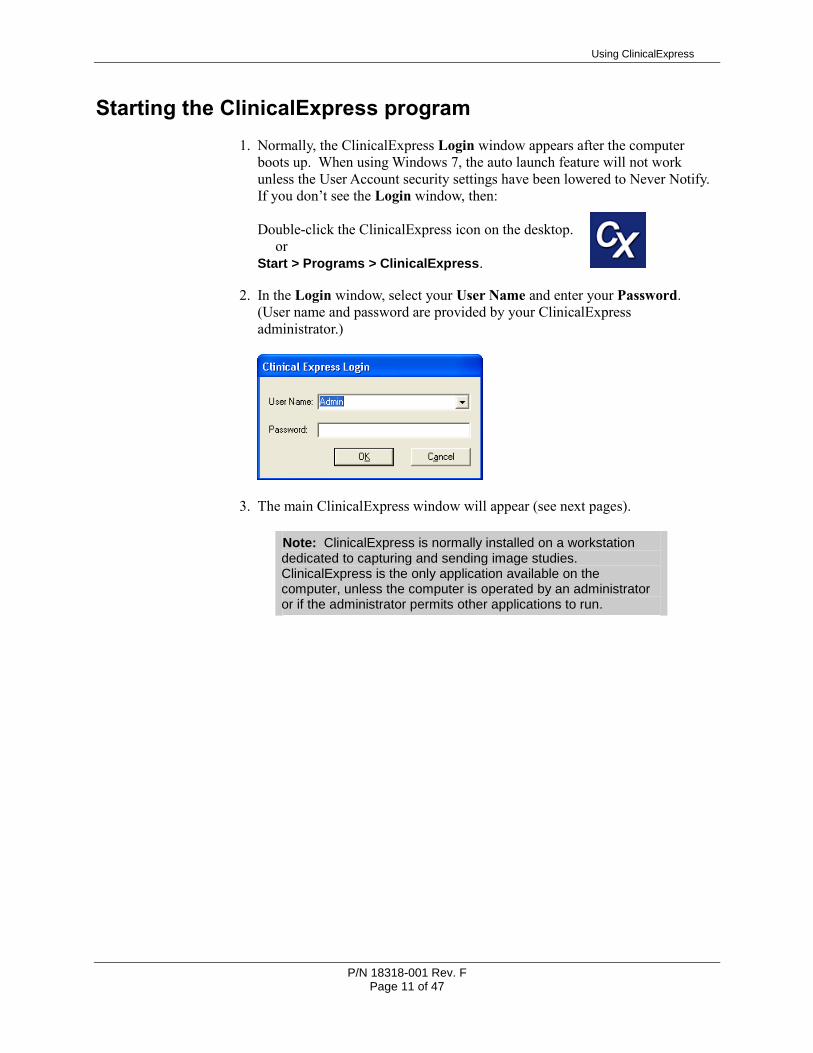
Starting the ClinicalExpress program
1. Normally, the ClinicalExpress Login window appears after the computer
boots up. When using Windows 7, the auto launch feature will not work
unless the User Account security settings have been lowered to Never Notify.
If you don’t see the Login window, then:
Double-click the ClinicalExpress icon on the desktop.
or
Start > Programs > ClinicalExpress.
2. In the Login window, select your User Name and enter your Password.
(User name and password are provided by your ClinicalExpress
administrator.)
3. The main ClinicalExpress window will appear (see next pages).
Note: ClinicalExpress is normally installed on a workstation dedicated to capturing and sending image studies. ClinicalExpress is the only application available on the computer, unless the computer is operated by an administrator or if the administrator permits other applications to run.
Using ClinicalExpress
P/N 18318-001 Rev. F Page 12 of 47
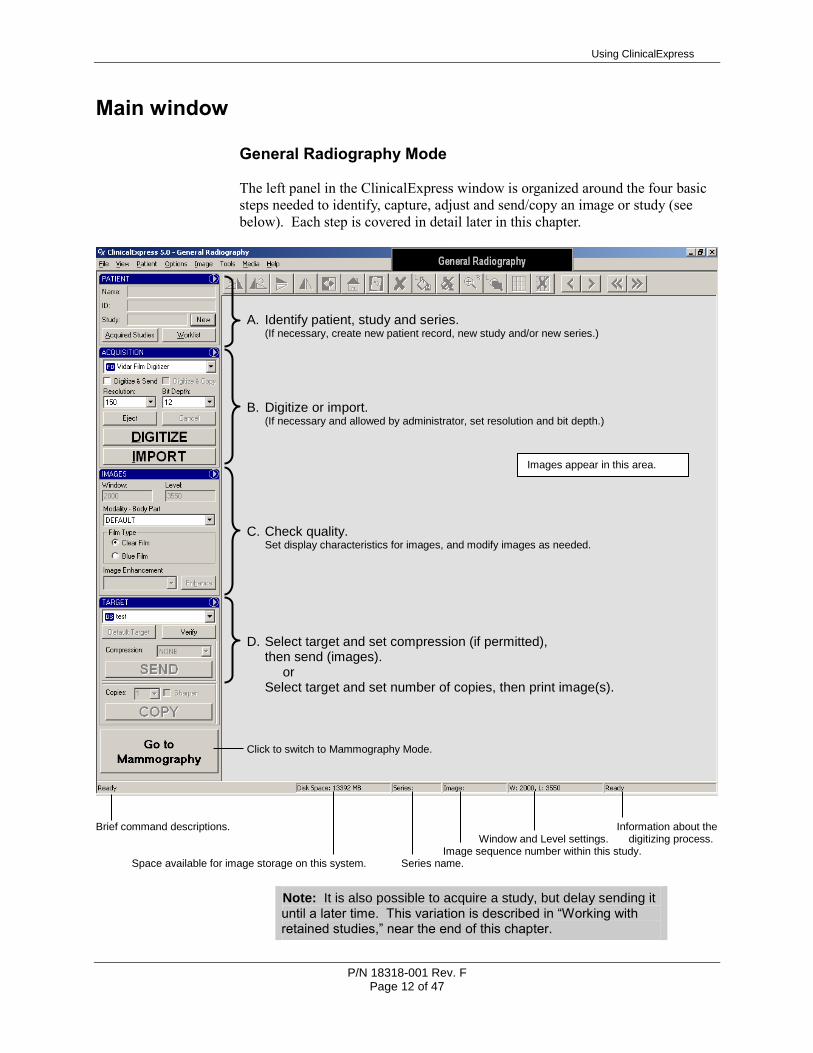
Main window
General Radiography Mode
The left panel in the ClinicalExpress window is organized around the four basic
steps needed to identify, capture, adjust and send/copy an image or study (see
below). Each step is covered in detail later in this chapter.
Brief command descriptions. Information about the Window and Level settings. digitizing process. Image sequence number within this study. Space available for image storage on this system. Series name.
Note: It is also possible to acquire a study, but delay sending it until a later time. This variation is described in “Working with retained studies,” near the end of this chapter.
A. Identify patient, study and series. (If necessary, create new patient record, new study and/or new series.)
B. Digitize or import. (If necessary and allowed by administrator, set resolution and bit depth.)
C. Check quality. Set display characteristics for images, and modify images as needed.
D. Select target and set compression (if permitted), then send (images). or Select target and set number of copies, then print image(s).
Images appear in this area.
Click to switch to Mammography Mode.
Using ClinicalExpress
P/N 18318-001 Rev. F Page 13 of 47
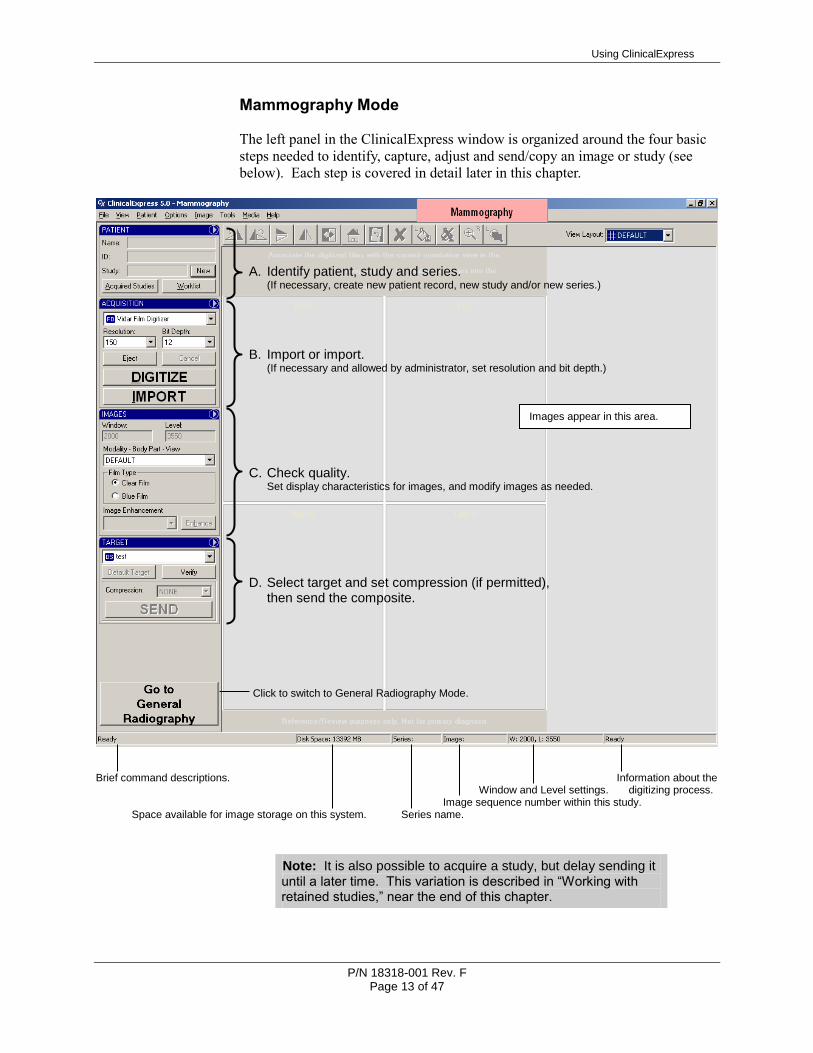
Mammography Mode
The left panel in the ClinicalExpress window is organized around the four basic
steps needed to identify, capture, adjust and send/copy an image or study (see
below). Each step is covered in detail later in this chapter.
Brief command descriptions. Information about the Window and Level settings. digitizing process. Image sequence number within this study. Space available for image storage on this system. Series name.
Note: It is also possible to acquire a study, but delay sending it until a later time. This variation is described in “Working with retained studies,” near the end of this chapter.
A. Identify patient, study and series. (If necessary, create new patient record, new study and/or new series.)
B. Import or import. (If necessary and allowed by administrator, set resolution and bit depth.)
C. Check quality. Set display characteristics for images, and modify images as needed.
D. Select target and set compression (if permitted), then send the composite.
Images appear in this area.
Click to switch to General Radiography Mode.
Using ClinicalExpress
P/N 18318-001 Rev. F Page 14 of 47
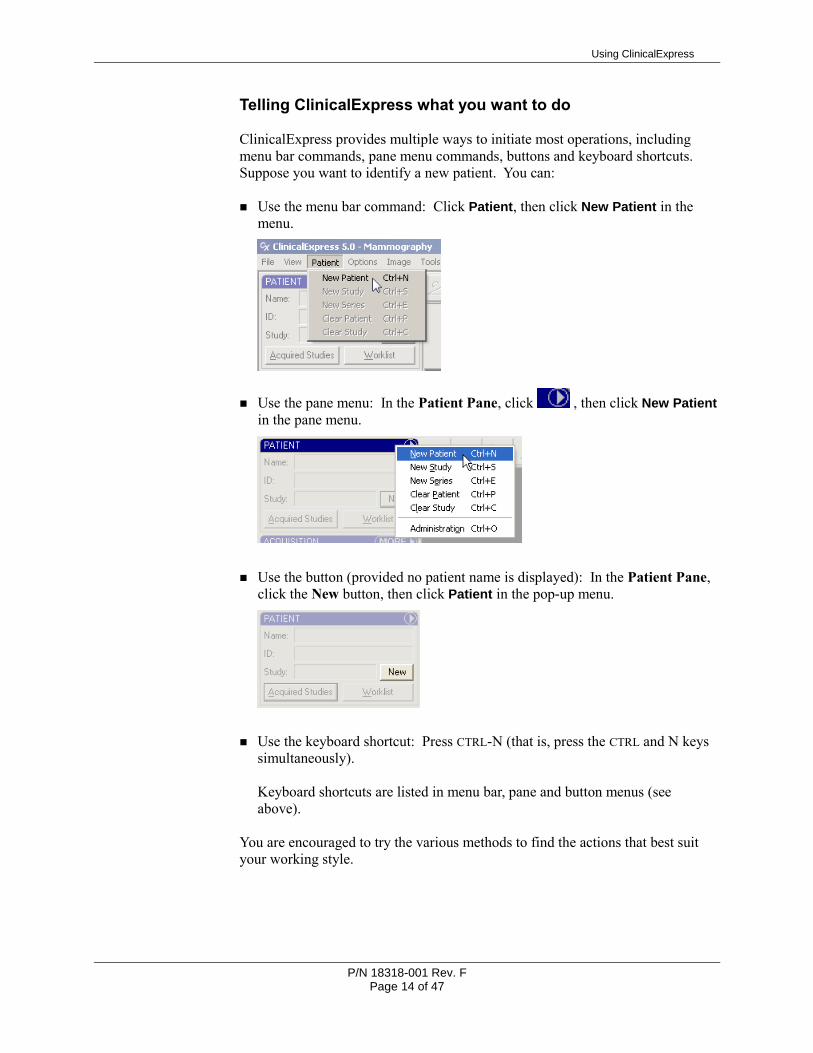
Telling ClinicalExpress what you want to do
ClinicalExpress provides multiple ways to initiate most operations, including
menu bar commands, pane menu commands, buttons and keyboard shortcuts.
Suppose you want to identify a new patient. You can:
Use the menu bar command: Click Patient, then click New Patient in the
menu.
Use the pane menu: In the Patient Pane, click , then click New Patient
in the pane menu.
Use the button (provided no patient name is displayed): In the Patient Pane,
click the New button, then click Patient in the pop-up menu.
Use the keyboard shortcut: Press CTRL-N (that is, press the CTRL and N keys
simultaneously).
Keyboard shortcuts are listed in menu bar, pane and button menus (see
above).
You are encouraged to try the various methods to find the actions that best suit
your working style.
Using ClinicalExpress
P/N 18318-001 Rev. F Page 15 of 47
A. Identify the patient, study and series.
In step A, you will:
a. Enter new patient data manually.
or
Select an existing patient record.
or
Import existing patient data using Modality Work List.
b. Enter new study and series information.
Each of these operations is covered in a separate section in step 1. Additionally,
you can edit patient data and delete patient records, as described in the “Manage
patient data” section at the end of step 1.
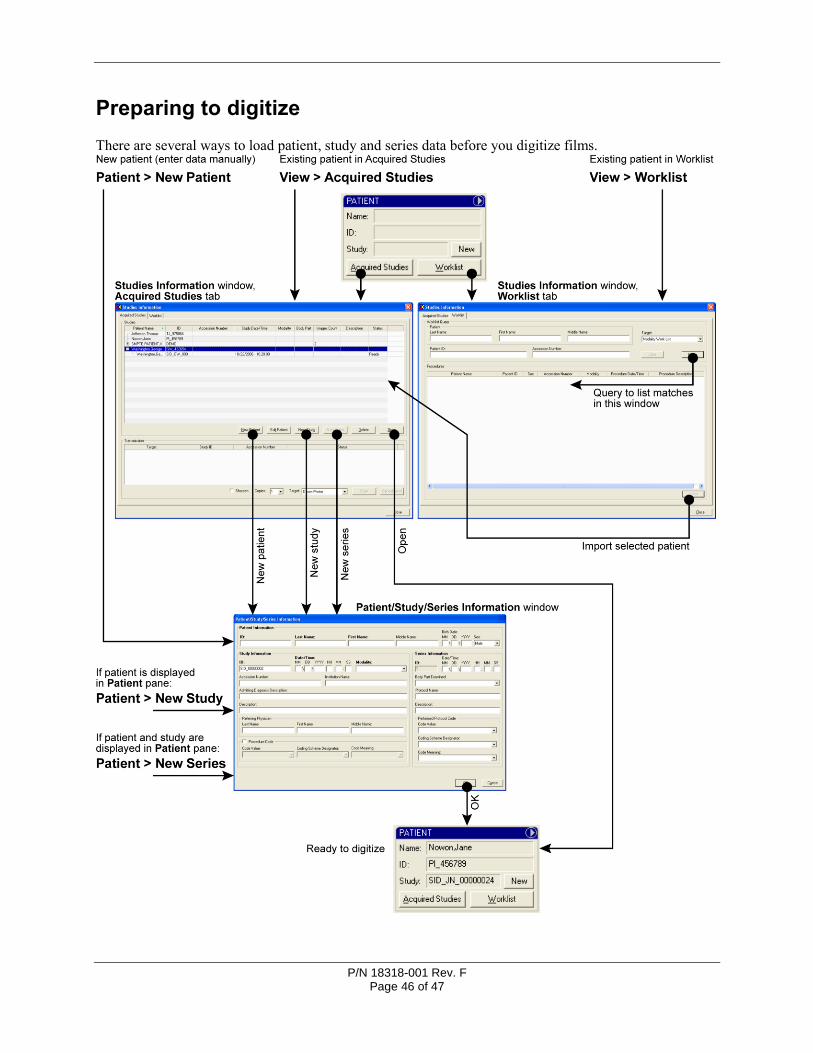
Tip: “Preparing to digitize,” in the Appendix, summarizes the different ways of entering patient, study and series data.
Getting started
To clear patient data from the main window: Patient > Clear Patient.
Note: Clearing patient data from the main window also clears the current study. The patient record remains in the Acquired Studies List.
To clear study data from the main window: Patient > Clear Study.
Note: Clearing the study from the main window leaves the current patient in the Patient pane.
Using ClinicalExpress
P/N 18318-001 Rev. F Page 16 of 47
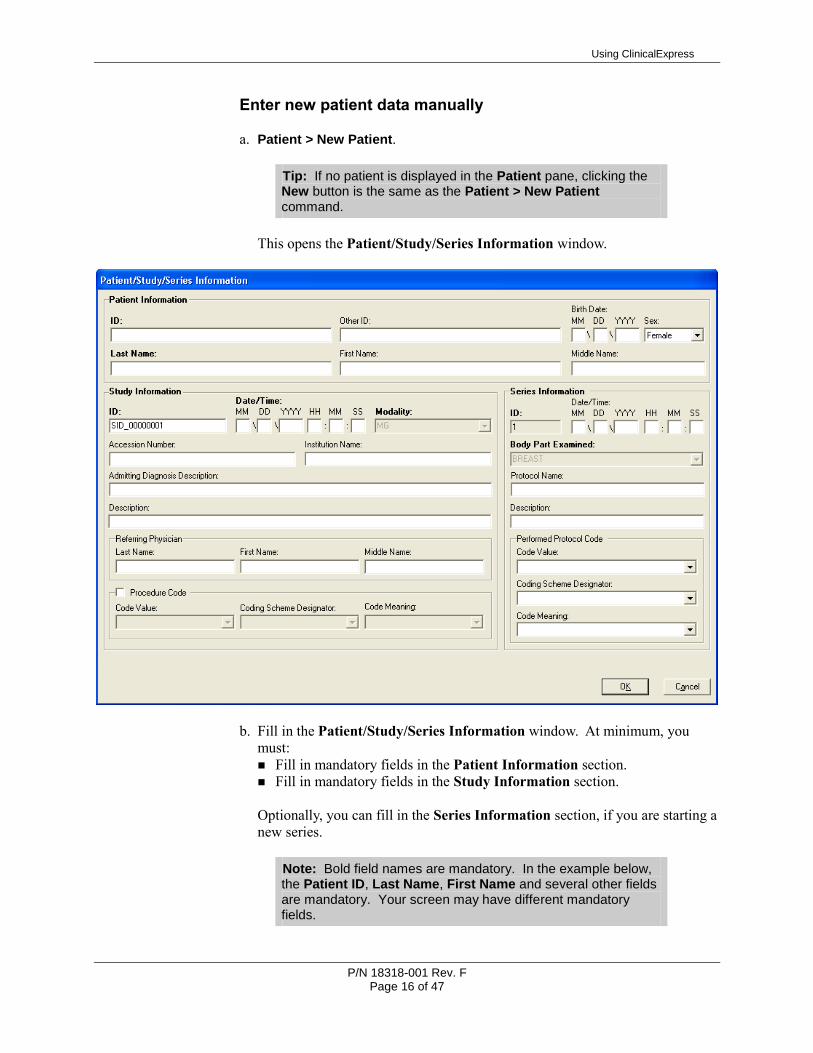
Enter new patient data manually
a. Patient > New Patient.
Tip: If no patient is displayed in the Patient pane, clicking the New button is the same as the Patient > New Patient command.
This opens the Patient/Study/Series Information window.
b. Fill in the Patient/Study/Series Information window. At minimum, you
must:
Fill in mandatory fields in the Patient Information section.
Fill in mandatory fields in the Study Information section.
Optionally, you can fill in the Series Information section, if you are starting a
new series.
Note: Bold field names are mandatory. In the example below, the Patient ID, Last Name, First Name and several other fields are mandatory. Your screen may have different mandatory fields.
Using ClinicalExpress
P/N 18318-001 Rev. F Page 17 of 47
c. Click OK.
d. The patient’s name, ID and study now appear in the main window:
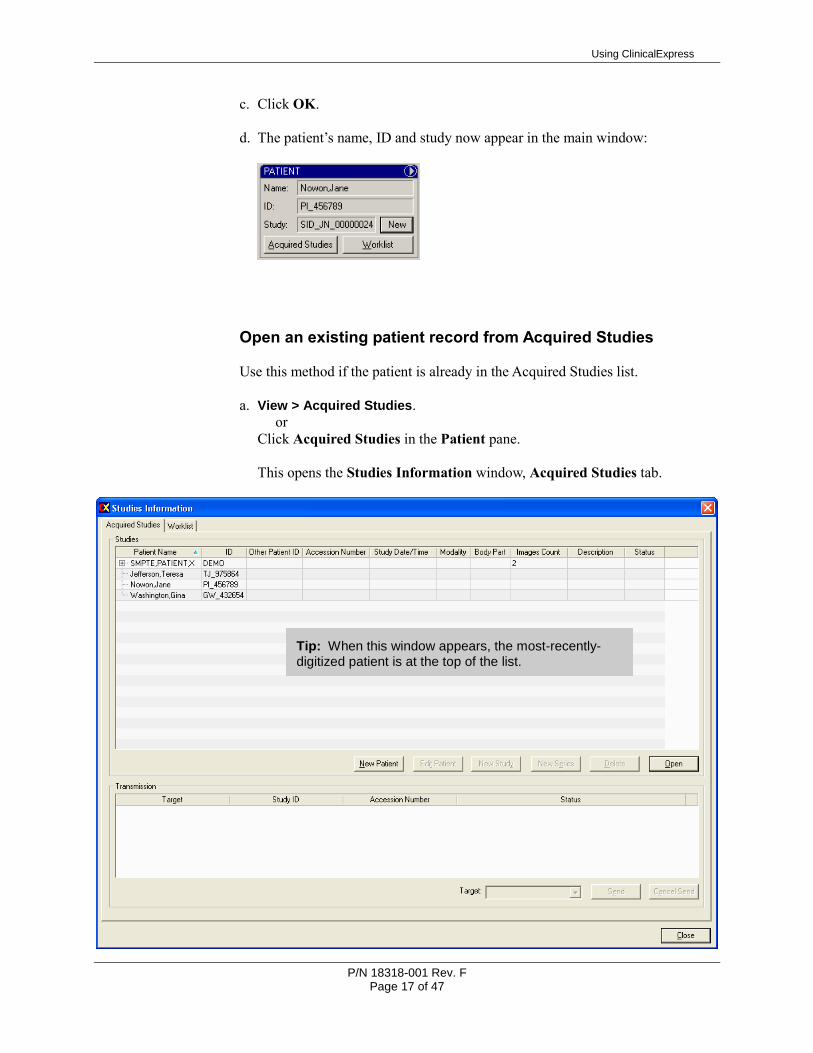
Open an existing patient record from Acquired Studies
Use this method if the patient is already in the Acquired Studies list.
a. View > Acquired Studies.
or
Click Acquired Studies in the Patient pane.
This opens the Studies Information window, Acquired Studies tab.
Tip: When this window appears, the most-recently-digitized patient is at the top of the list.
Using ClinicalExpress
P/N 18318-001 Rev. F Page 18 of 47
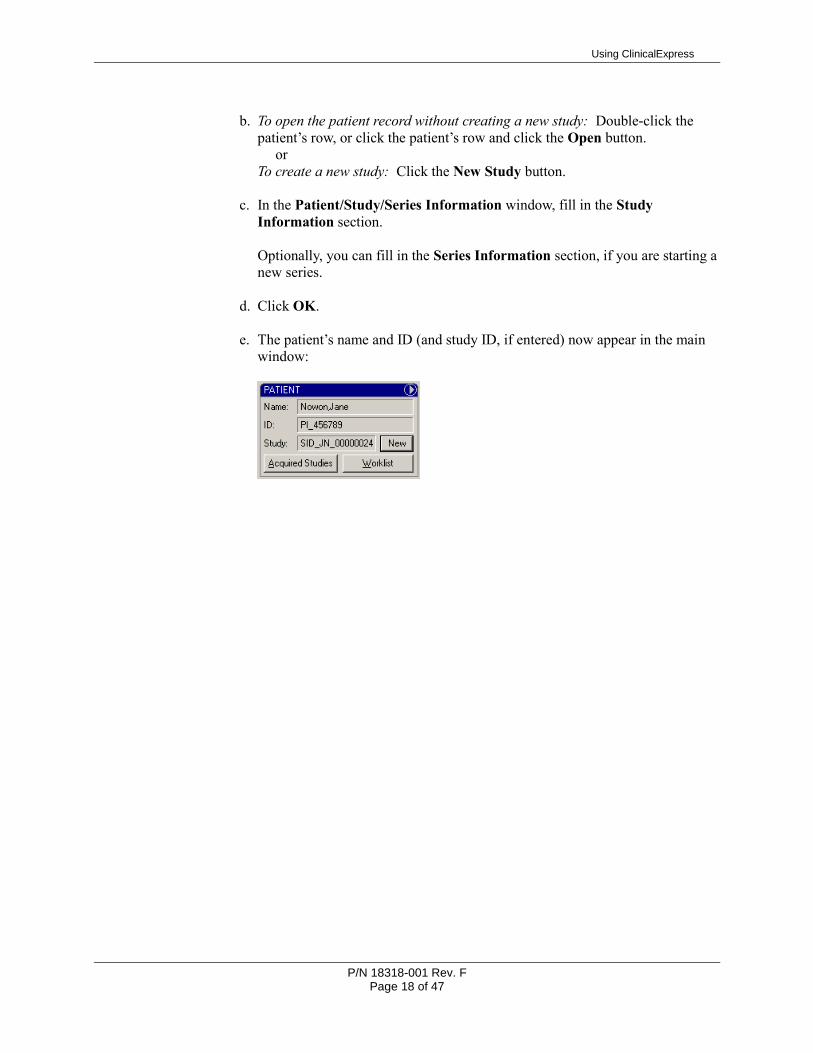
b. To open the patient record without creating a new study: Double-click the
patient’s row, or click the patient’s row and click the Open button.
or
To create a new study: Click the New Study button.
c. In the Patient/Study/Series Information window, fill in the Study
Information section.
Optionally, you can fill in the Series Information section, if you are starting a
new series.
d. Click OK.
e. The patient’s name and ID (and study ID, if entered) now appear in the main
window:
Using ClinicalExpress
P/N 18318-001 Rev. F Page 19 of 47
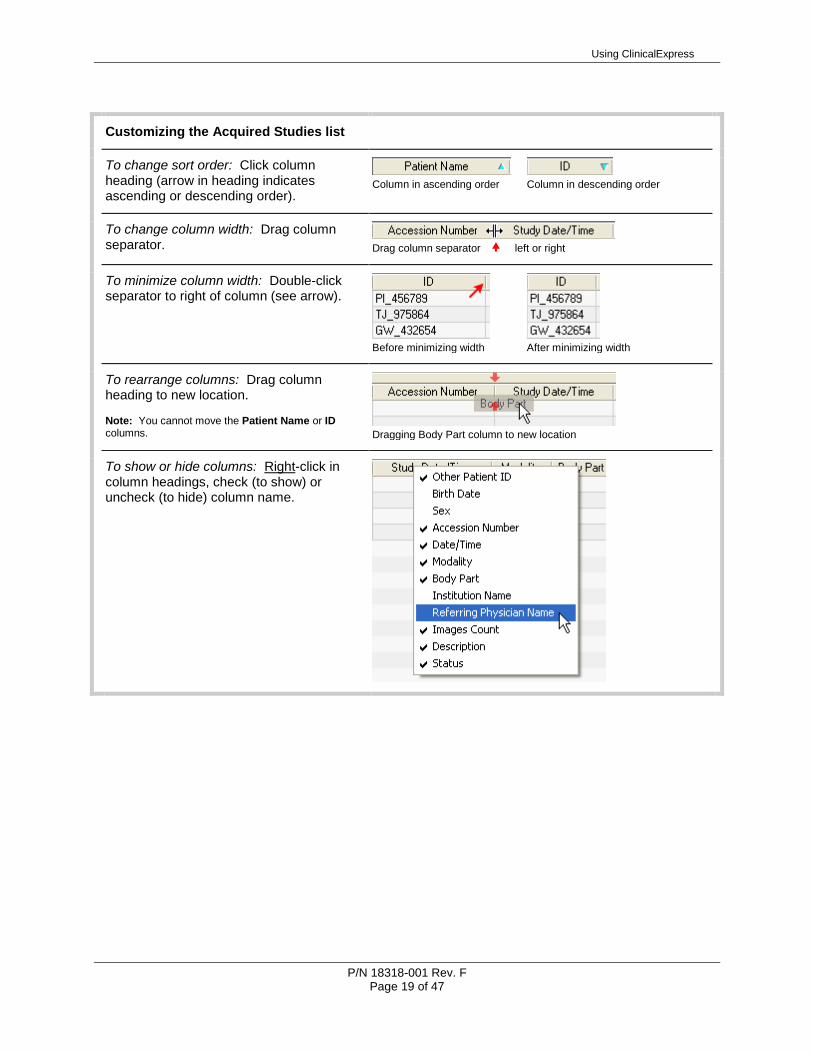
Customizing the Acquired Studies list
To change sort order: Click column heading (arrow in heading indicates ascending or descending order).
Column in ascending order Column in descending order
To change column width: Drag column separator.
Drag column separator left or right
To minimize column width: Double-click separator to right of column (see arrow).
Before minimizing width After minimizing width
To rearrange columns: Drag column heading to new location. Note: You cannot move the Patient Name or ID columns.
Dragging Body Part column to new location
To show or hide columns: Right-click in column headings, check (to show) or uncheck (to hide) column name.
Using ClinicalExpress
P/N 18318-001 Rev. F Page 20 of 47
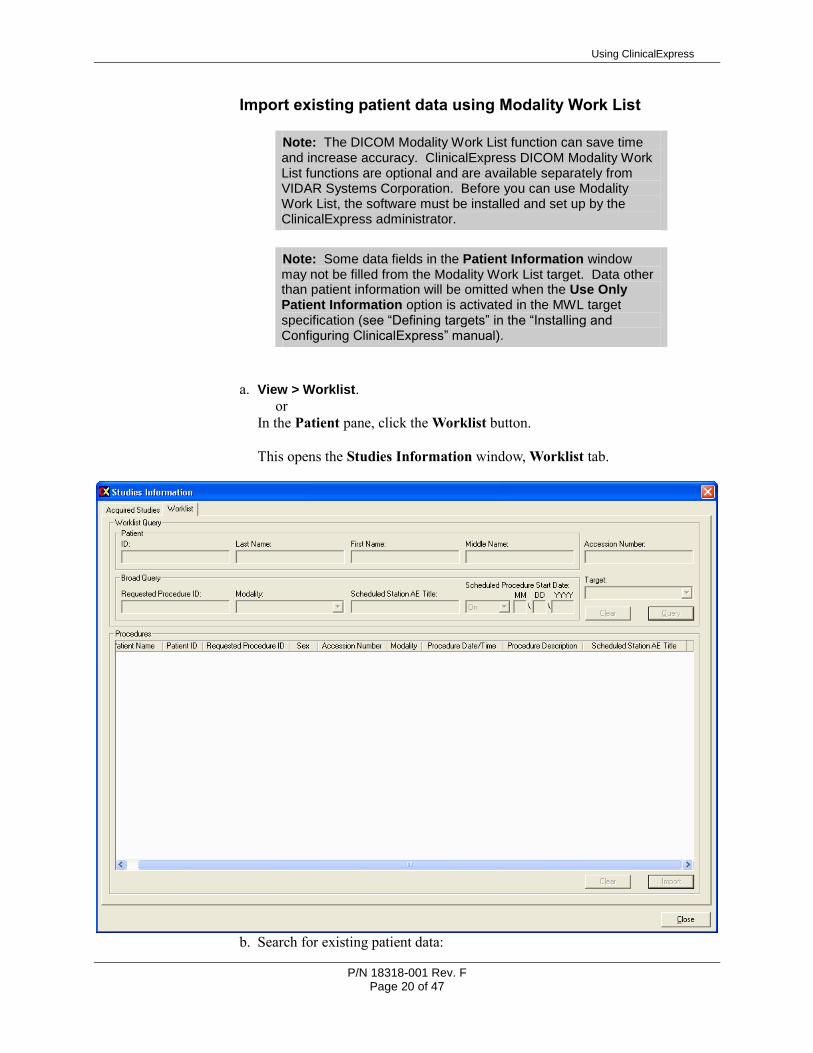
Import existing patient data using Modality Work List
Note: The DICOM Modality Work List function can save time and increase accuracy. ClinicalExpress DICOM Modality Work List functions are optional and are available separately from VIDAR Systems Corporation. Before you can use Modality Work List, the software must be installed and set up by the ClinicalExpress administrator.
Note: Some data fields in the Patient Information window may not be filled from the Modality Work List target. Data other than patient information will be omitted when the Use Only Patient Information option is activated in the MWL target specification (see “Defining targets” in the “Installing and Configuring ClinicalExpress” manual).
a. View > Worklist.
or
In the Patient pane, click the Worklist button.
This opens the Studies Information window, Worklist tab.
b. Search for existing patient data:
Using ClinicalExpress
P/N 18318-001 Rev. F Page 21 of 47
In the Worklist tab, enter enough information to identify the patient
(wildcards are acceptable; see “About wildcards,” below).
You can enter
Last Name and/or First Name, and/or
Patient ID, and/or
Accession Number.
About wildcards
(The configuration of the connected MWL target may limit wildcard search options.)
Use an asterisk ( * ) to represent any number of unknown characters. For example, if you search for the last name “john*”, the results might include data for patients with the last names John, Johns, Johnson, Johnston and Johnstone.
Use a question mark ( ? ) to represent one unknown character. For example, if you search for the last name “john?”, the results might include data for patients with the last name Johns, but not John or Johnson.
Click the Worklist button, then click the Modality Work List target name
(as assigned by the ClinicalExpress administrator).
Click the Query button.
c. To cancel the search: Click the Cancel button (same button as Query).
d. If Broad Query has been enabled by your administrator, you can search using
more specific details about the patient:
Requested Procedure ID.
Modality.
Schedule Station AE Title. (This refers to the ClinicalExpress
Workstation’s AE. The default is “ClinicalExpress,” but it can be changes
by the administrator.)
Scheduled Procedure Start Date.
e. The Procedures section lists matching patient records.
f. In the Procedures list, click the desired patient record, then click the Import
button.
g. The patient’s data now appears in the Acquired Studies tab of the Studies
Information window.
Tip: To edit patient information, click the patient row in the Acquired Studies tab, then click the Edit Patient button.
h. Go to “Enter new study information” next in step A.
Using ClinicalExpress
P/N 18318-001 Rev. F Page 22 of 47
Enter new study information
Follow the instructions in this section if you have not already entered study
information for a patient.
Note: You must identify a patient before you can enter study information. See “Enter new patient data manually,” “Open an existing patient record from Acquired Studies” and Import existing patient data using Modality Work List,” earlier in step A.
a. Patient > New Study.
Tip: If no study is displayed in the Patient pane, clicking the New button is the same as the Patient > New Study command.
This opens the Patient/Study/Series Information window.
b. Fill in the Study Information section.
Optionally, you can fill in the Series Information section, if you are starting a
new series.
Note: A new series can only be added during the initial digitization of a study. Once the study is closed, no new series can be added.
c. Click the OK button.
Enter new series information
Follow the instructions in this section if you have not already entered series
information for a study.
a. Patient > New Series.
Tip: If no study is displayed in the Patient pane, clicking the New button is the same as the Patient > New Study command.
This opens the Patient/Study/Series Information window.
b. Fill in the Series Information section.
c. Click the OK button.
Note: A new series can only be added during the initial digitization of a study. Once the study is closed, no new series can be added.
Using ClinicalExpress
P/N 18318-001 Rev. F Page 23 of 47
Manage patient data
To edit patient data:
a. View > Acquired Studies.
This opens the Studies Information window, Acquired Studies tab.
b. In the Studies list, click the patient record, then click the Edit Patient
button.
c. In the Patient/Study/Series Information window, edit the data as needed,
then click OK.
Note: Changes made to patient information will be applied to all studies still stored on the ClinicalExpress workstation, whether they have been sent or not. Studies already sent will not be resent automatically. If you must resend a study with corrected information, you must first delete the study from the receiving station.
To delete a patient record:
a. View > Acquired Studies.
This opens the Studies Information window, Acquired Studies tab.
b. In the Studies list, click the patient record, then click the Delete button.
c. You will be asked to confirm the deletion:
To complete the deletion: Click Yes.
To cancel the deletion and keep the patient record: Click No.
Using ClinicalExpress
P/N 18318-001 Rev. F Page 24 of 47
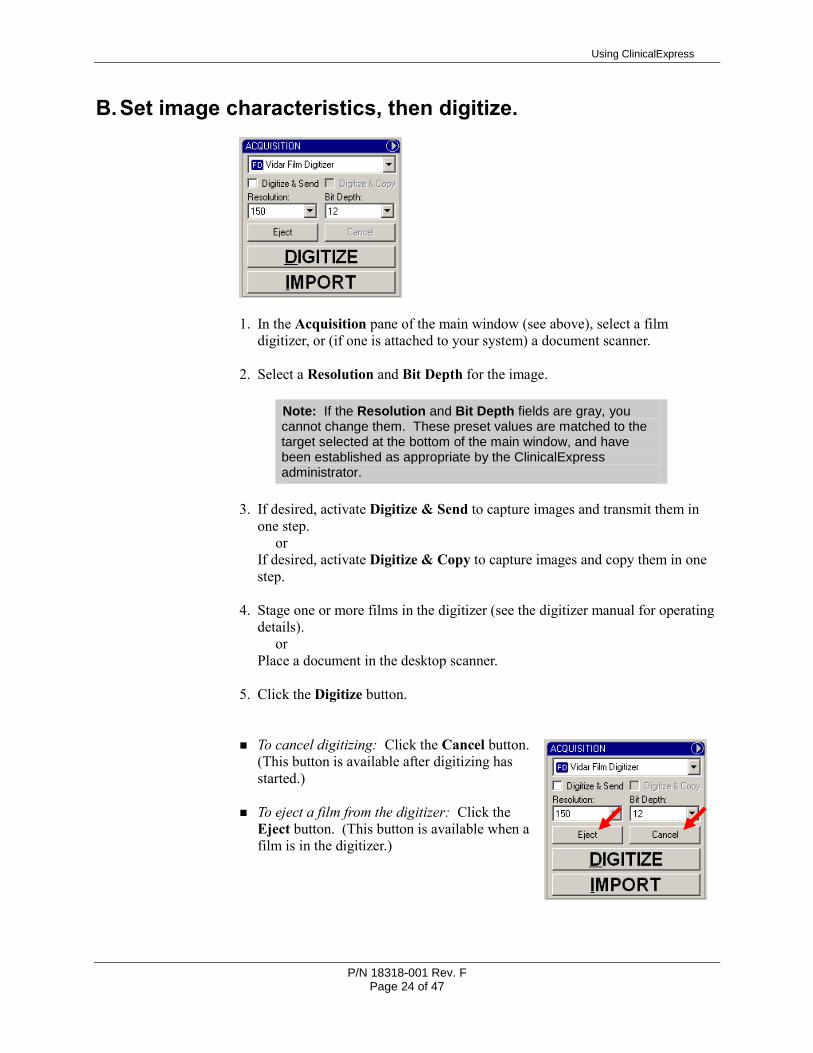
B. Set image characteristics, then digitize.
1. In the Acquisition pane of the main window (see above), select a film
digitizer, or (if one is attached to your system) a document scanner.
2. Select a Resolution and Bit Depth for the image.
Note: If the Resolution and Bit Depth fields are gray, you cannot change them. These preset values are matched to the target selected at the bottom of the main window, and have been established as appropriate by the ClinicalExpress administrator.
3. If desired, activate Digitize & Send to capture images and transmit them in
one step.
or
If desired, activate Digitize & Copy to capture images and copy them in one
step.
4. Stage one or more films in the digitizer (see the digitizer manual for operating
details).
or
Place a document in the desktop scanner.
5. Click the Digitize button.
To cancel digitizing: Click the Cancel button.
(This button is available after digitizing has
started.)
To eject a film from the digitizer: Click the
Eject button. (This button is available when a
film is in the digitizer.)
Using ClinicalExpress
P/N 18318-001 Rev. F Page 25 of 47
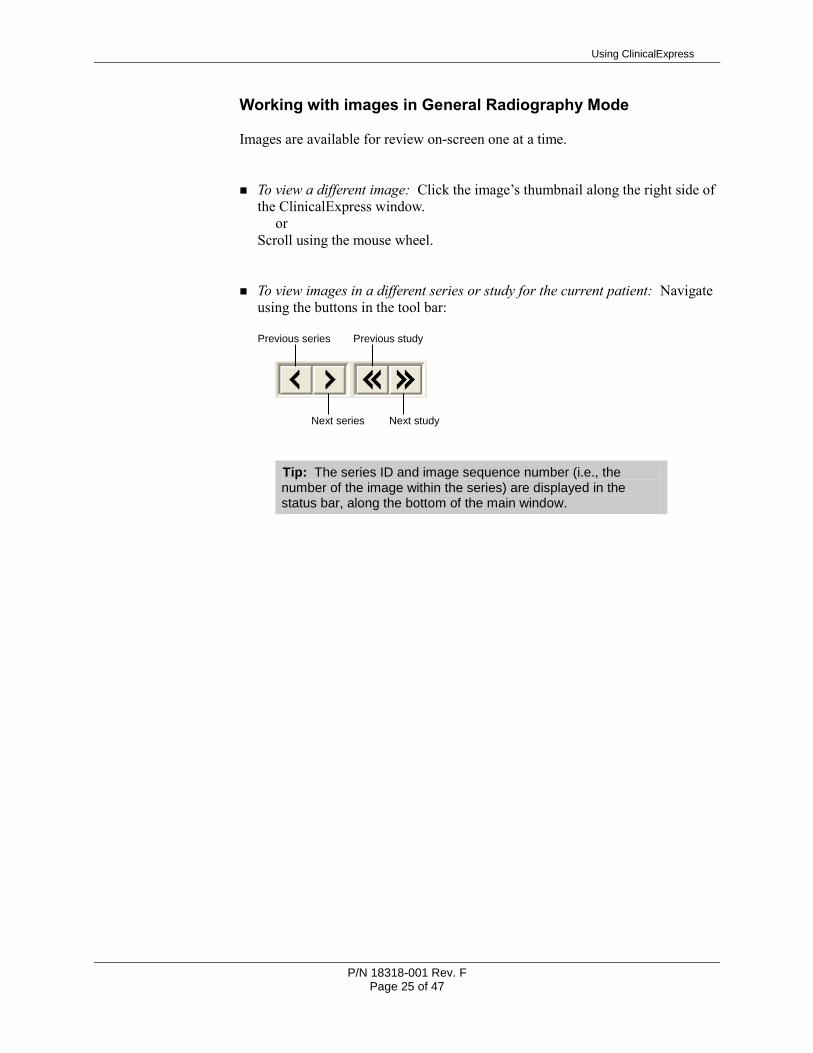
Working with images in General Radiography Mode
Images are available for review on-screen one at a time.
To view a different image: Click the image’s thumbnail along the right side of
the ClinicalExpress window.
or
Scroll using the mouse wheel.
To view images in a different series or study for the current patient: Navigate
using the buttons in the tool bar:
Previous series Previous study
Next series Next study
Tip: The series ID and image sequence number (i.e., the number of the image within the series) are displayed in the status bar, along the bottom of the main window.

Using ClinicalExpress
P/N 18318-001 Rev. F Page 26 of 47
Working with images in Mammography Mode
When digitizing is complete, you can view the images and add them to the
composite layout.
Drag and drop individual film images to place them in the composite
Select view here
Click any image in the composite to see it here
Click any thumbnail image to see it here
Double-click any image to have it fill the viewing area. Double-click again to view thumbnail/composite/individual images.
Individual image
Thumbnails
Composite (may have different
layout than shown here)
Using ClinicalExpress
P/N 18318-001 Rev. F Page 27 of 47
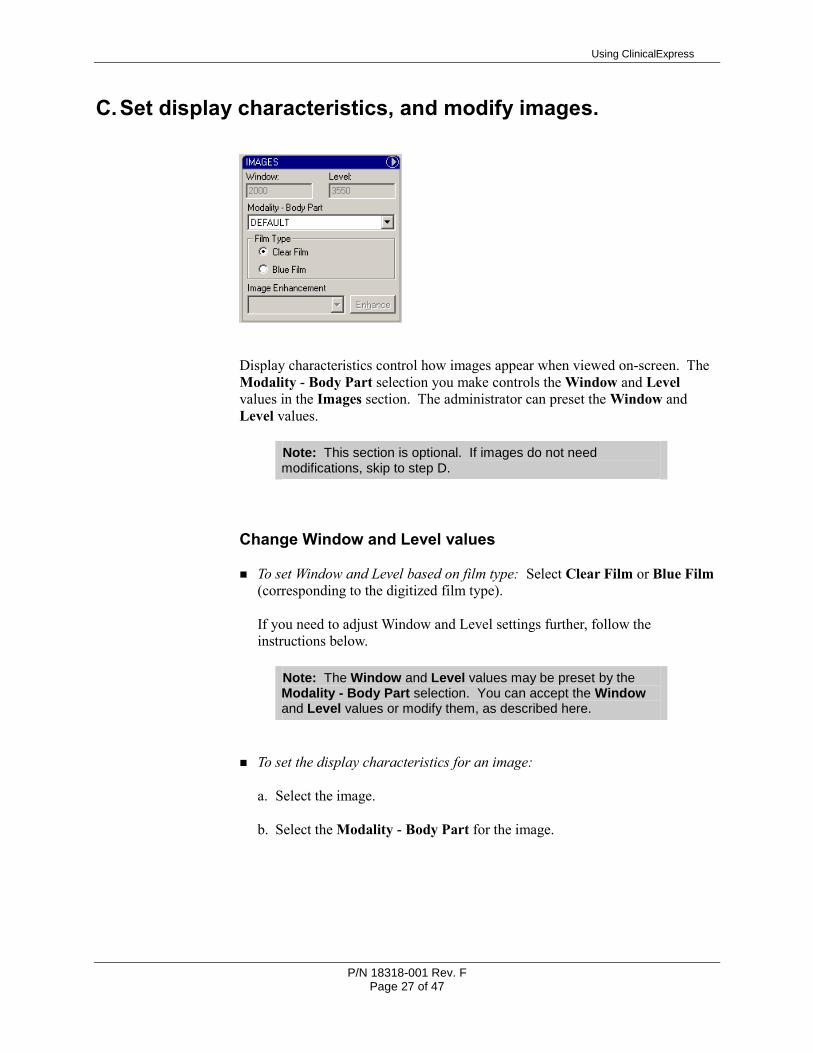
C. Set display characteristics, and modify images.
Display characteristics control how images appear when viewed on-screen. The
Modality - Body Part selection you make controls the Window and Level
values in the Images section. The administrator can preset the Window and
Level values.
Note: This section is optional. If images do not need modifications, skip to step D.
Change Window and Level values
To set Window and Level based on film type: Select Clear Film or Blue Film
(corresponding to the digitized film type).
If you need to adjust Window and Level settings further, follow the
instructions below.
Note: The Window and Level values may be preset by the Modality - Body Part selection. You can accept the Window and Level values or modify them, as described here.
To set the display characteristics for an image:
a. Select the image.
b. Select the Modality - Body Part for the image.
Using ClinicalExpress
P/N 18318-001 Rev. F Page 28 of 47
To set an image’s Window value: Right-drag the cursor left or right. (Image >
Window/Level must be activated.)
To right-drag: Press and hold the right mouse button, then drag the mouse.
To set an image’s Level: Right-drag the cursor up or down. (Image >
Window/Level must be activated.)
Tip: When changing Window and Level values, the current values are displayed in the status bar as well as the Images pane.
Using ClinicalExpress
P/N 18318-001 Rev. F Page 29 of 47
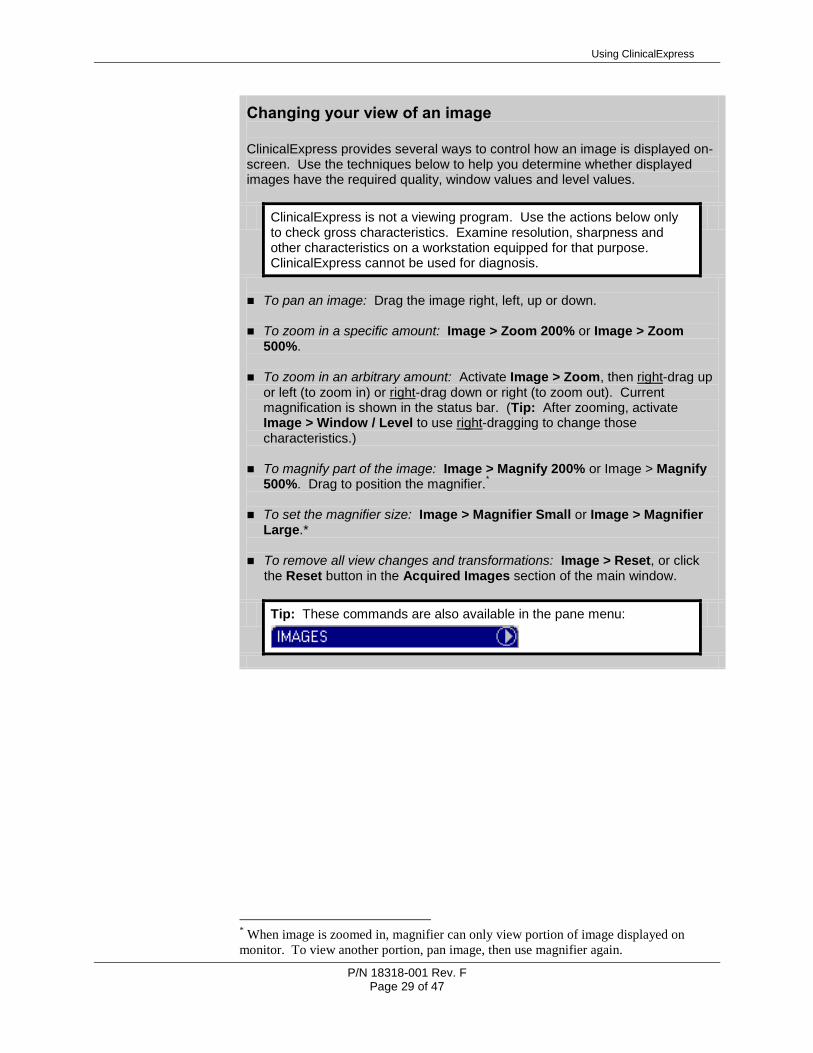
Changing your view of an image
ClinicalExpress provides several ways to control how an image is displayed on-screen. Use the techniques below to help you determine whether displayed images have the required quality, window values and level values.
ClinicalExpress is not a viewing program. Use the actions below only to check gross characteristics. Examine resolution, sharpness and other characteristics on a workstation equipped for that purpose. ClinicalExpress cannot be used for diagnosis.
To pan an image: Drag the image right, left, up or down. To zoom in a specific amount: Image > Zoom 200% or Image > Zoom
500%. To zoom in an arbitrary amount: Activate Image > Zoom, then right-drag up
or left (to zoom in) or right-drag down or right (to zoom out). Current magnification is shown in the status bar. (Tip: After zooming, activate Image > Window / Level to use right-dragging to change those characteristics.)
To magnify part of the image: Image > Magnify 200% or Image > Magnify
500%. Drag to position the magnifier.*
To set the magnifier size: Image > Magnifier Small or Image > Magnifier
Large.* To remove all view changes and transformations: Image > Reset, or click
the Reset button in the Acquired Images section of the main window.
Tip: These commands are also available in the pane menu:
* When image is zoomed in, magnifier can only view portion of image displayed on
monitor. To view another portion, pan image, then use magnifier again.
Using ClinicalExpress
P/N 18318-001 Rev. F Page 30 of 47
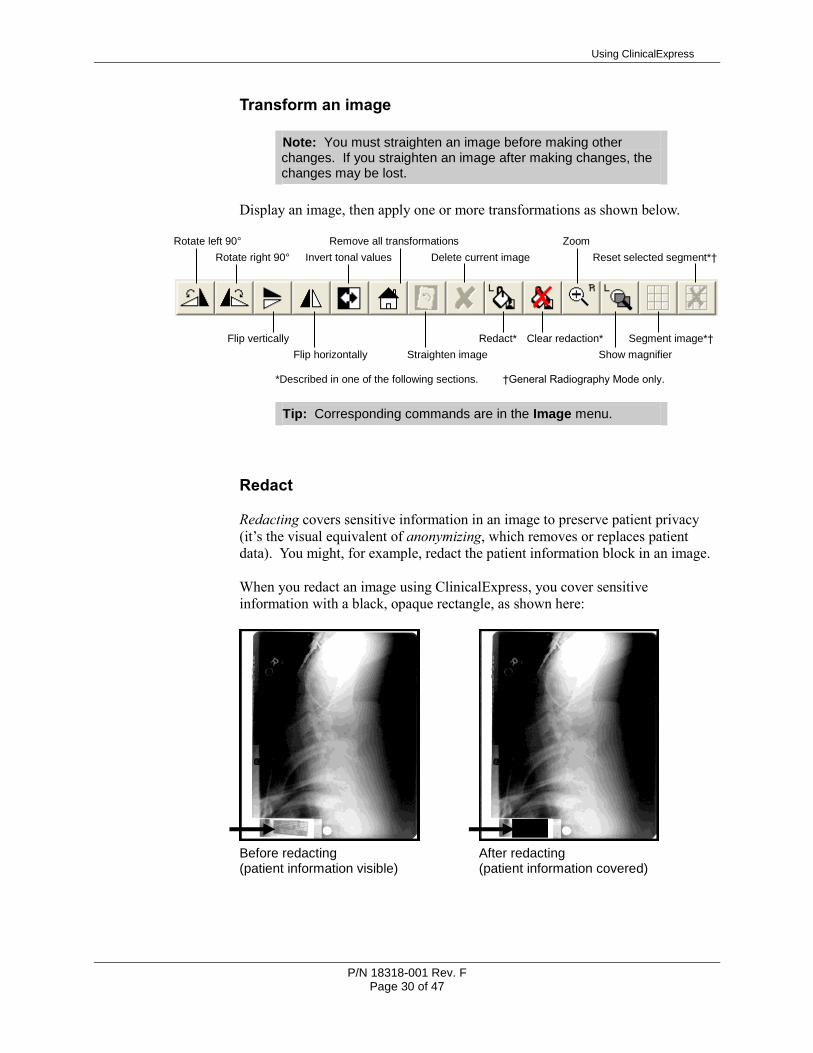
Transform an image
Note: You must straighten an image before making other changes. If you straighten an image after making changes, the changes may be lost.
Display an image, then apply one or more transformations as shown below.
Rotate left 90° Remove all transformations Zoom
Rotate right 90° Invert tonal values Delete current image Reset selected segment*†
Flip vertically Redact* Clear redaction* Segment image*†
Flip horizontally Straighten image Show magnifier
*Described in one of the following sections. †General Radiography Mode only.
Tip: Corresponding commands are in the Image menu.
Redact
Redacting covers sensitive information in an image to preserve patient privacy
(it’s the visual equivalent of anonymizing, which removes or replaces patient
data). You might, for example, redact the patient information block in an image.
When you redact an image using ClinicalExpress, you cover sensitive
information with a black, opaque rectangle, as shown here:
Before redacting After redacting (patient information visible) (patient information covered)
Using ClinicalExpress
P/N 18318-001 Rev. F Page 31 of 47
You can redact multiple areas of an image, and you can remove redactions you
apply within ClinicalExpress. Redacting doesn’t permanently change the
original image. However, if you redact an image, then send it to a target, the
redactions are a permanent part of the copy received by the target. A receiving
workstation, for example, cannot remove redactions.
Unlike anonymizing, which is applied automatically to patient data when
required (as set up by the ClinicalExpress administrator), you must decide when
and where to redact an image. The need to redact will be determined by (among
other considerations), your organization’s patient privacy and HIPAA-compliance
policies.
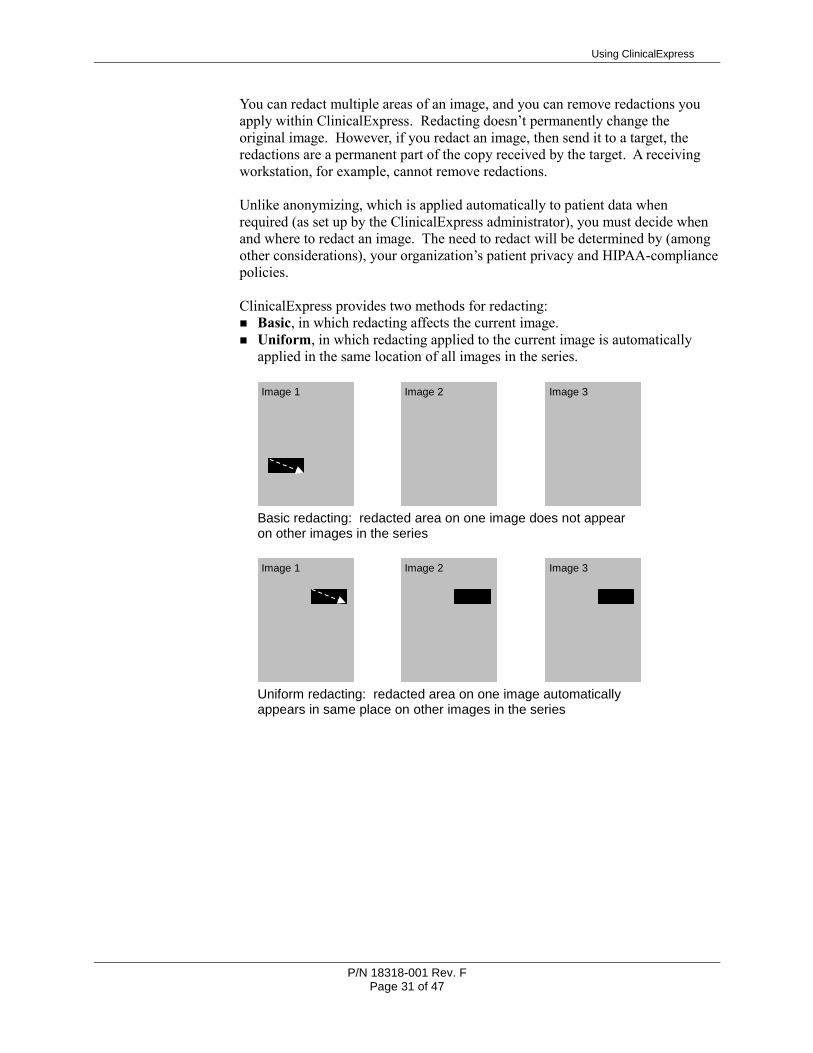
ClinicalExpress provides two methods for redacting:
Basic, in which redacting affects the current image.
Uniform, in which redacting applied to the current image is automatically
applied in the same location of all images in the series.
Basic redacting: redacted area on one image does not appear on other images in the series
Uniform redacting: redacted area on one image automatically appears in same place on other images in the series
Image 1 Image 2 Image 3
Image 1 Image 2 Image 3
Using ClinicalExpress
P/N 18318-001 Rev. F Page 32 of 47
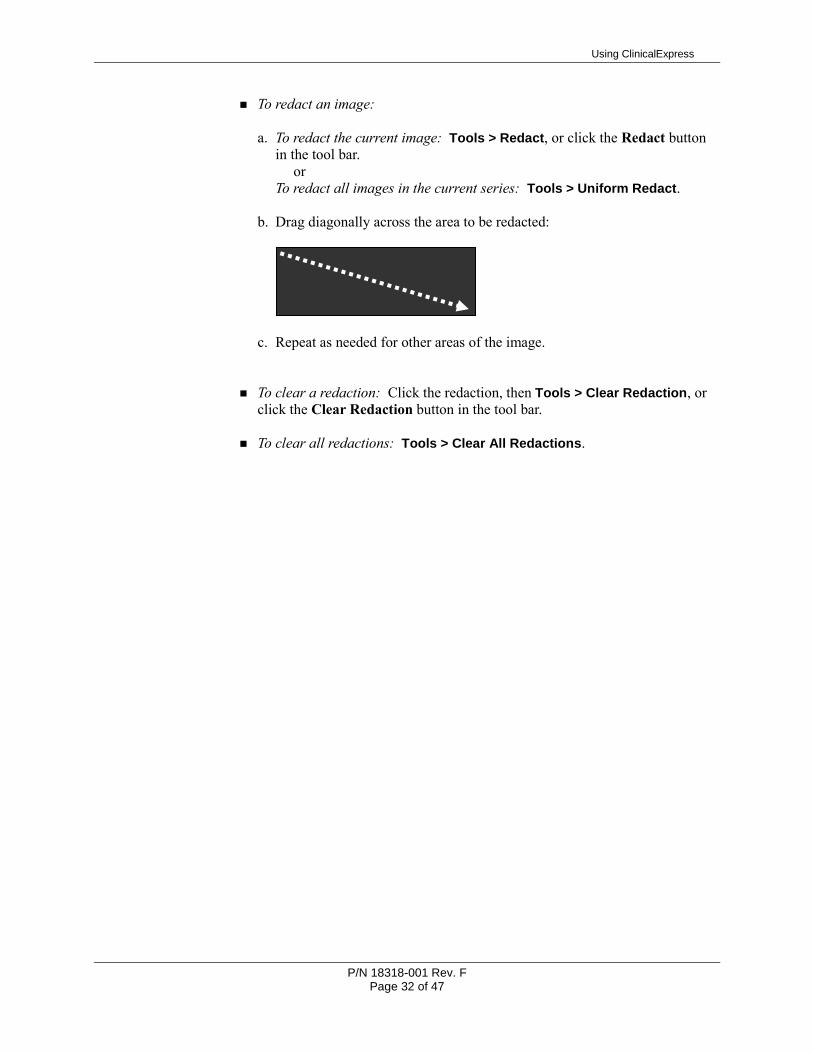
To redact an image:
a. To redact the current image: Tools > Redact, or click the Redact button
in the tool bar.
or
To redact all images in the current series: Tools > Uniform Redact.
b. Drag diagonally across the area to be redacted:
c. Repeat as needed for other areas of the image.
To clear a redaction: Click the redaction, then Tools > Clear Redaction, or
click the Clear Redaction button in the tool bar.
To clear all redactions: Tools > Clear All Redactions.
Using ClinicalExpress
P/N 18318-001 Rev. F Page 33 of 47
Segment an image (General Radiography Mode only)
Some films, such as those output by CT and MRI systems, contain multiple
images on a single film. Often, it is easier to work with individual images rather
than moving around a composite image on the receiving diagnostic workstation.
ClinicalExpress’ segmenting function enables you to divide a composite image
into individual images.
You can choose either of two methods for segmenting an image:
Automatic segmenting: ClinicalExpress analyzes the image and determines
where the image should be divided. This method is quick, and works well for
most composite images. If you are not satisfied with the result, then try...
Manual segmenting: You specify where the image should be divided. This
takes longer than automatic segmenting, but you may prefer the results.
Note: For images that will be segmented, VIDAR recommends digitizing films at 12 bit depth and 300 dpi resolution.
1. Display the composite image you want to segment.
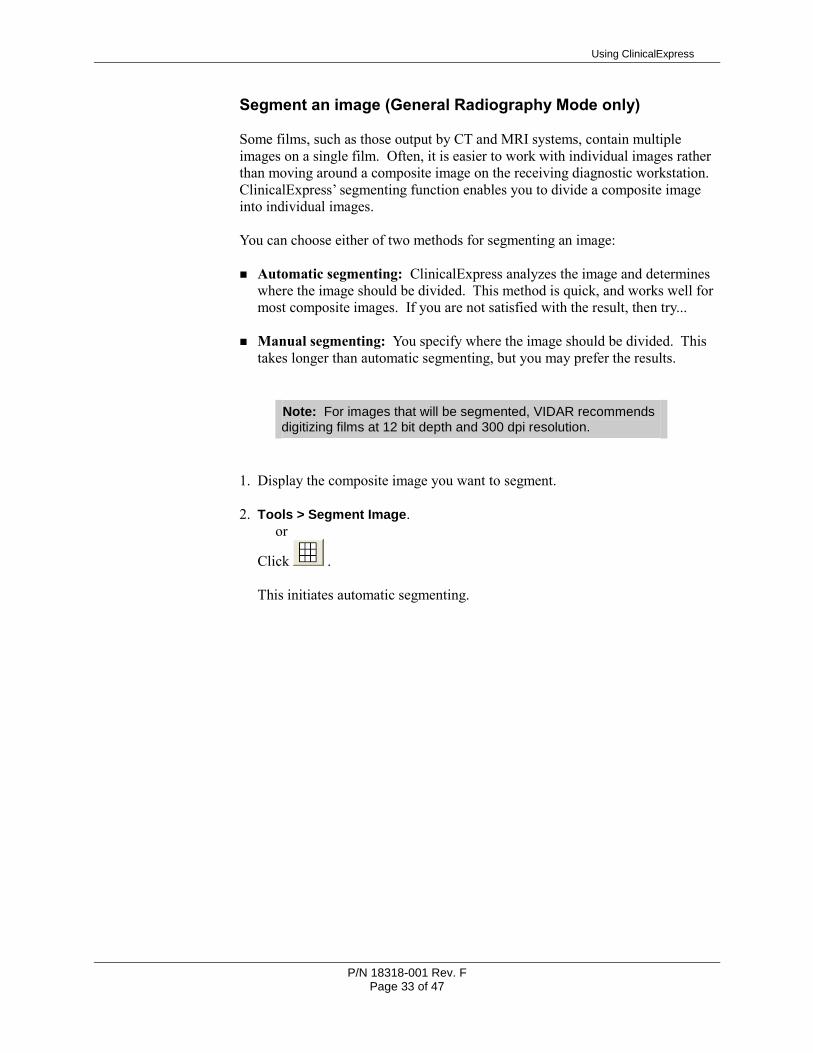
2. Tools > Segment Image.
or
Click .
This initiates automatic segmenting.
Using ClinicalExpress
P/N 18318-001 Rev. F Page 34 of 47
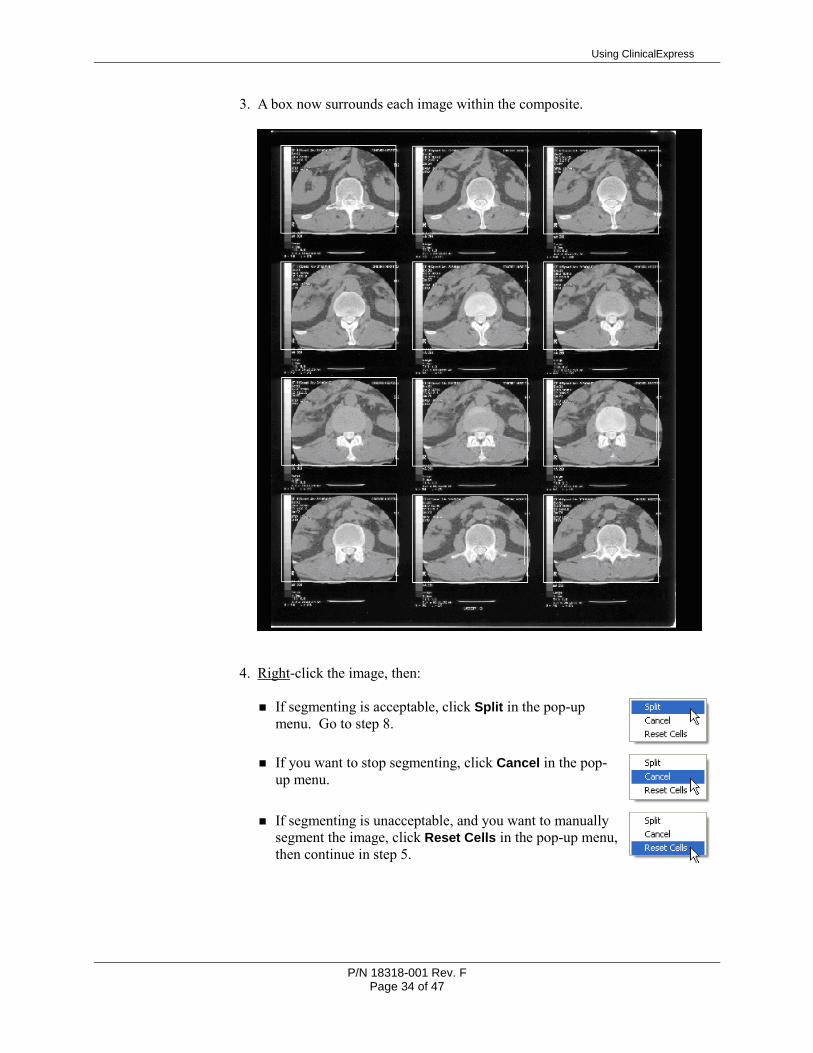
3. A box now surrounds each image within the composite.
4. Right-click the image, then:
If segmenting is acceptable, click Split in the pop-up
menu. Go to step 8.
If you want to stop segmenting, click Cancel in the pop-
up menu.
If segmenting is unacceptable, and you want to manually
segment the image, click Reset Cells in the pop-up menu,
then continue in step 5.
Using ClinicalExpress
P/N 18318-001 Rev. F Page 35 of 47
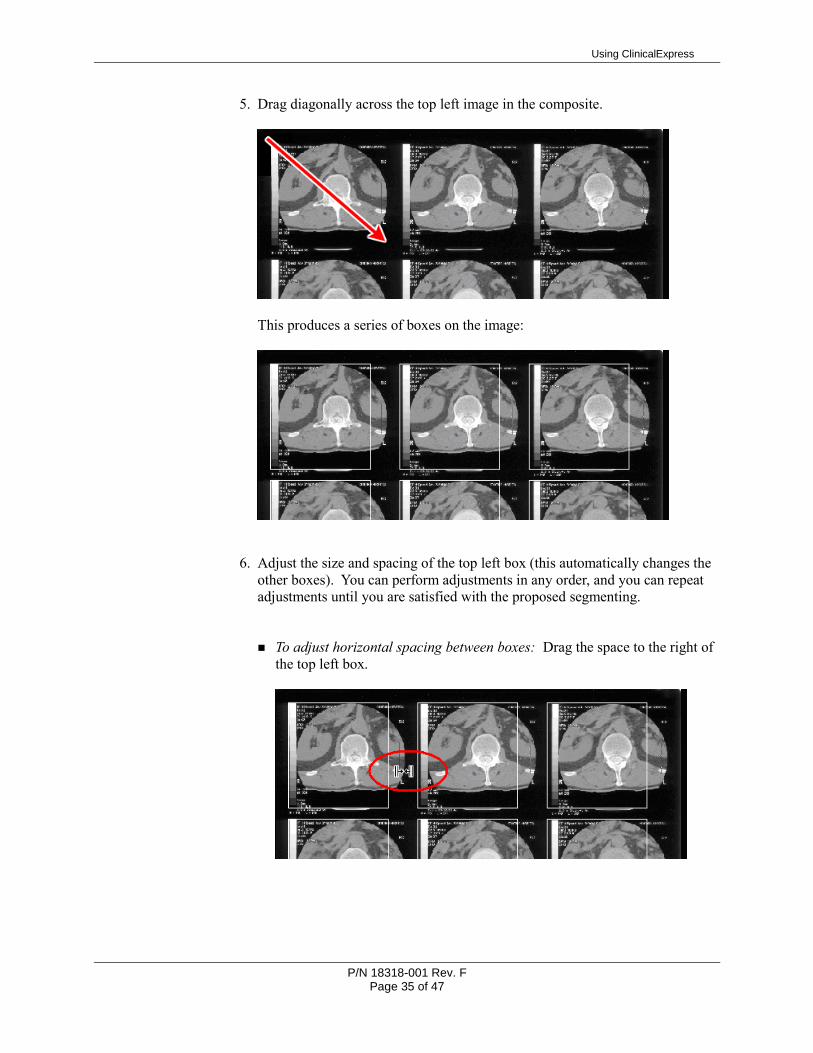
5. Drag diagonally across the top left image in the composite.
This produces a series of boxes on the image:
6. Adjust the size and spacing of the top left box (this automatically changes the
other boxes). You can perform adjustments in any order, and you can repeat
adjustments until you are satisfied with the proposed segmenting.
To adjust horizontal spacing between boxes: Drag the space to the right of
the top left box.
Using ClinicalExpress
P/N 18318-001 Rev. F Page 36 of 47
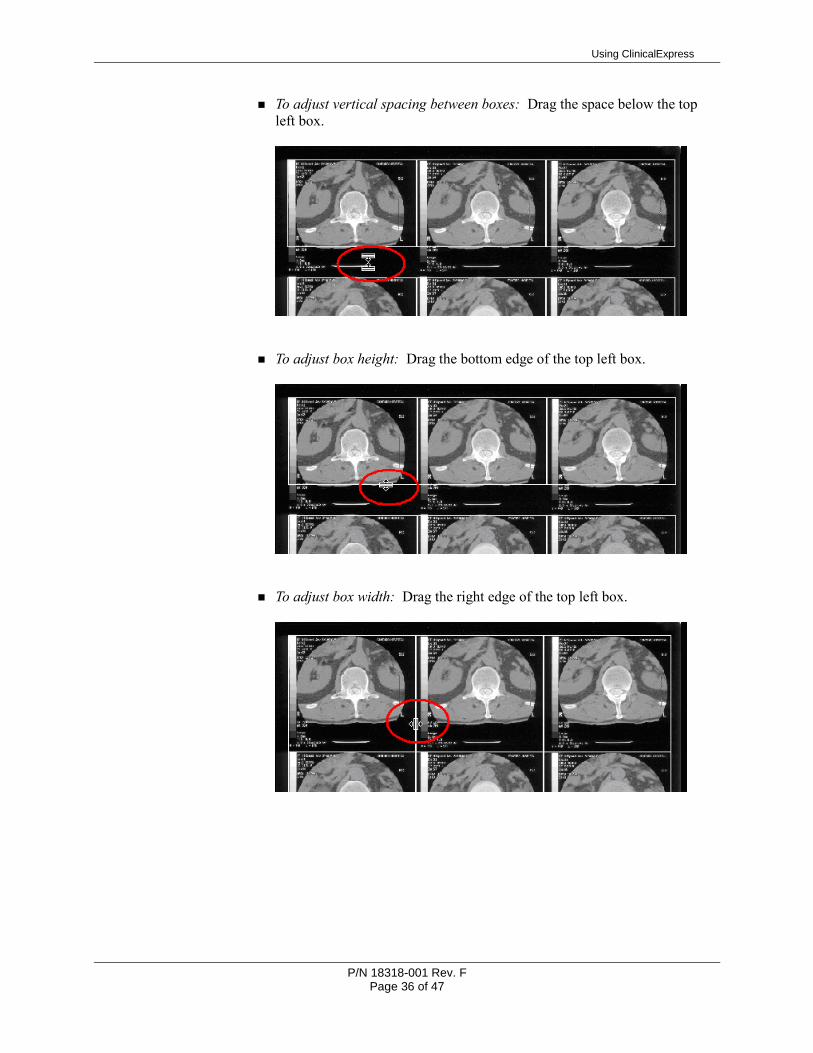
To adjust vertical spacing between boxes: Drag the space below the top
left box.
To adjust box height: Drag the bottom edge of the top left box.
To adjust box width: Drag the right edge of the top left box.

Using ClinicalExpress
P/N 18318-001 Rev. F Page 37 of 47
To move the entire set of boxes: Drag the upper left corner of the top left
box.
7. Right-click the image, then:
If segmenting is acceptable, click Split in the pop-up
menu. Go to step 8.
If you want to stop segmenting, click Cancel in the pop-
up menu.
If segmenting is unacceptable, and you want to again
manually segment the image, click Reset Cells in the pop-
up menu, then continue in step 5.
Using ClinicalExpress
P/N 18318-001 Rev. F Page 38 of 47
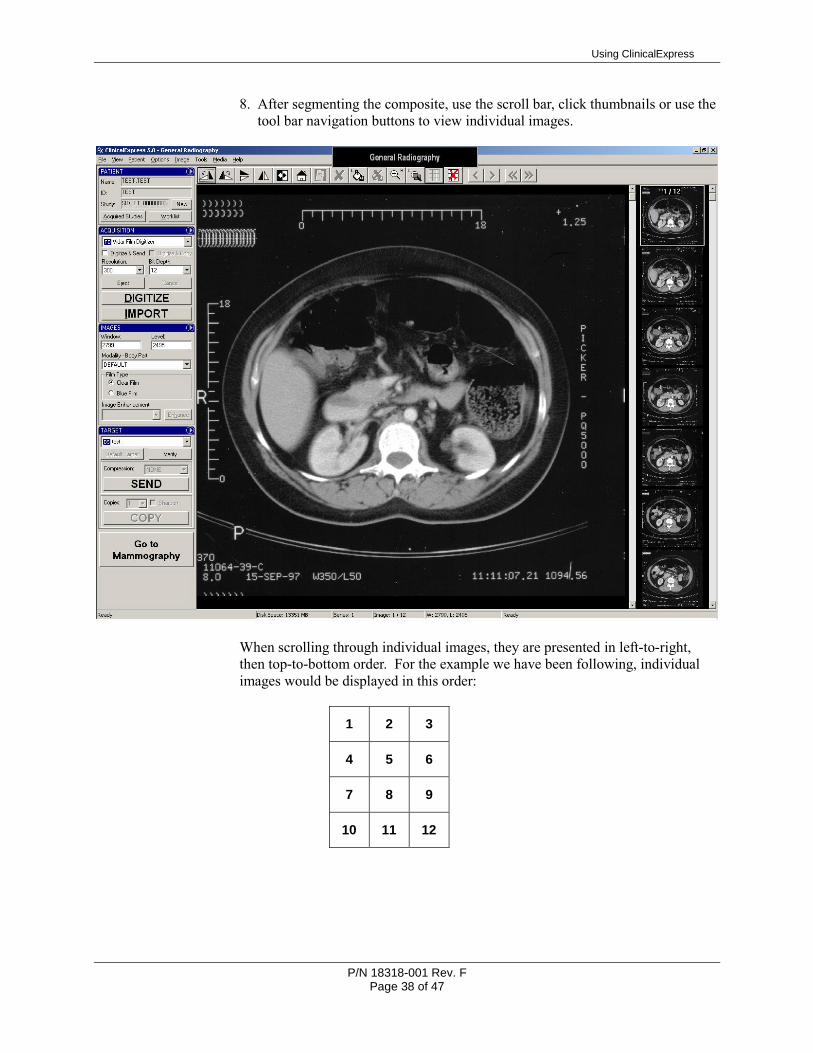
8. After segmenting the composite, use the scroll bar, click thumbnails or use the
tool bar navigation buttons to view individual images.
When scrolling through individual images, they are presented in left-to-right,
then top-to-bottom order. For the example we have been following, individual
images would be displayed in this order:
1 2 3
4 5 6
7 8 9
10 11 12

Using ClinicalExpress
P/N 18318-001 Rev. F Page 39 of 47
To cancel a segmentation:
a. Click the Reset Segments button .
b. You will be asked to confirm the reset:
To complete the reset: Click Yes.
To cancel the reset and keep the segments: Click No.

Using ClinicalExpress
P/N 18318-001 Rev. F Page 40 of 47
D. Select a target, then send the composite.
General Radiography Mode
Mammography Mode
When the images are ready to send (or copy, in General Radiography Mode):
a. Select a Target or click the Default Target button (see above).
Note: If you are not certain where the study should be sent, click the Default Target button. The default was selected by the administrator as the most likely target.
b. Select a Compression: None or Lossless (i.e., Baseline JPEG Lossless).
Note: Compression reduces image file size, thus reducing transmission time. If the Compression list is grayed, the administrator has preset compression or no compression for the target.
c. To send the images: Click the Send button.
or
To copy the images: Click the Copy button.
d. To monitor image transmission: View > Acquired Studies. Pending
transmissions are listed in the lower portion of the window. For details, see
“Working with retained studies,” next in this chapter.
Using ClinicalExpress
P/N 18318-001 Rev. F Page 41 of 47
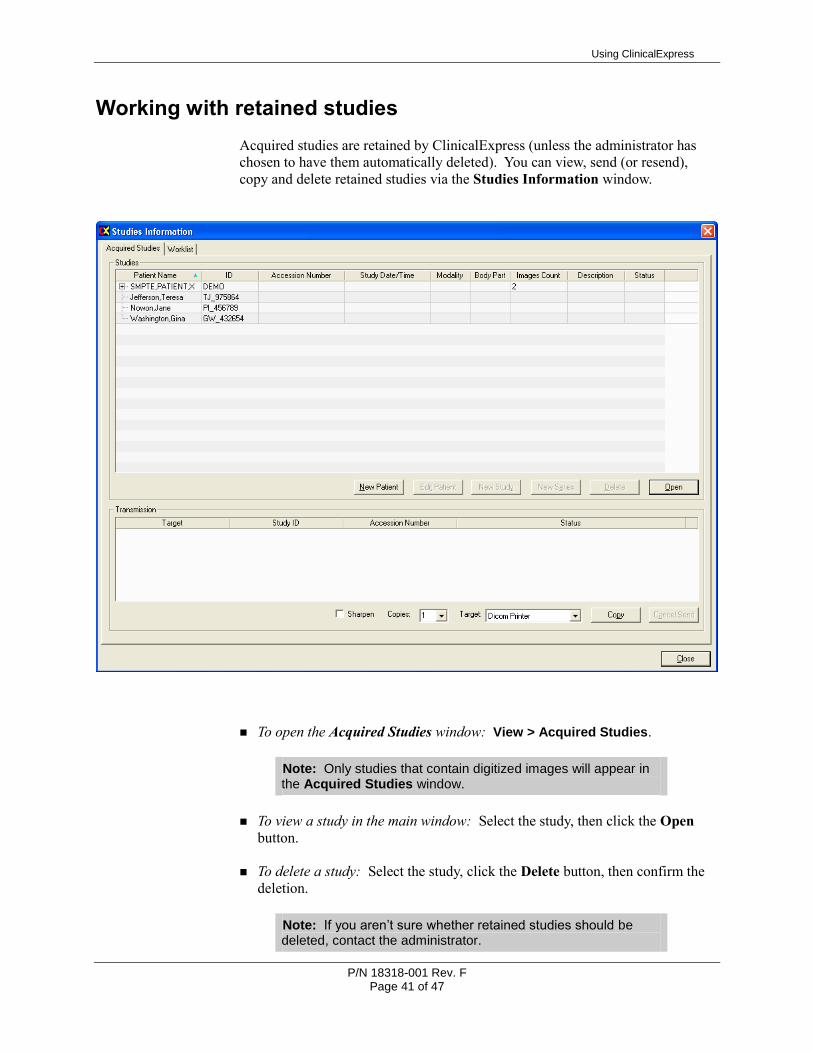
Working with retained studies
Acquired studies are retained by ClinicalExpress (unless the administrator has
chosen to have them automatically deleted). You can view, send (or resend),
copy and delete retained studies via the Studies Information window.
To open the Acquired Studies window: View > Acquired Studies.
Note: Only studies that contain digitized images will appear in the Acquired Studies window.
To view a study in the main window: Select the study, then click the Open
button.
To delete a study: Select the study, click the Delete button, then confirm the
deletion.
Note: If you aren’t sure whether retained studies should be deleted, contact the administrator.

Using ClinicalExpress
P/N 18318-001 Rev. F Page 42 of 47
To send or copy a study:
a. In the Studies list, select the study. Then in the Transmission section...
b. Select a Target.
c. Set options (these vary, depending on the target selected).
c. Click Send or Copy.
During the transmission, the Status column in the Transmission section
displays status information.
To stop a transmission in progress: Click the Cancel Send button.
Using ClinicalExpress
P/N 18318-001 Rev. F Page 43 of 47
Media import and export
Note: The ClinicalExpress Media Import/Export option can be purchased separately.
ClinicalExpress can import studies from, and export studies to, a CD using the
DICOM standard CD format.
To import studies:
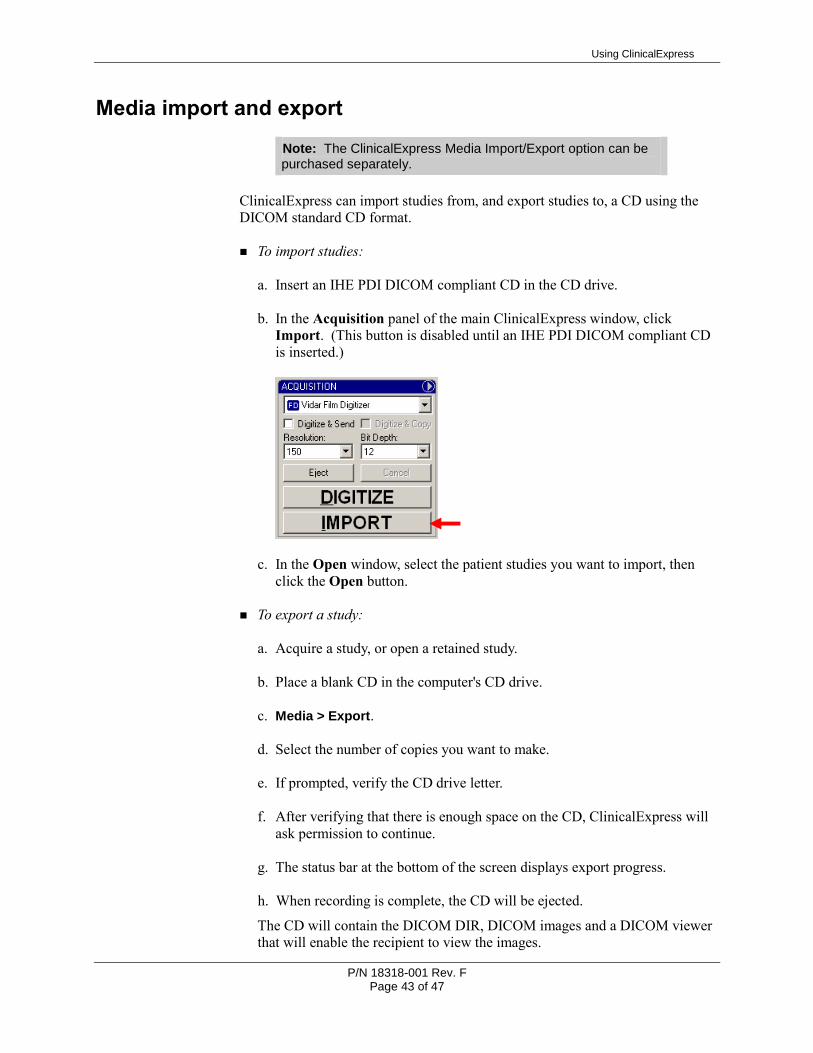
a. Insert an IHE PDI DICOM compliant CD in the CD drive.
b. In the Acquisition panel of the main ClinicalExpress window, click
Import. (This button is disabled until an IHE PDI DICOM compliant CD
is inserted.)
c. In the Open window, select the patient studies you want to import, then
click the Open button.
To export a study:
a. Acquire a study, or open a retained study.
b. Place a blank CD in the computer's CD drive.
c. Media > Export.
d. Select the number of copies you want to make.
e. If prompted, verify the CD drive letter.
f. After verifying that there is enough space on the CD, ClinicalExpress will
ask permission to continue.
g. The status bar at the bottom of the screen displays export progress.
h. When recording is complete, the CD will be ejected.
The CD will contain the DICOM DIR, DICOM images and a DICOM viewer
that will enable the recipient to view the images.
Using ClinicalExpress
P/N 18318-001 Rev. F Page 44 of 47
Scanning documents
While ClinicalExpress is designed for handling digitized film images, it can also
accept images from a customer-supplied document scanner. This capability
enables you to copy and send images of paper documents such as reports and
patient records.
To scan documents, generally follow the instructions provided in “Using
ClinicalExpress,” with these changes and precautions:
In step B1 (under “Set image characteristics, then digitize”), open the drop-
down list in the Acquisition pane, then select the document scanner (under
VIDAR Film Digitizer).
When using the Mammography application and paper scanning, you must
create a layout containing the paper option to properly identify the image as a
secondary capture image when it is sent to PACS. If you have more than one
document you must create more than one paper window in the layout.
Note: Scanned documents cannot be printed.

P/N 18318-001 Rev. F Page 45 of 47
Appendix
P/N 18318-001 Rev. F Page 46 of 47
Preparing to digitize
There are several ways to load patient, study and series data before you digitize films.
P/N 18318-001 Rev. F Page 47 of 47
Index
display
setting characteristics, 27 documents, scanning, 44
images
copying to target, 40 modifying, 27
redacting, 30
segmenting, 33 sending to target, 40
launching, 11
logging in
user, 11
main window, 12, 13
media import and export, 43 Modality Work List
importing data using, 20
new features, 8 patient
identifying, 15 patient data
methods for loading, 46
redacting images, 30 retained studies, 41
segmenting images, 33
series, identifying, 15
study, identifying, 15
system overview, 6
using ClinicalExpress
copying images to target, 40 identifying patient, 15
identifying series, 15
identifying study, 15 launching, 11
main window, 12, 13
media import and export, 43
Modality Work List, 20
modifying images, 27
process for using, 12, 13 redacting images, 30
scanning documents, 44
segmenting images, 33 sending images to target, 40
setting display characteristics, 27 setting image characteristics, 24
working with retained studies, 41
working with ClinicalExpress working with images in General Radiography Mode, 25
working with images in Mammography Mode, 26