Embed Size (px)
Citation preview

Version 5.0
Field BridgeWebpage Module II

From Scene Tab
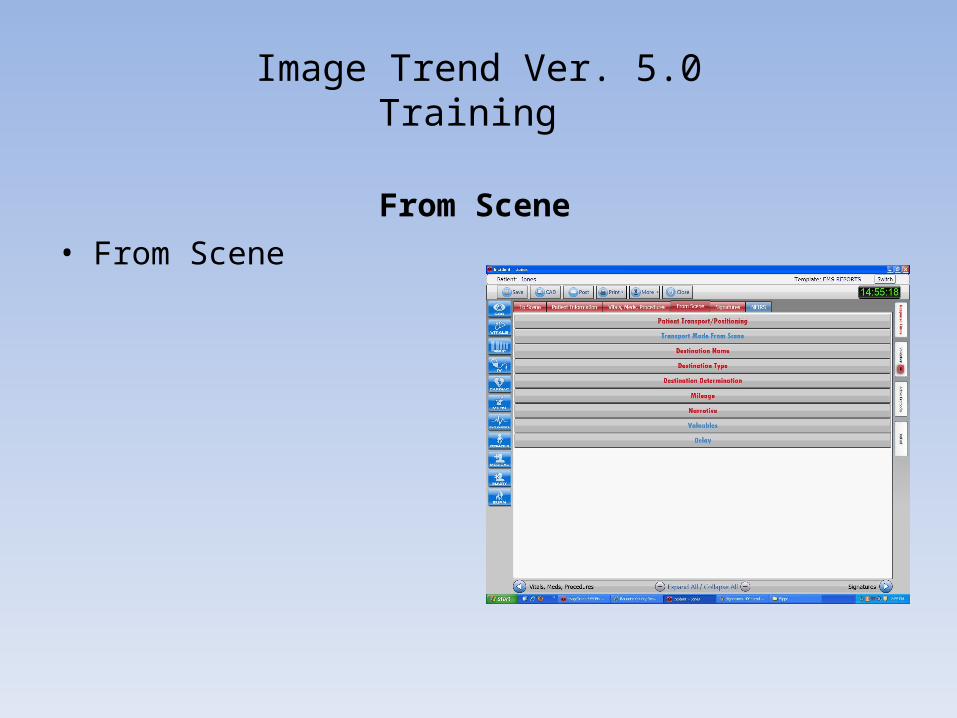
Image Trend Ver. 5.0Training
From Scene• From Scene

Image Trend Ver. 5.0Training
From Scene – Patient Transport / Positioning• All three fields must be completed for
transports. – Patient moved to Ambulance –
• Select from dropdown.
– Patient position in Transport –• Semi-Fowlers is the [DEFAULT],
Change if necessary.
– Patient Moved From Ambulance –• Stretcher is the [DEFAULT], Change if
necessary.

Image Trend Ver. 5.0Training
From Scene – Transport Mode From Scene
• Select the correct type of mode. – [DEFAULT] - No Lights or sirens

Image Trend Ver. 5.0Training
From Scene – Destination Name
• Select the correct destination. – Select the appropriate hospital from
the dropdown.
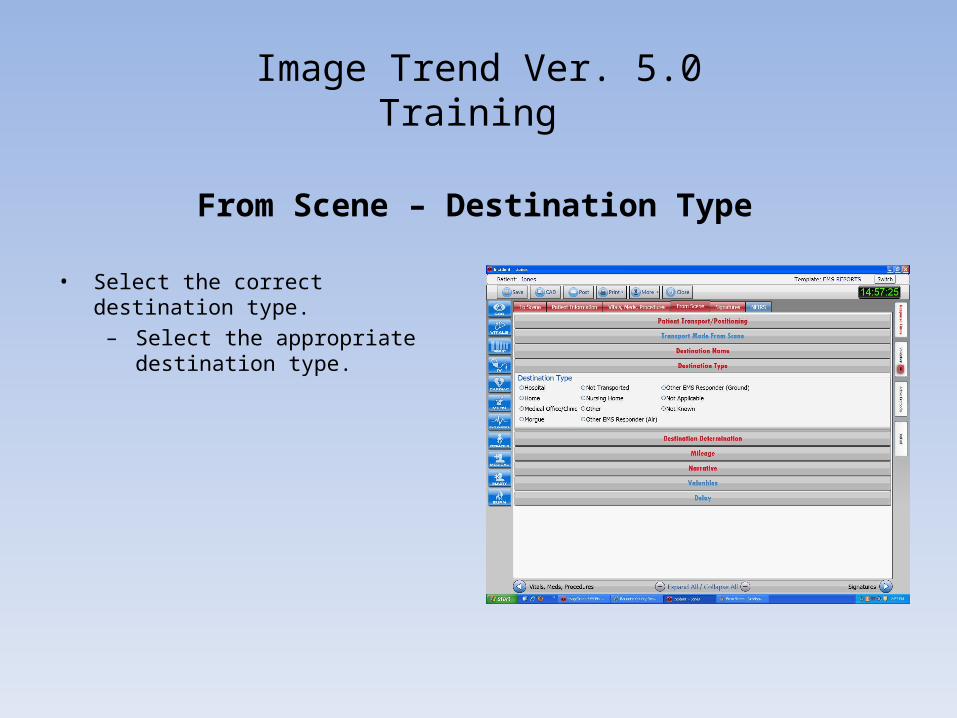
Image Trend Ver. 5.0Training
From Scene – Destination Type
• Select the correct destination type. – Select the appropriate destination
type.

Image Trend Ver. 5.0Training
From Scene – Destination Determination
• Select the correct destination determination.
– Select the appropriate destination determination.

Image Trend Ver. 5.0Training
From Scene – Mileage• Enter correct mileage from the odometer
and it must include “tenths”. This is a NIMSIS
– Starting Mileage – Odometer reading from the station or your beginning location with tenths. Example-[12034.7]
– At Scene – Odometer reading at the scene of the incident. with tenths Example-[12040.2]
– At Hospital – Odometer reading at the hospital. with tenths Example-[12050.4]
– Ending Mileage – Odometer reading when you are back at the station or your original starting place. with tenths Example-[12060.9]
• Enter LOADED mileage carefully. These are “billed miles” and subject to audit.
• If you do not transport, you still need the Beginning and Ending Mileage.

Image Trend Ver. 5.0Training
From Scene – Narrative• Enter your narrative.
– Free form text with spell check. Be specific in your narrative.
– You can use the CHARTED narrative option, HOWEVER, it must be updated and reviewed prior to completion.
– Remember, if you make note of a Procedure, an EKG, a set of Vitals, or Meds administration, YOU MUST document it under the “Vitals, Meds, Procedures TAB.
• Also remember – – If you didn’t document it , in the court of
law, it didn’t happen. – It’s not what you remembered, it’s what
you wrote down.

Image Trend Ver. 5.0Training
From Scene – Valuables
• Enter any valuables, belongings the patient may have entrusted you with.
– You can select from the dropdown, or enter others not listed.

Image Trend Ver. 5.0Training
From Scene – Delay
• Document any delays you may have encountered.
– [DEFAULT] is set to NONE on all four. • Really only need to document significant delays. • Delays by a one minute train passing versus a
stopped train.• Delays by having to run from outside versus you
were coded.• Delays by taking extra time to load a patient versus
waiting for animal control to gain access to a patient.
• Delays by taking extra time to complete a long narrative versus hospital not finding you a room for 10 minutes.

Signature Tab

Image Trend Ver. 5.0Training
Signatures
• Signatures
Image Trend Ver. 5.0Training
Signatures – Patient Signature
• Signatures– Select the HIPAA Consent-
• Try to explain what HIPAA is.
– Select the Authorization to Billing.• Try to explain Fauquier County Compassionate
Billing policy.• Billing agency will bill your insurance company first.• If no insurance – they will bill the patient--- BUT if
they are unable to pay, the bill is waived.
– Select the Waiver of Liability only of you obtain a Patient Refusal.
– Have Patient sign whenever possible.• If not possible – (unresponsive)- Just take the pen
and put your initials in the field.

Image Trend Ver. 5.0Training
Signatures – Against Medical Advise
• If Patient Refuses transport.– Check the box in the top left called – Attach AMA to
this Incident.
• Fill out as much information as possible.
• Remember this is to cover you.

Image Trend Ver. 5.0Training
Signatures – Technician Signature
• Technician signs all reports.

Image Trend Ver. 5.0Training
Signatures – Hospital / Receiving Agent Signature
• Signature obtained by nurse you are turning patient over to.
• If only BLS procedures performed, this is the only signature you need from the hospital.

Image Trend Ver. 5.0Training
Signatures – Medical Control / Physician Signature
• Signature obtained by any ER Doctor.
• If ALS procedures performed, you must obtain a signature from the Doctor.

Image Trend Ver. 5.0Training
Signatures – Controlled Substance Waste Signature 1
• Signature must be obtained by any ER nurse if you waste NARCOTICS.
• If NARCOTICS are used, you must obtain a signature from the Doctor.
• When replacing the NARCOTICS box:– Box must contain all narc’s not used or wasted.– Red tag.– Printed copy of the Run Sheet with a signature of
the Doctor. If you have unused narcotics, the run form must also contain the signature of the nurse that witnessed you waste these narcotics.

Image Trend Ver. 5.0Training
Signatures – Controlled Substance Waste Signature 2
• Narcotics that were wasted must be listed below in the dropdown.
• If more than two narcotics were partially used, document in the narrative and let Image Trend Administrator know.

POWER TOOL BARDown Left Side of Screen

Image Trend Ver. 5.0Training
Power Tools
• GCS• Select the blue button for each
test:– Eye– Verbal– Motor– Qualifier
• Your GCS score is totaled and posted in the Vitals tab automatically.
• Verify your times field.

Image Trend Ver. 5.0Training
Power Tools
• VITALS• Enter appropriate data for each
check:– Pulse– Respirations– Blood Pressure– BP Location– SpO2– Blood Glucose
• Your Vitals are posted in the Vitals tab automatically.
• Verify your times field.

Image Trend Ver. 5.0Training
Power Tools• PQRST• Select the blue button for each test:
– Provoked– Quality– Region– Radiation– Duration– Severity– Narrative – Short informative comments
only.
• Your information is posted in the Vitals tab automatically.
• Verify your times field.

Image Trend Ver. 5.0Training
Power Tools
• CARDIAC• Select the correct medication as
it is administered. It will display meds and times to the right.
• Press OK at the bottom and your meds information is posted in the Vitals tab automatically.
• Verify your times field.

Image Trend Ver. 5.0Training
Power Tools
• MEDS• Select the green button for each
Medication administered:– Medication– Dose– Unit of measure– Route– Site– Response
• Your MEDs are posted in the Vitals tab automatically.
• Verify your times field.

Image Trend Ver. 5.0Training
Power Tools
• PEDIATRIC• Select the correct weight of the
child: Example 26-30 lbs
– Correct doses are displayed for that size child. No need for the Pediatric Emergency Tape. (AKA Broselow)

Image Trend Ver. 5.0Training
Power Tools
• Same as under the Vitals, Meds, Procedures Tab.
• Click on the anatomical location of the medical incident and add information.
• Open with caution in public.

Image Trend Ver. 5.0Training
Vitals, Meds, Procedures – Assessments – Injury
• Same as under the Vitals, Meds, Procedures Tab.
• Click on the anatomical location of the injury and add information.
• Open with caution in public.

Image Trend Ver. 5.0Training
Power Tools• Same as under the Vitals, Meds,
Procedures Tab.
• Click on the anatomical location of the burn. – One click causes 1st degree.(purple)– Two clicks displays 2nd degree.
(yellow)– Three clicks displays 3rd degree.
(red)• System also calculates BSA as you click.
• Open with caution in public.

Down Right Side of Screen

Image Trend Ver. 5.0Training
Right Side of Screen
• Response Times• All fields should auto-fill from the
CAD data with the exception of:– Arrived Patient
• Only needed if you made patient contact.
– In Service• If you POST before you enter the In
Service time, GO BACK AND FIX and RE-POST.
– This is one of the single most points of STATE failure.
• Loading CAD data again here is a good idea.

Image Trend Ver. 5.0Training
Right Side of Screen
• Validation• Now we are synchronized with
the state codes: If you reach 100% here, we actually are 100% with the state.
• By selecting this tab, you can see why we are not 100% complete and how many points the STATE takes off.
• It will take you to the screen with the missing field(s).

Image Trend Ver. 5.0Training
Right Side of Screen
• Active Protocols• Select this tab and you get a
dropdown where you can select active protocols.
– Placing a check mark in the fields will auto-fill the vitals tab.

Image Trend Ver. 5.0Training
Right Side of Screen
• JotPad• Free form note pad. These notes
become part of your overall report.

Across the top

Image Trend Ver. 5.0Training
• Laptop screen overview

Image Trend Ver. 5.0Training
• Save Button – Saves the report to the laptop only.
Top Line View

Image Trend Ver. 5.0Training
• CAD Button – Loads CAD data to the report.
• Can be used anytime during the call.• Will only overwrite the fields
supplied by CAD. • Incident number• Location of call• Times
• Will not overwrite the any other fields you entered.
Top Line View

Image Trend Ver. 5.0Training
• POST Button – Prepares report to be uploaded (POST) to Minnesota (Rescue Bridge).
Top Line View

Image Trend Ver. 5.0Training
• POST Button – Note that the system is uploading to Rescue Bridge.
Top Line View

Image Trend Ver. 5.0Training
• POST Button – Note that the system is validating the report for Rescue Bridge.
Top Line View

Image Trend Ver. 5.0Training
• POST Button – Posting is now complete.
• HOWEVER – Remember the POST/SYNC does two things.
• POST – Posts the report to Rescue Bridge.• SYNC – Synchronizes the Field Bridge.
• If the POST fails – SYNC will still show 100% complete.
• Don’t be fooled.
Top Line View

Image Trend Ver. 5.0Training
• PRINT Button – Prepares report to be printed.
• This may take a few seconds because it is generating a PDF file.
• Print one copy for the hospital.• If you used NARC’s print two copies.
• One for the hospital.• One to accompany the NARCs to the
Pharmacy.
Top Line View

Image Trend Ver. 5.0Training
• MORE Button –
• History – • Tracks all activity for the report.
Top Line View

Image Trend Ver. 5.0Training
• MORE Button –
• Transfer Run– • Ability to send data to another agency.
• Example - • Catlett starts a call and Medic 1 rendezvous. Catlett
can upload the data they have acquired and Medic 1 can complete from there.
Top Line View

Image Trend Ver. 5.0Training
• MORE Button –
• Attach – • Can attach additional documents to the
report. Currently not used.
Top Line View

Image Trend Ver. 5.0Training
• MORE Button –
• Delete – • You can delete the entire report if desired.
• Not recommended.
Top Line View

Image Trend Ver. 5.0Training
• CLOSE Button –
• Closes that report –• Returns you to the Dash Board.
Top Line View

Image Trend Ver. 5.0Training
• Dash Board will display a check mark next to the run.
Verify POST complete

Any Questions ?