Embed Size (px)
Citation preview

Version 01-26-16(See back cover)

owner or the roofing contractor. Both in-stock and custom-made flashings and trims are availablein all colors as well.
Gulf Coast’s PBR panel is produced in a bare,AZ-55 hot dipped Galvalume® finish conform-
ing with ASTM A-792 Structural SteelGrade 80. The AZ-55 Galvalume® finishis not only durable and cost effective, butoffers the reflectivity which is so valuable
here in the South. The paint system employed on our painted panels offers optimum exteriorprotection plus superior resistance to corrosion and ultraviolet radiation that conforms with ASTMA-755. All of Gulf Coast Supply’s PBR finishes are of the highest known quality in the industry.
Gulf Coast panels and trim are fabricatedusing state-of-the-art computerized equipment atour 28-acre facility near Horseshoe Beach,Florida, to assure uniformity and consistency inproduct manufacture. Panels are roll-formed tothe lengths specified by customers in either 26- or24-gauge high-tensile steel, in either Galvalumeor any of more than twenty colors, ready foreither customer pickup or on-site delivery. All ofour PBR panels carry limited coil manufacturer’sfinish warranties of at least 25 years. Your GulfCoast representative is waiting to assist you inmaking the best choice for your particular roofingneeds.
Gulf Coast also stocks special low profilereflective foil insulation, roll-up doors, fasteners,sealants, closures, trims, and other accessories to meet every need of either the do-it-yourself home
®
Picture ofGulf Coast
The Gulf CoastPBR Roofing Panel
The Gulf Coast 26-gauge PBR panel is astrong, durable, economic, and attractiveanswer to the growing demand for metalroofing and siding needs in Florida andsouthern Georgia. PBR panels provide a 36-inch net coverage with inch ribs ontwelve-inch centers that provide the strengthyou need for industrial, commercial, agricul-tural, and utility buildings, as well as homesand businesses.
1¼
Figure 3 The PBR panel12”
1¼”
Figure 2 The 4 locations of Gulf Coast Supply.
Figure 1 The Horseshoe Beach Gulf Coast Supplyoffice (left) and manufacturing facility.
GULF PBR DETAIL MANUAL™GULF PBR DETAIL MANUAL™GULF PBR DETAIL MANUAL™
1(888) 393-0335 • FAX (352) 498-7852 • www.GulfCoastSupply.com 2
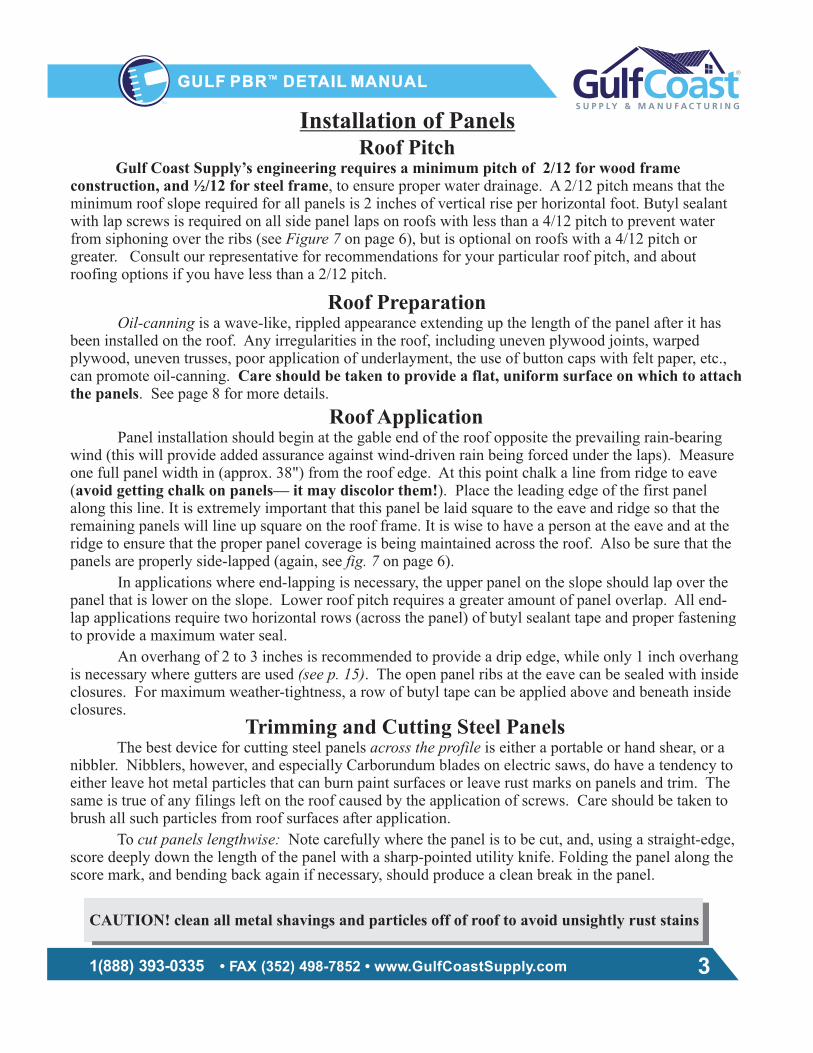
Roof PitchGulf Coast Supply’s engineering requires a minimum pitch of
to ensure proper water drainage. A 2/12 pitch means that theminimum roof slope required for all panels is 2 inches of vertical rise per horizontal foot.
to prevent waterfrom siphoning over the ribs (see on page 6), but is optional on roofs with a 4/12 pitch orgreater. Consult our representative for recommendations for your particular roof pitch, and aboutroofing options if you have less than a pitch.
Figure 7
2/12 for wood frameconstruction, and ½/12 for steel frame,
2/12
Butyl sealantwith lap screws is required on all side panel laps on roofs with less than a 4/12 pitch
Roof Application
In applications where end-lapping is necessary, the panel on the slope should lap over thepanel that is lower on the slope. Lower roof pitch requires a greater amount of panel overlap. All end-lap applications require two horizontal rows of butyl sealant tape and proper fasteningto provide a maximum water seal.
Panel installation should begin at the gable end of the roof opposite the prevailing rain-bearingwind (this will provide added assurance against wind-driven rain being forced under the laps). Measureone full panel width in from the roof edge. At this point chalk a line from ridge to eave( ). Place the leading edge of the first panelalong this line. It is extremely important that this panel be laid square to the eave and ridge so that theremaining panels will line up square on the roof frame. It is wise to have a person at the eave and at theridge to ensure that the proper panel coverage is being maintained across the roof. Also be sure that thepanels are properly side-lapped (again, see on
upper
(across the panel)
An overhang of 2 to 3 inches is recommended to provide a drip edge, while only 1 inch overhangis necessary where gutters are used . The open panel ribs at the eave can be sealed with insideclosures. For maximum weather-tightness, a row of butyl tape can be applied above and beneath insideclosures.
avoid getting chalk on panels— it may discolor them!
fig. 7
(see p. 15)
(approx. 38")
page 6).
Trimming and Cutting Steel PanelsThe best device for cutting steel panels is either a portable or hand shear, or a
nibbler. Nibblers, however, and especially Carborundum blades on electric saws, do have a tendency toeither leave hot metal particles that can burn paint surfaces or leave rust marks on panels and trim. Thesame is true of any filings left on the roof caused by the application of screws. Care should be taken tobrush all such particles from roof surfaces after application.
To Note carefully where the panel is to be cut, and, using a straight-edge,score deeply down the length of the panel with a sharp-pointed utility knife. Folding the panel along thescore mark, and bending back again if necessary, should produce a clean break in the panel.
across the profile
cut panels lengthwise:
Installation of Panels
CAUTION! clean all metal shavings and particles off of roof to avoid unsightly rust stains
Roof PreparationOil-canning is a wave-like, rippled appearance extending up the length of the panel after it has
been installed on the roof. Any irregularities in the roof, including uneven plywood joints, warpedplywood, uneven trusses, poor application of underlayment, the use of button caps with felt paper, etc.,can promote oil-canning.
. See page 8 for more details.Care should be taken to provide a flat, uniform surface on which to attach
the panels
GULF PBR DETAIL MANUAL™GULF PBR DETAIL MANUAL™GULF PBR DETAIL MANUAL™
1(888) 393-0335 • FAX (352) 498-7852 • www.GulfCoastSupply.com 3

PBRMetal Roofing
& SidingTrims
GR-5 SculpturedRake (p. 13)
TC-1 TrackCover(p. 15)TC-1 TrackCover(p. 15)
Base Drip(p. 14)
Base Drip(p. 14)
Inside Corner(p.13)
Inside Corner(p.13)
Gutter(p. 15)Gutter(p. 15)
Figure 4 Common trims assiciated with PBR roofing panels
SlidingDoor
Roll-up Doorp. 16
Roll-up Doorp. 16
EF-5 Gabletrim (p. 11)
Ridge cap(p. 9)
Valley(p. 12)
Endwall flashing(p. 11)
SidewallFlashing
(p. 10)
Eave drip(p. 10)
Eave drip(p. 10)
J-Channel(p.14)
J-Channel(p.14)
Drip Cap(p. 14)
Drip Cap(p. 14)
TransitionFlashing (p.12)
GR-6 Rake andCorner (p. 11,13)
GULF PBR DETAIL MANUAL™GULF PBR DETAIL MANUAL™GULF PBR DETAIL MANUAL™
1(888) 393-0335 • FAX (352) 498-7852 • www.GulfCoastSupply.com 4

Ordering and Applying Trim
The most common flashing for metal roofing is the , which is used at the peak of aroof where two opposing roof slopes join. Other flashings includeand , and (see diagram on right for application). Eave flashings include
and both of which are often applied above trim. When roof pitchexceeds 5/12 (a 5 inch rise in 12 inches), the slope of the roof should be mentioned when orderingridge caps, endwalls, and eave drip. When a steeper roof slope meets a lesser slope, both slopesshould be mentioned when ordering transition flashing.
At the gable edge the use of gable trim adds to the appearance of the structure and protectsthe fly-rafter, and sidewall flashing is used where the of a panel butts up against an adjacentwall. In either case, the installer should be careful to seal between the gable rake or sidewall andpanel with butyl sealant tape, and t p the slope of the roof withthe appropriate screws. If eave drip is used on the gable, the number of 90 degree eave drip for thegable should be specified separately from that used on the drip edge when ordering.
To prevent penetration of water, insects, and debris at the ridge, either solid or ventedclosure material is inserted between the ridge cap and the top end of the panel ( ).Screws are applied through the ridge cap, closure, and each rib of the panels. 2½" wood screws orself-drilling lap screws should be used for attaching ridge caps.
ridge captransition flashing end wall
sidewall flashings valleysgable flashing eave drip, fascia
,
side
shown on p. 9
o fasten the trim every 6" to 12" u
Ordering Roof Panels and Screws
Care should be taken to order panels of the correct length to avoid having to makecorrective measures after purchase. Panel lengths should fall 2 to 3 inches short of the ridge
, and should extend 2 to 3 inches past the eave to allow a sufficient dripedge (except as noted on pg. 3 concerning gutters). The Gulf Coast sales personnel are ready toassist customers with information specific to their particular roof.
Specially-washered screws applied through the flat of the metal is the most recommendedmethod used to attach roofing panels.
for ridge-cap application and other special needs. For attachment tometal purlins, a minimum of #12 x 1” hex head TEK screw or equivalent is recommended, and forstitching panels and trim to panels, we recommend #14 x 7/8” lap TEK self-drilling screws.
for more information on screw spacing and ordering.
whena vented ridge is desired
Seepages 6 and 7
1½ inch screws are the commonly recommended length.2½ inch screws are available
Keep Materials Dry!
Paint and finishes of Gulf Coast panels and trim are designed to withstand severe rain andwet weather conditions. Neither paint, galvanized, or Galvalume finishes, however, are designed tobe in continuous contact with water for long periods of time.
Be sure to store material that will not beinstalled immediately in a dry location. Wet material should be air-dried and re-stacked ifinstallation is not planned right away.
Damage will result if uninstalledpanels or trim are allowed to remain wet in storage.
TC-1 TrackCover(p. 15)
Base Drip(p. 14)
Inside Corner(p.13)
Gutter(p. 15)
Roll-up Doorp. 16
Eave drip(p. 10)
J-Channel(p.14)
Drip Cap(p. 14)
GULF PBR DETAIL MANUAL™GULF PBR DETAIL MANUAL™GULF PBR DETAIL MANUAL™
1(888) 393-0335 • FAX (352) 498-7852 • www.GulfCoastSupply.com 5

Panel lap detail
Figure 6
underlap
On roofs with less than 3/12 pitch, lapscrews and butyl tape (or approved roofingsealant) must be applied at the panel lap to keepwater from overflowing the lap. Note that the
side of the panel has a distinct purlin-bearing leg that rests on the roof decking.
Apply sealantto lap
Lap Screw
deckingpurlin-bearing leg
overlap
How to Figure and Apply Screws
Gulf Coast Supply carries screws in 3 different lengths: 1 inch, 1½ inch, and 2 ½ inch. 1-inch screws willbarely penetrate a 1x4, but the 1½ inch are the best all-purpose size.
The above table (Figure 6) can be used tofigure approximate quantities of screws for various purlin spacings and sizes of roofs. For 2-foot spacingbetween rows of screws, multiply the total linear feet of metal times 2.
your order is 1250 feet of PBR roofing. 1250 x 2 = 2500 screws
Please confirm all estimates with your Gulf Coast representative when you place your order.
Codes allow re-roofing over shingles without the use of battens providing the roof has been checkedby a licensed roofing contractor to insure levelness and pullout integrity.
PBR metal roofing can be separated from the moisture barrier by minimum, nominal 1"x 3" yellowpine battens spaced on maximum 24" centers, or according to ASCE calculations where applicable. Since
, Gulf Coast Supply sells only untreated battens.
CAUTION: Battens must be fastened to the roof deck with minimum #6 screws at 12" on-center, ortwo minimum 8d common or pneumatic nails spaced 8" on-center, or one every 4" on-center (or byapplicable calculations according to ASCE 7-98).
For solid decking, at least ½-inch structural plywood (5/8" for Metro-Dade new construction and forany high velocity wind zone of 120 and above) supported on rafters at a maximum of 24" on center isrequired. In residential applications, building codes require a plywood deck with the use of #30 felt toprovide adequate thermal and moisture barrier protection.
If care is taken, metal roofing application can be aided by pre-drilling panels, allowing screws to goquickly and accurately into the desired spacing. Pre-drilling will work provided that pilot holes
in the proper locations on panels. Purlin spacing must be uniform and carefully measured.
2½-inch wood screws or self-drilling lap screws are necessary for attaching ridge caps.
direct contact between pressure treated lumber and metal roofing must be avoided in order toprevent potential corrosion
Battens must be installed to support the entire widthand length of ridge, eave, hip, valley, and gable-end trims.
Example:
®
are placedaccurately
Screw (purlin) Spacing
linea
rfe
etof
pan
els
inyour
ord
er
12 inch 18 inch 24 inch 30 inch50100200300400500600700800900100011001200
190 143 95 76380 285 190 152760 570 380 304
1140 855 570 4561520 1140 760 6081900 1425 950 7602280 1710 1140 9122660 1995 1330 10643040 2280 1520 12163420 2565 1710 13683800 2850 1900 15204180 3135 2090 16724560 3420 2280 1824
Figure 5 PBR panel screw calculation chartFigure 5 PBR panel screw calculation chart
under-lapside
over-lapside
Ridge
Eave
Ridge
Eave
Eave
Gable
GULF PBR DETAIL MANUAL™GULF PBR DETAIL MANUAL™GULF PBR DETAIL MANUAL™
1(888) 393-0335 • FAX (352) 498-7852 • www.GulfCoastSupply.com 6

Figure 5 PBR panel screw calculation chart
Gulf Coast PBR Roofing Panels
under-lapside
under-lapside
over-lapside
over-lapside
RidgeRidge
EaveEave
On Center
Spacing
Figure 7see Fig. 6
Screws should be placed on both sides of the ribs at both eave and ridge,and on the overlap side of the panel lap ( ).also
RidgeRidge
EaveEave
Zone 1
EaveEave
Zone 3
Zone 2 a
a
GableGable
a
Fastening Schedule for Various Wind Speeds – minimum 1/2:12 roof pitch
Fastener pattern
Type 1
Type 2
Fastener pattern
a
Fastener patterns Type 1 and Type2 are shown at left, row spacings areshown in the table above, and roofzones are displayed on left below.
shows a simple illustration ofthe patterns. Note that fastener patternType 2
, as well as inadditional areas according to whichroof zone the fasteners fall in.
Each “zone” of the roof has its ownscrew requirements. isdefined as 10% of the minimum widthof the building, or 40% of the meanheight of the roof, whichever issmaller; however, cannot be lessthan either 4% of the minimum widthof the building, or 3 feet.
Figure 7
is required at top, bottom, andend laps of each panel
Dimension a
Zone 3 #9-15 x 1½*
Wind Speed Zone
RoofZone
Attaching to:Fastener SizeOn CenterSpacing
On CenterSpacing
On CenterSpacing
Zone 2 #9-15 x 1½*
130 MPH 140 MPH 150 MPH
Zone 1min. 15/32plywood
#9-15 x 1½*
min. 15/32plywood
min. 15/32plywood
24"Type 1
24"Type 1
24"Type 1
24"Type 1
24"Type 1
160 MPH
24"Type 1
On CenterSpacing
12"Type 2
12"Type 2
12"Type 2
12"Type 2
24"Type 1
24"Type 2
*Screw types: Woodgrip or lifetime screws (example: WoodZacTM ®or WoodMac )TM
GULF PBR DETAIL MANUAL™GULF PBR DETAIL MANUAL™GULF PBR DETAIL MANUAL™
1(888) 393-0335 • FAX (352) 498-7852 • www.GulfCoastSupply.com 7

Delivery policy
Sales tax
Warrantied products
Indemnity
Disclaimer
Oil Canning
Return policy
www.gulfcoastsupply.com
Delivery charges apply to all orders where delivery is requested. Please consult your GulfCoast sales department for details.
All orders picked up at Gulf Coast Supply, and all orders delivered within the state of Florida, aresubject to state sales tax. Tax exemptions should be verified prior to delivery or customer pickup.
A 40 year warranty applies to most material* manufactured from painted coil stock,and a 25-year warranty to Galvalume material. Ask for details.
All prices and designs are subject to change without notice
While we have made every attempt at accuracy in this manual, we are not responsible fortypographic, printing, or technical errors.
—a repeating, wave-like appearance in the length of the panel—is a possible but unlikelyoccurrence in PBR roofing. See recommendations on p. 3 on how to avoid oil-canning.
All panel orders and special order (non-stock) trims are considered the property of thecustomer and non-refundable once they are manufactured. Standard trim and accessories are refundableproviding they are returned in a clean, resalable condition. For details, go toand click on “No Hassle Return Policy” at bottom of page, or call Gulf Coast Supply to ask specificquestions about returns.
Ridge caps (RC-2) Specify pitch if less than 3/12 or greater than 6/12. Also available inlarger widths. Closures recommended (see p. 9).
Eave drip (ED-3) ED-3 style is pre-pitched for 3/12 to 6/12 roofs. For appearance or easeof application, order by either specific pitch or as gable trim (90°).
Gable flashings R (GR-5), and standard (GR-6) rakesavailable. Use butyl sealant between rake and panel.
Valleys (PV-1) Specify pitch if greater than 7/12. Seal with universal foam closurematerial. Open-hemmed valleys (PV-2) aid water-tightness.
Sidewall (SW-5)
item special order information
esidential (EF-5), sculptured
Use butyl sealant between sidewall flashing and panel.
Endwall (EW-1) Specify pitch if greater than 5/12. Seal with outside closures.
Transition flashing Specify pitches of both roof slopes. Seal lower slope using outsideclosures and, if desired, inside closures on upper slope.
Capping Trims Seal off the ends of siding panels. Base drip (BD-5) seals the bottoms atfloor level; J-channel (JC-5) caps panels on sides and below doors andwindows, while drip caps (DC-5) seal the bottoms of panels above them.
Summary of Common Stock Trims and Flashings
Figure 8 Ridge cap with outside closure (left) and vented closure inplace. PBR roofing requires either 7/8 inch lap tech or 2-1/2 inchWoodqrip screws for attaching the ridge cap.
®
panel
Gulf Coast Policies
*Metallic Copper 26 ga. has a 30 year warranty, and Brite Red 24 ga. a 20 year warranty.
GULF PBR DETAIL MANUAL™GULF PBR DETAIL MANUAL™GULF PBR DETAIL MANUAL™
1(888) 393-0335 • FAX (352) 498-7852 • www.GulfCoastSupply.com 8

The Ridge Cap is used to seal the upperpoint at which two slopes meet. This canbe both along the ridge of the roof as wellas the covering for a hip. Either woodgripor self-drilling lap TEK screws are appliedthrough the ribs of the metal.
Debris, insects, and blowing rain canfind easy access under the ridge cap, soclosures are required to either completelyor partially seal the opening. Closuresunder ridge caps come in 3 types: solid,vented, and hip tape.
(“Outside Closures”) are aslong as the width of the panels. Theylock together in a row placed directly under the screws that attach theridge cap, and form a solid, water-tight, air-tight barrier.
( ) is a sticky, adhesive-backed metallictape that seals the hip roof. It is 6 inches wide and comes in 33½ footrolls. Because it must conform to the rise and fall of panel ridges,approximately 10% extra may be needed beyond the length of the hipbeing covered.
Solid closures
Hip closure tape
Vented closure ( ) comes in lengths up to 50', is 3 incheswide, and forms a water-retardant, insect resistant barrier that allowshot air to escape from the attic. It is superior to many more elaborateand expensive venting systems.
Profile Vent
Peel and Seal
(seeabove).
Figure 8
®
®
RC-2 Standard 12-inch Ridge Capsare strong, economical and adequate for most of your roofing needs
RC-2 style over-sized ridge capsare available with 18-inch coverage, or as a
in (2 “a”) of 14-, 16-, 18-, 20-,22-, and 24-inch
custom trimitem timestotal widths
a
RC-1 style 12-inch Ridge Capsare also available in custom widths
6”
Ridge Cap
Figure 9 Pipe Boots provide a water-tight seal around roof vents and comein a variety of sizes. They seal withcaulk and conform to the shape of thepanel ribs.
Figure 8 Ridge cap with outside closure (left) and vented closure inplace. PBR roofing requires either 7/8 inch lap tech or 2-1/2 inchWoodqrip screws for attaching the ridge cap.
®
Figure 8 Ridge cap with outside closure (left) and vented closure inplace. PBR roofing requires either 7/8 inch lap tech or 2-1/2 inchWoodqrip screws for attaching the ridge cap.
®
6"Outsideclosure
panelpanel
2½" Woodgripor lap screw required
®
Ridge caps may be sealed with eithersolid or vented closure material
Profile Vent®
GULF PBR DETAIL MANUAL™GULF PBR DETAIL MANUAL™GULF PBR DETAIL MANUAL™
1(888) 393-0335 • FAX (352) 498-7852 • www.GulfCoastSupply.com 9

panelpanel
ED-3 styleeave drip
panelpanel
2 "3/8
3"
716"
fascia
a
b
Figure 11
SW-5C
Sidewall flashing is applied when the side of theroof butts up against an adjacent wall. The wall-side of theflashing can either be
. Butyl tape should be appliedwhere the “foot” of the flashing attaches to the roof, and, ifused, along the top edge of the counterflashing.
covered over with siding or sealedwith caulk(order )
Figure 10 Eave drip and fascia give a finished look along thedrip eave of the building, as well as providing protection for thematerials they cover. The
edge of the fascia. Inside closures, which seal off the openribs of the panels, are optional.
eave drip should completely cover thetop
a
b
Eave drip a
b
Fascia
Eave Drip & Fascia
Side-wall Flashing
SW-5 PBR SidewallStandard dimensions — = 4"
= 3½"ab
Custom trim—specify a customlength for or .a b
a
b
For custom eavedrip, specify theamount of the eave
that will be covered(dimension “a”),and,
pitch. Ifused as gable trim,be sure to mentionthe number of 90ºeave drip for thegable. If fascia is tobe used, be sure thatthe dimension youorder will allow thetop of the fascia tobe hidden by theeave drip.
for roofssteeper than 3/12,specify
Eave drip with fascia and inside closure
4"
3½"
5¾"
Butyl tape
caulk ( recommended)Solar Seal®
1¼"
caulk edge (order )(used if sidewall notcovered by siding)
SW-5C
GULF PBR DETAIL MANUAL™GULF PBR DETAIL MANUAL™GULF PBR DETAIL MANUAL™
1(888) 393-0335 • FAX (352) 498-7852 • www.GulfCoastSupply.com 10

3½"
3"
For custom end-walls, anddimensions “a” and “b”.
specify roof pitch
panelpanelpanelpanel
Lap screw or
2½" Woodgriprequired
®
caulk (recommended)
Solar Seal®
caulk edge (order)
(used if endwallnot covered bysiding)
EW-1Cor EW-2C
a = 4½"b = 3"
panel
Figure 12 Gable flashing is used to trim the edge of theroofing panel at the gable end of the roof. It should matchthe eave drip that extends along the drip edge of the roof. Ifthe panel is allowed to hang over the gable end, eave dripcan be used instead. Butyl tape between the trim andpanel eliminates leaks. Secured both to roof and rafter withscrews.
EF-5 style RakeCustom trim—specify a custom
length for or .a bStandard dimensions — = 3¼"
=3½ab
GR-6 style Rake and CornerCustom trim—specify a custom
length for or .a bStandard dimensions — = 4"
= 4"ab
Gable Flashing
5"
3¼"
3½"
1¼"
7/16"
Butyl tape
a
b
a
b
Remember: dimension b on gable rakes is theamount of eave covered 1-1/4 inch head space!plus
End-wall flashing is applied where the upwardslope of a roof meets a wall. The wall side ofthe flashing can be covered with siding orcounter-flashing, and outside closures areused to seal between the flashing and the
p a n e l . R o o fslope should bementioned ifroof exceeds5/12 pitch. UseE W- 2 w h e nnext to sidewallflashing.
End-wall Flashing
a
b EW-1 SteppedEndwall
Figure 13 As with the ridge cap, the ENDWALLFLASHING above must be sealed using outside closures.
View of EF-5 gable trim (fascia board removed)
a
b EW-2 HemmedEndwall
GULF PBR DETAIL MANUAL™GULF PBR DETAIL MANUAL™GULF PBR DETAIL MANUAL™
1(888) 393-0335 • FAX (352) 498-7852 • www.GulfCoastSupply.com 11

TRANSITION FLASHING preventsleakage at the point where two differentroof pitches meet. It is sealed on the lowerside with outside closures, and can besealed underneath the upper panels withinside closures. The less difference there isbetween the two pitches, the morenecessary a larger dimension “a” (shownbelow) becomes.
Transition Flashing
a
b
6½"
6½"
panelpanel
panelpanel
closure
For custom transition flashing specify the pitches of the two roofslopes and, if necessary, dimensions “a” and “b”.
Preformed Valley
Figure 14 Pre-formed valleys use a diverter to
channeling water off the roof. Expanding foamclosures (as the one shown in place above) arerecommended to assure a good seal.
prevent waterfrom rushing under panels on the opposite side whilemeanwhile
1"
9"Install panels 2 to 4"
from diverter
2" to 4"
Two basic styles ofvalley are available.For custom valleys,specify dimension“a”, and specifypitch if greater than7/12.
aPV-1 style
PV-2 style
Figure 15 The transition flashing provides a continuous drainagewhere two slopes meet.
expanding foam
panel
2½" Woodgripor lap screw required
®
GULF PBR DETAIL MANUAL™GULF PBR DETAIL MANUAL™GULF PBR DETAIL MANUAL™
1(888) 393-0335 • FAX (352) 498-7852 • www.GulfCoastSupply.com 12

PBR Rake and Corner
panel
panel
4"
4"
6"
1¼"
a
b
Figure 16 Corner trim straddles the ribs of the panels wherethey meet at the corner of the building. The PBR outside corner
also serves as a gable rake (see p.11). The inside corner ( )has similar dimensions but with a reverse middle bend.
IS-6
Sculptured Rake
a
b
The rake and corner canbe ordered as a customtrim item by specifyingcustom dimensions “a” or “b”. Custom rakesor corners are often necessary due to the rakelanding on a panel rib. Be sure to take intoaccount the 1¼" “head space” when figuringcustom dimensions.
Figure 17 The sculptured rake is often desirable on larger steel- andwood-framed buildings. The roof side can be sealed with butyl tape, and thewall side with outside closures. Butyl tape on the roof side prevents leaks.
GR-5 The 5½-inch dimensionis variable for custom trim
GR-6
IS-6
1¼"
1½"
3½"
3½"
5½"
panel
1½”
GR-5
Butyl tape
2½"Woodgripor lap screw required
1½"screw
GULF PBR DETAIL MANUAL™GULF PBR DETAIL MANUAL™GULF PBR DETAIL MANUAL™
1(888) 393-0335 • FAX (352) 498-7852 • www.GulfCoastSupply.com 13

1¼"3"
panel
1¼"
JC-5J-channel
Figure 19 Base drip seals off the bottoms of panels at the floor level, whereit helps to prevent the entrance of rodents and insects, as well as a base forthe setting of panels.
Figure 18 The drip cap is commonly used to trim out the bottoms of panelsover doorways and windows, and occasionally takes the place of base drip.J-channel is used to cap raw panel edges where run-off is not a problem, andis most commonly used to trim around the bottom, sides, and occasionallythe top windows and doors, and also to cap the top sides of skirting.of
drip cap
j-channel
Base Drip
Drip Cap andJ-Channel
panel
1 "3/8
7/16"
panel
DC-5Drip cap
1½"
2½"
1 "5/8
2½"
BD-5Base drip
3¾"
1 "5/8
Downspout
GULF PBR DETAIL MANUAL™GULF PBR DETAIL MANUAL™GULF PBR DETAIL MANUAL™
1(888) 393-0335 • FAX (352) 498-7852 • www.GulfCoastSupply.com 14
Inner utergutter appearance
and o gutter sections (marked “I” and “O”) alternate alongthe eave to assure ease of application and .
O OO OOuter OuterInner InnerO I II I
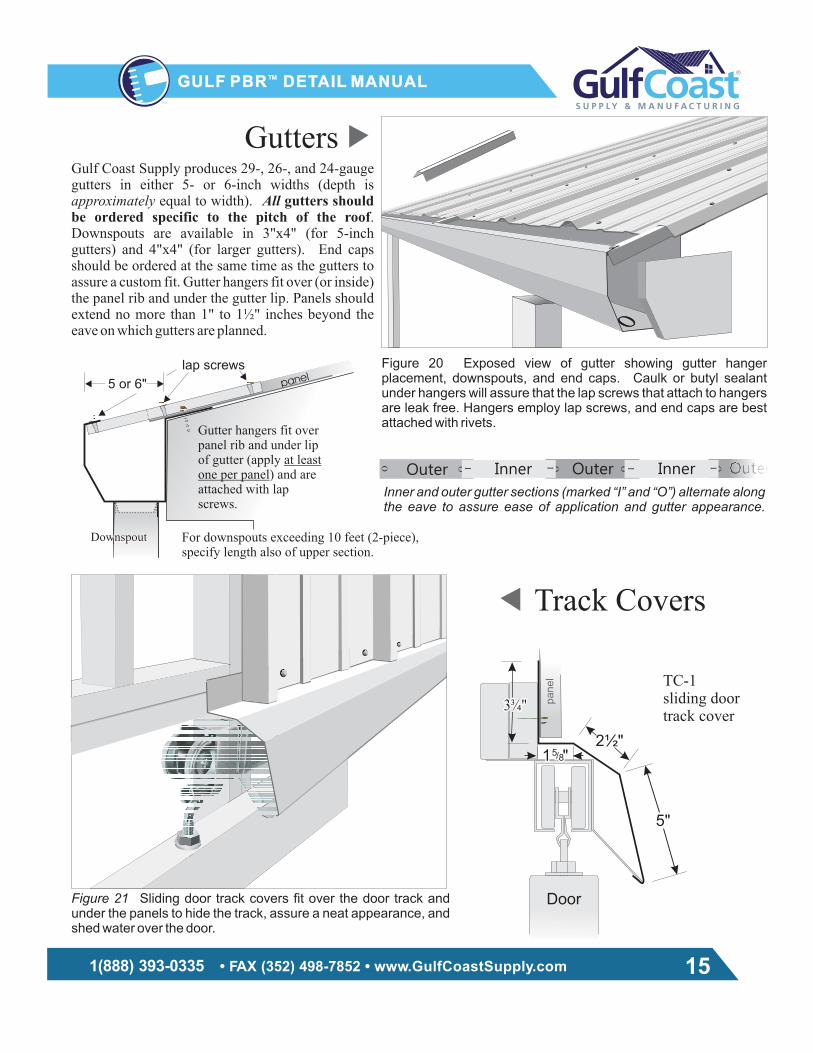
Gulf Coast Supply producesgutters in either 5- or 6-inch widths (depth is
equal to width)..
Downspouts are available in 3"x4" (for 5-inchgutters) and 4"x4" (for larger gutters). End capsshould be ordered at the same time as the gutters toassure a custom fit. Gutter hangers fit over (or inside)the panel rib and under the gutter lip. Panels shouldextend no more than 1" to 1½" inches beyond theeave on which gutters are planned.
29-, 26-, and 24-gauge
approximately All gutters shouldbe ordered specific to the pitch of the roof
Figure 20 Exposed view of gutter showing gutter hangerplacement, downspouts, and end caps. Caulk or butyl sealantunder hangers will assure that the lap screws that attach to hangersare leak free. Hangers employ lap screws, and end caps are bestattached with rivets.
Gutters
Track Covers
Figure 21 Sliding door track covers fit over the door track andunder the panels to hide the track, assure a neat appearance, andshed water over the door.
pa
ne
l
5"
2½"
3¾"3¾"
1 "5/81 "5/8
Door
TC-1sliding doortrack cover
panel
DownspoutDownspout
Gutter hangers fit overpanel rib and under lipof gutter (apply
) and areattached with lapscrews.
at leastone per panel
5 or 6"
lap screws
For downspouts exceeding 10 feet (2-piece),specify length also of upper section.
GULF PBR DETAIL MANUAL™GULF PBR DETAIL MANUAL™GULF PBR DETAIL MANUAL™
1(888) 393-0335 • FAX (352) 498-7852 • www.GulfCoastSupply.com 15

Butyl Tape Woodgrip Screws®
Outside Closures
Inside Closures
RC-2 Ridge cap(pg. 9)
TF-1 Transitionflashing (pg. 12)
PV-1 valley (pg. 12)
ED-3 eave drip(pg. 10)
ExpandingFoam
item application
roll-up doors Stocked in 8' (wide) x 7' manual roll-up style (white); custom order all othersizes. Manual roll-up, chain operated, and motor-driven available.
pipe boot Fits over vent and heat pipes. Available also in boots.
electrical boot Fits around pipes with inaccessible tops (such as weatherheads).
outside closures Required to seal under ridge caps and transition and endwall flashings.
inside closures Seals panels, particularly on the eave.
expanding foam Compressed adhesive foam expands to seal between valleys and panels.
Peel and Seal Seals hips under hip caps. Also, a general purpose sealing tape.
touch-up paint Hides scratches, matches panel colors.
butyl tape General purpose low-cost sealant, used on panel laps and under trim.
heat-resistant
under
Profile Vent, Flex-o-Vent Vented closure material surpassing many other venting systems.
Titebond A superior general purpose caulk for all joints. Matches panel colors.
low-profile insulation Greatly reduces radiant heat when installed under panels.
Woodgrip screws Used in all applications attaching metal to wood. 1½", 2" sizes.
TEK screws Self-drilling TEK screws for metal purlins. Lap TEK screws draw togetherjoints and attach trim.
ZAC screws “Lifetime” screws; 1½", 2", 2½", threaded for wood; self-drilling available.
® ®
®
®
®
®
Guide to Misc. Accessories
GR-6 Rake & Corner(pg. 11, 13)
Roll-up DoorsGutters (pg. 15)
Profile Vent®
Foil-backed thermalbarrier insulation
Peel and Seal®
Pipe Boot (pg. 11) Electrical Boot
Lap TEKLap TEKS/D TEKS/D TEK
TEK screws
Touch-up PaintTouch-up PaintFlex-o-vent®
WoodZac screws®
EF-5 Gable rake(pg. 11)
GULF PBR DETAIL MANUAL™GULF PBR DETAIL MANUAL™
16
Titebond®
Wall flashings(pgs. 10 - 11)
WoodMac screws®
Version 01-06-16See to ensure you have the current version.
Not responsible for inaccurate information contained in outdated installation guideswww.gulfcoastsupply.com