Embed Size (px)
Citation preview

TEK TUTORIAL: INTRODUCTION TO ADOBE FLASH CS3
INTRODUCTION This tutorial is an introduction to Adobe Flash CS3 and will demonstrate the basic Flash tools and concepts with a step by step guide to creating an animated butterfly.
VECTOR VS BITMAP Flash is a vector base animation program. Vector objects are described mathematically, whereas bitmaps are represented by pixels. This allows Flash documents to remain relatively small and Flash objects to retain quality regardless of zoom resolution.
CREATE A NEW FLASH DOCUMENT When you first start flash, you will be presented with a window to open a Flash document, create a new Flash document, or start from a template. Click on Flash File (ActionScript 3.0) to create a new blank Flash document.
SAVE AND SAVE OFTEN Before proceeding, save your document and save often thereafter.
Create a New File
Vector 20x Zoom
Bitmap 20x Zoom

TEK TUTORIAL: INTRODUCTION TO ADOBE FLASH CS3
USER INTERFACE The user interface consists of the following panels:
Timeline
Stage
Layers
Property Inspector
Behaviors
Library
Tools

TEK TUTORIAL: INTRODUCTION TO ADOBE FLASH CS3
DISPLAYING/HIDING PANELS Panels can be displayed or shown by selecting or deselecting panels from the Windows menu.
1. Click on the Windows menu.
2. Click on an unchecked panel to display it or click on a checked panel to hide it.

TEK TUTORIAL: INTRODUCTION TO ADOBE FLASH CS3
EXAMPLE EXPLAINING LAYERS Think of layers as individual transparency sheets which allow Flash objects to be created and edited independent from one another. The example below shows a Flash document which has three layers: Triangle, Rectangle, and Circle. Objects in the top most layer will cover any objects directly underneath.
LOCKING A LAYER Lock a layer or multiple layers to prevent them from being edited on. In the following example, only the Rectangle layer can be worked on. Lock a layer by clicking on the dot located underneath the Lock column. Click on the lock icon directly to the right of the layer name to unlock the layer.
Circle
Rectangle
Triangle
Lock Column
TEK TUTORIAL: INTRODUCTION TO ADOBE FLASH CS3
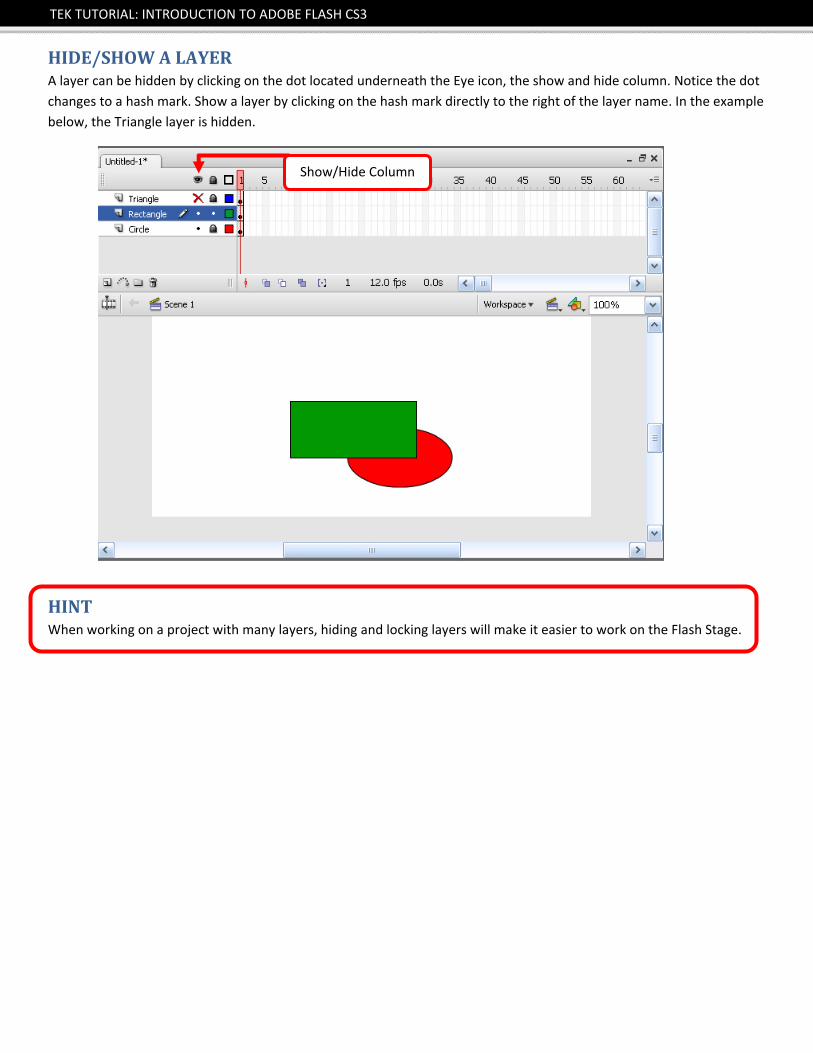
HIDE/SHOW A LAYER A layer can be hidden by clicking on the dot located underneath the Eye icon, the show and hide column. Notice the dot changes to a hash mark. Show a layer by clicking on the hash mark directly to the right of the layer name. In the example below, the Triangle layer is hidden.
HINT When working on a project with many layers, hiding and locking layers will make it easier to work on the Flash Stage.
Show/Hide Column
TEK TUTORIAL: INTRODUCTION TO ADOBE FLASH CS3
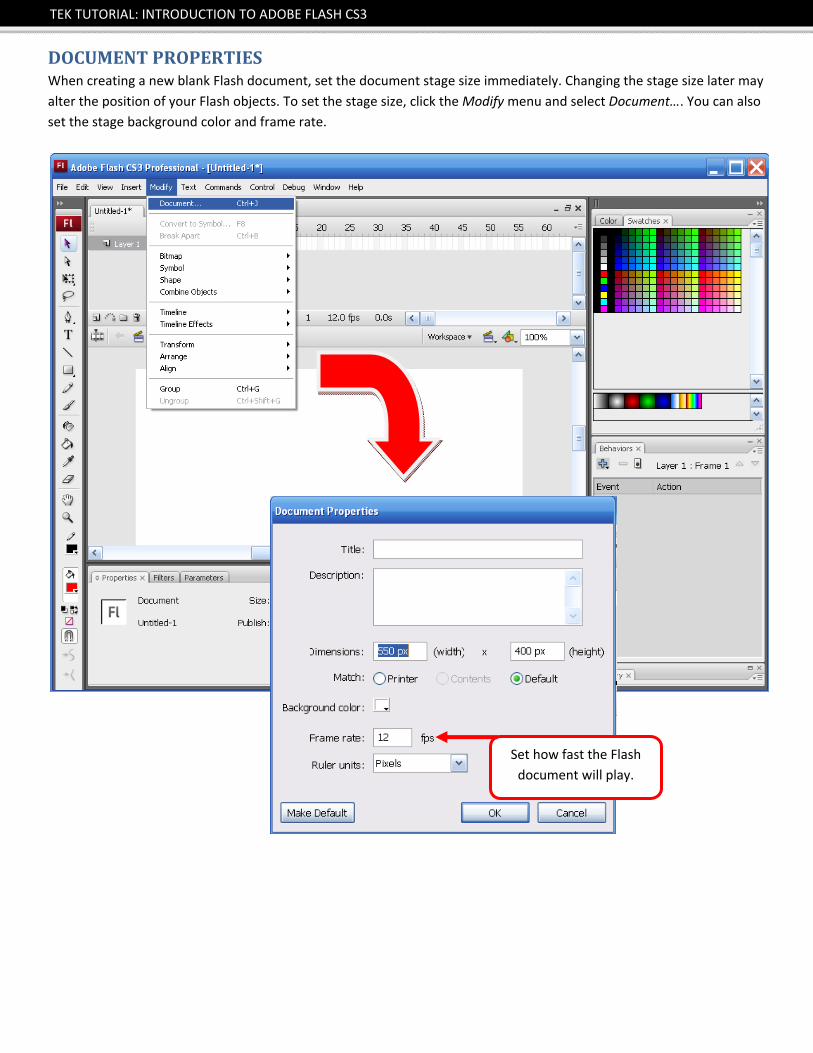
DOCUMENT PROPERTIES When creating a new blank Flash document, set the document stage size immediately. Changing the stage size later may alter the position of your Flash objects. To set the stage size, click the Modify menu and select Document…. You can also set the stage background color and frame rate.
Set how fast the Flash document will play.

TEK TUTORIAL: INTRODUCTION TO ADOBE FLASH CS3
FLASH SYMBOLS Objects in Flash are called symbols and a symbol can be a graphic, a movie, or a button. Symbols can contain other symbols. For example, a movie clip can contain graphic and button symbols.
WHY USE SYMBOLS Once a symbol is created, it gets stored in the Library and then can be reused multiple times in the Flash document, without significantly increasing the Flash document size. Another advantage is that modifications to the symbol will affect all instances of that symbol on the Flash stage, which saves time.
CREATING A BUTTERFLY Create a new movie symbol by clicking on the Insert menu and selecting New Symbol….
Select Movie Clip as the symbol type and enter a descriptive name like Butterfly, and then click OK.
BUTTERFLY MOVIE CLIP The blank butterfly movie clip appears on the stage and this is indicated by the Tab with the label Butterfly beneath the Timeline panel. Layer 1 by default has an empty frame indicated by the open circle in frame 1.
Graphic Icon Button Icon Movie Icon
Each layer begins with an empty frame Currently editing
Butterfly Movie Clip

TEK TUTORIAL: INTRODUCTION TO ADOBE FLASH CS3
THE BUTTERFLY BODY Select the oval tool .
Hint: The triangle in the lower right hand corner indicates that there are additional tools. Click and hold the tool to see a popup window of available tools.
With the oval tool active, click and drag the mouse to draw a slender oval shape for the butterfly body. Notice how frame 1 on the time line changes from an open circle to a solid circle. This indicates that this frame has objects.
ANTENNAE Select the line tool . Click, drag, and release to draw 1 antenna and repeat to draw the second antenna.
The solid circle indicates that there are objects created on this frame.

TEK TUTORIAL: INTRODUCTION TO ADOBE FLASH CS3
INSERT MORE FRAME Now that there is one frame with the body and antenna drawn, add more frames to the timeline. To do this, right‐click on frame 60 and choose Insert Frame from the popup window.
Frames 2 through 60 will turn grey. Frame 60 will have an open rectangle indicating that it is the last frame that is a duplicate of frame 1. Click on any one of the frames 2 through 60 and you will see a copy of the butterfly body identical to frame 1.
LABEL EACH LAYER It is important to label each layer with a descriptive name to make it is easier to distinguish between each layer, especially when you have many layers to work with. Double click on the label Layer 1 and type ”Body”. Lock the layer by click on the dot in the lock column.
Double click and type in a new layer name
Lock the layer to prevent it from being edited

TEK TUTORIAL: INTRODUCTION TO ADOBE FLASH CS3
ADD ANOTHER LAYER Click on the insert button to add another layer . Rename Layer 2 to “Left Wing”.
Click on the frame 1 of the Left Wing layer.
WHAT IS YOUR FAVORITE COLOR Select the rectangle tool . Click on the color palette and select a color for the wing.
WINGING IT On the Flash stage, in frame 1 of the Left Wing layer. Click and drag the rectangle tool and draw a box near the butterfly body.
Click on the selection tool
Click to add a layer above the current layer
Click on the color palette.
Choose a color for the wing.
Click at the upper left hand corner and drag the mouse to the lower right hand corner.

TEK TUTORIAL: INTRODUCTION TO ADOBE FLASH CS3
Click and the drag downward on the upper right hand corner of the rectangle.
Then click on the top edge of the rectangle and drag upward.
Then click on the left edge of the rectangle and drag to the left.
Then click on the lower right hand corner of the rectangle and drag downward.

TEK TUTORIAL: INTRODUCTION TO ADOBE FLASH CS3
Click on the oval tool .
Starting from the lower left hand corner, click and drag to draw an oval that ends near the butterfly body.
Click on the selection tool
Then click and drag the lower left edge of the oval outward, distorting the oval.
CONVERT THE WING TO A SYMBOL Now that the left wing is complete, convert the wing to a symbol to be reused for the right wing.
Make sure the selection tool is still active, otherwise click on it .
The click and drag the a marquee box around the entire left wing, to select it.

TEK TUTORIAL: INTRODUCTION TO ADOBE FLASH CS3
Then right‐click on the select left wing and choose Convert to Symbol… from the popup window.
The Convert to Symbol dialog box appears. Type “Butterfly wing” for name, select Graphic for type, and click Ok.
Notice the Butterfly wing symbol appearing in the Library panel.
MOVE THE PIVOT POINT OF THE LEFT WING Click on frame 1 and then click on the left wing to select it.
Select the Free transform tool .
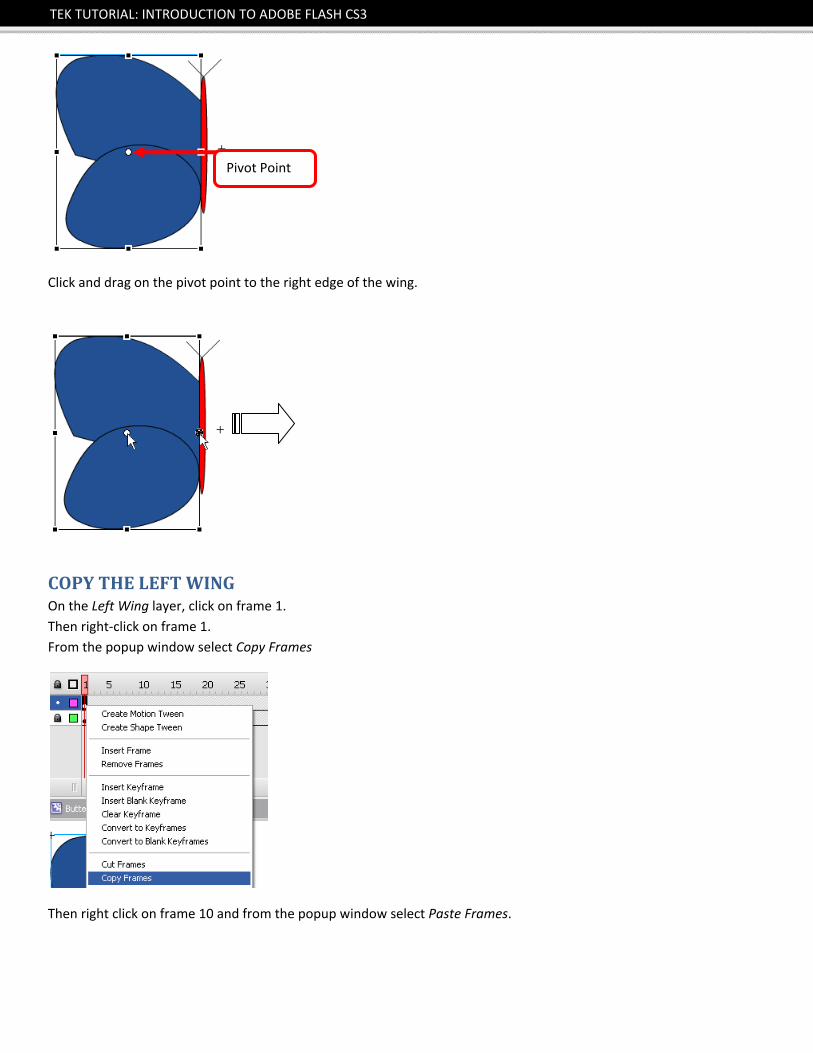
Use the Free transform tool to move the pivot point of the selected object, in this case the left wing. The pivot point is indicated by the white circle that generally is in the center of the selected object, unless it had previously been moved.
TEK TUTORIAL: INTRODUCTION TO ADOBE FLASH CS3
Click and drag on the pivot point to the right edge of the wing.
COPY THE LEFT WING On the Left Wing layer, click on frame 1. Then right‐click on frame 1. From the popup window select Copy Frames
Then right click on frame 10 and from the popup window select Paste Frames.
Pivot Point

TEK TUTORIAL: INTRODUCTION TO ADOBE FLASH CS3
A solid dot appears in frame 10 indicating that there are objects in this frame.
Repeat the last step for frames 20, 40, and 60 to copy the contents of frame 1 to frames 20, 40, and 60.

TEK TUTORIAL: INTRODUCTION TO ADOBE FLASH CS3
SHRINK AND EXPAND THE LEFT WING Click on Frame 10.
Select the Free transform tool and click on the left wing to select it.
Starting on the upper left hand corner of the left wing, click and drag to the right and upward to shrink and expand the wing to make the wing appear to be flapping.
ANIMATE THE LEFT WING Frame 1 has the wing in the outward flapping position and frame 10 has the wing in the inward flapping position. Flash will fill in the in between positions using a function call Motion tweening. To apply Motion tweening right click anyone of the frames between frames 1 and 10. Select Create Motion Tween from the popup window.
An arrow appears pointing from frames 1 through 10 to indicate that there is Motion tweening between the two frames.
COPY THE INWARD FLAPPING POSITION Now frames 1, 20, 40, and 60 all have the wing in the outward flapping position. Only frame 10 has the wing in the inward flapping position.

TEK TUTORIAL: INTRODUCTION TO ADOBE FLASH CS3
On the Left Wing layer, click on frame 10. Then right‐click on frame 10. From the popup window select Copy Frames
Then right click on frame 30 and from the popup window select Paste Frames.
A solid dot appears in frame 30 indicating that there are objects in this frame.
Repeat the last step for frame 50 to copy the contents of frame 10 to frame 50.
Right click between frames 10 and 20 and choose Create Motion Tween. Repeat for frames 20‐30, 30‐40, 40‐50, and 50‐60.

TEK TUTORIAL: INTRODUCTION TO ADOBE FLASH CS3
LOCK THE LEFT WING LAYER
CREATE A NEW LAYER FOR THE RIGHT WING Click on the Insert layer button to create a new layer and rename the layer to Right Wing.
Click on frame 1 on the Right Wing layer.
INSERT THE BUTTERFLY WING SYMBOL From the Library panel, click and drag the Butterfly wing symbol onto the Flash stage.

TEK TUTORIAL: INTRODUCTION TO ADOBE FLASH CS3
Select the Free transform tool .
Click on the right edge of the wing and drag to the left to flip the wing.
The right wing should now be a mirror of the left wing.
ANIMATE THE RIGHT WING Follow the steps to animating the left wing in the previous steps for the right wing.