Embed Size (px)
Citation preview

Vantage Provider Portal User Guide

2
Vantage Provider Portal User Guide
The Vantage Provider Portal is your one-stop electronic resource for eligibility, benefits, claims, checks, remittance advices, authorizations, and more! The Vantage Provider Portal has a new feature called Vantage Connect, which allows our providers to electronically request a variety of requests for authorization. The Vantage Provider Portal is available for in-network providers only. This guide is designed to provide detailed instructions on how to access and register for the portal and use its features. This guide is available on the Vantage Provider Portal underneath the “Documents” section. For technical questions relating to registration or login access, please call Vantage’s Provider Services Department at (318) 361-0900 (Option 3).
Please Note: This guide contains general instructions. It is provided for informational purposes only. Every effort has been made to print accurate, current information. Errors or omissions, if any, are inadvertent. All patient data included in this document is fictious. Information in this document is subject to change without notice.

3
Table of Contents Levels of Portal Access ................................................................................. 4
How to Access the Portal ............................................................................. 4
Vantage Portal Homepage ........................................................................... 5
Portal Registration – Register a New Group ................................................. 6
Portal Registration – Join an Existing Group ............................................... 10
Account Details .......................................................................................... 14
Group Profile ............................................................................................. 15
Admin Center ............................................................................................. 16
Authorizations ........................................................................................... 20
Checks........................................................................................................ 22
Claims ........................................................................................................ 24
Documents ................................................................................................ 25
Member Lookup ........................................................................................ 26
Vantage Connect ....................................................................................... 30
Troubleshooting ......................................................................................... 39
Frequently Asked Questions ...................................................................... 43

4
Levels of Portal Access There are two levels of access that a user can have to the Vantage Provider Portal:
• Group Moderator:
Person within the provider organization who is designated to complete the initial group registration
and thereafter grants access of the user(s) to the Vantage Provider Portal. Vantage requires that each
group designates at least one Group Moderator to self-manage user access to the provider portal for
your organization.
The Group Moderator role will have access to the Administration Center (“Admin Center”) within the
portal, whereas the Provider role will not. Within Admin Center, the Group Moderator can approve or
deny user requests for portal access and view/update user data for the group. Group Moderators can
also send out portal invites to users.
• Provider:
Person(s) at the provider organization who has been granted security access by the Group Moderator
and thereafter can self-manage their own portal access only.
How to Access the Portal Vantage’s Provider Portal is located at https://providers.vantagehealthplan.com. We recommend using Google Chrome to access the Vantage Provider Portal.

5
Vantage Portal Homepage
• If you already have a portal account, click I Have an Account or Log In on the homepage to log into your account.
• If the group you are affiliated with is not currently registered, please refer to the Portal Registration - Register a New Group section of this guide.
• If the group you are affiliated with has already been registered and you need to join the group, please refer to the Portal Registration - Join an Existing Group section of this guide.

6
Portal Registration – Register a New Group Vantage requires that each group self-designates at least one Group Moderator to self-manage user access to the provider portal for your organization. New group registration must be completed by the Group Moderator. If you will not be the Group Moderator, please reach out to that person to have them complete this registration. To gain portal access, the Group Moderator must first register the group by completing the steps below: 1. Go to https://providers.vantagehealthplan.com.
2. Click Register a New Group.
3. We will need the following information to complete the group registration process:
• Your contact information (Name, Email Address & Phone Number)
• The name of your group
• A list of the Tax IDs that your group needs access to
NOTE: If you need to add or remove a Tax ID number from your group after registration is complete, you must contact Provider Services at (318) 361-0900 (Option 3).

7
Once you have gathered all of the information listed above, click Next.
4. Fill in the required contact information: First Name, Last Name, Email, & Phone Number. Click Next.

8
5. Fill in the required group information: Company Name & Tax IDs. Multiple Tax IDs may be separated by a comma or a space. Click Next.
6. Review your information. If all information is correct, check the “I’m not a robot” checkbox & click Submit to
submit the registration for approval.
9
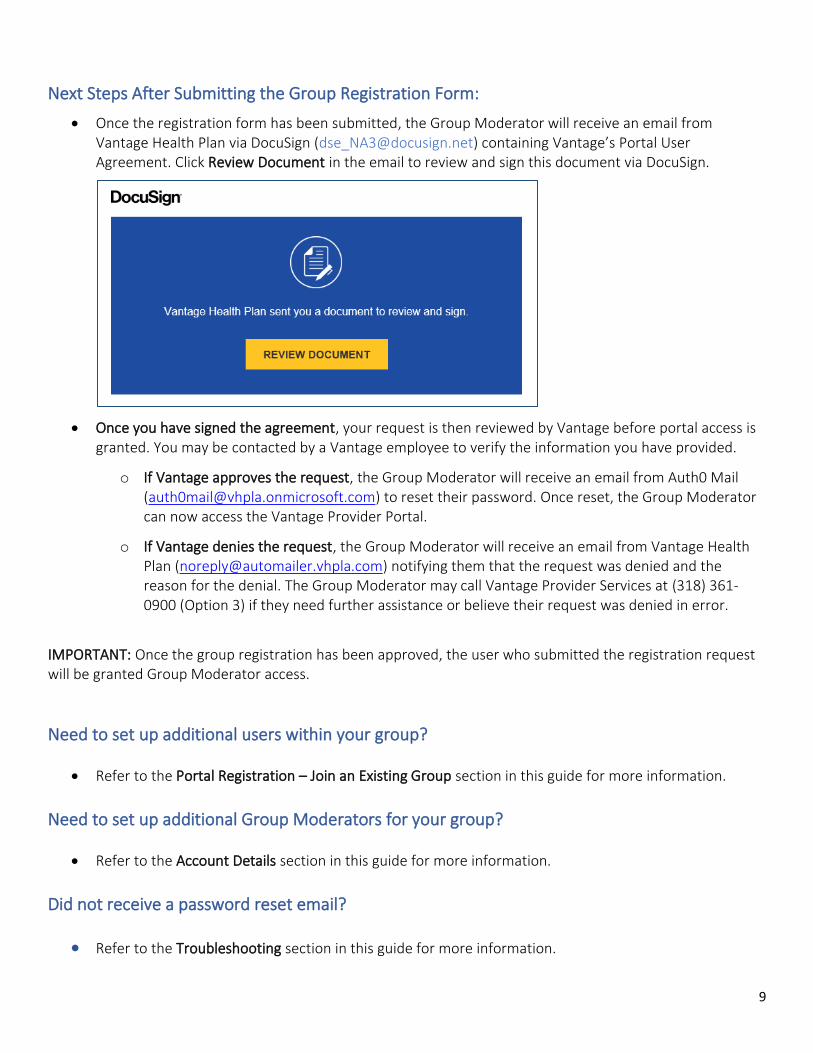
Next Steps After Submitting the Group Registration Form:
• Once the registration form has been submitted, the Group Moderator will receive an email from Vantage Health Plan via DocuSign ([email protected]) containing Vantage’s Portal User Agreement. Click Review Document in the email to review and sign this document via DocuSign.
• Once you have signed the agreement, your request is then reviewed by Vantage before portal access is granted. You may be contacted by a Vantage employee to verify the information you have provided.
o If Vantage approves the request, the Group Moderator will receive an email from Auth0 Mail ([email protected]) to reset their password. Once reset, the Group Moderator can now access the Vantage Provider Portal.
o If Vantage denies the request, the Group Moderator will receive an email from Vantage Health Plan ([email protected]) notifying them that the request was denied and the reason for the denial. The Group Moderator may call Vantage Provider Services at (318) 361-0900 (Option 3) if they need further assistance or believe their request was denied in error.
IMPORTANT: Once the group registration has been approved, the user who submitted the registration request will be granted Group Moderator access.
Need to set up additional users within your group?
• Refer to the Portal Registration – Join an Existing Group section in this guide for more information.
Need to set up additional Group Moderators for your group?
• Refer to the Account Details section in this guide for more information.
Did not receive a password reset email?
• Refer to the Troubleshooting section in this guide for more information.

10
Portal Registration – Join an Existing Group If you need to join a group that has already been registered on Vantage’s Provider Portal, you must complete user registration. To begin the user registration process, there are two options:
Option 1: The Group Moderator can invite additional users to join their group on the portal by clicking
View My Group at the top of the portal screen. On the Group Profile page, click Send Portal Invite. Enter the user’s email address & click Send Email. The user will receive an email containing a link to the user registration form as well as the group code they will need to complete registration.
Option 2: Users may initiate the request themselves to join an existing group on Vantage’s Provider Portal
by going to https://providers.vantagehealthplan.com & clicking Join an Existing Group.
11
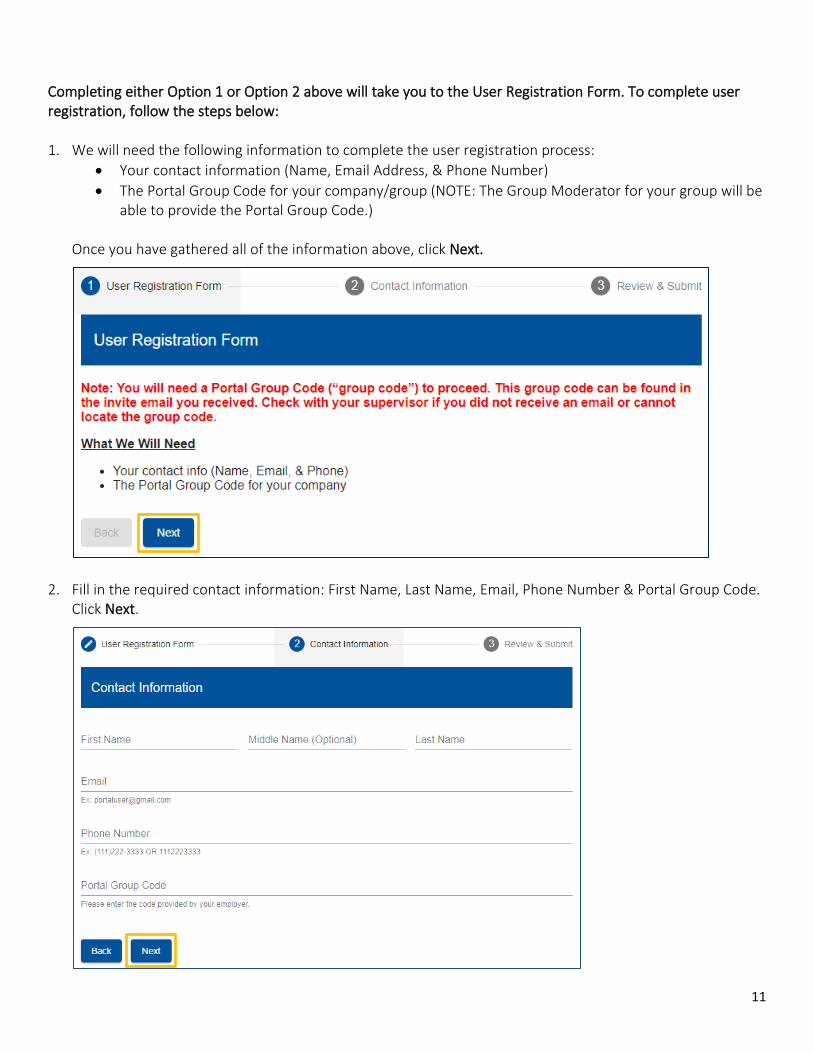
Completing either Option 1 or Option 2 above will take you to the User Registration Form. To complete user registration, follow the steps below: 1. We will need the following information to complete the user registration process:
• Your contact information (Name, Email Address, & Phone Number)
• The Portal Group Code for your company/group (NOTE: The Group Moderator for your group will be able to provide the Portal Group Code.)
Once you have gathered all of the information above, click Next.
2. Fill in the required contact information: First Name, Last Name, Email, Phone Number & Portal Group Code.
Click Next.

12
3. Review your information. If all information is correct, check the “I’m not a robot” checkbox & click Submit to submit the registration for approval.
Next Steps After Submitting the User Registration Form:
• Once the user registration form has been submitted, you will receive an email from Vantage Health Plan via DocuSign ([email protected]) containing Vantage’s Portal User Agreement. Click Review Document in the email to review and sign this document via DocuSign. You will need to review and sign this document before your request can be approved.

13
• Once you have signed the agreement, your request must be reviewed by the Group Moderator before you are granted access to the portal. (Group Moderators: refer to the Admin Center section in this guide for how to approve or deny requests for portal access.)
o If the Group Moderator approves your request, you will receive a notification email that access was approved. You will also receive an email from Auth0 Mail ([email protected]) to reset your password. Once reset, you can now access the Vantage Provider Portal. Users will not receive a password reset email until the Group Moderator has approved the user’s request to join the group.
o If the Group Moderator denies your request, you will receive an email from Vantage Health Plan ([email protected]) notifying you that the request was denied. You should contact your Group Moderator if you believe your request was denied in error.

14
Account Details To view your personal portal profile, click the icon at the top right of the portal screen and then select My Profile. This will open the Account Details screen where you can review & update your profile information.
Request Group Change You can submit a request to join a different group from this screen by selecting Request Group Change. You will need the group code associated with the group you are joining in order submit this request. The Group Moderator for your group will be able to provide the Group Code. Once you’ve submitted the group change request, the Group Moderator for the group you are requesting to join must approve the request before you can join the group.
Request Group Moderator Access If your group has more than one Group Moderator, additional users within your group may request Group Moderator access by selecting Request Moderator Access on the Account Details screen.

15
Group Profile To view your group’s profile information, click View My Group at the top right of the portal screen.
Only Group Moderators will have the option to send portal invites from this screen.

16
Admin Center Admin Center is only visible & accessible for Group Moderators. Within Admin Center, Group Moderators have access to Approve and Deny Requests for Portal Access and View & Update Portal User Data.
Approve and Deny Requests for Portal Access Within Admin Center, Group Moderators can approve or deny user requests to join their portal group. To view all requests for portal access for your group, click Admin Center and then click Approve & Deny Requests for Portal Access.
If you don’t enter in any search criteria, by default, you will see just the pending access requests. You can search for additional requests (such as those that have already been approved or denied) or narrow down the list of requests by entering in a Name, Company Name, Requested Role, Request Date, or Request Status. All requests, meeting the criteria entered, will appear on the screen. Click on a request within the list to view the request details.

17
You can approve or deny the request on the Request Details page by clicking either Approve or Deny.
Notice in the example below that the Approve button is grayed out. This is because the user has not yet signed Vantage’s Portal User Agreement, which is indicated by the alert message in red (NOTE: user has not signed DocuSign documents). The user should have received an email containing the portal user agreement. The user must review and sign this document before their access request can be approved. Once the user has signed the agreement, the alert in red below will be removed and the Approve button will become available.
Once the Group Moderator approves the request, the user will receive a notification email that their access request was approved. The user will also receive an email from Auth0 Mail ([email protected]) requesting that they reset their password. Once reset, the user will be able to access the provider portal.

18
View & Update Portal User Data Within Admin Center, Group Moderators can view and update user data for the users within their portal group.
To view a list of the users within your group, click Admin Center and then click View & Update Portal User Data. If you don’t enter in any search criteria, you will see the full list of users within your group. You can narrow down the user list by entering in a Name, Company Name, Role, or Date Created. All users, meeting the criteria entered, will appear on the screen. Click on a user within the list to view more details (see next page).

19
Group Moderators are responsible for promptly revoking user access when an employee changes roles or terminates employment.
• To revoke user access completely, click Revoke Access. This user will no longer be able to access the provider portal.
• To remove a user’s Group Moderator access only, click Demote. This user will still have access to the Vantage Provider Portal, but they will no longer be a Group Moderator for this group.

20
Authorizations On the left-side of the portal screen, there are two authorization-related sections:
• Authorizations – this is where you can look up and view authorization information.
• Vantage Connect – this is where you can inquire about an authorization or submit a new authorization. Please refer to the Vantage Connect section in this guide for more information.
Within the Authorizations section of the portal, you may search for authorizations by entering in any of the following criteria: Auth ID, Member ID, Member Name, Effective Date, or Status. Then click Search. All authorizations meeting the criteria entered will appear on the screen. Authorization status options are as follows:
• Approved: the authorization has been approved
• Processing: member in an inpatient facility and has not been discharged
• Pending: a decision is still pending
• Denied: the authorization has been denied
• Closed: no decision was rendered
The results can be sorted by clicking the column headers at the top of the table.

21
Click on a specific authorization within the results table to view additional details for that authorization. The Authorization Details screen will display additional details surrounding the authorization, as well as diagnosis details and service groups, as shown below.

22
Checks Users can view provider payment registers within the Checks section of the portal. You may search by entering in any of the following criteria: Check #, Print Date, Tax ID, or Printed Within time period. Then click Search. All checks meeting the criteria entered will appear on the screen. The results can be sorted by Check # or Print Date by clicking the column headers at the top of the table. Clicking the Check Number within the results table will take you to the Claims page where you can see all claims associated with that check number.
To download a PDF version of the remittance advice and check, click View Check PDF within the results table.

23
To determine if a check payment was an electronic or paper check, look at the first three digits of the check number:
Check Number Starts With… Check Type
111 Commercial – Paper Check
122 Commercial – Electronic Check
911 Metal Tier – Paper Check
922 Metal Tier – Electronic Check
411 Louisiana Medicare – Paper Check
422 Louisiana Medicare – Electronic Check
711 Arkansas Medicare – Paper Check
722 Arkansas Medicare – Electronic Check
811 Mississippi Medicare – Paper Check
822 Mississippi Medicare – Electronic Check
24
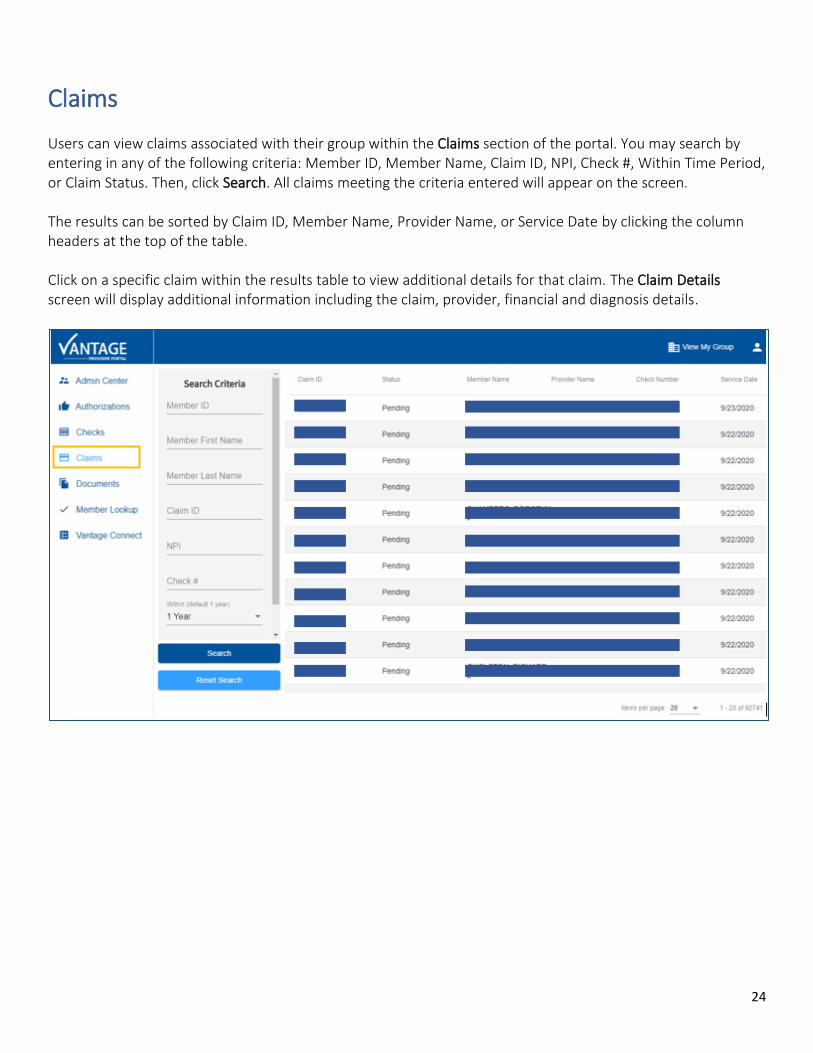
Claims Users can view claims associated with their group within the Claims section of the portal. You may search by entering in any of the following criteria: Member ID, Member Name, Claim ID, NPI, Check #, Within Time Period, or Claim Status. Then, click Search. All claims meeting the criteria entered will appear on the screen. The results can be sorted by Claim ID, Member Name, Provider Name, or Service Date by clicking the column headers at the top of the table. Click on a specific claim within the results table to view additional details for that claim. The Claim Details screen will display additional information including the claim, provider, financial and diagnosis details.

25
Documents The Documents section is designed to give users access to the most current Vantage resources, such as manuals, guides, forms, newsletters, & more.

26
Member Lookup Users can search for a member in the Member section of the portal. You may search for a member by entering in any of the following criteria: Member ID, First Name, Last Name, Social Security Number, or Date of Birth. Then, click Search. The results can be sorted by Name and Date of Birth by clicking the column headers at the top of the table.
Click on a member within the results table to view additional details for that member, as shown below.
Member Information - Users can view a member’s name, date of birth (DOB) and coverage status, as well as
view claims and authorizations associated with a member.

27
Plan Snapshot - Users can view a summary of a member’s enrollment information including: Plan, Member ID
Number (Card #), Plan Year, Program, Effective Date and Term Date.
Documents - Users can view plan-specific documents for a member.
28
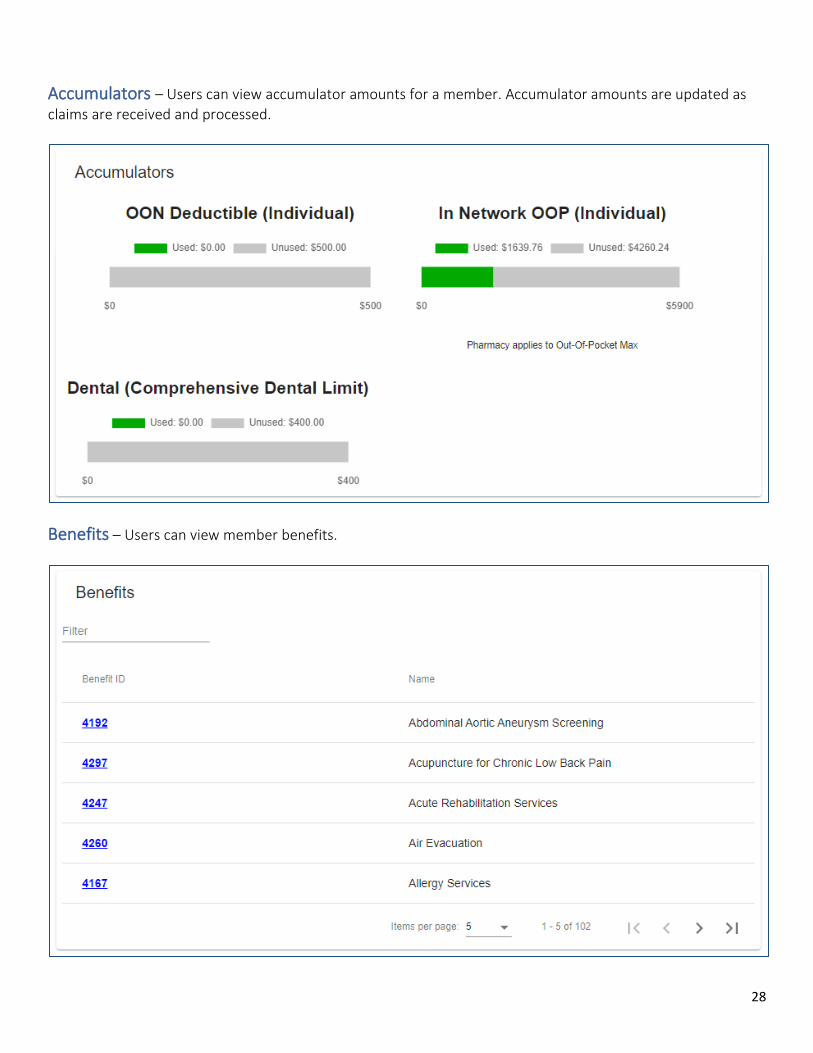
Accumulators – Users can view accumulator amounts for a member. Accumulator amounts are updated as
claims are received and processed.
Benefits – Users can view member benefits.

29
Coinsurance and Copays - Users can view member’s coinsurance or copayment (copays) amounts.
Previous Enrollments – Any previous enrollments of the member will show at the bottom of the member
details page. Click on a previous enrollment to expand it & view additional details.

30
Vantage Connect Vantage Connect is an online authorization portal where you can submit a new authorization or inquire about an existing authorization. Vantage Connect may be accessed by clicking Vantage Connect on the left-side of the provider portal screen and then clicking Open Vantage Connect. Vantage Connect will open in a new window.
Note: Authorizations that are submitted through Vantage Connect may not be visible in the Authorizations search immediately. Providers should allow time for authorizations to show through the search feature.
Vantage Connect Tips
• Use Google Chrome as your browser to log into the Provider Portal/Vantage Connect.
• The following authorization types cannot be entered through Vantage Connect. Please call 318-361-0900 or fax these types of requests to 318-361-2170.
o Inpatient o Wound Care o Therapy o Durable Medical Equipment o Home Health o Part D Drugs o Transplants o Ambulance Transports

31
Creating a New Outpatient Authorization Request (Inpatient services cannot be submitted through the portal at this time. For behavioral health services, see the Creating a New Outpatient Behavioral Heath Authorization Request section of this guide.)
• To request an outpatient authorization, locate the member record by entering the Member ID and
either the member’s First and Last Name or the member’s Date of Birth.
• Click on the desired Member record to display the Member Summary screen. It is imperative you only
choose a record indicating an Active, Primary member.
• Click on the second tab, labeled Authorization.
• Click on the button labeled + New Authorization. Then Select Outpatient.
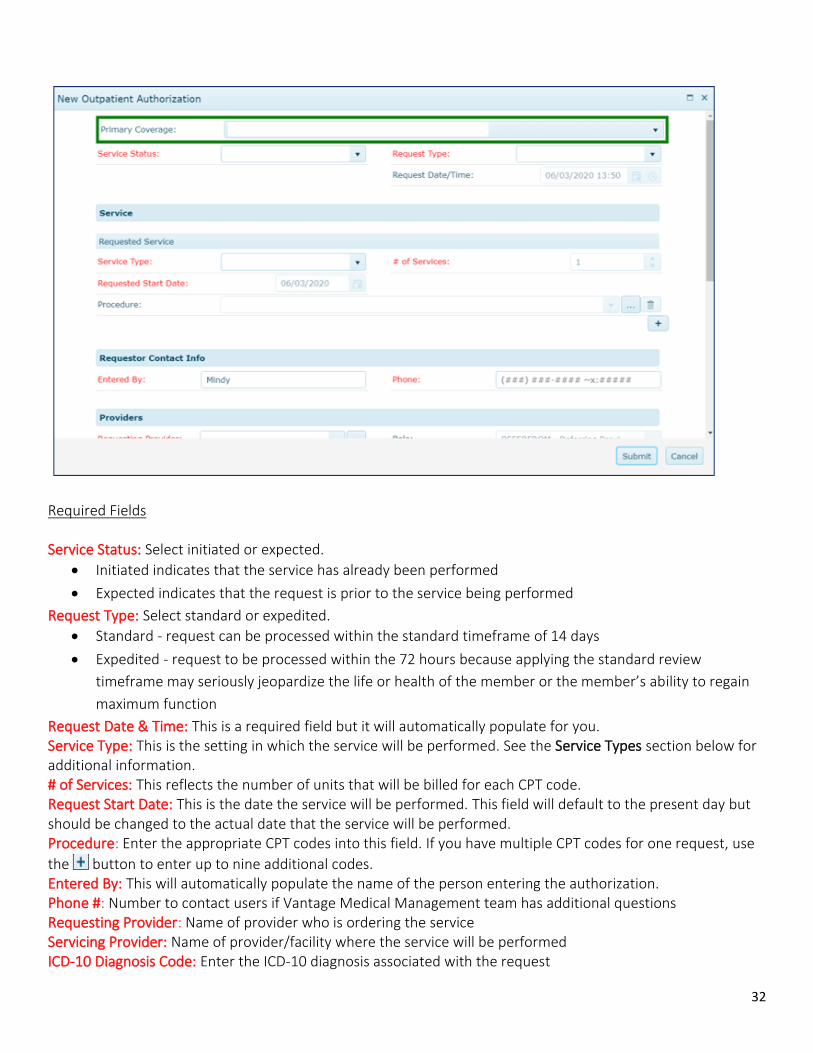
Users must complete the New Outpatient Authorization form and include all necessary documentation. Red fields are required and must be completed to successfully complete the authorization request.
32
Required Fields Service Status: Select initiated or expected.
• Initiated indicates that the service has already been performed
• Expected indicates that the request is prior to the service being performed
Request Type: Select standard or expedited.
• Standard - request can be processed within the standard timeframe of 14 days
• Expedited - request to be processed within the 72 hours because applying the standard review
timeframe may seriously jeopardize the life or health of the member or the member’s ability to regain
maximum function
Request Date & Time: This is a required field but it will automatically populate for you. Service Type: This is the setting in which the service will be performed. See the Service Types section below for additional information. # of Services: This reflects the number of units that will be billed for each CPT code. Request Start Date: This is the date the service will be performed. This field will default to the present day but should be changed to the actual date that the service will be performed. Procedure: Enter the appropriate CPT codes into this field. If you have multiple CPT codes for one request, use
the button to enter up to nine additional codes. Entered By: This will automatically populate the name of the person entering the authorization. Phone #: Number to contact users if Vantage Medical Management team has additional questions Requesting Provider: Name of provider who is ordering the service Servicing Provider: Name of provider/facility where the service will be performed ICD-10 Diagnosis Code: Enter the ICD-10 diagnosis associated with the request

33
Additional Fields Comments: is not a mandatory field. Users can provide additional information about the authorization request in this field.
• Example: MRI of right knee, EMG of bilateral upper extremities
Attachments: any additional documentation about the authorization request. This field is not mandatory but should be included if available.
• For example, clinical files such as: office visit notes, labs, x-rays, or MRIs. Users may select files from
their file system or drag and drop files from their computer. There is no limit on the number of
attachments that can add to a request. Attachments can also be viewed by the Vantage Medical
Management team.
Once the authorization request has been submitted, based on the criteria included for the services, the request may be automatically approved. If the request is not approved, it will be suspended to the Vantage Medical Management team for review. Users may return to the Authorization browse screen to check on the status of the request.
Outpatient Service Types
• OPMD - a procedure performed in the office setting
• OPFAC - a procedure performed in an outpatient facility setting, including Behavioral Health services
• ASU - a procedure performed in an ambulatory surgical setting

34
• SPEOV - specialist office visits
• POC - authorization for post op care for surgeries with 90-day global periods
Date of Service Ranges
• OPMD/OPFAC - These auth types will have a 30-day date range. If the dates of service need to be
extended, please send a message or add this information to the Comments section on the authorization.
• ASU - This authorization type will have a 30-day date range. Dates cannot be extended. However, if the
date of service for the procedure needs to be changed, please send a message to the Vantage Medical
Management team.
• SPEOV - The dates of service on this authorization type will be good through the end of the calendar
year (12/31/XX).
• POC - This authorization type will have a 90-day date range
Examples
• Diagnostic Imaging If performed in office
▪ Service Type = OPMD (Services performed in MD office) ▪ Requesting Provider = Name of ordering provider ▪ Servicing Provider = Name of provider rendering services
If performed in facility ▪ Service Type = OPFAC (Services performed in Outpatient Facility) ▪ Requesting Provider = Name of ordering provider ▪ Servicing Provider = Name of facility
• Office Visits
• Performed in office ▪ Service Type = SPEOV (Specialist Office Visits) ▪ # of Services = the amount of visits you are requesting ▪ Requested Start Date = Today or the date of the member’s next appointment. This
authorization will be good through the end of the current calendar year. ▪ Procedure = CPT codes are not required for this type of authorization ▪ Requesting Provider = Name of ordering provider ▪ Servicing Provider = Name of provider rendering services
• Outpatient Surgeries
• If performed in facility ▪ Service Type = ASU (Services performed in Outpatient/Surgical Unit) ▪ Requested Start Date= Date of surgery ▪ Requesting Provider = Name of provider rendering services ▪ Servicing Provider = Name of facility

35
• POC
• Post-op care in the office for surgeries that have a 90-day global period ▪ Service Type = POC ▪ # of Services = Will default to 1, but this is not required for this type of authorization ▪ Requested Start Date = Date of the member’s surgery. This authorization will be good for 90
days. ▪ Requesting Provider = Name of MD/surgeon ▪ Servicing Provider = Name of MD/surgeon
Additional Tips For any injections (Part B) being administered in the office/facility, but the member is obtaining the medication from the pharmacy, send a message on the online authorization portal to inform the Medical Management team.
Creating a New Outpatient Behavioral Health Authorization Request In addition to the steps outlined in the previous section Creating a New Outpatient Authorization Request, users must complete the following additional steps to submit a Behavioral Health authorization request.
• Comments – this is not a mandatory field but can be used to submit the following information:
A working fax number
List of service types being requested (e.g., IOP, PHP, ABA or Psychological testing)
• Attachments – please include additional documentation about the authorization request. This field is
not mandatory but should be completed when details are available.
For example, intensive outpatient program (IOP) or partial hospitalization program (PHP) clinical files such as: psychosocial evaluation, psychiatric evaluation, MD progress notes, treatment plan and group notes should be included. Referrals, initial evaluation and number of units needed for testing for psychological testing can also be reported here. Users may select and upload files or drag and drop them from their computer. There is no limit on the number of attachments that can add to a request. Attachments can be viewed by the Vantage Medical Management team. Once the authorization request has been submitted, it will be suspended to the Vantage Medical Management team for review. If medical necessity criteria are met, the request will be approved. Users will be contacted via phone or fax with the decision. If additional information is needed, you will receive specific instructions. Users may return to the Authorization browse screen to check on the status of the request.

36
Behavioral Health Outpatient Service Types
• OPFAC – services performed in an outpatient facility setting
Intensive Outpatient Program (IOP)
Partial Hospitalization Program (PHP)
• OPMD – services performed in the office setting
Psychological Testing
Date of Service Ranges
• OPFAC – Services are reviewed every 1-2 weeks. Concurrent review during the episode of care is
required.
• OPMD – Typically, one month. If longer is needed, users may request the appropriate time frame using
the Comments section.
Messages Users can communicate back and forth with the Vantage Medical Management team about a specific member or member service by using the Messages feature. For example, as you submit an Authorization request for your member, Vantage Health Plan may need additional information from you about that request. A Message will be sent to you from Vantage Health Plan about needing additional information. You can also send a Message to Vantage if you have a question about an

37
authorization or if you need to change something on that authorization such as the place of service or the date the service will be performed. **Messages should be checked on a routine basis by you or your staff**
This screen shows the provider’s Messages screen. You can see the default checkbox filters of My Messages and Not Completed are selected as the default view.
Creating a New Message Users can create a new message by completing the following steps: 1. Click the Authorizations tab to search for a specific authorization (users can enter any of the criteria listed at
the top of the screen such as Member ID, Member Name, Auth ID, etc., to locate an authorization)
2. Click on the desired authorization in the results list.
3. Click Messages & then click New.

38
4. Enter message and add all needed attachments. Then click Send.

39
Troubleshooting
The new Vantage Provider Portal site uses cookies to remember your login information. You must enable cookies for our portal site in order to log in and access all its features.
If you are accessing the Vantage Provider Portal via Google Chrome, your browser settings must allow the use of cookies on our portal site. To update your settings, follow the instructions below:
1. On your computer, open Google Chrome.
2. Click the icon at the top right of the screen and then click Settings.

40
3. Click Privacy and security and then click Cookies and other site data.
4. Underneath “General settings” click Block third-party cookies.

41
5. Scroll down the page until you see “Sites that can always use cookies” and click Add.
6. Copy and paste this web address into the Site field: [*.]providers.vantagehealthplan.com. (Please do not include any leading or trailing blanks.) Then, check the “Including third-party cookies on this site” checkbox and then click Add.

42
7. Your site settings should look similar to the image below. (If it does not look the same, delete the item
you just added and go back to Step 6.) Your setting updates are now complete. Please close all Google
Chrome browser windows. You can now log into the provider portal site.
Did Not Receive a Password Reset Email?
If you did not receive a password reset email from [email protected], please check your spam/junk folder. If you are still unable to locate the email, return to the provider portal and reset your password by clicking Login then Forgot Password?
If you do not receive a new email, you may need to contact your organization’s IT department:
• To whitelist the Auth0 email address ([email protected]) in the organization’s email
security platform; or
• Run a message trace to investigate what is blocking the email
Multiple Users Logging into the Same Computer
When multiple users share the same computer, they must complete the following steps to successfully login to the Vantage Provider Portal.
• Clear the browser cache. Once the first user has logged out of the portal, the browser cache must be cleared before the next user can complete the login process. Complete the following steps to clear the browser cache.
Open Chrome and click the in the top right corner
Select “More tools” then click “Clear browsing data…”
Choose the time range from the top menu and select “Cookies and other site data”
Then click “Clear data”
OR
• Each user has a unique Windows account on the same computer. The current user who is logged in under their account must logout of the portal and then their Windows account before the next user can log in using their own Windows account and thereafter access the portal under their own portal user ID and password.
For Additional Assistance Not Outlined in this Guide
For additional assistance not outlined in this guide, please call Vantage’s Provider Services Department at (318) 361-0900 (Option 3).

43
Frequently Asked Questions Q: How do I get access to the provider portal? A: Check with your Group Moderator to see if they have already created a group for the portal.
➢ If so, you can submit a request to join the group at https://providers.vantagehealthplan.com/request-form. Refer to the Portal Registration - Join an Existing Group section of this guide for more information.
➢ If not, your Group Moderator can submit a request for group creation at https://providers.vantagehealthplan.com/group-registration. Refer to the Portal Registration - Register a New Group section of this guide for more information.
Q: I submitted my request for portal access. What is next? A: You should have received an email from Vantage Health Plan via DocuSign ([email protected]) containing Vantage’s Portal User Agreement. You will need to review and sign this document before your request can be approved. Q: What if I do not receive the DocuSign document? A: Check your inbox and spam folders for an email from Vantage Health Plan via DocuSign ([email protected]) with the subject line Vantage Portal [User or Moderator] Agreement. If you are still unable to locate the agreement, you can re-submit your request to have a new one sent to you. Q: My group was approved, and I can log in to the provider portal. How do I get access for my employees? A: Refer to the Portal Registration - Join an Existing Group section of this guide. Q: How do I get access to a different group once I’ve signed up? A: You can submit a request to join a different group by visiting your profile page (https://providers.vantagehealthplan.com/profile) and selecting Request Group Change. You will need the group code associated with the group you are joining in order submit this request. Q: How can I become a Group Moderator for my provider portal group? A: You can submit a request for Group Moderator access by visiting your profile page and selecting Request Moderator Access. Q: How do I reset my password? A: From the home page of the provider portal, select Log In, then select Forgot password? Enter the email address used to sign into your account and select Continue. You should receive an email from Auth0 Mail ([email protected]) requesting that you reset your password.