Embed Size (px)
Citation preview

v.6.6 Upgrade
English

1 • Introduction SilverFast® v.6.6 Upgrade266_Upgrade_Addendum_en_07012011.indd2011.1.07; 11.23
SilverFast® Software-License Agreement
Please do not open the software package or use this software until you have read and agreed to the terms and conditions of this software-license agreement! If you cannot accept these terms and conditions, please, leave the software in its original packaging untouched and send it back to LaserSoft ImagingAG immediately! SilverFast® is a software package comprised of software and a user manual which is used for generating scans for the subsequent production of colour separations and printing of images. LaserSoft ImagingAG (“LS Imaging”) has developed SilverFast® and owns all rights of it:1. Copyright(1) The user and licensee acknowledges that the copyright of the software in both source and object code form is owned by LaserSoft ImagingAG.(2) Manual and other documentation are protected by copyright. Illegal usage, also of the images of the manual, will cause claim for damages.2. License(1) LaserSoft ImagingAG grants the licensee an exclusive and non-transferable license to use the software object code and user manual for his or her own use.(2) This license authorizes the use of SilverFast® on a single personal computer at one time. Separate licenses are required for use on multiple processors and/or multiple sites.(3) The user and licensee is not permitted to copy in whole or in part SilverFast® except for the purpose of making a backup copy. The licensee is neither allowed to copy in whole or in part supporting documentation supplied with SilverFast®.(4) The software contains confidential information; this license does not allow the licensee to change, adjust, reverse-engineer or otherwise disassemble the software to obtain access to the object code.(5) The licensee is not allowed to rent, lease, sub license or loan the software. Transfer of software and documentation is possible under the condition that all software and documentation is transferred, no copy (including backup software) is retained and the third party accepts this License Agreement. 3. Validity (1) This license will be valid from the day the software package is opened. It will be valid until the day LaserSoft ImagingAG or the licensee terminates this agreement. (2) This license agreement may be terminated to the terms and conditions as follows: (a) LaserSoft ImagingAG may terminate this license upon written notice if the licensee is in breach of the agreement in whole or parts of it. (b) The licensee may terminate this license upon written notice to LaserSoft ImagingAG under the terms and conditions of No. 4, if he sends back the opened software package, deletes the copy on his computer and any backup copy immediately.4. Warranty(1) SilverFast® is provided “as is”. LaserSoft ImagingAG does not warrant, neither expressed nor implied the usefulness of the software SilverFast® for a particular purpose or its merchant ability or the fitness for licensee’s requirements. Although every effort has been made to eliminate errors, LaserSoft ImagingAG does not warrant that SilverFast® is free of errors.(2) The licensee has to examine the software of considerable, recognizable defects within 14 days. These defects must be notified to LaserSoft ImagingAG in writing. Hidden defects are to be notified upon recognition in writing. Otherwise software and documentation are approved without reserve. (3) At considerable defects LaserSoft ImagingAG has the choice of either providing the licensee with another version or to eliminate the defect within reasonable time. If LaserSoft ImagingAG is not able to allow use of the software within this time, the licensee may reduce compensation or annihilate this contract.(4) Upon assertion of warranty the licensee is obliged to send back software and proof of reception at the costs of LaserSoft ImagingAG.5. Limitation of LiabilityIn no event shall LaserSoft ImagingAG, a distributor or authorized dealer be liable for any direct, indirect or consequential damages including economic loss even if LaserSoft ImagingAG, the distributor or authorized dealer has been advised of the possibility of such damage. The licensee agrees that any liability of LaserSoft ImagingAG arising out of the usage of SilverFast® whether in contract or in tort shall not exceed the amount paid by the licensee for the software involved.6. TrademarksSilverFast® and the trademarks mentioned in the documentation are (registered) trademarks of LaserSoft ImagingAG or their respective owners. The usage of these trademarks can only be permitted by LaserSoft ImagingAG or the respective owners. 7. Ineffective ProvisionsShould individual provisions of this contract, for any reason, found to be or become ineffective, or should a fulfilment discrepancy arise, then notwithstanding this agreement shall remain in full force. A provision that is closest in the scope of the legal possibilities of what the parties intended - or if they had considered the provision would have desired - shall replace the ineffective provision or the fulfilment discrepancy, if necessary retrospectively.8. AmendmentsAmendments of this Agreement have to be in writing.9. Applicable LawApplicable law is the German law; the United Convention of the International Sales of Goods (CISG) is hereby expressively excluded.
1996-2009 Copyright LaserSoft ImagingAG Germany • Luisenweg 6-8 • D 24105 Kiel • Germany

3SilverFast® v.6.6 Upgrade 1 • Introduction
Content
SilverFast® Software-License Agreement 2Introduction 5Change of system requirements 5Contents of the Upgrade 6
SilverFast ColorServer 7
Hotfolder 7What is the ColorServer (Hotfolder)? 7Which SilverFast Versions include the ColorServer? 7Launching the ColorServer 7
ColorServer Overview 8Working with the ColorServer 9
Select / Generate a Hotfolder 9Setting Input Parameters for a Hotfolder 9Setting the Hotfolder’s Output Parameters 11
Practical uses of ColorServer 13
Multi-Exposure 15Enhancing the Dynamic Range of Scanners 15
Function 15Supported Scanners 16Supported SilverFast Versions 16Usage of Multi-Exposure 17
Scanning 48 Bit 18Scan-Type „48 Bit Color“ 18Scan-Type „48 Bit HDR Color“ 18
NegaFix Improvement 19Automatic Colour Cast Removal (CCR) 19
Supported SilverFast Versions 19
New NegaFix Profiles 20NegaFix in JobManager* import dialogue 20
Auto-Frames 21Automatic Detection of Frames 21
Supported SilverFast Versions 21
Auto-Frame Function 21Auto-Frames example with SilverFastAi 22Auto-frame for flatbed scanner with transparency unit 23Resizing auto-frames* 24
Automatic frame rotation 25Manual frame rotation and alignment 26
Adjusting the frame size 26Adjusting the rotation 27Align horizon 28
Deleting framesets 28

1 • Introduction SilverFast® v.6.6 Upgrade4
SilverFast Basic-Mode 29Switching between Interfaces 29
Basic-Mode as Starting Aid 29Supported SilverFast Versions 29Basic / Standard Selection 29
Basic-Mode Overview 30
New Installers 31Supported SilverFast Versions 31
Installation Process 31
SF Ai – HDR Gamma Optimization 33Supported SilverFast versions 33Usage 33Images Without Embedded Gamma 34
More Powerful Selective Colour Correction 35Extended SCC-Presets 35
Supported SilverFast Versions 35
Colour management 36CMS palette 36
Supported SilverFast versions 36Activating the colour management 36SilverFast plug-in under Adobe Photoshop CS3 37
Automatic IT8 calibration 38One-click scanner calibration 38The calibration process 38
Presets 40
Dialogues in “Options” 41“General” palette 41“Auto” palette* 41
iSRD 42iSRD for Nikon Filmscanners (Mac only !) 42iSRD for Canon Flatbed Scanners 43
HDRi 44iSRD scans for SilverFast HDR and DC 44
Scan type „64Bit HDRi Color“ 44Scan type “32 Bit HDR Grayscale 44
Further processing of HDRi scans 45
ICC-Profiles for Kodachrome Slides 46

5SilverFast® v.6.6 Upgrade 1 • Introduction
Introduction
Dear SilverFast User,
SilverFast 6 has established the name SilverFast as the standard for scan software world-wide, while SilverFastHDR and SilverFastDCPro have become popular for working with scanner and camera raw data.We are proud that more than 1.5 Million users work with SilverFast world-wide and with the
recent support of the best scanners on the globe, the Heidelberg (Linotype-Hell) high-end series Topaz, Tango, Nexscan, Primescan and Chromagraph, we have reached the top of the imaging devel-opment. We are also proud to continue with some of the work of a great inventor of our time, Dr. Ing Rudolf Hell, the inventor of the fax machine, drum scanners and numerous other significant inven-tions, that built an important part of today‘s information technol-ogy.
At the 20th anniversary of LaserSoft Imaging we are now adding another milestone to our development with SilverFast 6.5 - even more quality and more productivity.
Please enjoy SilverFast 6.5 !
Karl-Heinz ZahorskyPresident & CEOLaserSoft Imaging AG Kiel, November 2006
Change of system requirements
SilverFast6.5 supports the operating systems Windows® 2000, Win-dows® ME, Windows® XP, Macintosh® OSX 10.3 and better.
Windows® 98 and Macintosh® OS9 are not supported anymore.

1 • Introduction SilverFast® v.6.6 Upgrade6
Contents of the Upgrade
SilverFast 6.5 (6.6, 6.6.1) contains the following features:
1. SilverFast ColorServerThe Hotfolder functionality allows flexible correction of image materials as well as the automatic control of directories.
2. Multi-Exposure For some scanners, the new Multi-Exposure function will result in a higher density and better quality while being much faster than Multi-Sampling.
3. Improved NegaFixThe NegaFix mode now operates more colour neutral with the new CCR colourcast neutralizer.
4. New NegaFix ProfilesSeveral new NegaFix profiles have been added and support more negative films.
5. Auto-FramesBy this function, Image frames can automatically be generated on the prescan.
6. SF-BasicThe SilverFast interface can now be switched from standard to basic mode.
7. New InstallerThe new Apple-Installer is now used to Macintosh.
8. SFAi - HDR Gamma OptimizationSilverFastHDR now automatically recognizes and sets the gamma value used in SilverFastAi.
9. Extended Selective Colour CorrectionNew presets for SilverFastSE and SilverFastSEPlus allowing better colour correc-tions.
10. Color management in SilverFast SEAll SilverFast SE versions contain only one input and one RGB working color space.
11. Automatic IT 8 calibrationOne click scanner calibration.
12. Options dialogAdditions on the “General” and “Auto” palette.
13. iSRD and HDRiDust and scratch removal iSDR for film and flatbed scanner. HDRi, the new raw data format with integrated infrared channel.
14. KodachromeICC profile for Kodachrome slides.
7SilverFast® v.6.6 Upgrade 2 • ColorServer
SilverFast ColorServer
Hotfolder
What is the ColorServer (Hotfolder)?
The hotfolder functionality allows the flexible correction of image material and the automatic control of directories.
On the one hand, entire image collections can be processed fully automatically. This will commonly be used for converting or scal-ing of images: By means of a few mouse clicks, all images may be copied from folder A into folder B while resizing them to a 72dpi output for web use.
On the other hand, the control of import-directories is possible. For example: The flash memory of a digital camera is emptied into a hotfolder. The hotfolder will then automatically process all images according to the users presets.
Which SilverFast Versions include the ColorServer?
The ColorServer is an optional extension for SilverFastDCProStudio and -HDRStudio versions.
Launching the ColorServer
The ColorServer may be opened in SilverFast’s main dia-logue by clicking of the respective button left of the large preview window.

8 2 • ColorServer SilverFast® v.6.6 Upgrade
ColorServer Overview
1 Status window Shows the status of the currently processed image.
2 Hotfolder selection A list of all generated hotfolders.
3 Taskbar Start, stop , add new hotfolder, delete selected hotfolder.
4 Hotfolder thumbnails The thumbnail displays a flickering image when a hotfolder is active.
5 General status of the ColorServer Halted or in operation.
6 Name of the selected hotfolder
7 QuickTime movie Introduction to the ColorServer.
8 Switch to SilverFast’s main dialogue
9 Input area Here, all parameters of the current hotfolder can be entered and displayed.
10 Output area Target directory, file format as well as archive and error directories can be
chosen here.
The image on the right show the ColorServer in operation.
The image below shows the resting ColorServer.
4
3
2
8
765
9
101

9SilverFast® v.6.6 Upgrade 2 • ColorServer
Working with the ColorServer
Using the ColorServer is easy. The following passage describes the generation and operation of a hotfolder.
Select / Generate a Hotfolder
Selection of a hotfolder is done by simply clicking the respective name in the hotfolder list.
A new hotfolder is generated by clicking the plus-button in the toolbar. The new hotfolder appears as “Unnamed” in the list. By double-clicking the name, it will be highlighted and can be edited.
A single click switched between hotfolders. The selected param-eters of the selected hotfolder are immediately displayed in the input- and output areas.
Setting Input Parameters for a Hotfolder
The name of a selected hotfolder appears on the upper edge of the input area.
• Source directory: First, select a source directory. A click on the directory button opens the operating system’s file browser.
Attention!
Each hotfolder must have a different source directory. A single source directory cannot be used by two or more hotfolders.
Attention !The Hotfolder is emptied with processing! The pictures in it are changed by the processing, according to the adjusted parameters. If it’s necessary to keep the originals preserved an archive directory must be selected absolutely.

10 2 • ColorServer SilverFast® v.6.6 Upgrade
• Frame parameters: Previously generated parameter settings from SilverFast’s main dialogue may be chosen next. These parameter settings will then be applied to every image that is dropped into hotfolder.
• Use image automatic: The image automatic is individually applied for each image in the hotfolder.
• Cut to image frame: All images in the hotfolder are cut to the proportion of the currently selected frame in SilverFast’s main dialogue.
• Image size / Do not change: By this selection, all images remain in their original size.
• Apply resolution: The selected output resolution of SilverFast’s main dialogue is applied to all images in the hotfolder
• Apply scaling: The selected scaling of SilverFast’s main dia-logue is applied to all images in the hotfolder.
Reminder
Where and how can the parameters be set?
In SilverFast’s main dialogue window on the “Frame” palette, under the “Setting” menu. All set parameters will be taken such as gradation-, colour corrections, USM, scaling, output resolution, etc.
11SilverFast® v.6.6 Upgrade 2 • ColorServer
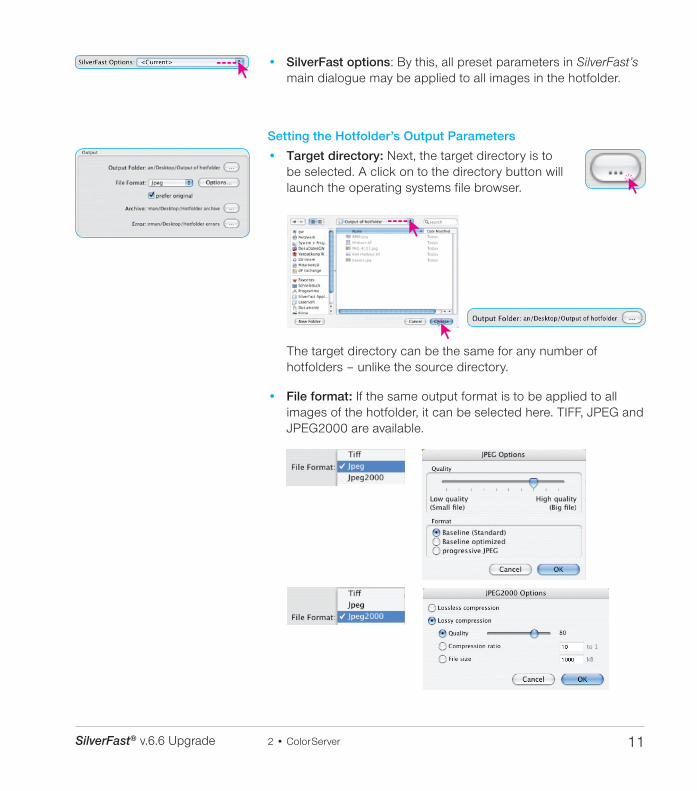
• SilverFast options: By this, all preset parameters in SilverFast’s main dialogue may be applied to all images in the hotfolder.
Setting the Hotfolder’s Output Parameters
• Target directory: Next, the target directory is to be selected. A click on to the directory button will launch the operating systems file browser.
The target directory can be the same for any number of hotfolders – unlike the source directory.
• File format: If the same output format is to be applied to all images of the hotfolder, it can be selected here. TIFF, JPEG and JPEG2000 are available.

12 2 • ColorServer SilverFast® v.6.6 Upgrade
• Prefer original: If the output format is to be the same as the original file, check this box. By doing this, the selected settings in the previous menu are overruled / deactivated.
• Archive directory: Next, the archive directory can be chosen. A click on to the directory button will launch the operating systems file browser.
The archive directory collects 1:1 copies of the originals.
• Error directory: The error directory grabs all defective files, as well as all files that could not be successfully processed by the hotfolder. A click on to the direc-tory button will launch the operating systems file browser.

13SilverFast® v.6.6 Upgrade 2 • ColorServer
Practical uses of ColorServer
Below is a classical example of the daily workflow of a photographer:
• Many pictures are taken on an event e.g. a marriage or a sports event.
• The full memory cards must now be emptied on location
• The photos are to be presented as a beamer presentation as soon as possible after the event
• SilverFastDCPro’s ColorServer optimizes all images automati-cally
• Additionally, a backup of all images is generated.
The individual steps:
Step 1The event is under way and the first memory card is full.Now this card is tom be emptied on a Laptop / Computer.
Step 2First, generate a folder (called “work folder” here) into which all images are to be transferred. This folder will be declared as the ColorServer-Hotfolder later..
Step 3Now the images from the first memory card can be transferred into the unload folder.
3
10
3
10

14 2 • ColorServer SilverFast® v.6.6 Upgrade
Step 4Parallel to this, the ColorServer can now be opened in SilverFastDCProStudio. By clicking the Plus-button, a new Hotfolder is created and the current event can be named.
Step 5The unload folder is now declared as monitored source directory.
Step 6The input parameters can now be entered. In our example, a previously selected frame setting is chosen, which merely re-sizes the images to a beamer-conform XVGA resolution and applies a gentle USM.
Step 7Activate “Image automatic” and “Use scaling”.
Step 8The destination folder is to be selected.
Step 9The output format is generally set as JPEG, since it is the most suitable for this purpose.
Step 10Now things become important! An archive folder is to be created and selected. The reason: The images are removed from the source directory and altered! Hence, the original files need to be saved in an archive folder.
Step 11For security reasons, an additional error folder may be generated and selected.
Step 12The ColorServer is now prepared and ready and may be launched by clicking the Start button.
Step 13Once the next memory card is full, the contents merely have to be transferred into the unload folder (see Step 3); the optimization monitored by the ColorServer is then done automatically in the background.
Step 14At the end of the event or once the last memory card has been emptied, the desti-nantion folder contains all images for the beamer presentation. The originals were copied into the archive folder and (hopefully) the error folder is empty.

15SilverFast® v.6.6 Upgrade 3 • Multi-Exposure
Multi-Exposure
Enhancing the Dynamic Range of Scanners
Function
SilverFast’s Multi-Exposure generates scans into which variable exposures may be calculated.
The function is similar to exposure rows as they are known from photography.
With this feature, the supported film- and flatbed scanner’s dynam-ic range is significantly increased and the noise of the CCDs effec-tively minimized. Hence, more details will become visible, which is especially true for the dark parts of an image.
In comparison to multi sampling, there is one main advantage: Multi-Exposure reaches the same quality much faster! The slower 8x or 16x Multi-Sampling processes become completely obsolete, since even a 2x Multi-Exposure reaches a higher quality.
1x scan 4x scan
Multi-Sampling (multiple scans)The single scan shows significant noise. A 2x Multi-Sampling reduces this noise.
2x Multi-Exposure
Multi-ExposureIf the two images above are com-pared to the Multi-Exposure results, a significant improvement in quality can be seen. The noise is reduced even more and more image details become visible.

16 3 • Multi-Exposure SilverFast® v.6.6 Upgrade
Supported Scanners
Multi-Exposure needs specific hardware features, which are not available in all scanners. In addition, Multi-Exposure is only avail-able for positives.For negatives, SilverFast’s NegaFix already uses a similar tech-nique.The following scanners support the Multi-Exposure feature at the time this manual was printed:
Nikon Coolscan V ED (LS-50)
Nikon Super Coolscan 5000 ED (LS-5000)
Nikon Super Coolscan 9000 ED (LS-9000)
Nikon Coolscan IV ED (LS-40)
Nikon Super Coolscan 4000 ED (LS-4000)
Nikon Super Coolscan 8000 ED (LS-8000)
Minolta DiMAGE Scan Elite 5400
Minolta DiMAGE Scan Elite 5400 II
Epson Expression 836 XL
Epson Perfection V700 Pro
Epson Perfection V750 Pro
Epson Perfection 4490
Epson Perfection 4870
Epson Perfection 4990
Please refer to LaserSoft Imaging’s Homepage for a list of scanners which might now be adapted for this feature.
Supported SilverFast Versions
Multi-Exposure is included with all SilverFastAiStudio and SEPlus 6.6 versions of the above listed scanners and many more. Multi-Exposure only works with positives and negatives in transparency mode.

17SilverFast® v.6.6 Upgrade 3 • Multi-Exposure
Usage of Multi-Exposure
Multi-Exposure only operates in transparency mode when scanning negatives or slides.
Activation and use of Multi-Exposure is simple: The button for activating the Multi-Sampling can be found on the left side of the large Preview window of SilverFastAi… the but-ton for Multi-Exposure is underneath it.
The button can be switched between Multi-Sampling or Multi-Exposure mode by clicking it.
Attention! Only one function may be used at any given time: either Multi-Sampling or Multi-Exposure.
When switching from one Multi-Sampling-level to Multi-Exposure, Multi-Sampling will automatically be reset to the first level and is de-activated.
Example: Switching from 4x Multi-Sampling to 2x Multi-Exposure. One click de-activates Multi-Sampling and activates 2x Multi-Exposure.
Example: Switching from 4x Multi-Exposure to 2x Multi-Sampling. One click switches off Multi-Exposure and activates 2x Multi-Sampling.
Scan type „48->24 Bit Color“ and Multi-Exposure
Since versioin 6.5.1 and later Multi-Exposure (ME) is also useable with scan types “48->24 Bit Color” and “16->8 Bit Grayscale”.An effect of ME can’t be made vis-ible in the big prescan because the preview data are based on a regular exposed scan.
The auto-adjust function calculates on base of the nor-mal prescan too and doesn’t
make use of the increase of dynamic range caused by ME. But there is a little trick:If ME is used together with the auto-adjust function it is recommended to reduce the histogram value for the shadows down to half or one third.
The example shows the reduction of the shadow level from 14 to 7.That make the additional dynamic range visible in the fine scan, even in 24 bit and 8 bit fine scans.
18 3 • Multi-Exposure SilverFast® v.6.6 Upgrade
Scanning 48 Bit
One of the main features of Multi-Exposure is the big dynamic range of the final scans. There are two different workflows recom-mended, corresponding to the selected scan type “48 Bit Color” or “16 Bit Grayscale”.
Scan-Type „48 Bit Color“
This scan type produces 48 bit scans which can be optimised completely just while scanning.
In contrast to scan type “48 Bit HDR Color” all imaging tools and filters are enabled.
That makes the workflow equal to the regular scanning in 24 bit mode. The significant difference is the doubled file size.
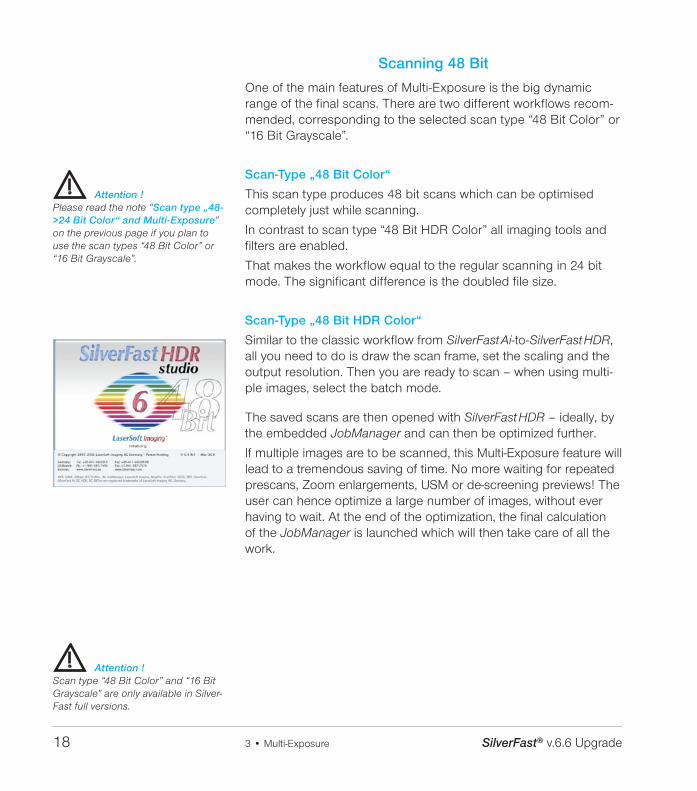
Scan-Type „48 Bit HDR Color“
Similar to the classic workflow from SilverFastAi-to-SilverFastHDR, all you need to do is draw the scan frame, set the scaling and the output resolution. Then you are ready to scan – when using multi-ple images, select the batch mode.
The saved scans are then opened with SilverFastHDR – ideally, by the embedded JobManager and can then be optimized further.
If multiple images are to be scanned, this Multi-Exposure feature will lead to a tremendous saving of time. No more waiting for repeated prescans, Zoom enlargements, USM or de-screening previews! The user can hence optimize a large number of images, without ever having to wait. At the end of the optimization, the final calculation of the JobManager is launched which will then take care of all the work.
Attention !Please read the note “Scan type „48->24 Bit Color“ and Multi-Exposure” on the previous page if you plan to use the scan types “48 Bit Color” or “16 Bit Grayscale”.
Attention !Scan type “48 Bit Color” and “16 Bit Grayscale” are only available in Silver-Fast full versions.

19SilverFast® v.6.6 Upgrade 4 • NegaFix Enhancement
NegaFix Improvement
Automatic Colour Cast Removal (CCR)
The NegaFix mode now operates much more colour neutral thanks to a new extended function. This is especially important for not 100% matching film profiles. With this feature, even the missed parts of the orange masks can easily be removed, already when the negatives are converted.
The activation of the CCR is done by a check box within the NegaFix dialogue.
Supported SilverFast Versions
The automatic colour cast removal CCR is available in all SilverFast versions which previously contained the NegaFix function.
NegaFix
Effect of CCRThe effects of CCR are already visible when no negative profiles have been selected:
Image left: CCR turned offImage right: CCR turned on.

20 4 • NegaFix Enhancement SilverFast® v.6.6 Upgrade
New NegaFix Profiles
Several new NegaFix profiles now support additional negative-films. The following profiles have been added to the 120 films already supported:
Fuji Pro 160S
Kodak 100UC
NegaFix in JobManager* import dialogue
The JobManager* import dialogue has been upgraded with the “Process as Negative (use NegaFix)” check box. Here, raw data scans of film negatives can be transferred directly to JobManager as positives. After import, negative thumbnails are automatically shown as positives in JobManager.
Another advantage is that when the raw data negative is opened from JobManager, the Nega-Fix dialogue appears immediately.
Figure to right: The negative is shown as a positive when added to the JobManager only when NegaFix is activated. Otherwise, it appears as a negative.
* AttentionThe availability of this function depends on what hardware and on which version of SilverFast are being used.
21SilverFast® v.6.6 Upgrade 5 • Auto Frame
Auto-Frames
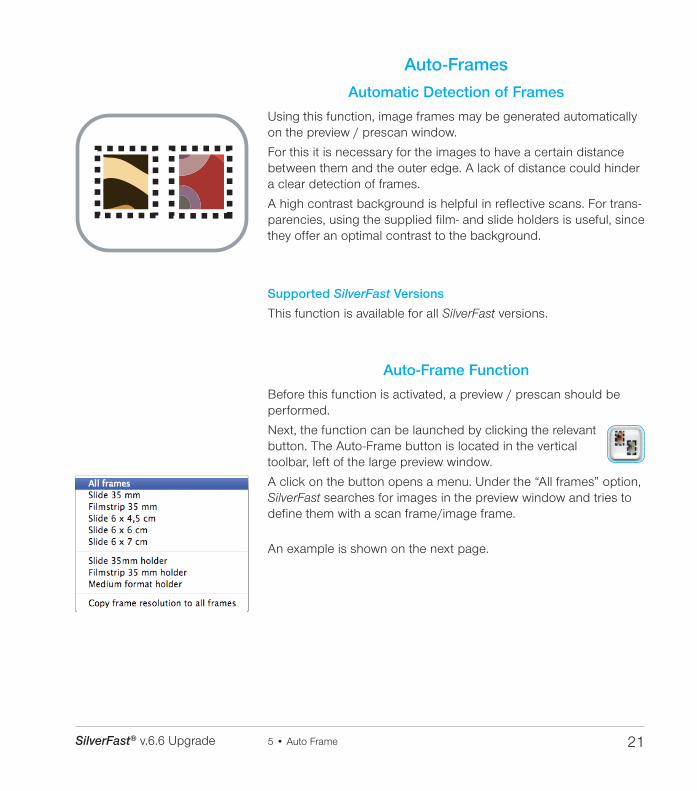
Automatic Detection of Frames
Using this function, image frames may be generated automatically on the preview / prescan window.
For this it is necessary for the images to have a certain distance between them and the outer edge. A lack of distance could hinder a clear detection of frames.
A high contrast background is helpful in reflective scans. For trans-parencies, using the supplied film- and slide holders is useful, since they offer an optimal contrast to the background.
Supported SilverFast Versions
This function is available for all SilverFast versions.
Auto-Frame Function
Before this function is activated, a preview / prescan should be performed.
Next, the function can be launched by clicking the relevant button. The Auto-Frame button is located in the vertical toolbar, left of the large preview window.
A click on the button opens a menu. Under the “All frames” option, SilverFast searches for images in the preview window and tries to define them with a scan frame/image frame.
An example is shown on the next page.

22 5 • Auto Frame SilverFast® v.6.6 Upgrade
Auto-Frames example with SilverFastAiThe left-hand image shows the large preview window after the first prescan has been done. Only one scan frame can be seen, which runs along the entire edge of the prescan window.
Click the Auto-Frame button and select “All frames” from the menu.
The right-hand image then shows the result of the frame search. All six images were fitted with a frame. The image frame is coloured red. This is the current active image frame.
If needed; any image can now undergo an individual optimization process. For example: image automation, colour correction and; frame alignment; image size; resolution and sharpening.
All six frames may now be scanned in batch mode.
Several options are available for special film-strip and slide origi-nals.

23SilverFast® v.6.6 Upgrade 5 • Auto Frame
Auto-frame for flatbed scanner with transparency unit
The automatic frame detector works more comfortably when scan-ning mounted slides or film-strips. If one places the slides or film-strips on the flatbed scanner with the appropriate film holder, then the relevant option can be chosen from the menu. Here are some examples shown for 35mm slide and 35mm film-strip holders.

24 5 • Auto Frame SilverFast® v.6.6 Upgrade
Resizing auto-frames*
The find frame function may be edited and changed under „options/auto/resize auto frames“.The function “find frames“ may be edited by means of the numeri-cal value. At 0% SilverFast tries to align the preview frame and the final scan frame to the exact margins of the scanned image. Negative values will cause the frame to be enlarged and positive values will reduce the frame size (see example) and push the frame further into the image.
Reducing auto framesSections of SilverFast‘s preview window with different values for frame reduction left: 0%; right: 1%
Tip for scanning framed slides: While using iSRD, it might be bet-ter to use small value for example 0.1%; as this might give bet-ter results at the image borders. If the iSRD overlaps the actual slide frame; this part of the scans may be blurred.
* AttentionThe availability of this function depends on what hardware and on which version of SilverFast are being used.

25SilverFast® v.6.6 Upgrade 5 • Auto Frame
Automatic frame rotation
Apart from detecting image frames automatically, SilverFast Ai Stu-dio and SilverFast SE Plus versions 6.5.5 or later now offer the option to automatically rotate and align frames.
If the contrast differences between image and image background are high enough; SilverFast will not only find the individual images but also rotate the scan frames automatically. By this method; images which are not aligned to the scanner will be automatically aligned while scanning.
For example: SilverFast recognizes the four non-aligned images on the scanned bed and automatically creates frames around these. Inactive frames are displayed in white the active frame is displayed in red.

26 5 • Auto Frame SilverFast® v.6.6 Upgrade
Manual frame rotation and alignment
The mouse can be used to change the size and the rotation of any frame freely.
Adjusting the frame size
In order to change that frame size the active red frame may be grabbed at its edges or borders and may be resized. And on the image on the lower left the contrast difference between the image and image background is not sufficient. This is not a problem because the frame can manually be altered by use of the mouse.
Since the actual scan cannot really be rotated, the selected scan area must always be larger for rotated images. After the final scan SilverFast then rotates and resizes the scan area to the selected output dimension.

27SilverFast® v.6.6 Upgrade 5 • Auto Frame
Image 1 (left): beginning with manu-ally drawn frame (red dots)
Image 2 : rotation by click dragging the left grabber
Image 3 (left): moving and dragging the scan frame to the desired final format by click dragging the frame borders and edges as well as a fine correction over the rotation by means all the grabbers.
Image 4: final scan
Adjusting the rotation
The manual frame rotation is done by click dragging the semicircu-lar grabbers on the borders all of the scan frame. A pressed shift key will cause the frame to be rotated in steps of 45°.

28 5 • Auto Frame SilverFast® v.6.6 Upgrade
Align horizon
Every photographer has come across images in which the camera was not perfectly aligned horizontally. The result is that the image appears tilted. A manual frame alignment can correct this error while scanning.
Deleting framesets
Since SilverFast always reopens the last preview window, those set-tings may not work for the new image. A general reset (Reset all) allows the deletion of old scan frames, and a new frame is placed over the entire prescan area.
“Reset all” on Macs: Click the reset button while keeping the “Shift” key pressed.
“Reset all” for Windows: Click the “Options” key while keeping the “Shift” key pressed.
Left image: The scan frame was detected correctly, but the horizon is misaligned
Image right: the scanned frame was manually rotated and repositioned. Image horizon and image border are now parallel..

29SilverFast® v.6.6 Upgrade 6 • SF-Basic
SilverFast Basic-Mode
Switching between Interfaces
Basic-Mode as Starting Aid
All SilverFast versions from V6.5 and up may now be switched between Standard- and Basic mode. By this, SilverFast novices will find the software easier to use.
Supported SilverFast Versions
The Basic-mode is available in all SilverFastSE, -SEPlus, -DCSE and -DCVLT versions.
Basic / Standard Selection
The selector can be found in the main part of the SilverFast dia-logue, and displays the current mode: Basic or Standard.
Attention!
When switching from Standard to Basic mode, all parameters will be lost that are not part of Basic mode.

30 6 • SF-Basic SilverFast® v.6.6 Upgrade
Basic-Mode Overview
5
2
1
1 Launch prescan / open image Launches the prescan in the scanner version or opens an image file in the
DC verions.
2 Output size and measuring units
3 Scan type (only for scanner versions) Selection of Photograph, Slide or Negative
4 Output resolution
5 Filters Selection of sharpening filter.
In scanner versions the additional option of de-screening.
6 Mode Switch between Basic and Standard mode.
7 Scan / Process Launches the scan or launches the optimization process.
8 Cancel / Quit Ends SilverFast.
6
4
2
7 8 1 7 8
The Basic dialogueLeft: SilverFastSERight: SilverFastDCVLT
3

31SilverFast® v.6.6 Upgrade 7 • New Installer
New Installers
The new Apple installer is now used for Macintosh computers.
All SilverFast installer were shipped as “.mpkg” file. A double click onto the installer icon launches the installation process.
The entire installation is completely guided and follows the current Apple Macintosh standard.
Supported SilverFast Versions
The new installers are used by all SilverFast Macintosh versions.
Installation Process
Double click the installer icon.
Click „Continue“ to run the installa-tion process
Please read the latest informations about the installation process and SilverFast.

32 7 • New Installer SilverFast® v.6.6 Upgrade
Please read and accept the terms of use and license agreement.
Select the destination volume.
Start installation procedure.
Security checkYou have to be logged in to your computer as root or administrator to run an installation successfully.
Installation finshed.

33SilverFast® v.6.6 Upgrade 8 • Gamma Optimization
SF Ai – HDR Gamma Optimization
The used gamma values of SilverFastAi is now automatically detected and applied in SilverFastHDR.
Supported SilverFast versions
The automatic gamma recognition is available in all SilverFastHDR and SilverFastHDRStudio versions.
Usage
The gamma detection is needed wherever RAW data files from dif-ferent sources (changing scanners, etc) are to be optimized.
For example: Scanner A is digitizing images (SilverFastAi in 48 Bit HDR Colour mode) with a gamma of 1,8. Scanner B is optimised 48 bit images (SilverFastAi in 48 Bit Colour mode) in the same for-mat, but is using a higher gamma of 2,2 (brighter monitor display)
In both cases the checkbox “For HDR Output” behind “Gamma gradation” should be activated in the “General” palette.
The entered gamma value will now be embedded into the scan data.

34 8 • Gamma Optimization SilverFast® v.6.6 Upgrade
The central working place now receives both images, in order to process them with SilverFastHDR for layout.
The embedded gamma will now be recognized by SilverFastHDR and will be applied when opening the images. Each image is thus correctly displayed on the monitor.
Images Without Embedded Gamma
In case an image has no embedded gamma, SilverFastHDR will apply the standard gamma.
This standard gamma value may be entered in SilverFastHDR’s gen-eral palette under the “Options…” menu.
Attention!
Images that contain un unspecified gamut or images that were not generated by SilverFast versions should be opened with a standard gamut of 1,0.
Every other gamut value could influence the image display since the embedded and the selected gamut in SilverFast are added and appear cumulative.

35SilverFast® v.6.6 Upgrade 9 • SCC-Presets
More Powerful Selective Colour Correction
Extended SCC-Presets
All SilverFastSE and SilverFastSEPlus versions of V.6.5 or newer will contain this new feature.
Supported SilverFast Versions
This feature is available for all SilverFastSE, -SEPlus, -DCSE versions.

36 10 • CMS SilverFast® v.6.6 Upgrade
Colour management
CMS palette
SilverFast version 6.5 or later now include a simple color manage-ment by means of ICC profiles for all of SilverFast SE and SE Plus versions.
Supported SilverFast versions
The CMS palette and for color management is available in all SilverFast SE and SE Plus versions 6.5.0r4 or later.
Activating the colour management
The settings for the colour management are entered in the presets (options…) dialogue.
Opening the preset dialogue “options”Left: MacintoshGeneral/options/CMS
Right: Windows
37SilverFast® v.6.6 Upgrade 10 • CMS
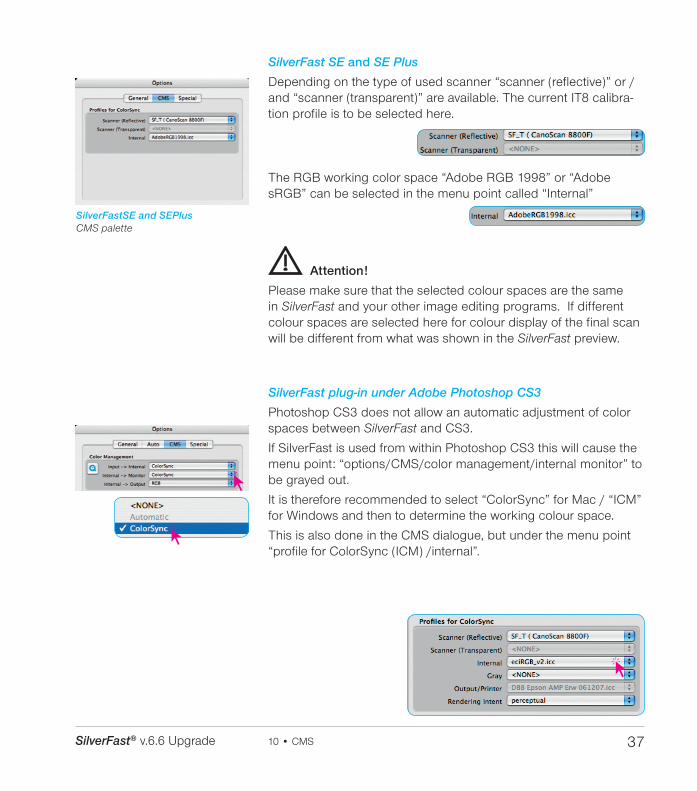
SilverFast SE and SE Plus
Depending on the type of used scanner “scanner (reflective)” or / and “scanner (transparent)” are available. The current IT8 calibra-tion profile is to be selected here.
The RGB working color space “Adobe RGB 1998” or “Adobe sRGB” can be selected in the menu point called “Internal”
Attention!
Please make sure that the selected colour spaces are the same in SilverFast and your other image editing programs. If different colour spaces are selected here for colour display of the final scan will be different from what was shown in the SilverFast preview.
SilverFast plug-in under Adobe Photoshop CS3
Photoshop CS3 does not allow an automatic adjustment of color spaces between SilverFast and CS3.
If SilverFast is used from within Photoshop CS3 this will cause the menu point: “options/CMS/color management/internal monitor” to be grayed out.
It is therefore recommended to select “ColorSync” for Mac / “ICM” for Windows and then to determine the working colour space.
This is also done in the CMS dialogue, but under the menu point “profile for ColorSync (ICM) /internal”.
SilverFastSE and SEPlusCMS palette
38 11 • Automatic IT8-Calibration SilverFast® v.6.6 Upgrade
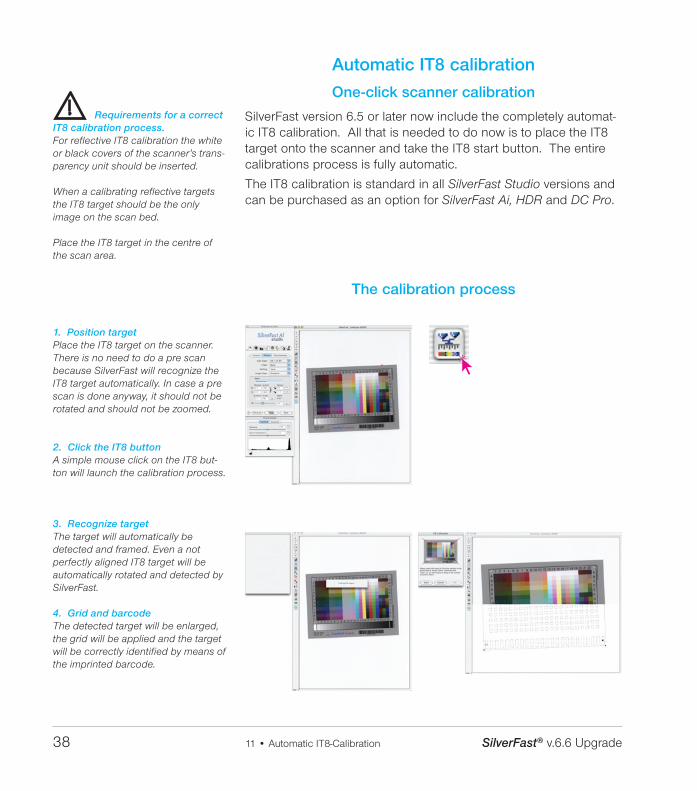
Automatic IT8 calibration
One-click scanner calibration
SilverFast version 6.5 or later now include the completely automat-ic IT8 calibration. All that is needed to do now is to place the IT8 target onto the scanner and take the IT8 start button. The entire calibrations process is fully automatic.
The IT8 calibration is standard in all SilverFast Studio versions and can be purchased as an option for SilverFast Ai, HDR and DC Pro.
The calibration process
1. Position targetPlace the IT8 target on the scanner.There is no need to do a pre scan because SilverFast will recognize the IT8 target automatically. In case a pre scan is done anyway, it should not be rotated and should not be zoomed.
2. Click the IT8 buttonA simple mouse click on the IT8 but-ton will launch the calibration process.
3. Recognize targetThe target will automatically be detected and framed. Even a not perfectly aligned IT8 target will be automatically rotated and detected by SilverFast.
4. Grid and barcodeThe detected target will be enlarged, the grid will be applied and the target will be correctly identified by means of the imprinted barcode.
Requirements for a correct IT8 calibration process.For reflective IT8 calibration the white or black covers of the scanner’s trans-parency unit should be inserted.
When a calibrating reflective targets the IT8 target should be the only image on the scan bed.
Place the IT8 target in the centre of the scan area.

39SilverFast® v.6.6 Upgrade 11 • Automatic IT8-Calibration
5. Measuring the IT8 targetBy means of the imprinted barcode the corresponding reference data file can be identified and applied. The calculations and creation often ICC profile will follow.
6. Replace old profile? !In case SilverFast finds an existing profile it will prompt if the new profile shell replace this. In general a click on “OK” is required.SilverFast and saves the new profile in the correct directory of the compu-ter and activates color management within the presets.
7. Calibration successfulAfter successful calibration, SilverFast will display the corresponding mes-sage. This dialog is closed by clicking “OK”
8. Updating the previewSilverFast now performs an updated prescan which incorporates the newly generated profile.This concludes the IT8 calibration process. The user does not have to do any additional tasks.SilverFast is now calibrated and ready for further scans.

40 11 • Automatic IT8-Calibration SilverFast® v.6.6 Upgrade
Presets
The presets (General-palette – Options – Auto – IT8 calibration), allow the option of modification by the user.
Auto IT8 Calbration: This check box activates or de-activates the automatic IT8 calibration.
A de-activated check box will make the calibration run in a step-by-step mode and allows the user to interact with the process.
Initially, a prescan is required in order to place scan frame over the IT8 target.
Next, the IT8 function itself is launched and the mask needs to be placed over the preview of the scanner. It can be moved and resized by means of click dragging it.
When the “Start” button is clicked, the process is launched and the scanner will start to operate. SilverFast will then search for the corresponding reference data file. This reference file is a text file in which the numerical values of the IT8 target are contained.
Next, SilverFast will generate the scanner profile. If needed, this profile can be renamed as desired.
Custom ICC profile name: If this check box is activated, a dialogue for naming the ICC profile pops up at the end of the calibration process.
41SilverFast® v.6.6 Upgrade 12 • Dialog „Optionen…“
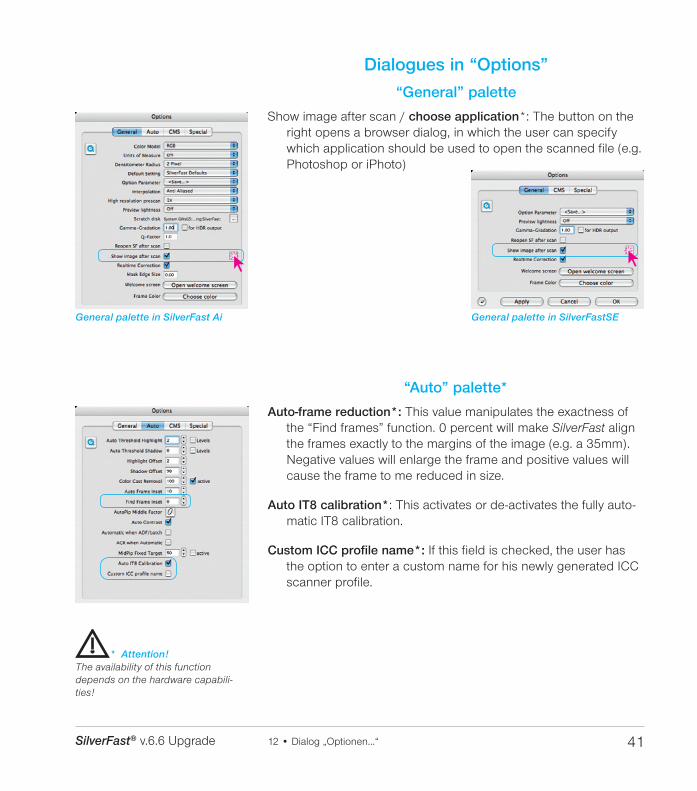
Dialogues in “Options”
“General” palette
Show image after scan / choose application*: The button on the right opens a browser dialog, in which the user can specify which application should be used to open the scanned file (e.g. Photoshop or iPhoto)
“Auto” palette*
Auto-frame reduction*: This value manipulates the exactness of the “Find frames” function. 0 percent will make SilverFast align the frames exactly to the margins of the image (e.g. a 35mm). Negative values will enlarge the frame and positive values will cause the frame to me reduced in size.
Auto IT8 calibration*: This activates or de-activates the fully auto-matic IT8 calibration.
Custom ICC profile name*: If this field is checked, the user has the option to enter a custom name for his newly generated ICC scanner profile.
* Attention!The availability of this function depends on the hardware capabili-ties!
General palette in SilverFast Ai General palette in SilverFastSE

42 13 • iSRD SilverFast® v.6.6 Upgrade
iSRD
iSRD for Nikon Filmscanners (Mac only !)
The iSRD function (the Infrared-based dust and scratch removal) is now also available for Nikon scanners from version 6.6 onwards.
The iSRD function will completely replace the ICE technology on Macintosh operating systems.
This became necessary because Nikon has stopped their develop-ment of their MAID driver for the current Mac OS systems. From SilverFast 6.6 onwards, SilverFast will drive the Nikon scanners directly, not utilizing any MAID modules. This ensures a quick and stable operation of the scanners under e.g. Mac OS 10.5 Leopard.
The following Nikon film scanners will be supported with iSRD:
Nikon LS-5000 (SUPER COOLSCAN 5000 ED)
Nikon LS-50 (COOLSCAN V ED)
Nikon LS-4000 (SUPER COOLSCAN 4000 ED)
Nikon LS-40 (COOLSCAN IV ED)
Nikon LS-2000 (SUPER COOLSCAN LS-2000)
If supported by the scanner type, the film strip adapters SA-20, SA-21 and SA-30 will be useable, as well as the slide feeder SF-200 and SF-210.
The older film scanners like COOLSCAN LS-10, SUPER COOLS-CAN LS-1000 und COOLSCAN III will not be supported.
The MAID-replacement and implementation of iSRD for the multi format Nikon scanners SUPER COOLSCAN 8000 und SUPER COOLSCAN 9000 ED will follow..
Detailed instructions on the use of SilverFast iSRD can be found in Chapter 6.13 “SilverFastSRD – scratch and dust removal” of the manual.
The direct link is:
http://www.silverfast.com/showdocu/en.html?docu=929

43SilverFast® v.6.6 Upgrade 13 • iSRD
iSRD for Canon Flatbed Scanners
The iSRD function (the Infrared-based dust and scratch removal) is now also available for some Canon flatbed scanners from version 6.6.0r4 onwards:
Canoscan 8800F
Canoscan 8600F
Canoscan 8400F
Canoscan 9900F
Canoscan 9950F
Detailed instructions on the use of SilverFast iSRD can be found in Chapter 6.13 “SilverFastSRD – scratch and dust removal” of the manual.
The direct link is:
http://www.silverfast.com/showdocu/en.html?docu=929

44 13 • iSRD SilverFast® v.6.6 Upgrade
HDRi
iSRD scans for SilverFast HDR and DC
With iSDR capable scanners, all versions of SilverFast from 6.6.1r1 onwards can produce raw data scans, in which additional infor-mation from infrared scans is embedded unmodified. Hence, it is possible to apply dust and scratch removal after the scan without any loss of quality. Bulk scanners, such as slide magazine or flat-bed scanners with large transparency units, can be used in an even more effective and time-saving manner. Particularly beneficial will be the split workflow in the SilverFast Archive Suites.
Two new scan types have been added for HDRi. They can be found on the “Frame” palette under “Scan type”
Scan type „64Bit HDRi Color“
This scan type produces a raw data file in “TIFF” format at 4x16 bit, in other words 16 bit for each of the colour channels red, green and blue, plus an additional 16 bit for a pure infrared scan. File size is increased by approximately one-third. Thus, the scan type is roughly equivalent to the “48 Bit HDR color” type, but with an inte-grated infrared scan.
Scan type “32 Bit HDR Grayscale
This scan type produces a raw data file in “TIFF” format at 2x16 bit, in other words 16 bit for the normal greyscale raw scan, plus addi-tional 16 bit for the pure infra-red scan. File size is doubled. Thus, the scan type is roughly equivalent to the “16 Bit HDR Grayscale” type, but with an integrated infrared scan.
Another difference from raw scans with no iSDR information is that for these scan types the scanning software does not apply any rotation of the scan frame. The small semi-circular adjusters do not appear in the scan frames. This procedure is necessary in order to prevent from the outset any possible positioning or alignment prob-
64 Bit HDRi TIFF fileIt includes not only the 48 bit colour raw scan, but also a 16 bit greyscale raw scan of the infra-red channel.

45SilverFast® v.6.6 Upgrade 13 • iSRD
lems when subsequently composing the scans. “Real” raw data scans are produced, allowing further processing to access the full potential of the raw scan.
Further processing of HDRi scans
Further processing is easy and takes place using SilverFast HDR (and higher) and SilverFast DC VLT (and higher).
These versions of SilverFast recognise automatically that the file is HDRi.
If an HDRi file is opened, the relevant version of SilverFast immedi-ately shows the iSDR button in the vertical toolbar, left of the large preview window. The button comes up in grey, meaning the function is inactive.
If you wish to use iSDR on the open raw data image, a single click on the iSDR button will activate this function. It will operate in fully automatic mode, defining the parameters for dust and scratch removal by itself. The iSDR function automatically adjusts the strength of the effect according to the image resolution.
Individual or manual control of the iSDR function can be activated by clicking again on the iSDR button.
An additional button appears immediately below.
Click to open the iSDR dialogue.
Operation of the iSDR dialogue in SilverFast DC or SilverFast HDR is carried out in exactly the same way as for the scanning software.
Detailed instructions on the use of SilverFast iSRD can be found in Chapter 6.13 “SilverFast SRD – scratch and dust removal” of the manual.
The direct link is:
http://www.silverfast.com/showdocu/en.html?docu=929
46 14 • Kodachrome SilverFast® v.6.6 Upgrade
ICC-Profiles for Kodachrome SlidesBy implementing more Kodachrome ICC-profiles into SilverFast Version 6.6.0r4, most Canon, Epson, Hewlett-Packard, Microtek, Minolta, Plustek, Quatographic and Reflecta’s scanners are now able to scan Kodachrome slides with the highest possible dynamic range – automatically IT8 calibrated and free of dust and scratces.
Please regard: SilverFast Multi-Exposure® (for enhancing the dynamic range) and iSRD (Infrared scratch and dust removal) are hardware dependent features. Kodachrome profiles are not included in SilverFast SE.
Further informations about “Scanning Kodachrome slides with SilverFast” and a list of supported scanners can be found here: http://www.silverfast.com/show/kodachrome/en.html
How easy this is can be seen here with the QuickTime-movie:
http://www.silverfast.com/download/movie/aist-660r1_en_kodachromeslides andisrd_en_2008-08-14.mov
Kodachrome

47SilverFast® v.6.6 Upgrade 14 • Kodachrome

En1/2011
LaserSoft Imaging AGLuisenweg 6-824105 Kiel • GermanyTel.: +49 (0) 431/5 60 09-0Fax: +49 (0) 431/5 60 09-96 E-Mail: [email protected]
©2009 SilverFast® and LaserSoft Imaging™ are registered trademarks of LaserSoft Imaging AG, Germany.All mentioned trademarks are the protected trademarks of the respective owners.Patents: EP 1594301, EP 1744278