Embed Size (px)
Citation preview

1
IEP-IPP v1.0
User Documentation V1.0 - Saturday, February 03, 2007.
IEP-IPP Information and Credits ........................................................................................ 3 Logging in ........................................................................................................................... 4 Main Screen ........................................................................................................................ 4 General Navigation............................................................................................................. 5
Top and Bottom Navigation Bars ............................................................................... 5 Home Button................................................................................................................... 6 Back Button.................................................................................................................... 6 About Button .................................................................................................................. 6 Student Button................................................................................................................. 6 View PDF Button .......................................................................................................... 6 Logout Button ................................................................................................................. 6 Warnings and Errors ................................................................................................... 6
Change Password Screen.................................................................................................... 6 Adding a new IEP/IPP ........................................................................................................ 7 Granting Others Access to Your Program Plans ................................................................. 8
Program Plan Permission Levels .................................................................................... 8 Coding a Student ............................................................................................................... 10 Assigning a Supervisor ..................................................................................................... 11 Moving Schools & School History................................................................................... 12
Move Student within Jurisdiction............................................................................. 12 Move Student out of Jurisdiction or Graduate .......................................................... 12 Add history for an out of Jurisdiction School. .......................................................... 13 Deleting School Histories ......................................................................................... 13
Managing Guardians ......................................................................................................... 13 Guardian Contact Information.................................................................................. 13 Changing Guardianship ............................................................................................. 14 Deleting a Guardian.................................................................................................. 14
Strengths and Needs.......................................................................................................... 14 Coordination of Services................................................................................................... 14 Current Level of Performance & Achievement Level...................................................... 15 Medical Information ......................................................................................................... 15 Medication ........................................................................................................................ 16 Testing to Support Code ................................................................................................... 16 Background Information................................................................................................... 17
Family History .............................................................................................................. 17 Social/Emotional ........................................................................................................... 17

2
Attendance ................................................................................................................... 17 Additional Coding.......................................................................................................... 17
Year End Summary........................................................................................................... 17 Anecdotals......................................................................................................................... 18 Assistive Technology........................................................................................................ 18 Transition Plans ................................................................................................................. 19 Accommodations .............................................................................................................. 19 Taking Snapshots .............................................................................................................. 20 Goals and Objectives ........................................................................................................ 20
Creating a new goal................................................................................................... 21 Adding objectives ..................................................................................................... 22
License and Version.......................................................................................................... 23

3
IEP-IPP Information and Credits The IEP-IPP system originated from the hard work and vision of the special education, information services, and administration staff at ‘Grasslands Public Schools’, which serves the area surrounding Brooks, Alberta. Many people were involved in this version of the system in the areas of design, testing, administration, and implementation.
4
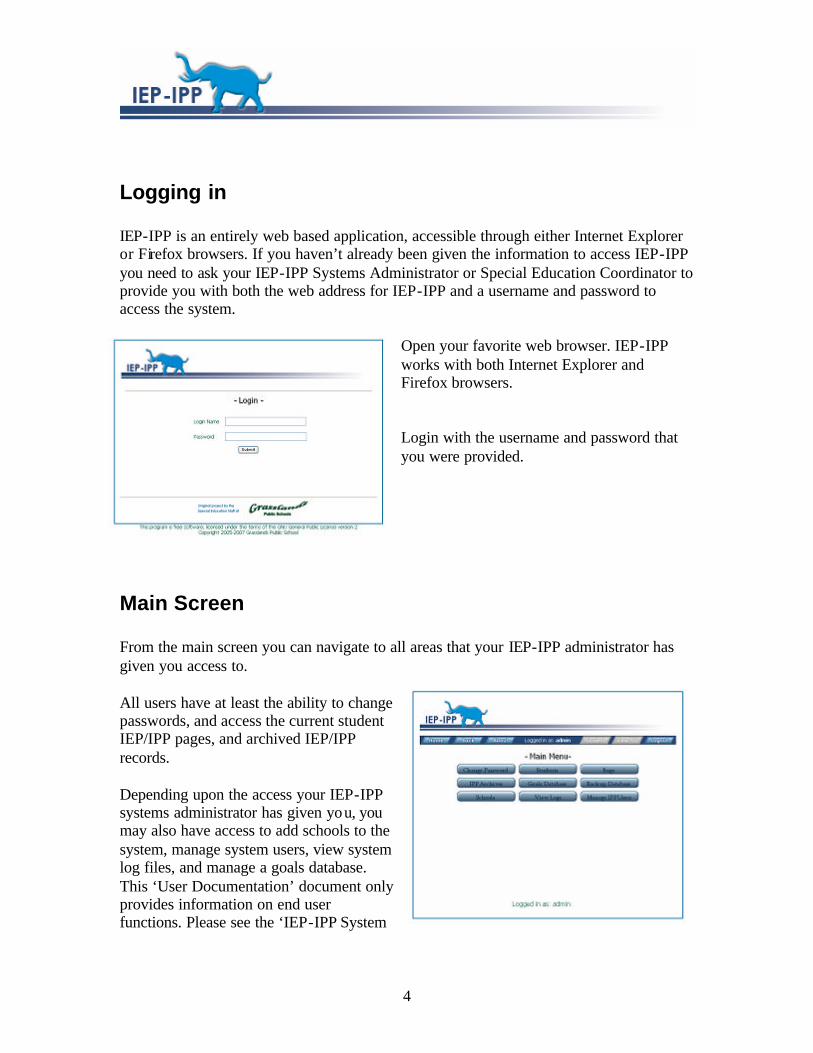
Logging in IEP-IPP is an entirely web based application, accessible through either Internet Explorer or Firefox browsers. If you haven’t already been given the information to access IEP-IPP you need to ask your IEP-IPP Systems Administrator or Special Education Coordinator to provide you with both the web address for IEP-IPP and a username and password to access the system.
Open your favorite web browser. IEP-IPP works with both Internet Explorer and Firefox browsers. Login with the username and password that you were provided.
Main Screen From the main screen you can navigate to all areas that your IEP-IPP administrator has given you access to. All users have at least the ability to change passwords, and access the current student IEP/IPP pages, and archived IEP/IPP records. Depending upon the access your IEP-IPP systems administrator has given you, you may also have access to add schools to the system, manage system users, view system log files, and manage a goals database. This ‘User Documentation’ document only provides information on end user functions. Please see the ‘IEP-IPP System

5
Administrators’ documentation for information on setting up schools and managing users. Buttons on the navigation bar on the main screen are blue (active) or gray (inactive) based upon the actions that are available, and your assigned permission levels on the page.
General Navigation
Top and Bottom Navigation Bars The top and bottom navigation bars allow you to navigate the system. Buttons are blue when active and gray when they are inactive on a screen or you do not have permission. When working within a student’s program plan area, the ‘View PDF’ button is available which gives you an immediate snapshot of the current program plan. Use the navigation buttons built into IEP-IPP. Using the navigation buttons built into your browser can cause problems like duplicate data being entered- this is a limitation of the HTTP protocol and nothing that can be corrected within the program plan software.

6
Home Button
The home button takes you to the ‘main’ page.
Back Button
The back button typically takes you to the previously viewed page. Some pages, the back button takes you to the parent page.
About Button
The ‘about’ button provides information on the IEP-IPP program, submitting bugs and making suggestions for future improvement on the program.
Student Button
When within the context of an individual program plan, the student button will return you to the main page for the program plan.
View PDF Button When within the context of an individual program plan, the ‘view PDF’ button will produce the current program plan in a portable document format (PDF) which can then be saved or printed.
Logout Button
The logout button will log you out of the system. If you do not logout, the system will automatically log you out after a certain amount of inactivity on the system, as determined by your IEP-IPP systems administrator.
Warnings and Errors Warnings and errors are typically displayed under top navigation bar and above the ‘Page Title’. They typically warn about format errors in dates, and missing required fields. When you enter information, check that it shows up in the ‘Current Data and Data Management’ area and that no warnings were produced.
Change Password Screen If your school is using the built- in username and password option, the change password button appears on the ‘home’ screen. To change your password enter it the same in both text fields and click the update button.

7
Adding a new IEP/IPP All IEP/IPP’s are managed from the ‘students’ page. To get to the student view page from the ‘home’ page you can click on the ‘students’ button. On the ‘student view’ page you can add a new IPP by clicking the ‘Add Student’ button.
On the ‘add student’ page you must fill in the demographic, school and birthday information. The Provincial Education Number is optional. To enter the data click on the ‘Add Student’ button to be returned to the ‘student’ page. Verify that the student you have added is visible in the list of students. You are currently the only one, except for ‘site based administrators’, ‘principals’, and ‘IEP-IPP systems administrators’ that have access to this newly created program plan. Other teachers at your school can see the student in the list on the ‘student view’ page, but are denied access to the program plan. If you want to collaborate with your peers on this students program plan you must add others to this students ‘support members’ list.

8
Granting Others Access to Your Program Plans By default, only the program plan creator, the designated site-based administrator, and people granted system-wide administrative access such as superintendents of special
education have general access to program plans. Everybody else needs to be explicitly allowed access to a student’s program plan. To grant access to a student’s program plan you must go the ‘students’ page. You can get to the ‘students’ page from the ‘home’ page by clicking on the ‘students’ button. Find the students program plan to which you would like to grant access and click to get to the ‘student view’ page.
From the ‘student view’ page there is a list of ‘support members’. This list specifies who has access to this students program plan and what their permission levels are and, optionally, in what program area or capacity they are supporting this student.
Program Plan Permission Levels
Assign means the person can read and write to this program plan and they can assign other people access rights to this program plan. Write means the person can read and write to this program plan but then cannot assign others access to this program plan Read means the person can only read the program plan but cannot enter information and cannot assign others access to this program plan.
9
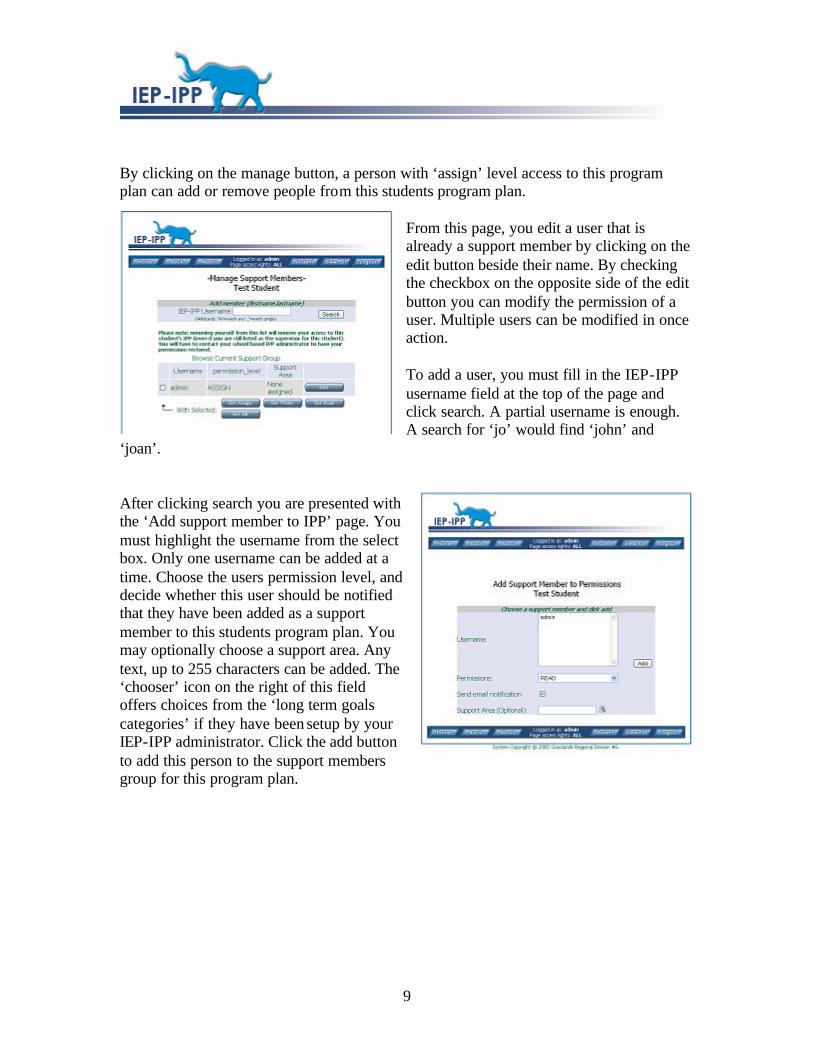
By clicking on the manage button, a person with ‘assign’ level access to this program plan can add or remove people from this students program plan.
From this page, you edit a user that is already a support member by clicking on the edit button beside their name. By checking the checkbox on the opposite side of the edit button you can modify the permission of a user. Multiple users can be modified in once action. To add a user, you must fill in the IEP-IPP username field at the top of the page and click search. A partial username is enough. A search for ‘jo’ would find ‘john’ and
‘joan’. After clicking search you are presented with the ‘Add support member to IPP’ page. You must highlight the username from the select box. Only one username can be added at a time. Choose the users permission level, and decide whether this user should be notified that they have been added as a support member to this students program plan. You may optionally choose a support area. Any text, up to 255 characters can be added. The ‘chooser’ icon on the right of this field offers choices from the ‘long term goals categories’ if they have been setup by your IEP-IPP administrator. Click the add button to add this person to the support members group for this program plan.
10
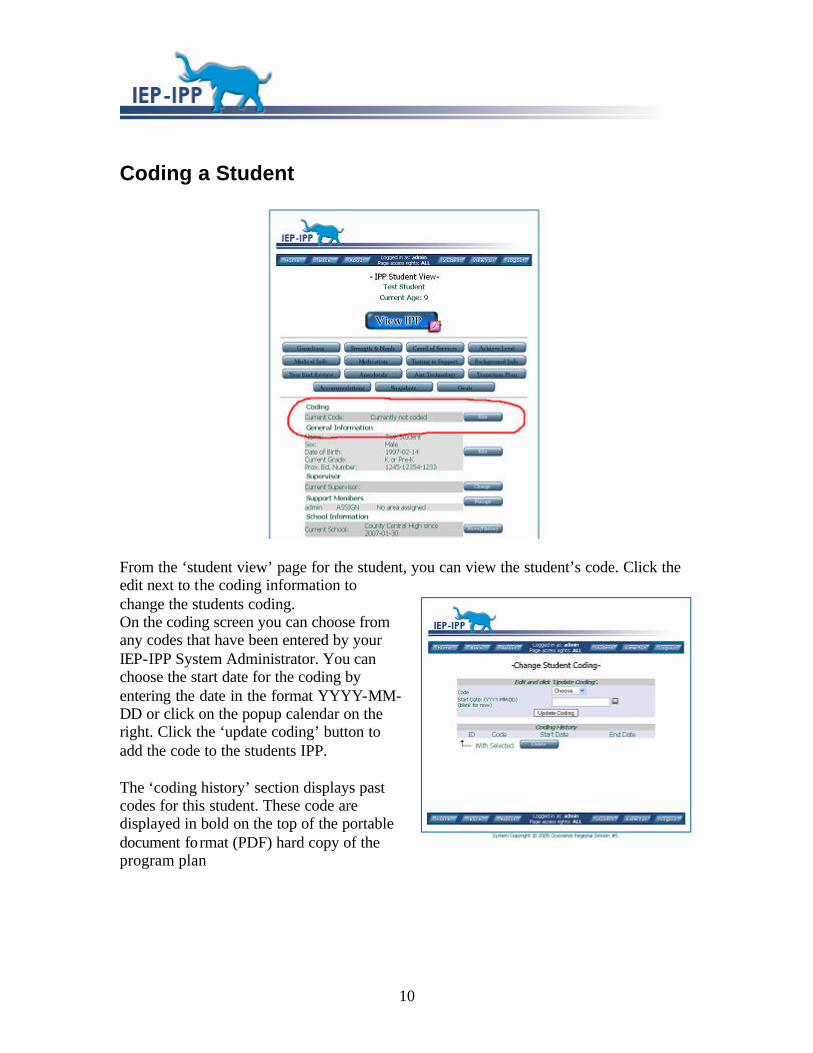
Coding a Student
From the ‘student view’ page for the student, you can view the student’s code. Click the edit next to the coding information to change the students coding. On the coding screen you can choose from any codes that have been entered by your IEP-IPP System Administrator. You can choose the start date for the coding by entering the date in the format YYYY-MM-DD or click on the popup calendar on the right. Click the ‘update coding’ button to add the code to the students IPP. The ‘coding history’ section displays past codes for this student. These code are displayed in bold on the top of the portable document format (PDF) hard copy of the program plan

11
Assigning a Supervisor
From the ‘student view’ page for the student, you can view the student’s current supervisor. Click the edit next to the supervisor information to add or change the
student’s supervisor. A supervisor is the person responsible for this student’s program. To assign a supervisor you must first make sure the supervisor is a member of the student’s ‘support member’ group. If they are not, they will not show up in the drop down option list of Supervisors. You may, optionally, also record this person’s position and click ‘add’ to update the supervisor records for this students program plan. Unless deleted, the history of the student’s supervisors is kept, along with start and end
date information. With sufficient privileges, you can also delete a supervisor record or set a person to no longer be a supervisor for this student.

12
Moving Schools & School History
From the ‘student view’ page for the student, you can view the student’s current school. Click the edit next to the school information to change the student’s school history or to move the student to a new school within our outside of you school district. The school history page has three methods of recording school histories.
Move Student within Jurisdiction You can move a student to any school within your jurisdiction. This keeps the student’s program plan active on the system and hands it over to the receiving school by notifying the ‘site based administrator’ for that school by email.
Move Student out of Jurisdiction or Graduate

13
By choosing this option, this student’s program plan is set to inactive and can be found in the student archives
Add history for an out of Jurisdiction School. If you wish to record the known past history of this student, you can enter in history of schools. Fill in the school name field or use the ‘chooser’ popup to the right for a list of common schools within the system. The ‘program plan present’ radio buttons are to specify whether this student had a code at the school. You may optionally enter any accommodations that were given to this student at this school
Deleting School Histories School histories can be deleted if you have sufficient rights to do so. Check the check box to the left of the histories you wish to remove and click delete. (Note: if you delete the active school, this student will be moved to the archives automatically. Active vs. Inactive program plans are determined by whether the student is currently enrolled in the jurisdictions school)
Managing Guardians From the ‘student view’ page you can click on the ‘Guardians’ button to get to the ‘Guardian View’ page. Information on current and past guardians are kept on record, however, only current guardian information is shown on portable document format (PDF) hard copies. To add a new guardian, click ‘New Guardian’. Fill in First and Last name information and click ‘Add Guardian’. You are returned to the ‘Guardian View’ to add contact information and any notes.
Guardian Contact Information From within the ‘Guardian View’ page you can click on edit contact in the Guardian box for the Guardian that you want to modify or add contact information.

14
Changing Guardianship If guardianship changes for a student, from within the ‘Guardian View’ page for the student you can click the ‘Change Status’ button above the guardian box, directly to the right of the guardian’s name. By clicking on this button you move this person to either the previous guardians category or to the current guardians category. This allows you to retain historical information on guardianship and any relevant notes.
Deleting a Guardian A guardian can be deleted from the system, if you have sufficient rights to do so, by clicking the ‘delete’ button to the right of the guardians name on the ‘Guardian View’ page.
Strengths and Needs From the ‘Student View’ page, click on the ‘Strengths & Needs’ button to manage the student’s strength and needs information. Choose either Strength or Need from the dropdown and enter a descrip tion of the need. Clicks add to add the information, which will show up in the pages data area near the bottom. You can toggle a Strength/Need entry to be ongoing or not ongoing by checking the left checkbox by the entry and clicking the appropriate button. Non-ongoing needs do not show up in the portable document format (PDF) output but are kept in the system as a
historical record.
Coordination of Services From the ‘Student View’ page, click on the ‘Coord. of Services’ button to manage the

15
information on a student’s services from external or internal agencies. Enter the service name (ie: Occupational Therapist). The ‘chooser’ icon on the left lists the most common services within your jurisdiction that have been entered into your system. Enter the date of the service in YYYY-MM-DD format or use the calendar popup. Optionally, you can upload a file or report from the service in one of the formats listed. If there is a hard copy report from the service you can indicate this with the ‘report in file’ checkbox. Click the ‘add’ button to submit the entry and ensure that it shows up in the data area near the bottom of the page.
Current Level of Performance & Achievement Level From the ‘Student View’ page, you can click on the ‘Achieve Level’ button to manage the information on a student’s tests and indicators. Enter the name of the test, date, and test results. You can optionally upload supporting files, which could include tests or results. Click the ‘add’ button to submit the entry and ensure that it shows up in the data area near the bottom of the page.
Medical Information
From the ‘Student View’ page, you can click on the ‘Medical Info’ button to manage the information on a student’s medical information. (note : medications should appear in the section on medications and not in this section). Enter the date for the medical information in YYYY-MM-DD format or use the popup

16
calendar. Enter a brief description of the information. You can indicate if there is a hard copy of the report filed by using the ‘report in file’ checkbox. Optionally you can enter a file upload, which supports the file types listed. If you flag a priority entry this entry will appear at the top of the Medical Information list on the portable document format hard copy.
Medication From the ‘Student View’ page, you can click on the ‘Medication’ button to manage the information on a student’s current and previous medications. By clicking on the ‘End’ button at the bottom- the student’s medication entry is ended, however, the entry remains in the system as historical data but does not show up on the students program plan. To remove the entry you must click on the ‘delete’ button if you have sufficient privileges to do so.
Testing to Support Code From the ‘Student View’ page, you can click on the ‘Testing to Support’ button to manage the information on a student’s testing that substantiates their coding such as psychological and behavioral assessments, vision tests, etc.

17
Background Information
From the ‘Student View’ page, you can click on the ‘Background Info’ button to manage the information on a student’s background. Enter a description of the background and choose the type of information:
Family History
Social/Emotional
Attendance
Additional Coding
Year End Summary From the ‘Student View’ page, you can click on the ‘Background Info’ button to produce a portable document format output of goal and objectives that have been achieved to date.

18
Anecdotals
From the ‘Student View’ page, you can click on the ‘Anecdotals’ button to enter anecdotal records. Enter the record information, data in YYYY-MM-DD format (or use the calendar popup) and optionally select a supported upload file. Anecdotal records do not appear on the portable document format (PDF) program plan output. Click the ‘Generate PDF copy’ link to output a portable document format (PDF) copy of anecdotal records.
Assistive Technology From the ‘Student View’ page, you can click on the ‘Asst. Technology’ button to enter assistive technology information for a students program plan. Clicking the ‘chooser’ icon gives you the most common assistive technology entries within the system.

19
Transition Plans From the ‘Student View’ page, you can click on the ‘Transition Plan’ button to enter the transition plan for a student. Enter the date that you are creating the plan. This date is used to determine which school year the transition plan was made.
Accommodations
From the ‘Student View’ page, you can click on the ‘Accommodations’ button to enter the accommodations for a student. Using the ‘chooser icon’ will popup a list of the most common accommodations on the system. You can check already entered accommodations and click on the ‘end button’ to prevent an accommodation from showing up on the portable document format (PDF) program plan output but still be part of the historical record for this student.
Checking already entered accommodations and then clicking the continue button will make the accommodation active.
20
Taking Snapshots From the ‘Student View’ page, you can click on the ‘Snapshots’ button to view previous snapshots or take a new snapshot. Snapshots are stored portable document format (PDF) files that are stored in the internal database. From the point that a snapshot is taken by clicking the ‘Take Snapshot’ button, any subsequent modifications to a students program plan will not affect the snapshot. The snapshot is a point- in-time record of the students program plan. Snapshots are automatically taken by the system when a student is moved to another school or the record is moved into the archives.
Goals and Objectives From the ‘Student View’ page, you can click on the ‘Goals’ button to enter goals and objectives. Because of the nature of the data, information in this areas is done in a unique way within the system.
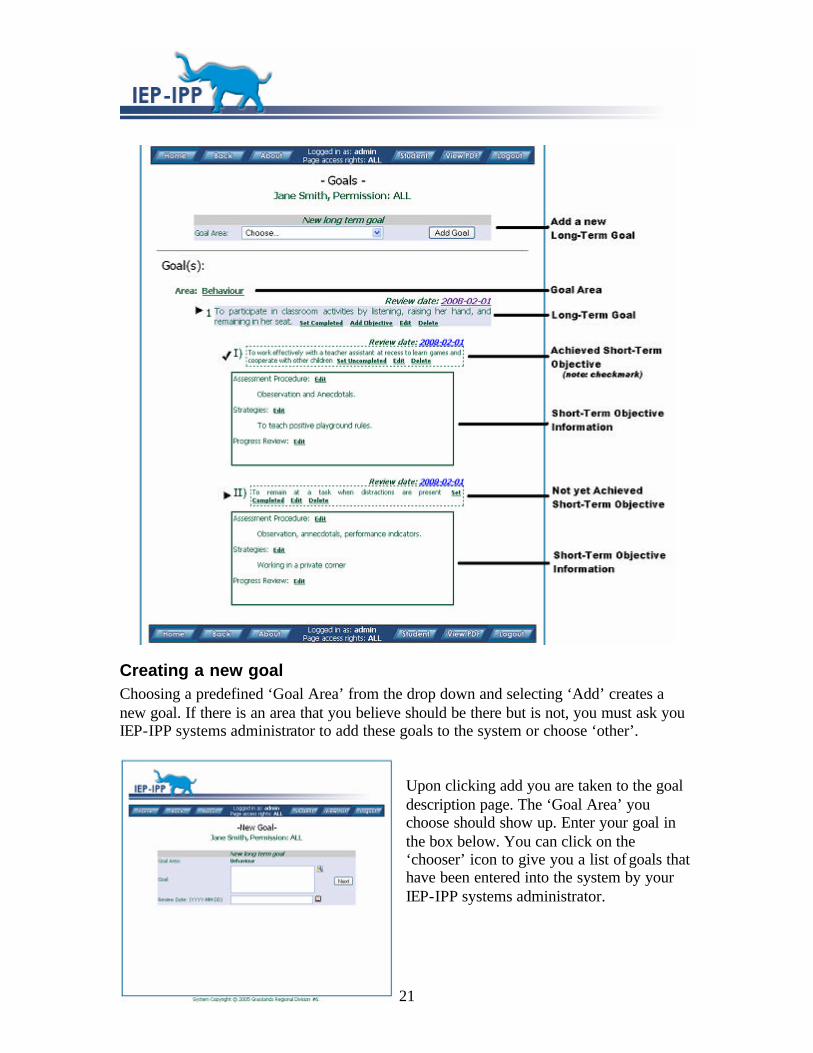
21
Creating a new goal Choosing a predefined ‘Goal Area’ from the drop down and selecting ‘Add’ creates a new goal. If there is an area that you believe should be there but is not, you must ask you IEP-IPP systems administrator to add these goals to the system or choose ‘other’.
Upon clicking add you are taken to the goal description page. The ‘Goal Area’ you choose should show up. Enter your goal in the box below. You can click on the ‘chooser’ icon to give you a list of goals that have been entered into the system by your IEP-IPP systems administrator.

22
(Note: this ‘chooser’ is unlike many of the other ‘choosers’ in the system that typically gives you a list of the most common entries. Your systems administrator must enter in goals and objectives hints into the system. This allows jurisdictions that do not want automatic goals and objectives to disallow this feature.)
Adding objectives You can add ‘objectives’ to an existing goal by clicking the ‘add objective’ link beside the goal name.
Add objectives at the bottom. Using the ‘chooser’ icon for ‘Assessment Procedure’ gives you a list of the most common assessment procedures entered in the system. When done adding objectives for this goal, click the ‘done’ button at the top to be returned to the main goals page for this program plan.

23
License and Version IEP-IPP is licensed separately from this document. See the license associated with the IEP-IPP program for details on that license. This document is licensed under the Creative Commons Attribution-Share Alike 2.5 Canada License. To view a copy of this license, visit http://creativecommons.org/licenses/by-sa/2.5/ca/or send a letter to Creative Commons, 543 Howard Street, 5th Floor, San Francisco, California, 94105, USA.


![IPP Everywhere v1.1 · Web view2020. 5. 15. · Note: The IPP Printer State Extensions v1.0 [PWG5100.9] does not specify the behavior of the "printer-alert" attribute when the prtAlertTable](https://img.dokumen.tips/doc/110x75/5feeda0ad33c060a0d568443/ipp-everywhere-v11-web-view-2020-5-15-note-the-ipp-printer-state-extensions.jpg)


