Embed Size (px)
Citation preview

R
UTS 30 CP/M PlusTM Operator's Guide
CPIM Plus™ is a trademark of Digital Research, Incorporated.
..JL Sl""'E ~V .,r UP-9839

This document contains the latest information available at the time of preparation. Therefore, it may contain descriptions of functions not implemented at manual distribution time. To ensure that you have the latest information regarding levels of implementation and functional availability, please consult the appropriate release documentation or contact your local Sperry representative.
Sperry reserves the right to modify or revise the content of this document. No contractual obligation by Sperry regarding level, scope, or timing of functional implementation is either expressed or implied in this document. It is further understood that in consideration of the receipt or purchase of this document, the recipient or purchaser agrees not to reproduce or copy it by any mea,ns whatsoever, nor to permit such action by others, for any purpose without prior written permission from Sperry.
FASTRAND, SPERRY, SPERRY UNIVAC, UNISCOPE, UNISERVO, and UNIVAC are registered trademarks of the Sperry Corporation. ESCORT, MAPPER, PAGEWRITER, PIXIE, SPERRYLINK, and UNIS are additional trademarks of the Sperry Corporation.
The statement below is included in this manual to comply with a Federal Communications Commission (FCC) Regulation. The FCC is an agency of the United States government; thus, the statement below applies to computing equipment installed in the United States of America. Sperry is taking appropriate steps to be in compliance with FCC regulations and similar regulations of other countries.
WARNING: This equipment generates, uses, and can radiate radio frequency energy and if not installed and used in accordance with the instructions manual, may cause interference to radio communications. It has been tested and found to comply with the limits for a Class A computing device pursuant to Subpart J of Part 15 of FCC Rules, which are designed to provide reasonable protection against such interference when operated in a commercial environment. Operation of this equipment in a residential area is likely to cause interference, in which case the user, at his own expense, will be required to take whatever measures may be required to correct the interference.
© 1984 - SPERRY CORPORATION PRINTED IN U.S.A.

UP-9839
CPIM Plus Summary
How to Use This Book
Related SPERRY Publications
Preface
CP/M Plus TM is a control program for microprocessors designed for use on the SPERRY UTS 30 Single Station. The CP/M Plus control program consists of three major components: the Console Command Processor {CCP), the Basic Disk Operating System {BOOS), and the Basic {peripheral) Input and Output System {BIOS). The CP/M Plus program has the following advantages:
• Increased user friendliness
• Faster disk operations
• Password protection
• Date/time stamping
• Additional command line editing capabilities
This book is written to aid entry level operators in using SPERRY CP/M Plus. There are a few conventions used throughout this book: whenever data is to be entered in the terminal, you will be instructed to type the data and press the RETURN or XMIT key which will be indicated by <RET>. Also, you may exit any utility at any time by holding the FUNCTION key down and pressing the C key. This is called the FUNCTION C sequence. If you do this, no data will be saved.
This guide contains the information necessary to operate CP/M Plus utilities on a SPERRY UTS 30 Single Station. Additional information may be found in the current versions of the following SPERRY publications. You should already be familiar with CP/M® or have the CP/M Plus documentation available for review or reference.
UTS 30 CP/M Plus™ Programmer's Technical Reference, UP-9840
UTS 30 CP/M Plus™ Release Description, UP-9838.2
UTS 4000 CP/M Plus TM User's Guide, UP-9847
UTS 4000 CP/M Plus TM Programmer's Utilities Guide, UP-9848
UTS 4000 CP/M Plus TM Programmer's Guide, UP-9849
UTS 4000 CP/M Plus™ Symbolic Instruction Debugger {SID™) Reference Manual, UP-9844
UTS 4000 CP/M Plus TM Symbolic Instruction Debugger {SID™) Command Summary, UP-9867
CP!M Plus™ and SID™ are trademarks of Digital Research, Inc. CPIM® is a registered trademark of Digital Research, Inc.


UP-9839
PREFACE
CONTENTS
1. INTRODUCTION
Contents
1.1. MAKING THE SYSTEM INDEPENDENT ............................... 1-1 1.2. PROTECTING DISKETTES . . . . . . . . . . . . . . . . . . . . . . . . . . . . . . . . . . . . . . . . . . 1-1 1.3. LOADING CP/M PLUS . . . . . . . . . . . . . . . . . . . . . . . . . . . . . . . . . . . . . . . . . . . . . 1-2 1.4. CP/M CONTROL PROGRAM . . . . . . . . . . . . . . . . . . . . . . . . . . . . . . . . . . . . . . . . 1-3
2. SYSTEM CONFIGURATION UTILITY
2.1. COMMAND:CONFIG3 .............................................. 2-1 2.2. CONFIG3 MENU OPTIONS . . . . . . . . . . . . . . . . . . . . . . . . . . . . . . . . . . . . . . . . . 2-3 2.3. COMPLETION MESSAGES . . . . . . . . . . . . . . . . . . . . . . . . . . . . . . . . . . . . . . . . . 2-4
3. CREATING COPIES OF DISKETTES
3.1. THE PREP UTILITY ................................................ 3-1 3.2. THE DCOPY UTILITY . . . . . . . . . . . . . . . . . . . . . . . . . . . . . . . . . . . . . . . . . . . . . . 3-3 3.3. THE FCOPY UTILITY . . . . . . . . . . . . . . . . . . . . . . . . . . . . . . . . . . . . . . . . . . . . . . 3-4 3.4. CREATING A SYSTEM DISKETTE . . . . . . . . . . . . . . . . . . . . . . . . . . . . . . . . . . . 3-6
4. LOADABLE CHARACTER SET UTILITY
4.1 . CHARACTER CODES . . . . . . . . . . . . . . . . . . . . . . . . . . . . . . . . . . . . . . . . . . . . . . 4-1 4.2. COMMAND:MAKELCS . . . . . . . . . . . . . . . . . . . . . . . . . . . . . . . . . . . . . . . . . . . . . 4-2 4.3. LCS SCREEN DISPLAY . . . . . . . . . . . . . . . . . . . . . . . . . . . . . . . . . . . . . . . . . . . . 4-3 4.4. EXITING MAKELCS ............................................... 4-11 4.5. LOADING THE CHARACTER SET ................................... 4-12 4.6. COMMAND:LOADLCS ............................................. 4-12 4.7. CREATING A SAMPLE CHARACTER . . . . . . . . . . . . . . . . . . . . . . . . . . . . . . . . . 4-14
5. MAKE KEYBOARD UTILITY
5.1. 5.2. 5.3. 5.4.
KEY CODES AND SHIFT LEVEL . . . . . . . . . . . . . . . . . . . . . . . . . . . . . . . . . . . . 5-1 COMMAND:MAKEKBD . . . . . . . . . . . . . . . . . . . . . . . . . . . . . . . . . . . . . . . . . . . . 5-1 MODIFYING KEYS . . . . . . . . . . . . . . . . . . . . . . . . . . . . . . . . . . . . . . . . . . . . . . . . 5-6 COMMAND:LOADKBD . . . . . . . . . . . . . . . . . . . . . . . . . . . . . . . . . . . . . . . . . . . . . 5-8
iii

iv
APPENDIXES
A. ERROR MESSAGES
B. DECIMAL ASCII CODES
SPERRY UTS 30 CP/M PLUS Operator's Guide
C. HEXADECIMAL ASCII CODES
D. CP/M PLUS COMMANDS
USER COMMENT SHEET
FIGURES
UP-9839
5-1. Key Number Layout for the Low Profile Keyboard . . . . . . . . . . . . . . . . . . . . . . . . . . 5-2
TABLES
8-1. Decimal ASCII Character Codes B-1
C-1. Hexadecimal ASCII Codes for the UTS 30 . . . . . . . . . . . . . . . . . . . . . . . . . . . . . . . . C-1

UP-9839
1. Introduction
1.1. MAKING THE SYSTEM INDEPENDENT
8439 Diskette Attachment
Select Line 1 Configuration
This section describes the special procedures for turning your systemdependent UTS 30 into a stand-alone CP/M Plus system. CP/M cuts your UTS 30 off from the host, turning it into an independent system. Therefore, you must attach a diskette subsystem directly into the back of the terminal, bypassing the controller, and you must identify or configure the subsystem to the terminal.
For information on the physical hookup of the SPERRY 8439 DoubleSided Diskette Subsystem, refer to the UTS 30 installation and verification guide, UP-9803.
The diskette subsystem on select line 1 must be configured. Instructions for configuring the diskette subsystem on a UTS 30 single station are given in section 2.
1.2. PROTECTING DISKETTES
Write Protection
There are several things you should do to protect the data stored on your diskettes. These include write protection of certain diskettes, backup copies of diskettes, and copies of certain files.
Write protect the system diskette and other important diskettes by making sure that the write-protect notch (A) is covered with the stickyback tabs included with the diskettes.
A----._~
0 ()
D []
This will prevent accidental writing on or erasing of the system diskette, or other important diskettes.
1-1

1-2
Copy of Diskette
Copies of Files
SPERRY UTS 30 CP/M PLUS Operator's Guide UP-9839
Before performing any CP/M Plus operation, you should make a backup copy of the system diskette and place the original diskette in a safe place. The original diskette will then be available for copying again in case operator error or equipment malfunction causes damage to the diskette. Section 3 discusses the steps for copying the system diskette using the DCOPY utility.
Sometimes files may be accidentally erased or overwritten. Therefore, you should make a copy of each important file at regular intervals to avoid losing pertinent data. Section 3 discusses the steps for making a backup file using the FCOPY utility.
1.3. LOADING CP/M PLUS
Screen Display
Proprietary Information
Now that the UTS 30 has been configured with the 8439 double-sided diskette subsystem, you are ready to load CP/M Plus into the memory of the terminal. CP/M Plus is loaded by placing the CP/M Plus system diskette with the label side up into drive A (or B) of the diskette subsystem and closing the door. When the power is turned on, the terminal firmware runs a power-on confidence (POC) test. If the POC passes, the terminal will then load CP/M Plus automatically. If the power is already on, press the RESET button to load CP/M Plus.
The terminal will not load CP/M Plus if the system diskette does not contain the files CPM3.SYS and CCP.SYS, if the system tracks. contain incorrect data, or if the keylock is in LOCKED position.
For information on creating files, assigning file attributes, time and date stamping, password protection, and deleting files, refer to the UTS 4000 CP/M Plus user's guide, UP-9847.
The CP/M Plus utilities will display various screens or prompts to help guide you as you perform certain tasks. The first screen you see after loading CP/M Plus is the proprietary and copyright information.
CP/M V3.0 Loader Copyright (c) 1982, Digital Research 61K TPA
Proprietary Information
The CP/M PLUS diskette including any corrections, modifications and revisions thereof and utilities supplied therewith contains information which is the property of and is confidential to SPERRY CORPORATION and/or its licensors. Use and disclosure of this information is subject to the provisions of an agreement with SPERRY CORPORATION.
Banked CP/M Plus system lRl
A>
STANDARD EXAMPLE DD/MM/YY IIll:MM:SS

UP-9839
Status Line
System Prompt
Error Conditions
SPERRY UTS 30 CP/M PLUS Operator's Guide 1-3
The bottom line of the screen is used as a status line. Each position in the line is used for specific messages:
• Columns 1 through 40 display user program messages.
• Columns 41 through 50 display the name of the keyboard table which is loaded in memory.
• Columns 51 through 60 display the name of the loadable character set file that is loaded in optional terminal memory.
• Columns 61 through 80 display date and time or time elapsed.
When the system prompt A> _ is displayed at the bottom of the screen, CP/M Plus is ready for use, the terminal is waiting for a command. The underline after the A> _ represents the CP/M Plus cursor. Through the configurator utility (section 2), the cursor may be represented as an underline, a solid reverse-video block, or a blinking reverse-video block. The A means you are using the A drive (left drive). If the prompt is B> you have loaded CP/M Plus from the B drive (right drive). If you would like to change from drive B to A, place the system diskette in drive A, enter A: after the prompt B> and press the RETURN key.
In most cases you will be able to load CP/M Plus without any difficulty. If an error condition occurs, the utility will prompt you with an error message. Refer to appendix A for additional information concerning error messages and recommended solutions.
1.4. CP/M CONTROL PROGRAM
CPIM Commands
File Directory
Once CP/M Plus has been loaded, the CP/M Plus program takes control of the terminal. The keyboard and peripheral functions are controlled by the CP/M control program. The UTS 30 then acts as a separate system, independent of the host. Communication with a host processor is not possible while CP/M Plus is loaded unless activated by a user program.
To proceed you should enter a command following the system prompt. A correct (defined) command will take you to the menu for that file. An incorrect (undefined) command will be redisplayed with a question mark, and the prompt A>.
Example:
Type "jkl" and press the RETURN key. The terminal responds JKL? because "jkl" is an incorrect (undefined) command.
Correct commands in CP/M Plus are those that have been defined and stored on diskette. These commands are called files because they may include a complete routine or program for performing certain operations.
A complete list of the files available on your diskette can be obtained by entering DIR <RET> after the prompt A>.

1-4
Uppercase or Lowercase Entries
Error Correction
Files Described in This Book
SPERRY UTS 30 CP/M PLUS Operator's Guide
A sample file directory follows:
A: GET COM: ASCII LCS: REP A: FCOPY COM: CCP SYS: CALLVERS A: COPYSYS COM: TTY COM: HELP A: DCOPY COM: CONFIG3 COM: DEVICE A: MAC COM: ERASE COM: HEX COM A: DUMP COM:. RMAC COM: SET A: INITDIR COM: LIB COM: LINK A: PUT COM: RENAME COM: SAVE A: SID COM: HIST UTL: TRACE A: TYPE COM: XREF COM: Z80 A: RANDOM ASM: DIRLBL RSX: STANDARD
UP-9839
COM: CPM3 SYS: MAKELCS COM ASM: CPMLDR COM: MAKEKBD COM HLP: TINSTALL COM: LOADKBD COM COM: SYSBUILD SUB: HELP COM COM: LOADLCS COM: DIR COM COM: ED COM: GEN COM COM: PATCH COM: PIP COM COM: SETDEF COM: SHOW COM UTL: DATE COM: SUBMIT COM LIB: DUMP ASM: ECHOVERS ASM KBD:
Your file directory may or may not look like this, depending on the files that have been recorded on your diskette. You will notice that each file name has 8 or fewer characters and is followed by a three-letter identifier. For example, the identifier for command is COM. You must choose one of the COM files to proceed. The files available with CP/M Plus are described in the UTS 30 CP/M Plus release description, UP-9838.2.
In the preceding example, "jkl" was entered in lowercase, but the reply was in uppercase. The terminal will always reply in uppercase, but you may enter commands in lower or uppercase. Uppercase entries may be made by:
• using the SHIFT key or LOCK/SHIFT keys,
• holding the FUNCTION key down while pressing F1 to move to uppercase only mode, or
• using the CONFIG3 utility described in section 3 to select uppercase only or uppercase/lowercase.
Errors or incorrect entries in the command line may be corrected or erased by the use of the cursor scroll keys and the delete key, or by use of the backspace key.
The remainder of this book will describe the following COM files from the file directory:
SECTION 2
SECTION 3
SECTION 4
SECTION 5
CONFIG3
PREP DCOPY FCOPY SYSBUILD COPYSYS
MAKELCS LOADLCS
MAKEKBD LOADKBD
Each chapter is independent of the others. Therefore, you may skip ahead to the section that interests you or read the sections in sequence.

UP-9839
2. System Configuration Utility
The UTS 30 must be configured for the peripheral subsystems such as disk drives and printers that may be attached. When the UTS 30 is not operating under CP/M Plus, peripheral devices are assigned or configured through the control page. When CP/M Plus is loaded, the UTS 30 is cut off from the host system and the control page is no longer active. Therefore, another configuration procedure is necessary if you want to connect peripheral devices to the UTS 30.
2.1. COMMAND: CONFIG3
Configuration Levels
CONFIG3.COM is the UTS 30 CP/M Plus system configuration utility. CONFIG3 allows you to customize the CP/M Plus BIOS contained in the file CPM3.SYS. In addition to configuring CP/M Plus for the number of disk drives and the type of printer being used, CONFIG3 also lets you set operating parameters such as screen blankout time, cursor type, etc.
You should run CONFIG3 the first time you use CP/M Plus and any time thereafter when you wish to change operating parameters or when peripheral devices are added to or removed from the system.
CONFIG3 configures a system on two levels:
• terminal memory
• diskette storage
A configuration that is active in terminal memory but has not been saved on the diskette is lost when the terminal is reset. The default values listed in the CONFIG3 menus will be those most recently saved on the diskette.
CP/M Plus makes a distinction between logical and physical peripheral device assignments. Physical refers to the physical attachment of the subsystem to the terminal. Logical refers to the configuration of the subsystem to the terminal. Use the DEVICE command to logically assign peripheral devices. The DEVICE command is discussed in the CP/M Plus user's guide, UP-9847.
2-1

2-2 SPERRY UTS 30 CP/M PLUS
Operator's Guide UP-9839
Loading CONFIG3 To load the configuration utility, proceed as follows:
CONFIG3 Menu
1. Load the CP/M Plus system ~iskette according to the instructions given in section 1.
2. When the system prompt A> appears, type: CONFIG3 in either uppercase or lowercase.
A> CONFIG3: configures terminal memory and file CPM3.SYS on drive A.
An optional drive modifier may be specified in order to modify a CPM3.SYS file in another drive:
A> CONFIG3 B: configures termina.1 .memory and file CPM3.SYS on drive B. ·;
3. Press the RETURN key. The CONFIG3 menu appears on the UTS 30 screen:
*****UTS 30 CP/M PLUS CONFIGURATOR UTILITY (version lRl)*****
How many diskette drives (1-4)? . . . . . . . ·. :· . . . . . 2 Select printer type (N=none, S=simplex, D= duplex) D Is the additional load.able character set feature installed (Y/N)? Y Default to uppercase only keyboard (Y /N)? . . • . . . . . . . . . N Enable keyboard click (Y/N)? . . . . . . . . . . . . . . . . . . . Y Select cursor type (1 =steady block, 2 =blinking block, 3 =underscore) 2 Select keyboard cycle rate (l=fast, 2=normal., '3=s1ow) 1 Select screen. blank time in minutes (1-20,. or O. i,f none) 10 Do you wish to updat.e A:CPM3.SYS (Y/N)? N
Valid ci'ptions are displayed in parentheses ·after each prompt. The current default values for each of the various operating parameters are displayed in the righthand column. These values correspond with those currently configured in terminal memory.
Moving the Cursor The cursor initially appears at the top of th~ current default list and can be moved up and down with the cursor control keys. If the cursor is moved past the bottom of the list, it reappears at the top of the list. If the cursor is moved up past the top of the list it "wraps around" to the bottom of the list.
Canceling CONFIG3
The cursor may also be moved down with thet.'RETURN or XMIT keys. In this case, the cursor will not "wrap around" but will exit the utility in response to the last line of the CONFIG3 menu.
,·
You may cancel the CONFIG3 system configura.tion program at any time by holding down the FUNCTION key and pressing the C key. This is known as the FUNCTION C sequence.

UP-9839 SPERRY UTS 30 CP/M PLUS
Operator's Guide 2-3
2.2. CONFIG3 MENU OPTIONS
Diskette Drives
Printer
Loadable Character Set
Uppercase Keyboard
Keyboard Click
Cursor Type
Keyboard Cycle Rate
Each selection in the configurator utility is discussed in detail in the following paragaraphs.
CP/M Plus allows you to use from one to four diskette drives per system.
Enter 1, 2, 3, or 4 <RET>
The cursor control keys will not move the cursor after an entry has been made. You must press the RETURN or the XMIT key to process the response and activate the cursor control keys.
The UTS 30 allows you to use only one printer. If you are not sure of the printer type, contact your supervisor or your Sperry representative. Your choices are N=none, S=simplex, D =duplex.
Enter N, S, or D <RET>
The CP/M Plus program cannot tell if the additional loadable character set feature hardware is installed in your terminal. If the hardware is installed in your terminal, enter Y. If it is not installed, enter N. If you are not sure if it is installed, contact your supervisor or your Sperry representative.
Enter Y or N <RET>
If you want all characters to be displayed and printed in uppercase, enter Y. If you do not want all characters to be displayed and printed in uppercase, enter N. The N (no) response will still allow you to use uppercase or lowercase with the use of the SHIFT/LOCKSHIFT keys. Also, at any time while running CP/M Plus, you can switch back and forth between uppercase only and lower/uppercase by holding down the FUNCTION key and pressing the F1 key.
Enter Y or N <RET>
If you want an audible click to be produced whenever you press an operative key, enter Y. If you do not want an audible click, enter N.
Enter Y or N <RET>
The CP/M Plus cursor can be displayed three ways (1 =steady block, 2=blinking block, 3=underline character).
Enter 1, 2, or 3 <RET>
All keys on the UTS 30 keyboard are repeat keys. This means that the character generated by a key is repeated as long as the key is held down. The keyboard cycle rate indicates the rate at which the terminal accepts keystrokes (1 =fast, 2=normal, 3=slow).
Enter 1, 2, or 3 <RET>

2-4
Screen Blankout Time.
Update Messages
SPERRY UTS 30 CP/M PLUS Operator's Guide UP-9839
If the terminal has been inactive (has not received ah'y input .or' keystrokes) for a specified interval of time, the screen blanks out to prolong the useful lifetime of the terminal's CRT screen. You can indicate the desired time interval in minutes (1 through 20) before the screen blanks out or entirely disable the screen blankout function.
Enter the time interval (1 through 20) or O <RET>
When you have selected. all of the desired responses in the CONFIG3 menu and are satisfied with the values in the righthand column, you should decide if you want to store those responses. The last line of the CONFIG3 menu asks for this decisjon:
Do you wish to update A:CPM3.SYS (Y/N)?
Enter Y or N <RET>
2.3. COMPLETION MESSAGES
Partial Completion Messages
If you enter Y in response to the last prompt, CONFIG3 processes all of your configuration entries. If valid responses are entered and if both terminal memory and CPM3.SYS can be modified, the utility displays the following message before exiting to the system prompt:
System configured in memory.
System configured on diskette.
If you enter N, the utility will return you to the main system prompt, retain all of the old default values on the diskette, store the new values in terminal memory, and display the following message:
System configured in memory
Although the system is configured in terminal memory, it has not been saved on diskette. This means that the changes made will be lost when the power is turned off or the terminal is reset.
In some cases it is not possible to update both the terminal memory and the system diskette. These cases are discussed in the following paragraphs.
If valid responses are entered and only memory can be modified, the utility displays the. following message before exiting to the system prompt:
System configured in memory.
If valid responses are entered and only the CPM3.SYS diskette can be modified, the utility displays the following message before exiting to the system prompt:
System configured on diskette.
After the system configuration has been modified, the new configuration in memory takes effect immediately.

UP-9839
Partial Update Messages
Terminal Memory
Diskette File
Error Messages
SPERRY UTS 30 CP/M PLUS Operator's Guide
If the message:
Do you wish to update A:CPM3.SYS (Y/N)?
2-5
does not appear at the bottom of the CONFIG3 menu, the utility will display one of the following messages. Each message indicates something about the status of your terminal memory, the system file CPM3.SYS, and CONFIG3's ability to update them.
To update memory press RETURN
This message indicates that the CPM3.SYS file cannot be updated, and the system can only be configured in memory. To update memory, even though the file CPM3.SYS cannot be updated, press RETURN.
To exit press RETURN
This message indicates that neither the file CPM3.SYS nor terminal memory can be updated. Pressing RETURN will abort CONFIG3 and return you to the system prompt, without saving any configuration changes.
CPM3.SYS is read only. Do you wish to update?
This message indicates that CPM3.SYS has been defined by the SET command as a read only (RO) file. To update CPM3.SYS, even though it is defined as read only, enter Y and press RETURN.
Terminal memory cannot be updated when:
• The version of CPM3.SYS currently in terminal memory is incompatible with the current version of CONFIG3.
• The diskette is in an unconfigured drive.
The diskette file CPM3.SYS cannot be updated when:
• The version of CPM3.SYS currently on the disk is incompatible with the current version of CONFIG3.
• The version of CPM3.SYS on the disk was created on something other than a UTS 30.
• CPM3.SYS does not exist on the diskette or there has been a read/ write error.
• The diskette is in an unconfigured drive.
After the last operating condition has been specified, CONFIG3 tells you if you have given an incorrect response to any one of the configuration prompts. Error messages are listed in appendix A along with probable causes and suggested solutions.


UP-~839
. •·
3. Creating Copies of Diskettes
This section shows you how to prepare diskettes for CP/M Plus data by using the PREP utility, how to copy entire diskettes by using the DCOPY utility, how to copy only certain files on a diskette by using the FCOPY utility, or how to prepare a new system load diskette using the COPYSYS and SYSBUILD commands. If an error condition occurs while you are performing any of the steps in this section, refer to appendix A for a discussion of error conditions and recovery procedures.
3.1. THE PREP UTILITY
Multiple-Drive System
The diskette preparation program (PREP) is used to prepare doubledensity two-sided diskettes for CP/M Plus files. To prep a diskette, first load CP/M (insert the system diskette and press RESET). When the system prompt A> appears, enter the command: PREP <RET>.
On a multiple-drive system the first prompt asks you to select the drive for the prep. The following screen display shows a prompt for a system with two drives (A-8), but a three- or four-drive system offers drive selections A-C or A-D.
***** UTS 30 CP/M PLUS DISKETTE PREP UTILITY (version lRl)***** Select drive for prep (A-B) or press RETURN to exit:
Select the drive you would like to use to prep the diskette. If you want to use the B drive, enter B <RET>. The utility displays the following prompts:
Insert diskette to be prepped in drive B.
Data on diskette B will be destroyed.
When ready, press RETURN.
Remove the write-protection sticker from the diskette to be prepped, and insert it into drive B with the label side up. If you want to destroy the data on the diskette in drive 8, press RETURN. If you want to save the data on drive B, change diskettes before pressing RETURN.
3-1

3-2
PREP Progress Messages
Single-Drive System
Canceling a PREP
PREP Error Messages
SPERRY UTS 30 CP/M PLUS Operator's Guide UP-9839
The PREP program prepares a diskette by writing track and sector addresses for all the data to be stored. While executing it displays the following message:
Prepping:
Track XX Side YY
You can keep track of the progress by watching the track status indicators (XX) go from 00 to 79 and the side status indicators (YY) go back and forth between 00 and 01. When the PREP utility has finished, it displays the following prompts:
Prep complete.
Select drive for prep (A-B), or press RETURN to exit:
You may now prep another diskette or exit the utility according to the last prompt.
To prep a diskette on a single-drive system, first load CP/M Plus as described in section 1. When the system prompt A> appears, enter the ~ommand: PREP <RET>. The utility displays the following screen:
*****UTS 30 CP/M PLUS DISKETTE PREP UTILITY (version lRl)*****
Insert diskette to be prepped in drive A.
Data on diskette A will be destroyed.
When ready, press RETURN.
Since the system has only one diskette drive, the program assumes that the prep must occur on drive A, and the drive specification prompt is omitted. Remove the system diskette from drive A to avoid losing the data contained on it. Remove the write-protect tab on the diskette to be prepped, insert the diskette in drive A, close the door, and press the RETURN key. The utility displays the same PREP progress and completion messages shown with the multiple-drive system.
You can exit the PREP program and return to the CP/M Plus system prompt at any time by entering FUNCTION C. If this is done while the progress messages are displayed, the portion of the disk indicated by the progress messages will be prepped.
If an error is detected, the utility displays an error message and diskette initialization is terminated to prevent accidental destruction of data on a diskette. You must correct the error condition and execute the PREP utility again before the diskette being initialized can be used. The following errors will cause the PREP utility to abort: invalid operator entries that have not been corrected, hardware diskette errors, an incorrect version of the BIOS, a write-protected diskette, an open diskette drive door, or failure to turn on diskette subsystem power. Refer to appendix A for error conditions and recovery procedures.

UP-9839 SPERRY UTS 30 CP/M PLUS
Operator's Guide 3-3
3.2. THE DCOPY UTILITY
Multiple-Drive System
DCOPY Termination Message
The diskette copy utility (DCOPY) is used to copy the entire content of a diskette onto one or more diskettes. Before you can proceed, you must first prepare a diskette with the PREP utility. The copy procedures differ according to the number of disk drives configured on your system.
To copy a diskette on a multiple-drive system, first load CP/M. When the system prompt A> appears, enter the command: DCOPY <RET>. The utility displays the following screen message and prompt.
*****UTS 30 CP/M PLUS DISKETTE COPY UTILITY (version lRl)*****
Select source drive (A-B), or press RETURN to exit:
If you have three or four drives configured, the prompt will indicate (AC) or (A-D). If you want the A drive to be the source drive, enter A and press RETURN. The utility displays the following prompt:
Select destination drive (A-B), or press RETURN to exit:
If you want the B drive to be the destination drive, enter B and press RETURN. The utility displays the following prompt:
Copy from drive A to drive B (Y/N)? Y
Check to make sure that you did not make a mistake in assigning drives. To complete the copy, insert the source diskette into drive A, insert the (prepped) destination diskette into drive B, close both doors and enter Y <RET>. The utility begins to copy the diskette and displays a progress report on the screen.
Reading from drive A. Track XX Side YY
This message will alternate with the following message as the copy continues:
Writing to drive B. Track XX Side YY
You can keep track of the copy by watching the alternating read and write cycles. The copy will write on all 79 tracks and on both sides of the diskette.
When the copy is finished, the program displays the message:
Disk copy complete
Select Source Drive (A-B), or press RETURN to exit:
You may now copy another diskette or exit the utility.
You can also enter a drive specifier with the initial command of DCOPY. For example, to copy the contents of diskette A to diskette B, insert the source diskette in drive A and a prepped diskette in drive B. Enter DCOPY B: =A: <RET>. If you enter DCOPY with this drive specifier, the prompts requesting selection of the source and destination drives will be omitted, but the prompt to verify must still be answered to start the copy. The same progress and termination messages will be displayed.

3-4
Single-Drive System
SPERRY UTS 30 CP/M PLUS Operator's Guide UP-9839
To copy a diskette on a single-drive system, first load CP/M Plus. When the system prompt A> appears, enter the command: DCOPV <RET>. The utility displays the following message and prompts:
*****UTS 30 CP/M PLUS DISKETTE COPY UTILITY (version lRl)*****
Insert source diskette into drive A.
When ready, press any key.
In single-drive systems, the A drive is automatically selected as the source and destination drive. Insert the diskette you wish to copy (source diskette) into drive A. Press any key, and the utility begins to read the source diskette and displays the following progress message:
Reading from drive A. Track XX Side YY
The XX counts the track numbers from 00 to 79. The VY counts the side numbers from 00 to 01. The data stored on a diskette generally exceeds the memory capacity of your terminal and therefore must be copied in stages. The program reads as much of the source diskette as will fit into memory and displays the following message:
Insert destination diskette into drive A.
When ready, press any key.
Remove the source diskette, insert the destination diskette, and close the door. Press any key to start the utility writing on the destination diskette. The utility displays the following progress message:
Writing to drive A. Track XX Side YY
When the utility has completed writing on the destination diskette, DCOPY cycles back to the first prompt:
Insert source diskette into drive A.
When ready, press any key.
Follow the prompts and continue switching diskettes until the copy is complete. You can cancel this program at any time and return to the CP/M Plus system command by pressing FUNCTION C. Only data written to the destination diskette up to that point will be saved.
3.3. THE FCOPV UTILITY
The single-file copy utility (FCOPY) is used to copy CP/M Plus files one at a time. The utility may be used with a single- or multiple-drive system. However, on a multiple-drive system, only one drive is used. The PIP utility is also used to copy files on a multiple-drive system. The PIP utility is documented in the UTS 30 CP/M Plus user's guide, UP-9847. To copy all of the files on a diskette in one operation, use the DCOPY utility.

UP-9839
Copying Lengthy Files
SPERRY UTS 30 CP/M PLUS Operator's Guide 3-5
To copy a single file to another diskette, first load CP/M. When the system prompt A> appears, enter the command: FCOPV <RET>. The utility displays the following message and prompts:
*****UTS 30 CP/M PLUS FILE COPY UTILITY (version lRl)*****
Enter file name, or press RETURN to exit:
Enter the file name for the file you wish to copy and a period. (If you are not sure of the file name or the diskette it is on, look in the file directory.) Then enter the identifier for the type of file and press RETURN. For example, to copy the SYS file CPM3, enter CPM3.SYS <RET>.
You may also specify the file name and type when you enter FCOPY. For example: A>FCOPY CPM3.SYS <RET>would load FCOPY, copy the SYS file CPM3, but would omit the prompt requesting the file name. In either case, after you have entered the file name, the utility displays the following prompt:
Insert source diskette into drive A.
When ready, press any key.
If the file to be copied is not on the system diskette, remove the system diskette and insert the diskette containing the file. When you want to start the reading of the source diskette, press any key. The utility reads the file to be copied, and then displays the following messages:
Insert destination diskette into drive A.
When ready, press any key.
Remove the source diskette from the drive and insert the destination diskette. When you are ready to start writing on the destination diskette, press any key. The utility starts writing on the destination diskette. When the copy is complete, the utility displays the following messages:
File copy complete.
Enter file name, or press RETURN to exit:
You may now copy another file or exit the utility according to the instructions in the last prompt.
Most file copy operations require only one read of the source diskette and one write operation to the destination diskette. However, if a file to be copied requires more space than is available in terminal memory, you will have to copy the file in segments. When the partial copy is complete (the first read and write cycle), reinsert the source diskette and an additional segment of the file will be read into memory. The system will continue to prompt you to insert the required diskette until the entire file is read.

3-6
Overwriting Read Only Files
Overwriting Existing Files
Error Conditions
SPERRY UTS 30 CP/M PLUS Operator's Guide UP-9839
If the file name you specify for the copy operation is read only on the destination diskette, the utility displays the following message:
File read only. Overwrite? (Y/N) Y
If you respond by entering V <RET> the copy proceeds and the existing file is overwritten and destroyed. If you respond by entering N <RET> the utility displays the prompt requesting the next file to copy. Follow the prompts and begin again.
If the file name you specify for the copy operation already exists on the destination diskette, the utility displays the following message:
File already exists. Overwrite? (Y/N) Y
In most cases, the copy will proceed without any errors. However, if an error condition occurs, the utility will prompt you with an error message. Refer to appendix A for error messages and recommended solutions.
3.4. CREATING A SYSTEM DISKETTE
Multiple-Drive System: SYSBUILD
These paragraphs present ways to create a new system diskette. First, remove the write-protect sticker and prep the diskette that will be the new system diskette. If want to make an exact copy of the CP/M Plus system diskette, including all of the files contained on it, use the DCOPY command. However, you may wish to create a diskette that will load the system but does not contain all of the CP/M Plus utilities and command files. The new diskette would have more work space for data and application files.
To create a system diskette on a multiple-drive system, use the SYS8UILD or the COPYSYS commands. To create a system diskette on a single-drive system, use only the COPYSYS and FCOPY commands.
The easiest way to create a new system diskette on a multiple-drive system is to use the SYS8UILD submit file. Load CP/M Plus on drive A, and insert a prepped diskette in drive 8. Enter the following command: SUBMIT SVSBUILD <RET>. This command is limited to copies from drive A to drive 8, so be sure that you .have the system diskette in drive A and the prepped copy diskette in drive B. The submit file SYS8UILD contains the instructions that the system needs to copy the system loader image and the two required system files to drive 8. The SYS8UILD utility performs all of these steps automatically. The program displays messages showing the operation being performed. The SYS8UILD file uses the COPYSYS utility to write the required information on the diskette in drive 8.
A>COPYSYS B: =A:
*****UTS 30 CP/M PLUS SYSTEM COPY UTILITY (version lRl)*****
Copy complete.
Enter destination drive (A:-B:) and/or file name, or press RETURN to exit:

UP-9839
Mu/tip/e .. Drive System: COPYS YS
SPERRY UTS 30 CP/M PLUS Operator's Guide 3-7
The loader image is now copied. SYSBUILD exits COPYSYS and proceeds to PIP. The utility displays the following progress messages:
A>PIP B: =*· SYS[RV]
COPYING CPM3.SYS CCP.SYS
When the SYSBUILD operation is complete, you can use the diskette in drive B to load the CPM Plus operating system.
The best method to create a new system diskette on a multiple-drive system is to use the SYSBUILD submit file. However, if you do not have the SYSBUILD file on your diskette, use the COPYSYS and the PIP files to create a copy of the system diskette. The required operations include copying the system loader image using COPYSYS and then using the PIP utility to copy the two necessary system files required to load CP/M Plus. Begin by inserting the system diskette in drive A and a prepped diskette in drive B, and load CP/M Plus. When the system prompt A> appears, enter the following command: COPYSYS B: =A: <RET>(including all spaces and punctuation marks).
*****UTS 30 CP/M PLUS SYSTEM COPY UTILITY (version lRl)*****
Copy Complete
Enter destination drive (A:-B:) and/or file name, or press RETURN to exit:
If you did not include the drive specifier B:=A: (copy from A to B), the utility will give you a series of prompts to identify the drives. After you respond to these prompts, the utility displays the copy complete message.
You have now completed loading the system loader image, but you still must copy the two necessary system files. Press RETURN to exit, and leave both diskettes in their respective drives. Use the PIP utility to copy the two system files. Enter PIP B: =A:* .SVS[V] <RET> (including all punctuation marks) after the system prompt. This command copies all system files on drive A to drive B, and displays the following progress messages:
COPYING -CPM3.SYS CCP.SYS
When you complete these steps, the diskette in drive B will load CP/M Plus. If you exit this utility by pressing FCTN before the copy is complete, only some of the data will be saved. Refer to appendix A for error messages and recovery procedures.

3-8
Single-Drive Systems:COPYSYS
Copying System Files
Error Conditions
SPERRY UTS 30 CP/M PLUS Operator's Guide UP-9839
To create a new system diskette on a single-drive system, load CP/M Plus if it is not already loaded. When the system prompt appears, enter COPYSYS A: =A: <RET> (including the spaces and punctuation).
*****UTS 30 CP/M PLUS SYSTEM COPY UTILITY (version lRl)*****
Insert source diskette into drive A. When ready, press any key.
Place the source diskette in drive A, and close the drive door. Then press any key; the utility locates the file, if it exists, and begins to read it. When the read operation is complete, the utility displays the following message:
Insert destination diskette into drive A.
When ready, press any key.
Remove the source diskette, insert the destination diskette, and close the drive door. Then press any key. When the write operation is complete, the utility displays the following message:
Copy Complete.
Enter destination drive (A:) and/or file name, or press RETURN to exit:
You have copied the loader image onto the destination diskette. If you did not include the drive specifier A:=A: in the command line, the utility will give you prompts to identify the source and destination drive. Both the source and destination drive will be the A drive in a singledrive system. In either case, you may now use COPYSYS to copy the loader image onto another diskette or you may exit the utility according to the prompt. However, before you can use the new diskette to load CP/M Plus, you must also copy the necessary system files as described in the following paragraphs. Press RETURN to exit COPYSYS.
Two system files must be copied onto the new diskette before it will load CP/M Plus. On a single-drive system, you must copy the following files one at a time with the FCOPY utility: CPM3.SYS and CCP.SYS. If you attempt to load CP/M Plus without copying these files, the utility displays the following error message:
CP/M V3.0 Loader Copyright (C) 1982, Digital Research
CPMLDR error: failed to open CPM3.SYS
If this happens, you should load CP/M Plus again with the original system diskette, and copy the necessary system files with the FCOPY utility. After copying the required system files, you will have a new diskette that will load the CP/M Plus system.
If an error condition occurs, the utility will prompt you with an error message. Refer to appendix A for a discussion of error conditions and recommended solutions.

UP-9839
4. Loadable Character Set Utility
One of the features available with CP/M Plus on your UTS 30 is the loadable character set (LCS) utility. With this feature you can generate and modify special character sets for the terminal while operating CP/M Plus. These special characters may be mathematical characters, foreign alphabet characters, or any other other character or artwork you might want. This section describes the features of the loadable character set utility and shows you how to create, modify, and load a sample character set. Read this entire section first and practice with the examples, then use the section for a reference. Refer to appendix A for a discussion of error conditions and recovery procedures.
4.1. CHARACTER CODES
The UTS 30 character set is comprised of 256 characters. These characters are labeled by the utility according to their ASCII decimal values. The character code is the numerical value ( 1 to 255) for the ASCII character or for the corresponding blank character. The first 128 characters (O to 127) are associated with the ASCII character set (see appendix B). The last 128 characters (128 to 255) are blank character codes that require a special program to be displayed. The LCS utility may be used to modify any of the codes 0 to 255. However, the codes 0 through 31 and 128 through 255 can be accessed only through special user programs. Therefore, you should work only with the codes 32 through 127 as listed in appendix B.
You may create an entirely new file with 256 new characters. If you do this, any characters not generated are loaded into the LCS file as blanks. The first 128 characters must be defined or else there will be blank spaces in the text when the undefined keys are pressed. Therefore, in many applications it may be best to leave the 128 ASCII characters and modify only a few keys for your special characters.
4-1

4-2 SPERRY UTS 30 CP/M PLUS
Operator's Guide UP-9839
4.2. COMMAND: MAKELCS
To create a loadable character set for use with CP/M Plus on the UTS 30 enter MAKELCS after the prompt A> and press RETURN. The utility will display the following screen if the MAKELCS COM file is on your diskette:
****UTS 30 CP/M PLUS MAKE CHARACTER SET UTILITY (version lRl)****
Enter file name, or press RETURN to exit:
Enter the name of the file (maximum of 8 characters) in which you would like to place the LCS. You may create a new file or modify an existing file. If you create a new file, the utility automatically adds the extension .LCS to the file name to identify the file as a loadable character set file. If you want to modify only a few characters and leave the others with their standard ASCII definitions, enter ASCII <RET>. You may also specify the file name on the command line when you enter the utility. For example, if you enter MAKELCS ASCII <RET>on the command line, the utility will load the ASCII file and display the main LCS menu.
LOADABLE CHARACTER SET GENERATOR
File: ASCII
Character code: o Character row: 1 Character column: 1 Character display:
MAIN MENU
E = Edit F = File control G Line drawing H Help x Exit
I I I I I I I I I II
11111111111
EDITING COMMANDS
* = Set pixel/move right @ = Set pixel/move left C = Clear character O = Complement character R = Restore character N = Next character L = Locate character B = Blink row (on/off)
Space bar and BACK SPACE erase pixel.
I STANDARD I I DATE TIME

UP-9839 SPERRY UTS 30 CP/M PLUS
Operator's Guide 4-3
4.3. LCS SCREEN DISPLAY
Character Information Area
File
Character Code
Character Row
Character Column
Character Display
You can now create your own special characters one at a time with this 15 by 10 dot matrix. The same screen display is used for each character you create. The screen may be divided into four different areas as follows:
• Character Information Area (upper left corner)
• Character Matrix Area (center of screen)
• Menu Selection Area (left center side of screen)
• Command Information Area (right center side of screen)
Most of the menus and commands are self explanatory; however they will be described in more detail in the following paragraphs in case you have any difficulty.
The upper left corner of the screen is the character information area. This area of the screen display provides information about the character being configured and the current cursor location. Each item is discussed in the following paragraphs.
File: ASCII
Character Code: O Character Row: 1 Character Column: 1 Character Display:
File indicates the name of the LCS file (maximum of 8 characters and drive specifier, if present) being generated or modified. The utility retrieves the current file by that name (in this case ASCII) if it exists on the diskette, or creates a local file in memory.
The character code is a numerical value from 0 to 255 for the ASCII or other character being edited or created.
The character row is a number from 1 to 15 that shows the current position of the cursor relative to the dot matrix rows.
The character column is a number from 1 to 1 O that shows the current position of the cursor relative to the dot matrix columns.
The character display shows the character being generated as it appears in normal size. If the alternate character set memory is not configured, nothing will be displayed in this area.

4-4
Character Matrix Area
Menu Selection Area
Command Information Area
SPERRY UTS 30 CP/M PLUS Operator's Guide UP-9839
The area in the center of the screen display in which the character is created or modified is called the character matrix area.
I I I I I I I I I I I
I I I I I I I I I I I
The matrix area is 10 columns by 15 rows and has a distinct border. Cursor movement is restricted to this area and the cursor "wraps around" from the end of one row to the beginning of the next row, and from the end of the last column to the beginning of the first column. Editing commands are provided for character construction.
The left center side is called the menu selection area. This area of the screen display lists the menus available to help you select groups of commands for generating characters in the matrix area. The following are the five available menus:
MAIN MENU
E = Edit F = File Control G = Line drawing H = Help X = Exit
The right center side of the screen is the command information area. This area of the screen display lists the commands associated with the particular menus from the main menu list.
EDITING COMMANDS
* = Set pixel/move right @ = Set pixel/move left C = Clear character 0 = Complement character R = Restore character N = Next character L Locate character B = Blink row (on/off)
Space bar and BACK SPACE erase pixel.
UP-9839
Editing Commands
File Control Commands
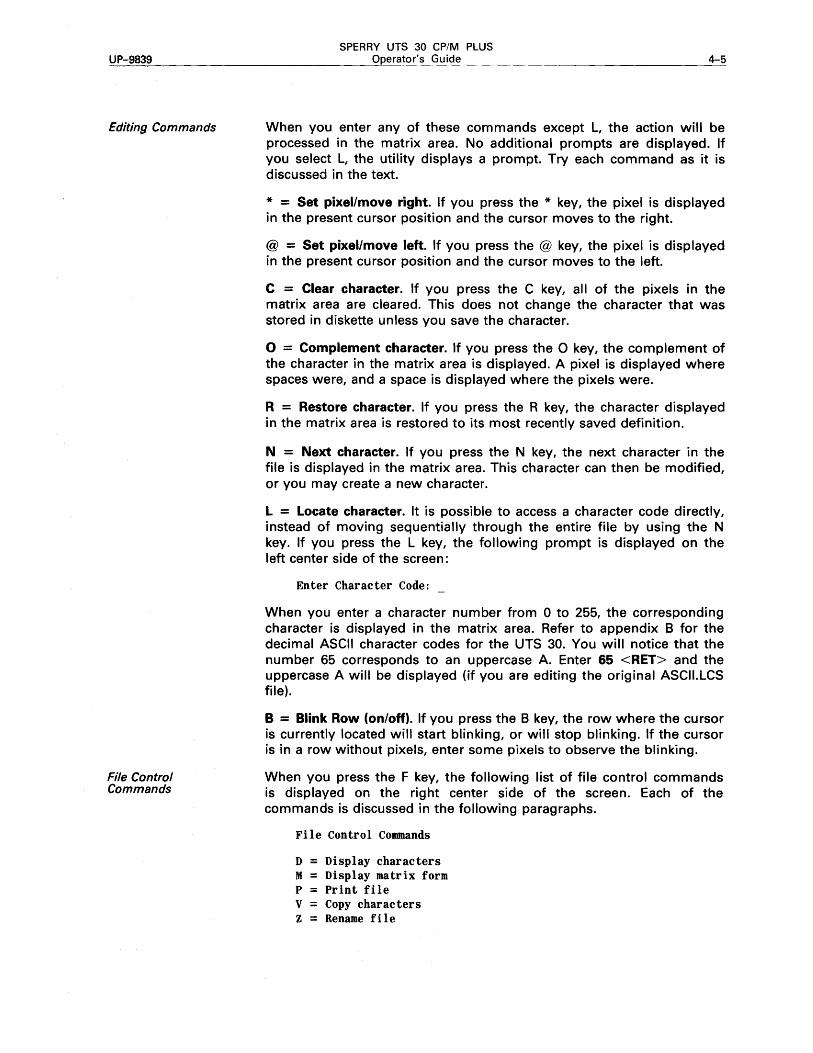
SPERRY UTS 30 CP/M PLUS Operator's Guide 4-5
When you enter any of these commands except L, the action will be processed in the matrix area. No additional prompts are displayed. If you select L, the utility displays a prompt. Try each command as it is discussed in the text.
* = Set pixel/move right. If you press the * key, the pixel is displayed in the present cursor position and the cursor moves to the right.
@ = Set pixel/move left. If you press the @ key, the pixel is displayed in the present cursor position and the cursor moves to the left.
C = Clear character. If you press the C key, all of the pixels in the matrix area are cleared. This does not change the character that was stored in diskette unless you save the character.
0 = Complement character. If you press the 0 key, the complement of the character in the matrix area is displayed. A pixel is displayed where spaces were, and a space is displayed where the pixels were.
R = Restore character. If you press the R key, the character displayed in the matrix area is restored to its most recently saved definition.
N = Next character. If you press the N key, the next character in the fil~ is displayed in the matrix area. This character can then be modified, or you may create a new character.
L = Locate character. It is possible to access a character code directly, instead of moving sequentially through the entire file by using the N key. If you press the L key, the following prompt is displayed on the left center side of the screen:
Enter Character Code:
When you enter a character number from 0 to 255, the corresponding character is displayed in the matrix area. Refer to appendix B for the decimal ASCII character codes for the UTS 30. You will notice that the number 65 corresponds to an uppercase A. Enter 65 <RET> and the uppercase A will be displayed (if you are editing the original ASCll.LCS file).
B = Blink Row (on/off). If you press the B key, the row where the cursor is currently located will start blinking, or will stop blinking. If the cursor is in a row without pixels, enter some pixels to observe the blinking.
When you press the F key, the following list of file control commands is displayed on the right center side of the screen. Each of the commands is discussed in the following paragraphs.
File Control Commands
D = Display characters M = Display matrix form p = Print file v = Copy characters z = Rename file

4-6 SPERRY UTS 30 CP/M PLUS
Operator's Guide UP-9839
D = Display characters. If you press the D key, the screen displays the character codes 0 to 127 with their corresponding characters. A second screen showing codes 128 to 255 may be displayed by pressing any other key. The characters are loaded as they appear on the screen into the alternate character memory until they are changed again. If the alternate character set is not configured, this command will be ignored.
M = Display matrix form. All of the characters can be displayed on the screen in the 15 x 10 matrix form. If you press the M key, the following prompt appears on the left center side of the screen.
Beginning character code:
When you enter a character number from 0 to 255, the utility displays three characters at a time on the screen in matrix form. For example, if you are editing the ASCII. LCS file, enter 65 <RET> and observe the matrix for A, B, and C. The first character corresponds to the number entered, and the other two numbers follow in numerical sequence. After each screen is displayed, press any key to display the next three characters in the file, or press RETURN to display the main menu.
P = Print File. You can print the character matrices for all of the characters in the file. When you press the P key, the following prompts appear in sequence on the left center side of the screen.
Beginning character code: Page Length (rows):_ Page Width (columns):
To stop print, press any key.
You should respond to the first prompt and press the RETURN key to get to the next prompt. The page length must be 18 or greater. The page width must be a value between 20 and 132.
When the last message appears, if the printer is ready to receive data, it immediately starts to print the specified character matrices in the file. You can stop the printer after it has started, by pressing any key. This will stop the print and return the utility to the main menu. If you get the message
Printer is not ready
you must make sure the printer is configured, turned on and online, and run the MAKELCS again.
V = Copy characters. You can copy groups of character definitions from one file to a specific destination in another file or in the same file. If you press the V key, the following prompt is displayed on the left center side of the screen:
Copy character selections:
1 Copy from current file 2 Copy from another file
Select 1 or 2:

UP-9839
line Drawing Commands
SPERRY UTS 30 CP/M PLUS Operator's Guide 4-7
For example, if you want to copy the 128 ASCII characters (0 to 127) to the blank spaces at the end of the file (128 to 255), enter 1 <RET>. The utility displays the following prompts one line at a time on the left center side of the screen:
Beginning character code: Ending character code: Destination
Copy to _- _(Y/N)? _
Enter 0 <RET>for the beginning character code.
Enter 127 <RET> for the ending character code.
Enter 128 <RET> for the destination.
Answer V <RET> to the last prompt.
Now press D; the codes 128 to 255 will be defined the same as O to 127.
If you enter option 2 to copy characters from a different file, the utility displays the following prompts on the left center side of the screen one line at a time:
Enter file name: Beginning character code: Ending character code: Destination
Copy to - (Y/N)?
If you enter Y (yes) in response to the final prompt, the utility copies the character codes from one file to the specified destination points in the other file.
Z = Rename file. You can rename the file you are working on. For example, if you want to change the name of this copy of the ASCII file to "Example," press the Z key. The utility displays the following prompt on the left center side of the screen:
Enter file name:
Enter EXAMPLE <RET> in response to this prompt. The utility displays the main LCS screen, with the new file name, "Example." After you have exited the utility and saved the file, the new name will appear on the directory. You may enter any valid file name.
Line drawing is an extension of the editing function that allows you to draw or erase a line between two designated points. If you press the G key to select the line drawing menu, the dot matrix will be redisplayed with the rows labeled A through 0, and the columns labeled 0 through 9. Line drawing commands are displayed on the right center side of the screen:
LINE DRAWING COMMANDS
- = Erase line + = Draw line

4-8
Help Menu
SPERRY UTS 30 CP/M PLUS Operator's Guide UP-9839
If you select the - option, the utility displays the following prompts in sequence on the left center side of the screen:
ERASE LINE FUNCTION
Beginning coordinate: Ending coordinate: _
Erase line (Y/N)?
If you select the + option, the utility displays the following prompts in sequence on the left center side of the screen:
DRAW LINE FUNCTION
Beginning coordinate: Ending coordinate: _
Draw line (Y/N)?
For example, if you want to draw a line from the upper left corner to the lower right corner, press C to clear the character. Then press G to get the line drawing commands. Press + to draw a line.
Enter AO <RET> for the beginning coordinate
Enter 09 <RET> for the ending coordinate
Answer Y <RET> to the last question.
Using a similar procedure, you may draw or erase other lines. To restore the previous character, press R.
If you press the H key to select the help menu, the screen displays the following information:
LOADABLE CHARACTER SET GENERATOR
HELP OPTIONS
Help screens are available to explain the following areas:
H = General information E = Edit F = Fi le Control G = Line drawing X = Exit
Enter selection or press RETURN to exit help:
You may select any one of the 5 special help menus, or exit by pressing RETURN. The 5 help menus are discussed in the following paragraphs.

UP-9839
General Information Help Menu
Edit Help Menu
SPERRY UTS 30 CP/M PLUS Operator's Guide 4-9
If you press the H key to select the general information help menu, the screen displays the following information:
GENERAL INFORMATION
The MAIN MENU identifies the primary options:
Edit is used to generate or change characters. File Control is used to display the characters in actual or matrix form, print the character matrices, copy character definitions, and rename the file. Line drawing, a form of character editing, is used to draw or erase lines. Exit is used to save the new/revised file.
The character matrix has 15 rows, each with 10 pixels. It is used for editing and line drawing.
Commands can be entered in shifted or unshif ted mode.
The RETURN key must be pressed after each response to a prompt.
Characters are automatically saved in memory when editing is complete.
Pressing RETURN aborts the current prompt.
Press any key to return to the initial help menu.
If you press the E key to select the edit help menu, the screen displays the following information:
EDITING COMMANDS
The scan keys move the cursor and wrap at the end of a row or column. An asterisk <*> is displayed within the matrix for each pixel which is enabled (set).
The space bar and BACK SPACE key erase enabled pixels.
The editing commands are:
* = Enables pixel under cursor and moves cursor right. @ = Enables pixel under cursor and moves cursor left. C = Clears all Pixels. O = Complements the Character. Enabled pixels are
disabled, and disabled pixels are enabled. R = Restores the displayed character to its most
recently saved definition. N = Moves to the next character so that it can be
created or changed. L = Locates a specific character. A prompt will be
displayed so that the desired character code can be entered.
B = Turns blinking on or off for that row.
Press any key to return to the initial help menu.

4-10
File Control Help Menu
Line Drawing Help Menu
SPERRY UTS 30 CP/M PLUS Operator's Guide UP-9839
If you press the F key to select the file control commands help menu, the screen displays the following information:
FILE CONTROL COMMANDS
D = Displays and loads all codes and corresponding characters.
M = Displays the characters in matrix form, three characters per screen. A prompt allows selection of beginning character.
P = Prints the characters in matrix form. Prompts allow selection of beginning character, page width, and page length. Page width must be a value between 20 and 132. Page length must be 18 or greater.
V = Allows character definitions to be copied from this or another file. Prompts allow selection of characters to copy and destination.
Z = Renames destination file.
Press any key to return to the initial help menu.
If you press the G key to select the line drawing commands help menu, the screen displays the following information:
LINE DRAWING COMMANDS
Line drawing is an extension of the editing function.
Rows of the character matrix are labeled A through o. Columns are numbered O through 9. Each pixel has a unique coordinate.
The line drawing co•ands are:
Erases the line between two pixels. + Draws a line between two pixels.
Prompts allow selection of beginning and ending pixel coordinates. The number or letter can be entered first.
Press any key to return to initial help menu.

UP-9839
Exit Help Menu
SPERRY UTS 30 CP/M PLUS Operator's Guide 4-11
If you press the X key to select the exit help menu, the screen displays the following information:
EXIT
A prompt allows the file to be saved or abandoned.
If the file is abandoned, it remains in its pre-edited form, with its pre-edited file name.
If the file is saved, all changes made to the file will be written to the active file name.
If the file has been renamed to a file name that does not exist, the edited file can be written to the new file name.
If the file has been renamed to a file name that exists, it can be overwritten.
If the file is read only protected, it can be saved.
Press any key to return to initial help menu.
4.4. EXITING MAKELCS
You can save or abandon a file when you exit the MAKELCS utility. When you press the X key to exit the MAKELCS utility, one of six sets of prompts is displayed on the left center side of the screen. Each prompt is discussed in the following paragraphs:
If a file has been edited, but not renamed, this prompt appears:
Save edited file (Y/N)?
If a file has been renamed, the edited file can be written to the new file name. For example, if you renamed a copy of the ASCII file to the new name "Example," the following prompts will appear:
Edited file renamed. Save edited file (Y/N)?
In other applications, you may or may not want to save the edited file.
If a file has been renamed to a file name that already exists, the old file will be overwritten and destroyed when the edited file is saved. The following prompts appear:
Edited file renamed.
File already exists. Save edited file (Y/N)?
If ~ file is read only, the edited file can still be saved. The following prompts appear:
File is read only. Save edited file (Y/N)?

4-12 SPERRY UTS 30 CP/M PLUS
Operator's Guide UP-9839
If a file is read only and has been renamed, the following prompts appear:
File is read only. Edited file renamed. Save edited file (Y/N)?
If a file has been renamed to a file name that is designated read only, the old file will be overwritten and destroyed when you save the edited file. The following prompts appear:
File is read only. Edited file renamed. File already exists. Save edited file (Y/N)?
If you enter Y <RET> to save the file, all changes made will be written to the active file. If you enter N <RET> to abandon the file, it will retain its pre-edited form and file name.
4.5. LOADING THE CHARACTER SET
Character sets are generated through the MAKELCS utility and are loaded through the LOADLCS utility. The UTS 30 terminal has two character memories: a standard character set memory, which is loaded automatically when CP/M Plus is loaded, and an optional character set memory, which can be loaded using the procedures described in this section. The LOADLCS utility loads the standard or the optional character set memory with a predefined character set. If the UTS 30 is configured without the optional memory, the character set is loaded to the standard memory. Characters loaded in the standard character set memory are immediately available. Characters loaded in the optional character set memory cannot be displayed unless a software utility, application program, or the escape sequence enable the memory.
4.6. COMMAND:LOADLCS
The load character set utility is executed by entering LOADLCS <RET> after the system prompt. After you press the RETURN key, the utility displays the following message if there are no error conditions:
****UTS 30 CP/M PLUS LOAD CHARACTER SET UTILITY (version lRl)****
Enter file name, or press RETURN to exit:
You must first create an LCS file with the MAKELCS command and save it before you can load the file. If you enter a file name that has not previously been defined and saved as an LCS file, the terminal will respond with the following message and return to the command level:
File does not exist.

UP-9839
Activating the LCS
Optional Terminal Memory
Deactivating the LCS
Optional Terminal Memory
SPERRY UTS 30 CP/M PLUS Operator's Guide 4-13
If this happens you must enter LOADLCS <RET> again and enter a defined file name. If any of the characters (32 to 127) in the file are undefined, some of the keys will be loaded as blanks. This is important to remember if you plan on loading your new character set into standard terminal memory instead of optional terminal memory. You may enter the file name at the same time you enter the LOADLCS utility. For example, if you enter A> LOADLCS EXAMPLE <RET> on the command line, CP/M will enter the LOADLCS utility, bring up the file "Example," and display the next prompt:
Select character set memory (1 =standard; 2 = optional):_
If the additional loadable character set feature is not installed or is not configured in your terminal, the previous prompt will be bypassed and the character set will be loaded into standard terminal memory.
If you enter 1 <RET>, the new character set will be loaded into standard terminal memory and the character set already loaded will be erased. All characters that are displayed will be redefined and redisplayed with their new value, and any characters from 32 to 127 that are not defined will disappear from the screen.
If you enter 2 <RET>, the new character set will be loaded into the optional terminal memory and the bottom line on the screen will show the status of the character set. The standard character set remains in terminal memory and is active on the keyboard.
You may activate the new character set in optional memory by using the escape F sequence. This sequence enables you to escape from one character set and enter another. Hold the FUNCTION key down and type the bracket key ([). Release the FUNCTION key and type F. The entry on the screen will look like this: /\[F. Press the RETURN key. Any characters that you now enter are taken from the new loadable character set in optional terminal memory.
If you loaded the character set in standard terminal memory, you will have to run the LOADLCS sequence again and load the ASCII (or alternate character set) in standard terminal memory. If an alternate character set is loaded in terminal memory, the displayed characters may not correspond to the keyboard entries. If you execute the LOADLCS sequence exactly as described, (even though the screen may be different) you will be able to reload an ASCII character set in standard terminal memory and turn off the loadable character set. If you have difficulty, press RESET and begin again.
When you want to exit the loadable character set, use the escape G sequence. This sequence enables you to exit the loadable character set in optional memory and return to the character set in standard terminal memory. Hold the FUNCTION key down, enter the bracket key ([), release the FUNCTION key, and enter G. The entry on the screen will look like this /\[G if the standard character set is in use. If another character set is in use, the key definitions will be different or may be displayed as blanks. Enter the escape G sequence to exit the loadable character set in optional terminal memory. If you have difficulty, press RESET and begin again.

4-14 SPERRY UTS 30 CP/M PLUS
Operator's Guide UP-9839
4.7. CREATING A SAMPLE CHARACTER
Example File
Changing the Character
Flag Character
Line Drawing Commands
You can use the following example to practice creating your own character. Hold the FUNCTION key down and press the C key to exit any utility that you are in. Enter MAKELCS <RET>- The following prompt appears:
****UTS 30 CP/M PLUS LOAD CHARACTER SET UTILITY (version lRl)****
Enter file name, or press RETURN to exit :
In this example, you are going to create a flag as a character in the "Example" character set. In section 4.1, you renamed a copy of the ASCII character set. If you do not have the file named "Example" on your diskette, refer to the paragraphs in 4.3 and follow the steps to rename a copy of the ASCII file to the new name "Example."
Enter EXAMPLE <RET>· The utility displays the matrix for the first character of the new character set. When the LCS file is loaded with the LOADLCS utility, you can create a new definition for only certain keys or for all keys.
For example, you may want to change the tilde character ( ~) so that it will display the flag. (Refer to appendix 8.) The decimal number 126 corresponds to the tilde symbol. Therefore, you should create the flag in the matrix for character number 126 so that whenever the tilde key is pressed, the flag will be displayed on the screen.
Press the L (locate) key. A new prompt appears on the left center side of the screen:
Enter Character Code:
Enter 126 <RET>· The utility displays the matrix for character number 126. To start with a clear matrix, press the C (clear) key. You will want your flag to look something like this.
Using the cursor scroll or the space bar, move the cursor to column 2 in the first row, and press the * key. This enables a pixel for the tip of the flag. You could continue creating the character with the cursor scroll keys, the space bar, and the * key or the @ key. However, using the line drawing commands will simplify the process.
Press the G key. The line drawing commands are given on the right center side of the screen and the character matrix appears with the numbers 0 to 9 across the top and the letters A to 0 along the left margin.

UP-9839
Verify Drawing
Saving Characters
loading Characters
Displaying Characters
SPERRY UTS 30 CP/M PLUS Operator's Guide 4-15
Press the + key to draw a line. The following prompt appears on the left center of the screen:
Draw line function
Beginning coordinate
Enter A1 <RET>- The following prompt appears:
Ending coordinate
Enter E9 <RET>· The following prompt appears:
Draw line (Y/N)?
This is a check built into the program so that you can verify the initial and terminal points on the line to be drawn before actually drawing the line. Enter V <RET>· Notice that a line is drawn from the beginning coordinate to the ending coordinate. Using a similar procedure, draw lines from E9 to H1 and from A 1 to 01 in order to complete the flag drawing. If you want to make other characters, press the N (next) key to display the next character matrix. When you have created all of the characters you want, you can exit the utility and save the new characters.
Press the X key. The following prompt appears:
Save edited file (Y/N)?
Enter V <RET>- The command saves the file on diskette and in terminal memory and exits the utility. You are now ready to load the new character set into terminal memory and enable a key to display the flag on the screen.
Enter LOADLCS EXAMPLE <RET>· The following prompt appears:
****UTS 30 CP/M PLUS LOAD CHARACTER SET UTILITY (version lRl)****
Select character set memory (1 = standard; 2 = optional):
Enter 2 <RET>· The status line at the bottom of the screen shows that the new character set (Example) is in the optional terminal memory.
STANDARD EXAMPLE DD/MM/YY llll:MM:SS
Now, press the ~ key. The character (~) appears on the screen. To switch to the new "Example" character set and display the flag, proceed as follows.
Press the FUNCTION key, enter the left bracket key ([), release FUNCTION, enter F and press RETURN. You have now escaped from the standard character set and are in the optional character set. Now, hold the SHIFT key down and press the ~ key. The flag will be displayed on the screen. All of the other keys will remain the same, since they were previously defined in the ASCII character set.

4-16 SPERRY UTS 30 CP/M PLUS
Operator's Guide UP-9839
To return to the standard character set, hold the FUNCTION key down, enter the left bracket key ([), release FUNCTION, enter G, and press RETURN. This returns the terminal to the character set loaded in standard terminal memory. Now, press the - key. The - will be displayed because you are now back in standard terminal memory. Using the same procedure, you may redefine other keys or all of the keys.

UP-9839
5. Make Keyboard Utility
The make keyboard utility (MAKEKBD) enables you to redefine the codes generated by the keys on the keyboard and store the new codes on diskette in a keyboard table. The MAKEKBD utility is used in conjunction with the load keyboard utility (LOADKBD), which loads the specified keyboard table from diskette to terminal memory. By using these two utilities, you can develop two or more keyboard tables and alternate between them. Refer to appendix A for a discussion of error conditions and recovery procedures.
5.1. KEY CODES AND SHIFT LEVEL
On the UTS 30, each key can be assigned the code normally generated by another key. When you load the new code and press a key, the newly assigned code is generated. The new code may be any of the ASCII characters, or a special function message that you create. The code generated by a key depends on the shift level. The three shift modes are lowercase (unshifted), uppercase (shifted using the SHIFT key), or function (upper function shift using the FUNCTION key). The code generated for each shift level can be individually defined for each key on the keyboard.
5.2. COMMAND: MAKEKBD
Creating a File
The make keyboard utility is started by entering MAKEKBD <RET> after the system prompt A>. The utility displays the following screen:
*****UTS 30 CP/M PLUS MAKE KEYBOARD UTILITY (Version lRl)*****
Enter file name, or press RETURN to exit:_
You may create a new file or modify an existing file. To create a new file for a new keyboard table, enter the desired file name. You may choose any name for the file as long as it has 8 or fewer characters. The extension .KBD is added to the file name by the utility to identify the file as a keyboard file. The utility automatically loads a copy of the default keyboard table from the system diskette to be used as a basis for modification.
5-1

5-2
Modifying a File
MAKEKBD Screen Displays
Number of Key to Modify
SPERRY UTS 30 CP/M PLUS Operator's Guide UP-9839
To modify an existing file, enter the desired file name. Any .KBD file can be modified. The utility loads the specified file. For example, if you want to make a new keyboard file and name it "Sample," enter SAMPLE <RET>. You may also enter a valid file name at the same time that you load MAKEKBD. For example, A>MAKEKBD SAMPLE would initialize the MAKEKBD utility, and create the keyboard file "Sample."
In either case, the utility tries to locate the entered file name. If the file cannot be located, the utility assumes that it does not exist and creates a new file. The utility displays the following screen:
*****UTS 30 CP/M PLUS MAKE KEYBOARD UTILITY (version lRl)*****
File: SAMPLE
Valid input responses are: 1-90 = Number of key to modify (keyboard chart) F = Function message table D = Display key definitions S = Save key definitions and exit A = Abort
Enter key number, F, D, S, or A:
This menu is described in the following paragraphs. The file name entered is "SAMPLE."
To help you identify a key for modification, the keys on the keyboard have been numbered from 1 to 90, starting in the upper left corner, as shown in figure 5-1.
Figure 5-1. Key Number Layout for the Low Profile Keyboard
I \ ~·.___ _______ 90 _____ ----J\I

UP-9839
Display Key Definitions
SPERRY UTS 30 CP/M PLUS Operator's Guide 5-3
The keyboard layout shows that key number 85 corresponds to the letter m. Enter 85 <RET> to see the current definitions for key number 85. Since you don't want to change any key definitions right now, press the RETURN key three times to leave the current values unchanged. The codes 60 = m and 40 = M are listed in appendix C in the hexadecimal ASCII character codes chart.
To decide which keys are the most suitable for modification, display the key definitions. It is recommended that you modify a key which is disabled or not being used so that you will not lose a defined ASCII character.
Enter D <RET> in response to the prompt:
Enter key number, F, D, S, or A
The utility displays a list of the key definitions in the given file. If you have created a new file (in this case "Sample") the utility automatically loads a copy of the standard keyboard definitions to be used as a basis for modification. These definitions are shown in the following screen display.
***** UTS 30 CP/M PLUS MAKE KEYBOARD UTILITY (version lRl:XX) ***** File: SAMPLE
ky le UC fc lky le UC fc lky le UC f c lky le UC fc lky le UC f c 1 Dis Dis Disl19 - - 137 5 5 5 155 Dis Dis Disl73 /\M /\M /\M 2 Dis Dis Disl20 /\G /\G /\G 138 6 6 6 156 1 1 1 174 0 0 0 3 /\x /\x Dis 121 Dis Dis Dis 139 + + + 157 2 2 2 175 . 4 Dis Dis Dis 122 I \ Dis 140 Dis Dis Dis 158 3 3 3 176 /\A /\A /\A
5 /\J /\J Dis 123 1 FF 141 Dis Dis Disl59 /\I /\I /\I 177 /\F /\F /\F 6 /\L /\L Dis 124 2 FE 142 Al /\I /\I 160 Dis Dis Dis 178 < > Dis 7 Dis Dis Disl25 3 # FD 143 q Q /\Q 161 a A /\A 179 z z /\z 8 Dis Dis Disl26 4 $ Dis 144 w w /\w 162 s s /\s l8o x x /\x 9 Dis Dis Dis 127 5 % Dis 145 e E /\E 163 d D /\D 181 c c /\c 10 Dis Dis Disl28 6 & Dis 146 r R /\R 164 f F /\F 182 v v /\v 11 Dis Dis Disl29 7 Dis 147 t T /\T 165 g G /\G Isa b B /\B 12 Dis Dis Sp lao 8 ( Dis 148 y y /\y 166 h H /\ff 184 n N /\N 13 Dis Dis Disl31 9 ) Dis 149 u u /\u 167 j J /\J 185 m M /\M 14 /\s /\s /\c 1a2 o = Dis 150 i I /\I 168 k K /\K 186 Dis 15 /\M /\M /\M 133 I ? Dis 151 o 0 /\0 169 1 L /\L 187 Dis 16 7 7 7 134 /\ /\/\ 1s2 p p /\p 110 ; + Dis lss /\
17 8 8 8 135 /\H /\H Del 153 @ \ /\\ In : * Disl89 Dis Dis Dis 18 9 9 9 136 4 4 4 154 [ { /\ [ 172 ] } /\] j90 Sp Sp Sp
Print keyboard tables (Y/N)? N
I MAKEKBDI I MM/DD/YY I HH: MM: SS

5-4
Function Message Table
SPERRY UTS 30 CP/M . PLUS Operator's Guide UP-9839
On this menu, the key column represents the key number corresponding to the key number layout. When you press a key, a character is displayed or a special code is activated depending on the key and the shift level. The shift levels are:
• Lowercase character or special code (le)
• Uppercase character or special code (uc)
• Function code (fc)
Compare the key definitions to the key number layout to decide which keys to redefine. If you want to use this table for reference only, enter N <RET> in response to the last prompt. The utility will redisplay the first menu. If you are going to modify some of the keys, you should have a printout of the key definitions.
If you enter V <RET> in response to the last prompt, the printout will begin immediately. If the printer is not ready, exit the utility, make sure that the printer is attached to the terminal, is online and turned on, and is configured on the UTS 30 terminal.
Some of the keys may be redefined with a special multiple-character message, which is defined in the function message table. Enter F <RET> in response to the first prompt. The utility displays the following screen:
*****UTS 30 CP/M PLUS MAKE KEYBOARD UTILITY (version lRl)*****
File: = SAMPLE
so = 90 = Sl = 91 = S2 92 S3 93 S4 94 S5 95 S6 96 S7 97 SS 9S S9 99 SA = 9A = SB = 9B = SC = 9C = SD = 9D = SE = 9E = SF = 9F =
Type 80-9F to enter message, or press RETURN to display main menu.
Enter message number:

UP-9839
Save Key Definitions and Exit
Abort
SPERRY UTS 30 CP/M PLUS Operator's Guide 5-5
This is the function message table. You may now enter special multiple character messages (up to 32 characters) to be initiated by a single keystroke. For example, if you want message number 80 to be MAKEKBD, enter 80 <RET>. The utility displays this same screen, except the cursor is positioned next to number 80 and the final messages and prompt change to the following:
Type message string (data characters--dim background; control characters-reverse video)
Press BACK SPACE to delete characters Press FNCT and F3 to end string
If the selected message number is already defined, the final messages and prompt change to the following:
To erase string, enter Y and then press FCTN and F3. To replace string, enter Y and new string.
Delete this message (Y/N)?
Follow these prompts to change a message or move to a new number. Once you have entered your desired message, in this example MAKEKBD, hold the FUNCTION key down and press the F3 key to end the message and return to the main function message table menu. The new message in number 80 will appear with a low intensity background. When all your messages have been entered, press the RETURN key to return to the main menu.
When you have redefined all the keys you want, enter S <RET>. You will exit the utility and save all of the key definitions. If you decide you would like to redefine other keys, enter the utility again and select the same file.
If you want to exit the utility without saving any of the redefined keys, enter A <RET> or press the FUNCTION and C keys.

5-6 SPERRY UTS 30 CP/M PLUS
Operator's Guide UP-9839
5.3. MODIFYING KEYS
If you enter the number of a key to modify, the utility displays a sequence of screens. For example, you may want to modify the key k so that FUNCTION K will display MAKEKBD. If you refer to the key number chart, you will note that k is key number 68. Load MAKEKBD. Enter 68 <RET>· The utility displays the following screen.
*****UTS 30 CP/M PLUS MAKE KEYBOARD UTILITY (version lRl)***** File: SAMPLE
Valid input responses are: 1-7F = ASCII character code (hex) 80-9F = Message =character = Character or function character for key 0 = Disable key function RETURN = Value unchanged
Enter key number, F, D, S, or A: 68
Changing key number 68
Previous value: New value:
Lowercase (unshifted)
6B = k
Uppercase (shifted)
4B = K
Function
OB = /\ K
The key redefinition screen lists the valid input responses at the top of the screen, shows the current values for the specified key, and allows you to change those values. The previous value line shows the current values for each shift level of the key. The value before the = character is the ASCII hexadecimal value (see appendix D). The value after the equal sign is the character equivalent. The symbol before a character in the function mode column indicates that you can enter a character by pressing the FUNCTION key concurrently with the character. The ASCII characters for 20 and 7F are nondisplayable, so the utility prints "space" if the value of 20 is used, and "DEL" if 7F is used.
The new value line is the active response area for this screen. You must define each shift mode (lowercase, uppercase, and function) in turn, pressing the RETURN key after each response. The location of the cursor indicates which mode you are defining: you cannot move the cursor to a different column until you press the RETURN key. After the response to the first (lowercase) shift level is processed, the utility moves the cursor to the next shift level.
The key redefinition screen lists three choices: you may save the current code, disable a key, or change the code displayed by a key. The selections are discussed in the following paragraphs:

UP-9839
Saving the Current Code
Disabling a Key
Changing the Code
Message Code
SPERRY UTS 30 CP/M PLUS Operator's Guide 5-7
The code produced by the key is unchanged if you press RETURN without entering any other characters. If you are redefining only a single level of a key, RETURN is used to save the current values of the other shift levels. When you press RETURN with no other input, the value in the previous value line is displayed in the appropriate column in the new value line.
You can disable a key by entering 0 and pressing RETURN which disables the key in that shift level. Whenever this table is loaded, the key beeps when you press it, but does not output any code. When the 0 response is processed, the word "disable" is displayed in the appropriate column of the new value line.
The following paragraphs discuss the ways to change the code generated by a key.
You can change the code by typing the hexadecimal number between 1 and 7F which becomes the code produced by that key. The set of allowable characters is defined by the hexadecimal characters 1 through 7F in the ASCII code chart (see appendix 8). Special or unique characters may be created using the loadable character set utility MAKELCS described in section 4.
You can change the code generated by a key by typing an equal sign ( =) followed by the appropriate key. Any key you press after the equal sign is accepted as data and the key function is not performed. Use the SHIFT or FUNCTION key, if necessary, to generate the character. The code produced by the entered key is also generated by the key being defined.
For each method, pressing the RETURN key causes the utility to process the response. An invalid entry is ignored. A valid response is redisplayed in the format shown in the previous value line. For example, if you enter either 68 or = k, the response is redisplayed as 68=k.
Typing a hexadecimal number between 80 and 9F does not generate a defined code. Instead, it generates a string of characters defined by the function key message process. There can be a total of 32 strings, each limited to 32 characters. When you enter one of these numbers, it is followed immediately by " = Message" to indicate that a message function has been assigned. The lines below the new value line show the specified message.
• Lowercase (assigned message)
• Uppercase (assigned message)
• Function (assigned message)
The message function codes (80 through 9F) can be assigned to keys before or after the function key message is specified. For the codes 80 through 9F to be usable as defined keys, the messages must be programmed. If a key is assigned before the message is entered, the shift mode is displayed but the associated message area is blank.

5-8
Sample Function Message
Exiting MAKEKBD
SPERRY UTS 30 CP/M PLUS Operator's Guide UP-9839
If you make an error in entering a response, but you haven't pressed the RETURN key, you can use the BACK SPACE key to erase the incorrect character. However, once you press the RETURN key, you must select the key again and correct the error.
For example, you may want to enable the function k key to display the sequence MAKEKBD. Refer to the key number layout for the low profile keyboard. The k key is number 68. Enter 68 <RET> then press the RETURN key twice to move the cursor over to the function column in the new value line. Now, enter 80 <RET>- The code MAKEKBD is now defined for function k. After you save the keyboard definitions and load the keyboard into terminal memory, you will be able to use the function k sequence to display the MAKEKBD command.
Once you have changed all the keys you want, enter S <RET>· This will save the file on diskette, return the utility to the command level, and display the CP/M Plus prompt. If the file is read only, the utility displays the following prompt:
File is read only.
Save edited file? (Y/N)
If you respond Y (yes), the file will be updated. After you have created a keyboard file on your diskette, it must be loaded into terminal memory with the LOADKBD utility before you can begin to use the new keyboard definitions.
5.4. COMMAND:LOADKBD
Now that you have created and saved a keyboard definition file, you can use the load keyboard utility (LOADKBD) to load the desired file into terminal memory. The name of the keyboard table which is currently loaded is displayed inthe status line.
STANDARD MM/DD/YY llll:MM:SS
When you load CP/M Plus, the system diskette automatically loads the standard keyboard file into terminal memory. With the use of the MAKEKBD utility, you may enter an alternate keyboard file. Enter LOADKBD <RET> to execute the load keyboard utility. The utility displays the following screen:
****UTS 30 CP/M PLUS LOAD KEYBOARD UTILITY (version lRl)****
Enter file name, or press RETURN to exit:
If you want want to use the sample keyboard file defined earlier in this section, enter Sample <REl > or enter the file name with the LOADKBD command, A> LOADKBD SAMPLE <RET>- The utility displays the following completion message:
System updated in memory.

UP-$839 SPERRY UTS 30 CP/M PLUS
Operator's Guide 5-9
This completes the load keyboard utility and returns you to the system prompt. The utility displays the name of the keyboard file on the status line.
SAMPLE MM/DD/YY IUl:MM:SS
You are now ready to begin entering data with your newly defined keyboard. If you desire to redefine other keys, refer to the MAKEKBD utility, redefine the desired keys, and load the new keyboard.
If you want to update the KBD tables in the file CP/M3.SYS, you may add a Z option to the command line. This will allow you to select the drive to access the system keyboard definitions contained in the CP/M3.SYS file for modification. For example:
X>LOADKBD FILENAME Z: modifies memory and Z:CPM3.SYS with the keyboard definitions in the file FILENAME in the default drive.
X>LOADKBD V: FILENAME Z: modifies memory and Z:CPM3.SYS with the keyboard definitions in the file FILENAME in drive Y.


Diskette Errors
Appendix A. Error Messages
The following error messages may occur on several of the CP/M utilities. A discussion of the causes and solutions to the error messages is presented below.
If a diskette error occurs during a loading or copy operation, the standard CP/M diskette error message may be displayed at the top of the screen:
Drive A type error: TRACK=tt, SIDE=z, SECTOR=ss, STATUS=xx Options: Abort, Retry, Continue, Ignore
Enter A to abort the program. To solve the problem:
• Make sure the diskette in drive A is not write protected.
• Make sure that the diskette is two-sided double-density.
• Make sure the diskette has been prepped and is inserted properly.
• Make sure the drive door is shut, the cables are firmly attached, and the power is on.
Other diskette error messages that may appear are:
CP/M error on A: Invalid Drive Do you want a retry (Y/N) ?_
If the retry doesn't work the first time, enter N <RET> to exit the utility. Follow the steps previously listed. If the problem persists, reload CP/M and try again.
Drive X is Read Only
Drive X is logically set (through the SET command) to be a read-only (RO) device. To solve the problem:
• Put diskette to be configured in another drive that is not read only.
• Use the CP/M Plus SET command described in the user's guide to set drive X to be a readwrite (RW) device.
• Use the FUNCTION sequence to set all drives to read-write.
UP-9839 A-1

A-2
System Errors
Operator Errors
SPERRY UTS 30 CP/M PLUS Operator's Guide
Disk Input Error. Disk Output Error. Data l/O Error. Disk I/O Error.
UP-9839
The above error messages often result from physical problems with the diskette or the drive. To solve the problem:
• Make sure the drive door is shut.
• Make sure the diskette is inserted right side up.
• Make sure the diskette is prepped.
• If the problem persists, try another prepped diskette or another drive.
Disk select error
You have selected the wrong disk drive or the diskette sector size is not supported. The sector size must be UTS 30 CP/M standard, 128 or 256.
If the utility is not compatible with the BIOS or BOOS, or is designed for a different system, the utility displays one of the following error messages, then exits.
System is incompatible with utility.
To solve the problem, you will have to get the appropriate version of the utility.
Y:CPM3.SYS cannot be configured (incorrect version)
The disk in drive Y contains an incorrect version of CPM3.SYS or the version of CPM3.SYS on the disk in drive Y was not created on a UTS 30. To solve the problem, make sure CPM3.SYS and CONFIG3 are compatible versions.
Memory cannot be configured
The version of CPM3.SYS currently irnerminal memory is incompatible with the current version of CONFIG3. To solve the problem, make sure that CPM3.SYS and CONFIG3 are compatible versions.
Invalid format
The command line you have entered does not conform to CP/M conventions. To ~ol,ve the problem:
• Make sure your spelling, punctuation and spacing are exact.
• Refer to the CP/M user's guide for more information.

UP-9839 SPERRY UTS 30 CP/M PLUS
Operator's Guide
Invalid drive, or, CP/M Error on X: Invalid Drive
A-3
The current configuration in terminal memory does not allow you to use drive X. To solve the problem, insert the diskette to be configured into a drive for which the system is currently configured and repeat the process.
Invalid file name.
Almost any sequence of letters/numbers is considered a valid file name. However, certain special characters or punctuation marks are considered invalid. For more information, refer to the UTS 4000 CP/M Plus user's guide.
File does not exist, or, Y:CPM3.SYS does not exist
The system file CPM3.SYS does not exist on the disk in drive Y. To solve the problem:
• Make sure the right disk is in drive Y and the disk contains the file CPM3.SYS.
• Check the directory to make sure the spelling and punctuation are identical.
If the file exists but data contained in the file is incorrect, the utility displays the error message below, then exits.
The format of the command line is not correct.
Some files may be password protected. If the file name you select requires a password, the utility will prompt you with the following message:
Enter password: or, Enter password for CPM3.SYS:
If you enter an incorrect password, the utility will display the following message:
Invalid password.
If you have been authorized to access these files, check with your supervisor for the correct password, and run the utility again. If the specified file is write-protected or already exists and contains data which would be erased, one of the following prompts is displayed:
File is read only. Overwrite (V/N)? Y File already exists. Overwrite (Y/N)? Y
If you enter Y <RET>, the file will be overwritten, and the data previously stored will be lost.


JP-9839
Appendix B. Decimal ASCII Codes
Table B-1 illustrates the decimal ASCII character codes used with the loadable character set utility (MAKELCS) discussed in section 4.
Table B-1. Decimal ASCII Character Codes.
0 = NUL 32 = space 64 =@ 96 = \ 1 = SOH 33 = ! 65 =A 97 = a 2 =STX 34 = " 66 = B 98 = b 3 = ETX 35 = # 67 = c 99 = c 4 =EQT 36 = $ 68 = D 100 = d 5 =ENG 37 = % 69 = E 101 = e 6 =ACK 38 = & 70 = F 102 = f 7 =BEL 39 =
, 71 = G 103 = g
8 =BS 40 = ( 72 = H 104 = h 9 =HT 41 =) 73 =I 105 = i
10 = LF 42 = * 74 = J 106 = j 11 = UT 43 = + 75 = K 107 = k 12 = FF 44 =, 76 = L 108 =I 13 =CR 45 = - 77 = M 109 = m 14 =so 46 =. 78 = N 110 = n 15 =SI 47 =I 79 = 0 111 = 0
16 = OLE 48 = 0 80 = p 112 = p 17 = DC1 49 = 1 81 =a 113 = q 18 = DC2 50 = 2 82 = R 114 = r 19 = DC3 51 = 3 83 = s 115 = s 20 = DC4 52 = 4 84 = T 116 = t 21 = NAK 53 = 5 85 = u 117 = u 22 = SYN 54 = 6 86 = v 118 = v 23 = ETB 55 = 7 87 = w 119 = w 24 =CAN 56 = 8 88 = x 120 = x 25 =EM 57 = 9 89 = y 121 = y 26 =SUB 58 =: 90 = z 122 = z 27 = ESC 59 =; 91 = [ 123 = { 28 = FS 60 = < 92 = \ 124 =I 29 =GS 61 = = 93 = J 125 = } 30 =RS 62 = > 94 = /' 126 = -31 =us 63 = ? 95 = 127 = DEL -
B-1


P-9839
Appendix C. Hexadecimal ASCII Codes
Table C-1 illustrates the hexadecimal ASCII character codes used with the make keyboard utility (MAKEKBD) discussed in section 5.
Table C-1. Hexadecimal ASCII Codes for the UTS 30 (Part 1of2)
Hexadecimal Character Hexadecimal Character Number Symbol Number Symbol
0 NUL 20 space 1 SOH 21 ! 2 STX 22 ,,
3 ETX 23 # 4 EQT 24 $ 5 ENG 25 % 6 ACK 26 & 7 BEL 27 ,
8 BS 28 (
9 HT 29 ) A LF 2A * B UT 2B + c FF 2C , D CR 20 -E so 2E F SI 2F I
10 OLE 30 0 11 DC1 31 1 12 DC2 32 2 13 DC3 33 3 14 DC4 34 4 15 NAK 35 5 16 SYN 36 6 17 ETB 37 7 18 CAN 38 8 19 EM 39 9 1A SUB 3A : 18 ESC 3B ; 1C FS 3C < 10 GS 30 =
1E RS 3E > 1F us 3F ?
C-1

C-2 SPERRY UTS 30 CP/M PLUS
Operator's Guide
Tal:tle C-1. Hex•decimal ASCII Codes for the UTS 30 (Part 2 of 2)
Hexaclecim•I Char.cter Hexadecimal Number Symbol Number
40 @ 60 41 A 61 42 8 62 43 c 63 44 D 64 45 E 65 46 F 66 47 G 67 48 H 68 49 I 69 4A J 6A 48 K 68 4C L 6C 40 M 60 4E N 6E 4F 0 6F 50 p 70 51 a 71 52 R 72 53 s 73 54 T 74 55 u 75 56 v 76 57 w 77 58 x 78 59 y 79 5A z 7A 58 [ 78 5C \ 7C 50 I 70 5E 7E 5F 7F -
UP-9839
Character Symbol
\ a b c d e f g h i j k I m n 0
p q r s t u v w x y z {
I }
-DEL

UP-9839
Appendix D. CP/M Plus Commands
There are several different ways to enter CP/M commands, depending on the location of the file to be loaded. The drive will be identified by the Y option on the command line.
For example:
X>LOADKBD
X>LOADKBD Filename
X>LOADKBD Y:Filename
The example shows different ways to load the keyboard with the new file using LOADKBD. Other CP/M Plus commands may be substituted for LOADKBD. The specification of Y is optional and allows the selection of a different drive than the currently active drive. The file name can be entered by itself or entered with the Y option. Y is added to select a different drive from the currently active drive.
X>LOADKBD
X>LOADKBD FILENAME
X>LOADKBD Y;FILENMAME
If no file name is entered on the command line, the utility will prompt you to identify the file name.
This command modifies memory with the keyboard definitions in the file FILENAME in the default drive.
This command modifies memory with the keyboard definitions in the file FILENAME in drive Y.
X>LOADKBD Y:FILENAME Z: This command modifies memory and Z:CPM3.SYS with the keyboard definitions in the file FILENAME in drive Y.
0-1


i\<
READER'S COMMENT SHEET
Your comments on this manual will help us improve it. Please fill in the requested information.
Name of manual:------------------------------------
Manual number: UP-__ revision number ___ , including update numbers ____ _
Name of your company: ---------------------------------
Address of company:-------------------------------------
What is your position?------------------------------------
Your level of experience: Professional ___ Knowledgeable _______ Novice----
With what system is the equipment used?---------------------------
How do you use this manual?
As a reference source 0 As a classroom text D
Please rate this manual
As a reference source:
As a text:
For other uses:
Good0
Good0
Good0
As a self-instructional text D As D
Adequate 0
Adequate 0
Adequate D
Not adequate 0 Not adequate 0 Not adequate 0
Add your specific comments. Give page and paragraph references where appropriate.
Thank you for your cooperation.
I
I I I I I I

(')
c -4
I I I I I I I I
PLEASE SEND US YOUR COMMENTS!
We feel that this manual is an essential part of our equipment. We want to be sure it is the best, most usable manual possible. Your comments will help us achieve this goal. When you have become familiar with the manual, please fill in the other side of this form and mail the form to us. Your reply will ~e carefully reviewed by the persons responsible for writing and publishing this manual.
I FOLD 1---------1
I
Bus IN ESS RE PL y M Al L NO POSTAGE STAMP NECESSARY IF MAILED IN THE UNITED STATES
POSTAGE WILL BE PAID BY
UNIVAC 322 NORTH 2200 WEST
SALT LAKE CITY, UTAH 84116
I ATTN: MANAGER, GSD PUBLICATIONS ------ ------------ -- ---- -------- -----------
FOLD
NOTE:
Requests for copies of this manual a"!d other Sperry Univac publications and for assistance in getting the most use out of your Sperry Univac equipment should be directed to your local Sperry Univac representative.


![1 Syntax of why-in-situ: Merge into [Spec,CP] in the - Uts Cc Utexas](https://img.dokumen.tips/doc/110x75/62060ee88c2f7b1730044766/1-syntax-of-why-in-situ-merge-into-speccp-in-the-uts-cc-utexas.jpg)