Embed Size (px)
Citation preview

1
USPS GATS INFORMAL PAYMENTS
EDUCATIONAL USER GUIDE
© September 30, 2008 United States Postal Service. All Rights Reserved. May not be reprinted without permission.
This document is intended only for official use by Labor Relations employees of the
United States Postal Service. No portion of this document may be reproduced, distributed or displayed without permission from Manager, Labor Relations Systems, United States Postal Service.
Any use of any portion of this document by unauthorized persons is strictly prohibited.

2
TABLE OF CONTENTS
1 BEFORE YOU BEGIN 3
1.1 HOW TO USE THIS MANUAL 3
2 OVERVIEW 4
2.1 ROLES & RESPONSIBILITIES 4 2.2 KEY TERMS 5
3 ACCESSING GATS 6
3.1 ACCESS GATS 6 3.2 LOG INTO GATS 7 3.3 HOMEPAGE NAVIGATION 9
4 CREATING INFORMAL PAYMENTS 10
4.1 GATS HOMEPAGE 10 4.2 CREATE INFORMAL AUTHORIZATION SCREEN 11 4.3 CONTINUE INFORMAL AUTHORIZATION SCREEN 14 4.4 TYPE OF COMPENSATION 17
5 CREATING HOURS-RELATED PAYMENTS 18
5.1 EMPLOYEE VERIFICATION SCREEN 18 5.2 ENTER HOURS COMPENSATION SCREEN 20 5.3 AUTHORIZE PAYMENT SCREEN 23 5.4 PRE-AUTHORIZATION DECISION AND PAYMENT MEMORANDUM 25 5.5 DECISION AND PAYMENT MEMORANDUM 25 5.6 REQUEST SUCCESSFULLY SUBMITTED 25
6 CREATING LUMP SUM ADJUSTMENTS 27
6.1 CREATE PAY ADJUSTMENT AUTHORIZATION LETTER 27 6.2 PAY ADJUSTMENT LETTER HISTORY 28 6.3 REQUEST PAYOUT FOR ADJUSTMENT 29 6.4 REQUEST SUCCESSFULLY SUBMITTED 31
7 VIEWING & UPDATING PAYMENT HISTORY 32
7.1 CREATING GATS REPORTS 35
8 FREQUENTLY ASKED QUESTIONS 38

3
This document has been created to provide a practical guide to the Supervisors of Collective Bargaining Units at the Postal Service who will authorize and pay informal grievance-related payments in the Grievance Arbitration and Tracking System (GATS). It provides step-by-step instructions and screen prints that will guide you through the process of authorizing and paying informal payments.
1 BEFORE YOU BEGIN 3
1.1 HOW TO USE THIS MANUAL ................................................................................................................................. 3
2 OVERVIEW 5
2.1 ROLES & RESPONSIBILITIES .................................................................................................................................. 5 2.2 KEY TERMS ......................................................................................................................................................... 6
3 ACCESSING GATS 7
3.1 ACCESS GATS ..................................................................................................................................................... 7 3.2 LOG INTO GATS .................................................................................................................................................. 8 3.3 HOMEPAGE NAVIGATION.................................................................................................................................... 10
4 CREATING INFORMAL PAYMENTS ......................................... 11
4.1 GATS HOMEPAGE ............................................................................................................................................. 11 4.2 CREATE INFORMAL AUTHORIZATION SCREEN ..................................................................................................... 12 4.3 CONTINUE INFORMAL AUTHORIZATION SCREEN .................................................................................................. 15 4.4 TYPE OF COMPENSATION .................................................................................................................................... 18
5 CREATING HOURS-RELATED PAYMENTS ............................. 19
5.1 EMPLOYEE VERIFICATION SCREEN...................................................................................................................... 19 5.2 ENTER HOURS COMPENSATION SCREEN .............................................................................................................. 21 5.3 AUTHORIZE PAYMENT SCREEN ........................................................................................................................... 24 5.4 PRE-AUTHORIZATION DECISION AND PAYMENT MEMORANDUM .......................................................................... 26 5.5 DECISION AND PAYMENT MEMORANDUM ........................................................................................................... 26 5.6 REQUEST SUCCESSFULLY SUBMITTED ................................................................................................................. 26
6 CREATING LUMP SUM ADJUSTMENTS .................................. 28
6.1 CREATE PAY ADJUSTMENT AUTHORIZATION LETTER .......................................................................................... 28 6.2 PAY ADJUSTMENT LETTER HISTORY ................................................................................................................... 29 6.3 REQUEST PAYOUT FOR ADJUSTMENT .................................................................................................................. 30 6.4 REQUEST SUCCESSFULLY SUBMITTED ................................................................................................................. 32
7 VIEWING & UPDATING PAYMENT HISTORY .......................... 33
7.1 CREATING GATS REPORTS ................................................................................................................................ 36
8 FREQUENTLY ASKED QUESTIONS ......................................... 39
1.1 How to Use This Manual In order to guide you practically through the transaction steps, this end user manual will refer often to screen windows and buttons. Below you will find examples of how these references are depicted:
1 Before You Begin

4
Reference Explanation Example
Screen Names Screen Names are depicted in italic font User Name
Fields and Button
“Button” refers to a button displayed on the screen. Click the button to initiate an action. Individual keys, buttons and fields that users are instructed to use are italicized and highlighted in bold
Click the Next button
Checkbox “Checkbox” refers to a square box displayed on the screen next to a field. Click the checkbox to select that field option or to clear an option
Field A - option not selected Field B - option selected
Radio Button
“Radio Button” refers to a circle displayed on the screen next to a field. Click the radio button to select that field or to clear an option. Radio buttons are usually used for “OR” type selections, i.e. either only field A or field B can be selected
Field A - option not selected Field B - option selected
Light Bulb Tips & Tricks that are useful during the learning process and can also help during your work (only in User Guide)
Stop Sign Important remark or moment of reflection before proceeding (only in User Guide)

5
The Grievance and Arbitration Tracking System (GATS) is used by the Postal Service’s management to locally authorize and process the payment of informal and grievance payments. GATS handles lump sum and hours-related payments for individual and class action settlements. GATS does this by:
1. Storing information about employees and their job assignments
2. Collecting information including adjustment/grievance type, incident date, issue description, involved parties, and settlement justification
3. Collecting payroll processing information including pay period, pay week and payment amount (lump sum) or number of hours at relevant pay rate (hours-related)
4. Capturing supervisor authorization of payment
5. Transmitting the pay information to the Payroll System for Payroll to process and issue the employee the correct amount of pay that they are due
GATS will also use all of this information to provide users with authorization and payment reports. The available report information includes the reporting period, performance cluster/installation name, union, informal adjustment/grievance number, incident date, craft code, issue description, payment amount, authorizing manager, payee name and payment date. These reports will help users review, track and assess the authorizations and payments in their respective areas. In addition, GATS performs other related functions. GATS tracks the status of grievances through the grievance process and the scheduling of arbitration cases. GATS also provides statistical information required during collective bargaining. GATS is a web-based system. Individual users access GATS through the Postal Service’s Intranet using a web browser (Internet Explorer).
2.1 Roles & Responsibilities Role Responsibility
Supervisor The Supervisor of the Collective Bargaining Unit who enters the informal hours-related and lump sum decisions within GATS for authorization and payment.
p
GATS Coordinator The Specialists who provide GATS administrative support to units in their designated area
Accounting Service Center (ASC) Payroll Processing Staff
The Payroll employees who oversee the payroll adjustment process at the Accounting Service Center
Field Finance Staff The Finance staff who provide oversight and guidance for payroll-related activities, including supporting the resolution of payroll issues in their designated area
2 Overview

6
2.2 Key Terms
Key Term Short Description
GATS The Postal Service’s national system for authorizing, paying and tracking informal adjustments and grievances (Grievance and Arbitration Tracking System)
APS The Postal Service’s payroll system for processing and paying employees (Adjustment Processing System)
Informal Payment Informal settlement or initial step in the resolution procedure (e.g. Step 1, informal Step A). Settlement is the result of a resolution between the employee and the employee’s immediate supervisor. The employee may be accompanied or represented by the employee’s steward/union representative
Simple Hours-Related Payment
Informal payments paid at the relevant pay period hourly rate (50% premium, straight, overtime, penalty)
Lump Sum Adjustment
Lump sum payments for settlements (already processed electronically using GATS)
Complex Adjustment Informal and grievance payments requiring manual review and processing at the ASC (i.e. Back Pay, Form 50 Change, Higher Level, Leave Change, Night Differential and Sunday Premium)

7
3.1 Access GATS You may access GATS:
1. Directly by entering the address in your web browser: https://gats.usps.gov/
2. Through the intranet page http://blue.usps.gov/lrinfo/ where the link to GATS will be displayed in the lower right corner under Tools
This is the GATS login screen that will appear when you access GATS
3 Accessing GATS

8
3.2 Log into GATS
To access GATS, click on the Enter GATS
2.5 Button
Logon Pop-up Box will appear on
screen

9
3. Enter your User Name by clicking on the User Name Text Field and typing your assigned user name
4. Enter your Password by clicking on the Password Text Field and typing your assigned password. The password will be displayed with asterisks to ensure privacy
5. After entering your User Name and Password, click the OK Button to take you to the GATS home page. Please do not check Remember my Password Check Box because it will cause security authentication problems
First Time Users: The first time you log into GATS you will have to reset your password. You will use the Postal Service’s ePasswordReset to reset your password. On the GATS Login Screen, click on the Click Here Link located at the bottom center of the screen to access ePassword Reset Forgotten or Expired Passwords: You may use ePasswordReset to reset your password. Click on the Click Here Link located at the bottom center of the screen to access ePasswordReset. Remember, the GATS Login Username and Password are case-sensitive

10
3.3 Homepage Navigation Main Menu
Main Menu Drop Down
You can use the Main Menu to access all of your GATS-related activities (e.g. Informal Pay Adjustments, Reports and Help).
1. Click on the Main Menu Drop-Down Menu. Click on your selected activity from the drop-down menu to go to the activity’s screen
2. For many of the activities, a second sub menu box may appear to the right of the Main Menu. Click on the sub menu box, and then click on your selected sub-activity from the drop-down menu to go to the sub-activity’s screen (see subsequent sections for the details of these screens)

11
This section explains step-by-step how to create informal payments for individuals and groups. Once you complete this section and create your informal payment, you will then proceed to either Section 5 pg. 19 for hours-related informal payments or Section 6 pg. 28 for lump sum informal payments.
4.1 GATS Homepage
1. Click on Informal Adjustment
2. Click on Create Pay Adjustment
1. On the GATS homepage screen, click on the Informal Pay Adj from the Main Menu
2. The Informal Pay Adj Sub Menu will appear to the right of the Main Menu
3. Click on the Informal Pay Adj Sub Menu
4. Click on Create Pay Adjustment from the Informal Pay Adj Sub Menu and you will advance to the Create Informal Authorization Screen
4 Creating Informal Payments
12
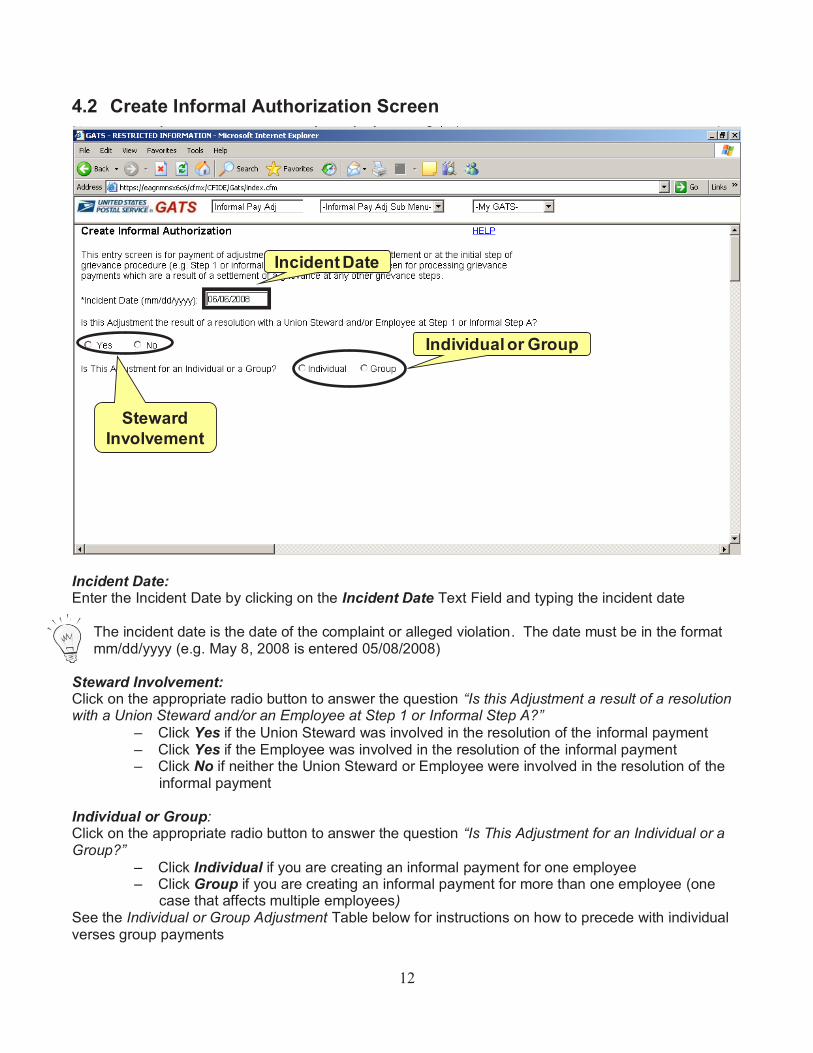
4.2 Create Informal Authorization Screen
Incident Date
Steward Involvement
Individual or Group
Incident Date: Enter the Incident Date by clicking on the Incident Date Text Field and typing the incident date
The incident date is the date of the complaint or alleged violation. The date must be in the format mm/dd/yyyy (e.g. May 8, 2008 is entered 05/08/2008)
Steward Involvement: Click on the appropriate radio button to answer the question “Is this Adjustment a result of a resolution with a Union Steward and/or an Employee at Step 1 or Informal Step A?”
– Click Yes if the Union Steward was involved in the resolution of the informal payment – Click Yes if the Employee was involved in the resolution of the informal payment – Click No if neither the Union Steward or Employee were involved in the resolution of the
informal payment
Individual or Group: Click on the appropriate radio button to answer the question “Is This Adjustment for an Individual or a Group?”
– Click Individual if you are creating an informal payment for one employee – Click Group if you are creating an informal payment for more than one employee (one
case that affects multiple employees) See the Individual or Group Adjustment Table below for instructions on how to precede with individual verses group payments

13
Some of the information you will need to enter for Individual verses Group payments in GATS will be different. See the Individual or Group Payment Table in each sections of this Guide for specific instructions on entering individual verses group payments
Individual or Group Payments?
If you selected
Individual
Employee Identification Number: If you have selected Individual, the Employee ID Text Field will appear on the bottom of the screen If you know the Employee Identification Number:
1. Enter the Employee’s ID by clicking on the Employee ID Text Field and typing the Employee ID
2. Click on the Continue Button to advance to the next screen
If you do not know the employee’s Identification Number: 1. Click on Search Button 2. Enter the employee’s finance number in the Fin No Text Field.
– If you do not know the finance number, you may search for the finance number by entering the employee’s state (mandatory), city and/or office in the appropriate text fields and clicking the Find Finance No. Button. A list of finance numbers will appear on the bottom of the screen. Click on the radio button of the correct finance number.
3. Enter the first and/or last name of the Employee in the Last Name and First Name Text Fields
4. Click on the Find Employee ID Button 5. A list of employees names will appear on the bottom of the screen 6. Click on the radio button of the correct employee 7. The employee’s Identification Number will now be listed in the Employee ID
Text Field 8. Click on the Continue Button to advance to the next screen
Franklin Ben
01010101
Search for Employee ID by Finance Number (mandatory)
and/or Employee Name
Enter or Search for Employee ID
Select correct employee using
radio button
Adams John
Franklin Ben Madison Dolly
14
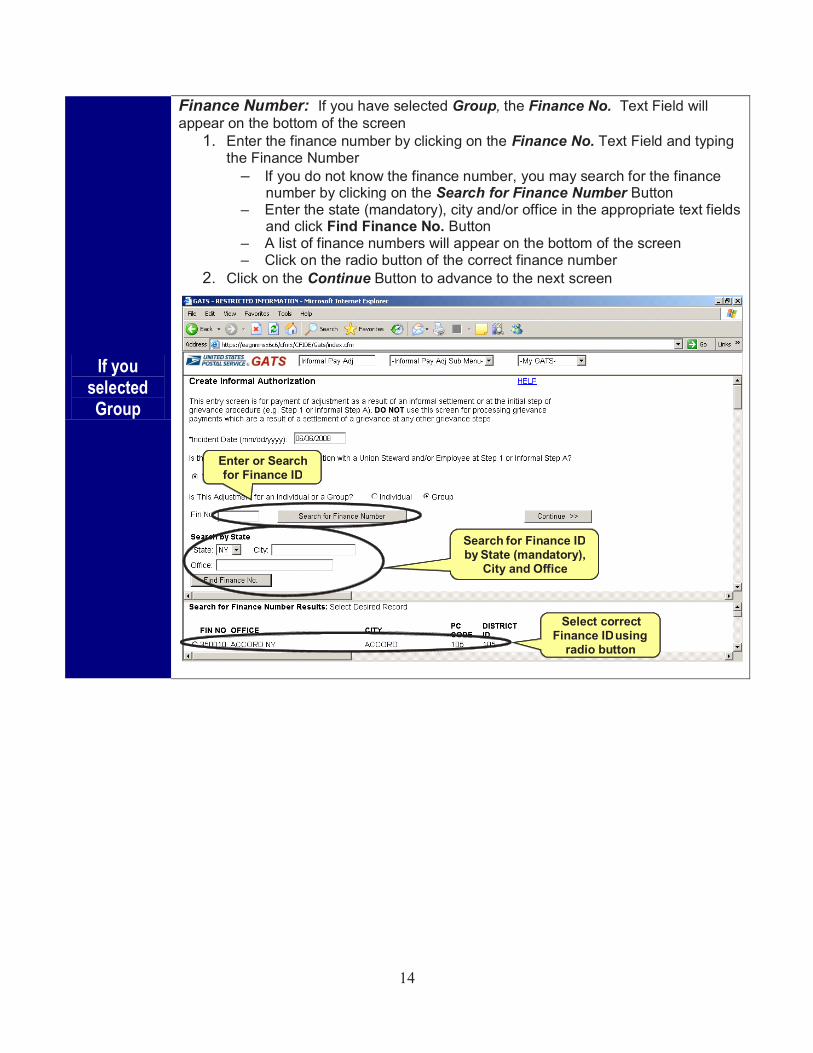
If you selected Group
Finance Number: If you have selected Group, the Finance No. Text Field will appear on the bottom of the screen
1. Enter the finance number by clicking on the Finance No. Text Field and typing the Finance Number
– If you do not know the finance number, you may search for the finance number by clicking on the Search for Finance Number Button
– Enter the state (mandatory), city and/or office in the appropriate text fields and click Find Finance No. Button
– A list of finance numbers will appear on the bottom of the screen – Click on the radio button of the correct finance number
2. Click on the Continue Button to advance to the next screen
01010101
Search for Finance ID by State (mandatory),
City and Office
Enter or Search for Finance ID
Select correct Finance ID using
radio button

15
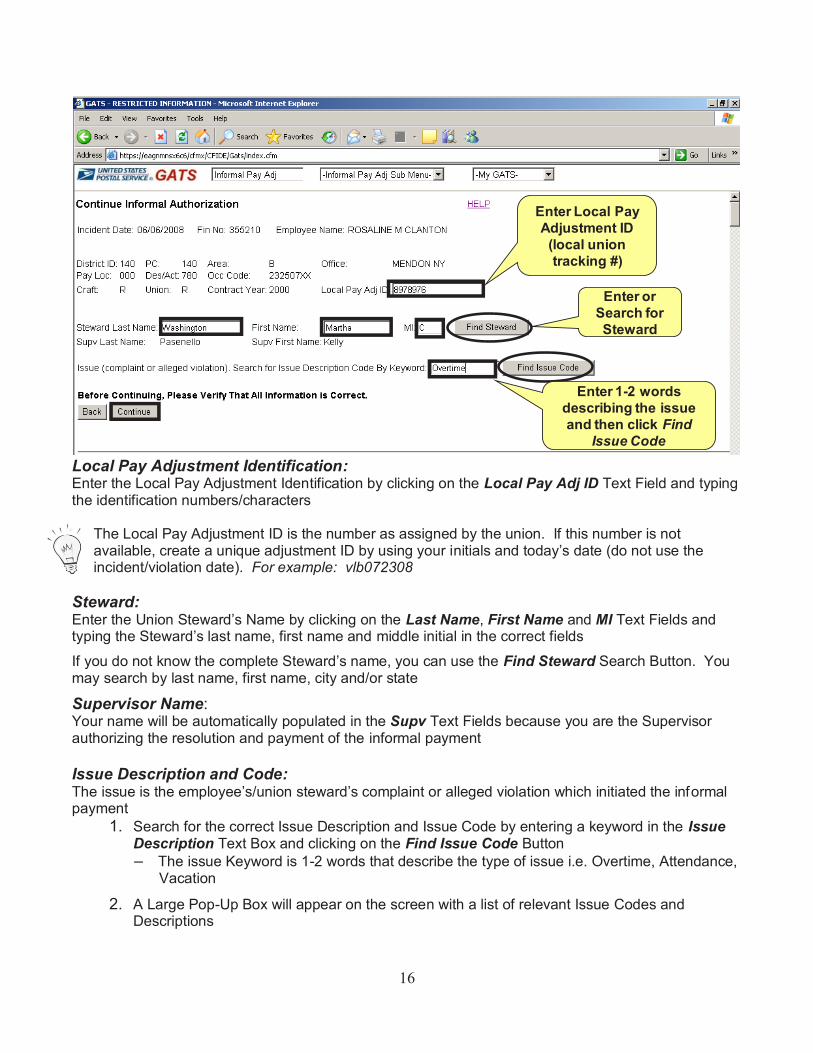
4.3 Continue Informal Authorization Screen
Individual or Group Payments?
If you selected
Individual
No additional steps for individual adjustments
Proceed to the Local Pay Adjustment Identification instructions below
If you selected Group
Craft Code: Enter the Craft by clicking on the Craft Drop Down Menu and selecting the correct craft code. The Union Text Box will be automatically populated with the correct Union Code
Proceed to the Local Pay Adjustment Identification instructions below
Select Craft Code from drop down menu
16
Enter Local Pay Adjustment ID
(local union tracking #)
Enter or Search for Steward
Enter 1-2 words describing the issue and then click Find
Issue Code
Local Pay Adjustment Identification: Enter the Local Pay Adjustment Identification by clicking on the Local Pay Adj ID Text Field and typing the identification numbers/characters
The Local Pay Adjustment ID is the number as assigned by the union. If this number is not available, create a unique adjustment ID by using your initials and today’s date (do not use the incident/violation date). For example: vlb072308
Steward: Enter the Union Steward’s Name by clicking on the Last Name, First Name and MI Text Fields and typing the Steward’s last name, first name and middle initial in the correct fields
If you do not know the complete Steward’s name, you can use the Find Steward Search Button. You may search by last name, first name, city and/or state
Supervisor Name: Your name will be automatically populated in the Supv Text Fields because you are the Supervisor authorizing the resolution and payment of the informal payment Issue Description and Code: The issue is the employee’s/union steward’s complaint or alleged violation which initiated the informal payment
1. Search for the correct Issue Description and Issue Code by entering a keyword in the Issue Description Text Box and clicking on the Find Issue Code Button – The issue Keyword is 1-2 words that describe the type of issue i.e. Overtime, Attendance,
Vacation 2. A Large Pop-Up Box will appear on the screen with a list of relevant Issue Codes and
Descriptions

17
3. Click on the radio button of the Issue Description that best describes the informal payment issue
4. The Issue Description and Code you selected will be stored within GATS
Click on the radio button of the issue that best describes
the complaint/alleged violation
Continue: Verify all of the information listed on the screen is correct, and if so, click on the Continue Button to advance to the next screen

18
4.4 Type of Compensation Click the appropriate radio button to enter the adjustment type
– You will select the Lump Sum Button to process lump sum informal payments – You will select the Hours Button to process hours-related informal payments
Complex informal payments require completion of external payment processes. Complex informal payments include Higher Level, Night Differential, Sunday Premium, Leave, Salary or Job Category Change, Backpay and Rural Employee Compensation
Lump SumSimple Hours
Complex Adjustments
Upon completion of this section, you will proceed to either Section 5 pg. 19 for hours-related informal payments or Section 6 pg. 28 for lump sum informal payments

19
5 Creating Hours-Related Payments This section explains step-by-step how to authorize and pay informal hours-related payments for individuals and groups. Hours-related payments are settlements paid at the relevant pay period hourly rate(s). For example, as the Supervisor, you may agree to pay your employee two hours at his/her overtime pay rate to resolve an overtime assignment issue at the informal step of the resolution process.
5.1 Employee Verification Screen
Individual or Group Payments?
If you selected
Individual
Employee Verification for individual payments: Click on the I Verify that this is the correct payee Check Box to verify the Employee Name and Employee ID displayed on the screen is correct
– If the Employee Name and/or Employee ID is not correct, click on the Back Button to return to the previous screen
Proceed to the Verification of Pay Date instructions below
If you selected Group
Employee IDs for Group payments:
1. Enter the Employee ID for the first employee you will pay by clicking on the
Employee ID Text Field and typing the Employee’s ID – If you do not know the employee’s ID, you may search for the employee’s
ID by clicking on the Search Button 2. Click on the Confirm Button
After you complete entering hours for this first employee on the next screen, you will then have the option to add additional(s) employees and their respective hours to the group adjustment (instructions to follow)
Proceed to the Verification of Pay Date instructions below
Enter or Search for Employee ID

20
Ben Franklin01010101xxxx
Click on the Checkbox to verify the correct payee
Verification of Pay Date: Verify the Pay Year, Pay Period and PP Week (pay period week) displayed on the screen is correct, and if so, click on the checkbox
– The Pay Year, Pay Period and PP Week are automatically populated based on the incident date you entered on the Create Informal Authorization Screen
– You will have the ability to enter additional hours for a different Pay Period Week and/or for a different employee (Group adjustment) on a subsequent screen
Continue: Verify all of the information listed on the screen is correct, and if so, click on the Continue Button to advance to the next screen
21
5.2 Enter Hours Compensation Screen Before You Begin
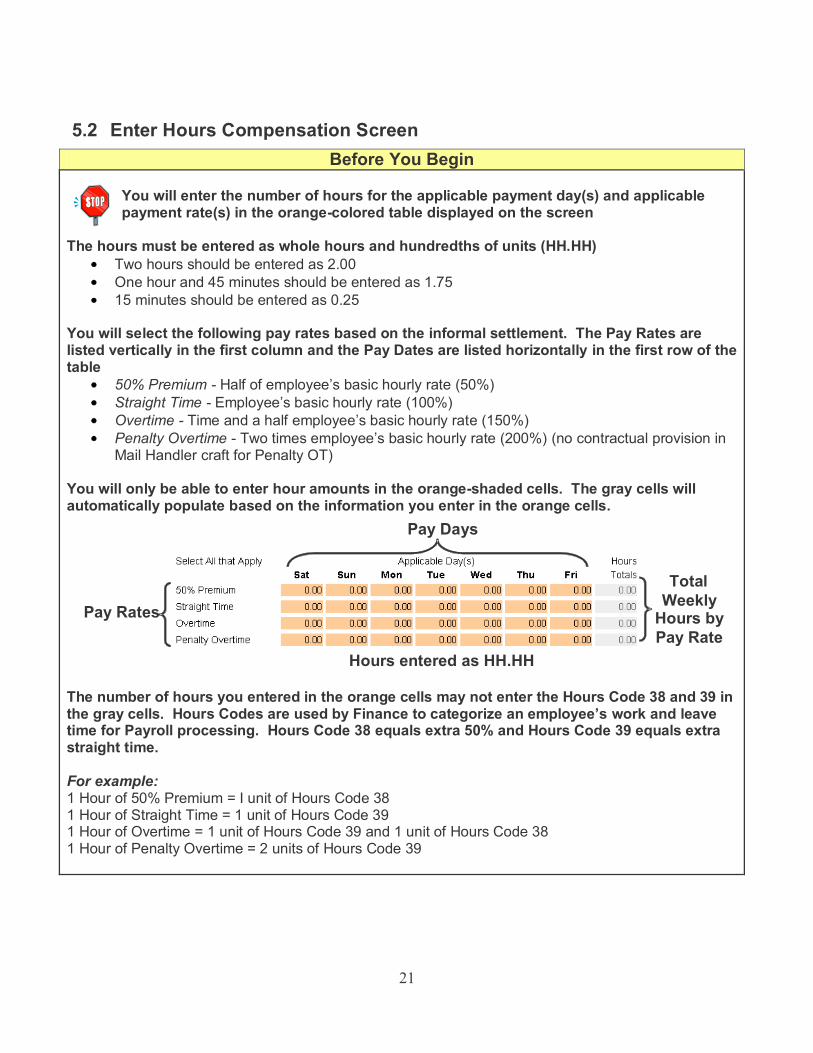
You will enter the number of hours for the applicable payment day(s) and applicable payment rate(s) in the orange-colored table displayed on the screen
The hours must be entered as whole hours and hundredths of units (HH.HH)
Two hours should be entered as 2.00 One hour and 45 minutes should be entered as 1.75 15 minutes should be entered as 0.25
You will select the following pay rates based on the informal settlement. The Pay Rates are listed vertically in the first column and the Pay Dates are listed horizontally in the first row of the table
50% Premium - Half of employee’s basic hourly rate (50%) Straight Time - Employee’s basic hourly rate (100%) Overtime - Time and a half employee’s basic hourly rate (150%) Penalty Overtime - Two times employee’s basic hourly rate (200%) (no contractual provision in
Mail Handler craft for Penalty OT)
You will only be able to enter hour amounts in the orange-shaded cells. The gray cells will automatically populate based on the information you enter in the orange cells.
The number of hours you entered in the orange cells may not enter the Hours Code 38 and 39 in the gray cells. Hours Codes are used by Finance to categorize an employee’s work and leave time for Payroll processing. Hours Code 38 equals extra 50% and Hours Code 39 equals extra straight time. For example: 1 Hour of 50% Premium = I unit of Hours Code 38 1 Hour of Straight Time = 1 unit of Hours Code 39 1 Hour of Overtime = 1 unit of Hours Code 39 and 1 unit of Hours Code 38 1 Hour of Penalty Overtime = 2 units of Hours Code 39
Pay Rates
Pay Days
Hours entered as HH.HH
TotalWeekly
Hours by Pay Rate

22
Hours Amount:
1. Enter the hour amount by clicking on the orange cell for the applicable pay rate and pay day. Type the hour amount as whole hours and hundredths of units (HH.HH)
2. You may add additional hours for different pay rates and/or pay dates by clicking on the applicable orange cell(s) and enter the correct hour amount in the cell(s)
3. Once you have completed entering in all the hours for the relevant pay week, verify the information is correct on the screen
4. The total weekly hours for each applicable rate will be automatically populated in the Hours Total Column
5. The gray summary table at the bottom of the screen will be automatically populated with the payment amounts by applicable hour reason codes for Payroll processing. The number of hours you entered in the orange table may not equal the number of Hours Code 38 and 39 in the gray table at the bottom of the screen. This is okay!
Payroll Processing Information

23
XXXXXX Ben Franklin
Enter Hour Amount(s)(HH.HH)
Continue: Verify all of the information listed on the screen is correct, and if so, click on the Continue Button to advance to the next screen. You will have the ability to enter additional hours for a different Pay Period Week or an additional employee (Group adjustment) on the next screen
24
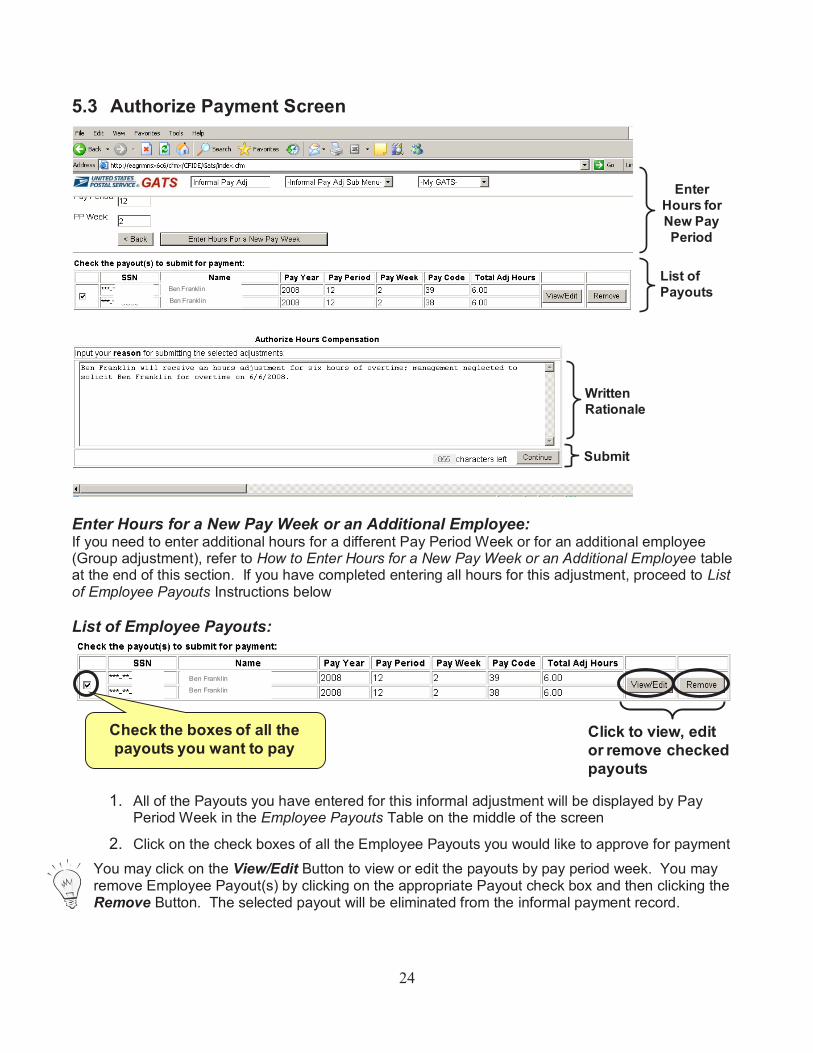
5.3 Authorize Payment Screen
Enter Hours for New Pay Period
List of Payouts
Written Rationale
Submit
Ben Franklin
Ben Franklin********
Enter Hours for a New Pay Week or an Additional Employee: If you need to enter additional hours for a different Pay Period Week or for an additional employee (Group adjustment), refer to How to Enter Hours for a New Pay Week or an Additional Employee table at the end of this section. If you have completed entering all hours for this adjustment, proceed to List of Employee Payouts Instructions below List of Employee Payouts:
Check the boxes of all the payouts you want to pay
Click to view, edit or remove checked payouts
Ben Franklin
Ben Franklin
1. All of the Payouts you have entered for this informal adjustment will be displayed by Pay
Period Week in the Employee Payouts Table on the middle of the screen 2. Click on the check boxes of all the Employee Payouts you would like to approve for payment
You may click on the View/Edit Button to view or edit the payouts by pay period week. You may remove Employee Payout(s) by clicking on the appropriate Payout check box and then clicking the Remove Button. The selected payout will be eliminated from the informal payment record.

25
Written Rationale for Adjustment Click on the Large Text Field to enter your reason for submitting the selected adjustments. See the What Should I Include in My Written Rationale Statement Table below an explanation of the rationale statement.
What Should I Include in My Written Rationale Statement? The Rationale Statement is the justification for the informal payment. You must include a detailed statement of the issue/dispute and resulting decision including: – Who – What – Why – When – Type of Payment (i.e. Hours, Lump Sum)
Example: Ben Franklin will receive an hours payment for six hours of overtime, management neglected to solicit Ben Franklin for overtime on 6/6/2008. Continue: Verify all of the information listed on the screen is correct, and if so, click on the Continue Button to advance to the next screen
Adding Additional Hours to the Adjustment
If you need to add
hours for a different pay
week
(Individual or Group)
Adding Hours for New Pay Week 1. Click on the I Verify that this is the correct payee Check Box on the top of
the screen 2. Enter the new Year, Pay Period and Week in the Year, Pay Period and Pay
Week text fields. 3. Click on the Enter Hours For a New Pay Week Button 4. You will be taken to the Enter Hours Compensation screen with a new Pay
Week Table for your to complete for the new pay week 5. Repeat the Enter Hours Compensation screen instructions listed in Section 5.2
pg. 21 You will continue to repeat these steps
until all of the applicable pay weeks have been entered for the payment
If you need to add
hours for an additional employee
(Group)
Adding Hours for an additional employee (Group only) 1. Click on the Enter Hours for Different Employee Button 2. You will be taken to the Employee Verification Screen for you to complete for
the additional employee (i.e. enter employee ID). 3. Repeat the Request Hours Adjustment screen instructions listed in Section 4.4
of this User Guide for the additional employee. You will also need to complete the Enter Hours Adjustment Screen (Section 4.5) for the additional employee
You will continue to repeat these steps until all of the applicable pay weeks have been entered for the adjustment

26
5.4 Pre-authorization Decision and Payment Memorandum 1. The Pre-Authorization Decision and Payment Memorandum will appear on the screen. This
document summarizes all of the information you have provided for this hours-related payment on all the preceding GATS screens.
2. Verify all the information displayed in the Memorandum is correct. – Upon submitting the adjustment for payment, GATS will retain an electronic record of the
Authorized Decision and Payment Memorandum for documentation (see Section 5.5 pg. 2633 for more information).
– You may click on the Cancel Button if you need to amend any of the information and/or you are not ready to authorize the adjustment for payment
3. Click the Submit Button to certify all of the information and authorize all of the listed payouts for payment.
By clicking OK, you are certifying that all of the information you have entered for this informal payment is accurately and appropriately reported to the best of your knowledge. All requests for payment are recorded as a permanent record including the date, time and authorizer of the payment request. Only approved payments are to be authorized in GATS
5.5 Decision and Payment Memorandum Upon submitting the adjustment for payment, the Decision and Payment Memorandum will appear on the screen as a PDF document. This document will be retained electronically in GATS as the decision and payment authorization record. If desired, you have the ability to:
1. Review Document: Use the Scroll Bar on the right side of the screen to scroll through the entire document
2. Print Document: On the File Menu, click the Print Tab
3. Save Document: On the File Menu, click the Save As Tab. Remember to save your document to a folder you can locate on your computer (e.g. My Documents, My Computer)
4. Email Document: On the File Menu, click the Send Tab > Page by E-mail Tab. A Microsoft Outlook Message will open on your computer with your document attached as a PDF document
5. Access Document at a Later Date in GATS: See Section 7 pg. 33 for detailed instructions
5.6 Request Successfully Submitted You may close or minimize the Memorandum PDF document on your computer screen. In GATS, You will have advanced to a new screen with “Request successfully submitted” on the top of the screen. You may view the informal adjustment/payment history from this screen by following the following steps:
1. Click on the Show Hours Adjustment History Button
2. Click on the Show History Button located within the Table on the screen
3. You will advance to the Hours Adjustment History for Informal Adjustment screen
4. Proceed to the Section 7 View Adjustment and Payment History to learn how to view payment details.

27
Mickey Mouse01010101
Click on the Show Hours Adjustment Button to view the
Informal Adjustment request details
Successful submission of the Informal Adjustment request

28
This section explains step-by-step how to authorize and pay informal lump sum payments for individuals and groups. Lump sum payments are settlements paid based on a agreed upon lump sum amount.
6.1 Create Pay Adjustment Authorization Letter You will create the Memorandum of Record for Informal Pay Adjustment on this screen. The memorandum template is generated on the screen with standard language
Clara Barton
Automatically populated
information
Enter lump sum dollar amount
Enter rationale for the adjustment
1. Verify the automatically populated information displayed on the screen. This information is based on the data you have provided on previous screens
2. The two large text boxes on the screen have standardized statements for you to complete by adding the specific details of your informal adjustment
3. Enter the name(s) of the lump sum dollar amount(s) and name(s) of the employees in the first large text box. For example: – For an individual lump sum payment: “Clara Barton will receive a lump sum payment in
the amount of $10.00.” – For a group lump sum payment: “George Washington and John Adams will receive a
lump sum payment in the amount of $10.00. Abraham Lincoln will receive a lump sum amount in the amount of $15.00.”
6 Creating Lump Sum Adjustments

29
4. Enter the reason for the adjustment in the second large text box including the detailed statement of the issue/dispute and resulting decision. See the “What Should I Include in My Written Rationale Statement” Table in the Authorize Payment Screen Section pg. 24 for instructions on creating your rationale statement
5. Click the Save and Continue Button
6.2 Pay Adjustment Letter History
Click Pay Button to authorize the informal adjustment for payment
You may Print, View, E-mail and/or Retract the Pay
Adjustment Letter by clicking the appropriate button(s)
Click the Pay Button to authorize the informal adjustment for payment
You may Print/View, E-mail, and/or Retract the Pay Adjustment Letter by clicking the appropriate button(s) on the screen.

30
6.3 Request Payout for Adjustment
Individual or Group Payment?
If you selected
Individual
Employee Verification: Click on the I Verify that this is the correct payee Check Box to verify the Employee Name and Employee ID displayed on the screen is correct
Payment Amount: 1. Enter the dollar amount by clicking on the Request Amount Text Field and
typing the dollar amount. Type the dollar amount as whole dollars and cents (i.e. 10.00, 6.54)
2. Verify the dollar amount by reentering the amount in the Verify Amount Text Field
3. The Pay Year and Pay Period are based on the incident date you entered on a previous screen. Do not edit the Pay Year or Pay Period dates on this screen
Payment Authorization: Click the Submit Button to certify all the information and authorize the payout for payment. You will be taken to the Request Successfully Submitted Screen
12345678 Mouse, Mickey
Enter the lump sum payment amounttwice in the two text fields (i.e. 10.00)
Click on the Checkbox to verify the correct payee
Click the Submit Button
31
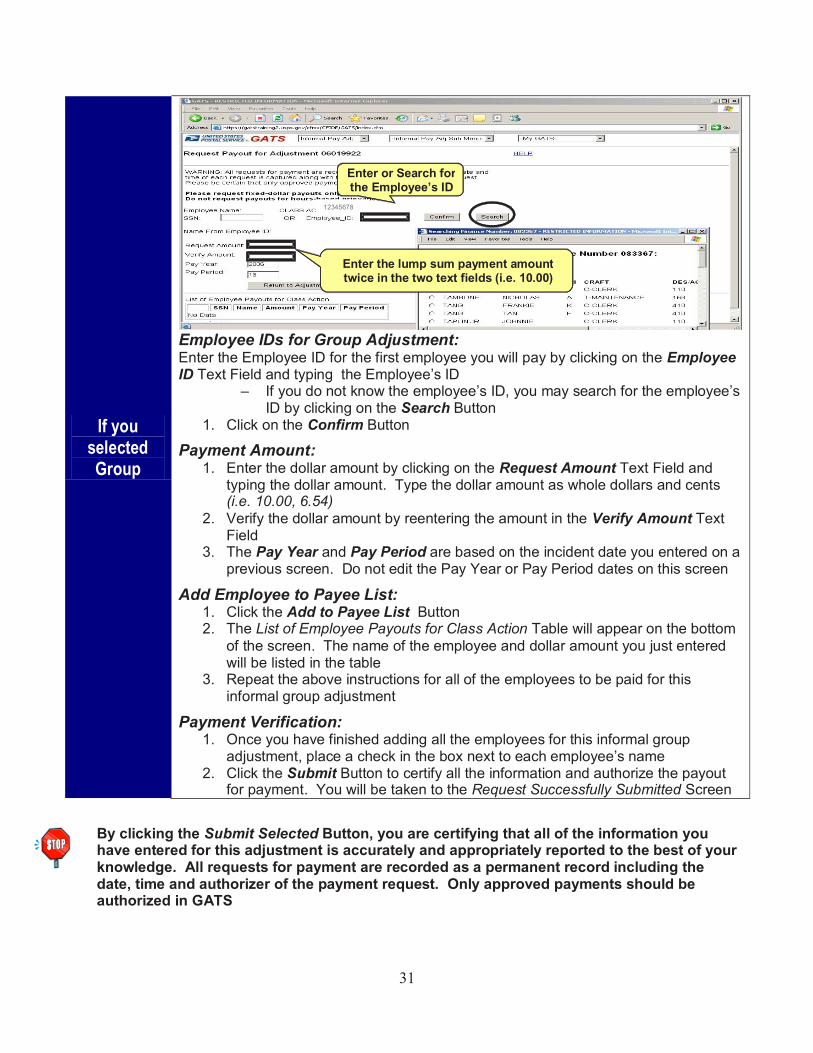
If you selected Group
Employee IDs for Group Adjustment: Enter the Employee ID for the first employee you will pay by clicking on the Employee ID Text Field and typing the Employee’s ID
– If you do not know the employee’s ID, you may search for the employee’s ID by clicking on the Search Button
1. Click on the Confirm Button
Payment Amount: 1. Enter the dollar amount by clicking on the Request Amount Text Field and
typing the dollar amount. Type the dollar amount as whole dollars and cents (i.e. 10.00, 6.54)
2. Verify the dollar amount by reentering the amount in the Verify Amount Text Field
3. The Pay Year and Pay Period are based on the incident date you entered on a previous screen. Do not edit the Pay Year or Pay Period dates on this screen
Add Employee to Payee List: 1. Click the Add to Payee List Button 2. The List of Employee Payouts for Class Action Table will appear on the bottom
of the screen. The name of the employee and dollar amount you just entered will be listed in the table
3. Repeat the above instructions for all of the employees to be paid for this informal group adjustment
Payment Verification: 1. Once you have finished adding all the employees for this informal group
adjustment, place a check in the box next to each employee’s name 2. Click the Submit Button to certify all the information and authorize the payout
for payment. You will be taken to the Request Successfully Submitted Screen
By clicking the Submit Selected Button, you are certifying that all of the information you have entered for this adjustment is accurately and appropriately reported to the best of your knowledge. All requests for payment are recorded as a permanent record including the date, time and authorizer of the payment request. Only approved payments should be authorized in GATS
12345678
Enter the lump sum payment amount twice in the two text fields (i.e. 10.00)
Enter or Search for the Employee’s ID
32
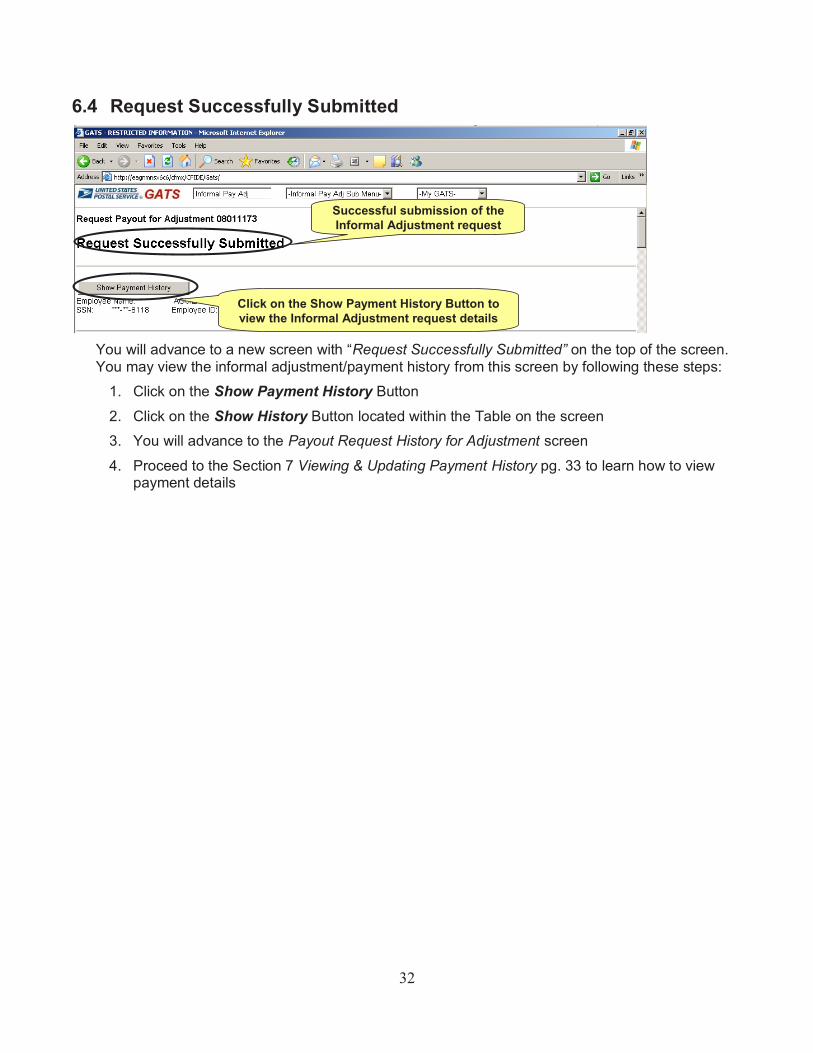
6.4 Request Successfully Submitted
Click on the Show Payment History Button to view the Informal Adjustment request details
Successful submission of the Informal Adjustment request
You will advance to a new screen with “Request Successfully Submitted” on the top of the screen. You may view the informal adjustment/payment history from this screen by following these steps:
1. Click on the Show Payment History Button
2. Click on the Show History Button located within the Table on the screen
3. You will advance to the Payout Request History for Adjustment screen
4. Proceed to the Section 7 Viewing & Updating Payment History pg. 33 to learn how to view payment details
33
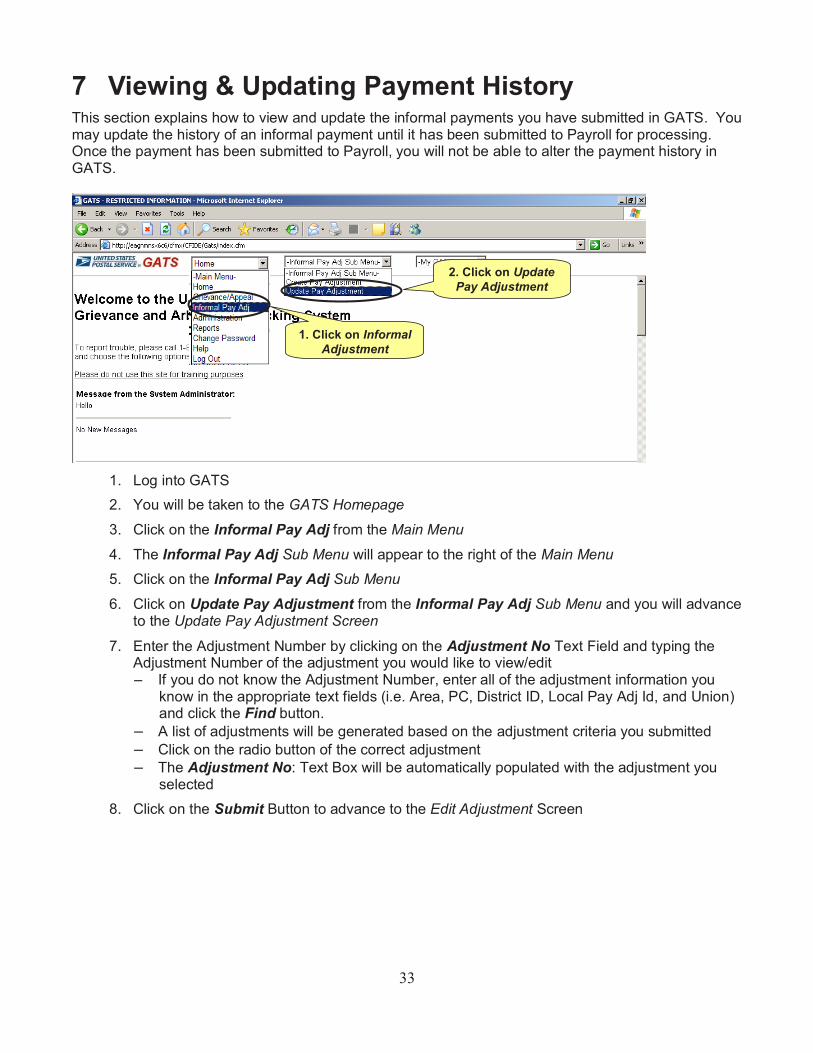
This section explains how to view and update the informal payments you have submitted in GATS. You may update the history of an informal payment until it has been submitted to Payroll for processing. Once the payment has been submitted to Payroll, you will not be able to alter the payment history in GATS.
1. Click on Informal Adjustment
2. Click on Update Pay Adjustment
1. Log into GATS 2. You will be taken to the GATS Homepage
3. Click on the Informal Pay Adj from the Main Menu
4. The Informal Pay Adj Sub Menu will appear to the right of the Main Menu
5. Click on the Informal Pay Adj Sub Menu
6. Click on Update Pay Adjustment from the Informal Pay Adj Sub Menu and you will advance to the Update Pay Adjustment Screen
7. Enter the Adjustment Number by clicking on the Adjustment No Text Field and typing the Adjustment Number of the adjustment you would like to view/edit – If you do not know the Adjustment Number, enter all of the adjustment information you
know in the appropriate text fields (i.e. Area, PC, District ID, Local Pay Adj Id, and Union) and click the Find button.
– A list of adjustments will be generated based on the adjustment criteria you submitted – Click on the radio button of the correct adjustment – The Adjustment No: Text Box will be automatically populated with the adjustment you
selected 8. Click on the Submit Button to advance to the Edit Adjustment Screen
7 Viewing & Updating Payment History

34
Update Adjustment
888-88-8888
View Adjustment Letter View Payment History
Click on the appropriate button(s) to update the adjustment, view the
adjustment letter and/or view the payment history
On the Edit Adjustment Screen, you may perform the following activities: Update Adjustment: You may update the adjustment information including: Incident Date, Local Pay Adjustment Identification Number, Steward and Issue Code. Click on the appropriate text field(s) and enter the correct information. Once the adjustment has been updated, click on the Update Adjustment Button at the bottom of the screen View Adjustment Letter: You may view, print and/or email the adjustment letter. Click on the Show Pay Adjustment Letter History Button to be taken to the Pay Adjustment Letter History Screen. On the Pay Adjustment Letter History Screen, click on the appropriate button to print, view and/or email the pay letter If the adjustment has not been transmitted to the Payroll interface for payment processing (new status), you will also have the option to retract the adjustment letter. By retracting the letter, you will delete all the adjustment requests associated with the letter. Click on the Show Pay Adjustment Letter History Button View Payment History: You may view the Payment history by clicking on the Show Payment History Button, and then the Show History Button located within the Table on the next screen. You will advance to the Adjustment History for Informal Adjustment screen. Two tables will be displayed on this screen: New, Pending and Submitted Requests, and Paid and Errors from Finance
The New, Pending and Submitted Requests table displays the payment details of all submitted payments for the informal adjustment. The first column of the table lists the status of the payment(s) as New, Pending or Paid
– New: Adjustment payment is pending; waiting for GATS to transmit payment request to Payroll interface on the 12th day of the 14th day pay cycle (Thursday before start of new

35
pay period). You may view the Details of the payment, Delete the payment and/or Edit the payment by clicking the appropriate buttons located in the far right column of the table
– Pending: Payment request sent to Payroll interface for processing; waiting payment. At this time, you may only view the Details of the payment. You may not make any changes or delete the payment request. Providing there are no other pay adjustments for the employee, the payment should be paid in the employee’s next paycheck. If outstanding pay adjustments exist for the employee, the GATS payment adjustment will be paid in the next available paycheck with no existing adjustment requests
– Paid: Payment request has been paid. At this time, you may only view the Details of the payment
The Paid and Errors from Finance table displays submitted payments for the informal adjustment which were not successfully processed and paid. The payments in this table will have a status of Error and a single-character code indicating the nature of the error. See the Payroll Errors table below for the list of error codes, definitions and required actions.
Payroll Errors Code Definition Action
S
The Social Security Number (SSN) provided by GATS was not found on the payroll's Employee Master File
If you determine that the SSN is wrong, then you should update the grievant record with the correct SSN and submit a new payout request If you determine that the SSN is correct, but the employee is not currently employed by Postal, re-submit the payment by clicking the Resubmit button.
T The Relevant Pay Period provided by GATS is after the termination date of the grievant
Submit a new request with the appropriate pay year and pay period
Y The Relevant Pay Year or Relevant Pay Period provided by GATS is not valid
Submit a new request with the valid pay year and pay period
A
The amount requested by GATS is not valid
Submit a new request within the established payout limits
For hours-related payments, no more than 40 hours per week may be submitted in GATS for Hours Code 38 or 39 (no more than 80 hours total for both Hours Codes)
N The grievance number provided by GATS is invalid
Submit a new request for a legitimate grievance
E
The Relevant Pay Week provided by GATS already has payment history (Hours Code 38 and/or 39). For hours-related adjustments only
If you determine the Pay Week is wrong, submit a new request with the appropriate Pay Week
If you determine the Payment is a duplicate, click the Cancel Button to cancel the payment
If you determine the Pay Week is correct, re-submit

36
the payment by clicking the Resubmit button
D
The payment is for a deceased employee
The payment will be processed but may take 2-4 months for the check to be issued. The check will be issued to the Installation Head of the deceased employee’s last work location for distribution. No further action is required within GATS.
7.1 Creating GATS Reports This section explains how to create GATS Reports. GATS reports enable users to view the payment details and statuses of all the informal adjustments authorized for payment (i.e. new, pending, paid, payroll error).
1. Click on Reports
2. Click on Grievance and Appeal
To create a GATS Report:
1. Click on the Reports from the Main Menu
2. The Reports Sub Menu will appear to the right of the Main Menu
3. Click on the Reports Sub Menu
4. Click on Grievance and Appeal from the Reports Sub Menu and you will advance to the Grievance and Appeal Reports Screen

37
Click on Payments
5. Click on Payments on the Grievance and Appeal Reports Screen
6. Click on the Appeal Level Drop Down Menu
7. Click on P-INFML ADJ from the Appeal Level Drop Down Menu
8. Specify Area, Union and/or PC Code by clicking on the appropriate drop down menu (optional)
Click on
P - INFML ADJ
Specify Area, PC Code and/or Union (optional)
Specify date range
Click on Run Report to create report

38
9. Specify the types of payments to include on the GATS Report i.e. New, Pending, Submitted, Paid, Payroll Error. Payroll Error is a payment that has not been paid due to a Payroll Error Code (see Explanation of Payroll Errors table at the end of this section for the description of the types of Payroll Errors)
10. Specify the date range by clicking on the appropriate radio button or typing the date range in the Begin Date and End Date Text Fields (mmdd/yyyy)
11. Click on the Run Report Button to create the GATS Report

39
Where can I find additional assistance for GATS?
On the GATS Homepage, select the Help Link. You will be taken to the Online Knowledge Base/Help Desk for GATS. You will have the ability to search the knowledge base by keyword and/or submit a question/ticket to the Help Desk. For additional assistance, contact your local district GATS coordinator.
Can I process a back pay claim in GATS?
No. You may not process any action or payment in GATS that may affect the status of an employee and/or the potential retirement date of an employee. Back pay settlements are wage-related income, and therefore, subject to federal income tax withholdings and reported to the Internal Revenue Service (IRS) on IRS Form W-2, Wage and Tax Statement. Additionally the direct, hours back pay settlements, require complex computations and processing by the Payroll Services Branch of the Eagan ASC.
Can I process time and attendance related adjustments in GATS (i.e. failure to enter employee’s time correctly)?
No. Only grievance-related adjustments are processed in GATS. All time and attendance-related adjustments must be processed in TACS AdjustPay. See the Handbook F-21, Time and Attendance for more information.
8 Frequently Asked Questions