Embed Size (px)
Citation preview

User GuideGateway Wireless-G Access Point/Router


Contents1 The Gateway Wireless-G Access Point/Router . . . . . . . . . . . . . . . . . . . 1
Features . . . . . . . . . . . . . . . . . . . . . . . . . . . . . . . . . . . . . . . . . . . . . . . . . . . . . . . . . . . 2Important safeguards . . . . . . . . . . . . . . . . . . . . . . . . . . . . . . . . . . . . . . . . . . . . . . . . . 2
Precautions . . . . . . . . . . . . . . . . . . . . . . . . . . . . . . . . . . . . . . . . . . . . . . . . . . . . . 2Package contents . . . . . . . . . . . . . . . . . . . . . . . . . . . . . . . . . . . . . . . . . . . . . . . . . . . 3Parts and accessories . . . . . . . . . . . . . . . . . . . . . . . . . . . . . . . . . . . . . . . . . . . . . . . . 3Front . . . . . . . . . . . . . . . . . . . . . . . . . . . . . . . . . . . . . . . . . . . . . . . . . . . . . . . . . . . . . . 4Back . . . . . . . . . . . . . . . . . . . . . . . . . . . . . . . . . . . . . . . . . . . . . . . . . . . . . . . . . . . . . . 5Getting started . . . . . . . . . . . . . . . . . . . . . . . . . . . . . . . . . . . . . . . . . . . . . . . . . . . . . . 6
2 Setup for Typical Users . . . . . . . . . . . . . . . . . . . . . . . . . . . . . . . . . . . . . . . . . . 7
Preparation . . . . . . . . . . . . . . . . . . . . . . . . . . . . . . . . . . . . . . . . . . . . . . . . . . . . . . . . . 8Using the setup wizard . . . . . . . . . . . . . . . . . . . . . . . . . . . . . . . . . . . . . . . . . . . . . . . 9Where to go from here . . . . . . . . . . . . . . . . . . . . . . . . . . . . . . . . . . . . . . . . . . . . . . 10
3 Initial Setup for Advanced Users. . . . . . . . . . . . . . . . . . . . . . . . . . . . . . . . 11
Preparation . . . . . . . . . . . . . . . . . . . . . . . . . . . . . . . . . . . . . . . . . . . . . . . . . . . . . . . . 12Connecting the hardware . . . . . . . . . . . . . . . . . . . . . . . . . . . . . . . . . . . . . . . . . 12
Contacting and configuring the access point/router . . . . . . . . . . . . . . . . . . . . . . . . 13Contacting the access point/router . . . . . . . . . . . . . . . . . . . . . . . . . . . . . . . . . . 14Configuring the access point/router . . . . . . . . . . . . . . . . . . . . . . . . . . . . . . . . . 15
Where to go from here . . . . . . . . . . . . . . . . . . . . . . . . . . . . . . . . . . . . . . . . . . . . . . 23
4 Setting Up Windows Ethernet Networking . . . . . . . . . . . . . . . . . . . . . . 25
Naming the computers and the workgroup . . . . . . . . . . . . . . . . . . . . . . . . . . . . . . . 26Naming the computers and the workgroup in Windows XP . . . . . . . . . . . . . . . 26Naming the computers and the workgroup in Windows 2000 . . . . . . . . . . . . . 32Naming the computers and the workgroup in Windows Me or Windows 98SE 33
Configuring the TCP/IP protocol . . . . . . . . . . . . . . . . . . . . . . . . . . . . . . . . . . . . . . . 35Configuring your computer for DHCP . . . . . . . . . . . . . . . . . . . . . . . . . . . . . . . . 35
Wireless operation . . . . . . . . . . . . . . . . . . . . . . . . . . . . . . . . . . . . . . . . . . . . . . . . . . 40Setting up a network (WEP) key in Windows XP . . . . . . . . . . . . . . . . . . . . . . . 40Setting up a network (WEP) key in Windows 98SE, Windows 2000, or Windows Me 41
Where to go from here . . . . . . . . . . . . . . . . . . . . . . . . . . . . . . . . . . . . . . . . . . . . . . 41
5 Using Your Network. . . . . . . . . . . . . . . . . . . . . . . . . . . . . . . . . . . . . . . . . . . . . 43
Sharing an Internet connection . . . . . . . . . . . . . . . . . . . . . . . . . . . . . . . . . . . . . . . . 44Setting up Internet Explorer . . . . . . . . . . . . . . . . . . . . . . . . . . . . . . . . . . . . . . . 44Accessing the Internet . . . . . . . . . . . . . . . . . . . . . . . . . . . . . . . . . . . . . . . . . . . . 50
Sharing drives and printers . . . . . . . . . . . . . . . . . . . . . . . . . . . . . . . . . . . . . . . . . . . 50Turning on file and printer sharing in Windows XP or Windows 2000 . . . . . . . 50
iwww.gateway.com

Turning on file and printer sharing in Windows Me or Windows 98SE . . . . . . 51Sharing drives or folders . . . . . . . . . . . . . . . . . . . . . . . . . . . . . . . . . . . . . . . . . . 51Un-sharing drives, folders, and files . . . . . . . . . . . . . . . . . . . . . . . . . . . . . . . . . 53Sharing printers . . . . . . . . . . . . . . . . . . . . . . . . . . . . . . . . . . . . . . . . . . . . . . . . . 53
Using the network . . . . . . . . . . . . . . . . . . . . . . . . . . . . . . . . . . . . . . . . . . . . . . . . . . . 54Viewing shared drives and folders . . . . . . . . . . . . . . . . . . . . . . . . . . . . . . . . . . 55Mapping a Network Drive . . . . . . . . . . . . . . . . . . . . . . . . . . . . . . . . . . . . . . . . . 55Opening files across the network . . . . . . . . . . . . . . . . . . . . . . . . . . . . . . . . . . . 56Copying files across the network . . . . . . . . . . . . . . . . . . . . . . . . . . . . . . . . . . . . 57Printing files across the network . . . . . . . . . . . . . . . . . . . . . . . . . . . . . . . . . . . . 57
6 Routine Access Point/Router Settings and Status. . . . . . . . . . . . . . . 59
Using access point/router settings and features . . . . . . . . . . . . . . . . . . . . . . . . . . . 60Restoring the access point/router’s default settings . . . . . . . . . . . . . . . . . . . . . 60Upgrading the firmware . . . . . . . . . . . . . . . . . . . . . . . . . . . . . . . . . . . . . . . . . . . 61Changing default access point/router settings . . . . . . . . . . . . . . . . . . . . . . . . . 63
Access point/router status . . . . . . . . . . . . . . . . . . . . . . . . . . . . . . . . . . . . . . . . . . . . 65
7 Advanced Configuration and Settings. . . . . . . . . . . . . . . . . . . . . . . . . . . 67
Setting up security . . . . . . . . . . . . . . . . . . . . . . . . . . . . . . . . . . . . . . . . . . . . . . . . . . 68Establishing an access point/router security scheme . . . . . . . . . . . . . . . . . . . . 68
Advanced settings . . . . . . . . . . . . . . . . . . . . . . . . . . . . . . . . . . . . . . . . . . . . . . . . . . 70Changing data transmission settings . . . . . . . . . . . . . . . . . . . . . . . . . . . . . . . . . 70Setting up filters . . . . . . . . . . . . . . . . . . . . . . . . . . . . . . . . . . . . . . . . . . . . . . . . . 74Setting up port forwarding . . . . . . . . . . . . . . . . . . . . . . . . . . . . . . . . . . . . . . . . . 77Setting up the routing mode . . . . . . . . . . . . . . . . . . . . . . . . . . . . . . . . . . . . . . . 80Setting up static routes . . . . . . . . . . . . . . . . . . . . . . . . . . . . . . . . . . . . . . . . . . . 82
8 Troubleshooting . . . . . . . . . . . . . . . . . . . . . . . . . . . . . . . . . . . . . . . . . . . . . . . . . 85
Determining network connections and IP addresses . . . . . . . . . . . . . . . . . . . . . . . 86Setting a static IP address . . . . . . . . . . . . . . . . . . . . . . . . . . . . . . . . . . . . . . . . . . . . 87Problem resolution . . . . . . . . . . . . . . . . . . . . . . . . . . . . . . . . . . . . . . . . . . . . . . . . . . 90Technical Support . . . . . . . . . . . . . . . . . . . . . . . . . . . . . . . . . . . . . . . . . . . . . . . . . . . 96
Automated troubleshooting system . . . . . . . . . . . . . . . . . . . . . . . . . . . . . . . . . . 96Telephone numbers . . . . . . . . . . . . . . . . . . . . . . . . . . . . . . . . . . . . . . . . . . . . . . 96
A Glossary. . . . . . . . . . . . . . . . . . . . . . . . . . . . . . . . . . . . . . . . . . . . . . . . . . . . . . . . . 97
Terms you should know . . . . . . . . . . . . . . . . . . . . . . . . . . . . . . . . . . . . . . . . . . . . . . 98
B Specifications . . . . . . . . . . . . . . . . . . . . . . . . . . . . . . . . . . . . . . . . . . . . . . . . . . 103
Specifications . . . . . . . . . . . . . . . . . . . . . . . . . . . . . . . . . . . . . . . . . . . . . . . . . . . . . 104
ii www.gateway.com

C Safety, Regulatory, and Legal Information . . . . . . . . . . . . . . . . . . . . . 105
Index . . . . . . . . . . . . . . . . . . . . . . . . . . . . . . . . . . . . . . . . . . . . . . . . . . . . . . . . . . . . . 111
iiiwww.gateway.com

iv www.gateway.com

Chapter 1
The Gateway Wireless-GAccess Point/Router
■ Product features
■ Safety
■ Package contents
■ Connectors and LEDs
1

Chapter 1: The Gateway Wireless-G Access Point/Router
FeaturesYour Gateway wireless access point/router features:
■ Compact, modern design
■ High speed (55 Mbps in the 2.4 GHz band - 802.11g)
■ Downward compatibility to the 802.11b wireless LAN standard (11 Mbps data rate)
■ Remote administration and firmware upgrades through the Internet
■ DHCP service to your network
■ Sophisticated security features, including 128-Bit network (WEP) encryption, Web and port filtering, WAN request blocking, and DMZ hosting
■ Virtual Private Networking (VPN) over the Internet (with IPSec, L2TP, and PPTP pass-through)
Important safeguards
Precautions■ Do not place your wireless access point/router in direct sunlight or near a heat source,
as this may damage the housing or electronic components of the device.
■ Do not open or try to repair the device yourself.
■ Do not place your wireless access point/router in a damp or excessively humid location, such as a bathroom.
■ To avoid possible electrical damage due to lightning or power surges, use a shielded, surge protector.
■ To avoid possible damage due to lightning, turn off and unplug the access point/router during electrical storms.
Caution Do not attempt to remove the cover. There are no user-serviceable parts inside. Removing the cover voids the warranty.
Have your wireless access point/router repaired by qualified service personnel only.
2 www.gateway.com

Package contents
Package contentsAlong with your wireless access point/router, the package also contains the following items:
■ Power supply
■ Ethernet cable
■ CD containing Gateway Wireless-G Access Point/Router Setup Wizard and Gateway Wireless-G Access Point/Router user guide
■ Gateway Wireless-G Access Point/Router setup poster
Parts and accessoriesThe following additional parts and accessories may be helpful in setting up your wireless network:
■ Wireless network controller cards (for desktop computers or notebooks)
■ RJ-45 (Cat-5) network cables (various lengths)
Contact Gateway for information on ordering these and other accessories.
3www.gateway.com

Chapter 1: The Gateway Wireless-G Access Point/Router
Front
LED Description
Power Off - The access point/router is turned off.
On (red) - The access point/router is turned on.
Blink (red) - After a firmware upgrade this LED will blink for the first minute.
Wireless Flashing (orange) - The wireless connection is operating.
WAN Flashing (orange) - Indicates activity on the Internet link.
LAN 4-1 Off - The connection does not have an Ethernet link.
On (green) - An Ethernet link has been detected on the indicated connection.
Flashing (green) - Data traffic is occurring on the indicated connection.
4 www.gateway.com

Back
Back
Connector/component Description
Antenna Sends and receives signals from wireless Ethernet computers and devices.
Reset switch Press and hold the reset switch for 10 seconds to return all configuration settings to the default.
LAN ports Connect a computer, hub, or switch to these RJ-45 Ethernet ports.
WAN port Connect the DSL or cable modem to this RJ-45 Ethernet port.
-OR-
If you are adding this access point/router to an existing network that has a router, connect the LAN port from the existing router to this RJ-45 Ethernet port.
Power connection Plug the AC adapter into this connection. Use only the AC adapter that came with the wireless access point/router. Use of any other AC adapter may damage your access point/router and void the warranty.
Antenna Antenna
Reset switch
WAN Port Power connectionLAN Ports
5www.gateway.com

Chapter 1: The Gateway Wireless-G Access Point/Router
Getting startedIf you are a typical user that wants to set up and use the wireless access point/router and adjust the basic security settings, go to “Setup for Typical Users” on page 7.
If you are an advanced user that wants to set up and use the wireless access point/router and adjust the advanced security settings or use advanced features such as router security schemes, access authentication, and port forwarding, go to “Initial Setup for Advanced Users” on page 11.
6 www.gateway.com

Chapter 2
Setup for Typical Users■ Preparation
■ Using the wizard
7

Chapter 2: Setup for Typical Users
PreparationIf you intend to use the access point/router to connect your network to the Internet, you need a broadband Internet connection (DSL or cable). You also need the following information and equipment:
■ A host computer (initially connected to the broadband modem or to a pre-existing router) that has a network interface card
■ An RJ-45 Ethernet cable (Cat-5 or better)
■ A DSL or cable modem (purchased or provided by your ISP)
■ Host computer’s IP address (assigned by your ISP, if a static IP address is required)
■ Subnet mask (assigned by your ISP, if a static IP address is required)
■ Default gateway (assigned by your ISP, if a static IP address is required)
■ Primary DNS IP address (assigned by your ISP, if a static address is used)
■ Host computer’s name and workgroup (available through the Windows Control Panel under System information)
8 www.gateway.com

Using the setup wizard
Using the setup wizard
To set up the access point/router using the wizard:
1 Insert the CD into the disc drive on the computer attached to your broadband modem. If the The Gateway Wireless-G Access Point/Router Setup Wizard opens, go to Step 5.
- OR -
If the wizard does not start automatically, go to Step 2.
2 Click Start, then click Run. The Run dialog box opens.
3 In the Open text box, type d:\WGR250.exe (where d is the drive letter of your disc drive).
4 Click OK. The Gateway Wireless-G Access Point/Router Setup Wizard opens.
5 Click Setup. Read and follow the instructions on each wizard screen. When you have completed using the wizard, you are ready to use your network.
Important For more information about using the Gateway Wireless-G Access Point/Router Setup Wizard, see the Gateway Wireless Access Point/Router setup poster.
9www.gateway.com

Chapter 2: Setup for Typical Users
Where to go from hereNow that you have your access point/router configured, it is time to configure your computers to use it. Go to “Setting Up Windows Ethernet Networking” on page 25.
10 www.gateway.com

Chapter 3
Initial Setup for AdvancedUsers
■ Preparation
■ Contacting and configuring the access point/router
11

Chapter 3: Initial Setup for Advanced Users
PreparationIf you intend to use the access point/router to connect your network to the Internet, you need a broadband Internet connection (DSL or cable). You also need the following information and equipment:
■ A host computer (initially connected to the access point/router) that has a network interface card
■ An RJ-45 Ethernet cable (Cat-5 or better)
■ A DSL or cable modem (purchased or provided by your ISP)
■ Host computer’s IP address (assigned by your ISP, if a static IP address is required)
■ Subnet mask (assigned by your ISP, if a static IP address is required)
■ Default gateway (assigned by your ISP, if a static IP address is required)
■ Primary DNS IP address (assigned by your ISP, if a static address is used)
■ Host computer’s name and workgroup (available through the Windows Control Panel under System information)
Connecting the hardware
To connect the hardware:
1 Turn off and unplug the host computer, the DSL or cable modem, and the access point/router.
2 Using an RJ-45 Ethernet cable (Cat-5 or better), connect the Ethernet port of the host computer to the LAN 1 connection on the back of the access point/router. You can also connect as many as three additional computers to the access point/router if you plan to use the access point/router in wired mode. To connect more than four computers to your network in wired mode, connect them to a hub or switch, then connect the hub or switch to one of the LAN ports on the access point/router. This is not required in wireless mode.
3 Using an RJ-45 Ethernet cable (Cat-5 or better), connect the Ethernet port of your DSL or cable modem to the WAN connection on the back of access point/router.
4 Plug the AC adapter into an electrical outlet. Connect the other end of the adapter to the power connector on the back of the access point/router. For more information, see the illustration on page 5.
■ The red Power LED turns on
■ The Wireless LED starts blinking
12 www.gateway.com

Contacting and configuring the access point/router
5 Turn on the DSL or cable modem. Check the LEDs on the modem to make sure that the modem is connected and operating normally. The WAN LED on the access point/router lights when the modem is connected correctly to the access point/router.
6 Turn on the host computer. The LAN LED corresponding to the RJ-45 jack used for the LAN connection on the access point/router lights to when the computer is connected correctly to the access point/router.
Contacting and configuring the access point/router
Now that all the hardware connections have been made, you must configure the access point/router to operate on your network and to connect to the Internet through an ISP.
Initial configurations vary somewhat, depending on your ISP. Contact your ISP, before you configure your access point/router, and determine the following:
■ If your ISP assigns a static IP address or provides one automatically (DHCP) each time you connect to the ISP
■ For an automatic IP address, the Host Name (if required) and the Domain Name (if required)
■ For a static IP address, the IP address, subnet mask, default gateway, and DNS address (at least one)
■ If you are connected with a DSL modem using Point-to-Point Protocol over Ethernet (PPPoE), or if your ISP requires a user name and password, the user name and password you need to use
■ If your ISP uses RAS (Singapore) or PPTP (Europe), instructions for setup
Caution Use only the AC adapter and power cord provided with the access point/router. Use of any other adapter or power cord may damage your access point/router and void your warranty.
Important If you are not comfortable with the procedures covered in this section, use the Gateway Wireless-G Access Point/Router Setup Wizard. For more information, see “Setup for Typical Users” on page 7.
13www.gateway.com

Chapter 3: Initial Setup for Advanced Users
Contacting the access point/router
To contact the access point/router:
1 Open your Web browser on the host computer.
2 In the address field, type 192.168.1.1, then press ENTER. The Connect to dialog box opens.
3 Type admin in the User name box.
14 www.gateway.com

Contacting and configuring the access point/router
4 Type admin in the Password box, then click OK. The Setup page opens.
5 Go to “Configuring the access point/router” on page 15.
Configuring the access point/router
To configure the access point/router:
1 On the Setup page, click the arrow to open the Time Zone list, then click your time zone. If your location uses Daylight Savings Time, click to select the Automatically adjust clock for daylight savings changes check box.
2 In the Internet area, type the Host Name and the Domain Name if your ISP requires those entries (contact your ISP for more information).
15www.gateway.com

Chapter 3: Initial Setup for Advanced Users
3 Click the arrow to open the Select your Connection Type list, then click one of the following:
Automatic Configuration - DHCP - If your ISP does not require a static IP address.
Static IP - If your ISP requires a static IP address (get the IP Address, the subnet mask, the default gateway, and the DNS from your ISP). Type the information in the appropriate boxes.
PPPoE - If your ISP uses this type of DSL connection, or if you normally sign on to the Internet with a user name and password. Type the information in the appropriate spaces. Also, select either Connect on Demand (which disconnects your network from the Internet after a specified Max Idle Time), or Keep Alive (which keeps you connected to the Internet, even when there is no activity).
PPTP (Europe only) - If your ISP uses this type of connection (obtain the WAN IP Address, the subnet mask, the VPN Server IP, the VPN user name, and the VPN Password from your ISP). Enter the information in the appropriate spaces. Also, select either Connect on Demand (which disconnects your network from the Internet after a specified Max Idle Time), or Keep Alive (which keeps you connected to the Internet, even when there is no activity).
4 In the LAN area, accept the default settings unless you have a specific reason to change them (for example, two routers with the same address on your LAN). If you need to change these settings, type the IP Address and subnet mask of the access point/router (as it will be seen by your local network).
16 www.gateway.com

Contacting and configuring the access point/router
5 In the Wireless area, click Mode, then click Mixed, G-Only, or Disable. Select Mixed if you are using both 802.11b and 802.11g wireless devices on your network. Select G-Only if you are using only 802.11g devices on your network. Select Disable if you are not using the wireless mode to communicate with the access point/router (wired mode only).
Channel - Select from channels 1 through 11 (each with a different frequency). Use the same channel for all devices on your network. If you have more than one network at your location, you may want to use different channels for each so the networks do not communicate with each other.
SSID (service set identifier) - Type the name of your local network. This must be the same for your entire local network. It is case sensitive and can be as much as 32 alphanumeric characters in length.
SSID Broadcast - Click the arrow to open the list, then click Enable or Disable. Enabling SSID broadcast lets users outside your LAN see your wireless network. Disabling SSID broadcase prevents your wireless LAN from being seen by users outside your wireless LAN, which adds an additional level of security to your network.
6 In the WEP area, select either Enable or Disable. If you choose to turn on WEP, click Edit Security Settings. The Wireless Security page opens.
17www.gateway.com

Chapter 3: Initial Setup for Advanced Users
7 Click the arrow button to open the Security Mode list, then click the wireless security you want. The Wireless Security page changes based on the security type you select. The four types of wireless security and the fields that must be completed are shown in this step.
WEP (Wired Equivalent Privacy)
Default Transmit Key The access point/router uses the selected key when it sends data. The receiver must use the same key to let data pass.
WEP Encryption Select the level of encryption to use: either 64-bit or 128-bit. The higher level offers more security but may slow network speed.
Passphrase You can type a passphrase (as many as 16 alphanumeric characters - case sensitive) and click Generate to automatically generate encryption Keys 1-4, instead of typing the keys manually.
Keys 1-4 If you type the encryption keys manually, they must contain exactly 10 hex characters (64-bit) or 26 hex characters (128-bit). Valid hex characters are 0-9 and A through F. Blank fields and all zeros are not valid.
18 www.gateway.com

Contacting and configuring the access point/router
WPA (Wi-Fi Protected Access) Pre-Shared key
WPA Algorithms Select an algorithm method: either TKIP (Temporal Key Integrity Protocol) or AES (Advanced Encryption Standard).
WPA Shared Key Type a pre-shared key of from 8 to 63 alphanumeric characters.
Group Key Renewal Type the length of time until the key is automatically renewed. The default is 300 seconds.
19www.gateway.com

Chapter 3: Initial Setup for Advanced Users
WPA RADIUS (Remote Authentication Dial-in User Service)
WPA Algorithms Select an algorithm method: either TKIP (Temporal Key Integrity Protocol) or AES (Advanced Encryption Standard).
RADIUS Server Address Type the IP address of the RADIUS server.
RADIUS Server Port Type the authentication port used by the RADIUS server. The default authentication port is 1812.
WPA Shared Key Type a text string that will be used as a password between the RADIUS server, proxy, and client.
Group Key Renewal Type the length of time until the key is automatically renewed. The default is 300 seconds.
20 www.gateway.com

Contacting and configuring the access point/router
RADIUS (Remote Authentication Dial-in User Service)
RADIUS Server Address Type the IP address of the RADIUS server.
RADIUS Port Type the authentication port used by the RADIUS server. The default authentication port is 1812.
Shared Key Type a text string that will be used as a password between the RADIUS server, proxy, and client.
21www.gateway.com

Chapter 3: Initial Setup for Advanced Users
8 In the DHCP area, click DHCP Server Setting to select the DHCP options for the access point/router. The DHCP Server setting screen opens.
DHCP Server - Click the arrow to open the list, then click Enable or Disable. Select Disable only if you have another router or DHCP server on your network. Select Enable if you want the access point/router to provide DHCP service to your network (by assigning an IP address automatically to each computer on your network at sign-on).
Starting IP Address - The first IP address assigned by the access point/router. Subsequent IP addresses increment by one until all addresses are assigned.
Maximum Number of DHCP Users - Enter the maximum number of IP addresses that you want assigned by the access point/router.
Client Lease Time - Enter the amount of time you want to let a network user connect to the access point/router with the current, assigned IP address.
Static DNS (1 - 3) - Type the IP address of alternate DNS (Domain Name System) servers (as many as 3) in addition to the one provided by your ISP. The access point/router uses these addresses for quicker access to alternate DNS Servers.
WINS - If you use a WINS (Windows Internet Naming Service) server, type its IP address in this field. If not, make no entry.
Currently Assigned - Click DHCP Clients Table to see the computers on your network and their assigned IP addresses.
22 www.gateway.com

Where to go from here
When you are finished making entries in the above fields, click Apply to save your entries and exit, or click Cancel to exit without saving any changes. Click Close to close the window if you did not make any changes.
9 When you are finished making entries on the Setup page, click Apply to save your entries. Click Cancel to revert to the previous settings.
10 To exit the access point/router setup utility, either close your browser or enter a different IP address in the address field and press ENTER.
Where to go from hereNow that you have your access point/router configured, it is time to configure your computers to use it. Go to “Setting Up Windows Ethernet Networking” on page 25.
In addition to the above mentioned chapter, you may be interested in modifying additional access point/router settings. If so, you should read “Routine Access Point/Router Settings and Status” on page 59 and “Advanced Configuration and Settings” on page 67.
23www.gateway.com

Chapter 3: Initial Setup for Advanced Users
24 www.gateway.com

Chapter 4
Setting Up WindowsEthernet Networking
■ Naming the computers
■ Configuring the TCP/IP protocol
■ Configuring your computer for wireless
25

Chapter 4: Setting Up Windows Ethernet Networking
Naming the computers and the workgroup
Each computer on your network must have a unique name and be identified as part of a workgroup. This must be done individually on each computer.
If you are naming the computers and workgroup in Windows XP, see “Naming the computers and the workgroup in Windows XP” on page 26.
If you are naming the computers and workgroup in Windows 2000, see “Naming the computers and the workgroup in Windows 2000” on page 32.
If you are naming the computer and workgroup in Windows Me or Windows 98SE, see “Naming the computers and the workgroup in Windows Me or Windows 98SE” on page 33.
Naming the computers and the workgroup in Windows XP
Use the Windows XP Network Setup Wizard to name each computer and workgroup as well as select other network settings in Windows XP.
Important The network setup procedure uses the Windows XP Network Setup Wizard. The example screens show those screens that typically appear in the course of using the wizard. If your network situation differs from that used in this example, you may encounter additional screens or screens with different selections. Make sure that you read each screen in the wizard and make your selections based on your particular network situation.
26 www.gateway.com

Naming the computers and the workgroup
To run the Windows XP Network Setup Wizard:1 Click the Network Setup Wizard icon on the Windows XP taskbar. The Network
Setup Wizard opens.
-OR-
Click Start, All Programs, Accessories, Communications, then click Network Setup Wizard. The Network Setup Wizard opens.
2 Click Next to continue through the wizard. The Select a connection method screen opens.
Important If The wizard found disconnected network hardware screen opens instead of the Select a connection method screen, make sure that one end of the Ethernet cable is connected to your computer and the other end is connected to the turned on access point/router, then click Next.
The wizard found disconnected network hardware screen will open if your computer also has a wireless Ethernet emitter. If your computer has a wireless Ethernet emitter, and your computer is connected to the turned on access point/router, click Ignore disconnected network hardware, then click Next.
27www.gateway.com

Chapter 4: Setting Up Windows Ethernet Networking
3 Because you are connecting to an Ethernet network and you are accessing the Internet through the wireless access point/router, click This computer connects to the Internet through another computer on my network or through a residential gateway.
4 Click Next. If your computer has both wired and wireless Ethernet capabilities, the Your computer has multiple connections screen opens.
-OR-
If your computer does not have both wired and wireless Ethernet capabilities, the Give this computer a description and name screen opens. Go to Step 7.
28 www.gateway.com

Naming the computers and the workgroup
5 Click Let me choose the connections to my network, then click Next. The Select the connections to bridge screen opens.
6 Click to select all of the Ethernet network connection check boxes, then click Next. The Give this computer a description and name screen opens.
7 Type a description of the computer in the Computer description box.
29www.gateway.com

Chapter 4: Setting Up Windows Ethernet Networking
8 Type a unique computer name in the Computer name box. This name identifies the computer to other users on the network. Use a computer name of as many as 15 characters with no blank spaces. Each computer name must be unique on your network. All-numeric computer names are not allowed. Names must contain some letters.
9 Click Next. The Name your network screen opens.
10 Type a name for your workgroup in the Workgroup name box. Use a workgroup name of as many as 15 characters with no blank spaces. The workgroup name must be the same for all computers in your network workgroup, and the name must be different than any computer name on your network.
11 Click Next. The Ready to apply network settings screen opens.
30 www.gateway.com

Naming the computers and the workgroup
12 Click Next to apply the network settings. The You’re almost done screen opens.
13 If you are setting up an Ethernet network on other computers, you may want to use the Network Setup Wizard to do so. Click a method for installing and configuring the network on your other computers, then click Next.
14 Click Finish.
15 After you name each networked computer and assign it to your workgroup, go to “Configuring the TCP/IP protocol” on page 35.
Important You must give each computer on the network a unique Computer Name and the same Workgroup Name.
Help and Support
For more information about using the Network Setup Wizard in Windows XP, click Start, then click Help and Support.
Type the keyword Network Setup Wizard in the HelpSpot Search box , then click the arrow.
31www.gateway.com

Chapter 4: Setting Up Windows Ethernet Networking
Naming the computers and the workgroup in Windows 2000
The first time you use networking on your computer, you need to give each computer a unique name and assign each computer to the same workgroup.
If you are naming the computers and workgroup in Windows XP, see “Naming the computers and the workgroup in Windows XP” on page 26.
If you are naming the computer and workgroup in Windows Me or Windows 98SE, see “Naming the computers and the workgroup in Windows Me or Windows 98SE” on page 33
To identify this computer on the network:1 Click Start, Settings, then click Control Panel. The Control Panel window opens.
2 Double-click the System icon. The System Identification dialog box opens.
3 Click the Network Identification tab.
4 Click Properties. The Identification Changes dialog box opens.
5 Type a unique computer name in the Computer name box. This name identifies the computer to other users on the network. Use a computer name of as many as 15 characters with no blank spaces. Each computer name must be unique on your network. All-numeric computer names are not allowed. Names must contain some letters.
32 www.gateway.com

Naming the computers and the workgroup
6 Type a name for your workgroup in the Workgroup box. Use a workgroup name of as many as 15 characters with no blank spaces. The workgroup name must be the same for all computers in your network workgroup, and the name must be different than any computer name on your network.
7 Click OK to close the Identification Changes dialog box.
8 Click OK to close the System Identification dialog box.
9 Click X to close the Control Panel window.
10 After you name each networked computer and assign it to your workgroup, go to “Configuring the TCP/IP protocol” on page 35.
Naming the computers and the workgroup in Windows Me or Windows 98SE
The first time you use networking on your computer, you need to give each computer a unique name and assign each computer to the same workgroup.
If you are naming the computers and workgroup in Windows XP, see “Naming the computers and the workgroup in Windows XP” on page 26.
If you are naming the computers and workgroup in Windows 2000, see “Naming the computers and the workgroup in Windows 2000” on page 32.
To identify this computer on the network:
1 Click Start, Settings, then click Control Panel. The Control Panel window opens.
2 If you are using Windows Me, click view all Control Panel options.
3 Double-click the Network icon. The Network dialog box opens.
Important You must give each computer on the network a unique Computer Name and the same Workgroup Name.
33www.gateway.com

Chapter 4: Setting Up Windows Ethernet Networking
4 Click the Identification tab.
5 Type a unique computer name in the Computer name box. This name identifies the computer to other users on the network. Use a computer name of as many as 15 characters with no blank spaces. Each computer name must be unique on your network. All-numeric computer names are not allowed. Names must contain some letters.
6 Type a name for your workgroup in the Workgroup box. Use a workgroup name of as many as 15 characters with no blank spaces. The workgroup name must be the same for all computers in your network workgroup, and the name must be different than any computer name on your network.
7 Click OK to close the Network dialog box.
8 Click X to close the Control Panel window.
9 After you name each networked computer and assign it to your workgroup, go to “Configuring the TCP/IP protocol” on page 35.
Important You must give each computer on the network a unique Computer Name and the same Workgroup Name.
34 www.gateway.com

Configuring the TCP/IP protocol
Configuring the TCP/IP protocolA networking protocol is a language computers use to talk to each other. One of several available protocols must be set up on each computer you plan to use on your network. We recommend you use the Transmission Control Protocol/Internet Protocol (TCP/IP), which is widely accepted and compatible for local area networks (LANs), as well as for Internet communications.
When networking is set up in Windows, TCP/IP should automatically be installed as the default protocol. If it is not installed, see the Windows help.
Configuring your computer for DHCPIn order to use the TCP/IP protocol on each computer, you must set the protocol to “Obtain an IP address from a DHCP server.”
If you are using Windows XP, the Windows XP Network Setup Wizard configured your computer for using a DHCP server. For more information, see Step 3 on page 28.
If you are using Windows 2000, go to “Configuring your computer for DHCP in Windows 2000” on page 36.
If you are using Windows Me or Windows 98SE, go to “Configuring your computer for DHCP in Windows Me or Windows 98SE” on page 37.
35www.gateway.com

Chapter 4: Setting Up Windows Ethernet Networking
Configuring your computer for DHCP in Windows 2000
To configure your computer for DHCP:
1 Click Start, Settings, then click Network and Dial-up Connections. The Network and Dial-up Connections window opens. This window has an icon for each networking connection available on your computer. For example, if you have both wired and wireless Ethernet hardware installed on your computer, there will be two icons, one for your wired Ethernet hardware and one for your wireless Ethernet hardware.
2 Right-click one of the Local Area Connection icons, then click Properties. The Local Area Connection Properties dialog box opens.
3 Click to select the Internet Protocol (TCP/IP) check box in the Components checked are used by this connection list. If you do not see TCP/IP, drag the scroll bar to see more choices.
36 www.gateway.com

Configuring the TCP/IP protocol
4 Click Properties. The Internet Protocol (TCP/IP) Properties dialog box opens.
5 Click Obtain an IP address automatically.
6 Click OK to close the Internet Protocol (TCP/IP) Properties dialog box.
7 Click OK to close the Local Area Connection Properties dialog box.
8 Click X to close the Network and Dial-up Connections window.
9 Repeat this procedure for each Ethernet device on your computer.
10 Repeat this procedure for every computer on your network.
Configuring your computer for DHCP in Windows Me or Windows 98SE
To configure your computer for DHCP:
1 Click Start, Settings, then click Control Panel. The Control Panel window opens.
2 If you are using Windows Me, click view all Control Panel options.
37www.gateway.com

Chapter 4: Setting Up Windows Ethernet Networking
3 Double-click the Network icon. The Network dialog box opens.
4 Click to select the TCP/IP for your Ethernet network. You may have more than one Ethernet device installed on your computer. If so, select one device to configure. If you do not see the TCP/IP option for your networking solution, drag the scroll bar to see more choices.
5 Click Properties. The Internet Protocol (TCP/IP) Properties dialog box opens.
38 www.gateway.com

Configuring the TCP/IP protocol
6 Click the IP Address tab.
7 Click Obtain an IP address automatically.
8 Click OK to close the Internet Protocol (TCP/IP) Properties dialog box.
9 Click OK to close the Network dialog box.
10 Click X to close the Control Panel window.
11 Repeat this procedure for each Ethernet device on your computer.
12 Repeat this procedure for every computer on your network.
39www.gateway.com

Chapter 4: Setting Up Windows Ethernet Networking
Wireless operationAfter the initial configuration is done, you can operate your network in wired or wireless mode. To operate in wireless mode, each computer in your network must have a wireless network interface card and the same SSID (similar to a computer name on a wireless network). For more information, see “Glossary” on page 97.
Setting up a network (WEP) key in Windows XPWindows XP does not automatically configure the wireless adapter to use the encryption key generated when a network (WEP) passphrase is entered. After the network (WEP) encryption key is generated on a Windows XP computer, you must manually enter the key so the computer can communicate with the access point/router.
To manually enter the network (WEP) encryption key in Windows XP:
1 Click Start, then click Control Panel. If your Control Panel is in Category View, click Network and Internet Connections.
2 Click/Double-click Network Connections. The Network Connections dialog box opens.
3 Double-click the Wireless Network Connection icon for your wireless network interface card. If more than one is shown, click the one that connects to your wireless network.
4 When the Wireless Network Connection Status window opens, click Properties. The Wireless Network Connection Properties window opens.
5 Click the Wireless Networks tab.
6 If the correct wireless network (check the SSID) is shown in the Preferred Networks area, double-click the connection and continue to Step 7.
- OR -
Click the connection in the Available Networks area, then click Configure. The Wireless Networks Properties window opens.
7 Click to select the Data encryption (WEP enabled) check box and click to clear the The key is provided for me automatically check box.
8 In the Network key box, type the network (WEP) key that was generated when you set up the access point/router.
Tips & Tricks For additional information on setting up your wireless network, see the documentation that came with your wireless network card or wireless network enabled device.
40 www.gateway.com

Where to go from here
9 Make sure that the Key format box indicates hexidecimal digits and that the Key length box indicates the correct length key (10 or 26 digits).
10 Click OK to accept the settings.
11 Click OK repeatedly until you return to the Windows XP desktop.
12 Close all applications and reboot the computer.
13 Repeat Step 1 through Step 12 for each computer on your network running Windows XP.
Setting up a network (WEP) key in Windows 98SE, Windows 2000, or Windows Me
To configure network (WEP) security in Windows 98, Windows 2000, and Windows Me, you must use a client manager. For instructions on using a client manager, see the documentation that came with your wireless Ethernet PC card or PCI card, USB adapter, or with your wireless enabled device.
Where to go from hereNow that you have your access point/router and computers configured, it is time to use your network. Go to “Using Your Network” on page 43.
Important The network (WEP) encryption key must be entered exactly as generated. All 10 (64-bit encryption) or 26 (128-bit encryption) hexidecimal digits must be entered.
41www.gateway.com

Chapter 4: Setting Up Windows Ethernet Networking
42 www.gateway.com

Chapter 5
Using Your Network■ Sharing an Internet connection
■ Sharing drives and printers
■ Using the network
43

Chapter 5: Using Your Network
Sharing an Internet connectionInternet sharing lets all computers on the network access the Internet at the same time using one Internet service provider (ISP) connection.
Setting up Internet ExplorerIf you are using Windows XP, go to “Setting up Internet Explorer in Windows XP” on page 44.
If you are using Windows 2000, Windows Me, or Windows 98SE, go to “Setting up Internet Explorer in Windows 2000, Windows Me, or Windows 98SE” on page 47.
Setting up Internet Explorer in Windows XP
To set up Internet Explorer on each computer on your Ethernet network in Windows XP:1 Make sure that the access point/router is turned on and configured as instructed by
your cable or DSL provider.
2 Click Start, right-click Internet, then click Internet Properties. The Internet Properties dialog box opens.
Important The Internet setup procedure for Windows XP uses the Windows XP New Connection Wizard and Internet Explorer. The example screens show those screens that typically appear in the course of using the wizard. If your Internet connection differs from that used in this example, you may encounter additional screens or screens with different selections. Make sure that you read each screen in the wizard and make your selections based on your particular Internet connection situation.
If you use a browser other than Internet Explorer, see the help provided with that browser for configuring it for use on a network.
44 www.gateway.com

Sharing an Internet connection
3 Click the Connections tab.
4 Click Setup. The New Connection Wizard opens.
5 Click Next. The Network Connection Type screen opens.
45www.gateway.com

Chapter 5: Using Your Network
6 Click Connect to the Internet, then click Next. The Getting Ready screen opens.
7 Click Set up my connection manually, then click Next. The Internet Connection screen opens.
8 Click the type of Internet connection you are setting up, then click Next.
9 Click Finish.
10 Repeat this procedure for each computer on your network. Go to “Accessing the Internet” on page 50.
46 www.gateway.com
Sharing an Internet connection
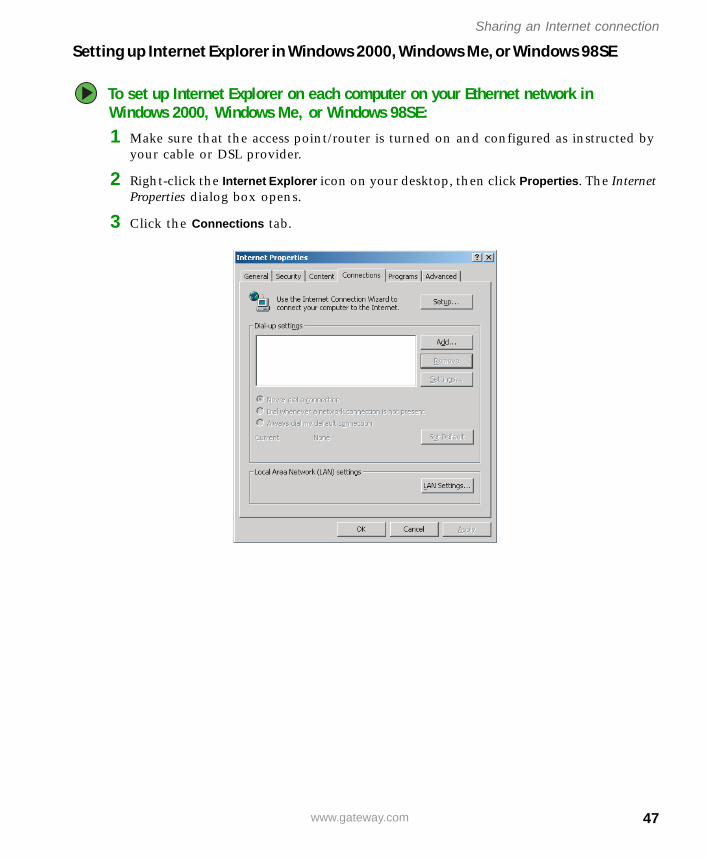
Setting up Internet Explorer in Windows 2000, Windows Me, or Windows 98SE
To set up Internet Explorer on each computer on your Ethernet network in Windows 2000, Windows Me, or Windows 98SE:1 Make sure that the access point/router is turned on and configured as instructed by
your cable or DSL provider.
2 Right-click the Internet Explorer icon on your desktop, then click Properties. The Internet Properties dialog box opens.
3 Click the Connections tab.
47www.gateway.com

Chapter 5: Using Your Network
4 Click Setup. The Internet Connection Wizard opens.
5 Click I want to set up my Internet connection manually, or I want to connect through a local area network (LAN), then click Next. The Setting up your Internet connection screen opens.
48 www.gateway.com

Sharing an Internet connection
6 Click I connect through a local area network (LAN), then click Next. The Local area network Internet connection screen opens.
7 Click to select the Automatic discovery of proxy server (recommended) check box, then click Next. The Set Up Your Internet Mail Account screen opens.
8 If you want to set up an Internet e-mail account other than the e-mail account supplied by your Internet service provider, select Yes then click Next. Follow the on-screen instructions to complete the Internet mail setup. When you are finished setting up mail, click Finish.
- OR -
If you do not want to set up an e-mail account other than the e-mail account supplied by your Internet service provider, select No, click Next, then click Finish.
9 Repeat this procedure for each computer on your network. Go to “Accessing the Internet” on page 50.
49www.gateway.com

Chapter 5: Using Your Network
Accessing the Internet
To access the Internet from your computer:
1 Make sure that the access point/router is turned on.
2 Open Internet Explorer.
Sharing drives and printersWith a network, you can share drives (for example hard drives, diskette drives, and CD or DVD drives) and printers among the computers connected to the network.
After the drives and printers on each network computer are shared, you can access them as though they were attached directly to your computer. Then you can:
■ View a network drive
■ Open and copy files stored on other network computers
■ Print documents on network printers
Before you can share your drives and printers, you need to turn on Windows file and printer sharing on all the network computers.
Turning on file and printer sharing in Windows XP or Windows 2000
To turn on Windows file and printer sharing in Windows XP or Windows 2000:1 In Windows XP, click Start, then click Control Panel. The Control Panel window opens.
If your Control Panel is in Category View, click Network and Internet Connections.
-OR-
In Windows 2000, click Start, Settings, then click Control Panel. The Control Panel window opens.
Important To share a printer among the network computers, each computer must have the shared printer’s drivers installed. Follow the instructions included with your printer to install the printer drivers on each computer.
50 www.gateway.com

Sharing drives and printers
2 Click/Double-click the Network Connections or Network and Dial-up Connections icon.
3 Right-click the network connection icon that you want to set up file and printer sharing on, then click Properties.
4 Click Install.
5 Click Service, then click Add.
6 Click File and Printer Sharing for Microsoft Networks, then click OK.
7 If prompted, restart your computer.
8 Repeat this procedure on every computer on the network.
Turning on file and printer sharing in Windows Me or Windows 98SE
To turn on Windows file and printer sharing in Windows Me or Windows 98SE:
1 Right-click the My Network Places icon on your desktop, then click Properties.
2 Click File and Printer Sharing for Microsoft Networks.
3 Click OK.
4 If prompted, restart your computer.
5 Repeat this procedure on every computer on the network.
Sharing drives or foldersIf you want to share a drive or folder, use the following instructions.
To share drives or folders:1 Make sure that each computer on your network has Windows file and printer sharing
turned on by following the steps in “Turning on file and printer sharing in Windows XP or Windows 2000” on page 50 and “Turning on file and printer sharing in Windows Me or Windows 98SE” on page 51.
51www.gateway.com

Chapter 5: Using Your Network
2 In My Computer or Windows Explorer, right-click the drive or folder that you want to share, then click Sharing and Security or Sharing. The folder properties dialog box opens.
If you share a drive, the entire contents of that drive will be available to everyone on your network. If you share a folder, only the contents of that folder will be available to everyone on the network.
3 Click the Sharing tab.
4 In Windows XP, if you want to share the drive or folder with anyone on the network (network sharing), click to select the Share this folder on the network check box.
-OR-
In Windows 2000, if you want to share the drive or folder with anybody on the network (network sharing), click to select the Share this folder check box.
-OR-
In Windows Me or Windows 98SE, if you want to share the drive or folder with anybody on the network (network sharing), click to select the Shared as check box.
5 Click OK.
52 www.gateway.com

Sharing drives and printers
Un-sharing drives, folders, and filesIf you want to un-share a drive, folder, or file, use the following instructions.
To un-share drives or folders:
1 In My Computer or Windows Explorer, right-click the drive or folder that you want to un-share, then click Sharing and Security or Sharing.
2 In Windows XP, make sure that the Share this folder on the network check box is not selected.
-OR-
In Windows 2000, click Do not share this folder.
-OR-
In Windows Me or Windows 98SE, click Not shared.
3 Click OK.
Sharing printers
To share your printer in Windows XP:
1 Click Start, then click Control Panel. The Control Panel window opens. If your Control Panel is in Category View, click Printers and Other Hardware.
2 Click/Double-click the Printers and Faxes icon. The Printers and Faxes window opens.
3 Right-click the name of the printer you want to share, then click Sharing.
4 Click Share this printer.
5 Click OK.
53www.gateway.com

Chapter 5: Using Your Network
To share your printer in Windows 2000:1 Click Start, Settings, then click Printers.
2 Right-click the name of the printer you want to share, then click Sharing.
3 Click Shared as.
4 Click OK.
To share your printer in Windows Me or Windows 98SE:1 Click Start, Settings, then click Printers.
2 Double-click the name of the printer you want to share.
3 Click File, then click Properties.
4 Click the Sharing tab.
5 Click Shared as.
6 Click OK.
Using the networkAfter the drives and printers on each network computer are shared, you can:
■ View shared drives and folders
■ Map a network drive
■ Open and copy files stored on other network computers
■ Print documents on network printers
54 www.gateway.com

Using the network
Viewing shared drives and folders
To view shared drives and folders:
1 In Windows XP, click Start, then click My Network Places. The My Network Places window opens.
-OR-
In Windows 2000, Windows Me, or Windows 98SE, double-click the My Network Places icon. The My Network Places window opens.
2 Click/Double-click Entire Network. The Entire Network window opens. If you do not see the contents of the network after you double-click Entire Network, click entire contents.
3 In Windows XP or Windows 2000, double-click Microsoft Windows Network.
4 Double-click the name of your workgroup. The names of each of the computers in your workgroup are listed. For more information about workgroups, see “Naming the computers and the workgroup” on page 26.
5 Double-click the name of the computer containing the drive or folder you want to view. All shared drives and folders are listed.
Mapping a Network DriveAfter a drive or folder on one computer is mapped as a drive on another computer, the contents of the drive or folder can be accessed as if the drive were attached directly to the computer.
For example, the My Documents folder on computer 1 is mapped as the Z drive on computer 2. To access the My Documents folder on computer 1 from computer 2, double-click the Z drive.
To map a network drive in Windows XP or Windows 2000:
1 Locate the drive or folder by completing the steps in “Viewing shared drives and folders” on page 55.
2 Right-click the drive or folder, then click Map Network Drive. The Map Network Drive wizard opens.
3 Click the arrow to open the Drive list, then click the drive letter you want to map this drive or folder to.
55www.gateway.com

Chapter 5: Using Your Network
4 Click Reconnect at Logon if you want to reconnect to this drive or folder each time you log on to the network.
5 Click Finish.
To map a network drive in Windows Me or Windows 98SE:1 Locate the drive or folder by completing the steps in “Viewing shared drives and
folders” on page 55.
2 Right-click the drive or folder, then click Map Network Drive. The Map Network Drive dialog box opens.
3 Click the arrow to open the Drive list, then click the drive letter you want to map this drive or folder to.
4 Click Reconnect at Logon if you want to reconnect to this drive or folder each time you log on to the network.
5 Click OK.
Opening files across the network
To open files across the network:
1 Start the program for the file you want to open.
2 Click File, then click Open.
3 Browse to the network drive that contains the file you want to open.
4 Double-click the folder containing the file, then double-click the file.
56 www.gateway.com

Using the network
Copying files across the network
To copy files across the network:
1 In Windows XP, click Start, then click My Computer. The My Computer window opens.
-OR-
In Windows 2000, Windows Me, or Windows 98SE, double-click the My Computer icon.
2 Browse to the network drive that contains the file you want to copy.
3 Browse to the file you want to copy.
4 Click the file.
5 Click Edit, then click Copy.
6 Double-click the folder where you want to copy the file to.
7 Click Edit, then click Paste.
Printing files across the network
To print files across the network:1 Open the file you want to print.
2 Click File, then click Print.
3 In the printer name list, click the network printer.
4 Click OK.
57www.gateway.com

Chapter 5: Using Your Network
58 www.gateway.com

Chapter 6
Routine Access Point/RouterSettings and Status
■ Restore the access point/router’s default settings
■ Upgrade the firmware
■ Change default access point/router settings
■ Check access point/router status
59

Chapter 6: Routine Access Point/Router Settings and Status
Using access point/router settings and features
From the Router page in the Gateway Wireless Router Setup utility, you can turn many of the access point/router’s features on and off. You can also restore the access point/router’s settings to the defaults and upgrade the firmware to the latest version.
Restoring the access point/router’s default settingsThe access point/router comes with pre-set settings that lets it operate in most situations. If you have made changes to these settings and are having problems, you may want to return the settings to the defaults.
To return access point/router settings to the defaults:
1 Open your Web browser and go to the Gateway Wireless Router Setup utility. For more information, see “Contacting the access point/router” on page 14.
2 Click Router on the left side of the window. The Router page opens.
60 www.gateway.com

Using access point/router settings and features
3 Click the Yes check box to select Router Defaults, then click Apply at the bottom of the page. The access point/router settings are returned to the defaults.
4 To exit the Gateway Wireless Router Setup utility, close your browser or enter another address in the browser’s address field and press ENTER.
Upgrading the firmwareNew firmware for your access point/router is made available periodically by Gateway. Firmware upgrades may provide enhanced features, increased compatibility, or an updated interface.
Check your firmware version and date (found on the Setup page) against the latest version on the Gateway Web site (www.gateway.com). If a new version is available, follow these instructions to download and install the update.
To upgrade the firmware:
1 Download the new firmware version (a .TRX file) from the Gateway Web site and note where the file is saved on your computer.
2 Open your Web browser and go to the Gateway Wireless Router Setup utility. For more information, see “Contacting the access point/router” on page 14.
3 Click Router on the left side of the window. The Router page opens.
Caution Any settings you have made and saved will be lost when the default settings are restored.
61www.gateway.com

Chapter 6: Routine Access Point/Router Settings and Status
4 Click the Upgrade button. The Upgrade Firmware dialog box opens.
5 Click Browse and locate the file you downloaded on your computer. Click the file, then click Open. The file name and path appear in the File Path box.
6 Click the Upgrade button and wait while the file is loaded into firmware.
7 After the firmware upgrade is complete, return to the Setup page and make sure that the new firmware version and date are shown.
8 To exit the Gateway Wireless Router Setup utility, close your browser or type another address in the browser’s address field and press ENTER.
Caution Do not turn off or reset the access point/router while the firmware is being upgraded. This may cause problems with the access point/router.
62 www.gateway.com

Using access point/router settings and features
Changing default access point/router settingsThe access point/router comes with pre-set settings that lets it operate in most situations. You can make changes to these settings if you want to enable additional features on your access point/router or to set your access point/router to conform to your ISP’s requirements for Internet access.
To change default access point/router settings:
1 Open your Web browser and access the Gateway Wireless Router Setup utility. For more information, see “Contacting the access point/router” on page 14.
2 Click Router on the left side of the window. The Router page opens.
3 To use MAC Cloning click the arrow to open the MAC Cloning list, click Enable (the default is disabled), then type the MAC address in the field provided.
A MAC address is a unique, 12-digit code assigned to networking hardware for identification purposes. Some ISPs require you to provide them with the MAC address of the network interface card that was connected to their DSL or cable modem during installation. MAC cloning lets you type the required MAC address.
■ To determine your adapter’s MAC address in Windows 2000 and Windows XP, click Start, then click Run. Type cmd in the Run dialog box, then click OK. At the command prompt, type ipconfig/all, then press ENTER. Write down the adapter’s hardware address.
■ To determine your adapter’s MAC address in Windows 98SE and Windows Me, click Start, then click Run. Type winipcfg in the Run dialog box, then click OK. Click the adapter you are using, then click More Info. Write down the number.
4 To use Remote Management, click the arrow to open the Remote Management list, click Enable (factory default is disabled). We also encourage you to change the access point/router’s default password at this time, to provide increased security.
Remote Management lets you access and manage your access point/router from a remote location through the Internet. To remotely manage your access point/router, type the access point/router’s Internet IP address and port number (8080 is the default) in the address box of the remote browser (for example, http://188.123.12.1:8080), then press ENTER. When prompted, type the appropriate password to access the access point/router.
5 To set the MTU (Maximum Transmission Unit) to manual, click the arrow to open the MTU list, click Manual from the drop-down menu, then type the unit size in the Size box (this value should be in the 1200 to 1500 range).
MTU lets the access point/router automatically set the best transmission packet unit size for your Internet connection (the default) or you can set the unit size manually.
63www.gateway.com

Chapter 6: Routine Access Point/Router Settings and Status
6 To turn on Universal Plug-and-Play, click UPnP.
Turning on this feature lets the access point/router take advantage of Universal Plug and Play technology.
7 To create a permanent log of all incoming and outgoing traffic on your Internet connection, click the arrow to open the Log list, then click Enable.
8 To save the new settings, click Apply at the bottom of the page. To return all settings to default without saving, click Cancel.
9 To exit the Gateway Wireless Router Setup utility, close your browser or type another address in the browser’s address field and press ENTER.
64 www.gateway.com

Access point/router status
Access point/router statusYou can view the current access point/router settings and status by accessing the Status page in the Gateway Wireless Router Setup utility. The information on this page is updated approximately every ten seconds. In addition to the firmware version and the current time, the host name and the domain name (if required) are shown, as well as information on the LAN settings, wireless settings, and WAN settings.
To release the access point/router’s current Internet IP address:
1 Click Status on the left side of the window. The Status page opens.
2 Click DHCP Release.
65www.gateway.com

Chapter 6: Routine Access Point/Router Settings and Status
To get a new Internet IP address:1 Click Status on the left side of the window. The Status page opens.
2 Click DHCP Renew.
66 www.gateway.com

Chapter 7
Advanced Configuration andSettings
■ Set up a security scheme
■ Use filters
■ Forward ports
■ Set up routing (dynamic/static)
67

Chapter 7: Advanced Configuration and Settings
Setting up securityNetwork security is important for home networks to protect personal information, such as credit card numbers, Social Security numbers, tax records, and other private information. Network security is vital for business, corporate, or government networks, where the safety of the organization, and possibly the safety of the employees, may be at stake.
Establishing an access point/router security schemeAccess point/router security is your first line of defense whenever you are connected to the Internet. Take the time to set up a good access point/router security scheme to prevent unauthorized access to your network.
To change access point/router security settings:
1 Open your Web browser and go to the Gateway Wireless Router Setup utility. For more information, see “Contacting the access point/router” on page 14.
2 Click Security on the left side of the window. The Security page opens.
3 In the Router Password area, highlight the row of asterisks in the Enter New Password box and type a new access point/router password.
68 www.gateway.com

Setting up security
4 Highlight the row of asterisks in the Re-enter to Confirm box and retype the new password to confirm your entry. This will be your password the next time you access the Gateway Wireless Router Setup utility.
5 If you do not use VPN, click to clear the check boxes for L2TP (Layer-2 Tunneling Protocol) and PPTP (Point-to-Point Tunneling Protocol) tunnels in the VPN Pass-Through area.
6 In the Web Filters area, click to select the check box for the type of Web filters you want to use. You can select:
■ Proxy - Turn on proxy filtering to keep your network from accessing WAN proxy servers, a potential source of network security compromise.
■ Java - Turn on Java filtering to keep your network from accessing Web sites that use the Java programming language.
■ ActiveX - Turn on ActiveX filtering to keep your network from accessing to Web sites that use the ActiveX programming language.
■ Cookies - Turn on cookie filtering to keep cookies (small data files containing information about your computer) from being stored on your computer.
7 In the DMZ (Demilitarized Zone) area, click the arrow to open the DMZ list, then click Enable or Disable.
DMZ hosting opens one computer on your network to the Internet for a specific purpose, such as Internet gaming or video conferencing. If you choose to enable this feature, you must disable the DHCP function on the subject computer, assign an IP address to the computer, and type the IP address of the computer in the box provided. Port Forwarding (see “Setting up port forwarding” on page 77) should be considered as an alternative to DMZ hosting as it provides better security because it only opens selected ports, instead of all ports on the subject computer.
8 Click Apply to implement your changes.
-OR-
Click Cancel to return the access point/router’s security settings to defaults.
69www.gateway.com

Chapter 7: Advanced Configuration and Settings
Advanced settingsYou can customize settings for security, data transmission, filters, port configuration, and routing. You can configure the access point/router for any of the following:
■ Specific types of access authentication
■ Designated data transmission rates and notification
■ Internet access policies and blocking lists
■ Public services such as Web servers, ftp servers, and mail servers
■ Various routing modes
Changing data transmission settingsOn the Advanced (Data) page you can give or deny specific computers access to your wireless network. You can specify an authentication type and transmission rate for your network. You can also modify transmission rate, client message notification, and data flow.
Caution We recommend that you do not change the default values on these pages unless you are an advanced user with a complete understanding of the settings you are changing and the purpose for those changes. These settings determine the way your access point/router sends and receives data and may limit or expand access to the access point/router and your network.
Caution We recommend that you do not change the default values on these pages unless you are an advanced user with a complete understanding of the settings you are changing and the purpose for those changes. These settings determine the way your access point/router sends and receives data and may limit or expand access to the access point/router and your network.
70 www.gateway.com

Advanced settings
To change access point/router security settings:1 Open your Web browser and go to the Gateway Wireless Router Setup utility. For more
information, see “Contacting the access point/router” on page 14.
2 Click Advanced on the left side of the window. The Advanced (Data) page opens.
3 To turn on Wireless MAC Filter, click the arrow to open the Wireless MAC Filters list, then click Enable. Do the following:
71www.gateway.com

Chapter 7: Advanced Configuration and Settings
a Click to select either the Prevent the PC’s listed from accessing the wireless network check box.
-OR-
Click to select the Permit the PC’s listed to access the wireless network check box.
b After you make your choice, click Edit MAC Filter List, then type the wireless MAC addresses of the computers you want to permit or prevent access to your wireless network. To determine an adapter’s wireless MAC address, see “Changing default access point/router settings” on page 63.
c Click Apply to accept your settings.
-OR-
Click Cancel to remove your changes.
d Click Close to return to the Advanced (Data) page.
4 Click the arrow to open the Authentication Type list, then click Auto (the default), Open System, or Shared Key.
■ Auto - Authentication method automatically adjusts to client system’s authentication.
■ Open System - No authentication required.
■ Shared Key - Authentication based on a shared key. This is only available if you selected WEP as your wireless security setting and established a key (Step 5 on page 17).
72 www.gateway.com

Advanced settings
5 Click the arrow to open the Transmit Rate list, then click the data transmission rate you want to use in your wireless network. The setting should be based on the speed of your wireless network. The recommended setting is Auto (the default), which lets the access point/router use the fastest reliable transmission speed.
6 In the Beacon Interval field, type in the frequency interval of the access point/router’s network synchronization beacon between 20 and 1000. The default frequency of 100 is recommended.
7 In the DTIM Interval field, type the interval of the Delivery Traffic Indication Message. The DTIM lets client systems know when the next broadcast or multicast message will be sent. Available settings are 1 (default) to 255.
8 In the RTS Threshold field, type the threshold size of data packets which enables the Request to Send (RTS)/Clear to Send (CTS) mechanism. Available settings are 0 to 2346 (default). If you encounter inconsistent data flow at the default setting, only minor setting changes should be made.
9 In the Fragmentation Threshold field, type the threshold size of data packets which will be fragmented into smaller packets. Available settings are 256 to 2346 (default). If you encounter a high packet data error rate at the default setting, slightly decrease the threshold (only minor setting changes should be made). Setting the Fragmentation Threshold too low may result in poor network performance.
10 To disable Clear to Send (CTS) protection (the default is Auto) on your network, click the arrow to open the CTS Protection Mode list, then click Disable. If you wireless network consists of 802.11g equipment only, you can disable CTS Protection. However, if your network has both 802.11b and 802.11g adapters present, the setting should be left on Auto due to backward-compatibility issues.
11 Click the arrow to open the Basic Rates list, then click the setting you want your access point/router to use:
■ ALL - (default - recommended) allows all data rates with a maximum of 54 Mbps.
■ 1-2Mbps - supported by all 802.11 standards.
■ 1,2,5.5,11 Mbps (for wifi-g) - supported by the 802.11g and 802.11b standards.
■ 1,2,5.5,6,11,12,24 Mbps (for wifi-g) - supported by the 802.11g standard.
12 Click Apply to save your changes
-OR-
Click Cancel to return the access point/router’s data settings to the defaults.
73www.gateway.com

Chapter 7: Advanced Configuration and Settings
Setting up filtersThe Advanced (Filter) page lets you set a variety of overall Internet Access Policies for your entire network or specific policies for selected computers on your network.
Each policy you establish can deny or allow access to the Internet or to inbound traffic for the network clients (computers) you specify. You can also allow or deny this access based on the time of day, day of the week, service type, domain name, or a keyword you designate.
To establish Internet Access Policies:
1 Open your Web browser and go to the Gateway Wireless Router Setup utility. For more information, see “Contacting the access point/router” on page 14.
2 Click Advanced on the left side of the window. The Advanced (Data) page opens.
3 Click the Filter tab at the top of the page to open the Advanced (Filters) page.
4 Click the arrow to open the Internet Access Policy list, then click a policy number (1 to 10).
5 In the Enter Policy Name field, type a unique, alphanumeric name.
74 www.gateway.com

Advanced settings
6 Click the arrow to open the Policy Type list, then click one of the following:
■ Internet Access - to control access to the Internet by computers on your network
■ Inbound Traffic - to control access to your internal network by computers outside your network.
7 Click to select the Deny check box (to deny access to specific computers during the times and days specified).
- OR -
Click to select the Allow check box (to give access to specific computers during the times and days specified).
8 Click Edit List. A List of PCs or List of Internet PCs page opens (depending on the Policy Type selected).
75www.gateway.com

Chapter 7: Advanced Configuration and Settings
a Enter the MAC addresses, the IP addresses, or the Range of IP addresses of the computers which are affected by this policy.
b Click Apply to save your changes
-OR-
Click Cancel to remove your entries.
c Click Close to return to the Advanced (Filters) page.
9 Click to select the Days you want to control access for.
10 Click to select either 24 Hours or From (requires you to enter a time interval). If you selected From, click the arrows to open the time lists, then click the time.
11 If you selected the Internet Access policy type, click the arrow to open the Blocking Services list, then click the type of services you want blocked. If you click a service to block, the type of service and port range appear in the Blocking Services boxes. To add or edit a service, do the following:
a Click Add Service. The Add Services page opens.
b To add a new service, type the name of the service in the Service Name box, click the arrow to open the Protocol list, then click the Protocol Type in the range of ports for the service in the Port Range boxes. Click Add when you finish. The service is added to the list.
76 www.gateway.com

Advanced settings
c To modify a service and port range, click the service on the list at the right of the window. Click the arrow to open the Protocol list, then click a new protocol, or change the port ranges in the Port Range boxes. Click Modify. The service parameters change.
d To delete a service, select the service from the list at the right of the window, then click Delete. The service is removed from the list.
e To remove your entries or your changes, click Cancel.
f When you are finished, click Close to return to the Advanced (Filters) page.
12 If you selected the Internet Access policy type, type the URL addresses (as many as four) in the Website Blocking by Domain Name boxes for any Web sites that you want to permanently block access to.
13 If you selected the Internet Access policy type, type the keywords (as many as six) in the Website Blocking by Keyword boxes for words that may be found on Web sites that you want to permanently block access to.
14 To create additional policies, repeat Step 4 through Step 13 (blocked services and Web sites remain blocked at all times).
15 To delete an access policy, click the arrow to open the Internet Access Policy list, then click the policy number. Click the Delete button.
16 For a summary of all access policies in effect, and a description of each policy, click Summary to open the Internet Policy Summary page.
17 When you are finished making changes, click Apply to save your changes.
-OR-
Click Cancel to return the access point/router’s filter settings to the defaults.
Setting up port forwardingThe Advanced (Ports) page lets you set up a variety of public services on your network. These services can include Web servers, ftp servers, mail servers, and other, more specialized functions such as gaming or video conferencing.
As many as ten customized applications can be configured to allow access to specific ports on individual computers. Applications can be set up and enabled immediately, or set up and enabled as needed.
77www.gateway.com

Chapter 7: Advanced Configuration and Settings
To set up customized applications:1 Open your Web browser and go to the Gateway Wireless Router Setup utility. For more
information, see “Contacting the access point/router” on page 14.)
2 Click Advanced on the left side of the window. The Advanced (Data) page opens.
3 Click the Ports tab at the top of the page to open the Advanced (Ports) page.
4 In the first available Customized Applications box, type the name of the service or application you are setting up.
5 On the same line, in the External Port boxes, type the port range that the service uses.
6 On the same line, click to select a check box under the Protocol required by the application.
■ TCP - Transmission Control Protocol (allows data streaming)
■ UDP - User Datagram Protocol (used primarily for broadcasting messages over a network)
Important To facilitate port forwarding to a computer, the DHCP client function must be disabled on the computer and a static IP address assigned (see “Setting a static IP address” on page 87).
78 www.gateway.com

Advanced settings
7 On the same line, enter the static IP Address of the computer that runs the application or provides the service.
8 On the same line, click to select the Enable check box to turn on access to the application or service.
9 For special applications where the computer sends data out from a different port than it receives data from, click Port Triggering to set up the access point/router to monitor outgoing data for specific port numbers so the access point/router can direct the requested incoming data to the same computer. The Port Trigger List page opens.
a On the first available line, type the Application Name in the Application Name box.
b On the same line, under Trigger Port Range, type the outgoing port range used by the application or service.
c On the same line, under Incoming Port Range, type the incoming port range used by the application or service.
d Click Apply to save your entries.
-OR-
Click Cancel to delete your entries.
e Click Close to close the page and return to the Advanced (Ports) page.
79www.gateway.com

Chapter 7: Advanced Configuration and Settings
10 To set up additional services or applications, repeat Step 4 through Step 9 (blocked services and Web sites remain blocked at all times).
11 When you are finished making changes, click Apply to save your changes.
-OR-
Click Cancel to delete your entries.
Setting up the routing modeThe Advanced (Routing) page lets you set the operating mode and configuration of the access point/router.
If the access point/router is used to host your network’s connection to the Internet, you should set it to Gateway mode. If your access point/router is part of a network with other routers, you should set it to Router mode.
To set the routing mode:1 Open your Web browser and go to the Gateway Wireless Router Setup utility. For more
information, see “Contacting the access point/router” on page 14.)
2 Click Advanced on the left side of the window. The Advanced (Data) page opens.
80 www.gateway.com

Advanced settings
3 Click the Routing tab at the top of the page. The Advanced (Routing) page opens.
4 Click the arrow to open the Operating Mode list, then click Gateway or Router.
■ Gateway - If the access point/router is used to host your network’s connection to the Internet
■ Router - If your access point/router is part of a network with other routers
5 If you selected Router mode and you want to use dynamic routing, click the arrow to open the Dynamic Routing (RIP) list, then click Enable.
Dynamic routing lets your access point/router automatically adjust to changes in your network’s layout and exchange routing tables with other routers on your network.
6 When you are finished making changes, click Apply to save your changes
-OR-
Click Cancel to delete your entries.
81www.gateway.com

Chapter 7: Advanced Configuration and Settings
Setting up static routesThe Advanced (Routing) page also lets you set up static routes (preset pathways) between your access point/router and other specific hosts or networks.
To set up a static route:
1 Open your Web browser and go to the Gateway Wireless Router Setup utility. For more information, see “Contacting the access point/router” on page 14.)
2 Click the Advanced heading on the left side of the window. The Advanced (Data) page opens.
3 Click the Routing tab at the top of the page. The Advanced (Routing) page opens.
4 Click the arrow to open the Static Routing list, then click a route number.
5 Type a descriptive name in the Enter Route Name box.
6 Type the IP address of the network or host to which the static route is directed in the Destination IP Address box.
7 Type the subnet mask of the network or host to which the static route is directed in the Subnet Mask box.
8 Type the IP address of the gateway device permitting contact with the network or host to which the static route is directed in the Gateway box.
9 Click the arrow to open the Interface list, then click LAN & Wireless or Internet, depending on where the destination IP address is located.
10 Click Show Routing Table to see a table that shows all of the valid static routes in use by the access point/router. The Routing Table Entry List page opens and shows the Destination LAN IP, the Subnet Mask, the Gateway, and the Interface type on all established static routes.
11 To set up additional static routes, repeat Step 3 through Step 9.
82 www.gateway.com

Advanced settings
12 To delete an active static route from the access point/router, click the arrow to open the Static Routing list, click the static route you want to delete, then click Delete This Entry. The settings for that static route are deleted.
13 When you are finished making changes, click Apply to save your changes.
-OR-
Click Cancel to delete your current entries.
83www.gateway.com

Chapter 7: Advanced Configuration and Settings
84 www.gateway.com

Chapter 8
Troubleshooting■ Determining network connections and IP addresses
■ Setting a static IP address
■ Problem resolution
■ Contact information
85

Chapter 8: Troubleshooting
Determining network connections and IP addresses
You can use the ping utility to help determine whether a connection has been established on a network or to determine a numerical IP address (xxx.xxx.xxx.xxx) based on an alphanumeric Internet or Web address such as www.gateway.com.
Also, your access point/router may have difficulty sending and receiving e-mail or connecting to the Internet if your ISP’s mail and server addresses are configured with single words, such as mail, home, or pop3. The access point/router has no way to resolve these abbreviated addresses to the actual IP and Web addresses required for connection. The ping utility can help you find out the required addresses.
To use the ping utility to obtain an IP address:
1 Turn on your computer, the access point/router, and the DSL or cable modem.
2 Click Start, then click Run. Type command in the Open box, then click OK.
3 At the command prompt, type ping followed by the single word or verbal address you want resolved (for example ping mail), then press ENTER.
86 www.gateway.com

Setting a static IP address
4 The ping utility returns the actual IP address of the mail server (in this case 64.8.50.100). Write down this number.
This number works as the IP address of your ISP’s e-mail server. Unfortunately, this number may change at some point, so it may be necessary to further resolve the number to determine the actual Web address of the server (which will not change).
In the above example, note the line that states Pinging mail.adelphia.net [64.8.50.100] with 32 bytes of data. In this case mail.adelphia.net is the actual Web address of the mail server and does not need to be resolved. Write down this Web address and use it to replace your ISP’s one word mail server address (in your Web browser or e-mail program).
However, if the ping utility returned only the IP address, you will need to determine the Web address.
To resolve an IP address:
1 With the ping utility still active, type ping -a 64.8.50.100, (64.8.50.100 is the IP address returned from pinging mail), then press ENTER.
2 The ping utility returns several lines of information, including one that states Pinging mail.adelphia.net [64.8.50.100] with 32 bytes of data. In this case mail.adelphia.net is the actual Web address of the mail server. Write down this Web address and use it to replace your ISP’s one word mail server address (in your Web browser or e-mail program).
Setting a static IP addressTypically, the computers on your network obtain an IP address dynamically (using the DHCP server function of the access point/router) whenever they contact your local network. However, in certain cases, such as DMZ hosting or port forwarding, you are required to assign a static IP address to a computer so that its address remains constant and it can be contacted at the same address in the future.
87www.gateway.com

Chapter 8: Troubleshooting
To set a static IP address using Windows XP:1 Click Start, then Control Panel. If your Control Panel is in Category View, click Network
and Internet Connections.
2 Click/Double-click Network Connections.
3 Right-click the Local Area Connection that is associated with your network adapter card, then click Properties.
4 In the This connection uses the following items list, click Internet Protocol (TCP/IP), then click Properties.
5 In the IP Address box, type a unique IP address that will not be used by any other computer on your network. You can use IP addresses between 192.168.1.2 and 192.168.1.99 (IP address 192.168.1.1 is assigned to the access point/router and the access point/router’s DHCP server assigns addresses from 192.168.1.100 up to 192.168.1.254).
6 In the Subnet Mask box, type 255.255.255.0.
7 In the Default Gateway box, type 192.168.1.1.
8 At the bottom of the window, click Use the following DNS server addresses and type the Preferred DNS Server and Alternative DNS Server (contact your ISP if you do not have this information).
9 Click OK to close the Internet Protocol (TCP/IP) Properties window.
10 Click OK to close the Local Area Connection Properties window.
To set a static IP address using Windows 2000:1 Click Start, Settings, then click Control Panel.
2 Double-click Network and Dial-Up Connections, right-click the Local Area Connection that is associated with your network adapter card, then click Properties.
3 In the Components checked are used by this connection list, click Internet Protocol (TCP/IP), then click Properties.
4 Click Use the following IP address.
5 In the IP Address box, type a unique IP address that will not be used by any other computer on your network. You can use IP addresses between 192.168.1.2 and 192.168.1.99 (IP address 192.168.1.1 is assigned to the access point/router and the access point/router’s DHCP server assigns addresses from 192.168.1.100 up to 192.168.1.254).
88 www.gateway.com

Setting a static IP address
6 In the Subnet Mask box, type 255.255.255.0.
7 In the Default Gateway box, type 192.168.1.1.
8 At the bottom of the window, click Use the following DNS server addresses, then type the Preferred DNS Server and Alternative DNS Server (contact your ISP if you do not have this information).
9 Click OK to close the Internet Protocol (TCP/IP) Properties window.
10 Click OK to close the Local Area Connection Properties window. If you are prompted, restart your computer.
To set a static IP address using Windows 98SE and Windows Me:1 Click Start, Settings, then click Control Panel. The Control Panel window opens.
2 Double-click the Network icon. The Network window opens.
3 In The following network components are installed list, click the TCP/IP line associated with your computer’s network adapter (if there is only one TCP/IP line, click it), then click Properties. The TCP/IP Properties window for your network adapter opens.
4 Click the IP Address tab, then click Specify an IP address.
5 In the IP Address box, type a unique IP address that will not be used by any other computer on your network. You can use IP addresses between 192.168.1.2 and 192.168.1.99 (IP address 192.168.1.1 is assigned to the access point/router and the access point/router’s DHCP server assigns addresses from 192.168.1.100 up to 192.168.1.254).
6 In the Subnet Mask box, type 255.255.255.0.
7 Click the Gateway tab. In the New Gateway box, type 192.168.1.1, then click Add.
8 Click the DNS Configuration tab, then click Enable DNS.
9 Type any Host and Domain names, then type the DNS IP address provided by your ISP (contact your ISP if you do not have this information).
10 Click OK to close the TCP/IP Properties window.
11 Click OK to close the Network window. If you are prompted, restart your computer.
89www.gateway.com

Chapter 8: Troubleshooting
Problem resolutionYour wireless access point/router will not turn on (no LEDs)
■ Make sure that the AC adapter is plugged in and connected to the access point/router.
■ Make sure that the power strip, surge protector, or UPS (uninterruptable power supply) is operating correctly.
You have forgotten your password
Press the Reset button on the back of the access point/router for approximately 10 seconds to reset the access point/router to the defaults, then use the default User Name and Password (admin and admin) to access the Gateway Wireless Router Setup utility. Change the password (see “Establishing an access point/router security scheme” on page 68) and write it down.
You are having problems connecting to the Internet
1 Turn off the computer, the access point/router, and the DSL or cable modem.
2 Turn on the DSL or cable modem and wait several minutes until the modem has established communication with you ISP.
3 Turn on the access point/router, then turn on the computer.
If you still cannot connect, open the Gateway Wireless Router Setup utility and make sure that the settings are all correct (see “Configuring the access point/router” on page 15). You may need to enter additional information, for example your ISP may require a specific MAC address setting on your access point/router (see “Changing default access point/router settings” on page 63).
Caution Use only the power cord and AC adapter provided with the access point/router. Use of an unauthorized power cord or AC adapter may cause damage to your access point/router and void your warranty.
90 www.gateway.com

Problem resolution
You receive a time-out message when you try to enter a URL or address in your browser
■ Check the other computers on your network to see if they have the same problem or if the problem is isolated to one specific computer.
■ If the problem is isolated:
■ Make sure that the configuration settings are correct (DHCP setting, IP address, subnet mask, default gateway, and DNS), then restart the computer.
■ If the problem is general:
■ Make sure that the access point/router is on and configured correctly (see “Configuring the access point/router” on page 15).
■ Make sure that the DSL or cable modem is on and operating correctly (check the LEDs on the front to make sure it is receiving power and is not on standby).
■ Check with your ISP for outage or cable problems.
■ Try connecting a single computer to the DSL or cable modem to see if connection is possible.
■ If you are connected to a remote server using a VPN, try disconnecting the VPN.
■ Make sure that your browser is set to connect directly to the Internet and not to use a dial-up connection.
You cannot access your wireless access point/router
■ Make sure that your access point/router is turned on (check the power LED).
■ Make sure that the SSIDs (wireless) or workgroup name on both the access point/router and the computer are the same (see “Configuring the access point/router” on page 15, “Naming the computers and the workgroup” on page 26, and see the documentation that came with your wireless network card).
■ Make sure that the access point/router has the same subnet mask as the computer.
■ If you assigned IP addresses to the computers, make sure that all computers have different IP addresses. For home networks, IP addresses should be 192.168.1.N where N is a number you assign between 100 and 254. The N should be different for all computers on your network.
■ Press and hold the RESET button on the back of the access point/router for 10 seconds to reset the access point/router to the default settings.
You cannot see the other computers on your network
■ Make sure that all computers are plugged into a powered electrical outlet and turned on.
■ Make sure that all computers on your network have the same workgroup name.
■ Make sure that all computers are using the same subnet mask.
91www.gateway.com

Chapter 8: Troubleshooting
■ Make sure that all computers have a folder or drive shared.
■ If you are using DHCP though the access point/router, make sure that the other computers are set to obtain IP addresses from DHCP.
■ If you assigned IP addresses to the computers, make sure that all computers have different IP addresses. For home networks, IP addresses should be 192.168.N.N where N is a number you assign between 0 and 254. The first N should be the same for all computers on your network and the second N should be different for all computers on your network.
■ If you are operating in wireless mode, make sure that the access point/router and each wireless network adapter have the same settings for Mode, SSID, channel, and encryption type.
■ Check the signal strength of your wireless network. For more information, see “Your wireless Ethernet network is running slower than you expect” on page 92.
Your wireless Ethernet network is running slower than you expect
■ If your wireless Ethernet network is running slower than you expect, you should check your network signal strength. If you find the signal strength is low, try moving to a new location to increase the signal strength.
To check the signal strength of your wireless Ethernet network in Windows XP:1 Click Start, then click Control Panel. The Control Panel window opens. If your
Control Panel is in Category View, click Network and Internet Connections. The Network and Internet Connections window opens.
2 Click/Double-click Network Connections. The Network Connections dialog box opens.
Important Signal strength is affected by the distance between your wireless network devices, by radio interference, and by interference from natural obstructions such as walls, floors, and doors.
92 www.gateway.com

Problem resolution
3 Right-click Wireless Network Connection, then click Status. The Wireless Network Connection Status dialog box opens. The meter shows the signal strength for wireless Ethernet networking on your computer if other computers with the same network name are within range of your computer.
To check the signal strength of your wireless Ethernet network in Windows 2000, Windows Me, or Windows 98SE using the Gateway Wireless Monitor:
Important If your Windows 2000, Windows Me, or Windows 98SE computer uses a client manager other than the Gateway Wireless Monitor, see the instructions that came with your wireless networking hardware for instructions on checking the signal strength.
93www.gateway.com

Chapter 8: Troubleshooting
1 Double-click the Gateway Wireless Monitor icon on the taskbar. The Gateway Wireless Monitor program opens.
2 Click the Available Networks tab and make sure that you are connected to the network.
3 Click the Link Information tab.
94 www.gateway.com

Problem resolution
4 Click More. The following screen opens. The meter shows the signal strength for wireless Ethernet networking on your computer if other computers with the same network name are within range of your computer.
95www.gateway.com

Chapter 8: Troubleshooting
Technical SupportGateway offers a wide range of customer service, technical support, and information services.
Automated troubleshooting system
Telephone numbersYou can access the following services through your telephone to get answers to your questions:
Service description How to reach
Use an automated menu system and your telephone keypad to find answers to common problems.
800-846-2118 (US)877-709-2945 (Canada)
Resource Service description How to reach
Fax on demand support
Order a catalog of documents on common problems, then order documents by document numbers. The documents will be faxed to you.
800-846-4526 (US)877-709-2951 (Canada)
Gateway’s fee-based software tutorial service
Get tutorial assistance for software issues billed by the minute.
800-229-1103 (charged to your credit card)900-555-4695 (charged to your telephone bill)
Gateway Technical Support
Talk to a Gateway Technical Support representative about a non-tutorial technical support question.)
TDD Technical Support (for hearing impaired) is available:
Weekdays 6:00 a.m. - 8:00 p.m. Central Time
Weekends 6:00 a.m. - 5:00 p.m. Central Time
800-846-2301 (US)800-846-3609 (Canada and Puerto Rico)605-232-2191 (all other countries)
800-846-1778 (TDD)
Sales, accounting, and warranty
Get information about available systems, pricing, orders, billing statements, warranty service, or other non-technical issues.
800-846-2000 (US)888-888-2037 (Canada)
96 www.gateway.com

Appendix A
Glossary97

Appendix A: Glossary
Terms you should knowadapter (network) - A circuit board that plugs into a computer to let the computer connect to a network.
beacon interval - A beacon is a periodic broadcast by the access point/router to keep the network synchronized. The interval indicates how often the access point/router broadcasts the beacon.
broadband - When multiple signals or channels (such as voice, data, and video) share the bandwidth of a single medium.
browser - A program running on a computer which makes it possible to view and interact with the Internet.
cable modem - A broadband device that uses a coaxial cable to connect to an ISP to access the Internet.
CAT 5 - The minimum standard of twisted-pair cable suitable for data transmission over a computer network.
data packet - A unit of transmitted data. For more information, see packet.
default gateway - A routing device that forwards data over a local network.
DHCP (Dynamic Host Configuration Protocol) - DHCP lets a router or access point/router temporarily assign an IP address to a computer on the network.
DMZ (demilitarized zone) - DMZ hosting lets a single computer on your LAN expose all of its ports to the Internet. When you set up DMZ hosting on a computer, you bypass the security provided by a router. Consider port forwarding as an alternative to DMZ hosting.
DNS - A database that translates and stores domain and host names as IP addresses.
domain - A set of IP addresses usually owned by a company. For example, in an e-mail address the name of the domain comes after the @ symbol.
DSL (Digital Subscriber Line) - A broadband Internet connection that uses an ordinary telephone line to provide a fast, always on connection to the Internet.
DTIM (Delivery Traffic Indication Message) - A message sent by the access point/router to a wireless network device to indicate when the next broadcast or multicast message will be sent. This parameter is necessary to accommodate devices using power save mode.
dynamic IP address - An IP address that is temporarily assigned by a DHCP server. Many ISPs use dynamic IP addresses. When a computer connects the Internet, an ISP provides an IP address. When the computer disconnects from the Internet, the ISP reassigns the dynamic IP address to another computer requesting Internet access.
98 www.gateway.com

Terms you should know
dynamic routing - In dynamic routing, a router is configured to automatically generate routing information and share the information with neighboring routers.
encryption - The translation of data into a secret code. Encryption is the most effective way to achieve data security. To read an encrypted file, you must have the encryption key (code) associated with the encrypted data. Encryption is especially useful when you are using a wireless network because it prevents outsiders from accessing data. Each computer on a wireless network must use the same encryption code.
Ethernet - Ethernet is a common technology used to create computer networks. Wired Ethernet uses cables to link computers, hubs, switches, and routers. Wireless Ethernet uses radio waves to create links.
firmware - Firmware is programming that is inserted into programmable read-only memory (programmable ROM), thus becoming a permanent part of a computing device. Firmware cannot be modified by a user. Updating firmware requires a special program usually provided by the hardware manufacturer.
fragmentation - The process of breaking data into small segments for transmitting. When the segments are received, the data is defragmented and returned to its original format.
FTP (File Transfer Protocol) - A simple method of transferring files from one computer to another.
Gateway - A system that joins two networks together.
hardware - Physical equipment as opposed to software. An access point/router is a hardware device.
HTTP (HyperText Transport Protocol) - A system that lets Web browsers and Web servers communicate.
hub - A hardware device that joins multiple computers to create a network.
IP address - A number that uniquely identifies a computer on the network.
IPSec (Internet Protocol Security) - A standard method for providing data confidentiality, integrity, and the authentication between participating hosts.
ISP (Internet service provider) - A company that provides access to the Internet. Most ISPs also provide e-mail addresses.
LAN (local area network) - A LAN uses network hardware, such as network adapters, hubs, cables, and wireless devices, to link multiple computers for sharing resources, such as files, printers, and an Internet connection.
MAC (Media Access Control) Address - A unique number assigned to networking hardware, such as routers, hubs, and network interface cards by the manufacturer.
Mbps (MegaBits Per Second) - Transfer speed of 1 million bits per second.
99www.gateway.com

Appendix A: Glossary
network - Two or more computers linked together for the purpose of sharing resources, such as files, printers, or an Internet connection. Routers are often used to link the device, especially if the network includes more than two computers.
packet - A unit of transmitted data. When a server sends information, such as e-mail messages and files, through the Internet, the server divides the information into packets that contains identifying information called headers and footers. The system receiving the information uses the headers and footers to reassemble the information.
passphrase - Similar to a password, a passphrase is a sequence of characters used by the access point/router to create encryption keys.
ping (Packet INternet Groper) - A network utility that determines if a remote device, such as a server, can be reached on the network. For more information, see “Determining network connections and IP addresses” on page 86.
plug-and-play - If a device is a plug-and-play device, a computer can automatically detect and configure the device and install the appropriate software called a device driver.
port - A computer program using TCP/IP sends information to another computer through a port. Ports are assigned numbers that come after a standard IP address. Many programs hide these port numbers to reduce the complexity of TCP/IP.
port forwarding - Port forwarding, unlike DMZ hosting, lets a single computer on your LAN expose only one of its ports to the Internet. This type of port exposure has more security than DMZ hosting.
PPPoE (Point-to-Point Protocol over Ethernet) - A communications protocol that combines the Ethernet and Point-to-Point Protocol (PPP) standards. PPPoE is sometimes used with broadband modems.
PPTP (Point-to-Point Tunneling Protocol) - A protocol that lets a private network connect securely to another private network through private tunnels over the public Internet. This kind of interconnection is known as a virtual private network (VPN).
protocol - A set of communication rules. When two computers or networks use the same protocol, they can communicate with each other.
RADIUS (Remote Authentication Dial-In User Service) - An authentication and accounting system. When you access a wireless network you must enter a shared key. This shared key is passed to a RADIUS server, which checks that the key is correct, and then authorizes access to the network.
RIP (Routing Information Protocol) - A protocol used by a router to maintain routing tables of configuration information to filter incoming and outgoing traffic based on the IP addresses of the senders and receivers.
100 www.gateway.com

Terms you should know
RJ-45 - RJ-45 jacks connect a computer to a router. In a wired network, one end of a network cable is plugged into the RJ45 jack on a computer. The other end of the cable is plugged into an RJ45 jack on a router. Data is passed to and from the computer and router through the RJ45 jacks.
router - A hardware device that connects devices in a network. A router can also provide Internet access to the networked devices.
RTS (Request To Send) - A signal sent by a receiving device, like a router, that tells the sending device to begin transmission.
server - A computer that provides shared network service to a network. For example, a server can provide file and printer sharing between networked computers.
SSID (Service Set IDentifier) - In a wireless network, the SSID identifies a network. All computers in the network must use the same SSID.
static IP address - An IP address that is permanently assigned to a device.
static routing - The routing of network information through a single, set path.
subnet mask - This number identifies what subnetwork the computer is located on. This number is the same on all computers on a home network.
switch - Like a hub, a switch is a hardware device that links computers to create a network. A switch provides better data routing than a hub.
TCP (Transmission Control Protocol) - A protocol used in connection with Internet Protocol (IP) to let computers communicate over the Internet.
TCP/IP (Transmission Control Protocol/Internet Protocol) - A combination of two protocols (TCP and IP) that lets computers communicate with Web servers.
UDP (User Datagram Protocol) - UDP is a simpler, faster protocol than TCP. UDP is used with IP. Unlike TCP, UDP drops packets without retries and packets are received in a different order than they were sent. UDP is often used in videoconferencing applications or games where speed is preferred over guaranteed message delivery.
upgrade - An addition or update to a program that provides additional features or fixes.
URL (Uniform Resource Locator) - A standard method of specifying a Web location, for example the URL for Gateway is www.gateway.com. Also called a Web address.
VPN (Virtual Private Network) - A private network link that lets a computer communicate with another network over the Internet. VPNs usually use encryption to provide secure communication.
101www.gateway.com

Appendix A: Glossary
WAN (Wide Area Network) - A network that provides data communications to a large number of independent users spread over a large geographic area. A WAN often links several networks. The Internet is a WAN.
WEP (Wired Equivalent Privacy) - A protocol that adds security to wireless local area networks (WLANs). WEP uses encryption to provide security.
102 www.gateway.com

Appendix B
Specifications103

Appendix B: Specifications
SpecificationsSpecifications are subject to change without notice or obligation.
Dimensions 7.32 × 6.89 × 1.89 in. (186 x 175 x 48 mm)
Weight 17 oz. (0.482 Kg)
Color Graphite and Platinum
Power consumption 50 mW to 200 mW
Power supply Input 100-240V AC ~ .4A Output 5V DC 2.5A
Operating temperature 320° to 40°C (32° to 104°F)
Operating humidity 10% to 85% non-condensing
Non-operating temperature -20° to 70°C (-4° to 158°F)
Non-operating humidity 5% to 90% con-condensing
MTBF 500,000 hours
Operating range (indoors) As much as 30 m (100 ft) @ 54 Mbps
As much as 50 m (165 ft) @ 24 Mbps
As much as 70 m (230 ft) @ 12 Mbps
As much as 91 m (300 ft) @ 6 Mbps
104 www.gateway.com

Appendix C
Safety, Regulatory, and LegalInformation
105

Appendix C: Safety, Regulatory, and Legal Information
Regulatory compliance statements
Wireless GuidanceThe WGR-250 802.11G wireless LAN, (low power Radio Frequency, RF, transmitting device), operates in the 2400 - 2483.5 MHz band. The following section is a general overview of considerations while operating the wireless LAN.
Limitations, cautions, and concerns are listed below and in the specific country sections (or country group sections). This wireless device is only qualified for use in the countries identified by the Radio Approval Marks on the device rating label. If the country you will be using the wireless device in is not listed, please contact that countries local Radio Approval agency for requirements prior to operation. Wireless devices are closely regulated and use may not be allowed.
The power output of the WGR-250 wireless LAN device is well below the RF exposure limits as known at this time. Because this wireless device emits less energy than is allowed in radio frequency safety standards and recommendations, Gateway believes these devices are safe for use. Regardless of the power levels, care should be taken to minimize human contact during normal operation.
Measurements have been performed to show that the RF exposure is below what is considered safe limits; however care should be taken to make sure the user or bystanders keep the transmitter away from their body when the wireless device is transmitting. The transmitting antenna should be installed and used in a manner to maintain 20cm (8 inches) from user’s or bystander’s bodies.
This wireless device is intended to be used indoors. In some areas, use of this device outdoors is prohibited.
Some circumstances require restrictions on using wireless devices. Examples of common restrictions are listed below:
Warning In environments where the risk of interference to other devices or services is harmful or perceived as harmful, the option to use a wireless device may be restricted or eliminated. Airports, Hospitals, and Oxygen or flammable gas laden atmospheres are limited examples where use of wireless devices may be restricted or eliminated. When in environments where you are uncertain of the sanction to use wireless devices, ask the applicable authority for authorization prior to use or turning on the wireless device.
Important Every country has different restrictions on the use of wireless devices. Since your access point/router is equipped with a wireless device, when traveling between countries with your system, check with the local Radio Approval authorities prior to any move or trip for any restrictions on the use of a wireless device in the destination country.
Warning Do not operate the wireless device unless all covers and shields are in place and the device is fully assembled.
106 www.gateway.com

United States of AmericaFederal Communications Commission (FCC)Intentional emitter per FCC Part 15
The power output of the WGR -250 wireless LAN device is well below the RF exposure limits as known at this time. Because this wireless device emits less energy than is allowed in radio frequency safety standards and recommendations, Gateway believes these devices are safe for use. Regardless of the power levels, care should be taken to minimize human contact during normal operation.
Measurements have been performed to show that the RF exposure is below what is considered safe limits; however care should be taken to make sure the user or bystanders keep the transmitter away from their body when the wireless device is transmitting. The transmitting antenna should be installed and used in a manner to maintain 20cm (8 inches) from user’s or bystander’s bodies.
This wireless device is intended to be used indoors. In some areas, use of this device outdoors is prohibited.
Operation of this device is subject to the following two conditions: (1) This device may not cause harmful interference, and (2) this device must accept any interference received, including interference that may cause undesired operation of the device.
Caution Wireless devices are not user serviceable. Do not modify them in any way. Modification to a wireless device will void the authorization to use it. Please contact Gateway for service.
Caution Only use drivers approved for the country in which the device will be used. See the Gateway System Restoration Kit, or contact Gateway Technical Support for additional information.
Caution Wireless devices are not user serviceable. Do not modify them in any way. Modification to a wireless device will void the authorization to use it. Please contact Gateway for service.
Caution In order to comply with FCC requirements this transmitter must not be operated (or co-located) in conjunction with any other transmitter or antenna.
107www.gateway.com

Appendix C: Safety, Regulatory, and Legal Information
Unintentional emitter per FCC Part 15This device has been tested and found to comply with the limits for a Class B digital device, pursuant to Part 15 of the FCC rules. These limits are designed to provide reasonable protection against harmful interference in a residential installation. This equipment generates, uses, and can radiate radio frequency energy and, if not installed and used in accordance with the instructions, may cause harmful interference to radio or television reception. However, there is no guarantee that interference will not occur in a particular installation. If this equipment does cause interference to radio and television reception, which can be determined by turning the equipment off and on, the user is encouraged to try to correct the interference by one or more of the following measures:
■ Reorient or relocate the receiving antenna■ Increase the separation between the equipment and receiver■ Connect the equipment into an outlet on a circuit different from that to which the receiver is connected■ Consult the dealer or an experienced radio/TV technician for help.
Compliance Accessories: These accessories are required to be used in order to ensure compliance with FCC rules: The AC Adapter supplied with the device.
FCC declaration of conformityResponsible party:
Gateway Companies, Inc.610 Gateway Drive, North Sioux City, SD 57049(605) 232-2000 Fax: (605) 232-2023
Product:
■ Gateway WGR-250
This device complies with Part 15 of the FCC Rules. Operation of this product is subject to the following two conditions: (1) this device may not cause harmful interference, and (2) this device must accept any interference received, including interference that may cause undesired operation.
California Proposition 65 Warning
Caution Changes or modifications not expressly approved by Gateway could void the FCC compliance and negate your authority to operate the product.
Warning This product contains chemicals, including lead, known to the State of California to cause cancer, birth defects, or reproductive harm.
108 www.gateway.com

NoticesCopyright © 2004 Gateway, Inc.All Rights Reserved14303 Gateway PlacePoway, CA 92064 USA
All Rights ReservedThis publication is protected by copyright and all rights are reserved. No part of it may be reproduced or transmitted by any means or in any form, without prior consent in writing from Gateway.
The information in this manual has been carefully checked and is believed to be accurate. However, changes are made periodically. These changes are incorporated in newer publication editions. Gateway may improve and/or change products described in this publication at any time. Due to continuing system improvements, Gateway is not responsible for inaccurate information which may appear in this manual. For the latest product updates, consult the Gateway Web site at www.gateway.com. In no event will Gateway be liable for direct, indirect, special, exemplary, incidental, or consequential damages resulting from any defect or omission in this manual, even if advised of the possibility of such damages.
In the interest of continued product development, Gateway reserves the right to make improvements in this manual and the products it describes at any time, without notices or obligation.
Trademark Acknowledgments1-800-GATEWAY, ActiveCPR, ALR, AnyKey, black-and-white spot design, CrystalScan, Destination, DestiVu, EZ Pad, EZ Point, Field Mouse, Gateway 2000, Gateway Country, gateway.net, Gateway stylized logo, Perfect Scholar, Solo, TelePath, Vivitron, stylized “G” design, and “You’ve got a friend in the business” slogan are registered trademarks and black-and-white spotted box logo, GATEWAY, Gateway Astro, Gateway@Work, Gateway Connected touch pad, Gateway Connected music player, Gateway Cyber:)Ware, Gateway Education:)Ware, Gateway Flex Case, Gateway Gaming:)Ware, Gateway GoBack, Gateway Gold, Gateway Learning:)Ware, Gateway Magazine, Gateway Micro Server, Gateway Money:)Ware, Gateway Music:)Ware, Gateway Networking Solutions, Gateway Online Network (O.N.) solution, Gateway Photo:)Ware, Gateway Professional PCs, Gateway Profile, Gateway Solo, green stylized GATEWAY, green stylized Gateway logo, Gateway Teacher:)Ware, Gateway Video:)Ware, HelpSpot, InforManager, Just click it!, Learn@Gateway, Kids BackPack, SERVE-TO-ORDER, Server Watchdog, the Spotted G Gateway Logo and the Spotted G Logo, SpotShop, Spotshop.com, and Your:)Ware are trademarks of Gateway, Inc. Intel, Intel Inside logo, and Pentium are registered trademarks and MMX is a trademark of Intel Corporation. Microsoft, MS, MS-DOS, and Windows are trademarks or registered trademarks of Microsoft Corporation. All other product names mentioned herein are used for identification purposes only, and may be the trademarks or registered trademarks of their respective companies.
109www.gateway.com

Appendix C: Safety, Regulatory, and Legal Information
110 www.gateway.com

IndexAaccess point/router
changing default settings 63configuring 9factory default settings 60setting password 68settings 60status 65
accessingInternet 50
ActiveX filterturning on 69
adapter (network)definition 98
add serviceblocking 76
Advanced (Data) pagefilters 74ports 78routing 80, 82using 70
advanced settings 70antenna 5authentication
auto 72open system 72type 72
auto authenticationsetting 72
automated troubleshooting systemusing 96
automatic configurationDHCP 16
Bbasic rates
setting 73beacon interval
definition 98setting 73
blocking servicessetting 76
broadband
definition 98browser
definition 98
Ccable modem
definition 98Cat-5
connecting 8, 12definition 98purchasing 3
CD 3channel
setting 17client lease time
setting 22computers
naming 26, 32, 33configuring
access point/router 9, 13, 59, 67connections
power 5cookies filter
setting 69copying
files 57CTS protection mode
setting 73currently assigned
checking DHCP clients 22customized applications
setting 78
Ddata packet
definition 98data transmission settings
changing 70default gateway
definition 98obtaining from ISP 8, 12
DHCP (Dynamic Host Configuration Protocol)
111www.gateway.com

configuring 35, 36, 37definition 98server 22setting maximum users 22
disablewireless mode 17
DMZ (Demilitarized Zone)definition 98turning on 69
DNSdefinition 98
domaindefinition 98
drivessharing 50, 51un-sharing 53viewing shared 55
DSL (Digital Subscriber Line)definition 98modem 8, 12
DTIM (Delivery Traffic Indication Message)definition 98setting interval 73
dynamic IP addressdefinition 98
dynamic routingdefinition 99
Eencryption
definition 99Ethernet
cable 3definition 99
external portsetting 78
Ffile
sharing 50, 51files
copying 57opening 56printing 57un-sharing 53
filters
cookies 69setting up 74
firmwaredefinition 99upgrading 61
folderssharing 51un-sharing 53viewing share 55
fragmentationdefinition 99setting threshold 73
FTP (File Transfer Protocol)definition 99
Ggateway
definition 99G-Only mode 17
Hhardware
connecting 12definition 99
HTTP (HyperText Transport Protocol)definition 99
hubdefinition 99
Iincoming port range
setting 79Internet 47
accessing 50interface 82sharing connection 44
Internet Explorersetting up 44, 47
IP address 8, 12definition 99resolving 87
IPSec (Internet Protocol Security)definition 99
ISP (Internet service provider)definition 99
112 www.gateway.com

JJava filter
turning on 69
LL2TP (Layer-2 Tunneling Protocol)
setting 69LAN (local area network)
connections 5definition 99interface 82LEDs 4
List of Internet PCs 75List of PCs 75
MMAC (Media Access Control) address
cloning 63definition 99setting filter list 72
mappingnetwork drive 55
Mbpsdefinition 99
mixed modesetting 17
MTU (Maximum Transmission Unit)setting 63
Nnetwork
definition 100mapping drive 55using 54Windows XP Network Setup Wizard 27
Oopen system authentication 72opening
files 56operating mode
access point/router 81gateway 81setting 81
Ppacket
definition 100passphrase
definition 100PC
host 8, 12Ping (Packet INternet Groper)
definition 100using utility 86
plug-and-playdefinition 100
portdefinition 100
port forwardingdefinition 100setting up 77
port rangesetting 76
port trigger rangesetting 79
port triggeringsetting 79
powerconnection 5LED 4supply 3
PPPoE (Point-to-Point Protocol over Ethernet)definition 100setting 16
PPTP (Point-to-Point Tunneling Protocol)definition 100setting 16, 69
precautions 2primary DNS
obtaining from ISP 8, 12printers
sharing 50, 51, 53printing
files 57problem resolution 90protection mode
CTS 73protocol
definition 100service name 76
113www.gateway.com

proxy filtersetting 69
RRADIUS
definition 100rates
setting basic 73remote management
using 63reset switch
button 5resources
sharing 43RIP (Routing Information Protocol)
definition 100RJ-45
connecting 8, 12definition 101purchasing 3
routerdefinition 101page 60See also access point/router
routing tableviewing 82
RTS (Request To Send)definition 101setting threshold 73
Ssecurity
access point/router 68server
definition 101setting up
Internet Explorer 44, 47setup poster 3sharing
drives 50, 51files 50, 51folders 51Internet connection 44printers 50, 51, 53
signal strengthchecking 92
SSID (Service Set IDentifier)broadcast ID 17definition 101setting 17
starting IP addresssetting 22
static DNSsetting 22
static IP addressdefinition 101setting 16, 87
static routessetting up 82
static routingdefinition 101
subnet maskdefinition 101obtaining from ISP 8, 12
summaryInternet policy summary 77
switchdefinition 101
TTCP (Transmission Control Protocol)
definition 101using protocol 78
TCP/IPconfiguring 35definition 101
Technical Support 96telephone numbers 96threshold
fragmentation 73RTS 73
transmission ratesetting 73
UUDP (User Datagram Protocol)
definition 101using protocol 78
un-sharingdrives 53files 53folders 53
114 www.gateway.com

upgradedefinition 101firmware 61
UPnP 64URL (Uniform Resource Locator)
definition 101user guide 3using
network 54
Vviewing
drives 55folders 55
VPN (Virtual Private Network)definition 101pass-through 69
WWAN (Wide Area Network)
connection 5definition 102LED 4
Web filterssetting 69
Website Blockingby Domain Name 77by Keyword 77
WEP (Wired Equivalent Privacy)definition 102setting 17
Windows XP Network Setup Wizard 27WINS 22wireless
interface 82LED 4MAC filter 71
wizardGateway Wireless-G Access Point/Router
Setup Wizard 9Windows XP Network Setup Wizard 27
workgroupnaming 26, 32, 33
115www.gateway.com

116 www.gateway.com


MAN 802.11G ROUTER GDE R1 02/04