Embed Size (px)
Citation preview

USING WORDPRESS TO CREATE A WEBSITE (RATHER THAN A BLOG)
STEP-BY-STEP INSTRUCTIONS

STEP 1:Preparing your WordPress site • Go to the Dashboard for your new “blog”• Select Appearance > Themes. Make sure you have
Activated the Theme that you have selected for your web site
• Select Posts. If it is there, delete the post called “Hello World” by clicking the checkbox and selecting Trash
• Select Pages. Delete the “About” page (or any other page you find there) by clicking the checkbox and selecting Trash
• NOW CREATE YOUR SITE

STEP 2: Adding your home page plus your other 5 pages
1. Go to Dashboard >Pages > Add New2. In the Title box, add the name of your first page
– In my example BT Media (my Home page)
3. Under Page Attributes > Template (on the RH side of the page) select the layout that you want for the page (sidebars etc)
4. Scroll down and remove the checkmarks from the Discussion area to prevent comments (if you don’t have this box on your Theme, see the next slide)
5. Remove the social sharing buttons if you don’t want them6. Publish your page by clicking the Publish button
Add your other 5 pages in the same way (following Steps 1-5 above), giving each the relevant title from your plan (you can, if you wish, have a different layout for your home page and your secondary pages)
Don’t add any content to your pages at this point – just concentrate on establishing the skeleton for your site. You should have 6 pages.

Remove Comments Box
Remove Sidebar contents
STEP 3: These elements make your website look like a blog and need to be removed – the next 2 slides show you how
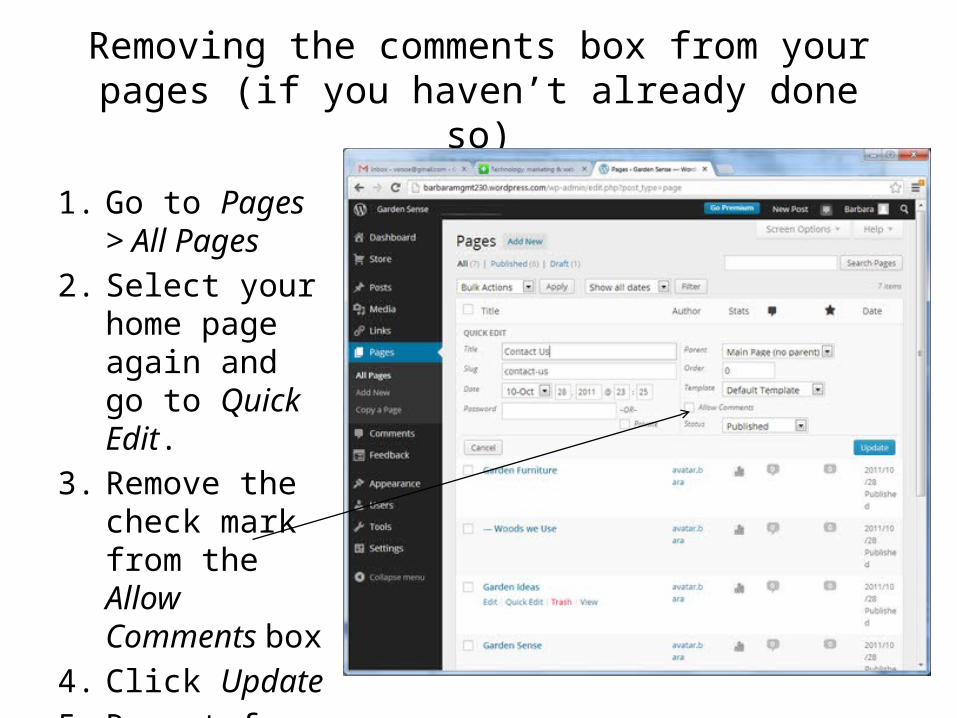
Removing the comments box from your pages (if you haven’t already done so)
1. Go to Pages > All Pages
2. Select your home page again and go to Quick Edit.
3. Remove the check mark from the Allow Comments box
4. Click Update5. Repeat for each
of your Pages

Removing unwanted widgets from the page sidebar • From the LH sidebar menu
of the Dashboard go to Appearance > Widgets
• Remove all the widgets from the right-hand sidebar by dragging and dropping them to the left into the main area of the page– You may want to add Widgets
later, but for now your objective is a blank canvas!
• View your page to make sure the sidebars are empty
Sometimes widgets show up on your page that aren’t listed under the sidebar on the Appearance -> Widgets screenIf you can still see content in the sidebar when you view your page try dragging a blank Text Widget into the right-hand sidebar
For more help on this look at http://en.forums.wordpress.com/topic/remove-meta-from-sidebar

STEP 4: Set your homepage for the navigation bar (IMPORTANT!)
• From the LH sidebar menu of the Dashboard go to Settings > Reading Settings
• Click on Front Page Displays >Static Page then select the name of your home page (Garden Sense in my example)
• Save your changes (button is at the bottom of the page)

STEP 5: Customize your settings
• Go to Settings > General• Change the Site Title to the name of your
organization. • Either delete the Tagline, or add one that is
appropriate for your site• Save your changes• You can also change the header image (depending on
your theme), but we will get to that later• View your pages by clicking on the name of your site
at the top of the screen

STEP 6: Navigation bar and “Menus”
• View your site (using the link in the top menu bar)• Your navigation bar items (the same as the titles you
entered earlier) will appear in alphabetical order, rather than the order that you showed in your plan
• From the LH sidebar menu of the Dashboard go to Appearance > Menus and use the tool there to create a custom menu with the items in the order that you wish. You can also change the wording here (see next slide for details)
• NOTE – if you have an additional Home link on your navigation bar, make sure you have followed STEP 4

Step 3: Rearrange your navigation bar elements
here by dragging them into place
Step 1: Create a new menu and save it with a descriptive name
Step 2: Select the pages for
your navigation menu and
click Add to Menu
Step 5: Click Save Menu
Step 4: Select Primary Menu

Adding “child” pages to your navigation bar (if applicable)•On my site map, I have shown that the page Woods we Use is accessible only from the Garden Furniture page •If you have a page like this then you will want it to appear in a drop-down menu on the navigation bar•Edit your page•In the Page Attributes, select the “parent” page•Click Update•Your page navigation will now show the child page in drop-down menu

STEP 7: Adding a header image or a “featured” image
• Some themes allow only one header image – so it may be the same on all your pages. Investigate the options for your theme.
• From the LH sidebar menu of the Dashboard go to Appearance > Header
• Upload the image you have prepared (you will need to check the size for your particular theme)
• You can crop the image to fit using WordPress, but it is better if you have prepared it earlier, along with your other images
• You can also add/remove Header Text to/from the image if you wish
• “Featured” images (used by the Edin theme) are added at the individual page level

Checkpoint: before you add any content make sure your site has:
1. 6 pages including your homepage (no content at this point)
2. A custom navigation bar showing the navigation links in the same order as on your plan
3. A blank sidebar (no comments, meta, etc)4. Custom header or featured images5. A custom tag line (or none at all)

STEP 8: Adding content to each page• Click on Pages and you will see a list of all the pages in your site• Select the page you want and click Edit• You can edit a page as many times as you want to, so there is no need to
worry about getting it perfect on the first try• Add your text, images, links, and video• Click Update and Preview Changes• You can edit using either / both the Visual and Text toolbars

Create embedded links to external sites
Add images so that the text
wraps around them
Add video
Adding content to your pages

Adding images to your pages1. Resize all your images so they match your plan (use a tool
like pixlr.com or the image editor of your choice)2. In WordPress, open the page you want to Edit3. Place your cursor where you want the image to go.4. Click on the Add Media button (camera icon) and upload
your file5. Add the Alt Text (from your plan)6. Use the align controls to position the image on the page7. In the Size options select Full Size 8. Click Insert into PostSee illustration on next slide

Alt text
Alignment on page

Adding content• Add all of your content – remember you can
edit your pages at any time• Use the Text Widget to add text or images to
the sidebar (you can use html to add these)• If you want to remove the Like and Share
buttons from your pages scroll down in edit mode and uncheck the relevant boxes
• See the next section for information on making text into clickable links, adding a YouTube video, and embedding a Google Docs form

MAKE TEXT INTO A CLICKABLE LINK
EMBED A VIDEO FROM YOUTUBE
EMBED A GOOGLE DOCS FORM
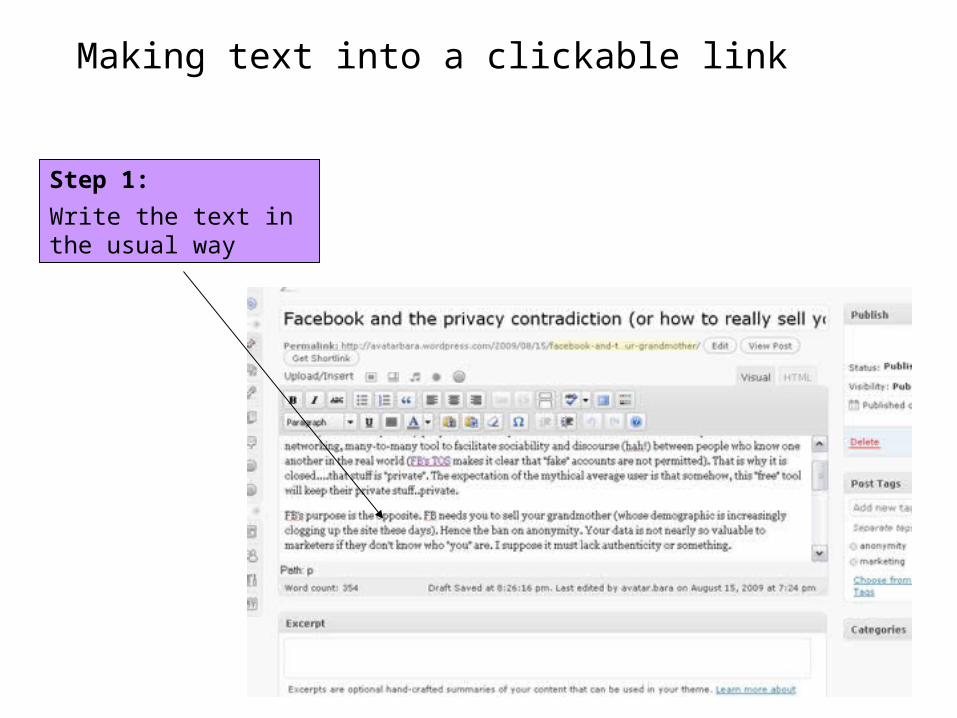
Making text into a clickable link
Step 1:
Write the text in the usual way

Step 2:
Highlight the phrase you want to make into a link. Make it as descriptive as possible so people know what to expect when they click.
Step 3:
Click the link icon on the toolbar and a dialog box will appear
Making text into a clickable link

Step 4:
Copy and paste the URL into the dialog box, or link to other pages in your site
Step 5:
If you want the page to open in a new window or tab, then check this box
Step 6:
Whatever you write in the Title box will appear when someone mouses over the link on your page
Step 7:
Click “Add Link” and that’s it!
Making text into a clickable link

Embedding a video from YouTube
• Get the URL for sharing the video from YouTube
• Edit the page you want the video to appear on.
• Place your cursor where the video will go
• Select Add Media• Select Insert from
URL
• (This is easier than using the Insert YouTube function)

Embedding a Google Docs form
• Once you have finished designing and testing your Google Docs form you need to embed it into the relevant page of your web site
• Google creates the embed code that you need, so you simply have to paste it into your page

When you have created your form, click Send Form to get the embed code from
Google Docs
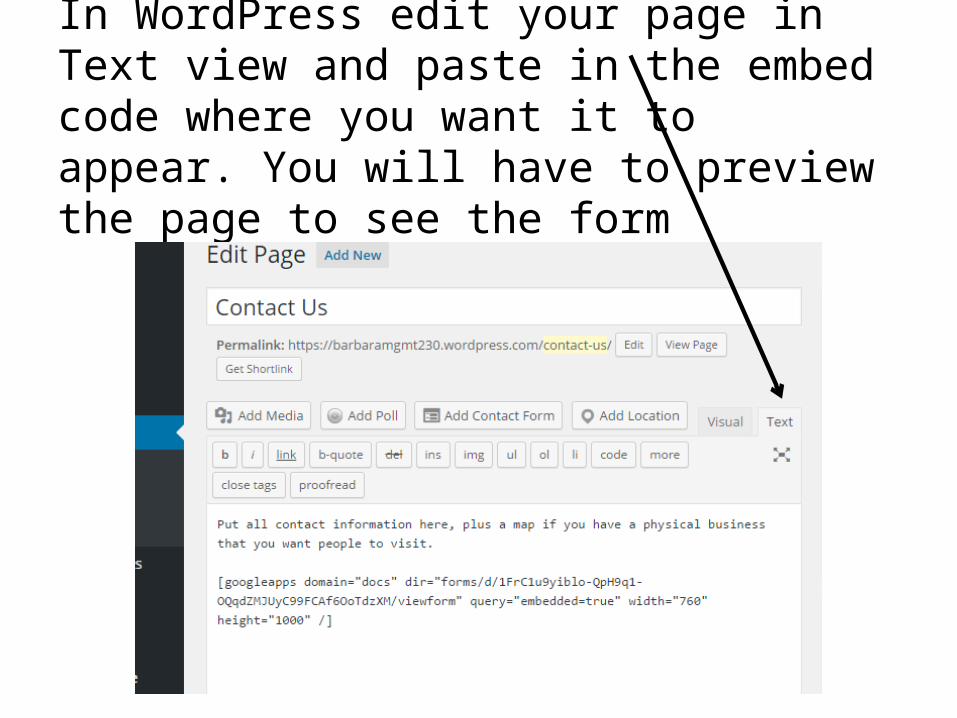
In WordPress edit your page in Text view and paste in the embed code where you want it to appear. You will have to preview the page to see the form