Embed Size (px)
Citation preview

Using theUsing theFOCUS FOCUS Web Site Web Site Teacher’sTeacher’sDeskDesk

Topics Covered in this Topics Covered in this PresentationPresentation
Accessing the FOCUS Web site Accessing the FOCUS Web site
Importing and Creating ClassesImporting and Creating Classes
Adding Students to the Class RollAdding Students to the Class Roll Managing AssessmentsManaging Assessments
Using the CalendarUsing the Calendar
Using the Tools and ResourcesUsing the Tools and Resources

Accessing the FOCUS Accessing the FOCUS Web SiteWeb Site

Accessing the FOCUS Accessing the FOCUS Web SiteWeb Site
FOCUS Web site home page
Use your FCAT Explorer sign-in name and password to sign in to the FOCUS Teacher’s Desk.

Accessing the FOCUS Web SiteAccessing the FOCUS Web Site
FOCUS Web site Teacher’s Desk(welcome screen view)
First-time visitors to the FOCUS Teacher’s
Desk will see the welcome screen shown
on the right.
At the welcome screen, teachers can download
the FOCUS Web Site Teacher’s Manual, import a class, or
create a class.

Accessing the FOCUS Web SiteAccessing the FOCUS Web Site
FOCUS Web site Teacher’s Desk(At-a-Glance screen)
At the FOCUS Teacher’s Desk, teachers can
Set up an instructional calendar.
Administer five-item mini-assessments for reading and math.
Review student performance with FOCUS reports.

Accessing the FOCUS Web SiteAccessing the FOCUS Web Site
Teacher’s Desk tabs
The Teacher’s Desk is organized into six tabbed pages:
At-a-Glance
Class Options
Assessments
Reports
Calendar
Tools/Resources

Importing and Creating Importing and Creating ClassesClasses
Importing and Creating ClassesImporting and Creating Classes
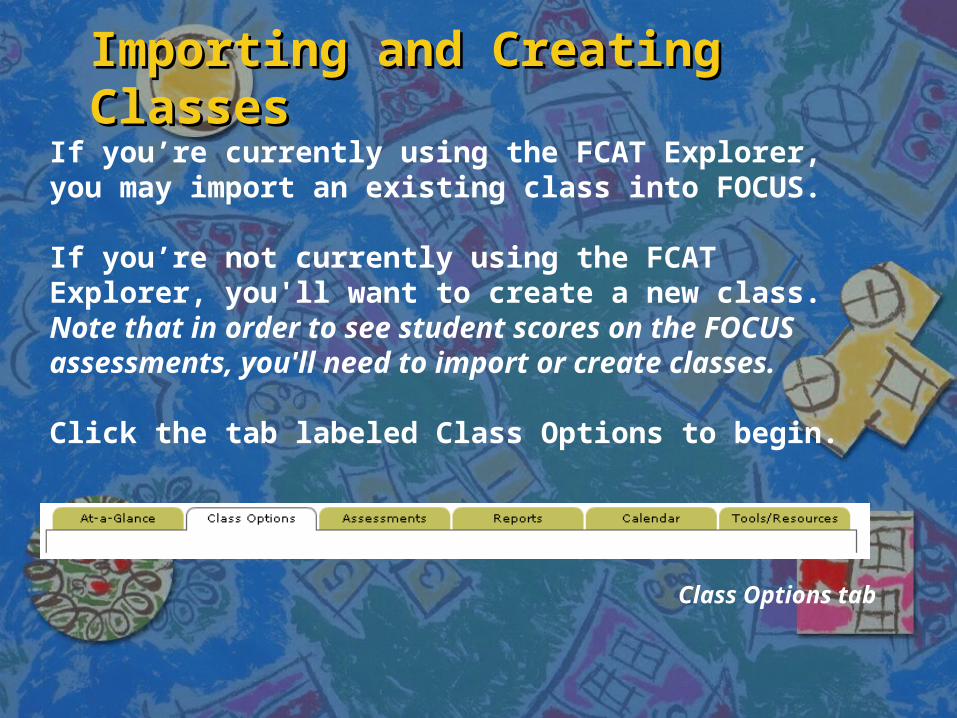
Class Options tab
If you’re currently using the FCAT Explorer, you may import an existing class into FOCUS.
If you’re not currently using the FCAT Explorer, you'll want to create a new class. Note that in order to see student scores on the FOCUS assessments, you'll need to import or create classes.
Click the tab labeled Class Options to begin.

Importing Classes from the FCAT Importing Classes from the FCAT ExplorerExplorer
Class Options buttons
To import an existing class from the FCAT Explorer, click Import Class at the Class Options screen.
The Import a Class from FCAT Explorer screen will then display in your browser.

Importing Classes from the FCAT Importing Classes from the FCAT ExplorerExplorer
Import a Class from FCAT Explorer screen
First, open the drop-down box labeled Select a class from your FCAT Explorer Teacher’s Desk.
Your FCAT Explorer classes are displayed in this list. Select the class you wish to import.

Importing Classes from the FCAT Importing Classes from the FCAT ExplorerExplorer
Import a Class from FCAT Explorer screen
Second, open the drop-down box labeled Select a program for this class.
You may select 3rd – 10th Grade Math or Reading.

Importing Classes from the FCAT Importing Classes from the FCAT ExplorerExplorer
Import a Class from FCAT Explorer screen
In the third field, enter a name for the class.
Then click Import.
Any students in your FCAT Explorer class have now been imported into a new FOCUS class.

Creating ClassesCreating Classes
Class Options buttons
To create a new FOCUS class, click Create Class at the Class Options screen.
The Create New Class screen will then display in your browser.

Creating ClassesCreating Classes
Create a New Class screen
First, open the drop-down box labeled Select a program for this class.
You may select 3rd – 10th Grade Math or Reading.

Creating ClassesCreating Classes
Create a New Class screen
Second, enter a name for the class, then click Save.
Your class has now been added to your Teacher’s Desk. However, no students are currently enrolled in your class.
Your next step will be to add students to the class.

Adding Students to Adding Students to the Class Roll the Class Roll

Adding Students to the Class RollAdding Students to the Class Roll
Class Options buttons
Now that you’ve imported or created a class, your next step is to add students to this class. You may either add students who are currently enrolled in your school or create new student accounts.
Click Add Students at the Class Options screen. The Add/Remove Students screen will then display in your browser.

Adding Students to the Class RollAdding Students to the Class Roll
Add/Remove Students screen
To add students to your class who are already enrolled in your school, use the alpha-numeric student directory search.
Click a letter to see a list of all students enrolled in your school whose last name begins with the selected letter.

Adding Students to the Class RollAdding Students to the Class Roll
Add/Remove Students screen
Selecting the letter B returns the list of students shown to the right. To add a student to your class, check the box next to the student name and click Save.
The student has now been added to your class.

Adding Students to the Class RollAdding Students to the Class Roll
Add/Remove Students screen
To add students to your class who are not enrolled in your school, you will need to create new student accounts.
To create a new student account, click the click here to add new students link.

Adding Students to the Class RollAdding Students to the Class Roll
Enroll Students screen
At the Enroll Students screen, enter the new student information in the appropriate fields and click Save.
The new students will be added to your school roll as well as your class roll.
Now that you've added students to your class roll, you can begin managing your reading and math assessments.

Managing Assessments Managing Assessments

Managing AssessmentsManaging Assessments
Assessment Management screen
To begin managing your reading and math assessments, click the Assessments tab.
The Assessment Management screen shown on the right will then display in your browser.

Managing AssessmentsManaging Assessments
Assessment Management screen
To open assessments for your class, select the strand or benchmark on which you want the class assessed.
Open the drop-down box to select the strand or benchmark.

Managing AssessmentsManaging Assessments
Assessment Management screen
The assessments related to your selected strand or benchmark will display in the Assessment Name column.
You can view the status of each assessment by looking in the columns labeled First Assessment and Second Assessment.
.

Managing AssessmentsManaging Assessments
First assessments are automatically set to Closed, meaning they do not appear on your students’ home page.
To change an assessment’s status from Closed to Open so that your students can take the assessment, click the assessment status button (outlined in red below).
The assessment will now display as Open.

Managing AssessmentsManaging Assessments
To change an assessment’s status back to Closed, click the assessment status button. This will remove the assessment from your students’ home page, preventing them from accessing the assessment.
Remember that assessments should be opened only at that point in time when you’re ready to check your students’ mastery.
The following slide displays FOCUS student assessment content.

FOCUS Student AssessmentsFOCUS Student Assessments
FOCUS Web site student
assessment menu
Sample student assessment math item

Running ReportsRunning Reports

Running ReportsRunning Reports
Reports tab
You can create three different kinds of reports on your students’ progress at the Teacher’s Desk:
1. Student Reports2. Class Reports3. Class Summary Reports
To begin running reports, click the Reports tab.

Student ReportsStudent Reports
Reports screen (Student report selected)
The student report allows you to see how an individual student has done on the assessments.
To run a student report, choose a student from the drop-down box (outlined in red). Then click Get Data.

Class Summary ReportsClass Summary Reports
Reports screen (Class summary report selected)
The class summary report allows you to see all the work your selected class has completed.
To run a class summary report, make sure the class you want to create a report for is selected. Then click Get Data.

Using the CalendarUsing the Calendar

Using the CalendarUsing the Calendar
Calendar tab
The Calendar screen of the Teacher’s Desk provides a tool for planning instructional units and scheduling assessments. Events that you schedule using the calendar will appear in your Upcoming Events list on your At-a-Glance page.
To open the Calendar screen, click the tab labeled Calendar.

Using the CalendarUsing the Calendar
Calendar screen(Add New Event button selected)
To enter events on your calendar, click a month and a day. Then click Add New Event below the calendar to enter the event information.

Using the CalendarUsing the Calendar
Add New Event pop-up window
After clicking Add New Event, you will see a pop-up window prompting you to enter a name, start and end dates, and notes for your event.
After entering all the information on your new event, click Create and the event will be added to your calendar.

Using the CalendarUsing the Calendar
Calendar screen (Edit and Delete buttons selected)
To delete or edit events on your calendar, click the date of the event you wish to change. A list of events will appear to the right of the calendar.
You can then click Edit to make changes to the event or Delete to remove the event from your calendar.

Using the Using the Tools and ResourcesTools and Resources

Using the Tools and ResourcesUsing the Tools and Resources
Tools/Resources tab
The Tools/Resources screen of the Teacher’s Desk offers helpful links for teachers and a content review feature.
To open the Tools/Resources screen, click the Tools/Resources tab.

Using the Tools and ResourcesUsing the Tools and Resources
Tools/Resources screen
The Content Review feature on the Tools/Resources screen allows you to see the questions on any of the FOCUS assessments.
To review assessment materials, choose the benchmark or focus you want to see from the drop-down list (outlined in red).

Using the Tools and ResourcesUsing the Tools and Resources
Tools/Resources screen
If you would like the correct answer indicated, check the box labeled Show correct answers below the drop-down box.
Click Review Content and the assessment questions and/or reading passages will appear.

For more information about the For more information about the FOCUS Web site, visit FOCUS Web site, visit
focus.florida-achieves.com focus.florida-achieves.com or call the FOCUS Support Team or call the FOCUS Support Team
toll-free at toll-free at 1-888-750-3228. 1-888-750-3228.