Embed Size (px)
Citation preview

Produce Removable Partial Dentures Using Spin Casting Technique Convert a wax rendering of a dental partial into a cast metal partial denture. This manual uses the spin casting technique to create a cast metal dental partial. This manual may be used after the dental technician has made a duplicate cast of the patience maxillary and before denture finishing and polishing. The manual should be used by dental technicians.
2011
Armando J. Torres Writing 107T
5/12/2011

Writing 107T | Introduction 2
Table of Contents Introduction ..................................................................................................................................... 3
Intended Audience ...................................................................................................................... 3
Kerr Centrifugal Casting Machine .................................................................................................. 4
Description of Components and their Functions ........................................................................ 4
Before You Begin ........................................................................................................................... 6
Equipment Required ................................................................................................................... 6
Materials Required ...................................................................................................................... 6
Safety Precautions ....................................................................................................................... 6
Prepare the Equipment and Material for Casting ............................................................................ 8
Make the Investment Case ............................................................................................................ 10
Transfer the Fired Investment Case .............................................................................................. 14
Melt the Metal and Use Centrifugal Force to Fill Investment Case ............................................. 16
Cool and Remove the Metal Partial from Investment Material .................................................... 17
Glossary ........................................................................................................................................ 19
Writing 107T | Introduction 3
Introduction
The dental laboratory is an important part of dental services. This specialty deals with the design, fabrication, and repair of dental appliances (crowns, complete dentures, removable partial dentures, crown, and bridge) under the direction and supervision of the dentist. Once the dentist establishes the treatment plan and the tooth or teeth are prepared, an impression is made of your mouth and sent to the laboratory. There are several fabrication phases and checkpoints within a dental lab that contribute to the end result. Spin casting is a process used to create a cast metal partial denture from a wax rendering. Figure 1 illustrates the before and after using spin casting.
Figure 1. Images of two dental partials: A wax rendering of a dental partial (left) and a cast metal dental partial (right).
These instructions include five stages:
• Prepare the Equipment and Material for Casting • Make the Investment Case • Transfer the Fired Investment Case • Melt the Metal and Use Centrifugal Force to Fill Investment Case • Cool and Remove the Metal Partial from Investment Material
Following these instructions will reduce the time a dental technician uses to train an assistant to aid with simple, non-skill intensive tasks. Anyone willing to participate in technical dentistry can use this manual to take on these tasks and learn the trade independently. Intended Audience The intended audience is the dental technicians. These instructions assume you have basic knowledge of welding equipment and general dental material terms; however, no welding experience is required.
Writing 107T | Kerr Centrifugal Casting Machine 4
Kerr Centrifugal Casting Machine
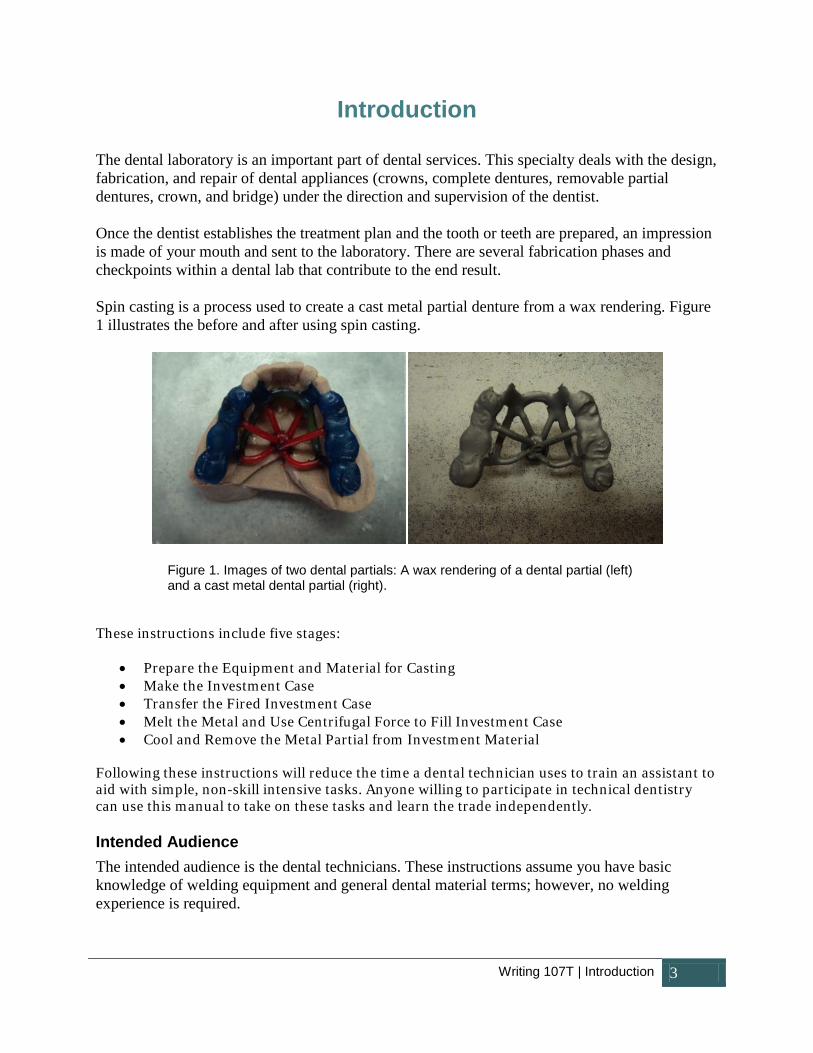
The Kerr Centrifugal Casting Machine is the main piece of equipment for metal casting. It has six main components: the arm, the arm pin, the crucible carriage, the crucible, the cradle, and the base, which is bolted to the casting well and comes integrated with a heavy-duty spring (Figure 2).
Figure 2. A top view of a centrifugal casting machine bolted to a blue casting well Description of Components and their Functions Counterweight: The counterweight is made of multiple ¾- inch steel discs with a diameter of 3 inches each. The counterweight is fastened to one end of the arm with a holding screw and nut. The counterweight balances the other end of the arm providing a stable centrifugal force. The operator can adjust the counterweight to balance opposite sides. Arm: The arm is a ¾-inch steel bar that is 10-inch by 1-inch stretching across the central axis of the base of the machine. The arm is attached perpendicularly to the base axis, which allows it to rotate. The arm, at one end, has a bending joint that leads into the cradle and at the opposite end,
Writing 107T | Kerr Centrifugal Casting Machine 5
supports the counterweight. This arm holds the counterweight, the cradle, the crucible carriage, and the crucible together while in rotation. Base: The base contains an integrated heavy-duty steel spring with a cover that is 4.5 inches by 6-inch diameter. The base makes up the center most part of the machine and provides the initial trigger for the exerted centrifugal force. Arm pin: The arm pin is a steel 5-inch cylinder that sticks out freely from the base. The arm pin holds the arm in place after you have loaded the spring by spinning the arm clockwise until reaching maximum tension. Cradle: The cradle is a holding construct that cradles the fired investment case with four 6-inch horizontal cylinder rods connected to a vertical circular dish with a diameter of 4 inches. The cradle supports the case while it takes in the molten metal from the crucible. Crucible Carriage: The crucible carriage is a sliding steel dish, 3 inches in diameter that is attached to the cradle. It holds the crucible into place while spinning occurs. Crucible: The crucible is a ceramic piece, 2 inches wide and 2.5 inches long, that holds the metal for casting. The crucible contains two retaining groves on each side that allow it to slide securely into the crucible carriage. The crucible has two open ends. One end is formed to hold the metal, both solid and liquid form, and the other ¼ inch diameter opening is used to exit the metal that pours into the investment case when spinning. Casting Well: The casting well is a blue steel baked enamel-finished drum, 23.75 inches wide by 11.5 inches high and has an octagon shape. The base is bolted to the center bottom of the well. The casting well helps protect the operator against accidental metal spilling from the whirling crucible.

Writing 107T | Before You Begin 6
Before You Begin
Equipment Required • Centrifugal casting machine with casting well • Sandblasting machine • Welding unit (Oxygen tank, Acetylene tank, Torch and nozzle) • Dental Technician Vibrator • Wax heating pot • 2 – one inch brushes • Gram scale • Metal flask tongs • Bucket and ladle • Plaster nipper (pliers) • Silicon Bowl • Mixing Spatula • Hammer • Welding Goggles • Welding Gloves • Protective Apron (optional)
Materials Required
• Chrome Cobalt Shot Alloy • Water • Paraffin Wax • Ethyl Silicate Investment Compound • Investment Binder Liquid • Petroleum Jelly
Safety Precautions
⊗ Make sure you have the following protective equipment before handling the welding torch or hot material (Figure 3).
Welding Goggles Welding Gloves Flask Tongs
Figure 3. Images of safety equipment and names
NOTE: Protective Apron is optional
⊗ The Kerr Centrifugal Casting Machine is equipment essential to the dental technician. Those who operate this machine must understand the risks involved. Operators of this
Writing 107T | Before You Begin 7
machine will be working with dangerous and hazardous materials. It is important to follow all the safety precautions and utilize designated safety equipment properly. Following the directions accurately is vital to the proper and safe use of this machine.
⊗ You should perform all tasks in a dental laboratory under the supervision of an experienced dental technician.
⊗ Do not obstruct the casting machine arm when spinning.
⊗ To avoid serious burns, be cautious when near the oven. It heats to over 1000 degrees Fahrenheit.
⊗ The investment binder liquid is a hazardous substance. AVOID CONTACT WITH THE SKIN AND MOUTH.
⊗ Use the tongs and gloves at all times when handling hot material or removing things from the oven. Simply standing too close to the oven can cause burns.
⊗ Use the length of the tongs to avoid burns from the oven.
⊗ Do not forget to turn the oven off after use.
⊗ Use the brushes when applying hot wax.
⊗ Make sure you use the welding torch properly. ⊗ Do not operate the sandblasting machine when the protective glass is open.
Writing 107T | Prepare the Equipment and Material for Casting 8
Prepare the Equipment and Material for Casting
The first step is to prepare the necessary equipment and material you will use to perform the procedures. To prepare the centrifugal casting machine for torching:
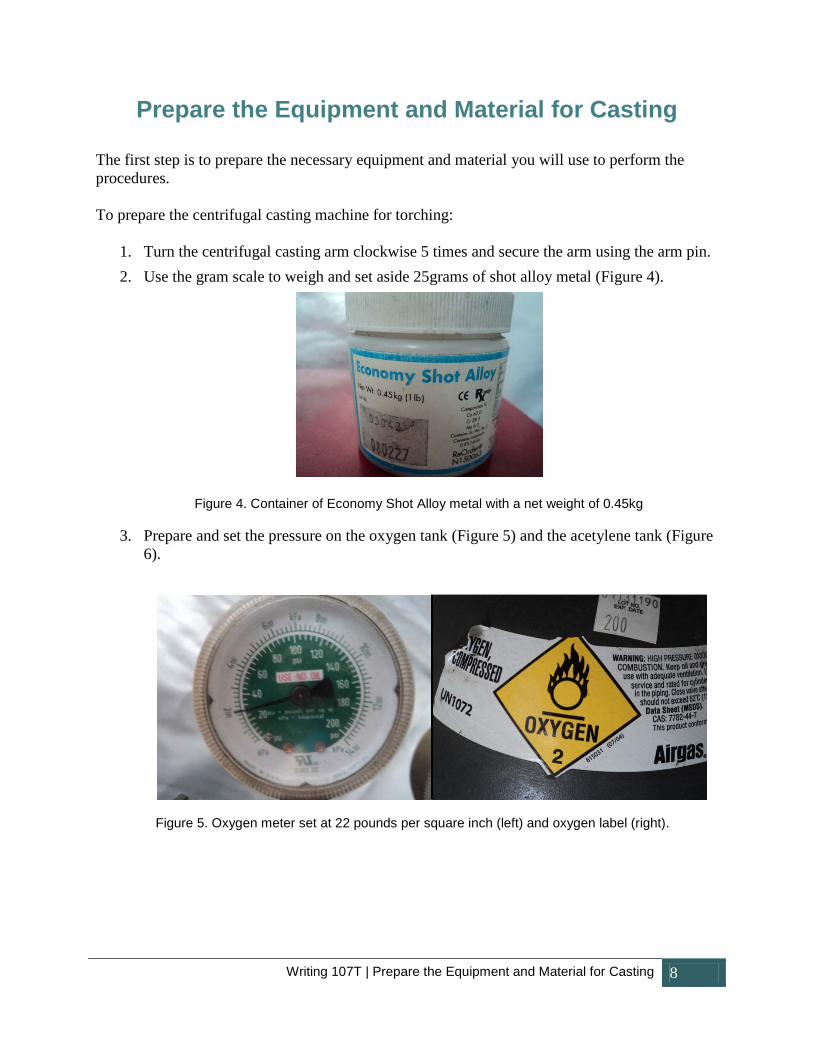
1. Turn the centrifugal casting arm clockwise 5 times and secure the arm using the arm pin. 2. Use the gram scale to weigh and set aside 25grams of shot alloy metal (Figure 4).
Figure 4. Container of Economy Shot Alloy metal with a net weight of 0.45kg
3. Prepare and set the pressure on the oxygen tank (Figure 5) and the acetylene tank (Figure 6).
Figure 5. Oxygen meter set at 22 pounds per square inch (left) and oxygen label (right).
Writing 107T | Prepare the Equipment and Material for Casting 9
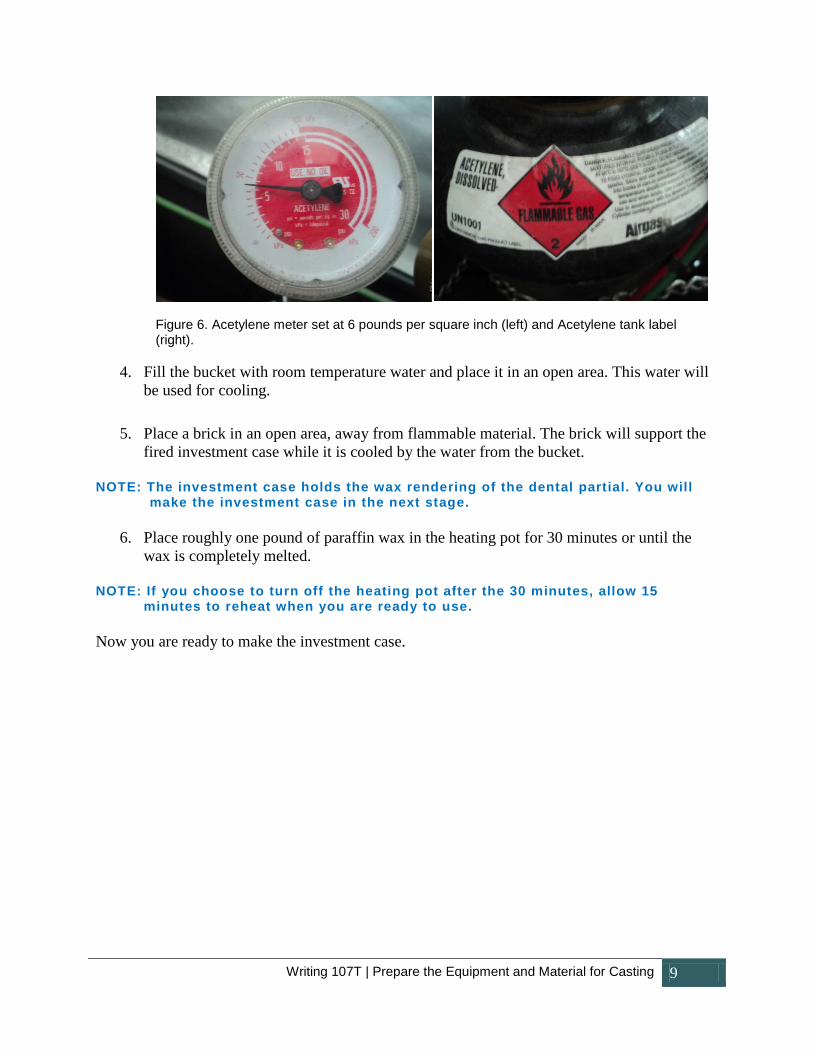
Figure 6. Acetylene meter set at 6 pounds per square inch (left) and Acetylene tank label (right).
4. Fill the bucket with room temperature water and place it in an open area. This water will
be used for cooling. 5. Place a brick in an open area, away from flammable material. The brick will support the
fired investment case while it is cooled by the water from the bucket.
NOTE: The investment case holds the wax rendering of the dental partial. You will make the investment case in the next stage.
6. Place roughly one pound of paraffin wax in the heating pot for 30 minutes or until the
wax is completely melted.
NOTE: If you choose to turn off the heating pot after the 30 minutes, allow 15 minutes to reheat when you are ready to use.
Now you are ready to make the investment case.

Writing 107T | Make the Investment Case 10
Make the Investment Case
You must make an investment case of the partial wax rendering in preparation for the burnout oven. After you make the case you can start the casting process. To make the case:
1. Turn on the wax heating pot and allow the paraffin wax to re-melt. 2. Place and center the duplicate maxillary mold with the wax rendering on a 5x5 inch
plastic base.
3. Use the brush to apply hot paraffin wax along the edges of the inferior maxillary duplicate to secure it to the plastic base (Figure 7).
4. Add a layer of petroleum jelly to the inner lining of the plastic ring using your fingers. Wipe your hands with a rag after to avoid slippery hands.
Figure 7. Apply paraffin wax to inferior maxillary duplicate and secure to plastic base.
5. Cover the duplicate with the plastic ring and attach it to the plastic base using hot paraffin wax with the brush (Figure 8).
NOTE: Make sure the plastic ring does not make contact with the maxillary duplicate and both the ring and the duplicate are secured to the plastic base.

Writing 107T | Make the Investment Case 11
Figure 8. (Left) Secure the plastic ring to the base using hot paraffin wax. The plastic ring should enclose the inferior maxillary duplicate without making contact (Right).
6. Collect one scoop of Ethyl Silicate Investment compound and pour it into the silicon
mixing bowl (Figure 9).
Figure 9. Pour investment compound in mixing bowl.
7. Add the investment bonding liquid to the investment compound until you get a
manageable consistency (Figure 10).
NOTE: The consistency should be manageable but not watery.

Writing 107T | Make the Investment Case 12
Figure 10. Add binder liquid to investment compound and mix with spatula.
8. Use another brush to apply the newly combined investment material to the wax
rendering.
NOTE: Make sure to fill in all the small crevices on the wax rendering.
9. Turn the dental technician vibrator on and place the plastic base on the vibrator.
10. Gradually, add the rest of the investment material inside the now vibrating ring so that it fills all crevices within the ring.
NOTE: Be careful not to over fill the plastic ring. Fill the ring until it is almost flush with the top opened surface of the ring.
11. Let the newly filled plastic ring sit in a cool dry place for 45 minutes, or until the
investment material hardens.
12. Carefully detach the plastic base from the ring. Hold the ring with both hands and gently push out the case from the plastic ring using both thumbs.
13. Place the investment case in the burnout oven along with the crucible. Then close and secure the oven door.
14. Turn the temperature dial to level 5 and allow the oven to heat for two hours.
WARNING: DO NOT LEAVE THE OVEN UNATTENDED. THE OVEN TEMPERATURE WILL CONTINUE TO RISE AND CAN REACH OVER 2000 DEGREES FAHRENHEIT.
NOTE: Check the oven every 30 minutes to prevent any serious damage.
Writing 107T | Make the Investment Case 13
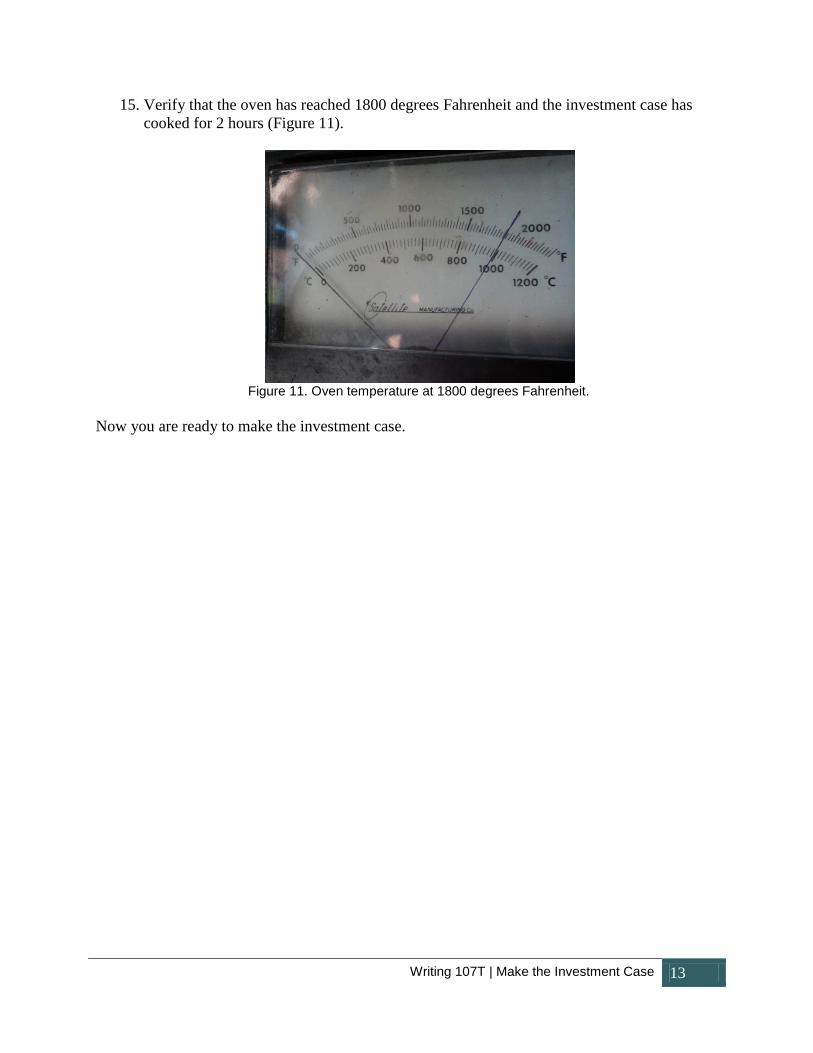
15. Verify that the oven has reached 1800 degrees Fahrenheit and the investment case has cooked for 2 hours (Figure 11).
Figure 11. Oven temperature at 1800 degrees Fahrenheit.
Now you are ready to make the investment case.

Writing 107T | Transfer the Fired Investment Case 14
Transfer the Fired Investment Case After the investment case has cooked for two hours, you need to get the recently fired investment case from the burnout oven into the casting machine cradle. This stage will prepare you for the melting of the metal and for the use of the casting machine. To transfer the investment case:
WARNING: THE OVEN IS EXTREMELY HOT!
1. Using the tongs, open the oven latch wearing your welding gloves and using the tongs,
remove the crucible from the oven (Figure 12).
Figure 12. Crucible and Investment cases at 1800 degrees Fahrenheit.
NOTE: Close the oven door every time after removing fired items. EXTREMELY HOT!
2. Place the fired crucible in the crucible carriage and carefully place 25g of shot alloy metal into the crucible (Figure 13).
Figure 13. Shot alloy in f ired crucible. Figure 14. Fired investment case
in cradle
CRUCIBLE
Investment Case on cradle
Shot Alloy in crucible

Writing 107T | Transfer the Fired Investment Case 15
3. Use the tongs to remove the fired investment case from the oven.
4. Place the case on the cradle with the entry hole facing the crucible (Figure 14).
Now you are ready to melt the metal and use the spin-casting machine.
Writing 107T | Melt the Metal and Use Centrifugal Force to Fill the Investment Case
16
Melt the Metal and Use Centrifugal Force to Fill the Investment Case
After you transfer the case to the casting machine, you need to melt the metal alloy with a welding torch. To melt the metal and to use the centrifugal force:
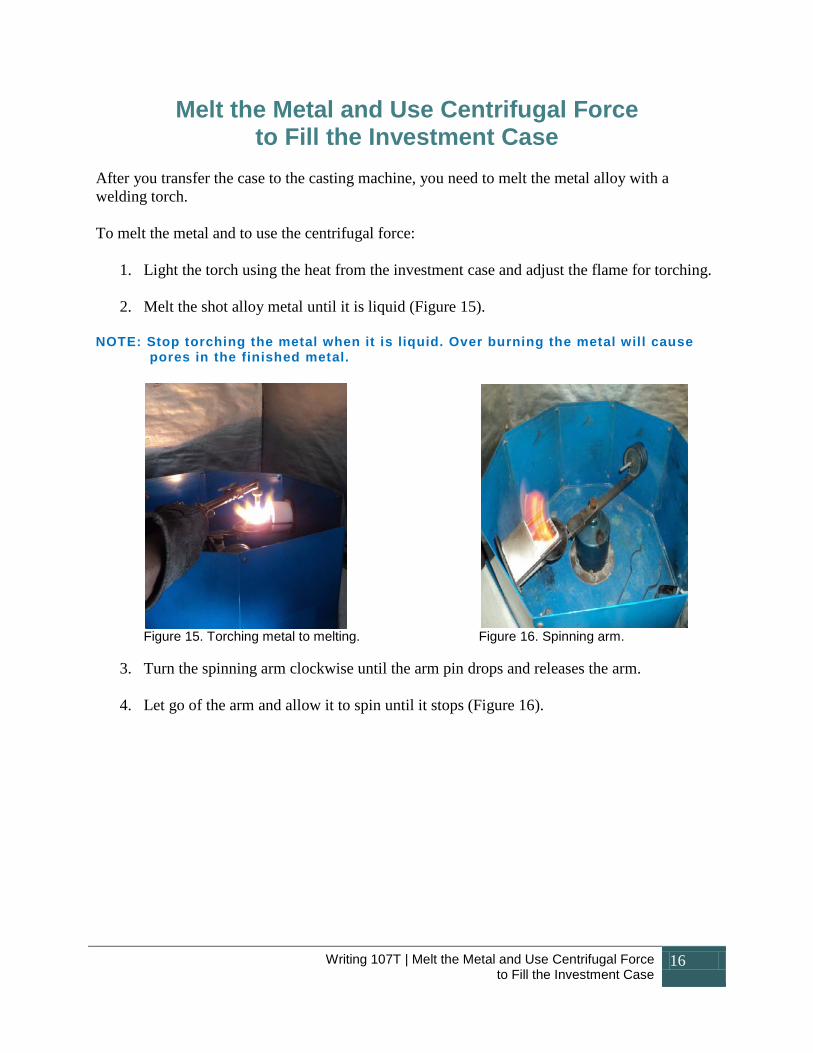
1. Light the torch using the heat from the investment case and adjust the flame for torching.
2. Melt the shot alloy metal until it is liquid (Figure 15).
NOTE: Stop torching the metal when it is liquid. Over burning the metal will cause
pores in the finished metal.
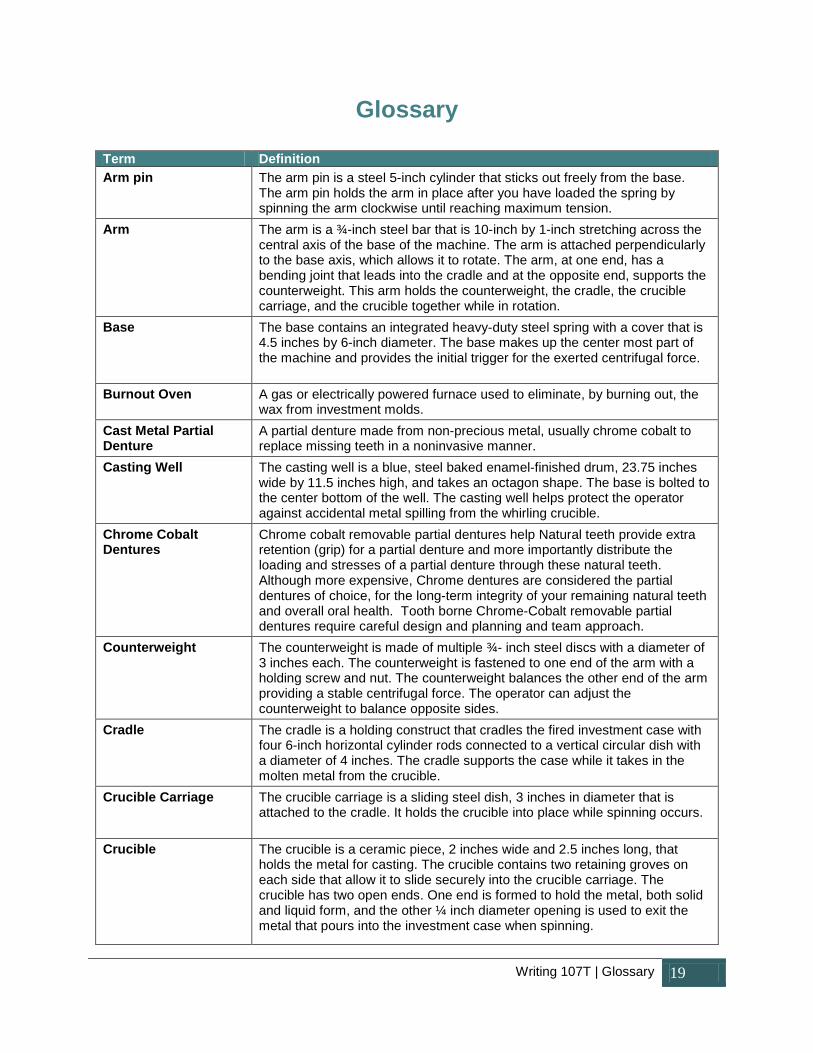
Figure 15. Torching metal to melting. Figure 16. Spinning arm.
3. Turn the spinning arm clockwise until the arm pin drops and releases the arm.
4. Let go of the arm and allow it to spin until it stops (Figure 16).

Writing 107T | Cool and Remove the Metal Partial from Investment Material
17
Cool and Remove the Metal Partial from Investment Material
The last stage in this process involves the cooling and the removal of the metal partial from all investment material. To cool and remove the metal partial:
1. Remove the case using the tongs.
WARNING: STEAM FROM THE INVESTMENT CASE IS
EXTREMELY HOT AND CAN BURN THE SKIN.
2. Place the case on a brick. Cool the case by pouring water from the bucket using the ladle. Do this until the case is cool (Figure 17).
NOTE: Pour from a safe distance to avoid burns from the steam.
Figure 17. Removed and cooled investment case on the brick
3. Use a small hammer to break away the surrounding investment material from metal partial button (Figure 18).

Writing 107T | Cool and Remove the Metal Partial from Investment Material
18
Figure 18. Breaking away investment material Figure 19. Grasping metal button with without hitting the metal. plaster nippers.
4. Grasp the exposed metal button with the plaster nippers and hit the center of the button with the hammer to remove excess investment case material from the partial (Figure 19).
5. Sandblast the partial to remove any remaining investment material. The partial should be
free of all investment material (Figure 20).
Figure 20. Finished partial after all steps are completed.
Now, the partial is ready for metal finishing.
Partial Button
Writing 107T | Glossary 19
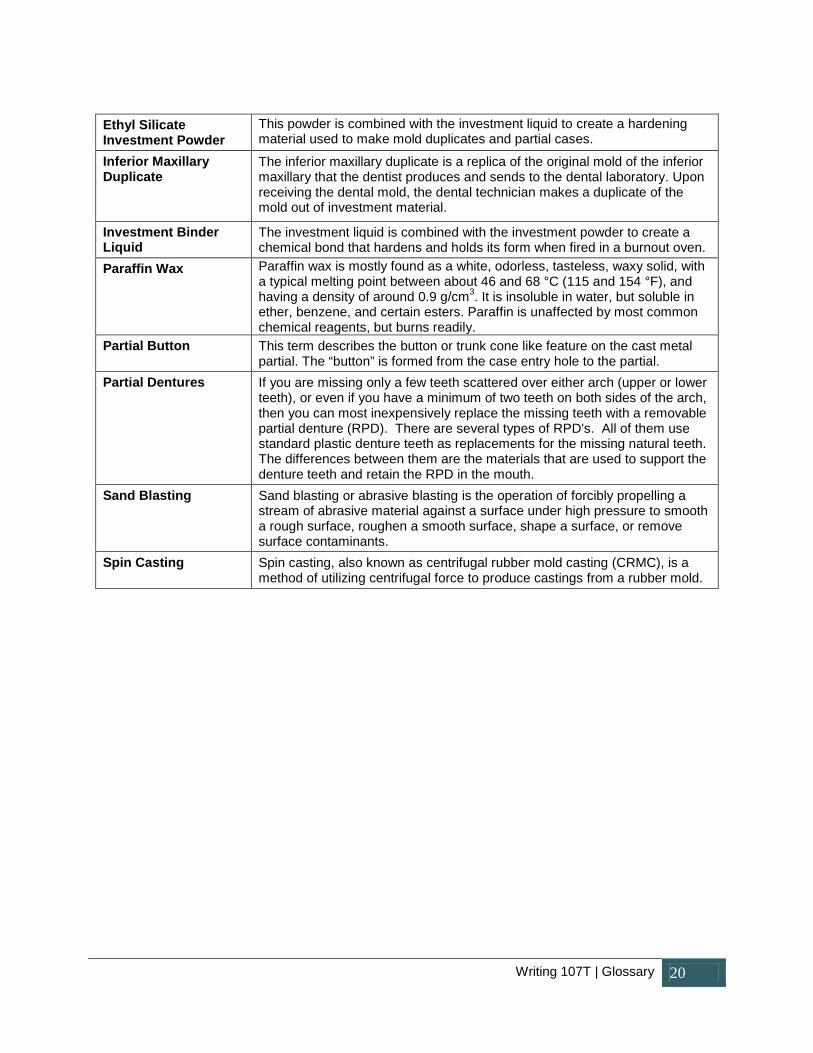
Glossary
Term Definition Arm pin The arm pin is a steel 5-inch cylinder that sticks out freely from the base.
The arm pin holds the arm in place after you have loaded the spring by spinning the arm clockwise until reaching maximum tension.
Arm The arm is a ¾-inch steel bar that is 10-inch by 1-inch stretching across the central axis of the base of the machine. The arm is attached perpendicularly to the base axis, which allows it to rotate. The arm, at one end, has a bending joint that leads into the cradle and at the opposite end, supports the counterweight. This arm holds the counterweight, the cradle, the crucible carriage, and the crucible together while in rotation.
Base The base contains an integrated heavy-duty steel spring with a cover that is 4.5 inches by 6-inch diameter. The base makes up the center most part of the machine and provides the initial trigger for the exerted centrifugal force.
Burnout Oven A gas or electrically powered furnace used to eliminate, by burning out, the wax from investment molds.
Cast Metal Partial Denture
A partial denture made from non-precious metal, usually chrome cobalt to replace missing teeth in a noninvasive manner.
Casting Well The casting well is a blue, steel baked enamel-finished drum, 23.75 inches wide by 11.5 inches high, and takes an octagon shape. The base is bolted to the center bottom of the well. The casting well helps protect the operator against accidental metal spilling from the whirling crucible.
Chrome Cobalt Dentures
Chrome cobalt removable partial dentures help Natural teeth provide extra retention (grip) for a partial denture and more importantly distribute the loading and stresses of a partial denture through these natural teeth. Although more expensive, Chrome dentures are considered the partial dentures of choice, for the long-term integrity of your remaining natural teeth and overall oral health. Tooth borne Chrome-Cobalt removable partial dentures require careful design and planning and team approach.
Counterweight The counterweight is made of multiple ¾- inch steel discs with a diameter of 3 inches each. The counterweight is fastened to one end of the arm with a holding screw and nut. The counterweight balances the other end of the arm providing a stable centrifugal force. The operator can adjust the counterweight to balance opposite sides.
Cradle The cradle is a holding construct that cradles the fired investment case with four 6-inch horizontal cylinder rods connected to a vertical circular dish with a diameter of 4 inches. The cradle supports the case while it takes in the molten metal from the crucible.
Crucible Carriage The crucible carriage is a sliding steel dish, 3 inches in diameter that is attached to the cradle. It holds the crucible into place while spinning occurs.
Crucible The crucible is a ceramic piece, 2 inches wide and 2.5 inches long, that holds the metal for casting. The crucible contains two retaining groves on each side that allow it to slide securely into the crucible carriage. The crucible has two open ends. One end is formed to hold the metal, both solid and liquid form, and the other ¼ inch diameter opening is used to exit the metal that pours into the investment case when spinning.
Writing 107T | Glossary 20
Ethyl Silicate Investment Powder
This powder is combined with the investment liquid to create a hardening material used to make mold duplicates and partial cases.
Inferior Maxillary Duplicate
The inferior maxillary duplicate is a replica of the original mold of the inferior maxillary that the dentist produces and sends to the dental laboratory. Upon receiving the dental mold, the dental technician makes a duplicate of the mold out of investment material.
Investment Binder Liquid
The investment liquid is combined with the investment powder to create a chemical bond that hardens and holds its form when fired in a burnout oven.
Paraffin Wax Paraffin wax is mostly found as a white, odorless, tasteless, waxy solid, with a typical melting point between about 46 and 68 °C (115 and 154 °F), and having a density of around 0.9 g/cm3. It is insoluble in water, but soluble in ether, benzene, and certain esters. Paraffin is unaffected by most common chemical reagents, but burns readily.
Partial Button This term describes the button or trunk cone like feature on the cast metal partial. The “button” is formed from the case entry hole to the partial.
Partial Dentures If you are missing only a few teeth scattered over either arch (upper or lower teeth), or even if you have a minimum of two teeth on both sides of the arch, then you can most inexpensively replace the missing teeth with a removable partial denture (RPD). There are several types of RPD's. All of them use standard plastic denture teeth as replacements for the missing natural teeth. The differences between them are the materials that are used to support the denture teeth and retain the RPD in the mouth.
Sand Blasting Sand blasting or abrasive blasting is the operation of forcibly propelling a stream of abrasive material against a surface under high pressure to smooth a rough surface, roughen a smooth surface, shape a surface, or remove surface contaminants.
Spin Casting Spin casting, also known as centrifugal rubber mold casting (CRMC), is a method of utilizing centrifugal force to produce castings from a rubber mold.