Embed Size (px)
Citation preview
Using ICT to support numeracy
Information workshop 2000
JC/BELB/2004
Getting Started
Information Workshop 2000 is an information handling (database) program which includes plenty of powerful
features. It is relatively simple to use and includes lots of built-in topics to make the creation of a new data file far
1

quick and straightforward. This screen asks if you wish to create your own file, load an existing file or to quit. When first using the program it is useful to load an existing file and explore how the files are organised and navigated.
Loading files from the Public folder
To open files on your school’s network you need to select the last option on the menu “My Network P…” This opens a link from your computer to the school’s network. Next you must select the “Public” folder from the list. This folder can be accessed by all staff and pupils in the school. The ‘Public’ folder is probably the best
place to save the files you want all children to be able to access. You could create a new folder inside the public folder (perhaps named after the class teacher or the year group). You can create a new folder by selecting the button.
2
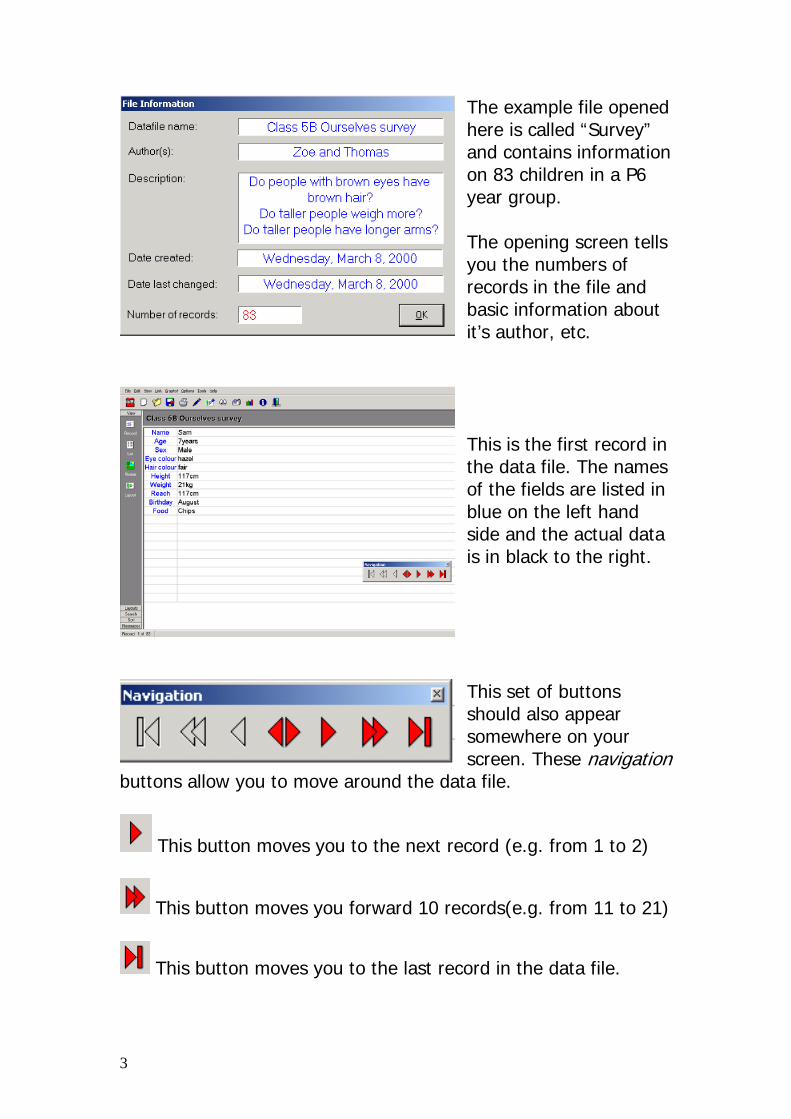
The example file opened here is called “Survey” and contains information on 83 children in a P6 year group. The opening screen tells you the numbers of records in the file and basic information about it’s author, etc.
This is the first record in the data file. The names of the fields are listed in blue on the left hand side and the actual data is in black to the right.
This set of buttons should also appear somewhere on your screen. These navigation
buttons allow you to move around the data file.
This button moves you to the next record (e.g. from 1 to 2)
This button moves you forward 10 records(e.g. from 11 to 21)
This button moves you to the last record in the data file.
3

This button (when red) moves you back one record.
This button (when red) moves you back 10 records.
This button (when red) takes you back to the first record.
Making a graph
If you select the button at the top of the screen you will be presented with the following screen:
You must now select the type of graph you wish to produce: horizontal or vertical bar graph, pie chart, etc. Once this has been chosen you are presented with the following page:
This menu allows you to choose the field to be placed on the ‘X’ axis on the graph. If you have chosen a field containing numeric data, then it may
be possible to select a second field and plot a graph.
This is a graph using the ‘birthday’ field.
4

Notice how the left side of the screen allows you to “keep a graph” – this means the graph will be stored on the left side of the screen for quick access later.
Changing the view on the screen
Information Workshop 2000 allows 4 different views of the data file. The buttons on the left of the screen allow you to change the way that the data is shown.
The ‘record’ view is the usual view, showing information on one record at a time. The list view tries to show all the fields from all the records on the screen at one time. The picture view will display any pictures attached to the record. The layout view will show both a record and its picture (if the record has one)
5

This is an example of the list view.
Starting a new data file using topics
When starting a new file, you are asked to choose either a ‘simple file setup’ or the ‘advanced file setup’. It is advisable to use the simple file setup, particularly when first beginning to use the program.
Next you are asked to either select ‘choose a topic’ or ‘make your own file’. Again, if you are just beginning to work with Information Workshop 2000, then the ‘choose a topic option is useful.
6
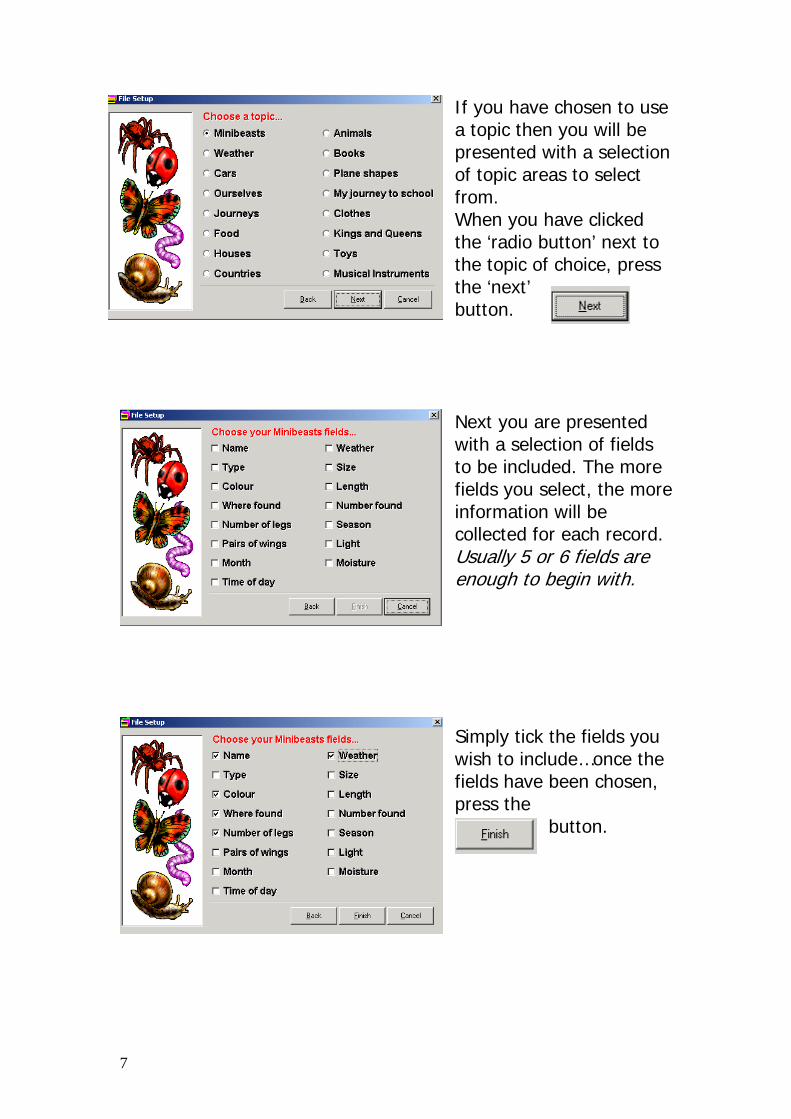
If you have chosen to use a topic then you will be presented with a selection of topic areas to select from. When you have clicked the ‘radio button’ next to the topic of choice, press the ‘next’ button.
Next you are presented with a selection of fields to be included. The more fields you select, the more information will be collected for each record. Usually 5 or 6 fields are enough to begin with.
Simply tick the fields you wish to include…once the fields have been chosen, press the
button.
7
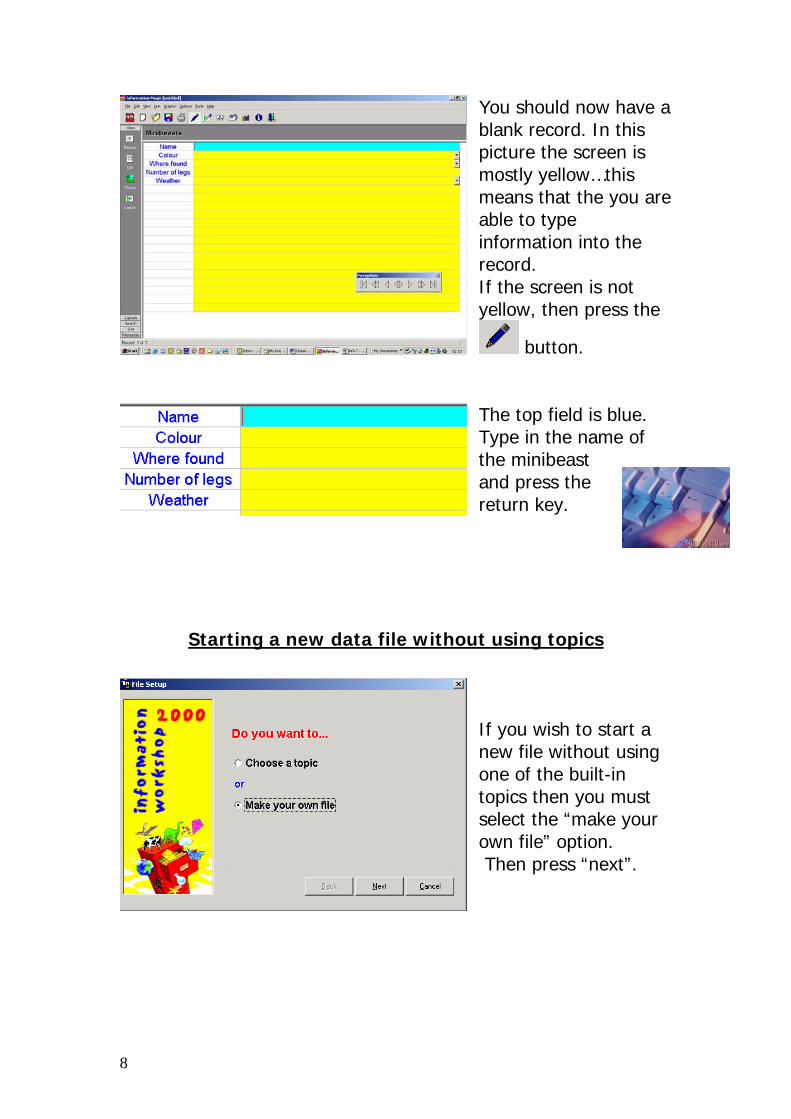
You should now have a blank record. In this picture the screen is mostly yellow…this means that the you are able to type information into the record. If the screen is not yellow, then press the
button.
The top field is blue. Type in the name of the minibeast and press the return key.
Starting a new data file without using topics
If you wish to start a new file without using one of the built-in topics then you must select the “make your own file” option. Then press “next”.
8

You are now prompted to enter a name for your new data file and the author’s name. Next you are encouraged to describe the file you are creating and finally to select the number of fields your new data file will contain.
The ‘number of fields’ is a very important factor in the successful creation of a data file. Decide upon how many different pieces of information you will want to store on each individual record. Enter the number of fields and press ‘next’.
In this example the file is called ‘Vikings’ and the authors are the attendees at a P 6/7 course. The field description is followed by the number of fields (in this case, 4 fields).
This screen asks you to enter details about each individual field – the name of the field, the type of information it will hold and the likely size of the information (ho many letters in a name, etc)
9
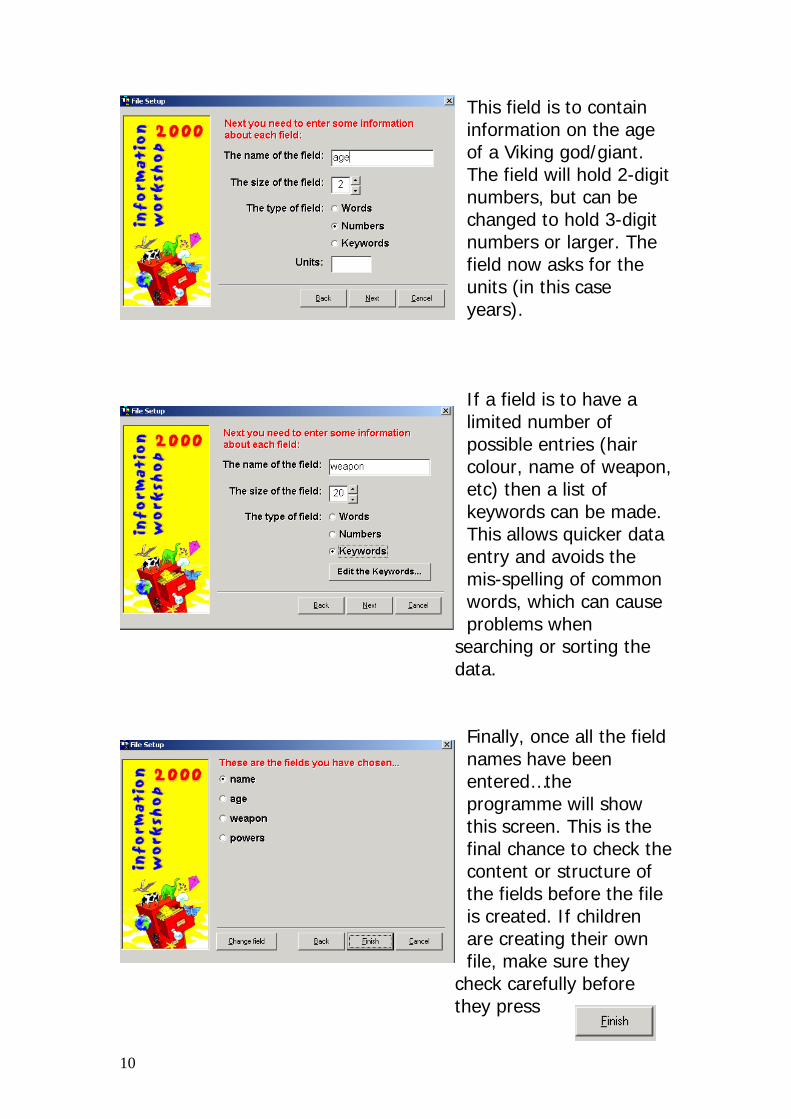
This field is to contain information on the age of a Viking god/giant. The field will hold 2-digit numbers, but can be changed to hold 3-digit numbers or larger. The field now asks for the units (in this case years).
If a field is to have a limited number of possible entries (hair colour, name of weapon, etc) then a list of keywords can be made. This allows quicker data entry and avoids the mis-spelling of common words, which can cause problems when
searching or sorting the data.
Finally, once all the field names have been entered…the programme will show this screen. This is the final chance to check the content or structure of the fields before the file is created. If children are creating their own file, make sure they
check carefully before they press
10

When your data file first appears it may not be yellow…press the pencil icon and the screen should turn yellow. This means that the record is ready for data entry. Notice that the navigation buttons are not red, as there are no records to move to!
Sorting records
The sort icon allows you to sort the records according to the contents of one of the fields. When you open a data file the
records are sorted by record number already (e.g. record 1 is first, 2 is second, etc).
The menu asks you to select the field for sorting. In the example ‘height’ has been used…then press ‘sort’. Now the records will be displayed in order of height (e.g. tallest to
smallest or smallest to tallest).
11
Searching records
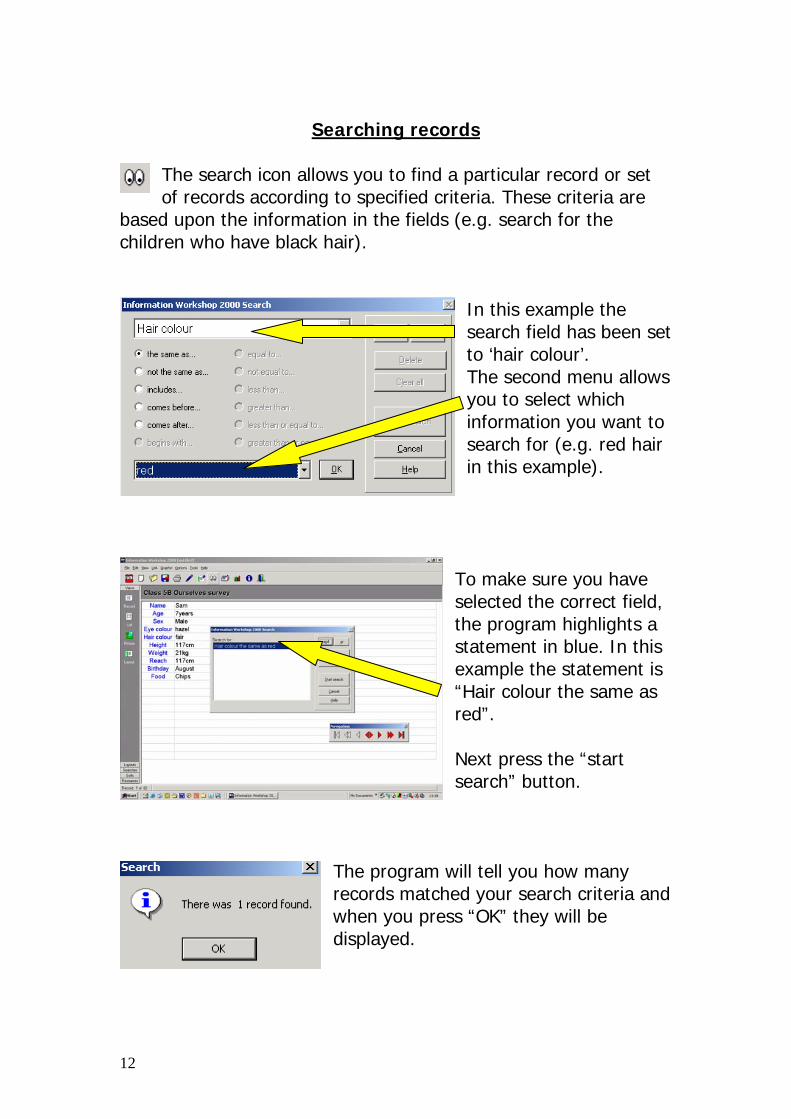
The search icon allows you to find a particular record or set of records according to specified criteria. These criteria are
based upon the information in the fields (e.g. search for the children who have black hair).
In this example the search field has been set to ‘hair colour’. The second menu allows you to select which information you want to search for (e.g. red hair in this example).
To make sure you have selected the correct field, the program highlights a statement in blue. In this example the statement is “Hair colour the same as red”. Next press the “start search” button.
The program will tell you how many records matched your search criteria and when you press “OK” they will be displayed.
12

This is the one record found during the last search –James is the only person with red hair in the survey. Notice how the red navigation buttons are not ‘lit up’ because this is the only record to
move to. If a graph were selected now or the records were searched or sorted…it would appear that the survey only contained information on one child (James). We need to tell the computer that we wish to look at all the records contained in the data file again.
To be able to view all the records go to ‘view” at the top of the screen and select ‘all records’ from the menu. When this has been selected, you should notice that more of the red transport buttons are now ‘lit up’ to show that the other records are available to be searched.
Remember that ICT should be used to enhance and support the teaching and learning of Numeracy (not the other way round).
13