Embed Size (px)
Citation preview

LOTUS TECHCENTRE BASIC USERS GUIDE
A Vehicle Communication Device (T000T1472F) is used to connect the vehicle to the
laptop installed with the Lotus Techcentre Software (contained on the disc T000T1510F). Engine programming, live data display, diagnostics of engine, ABS,
airbag systems etc is accessed through this software.
Also required is a unique 18 character licence/registration key without which
Techcentre will not function. This key is non transferable to other PC’s.
The minimum specification of the laptop computer for installation of the Lotus
Techcentre is as follows:
Processor 1.70 GHz; 1 GB RAM; 40 GB HDD; CDRW DVD ROM; WIN XP PRO OR VISTA; USB interface; Ethernet or Wireless LAN
Note that this laptop should ideally be dedicated totally to the Lotus Techcentre, with no other software.
This Diagnostic software was primarily designed for use by trained Lotus technicians.
Controller Area Network (CAN) is an electronic standard to allow high speed
communication between modules and controllers, via a serial data bus. The bus is a
circuit linking the modules to the controller, consisting of a pair of cables, twisted together to reduce electromagnetic interference, and carrying a square wave voltage
signal corresponding to '0's and '1's, coded in such a way as to identify and prioritise
the individual messages.
On all or most of the current Lotus range, CAN based systems include; engine management system, ABS, instrument cluster and tyre pressure monitoring system.
Please note SRS is serial comms on K-Line
Version 4. T000T1510F
INTRODUCTION
The Lotus Techcentre unique telephone number for Technical Support is 0870 9493 668.
The email address is [email protected] when an email is sent you
automatically receive a confirmation email response with a unique tracking number.
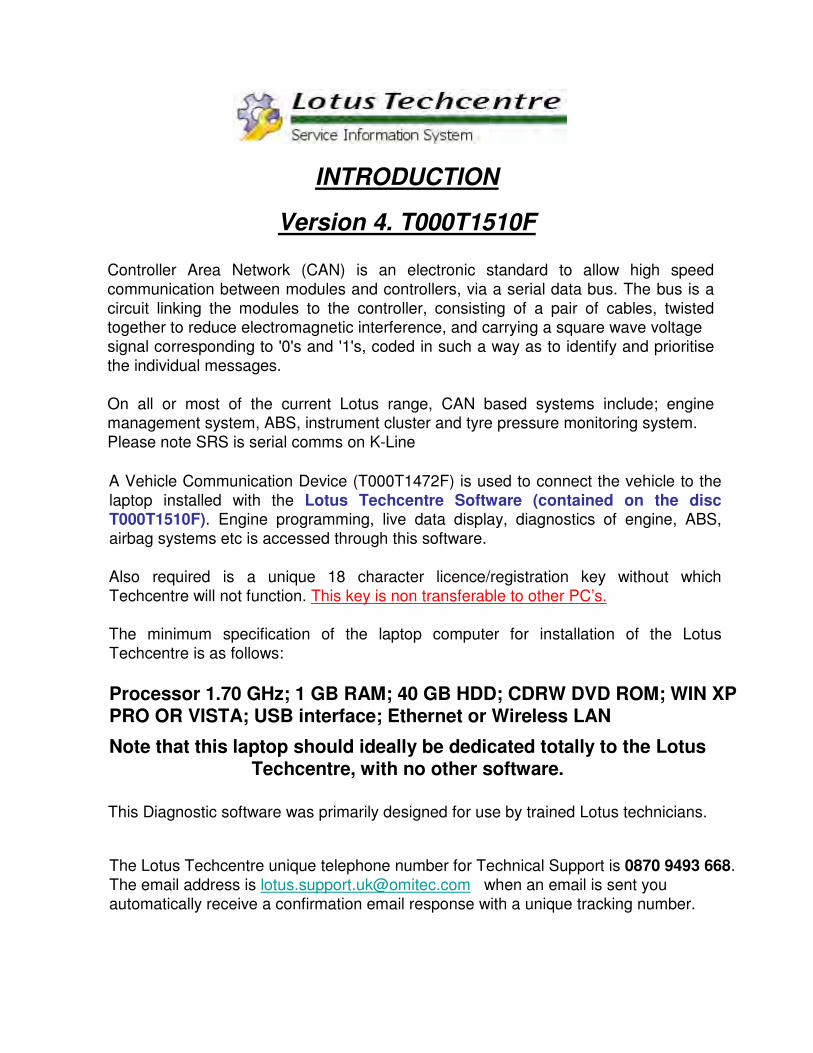
Note:
Currently Techcentre is only able to re-program engine ECU’s for 08MY on.
*A new communication cable will be available in the near future to provide management
program downloads to pre 08 MY Toyota powertrain*.
Excluding Europa. Refer to above table.
Techcentre has no connectivity to Elise/Exige range and variants fitted with MG/Rover
powertrain.
Limited diagnostics is available on V8 Esprit.
No communication is available to Europa powertrain.
Communication to the above mentioned vehicles is via the Lotus Scan 3 tool.
Part numbers: T000T1467F UK/EU
T000T1456F USA
Key:
EMS : Engine Management System
ABS : Brakes (Anti-lock Braking System)
SRS : Airbags (Supplemental Restraint System )
TPMS : Tyre Pressure Monitoring System
IP : Instrument Cluster
Model Type of Electronic Control Unit Engine ECU
Communication compatible Reprogrammable
EMS ABS SRS TPMS IP 08 MY on Pre 08
Elise 2004 on Y Y Y Y N Y N*
Exige 2004 on Y Y Y Y N Y N*
Europa 2006 on N Y Y N/A N N N
2-11 2007 on Y Y N/A N/A N Y N*
Evora 2009 on Y Y Y Y Y Y N/A
Esprit V8 Y Y N N N N N
TECHCENTRE CONNECTIVITYTECHCENTRE CONNECTIVITY

VEHICLE CONNECTION
Connection of the Techcentre is via a dedicated connector socket known as the Data
Link Connector (DLC) which is located within the footwell of vehicles.
Power for the VCD is taken from the DLC and when powered a blue light will illuminate.
Should updated firmware be available for the VCD (usually downloaded as part of online
update) Techcentre will automatically update the VCD and display a message to confirm.
Vehicle Communication Device T000T1472F (VCD) is supplied in a black plastic carry case containing the following:
VCD
16 Pin Yellow connector plug (VCD to Vehicle)
USB lead (VCD to PC)
USB extension lead (VCD to PC) not illustrated
Yellow Plug
16 Pin Connector
USB LeadVCD
Blue Power Indicator

CONTENTS
Page 1. START UPPage 2. VIN ENTRY/MODEL SELECTIONPage 3. TYPE & MARKETPage 4. MODEL YEAR/ECU SELECTIONPage 5. TAB CATEGORIES. EMS/PERFORMANCE INFORMATION Page 6. FAULT CODES/LIVE DATAPage 7. LIVEDATA CONTINUEDPages 8-12. LIVE DATA RECORDING & PLAYBACKPage 13. TECHNICAL INFORMATION/SETTINGSPage 14. ACTUATOR TESTSPage 15. OBD TEST RESULTS/VEHICLE INFORMATIONPage 16. GUIDED ROUTINESPage 17. ECU REPROGRAMMINGPage 18. ECU REPROGRAMMING CONTINUEDPage 19-21. VEHICLE CONFIGURATION (EVORA)Page 22. ABS TAB CATEGORIESPage 23. SRS TAB CATEGORIESPage 24. TPMS TAB CATEGORIESPage 25. IP TAB CATEGORIES

1
Basic users guide
After software installation is complete these 2 icons will be displayed on your
desktop. Periodically, approx every 7-10 days, click on ‘Lotus Update Client. exe’
to ensure latest version/software is loaded.
To start Techcentre click on ‘Lotus TechCentre Icon’ and start up screen will appear
followed by home screen as below.

2
Enter VIN number or click on icon to read VIN from ECU
If no Vin is entered you will need to select vehicle from menu displayed.

3
Select market from list
Select type from list

4
Select model year from list
Select system from list

5
Only tabs that are highlighted can be read.
Tabs that are ‘greyed out’ will not function usually due to the fact that they are not
applicable to ECU system selected.
Tab will change colour from grey/green to orange to show
this tab is active.
Tab Categories
Performance Information: Displays recorded performance data such as, engine speedVehicle speed, temperatures etc and also total engine run time.
To read this data, click on magnifying glass icon.
To save this data, click on floppy disc icon. The window
below will pop up showing destination of saved information.

6
Tab Categories
Fault Codes: Displays any fault codes stored in the control unit.
To read this data, click on magnifying glass icon.
To erase codes, click on eraser icon.
Screen tab displays the following:
Fault manager: Displays codes.
Full Fault List: Full list of codes relevant to
this control unit.
Fault Diagnosis: Not yet enabled.Freeze Frame: Data recorded when code
triggered.
Live Data: Displays live data streamed into and out of the control unit.
Click on tab and screen below is displayed.

7
Live Data: Continued.
Select and highlight desired item/items. Click on + to add – to remove.
Values are displayed numerically. To view as graph click here.
Start/Pause recording Stop recording

8
Recording Live Data in Techcentre V4
1) Select EMS Module > Live Data
2) Select items to view / record
3) Click record Data
4) Data can be viewed as graphs if desired
5) Click stop to finish recording
6) On screen prompt - select yes to save data
7) Enter an appropriate file name, click ok
1
2
5 3 4
6 7

9
Playback of Live Data in Techcentre V4
• The correct model must be selected in Techcentre
to playback live data recorded.
• If connected to an incorrect vehicle type or
playing back data on bench, disconnect the VCD
from Laptop.
• Open Techcentre click ‘look up vehicle details’
and manually select desired model from which data was recorded.
• Click on EMS > Live Data
• Click on ‘Saved Data’
(Located on lower left of screen)

10
Playback of Live Data in Techcentre V4
1) Select data to playback in LH pane
2) Click open file (items will appear in RH pane)
3) Click play to playback
4) Data can be viewed as graphs if desired
5) Click Stop to finish playback
2
1
3 45

11
Transfer of recorded Live Data in Techcentre V4
Recorded Live Data is stored in the following directory:-
Note: you must select the correct ‘user’ from document and settings, this is the user
logged into the laptop when the data was recorded.
C:\Documents and Settings\User\ApplicationData\Omitec\Techcentre\RealTimeModel
• Recorded Live Data is stored in folders as shown above
• In order to transfer live data the ENTIRE FOLDER (xxxxxxx-xxxx-xxxx-xxxxxxxxxxxx) which contains the saved data is required.
• Right click in RealTimeModel folder and select view details, use the ‘date modified’ field to help identify where your data is stored. (aim to improve folder location in future).
• If you cannot locate the file use the windows search function. Select the
RealTimeModel folder as the folder to search in and enter the vehicle VIN number as filename.
• Double click the folder and check if the desired is contained within.

12
Transfer of recorded Live Data in Techcentre V4 (2)
• Folder will contain the individual recorded files in CSV format as shown below.
• Once the data file to transfer is successfully located, return to its containing folder as
shown below and archive (zip) the ENTIRE FOLDER (xxxxxxx-xxxx-xxxx-xxxxxxxxxxxx)
• Email file to Lotus for analysis.
Best practice to help manage file size and non relevant data being transferred, copy the
ENTIRE FOLDER to another location on the laptop, delete CSV files that are not required and then zip.

13
Technical Information: Contains Lotus Service Bulletins etc.
Click on folder and list will be displayed All files are PDF format and searchable
Settings: Identifies Software Version and all release notes which are PDF format.

14
Actuator Tests: Tests function and circuit integrity to highlighted items.
Select and highlight desired item/items by clicking on + and remove with -.
Toggle desired item on/off by clicking on words or slider

15
OBD Test Results: Shows results for emission related sensors.
Select and highlight desired item separately to show test result.
Result can be printed out if desired by clicking on printer icon in top right corner.
Look in vehicle information for ECU software level , serial number etc.
Vehicle Information:

16
Guided Routines: These are step by step instructions to perform certain operations for example, ECU renewal.
1. Click on required tab.
2. Click on forward button.
3. Follow on screen
instructions.
4. Exit

17
ECU Reprogramming: Follow these step by step instructions to reprogram ECU.
1. Click on this icon to start programming.2. This message will be displayed.
3. Followed by printer info.
Note:
If history is not recorded it may affect future warranty
claims!
Progress display

18
ECU Reprogramming: Continued.
Warning!
Pay attention to this message as re-programming will wipe previous software.
4. Click OK to continue
Follow on screen instructions.
To confirm calibration ID is correct check in vehicle information as detailed on page 10

19
Vehicle Configuration: Only applicable to Evora.
EMS (Engine)Engine Ecu fitted to Evora will require configuring depending on variant/model.
From the table displayed select applicable configuration relevant to model.
Note:
(Above illustration does not show full list.)
Click on this to read current configuration.
Click on this to write new configuration.

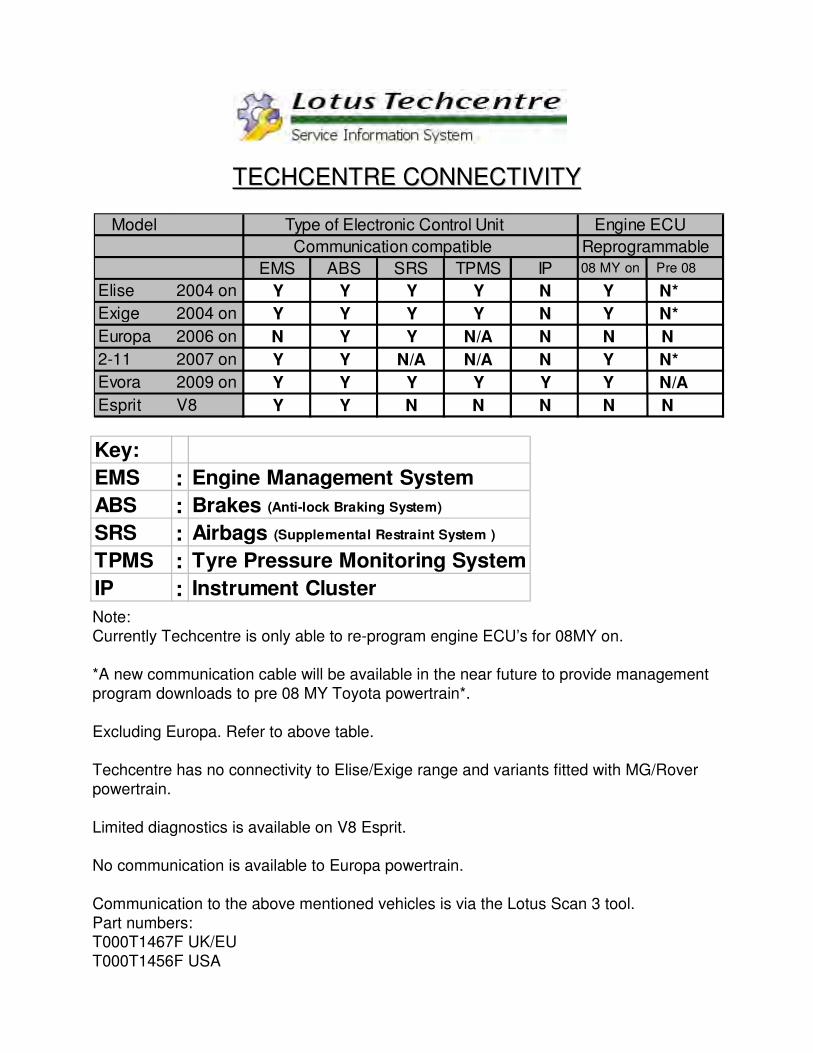
Vehicle Configuration: Only applicable to Evora.
Variant coding via guided routines
Click on this to write
Variant code.
Click on this and ensure ignition is
on.
20
Variant coding via guided routinesContinued.
Enter 16 digit variant
Code here.
Verify ‘Yes or No’.
Click to continue.
Variant coding is now complete. Exit guided routines and check vehicle configuration
21

20
ABS
ABS Tab categories
Fault Codes:Reads and clears stored fault codes. Full fault code list included.
Live Data:Displays data and sensor reading in numeric and graphical format.
Actuator Tests:
Activates circuits and related hardware.
Guided Routines:
Brake Bleed. Steering Angle Sensor Calibration. ECU Renewal.
Vehicle Configuration Evora Only:Configures ABS ECU e.g. TCS, ESP,HBA etc.
Vehicle Information:
Displays Hardware version, Software version, Serial number etc.
22

21
SRS
SRS Tab categories
Fault Codes:Reads and clears stored fault codes. Full fault code list included.
Live Data:Displays data and sensor reading in numeric and graphical format.
Guided Routines:
Configuration-Reprogram. ECU Renewal.
Vehicle Information:
Displays Hardware version, Software version, Serial number etc.
Actuator Tests:
Activates lamp circuits. (Not on all Models)
Memory Read:(Not on all Models)
23

22
TPMS
Fault Codes:Reads and clears stored fault codes. Full fault code list included.
Live Data:Displays sensor reading in numeric and graphical format.
Guided Routines:
Pressure sensor & ECU Renewal.
TPMS Tab categories
24

23
IP (Instrument Cluster)
IP Tab categories
Actuator Tests:Activates Speedo.
Guided Routines:Write Odo value to new instrument cluster.
Vehicle Configuration Evora Only:
Writes configuration to new instrument cluster.
25