Embed Size (px)
Citation preview

Finder Desktop 3D Printer
User Guide
V1.0 17.6.2015


Finder User Guide| www.ff3dp.com
Contents
Welcome to Flashforge FinderA. OverviewB. Acknowledgment and CommitmentsC. About 3D Printing
Chapter 1. Set up Your FinderA. Unpacking Your FinderB. About FinderC. Hardware Assembly
C1. Installing FilamentC2. Connecting Power Cable and USB Cable
D. Loading and Unloading FilamentD1. Loading FilamentD2. Unloading Filament
E. Leveling Build Plate
Chapter 2. About FlashPrintA. About the Software
Chapter 3. First PrintA. Start to PrintB. Methods of Printing
B1. Printing from USBB2. Printing from USB Flash DiskB3. Printing from Wi-Fi
Chapter 4. Other InformationA. Supports and Service

Finder User Guide| www.ff3dp.com
WELCOME TOFLASHFORGE FINDER
A. IntroductionB. Acknowledgment and CommitmentsC. About 3D Printing
Finder User Guide | www.sz3dp.com 2

Finder User Guide| www.ff3dp.com
A. IntroductionThis User Guide is designed to start your journey with the Finder 3D
Printer off in the right direction. It presents the operation process on the
basis of the window 7 operating system. To get familiar with the machine,
it is essential for you to read through this guide. This User Guide includes
four chapters.
In the first chapter, you will learn how to get set-up the Finder for the first
print. In the second chapter, you will learn the ins and outs of FlashPrint
software. The third chapter will take you through printing operation and
different printing methods. The last chapter includes information
regarding obtaining support.
Ensure that you have read the following section carefully prior
to setting up and operating the Finder:
Ensure that the Finder is earthed lest electrostatic interference.
Before repairing or making any alterations to the Finder, it is essential
that the machine is turned off, and the power cord is unplugged.
The Finder operates at a very high temperature; allow the nozzle,
extruded plastic and heating plate to cool before touching.
Certain types of plastic filament may give off a slight odor when heated.
Because of this, the Finder should always operate in a well-ventilated
area.
Do not leave the Finder unattended when in operation.
2

Finder User Guide| www.ff3dp.com
B. Acknowledgment and CommitmentsAcknowledgmentOur sincere gratitude goes to you for your great support. Even if you are
familiar with earlier Flashforge machines or 3D printing technology, we
still recommend that you read through this guide, as there is lots of
important information about Finder for you to get a better 3D experience.
Following this guide will ensure your successful first print journey.
CommitmentsOur team is composed of geeks and makers who are passionate about 3D
printing and want to share this new technology with the world. We
understand the importance of product and service support, especially the
challenges that a new technology may bring along. With FLASHFORGE,
you can always expect a close, personal service from our team of experts.
At FLASHFORGE, we understand that 3D printing is a new technology
to many individuals. Our aim is to educate and guide you through the
entire process of 3D printing. With 3D printing, there are no limits — you
can go as far as your imagination takes you. With the Finder, dreams are
no longer simply just imaginations. They can become physical realities
that you can hold, touch, and feel. It is amazing to see a 3D printer turn
an idea into real life, layer by layer, and we are delighted to have you
on-board with us to experience this phenomenon!

Finder User Guide| www.ff3dp.com
C. About 3D PrintingWhat is 3D Printing?Simply put, 3D printing is transforming three-dimensional models into
physical objects that you can hold and touch. It is also called additive
manufacturing because the 3D model is created by “adding” layers upon
layers of material until the object is fully formed.
The TechniqueFused Deposition Modeling(FDM) is the most common method of 3D
printing. It is also the method that the Finder uses. It works by melting
plastic material called filament onto a print surface using high
temperature. The filament solidifies after it cools down, which happens
instantaneously after it is extruded from the print head. 3D objects are
formed with the filament laying down multiple layers.
3D Printing Process3D printing involves three steps: 1.) 3D model design, 2.) Slicing and
exporting the 3D model, and 3.) Making the print
1. Designing the 3D Model: Currently, there are three ways of creating a
3D model.
Designing From Scratch. You can use free CAD (computer aided design)
software such as AutoCAD, SolidWorks, Pro-E to design your very own
3D model.
3D Scanners.An alternative method to creating a 3D model is to scan an

Finder User Guide| www.ff3dp.com
object. 3D scanners work by digitizing a physical object, collecting its
geometric data, and saving it to a file on your PC. There are also apps that
can turn a mobile device into a 3D scanner.
From the Cloud. The most popular way of obtaining a 3D model is to
download it from websites that allow users to upload 3D models that they
designed.
E.g. www.ishare3d.com
2. Slicing and Exporting the 3D Model:
A slicing software is required to process and interpret the 3D model
into the language that 3D printers can understand. The FlashPrint is the
slicing software used for the FlashForge Finder.
FlashPrint will slice the 3D model into numerous layers and output it
as a .g file, which is the format read by the Finder. The file is then
transferred to the Finder by USB cable, USB Flash Disk or Wi-Fi.
3. Making the Print:
Once the output file has been transferred to the Finder, it will start to turn
the 3D model into a physical object by laying down layers of filament.

Finder User Guide| www.ff3dp.com
CHAPTER 1.Set up Your Finder
A. Unpacking Your FinderB. About FinderC. Hardware AssemblyD. Loading and Unloading FilamentE. Leveling Build Plate
Finder User Guide| www.ff3dp.com
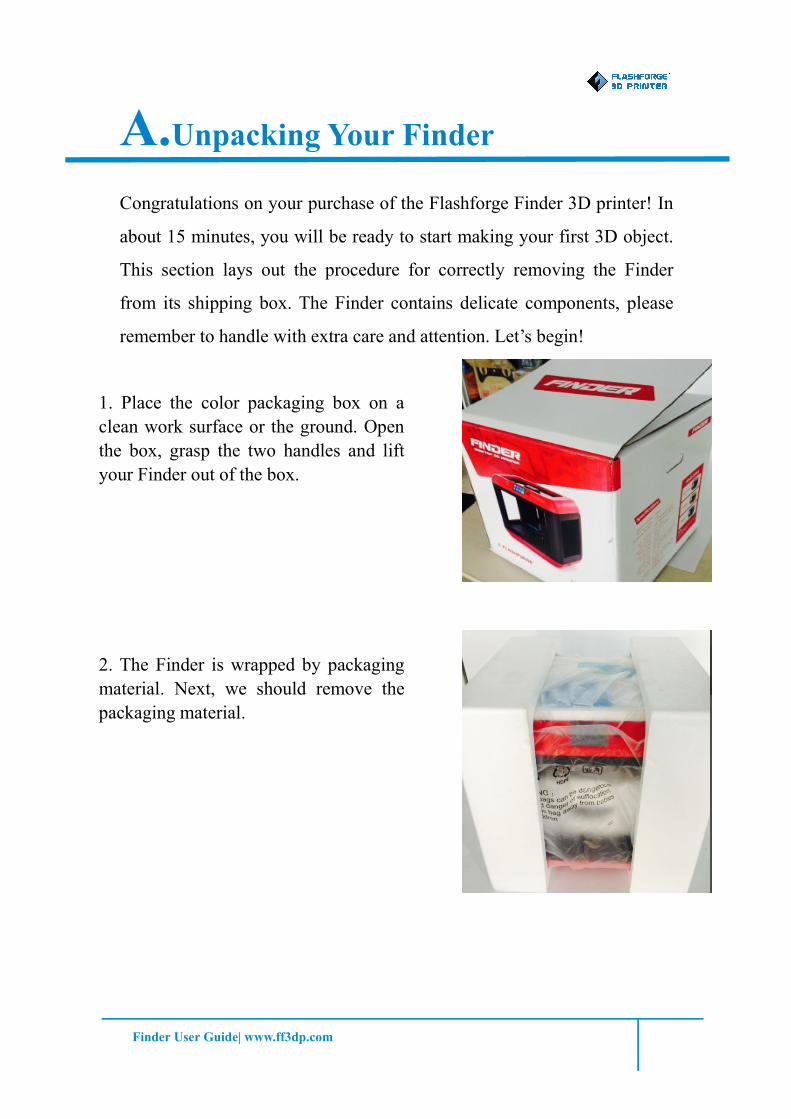
A.Unpacking Your FinderCongratulations on your purchase of the Flashforge Finder 3D printer! In
about 15 minutes, you will be ready to start making your first 3D object.
This section lays out the procedure for correctly removing the Finder
from its shipping box. The Finder contains delicate components, please
remember to handle with extra care and attention. Let’s begin!
77
1. Place the color packaging box on aclean work surface or the ground. Openthe box, grasp the two handles and liftyour Finder out of the box.
2. The Finder is wrapped by packagingmaterial. Next, we should remove thepackaging material.

Finder User Guide| www.ff3dp.com
3. Remove the side protective foamsheets, you will see the Finder in atransparent bag. Then remove the bagto unveil the Finder.
4. On the top foam sheet we can seethe accessories from the kit contents:one plate tape, one Quick Start Guide,one 4GB USB, two Allen wrenches(M1.5 and M2) and one screwdriver.

Finder User Guide| www.ff3dp.com
5. Remove the top foam sheet, youwill see the extruder and X-axisguide rods. Slide the extruder leftand right to ensure the extruder andthe guide rod intact. Discard the tapeholding the flat cable in place .
6. Take the filament spool protectivefoam out of the Finder. You will seea roll of blue PLA filament inside.

Finder User Guide| www.ff3dp.com
7. Then you will see the build plate.The build plate with a blue build tape isavailable for direct use. Beside thebuild plate lies a power cable and aUSB cable.
8. Move the build plate up. Remove theprotective foam for build plate and takethe power cable and USB cable out.
9. You have unpacked your Finder.Next, let’s go to the overview andaccessories of Finder.

Finder User Guide| www.ff3dp.com
B.About FinderViews:
1. Touch screen panel 2. Power switch 3. Nozzle 4. Z-axis guide rod
5.Build plate 6. Leveling thumb screw 7. Filament cartridge 9. Filament
intake 10. X-axis guide rod 11. Spring presser 12. USB cable input 13. USB
flash disk input 14. Power input

Finder User Guide| www.ff3dp.com
Accessory Box
PLA Filament Power Cable USB Cable Plate Tape
Quick Start Guide USB Flash Disk Allen Wrench(M1.5、M2.0) Screwdriver

Finder User Guide| www.ff3dp.com
Accessory Introduction
PLA Filament Polylactic acid filament. PLA is a renewable bilplastic.
Finder PLA is the source material from which you make
objects on the Finder.
Power Cable A cable that allows the Finder to connect with power
USB Cable A cable that allows the Finder to communicate with a
computer using the USB interface on the computer.
Plate Tape A tape that sticks to the build plate for a better print
quality.
Quick Start Guide Overview of the printer and the operation.
USB Flash Disk A data storage device for saving the files.
Allen Wrench,
Screwdriver
Tools for the installation and maintenance of the Finder.

Finder User Guide| www.ff3dp.com
C.Hardware AssemblyYour Finder has been installed before leaving factory, you can start up the
Finder for printing after mounting the filament spool.
Installing the Filament
1. Remove the filament cartridge inthe rear of Finder, where you willplace the filament spool.
2. Thread the filament through thefilament guide tube, pierce thefilament through the filament outletand then place the filament spool inthe box. Note: You should ensure theright direction of the filament spool.
3. Put the filament cartridge back tothe Finder. Next load the PLAfilament to the extruder.

Finder User Guide| www.ff3dp.com
Connecting power cable and USB cable
1. Insert the power supply into thepower input on the back of theFinder and plug the power cord intoan electrical outlet.
2. Locate the USB cable and plugone end into the Finder and the otherinto your personal computer. TheFinder supports USB 2.0.
4. After loading the PLA filament, adherethe plate tape over the build plate, asshown in the right picture.Note: The plate can be dawn out from thebuild platform.

Finder User Guide| www.ff3dp.com
D.Load and Unload FilamentLoading the filament:
1. Tap [Tool].
2. Tap [Filament]--[Load].
3. Wait for the extruder to heat upto the operating temperature. Theextruder will alert you once it is atthe operating temperature. Load thefilament by inserting it into theextruder at an upright angle.
4. Filament will start to extrude outof the nozzle. Continue loading toensure that the filament is extrudingin a straight line. Refer to thetroubleshooting section if thefilament is extruding at an angle.(Note: The Finder will sound awarning when the filament isrunning out, please change thefilament in time)

Finder User Guide| www.ff3dp.com
Unloading the filament
1. Tap [Tool]
2. Tap [Filament]--[Unload].
3. Wait for the extruder to heat up tothe operating temperature. Theextruder will alert you once it is atthe operating temperature. Unloadthe filament by gently guiding it outof the extruder.。Note: Do not pull out the filamentwith force as it will damage thegears. If the melted filament hascooled down in the extruder, pleaserepeat the steps above.
Finder User Guide| www.ff3dp.com
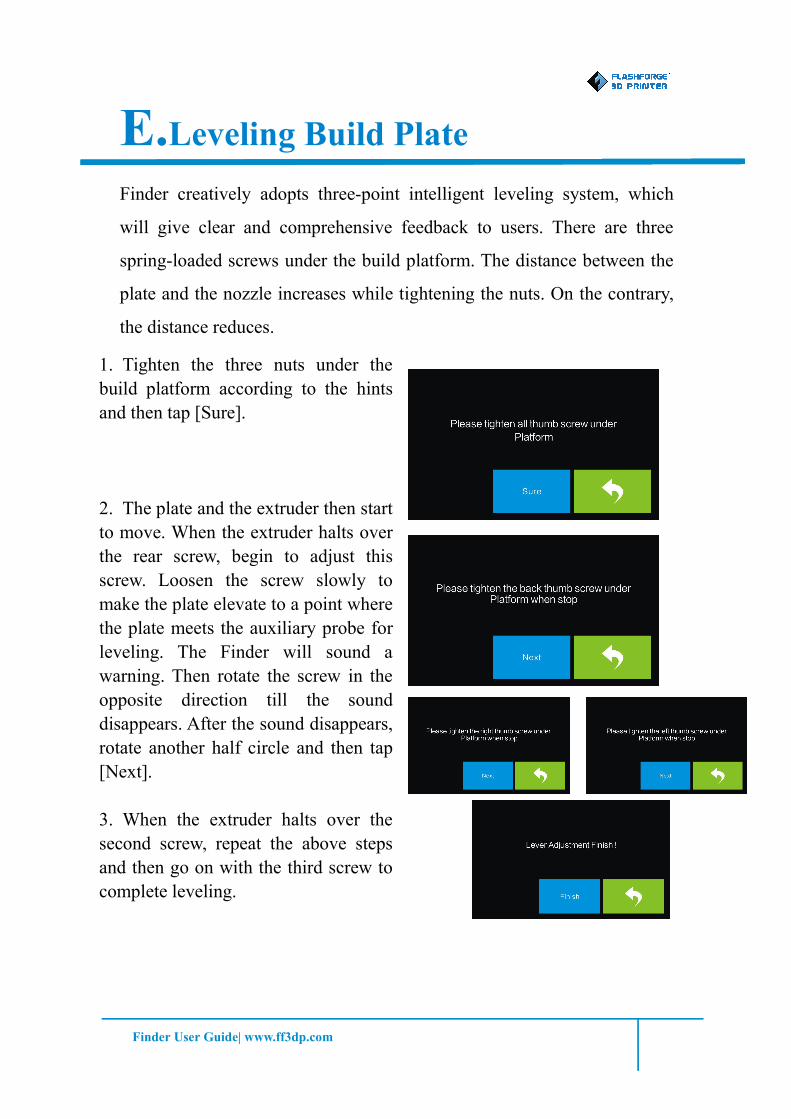
E.Leveling Build PlateFinder creatively adopts three-point intelligent leveling system, which
will give clear and comprehensive feedback to users. There are three
spring-loaded screws under the build platform. The distance between the
plate and the nozzle increases while tightening the nuts. On the contrary,
the distance reduces.
1. Tighten the three nuts under thebuild platform according to the hintsand then tap [Sure].
2. The plate and the extruder then startto move. When the extruder halts overthe rear screw, begin to adjust thisscrew. Loosen the screw slowly tomake the plate elevate to a point wherethe plate meets the auxiliary probe forleveling. The Finder will sound awarning. Then rotate the screw in theopposite direction till the sounddisappears. After the sound disappears,rotate another half circle and then tap[Next].
3. When the extruder halts over thesecond screw, repeat the above stepsand then go on with the third screw tocomplete leveling.

Finder User Guide| www.ff3dp.com
Chapter2.About FlashPrint
A. About the Software
Finder User Guide | www.sz3dp.com

Finder User Guide| www.ff3dp.com
A. About the Software1. Software Installation
1.1 Download
Method 1: Insert the USB flash disk from the toolkit into a computer, we
have already prepare the latest driver installation package in the USB
flash disk.
Method 2: Open the link below to download the installation package:
http://www.ff3dp.com
1.2 Installation & Start
1. Decompress the downloaded RAR, and complete installation according
to the instruction.
2.Start the software with the start menu shortcut or by clicking the
software icon.
2. Software Operating Instructions
You can use Flashprint software to control Finder and perform printing
tasks.

Finder User Guide| www.ff3dp.com

Finder User Guide| www.ff3dp.com
2.1 Load File
You can load a model file or Gcode file into the software by the following
six methods:
Load one or multiple files.
Enter the support edit mode
View FlashPrint home screen from one of six viewing angles.
Move model around on xy-plane; shift+click to move along z axis
Turn and rotate your model
Scale the size of your object
Select right or left extruder you want to print with
Print it directly with your Finder or export to your SD card.

Finder User Guide| www.ff3dp.com
Method 1: Click the Load icon on the main interface. Then select the
object file.
Method 2: Select the file for loading and drag the file to the main
interface of the software.
Method 3: Click [File] -- [Load File]. Then select the object file for
loading.
Method 4: Click the [File] --[Examples] to load the example files
Method 5: Click the [File] --[Recent Files] to load the files opened
recently.
Method 6: Select the file for loading, and drag the file to the icon of the
software.
You can load into .stl, .obj, or .fpp model files which are editable in the
software. Please refer to Section 2.2~2.5 and you can find instructions of
that modification, such as operations of mouse, changes of view from
different angles and how to edit and save the file. After modification,
please refer to Section 2.6 if you want to slice the model file , generate
Gcode file and print it.
2.2 Mouse Operations
2.2.1 Left-click
Select a model by moving the cursor onto it and left-click it.

Finder User Guide| www.ff3dp.com
Select multiple models by holding down the Ctrl key and left-click the
models.
Model looks brighter when selected.
Model can be edited when selected.
Left-click on blank space to undo the selection of model.
2.2.2 Left-click and hold down the left mouse button
When changing the viewing angles or editing models, different effects
appear by left-clicking and holding down the left button. Please refer to
Section 2.3.1~2.3.2 & 2.4.
2.2.3 Right-click and hold the right button
Same results in any operations when right-clicking and holding down the
right button. Please refer to the Sections 2.3.1 & 2.3.2.
2.2.4 Scroll the mouse wheel
Same effects in any operations when scrolling the mouse wheel. Please
refer to the Section 2.3.3.
2.3 Change Views
Change your views of the model by moving, rotating, scaling the view
and so on.

Finder User Guide| www.ff3dp.com
2.3.1 Set Position
You can move the view of build platform frame in the software interface
by the following three ways:
Method 1: Hold down the left mouse button and drag.
Method 2: Hold down the middle mouse button and drag.
Method 3: Hold down the Shift key, hold down the right mouse button
and drag.
2.3.2 Set Rotation
You can rotate the view of build platform frame in the software interface
by the following two ways,
Method 1. Hold down the right mouse button and drag.
Method 2. Hold down the Shift key, hold down the left mouse button and
drag.
2.3.3 Set Dimensions
You can scale the view of build platform frame in the software interface
by scrolling the mouse wheel in any condition.
2.3.4 Set View
You can set the view of build platform frame in the software interface
from six angels by following two ways to observe the model. (Top/
Bottom/Front/ Back/ Left/ Right View) .
Method 1: Click the the [View] button, and then select the view you need
to observe the model.

Finder User Guide| www.ff3dp.com
Method 2: Click the the [Look] button on the left of the software
interface, and select the view you need.
2.3.5 Reset View
Method 1: Click the [View] menu and select [Home View]
Method 2: Click the [View] button on the left side, click it again and you
will see the viewing options, you can click [Reset].
2.3.6 Show Model Outline
Click [View]--[Show Model Outline], it will highlight the outer surfaces
of your model file with gray and white color.
2.3.7 Show Steep Overhang
Click [View]--[Show Steep Overhang]. When the intersection angle
between the model surface and horizontal line is within the overhang
threshold value, the surface has steep overhang and it becomes red in the
software. Overhang threshold value could be set as needed. The default
value is 45 degree.
2.4 Edit models
You can edit the models by moving, rotating, scaling the model and so
on.

Finder User Guide| www.ff3dp.com
2.4.1 Move
When the model is selected, you can change model location on the build
platform by the following two ways:
Method 1: Click the [Move] button on the left of the software interface.
Hold down the left mouse button and drag, you could adjust the location
of the model in XY direction. Hold down the Shift key, and long-press
hold down the left mouse button and drag, you can adjust the location of
the model in Z direction. You can see the distance and direction of the
movement which refers to the relative distance between present and
former location.
Method 2: Click the [Move] button on the left of the software interface
and then enter the distance value you want to move on X/Y/Z axes
positioning. Click [Reset] to reset distance values.
Note: Generally, we suggest you to click [Center] and [On Platform]
after adjusting location of the model to make sure the model within the
build area and sticking to the build platform. Only click [On Platform] if
you want to print the model in a specified position.
2.4.2 Rotate
When the model is selected, you can change the orientation of your
model on the build platform by the following two ways:
Method 1: Click the [Rotate] button on the left of the software interface
and you can find three mutually perpendicular rings whose color is red,
green and blue. Click one ring and rotate on the present axis, you will see

Finder User Guide| www.ff3dp.com
the rotation angle and direction in the center of circle. In this way, you
could make the model rotate on X/Y/Z axis.
Method 2: Click the [Rotate] button on the left of the software interface,
and then enter into rotating angel values in X/Y/Z axes positioning. Click
[Reset] to reset rotating angel values.
2.4.3 Scale
When the model is selected, you could change the size of the model on
the build platform by the following two ways.
Method 1: Click the [Scale] button on the left of the software interface,
then hold down the left mouse button and move the mouse to adjust the
size of the model. You will see corresponding values of different axes
near the borders.
Method 2: Click the [Scale] button on the left of the software interface,
and then enter into scale values in X/Y/Z axes positioning. Click the
[Maximum] button to get largest size possible for building. Click [Reset]
to reset the size of model.
Note: If the [Uniform Scaling] radio button is clicked, it will scale the
model in equal proportion when changing value in any positioning of the
model. Otherwise it will only change the value of the corresponding
positioning.
2.4.5 Others
2.4.5.1 Undo
Undo the most recent edit you made to your model file by the following

Finder User Guide| www.ff3dp.com
two ways:
Method 1: Click [Edit]--[Undo].
Method 2: Press the shortcut Ctrl+Z.
2.4.5.2 Redo
Redo the most recent edit you have undone to your model file by the
following two ways:
Method 1: Click [Edit]--[Redo]
Method 2: Press the shortcut Ctrl+Y.
2.4.5.3 Select All
By the following two methods, you could select all models in the scene.
(When models are too small to be seen or out of viewing scope, please
click [Center] and [Scale] buttons to adjust the model.)
Method 1: Click [Edit]--[Select All].
Method 2: Press the shortcut Ctrl+A.
2.4.5.4 Duplicate
There will be two ways to create copy of relevant model after pitching on
it.
Method 1: Click [Edit]--[Duplicate]
Method 2: Press the shortcut Ctrl+D
2.4.5.5 Delete
There will be two ways to delete relevant model after pitching on it.
Method 1: Click [Edit]--[Delete]
Method 2: Press the shortcut Delete

Finder User Guide| www.ff3dp.com
2.4.5.6 Surface to Platform
After selecting the model, you can make the model surface to platform
via the following operation.
Click [Edit]--[Surface to Platform] into surface to platform mode(As
shown in the picture)
Select one surface of model, double left-click the surface, then the model
will be placed automatically with the selected surface to platform.
Surface to Platform
2.4.5.7 Auto Layout All
Click [Edit]--[Auto Layout All] after loading one or more than one
models, all models will be placed automatically as automatic placement

Finder User Guide| www.ff3dp.com
rule.
2.5 Supports Edit
After loading the model, click [Edit]--[Supports] or click the Supports
icon( ) directly on the main interface, then you will enter the support
edit mode(as shown in the picture below). Click [Back] to exit when you
finish editing..
2.5.1 Auto Supports
Click the [Auto Supports] button, the software will judge the position
where supports are needed and generate corresponding treelike or linear
supports. If the model already had support, the existing supports will be
deleted and new supports will be generated.

Finder User Guide| www.ff3dp.com
2.5.2 Clear Supports
Click [Clear Supports], all supports will be deleted. The operation can
be repealed via clicking [Undo] or pressing the shortcut key Ctrl+Z.
2.5.3 Add Support
Supports will be added once clicking the [Add] button. Move the cursor
to the position where needs supports, left-click to choose the starting
point of supports, hold down the left mouse button and drag the mouse
the supports preview will show up(if support surface doesn’t need support
or the support column angle is too large, will highlight the support
review ).Loosen the left mouse button, if support column doesn’t meet
with model, then support will be generated on origin and terminal
point(the highlighted preview support won’t generate support structure )
2.5.4 Delete Supports
Supports will be deleted once clicking the [Delete] button. Move the
cursor to the supports needed deleting, current supports and its child node
support will be highlighted, click the left mouse button to delete these
highlighted support.

Finder User Guide| www.ff3dp.com
2.5.5 Supports
Click the Supports icon on the main interface, an option box will
appear, supports options include “treelike”and “linear”, when choose
“treelike”, click [OK], then the support generated will be treelike
structure; when choose “linear”, click [OK], then the support
generated will be linear structure; if the model already had support,
when you choose one of the supports options,software will judge
whether existing supports need to be deleted or not depend on the
type of existing support, and will pop up the corresponding prompt to
let you make the choice.
2.6 New Project
Click [File]--[New Project] can build a blank project. If there is an
unsaved modification on previous project, then will inform you whether

Finder User Guide| www.ff3dp.com
the modification needs to be saved or not. Click [Yes] will save the
modification , click [No] will abandon it. If click [Cancel] or close tool
tip, then will cancel the new project.
2.7 Save Project
After finishing the model edit and adjustment, there are two ways below
to save all models in the scene.
Method 1:
Click [File]--[Save Project] in the menu bar, can save the file as a project
file which suffix is ”.fpp” in this type of file,all models in the scene
(include support) are independent .after reloading the files, extruder
configuration information and model position will be as same as the
configuration during saving.
Method 2:
Click on [File]--[Save as...] to save the model as project file .fpp or .stl
and .obj. For .stl and .boj, models are integrated as one(include support
part). If load it again, only the position of the model was saved, not
included the printing parameters.
2.8 Printing Procedure
2.8.1 Select Machine Type
Finder User Guide| www.ff3dp.com
Before connecting the printer with PC, Click[Print]--[Machine Type] to
select your machine type. After connection, the software will
automatically recognize and choose your machine type, manual operation
is invalid now. The selection of machine type will confirm the framework
volume, which will influence the slicing result.
2.8.2 Connect Printer with PC
Before this step, we need to do setup for the printer(refer to Section
2.9.1.1)
2.8.3 Print
2.8.3.1 Generate Gcode File
You need to slice the model before printing(printable file is generated by
slicing the model). The following is operation process.
(1)Pattern
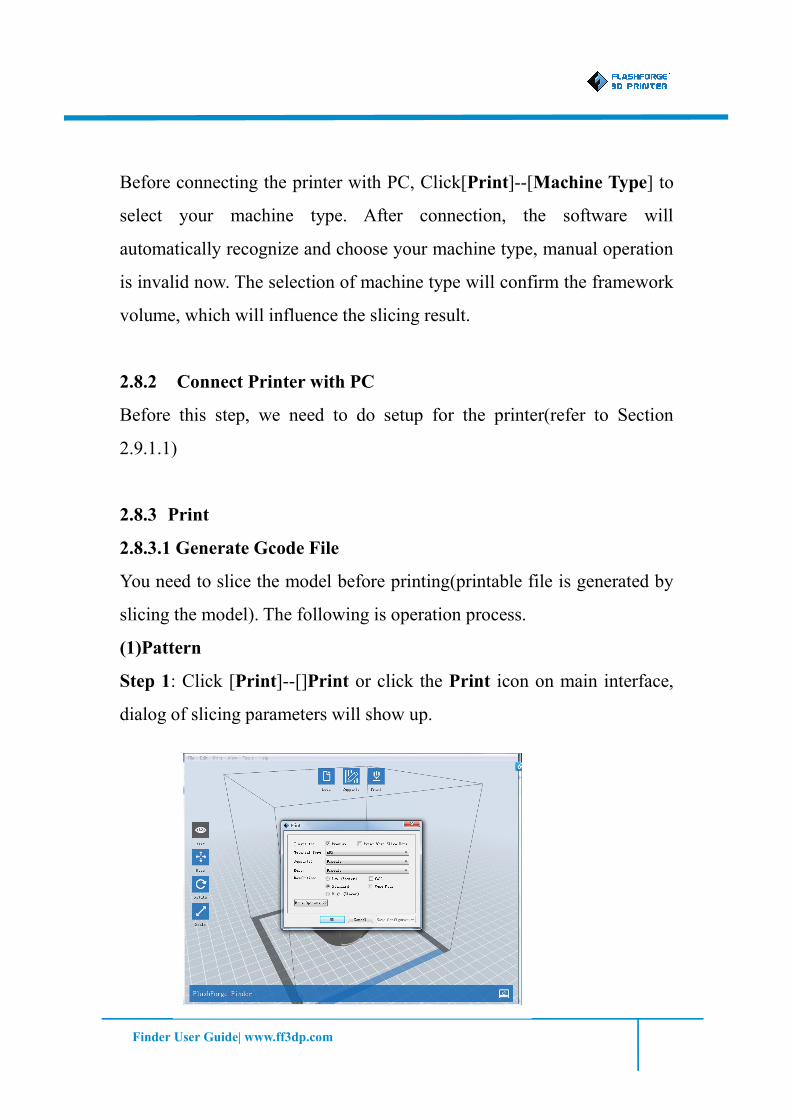
Step 1: Click [Print]--[]Print or click the Print icon on main interface,
dialog of slicing parameters will show up.

Finder User Guide| www.ff3dp.com
Step2: After the setting of slicing parameters, click [OK] and a dialog for
saving Gcode will pop up.
Step3: Choose a save path and click the [Save] button, slicing will begin
and a progress bar will appear. If you want to stop, click the [Abort]
button to stop slicing.
(2)Slicing Parameters
Preview: Choose to enter preview interface or not
Print when slice done: Print or not when slice done
Material type: Choose according to the type of model
Supports: When print with model contains part hanging in the air or
top-heavy, support is necessary. Click [supports] to create support part
for the printing.
Raft: This function will help the model to stick well on the platform.
Wall: During dual color printing, this function will help to clear the
leaking filament of another extruder.
Vase Mode: No capping for the model
You have three resolution solution(with default setting)to choose from,
high resolution is corresponding with slow printing speed, opposite for
the low resolution.For PLA printing, an extra solution “Hyper” is
available.
Click [More options] to set for layer, shell, infill, speed, temperature.

Finder User Guide| www.ff3dp.com
Different resolution solution is corresponding to different defaults, click
[Restore Defaults] to back to default setting.
Layer
a. Layer: Layer thickness of the printing model. With a small number,
the surface of the model will be more smooth.
b. First Layer Height: This is the first layer of the model, which will
affect the sticking performance between the model and platform.
Maximize is 0.4mm, usually the default is ok.
c. Shell: Contains of the outside shell number, capping layer number
(under vase pattern, top solid layer setting is invalid.)
Primeter Shells:Maximize is 10
Top Solid Layer:Maximize is 10, minimum is 1.
Bottom Solid Layer:Maximize is 10, minimum is 1.
Infill
a. Fill Density means fill rate.
b. Fill Pattern is the pattern of filling shape which effects printing
duration.
Speed
a. Print Speed is the moving speed of the extruder. Generally, the lower

Finder User Guide| www.ff3dp.com
speed is, the better print you will get. For PLA printing, 80 is
recommended.
b. Support Print Speed is needed to set when choosing Slic3r as the
slice engine which can control the moving speed of the extruder when
printing the supports.
c. Travel Speed is to control the moving speed of the extruder under
non-printing Status during work. for PLA printing, 100 is recommended.
Note:Modify parameters settings to get better prints as different models
need different parameters.
Temperature
Extruder Temperature: Recommended extruder temperature is 220℃.
Note: Different temperatures have subtle influences in prints. Please
adjust the temperature according to the condition in order to get a good
print.
2.8.3.2 Print Gcode file
Load Gcode file into FlashPrint software when it is generated.
Step 1: The generated Gcode file will be loaded into software
automatically if you select the [Preview] check-box when slicing, or you
need manually load into it and then go to preview interface.

Finder User Guide| www.ff3dp.com
Step 2: Click the [Print] button on up right corner, the machine starts to
print while click the [Back] button to exit.
Note: In the preview interface, there is a vertical scroll bar which shows
each layer of the model and you can find Estimated Material Right and
Estimated Print Time it costs on the top right corner.
2.8.3.3 Pause or Terminate Printing
Once printing starts, click the machine icon on the bottom right corner of
the software interface and it will show the process status in a frame. Click
Pause button to pause printing and then click Continue button to resume it.
Click [Stop] button to cancel this printing task and you need to restart
this print task if you want to print it again.
Note: Please DO NOT click the [Pause] button unless necessary, for it
will affect printing result.
2.9 Printer Operations
2.9.1 Connect / Disconnect
2.9.1.1 Connect
You can connect the Finder to Flashprint software via USB cable or WIFI.
The machine icon on the bottom right corner of the software interface
shows a broken chain pattern means disconnected, while shows a
unbroken one means connected.

Finder User Guide| www.ff3dp.com
A. USB Cable Connection
a. Find USB ports on the right-side of machine and computer, plug in and
connect.
b. Open Flashprint software and turn on the printer.
c. Click [Print]--[Connect Machine], then select USB in the
[Connection Mode] option and select machine you want to connect in
[Select Machine] option. If you can not find your machine, click the
[Rescan] button to scan your machine and select it. Finally click Connect
button to connect to the printer. If you still can not find your machine
after rescan, which means you haven’t installed the driver in the software.
You have to install the driver manually, please refer to the Chapter 2.8.3.1.
Normally, driver shall be installed automatically along with software.
B. WiFi Connection
a. Via wireless network
1. Switch on the printer, and make the WIFI available by clicking the
menu [Tools]--[Set up]--[WIFI]-[WIFI ON].
2. Open the wireless network connection in your computer, and choose .
LPB wireless network. It is the default network of the printer, and no
password is needed if you haven’t changed the settings.

Finder User Guide| www.ff3dp.com
3. Open your browser and enter the IP address 10.10.100.254 in the
Address Bar. Then enter in admin as the account and password . (The
above mentioned IP address /Account /Password are default when the
setting haven’t been changed)
Finder User Guide| www.ff3dp.com
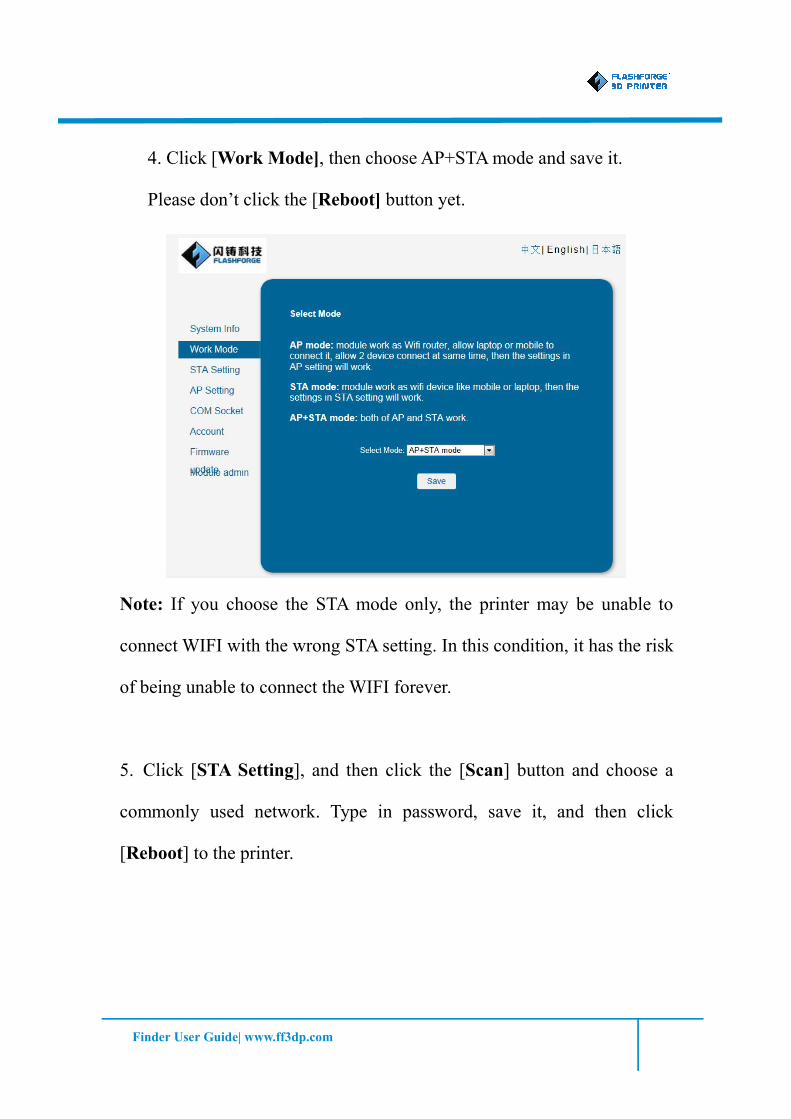
4. Click [Work Mode], then choose AP+STAmode and save it.
Please don’t click the [Reboot] button yet.
Note: If you choose the STA mode only, the printer may be unable to
connect WIFI with the wrong STA setting. In this condition, it has the risk
of being unable to connect the WIFI forever.
5. Click [STA Setting], and then click the [Scan] button and choose a
commonly used network. Type in password, save it, and then click
[Reboot] to the printer.

Finder User Guide| www.ff3dp.com
6. Five seconds after the reboot, choose disconnect and try to connect
WIFI again. Open FlashPrint, click the menu [Print]--[Connect] to select
WIFI connection, and then enter the network IP address (same as the IP
showed on the touchscreen) in the IP port option. Finally click [Connect]
to complete it.
After this, you do not need to connect WIFI in the future if no WIFI
setting is changed. If you want to change WIFI setting, please try the
same way.
e. Open STA setting, click search, choose an appropriate network, type in
password and save it. Then reboot the printer.

Finder User Guide| www.ff3dp.com
f. After the reboot, open wireless connection, choose appropriate network,
and open FlashPrint. Click [Print]--[Connect Machine]. Choose WIFI as
connect mode, and type in the IP address (showed on Touch Screen
Panel), and click connect.
Type 2: Set Finder as WIFI spot, and connect PC with Finder.
a. Switch on Finder, go to WIFI ([Tools]—[Settings]—[WIFI]—[WIFI
ON])
b. Open the wireless network connection, and choose xxx.LPB. (this is
the default network without password, if the settings haven’t been
changed)
c. Click [Print]--[Connect Machine]. Choose WIFI as connect mode,
and type in the IP address 10.10.100.254:8899, and click [Connect].
Note: A printer can only have one connection. If printer is operating by
another process, connections should be switched off first and try to
connect again. If AP mode is chosen, WIFI cannot be used by PC.
2.9.1.2 Disconnect Finder
Choose [Print]--[Disconnect], and the connection between PC and
Finder is break.
2.9.2 Control Panel
After connect PC and Finder, click [Tools]--[Control Panel]. Then you
will see the Control Panel dialog pop up, and operate the following tips.

Finder User Guide| www.ff3dp.com
Jog Controls
a. Jog Mode: refers to the distance that extruder/build platform move a
single time (that is to say, the distance extruder/build platform move upon
your single click).
b. Six blue arrow direction button: Control the move along X/Y/Z axis.
X/Y axis button control extruder move, Z axis button control build
platform move. Click X-, extruder will move leftward a specified distance;
Click X+, extruder will move a specified distance rightward. Click Y-,
extruder will move forward a specified distance; Click Y-, extruder will
move backward a specified distance. Click Z-, build platform will move
upward a specified distance; Click Z-, build platform will move
downward a specified distance. (Specified distance refers to the move
distance you set in Jog Mode.
c. Stop button: When the extruder/build platform is moving, this button
will stop this movement immediately.
d. XYZ coordinate frame on the right side: Show the current position
of extruder/build platform.
e. Make Current Position Zero button: Set the current position of the
extruder/ build platform as (0, 0, 0). (NOTE: X, Y, and Z boxes are for

Finder User Guide| www.ff3dp.com
display purposes. Changing the value in the boxes will not affect
anything.
f. Center X/Y/Z button: Extruder and build platform will back to the
zero (0, 0, 0) you set last time.
g. X/Y Speed and Z Speed: Set the move speed of extruder/ build
platform.
Limit Switch
To protect Finder, it has 3 end-stop switches to control the maximum
position, and the 3 limit switches corresponding to X/Y/Z axis limit
switch. It has 2 status:
a. Not Triggered: When extruder/build platform do not move to the
maximum position, X/Y/Z axis limit switch is not triggered, and shows
“Not Triggered”.
b. Triggered: When extruder/build platform move to the maximum
position, X/Y/Z axis limit switch is not triggered, and shows “Triggered”.
Cooling Fan Controls
This is aim to check cooling fan of extruder is work or not. Click [Turn
On], you will turn on the cooling fan; and click [Turn off], you will turn
off the cooling fan.
Stepper Motor Controls
This is aim to check whether stepper motor is on or not. Click [Enable],

Finder User Guide| www.ff3dp.com
and lock the motor so it does not allow any movement; click [Disable],
and unlock the motor to be controlled manually.
LED Color
LED color of Finder can be changed via control this button.
Extruder Controls
You can set the value of “Motor Speed(RPM)”, which can control the
rotation speed of filament feeding wheel. The motor rotation time can be
controlled via setting the value of “Extruder Duration”.Generally we
suggest the users choose option of continuous time 60 seconds.
The filament must be melted in extruder before motor starts to rotate.
Therefore, please do not start rotation operation until the extruder
temperature reach the printing temperature of filament. For PLA filament,
the extruder temperature should reach 200℃, after reaching the extruder
temperature, click the [Forward]/[Reverse] rotation button to control
filament load and filament unload. Furthermore, if you want to stop
filament load and unload, you can click [Stop].
Temperature Control
Input the temperature you want to get in the left frame, click [Apply], the
printer will automatically heat the corresponding part, the right side
shows the current actual temperature of corresponding part. After start
heating, the below curve of temperature form will start to change,
different color correspond different parts’ temperatures
.

Finder User Guide| www.ff3dp.com
2.9.3 Update Firmware
Every time when you start the software, it will automatically detected the
update and download new printer firmware. If there is new available
firmware, it will remind user to update, the installation method is as
below:
Step 1: Click [Tools]--[Update firmware]. It needs to cut off connection
before updating firmware. If software and printer are already in
connection, it reminds you cutting off the connection, choose [Yes] and
go on to the next step.
Step 2: Choose corresponding printer type and firmware version and
click [OK] in the firmware updating box. After confirming the printer is
in free state, the software will automatically update the firmware.
2.9.4 On Board Preferences
When the computer and printer are in connection state, click [Tools]--[On
Board Preferences], you can check the printer name, extruder quantity
etc.

Finder User Guide| www.ff3dp.com
2.9.5 Machine information
When the computer and printer are in connection state, click
[Tools]--[Machine information], you can check the machine type,
machine name and firmware etc.
2.9.6 Manual Installation of Driver
The manual installation of driver method as below:
Step 1: Open the root directory of software(For example:\Program
Files\flashforge\FlashPrint )
Step 2: Open the driver folder in root directory, find the driver software,
click installation(There are two installation packages:dpinst_amd64.exe
for 64 - bit system, dpinst_x86.exe for 32- bit system, users can choose
which they need)
2.10 Other
2.10.1 Preferences
Click [File]--[Preferences], you can choose language and if needs
detecting update when start

Finder User Guide| www.ff3dp.com
Language
The software supports six languages, that is Chinese(simplified Chinese
and traditional Chinese), English, French, Korean, Japanese and Russian,
Detect Update
It is used to set if needs to activate the online automatic update function,
if choose yes, every time when you open software, it can online detect if
there is new version software, once new version found, it will reminds
uses to download and install new version firmware.
2.10.2 Check the Help Contents
Click [Help]--[Help], you can read the help contents.
2.10.3 Version updating
There are two ways to update the software.
Online Automatic Update
Choose [Detect update], the software will be updated automatically
(Refer to 2.9.1)
Manual Update
Click [Help]--[Check for Update], it can detect online if there are
Finder User Guide| www.ff3dp.com
updated version. If there are available updated software version, the user
can download and update new version.
Note: The process of software download and installation, please refer to
Section1.1~1.2
2.10.5 Check Flashprint information
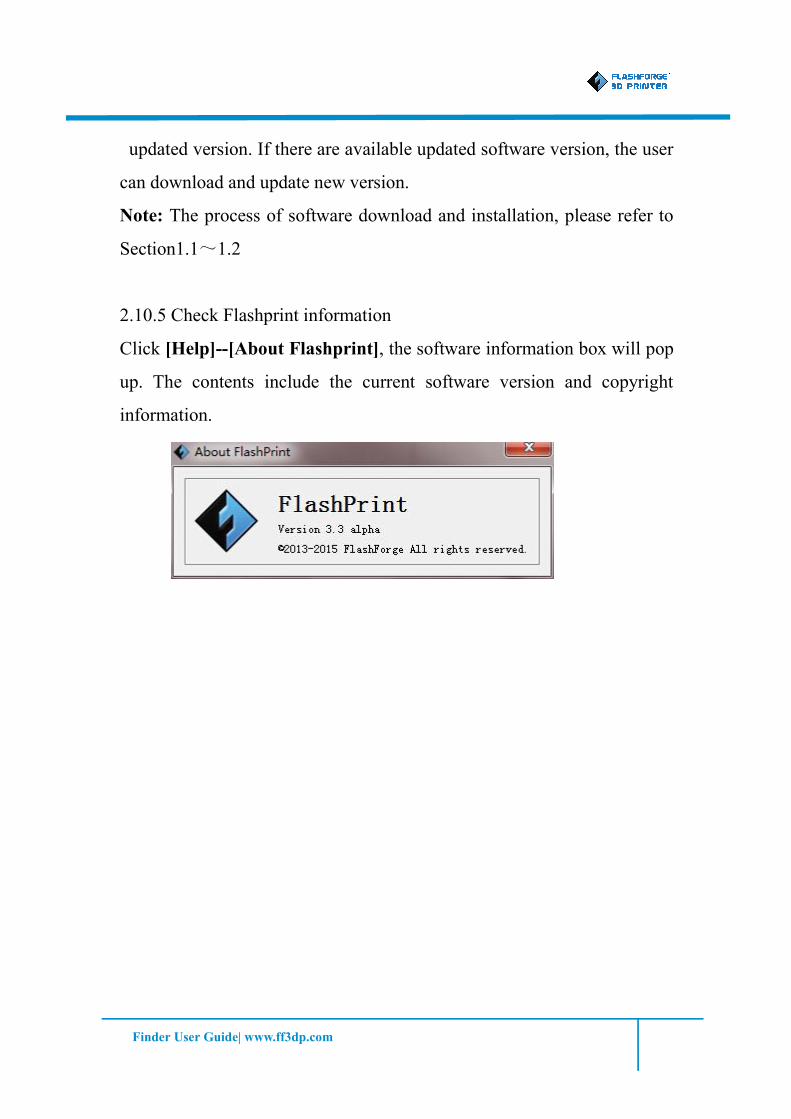
Click [Help]--[About Flashprint], the software information box will pop
up. The contents include the current software version and copyright
information.
Finder User Guide| www.ff3dp.com
Chapter3.First Print
A. OverviewB. Start PrintingC. Methods of Printing

Finder User Guide| www.ff3dp.com
A. OverviewThis chapter will provide a step-by-step guide on turning a 3D model into
a physical reality. Before proceeding, it is recommended that you go over
prior chapters on loading/unloading filament, leveling the build platform,
and the functions and capabilities of FlashPrint.
There are three connection methods in order to print using the Finder. All
methods, which include USB, USB flash disk, and Wi-Fi are covered in
this chapter.
34

Finder User Guide| www.ff3dp.com
B. Start PrintingThree kinds of connection methods: including USB, USB flash disk,
Wi-fi
Below we will introduce you one by one the print mode and connection
method, it will become a wonderful experience in your first print.
1. Double-click the icon to open the FlashPrint software.
2. Click on the [Load] icon to select a 3d model file with STL suffix from
the hard disk.
3. The object selected will show on the screen.
4. Adjust model print position and size according to your convenience,
requirement and preference. Please refer to the Software part on Chapter
2 for adjustment.
5. Now the 3d model is ready to be printed. Part B will introduce how to
choose connection methods.

Finder User Guide| www.ff3dp.com
C. Printing MethodUSB Connection Printing:1. Connect Finder to computer with an USB 2.0 cable
2. Open the machine. Make sure that the plate has been leveled and
filament has been loaded. The two steps above could be referred to the
Build Plate Leveling section, and the Filament Loading section.
3. Select the [Print] menu, then choose [Connect].
4.Click on [Rescan],then click [Connect].
5.Now the printer is connected with FlashPrint. The status bar on the
bottom right corner displays nozzle temperature.
6. Click the [Print] icon, a printing options dialog will pop up. Make sure
that the [Material Type] is selected as “PLA”. Advanced settings can be
set under [More Options] icon. Check the box [Print When Slice Done]
and click [OK].
7. Save the file at any location, and the object will start slicing.After the
object is done slicing, it will automatically upload the gcode to Finder,
then, the printer will go into a preheat phase. The Finder will begin
printing once it has finished preheating.
Printing from USB Flash Disk:
1. Insert the USB flash disk into the computer.
2. Tap [Print], and a printing options screen will show up. Make sure that
the [Material Type] is selected as “PLA”. You can operate advanced
settings after clicking the [More Options] button. Notice that you need to
click the [Print preview] radio button and click [OK].

Finder User Guide| www.ff3dp.com
3. Save the g. code file in the USB flash disk, FlashPrint will begin
slicing the 3D model.
4. After finishing slicing, insert the USB flash disk into the USB interface
on the Finder. Turn on the Finder. Make sure the build plate is leveled,
and filament is loaded.
5. Tap [Print] and then select SD Card icon in the middle. A list of file(s)
will show up, press the file that you would like to print, then press [Yes].
6.The printer will heating up automatically and will start printing after
finishing heating,
Printing fromWi-Fi:1. Turn on Finder. Make sure the build plate is leveled and filament is
loaded.
2. Open the wifi, tap [Tools]--[Setting]--[WIFI]--[WIFI ON].
3. After open Wifi,a connection called LPB can be founded on the list of
available networks. Connect to this network.
4. Open the Internet browser,type in “10.10.100.254” and hit [Enter] on
your keyboard. Enter the user-name and password to login. The default
user-name and password are both“admin.” The control panel will appear
after a successful login.
Finder User Guide| www.ff3dp.com
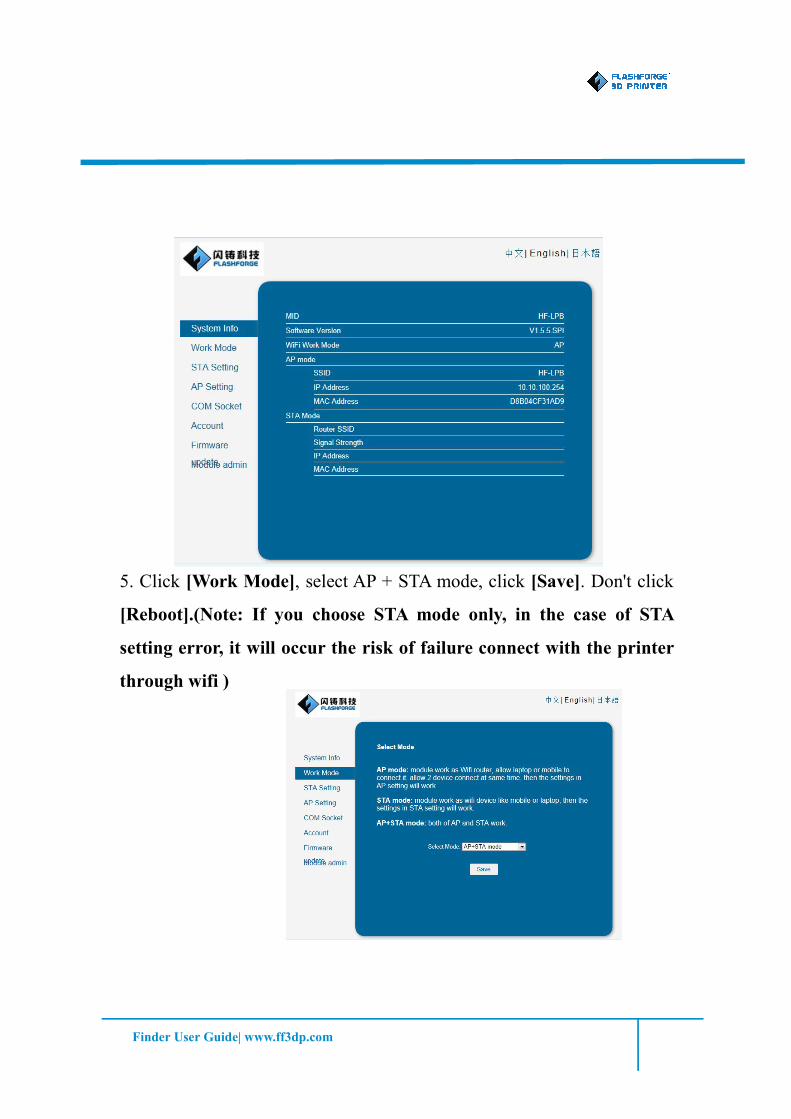
5. Click [Work Mode], select AP + STA mode, click [Save]. Don't click
[Reboot].(Note: If you choose STA mode only, in the case of STA
setting error, it will occur the risk of failure connect with the printer
through wifi )

Finder User Guide| www.ff3dp.com
6. Click [STA Setting], click [Scan]. Choose commonly used network.
enter the password. Click [Save], then click [Reboot].
7. Open wireless network selection to select common network. Then start
FlashPrint and click [Menu]—[Print]—[Connect] successively. Choose
WIFI as the link mode, input the IP address of user’ internet( The IP
address shows on the screen of the 3D printer) to the IP port below, and
then click [Connect].
8. And now the printer has connected with FlashPrint. The status bar in
the lower right corner would show the temperatures of the nozzle.
9.Click the Print icon on the main interface, a printing selection dialog
will show up. You should ensure that you choose “PLA” in the material
options. Click [More Options] to implement advanced options. And you
should check on [Print When Slice Done] and click [OK].

Finder User Guide| www.ff3dp.com
10. Gcode files could be saved at any locations. After being saved, the
model starts to be cut into slices and be uploaded to Finder. Then the
printer will turn into preheat mode and start to print when the preheat
finishes.
The printer cannot read the target file from USB flash diskunder the WIFI mode. You can transfer the file to TF cardfor printing.

Finder User Guide| www.ff3dp.com
Chapter4.Supports and Service
A. SupportsB. Attachment

Finder User Guide| www.ff3dp.com
A. SupportsOur team of knowledgeable staff is on standby and ready to help you
overcome any challenges you may have with your Finder. If your issue or
question is not covered in the user manual, you can seek for solutions on
our office website or contact us via telephone.
There are solutions and instructions to common issues that can be found
in our knowledge base. Have a look first as most basic questions are
answered there.
http://www.ff3dp.com
The FlashForge support team can be reached by e-mail or phone between
the hours of 8:00 a.m. to 5:00 p.m. PST Monday through Saturday. In
case you contact us during after-hours, your inquiry will be answered the
following business day.
Tel:86+579-82273989
ADD:No. 518, Xianyuan Road, Wucheng, Jinhua, Zhejiang
*When contacting support, please have your serial number ready. The
serial number is a bar code on the back of your Finder.”
41

Finder User Guide| www.ff3dp.com
B. AttachmentParameters:
Name Finder
Extruder Number Single
Technique Fused Deposition Modeling (FDM)
Screen 3.5’’ color IPS Touch Screen
Build Size 230×150×140mm
Layer Thickness 0.1 - 0.5mm
Build Precision ±0.2mm
Located Precision Z axis 0.0025mm; XY axis 0.011mm
Filament Diameter 1.75mm
Nozzle Diameter 0.4mm
Current Speed 24CC/hr
software FlashPrint
Support Formats stl、obj
OS Windows Mac OS
Printer Size 420*420*420mm
Weight 10.75Kg
Input Voltage 100-240V, 50-60Hz, 100W
Data Transmission USB cable、USB flash disk、wifi