Embed Size (px)
Citation preview

USER MANUAL
Inventory Manager
Version: 4.0
Compatibility:
Microsoft Dynamics CRM 2016(v8.0) and above
TABLE OF CONTENTS
Introduction .................................................. 1
Benefits of Inventory Manager ..................... 1
Prerequisites ................................................. 2
Installation & Configuration .......................... 2
Installation Steps ....................................... 2
Configuration Steps ................................... 5
Procedure .................................................... 12
Stock Management .................................. 12
Product List Page ..................................... 25
Creating Sales Order ................................ 33
Generating Purchase Order ..................... 36
Creating Purchase Invoice ....................... 37
Completing Invoice .................................. 40
Stock Update on Order Fulfillment .......... 41
Generating RMA ...................................... 42
Generating RTS ........................................ 45
Creating Manual Purchase Order ............ 47
Creating PO for Low Stock Products ........ 47
Dashboard ............................................... 49
Inventory Reports .................................... 53
Inventory Charts ...................................... 65
Uninstallation Steps .................................... 72
Contact Us ................................................... 73

USER MANUAL: Dynamics CRM Inventory Manager
www.appjetty.com 1
Introduction
Inventory Manager from AppJetty is an Inventory Management Solution for Dynamics CRM. This plugin
helps you to streamline your purchase and stock keeping process.
With the help of Inventory Manager, you can manage stocks (keep track of stock transactions, low stocked
products) and purchases (generate purchase orders, purchase invoices, low stock purchase orders, RMA-
Return Merchandise Authorization and RTS-Return To Suppliers). You can also generate reports for RMA,
RTS, purchase orders, and purchase order invoices.
Inventory Manager enables you to generate inventory reports of stock history, detailed stock history,
inventory status. You can also analyze your inventory through charts of warehouse stock, returned and
available stocks. It comes with a warehouse module using which you can create a new warehouse and
allocate warehouses for every stock of products. You can also transfer the stock of products from one
warehouse to another.
In addition to the above functionalities, it is also possible to view the total amount of credits and debits
carried out in your inventory orders through this plugin. You can also generate account report which will
provide a complete detail about the detailed history of the credits or debits made in any stock of an
inventory. It will also provide basic summary like total sales, returns, and purchases along with other
details.
Benefits of Inventory Manager
Compelling benefits that streamline your inventory management:
• Helps you manage all your stock purchases in an efficient manner by automating documentation.
• Keeps track of your entire inventory - how many products purchased, how many remaining in stock,
how many sold, etc.
• Helps you keep a track of stocks so that you do not run out of stocks or keep more stock than
necessary.
• Easily manages all the documents required to fulfill a purchase like purchase orders and purchase
invoices.
• Eliminates chances of human errors with an automated system.
• Accurate data delivers critical information to help you make right decision and avoiding mistakes.
• Analyze your inventory by viewing bar chart and pie chart for your warehouse stocks as well as
available and returned stocks.
• Easily manage warehouses for your products
• Quickly transfer stock of products from one warehouse to another.
• Easily manage Credits and Debits of your account and view its details through an Account Report.

USER MANUAL: Dynamics CRM Inventory Manager
www.appjetty.com 2
Prerequisites
Following point must be followed before starting the Plugin installation:
• You should be logged into Dynamics CRM Online (Version 8.0 and above).
Installation & Configuration
Installation Steps
To install ‘Inventory Manager’ plugin, the following steps has to be followed:
• On purchasing the plugin, you will get a zip file named Inventory-Manager-v4.0.zip. • Login into your CRM Account and click on Settings -> Solutions
• Click on ‘Import’ to upload and install the Solution.
• Click on ‘Browse’ button and choose the Package Zip File for Inventory Manager from the Import
Solution Window.

USER MANUAL: Dynamics CRM Inventory Manager
www.appjetty.com 3
• Click on ‘Next’ for further processing.
• Check the checkbox to enable any SDK message processing steps included in the solution and click
on Import button to Import the Solution.

USER MANUAL: Dynamics CRM Inventory Manager
www.appjetty.com 4
• Click on ‘Close’ after successful completion message is displayed.
• Once you import the solution, it will be displayed in the solutions grid view.
USER MANUAL: Dynamics CRM Inventory Manager
www.appjetty.com 5
Configuration Steps
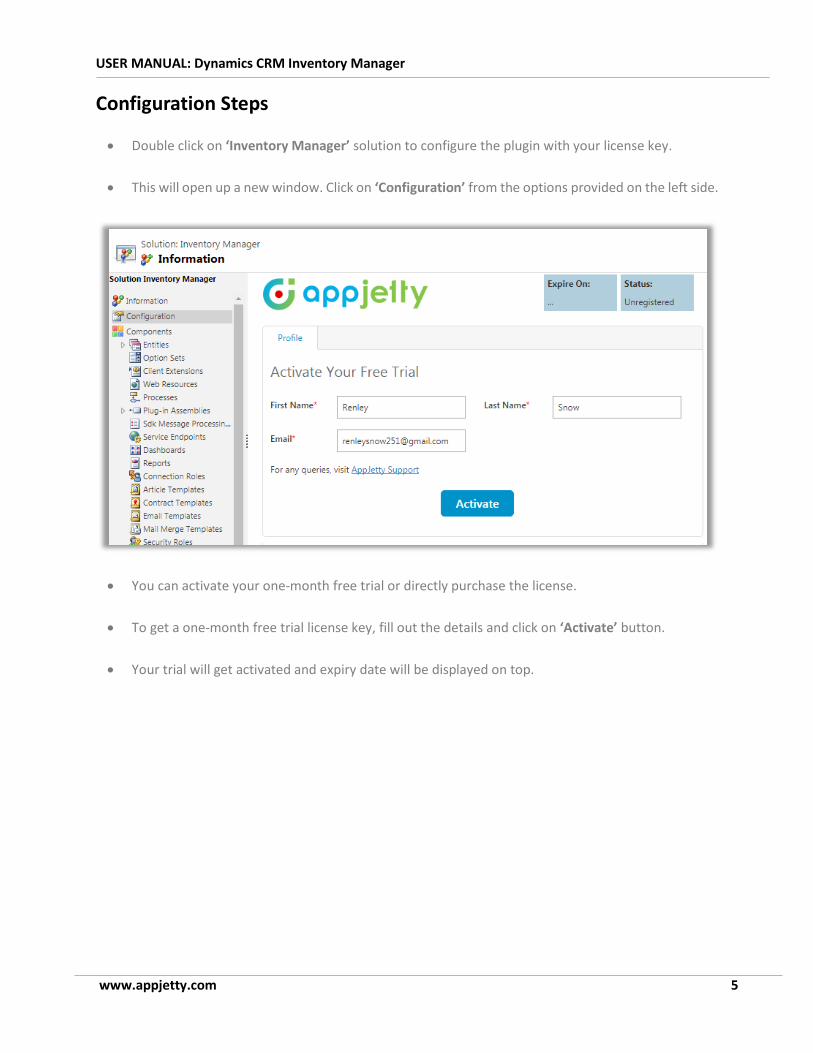
• Double click on ‘Inventory Manager’ solution to configure the plugin with your license key.
• This will open up a new window. Click on ‘Configuration’ from the options provided on the left side.
• You can activate your one-month free trial or directly purchase the license.
• To get a one-month free trial license key, fill out the details and click on ‘Activate’ button.
• Your trial will get activated and expiry date will be displayed on top.

USER MANUAL: Dynamics CRM Inventory Manager
www.appjetty.com 6
• You can purchase the licensed version any time. To purchase the license, click on ‘Buy Now’ button.

USER MANUAL: Dynamics CRM Inventory Manager
www.appjetty.com 7
• On expiration of Trial, a message will appear that the trial has been expired. Now to purchase the
license click on ‘Buy Now’ button.
• This will redirect you to our product page and a pop-up will appear to request quote. Click on
‘Request Quote’ button and give your complete details.
• On successfully completing the process and once you have purchased the plugin, you will receive
your license key via email along with steps to complete the license configuration.
• Click on ‘Activate’ button to activate your license.

USER MANUAL: Dynamics CRM Inventory Manager
www.appjetty.com 8
• After submitting the valid license key, you will be navigated to the ‘Setup’ tab.

USER MANUAL: Dynamics CRM Inventory Manager
www.appjetty.com 9
• From ‘Setup’ tab, you can enable/disable Email Notification Settings, Warehouses, Credit and
Debit Module.
• To enable the Email Notifications for your Stock Transactions, check the ‘Enable Email
Notification’ checkbox.
• By checking the ‘Enable Email Notification’ checkbox, ‘Reasons’, ‘Users’ and ‘Reorder Notification
Users’ dropdown list will appear below the Enable Email Notification.

USER MANUAL: Dynamics CRM Inventory Manager
www.appjetty.com 10
• Reasons: Select the reasons for which you want to receive email notifications.
• Users: Select the users who will receive the email notifications for their stock transactions.
• Reorder Notification Users: Select the users who will be receiving email notifications related
to product reordering.
• To enable the Warehouses in your Inventory Manager, navigate to the ‘Other Settings’ section
and check the ‘Enable Warehouses’ checkbox and to enable Credit - Debit module check the
‘Enable Credit -Debit Module’ checkbox.
• Check the ‘Error Log Tracking’ checkbox to enable error log tracking.
• Once you have enabled Warehouses and Credit –Debit Module, you can access it from Products
and Orders module of the Inventory Manager.

USER MANUAL: Dynamics CRM Inventory Manager
www.appjetty.com 11
Note: Once warehouses are enabled and transactions have been performed, warehouses cannot be
disabled.
Configure Languages:
• You can also configure language of your choice by clicking on configure languages button available
on set up page.
• On configure language page, select the language from dropdown that you wish to configure
messages for.
• Here, user needs to add translations themselves for the messages in the language of their choice.
• Click on save button to save the language translations.
Note: For configuring languages, user first needs to manage language settings from CRM. Languages
that are selected in CRM can be configured for the calendar.

USER MANUAL: Dynamics CRM Inventory Manager
www.appjetty.com 12
Procedure
Stock Management
• To manage the stock of products, navigate to Sales -> Products.
• To manage the stock of a particular product, click on that product name from the list of products
in products listing page.
• You will be able to manage only those products which are Active.
• By clicking on the product name, its Product Detail Page will be displayed, wherein you will find a
section for Stock Management along with a ‘Manage Stock’ and ‘View History’ button.

USER MANUAL: Dynamics CRM Inventory Manager
www.appjetty.com 13
• In the stock management panel, you can find product related details like available stock, minimum
stock level, reordering quantity, total inwards, total outwards, whether product is a serial number
product or not and know if a product is low stock enabled product or not. You also get idea from
detail page itself if alerts and reordering is enabled or not.
• Also default supplier and default warehouse assigned to the product will be shown in the stock
management panel. Default supplier will be assigned as default for automatically generated
purchase order.
• Now click on ‘Manage Stock’ button. This will open up a new window with stock details, wherein
you can configure your stocks for that product.
• It will display the current stock of the product, its total inward & outward quantity till now. Check
the ‘Manage Stock’ check box to enable stock management for the selected product.

USER MANUAL: Dynamics CRM Inventory Manager
www.appjetty.com 14
• If product has serial number as well, check the checkbox ‘Has Serial Number’.
• To update the serial number, click on ‘Update Serial No.’ button and if the serial number is not
added click on ‘Add Serial Number’ button besides quantity field.
• By clicking on Add Serial Number, it will open screen where you can either add all numbers
manually or directly import csv or xlsx file.
• Along with file selection, you can also select sheet from the dropdown if your selected file has
multiple sheets.

USER MANUAL: Dynamics CRM Inventory Manager
www.appjetty.com 15
Note: It is mandatory to have Serial Number once the serial number is enabled for a product. And once
the stock is managed without enabling the Serial Number, you cannot enable serial number for that
product anymore.
• You can update the stock by entering the quantity in the ‘Quantity’ text box.
• After entering the quantity, select supplier for the stock update from ‘Supplier’ dropdown list. You
can also add a new supplier by clicking on ‘Add Supplier’ button.
• This will open up a new window to enter the details of the new supplier clicking on ‘Save’ button
will add the supplier in dropdown list. If not added, then click on the ‘Refresh’ icon besides the
‘Add Supplier’ button to refresh the supplier list.

USER MANUAL: Dynamics CRM Inventory Manager
www.appjetty.com 16
• Now, to select the warehouse for the stock update, choose the warehouse from the ‘Warehouse’
dropdown list. You can also add a new warehouse by clicking on ‘Add Warehouse’ button.
• This will open ‘Create Warehouse’ window, where you can enter all relevant details for the
warehouse.
• Along with creation of warehouse, you get to view list of warehouses where you can also edit or
delete the warehouse by clicking on ‘Edit’ and ‘Delete’ icon respectively under the ‘Actions’
column.

USER MANUAL: Dynamics CRM Inventory Manager
www.appjetty.com 17
• Thereafter, to add a new warehouse, click on ‘Add Warehouse’ button present on the top left
corner. This will display ‘Create Warehouse’ section.
• Now, enter the basic details of the warehouses and click on ‘Save’ button. After clicking on ‘Save’
button, the warehouse will be added in the dropdown list. If not added, click on the ‘Refresh’ icon
besides the ‘Add Warehouse’ to refresh the warehouse list.
• The reason for stock update can be selected from the drop-down list or a new reason can be
added by clicking on the ‘Add Reason’ Button.

USER MANUAL: Dynamics CRM Inventory Manager
www.appjetty.com 18
• You will see a pop-up wherein you need to enter the name of new reason and select whether it is
an inward or outward transaction. Clicking on ‘Save’ button will add the reason in the ‘Reason’
dropdown list.
• Thereafter, enter the reason for stock management in ‘Reason Description’ text field and click on
‘Save’ button to manage the stock for the particular product.
Assign Supplier
• To assign a supplier to the product, select a supplier from the ‘Supplier’ dropdown list and click on
‘Assign Supplier’ button.
• You can also add a new supplier for the product by clicking on ‘Add Supplier’ button. This will
open a new window where you can enter the details of supplier and add the supplier to the list.
• Click on ‘Refresh’ icon to update the dropdown list.
Assign Warehouse
• To assign a warehouse to the product, select a warehouse from the ‘Warehouse’ dropdown list
and click on ‘Assign Warehouse’ button.
• You can also add a new warehouse for the product by clicking on ‘Add Warehouse’ button.

USER MANUAL: Dynamics CRM Inventory Manager
www.appjetty.com 19
• Thereafter click on ‘Assign Warehouse’ button to add the warehouse to the list.
• Additionally, you can also manage warehouses (Add, View or Delete) by clicking on ‘Warehouses’
button from the ‘MANAGE WAREHOUSES’ module on the Products listing page.
Note: You cannot delete the ‘Main’ warehouse and the warehouses containing product stocks.
Low Stock Management
• To enable low stock management, check the ‘Enable Low Stock’ checkbox under ‘Low Stock
Management’. By defining low stock for a product, one can filter product as low stock product and
purchase order is created of it when product goes below the defined mark.

USER MANUAL: Dynamics CRM Inventory Manager
www.appjetty.com 20
• You can also enable alerts for low stock by checking the check box to ‘Enable Alerts’. On enabling
alerts, user gets message on opening the product detail page stating product to be in low stock.
• Product reordering can be also managed by enabling reordering option. By enabling this option,
automatically PO is generated with assigned default supplier for the product.
• Mention low stock limit for that product in ‘Minimum Stock’.
• Mention reordering stock quantity for that product in ‘Reordering Stock’.
• Click on ‘Save’ button.
Note: Reordering stock can be enabled only if product has price list associated with it and has default
supplier assigned.

USER MANUAL: Dynamics CRM Inventory Manager
www.appjetty.com 21
• Once the low stock management is enabled for a product you will be able to filter out such
products from the list view of products.

USER MANUAL: Dynamics CRM Inventory Manager
www.appjetty.com 22
View Stock History
• You can view the stock transaction history of the product by clicking on ‘View History’ button from
the Product Details page under Stock Management Panel.
• This will open a new window displaying the Stock Transaction History of the product with full
information of incoming and outgoing stocks.
• For serial numbers enabled products, you can view detailed transaction list of products along with
serial numbers by clicking on Detailed Stock History button.

USER MANUAL: Dynamics CRM Inventory Manager
www.appjetty.com 23
• Also, there are buttons available to view serial numbers and warehouses for transactions for serial
number products.
• You can filter the Transaction history in the following ways:
▪ Date-wise: Select the date range between which you wish to view transactions.
▪ User-wise: Select multiple users to get transaction details user wise.
▪ Reason-wise: Select multiple reasons to filter list based on reasons selected.
▪ Transaction-wise: Filters list based on inward or outward flow of products.

USER MANUAL: Dynamics CRM Inventory Manager
www.appjetty.com 24
• To view the serial numbers of transaction, click on ‘View’ button under ‘View Serial Number’
column from the history of product. This will open a pop up containing a list of serial numbers of
the products included in the transaction.
• You can view the Detailed Summary of product stock history by clicking on the ‘+’ sign on the top-
left corner.

USER MANUAL: Dynamics CRM Inventory Manager
www.appjetty.com 25
Product List Page
• On product list page, under product grid it displays whether manage stock and low stock is enabled
for product or not. Also shows available stock and minimum stock level.
• Inventory Reports fly out is available that contains Stock History and Inventory Status buttons.
• Manage Stock fly out has buttons for Transaction Reasons and Manage Stock.
• Manage Warehouses contains button warehouses and warehouses stock transfer.
• Charts: Warehouse Stock, Return Stock, and Available Stock.
Stock History
• Stock history will list the history of stock transactions for selected products.
• For products with serial numbers, it will provide button in Detail View column.
• For report generated, you can select columns that you wish to view. Certain columns are by default
in the report and cannot be unselected.
• Report can be filtered, exported, searched and printed based on user need.

USER MANUAL: Dynamics CRM Inventory Manager
www.appjetty.com 26
Inventory Status
• Inventory Status option will show status of inventory for selected products.
• Under inventory status it shows Quantity on Hand, Quantity on Order, Total Quantity for the
products.
• User can check detailed status for inventory containing list of serial numbers and its status along
with reasons by clicking on Detail View button.
Transaction Reasons
• To manage the reasons of transactions in your inventory, navigate to ‘MANAGE STOCK’ from
product listing page and click on ‘Transaction Reasons’.
• By clicking on ‘Transaction Reasons’, a new window screen will pop up containing a list of inventory
reasons along with its details.

USER MANUAL: Dynamics CRM Inventory Manager
www.appjetty.com 27
• Now to add an Inventory Reason click on ‘Add Reason’ button, from top – left corner. After clicking
on it a new section will be displayed above the Inventory Reasons section.
• Enter the name of reason in ‘Reason Name’ text field; select the type of transaction from
‘Transaction Type’ dropdown list and check the ‘Active’ checkbox to activate the reason.
• Thereafter click on ‘Save’ button to save the reason and by clicking on it, reason will be added to
the list of Inventory Reasons and you will be notified with ‘Reason added successfully’ message.
• You can also edit inventory reasons by clicking on ‘Edit’ icon besides the particular inventory reason
under ‘Actions’ column.

USER MANUAL: Dynamics CRM Inventory Manager
www.appjetty.com 28
Note: Transaction Reasons can also be added from ‘Manage Stock’ under ‘MANAGE STOCK’. In inventory
reasons only, those reasons will be shown that are created by user itself.
Manage Stock
• To manage the stock of products, select the products from product listing page then go to ‘MANAGE
STOCK’ and click on ‘Manage Stock’ button. By clicking on it, Manage Stock window will pop up on
your screen.
• Now you need to enter the quantity, select supplier, select warehouse, select the reason for the
stock management and enter the description for managing the stock.
• Thereafter click on ‘Save’ button besides the stock to save the managed stock of only particular
product and click on ‘Save All’ button to save the managed stocks of all the products.
Note:
• Stock cannot be managed for following:
i. Inactive or Family Products
ii. Products with Serial Number
• Warehouse column will only be displayed if ‘Warehouse’ module is enabled from Configuration
Settings.

USER MANUAL: Dynamics CRM Inventory Manager
www.appjetty.com 29
Warehouse
• Clicking on warehouse option under manage warehouse get list of warehouses. From the list itself
user can add, edit, delete warehouse
Note: Main warehouse cannot be edited or deleted. Also, warehouse can’t be deleted if it is having stock.
Warehouse Stock Transfer
• To transfer the stock of one warehouse into another click on ‘Warehouse Stock Transfer’ button
under ‘MANAGE WAREHOUSES’ module in Products listing page after selecting products.
• By clicking on ‘Warehouse Stock Transfer’ button you will be presented with the Warehouse Stock
Transfer screen.

USER MANUAL: Dynamics CRM Inventory Manager
www.appjetty.com 30
Transfer Serial Number Products
• To transfer the products with serial number, select the ‘Serial Number Products’ option from ‘Select
Product Type’ dropdown list. A list of products with serial numbers will be displayed.
• For product with serial number, you can also enter quantity and click on select button to select that
many products.
• After selection of the products to be transferred, choose the ‘Warehouse From’ (Warehouse from
which the product is to be transferred) and ‘Warehouse To’ (Warehouse to which the product is to
be transferred) along with supplier selection.
• Click on ‘Transfer’ button. By clicking on it, your selected serial number products will be transferred
to the respective warehouses.

USER MANUAL: Dynamics CRM Inventory Manager
www.appjetty.com 31
Transfer Non-Serial Number Products
• To transfer the non-serial number products, select the ‘Non-Serial Number Products’ option from
‘Select Product Type’ dropdown list. A list of products without serial numbers will be displayed.
• Now select the products to be transferred and choose the ‘Warehouse From’ (Warehouse from
which the product is to be transferred) and ‘Warehouse To’ (Warehouse to which the product is to
be transferred) along with supplier selection.
• Click on ‘Transfer’ button. By clicking on it, your selected non-serial number products will be
transferred to the respective warehouses.
Note: List of products will be shown on basis of combination of warehouse and supplier selection.

USER MANUAL: Dynamics CRM Inventory Manager
www.appjetty.com 32
Order Summary
• To get order summary of the products, select the products and click on View Order Summary.
• You get graphical representation (line chart) of product selling along with tabular data showing
quantity sold and total sale amount.
• Users can also filter data based on period like: This month, This week, This year, Last month, Last
week, Last year.

USER MANUAL: Dynamics CRM Inventory Manager
www.appjetty.com 33
Creating Sales Order
• To create a new Order, navigate to Sales -> Orders
• Now, click on ‘New’ and enter details such as: Order Name, Currency, Value of Price List, Potential
Customers etc.
• Once the order is created, select products with the help of look up and add them to the order. You
can also add bundle (containing multiple product with multiple quantities) in your order. Also on
order creation, order timeline is being maintained to let users know about their completed stages.
• Now in order to link serial numbers with the products and warehouses with the products without
serial numbers, added in the order, click on ‘LINK ORDER PRODUCTS’.

USER MANUAL: Dynamics CRM Inventory Manager
www.appjetty.com 34
• This will open a popup with the list of serial number products and list of non-serial number products.
• From ‘LINK SERIAL NUMBERS PRODUCTS’, select products which are to be linked and click on ‘Link’
button.
• Thereafter select the quantity per warehouse from ‘Select Warehouse’ column under ‘LINK NON-
SERIAL NUMBERS PRODUCTS’ section and click on ‘Save’ button.

USER MANUAL: Dynamics CRM Inventory Manager
www.appjetty.com 35
Note:
i. It will display products for which Serial Number is enabled under LINK SERIAL NUMBER
PRODUCTS section and it will display products without Serial Number under LINK NON-SERIAL
NUMBER PRODUCTS section.
ii. Warehouse selection section will only be displayed if Warehouse module is enabled from the
Configuration Settings.
iii. For linking products, selection of products should be same as quantity entered.

USER MANUAL: Dynamics CRM Inventory Manager
www.appjetty.com 36
Generating Purchase Order
• After adding the products, to generate the Purchase Order click on ‘Generate PO’ which is available
at more options on the CRM ribbon as shown below:
• Clicking on ‘Generate PO’ will open a new window in which you can select supplier for each product.
• If you have already assigned a supplier to a product then that supplier will be selected by default
and if you want to change the supplier, then you can select a supplier from the dropdown list.
• You can also add a new supplier by clicking on ‘Add Supplier’ button.
• Select the products and click on ‘Create PO’ button. This will create a Purchase Order based on the
selection of suppliers and a success message will appear. Click on ‘OK’ button to continue
• Once a P.O is generated, it will be displayed on the order page as shown in reference screen below.
Purchase Orders will be created, and visible as created PO’s as shown below. Also order timeline
will be updated.
USER MANUAL: Dynamics CRM Inventory Manager
www.appjetty.com 37
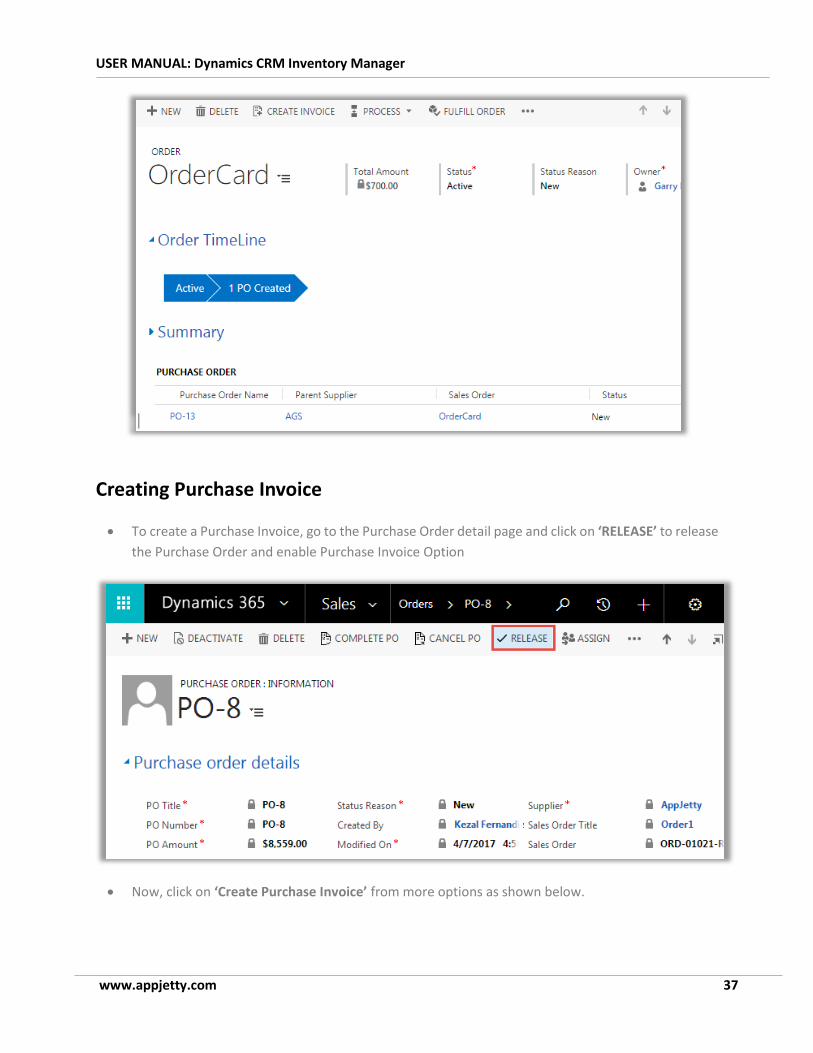
Creating Purchase Invoice
• To create a Purchase Invoice, go to the Purchase Order detail page and click on ‘RELEASE’ to release
the Purchase Order and enable Purchase Invoice Option
• Now, click on ‘Create Purchase Invoice’ from more options as shown below.

USER MANUAL: Dynamics CRM Inventory Manager
www.appjetty.com 38
• This will open up a new window in which you can enter the quantity received from your supplier or
change price if it is different.
• Click on ‘Create Invoice’ button to create the purchase invoice.
• This will create a Purchase Invoice and a success message will appear. Click on ‘OK’ button to
continue

USER MANUAL: Dynamics CRM Inventory Manager
www.appjetty.com 39
• Once a Purchase Invoice is generated, it will be displayed on the Purchase Order page as shown in
reference screen below. Invoice will be created and visible as shown below.

USER MANUAL: Dynamics CRM Inventory Manager
www.appjetty.com 40
Completing Invoice
• To complete an invoice, go to the detail view of an invoice and click on ‘COMPLETE INVOICE’ as
shown in the reference screen below.
• By clicking on ‘COMPLETE INVOICE’ a pop up will appear displaying the Invoice Products along with
its quantity.
• Select warehouse and click on ‘Complete Invoice’
Note: Warehouse selection from Warehouse Column will only be possible if Warehouse is enabled from
Configuration Settings
• On completing the invoice, the quantity mentioned in the purchase order will be added in to the
stock and the current stock gets updated automatically. Thereafter if you have enabled the Credit
– Debit Module from Configuration Settings, it will track the financial transactions and inward or
outward of the amount.

USER MANUAL: Dynamics CRM Inventory Manager
www.appjetty.com 41
Stock Update on Order Fulfillment
• When you fulfill an Order from the Order Module, the stock for products included in that order will
be automatically updated.
• Similarly, when you cancel a Fulfilled Order for products which you have enabled stock
management, the stock for that product will be updated automatically and the same will be
displayed in the Stock Transaction History as well.
• Thereafter if you have enabled the Credit - Debit Module from Configuration Settings, it will track
the financial transactions and inward or outward of the amount.

USER MANUAL: Dynamics CRM Inventory Manager
www.appjetty.com 42
Generating RMA
• Once you have fulfilled the order you can create an RMA for the same. To create an RMA go to the
detail view of the order and click on ‘Create RMA’ button.
• A new window will open up with a list of products which were included in the order.
• Now, select the products which are to be included in the RMA and enter the returned quantity.
• For serial number products, you can enter quantity and reason such that that many products are
selected automatically with reason.

USER MANUAL: Dynamics CRM Inventory Manager
www.appjetty.com 43
• Click on ‘CREATE RMA’, it will redirect you to RMA detail page. It will provide details of Sales Order,
Shipping Details, Customer Name, Status etc.
Note: Shipping Address will be inherited from the Sales Order and you need to provide the Warehouse
Address.

USER MANUAL: Dynamics CRM Inventory Manager
www.appjetty.com 44
• To complete the RMA click on ‘COMPLETE’. This will open a pop up containing the products selected
for the RMA.
• Now to manage the stock of products included in RMA, select ‘Managed Stock’ checkbox besides a
product and click on ‘Submit’ button to submit the RMA.
Note:
i. Warehouse column will only be displayed if Warehouse module is enabled from Default
Configuration Settings
ii. Once the RMA is submitted you will not be able to manage the stock for products included in it.
• Thereafter the RMA will be listed in the particular order and can be viewed from the Order Detail
Page. Also, If the Credit - Debit Module is enabled from Configuration Settings it will track the
financial transactions and inward or outward of the product amounts.

USER MANUAL: Dynamics CRM Inventory Manager
www.appjetty.com 45
Generating RTS
• Once purchase order has been fulfilled, you can create RTS for the same. To create RTS go to the
detail page of Purchase Order and click on ‘Create RTS’ button.
• New window will open with the listing of products included in purchase order. Select the products
and enter reason for product return and click on ‘Create RTS’.
• Upon RTS Creation, you are redirected to detail page of RTS where you can view products that are
included in the RTS.

USER MANUAL: Dynamics CRM Inventory Manager
www.appjetty.com 46
• Click on Complete RTS option to complete RTS. On completion of RTS and selection of manage stock
option, stock will be outwarded from the inventory.
• Click on Submit button to complete the RTS process and view the RTS from the detail page of
Purchase Order. Also If the Credit - Debit Module is enabled from Configuration Settings it will track
the financial transactions and inward or outward of the product amounts.

USER MANUAL: Dynamics CRM Inventory Manager
www.appjetty.com 47
Creating Manual Purchase Order
• You can also create purchase orders from the products grid view, using the ‘CREATE PURCHASE
ORDER’ option for the selected products.
Note: After generating the Purchase Order you can also create Purchase Order Invoice for the same.
Creating PO for Low Stock Products
• Purchase orders for low stock products will only include products in which Low Stock Management
is enabled and products have reached their minimum quantity.
• To generate PO for low stock products, click on ‘GENERATE LOW STOCK PO’ as shown in the
reference screen.
• Clicking on ‘GENERATE LOW STOCK PO’ will open up a new window in which you can select supplier
for each product.

USER MANUAL: Dynamics CRM Inventory Manager
www.appjetty.com 48
• If you have already assigned a supplier to a product then that supplier will be selected by default
and if you want to change the supplier then you can select from dropdown list.
• Clicking on ‘Create PO’ button will create Purchase Orders based on the selection of suppliers and
a success message will appear. Click on ‘OK’ button to continue
• Follow the similar steps as above to create an invoice and complete the PO.
• On completing the Purchase Invoice, stock will be updated automatically.

USER MANUAL: Dynamics CRM Inventory Manager
www.appjetty.com 49
Dashboard
• To access dashboard, navigate to Dynamics CRM -> AppJetty -> Dashboard
• Dashboard has been divided into three sections based on data shown in the dashlet.
Product
• Product dashboard displays summarized count and listing related to products.
• Low stock products: Get count of low stock products. On clicking count number get redirected to
list of low stock products.

USER MANUAL: Dynamics CRM Inventory Manager
www.appjetty.com 50
• All Item Groups: This dashlet shows count of product bundles present in the inventory. On click of
count, redirects to product bundles listing.
• All Items: This dashlet shows count of all products in the inventory. On click of count, redirects to
product listing page.
• On dashboard you can also get to know top selling and worst selling products from the inventory
based on product sales. This product list can be filtered on basis of period like this week, previous
week, this month, previous month, this year and previous year.
• Inventory Summary: As part of inventory summary get count of your RMA products, RTS products,
Quantity on Hand, Quantity in Purchase Order. Quantity in purchase order is count of products that
are in order and are yet to be received.
• Total Suppliers: Get count and list of suppliers.
• Zero Stock Product: Get count of zero stock product and on click get redirected to data table listing
all zero stock products.

USER MANUAL: Dynamics CRM Inventory Manager
www.appjetty.com 51
Sales Order
• Sales Order dashboard provides summarized count related to sales order stages. This count can be
viewed based on period selected.
• Total Purchase: Get count of total number of products that were purchased along with amount.
This list can be filtered on basis of period like this week, previous week, this month, previous month,
this year and previous year.
• Total Return: Get count of total number of products that were returned along with amount. This
list can be filtered on basis of period like this week, previous week, this month, previous month, this
year and previous year.
• Stock in warehouse: Get count of present stock in warehouse based on warehouse selected from
the dropdown. On click of count get redirected to warehouse – inventory report.

USER MANUAL: Dynamics CRM Inventory Manager
www.appjetty.com 52
Purchase Order
• Purchase Order dashboard provides summarized count related to purchase orders and invoices.

USER MANUAL: Dynamics CRM Inventory Manager
www.appjetty.com 53
• Get listing of recent Purchase Orders Invoices and Recent Purchase Orders.
• Get count of Active PO Invoices, Completed PO Invoices and Canceled PO Invoices.
• Total Product in Order: This dashlet provides count of products for which purchase order has been
created.
• Get count of Completed Purchase Orders and Canceled Purchase Orders.
Inventory Reports
Multiple Products Stock History
• Stock History allows users to view stock transaction history of multiple products with a single click.
To generate multiple products Stock History, select products from the list and click on ‘Stock
History’ button from ‘INVENTORY REPORTS’ in the Products listing page.
• This will open up a new window displaying Stock Transaction History for the selected products with
full information of incoming and outgoing stocks along with their warehouses.
• You can filter the Stock Transaction History in the following ways:
▪ Date-wise
▪ User-wise
▪ Reason-wise
▪ Transaction-wise
▪ Warehouse-wise
• You can also take a print out of the whole or selected records of stock history, export it to an excel
sheet or csv file, copy records, print and download it as a PDF.

USER MANUAL: Dynamics CRM Inventory Manager
www.appjetty.com 54
Note: Warehouse of serial number product for outward transaction won’t be displayed as there can be
multiple warehouse for different serial number product in single transaction.
• Detailed View allows users to view the detail history of the selected products including their inward
/ outward transaction history along with the serial number of each product. It also includes history
of stocks along with the Transaction Date / Time and name of Supplier and Customer of the stocks.
• This will open a new window displaying Detailed Stock Transaction History for the selected products
with detailed information of each inward and outward transaction.
• This report can be exported as pdf, csv or excel file. You can also copy and take print of selected or
all records.

USER MANUAL: Dynamics CRM Inventory Manager
www.appjetty.com 55
Inventory Status
• Inventory Status allows users to view status of the Inventory with a single click. To generate
Inventory Status report, select products from the list and click on ‘Inventory Status’ button from
‘INVENTORY REPORTS’ in the Products listing page.
• This will open up a new window displaying Inventory Status for the selected products with
information like quantity on hand; quantity on order and total quantity and other details of each
product.

USER MANUAL: Dynamics CRM Inventory Manager
www.appjetty.com 56
• To view the Detailed Inventory Status, click on ‘Detailed View’ button within the selected row.

USER MANUAL: Dynamics CRM Inventory Manager
www.appjetty.com 57
• You can also take a print out of the whole or selected records of stock history, export it to an excel
sheet or csv file, copy records, print and download it as a PDF.
Warehouse-Inventory Report
• To generate a Warehouse-Inventory Report, navigate to AppJetty > Warehouses under Inventory
Manager section.
• Accessing this report, get warehouse wise stock details. Based on warehouse selection and product
type user gets product detail along with Total Inward number, Total Outward number and Quantity
on Hand for products.

USER MANUAL: Dynamics CRM Inventory Manager
www.appjetty.com 58
• Report generated can be exported as csv, excel or pdf file, can be printed and copied as well.
Supplier-Inventory Report
• To generate a Suppliers-Inventory Report, navigate to AppJetty > Suppliers under Inventory
Manager section.
• Through this report, get supplier wise stock details. Based on supplier selection and product type
user gets product detail along with Total Inward number, Total Outward number and Quantity on
Hand for products.
• Report generated can be exported as csv, excel or pdf file, can be printed and copied as well.

USER MANUAL: Dynamics CRM Inventory Manager
www.appjetty.com 59
Account Report
• Account Report allows you to view the complete summary of your Inventory account with the
complete details of multiple modules like Order, Purchase Invoices, RMA, RTS, etc. It will also
provide basic summary like Total Sales, Total Return, Total Purchase and Difference.
• To generate Account Report, navigate to ‘Orders’ module and click on ‘Account Report’ button from
the Order Listing page.
• You can view the details of any particular module from the Account Report by clicking on ‘View’
button besides the particular module under the ‘View Detail’ column.
• You can also do the column selection if you wish to view only certain selected columns in the list.
• Additionally, you can filter the account report date wise and along with that take a print out, export
it to an excel sheet or csv, download it as a PDF, print as well as copy.

USER MANUAL: Dynamics CRM Inventory Manager
www.appjetty.com 60
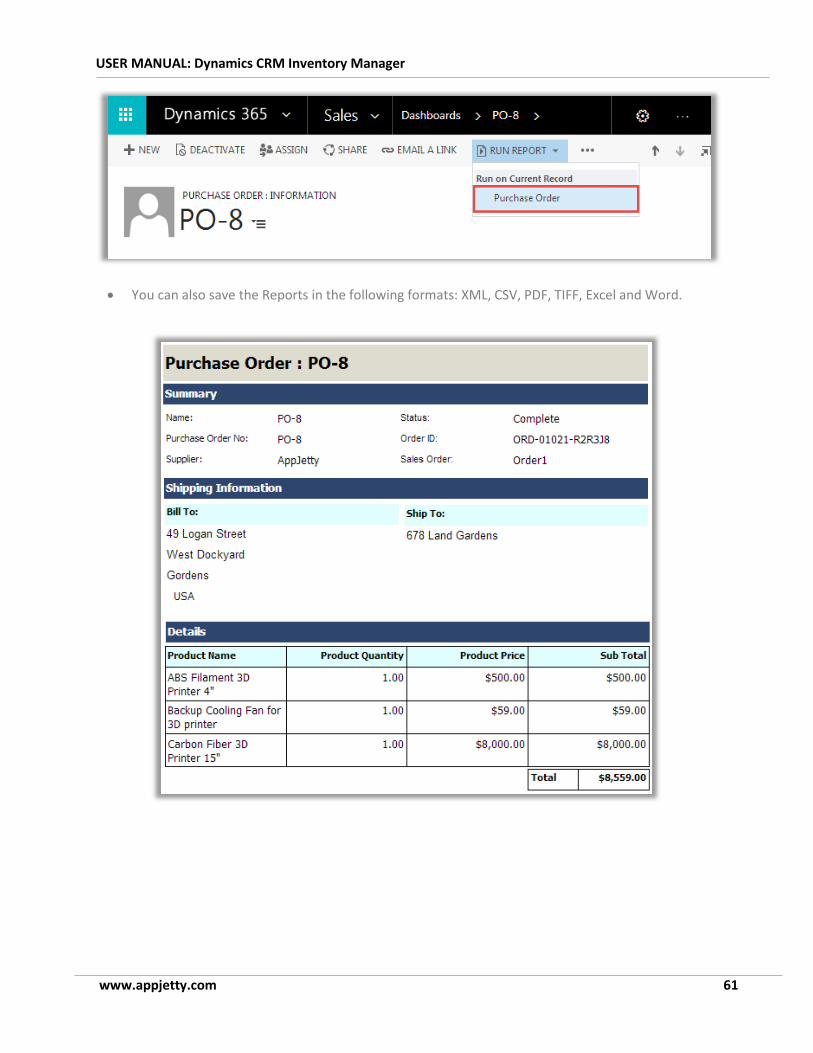
Generating Purchase Order Report
• To generate a Purchase Order Report, navigate to AppJetty > Purchase Order under Inventory
Manager section.
• A list of created purchase orders will be displayed.
• Go to Detail view of a Purchase Order to generate the report.
• Click on Run Report and select ‘Purchase Order’.
USER MANUAL: Dynamics CRM Inventory Manager
www.appjetty.com 61
• You can also save the Reports in the following formats: XML, CSV, PDF, TIFF, Excel and Word.

USER MANUAL: Dynamics CRM Inventory Manager
www.appjetty.com 62
Generating Purchase Order Invoice Report
• To generate a Purchase Order Invoice Report, navigate to AppJetty > Purchase Order Invoice under
Inventory Manager section.
• Go to Detail view of a Purchase Order Invoice
• Click on Run Report and select ‘Purchase Invoice’.

USER MANUAL: Dynamics CRM Inventory Manager
www.appjetty.com 63
• This will open up a New Window with the ‘Purchase Order Report’.
• You can save the Reports in the following formats: XML, CSV, PDF, TIFF, Excel and Word.

USER MANUAL: Dynamics CRM Inventory Manager
www.appjetty.com 64
Generating RMA Report
• To generate a report for the RMA navigate to the detail page of the RMA. Now click on ‘Run Report’
and select ‘RMA’.
• You can also save the Reports in the following formats: XML, CSV, PDF, TIFF, Excel and Word.

USER MANUAL: Dynamics CRM Inventory Manager
www.appjetty.com 65
Inventory Charts
Warehouse Stock
• Warehouse Stock Chart displays a Bar Chart, Pie Chart and Line Chart for the stocks available and
number of stocks sold from the warehouses of the selected products. A table is also displayed
besides the Charts displaying the list of products along with their quantity (stock).
• User can also choose the Warehouse for which he/she wants to view the stock from ‘Warehouse’
dropdown list.
Bar Chart

USER MANUAL: Dynamics CRM Inventory Manager
www.appjetty.com 66
Pie Chart

USER MANUAL: Dynamics CRM Inventory Manager
www.appjetty.com 67
Line Chart

USER MANUAL: Dynamics CRM Inventory Manager
www.appjetty.com 68
Returned Stock
• Returned Stock Chart displays a Bar Chart, Pie Chart and Line Chart for the stocks returned of the
selected products. A table is also displayed besides the Charts displaying the list of products along
with their quantity (stock).
Bar Chart

USER MANUAL: Dynamics CRM Inventory Manager
www.appjetty.com 69
Pie Chart
Line Chart

USER MANUAL: Dynamics CRM Inventory Manager
www.appjetty.com 70
Available Stock
• Available Stock Chart displays a Bar Chart, Pie Chart and Line Chart for the total stocks available of
the selected products. A table is also displayed besides the Charts displaying the list of products
along with their quantity (stock).
Bar Chart

USER MANUAL: Dynamics CRM Inventory Manager
www.appjetty.com 71
Pie Chart
Line Chart

USER MANUAL: Dynamics CRM Inventory Manager
www.appjetty.com 72
Uninstallation Steps
• To uninstall the Solution, navigate to Settings - > Solutions.
• Check on the Plugin Name and click on ‘Delete’.
• Click on ‘OK’ to Delete and uninstall the solution from CRM.

USER MANUAL: Dynamics CRM Inventory Manager
www.appjetty.com 73
Contact Us
We simplify your business, offer unique business solution in digital web and IT landscapes.
Customization: If you would like to customize or discuss about additional features for Dynamics CRM Inventory
Manager, please write to [email protected]
Live Chat
• Get instant support with our Live Chat.
• Visit our product page at:
https://www.appjetty.com/dynamicscrm-
inventory-manager.htm and click on the Live
Chat button for instant support.
Tickets
• Raise tickets for your specific question!
• Send an email to [email protected] or
you can login to your account @
www.appjetty.com and click on My Support
Tickets on your account dashboard, to get
answers to your specific questions.