Embed Size (px)
Citation preview

http://partner.lge.com
USER MANUAL
SuperSign Control

ENG
LISH
2
CONTENTS
SUPERSIGN CONTROL ...............3 - SuperSign Control Components ......................... 3 - System Requirements .............................................. 3
SuperSign Control Manager
SUPERSIGN CONTROL INSTALLATION AND COMPONENTS ...........................4
- SW Installation ............................................................. 4
SuperSign Control
SUPERSIGN CONTROL FUNCTION DETAILS ..................6
- Dashboard ....................................................................... 6
Device Search
Filter
- Signage Popup .............................................................. 9
Information
Picture
Time
Schedule
Option
Support
Command
Control History
Multi Control - Multi Signage Popup .............................................. 20
Information
Picture
Time
Schedule
Option
Support
Command
Control History - Setting ........................................................................... 31
About
Config
Information on Used Port

ENG
LISH
3
SUPERSIGN CONTROLThe SuperSign Control software is a software to manage and control a Signage product of LG Electronics. A user can control and manage Signage products connected through the SuperSign Control.
SuperSign Control Components
System Requirements
SuperSign Control ManagerHardware
RAM: 4 GB (DDR3) or higher
CPU: 2.40 GHz, 4-core or higher
Network: 100 Mbps or higher
Software
Node.js v8.9.4
Redis v3.0.504
Microsoft Visual C++ 2017 Redistributable (x86)
System OS
Windows 7 32/64bit Platform
Windows 10 32/64bit Platform

ENG
LISH
4
SUPERSIGN CONTROL INSTALLATION AND COMPONENTS
SW Installation
SuperSign Control
1 Run the installation file (supersign-control Setup [x.x.x].exe) of the SuperSign Control+ that has been downloaded.
2 Accept the Terms and Conditions and click I Agree. When you click I Agree, the program installation proceeds.
3 When a window that asks the location to install the program appears, select the desired folder for installation or check the default folder, and click Install.

ENG
LISH
5
4 The installation of the SuperSign Control software proceeds. Wait for a moment until the installation is completed.
5 When the installation is completed, select a checkbox asking whether to immediately run the SuperSign Control and click Finish.

ENG
LISH
6
SUPERSIGN CONTROL FUNCTION DETAILS
Dashboard
1
4
8 9
5 6
7
32
No. Item Description
1 Select All You can select all Signage products on the list.
2 Device Search When clicked, the Signage Search window appears.
3 Filter When clicked, the Filter window appears.
4 Device List Information about a Signage product is displayed as in buttons including Name, IP Address, Model Name, Platform, Serial Number, S/W Ver., Power and Control.
5 Power You can view the power status of the Signage product and control ON/OFF.
6 Control When clicked, the Signage control window will appear.
7 Settings When clicked, the Settings window appears.
8 Rows per page You can set the number of devices viewed per page to be 10, 15, 30, or 50.
9 Number of Selected Signage Products
Show the number of the currently selected Signage products.

ENG
LISH
7
Device Search
Search if there is a connected Signage product by the set type and time.
1
3
4
2
No. Item Description
1 Scan Type Search a connected network for the time set in the Time Out window when Automatic is selected.
The IP Address Input window is activated, and the program searches the entered IP address scope for the set time when Manual is selected.
2 Time Out Set the Signage search time by seconds. The time can be set up to 60 seconds.
3 IP Address This field is activated when Manual is selected and sets an IP address scope to search.
4 Signage List The list of the found Signage products is displayed, and you can add a selected Signage product.

ENG
LISH
8
Filter
You can set a filter in accordance with a platform or power status. Devices are shown on the device list in the dashboard in accordance with filtering conditions.
1 5
2 6
3
4
No. Item Description
1 non-webOS Show the Signage products with the non-webOS platform.
2 L18 Show the Signage products with the L18 platform.
3 webOS 1.0-3.0 Show the Signage products with the platform of webOS 1.0-3.0.
4 webOS 3.2 Show the Signage products with the webOS 3.2 platform.
5 On Show the Signage products with the power on.
6 Off Show the Signage products with the power off.
NOTE
• If two filters are set at the same time, the filter set earlier is first applied, and then the filter set later is applied.

ENG
LISH
9
Signage PopupWhen you click the Control button in the Signage List, the relevant Signage information and Settings menu appear in a popup.
Information
1 4
2 3
No. Description
1 Show the Signage Name, and you can change the name by clicking it.
2 Tabs to call the menu - Information, Picture, Time, Schedule, Option, Support, Command and Control History
3 Information on the display connected to the Signage product is shown. - Model Name, Platform, Serial Number, S/W Version and Power
4 Click Refresh to update the current value.
NOTE
• The name may not be changed according to the model platform and the name change is activated only when the model supports the name change.

ENG
LISH
10
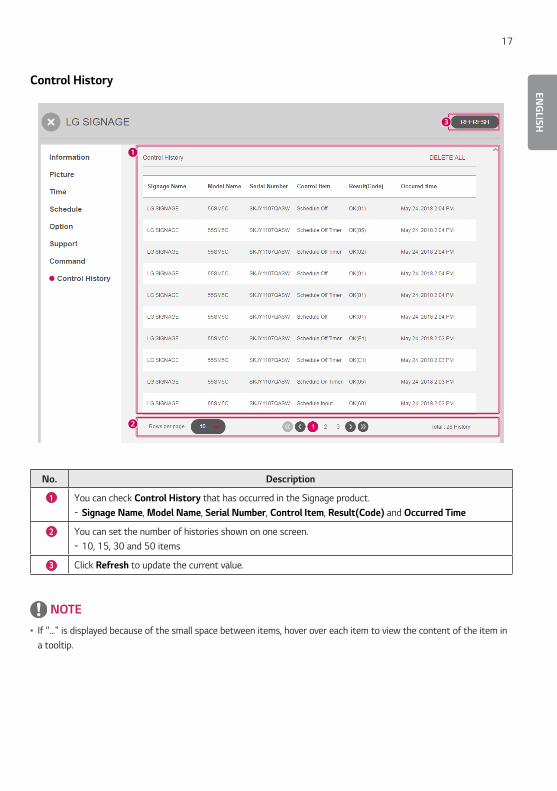
Picture
5
2
1
3

ENG
LISH
11
4
No. Description
1 You can set the basic settings.
Picture Mode, Input, Aspect Ratio and Brightness Control
2 You can apply the changed value to all input.
3 You can set the advanced settings. - Backlight, Contrast, Brightness, Sharpness, Color, Tint and Color Temperature
4 You can add the backlight value and time to the list by setting Brightness Scheduling on and setting and adding the backlight value and time. The backlight value will be changed to the set value in accordance with the time shown on the list.
5 Click Refresh to update the current value.
NOTE
• If an item is not supported by the display, the status of the item will be indicated as Not Supported.
• When you enable Brightness Scheduling, the Backlight settings will be disabled.

ENG
LISH
12
Time
3
1
2
No. Description
1 You can manually enter and apply the date and time. Click Setting by pc time to automatically apply the time of the PC.
2 Turn Daylight Saving on, et Start Time and End Time, and click Apply to set Daylight Saving.
3 Click Refresh to update the current value.
NOTE
• If time is not set in the display, the items of the date and time will be shown empty.
• If an item is not supported by the display, the status of the item will be indicated as Not Supported.

ENG
LISH
13
Schedule
3
1
2
No. Description
1 When you set Day, On Time and Off Time, and click Add to add the relevant schedule.
2 The list of the schedule saved in the display is shown. Click Delete All to delete all schedules.
Click Delete of each schedule to delete the selected schedule.
3 Click Refresh to update the current value.
NOTE
• If an item is not supported by the display, the status of the item will be indicated as Not Supported.
• The screen may look different by display platform. You can refer to the page of each multi control platform. (See page 24.)

ENG
LISH
14
Option
3
1
2
No. Description
1 You can adjust settings related to Signage options. - ISM Method, DPM Select, Power On Delay, Default Setting, OSD Lock, Remote/Key Lock and Wake On LAN
2 You can adjust settings related to Audio. - Speaker, Sound Mode, Audio out, Sound Balance, Volume and Volume Mute
3 Click Refresh to update the current value.
NOTE
• If an item is not supported by the display, the status of the item will be indicated as Not Supported.
Support

ENG
LISH
15
2
1
No. Description
1 Click FILE UPLOAD to select the FW file to update the selected Signage product.
2 Click UPDATE to update the selected FW file to the Signage product.
NOTE
• If an item is not supported by the display, the UPDATE button will be inactivated.
ENG
LISH
16
Command
1
2
No. Description
1 Enter a command to be transmitted to the Signage product, and click Send. (e.g., ka 01 ff)
2 A response from the Signage product to the transmitted command will appear.
NOTE
• If a command not supported by a connected Signage product is transmitted through an agent, the connection with the display may be terminated temporarily.
• If a command to set a SetID of "00" to the Signage product connected through the Agent is transmitted, the response value will be indicated as NONE.
ENG
LISH
17
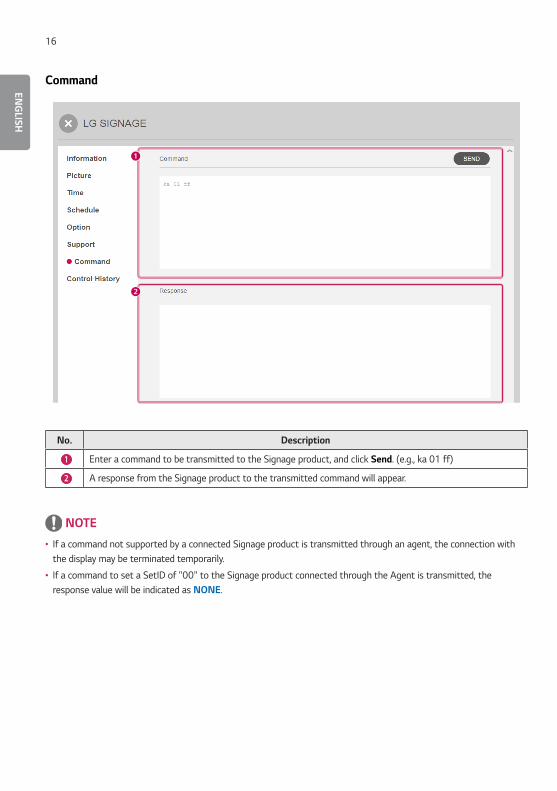
Control History
3
1
2
No. Description
1 You can check Control History that has occurred in the Signage product. - Signage Name, Model Name, Serial Number, Control Item, Result(Code) and Occurred Time
2 You can set the number of histories shown on one screen. - 10, 15, 30 and 50 items
3 Click Refresh to update the current value.
NOTE
• If "..." is displayed because of the small space between items, hover over each item to view the content of the item in a tooltip.

ENG
LISH
18
When the device is disconnected
1
2
No. Description
1 When the device is disconnected, the message "Disconnected" and information will appear.
2 When the device is disconnected, only the tabs of Information and Control History will be activated, and you can check the information and control history saved before disconnection.

ENG
LISH
19
Multi Control
This function is to control several Signage products at once.
2
1
No. Description
1 If you select two or more Signage products from the Signage list in the Dashboard, the menu for multi control will appear on the top.
2 The multi control function is comprised of the menu including Select All, Delete, Display On, Display off and Control. - Select All and Deselect All: You can select/deselect all Signage products. - Delete: You can delete a selected Signage product from the Signage list. - Display On and Display Off: You can turn on/off the power supply for the selected monitor. - Control: You can view information about the selected Signage products and a settings menu provided by each Signage product.

ENG
LISH
20
Multi Signage PopupSelect two or more Signage products and click Control to show the multi Signage popup will appear.
Information
432
1
No. Description
1 Names of the Signage products are displayed. The name of the representative Signage (the first one) and the number of the other Signage products are shown. If there is a disconnected Signage among the selected Signage products, the number of the relevant Signage products is indicated on a bottom side.
2 Tabs to call the menu - Information, Picture, Time, Schedule, Option, Support, Command and Control History
3 Show the information about the selected Signage product.
4 You can view the information about the Signage products selected with the Direction button.
ENG
LISH
21
Picture
2
1
3

ENG
LISH
22
4
No. Description
1 You can set the basic settings. - Picture Mode, Input, Aspect Ratio and Brightness Control
2 You can apply the changed value to all input.
3 You can set the advanced settings. - Backlight, Contrast, Brightness, Sharpness, Color, Tint and Color Temperature
4 You can add the backlight value and time to the list by setting Brightness Scheduling on and setting and adding the backlight value and time. The backlight value will be changed to the set value in accordance with the time shown on the list.
NOTE
• If an item is not supported by the display, the status of the item will be indicated as Not Supported.
• When you enable Brightness Scheduling, the Backlight settings will be disabled.

ENG
LISH
23
Time
1
2
No. Description
1 You can manually enter and apply the date and time. Click Setting by pc time to automatically apply the time of the PC.
2 Turn Daylight Saving on, et Start Time and End Time, and click Apply to set Daylight Saving.
NOTE
• Applicable items may vary according to the display.

ENG
LISH
24
Schedule
When Signage products of the same platform perform a multi control
When the platform of webOS 3.0 or lower is used
1
2
No. Description
1 Set Power, Time, Schedule Input and Repeat Type, and click Add to add the relevant schedule.
2 Click Delete All to delete all schedules.

ENG
LISH
25
When the webOS 3.2 platform is used
1
2
No. Description
1 When you set Day, On Time and Off Time, and click Add to add the relevant schedule.
2 Click Delete All to delete all schedules.
When the platform of webOS 4.0 or higher or L18 is used
1
2
No. Description
1 When you set Power, Time and Repeat Type, and click Add to add the relevant schedule.
2 Click Delete All to delete all schedules of the selected Signage product.

ENG
LISH
26
When Signage products with different platforms are multi controlled
Control is unavailable, so "only the same platform can be controlled." After a guide popup appears, the program returns to the Signage list.
NOTE
• The screen may look different by display platform.
• A multi control is supported only among the same platforms.

ENG
LISH
27
Option
1
2
No. Description
1 You can adjust settings related to Signage options. - ISM Method, DPM Select, Power On Delay, Default Setting, OSD Lock, Remote/Key Lock and Wake On LAN
2 You can adjust settings related to Audio. - Speaker, Sound Mode, Audio out, Sound Balance, Volume and Volume Mute
NOTE
• Each item of the settings is applied when Apply is clicked.
• Applicable items may vary according to the display.

ENG
LISH
28
Support
2
1
No. Description
1 Click FILE UPLOAD to select the FW file to update the selected Signage product.
2 Click UPDATE to update the selected FW file to the Signage product.
NOTE
• If an item is not supported by the display, the UPDATE button will be inactivated.
• Only when you select the display of the same inches and the same name, you can perform multi-update.

ENG
LISH
29
Command
1
2
No. Description
1 Enter a command to be transmitted to the Signage product, and click Send. (e.g., ka 01 ff)
2 A response from the Signage product to the transmitted command will appear.
NOTE
• If a command not supported by a connected Signage product is transmitted through an agent, the connection with the display may be terminated temporarily.
• If a command to set a SetID of "00" to the Signage product connected through the Agent is transmitted, the response value will be indicated as NONE.

ENG
LISH
30
Control History
1
2
No. Description
1 You can check Control History that has occurred in the Signage product. - Signage Name, Model Name, Serial Number, Control Item, Result(Code) and Occurred Time
2 You can set the number of histories shown on one screen. - 10, 15, 30 and 50 items
NOTE
• If "..." is displayed because of the small space between items, hover over each item to view the content of the item in a tooltip.

ENG
LISH
31
Setting
About
1
2
3
No. Description
1 You can check the version information of the SuperSign Control.
2 You can check the Release Note of the SuperSign Control.
3 You can change the language of the SuperSign Control. - Supported languages: Korean, English

ENG
LISH
32
Config
1
2
No. Description
1 The menu in the tab to change the Config
2 You can enter details about each item and click the Apply button to check the details in a popup that appears and select to apply/cancel.
- Device Connection Port: Enter a device connection port. (between 0 and 65535) - File Server Port: Enter a file server port number. (port between 0 and 65535)

ENG
LISH
33
Information on Used Port
The SuperSign Control is connected through the ports below.
• 3333: Player Access Server
• 3000: File transmission server
CAUTION
• The SuperSign Control and the SuperSign Control+ use the same port, so they cannot be executed at the same time.
• You can use them simultaneously by changing their port in the Config menu.

To obtain the source code under GPL, LGPL, MPL, and other open source licenses, that is contained in this product, please visit http://opensource.lge.com.In addition to the source code, all referred license terms, warranty disclaimers and copyright notices are available for download. LG Electronics will also provide open source code to you on CD-ROM for a charge covering the cost of performing such distribution (such as the cost of media, shipping, and handling) upon email request to [email protected]. This offer is valid for a period of three years after our last shipment of this product. This offer is valid to anyone in receipt of this information.


![USER MANUAL LG SuperSign CMS › us › business › display-solutions › supersign-w-lit… · 11 English Starting SuperSign Server This section describes [Login], [Logout] and](https://img.dokumen.tips/doc/110x75/5f1b9e875419b325dd2917b6/user-manual-lg-supersign-cms-a-us-a-business-a-display-solutions-a-supersign-w-lit.jpg)