Embed Size (px)
Citation preview

www.buffalotech.com
User Manual - Secure Lock WareDrive Encryption System
v1.8
Ultra High Security - 256-bit Capable AES Encryption for Buffalo USB Hard Drives
2
Table of Contents
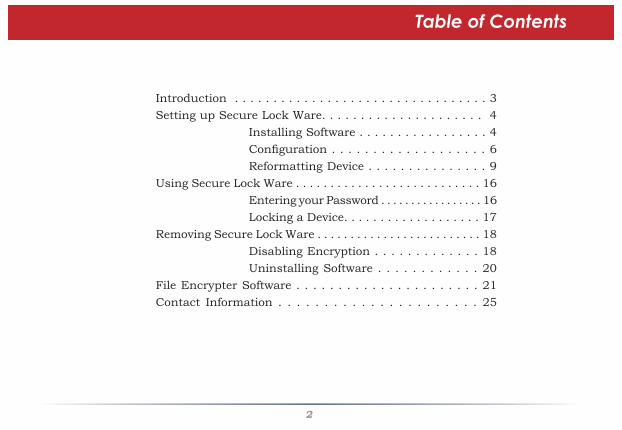
Introduction . . . . . . . . . . . . . . . . . . . . . . . . . . . . . . . . . 3Setting up Secure Lock Ware. . . . . . . . . . . . . . . . . . . . . 4 Installing Software . . . . . . . . . . . . . . . . . 4 Confi guration . . . . . . . . . . . . . . . . . . . 6 Reformatting Device . . . . . . . . . . . . . . . 9Using Secure Lock Ware . . . . . . . . . . . . . . . . . . . . . . . . . . . 16 Entering your Password . . . . . . . . . . . . . . . . . 16 Locking a Device. . . . . . . . . . . . . . . . . . . 17Removing Secure Lock Ware . . . . . . . . . . . . . . . . . . . . . . . . . 18 Disabling Encryption . . . . . . . . . . . . . 18 Uninstalling Software . . . . . . . . . . . . 20File Encrypter Software . . . . . . . . . . . . . . . . . . . . . . 21Contact Information . . . . . . . . . . . . . . . . . . . . . . 25

3
Do you keep sensitive material on your external hard drive? Secure Lock Ware’s 256-bit capable AES encryption provides powerful protection for data on your external USB devices. When Secure Lock Ware is confi gured, no one will be able to access the data on your external device without entering the correct password - period.
AES stands for Advanced Encryption Standard and is one of the most secure forms of encryption currently available.
Protect your password carefully! Your data is only secure as long as your password is secret. On the other hand, if you lose your password, you will not be able to access data on your device.
System Requirements• Windows 2000 or Windows XP on any client computers that the external USB device will
be used with.
Introduction

4
Insert your CD in the CD drive of the computer that you’ll be using to access the external hard drive. If it doesn’t start automatically, open My Computer and browse your CD drive. Double-click on the Setup.exe fi le to open the installation program. Depending on your product, accessing the installation utility will vary.
Setting up Secure Lock Ware
To begin, fi nd the Secure Lock Ware Setup or Installation program; for the DriveStation it will be under the Utilities section, and for the MiniStation it will be be on the main wizard screen.

5
Setting up Secure Lock Ware
This screen will appear. Click Start.
When installation completes, click Next to open the Settings screen. Secure Lock Ware software is now installed on your computer, but you still need to set up encryption on the device.
If your device was already encrypted from another PC, just click Finish instead of Next. You may now access the device normally.

6
Highlight Drive Encryption Settings and click Start.
Confi guring Secure Lock Ware
Choose Set Up Drive Encryption on Device and click Start.

7
Do not connect the device that you want to encrypt to the computer at this time. If you've already connected it, disconnect it now. Click OK.
Confi guration
Now, plug in the device that you want to encrypt and allow it to power up. Then click OK.

8
Enter your desired password twice and choose either AES 128 bit security or AES 256 bit security. Because this encryption is extremely secure, information on your device will be inaccessible if you forget your password. You may wish to enter a hint to help you remember the password later. Click OK when done.
Confi guration
If you click Yes on this screen, your device will be encrypted and all data currently on it will be lost.
Click OK to fi nish confi guration. Now, you’ll need to reformat the device.

9
Right-click on My Computer and select Manage.
Reformatting Your Encrypted Device
On the left side, under Storage, click on Disk Management. Your hard drives, CD drives, and other devices will appear to the bottom right, and the Initialize and Convert Wizard will open.

10
Click Next,
Reformatting Your Device
and Next again,
and fi nally, click Finish.

11
The drive that you need to format will have a black bar to the right of it because it’s “Unallocated”. Usually this will be "Disk 1". Right-click on the black bar and select New Partition.
Reformatting Your Device

12
Click Next,
Reformatting Your Device
then Next again,
and again,

13
and Next again.
Reformatting Your Device
Leave the fi le system set to NTFS, but you can change the Volume Label (the drive’s name in My Computer) if desired. Checking Perform a Quick Format will greatly speed up the format process.
Finally, click Finish.

14
Your encrypted device will begin to format. This may take several minutes if you did not select Perform a Quick Format.
Reformatting Your Device
When the format is fi nished, your encrypted device should be described as “Healthy”.

15
Open up My Computer. You should be able to see your new device, ready to use! If you chose the defaults during installation, your new drive will be named "New Volume" or otherwise, the drive will be named whatever you entered as “Volume Label” on page 13.
Reformatting Your Device
16
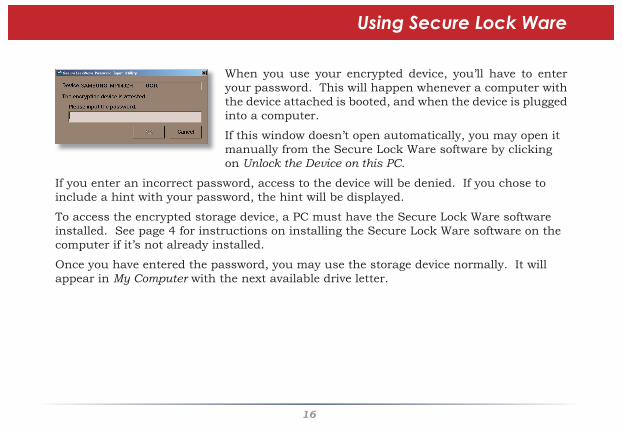
When you use your encrypted device, you’ll have to enter your password. This will happen whenever a computer with the device attached is booted, and when the device is plugged into a computer.
If this window doesn’t open automatically, you may open it manually from the Secure Lock Ware software by clicking on Unlock the Device on this PC.
If you enter an incorrect password, access to the device will be denied. If you chose to include a hint with your password, the hint will be displayed.
To access the encrypted storage device, a PC must have the Secure Lock Ware software installed. See page 4 for instructions on installing the Secure Lock Ware software on the computer if it’s not already installed.
Once you have entered the password, you may use the storage device normally. It will appear in My Computer with the next available drive letter.
Using Secure Lock Ware

17
To lock your encrypted device without unplugging it from your computer, select Lock the Device from within Secure Lock Ware software and then click Start.
Alternately, you could select Start/Buffalo/Secure Lock Ware, and then click on Lock the Device.
Once the device is locked, you will have to unlock the device and reenter your password before you can access data on the device.
Using Secure Lock Ware (Lock Device)
18
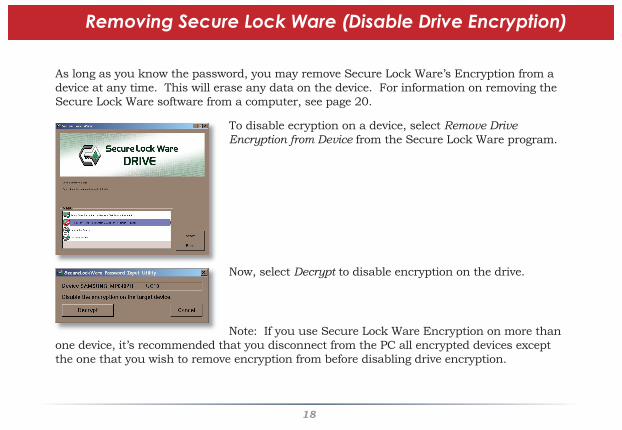
As long as you know the password, you may remove Secure Lock Ware’s Encryption from a device at any time. This will erase any data on the device. For information on removing the Secure Lock Ware software from a computer, see page 20.
To disable ecryption on a device, select Remove Drive Encryption from Device from the Secure Lock Ware program.
Now, select Decrypt to disable encryption on the drive.
Note: If you use Secure Lock Ware Encryption on more than one device, it’s recommended that you disconnect from the PC all encrypted devices except the one that you wish to remove encryption from before disabling drive encryption.
Removing Secure Lock Ware (Disable Drive Encryption)

19
Now, click Yes,
enter your password one last time and click OK,
and then click OK again. You will now need to reformat the device to use it. See pages 9-15 for instructions on reformatting the device.
Removing Secure Lock Ware (Disable Drive Encryption)

20
To remove Secure Lock Ware software from a computer, select Start/Buffalo/Secure Lock Ware/Uninstaller.
Now, click Start,
and then click Yes to restart your computer.
Secure Lock Ware software will be removed from the computer. This computer will no longer be able to access devices that are encrypted with Secure Lock Ware.
Removing Secure Lock Ware Software from your PC
21
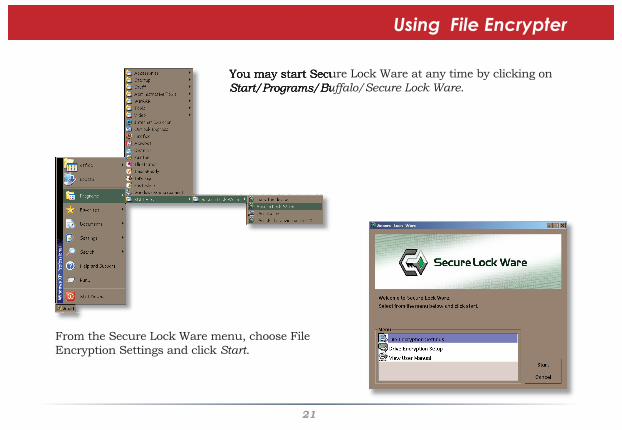
You may start Secure Lock Ware at any time by clicking on Start/Programs/Buffalo/Secure Lock Ware.
Using File Encrypter
From the Secure Lock Ware menu, choose File Encryption Settings and click Start.

22
From the Encryption tab, choose a destination for Encrypted fi les. This is the location that encrypted fi les will be placed after the encryption process is run on them.
Using File Encrypter
From the Decryption tab, specify a destination for decrypted fi les. This is the location that decrypted fi les will be placed after the decryption process is run on them.

23
From the Compression tab, choose a rate for compression. Low compression rates result in faster encryption processing, but make for larger fi les. High compression rates give smaller fi le sizes but take longer to compress and uncompress.
Using File Encrypter
The Startup tab lets you choose whether or not to have shortcuts to Encryption and Decryption tools on the desktop. You may also add these options to fi les when right-clicked.

24
If you right click on any fi le, then an Encrypt option will be available. If you right click on any .CRY (encryption fi le), then a Decrypt option will be available.
We’ve conveniently placed icons to the Encrypt and Decrypt fi le functions on the desk top. You may disable these on page 23. Dragging fi le(s) onto these icons will result in them being encrypted or decrypted (depending on which icon the fi les is placed on).
Using File Encrypter

25
Contact Information
Buffalo Technology (USA), Inc.4030 West Braker Lane, Suite 120Austin, TX 78759-5319
GENERAL INQUIRIES Monday through Friday 8:30am-5:30pm CSTDirect: 512-794-8533 | Toll-free: 800-456-9799 | Fax: 512-794-8520 | Email: [email protected]
TECHNICAL SUPPORT North American Technical Support by phone is available 24 hours a day, 7 days a week. (USA and Canada). Toll-free: (866) 752-6210 | Email: [email protected]

26
Buffalo Technology (Europe), Inc.176 Buckingham Avenue,Slough, Berkshire, SL1 4RDUnited Kingdom
GENERAL INQUIRIES Email: [email protected]
TECHNICAL SUPPORT Technical Support in Europe is available between the hours of 9am-6pm (GMT) Monday to Thursday and 9am-4:30pm (GMT) Friday for this product. Customers in Europe can obtain Technical Support using the following information:
E-mail: [email protected] | Web: www.buffalo-technology.com
Contact Information