Embed Size (px)
Citation preview

© 2012 Sunbeam Products, Inc. doing business as Jarden Consumer Solutions. All rights reserved. Distributed by Sunbeam Products, Inc. doing business as Jarden Consumer Solutions, Boca Raton, Florida 33431. Sunbeam Products, Inc.is a subsidiary of Jarden Corporation (NYSE:JAH).Keurig, the Cup and Star logo, Keurig Brewed and K-cup are trademarks or registered trademarks of Keurig, Incorporated used under license.
© 2012 Sunbeam Products, Inc. operando bajo el nombre de Jarden Consumer Solutions. Todos los derechos reservados. Distribuido por Sunbeam Products, Inc. operando bajo el nombre de Jarden Consumer Solutions, Boca Raton, Florida 33431. Sunbeam Products, Inc. es una subsidiaria de Jarden Corporation (NYSE:JAH).Keurig, el logo de Taza y Estrella, “Keurig Brewed” y “K-cup” son marcas registradas de la Corporación Keurig, usadas bajo licencia.
U.S. 1-877-517-6400 Canada 1-800-667-8623 Visit us at www.mrcoffee.com / Visítenos en www.mrcoffee.com
Printed in China/Impreso en China P.N. 159760 Rev. AGCDS-MRC27851-ZZ BVMC-KG6_12ESM1 www.mrcoffee.com
User Manual / Manual del Usuario
Single Serve Brewer / Cafetera individualBVMC-KG6

2 3
IMPORTANT SAFEGUARDSWhen using electrical appliances, basic safety precautions should be followed, including the following:1. READ ALL INSTRUCTIONS BEFORE USING.2. Do not touch hot surfaces. Use handles and knobs when
available. Scalding may occur if the coffee Brewer is moved or opened or K-Cup® pack is disturbed during brewing cycles.
3. This appliance must be properly installed and located in accordance with these instructions before it is used.
4. The use of accessory attachments not recommended by the appliance manufacturer may result in fi re, electrical shock or injury to persons.
5. Do not place on or near a hot gas or electric burner, or in a heated oven.
6. Do not use outdoors.7. To protect against fi re, electric shock and injury, do not
immerse cords, plugs or the appliance in water or any other liquid.
8. Use only water in this appliance! Do not put any other liquids or foods in the Water Reservoir.
9. To disconnect, unplug power cord when not in use and before cleaning.
10. Do not operate any appliance with a damaged cord or plug or after the appliance malfunctions or is damaged in any manner. Contact your Mr. Coffee® Customer Service to arrange for replacement or repair.
11. Do not let the cord hang over the edge of the table or counter, or touch hot surfaces.
12. Close supervision is necessary when any appliance is used by or near children.
13. Do not open the Brewer while brewing is in progress.14. Do not use appliance for other than intended use.
CAUTION: There are two sharp needles that puncture the K-Cup® pack, one above the K-Cup® Assembly Housing and the other in the bottom of the K-Cup® Assembly Housing. To avoid risk of injury, do not put your fi ngers in the K-Cup® Assembly Housing.CAUTION: There is extremely hot water in the K-Cup® Assembly Housing during the brew process. To avoid risk of injury, do not lift the handle or open the K-Cup® Assembly Housing during the brewing process.
WARNING: To reduce the risk of fi re or electric shock, do not remove any service covers. There are no user serviceable parts inside the coffeemaker. Only authorized personnel should repair the coffeemaker.
Please read ALL of the instructions in this manual carefully before you begin to use this appliance. Proper care and maintenance will ensure a long life and a trouble-free operation for this appliance. Please save these instructions and refer to them for cleaning and care tips.
SAVE THESE INSTRUCTIONS

4 5
SPECIAL CORD SET INSTRUCTIONS1. A short power supply cord is provided to reduce
the hazards resulting from a person or pet becoming entangled in, or tripping over, a longer cord.
2. An extension cord may be purchased and used if care is exercised in its use.
3. If an extension cord is used, the marked electrical rating of the extension cord must be at least 10 amps and 120 volts. The resulting extended cord must be arranged so that it will not drape over a countertop or tabletop where it can be pulled on by children or tripped over accidentally.
4. This appliance has a polarized plug (one blade is wider than the other). To reduce the risk of electric shock, this plug will fi t in a polarized outlet only one way. If the plug does not fi t fully in the outlet, reverse the plug. If it still does not fi t, contact a qualifi ed electrician. Do not modify the plug in any way.
5. You can customize the length of the power cord so that it is the exact length you desire. To increase the length of the power cord: grasp the power cord (not the power plug) and gently lift it out of the slot, then pull it away from the Single Serve Brewer. To decrease the length of the power cord: grasp the power cord (not the power plug), lift it out of the slot and gently feed it into the Single Serve Brewer. Lock the cord in the slot when fi nished.
THIS PRODUCT IS FOR HOUSEHOLD USE ONLY
TABLE OF CONTENTS
Important Safeguards . . . . . . . . . . . . . . . . . . . . . . . . . . . . . . 2Special Cord Set Instructions. . . . . . . . . . . . . . . . . . . . . . . . . 4Parts Diagram . . . . . . . . . . . . . . . . . . . . . . . . . . . . . . . . . . . . 6Set-Up & How to Brew . . . . . . . . . . . . . . . . . . . . . . . . . . . . . 7Helpful Hints . . . . . . . . . . . . . . . . . . . . . . . . . . . . . . . . . . . . . 10Adding Water To The Water Reservoir . . . . . . . . . . . . . . . . . . . 12Auto Off Timer Feature . . . . . . . . . . . . . . . . . . . . . . . . . . . . . 12Control Panel Indicator Lights . . . . . . . . . . . . . . . . . . . . . . . . . . 13Cleaning and Maintaining . . . . . . . . . . . . . . . . . . . . . . . . . . 14Troubleshooting . . . . . . . . . . . . . . . . . . . . . . . . . . . . . . . . . 16Service and Maintenance . . . . . . . . . . . . . . . . . . . . . . . . . . 18Warranty Information . . . . . . . . . . . . . . . . . . . . . . . . . . . . . 19
Welcome and congratulations on the purchase of your new Mr. Coffee® Single Serve Brewer. With a large variety of Keurig® K-Cup® packs, the options are endless. You can enjoy tea, cocoa, and coffee, in a fast and simple way.How you enjoy your Mr. Coffee® Single Serve Brewer is up to you!

6 7
PARTS DIAGRAM
1. Brew•Off Button2. Pre-Heating Light3. Serving Size Indicators4. Serving Size Button5. Add Water Light6. Water Reservoir Lid7. Water Reservoir8. Drip Tray Base 9. Drip Tray10. Drip Tray Plate11. Brew Head12. K-cup® Assembly Housing 13. Brew Head Needle14. Brew Head Handle15. Water Reservoir Lock Tab Slots
SET-UP & HOW TO BREW 1. Place Brewer upright on a fl at
surface, remove all product packaging and plug into outlet.
4. Lift the Brew Head Handle to insert a K-Cup® pack.
NOTE: DO NOT remove or puncture the foil lid of the K-Cup® pack.
2. Remove Water Reservoir and Water Reservoir Lid, then fi ll with bottled or fi ltered water to the MAX FILL line.
NOTE: DO NOT overfi ll.
3. Replace Water Reservoir Lid and Water Reservoir to the left side of the Brewer.
Controls and Indicators
14
12
13
8
11
9
7
6
10
15
4
2
1
3
5
8 9
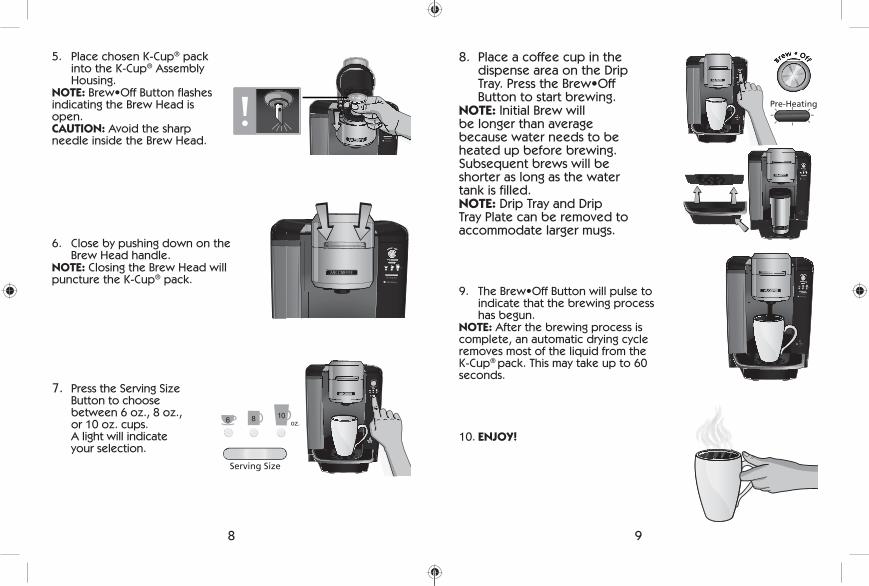
5. Place chosen K-Cup® pack into the K-Cup® Assembly Housing.
NOTE: Brew•Off Button fl ashes indicating the Brew Head is open.CAUTION: Avoid the sharp needle inside the Brew Head.
6. Close by pushing down on the Brew Head handle.
NOTE: Closing the Brew Head will puncture the K-Cup® pack.
7. Press the Serving Size Button to choose between 6 oz., 8 oz., or 10 oz. cups. A light will indicate your selection.
8. Place a coffee cup in the dispense area on the Drip Tray. Press the Brew•Off Button to start brewing.
NOTE: Initial Brew will be longer than average because water needs to be heated up before brewing. Subsequent brews will be shorter as long as the water tank is fi lled.NOTE: Drip Tray and Drip Tray Plate can be removed to accommodate larger mugs.
9. The Brew•Off Button will pulse to indicate that the brewing process has begun.
NOTE: After the brewing process is complete, an automatic drying cycle removes most of the liquid from the K-Cup® pack. This may take up to 60 seconds.
10. ENJOY!
6 8 10oz.
10 11
HELPFUL HINTS• Keep your Brewer turned “ON” at all times – To brew a
fresh cup of coffee, tea or hot cocoa anytime you want, we suggest you keep your Brewer turned “ON” all the time. However, you can set the Brewer to automatically turn off two hours after your last brew. Follow the instructions on page 12 to activate or de-activate the auto-off feature.
• Initial Cleansing Brew – Before you use your Brewer for the fi rst time, perform an initial cleansing brew by running clean water through the brew cycle without using a K-Cup® pack.
• One Cup at a Time – Your new Brewer makes one fresh beverage at a time.
• Water Reservoir - Your new Brewer holds up tp 40 oz. of water.This will make aproximately 6 cups of coffee (6oz. each) or 5 cups of coffee (8oz. each) or 4 cups of coffee (10oz.). This Brewer also has a internal pre-heated hot water reservoir for a faster brew.
• The Right Water Makes a Difference – For the best tasting gourmet coffee, tea or hot cocoa, we recommend using bottled or fi ltered water. We do not recommend using distilled or reverse osmosis water. Water quality varies from place to place. If you notice an undesirable taste in your cup of coffee such as chlorine or other mineral taste, we recommend you consider using bottled water or water from a fi ltration system.
• Replace K-Cup® Pack Between Brews - It is necessary to replace your K-Cup® pack before starting your next brew. This will reset the Brewer to allow you to brew another cup of coffee.
• Customize Your Flavor & Brew – With the choice of over 200 varieties of K-Cup® packs, your Brewer gives you endless options to customize the fl avor and strength that’s perfect for you. For a strong, intense cup, select an Extra Bold K-Cup® pack (with up to 30% more ground coffee than regular varieties).
• Brewing Into a Tall Mug – To brew into a tall mug, simply remove the Drip Tray Plate and Drip Tray, place the tall mug on the Drip Tray Base.
• The Drip Tray – Any liquid overfl ow (from your cup or mug) will be caught in the Drip Tray. Make sure you empty the Drip Tray regularly.
• Clean Your Brewer Regularly – To keep your Brewer looking and performing its best, be sure to clean the external and internal components on a regular basis. See page 14 for more information.
• De-Scaling – Mineral content in water varies from place to place. Depending on the mineral content of the water in your area, calcium deposits or scale may build up in your Brewer. Scale is non-toxic, but left unattended, it can hinder Brewer performance. De-scaling your Brewer helps maintain the heating element and other internal parts of the Brewer that come in contact with water. See page 16 for more information.
• Storing – When storing your Brewer, carefully empty the Drip Tray and Water Reservoir. Store your Brewer upright in a safe, dry, frost-free environment.

12 13
ADDING WATER TO THE WATER RESERVOIR The Add Water Light will fl ash indicating the Water Reservoir is out of water. Fill Water Reservoir with fi ltered or bottled water to the MAX FILL line. Once Water Reservoir is placed back on the Brewer, press the Brew•Off Button to begin the brewing process. The fi rst brew after refi lling the Water Reservoir will be longer than average because more water needs to be heated up before brewing. Subsequent brews will be shorter as long as the Water Reservoir remains fi lled. NOTE: Pressing the Brew•Off Button is not needed if you refi ll the Water Reservoir before the Add Water Light fl ashes.
AUTO OFF TIMER FEATURE This Brewer is equiped with an auto-off timer feature that will turn off the Brewer after 2 hours of non-use. NOTE: The Brewer’s auto-off timer comes deactivated from the factory. Follow the below steps to activate or deactivate the auto-off timer. 1. To activate the auto-off timer, hold down the Serving Size
Button and Brew•Off Button together for 5 seconds. The Serving Size Indicators and Brew•Off Button will fl ash 2 times indicating the auto-off timer is activated.
2. To deactivate the auto-off timer, hold down the Serving Size Button and Brew•Off Button together for 5 seconds. The Serving Size Indicators and Brew•Off Button will fl ash 5 times indicating the auto-off timer is de-activated.
CONTROL PANEL INDICATOR LIGHTS Indicator Reason
Brew•Off Button
Flashing Indicates Brew Head is open or water is needed
Pulsing Indicates Brewer is brewing
Steady on Ready to brew
6 8 10oz.
Brew•Off Button + Serving Size Indicators
Flashes 2 times
Indicates the auto-off timer feature is activated. See page 12 for further instructions.
Flashes 5 times
Indicates the auto-off timer feature is de-activated. See page 12 for further instructions.
6 8 10oz. Serving
Size Indicators
Flashing
Indicates Brewer needs to be de-scaled. See de-scale instructions on page 16.
Add Water Light Flashing
Indicates the Water Reservoir is out of water. When Water Reservoir is refi lled, press the Brew●Off Button to resume or start brewing.
Pre-Heating Light
Flashing
Indicates water in the internal reservoir in heating to prepare for your next brew. The light will go off indicating that the water has reached the correct temperature to brew.

14 15
CLEANING AND MAINTAINING YOUR SINGLE SERVE BREWERCleaning External Parts
CAUTION : Make sure the Brewer is unplugged before cleaning and allow to cool. Regular cleaning of the Brewer’s external components is recommended.
1. Never immerse the Brewer in water or other liquids. The housing and other external components may be cleaned with a soapy, damp, non-abrasive cloth.
2. The Drip Tray can accumulate liquids. The Drip Tray and Drip Tray Plate should be periodically inspected and cleaned with a damp soapy nonabrasive lint free cloth. The Drip Tray and Drip Tray Plate should not be put into the dishwasher. To remove the Drip Tray, simply Lift upward, keeping it level at all times to avoid spilling.
Cleaning the K-Cup® Assembly Housing1. Cleaning the Parts – The K-Cup® Assembly Housing can be
placed on the top rack of a dishwasher.NOTE: Use low temperature cycles in the dishwasher.
To remove from the Brewer, lift the Brew Head, then grasp the top of the K-Cup® Assembly Housing with one hand while pushing up on the bottom of the K-Cup® Assembly Housing from underneath with the other until it releases. After cleaning, align the K-Cup® Assembly Housing with the opening using the two front ribs as a guide, and snap into place from the top.2. Cleaning the Funnel – The funnel can be
removed from the K-Cup® Assembly Housing by pulling on it until it snaps off (fi g. 1). The funnel is dishwasher safe. To replace it, snap it back onto the K-Cup® Assembly Housing.
3. Cleaning the Needles – The exit needle is located on the inside bottom of the K-Cup® Assembly Housing. Should a clog arise due to coffee grinds, it can
be cleaned using a paper clip or similar tool. Remove K-Cup® Assembly Housing and detach funnel. Insert the household tool into the needle to loosen the clog and push it out. The K-Cup® Assembly Housing is dishwasher safe. A paper clip can also be used to clean the Brew Head Needle located inside of the Brew Head.
CAUTION:There are sharp needles that puncture the K-Cup® pack above the K-Cup® Assembly Housing and in the bottom of the K-Cup® Assembly Housing. To avoid risk of injury, do not put your fi ngers in the K-Cup® Assembly Housing.
Cleaning and Emptying the ReservoirDiscard the remaining water by removing the Water Reservoir Lid and turning the Water Reservoir upside down over the sink. The Water Reservoir Lid should NOT be put into the dishwasher. It should be cleaned with a damp, soapy, non-abrasive cloth and rinsed thoroughly. The Water Reservoir is dishwasher safe.NOTE: DO NOT dry the inside of the Water Reservoir with a cloth as lint may remain.
CAUTION: Please rinse the Water Reservoir thoroughly after cleaning to ensure that no cleaners or cleaning solutions remain in this area as they may contaminate the water supply in the Brewer. Do not immerse appliance in water.
StorageEmpty the Water Reservoir before storing and take care to ensure that you store your Brewer in a safe and frost free environment. It is suggested to store your Brewer in the upright position. If you store the Brewer in a cold environment, you run the risk of condensation freezing inside the Brewer and causing damage. When you prepare to use it after storage, we recommend wiping the Water Reservoir with a damp lint-free cloth and running three cleansing brews without a K-Cup® pack.
FIGURE 2
!
FIGURE 1

16 17
If your Brewer has been in an environment below freezing, please be sure to let it warm to room temperature for 2 hours before using.De-Scaling Your BrewerThe Brewer should be de-scaled every 3-6 months to ensure optimal performance or when there are white deposits in the Water Reservoir. It is possible for calcium deposits to build up faster, making it necessary to de-scale more often. The three Serving Size Indicators will fl ash indicating the Brewer needs to be de-scaled.
1. Make sure you have at least 40 ounces of undiluted white vinegar on hand. You will also need a 10 oz ceramic mug (do not use a paper cup) and access to a sink.
2. Fill the Water Reservoir with 40 ounces of undiluted white vinegar, place a ceramic mug on the Drip Tray Plate.
3. Close the Brew Head and perform a brew into the ceramic mug without adding a K-Cup® pack.
4. Repeat the brew cycle until the Water Reservoir is empty and then allow it to sit for at least 60 minutes.
5. Fill the Water Reservoir with 40 ounces of fi ltered or purifi ed water, close the Brew Head, place a cup on the Drip Tray Plate and perform a brew.
6. Repeat the brew cycle until the Water Reservoir is empty (with no K-Cup® pack in place) to clean the Brewer plumbing and get rid of any residual taste from the vinegar. The Brewer is now ready for normal use again.
Note: If the de-scale process is not followed correctly or if you choose not to de-scale your Brewer, the lights can be reset as with most other Mr. Coffee® Brewers, by unplugging the Brewer for 30 seconds.TROUBLESHOOTING YOUR SINGLE SERVE BREWERYour MR. COFFEE® Single Serve Brewer has been carefully designed to give you many years of trouble-free service. In the unlikely event that your new coffeemaker does not operate satisfactorily, please review the following potential problems and try the steps recommended BEFORE you call an Authorized Sunbeam Service Center.
PROBLEM SOLUTION
Brewer does not have power
Make sure the Brew•Off Button is pressed and is illuminated.
Plug Brewer into an independent outlet.
Check to be sure that it is plugged in securely.
Plug into a different outlet.
Brewer will not brew
If Brewer is cold/frozen, wait for at least two hours for it to reach room temperature before powering on.
Check to make sure there is water in the Water Reservoir and the Brew Head is closed securely. NOTE: the Brew•Off Button will fl ash if the Brew Head is open.
Lift Brew Head and replace K-Cup® pack to reset the Brewer.
Brewer not brewing a full serving
The exit needle may be clogged (refer to page 14).
Clean K-Cup® Assembly Housing if necessary and rinse under faucet (refer to page 14).
De-scale the Brewer (refer to page 16).
If you have repeated the de-scale procedure on your Brewer two times and the Brewer is still not brewing, contact Customer Service.
Won’t work with Keurig® My K-Cup®
K-Cup® Assembly Housing needs to be removed.
Esnure My K-Cup® lid is secured tightly.
Add Water Light is still fl ashing after Water Reservoir is refi lled
Press the Brew●Off Button to begin brewing. The Add Water light will then turn off.

18 19
WARRANTY INFORMATION1-YEAR LIMITED WARRANTYSunbeam Products, Inc. doing business as Jarden Consumer Solutions or if in Canada, Sunbeam Corporation (Canada) Limited doing business as Jarden Consumer Solutions (collectively “JCS”) warrants that for a period of one year from the date of purchase, this product will be free from defects in material and workmanship. JCS, at its option, will repair or replace this product or any component of the product found to be defective during the warranty period. Replacement will be made with a new or remanufactured product or component. If the product is no longer available, replacement may be made with a similar product of equal or greater value. This is your exclusive warranty. Do NOT attempt to repair or adjust any electrical or mechanical functions on this product. Doing so will void this warranty. This warranty is valid for the original retail purchaser from the date of initial retail purchase and is not transferable. Keep the original sales receipt. Proof of purchase is required to obtain warranty performance. JCS dealers, service centers, or retail stores selling JCS products do not have the right to alter, modify or any way change the terms and conditions of this warranty.This warranty does not cover normal wear of parts or damage resulting from any of the following: negligent use or misuse of the product, use on improper voltage or current, use contrary to the operating instructions, disassembly, repair or alteration by anyone other than JCS or an authorized JCS service center. Further, the warranty does not cover: Acts of God, such as fi re, fl ood, hurricanes and tornadoes. What are the limits on JCS’s Liability?JCS shall not be liable for any incidental or consequential damages caused by the breach of any express, implied or statutory warranty or condition.Except to the extent prohibited by applicable law, any implied
SERVICE AND MAINTENANCE
If your coffeemaker requires service, do not return it to the store where you purchased it. All repairs and replacements must be made by Sunbeam or an authorized Sunbeam Service Center. If you live in the U.S. or Canada, please call us at the following toll-free telephone numbers to fi nd the location of the nearest authorized service center:
U.S. 1-877-517-6400Canada 1-800-667-8623
You may also visit our web site at www.mrcoffee.com
To assist us in serving you, please have the coffeemaker model number and date of purchase available when you call. The model number is stamped on the bottom metal plate of the coffeemaker.We welcome your questions, comments or suggestions. In all your communications, please include your complete name, address and telephone number and a description of the problem.
Model Number: _______________________________________
(The model number is stamped on the bottom metal plate of the coffeemaker)
Serial Number_________________________________________
Date Code: ___________________________________________
(Located on the metal prong of the power cord. Begins with a letter followed by three numbers)
Date of Purchase: ______________________________________

20 21
warranty or condition of merchantability or fi tness for a particular purpose is limited in duration to the duration of the above warranty.JCS disclaims all other warranties, conditions or representations, express, implied, statutory or otherwise.JCS shall not be liable for any damages of any kind resulting from the purchase, use or misuse of, or inability to use the product including incidental, special, consequential or similar damages or loss of profi ts, or for any breach of contract, fundamental or otherwise, or for any claim brought against purchaser by any other party.Some provinces, states or jurisdictions do not allow the exclusion or limitation of incidental or consequential damages or limitations on how long an implied warranty lasts, so the above limitations or exclusion may not apply to you.This warranty gives you specifi c legal rights, and you may also have other rights that vary from province to province, state to state or jurisdiction to jurisdiction.How to Obtain Warranty ServiceIn the U.S.A.If you have any question regarding this warranty or would like to obtain warranty service, please call 1-877-517-6400 and a convenient service center address will be provided to you.In CanadaIf you have any question regarding this warranty or would like to obtain warranty service, please call 1-800-667-8623 and a convenient service center address will be provided to you.In the U.S.A., this warranty is offered by Sunbeam Products, Inc. doing business as Jarden Consumer Solutions located in Boca Raton, Florida 33431. In Canada, this warranty is offered by Sunbeam Corporation (Canada) Limited doing business as Jarden Consumer Solutions, located at 20 B Hereford Street, Brampton, Ontario L6Y 0M1. If you have any other problem or claim in connection with this product, please write our Consumer Service Department.PLEASE DO NOT RETURN THIS PRODUCT TO ANY
OF THESE ADDRESSES
NOTES
22 23
PRECAUCIONES IMPORTANTESCuando utilice electrodomésticos, se deben seguir precauciones básicas de seguridad, incluidas las siguientes:1. LEA TODAS LAS INSTRUCCIONES ANTES DEL USO.2. No toque las superfi cies calientes. Utilice manijas y
perillas si las hay. Si el electrodoméstico se mueve o se abre durante los ciclos de preparación, se pueden sufrir quemaduras, al igual que si se altera el K-Cup® pack.
3. Este electrodoméstico se debe instalar y localizar de forma correcta de acuerdo con estas instrucciones antes del uso.
4. El uso de accesorios no recomendados por el fabricante del electrodoméstico puede resultar en incendio, descarga eléctrica o lesiones a personas.
5. No coloque sobre quemadores eléctricos o de gas, ni cerca de éstos, o en un horno caliente.
6. No lo use en exteriores.7. Para protegerse contra un incendio, descarga eléctrica
o lesión, no sumerja en agua o en cualquier otro líquido los cables, enchufes o el electrodoméstico.
8. ¡Use únicamente agua en este electrodoméstico! No coloque ningún otro líquido o alimento en el depósito del agua.
9. Desconecte la unidad cuando no esté en uso y antes de limpiarla.
10. No opere ningún electrodoméstico con un cable o enchufe dañados o después de un mal funcionamiento o cualquier daño del electrodoméstico. Llame a Servicio al cliente de Mr. Coffee® para el reemplazo o la reparación.
11. No deje que el cable quede colgando del borde de la mesa o mostrador o que toque superfi cies calientes.
12. Se necesita supervisión cercana cuando cualquier electrodoméstico se use cerca de niños o por parte de éstos.
13. No abra este electrodoméstico cuando el café se esté preparando.
14. No utilice el artefacto para otros fi nes que no sean los especifi cados.
PRECAUCIÓN: Hay dos agujas fi losas que perforan el paquete individual K-Cup® pack, una por encima y otra por debajo del receptáculo del K-Cup® pack. Para evitar riesgo de lesión, no ponga los dedos en la carcasa de ensamblaje del K-Cup® pack.PRECAUCIÓN: Durante el proceso de preparación el agua del receptáculo del K-Cup® pack está extremadamente caliente. Para evitar riesgo de lesión, no levante la manija ni abra la carcasa del ensamblaje del K-Cup® pack durante el proceso de preparación.
ADVERTENCIA! Para reducir el riesgo de incendio o descarga eléctrica, no retire ninguna cubierta. No existen partes que el usuario pueda reparar dentro de este electrodoméstico. Solamente personal autorizado debe reparar la cafetera.
Lea cuidadosamente TODAS las instrucciones de este manual antes de empezar a usar este electrodoméstico. El mantenimiento y cuidado correctos garantizan una vida larga y una operación sin problemas de este electrodoméstico. Guarde estas instrucciones y consúltelas para sugerencias durante la limpieza y el cuidado.
CONSERVE ESTAS INSTRUCCIONES

24 25
INSTRUCCIONES ESPECIALES PARA EL CABLE1. Se incluye un cable corto de suministro de energía para
reducir los peligros que resulten de que una persona o mascota se enreden o tropiecen con un cable más largo.
2. Se puede comprar un cable de extensión y usarse con cuidado.
3. Si se usa un cable de extensión, el calibre eléctrico marcado de la extensión debe ser por lo menos de 10 amperios y 120 voltios. El cable de extensión se debe colocar de manera que no cuelgue de una mesa o mostrador donde los niños lo puedan jalar o tropezarse accidentalmente.
4. Este electrodoméstico tiene un enchufe polarizado (una pata es más ancha que la otra). Para reducir el riesgo de descarga eléctrica, este enchufe encajará en un tomacorriente polarizado en una sola dirección. Si el enchufe no encaja completamente en el tomacorriente, voltee el enchufe. Si sigue sin encajar, contacte a un electricista califi cado. De ninguna manera modifi que el enchufe.
5. Usted puede ajustar el largo del cable eléctrico de manera que sea de la longitud precisa que usted desee. Para aumentar el largo del cable eléctrico: agarre el cable eléctrico (no el enchufe) y hálelo hacia arriba de su hendidura con delicadeza, retirándolo de la cafetera. Para disminuir el largo del cable eléctrico: agarre el cable eléctrico (no el enchufe) y hálelo hacia arriba de su hendidura, insertándolo con delicadeza en la cafetera. Fije el cable en la hendidura cuando termine.
ES TE PRODUCTO ES PARA USO DOMÉSTICO ÚNICAMENTE
CONTENIDO
Precauciones importantes . . . . . . . . . . . . . . . . . . . . . . . . . . 22Instrucciones especiales para el cable. . . . . . . . . . . . . . . . . 24Diagrama de partes . . . . . . . . . . . . . . . . . . . . . . . . . . . . . . . . . . 26Instalación de la cafetera y preparación del café . . . . . . . . 27Consejos Útiles . . . . . . . . . . . . . . . . . . . . . . . . . . . . . . . . . . . . 30Añadiendo Agua al Depósito de Agua . . . . . . . . . . . . . . . . . . 31Función de Apagado Automático . . . . . . . . . . . . . . . . . . . . . . 32Luces del Panel de Control . . . . . . . . . . . . . . . . . . . . . . . . . . 33Limpieza y mantenimiento . . . . . . . . . . . . . . . . . . . . . . . . . . . 34Solución de problemas . . . . . . . . . . . . . . . . . . . . . . . . . . . . 37Servicio y mantenimiento . . . . . . . . . . . . . . . . . . . . . . . . . . 39Información de la garantía . . . . . . . . . . . . . . . . . . . . . . . . . 40
Bienvenidos y felicitaciones por la compra de su nueva cafetera individual MR. COFFEE®. Con una gran variedad de K-Cup® packs Keurig®, las opciones son infi nitas. Usted puede disfrutar del te, chocolate y café, en una forma rápida y sencilla.¡Disfrutar de su cafetera individual MR. COFFEE® depende de usted!
ADVERTENCIA ADVERTENCIA: PARA REDUCIR EL RIESGO DE INCENDIO O DE DESCARGA ELÉCTRICA NO RETIRE LA TAPA INFERIOR. NO EXISTEN PARTES INTERNAS QUE EL USUARIO PUEDA REPARAR. ÚNICAMENTE PERSONAL DE SERVICIO AUTORIZADO PUEDE REALIZAR REPARACIONES.
RIESGO DE INCENDIO O DEDESCARGA ELÉCTRICA.
NO ABRA !

26 27
14
12
13
8
11
9
7
6
10
15
DIAGRAMA DE PARTES INSTALACIÓN DE LA CAFETERA Y PREPARACIÓN DEL CAFÉ1. Ponga la cafetera sobre una
superfi cie plana, retire el material del empaque y conecte la unidad.
2. Retire el depósito de agua y tapa del depósito de agua, luego llénelo con agua embotellada o agua fi ltrada hasta la línea Max Fill (Llenado Máximo).
NOTA: no sobrepase esta línea.
1. Botón Colar•Apagado2. Luz de Pre-Calentado3. Indicador del tamaño de la taza4. Botón para seleccionar el tamaño
de la taza5. Indicador de añadir agua6. Cubierta del tanque de agua7. Tanque de agua8. Base de bandeja de goteo9. Bandeja de goteo10. Plato de la bandeja de goteo11. Cabezal de preparación12. Lugar para el K-cup® pack13. Aguja de preparación14. Manija del Cabezal de preparación15. Orifi cios para fi jar el Tanque de agua
3. Vuelva a colocar la tapa del depósito y el depósito de agua en el costado izquierdo de la cafetera
4. Levante la manija de la cafetera para insertar un paquete individual K-Cup® Pack.
NOTA: NO retire o perfore la cubierta de papel de aluminio del K-cup® pack.
Controles e Indicadores
4
2
1
3
5

28 29
5. Ponga el paquete individual K-Cup® Pack deseado en el lugar para el K-Cup® Pack.
NOTA: El botón Colar•Apagado destella para indicar que el cabezal de preparación está abierto.PRECAUCIÓN: Tenga cuidado con la aguja dentro del cabezal de preparación.
6. Cierre haciendo presión sobre el cabezal de preparación.
NOTA: Al cerrar el cabezal de preparación, se perforará el paquete individual K-Cup® Pack.
7. Seleccione el tamaño de su taza presionando el botón Serving Size (Seleccionar el tamaño de la taza). Una luz indicará el tamaño seleccionado: 6 onzas, 8 onzas o 10 onzas.
8. Coloque su taza en la zona para dispensar, arriba de la bandeja de goteo. Pulse el botón Brew•Off (Colar•Apagado) para iniciar la elaboración de su bebida.
NOTA: La preparación inicial tomará más tiempo de lo normal ya que el agua debe calentarse antes de iniciar el proceso. El tiempo de las preparaciones posteriores será más corto, siempre y cuando el tanque de agua esté lleno.NOTA: la bandeja de goteo y el plato de la bandeja de goteo se pueden remover para dar cabida a tazas grandes.
9. Cuando el agua llega a la temperatura adecuada el botón Bew•Off (Colar•Apagado) titilará y la elaboración de su bebida comenzará.
NOTA: Después de que el proceso de elaboración se haya completado, un ciclo automático de enfriamiento para eliminar casi todo el líquido del K-Cup® pack. Este proceso puede tardar hasta 60 segundos.
10. ¡DISFRUTE!
6 8 10oz.

30 31
• Personalice su sabor y preparación – Con una selección de más de 200 variedades de K-Cup® packs, su cafetera le ofrece infi nidad de opciones para personalizar el sabor y la concentración perfecta para usted. Para una taza de café fuerte, intenso, seleccione el “Extra Bold” K-Cup® pack (hasta 30% más café molido que las variedades normales).
• Preparación de una taza más grande – Para preparar una taza más grande (o tazas de viaje), simplemente retire la bandeja de goteo y coloque la taza en la base de la bandeja.
• La bandeja de goteo – Cualquier líquido derramado (desde el vaso o taza) caerá en la bandeja de goteo. Cerciórese de vaciar la bandeja de goteo periódicamente.
• Limpie su cafetera con frecuencia – Para mantener su cafetera luciendo y operando de la mejor forma, cerciórese de limpiar los componentes externos e internos con frecuencia. Para mayor información, consulte la página 34.
• Descalcifi cación – El contenido mineral en el agua varía de un lugar a otro. Dependiendo del contenido mineral del agua en su área, se pueden acumular depósitos de calcio en su cafetera. Estos minerales no son tóxicos, pero si se ignora, puede entorpecer el desempeño de la cafetera. Descalcifi car su cafetera ayuda a mantener el elemento calefactor y otras partes internas de la cafetera que entran en contacto con el agua. Para mayor información consulte la página 36.
• Almacenamiento – Cuando almacene su cafetera, vacíe con cuidado la bandeja de goteo y el tanque de agua. Guarde la cafetera en posición vertical en un ambiente seguro, seco y libre de congelamiento.
AÑADIENDO AGUA AL DEPÓSITO DE AGUALa Luz de Add Water (Añadir Agua) titilará indicando que el tanque no tiene agua. Llene el tanque de agua con agua fi ltrada o embotellada a la línea Max Fill (Llenado Máximo).
CONSEJOS ÚTILES• Mantenga su Cafetera encendida en todo momento -
Para preparar una nueva taza de café, té o chocolate en cualquier momento que desee, le sugerimos que mantenga su cafetera encendida todo el tiempo. Sin embargo, se puede confi gurar la cafetera para que automáticamente se apague dos horas después de que haya preparado su última bebida. Siga las sencillas instrucciones de la página 32 para hacer el uso de la cafetera conveniente para usted.
• Operación para limpieza inicial – Antes de utilizar su cafetera por primera vez, se debe realizar una limpieza inicial utilizando solamente agua y activando un ciclo de preparación sin utilizar un K-Cup® pack.
• Una taza a la vez – Su nueva cafetera prepara una bebida fresca cada vez.
• Tanque de agua - Su nueva cafetera puede almacenar hasta 40 oz de agua. Esta cantidad será sufi ciente para preparar 6 tazas de pequeñas (6 oz. cada una), 5 tazas medianas (8 oz. cada una) o 4 tazas grandes (10 oz. cada una). Esta cafetera cuenta con un depósito interno que mantiene agua precalentada, para una preparación más rápida.
• El agua correcta hace la diferencia – Para un mejor sabor del café gourmet, té o chocolate caliente, recomendamos que use agua fi ltrada o embotellada. No recomendamos agua destilada o de ósmosis inversa. La calidad del agua varía de un lugar a otro. Si nota un sabor no deseado en su taza de café como cloro u otro sabor mineral, le recomendamos que considere usar agua embotellada o proveniente de otro sistema de fi ltración.
• Sustituya el K-Cup® pack entre preparaciones - Es necesario sustituir el K-Cup® pack antes de comenzar su preparación. Esto restablecerá la cafetera para que pueda preparar otra taza de café.

32 33
Una vez que haya colocado el tanque de agua de nuevo en la cafetera, pulse el botón Brew•Off (Colar•Apagado) para iniciar el proceso de funciona. La primera preparación después de nuevamente llenar el tanque de agua tomará más tiempo de lo normal ya que antes de iniciar el proceso hay que calentar más agua. El tiempo de las preparaciones posteriores será más corto, siempre y cuando el tanque de agua permanezca lleno.NOTA: No es necesario pulsar el botón Brew•Off (Colar•Apagado) si se llena el tanque de agua antes de que la luz de Add Water (Añadir Agua) se encienda.
FUNCIÓN DE APAGADO AUTOMÁTICO - AUTO OFFEsta cafetera está equipada con una función de temporizador de apagado automático que se activará después de 2 horas de no uso. NOTA: El apagado automático viene desactivado de fábrica. Siga los pasos a continuación para activar o desactivar la función de apagado automático.1. Para activar la función de apagado automático, mantenga
presionado el botón Serving Size (Botón para seleccionar el tamaño de la taza) y el Brew•Off (Colar•Apagado) durante 5 segundos. Los indicadores de tamaño de la taza y el botón Colar•Apagado parpadearán 2 veces para indicar que el de apagado automático está activado.
2. Para desactivar la función de apagado automático, mantenga presionado el botón Serving Size (Botón para seleccionar el tamaño de la taza) y el Botón Brew•Off (Colar•Apagar) durante 5 segundos. Los indicadores de tamaño de la taza y el botón Colar•Apagado parpadearán 5 veces para indicar que el de apagado automático está activado.
LUCES DEL PANEL DE CONTROLIndicador Acción
Botón Colar•Apagado
Titila Indica que el Cabezal de preparación está abierto
Pulsa Indica que la unidad esta colando
Fija Lista para colar
6 8 10oz.
Botón Colar•Apagado+Indicador del tamaño de la taza
Titila 2 veces
Indica que el apagado automático esta activado. Vea la pagina 32 para mas instrucciones
Titila 5 veces
Indica que el apagado automático esta desactivado. Vea la página 32 para más instrucciones
6 8 10oz. Indicador del
tamaño de la taza
Titila
Indica que la unidad debe ser limpiada.vea las instrucciones en la página 36
Añadir agua Titila
Indica que el tanque de agua está vacío. Cuando el tanque de agua se llena de nuevo, presione el botón Brew●Off para reanudar o empezar la preparación.
Luz de Pre-Calentado Titila
Indica que el agua en el depósito interior se está calentando para preparar su próxima bebida. La luz se apagará indicando que el agua ha alcanzado la temperatura correcta para preparar su bebida.

34 35
LIMPIEZA Y MANTENIMIENTO DE SU CAFETERA INDIVIDUALLimpieza de las partes externas
PRECAUCIÓN: Verifi que que la cafetera esté desconectada antes de hacer la limpieza normal. Se recomienda la limpieza frecuente de los componentes externos de la cafetera. Permita que se enfríe.
1. Nunca sumerja la cafetera en agua o en otros líquidos. La base del K-cup pack y otros componentes externos se pueden limpiar con un paño jabonoso y húmedo, no abrasivo.
2. La bandeja de goteo puede acumular líquidos. La bandeja de goteo y la base de la bandeja de goteo se deben inspeccionar y limpiar periódicamente con un paño jabonoso y húmedo, no abrasivo que no produzca pelusa. La bandeja de goteo o la base no se deben lavar en la lavadora de platos. Para retirar el ensamble de la bandeja de goteo, simplemente deslícelo en dirección suya, manteniéndolo nivelado en todo momento para evitar derrames.
Limpieza del ensamble de receptáculo del K-Cup® Pack1. Limpieza de las partes – El ensamble del receptáculo del
K-Cup® pack se puede colocar en la sección superior del lavaplatos. NOTA: Use un ciclo de temperatura baja en el lavaplatos. Para retirar la cafetera, levante el frente de la cafetera, agarre la parte superior del receptáculo del K-Cup® pack con una mano mientras empuja hacia arriba con la otra mano la base del receptáculo del K-Cup® pack hasta que se libere. Después de limpiar, alinee el receptáculo del K-Cup® pack con la abertura utilizando las dos estrías delanteras como guía y coloque en su lugar desde la parte superior.
2. Limpieza del embudo – El embudo se puede retirar del receptáculo del K-Cup® pack halando hasta que se libere (fi gura 1).
El embudo se puede lavar en el lavaplatos. Para volver a colocar, simplemente encaje de nuevo en el ensamble del receptáculo del K-Cup® pack.
3. Limpieza de las agujas - La aguja de salida se encuentra ubicada en la base interna del lugar para el K-Cup® pack. Si se obstruye la aguja a causa de alguna partícula de café molido, se puede destapar utilizando un clip para papel o un instrumento similar. Quite el lugar para el K-Cup® pack y separe el embudo. Inserte el instrumento dentro de la aguja para afl ojar la obstrucción y expulsarla. El lugar para el K-Cup® pack es apto para lavado en lavavajilla. También puede utilizar un clip para papel para limpiar la aguja del cabezal de preparación que se encuentra en el interior del cabezal de preparación.
PRECAUCIÓN: Hay dos agujas fi losas que perforan el paquete individual K-Cup® pack, una por encima y otra por debajo del receptáculo del K-Cup® pack. Para evitar riesgo de lesión, no ponga los dedos en la carcasa de ensamblaje del K-Cup® pack.
Limpieza y vaciado del tanqueDeseche el sobrante de agua removiendo la tapa del depósito y volcando el depósito en la pileta. La tapa del depósito de agua NO debe lavarse en el lavavajillas. Lave con un paño húmedo con jabón no abrasivo y enjuague bien. El depósito de agua es apto para lavado en lavavajillas.NOTA: NO seque el interior del tanque de agua con un paño ya que las pelusas pueden quedar en el tanque.
PRECAUCIÓN: Por favor, enjuague el tanque de agua completamente después de la limpieza para asegurarse que no quedan residuos de limpiadores o soluciones de limpieza, ya que pueden contaminar el suministro de agua en la cafetera. No sumerja el electrodoméstico en agua.
FIGURA 2
!
FIGURA 1

36 37
6. Repita el ciclo de preparación hasta que el depósito esté vacío (sin tener un K-Cup® pack), para limpiar las tuberías de la cafetera y deshacerse de cualquier sabor residual del vinagre.La cafetera está ahora lista para su uso normal.
NOTA: las tres luces LED indicadoras del tamaño de tazas seguirán titilando si no se siguen los procedimientos de limpieza correctamente.
SOLUCIÓN DE PROBLEMAS PARA SU CAFETERA INDIVIDUALSu Cafetera Individual MR. COFFEE® ha sido diseñada con esmero para darle muchos años de servicio sin contratiempos. En el caso improbable de que su nueva cafetera individual no funcione adecuadamente, favor examinar los siguientes problemas potenciales y efectuar los pasos recomendados ANTES de llamar a un Centro de Servicio Autorizado Sunbeam.
AlmacenamientoDesocupe tanque de agua antes de almacenar y cerciórese de guardar su cafetera en un ambiente seguro y que no quede expuesta a congelamiento. Se sugiere guardar la cafetera en posición vertical. Si guarda la cafetera en un ambiente frio, se corre el riesgo de congelamiento por condensación al interior lo que podría causar daños. Cuando se prepare para usarla después de estar almacenada, recomendamos limpiar el tanque de agua con un paño húmedo, libre de pelusa y operar tres ciclos sin un K-Cup® pack.Si la cafetera ha estado en un ambiente por debajo del nivel de congelamiento, cerciórese de dejarla calentar a temperatura ambiente por 2 horas antes de usar.
Cómo quitar el sarro a su cafeteraSe debe limpiar el sarro de la cafetera cada 3-6 meses para garantizar un desempeño óptimo o cuando se formen depósitos blancos en el tanque de agua. Es posible que los depósitos de calcio se desarrollen más rápido, lo que exige limpiar el sarro más frecuentemente.1. Verifi que que tiene a mano al menos 40 onzas de
vinagre blanco no diluido. También necesitará una jarra de cerámica de 10 onzas (no use una taza desechable) y acceso a un lavadero de platos.
2. Llene tanque de agua con 40 onzas de vinagre blanco no diluido hasta la marca del NIVEL DE LLENADO. Coloque la jarra de cerámica sobre la base de la bandeja de goteo.
3. Cierre el cabezal de preparación y realice un ciclo de preparación en una taza de cerámica sin agregar el K-Cup® pack.
4. Repita un ciclo de preparación hasta que el tanque esté vacio y luego deje reposar por 60 minutos.
5. Llene el tanque con 40 onzas de agua fi ltrada o purifi cada, cierre el cabezal de preparación, coloque una jarra en la base de la bandeja de goteo y realice un ciclo de preparación.
PROBLEMA SOLUCIÓNLa cafetera individual no tiene energía
Verifi que que el botón de Brew•Off (Colar•Apagado) esté oprimido e iluminado.Conecte la cafetera individual en un tomacorriente independiente.Verifi que que esté conectada de forma segura.Conecte en un tomacorriente diferente.

38 39
Servicio y mantenimiento
Si su cafetera requiere reparación, no la devuelva a la tienda donde la compró. Todas las reparaciones y reemplazos se deben hacer a través de Sunbeam o de un centro de servicio autorizado de Sunbeam. Si usted vive en EE.UU. o Canadá, llámenos a los siguientes números telefónicos gratuitos para encontrar el centro de servicio autorizado más cercano:
EE.UU. 1-877-517-6400Canadá 1-800-667-8623
También puede visitar nuestro sitio web en www.mrcoffee.com
Para atenderle mejor, tenga consigo el número del modelo de la cafetera y la fecha de compra cuando llame. El número del modelo está estampado en la placa metálica por debajo de la cafetera.Sus preguntas, comentarios o sugerencias son bienvenidos. En todas sus comunicaciones, incluya su nombre completo, dirección y número telefónico, así como una descripción del problema.
Número del Modelo:____________________________________
(El número del modelo está estampado en la placa de metal inferior de la cafetera)
Número de Serie:_______________________________________
Código de Fecha: ______________________________________
(Ubicado en la punta metálica del cable eléctrico. Comienza con una letra seguida de tres números)
Fecha de Compra:______________________________________
PROBLEMA SOLUCIÓNLa cafetera individual no prepara el café.
Si la cafetera individual está fría/congelada, espere por lo menos dos horas para que alcance la temperatura ambiente antes de encenderla.Asegúrese de que haya agua en el tanque y de que la cabeza de preparación esté cerrada fi rmemente NOTA: El botón “Brew•Off (Colar•Apagado)” se iluminará intermitentemente si la cabeza de preparación está abierta.Levante el cabezal y reemplace el K-Cup® pack para reiniciar la cafetera.
La cafetera individual prepara el café parcialmente.
La aguja de salida puede estar obstruida (consulte la página 35). Si es necesario, limpie y enjuague en el grifo el receptáculo del K-Cup® pack (consulte la página 34).Retire el sarro de la cafetera individual (consulte la página 36).Si ha repetido el procedimiento de limpieza del sarro en su cafetera individual dos veces y ésta sigue sin funcionar, contacte a Servicio al cliente.
La cafetera no funciona con Keurig® mis K-Cup®.
El lugar para el K-Cup® pack debe ser removido.
Asegúrese que la tapa del K-Cup® esté bien cerrada.
La luz Add Water (Agregar agua) todavía estará parpadeando después de llenar el tanque de agua.
Presione el botón Brew●Off para empezar la preparación. Entonces la luz de Add Water se apagará.
40 41
causados por el incumplimiento de alguna garantía o condición expresa, implícita o legal.Excepto en la medida en que lo prohíba la ley aplicable, cualquier garantía o condición implícita de comerciabilidad o aptitud para un fi n determinado se limita, en cuanto a su duración, al plazo de la garantía antes mencionada.JCS queda exenta de toda otra garantías, condiciones o manifestaciones, expresa, implícita, legal o de cualquier otra naturaleza.JCS no será responsable de ningún tipo de daño que resulte de la compra, uso o mal uso del producto, o por la imposibilidad de usar el producto, incluidos los daños incidentales,especiales, emergentes o similares, o la pérdida de ganancias, ni de ningún incumplimiento contractual, sea de una obligación esencial o de otra naturaleza, ni de ningún reclamo iniciado contra el comprador por un tercero.Algunas provincias, estados o jurisdicciones no permiten la exclusión o limitación de los daños incidentales o emergentes ni las limitaciones a la duración de las garantías implícitas, de modo que es posible que la exclusión o las limitaciones antes mencionadas no se apliquen en su caso.Esta garantía le otorga derechos legales específi cos y es posible que usted tenga otros derechos que varían de un estado, provincia o jurisdicción a otro.Cómo solicitar el servicio en garantíaEn los Estados Unidos.Si tiene alguna pregunta sobre esta garantía o desea recibir servicio de garantía, llame al 1-877-517-6400 y podrá obtener la dirección del centro de servicio que le resulte más conveniente.En CanadáSi tiene alguna pregunta sobre esta garantía o desea recibir servicio de garantía, llame al 1-800-667-8623 y podrá obtener la dirección del centro de servicio que le resulte más conveniente.
INFORMACIÓN DE GARANTÍAGarantía Limitada de 1 AñoSunbeam Products, Inc. operando bajo el nombre de Jarden Consumer Solutions, o en Canadá, Sunbeam Corporation (Canada) Limited operando bajo el nombre de Jarden Consumer Solutions, (en forma conjunta, “JCS”), garantiza que por un período de un año a partir de la fecha de compra, este producto estará libre de defectos de materiales y mano de obra. JCS, a su elección, reparará o reemplazará este producto o cualquier componente del mismo que presente defectos durante el período de garantía. El reemplazo se realizará por un producto o componente nuevo o reparado. Si el producto ya no estuviera disponible, se lo reemplazará por un producto similar de valor igual o superior. Ésta es su garantía exclusiva. No intente reparar o ajustar ninguna función eléctrica o mecánica de este producto. Al hacerlo elimínará ésta garantía.La garantía es válida para el comprador minorista original a partir de la fecha de compra inicial y la misma no es transferible. Conserve el recibo de compra original. Para solicitar servicio en garantía se requiere presentar un recibo de compra. Los agentes y centros de servicio de JCS o las tiendas minoristas que venden productos de JCS no tienen derecho a alterar, modifi car ni cambiar de ningún otro modo los términos y las condiciones de esta garantía.Esta garantía no cubre el desgaste normal de las piezas ni los daños que se produzcan como resultado de uso negligente o mal uso del producto, uso de voltaje incorrecto o corriente inapropiada, uso contrario a las instrucciones operativas, y desarme, reparación o alteración por parte de un tercero ajeno a JCS o a un Centro de Servicio autorizado por JCS. Asimismo, la garantía no cubre actos fortuitos tales como incendios, inundaciones, huracanes y tornados.¿Cuál es el límite de responsabilidad de JCS?JCS no será responsable de daños incidentales o emergentes

42 43
En los Estados Unidos, esta garantía es ofrecida por Sunbeam Products, Inc. operando bajo el nombre de Jarden Consumer Solutions, Boca Ratón, Florida 33431. En Canadá, esta garantía es ofrecida por Sunbeam Corporation (Canada) Limited operando bajo el nombre de Jarden Consumer Solutions, 20 B Hereford Street, Brampton, Ontario L6Y 0M1. Si usted tiene otro problema o reclamo en conexión con este producto, por favor escriba al Departamento de Servicio al Consumidor.POR FAVOR NO DEVUELVA ESTE PRODUCTO A NINGUNA DE ESTAS DIRECCIONES
NOTAS