Embed Size (px)
Citation preview

iFile Web User Guide P a g e | 1
USER MANUAL - IRIS iFile Web
1 Contents
1. Outline...........................................................................................................................................................................2
1.1 Benefits ...............................................................................................................................................................2
1.2 Features..............................................................................................................................................................3
1.3 Process Flow Diagram .................................................................................................................................3
1.4 Browser Requirements ...............................................................................................................................3
1.5 Log-in credentials ..........................................................................................................................................4
2 Initiate ...........................................................................................................................................................................4
2.1 Navigation .........................................................................................................................................................5
2.2 Set-Up Details ..................................................................................................................................................6
3 Initiate ...........................................................................................................................................................................8
3.1 Extended Link Selection .............................................................................................................................8
3.2 Hierarchy ........................................................................................................................................................ 10
3.3 Previous and Current Year Column ................................................................................................... 11
3.4 Legend .............................................................................................................................................................. 11
3.5 Documentation ............................................................................................................................................ 12
3.6 Input Validation........................................................................................................................................... 12
3.7 Help Files ........................................................................................................................................................ 13
3.8 Search ............................................................................................................................................................... 13
3.9 Filter option................................................................................................................................................... 14
4 Input Data ................................................................................................................................................................. 14
4.1 Enter Value in grid ..................................................................................................................................... 14
4.2 Automatic Calculation .............................................................................................................................. 15

iFile Web User Guide P a g e | 2
4.3 Text Block Items: -...................................................................................................................................... 16
4.4 Tuples ............................................................................................................................................................... 17
4.5 Add Footnote:- ............................................................................................................................................. 19
4.6 Property Window ....................................................................................................................................... 20
4.6.1 Change Scale ........................................................................................................................................ 21
4.6.2 Change Unit .......................................................................................................................................... 21
5 iFile Web Menu ...................................................................................................................................................... 22
5.1 Save ................................................................................................................................................................... 22
5.2 Validate ............................................................................................................................................................ 23
5.3 Bifurcation ..................................................................................................................................................... 25
5.4 View................................................................................................................................................................... 26
5.5 Download ....................................................................................................................................................... 30
5.6 View/Hide Columns .................................................................................................................................. 31
5.7 Reset Columns .............................................................................................................................................. 31
1. Outline
iFILE Web is a web-based application for generating XBRL instance documents. The process
of XBRL instance document generation is fully automated and customized as per the
requirements of the Ministry of Corporate Affairs (MCA). The product is endowed with an in-
built validation engine, which checks if the instance document is in conformity with MCA
business rules and XBRL specifications.
1.1 Benefits
User can log in from any remote location
User need not know the nitty-gritty of XBRL
Creation and validation of XBRL documents using the same application
Validations based on MCA’s XBRL specification and Business Rules

iFile Web User Guide P a g e | 3
1.2 Features
Web-based application
Captures all data points/elements of the MCA taxonomy
Designed in a user friendly manner
Easy navigation to toggle between the templates
User friendly error and warning messages in case of incorrect entries
1.3 Process Flow Diagram
The process of using iFILE Web application may be summed up through the following flow
diagram. The user, upon successful registration, may log into the application with his
respective username and password. Following are the steps to be followed:
1) The user initiates the application by selecting the company for which he has
registered and filling the ‘Set-Up Details’.
2) The next step would be to ‘Input Data’ in the various templates for financial
statements provided in iFILE Web as per the MCA requirement.
3) After filling in all the relevant data, the user has to ‘Validate’ the data. This function
would check compliance with MCA business rules and XBRL specifications, lacunas
observed, if any, can be corrected.
4) After validation, the XBRL output can be ‘Viewed’ using a user friendly renderer.
1.4 Browser Requirements
For best viewing use Firefox Version 4.0 or Internet Explorer 9.0
1 2 3 4
Setup details Input data Validate View
Document
iFile Web User Guide P a g e | 4
1.5 Log-in credentials
Once you complete the process of registration and the payment of iFILE Web application you
would get a unique username and password for logging into the application. A username and
password will be created and e-mailed to you for security and confidentiality of your
account. You will be able to login to the iFILE Web from URL
http://webforms.irisbusiness.com .
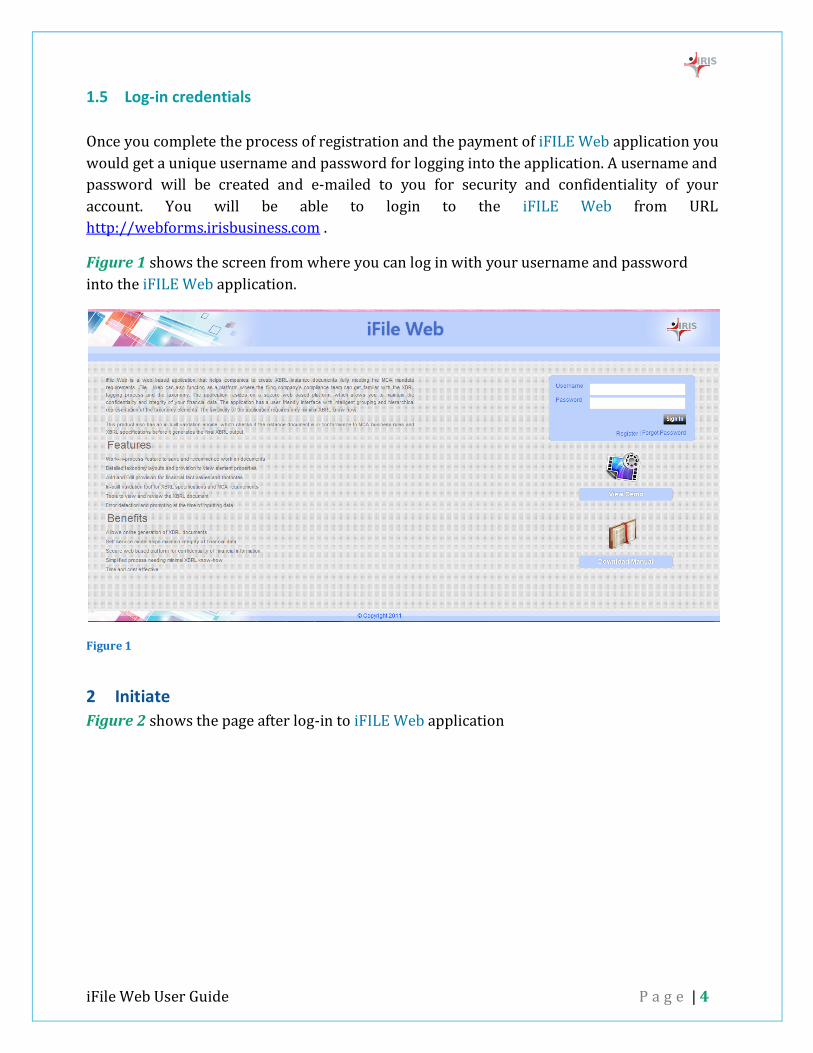
Figure 1 shows the screen from where you can log in with your username and password
into the iFILE Web application.
Figure 1
2 Initiate
Figure 2 shows the page after log-in to iFILE Web application

iFile Web User Guide P a g e | 5
Figure 2
2.1 Navigation
You need to select the company for which instance document is to be generated, from the
drop down options at the top left corner of the screen as shown in Figure 2. You can register
for more than one company at the time of registration.
This acts as an index to the entire iFILE Web application. The navigation sheet is divided into
four broad categories or blocks.
Start Creating for Instance Document – To start creating instance documents for a
company you click on this option. This option can also be used to initialize your data
filled so far and start creating afresh. Upon clicking this link, you are directed to set-
up details.
Continue with Saved Document – You can access your saved work and resume your
work by clicking on this link.
Validation Status - You can click on this tab to know the status of validation of the
last saved file. Validation status is a compliance check of your data with MCA business
rules and XBRL specifications.
iFile Web User Guide P a g e | 6
View Statement– On clicking this link you would be redirected to the page from
where you can view the data entered so far. This will give you a visual glimpse of how
much more is done and the pending one.
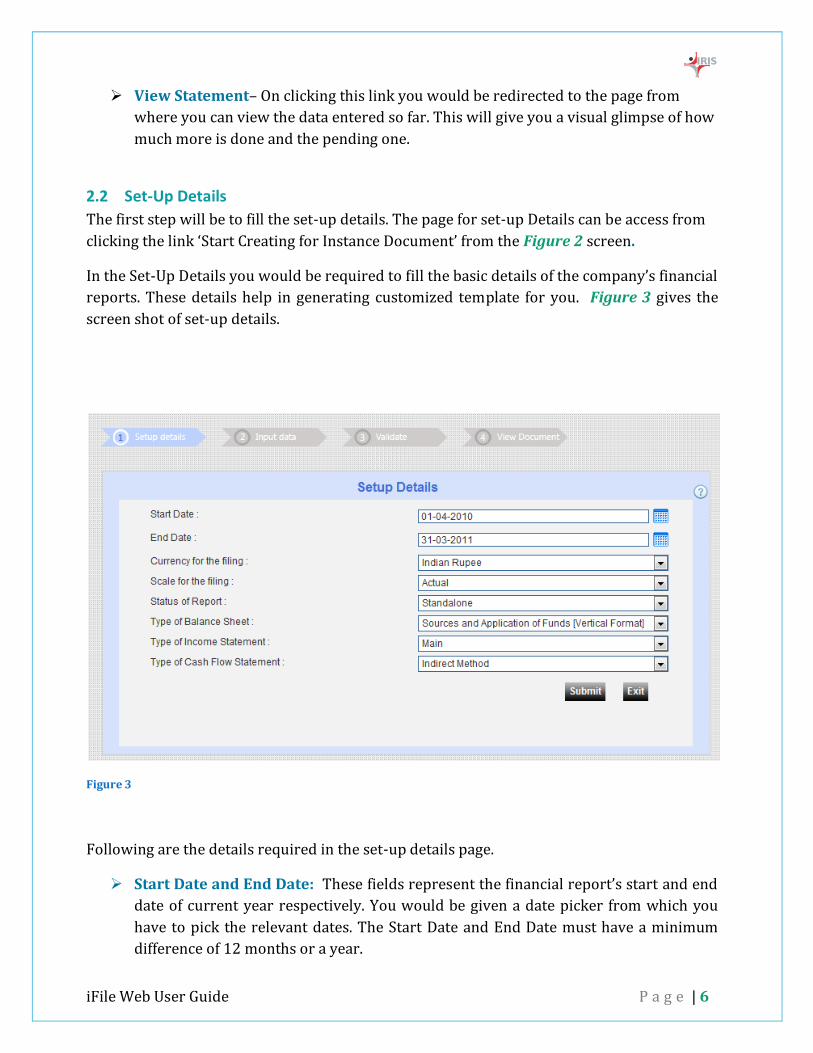
2.2 Set-Up Details
The first step will be to fill the set-up details. The page for set-up Details can be access from
clicking the link ‘Start Creating for Instance Document’ from the Figure 2 screen.
In the Set-Up Details you would be required to fill the basic details of the company’s financial
reports. These details help in generating customized template for you. Figure 3 gives the
screen shot of set-up details.
Figure 3
Following are the details required in the set-up details page.
Start Date and End Date: These fields represent the financial report’s start and end
date of current year respectively. You would be given a date picker from which you
have to pick the relevant dates. The Start Date and End Date must have a minimum
difference of 12 months or a year.
iFile Web User Guide P a g e | 7
Currency of Filing: Here the options are given regarding the reporting currency. In
the Indian context the option to be chosen would always be “India, Rupees”
Scale of filing: In this option you need to specify the scale used to represent most of
the financial items in the annual report. The scale selected here would be the default
scale for all the monetary items in the template; however option would be available
with you to change the scale of a specific item if desired.
Status of report: There are two options provided in this drop down. You need to
select the appropriate option depending on the type financial report for which you
want to create the XBRL instance document. The options available are
Standalone
Consolidated
Type of Balance Sheet: There are two options provided in this drop down. You need
to select the suitable option depending on the type which is used to represent the
balance sheet of your company. The options available are
Sources and Application of Funds [Vertical Format] -- Most widely used format
Total assets and liabilities [Horizontal Format]
Type of Income Statement: There are two options provided in this drop down. You
need to select the appropriate option depending on the type which is used to
represent the Income Statement of your company. The options available are
Main – (Represents Income Statement by Nature) – In this presentation Net profit
is directly arrived at after deducting the Total Income from Total Expenditure.
This format does not require calculation of Operating Profit or Gross Profit. This is
the most widely used format.
Alternative – (Represents Income Statement by Function) – In this presentation
first Gross Profit is arrived at by deducting operating income and from Cost of
Goods Services; there after Net Profit is arrived at by adjusting for Other Income
and Indirect Expenses like administration Expenses, interest charges etc
Type of Cash Flow Statement: There are two options provided in this drop down.
Select the appropriate option depending on the type used to represent the Cash flow
statement of your company. The options available are
Direct Method
Indirect Method

iFile Web User Guide P a g e | 8
Submit: After filling the above mentioned fields you may click Submit button to
proceed ahead for filling iFILE Web.
Exit: This link is for exiting from set-up details
3 Initiate
From the set-up details you would be directed to the grid in which you will be doing the
actual entry of data. Before you go ahead with using iFILE Web you must get conversant
with the layout, design and basic features of the template. This section would explain
you the same.
3.1 Extended Link Selection
In order get started to fill the templates, first you need to select the extended link.
Extended link can be selected from the section highlighted in Figure 4
Figure 4
There are five broad groups available for you to select a section for filling the data
• Balance Sheet, • Income Statement, • Cash Flow, • Notes to Accounts • MCA When you open each group you will find further links under them. There are 57 extended
links (headings) available in the taxonomy which are grouped under the above five heads
Drop-down to select
Extended Link

iFile Web User Guide P a g e | 9
As the name suggests the groups – Balance Sheet, Income Statement, Cash Flow would
contain links pertaining to them.
E.g. Balance Sheet group will contain further links for the Summary Balance Sheet and
its Schedules such as Share Capital, Reserves & Surplus, Fixed Assets etc
Notes to Accounts contains links pertaining to various disclosures which are required
like Subsidiary Information, Directors Remuneration, and Segment Reporting etc
‘MCA’ would have links pertaining to disclosures /requirements specific to Ministry of
Corporate Affairs such as Auditors Report, Director’s Report, and General Information
about Company etc
To access each template you need to click on the link. As you take your mouse over the
link, a tool-tip will guide you as to what has to be filled in this section. Tool tip screen
shot is shown in Figure 5
Figure 5
Tool Tip information explaining
the scope and level of Tagging
iFile Web User Guide P a g e | 10
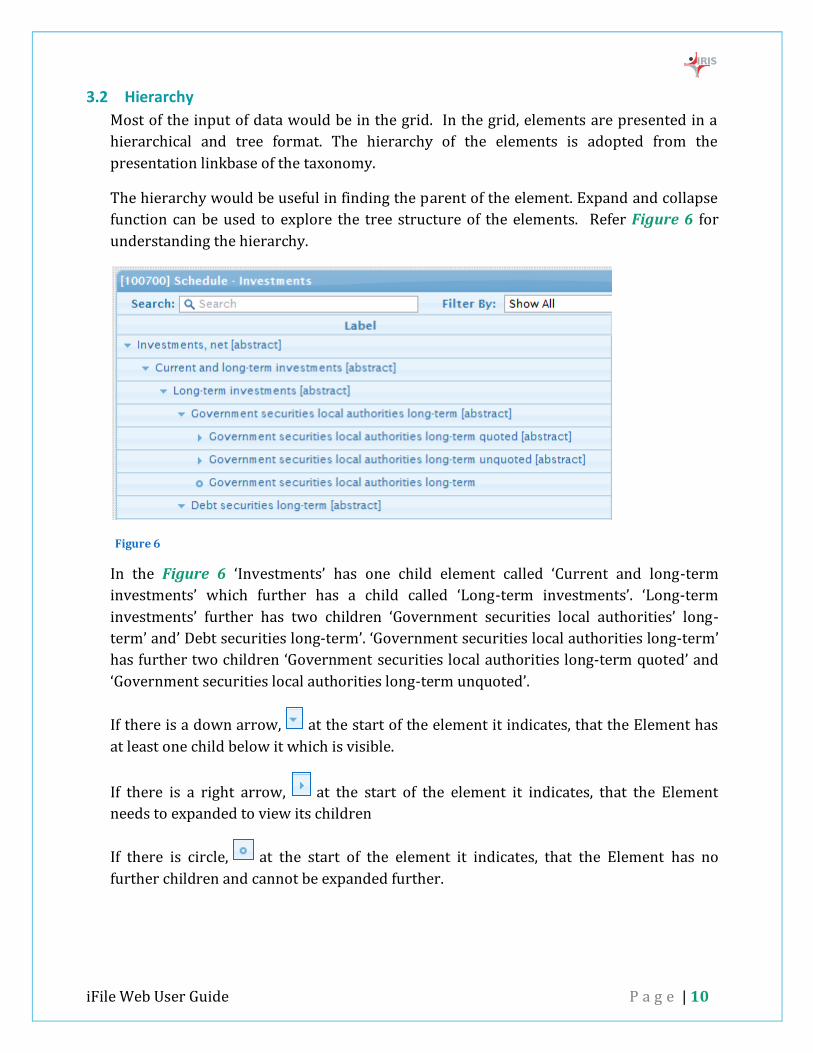
3.2 Hierarchy
Most of the input of data would be in the grid. In the grid, elements are presented in a
hierarchical and tree format. The hierarchy of the elements is adopted from the
presentation linkbase of the taxonomy.
The hierarchy would be useful in finding the parent of the element. Expand and collapse
function can be used to explore the tree structure of the elements. Refer Figure 6 for
understanding the hierarchy.
Figure 6
In the Figure 6 ‘Investments’ has one child element called ‘Current and long-term
investments’ which further has a child called ‘Long-term investments’. ‘Long-term
investments’ further has two children ‘Government securities local authorities’ long-
term’ and’ Debt securities long-term’. ‘Government securities local authorities long-term’
has further two children ‘Government securities local authorities long-term quoted’ and
‘Government securities local authorities long-term unquoted’.
If there is a down arrow, at the start of the element it indicates, that the Element has
at least one child below it which is visible.
If there is a right arrow, at the start of the element it indicates, that the Element
needs to expanded to view its children
If there is circle, at the start of the element it indicates, that the Element has no
further children and cannot be expanded further.

iFile Web User Guide P a g e | 11
3.3 Previous and Current Year Column
There are two columns provided in all templates- One for current year and previous
year each. MCA mandate expects the company to give comparative financial figures for
previous year also. The second column would enable the user to do so. The heading of
the column would explain whether the column pertains to the current year or previous
year.
The first column to the left represents the field for input of current year’s data, while
the column on the right represents field for input of corresponding previous year’s
data
Heading of the column would indicate the period covered by it. Refer - Figure 7
Figure 7
3.4 Legend
For making the application user-friendly, the cells are color coded identify expected
data. This section gives a brief on color coding used in the templates. The legend is
placed in the right bottom of the grid page. For list of coding used refer - Figure 8
Figure 8
The text of the ledegs are self explanatory. Wherever you find a Tuple item indicated
with Blue color, you need to click on the element which would direct you to different
window in which Tabular details are to be filled
Input in some files are prohibited depending on the business rules speciifed by MCA.
Current Year
Previous Year

iFile Web User Guide P a g e | 12
3.5 Documentation
The elements/line items in the templates of iFILE Web carry a brief note about them,
as given in the taxonomy. Taxonomy does not contain documentation for all elements.
Documentation helps in understanding the element in a better way.
On taking the mouse over an element its documentation can be viewed. Refer Figure
8.1
Figure 8.1
In the Figure 8.1 mouse was taken over the element ‘Reserves surplus’ the
documentation about the element is given in tool-tip.
3.6 Input Validation
Based on the data type expected for the elements, input is restricted. Fields which
would take only numeric data, you would not be allowed to enter string item and you
would get an error messgae as given in Figure 9
Figure 9
Similar kind of validation is built in for following data types
Corporate Identity Number
Director Identification Number
SRN number
iFile Web User Guide P a g e | 13
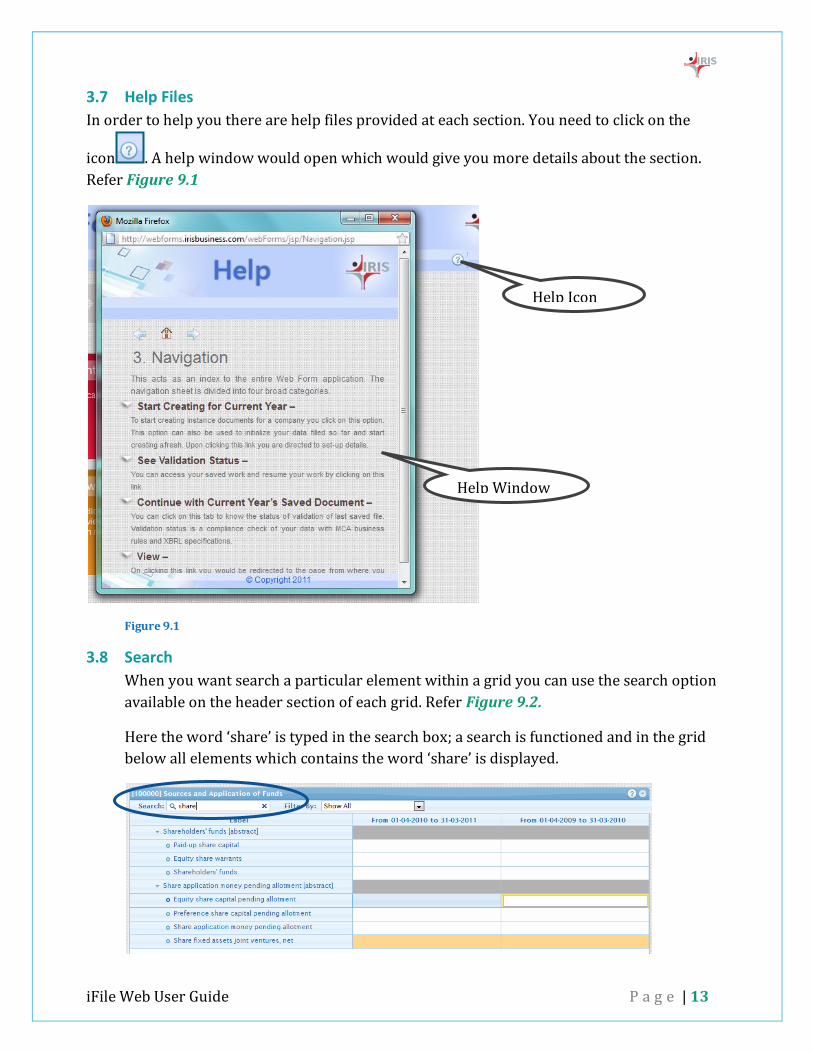
3.7 Help Files
In order to help you there are help files provided at each section. You need to click on the
icon . A help window would open which would give you more details about the section.
Refer Figure 9.1
Figure 9.1
3.8 Search
When you want search a particular element within a grid you can use the search option
available on the header section of each grid. Refer Figure 9.2.
Here the word ‘share’ is typed in the search box; a search is functioned and in the grid
below all elements which contains the word ‘share’ is displayed.
Help Icon
Help Window

iFile Web User Guide P a g e | 14
Figure 9.2
3.9 Filter option
There is filter available on the header section of each grid. Refer Figure 9.3. There are
two options under filter:
Show All
Show Only Inputted Value
Figure 9.3
If you choose ‘Show All’ option then all elements in the grid are displayed, irrespective of
whether the element contains a value or not
If you choose ‘Show Only Inputted Value’ option then only the elements which contain
the value are displayed in the grid. This option is helpful when you are reviewing the
data inputted so you concentrate only data filled by you and can ignore the blank cells
4 Input Data
All your data entries would be in grid. You need to get familiarized with how to input
different types of data in the grid. This section will guide you through different data
entry types.
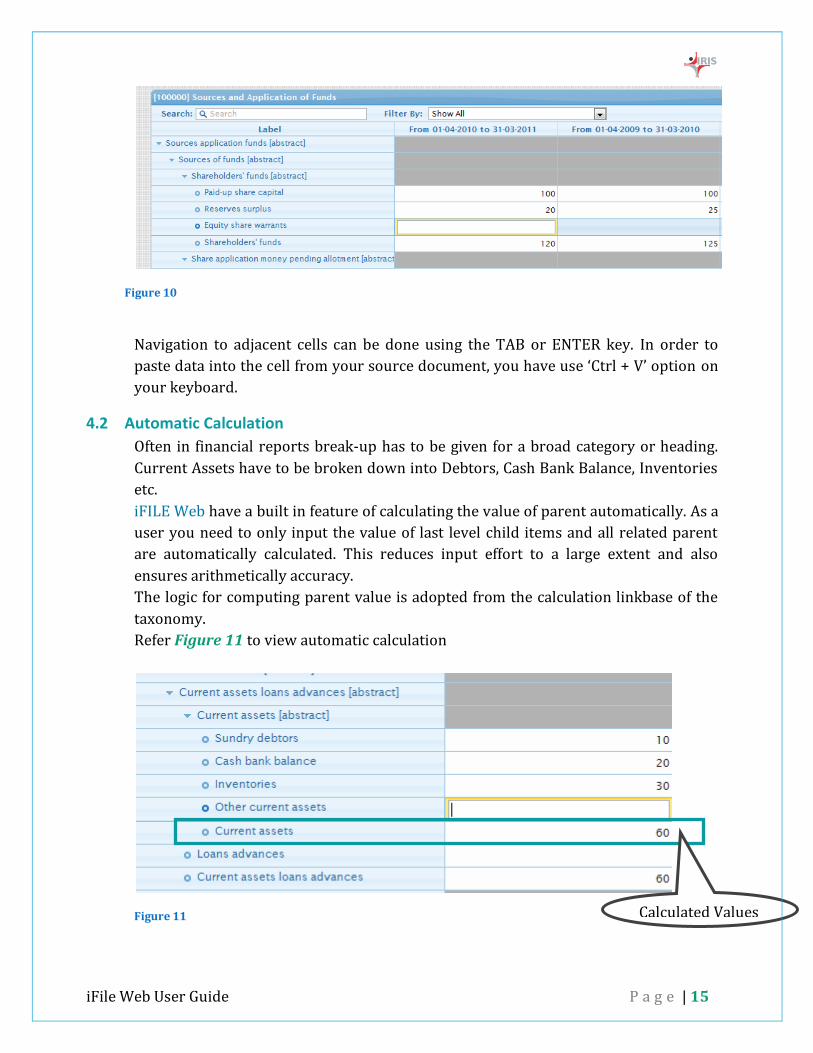
4.1 Enter Value in grid
You can double click on a cell to enter value in it or select the cell and Press ‘F2’. You
will be able to enter in a cell only when the cursor is blinking in a cell. Figure 10
shows cell ‘Equity share warrants’ selected for entry.
iFile Web User Guide P a g e | 15
Figure 10
Navigation to adjacent cells can be done using the TAB or ENTER key. In order to
paste data into the cell from your source document, you have use ‘Ctrl + V’ option on
your keyboard.
4.2 Automatic Calculation
Often in financial reports break-up has to be given for a broad category or heading.
Current Assets have to be broken down into Debtors, Cash Bank Balance, Inventories
etc.
iFILE Web have a built in feature of calculating the value of parent automatically. As a
user you need to only input the value of last level child items and all related parent
are automatically calculated. This reduces input effort to a large extent and also
ensures arithmetically accuracy.
The logic for computing parent value is adopted from the calculation linkbase of the
taxonomy.
Refer Figure 11 to view automatic calculation
Figure 11
Calculated Values

iFile Web User Guide P a g e | 16
4.3 Text Block Items: -
These elements are in the nature of representing the whole of the notes or
disclosures. Normally the user will find text block elements at the beginning of Notes
or Disclosures. Cells adjacent to Text Block elements contains the wordings “Click
here to input data” Refer Figure 12 for text block identification
Figure 12
In extended link for “Accounting Policies and Basis of Presentation” there is a text
block item pertaining to “Disclosure of accounting policies and basis of presentation”.
In this text block item the user would be giving the entire notes and disclosures
pertaining to “Accounting policy and Basis for presentation”. The elements following
the text block element would point to a specific note or disclosures namely
“Accounting principle of going concern departure disclosure”, “Revenue recognition
policy sale of goods” and so on.
For entering value for your text block items, you need to click on the text “Click here
to input data”.
i. A rich text editor window emerges that contain options for formatting the text.
ii. In the white space available you could either type in the text or paste from any
other source. The rich text box would also accept the tabular data.
iii. Once you are done with adding/updating text block to save your work you can
click on ‘OK’ else ‘Cancel’ to exit out of the rich text box.
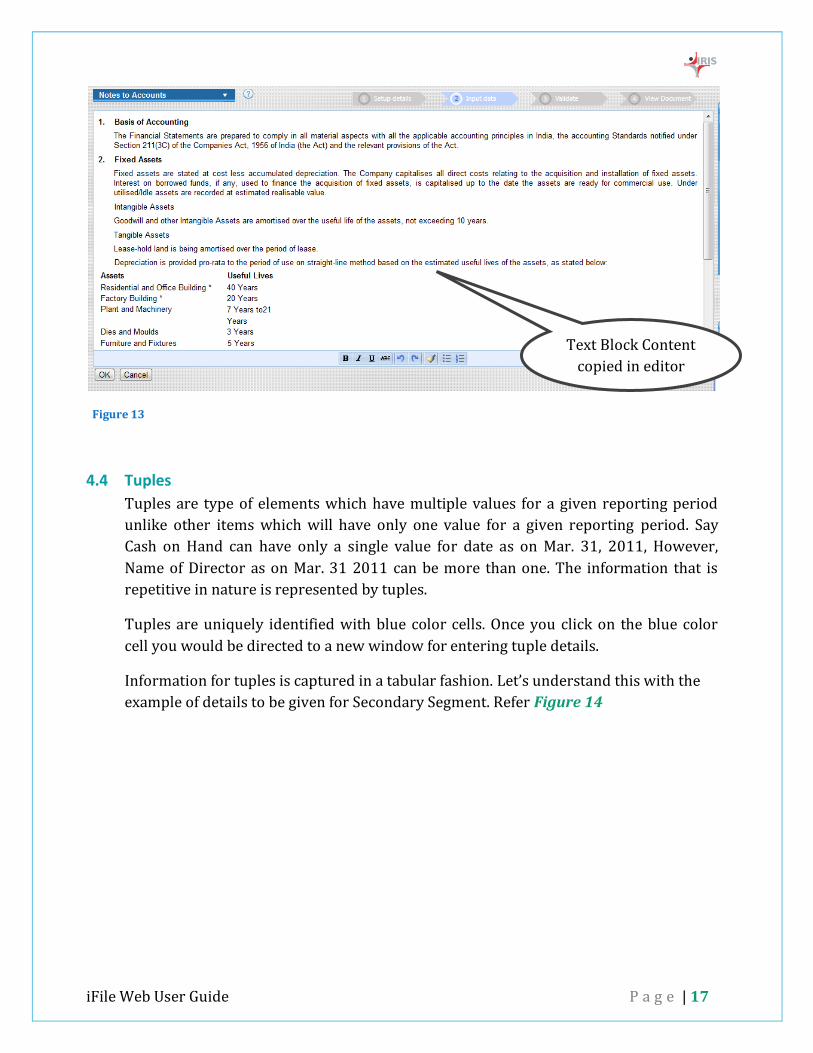
Refer Figure 13 for Text editor to input text block items
Text Block item
iFile Web User Guide P a g e | 17
Figure 13
4.4 Tuples
Tuples are type of elements which have multiple values for a given reporting period
unlike other items which will have only one value for a given reporting period. Say
Cash on Hand can have only a single value for date as on Mar. 31, 2011, However,
Name of Director as on Mar. 31 2011 can be more than one. The information that is
repetitive in nature is represented by tuples.
Tuples are uniquely identified with blue color cells. Once you click on the blue color
cell you would be directed to a new window for entering tuple details.
Information for tuples is captured in a tabular fashion. Let’s understand this with the
example of details to be given for Secondary Segment. Refer Figure 14
Text Block Content
copied in editor
iFile Web User Guide P a g e | 18
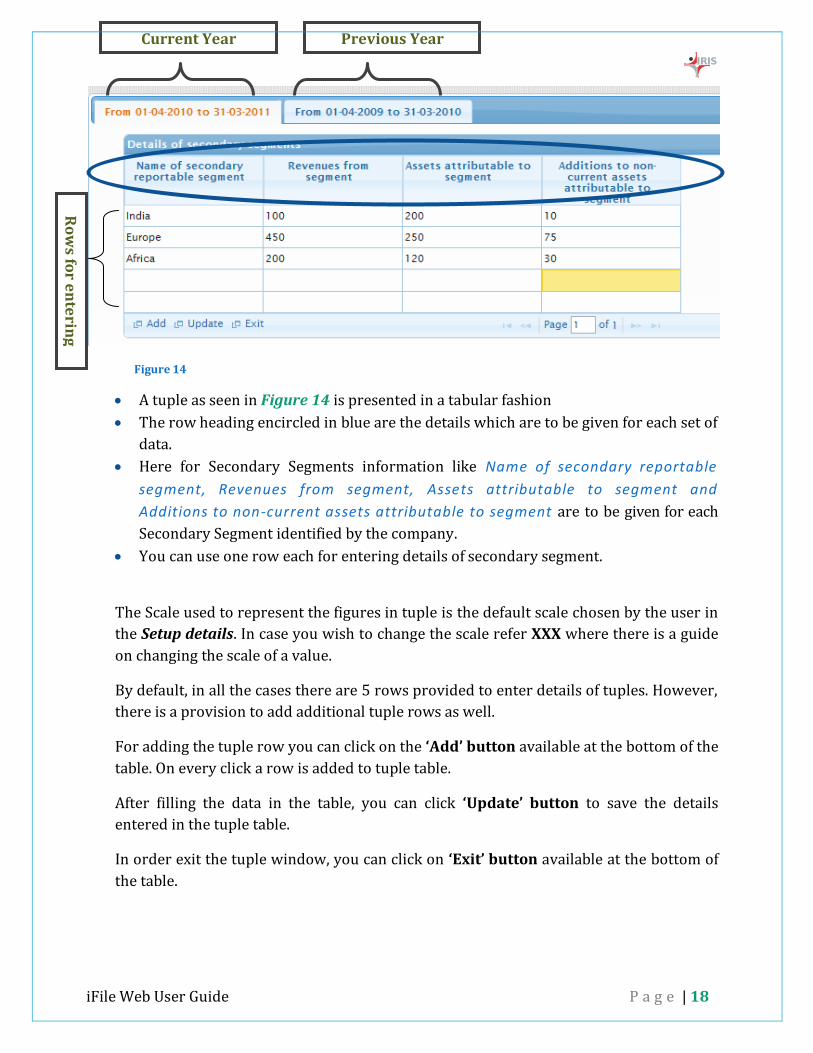
Figure 14
A tuple as seen in Figure 14 is presented in a tabular fashion
The row heading encircled in blue are the details which are to be given for each set of
data.
Here for Secondary Segments information like Name of secondary reportable
segment, Revenues from segment, Assets attributable to segment and
Additions to non-current assets attributable to segment are to be given for each
Secondary Segment identified by the company.
You can use one row each for entering details of secondary segment.
The Scale used to represent the figures in tuple is the default scale chosen by the user in
the Setup details. In case you wish to change the scale refer XXX where there is a guide
on changing the scale of a value.
By default, in all the cases there are 5 rows provided to enter details of tuples. However,
there is a provision to add additional tuple rows as well.
For adding the tuple row you can click on the ‘Add’ button available at the bottom of the
table. On every click a row is added to tuple table.
After filling the data in the table, you can click ‘Update’ button to save the details
entered in the tuple table.
In order exit the tuple window, you can click on ‘Exit’ button available at the bottom of
the table.
Current Year Previous Year
Ro
ws fo
r en
terin
g
iFile Web User Guide P a g e | 19
4.5 Add Footnote:-
Footnotes in XBRL are used for entering additional information about a particular
value.
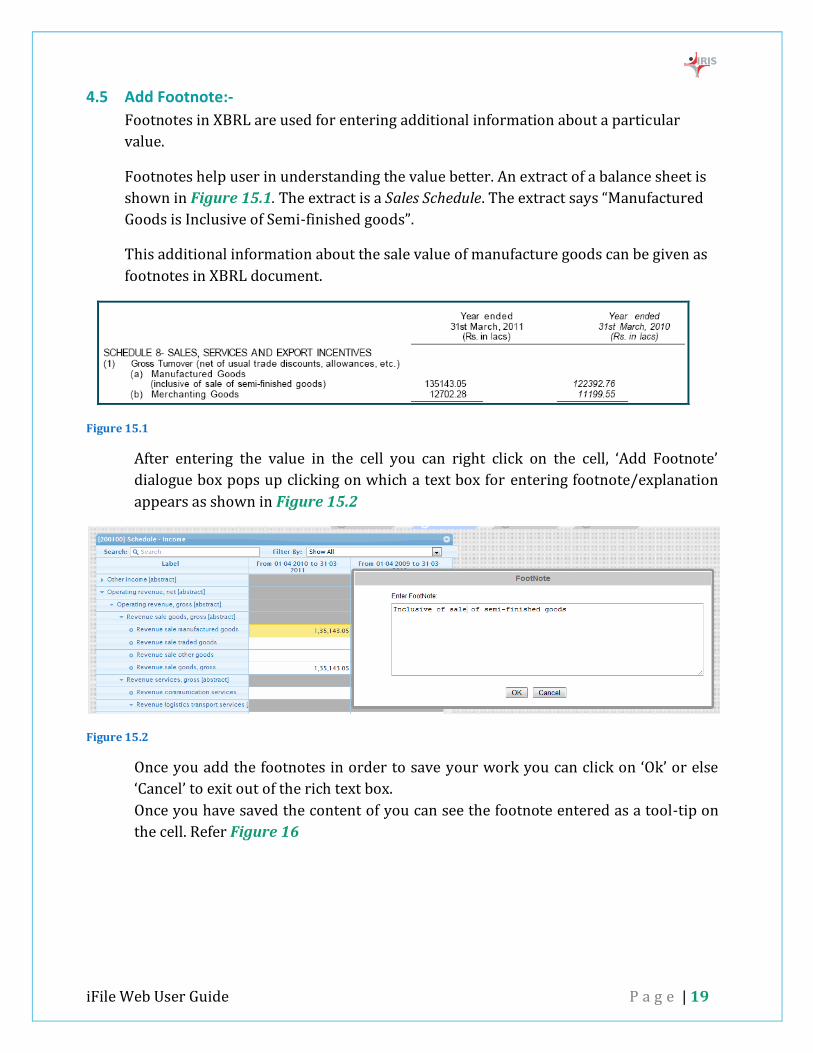
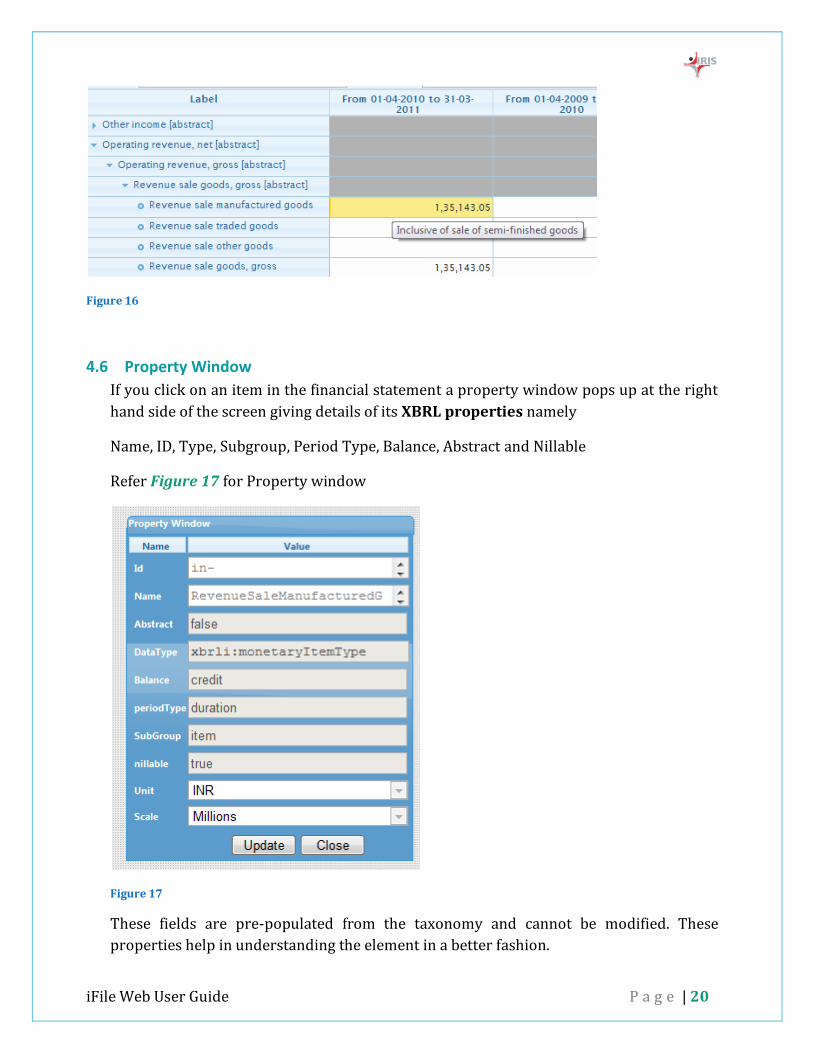
Footnotes help user in understanding the value better. An extract of a balance sheet is
shown in Figure 15.1. The extract is a Sales Schedule. The extract says “Manufactured
Goods is Inclusive of Semi-finished goods”.
This additional information about the sale value of manufacture goods can be given as
footnotes in XBRL document.
Figure 15.1
After entering the value in the cell you can right click on the cell, ‘Add Footnote’
dialogue box pops up clicking on which a text box for entering footnote/explanation
appears as shown in Figure 15.2
Figure 15.2
Once you add the footnotes in order to save your work you can click on ‘Ok’ or else
‘Cancel’ to exit out of the rich text box.
Once you have saved the content of you can see the footnote entered as a tool-tip on
the cell. Refer Figure 16
iFile Web User Guide P a g e | 20
Figure 16
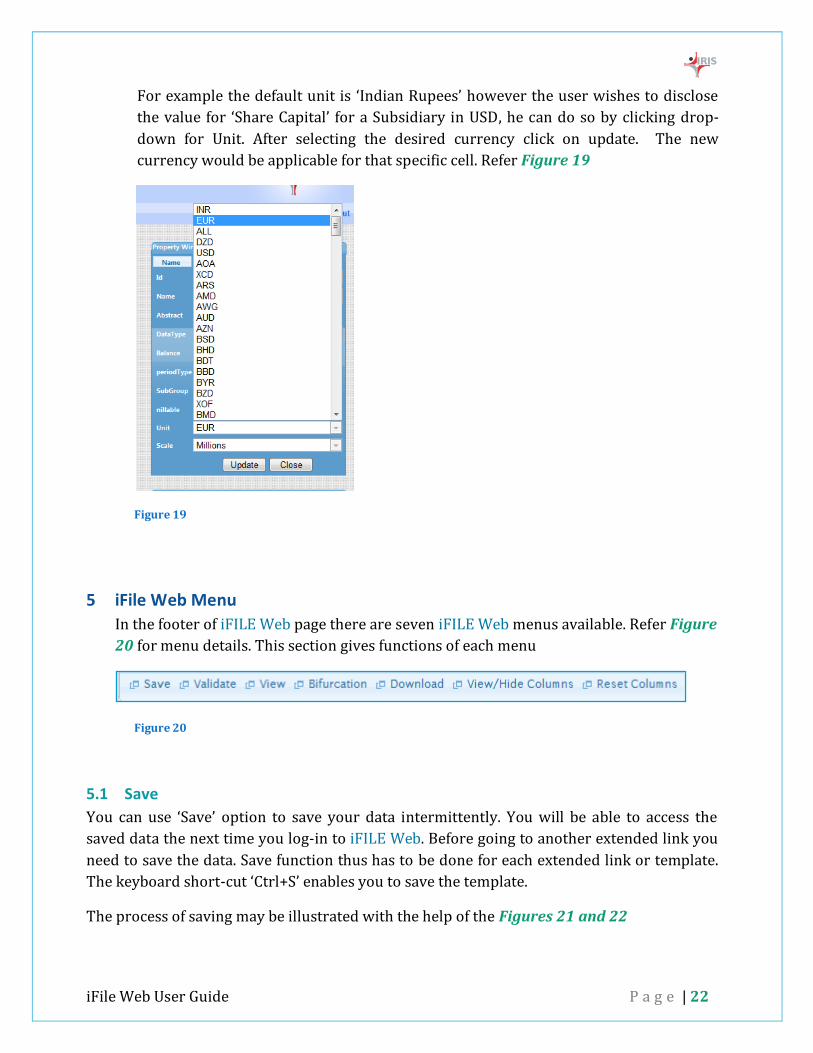
4.6 Property Window
If you click on an item in the financial statement a property window pops up at the right
hand side of the screen giving details of its XBRL properties namely
Name, ID, Type, Subgroup, Period Type, Balance, Abstract and Nillable
Refer Figure 17 for Property window
Figure 17
These fields are pre-populated from the taxonomy and cannot be modified. These
properties help in understanding the element in a better fashion.

iFile Web User Guide P a g e | 21
E.g. Type of the element will guide you in knowing the data type expected for the element
i.e. whether is numeric, string etc. Balance would tell you, if the monetary item normally
carries a debit or credit balance.
In the property window you can find further two options of numeric items
4.6.1 Change Scale
Default scale adopted in iFILE Web is the scale chosen by the user in the Set-up
details. In case of monetary and shares elements, an option is available with you to
change the scale for a particular cell in the Property Window.
For example the user has chosen the default scale to be ‘Crores’, however he wishes
to disclose value for ‘Impairment loss recognized in profit and loss’ for primary
segment in ‘lakhs’, he can do so by clicking the drop-down for Scale. You can choose
from the various options available under it and click on update. The new scale would
be applicable for that specific cell. Refer Figure 18
Figure 18
4.6.2 Change Unit
Default unit adopted by iFILE Web is the currency chosen by the user in the Set-up
details. In case of monetary and per share elements the there is an option available
with you to change the unit for a particular cell.
iFile Web User Guide P a g e | 22
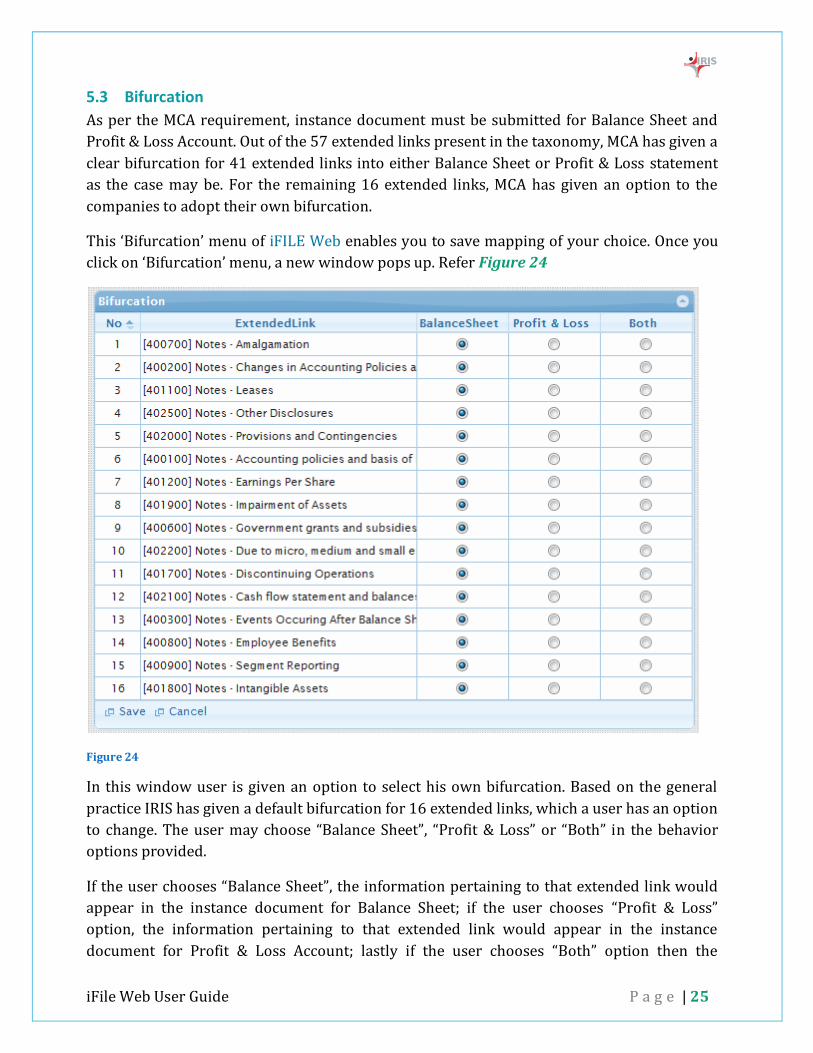
For example the default unit is ‘Indian Rupees’ however the user wishes to disclose
the value for ‘Share Capital’ for a Subsidiary in USD, he can do so by clicking drop-
down for Unit. After selecting the desired currency click on update. The new
currency would be applicable for that specific cell. Refer Figure 19
Figure 19
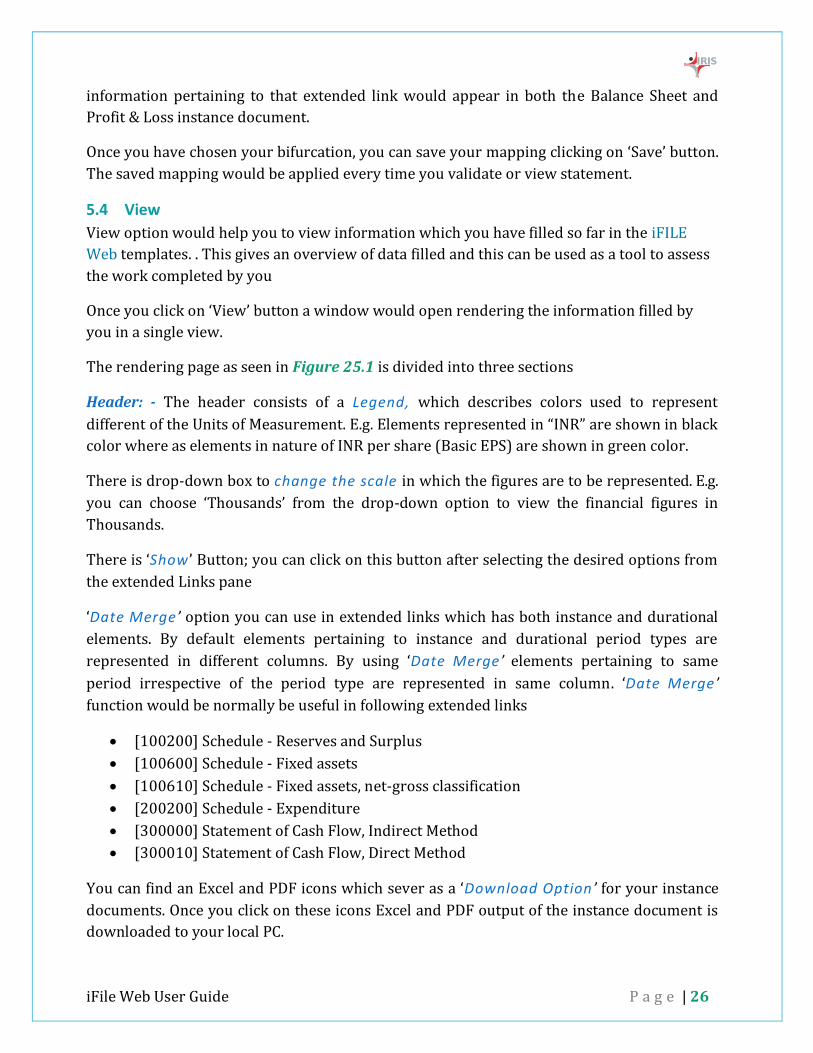
5 iFile Web Menu
In the footer of iFILE Web page there are seven iFILE Web menus available. Refer Figure
20 for menu details. This section gives functions of each menu
Figure 20
5.1 Save
You can use ‘Save’ option to save your data intermittently. You will be able to access the
saved data the next time you log-in to iFILE Web. Before going to another extended link you
need to save the data. Save function thus has to be done for each extended link or template.
The keyboard short-cut ‘Ctrl+S’ enables you to save the template.
The process of saving may be illustrated with the help of the Figures 21 and 22

iFile Web User Guide P a g e | 23
Figure 21
Figure 22
5.2 Validate
After you have filled all the templates the step would be to validate the instance document.
You can click on ‘Validate’ button available in the iFILE Web menu. Once you click on this
Data Saved
Saving
In Process

iFile Web User Guide P a g e | 24
option, the iFILE Web application runs all validation check pertaining to MCA business rules
and XBRL specifications. The keyboard short-cut ‘Ctrl+V’ enables you to save the template.
The validation results are shown in separate window of the browser. Refer Figure 23 for
validation results window.
Figure 23
In this page all the validation errors and warnings are listed. This Validation page would
comprise of three tabs MCA, FRIS and XBRL.
Under MCA tab you would find the errors pertaining due to non-compliance with MCA
business rules. Under FRIS tab you would find errors pertaining to deviation from “Financial
Reporting Instance Standards’ published by XBRL International Consortium. XBRL tab
would give you errors due to departure from XBRL 2.1 specifications.
There are two types of validation results which you would come across, ‘Error’ and
‘Warning’. Error indicates that the discrepancies have to be resolved to enable generating an
instance document. ‘Warning’ as the name suggest are in nature of warning, you have an
option to either solve them or ignore it.
Each Error or warning is accompanied by an error message which would guide you to solve
those errors. In most of the cases errors would pertain to an element. You need to go that
element in the iFILE Web template and input/edit data to resolve the errors.
iFile Web User Guide P a g e | 25
5.3 Bifurcation
As per the MCA requirement, instance document must be submitted for Balance Sheet and
Profit & Loss Account. Out of the 57 extended links present in the taxonomy, MCA has given a
clear bifurcation for 41 extended links into either Balance Sheet or Profit & Loss statement
as the case may be. For the remaining 16 extended links, MCA has given an option to the
companies to adopt their own bifurcation.
This ‘Bifurcation’ menu of iFILE Web enables you to save mapping of your choice. Once you
click on ‘Bifurcation’ menu, a new window pops up. Refer Figure 24
Figure 24
In this window user is given an option to select his own bifurcation. Based on the general
practice IRIS has given a default bifurcation for 16 extended links, which a user has an option
to change. The user may choose “Balance Sheet”, “Profit & Loss” or “Both” in the behavior
options provided.
If the user chooses “Balance Sheet”, the information pertaining to that extended link would
appear in the instance document for Balance Sheet; if the user chooses “Profit & Loss”
option, the information pertaining to that extended link would appear in the instance
document for Profit & Loss Account; lastly if the user chooses “Both” option then the
iFile Web User Guide P a g e | 26
information pertaining to that extended link would appear in both the Balance Sheet and
Profit & Loss instance document.
Once you have chosen your bifurcation, you can save your mapping clicking on ‘Save’ button.
The saved mapping would be applied every time you validate or view statement.
5.4 View
View option would help you to view information which you have filled so far in the iFILE
Web templates. . This gives an overview of data filled and this can be used as a tool to assess
the work completed by you
Once you click on ‘View’ button a window would open rendering the information filled by
you in a single view.
The rendering page as seen in Figure 25.1 is divided into three sections
Header: - The header consists of a Legend, which describes colors used to represent
different of the Units of Measurement. E.g. Elements represented in “INR” are shown in black
color where as elements in nature of INR per share (Basic EPS) are shown in green color.
There is drop-down box to change the scale in which the figures are to be represented. E.g.
you can choose ‘Thousands’ from the drop-down option to view the financial figures in
Thousands.
There is ‘Show ’ Button; you can click on this button after selecting the desired options from
the extended Links pane
‘Date Merge ’ option you can use in extended links which has both instance and durational
elements. By default elements pertaining to instance and durational period types are
represented in different columns. By using ‘Date Merge ’ elements pertaining to same
period irrespective of the period type are represented in same column. ‘Date Merge ’
function would be normally be useful in following extended links
[100200] Schedule - Reserves and Surplus
[100600] Schedule - Fixed assets
[100610] Schedule - Fixed assets, net-gross classification
[200200] Schedule - Expenditure
[300000] Statement of Cash Flow, Indirect Method
[300010] Statement of Cash Flow, Direct Method
You can find an Excel and PDF icons which sever as a ‘Download Option ’ for your instance
documents. Once you click on these icons Excel and PDF output of the instance document is
downloaded to your local PC.

iFile Web User Guide P a g e | 27
Extended Links: - The left pane in the web-page lays down all the extended links i.e.
groupings as defined in the Taxonomy and present in the instance document. Extended links
are used to group similar elements and define presentation. A check box is provided against
each extended link. You can select the extended links which you want to view and click on
the ‘Show ’ Button in the header.
Main Section: - This section renders the instance documents for the selected extended links.
The Main section is laid out in grid format. The first column consists of the label of the
element. Hierarchical view as per the presentation linkbase of the taxonomy is adapted to
render the elements. The hierarchical view helps in understanding the relationship amongst
the elements in a better fashion.
The last column in the grid represents the Element id as defined in the taxonomy. The
columns between the First and the Last Column in the grid represents the period which are
associated with the values in the instance document. E.g. Values given in the column 31st
March 2010 pertains value as on 31st March 2010.
Figure 25.1
XBRL Properties
On clicking any element in the first column a window would open–up as given in Figure
25.2. This window contains the XBRL properties of the element selected
Extended Links
Scale
Legend: Units of
measurement
Main Section
Date Merge
Download Options
iFile Web User Guide P a g e | 28
Figure 25.2
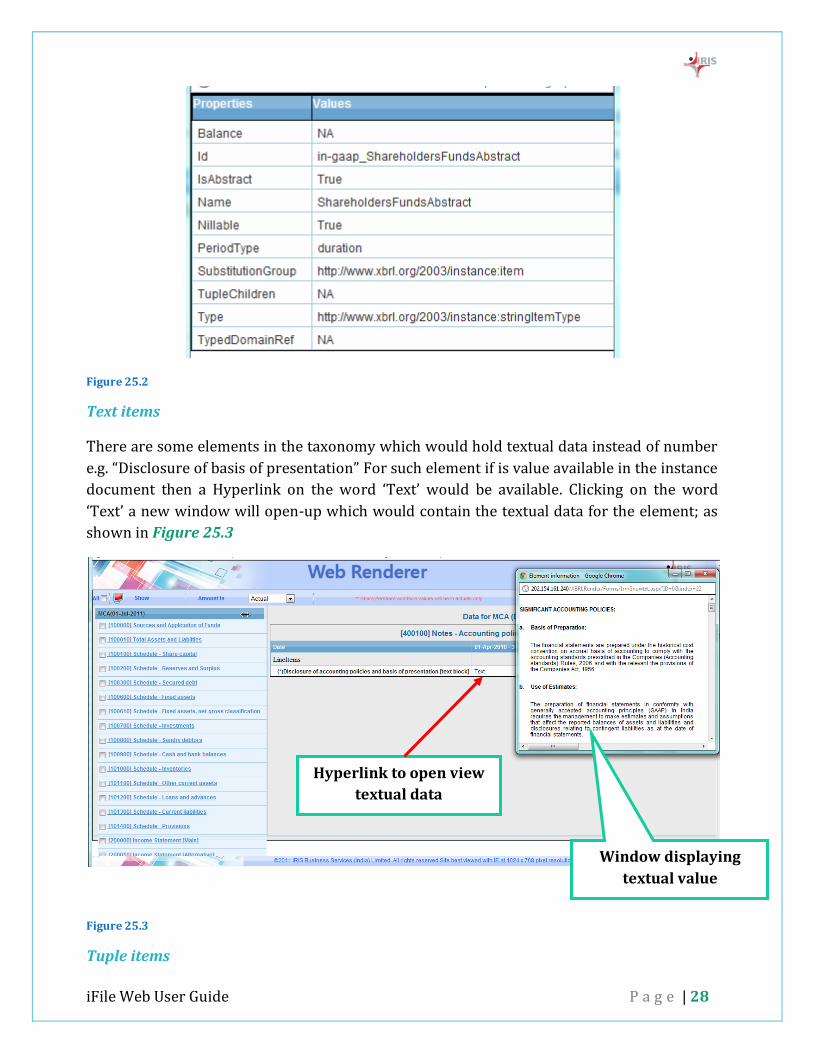
Text items
There are some elements in the taxonomy which would hold textual data instead of number
e.g. “Disclosure of basis of presentation” For such element if is value available in the instance
document then a Hyperlink on the word ‘Text’ would be available. Clicking on the word
‘Text’ a new window will open-up which would contain the textual data for the element; as
shown in Figure 25.3
Figure 25.3
Tuple items
Window displaying
textual value
Hyperlink to open view
textual data

iFile Web User Guide P a g e | 29
There are some elements in taxonomy whose value repeats for a given period. Such elements
are designed as tuple in the taxonomy. Examples of such elements are Director’s details,
Subsidiary information, related party disclosure etc. The rendering of tuple is done in a
tabular manner as shown in Figure 25.4. Each row in the tuple represents a unique set of
value. In Figure 25.4 the first row in the Director’s information pertains to details of the
Directors whose name is “Mr. Ramesh H. Thakkar”
Figure 25.4
Footnotes
Footnotes in XBRL are used for conveying additional information about a particular value.
Footnotes help user in understanding the value in better fashion. E.g. If instance creator
wants to give beak-up of ‘Hire purchase Installment Payable’ which comprises of ‘Due to
banks and Due to others’; then he can use footnotes to convey it.
If a value is assigned a footnote in the instance document then, there is an alphabet ‘F’ is
placed adjacent to the value. On clicking the alphabet a new window would open-up which
gives the footnote details as shown in Figure 25.5
Tuple Heading

iFile Web User Guide P a g e | 30
Figure 25.5
5.5 Download
This would be your last step in creation of instance document. This link would be enabled
only when all the errors of the validation are cleared. Once you click on this link the two
instance document Balance Sheet and Profit & Loss would be opened in a separate tab or
window of the browser.
Refer Figure 26 for instance document opened in the browser.
Figure 26
Window displaying
footnotes
Footnotes
Indicator

iFile Web User Guide P a g e | 31
5.6 View/Hide Columns
This option allows you to view or hide columns while entering values in the financial
statements. Upon clicking on the View/Hide Columns button a Select Columns dialogue box
pops up as shown in Figure 27. The columns to be hidden/viewed may be selected by
checking/unchecking the relevant check boxes.
Figure 27
5.7 Reset Columns
This option allows you to go back to the default column view. If in case you have deselected
some columns using ‘View/Hide Column’ option then this option would help you to revert
back to default/original settings of column view.