Embed Size (px)
Citation preview

folding bikezusammenklappbare fahrradbicicletta pieghevolebicyclette pliablezložljivo kolo
user manualgebrauchsanweisungenmanuale d’istruzionimode d’emploinavodila za uporabo

TABLE OF CONTENTS
IMPORTANT SAFETY WARNINGS ....................................................................................................................................5UNFOLDING AND FOLDING OF THE BIKE ....................................................................................................................10UNFOLDING ......................................................................................................................................................................14FOLDING ...........................................................................................................................................................................20TRANSPORT ....................................................................................................................................................................24MAINTENANCE ................................................................................................................................................................25
INHALTSVERZEICHNIS
WICHTIGE SICHERHEITSERMAHNUNGEN ....................................................................................................................6ZUSAMMENKLAPPEN UND AUSEINANDERKLAPPEN DES ZUSAMMENKLAPPBAREN FAHRRADES .................10DAS AUSEINANDERKLAPPEN .......................................................................................................................................14DAS ZUSAMMENKLAPPEN ............................................................................................................................................20TRANSPORTIEREN ..........................................................................................................................................................24WARTUNG .......................................................................................................................................................................25
INDICE
AVVERTENZE DI SICUREZZA ...........................................................................................................................................7APERTURA E CHIUSURA DELLA BICICLETTA PIEGHEVOLE .....................................................................................10APERTURA DELLA BICICLETTA PIEGHEVOLE .............................................................................................................14CHIUSURA DELLA BICICLETTA PIEGHEVOLE .............................................................................................................20TRASPORTO DELLA BICICLETTA PIEGHEVOLE ..........................................................................................................24MANUTENZIONE DELLA BICICLETTA PIEGHEVOLE ...................................................................................................25
INDEX
AVERTISSEMENTS DE SECURITE IMPORTANTS ...........................................................................................................8ASSEMBLAGE ET PLIAGE DE LA BICYCLETTE ...........................................................................................................10ASSEMBLAGE ..................................................................................................................................................................14PLIAGE ..............................................................................................................................................................................20TRANSPORT .....................................................................................................................................................................24ENTRETIEN .......................................................................................................................................................................25
KAZALO
POMEMBNA VARNOSTNA OPOZORILA .........................................................................................................................9SESTAVLJANJE IN ZLAGANJE ZLOŽLJIVEGA KOLESA ..............................................................................................10SESTAVLJANJE ................................................................................................................................................................14ZLAGANJE ........................................................................................................................................................................20PRENAŠANJE ...................................................................................................................................................................24VZDRŽEVANJE .................................................................................................................................................................25

IMPORTANT SAFETY WARNINGS
Read the User Manual and the important safety warnings regarding the use of the bike thoroughly.
Before using the Bigfish folding bike make sure you know the folding and assembly procedures. Be sure to follow the proper sequence of assembly or folding steps. The correct use of your folding bike is important for your safety.
Failure to follow instructions and improper maintenance can lead to physical injury and property damage.
During folding and assembly, be attentive so as to prevent injury. Avoid placing your arms, legs, any other body parts and clothing between the elements of the folding bike in a way not described in the instructions. Failure to do so can result in injury.
Small bikes have poor grip in slippery conditions, therefore be very careful when riding on wet surfaces and in rain. Also consider that the brakes may not perform as well in wet conditions.
Before each ride, check every lock and all the components to ensure they are properly set up. Make sure the safety cover (1)* and the frame hooks (2)* are properly set up, and that the seat height adjustment handle (7)* is facing downwards above the safety cover! Only a proper setting of these important elements ensures a completely safe ride with the Bigfish. Press the tyres to examine the air pressure. Also make sure the brakes are functioning properly (front brake on the left handlebar, rear brake on the pedal) and that the bike is in proper working condition, otherwise do not ride it.
Before riding the bike, also make sure it is not damaged in any way. Using (riding and transport) of a damagedfolding bike is not safe and can lead to physical injury and property damage. In case the bike is damaged or not fit for riding in any way, do not use it but contact an authorised repair shop.
A damaged folding bike is dangerous to ride or transport. By riding a damaged folding bike, you risk injury to yourself and the people around you.
The Bigfish is a folding bike designed and intended for city riding. It is not a mountain bike and is not fit for fastriding on rough terrain or jumping. The manufacturer cannot be held responsible for any injury or damage caused by improper, extreme usage of the bike.
The manufacturer cannot be held responsible for injury or damage caused by improper use of the folding bike or the use of a damaged bike. The manufacturer also cannot be held responsible for damage or injury resulting from an improperly executed folding procedure.
We recommend that children under the age of ten do not ride the folding bike.
If you have bought the bike for your child, review the User Manual with him or her and make sure that he or she will be able to use the bike properly.If you intend to lend the bike to someone, make sure he or she is familiar with the instructions in this manual and knows how to use the bike properly.
Follow traffic rules and regulation. Use front and rear lights when riding at night.
Do not ride with a passenger and avoid carrying heavy loads on the Bigfish folding bike.
The maximum permitted weight of the rider and any luggage is 110 kg.
Regularly service your folding bike and carry out repairs only at authorised repair shops. Details on maintenance can be found in the attached General Instructions.
UK
* For an overview of the components of the bike see page 11 - 12.5

UNFOLDING AND FOLDING OF THE BIKEThe Bigfish can be folded and unfolded in a matter of seconds, without the use of any tools and getting your hands dirty. Only the proper way of folding and unfolding, as shown in this manual, ensure a safe and effective use of your folding bike. All other ways of folding and unfolding are incorrect and can lead to physical injury and property damage.
Before using the Bigfish folding bike, make sure you know the complete folding and unfolding procedures. Be sure to follow the right sequence of folding orunfolding steps. The proper way of handling the bike is important for your safety. With a bit of practice you will be able to fold and unfold it within seconds.
During folding and unfolding, be attentive so as to prevent injury. Avoid placing your arms, legs, any other body part and clothing between the components of the folding bike in a way not described in theinstructions. Failure to do so can result in injury.
ZUSAMMENKLAPPEN UND AUSEINANDERKLAP-PEN DES ZUSAMMENKLAPPBAREN FAHRRADESDas zusammenklappbare Fahrrad Bigfish wird in nur einigen Sekunden zusammengeklappt und auseinan-dergeklappt, ohne Verwendung von Werkzeug und ohne schmutzige Hände. Nur das Zusammenklappen und Auseinanderklappen, wie in diesem Handbuch beschrieben, gewährleistet eine effektive und sichere Verwendung Ihres zusammenklappbaren Fahrrades. Alle anderen Arten des Zusammenklappens und Auseinanderklappens sind nicht passend und können Körper- und Materialschäden verursachen.
Vor der Verwendung des klappbaren Fahrrades überzeugen Sie sich, dass Sie das gesamte Verfahren des Zusammenklappens und Auseinanderklappens beherrschen. Seien Sie aufmerksam und folgen Sie der korrekten Schrittfolge des Zusammenklappens bzw. Auseinanderklappens. Die richtige Verwendung Ihres zusammenklappbaren Fahrrades ist von großer Bedeutung für Ihre Sicherheit. Mit etwas Übung lernen Sie das Fahrrad in nur wenigen Sekunden zusammen-zuklappen und wieder auseinanderzuklappen.
Während des Zusammenklappens und Auseinanderk-lappen des Fahrrades seien sie aufmerksam, um sich nicht zu verletzen. Meiden sie das Einschieben Ihrer Hände/Arme oder Füße/Beine oder anderer Kör-perteile und Kleidungsstücke zwischen die Teile des Klappbaren Fahrrades auf eine Art, die nicht in den Anweisungen beschrieben ist. Im Gegenfall können sie sich verletzten.
APERTURA E CHIUSURA DELLA BICICLETTA PIEGHEVOLELa bicicletta pieghevole Bigfish si apre e chiude in pochi secondi, senza l’utilizzo di attrezzi e senza sporcarsi le mani. Soltanto le operazioni di apertura e di chiusura il-lustrate nel presente manuale assicurano un utilizzo sicuro ed efficace della bicicletta pieghevole. Ogni altra operazione di chiusura o di apertura non è idonea e può provocare lesioni all’utilizzatore e danni materiali.
UK
DE
Prima dell’utilizzo della bicicletta pieghevole Bigfish accertarsi di aver compreso l’intera procedura di chiusura e apertura. Prestare massima attenzione alla successione delle operazioni di apertura e chiusura della bicicletta. Il corretto utilizzo della bicicletta pieghevole è fondamentale per la sicurezza personale. Con un po’ di pratica sarà possibile chiudere ed aprire nuovamente la bicicletta pieghevole in pochi secondi.
Durante l’apertura edla chiusura della bicicletta pre-stare attenzione a non incorrere nel rischio di lesioni. Evitare di infilare mani, piedi, altre parti del corpo o indumenti tra i componenti della bicicletta pieghevole con modalità non descritte nel presente manuale. In caso contrario, si corre il rischio di procurarsi lesioni.
ASSEMBLAGE ET PLIAGE DE LA BICYCLETTE La bicyclette pliable Bigfish se plie et s’assemble en quelques secondes, sans l’utilisation d’outils et sans se salir les mains. L’assemblage et le pliage comme dans le manuel d’instructions, assure une utilisation sûre et effective de votre bicyclette pliable. Toutes les autres méthodes de pliage et d’assemblage ne sont pas recommandées et peuvent provoquer des bles-sures physiques et des dommages matériels.
Avant l’utilisation de la bicyclette pliable Bigfish, as-surez-vous de bien connaître la procédure complète de pliage et d’assemblage de la bicyclette. Suivre attentivement les étapes de pliage et d’assemblage. L’utilisation correcte de votre bicyclette pliable est im-portante pour votre sécurité. Avec un peu de pratique, vous pourrez plier ou assembler votre bicyclette en quelques secondes.
Veuillez faire attention de ne pas vous blesser pendant l’assemblage et le pliage de la bicyclette. Éviter de mettre les mains, les jambes ou d’autres parties du corps, ou les vêtements, entre les parties pliantes de la bicyclette d’une façon qui n’est pas décrite dans les instructions. Procéder d’une autre façon peut entraîner des blessures.
SESTAVLJANJE IN ZLAGANJE ZLOŽLJIVEGA KOLESAZložljivo kolo Bigfish se zloži in sestavi v le nekaj sekundah, brez uporabe orodja in umazanih rok. Le sestavljanje in zlaganje na način, kot je prikazan v tem priročniku, zagotavlja učinkovito in varno uporabo vašega zložljivega kolesa. Vsi ostali načini zlaganja in sestavljanja niso ustrezni in lahko povzročijo fizične poškodbe in materialno škodo.
Pred uporabo zložljivega kolesa Bigfish se prepričajte, da obvladate celoten postopek zlaganja in sestav-ljanja kolesa. Bodite pozorni, da sledite pravilnemu zaporedju korakov sestavljanja oz. zlaganja. Pravilna uporaba vašega zložljivega kolesa je pomembna za vašo varnost. Z malo vaje boste zložljivo kolo lahko zložili in spet sestavili v le nekaj sekundah.
Med sestavljanjem in zlaganjem kolesa bodite pozorni, da se ne boste poškodovali. Izogibajte se vtikanju svojih rok in nog ter drugih delov telesa in oblačil med dele zložljivega kolesa na način, ki ni opisan v navodi-lih. V nasprotnem primeru se lahko poškodujete.
IT
FR
SI
10

UK
DE
IT
FR
SI
IMPORTANT! When folding or unfolding, pay particular attention to the following components of the foldingbike:
WICHTIG! Seien Sie beim Zusammenklappen und Auseinanderklappen besonders aufmerksam auf folgende wich-tige Bestandteile des zusammenklappbaren Fahrrades:
ATTENZIONE! Durante la chiusura e la apertura prestare particolare attenzione ai seguenti componenti importanti della bicicletta pieghevole:
IMPORTANT! Pendant le pliage et l’assemblage, porter une attention particulière à ces importantes pièces d’assemblage de la bicyclette pliable:
POMEMBNO! Pri zlaganju in sestavljanju bodite še posebej pozorni na naslednje pomembne sestavne dele zložljivega kolesa:
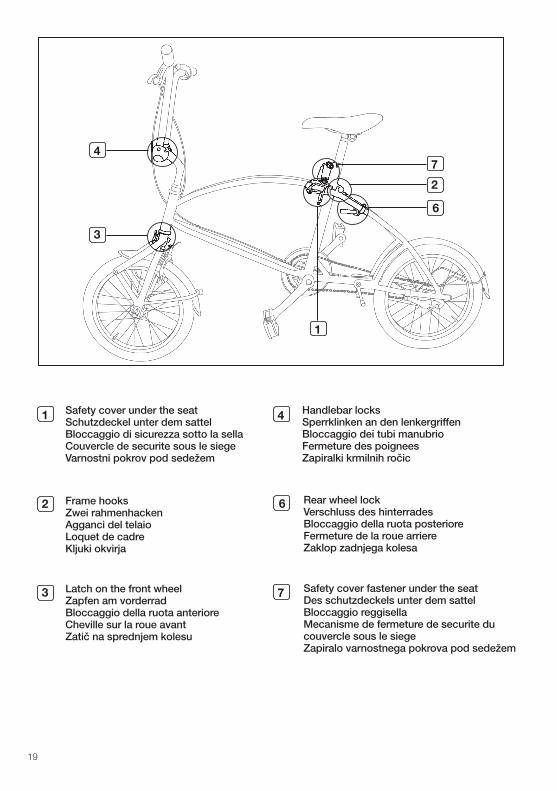
� Safety cover under the seat� Schutzdeckel unter dem sattel� Bloccaggio di sicurezza sotto la sella� Couvercle de securite sous le siege� Varnostni pokrov pod sedežem
� Frame hooks� Zwei rahmenhacken� Agganci del telaio� Loquet de cadre� Kljuki okvirja
� Latch on the front wheel� Zapfen am vorderrad� Bloccaggio della ruota anteriore� Cheville sur la roue avant� Zatič na sprednjem kolesu
� Handlebar locks� Sperrklinken an den lenkergriffen� Bloccaggio dei tubi manubrio� Fermeture des poignees� Zapiralki krmilnih ročic
1
2
3
4
11

� Plastic safety fastener on the handlebars� Kunststoff-sicherheitsverschluss am lenker� Stabilizzatore del manubrio� Fermeture de securite en plastique du guidon� Plastično varnostno zapiralo na krmilu
� Rear wheel lock � Verschluss des hinterrades� Bloccaggio della ruota posteriore� Fermeture de la roue arriere� Zaklop zadnjega kolesa
� Safety cover fastener under the seat� Des schutzdeckels unter dem sattel� Bloccaggio reggisella� Mecanisme de fermeture de securite du couvercle sous le siege� Zapiralo varnostnega pokrova pod sedežem
You will receive the Bigfish folded upon purchase. Follow the unfolding instructions, unfold the bike and prepare it for the road. Folding and unfolding do not require any tools; make sure you follow instructions when performing both.
Beim Einkauf erhalten Sie das Bigfish Fahrrad im zusammengeklappten Zustand. Beachten Sie die Anweisungen des Auseinanderklappens, klappen sie das Fahrrad auseinander und bereiten Sie es für die Fahrt. Für das Ausein-anderklappen und Zusammenklappen benötigen Sie kein Werkzeug. Folgen Sie beim Auseinanderklappen und Zusammenklappen den Anweisungen.
Al momento dell’acquisto la bicicletta Bigfish si presenterà ripiegata. Attenersi alle istruzioni per l’apertura. Aprire labicicletta e prepararla per la guida. Per l’apertura e la chiusura non sono necessari attrezzi. Per l’apertura e la chiu-sura attenersi alle istruzioni.
A l’achat, vous obtenez la bicyclette Bigfish pliée. Respecter les instructions pour l’assemblage, assembler labicyclette et préparer-la pour la conduite. L’utilisation d’outils n’est pas nécessaire pour l’assemblage et le pliage. Pour l’assemblage et le pliage, veuillez suivre les instructions.
Ob nakupu prejmete kolo Bigfish zloženo. Upoštevajte navodila za sestavljanje, kolo sestavite in ga pripravite zavožnjo. Za sestavljanje in zlaganje ne potrebujete orodja. Pri sestavljanju in zlaganju sledite navodilom.
5
6
7
UK
DE
IT
FR
SI
12

13
Rear wheel lock Verschluss des hinterradesBloccaggio della ruota posterioreFermeture de la roue arriereZaklop zadnjega kolesa
Safety cover fastener under the seatDes schutzdeckels unter dem sattelBloccaggio reggisellaMecanisme de fermeture de securite ducouvercle sous le siegeZapiralo varnostnega pokrova pod sedežem
Safety cover under the seatSchutzdeckel unter dem sattelBloccaggio di sicurezza sotto la sellaCouvercle de securite sous le siegeVarnostni pokrov pod sedežem
Frame hooksZwei rahmenhackenAgganci del telaioLoquet de cadreKljuki okvirja
Latch on the front wheelZapfen am vorderradBloccaggio della ruota anterioreCheville sur la roue avantZatič na sprednjem kolesu
Handlebar locksSperrklinken an den lenkergriffenBloccaggio dei tubi manubrioFermeture des poigneesZapiralki krmilnih ročic
1
2
3
4
6
7
1
23
4
6
7

UNFOLDING DAS AUSEINANDERKLAPPEN APERTURA DELLA BICICLETTA PIEGHEVOLEASSEMBLAGE SESTAVLJANJE
Step 1: Unfold the handlebarSchritt 1: Klappen Sie die Lenkstange auseinanderFase 1: Posizionamento del manubrioÉtape 1: Assemblage du guidonKorak 1: Sestavite krmilo
Stand on the bike’s left side (no chain on this side). Raise the handlebars to the riding position so that the two locks (4) are firmly closed.
Stellen Sie sich an die linke Seite des Fahrrades (auf die kettenlose Seite). Heben Sie beide Lenkergriffe in die Fahrtrichtung, so dass sich dieSperrklingen (4) gut schließen.
Posizionarsi sul lato sinistro della bicicletta (lato in cui non è presente la cat-ena). Alzare i tubi del manubrio in posizione di guida in modo che i bloccaggi dei tubi (4) si chiudano bene.
Placez-vous sur le côté gauche de la bicyclette (côté qui n’a pas de chaîne). Soulever le manche du guidon en position de conduite, de façon à ce que le système de fermeture (4) se ferme bien.
Postavite se na levo stran kolesa (stran, kjer ni verige). Krmilni ročici dvignite v položaj vožnje tako, da se zapiralki (4) dobro zapreta.
UK
DE
IT
FR
SI
Press both parts of the plastic safety fastener (5) together so that the fastener clasps both handles. The fastener ensures the rigidity of the handlebar.
Beide Teile des Kunststoff-Sicherheitsverschlusses (5) zusammendrucken, so dass der Verschluss beide Lenkergriffe umklammert. Der Sicherheitsverschluss sichert die Steifheit des Lenkers.
Accoppiare tra loro le due parti dello stabilizzatore del manubrio (5) in modo che racchiuda entrambi i tubi del manubrio. Lo stabilizzatore del manubrio garantisce la rigidità del manubrio stesso.
Serrer les deux parties en plastique de la fermeture de sécurité (5) de façon à ce qu’elle ferme les deux manches du guidon. La fermeture de sécurité assure la rigidité du guidon.
Oba dela plastičnega varnostnega zapirala (5) stisnite skupaj tako, da zapiralo objame obe krmilni ročici. Varnostno zapiralo zagotavlja togost krmila.
UK
DE
IT
FR
SI
Make sure that the locks (4) are properly set by pressing them downward.
Mit dem Drücken der Sperrklinken (4) nach unten versichern Sie sich, dass beide Sperrklinken gut verschlossen sind.
Spingere le levette del bloccaggio dei tubi (4) verso il basso per verificarne la corretta chiusura.
En pressant la fermeture (4) vers le bas, assurez-vous que touts les ouvertures sont fermees.
S pritiskom zapiralk (4) navzdol se prepričajte, da sta zapiralki dobro zaprti.
UK
DE
IT
FR
SI14

Step 2: Unfold the front wheelSchritt 2: Klappen das Vorderrad auseinander Fase 2: Posizionamento della ruota anterioreÉtape 2: Assemblage de la roue avantKorak 2: Sestavite sprednje kolo
Hold the handlebar and by pressing the bolt cap in the wheel hub with your foot release the front wheel from the hold of the frame.
Fassen Sie den Lenker an und lösen Sie das Vorderrad aus der Einspannung des Rahmens heraus, indem Sie mit dem Fuß an die Schraubenkappe in der Achse des Fahrrades drucken.
Afferrare il manubrio e con la pressione del piede sulla testa della vite sull’asse della ruota spingere la ruota anteriore fuori dall’alloggiamento tra i due tubi obliqui del telaio.
Tenir le guidon et appuyer avec le pied sur la tête de vis de l’essieu de la bicy-clette et pousser la roue avant maintenue par le cadre.
Primite krmilo in s potiskom stopala na kapico vijaka v osi kolesa potisnite sprednje kolo iz primeža okvirja.
UK
DE
IT
FR
SI
Leverage the bike so that the front wheel latch snaps into place.
Unterschlagen Sie das Rad so, dass der Zapfen am Vorderrad einrastet.
Ruotare la ruota e far scattare il bloccaggio della ruota anteriore.
Ajuster la roue de telle façon à ce que la cheville de la roue avant s’enclenche.
Kolo spodvijte tako, da se zatič na sprednjem kolesu zaskoči.
UK
DE
IT
FR
SI
Turn the handlebar clockwise (where there are no cables) and set the front wheel into riding position.
Wenden Sie die Lenkstange in Uhrzeigerrichtung (in die Richtung ohne Stahl-gabeln) und stellen Sie das Vorderrad in die Fahrtposition.
Ruotare il manubrio in senso orario (senso in cui non sono presenti guaine e cavi) e posizionare la ruota anteriore in posizione di guida.
Tourner le guidon dans le sens des aiguilles d’une montre (sens qui n’a pas de câbles de vitesse) et mettre la roue avant en position de conduite.
Krmilo obrnite v smeri urinega kazalca (smer, kjer ni jeklenih pletenic) in postavite sprednje kolo v položaj vožnje.
UK
DE
IT
FR
SI
Attention! Be careful to turn the handlebar and the wheel in the right direction to release the gear and brake cables and not tighten them!
Achtung! Seine Sie vorsichtig die Lenkung und das Rad in die richtige Richtung zu drehen, so dass beide Stahlga-beln für die Schaltungen und Bremsen loser werden und nicht angespannter.
Attenzione! Prestare attenzione a ruotare il manubrio e la ruota nel verso corretto in modo chele guaine ed i cavi del cambio e dei freni siano liberi e non si tendano ulteriormente.
UK
DE
IT
15

Step 3: Unfold the rear wheelSchritt 3: Klappen Sie das Hinterrad auseinander Fase 3: Posizionamento della ruota posterioreÉtape 3: Assemblage de la roue arrièreKorak 3: Sestavite zadnje kolo
Hold the handlebar with your left hand, using the right hand to release the rear wheel lock (6) and pull it up toward the seat with a firm thrust. Be careful not to hurt your fingers in contact with the safety cover (1).
Greifen Sie mit Ihrer linken Hand die Lenkung, lösen Sie mir Ihrer rechten Hand den Verschluss des Hinterrades (6) und ziehen Sie es mit einem starken Schwung nach oben, in die Richtung des Sattels. Seien Sie dabei vorsichtig, sich beim Kontakt mit dem Schutzdeckel (1), die Finger nicht zu verletzen.
Afferrare con la mano sinistra il manubrio e con la destra liberare il bloccaggio della ruota posteriore (6); con un colpo secco, tirarlo verso l’alto in direzione della sella. Durante questa operazione, fare attenzione a non procurarsi lesioni alle dita; non metterle a contatto con il bloccaggio di sicurezza sotto la sella (1).
Avec la main gauche prendre le guidon et avec la main droite, relâcher la fermeture de la roue arrière (6) et la tirer d’un coup en haut, vers le siège. En faisant cela, faire attention de ne pas se blesser les doigts au contact du couvercle de sécurité (1).
Z levo roko primite krmilo, z desno roko pa sprostite zaklop zadnjega kolesa (6) in ga z močnim sunkom povlecite navzgor proti sedežu. Pri tem pazite, da ne poškodujete prstov ob stiku z varnostnim pokrovom (1).
UK
DE
IT
FR
SI
Make sure the frame hooks (2) snap properly into place under the seat, as shown in figure. Make sure the safety cover (1) envelops the frame properly! Always make sure the frame hooks (2) and the safety cover (1) are properly assembled.
Seien Sie aufmerksam, dass sich beide Rahmenhaken (2) richtig unter dem Sattel einklemmen, wie auf dem Bild dargestellt. Seien Sie vorsichtig, dass der Schutzdeckel (1) richtig den Rahmen umklemmt! Überzeugen sie sich immer davon, dass beide Rahmenhacken (2) und der Schutzdeckel (1) richtig zusam-mengesetzt sind.
Prestare attenzione agli agganci del telaio (2) che devono agganciarsi cor-rettamente sotto la sella come illustrato nella figura. Prestare attenzione al bloccaggio di sicurezza sotto la sella(1) che deve agganciare correttamente il telaio. Verificare sempre il corretto posizionamento degli agganci del telaio (2) e del bloccaggio di sicurezza sotto la sella (1).
Attention à ce que le loquet du cadre (2) s’enclenche sous le siège, comme indiqué dans l’illustration. Faire attention à ce que le couvercle de sécurité (1) tienne le cadre ! Veuillez toujours vous assurer à ce que la cheville du cadre (2) et le couvercle de sécurité (1) soient assemblées correctement.
Bodite pozorni, da se kljuki okvirja (2) pravilno zaskočita pod sedežem, kot je to prikazano na sliki. Pazite, da varnostni pokrov (1) pravilno objame okvir! Vedno se prepričajte, da sta kljuki okvirja (2) in varnostni pokrov (1) pravilno sestavljena.
DE
IT
FR
SI
UK
16
Attention! Faire attention à ce que vous tourniez le guidon et la bicyclette dans la bonne direction, pour que les câbles de vitesse en acier et les freins se relâchent au lieu d’avantage se resserrer plus!
Pozor! Bodite pozorni, da zavrtite krmilo in kolo v pravo smer, da se jekleni pletenici prestav in zavor sprostita in ne še bolj zategneta!
FR
SI

Step 4: Set up the seatSchritt 4: Stellen Sie den Sattel ein Fase 4: Posizionamento della sellaÉtape 4: Réglage du siègeKorak 4: Nastavite sedež
Extend the seat from the post and find the position that fits your height. Make sure you do not extend the seat beyond the safety line indicated on the seat post.
Ziehen sie die Sitzstütze bis zum Punkt, der Ihrer Körpergröße entspricht, heraus. Seien Sie dabei vorsichtig, den Sitz nicht über die Schutzlinie, die an der Sitzstütze eingezeichnet ist, herauszuziehen.
Estrarre il cannotto della sella fino a raggiungere il punto più adatto alla propria altezza. Prestare attenzione a non estrarre il cannotto della sella oltre la linea di sicurezza indicata sul cannotto stesso.
Relever le siège au point qui convient pour votre grandeur. Soyez prudents à ce que la tige ne soit retirée au delà de la ligne de sécurité, dessiné sur la tige de selle.
Izvlecite sedežno oporo do točke, ki ustreza vaši višini. Pri tem bodite pozorni, da sedeža ne izvlečete preko varnostne črte, zarisane na sedežni opori.
UK
DE
IT
FR
SI
Fasten the seat height adjustment handle (7) so that it is in fastened position vertically above the safety cover (1). The handle serves as a lock of the safety cover under the seat and ensures a safe ride.
Befestigen Sie den Einstellungshebel für die Sitzhöhe (7) so, dass er in dem zugezogenen Zustand vertikal über dem Schutzdeckel (1) liegt. Der Hebel dient als Verschluss des Schutzdeckels über den Sattel und gewährleistet eine sichere Fahrt.
Fissare l bloccaggio reggisella (7) in modo che la leva sia tesa e posizionata verticalmente sopra il bloccaggio di sicurezza sotto la sella (1). Il bloccaggio reggisella funge da chiusura del bloccaggio di sicurezza sotto la sella edassicura una guida sicura.
10 serrer le manche pour le réglage de la hauteur du siège (7) de façon à ce qu’en position fixe, il soit au-dessus du couvercle de sécurité (1). Le manche sert de fermeture au couvercle de sécurité au-dessus du siège et assure une conduite en pleine sécurité.
Pritrdite ročico za nastavitev višine sedeža (7) tako, da je v zategnjenem položaju navpično nad varnostnim pokrovom (1). Ročica služi kot zapiralo varnostnega pokrova pod sedežem in zagotavlja varno vožnjo.
UK
DE
IT
FR
SI
Attention! Make sure that the handle (7) is properly set – turned vertically towards the safety cover (1), because this is the only way it prevents the safety cover from opening by itself.If you cannot position the handle vertically above the safety cover, this can mean:a) that the safety cover is not properly assembled orb) that the handle screw is fastened too tightly.
Achtung! Vergewissern Sie sich, dass der Hebel (7) richtig angebracht ist – vertikal über den Schutzdeckel (1), denn nur auf die Art kann er ein selbständiges Öffnen des Deckels verhindern.Falls Sie es nicht schaffen, den Hebel vertikal über den Schutzdeckel einzustellen, kann das folgendes bedeuten:a) der Schutzdeckel wurde nicht richtig zusammengesetzt oderb) die Schraube des Hebels wurde zu stark angezogen.
Attenzione! Verificare il corretto posizionamento della bloccaggio reggisella (7) che deve essere in posizione verticale sopra il bloccaggio di sicurezza sotto la sella (1) per impedire a quest’ultimo di aprirsi inavvertitamente!Se la leva del bloccaggio reggisella non può essere posizionata verticalmente sopra il bloccaggio di sicurezza sottola sella, ciò può indicare che:a) il bloccaggio di sicurezza sotto la sella non è posizionato correttamente; oppure b) la vite del bloccaggio reggisella è avvitata eccessivamente.
UK
DE
IT
17

Attention! S’assurer que le manche (7) soit bien placé - verticalement au couvercle de sécurité (1), car le couvercle de sécurité (1) ne peut pas s’ouvrir seulement dans cette position !Si vous ne pouvez pas placer le manche verticalement au couvercle de sécurité, cela veut dire :a) que le couvercle de sécurité n’est pas correctement assemblé oub) que la vis du manche est trop serrée.
Pozor! Prepričajte se, da je ročica (7) pravilno nameščena - navpično nad varnostni pokrov (1), saj le tako onemogoči, da se varnostni pokrov samodejno odpre!Če ročice ne morete namestiti navpično nad varnostni pokrov, lahko to pomeni:a) da varnostni pokrov ni pravilno sestavljen alib) da je vijak ročice preveč pritrjen.
FR
SI
Set the pedals to riding position.The Bigfish folding bike is now assembled and ready to ride.
Stellen Sie die Pedale in die Fahrtposition. Das zusammenklappbare Fahrrad Bigfish ist nun auseinandergeklappt und für die Fahrt einsatzbereit.
Posizionare i pedali in posizione di guida. La bicicletta pieghevole Bigfish è montata e pronta per la guida.
Placer les pédales en position de conduite.La bicyclette pliable Bigfish est ainsi assemblée et prête à la conduite.
Pedali postavite v položaj za vožnjo . Zložljivo kolo Bigfish je tako sestavljeno in pripravljeno na vožnjo.
UK
DE
IT
FR
SI
Attention! Before riding, make sure the Bigfish is properly assembled and that all the locks, latches and elements are properly set, otherwise do not use the bike!
Achtung! Vergewissern Sie sich vor jeder Fahrt, dass Bigfish korrekt auseinandergeklappt ist und dass sich alle Ver-schlüsse und wichtigen Bestandteile in ihrer richtigen Position befinden. Im Gegenfall benutzen Sie das Fahrrad nicht!
Attenzione! Prima di ogni utilizzo verificare che la bicicletta Bigfish sia montata correttamente e che tutti i dispositivi di fissaggio ed i componenti fondamentali siano posizionati correttamente. In caso contrario, non utilizzare la bici-cletta!
Attention! Avant chaque conduite, assurez-vous que la bicyclette Bigfish est correctement assemblée et que toutes les fermetures et les pièces d’assemblage importantes sont à leur place. Dans le cas contraire, ne pas utiliser la bicyclette!
Pozor! Pred vsako vožnjo se prepričajte, da je Bigfish pravilno sestavljen in da so vsi zaklopi in pomembni sestavni deli na svojem mestu. V nasprotnem primeru kolesa ne uporabljajte!
UK
DE
IT
FR
SI
18
19
Rear wheel lock Verschluss des hinterradesBloccaggio della ruota posterioreFermeture de la roue arriereZaklop zadnjega kolesa
Safety cover fastener under the seatDes schutzdeckels unter dem sattelBloccaggio reggisellaMecanisme de fermeture de securite ducouvercle sous le siegeZapiralo varnostnega pokrova pod sedežem
Safety cover under the seatSchutzdeckel unter dem sattelBloccaggio di sicurezza sotto la sellaCouvercle de securite sous le siegeVarnostni pokrov pod sedežem
Frame hooksZwei rahmenhackenAgganci del telaioLoquet de cadreKljuki okvirja
Latch on the front wheelZapfen am vorderradBloccaggio della ruota anterioreCheville sur la roue avantZatič na sprednjem kolesu
Handlebar locksSperrklinken an den lenkergriffenBloccaggio dei tubi manubrioFermeture des poigneesZapiralki krmilnih ročic
1
2
3
4
6
7
1
2
6
7
3
4
FOLDING DAS ZUSAMMENKLAPPEN CHIUSURA DELLA BICICLETTA PIEGHEVOLEPLIAGE ZLAGANJE
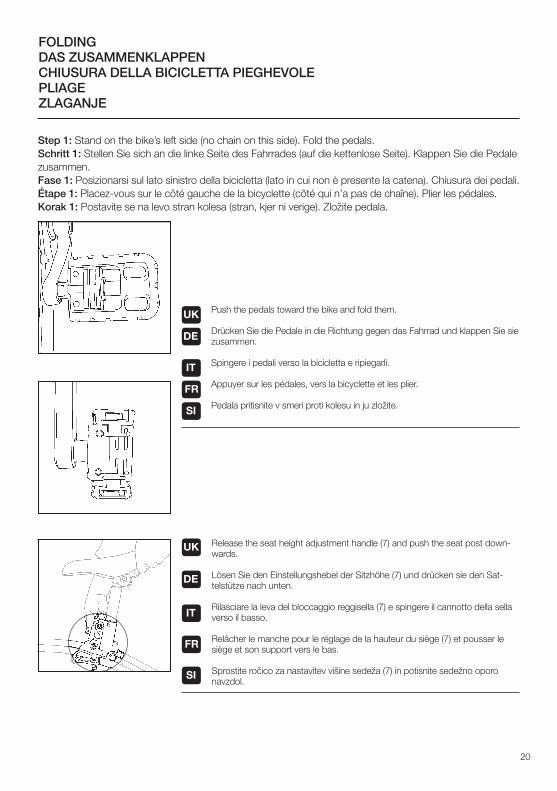
Step 1: Stand on the bike’s left side (no chain on this side). Fold the pedals.Schritt 1: Stellen Sie sich an die linke Seite des Fahrrades (auf die kettenlose Seite). Klappen Sie die Pedale zusammen.Fase 1: Posizionarsi sul lato sinistro della bicicletta (lato in cui non è presente la catena). Chiusura dei pedali.Étape 1: Placez-vous sur le côté gauche de la bicyclette (côté qui n’a pas de chaîne). Plier les pédales.Korak 1: Postavite se na levo stran kolesa (stran, kjer ni verige). Zložite pedala.
Release the seat height adjustment handle (7) and push the seat post down-wards.
Lösen Sie den Einstellungshebel der Sitzhöhe (7) und drücken sie den Sat-telstütze nach unten.
Rilasciare la leva del bloccaggio reggisella (7) e spingere il cannotto della sella verso il basso.
Relâcher le manche pour le réglage de la hauteur du siège (7) et pousser le siège et son support vers le bas.
Sprostite ročico za nastavitev višine sedeža (7) in potisnite sedežno oporo navzdol.
UK
DE
IT
FR
SI
Push the pedals toward the bike and fold them.
Drücken Sie die Pedale in die Richtung gegen das Fahrrad und klappen Sie sie zusammen.
Spingere i pedali verso la bicicletta e ripiegarli.
Appuyer sur les pédales, vers la bicyclette et les plier.
Pedala pritisnite v smeri proti kolesu in ju zložite.
UK
DE
IT
FR
SI
20

Hold the handlebar with one hand, using the other to lift the safety cover (1) holder. The rear part of the frame folds automatically.
Mit einer Hand greifen Sie an den Lenker, mit der rechten Hand heben Sie die Stütze des Schutzdeckels (1). Der hintere Teil des Rahmens wird automatisch zusammengeklappt.
Afferrare con la mano sinistra il manubrio e con la mano destra sollevare il gan-cio del bloccaggio di sicurezza sotto la sella (1). La parte posteriore del telaio si ripiega automaticamente.
Avec une main, prenez le guidon et avec la main droite, soulever la poignée du couvercle de sécurité (1). La dernière partie du cadre se plie automatiquement.
Z eno roko primite krmilo, z desno roko pa dvignite držalo varnostnega pokrova (1). Zadnji del okvirja se avtomatično zloži.
UK
DE
IT
FR
SI
Attention! If the rear part of the frame does not fold, lift the safety cover (1), so that you also lift the rear wheel from the ground, and then put the rear wheel to the ground with a slight thrust.
Achtung! Falls der hintere Teil des Rahmens nicht zusammenklappt, heben Sie den Schutzdeckel (1), indem Sie gleichzeitig das Hinterrad anheben, anschließend lassen Sie das Hinterrad mit einem heftigen Stoss den Boden berühren.
Attenzione! Nel caso in cui la parte posteriore del telaio non si ripiegasse, sollevare il bloccaggio di sicurezza sotto la sella (1) finché si solleva da terra anche la ruota posteriore. Successivamente appoggiare a terra la ruota posteriore con gesto leggero mantenendo sollevato il bloccaggio di sicurezza sotto la sella.
Attention! Si la dernière partie du cadre ne se plie pas, soulever le couvercle de sécurité (1), de façon à ce qu’en même temps se soulève aussi la roue arrière, puis d’une poussée légère sur la roue arrière pour la descendre sur le sol.
Pozor! Če se zadnji del okvirja ne zloži, dvignite varnostni pokrov (1), tako da se hkrati od tal dvigne tudi zadnje kolo, nato pa zadnje kolo z rahlim sunkom spustite na tla.
UK
DE
IT
FR
SI
Step 2: Fold the rear wheelSchritt 2: Klappen Sie das Hinterrad zusammen Fase 2: Chiusura della ruota posterioreÉtape 2: Pliage de la roue arrièreKorak 2: Zložite zadnje kolo
Hold the handlebar with both hands, pulling it towards yourself. This will push the rear wheel towards the frame, so that it snaps into position with the rear wheel lock (6).
Greifen sie mit Ihren beiden Händen das Lenkrad und ziehen es gegen sich. Somit drücken Sie das Hinterrad gegen den Rahmen so, dass er mit Hilfe des Verschlusses des Hinterrades (6) einrastet und in dieser Position auch bleibt.
Afferrare con entrambe le mani il manubrio e tirarlo verso di sé. Spingere la ruota posteriore verso il telaio in modo che si blocchi grazie al bloccaggio della ruota posteriore (6) e rimanga in tale posizione.
Avec les deux mains, prendre le guidon et le tirer vers vous. Avec cela, pousser la roue arrière vers le cadre pour la fermer avec l’aide de la fermeture de la roue arrière (6) permettant ainsi de rester dans cette position.
Z obema rokama primite krmilo in ga povlecite k sebi. S tem potisnete zadnje kolo proti okvirju tako, da se zatakne s pomočjo zaklopa zadnjega kolesa (6) in v tem položaju obstane.
UK
DE
IT
FR
SI
Attention! The aft part of the frame will not lock into position if the pedals are obstructing it. In this case, turn the pedals into the other position.UK
21

Achtung! Der hintere Rahmenteil rastet nicht ein, wenn dies anhand der Position der Pedale verhindert wird. In diesem Fall drehen Sie die Pedale in eine andere Position.
Attenzione! La parte posteriore del telaio non si blocca se la posizione del pedale glielo impedisce. Nel caso in cui un pedale impedisca il bloccaggio del telaio, spostare i pedali in una posizione diversa.
Attention! La dernière partie du cadre ne se fermera pas, si la position des pédales ne le permet pas. Dans ce cas, faire tourner les pédales dans une autre position.
Pozor! Zadnji del okvirja se ne bo zataknil, če mu to onemogoča položaj pedal. V tem primeru zavrtite pedala v drug položaj.
DE
IT
FR
SI
Step 3: : Fold the front wheelSchritt 3: Klappen Sie das Vorderrad zusammen Fase 3: Chiusura della ruota anterioreÉtape 3: Pliage de la roue avantKorak 3: Zložite sprednje kolo
Using the handlebar, turn the front wheel counter-clockwise (where there are no cables).
Mit Hilfe des Lenkers drehen Sie das Vorderrad gegen die Uhrzeigerrichtung(in der Richtung, in der sich keine Stahlgabeln befinden).
Con l’aiuto del manubrio ruotare la ruota anteriore in senso antiorario (senso in cui non sono presenti guaine e cavi).
Avec l’aide du guidon, tourner la roue avant dans le sens des aiguilles d’une montre (dans la direction où il n’y a pas de câbles).
S pomočjo krmila zavrtite sprednje kolo v obratni smeri urinega kazalca (v smeri, kjer ni jeklenih pletenic).
UK
DE
IT
FR
SI
Press the front wheel latch (3).
Drücken Sie den Zapfen am Vorderrad (3).
Premere sulla leva del bloccaggio della ruota anteriore (3).
Appuyer sur la cheville de la roue avant (3).
Pritisnite na zatič na sprednjem kolesu (3).
DE
IT
FR
SI
UK
Fold the front wheel between the frame tubes, so that it snaps between the tubes.
Unterschlagen Sie das Vorderrad zwischen die Röhre des Rahmens, so dass das Vorderrad zwischen die Röhre einrenkt.
Ripiegare la ruota anteriore tra i tubi del telaio in modo tale che la ruota anteri-ore si blocchi tra i due tubi obliqui.
Placer la roue avant entre les tubes de cadre de façon à ce que la roue avant soit bloquée entre les tubes.
Sprednje kolo spodvijte med cevi okvirja tako, da se sprednje kolo zatakne med cevi.
DE
IT
FR
SI
UK
22

Step 4: Fold the handlebarSchritt 4: Klappen Sie die Lenkstange zusammen Fase 4: Chiusura del manubrioÉtape 4: Pliage du guidonKorak 4: Zložite krmilo
Press the Plastic safety fastener (5) together in the spot indicated by the notches (top and bottom side of the fastener), and pull it open. Lifting the handlebar locks (4), release the handlebar.
Drücken sie den Sicherheitsverschluss aus Kunststoff (5) an der Stelle zusam-men, die eingekerbt ist (Unter- und Oberseite des Verschlusses), und öffnen sie diesen durch das Heranziehen zu sich. Mit der Anhebung beider Sperrklinken der Lenkergriffe (4) lösen Sie den Lenker auf.
Stringere il gancio di sicurezza di plastica (5) nel punto indicato dalle fessure (sulla parte superiore ed inferiore del gancio) e tirarlo verso sé per aprirlo. Sol-levare i bloccaggi dei tubi del manubrio (4) per sbloccare i tubi del manubrio.
Presser la fermeture de sécurité en plastique (5) ensemble à la place indiquée par des entailles (côté inférieur et supérieur du couvercle), et le tirer vers soi pour ouvrir. En soulevant le manche de fermeture du guidon (4), Relâcher le guidon.
Plastično varnostno zapiralo (5) stisnite skupaj na mestu, ki je označen zzarezami (spodnja in zgornja stran zapirala), ter ga s potegom k sebi odprite.Z dvigom zapiralk krmilnih ročic (4) nato sprostite krmilo.
UK
DE
IT
FR
SI
Fold the handlebars into the empty space in the frame.
Beide Lenkergriffe in den Leerplatz des Rahmens zusammenklappen.
Ripiegare i tubi del manubrio nello spazio vuoto del telaio.
Plier les poignées dans l’espace vide du cadre.
Krmilni ročici zložite v prazni prostor v okvirju.
UK
DE
IT
FR
SI
Step 5: Press in the seatSchritt 5: Räumen Sie den Sattel auf Fase 5: Abbassamento della sellaÉtape 5: Ranger le siègeKorak 5: Pospravite sedež
Pressing the seat, push its support into the seat tube. Your Bigfish folding bike is now folded.
Mit einem Druck auf den Sattel drücken Sie die Sitzstütze in das tragende Rohr. Das zusammenklappbare Fahrrad Bigfish ist zusammengeklappt.
Esercitare pressione sulla sella per far scorrere il cannotto della sella nel tubo piantone del telaio. La bicicletta pieghevole Bigfish è chiusa.
En appuyant sur le siège, vous pousser la tige de selle dans le tube vertical. La bicyclette pliable Bigfish est pliée.
S pristiskom na sedež potisnite sedežno oporo v nosilno cev. Zložljivo kolo Bigfish je zloženo.
UK
DE
IT
FR
SI23

TRANSPORT
When transporting the folded bike, always make sure it is properly folded, as indicated in the User Manual.
If the bike is properly folded, transport is easy and safe. Otherwise, a wheel may detach from the frame or something similar may happen, which would be dangerous and could cause injury.
WARNING: The manufacturer cannot be held responsible for physical injury or property damage caused by improper folding or assembly of the folding bike and transport of an improperly folded bike.
TRANSPORTIEREN
Beim Transportieren des zusammenklappbaren Fahrrades überzeugen Sie sich immer, ob das Fahrrad korrekt, wie im Handbuch angeführt, zusammengeklappt ist.
Falls das Fahrrad korrekt zusammengeklappt ist, ist das Transportieren einfach und sicher. Deshalb überzeugen Sie sich vor jedem Transportieren des zusammenklappbaren Fahrrades, ob das Fahrrad korrekt zusammengeklappt ist. Im Gegenfall kann sich ein plötzliches, unerwartetes Herausfallen des Fahrrades aus dem Rahmen ereignen oder es kann Ähnliches passieren, was gefährlich ist und wobei Sie sich verletzen könnten.
HINWEIS: Der Hersteller haftet nicht für physische Verletzungen und für den Materialschaden, der auf falscher Art des Zusammenklappens oder Auseinanderklappens und Transportierens des Fahrrades, das nicht korrekt zusam-mengeklappt ist, beruht.
TRASPORTO DELLA BICICLETTA PIEGHEVOLE
Per il trasporto della bicicletta pieghevole verificare sempre che la bicicletta sia chusa correttamente secondo le istruzioni del presente manuale.
Se la bicicletta è correttamente chiusa, il trasporto risulta facile e sicuro. Pertanto, prima di trasportare la bicicletta ripiegata verificarne sempre la corretta chiusura. In caso contrario, potrebbe verificarsi la caduta improvvisa di una ruota dal telaio o altri incidenti pericolosi che potrebbero causare lesioni.
AVVERTENZA: Studio Moderna non risponde di eventuali lesioni alle persone o danni materiali verificatisi in seguito ad una non corretta operazione di apertura o chiusura della bicicletta pieghevole o al trasporto della bicicletta chiusa in modo scorretto.
TRANSPORT
Pour le transport de la bicyclette pliable, assurez-vous que la bicyclette est correctement pliée, comme illustrée dans les instructions.
Si la bicyclette est correctement pliée, le transport est simple et sûr. Assurez-vous donc avant chaque transport que cela est le cas. Car sinon, il peut se produire une chute des roues du cadre, ou quelque chose de similaire, qui pour-rait être dangereux et vous blesser.
ATTENTION : le fabricant n’est pas responsable pour les blessures physiques et les dommages matériels qui résultent d’un pliage ou assemblage incorrect de la bicyclette pliable, et le transport de la bicyclette qui n’est pas correctement pliée.
PRENAŠANJE
Pri prenašanju zloženega kolesa se vedno prepričajte, da je kolo pravilno zloženo, kot je to navedeno v priročniku.
Če je kolo pravilno zloženo, je prenašanje enostavno in varno. Zato se pred vsakim prenašanjem zloženega kolesa prepričajte, da je kolo pravilno zloženo. V nasprotnem primeru se lahko zgodi nepričakovani izpad kolesa iz okvirja ali kaj podobnega, kar je lahko nevarno in vas lahko poškoduje.
OPOZORILO: Proizvajalec ne odgovarja za fizične poškodbe in materialno škodo, ki izhajajo iz napačnega načina zlaganja ali sestavljanja zložljivega kolesa ter prenašanja kolesa, ki ni pravilno zloženo.
UK
DE
IT
FR
SI
24

MAINTENANCE
The Bigfish needs to be cleaned regularly. Do not wash it with a spray of water. Clean it with a damp cloth. You can read more about maintenance in the supplied General Instructions.
Information about technical details can be reviewed in the supplied General Instructions.
WARTUNG
Das zusammenklappbare Fahrrad Bigfish muss regelmäßig gepflegt werden. Sie dürfen es nicht mit dem Wasserst-rahl waschen. Reinigen Sie es mit einem feuchten Tuch. Mehr über die Fahrradpflege finden Sie in den beigelegten allgemeinen Anweisungen.
Mehr über die Fahrradpflege entnehmen Sie den beigelegten allgemeinen Anweisungen.
MANUTENZIONE DELLA BICICLETTA PIEGHEVOLE
La bicicletta pieghevole Bigfish deve essere pulita regolarmente. Non lavare la bicicletta con getto d’acqua. Pulire la bicicletta con un panno umido. Per maggiori informazioni sulla manutenzione consultare le istruzioni generali allegate.
Per informazioni sui dettagli tecnici consultare le istruzioni generali allegate.
ENTRETIEN
La bicyclette pliable Bigfish doit être nettoyée régulièrement. Ne pas la laver avec des jets d’eau. Nettoyer avec un linge humide. Vous pouvez lire pour plus de détails sur l’entretien, le mode d’emploi ci-inclus pour l’utilisation.
Vous pouvez lire pour plus d’informations sur les détails techniques, le mode d’emploi ci-inclus pour l’utilisation.
VZDRŽEVANJE
Zložljivo kolo Bigfish mora biti redno čiščeno. Ne smete ga prati s curkom vode. Očistite ga z vlažno krpo. Več o vzdrževanju si preberite v priloženih splošnih navodilih za uporabo.
Informacije o tehničnih podrobnostih si preberite v priloženih splošnih navodilih za uporabo.
UK
DE
IT
FR
SI
25

SAFETY WARNING
Do not sit or lean on the bike when folded as there is a risk it could become damaged. The warranty is invalid for all damages to the bike which arise from notproperly following the User Manual.
SICHERHEITSWARNUNG
Setzen Sie sich nicht auf das Fahrrad und lehnen Sie sich nicht an es an, wenn es zusammengeklappt ist, da es in diesem Fall durchdas Körpergewicht beschädigt werden kann. Die Herstellergarantie gilt für keinerlei Schäden, die aufgrund derNichtbeachtung der Gebrauchsanweisung an dem Fahrrad entstehen.
AVVERTENZA DI SICUREZZA
Non sedersi o sdraiarsi sulla bicicletta mentre è ripiegata poiché potrebbe danneggiarsi.La garanzia non copre i danni che causati dal un utilizzo della bicicletta non conforme a quanto descritto nel manuale di istruzioni.
AVERTISSEMENT DE SECURITE
Ne pas s'asseoir et ne pas s'appuyer sur la bicyclette pliable, lorsqu'enposition pliée, parce qu'avec votre poids, vous pourriez l'endommager.Pour tout défaut sur la bicyclette qui résulte d'une utilisation non conformeau mode d'emploi, la garantie du vendeur ne s'applique pas.
VARNOSTNO OPOZORILO
Ne usedajte in ne naslanjajte se na zložljivo kolo, ko je le-to zloženo, saj lahko v tem primeru s svojo težo kolo poškodujete.Za vse napake na kolesu, ki nastanejo zaradi neupoštevanja navodil, garancija prodajalca ne velja.
26
UK
DE
IT
FR
SI